Teachers College Recruitment Training Guide
95
Last Updated on 8 November 2021 0 | Page Teachers College Recruitment Training Guide New User Essentials
Transcript of Teachers College Recruitment Training Guide
Last Updated on 8 November 2021 0 | P a g e
Teachers College
Recruitment Training Guide New User Essentials
Last Updated on 8 November 2021 1 | P a g e
Table of Contents
Sections Page
Accessing Recruitment Dashboard via TC portal 03
Creating a new Job Description 04 - 06
Definitions for Reasons for Job Description 07
Description of Approval Process for Job Description 08
Actions of Icons in new Job Description form 09
Definition of fields in Job Description card 10
Helpful Tabs in Job Description card 11
Approving Job Descriptions 12
Declining a Job Description 13
Re starting approval process for Job Description that has been declined 14
Creating a Requisition 15 - 20
Approving a Requisition 21
Description of Approval Process for a Job Requisition 22
Declining a Requisition 23
Definition of fields in Requisition form 24
Posting Jobs to TC careers 25 - 29
Previewing Job Advertisement 30
Reviewing Applicants 31- 34
Reviewing Applicants – Attaching New Documents to Applicant Cards 35
Reviewing Applicants as Search Committee Member 36
Making an Offer to Full Time/ Part Time Professional 36 - 37
Definitions of Fields in Offer Details form 38
Making an Offer for Pooled Positions 39 - 43
Closing a Job in the system Plan 44
Closing a job in the system (Cancelled) 45-46
Closing a job in the system (Filled) along with Reasons for Non Selection 47-53
Reviewing New Hires 54
Last Updated on 8 November 2021 2 | P a g e
On boarding (View from Applicant) 55-57
Reviewing New hires task list 58-59
Student Hire Process 60-63
Making an Offer for Faculty 64 - 68
Managing Job overviews 69
Bulk Update to Jobs 70
Managing Applications 71-85
Appendix 86
Last Updated on 8 November 2021 3 | P a g e
Accessing Recruitment Dashboard via TC portal
What you need to do What you will see
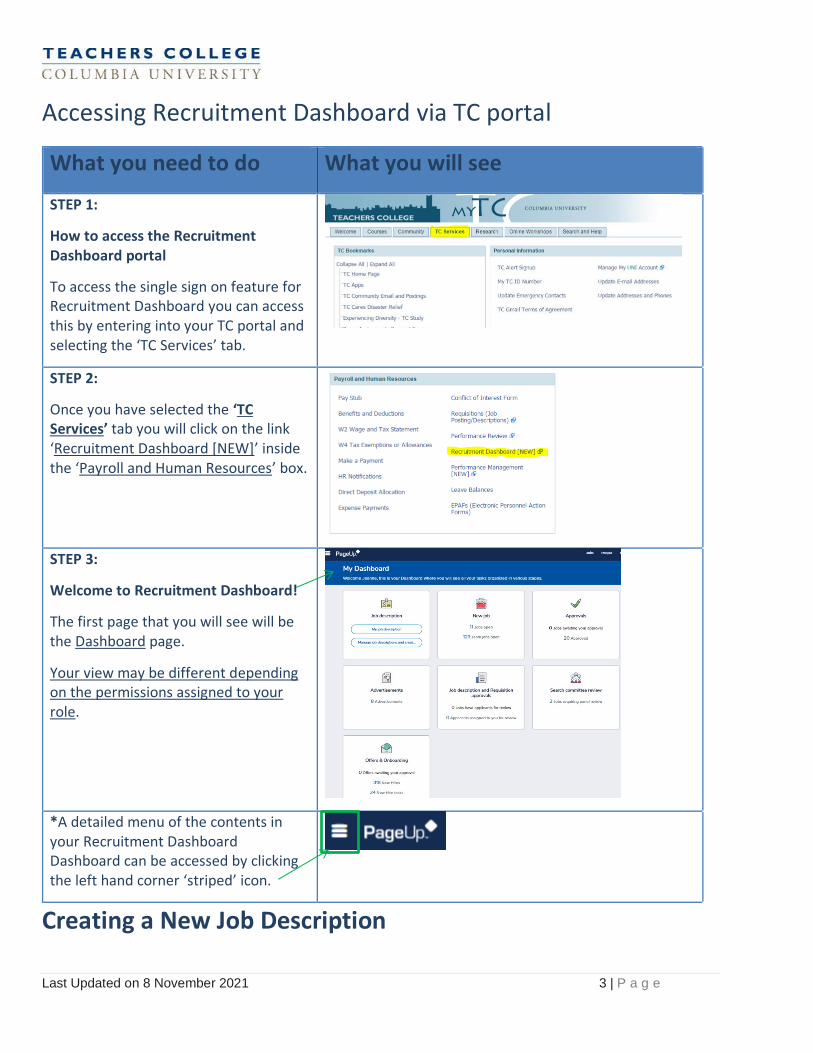
STEP 1:
How to access the Recruitment Dashboard portal
To access the single sign on feature for Recruitment Dashboard you can access this by entering into your TC portal and selecting the ‘TC Services’ tab.
STEP 2:
Once you have selected the ‘TC Services’ tab you will click on the link ‘Recruitment Dashboard [NEW]’ inside the ‘Payroll and Human Resources’ box.
STEP 3:
Welcome to Recruitment Dashboard!
The first page that you will see will be the Dashboard page.
Your view may be different depending on the permissions assigned to your role.
*A detailed menu of the contents in your Recruitment Dashboard Dashboard can be accessed by clicking the left hand corner ‘striped’ icon.
Creating a New Job Description
Last Updated on 8 November 2021 4 | P a g e
What you need to do What you will see
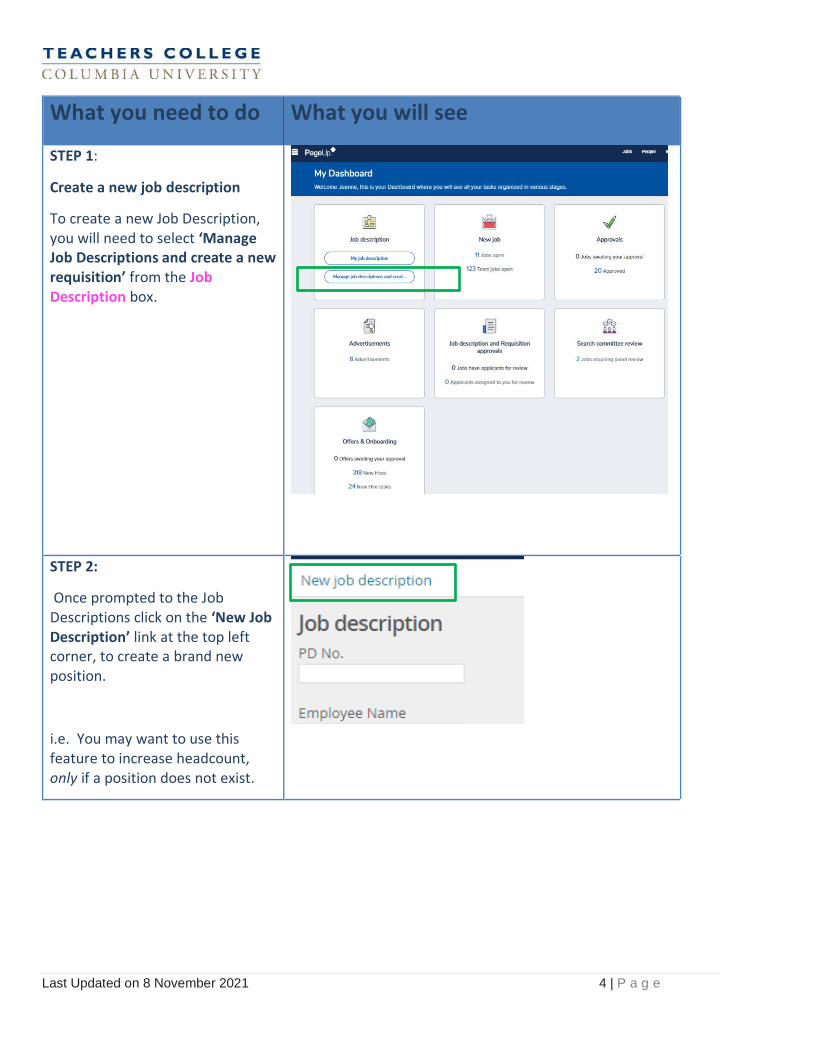
STEP 1:
Create a new job description
To create a new Job Description, you will need to select ‘Manage Job Descriptions and create a new requisition’ from the Job Description box.
STEP 2:
Once prompted to the Job Descriptions click on the ‘New Job Description’ link at the top left corner, to create a brand new position.
i.e. You may want to use this feature to increase headcount, only if a position does not exist.
Last Updated on 8 November 2021 5 | P a g e
Creating a New Job Description
What you need to do What you will see
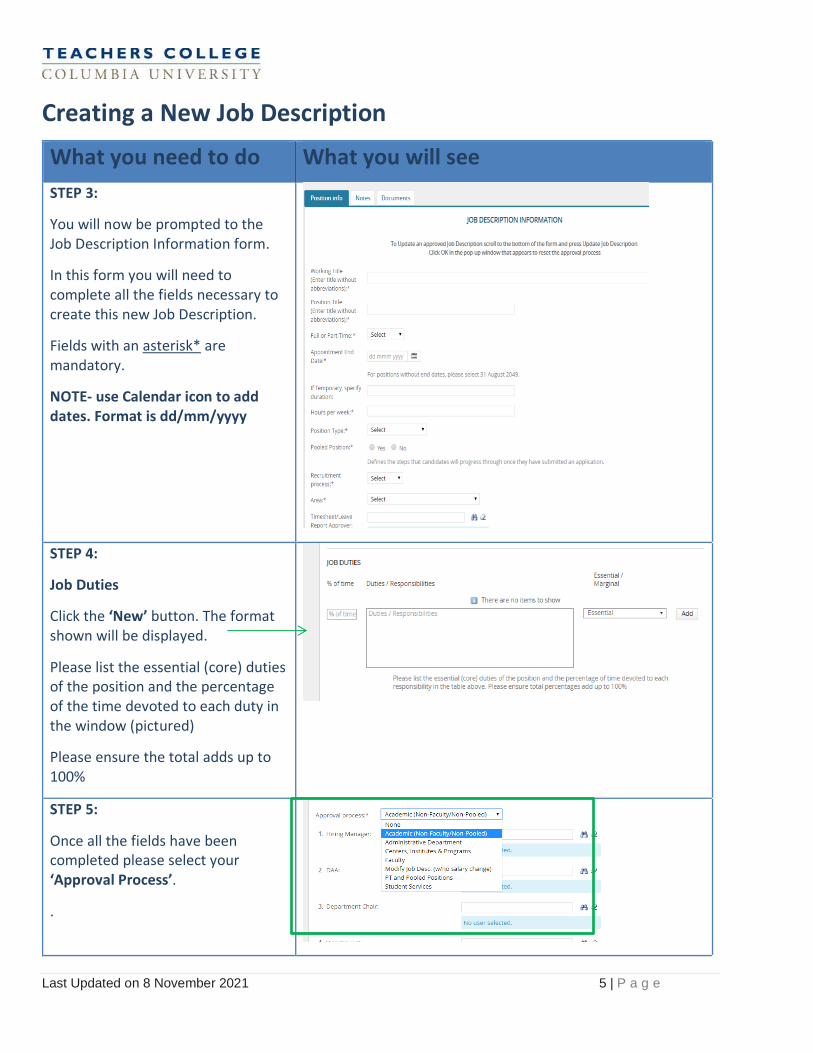
STEP 3:
You will now be prompted to the Job Description Information form.
In this form you will need to complete all the fields necessary to create this new Job Description.
Fields with an asterisk* are mandatory.
NOTE- use Calendar icon to add dates. Format is dd/mm/yyyy
STEP 4:
Job Duties
Click the ‘New’ button. The format shown will be displayed.
Please list the essential (core) duties of the position and the percentage of the time devoted to each duty in the window (pictured)
Please ensure the total adds up to 100%
STEP 5:
Once all the fields have been completed please select your ‘Approval Process’.
.
Last Updated on 8 November 2021 6 | P a g e
Creating a New Job Description
What you need to do What you will see
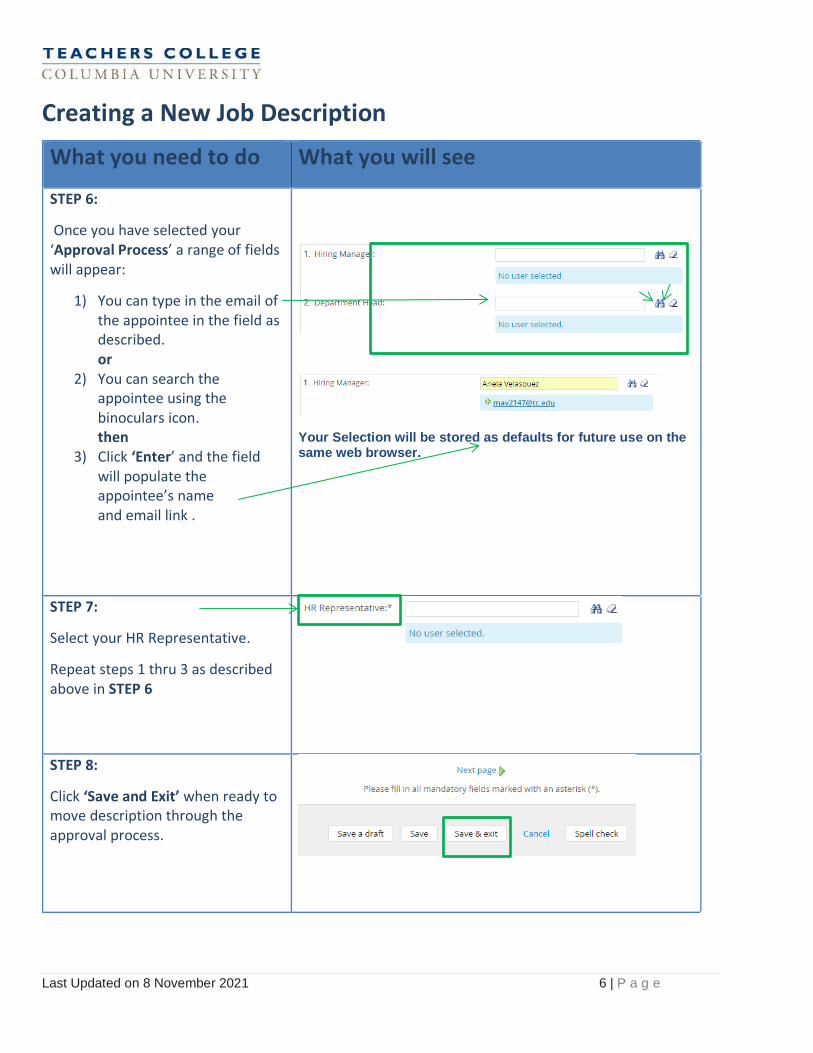
STEP 6:
Once you have selected your ‘Approval Process’ a range of fields will appear:
1) You can type in the email of the appointee in the field as described. or
2) You can search the appointee using the binoculars icon. then
3) Click ‘Enter’ and the field will populate the appointee’s name and email link .
Your Selection will be stored as defaults for future use on the same web browser.
STEP 7:
Select your HR Representative.
Repeat steps 1 thru 3 as described above in STEP 6
STEP 8:
Click ‘Save and Exit’ when ready to move description through the approval process.
Last Updated on 8 November 2021 7 | P a g e
Definitions for Reasons for Job Description
Reason Use When:
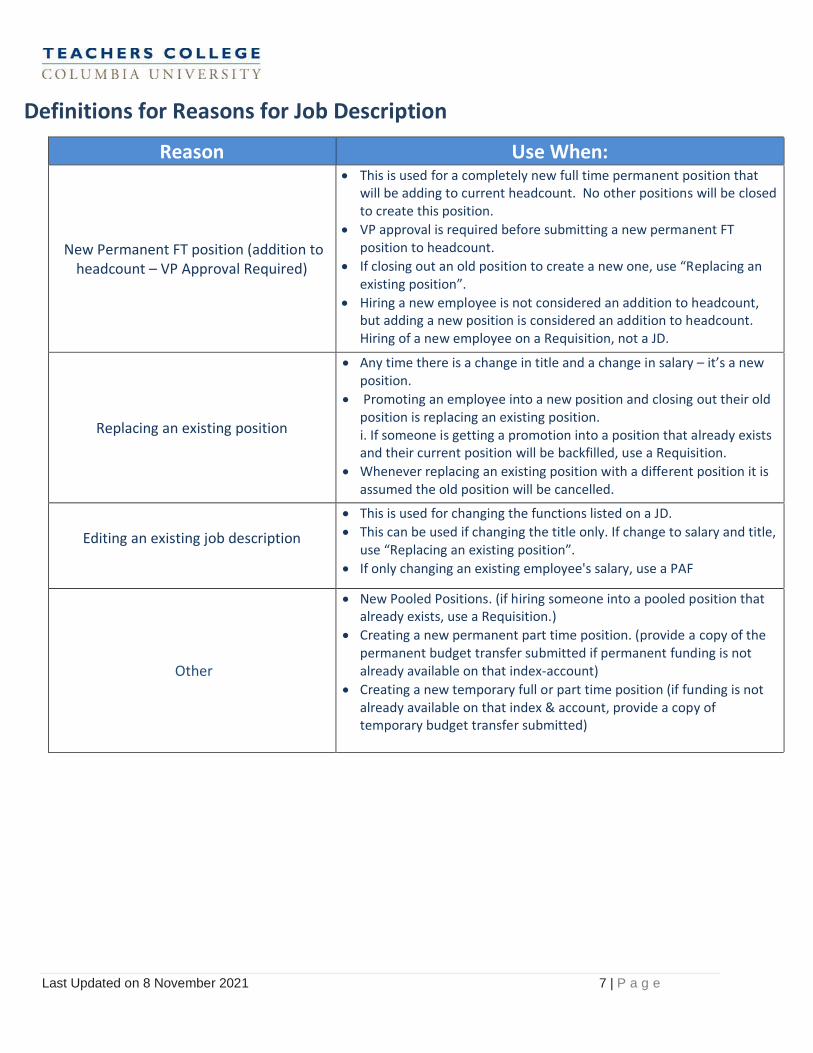
New Permanent FT position (addition to headcount – VP Approval Required)
• This is used for a completely new full time permanent position that will be adding to current headcount. No other positions will be closed to create this position.
• VP approval is required before submitting a new permanent FT position to headcount.
• If closing out an old position to create a new one, use “Replacing an existing position”.
• Hiring a new employee is not considered an addition to headcount, but adding a new position is considered an addition to headcount. Hiring of a new employee on a Requisition, not a JD.
Replacing an existing position
• Any time there is a change in title and a change in salary – it’s a new position.
• Promoting an employee into a new position and closing out their old position is replacing an existing position. i. If someone is getting a promotion into a position that already exists and their current position will be backfilled, use a Requisition.
• Whenever replacing an existing position with a different position it is assumed the old position will be cancelled.
Editing an existing job description
• This is used for changing the functions listed on a JD.
• This can be used if changing the title only. If change to salary and title, use “Replacing an existing position”.
• If only changing an existing employee's salary, use a PAF
Other
• New Pooled Positions. (if hiring someone into a pooled position that already exists, use a Requisition.)
• Creating a new permanent part time position. (provide a copy of the permanent budget transfer submitted if permanent funding is not already available on that index-account)
• Creating a new temporary full or part time position (if funding is not already available on that index & account, provide a copy of temporary budget transfer submitted)
Last Updated on 8 November 2021 8 | P a g e
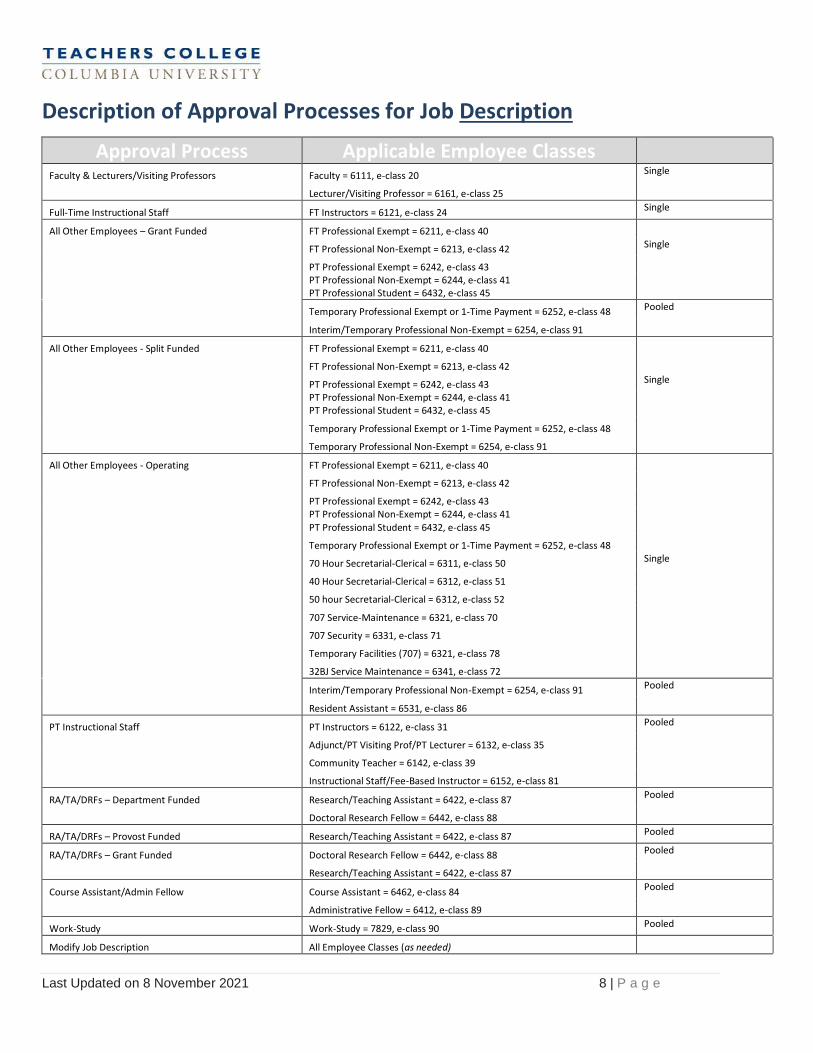
Description of Approval Processes for Job Description
Approval Process Applicable Employee Classes Faculty & Lecturers/Visiting Professors Faculty = 6111, e-class 20 Single
Lecturer/Visiting Professor = 6161, e-class 25
Full-Time Instructional Staff FT Instructors = 6121, e-class 24 Single
All Other Employees – Grant Funded FT Professional Exempt = 6211, e-class 40
FT Professional Non-Exempt = 6213, e-class 42 Single
PT Professional Exempt = 6242, e-class 43
PT Professional Non-Exempt = 6244, e-class 41 PT Professional Student = 6432, e-class 45
Temporary Professional Exempt or 1-Time Payment = 6252, e-class 48 Pooled
Interim/Temporary Professional Non-Exempt = 6254, e-class 91
All Other Employees - Split Funded FT Professional Exempt = 6211, e-class 40
FT Professional Non-Exempt = 6213, e-class 42
PT Professional Exempt = 6242, e-class 43 Single
PT Professional Non-Exempt = 6244, e-class 41 PT Professional Student = 6432, e-class 45
Temporary Professional Exempt or 1-Time Payment = 6252, e-class 48
Temporary Professional Non-Exempt = 6254, e-class 91
All Other Employees - Operating FT Professional Exempt = 6211, e-class 40
FT Professional Non-Exempt = 6213, e-class 42
PT Professional Exempt = 6242, e-class 43
PT Professional Non-Exempt = 6244, e-class 41 PT Professional Student = 6432, e-class 45
Temporary Professional Exempt or 1-Time Payment = 6252, e-class 48
70 Hour Secretarial-Clerical = 6311, e-class 50 Single
40 Hour Secretarial-Clerical = 6312, e-class 51
50 hour Secretarial-Clerical = 6312, e-class 52
707 Service-Maintenance = 6321, e-class 70
707 Security = 6331, e-class 71
Temporary Facilities (707) = 6321, e-class 78
32BJ Service Maintenance = 6341, e-class 72
Interim/Temporary Professional Non-Exempt = 6254, e-class 91 Pooled
Resident Assistant = 6531, e-class 86
PT Instructional Staff PT Instructors = 6122, e-class 31 Pooled
Adjunct/PT Visiting Prof/PT Lecturer = 6132, e-class 35
Community Teacher = 6142, e-class 39
Instructional Staff/Fee-Based Instructor = 6152, e-class 81
RA/TA/DRFs – Department Funded Research/Teaching Assistant = 6422, e-class 87 Pooled
Doctoral Research Fellow = 6442, e-class 88
RA/TA/DRFs – Provost Funded Research/Teaching Assistant = 6422, e-class 87 Pooled
RA/TA/DRFs – Grant Funded Doctoral Research Fellow = 6442, e-class 88 Pooled
Research/Teaching Assistant = 6422, e-class 87
Course Assistant/Admin Fellow Course Assistant = 6462, e-class 84 Pooled
Administrative Fellow = 6412, e-class 89
Work-Study Work-Study = 7829, e-class 90 Pooled
Modify Job Description All Employee Classes (as needed)
Last Updated on 8 November 2021 9 | P a g e
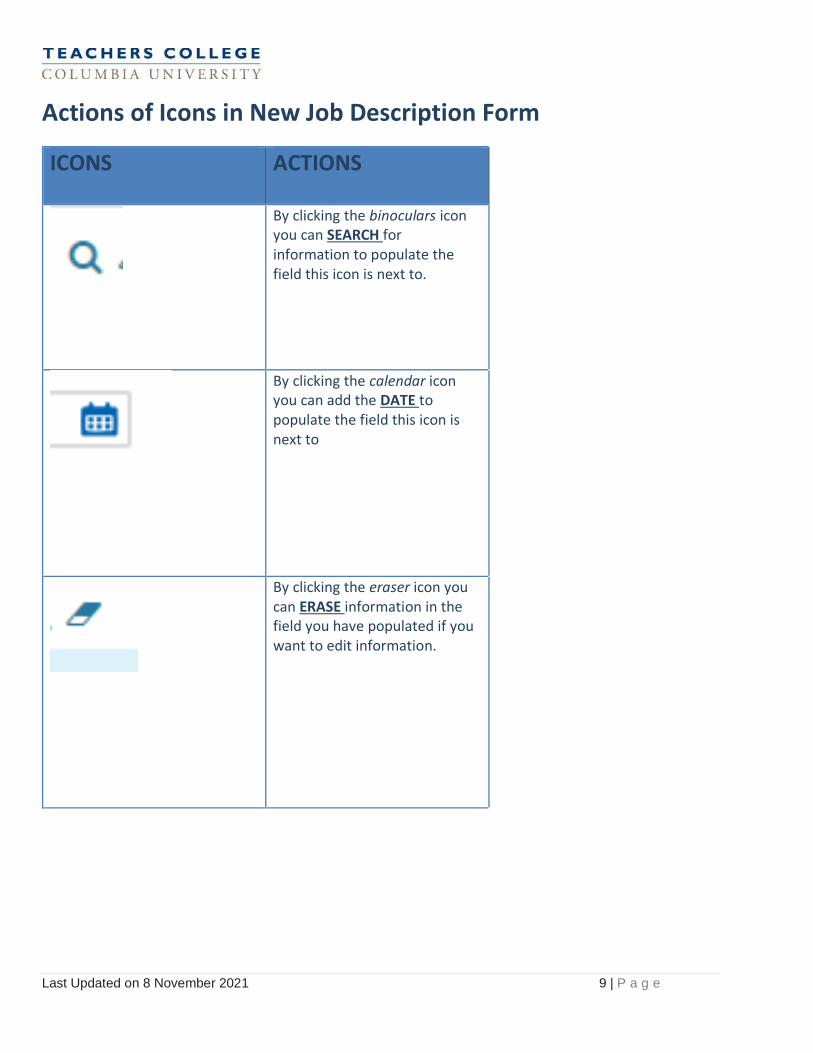
Actions of Icons in New Job Description Form
ICONS ACTIONS
By clicking the binoculars icon you can SEARCH for information to populate the field this icon is next to.
By clicking the calendar icon you can add the DATE to populate the field this icon is next to
By clicking the eraser icon you can ERASE information in the field you have populated if you want to edit information.
Last Updated on 8 November 2021 10 | P a g e
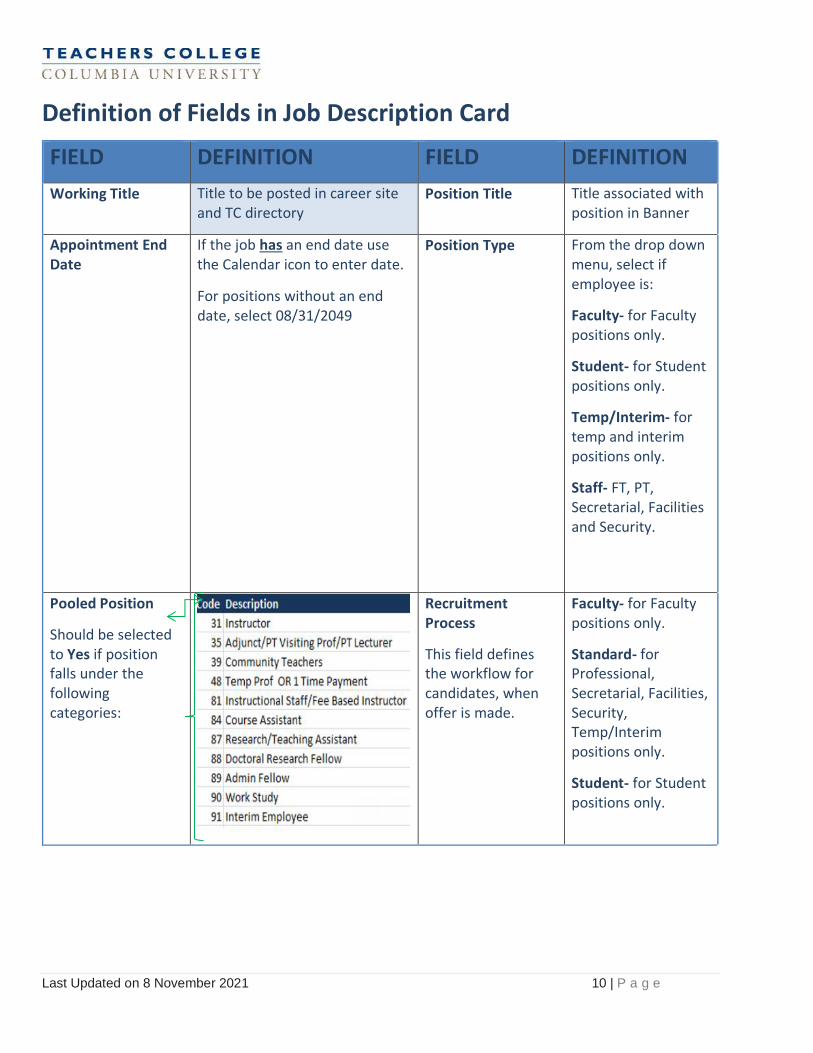
Definition of Fields in Job Description Card
FIELD DEFINITION FIELD DEFINITION
Working Title Title to be posted in career site and TC directory
Position Title Title associated with position in Banner
Appointment End Date
If the job has an end date use the Calendar icon to enter date.
For positions without an end date, select 08/31/2049
Position Type From the drop down menu, select if employee is:
Faculty- for Faculty positions only.
Student- for Student positions only.
Temp/Interim- for temp and interim positions only.
Staff- FT, PT, Secretarial, Facilities and Security.
Pooled Position
Should be selected to Yes if position falls under the following categories:
Recruitment Process
This field defines the workflow for candidates, when offer is made.
Faculty- for Faculty positions only.
Standard- for Professional, Secretarial, Facilities, Security, Temp/Interim positions only.
Student- for Student positions only.
Last Updated on 8 November 2021 11 | P a g e
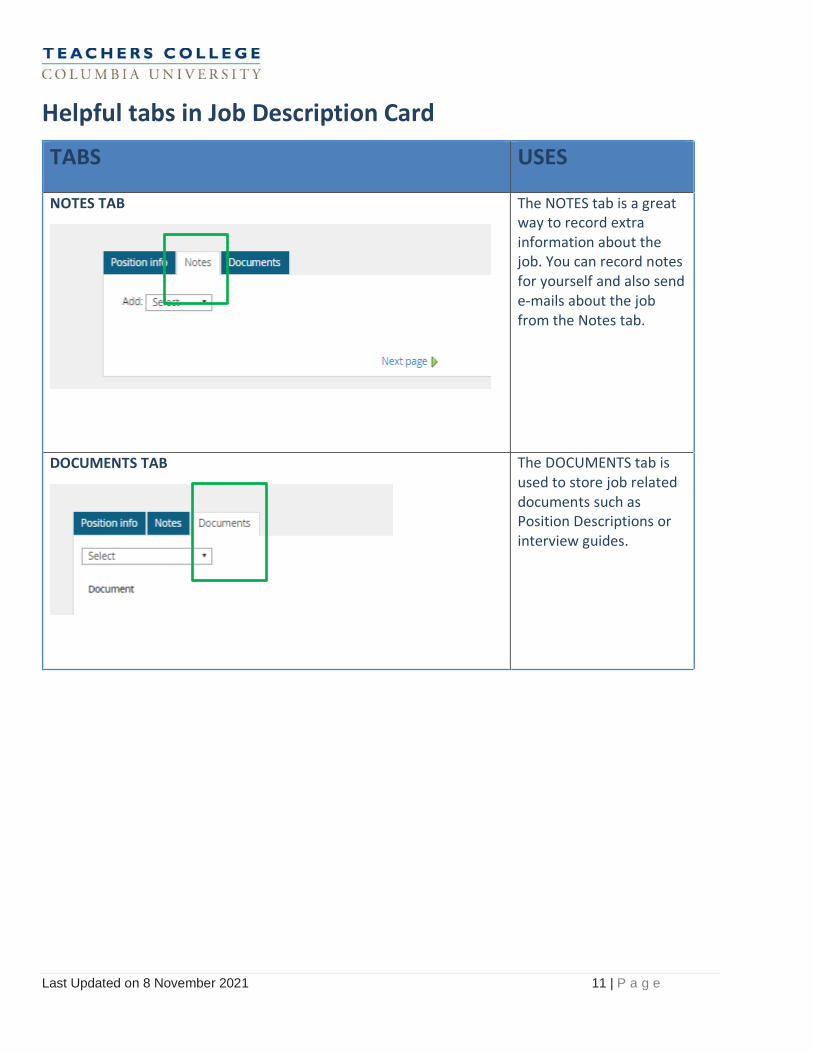
Helpful tabs in Job Description Card
TABS USES
NOTES TAB
The NOTES tab is a great way to record extra information about the job. You can record notes for yourself and also send e-mails about the job from the Notes tab.
DOCUMENTS TAB
The DOCUMENTS tab is used to store job related documents such as Position Descriptions or interview guides.
Last Updated on 8 November 2021 12 | P a g e
Approving Job Description
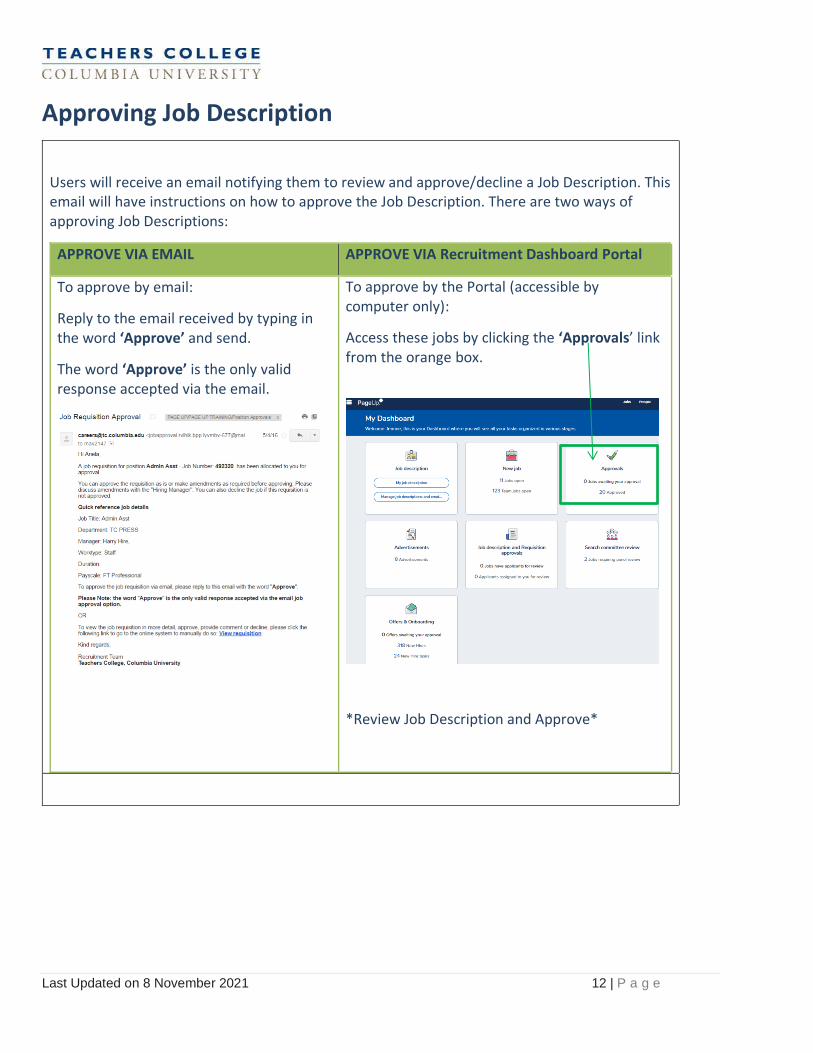
Users will receive an email notifying them to review and approve/decline a Job Description. This email will have instructions on how to approve the Job Description. There are two ways of approving Job Descriptions:
APPROVE VIA EMAIL APPROVE VIA Recruitment Dashboard Portal
To approve by email:
Reply to the email received by typing in the word ‘Approve’ and send.
The word ‘Approve’ is the only valid response accepted via the email.
To approve by the Portal (accessible by computer only):
Access these jobs by clicking the ‘Approvals’ link from the orange box.
*Review Job Description and Approve*
Last Updated on 8 November 2021 13 | P a g e
Declining a Job Description
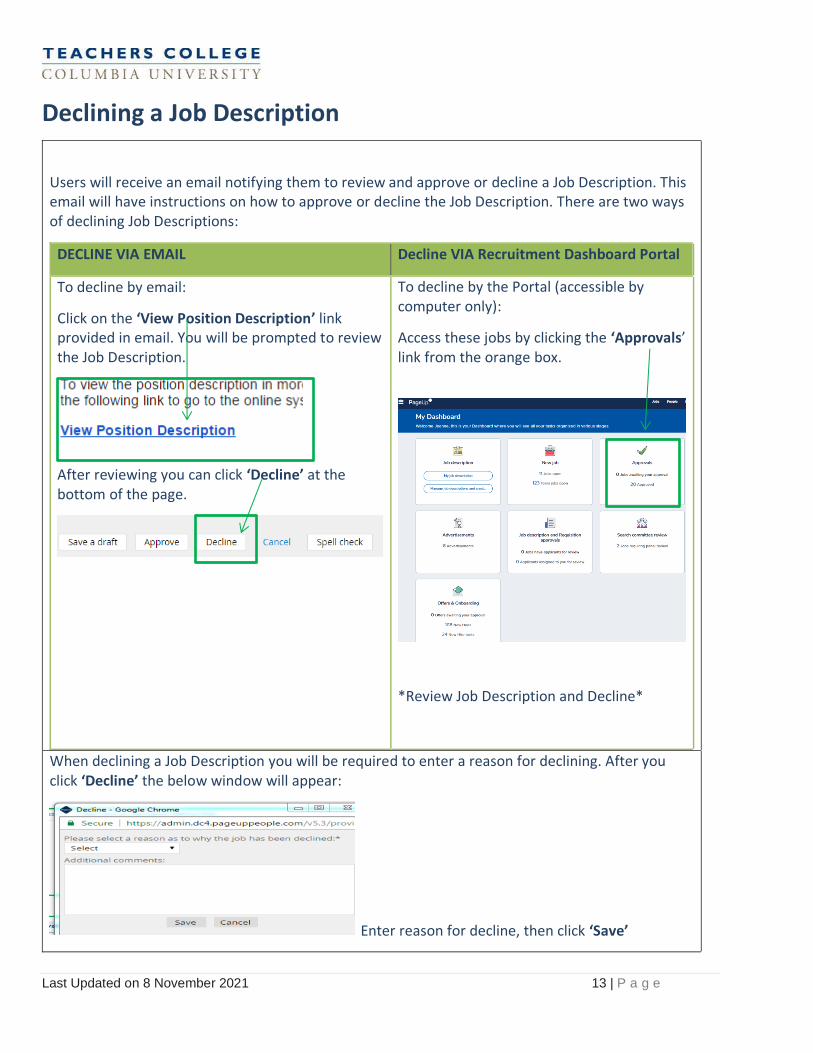
Users will receive an email notifying them to review and approve or decline a Job Description. This email will have instructions on how to approve or decline the Job Description. There are two ways of declining Job Descriptions:
DECLINE VIA EMAIL Decline VIA Recruitment Dashboard Portal
To decline by email:
Click on the ‘View Position Description’ link provided in email. You will be prompted to review the Job Description.
After reviewing you can click ‘Decline’ at the bottom of the page.
To decline by the Portal (accessible by computer only):
Access these jobs by clicking the ‘Approvals’ link from the orange box.
*Review Job Description and Decline*
When declining a Job Description you will be required to enter a reason for declining. After you click ‘Decline’ the below window will appear:
Enter reason for decline, then click ‘Save’
Last Updated on 8 November 2021 14 | P a g e
Restarting approval process for a Job Description that has been Declined.
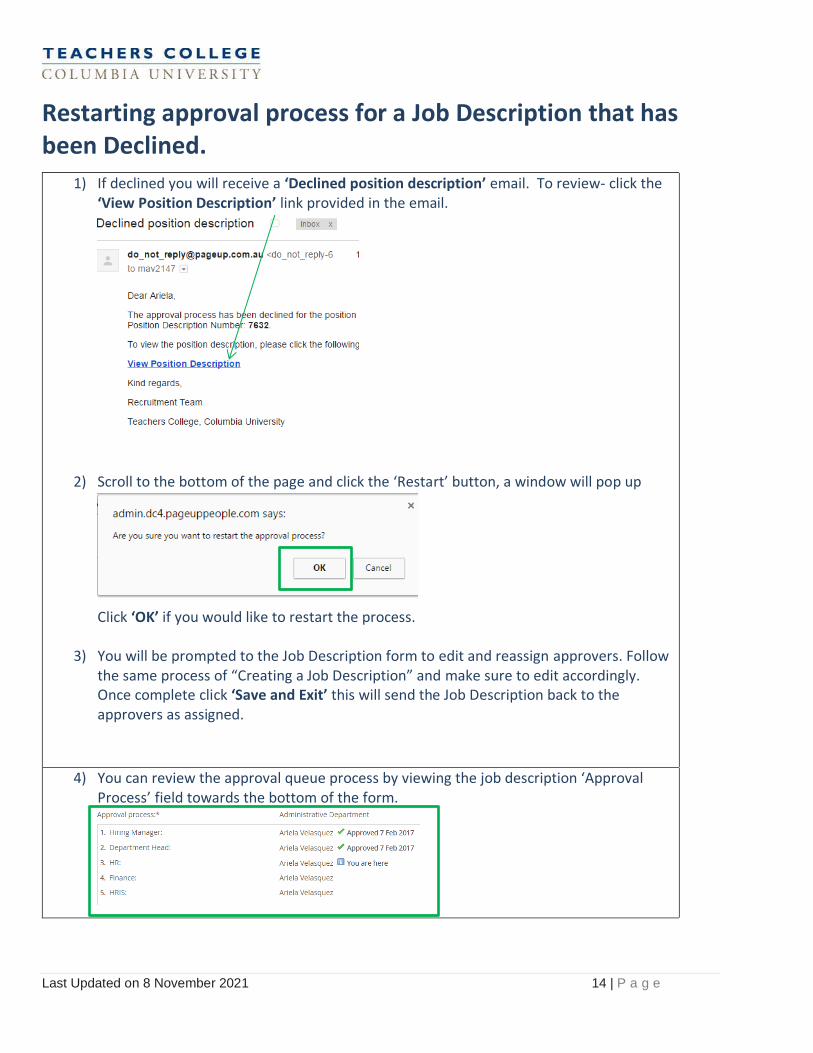
1) If declined you will receive a ‘Declined position description’ email. To review- click the ‘View Position Description’ link provided in the email.
2) Scroll to the bottom of the page and click the ‘Restart’ button, a window will pop up
Click ‘OK’ if you would like to restart the process.
3) You will be prompted to the Job Description form to edit and reassign approvers. Follow the same process of “Creating a Job Description” and make sure to edit accordingly. Once complete click ‘Save and Exit’ this will send the Job Description back to the approvers as assigned.
4) You can review the approval queue process by viewing the job description ‘Approval Process’ field towards the bottom of the form.
Last Updated on 8 November 2021 15 | P a g e
Creating a Requisition
What you need to do What you will see
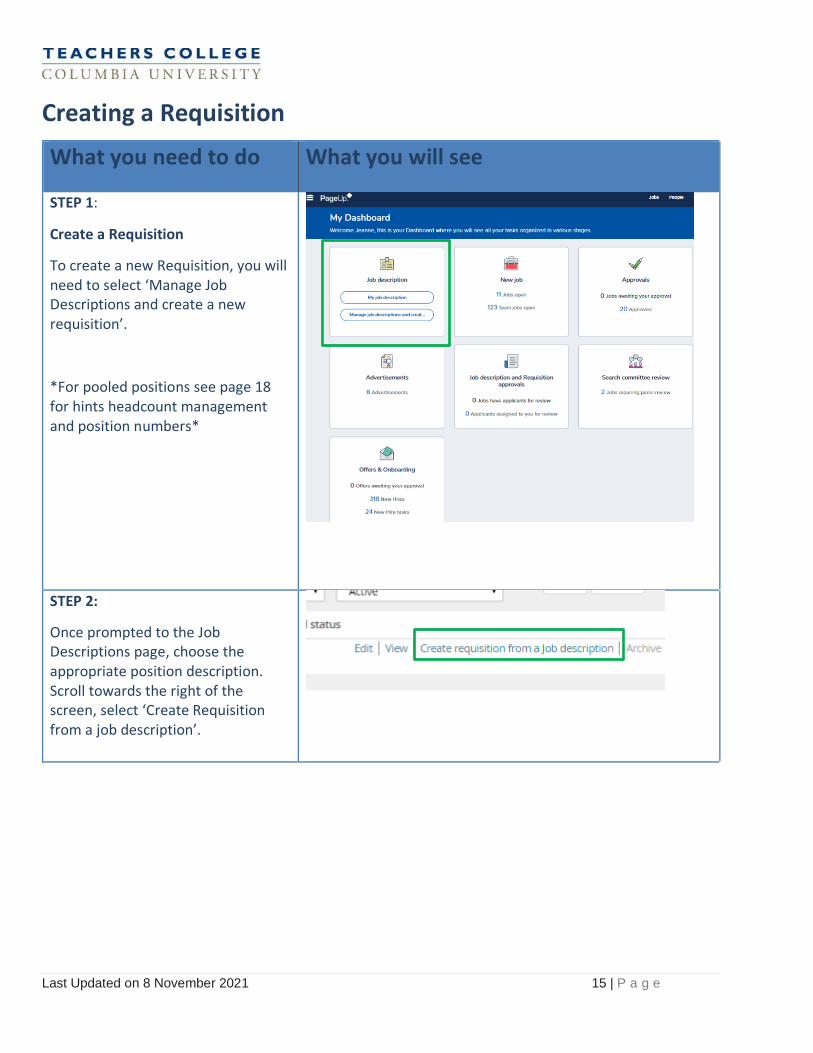
STEP 1:
Create a Requisition
To create a new Requisition, you will need to select ‘Manage Job Descriptions and create a new requisition’.
*For pooled positions see page 18 for hints headcount management and position numbers*
STEP 2:
Once prompted to the Job Descriptions page, choose the appropriate position description. Scroll towards the right of the screen, select ‘Create Requisition from a job description’.
Last Updated on 8 November 2021 16 | P a g e
Creating a Requisition
What you need to do What you will see
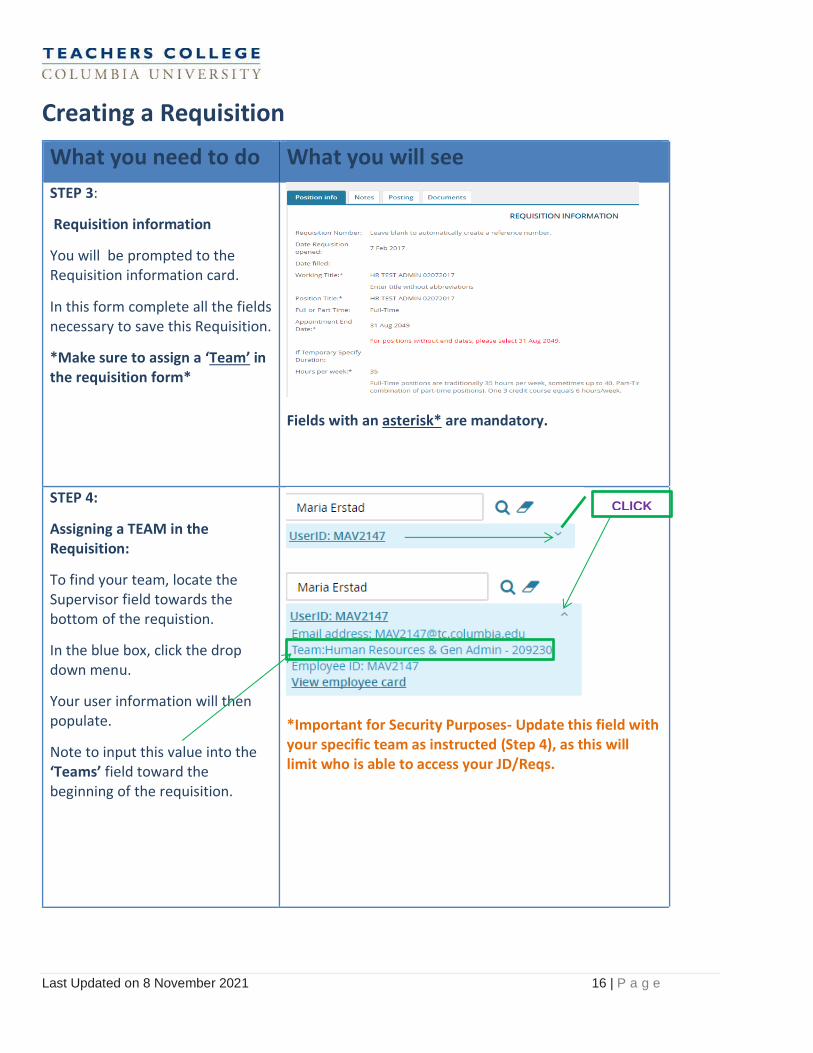
STEP 3:
Requisition information
You will be prompted to the Requisition information card.
In this form complete all the fields necessary to save this Requisition.
*Make sure to assign a ‘Team’ in the requisition form*
Fields with an asterisk* are mandatory.
STEP 4:
Assigning a TEAM in the Requisition:
To find your team, locate the Supervisor field towards the bottom of the requistion.
In the blue box, click the drop down menu.
Your user information will then populate.
Note to input this value into the ‘Teams’ field toward the beginning of the requisition.
*Important for Security Purposes- Update this field with your specific team as instructed (Step 4), as this will limit who is able to access your JD/Reqs.
CLICK
Last Updated on 8 November 2021 17 | P a g e
Creating a Requisition
What you need to do What you will see
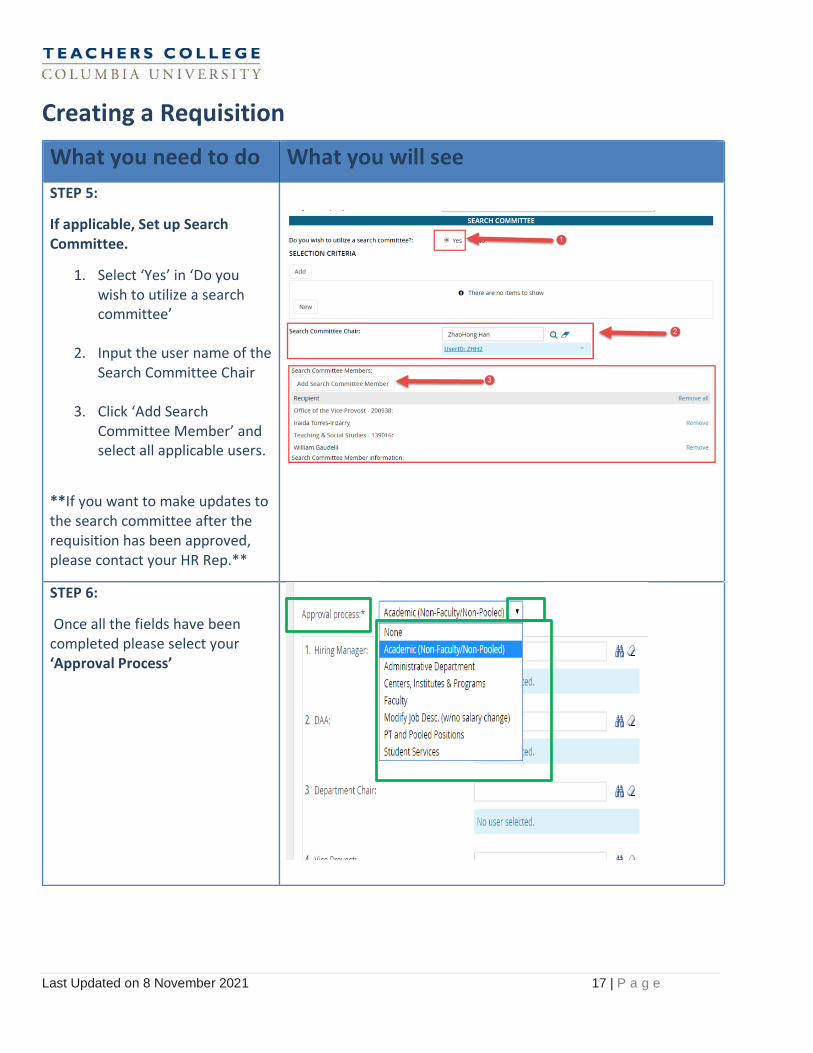
STEP 5:
If applicable, Set up Search Committee.
1. Select ‘Yes’ in ‘Do you wish to utilize a search committee’
2. Input the user name of the Search Committee Chair
3. Click ‘Add Search Committee Member’ and select all applicable users.
**If you want to make updates to the search committee after the requisition has been approved, please contact your HR Rep.**
STEP 6:
Once all the fields have been completed please select your ‘Approval Process’
Last Updated on 8 November 2021 18 | P a g e
Creating a Requisition
What you need to do What you will see
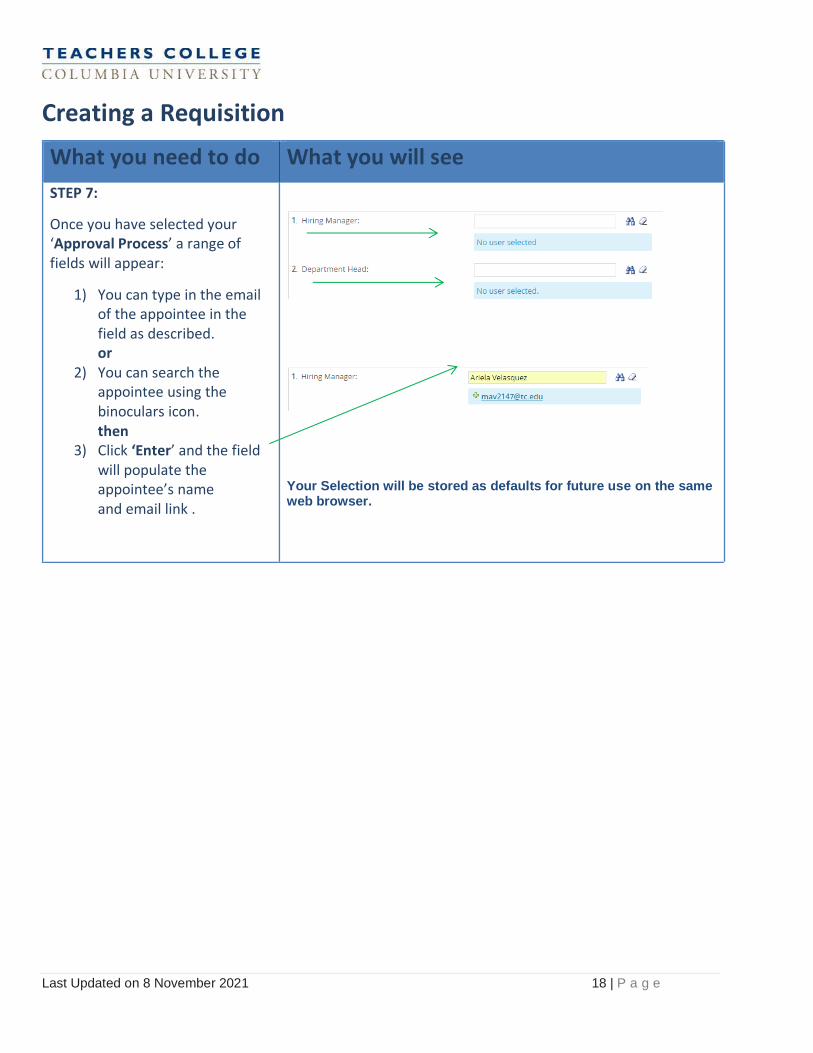
STEP 7:
Once you have selected your ‘Approval Process’ a range of fields will appear:
1) You can type in the email of the appointee in the field as described. or
2) You can search the appointee using the binoculars icon. then
3) Click ‘Enter’ and the field will populate the appointee’s name and email link .
Your Selection will be stored as defaults for future use on the same web browser.
Last Updated on 8 November 2021 19 | P a g e
Creating a Requisition
What you need to do What you will see
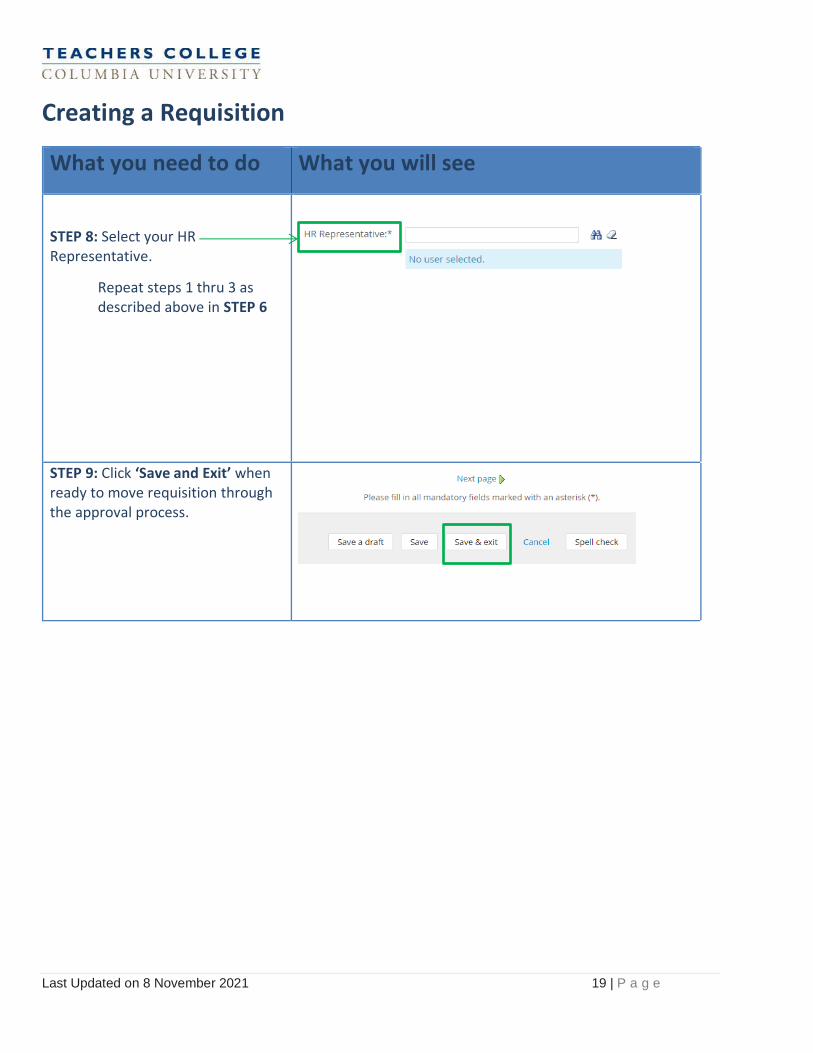
STEP 8: Select your HR Representative.
Repeat steps 1 thru 3 as described above in STEP 6
STEP 9: Click ‘Save and Exit’ when ready to move requisition through the approval process.
Last Updated on 8 November 2021 20 | P a g e
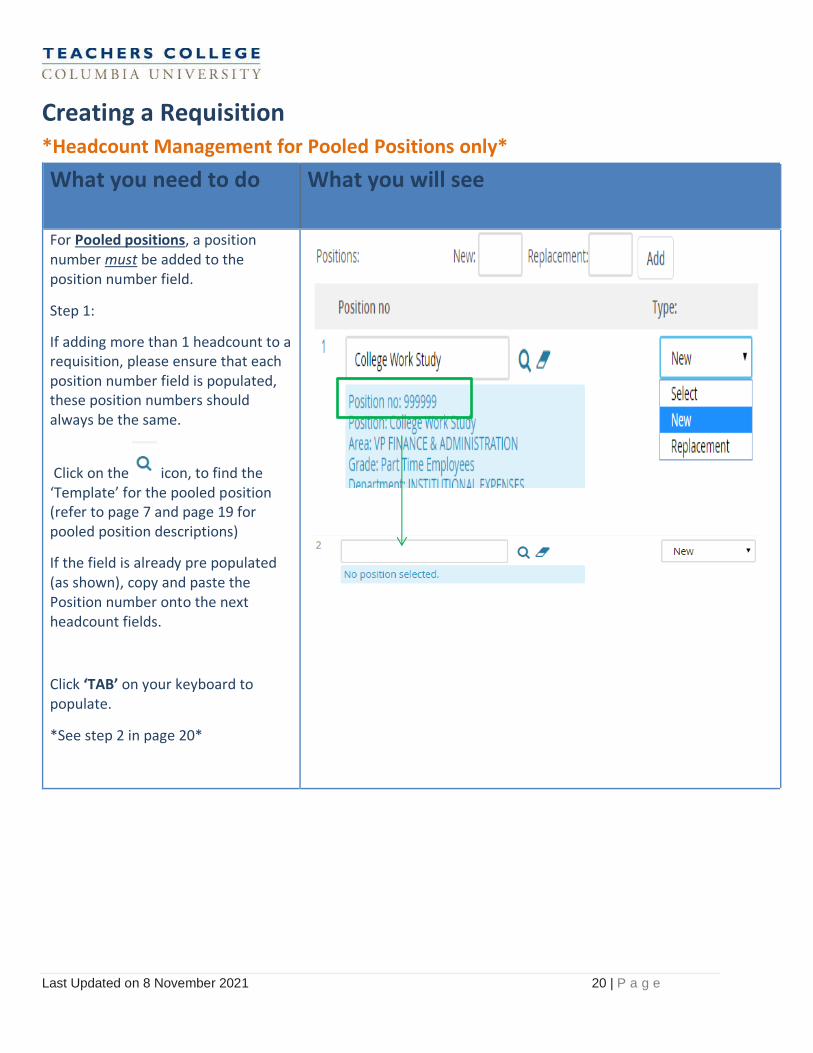
Creating a Requisition *Headcount Management for Pooled Positions only*
What you need to do What you will see
For Pooled positions, a position number must be added to the position number field.
Step 1:
If adding more than 1 headcount to a requisition, please ensure that each position number field is populated, these position numbers should always be the same.
Click on the icon, to find the ‘Template’ for the pooled position (refer to page 7 and page 19 for pooled position descriptions)
If the field is already pre populated (as shown), copy and paste the Position number onto the next headcount fields.
Click ‘TAB’ on your keyboard to populate.
*See step 2 in page 20*
Last Updated on 8 November 2021 21 | P a g e
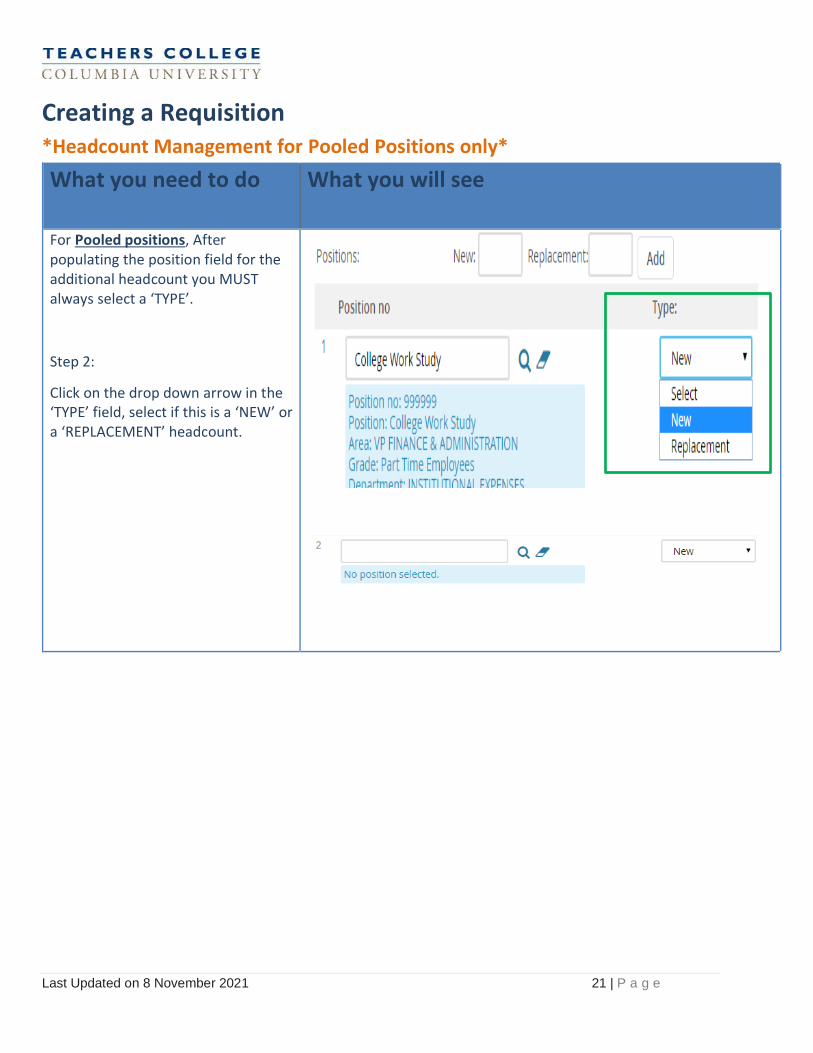
Creating a Requisition *Headcount Management for Pooled Positions only*
What you need to do What you will see
For Pooled positions, After populating the position field for the additional headcount you MUST always select a ‘TYPE’.
Step 2:
Click on the drop down arrow in the ‘TYPE’ field, select if this is a ‘NEW’ or a ‘REPLACEMENT’ headcount.

Last Updated on 8 November 2021 22 | P a g e
Approving a Requisition
Users will receive an email notifying them to review and approve/decline a Job Requisition. This email will have instructions on how to approve the Job Requisition. There are two ways of approving Job Requisitions:
APPROVE VIA EMAIL APPROVE VIA Recruitment Dashboard Portal
To approve by email:
Reply to the email received by typing in the word ‘Approve’ and send.
The word ‘Approve’ is the only valid response accepted via the email.
To approve by the Portal (accessible by computer only):
Access these jobs by clicking the ‘Approvals’ link from the orange box.
*Review Job Requisition and Approve*
Last Updated on 8 November 2021 23 | P a g e
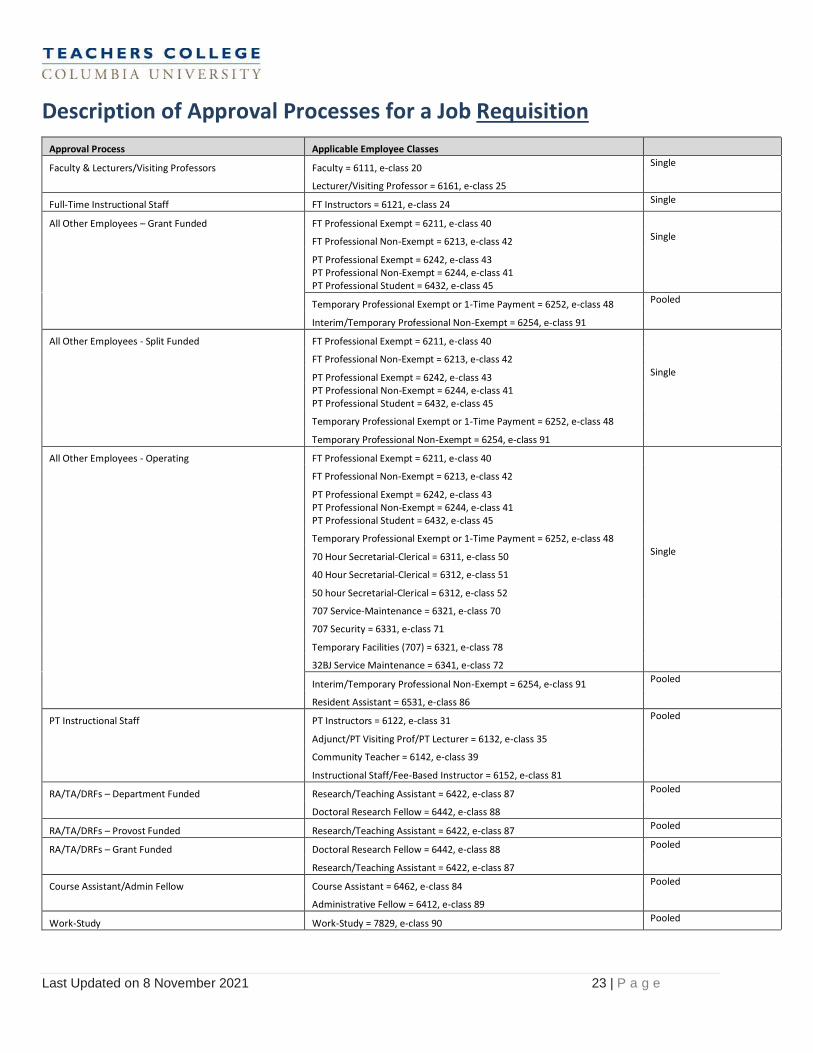
Description of Approval Processes for a Job Requisition
Approval Process Applicable Employee Classes
Faculty & Lecturers/Visiting Professors Faculty = 6111, e-class 20 Single
Lecturer/Visiting Professor = 6161, e-class 25
Full-Time Instructional Staff FT Instructors = 6121, e-class 24 Single
All Other Employees – Grant Funded FT Professional Exempt = 6211, e-class 40
FT Professional Non-Exempt = 6213, e-class 42 Single
PT Professional Exempt = 6242, e-class 43
PT Professional Non-Exempt = 6244, e-class 41 PT Professional Student = 6432, e-class 45
Temporary Professional Exempt or 1-Time Payment = 6252, e-class 48 Pooled
Interim/Temporary Professional Non-Exempt = 6254, e-class 91
All Other Employees - Split Funded FT Professional Exempt = 6211, e-class 40
FT Professional Non-Exempt = 6213, e-class 42
PT Professional Exempt = 6242, e-class 43 Single
PT Professional Non-Exempt = 6244, e-class 41 PT Professional Student = 6432, e-class 45
Temporary Professional Exempt or 1-Time Payment = 6252, e-class 48
Temporary Professional Non-Exempt = 6254, e-class 91
All Other Employees - Operating FT Professional Exempt = 6211, e-class 40
FT Professional Non-Exempt = 6213, e-class 42
PT Professional Exempt = 6242, e-class 43
PT Professional Non-Exempt = 6244, e-class 41 PT Professional Student = 6432, e-class 45
Temporary Professional Exempt or 1-Time Payment = 6252, e-class 48
70 Hour Secretarial-Clerical = 6311, e-class 50 Single
40 Hour Secretarial-Clerical = 6312, e-class 51
50 hour Secretarial-Clerical = 6312, e-class 52
707 Service-Maintenance = 6321, e-class 70
707 Security = 6331, e-class 71
Temporary Facilities (707) = 6321, e-class 78
32BJ Service Maintenance = 6341, e-class 72
Interim/Temporary Professional Non-Exempt = 6254, e-class 91 Pooled
Resident Assistant = 6531, e-class 86
PT Instructional Staff PT Instructors = 6122, e-class 31 Pooled
Adjunct/PT Visiting Prof/PT Lecturer = 6132, e-class 35
Community Teacher = 6142, e-class 39
Instructional Staff/Fee-Based Instructor = 6152, e-class 81
RA/TA/DRFs – Department Funded Research/Teaching Assistant = 6422, e-class 87 Pooled
Doctoral Research Fellow = 6442, e-class 88
RA/TA/DRFs – Provost Funded Research/Teaching Assistant = 6422, e-class 87 Pooled
RA/TA/DRFs – Grant Funded Doctoral Research Fellow = 6442, e-class 88 Pooled
Research/Teaching Assistant = 6422, e-class 87
Course Assistant/Admin Fellow Course Assistant = 6462, e-class 84 Pooled
Administrative Fellow = 6412, e-class 89
Work-Study Work-Study = 7829, e-class 90 Pooled
Last Updated on 8 November 2021 24 | P a g e
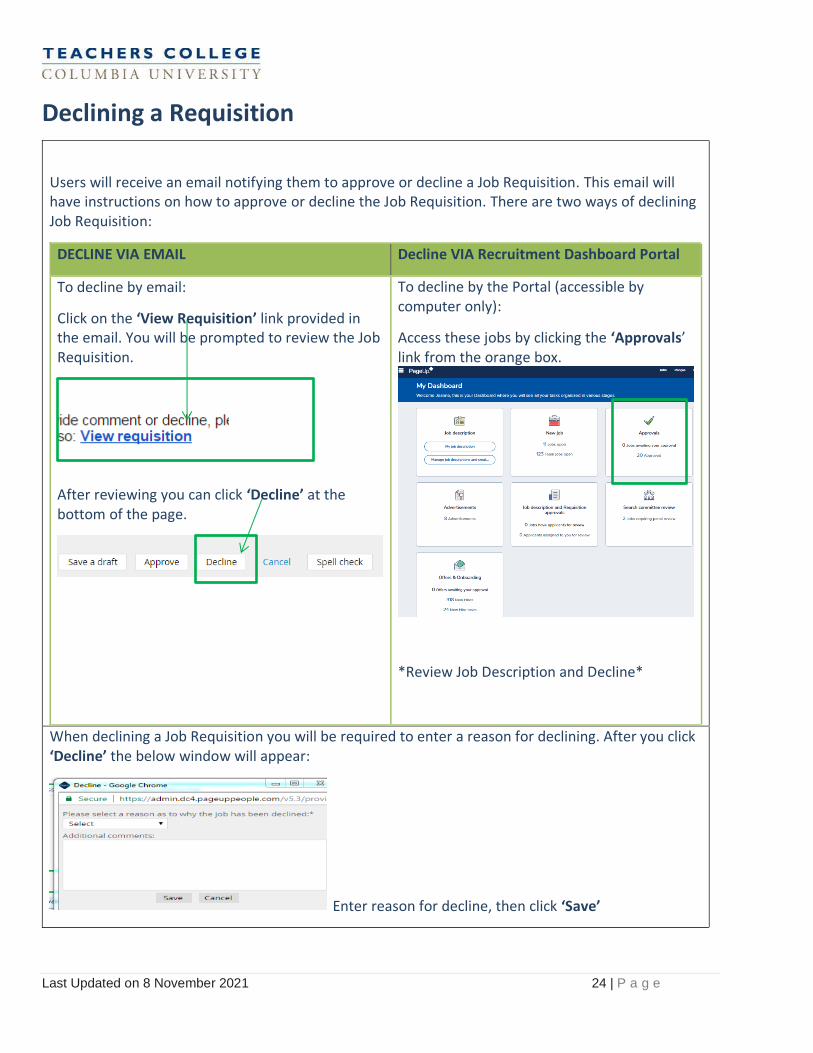
Declining a Requisition
Users will receive an email notifying them to approve or decline a Job Requisition. This email will have instructions on how to approve or decline the Job Requisition. There are two ways of declining Job Requisition:
DECLINE VIA EMAIL Decline VIA Recruitment Dashboard Portal
To decline by email:
Click on the ‘View Requisition’ link provided in the email. You will be prompted to review the Job Requisition.
After reviewing you can click ‘Decline’ at the bottom of the page.
To decline by the Portal (accessible by computer only):
Access these jobs by clicking the ‘Approvals’ link from the orange box.
*Review Job Description and Decline*
When declining a Job Requisition you will be required to enter a reason for declining. After you click ‘Decline’ the below window will appear:
Enter reason for decline, then click ‘Save’

Last Updated on 8 November 2021 25 | P a g e
Definition of Fields in Requisition Form
FIELD DEFINITION FIELD DEFINITION
Department Enter name of Department for position
Requested Salary Enter requested salary for this position.
* The system will not accept offers outside the approved range. If you decide to offer an amount outside of the range, please work with your VP and HR Representative. Once approved, the range will be updated allowing you to proceed with the posting.
Headcount Management
If hiring more than one person on this requisition please enter the no. of ADDITIONAL New or Replacement positions required.
Skip this section if only hiring one person Note: all requested positions must have approved budget.
Search Committee You can use these fields to create a committee for the hiring of this position.
Posting Details
In this menu you can apply for a posting Waiver. (Waiving only allowed for Student positions)
Enter reason for Waiver
Posting Details
If you plan to advertise in addition to the TC website indicate the advertising source.
Email your Representative and discuss these sources. HR will post positions externally.
Last Updated on 8 November 2021 26 | P a g e
Posting Jobs to TC Careers
*To be completed after Requisition has been approved*
What you need to do What you will see
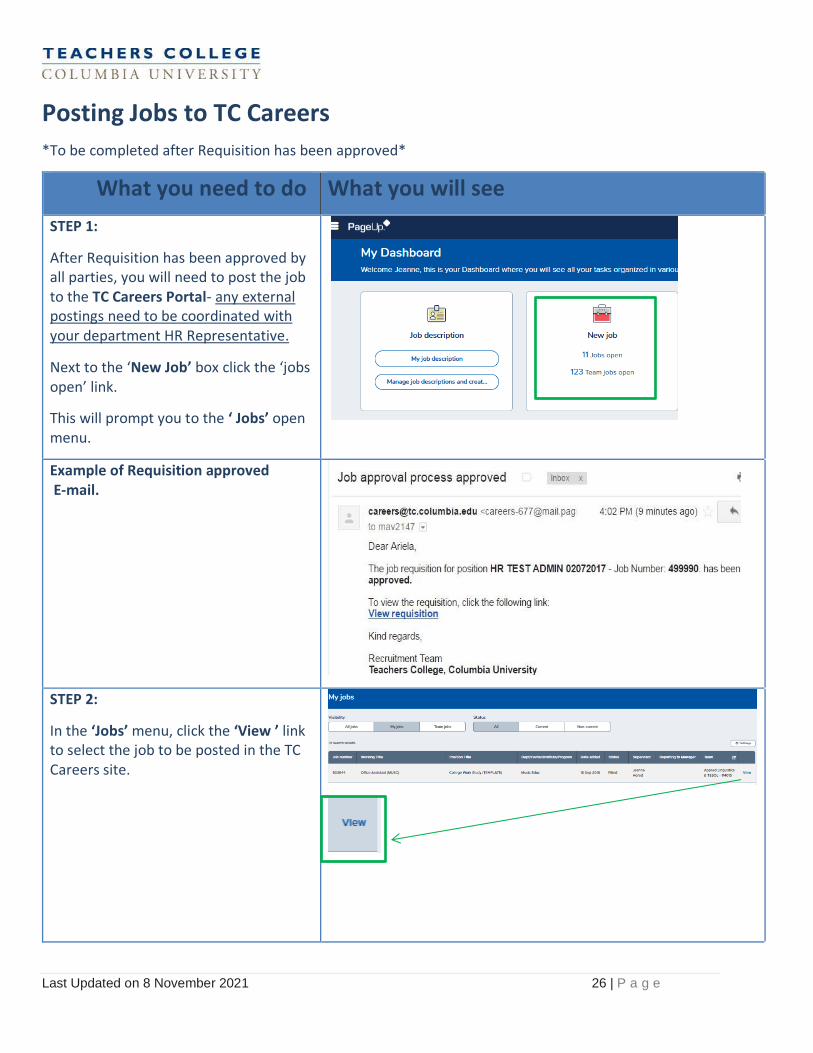
STEP 1:
After Requisition has been approved by all parties, you will need to post the job to the TC Careers Portal- any external postings need to be coordinated with your department HR Representative.
Next to the ‘New Job’ box click the ‘jobs open’ link.
This will prompt you to the ‘ Jobs’ open menu.
Example of Requisition approved E-mail.
STEP 2:
In the ‘Jobs’ menu, click the ‘View ’ link to select the job to be posted in the TC Careers site.
Last Updated on 8 November 2021 27 | P a g e
Posting Jobs to TC Careers
What you need to do What you will see
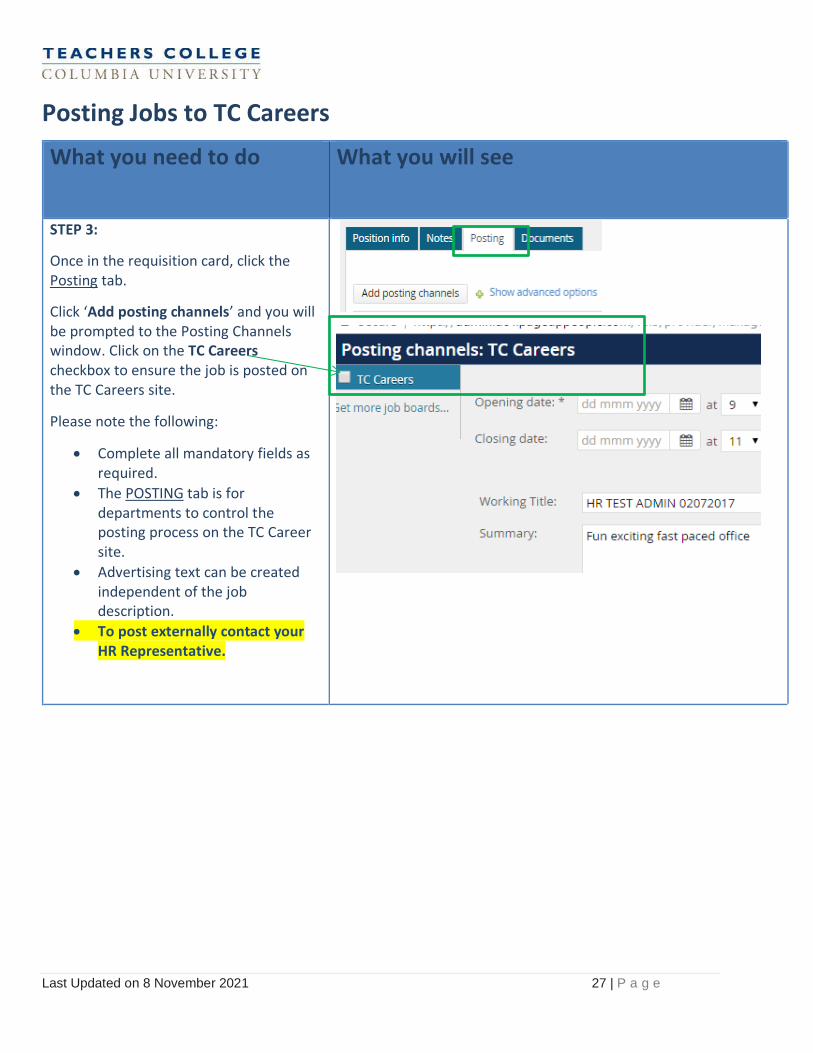
STEP 3:
Once in the requisition card, click the Posting tab.
Click ‘Add posting channels’ and you will be prompted to the Posting Channels window. Click on the TC Careers checkbox to ensure the job is posted on the TC Careers site.
Please note the following:
• Complete all mandatory fields as required.
• The POSTING tab is for departments to control the posting process on the TC Career site.
• Advertising text can be created independent of the job description.
• To post externally contact your HR Representative.
Last Updated on 8 November 2021 28 | P a g e
Posting Jobs to TC Careers
What you need to do What you will see
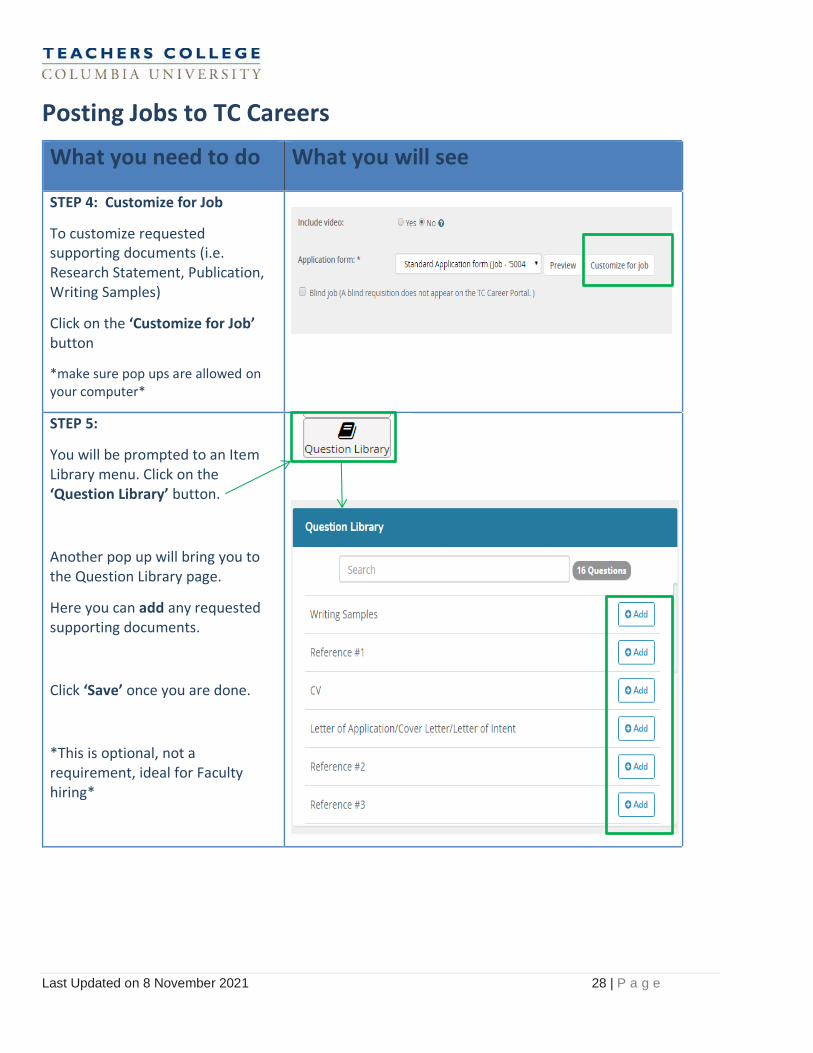
STEP 4: Customize for Job
To customize requested supporting documents (i.e. Research Statement, Publication, Writing Samples)
Click on the ‘Customize for Job’ button
*make sure pop ups are allowed on your computer*
STEP 5:
You will be prompted to an Item Library menu. Click on the ‘Question Library’ button.
Another pop up will bring you to the Question Library page.
Here you can add any requested supporting documents.
Click ‘Save’ once you are done.
*This is optional, not a requirement, ideal for Faculty hiring*
Last Updated on 8 November 2021 29 | P a g e
Posting Jobs to TC Careers
What you need to do What you will see
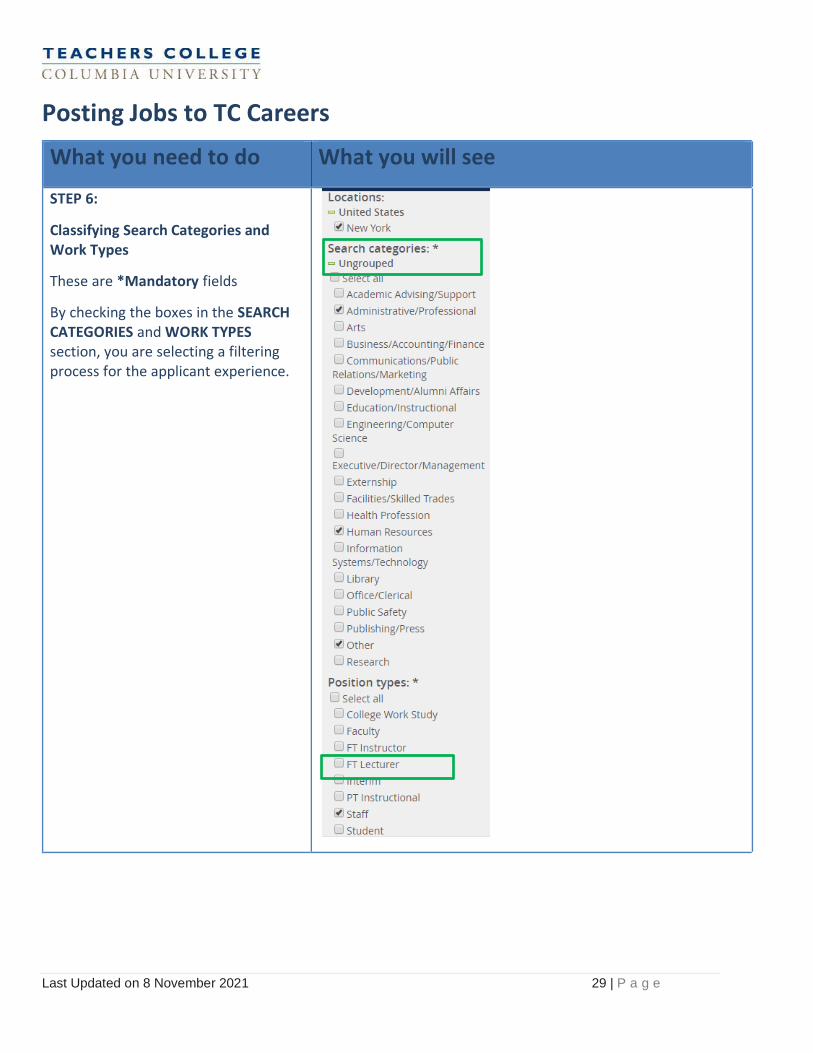
STEP 6:
Classifying Search Categories and Work Types
These are *Mandatory fields
By checking the boxes in the SEARCH CATEGORIES and WORK TYPES section, you are selecting a filtering process for the applicant experience.
Last Updated on 8 November 2021 30 | P a g e
Posting Jobs to TC Careers
What you need to do What you will see
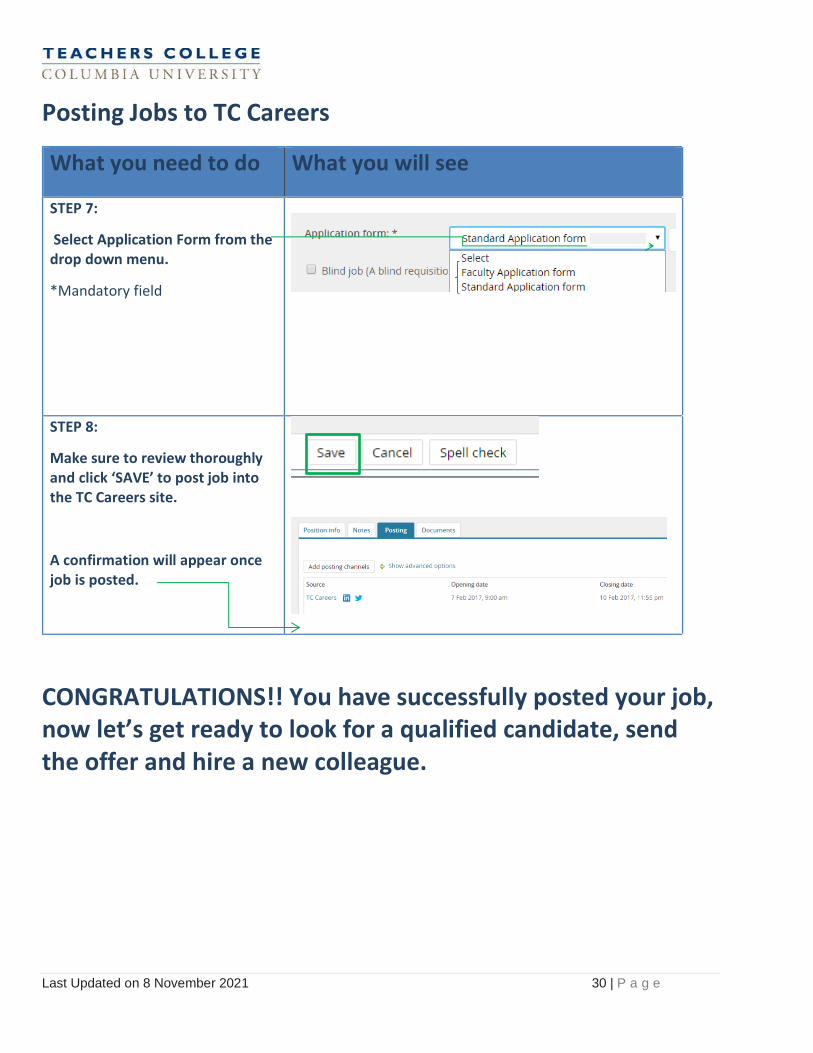
STEP 7:
Select Application Form from the drop down menu.
*Mandatory field
STEP 8:
Make sure to review thoroughly and click ‘SAVE’ to post job into the TC Careers site.
A confirmation will appear once job is posted.
CONGRATULATIONS!! You have successfully posted your job, now let’s get ready to look for a qualified candidate, send the offer and hire a new colleague.
Last Updated on 8 November 2021 31 | P a g e
Previewing Job Advertisement Supervisor and Hiring Manager roles
What you need to do What you will see
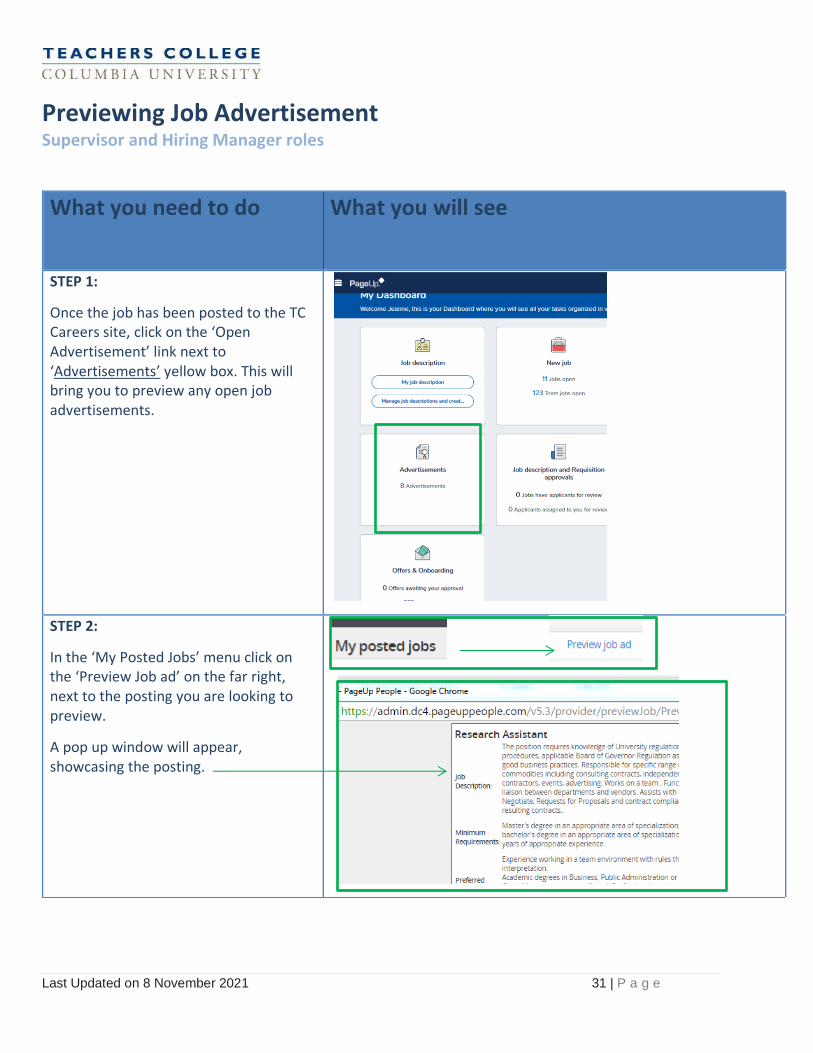
STEP 1:
Once the job has been posted to the TC Careers site, click on the ‘Open Advertisement’ link next to ‘Advertisements’ yellow box. This will bring you to preview any open job advertisements.
STEP 2:
In the ‘My Posted Jobs’ menu click on the ‘Preview Job ad’ on the far right, next to the posting you are looking to preview.
A pop up window will appear, showcasing the posting.
Last Updated on 8 November 2021 32 | P a g e
Reviewing Applicants
*Contingent on permissions and team settings*
What you need to do What you will see
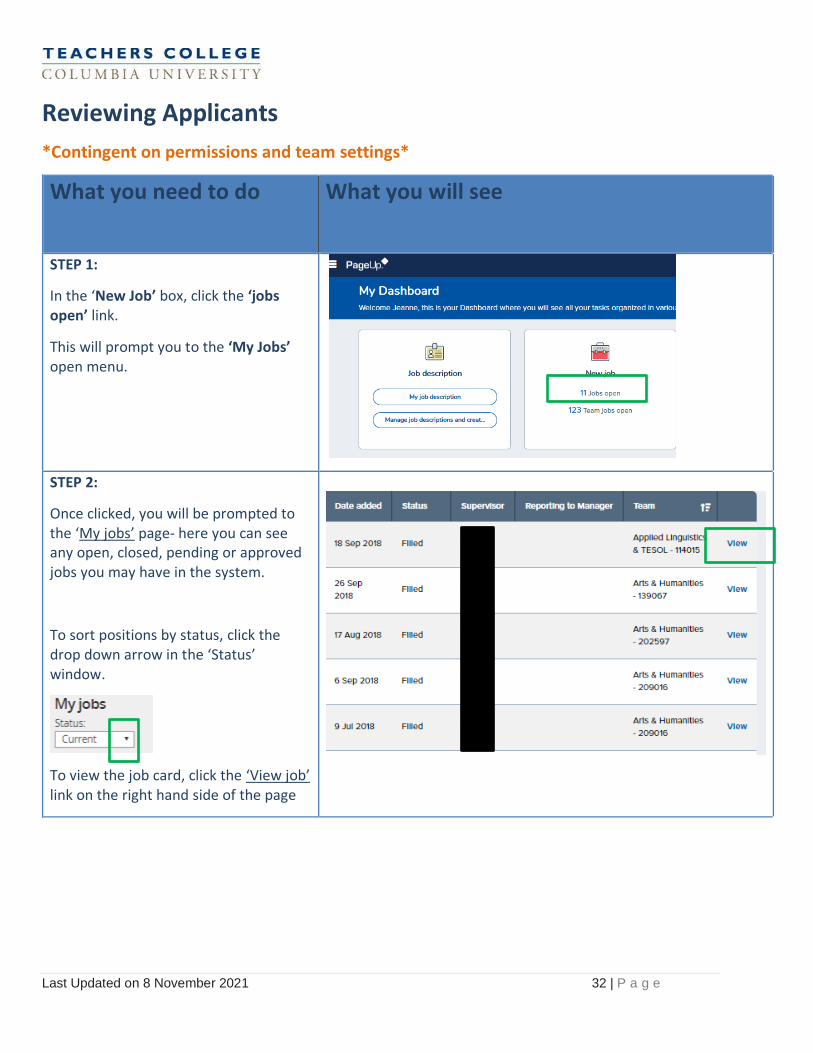
STEP 1:
In the ‘New Job’ box, click the ‘jobs open’ link.
This will prompt you to the ‘My Jobs’ open menu.
STEP 2:
Once clicked, you will be prompted to the ‘My jobs’ page- here you can see any open, closed, pending or approved jobs you may have in the system.
To sort positions by status, click the drop down arrow in the ‘Status’ window.
To view the job card, click the ‘View job’ link on the right hand side of the page
Last Updated on 8 November 2021 33 | P a g e
Reviewing Applicants
*Contingent on permissions and team settings*
What you need to do What you will see
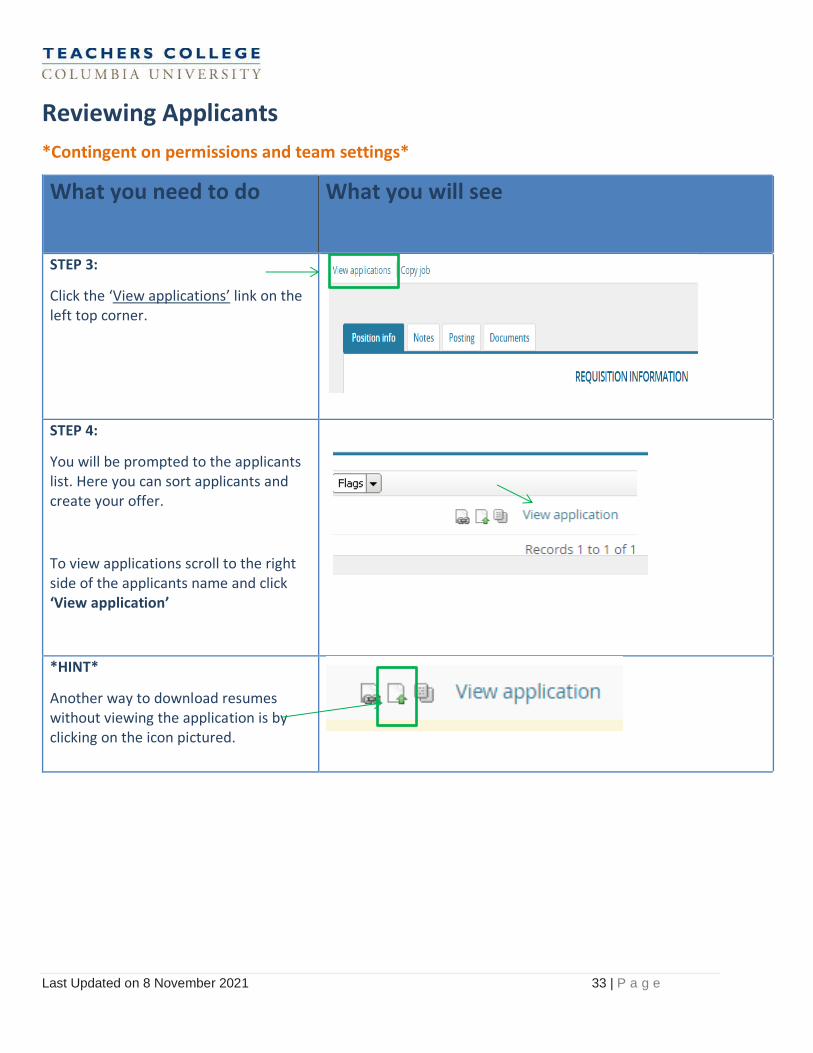
STEP 3:
Click the ‘View applications’ link on the left top corner.
STEP 4:
You will be prompted to the applicants list. Here you can sort applicants and create your offer.
To view applications scroll to the right side of the applicants name and click ‘View application’
*HINT*
Another way to download resumes without viewing the application is by clicking on the icon pictured.
Last Updated on 8 November 2021 34 | P a g e
Reviewing Applicants
*Contingent on permissions and team settings*
What you need to do What you will see
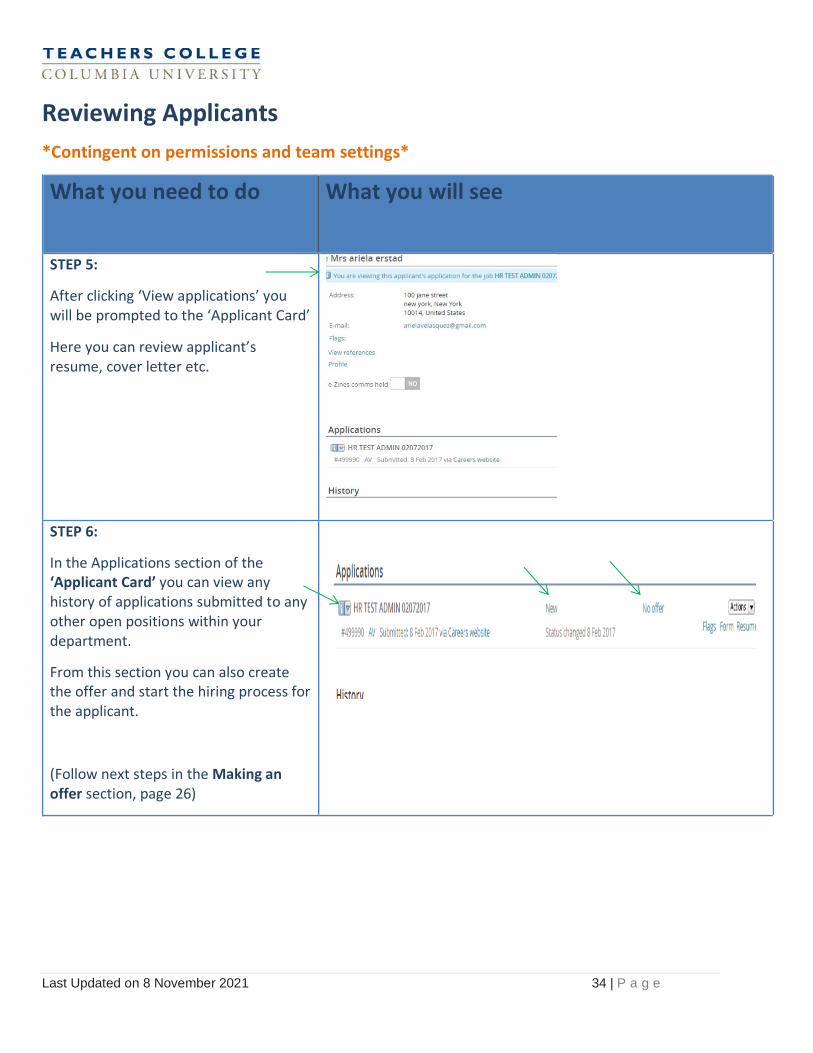
STEP 5:
After clicking ‘View applications’ you will be prompted to the ‘Applicant Card’
Here you can review applicant’s resume, cover letter etc.
STEP 6:
In the Applications section of the ‘Applicant Card’ you can view any history of applications submitted to any other open positions within your department.
From this section you can also create the offer and start the hiring process for the applicant.
(Follow next steps in the Making an offer section, page 26)
Last Updated on 8 November 2021 35 | P a g e
Reviewing Applicants – As a Search Committee Member
*Contingent on permissions and team settings*
What you need to do What you will see
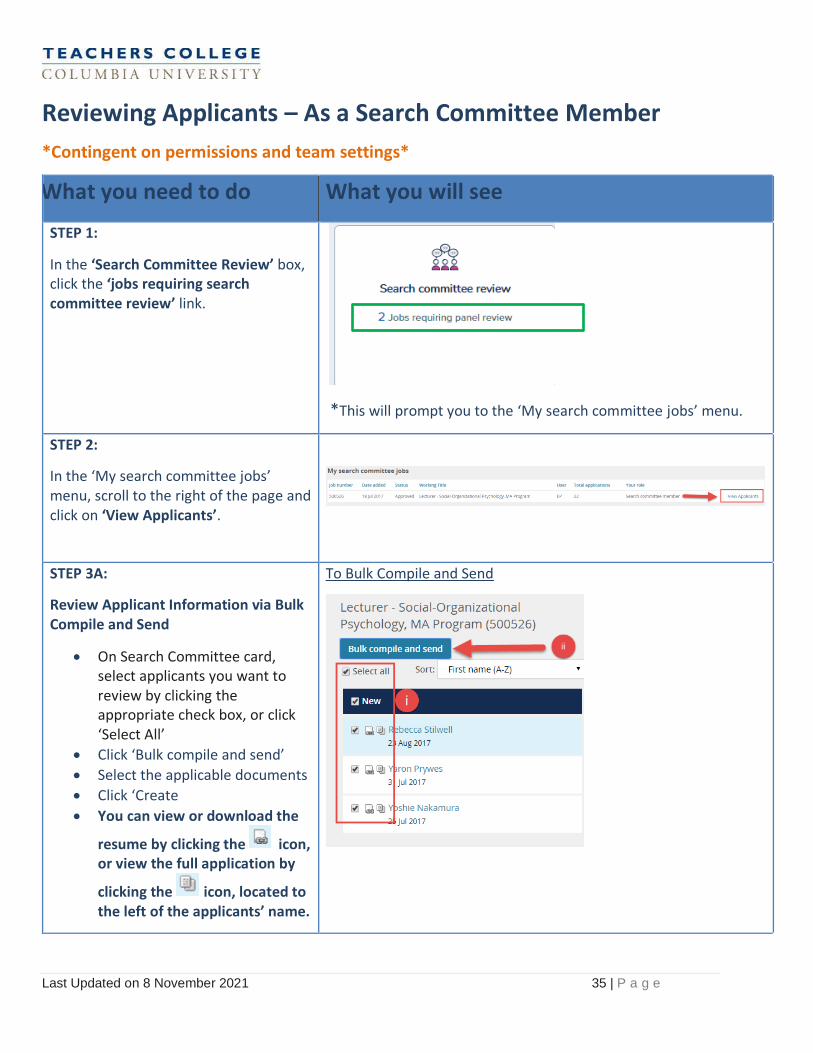
STEP 1:
In the ‘Search Committee Review’ box, click the ‘jobs requiring search committee review’ link.
*This will prompt you to the ‘My search committee jobs’ menu.
STEP 2:
In the ‘My search committee jobs’ menu, scroll to the right of the page and click on ‘View Applicants’.
STEP 3A:
Review Applicant Information via Bulk Compile and Send
• On Search Committee card, select applicants you want to review by clicking the appropriate check box, or click ‘Select All’
• Click ‘Bulk compile and send’
• Select the applicable documents
• Click ‘Create
• You can view or download the
resume by clicking the icon, or view the full application by
clicking the icon, located to the left of the applicants’ name.
To Bulk Compile and Send
Last Updated on 8 November 2021 36 | P a g e
Reviewing Applicants – As a Search Committee Member
*Contingent on permissions and team settings*
What you need to do What you will see
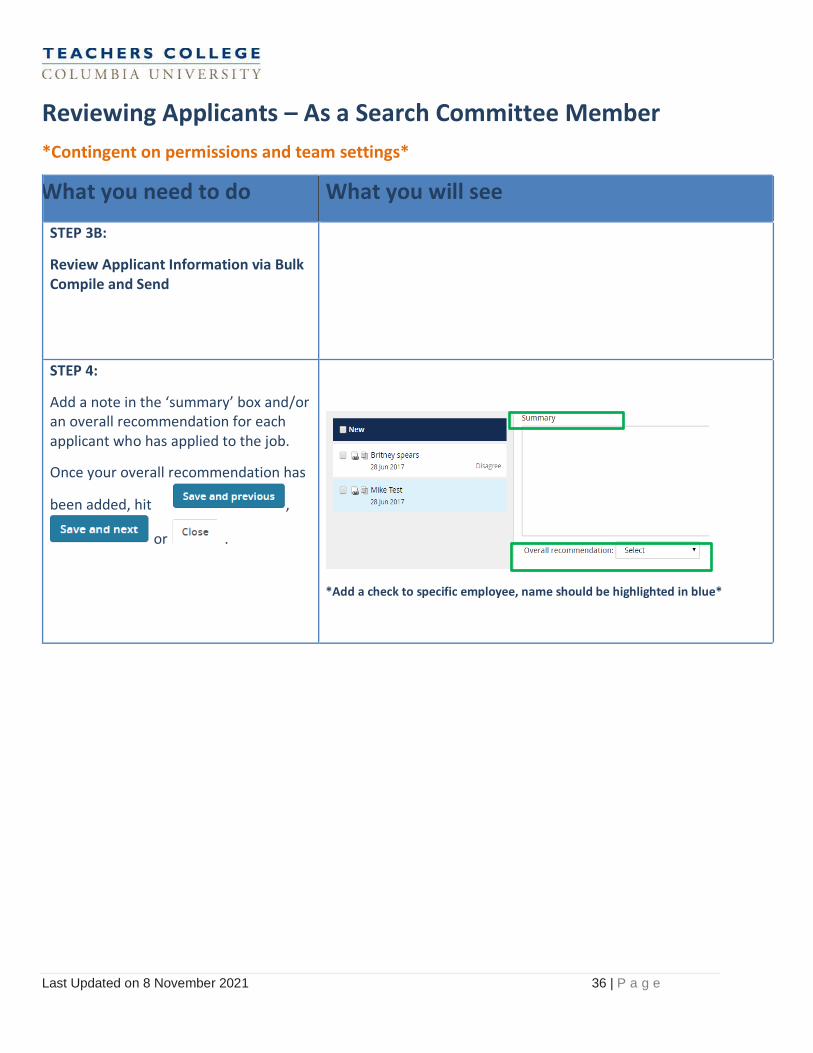
STEP 3B:
Review Applicant Information via Bulk Compile and Send
STEP 4:
Add a note in the ‘summary’ box and/or an overall recommendation for each applicant who has applied to the job.
Once your overall recommendation has
been added, hit ,
or .
*Add a check to specific employee, name should be highlighted in blue*
Last Updated on 8 November 2021 37 | P a g e
Making an Offer - Full Time and Part Time Professionals
What you need to do What you will see
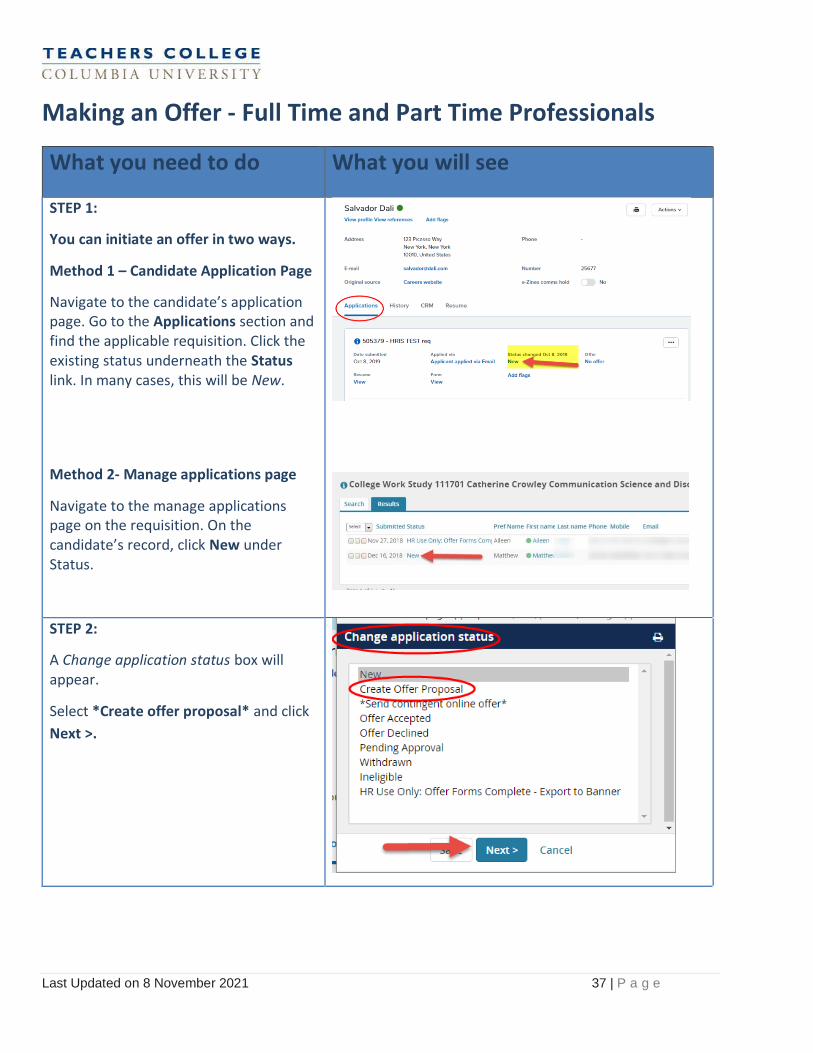
STEP 1:
You can initiate an offer in two ways.
Method 1 – Candidate Application Page
Navigate to the candidate’s application page. Go to the Applications section and find the applicable requisition. Click the existing status underneath the Status link. In many cases, this will be New.
Method 2- Manage applications page
Navigate to the manage applications page on the requisition. On the candidate’s record, click New under Status.
STEP 2:
A Change application status box will appear.
Select *Create offer proposal* and click
Next >.
Last Updated on 8 November 2021 38 | P a g e
What you need to do What you will see
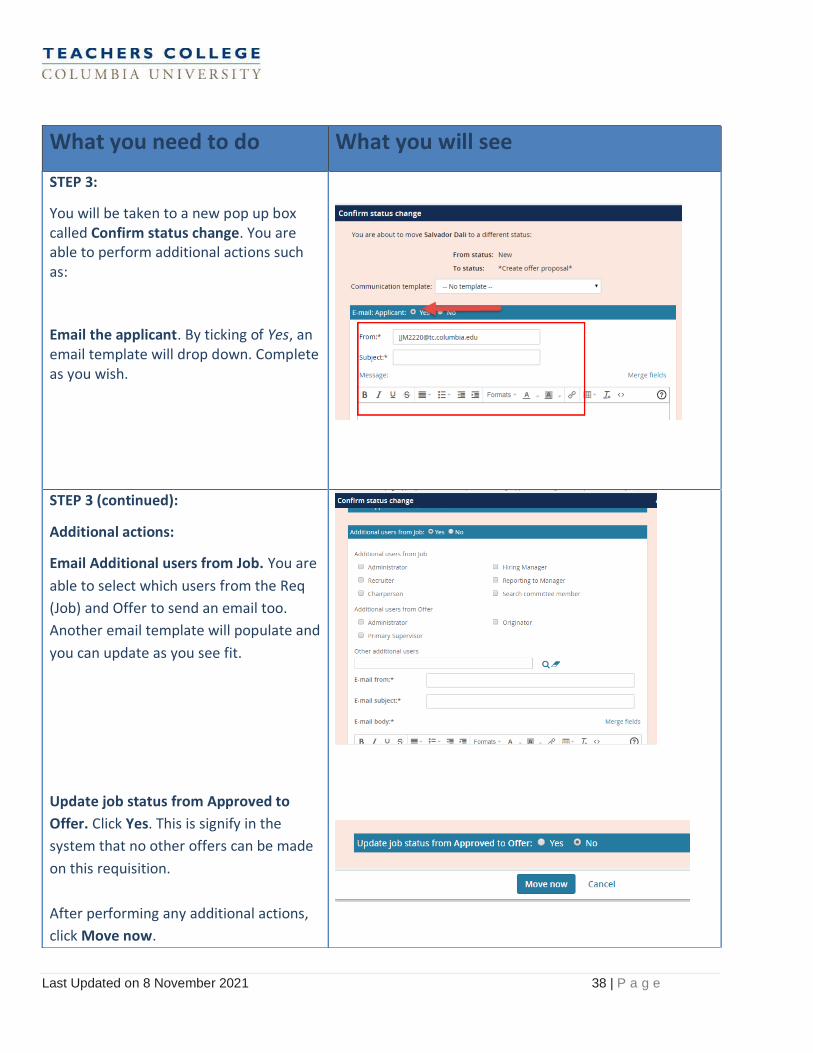
STEP 3:
You will be taken to a new pop up box called Confirm status change. You are able to perform additional actions such as:
Email the applicant. By ticking of Yes, an email template will drop down. Complete as you wish.
STEP 3 (continued):
Additional actions:
Email Additional users from Job. You are
able to select which users from the Req
(Job) and Offer to send an email too.
Another email template will populate and
you can update as you see fit.
Update job status from Approved to
Offer. Click Yes. This is signify in the
system that no other offers can be made
on this requisition.
After performing any additional actions,
click Move now.
Last Updated on 8 November 2021 39 | P a g e
Making an Offer - Full Time and Part Time Professionals
What you need to do What you will see
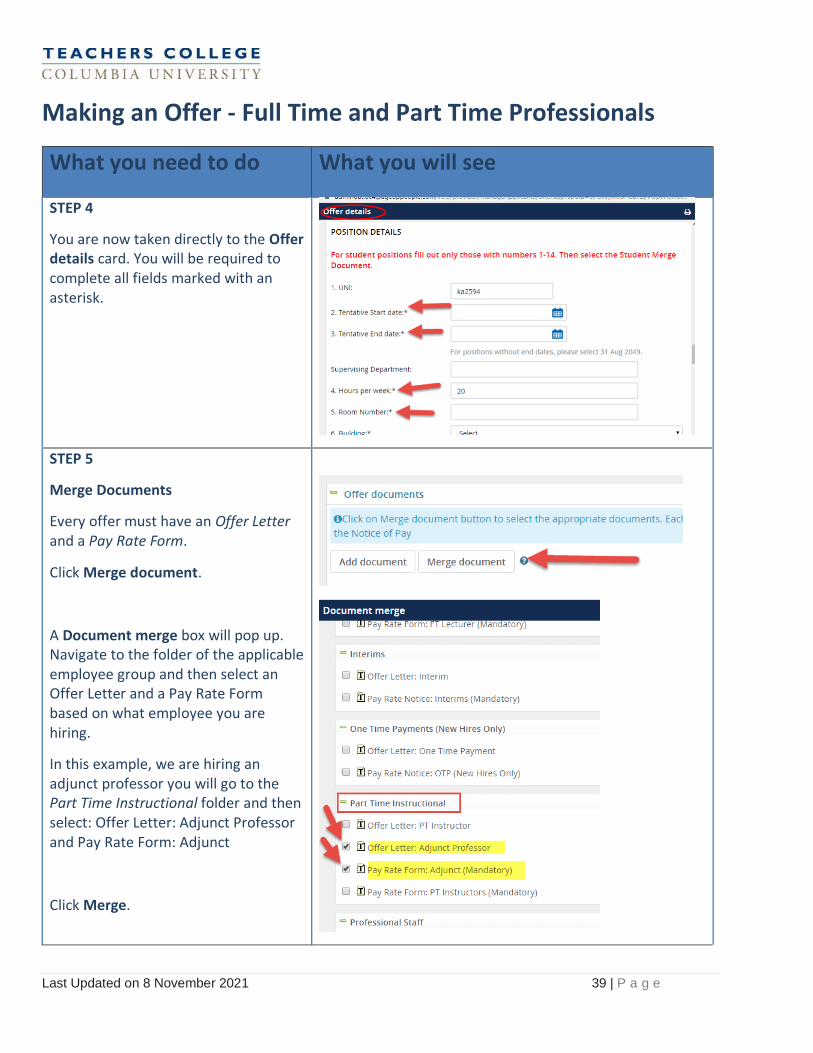
STEP 4
You are now taken directly to the Offer details card. You will be required to complete all fields marked with an asterisk.
STEP 5
Merge Documents
Every offer must have an Offer Letter and a Pay Rate Form.
Click Merge document.
A Document merge box will pop up. Navigate to the folder of the applicable employee group and then select an Offer Letter and a Pay Rate Form based on what employee you are hiring.
In this example, we are hiring an adjunct professor you will go to the Part Time Instructional folder and then select: Offer Letter: Adjunct Professor and Pay Rate Form: Adjunct
Click Merge.
Last Updated on 8 November 2021 40 | P a g e
What you need to do What you will see
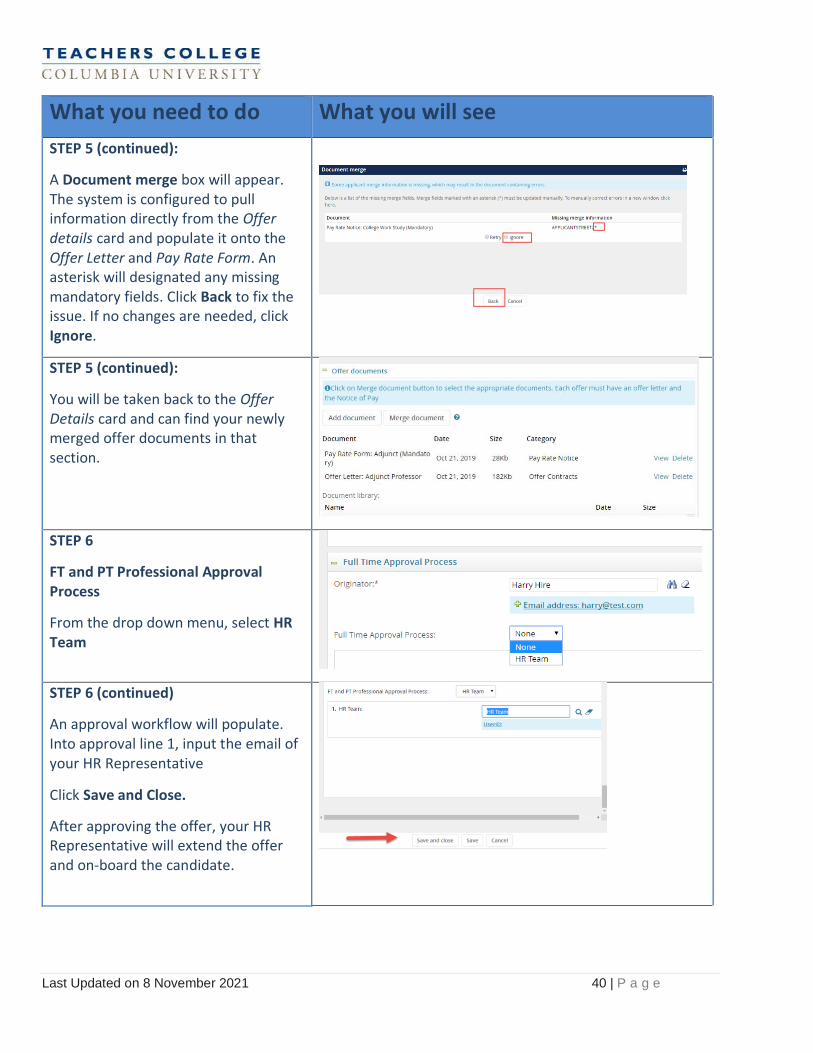
STEP 5 (continued):
A Document merge box will appear. The system is configured to pull information directly from the Offer details card and populate it onto the Offer Letter and Pay Rate Form. An asterisk will designated any missing mandatory fields. Click Back to fix the issue. If no changes are needed, click Ignore.
STEP 5 (continued):
You will be taken back to the Offer Details card and can find your newly merged offer documents in that section.
STEP 6
FT and PT Professional Approval Process
From the drop down menu, select HR Team
STEP 6 (continued)
An approval workflow will populate. Into approval line 1, input the email of your HR Representative
Click Save and Close.
After approving the offer, your HR Representative will extend the offer and on-board the candidate.
Last Updated on 8 November 2021 41 | P a g e
Definition of Fields in Offer details form
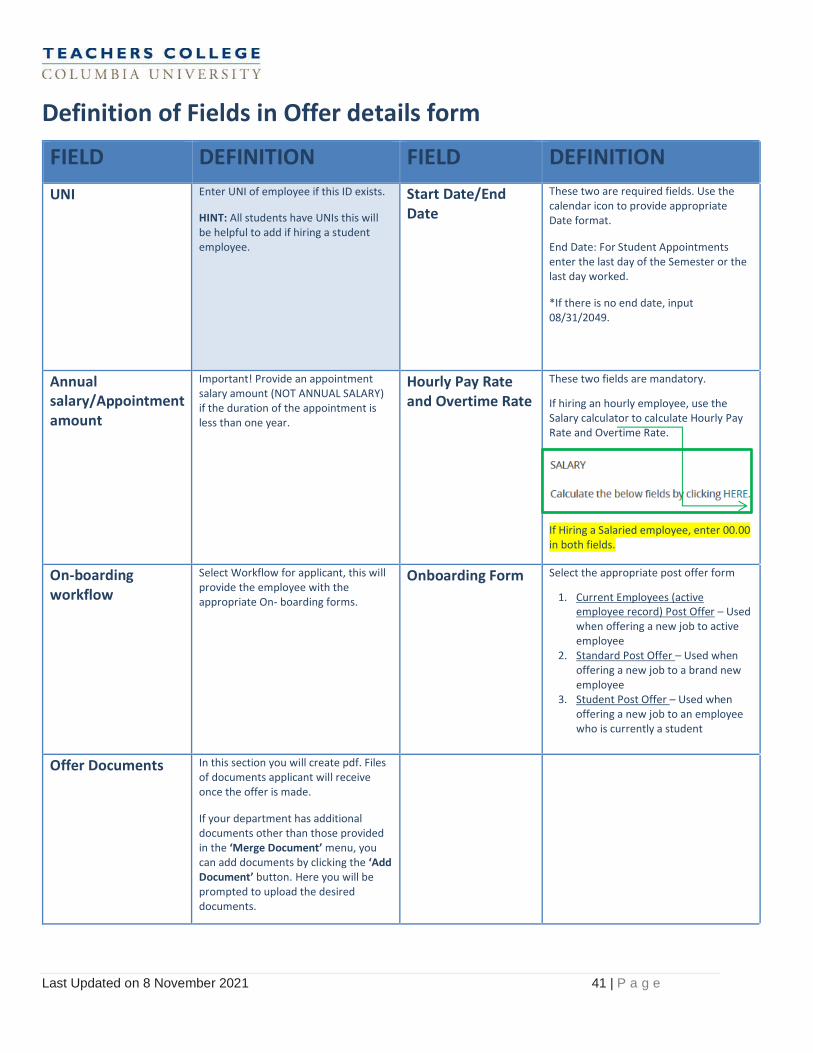
FIELD DEFINITION FIELD DEFINITION
UNI Enter UNI of employee if this ID exists.
HINT: All students have UNIs this will be helpful to add if hiring a student employee.
Start Date/End Date
These two are required fields. Use the calendar icon to provide appropriate Date format.
End Date: For Student Appointments enter the last day of the Semester or the last day worked.
*If there is no end date, input 08/31/2049.
Annual salary/Appointment amount
Important! Provide an appointment salary amount (NOT ANNUAL SALARY) if the duration of the appointment is less than one year.
Hourly Pay Rate and Overtime Rate
These two fields are mandatory.
If hiring an hourly employee, use the Salary calculator to calculate Hourly Pay Rate and Overtime Rate.
If Hiring a Salaried employee, enter 00.00 in both fields.
On-boarding workflow
Select Workflow for applicant, this will provide the employee with the appropriate On- boarding forms.
Onboarding Form
Select the appropriate post offer form
1. Current Employees (active employee record) Post Offer – Used when offering a new job to active employee
2. Standard Post Offer – Used when offering a new job to a brand new employee
3. Student Post Offer – Used when offering a new job to an employee who is currently a student
Offer Documents In this section you will create pdf. Files of documents applicant will receive once the offer is made.
If your department has additional documents other than those provided in the ‘Merge Document’ menu, you can add documents by clicking the ‘Add Document’ button. Here you will be prompted to upload the desired documents.

Last Updated on 8 November 2021 42 | P a g e
Making an Offer- Pooled Positions
What you need to do What you will see
STEP 1:
You can initiate an offer in two ways.
Method 1 – Candidate Application Page
Navigate to the candidate’s application page. Go to the Applications section and find the applicable requisition. Click the existing status underneath the Status link. In many cases, this will be New.
Method 2- Manage applications page
Navigate to the manage applications page on the requisition. On the candidate’s record, click New under Status.
STEP 2:
A Change application status box will appear.
Select *Create offer proposal*
and click Next >.
Last Updated on 8 November 2021 43 | P a g e
Making an Offer- Pooled Positions
What you need to do What you will see
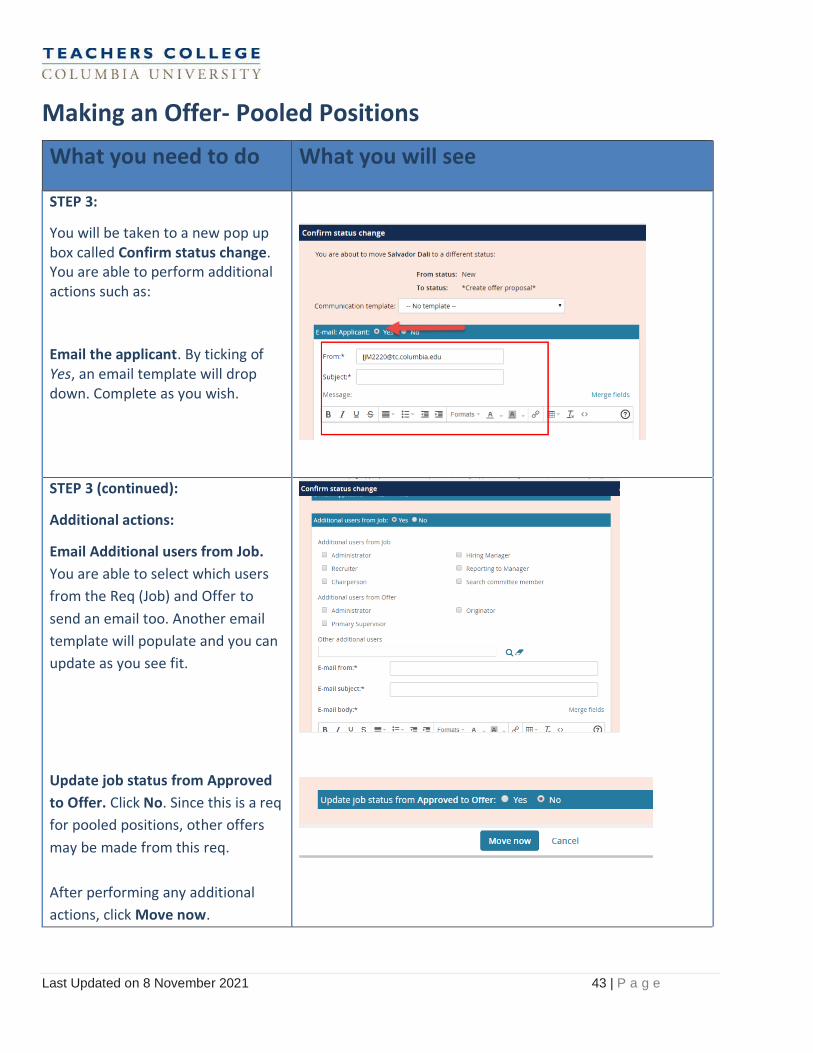
STEP 3:
You will be taken to a new pop up box called Confirm status change. You are able to perform additional actions such as:
Email the applicant. By ticking of Yes, an email template will drop down. Complete as you wish.
STEP 3 (continued):
Additional actions:
Email Additional users from Job.
You are able to select which users
from the Req (Job) and Offer to
send an email too. Another email
template will populate and you can
update as you see fit.
Update job status from Approved
to Offer. Click No. Since this is a req
for pooled positions, other offers
may be made from this req.
After performing any additional
actions, click Move now.
Last Updated on 8 November 2021 44 | P a g e
What you need to do What you will see
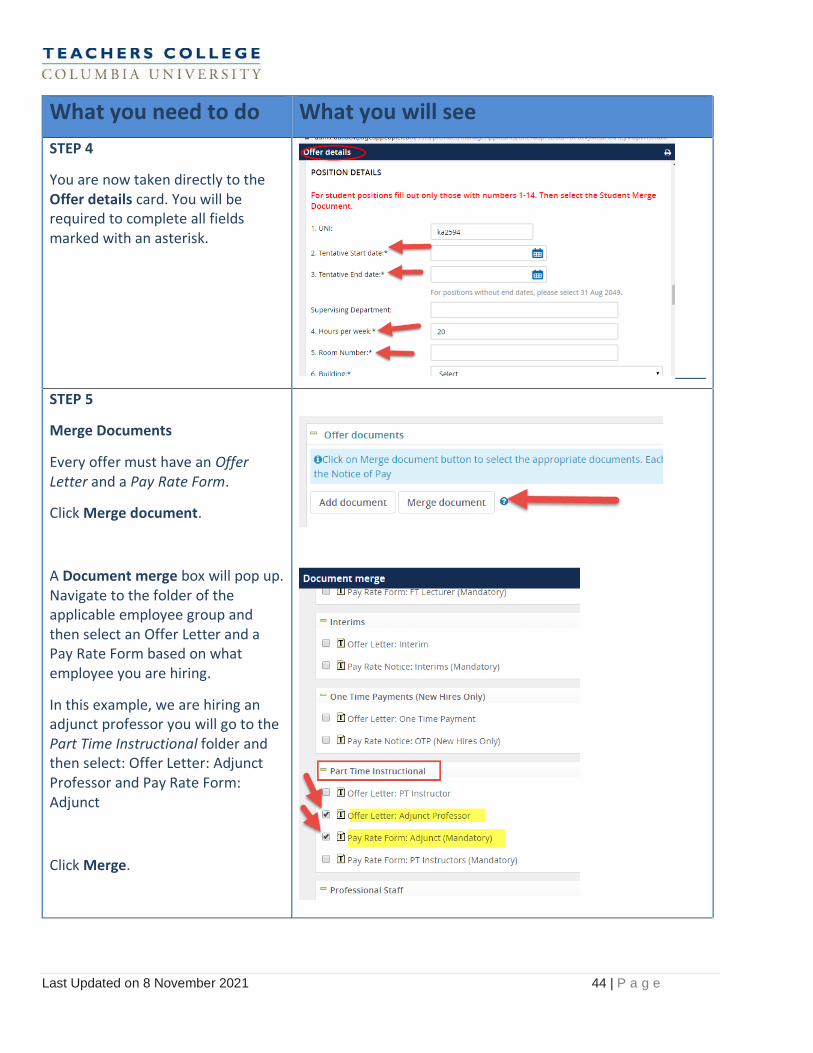
STEP 4
You are now taken directly to the Offer details card. You will be required to complete all fields marked with an asterisk.
STEP 5
Merge Documents
Every offer must have an Offer Letter and a Pay Rate Form.
Click Merge document.
A Document merge box will pop up. Navigate to the folder of the applicable employee group and then select an Offer Letter and a Pay Rate Form based on what employee you are hiring.
In this example, we are hiring an adjunct professor you will go to the Part Time Instructional folder and then select: Offer Letter: Adjunct Professor and Pay Rate Form: Adjunct
Click Merge.
Last Updated on 8 November 2021 45 | P a g e
What you need to do What you will see
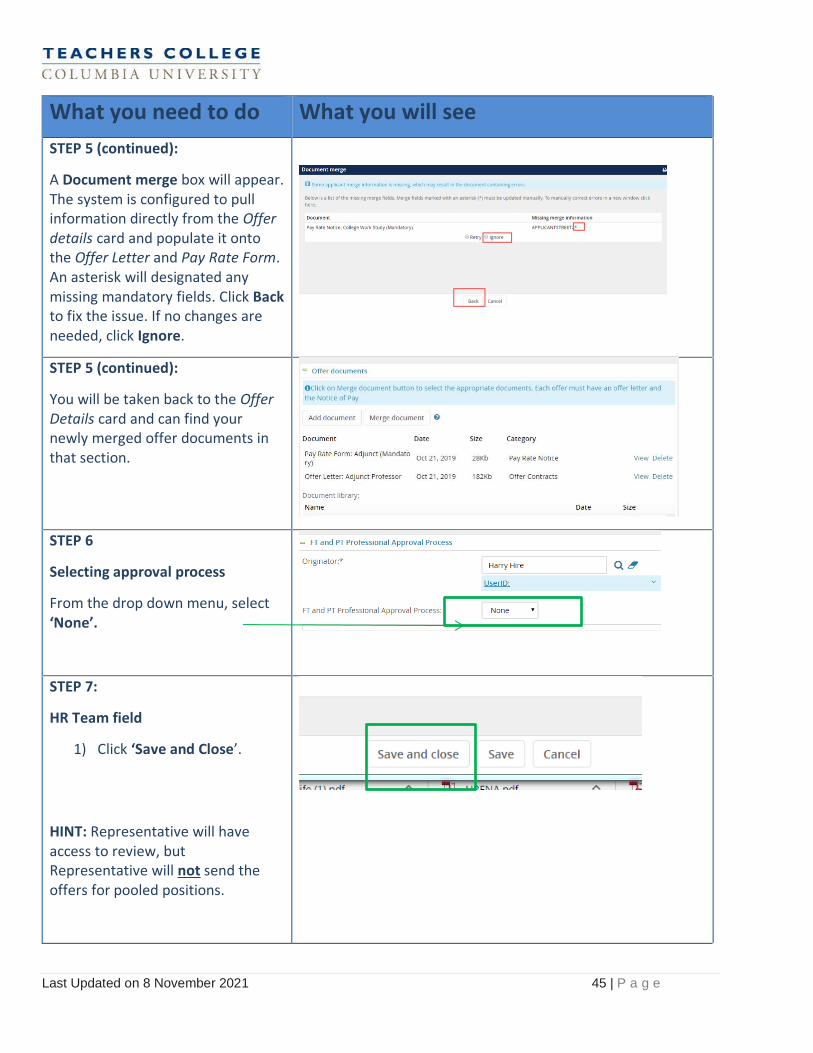
STEP 5 (continued):
A Document merge box will appear. The system is configured to pull information directly from the Offer details card and populate it onto the Offer Letter and Pay Rate Form. An asterisk will designated any missing mandatory fields. Click Back to fix the issue. If no changes are needed, click Ignore.
STEP 5 (continued):
You will be taken back to the Offer Details card and can find your newly merged offer documents in that section.
STEP 6
Selecting approval process
From the drop down menu, select ‘None’.
STEP 7:
HR Team field
1) Click ‘Save and Close’.
HINT: Representative will have access to review, but Representative will not send the offers for pooled positions.
Last Updated on 8 November 2021 46 | P a g e
Making an Offer- Pooled Positions
What you need to do What you will see
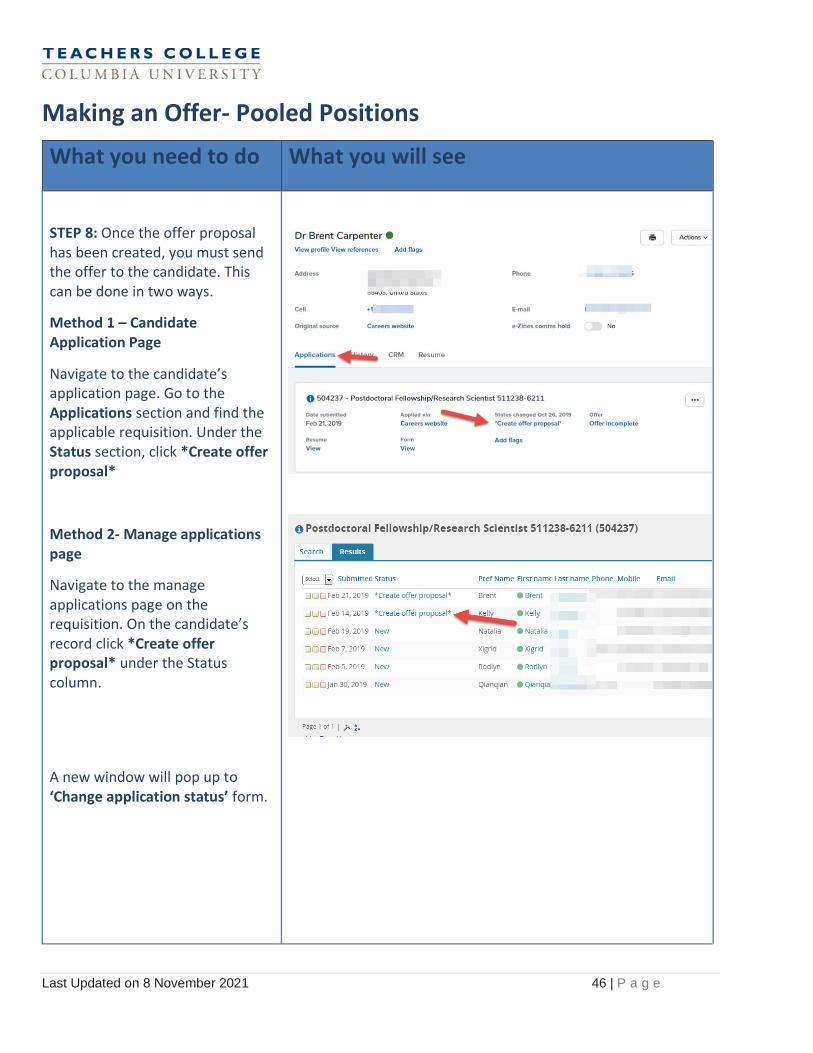
STEP 8: Once the offer proposal has been created, you must send the offer to the candidate. This can be done in two ways.
Method 1 – Candidate Application Page
Navigate to the candidate’s application page. Go to the Applications section and find the applicable requisition. Under the Status section, click *Create offer proposal*
Method 2- Manage applications page
Navigate to the manage applications page on the requisition. On the candidate’s record click *Create offer proposal* under the Status column.
A new window will pop up to ‘Change application status’ form.
Last Updated on 8 November 2021 47 | P a g e
What you need to do What you will see
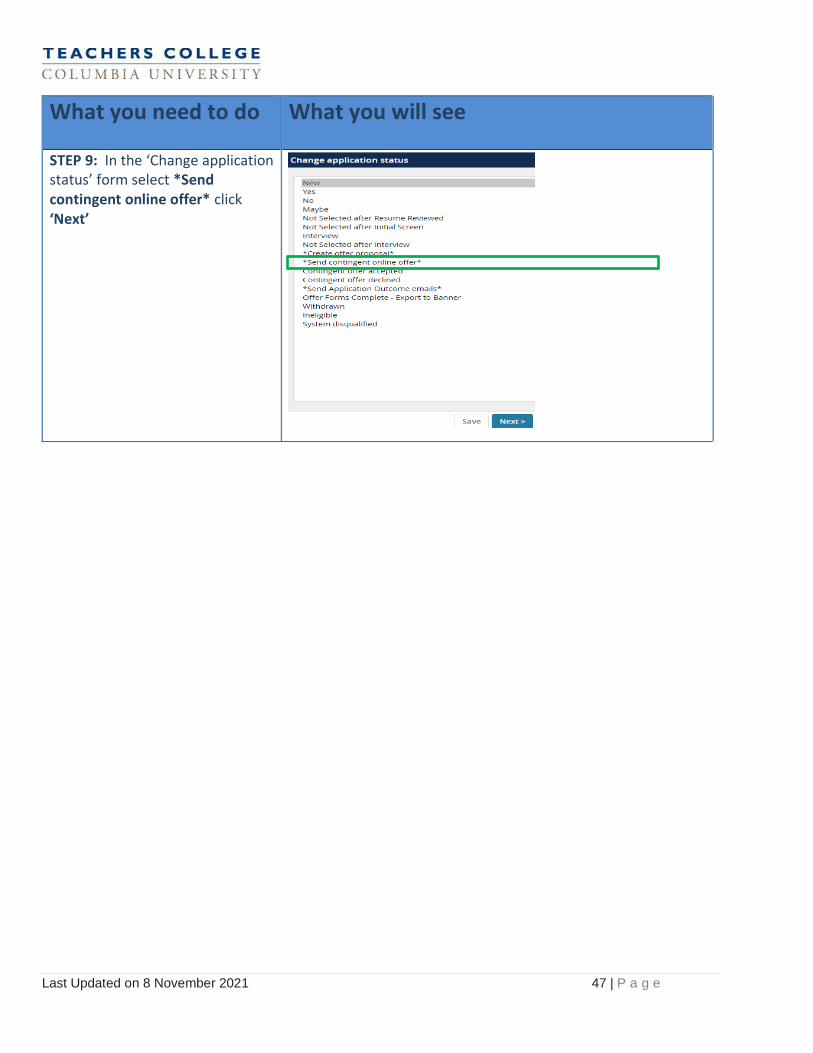
STEP 9: In the ‘Change application status’ form select *Send contingent online offer* click ‘Next’
Last Updated on 8 November 2021 48 | P a g e
Making an Offer- Pooled Positions
What you need to do What you will see
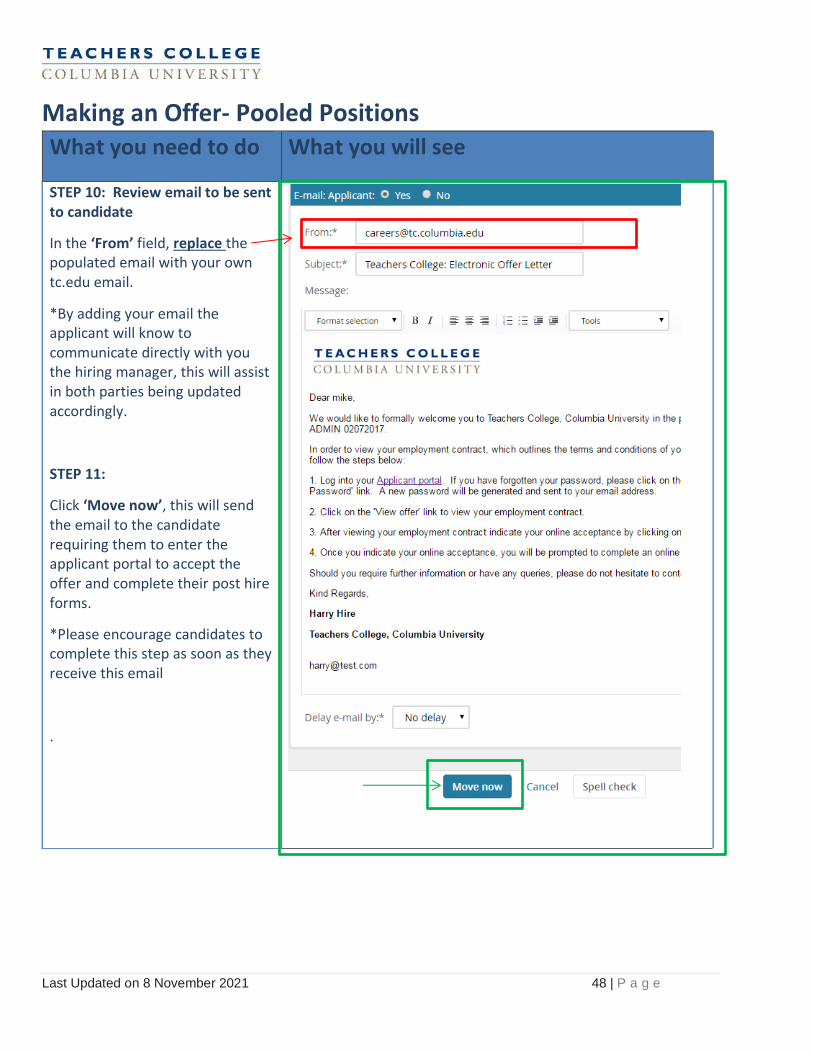
STEP 10: Review email to be sent to candidate
In the ‘From’ field, replace the populated email with your own tc.edu email.
*By adding your email the applicant will know to communicate directly with you the hiring manager, this will assist in both parties being updated accordingly.
STEP 11:
Click ‘Move now’, this will send the email to the candidate requiring them to enter the applicant portal to accept the offer and complete their post hire forms.
*Please encourage candidates to complete this step as soon as they receive this email
.
Last Updated on 8 November 2021 49 | P a g e
Closing a Job in the system
Responsibility of Hiring Manager
In accordance with Federal law, the College maintains an Affirmative Action Plan.
Part of that plan is to report and track recruitment activity. For positions which are part of this plan such as faculty, professional, instructional staff and executive positions. For these positions we identify reasons for non- selection for each candidate and the stage in the process where they are no longer being considered.
Student positions, interim position and any other “pooled position” do not require identification of reasons for non-selection.
There are two ways to close out a job
1)Cancel a job (pages)
2) Job has been filled (pages)
Last Updated on 8 November 2021 50 | P a g e
Closing a Job in the system (Cancelled)
It is the Responsibility of the Hiring Manager once a position has been filled to always close out the job.
What you need to do
What you will see
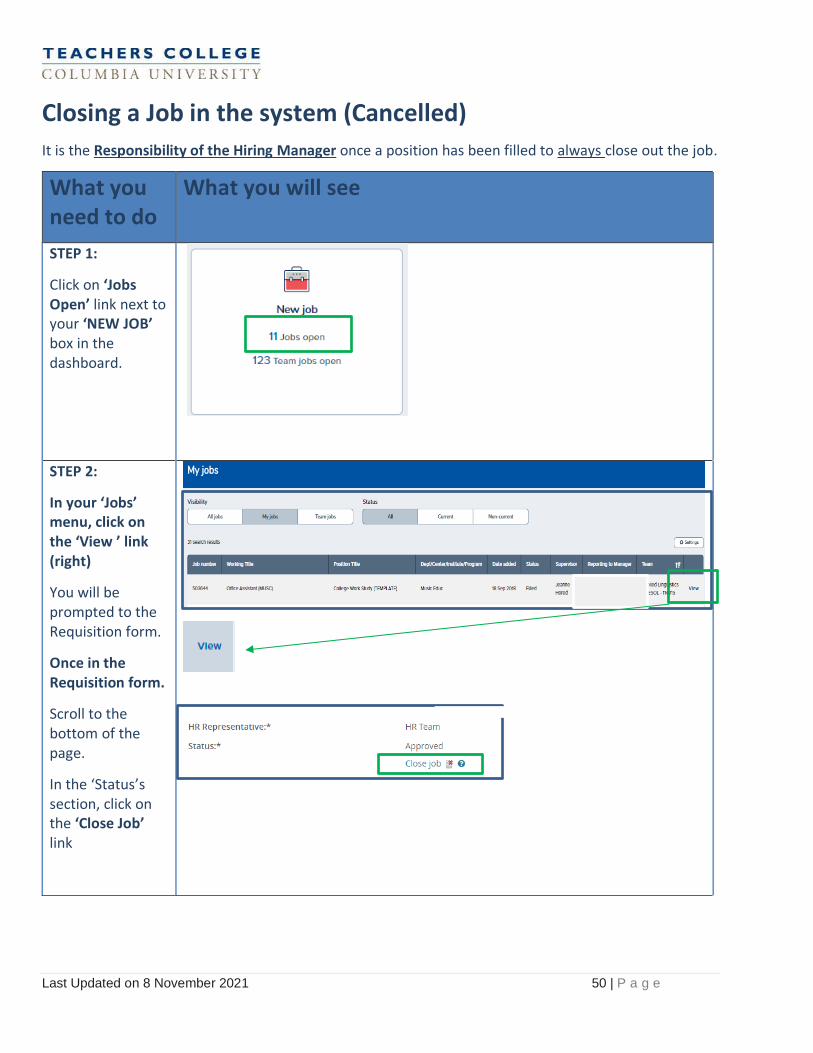
STEP 1:
Click on ‘Jobs Open’ link next to your ‘NEW JOB’ box in the dashboard.
STEP 2:
In your ‘Jobs’ menu, click on the ‘View ’ link (right)
You will be prompted to the Requisition form.
Once in the Requisition form.
Scroll to the bottom of the page.
In the ‘Status’s section, click on the ‘Close Job’ link
Last Updated on 8 November 2021 51 | P a g e
Closing a Job in the system (Cancelled)
It is the Responsibility of the Hiring Manager once a position has been filled to always close out the job.
What you need to do
What you will see
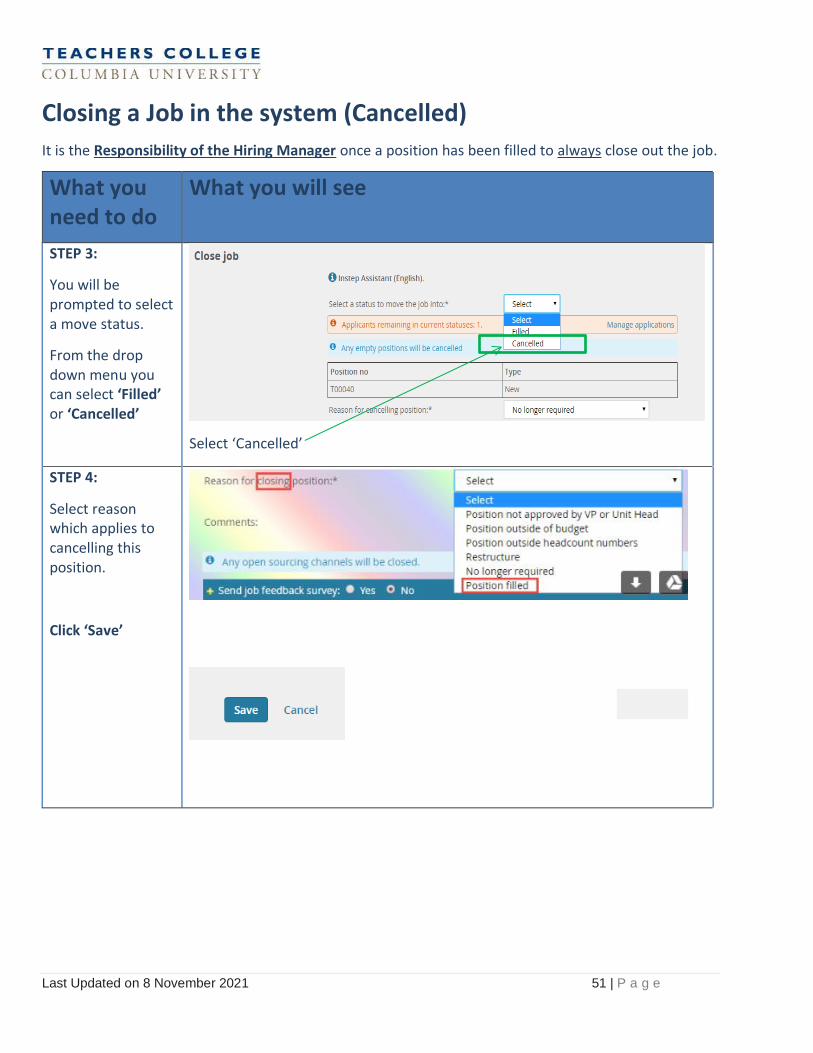
STEP 3:
You will be prompted to select a move status.
From the drop down menu you can select ‘Filled’ or ‘Cancelled’
Select ‘Cancelled’
STEP 4:
Select reason which applies to cancelling this position.
Click ‘Save’
Last Updated on 8 November 2021 52 | P a g e
Closing Job in the System (Filled)
It is the Responsibility of the Hiring Manager to close out the job once a position has been filled.
What you need to do
What you will see
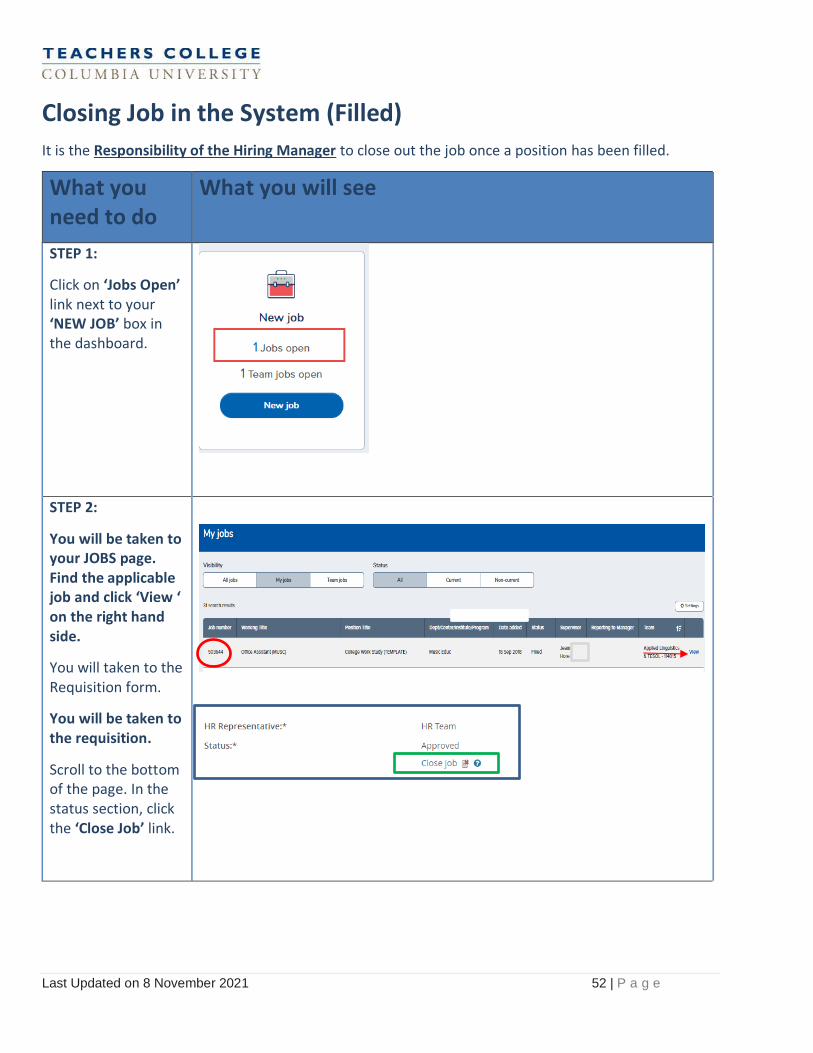
STEP 1:
Click on ‘Jobs Open’ link next to your ‘NEW JOB’ box in the dashboard.
STEP 2:
You will be taken to your JOBS page. Find the applicable job and click ‘View ‘ on the right hand side.
You will taken to the Requisition form.
You will be taken to the requisition.
Scroll to the bottom of the page. In the status section, click the ‘Close Job’ link.
Last Updated on 8 November 2021 53 | P a g e
Closing Job in the System (Filled)
It is the Responsibility of the Hiring Manager to close out the job once a position has been filled.
What you need to do
What you will see
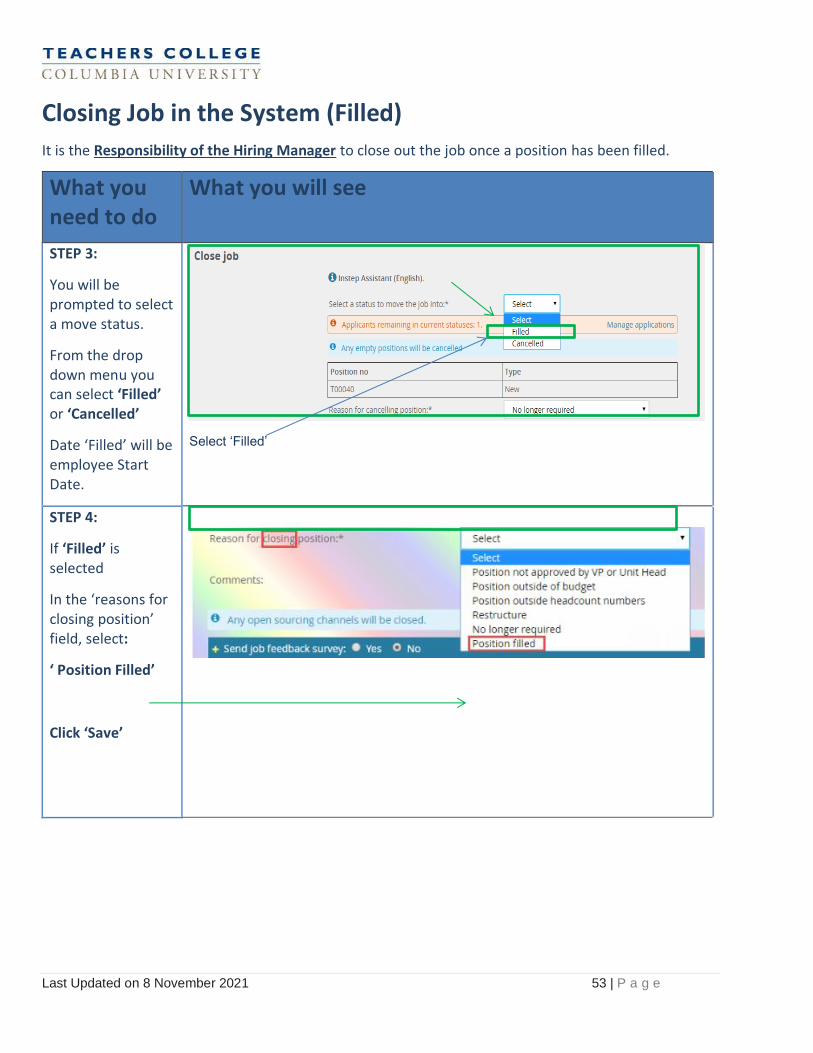
STEP 3:
You will be prompted to select a move status.
From the drop down menu you can select ‘Filled’ or ‘Cancelled’
Date ‘Filled’ will be employee Start Date.
Select ‘Filled’
STEP 4:
If ‘Filled’ is selected
In the ‘reasons for closing position’ field, select:
‘ Position Filled’
Click ‘Save’
Last Updated on 8 November 2021 54 | P a g e
Closing Job in the system (Filled) Reasons for Non Selection
It is the Responsibility of the Hiring Manager once a position has been filled to always close out the job.
What you need to do
What you will see
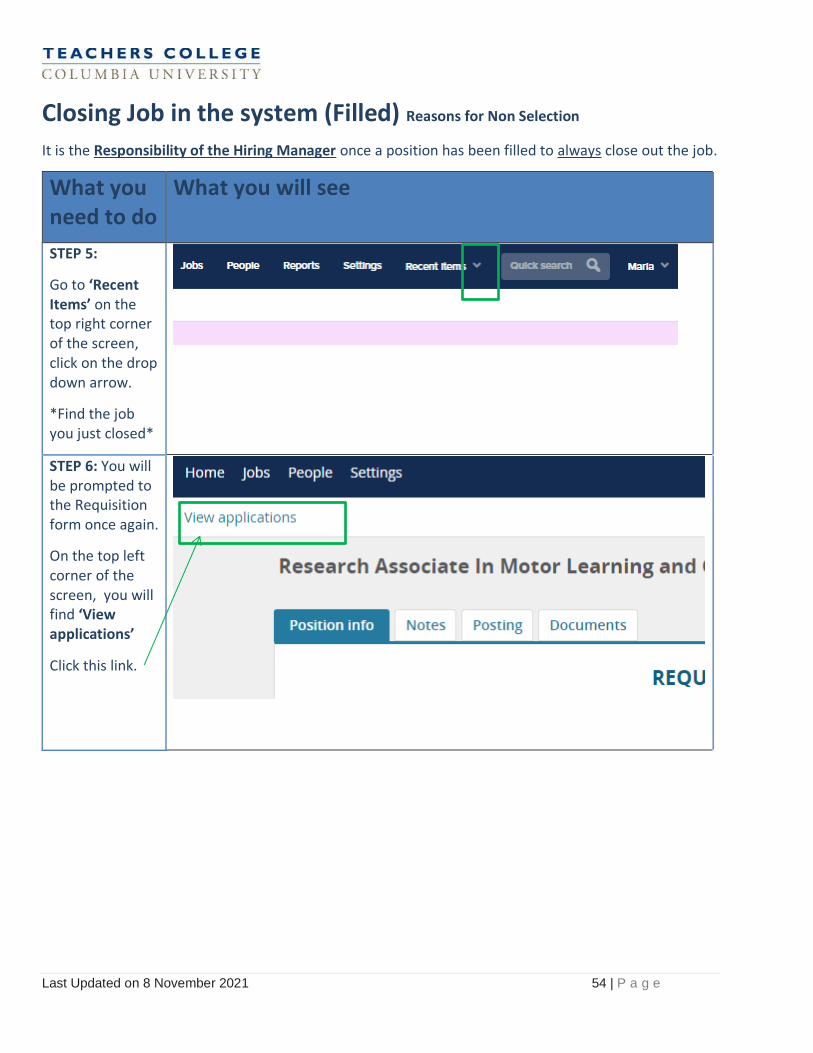
STEP 5:
Go to ‘Recent Items’ on the top right corner of the screen, click on the drop down arrow.
*Find the job you just closed*
STEP 6: You will be prompted to the Requisition form once again.
On the top left corner of the screen, you will find ‘View applications’
Click this link.
Last Updated on 8 November 2021 55 | P a g e
Closing Job in the system (Filled) Reasons for Non Selection
It is the Responsibility of the Hiring Manager once a position has been filled to always close out the job.
What you need to do
What you will see
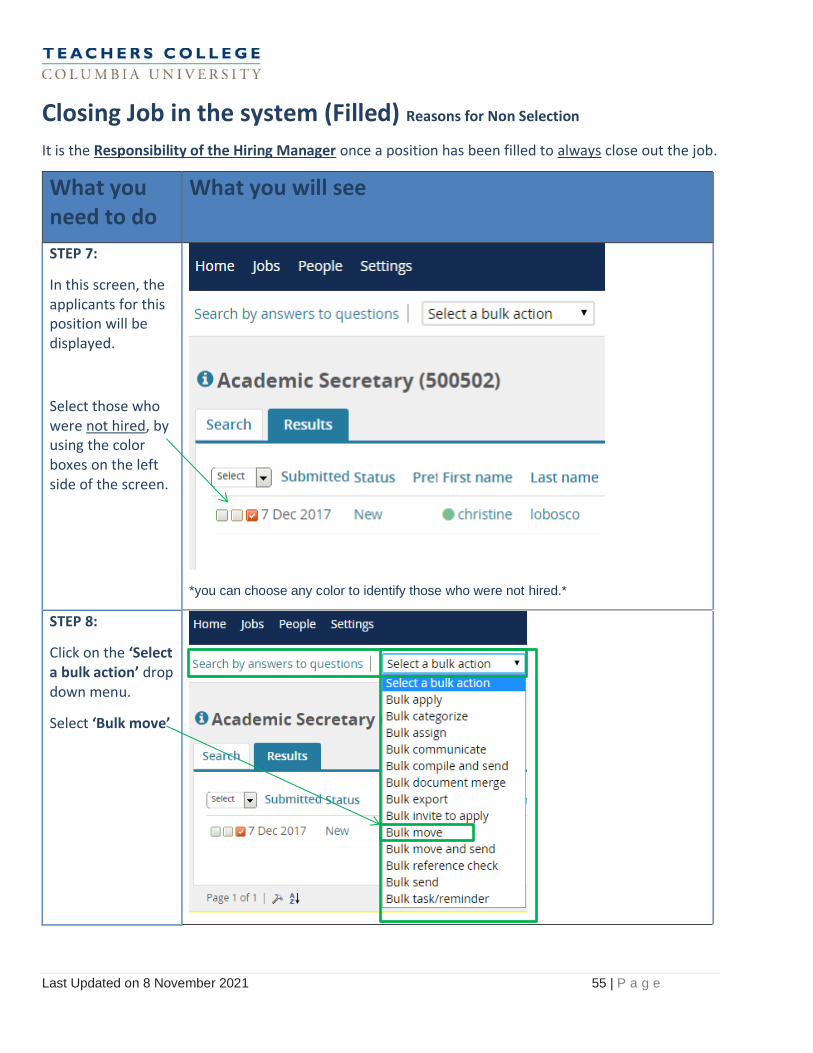
STEP 7:
In this screen, the applicants for this position will be displayed.
Select those who were not hired, by using the color boxes on the left side of the screen.
*you can choose any color to identify those who were not hired.*
STEP 8:
Click on the ‘Select a bulk action’ drop down menu.
Select ‘Bulk move’
Last Updated on 8 November 2021 56 | P a g e
Closing Job in the system (Filled) Reasons for Non Selection
It is the Responsibility of the Hiring Manager once a position has been filled to always close out the job.
What you need to do
What you will see
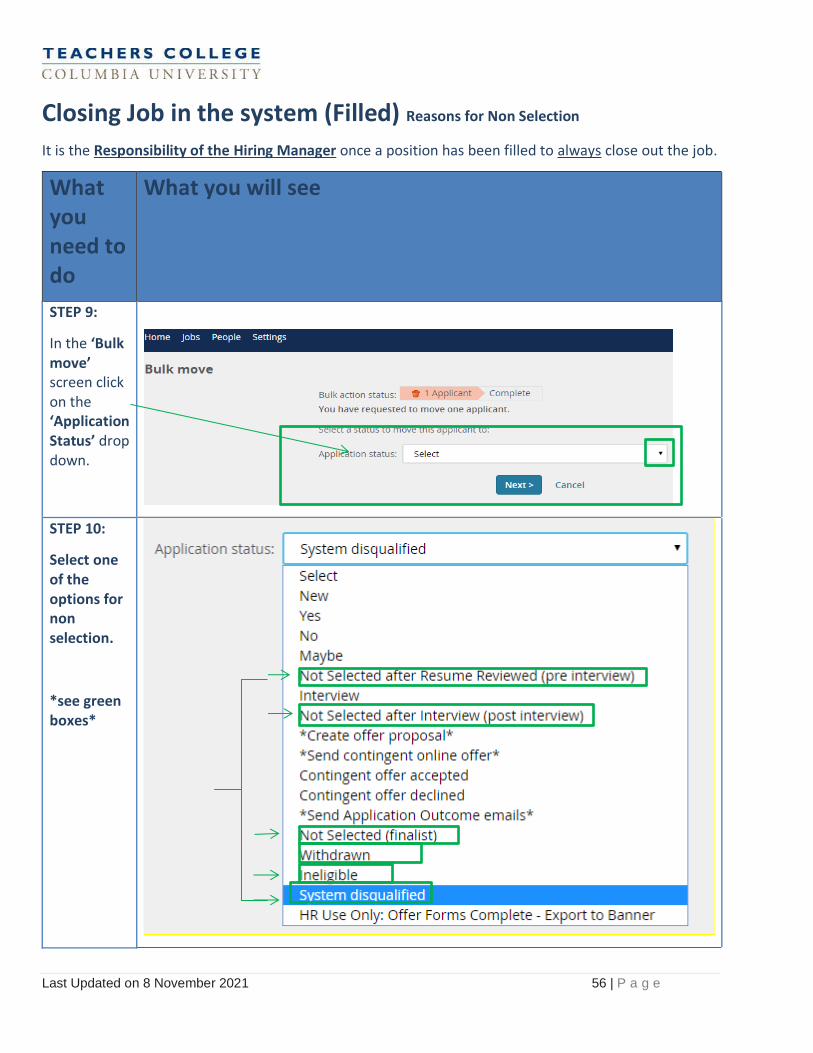
STEP 9:
In the ‘Bulk move’ screen click on the ‘Application Status’ drop down.
STEP 10:
Select one of the options for non selection.
*see green boxes*
Last Updated on 8 November 2021 57 | P a g e
Closing Job in the system (Filled) Reasons for Non Selection
It is the Responsibility of the Hiring Manager once a position has been filled to always close out the job.
What you need to do
What you will see
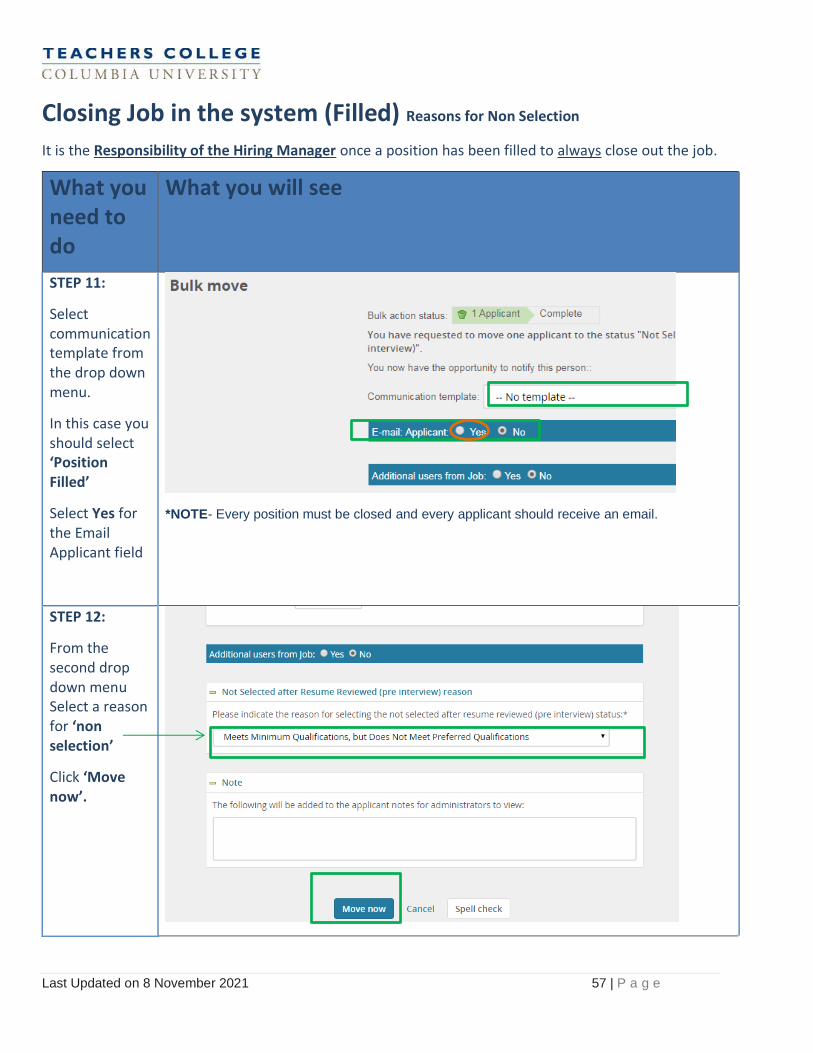
STEP 11:
Select communication template from the drop down menu.
In this case you should select ‘Position Filled’
Select Yes for the Email Applicant field
*NOTE- Every position must be closed and every applicant should receive an email.
STEP 12:
From the second drop down menu Select a reason for ‘non selection’
Click ‘Move now’.

Last Updated on 8 November 2021 58 | P a g e
Reasons for Non Selection- Responsibility of Hiring Manager
Reason Use When:
Position Cancelled and/or Filled Internally The position is filled by a TC employee or is not filled at all.
Withdrew for Not Completing and/or Cooperating in Recruitment Process
An application is incomplete or when a candidate could not be reached for an interview
Does not meet Advertised/Posted Minimum Qualifications
it is determined that the candidate does not meet the posted minimum qualifications. This can be done at any stage of the process, but typically determined at the pre-interview stage.
Meets Minimum Qualifications, but Does Not Meet Preferred Qualifications
it is determined that the candidate meets the posted minimum qualifications, but not the posted preferred qualifications. This can be done at any stage of the process.
Meets Preferred Qualifications, but Finalist is a Better fit it is determined that the candidate meets all of the posted qualifications but was not the selectee. This can only be determined after the selectee has been identified.
No Offer and/or Office Rescinded due to Results for Background Check or Other Screening
References result in the candidate no longer being considered or when an offer has been rescinded due to background check. Background checks are only conducted after a "contingent offer" is initially made. Reference checks are made before an offer is made
Screening and/or Interview revealed Insufficient Experience or Skills
After phone or in-person interview
Screening and/or Interview revealed a Lack of Interest or Poor Communication Skills
After phone or in-person interview
Withdrew due to Dissatisfaction with Terms of Employment
After the candidate is interviewed in phone or in person and informs the interviewer that they are no longer interested in the position
Not Hired (only to be used for pooled positions) A candidate is not selected for a "pooled" budgeted position, such as a student employee, part-time instructor or adjunct faculty position
Qualifications Not Considered due to Data Management Techniques
This is legally permissible but not normally employed at Teachers College. This is only to be used if it is decided, before the screening begins, that a certain number (or percentage) of applicants will not be viewed due to the large number of applications anticipated and/or received. In this approach, the specific applications are viewed based on a defined criteria (e.g., the first 50 applications or specific resumes in a sequence such as every fifth application).
Last Updated on 8 November 2021 59 | P a g e
Reviewing New Hires
What you need to do What you will see
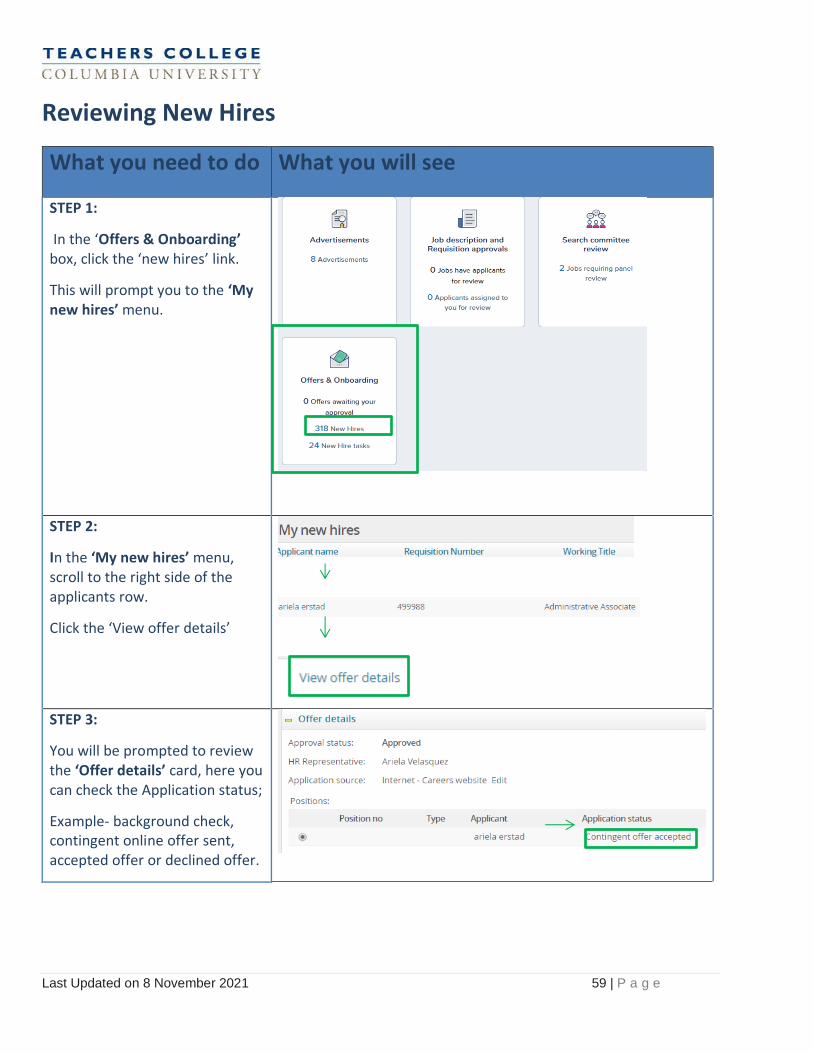
STEP 1:
In the ‘Offers & Onboarding’ box, click the ‘new hires’ link.
This will prompt you to the ‘My new hires’ menu.
STEP 2:
In the ‘My new hires’ menu, scroll to the right side of the applicants row.
Click the ‘View offer details’
STEP 3:
You will be prompted to review the ‘Offer details’ card, here you can check the Application status;
Example- background check, contingent online offer sent, accepted offer or declined offer.
Last Updated on 8 November 2021 60 | P a g e
On-boarding (View from applicant)
What you need to do
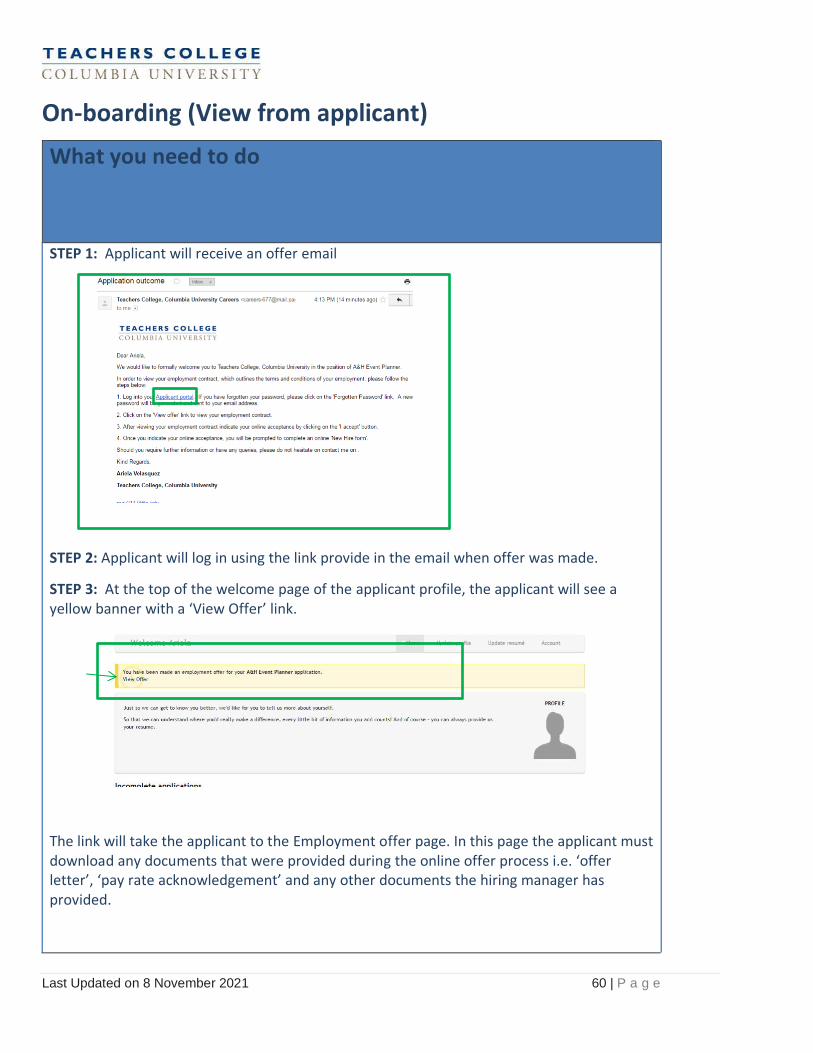
STEP 1: Applicant will receive an offer email
STEP 2: Applicant will log in using the link provide in the email when offer was made.
STEP 3: At the top of the welcome page of the applicant profile, the applicant will see a yellow banner with a ‘View Offer’ link.
The link will take the applicant to the Employment offer page. In this page the applicant must download any documents that were provided during the online offer process i.e. ‘offer letter’, ‘pay rate acknowledgement’ and any other documents the hiring manager has provided.
Last Updated on 8 November 2021 61 | P a g e
Onboarding (View from applicant)
What you need to do
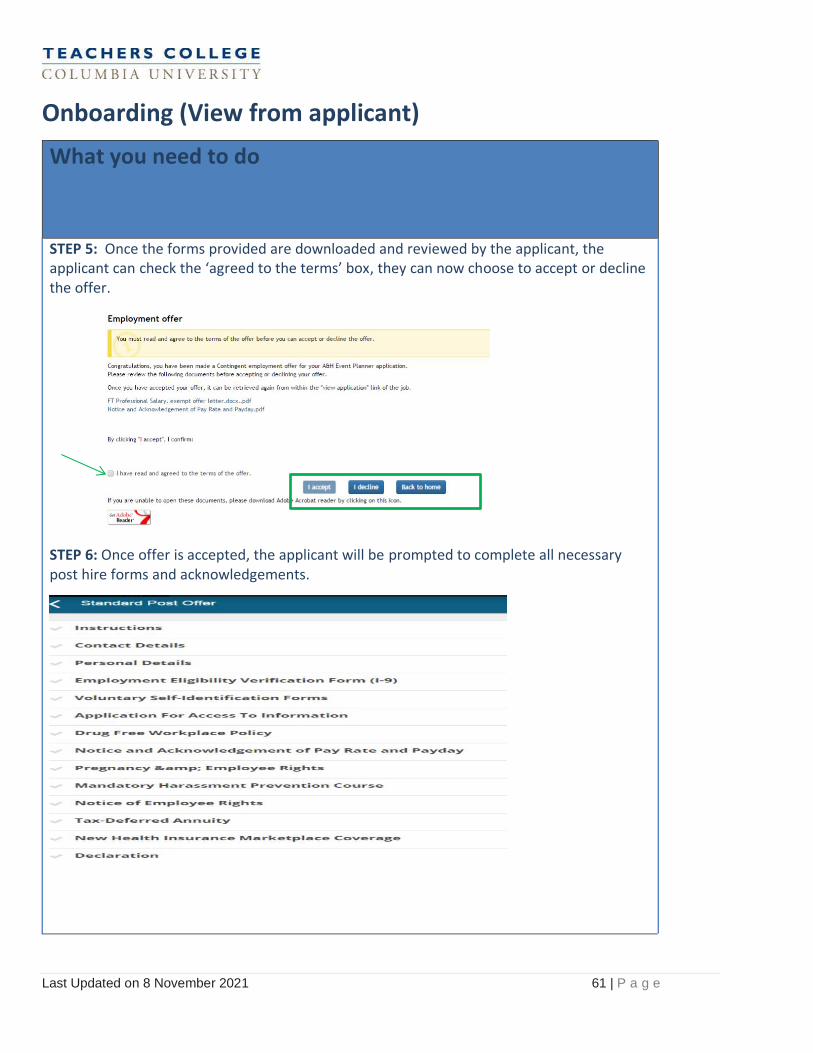
STEP 5: Once the forms provided are downloaded and reviewed by the applicant, the applicant can check the ‘agreed to the terms’ box, they can now choose to accept or decline the offer.
STEP 6: Once offer is accepted, the applicant will be prompted to complete all necessary post hire forms and acknowledgements.
Last Updated on 8 November 2021 62 | P a g e
On-boarding (View from applicant)
What you need to do
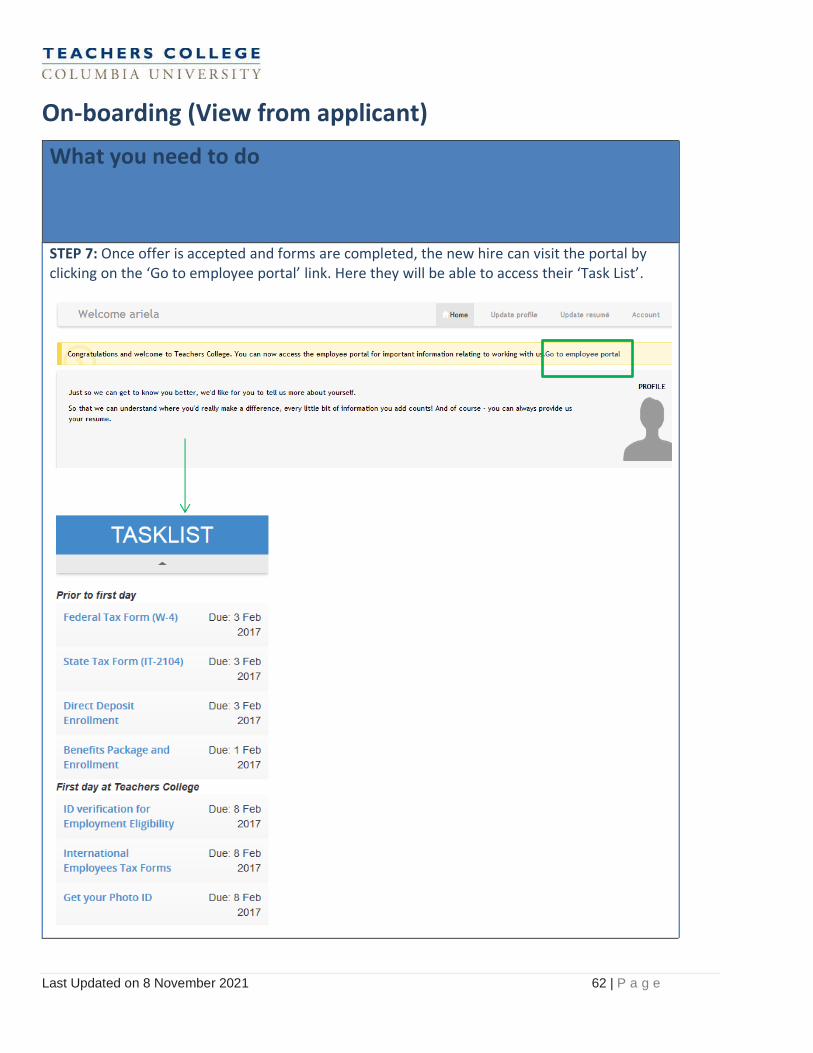
STEP 7: Once offer is accepted and forms are completed, the new hire can visit the portal by clicking on the ‘Go to employee portal’ link. Here they will be able to access their ‘Task List’.
Last Updated on 8 November 2021 63 | P a g e
Reviewing New Hires- Task List
These lists can be viewed once employee has completed the onboarding process.
What you need to do What you will see
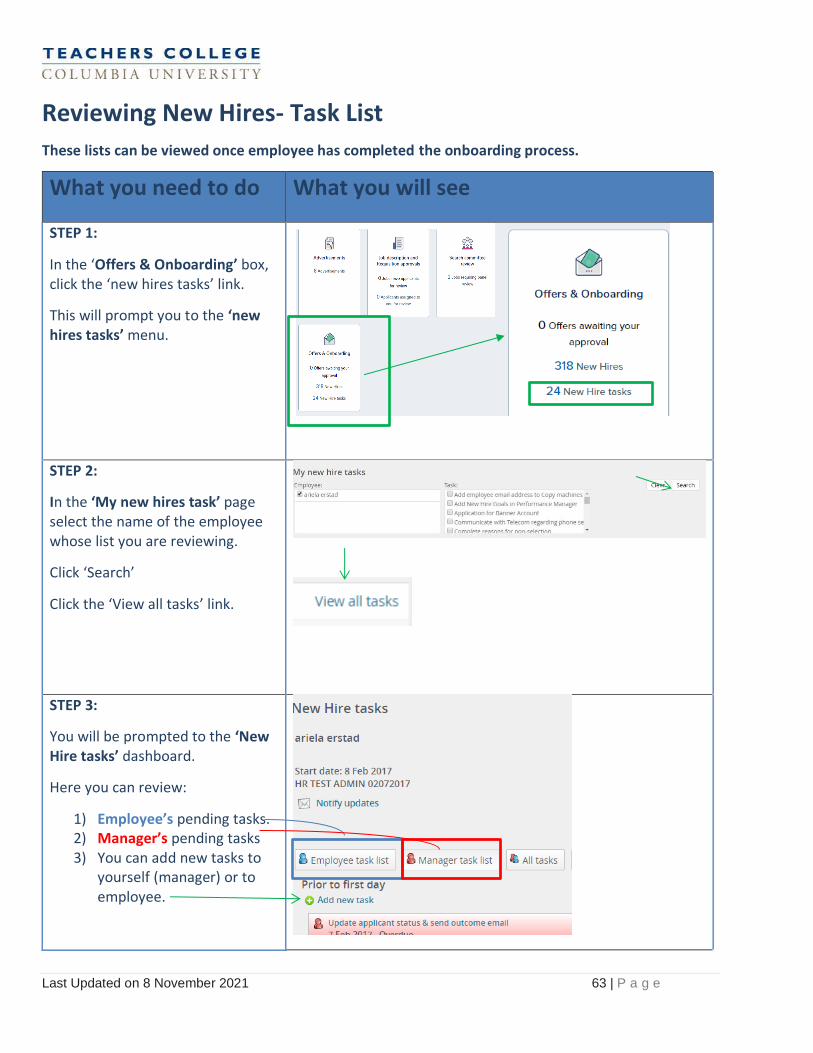
STEP 1:
In the ‘Offers & Onboarding’ box, click the ‘new hires tasks’ link.
This will prompt you to the ‘new hires tasks’ menu.
STEP 2:
In the ‘My new hires task’ page select the name of the employee whose list you are reviewing.
Click ‘Search’
Click the ‘View all tasks’ link.
STEP 3:
You will be prompted to the ‘New Hire tasks’ dashboard.
Here you can review:
1) Employee’s pending tasks. 2) Manager’s pending tasks 3) You can add new tasks to
yourself (manager) or to employee.
Last Updated on 8 November 2021 64 | P a g e
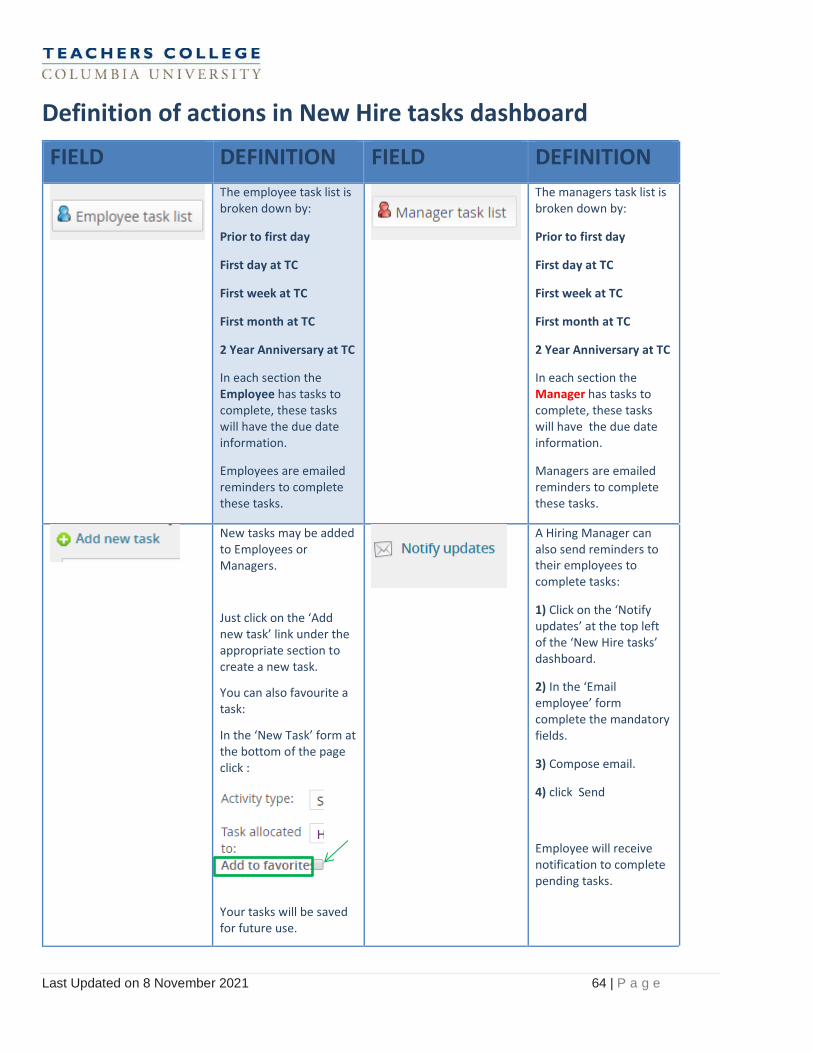
Definition of actions in New Hire tasks dashboard
FIELD DEFINITION FIELD DEFINITION
The employee task list is broken down by:
Prior to first day
First day at TC
First week at TC
First month at TC
2 Year Anniversary at TC
In each section the Employee has tasks to complete, these tasks will have the due date information.
Employees are emailed reminders to complete these tasks.
The managers task list is broken down by:
Prior to first day
First day at TC
First week at TC
First month at TC
2 Year Anniversary at TC
In each section the Manager has tasks to complete, these tasks will have the due date information.
Managers are emailed reminders to complete these tasks.
New tasks may be added to Employees or Managers.
Just click on the ‘Add new task’ link under the appropriate section to create a new task.
You can also favourite a task:
In the ‘New Task’ form at the bottom of the page click :
Your tasks will be saved for future use.
A Hiring Manager can also send reminders to their employees to complete tasks:
1) Click on the ‘Notify updates’ at the top left of the ‘New Hire tasks’ dashboard.
2) In the ‘Email employee’ form complete the mandatory fields.
3) Compose email.
4) click Send
Employee will receive notification to complete pending tasks.
Last Updated on 8 November 2021 65 | P a g e
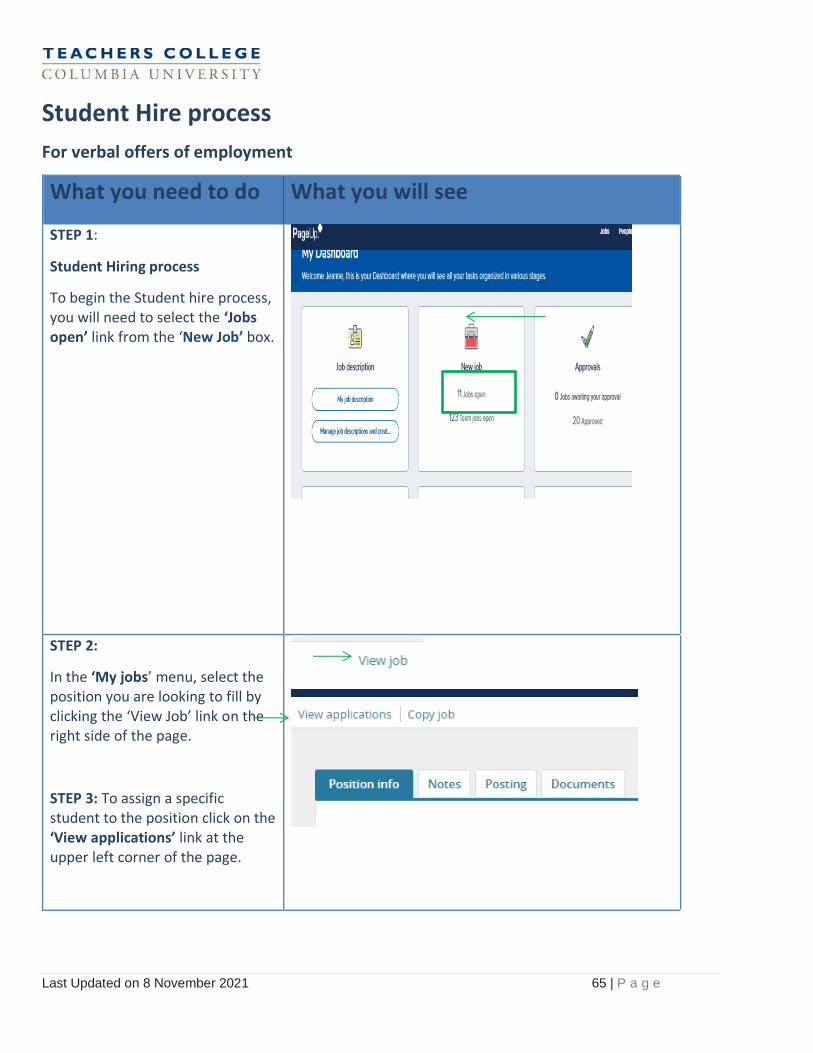
Student Hire process
For verbal offers of employment
What you need to do What you will see
STEP 1:
Student Hiring process
To begin the Student hire process, you will need to select the ‘Jobs open’ link from the ‘New Job’ box.
STEP 2:
In the ‘My jobs’ menu, select the position you are looking to fill by clicking the ‘View Job’ link on the right side of the page.
STEP 3: To assign a specific student to the position click on the ‘View applications’ link at the upper left corner of the page.

Last Updated on 8 November 2021 66 | P a g e
Student Hire process
For verbally hired student
What you need to do What you will see
STEP 4:
You will be prompted to a menu of applicants for this position.
If the applicant is not on the list and you would like to extend an invitation, do the following:
1) Click ‘New applicant’ at top left corner.
2) Complete mandatory fields in the ‘New applicant’ card.
3) To disclose the application select Yes from the drop down menu.
4) Click ‘Save’
STEP 5:
You will be prompted to the ‘Offer details’ card.
Complete all mandatory fields- add or merge student documents as required.
Please follow instructions to completing the ‘Offer details’ card in pages 26-29.
Last Updated on 8 November 2021 67 | P a g e
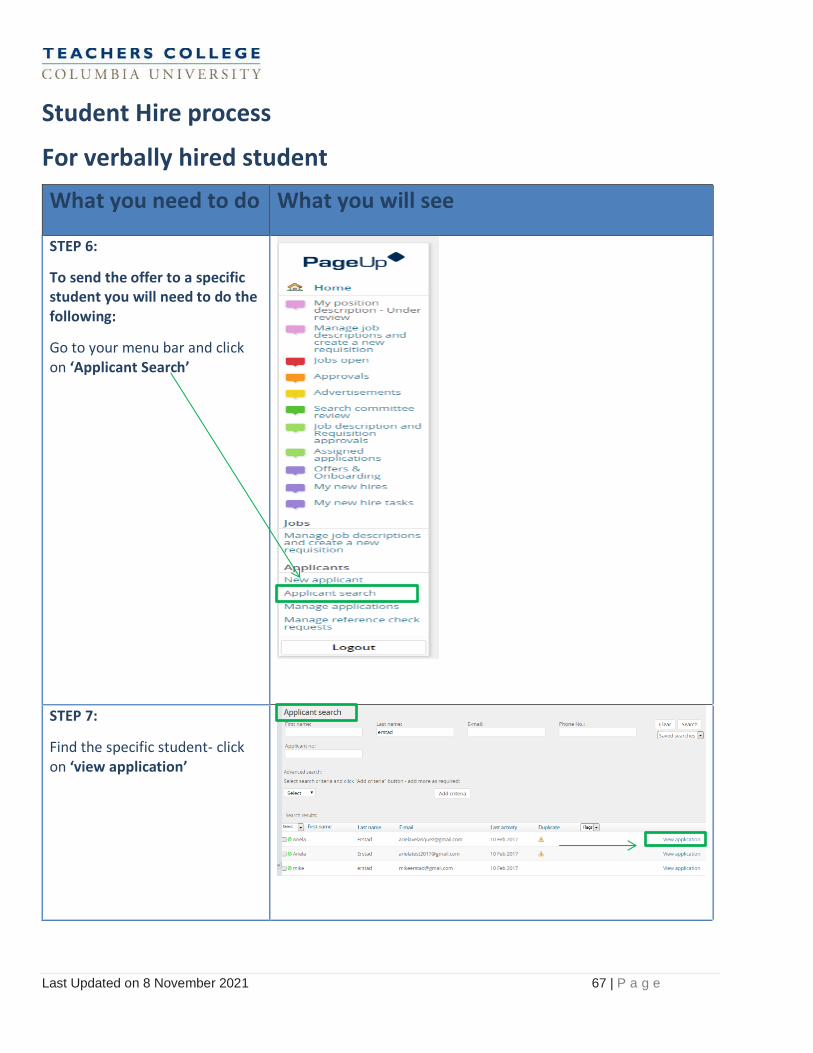
Student Hire process
For verbally hired student
What you need to do What you will see
STEP 6:
To send the offer to a specific student you will need to do the following:
Go to your menu bar and click on ‘Applicant Search’
STEP 7:
Find the specific student- click on ‘view application’
Last Updated on 8 November 2021 68 | P a g e
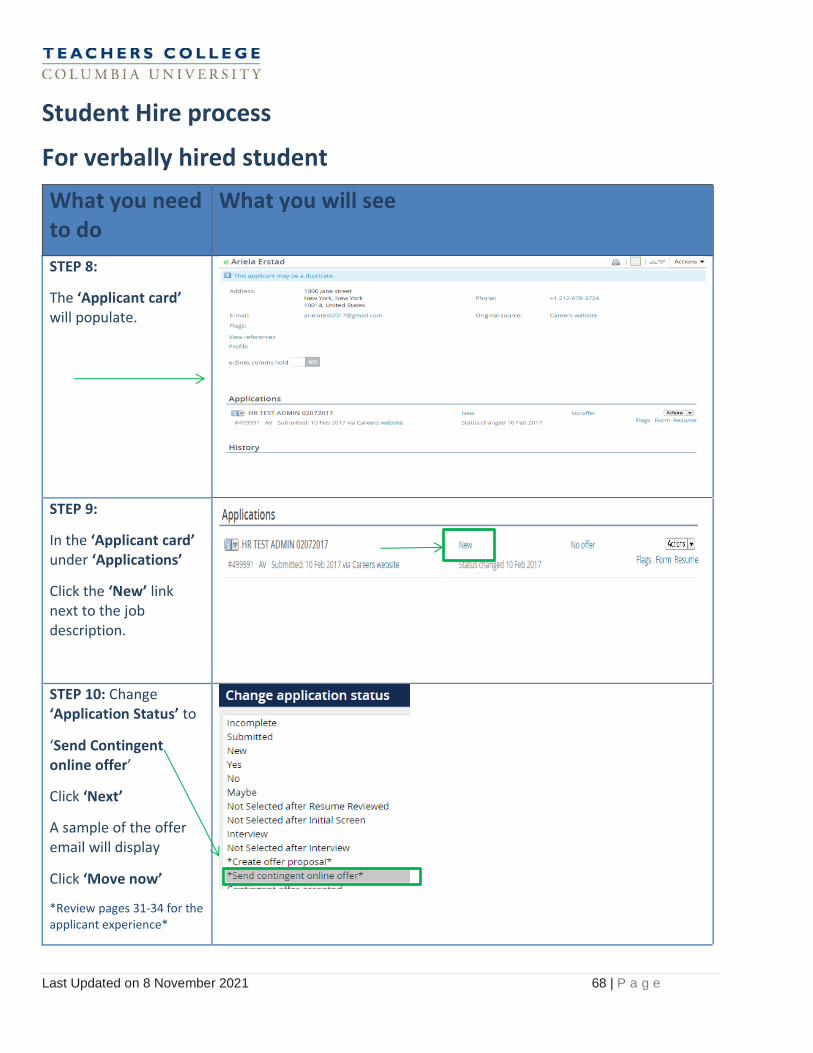
Student Hire process
For verbally hired student
What you need to do
What you will see
STEP 8:
The ‘Applicant card’ will populate.
STEP 9:
In the ‘Applicant card’ under ‘Applications’
Click the ‘New’ link next to the job description.
STEP 10: Change ‘Application Status’ to
‘Send Contingent online offer’
Click ‘Next’
A sample of the offer email will display
Click ‘Move now’
*Review pages 31-34 for the applicant experience*
Last Updated on 8 November 2021 69 | P a g e
Making an offer- Faculty
To make an offer from ‘Applicant Card’ follow next steps
What you need to do
What you will see
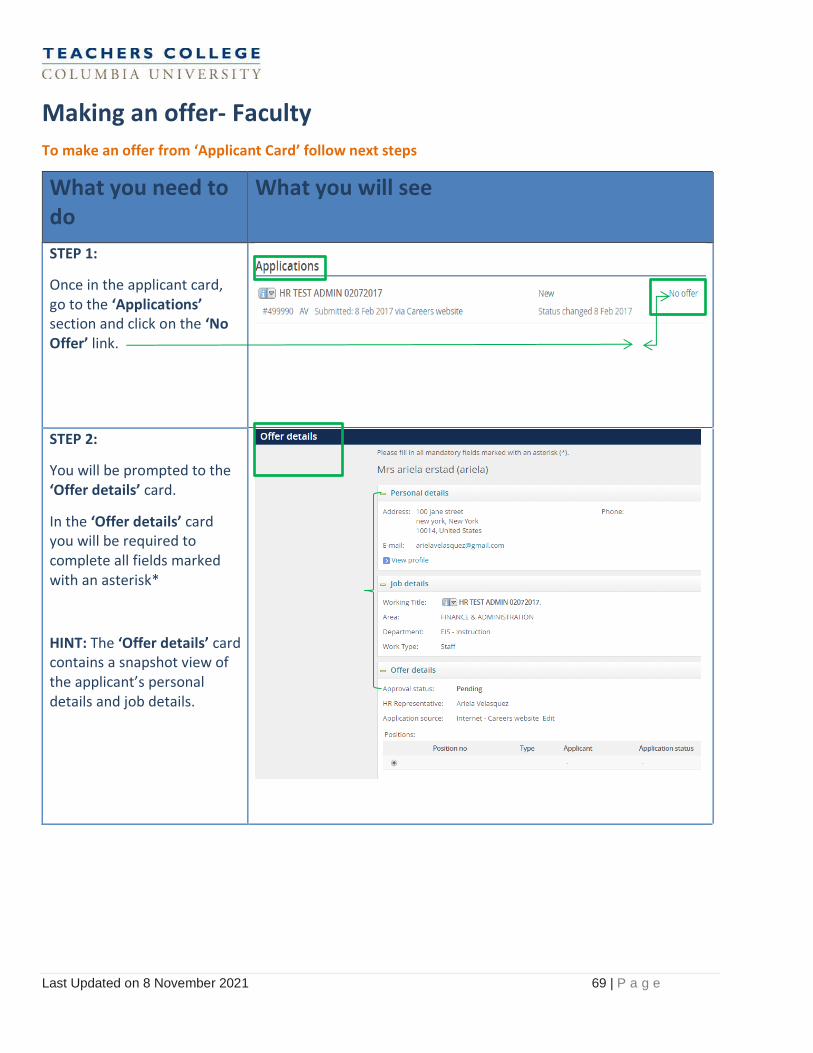
STEP 1:
Once in the applicant card, go to the ‘Applications’ section and click on the ‘No Offer’ link.
STEP 2:
You will be prompted to the ‘Offer details’ card.
In the ‘Offer details’ card you will be required to complete all fields marked with an asterisk*
HINT: The ‘Offer details’ card contains a snapshot view of the applicant’s personal details and job details.

Last Updated on 8 November 2021 70 | P a g e
Making an offer- Faculty
To make an offer from ‘Applicant Card’ follow next steps
What you need to do
What you will see
STEP 3:
For Academic Appointments, complete the ‘Academic Appointment Details’ section
*All fields in this section must be completed.
STEP 4:
Select a ‘Term’ from the drop down menu
Last Updated on 8 November 2021 71 | P a g e
Making an offer- Faculty
To make an offer from ‘Applicant Card’ follow next steps
What you need to do
What you will see
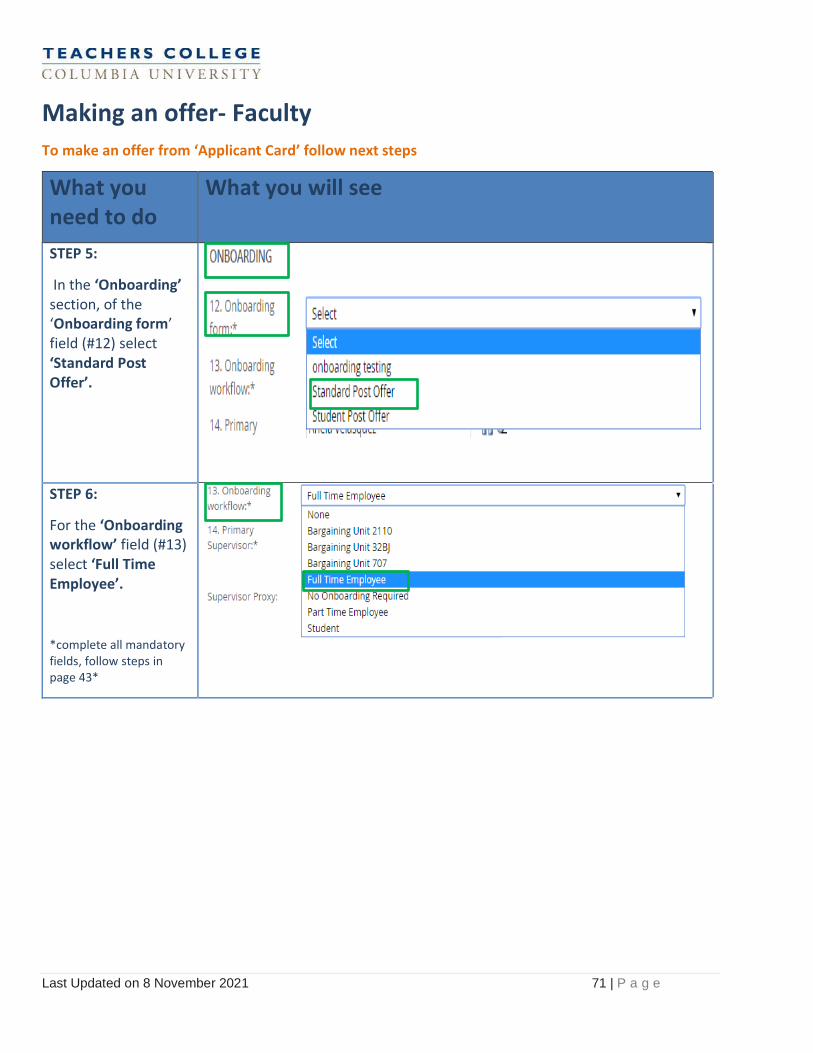
STEP 5:
In the ‘Onboarding’ section, of the ‘Onboarding form’ field (#12) select ‘Standard Post Offer’.
STEP 6:
For the ‘Onboarding workflow’ field (#13) select ‘Full Time Employee’.
*complete all mandatory fields, follow steps in page 43*
Last Updated on 8 November 2021 72 | P a g e
Making an offer- Faculty ( Merge Documents)
To make an offer from ‘Applicant Card’ follow next steps
What you need to do
What you will see
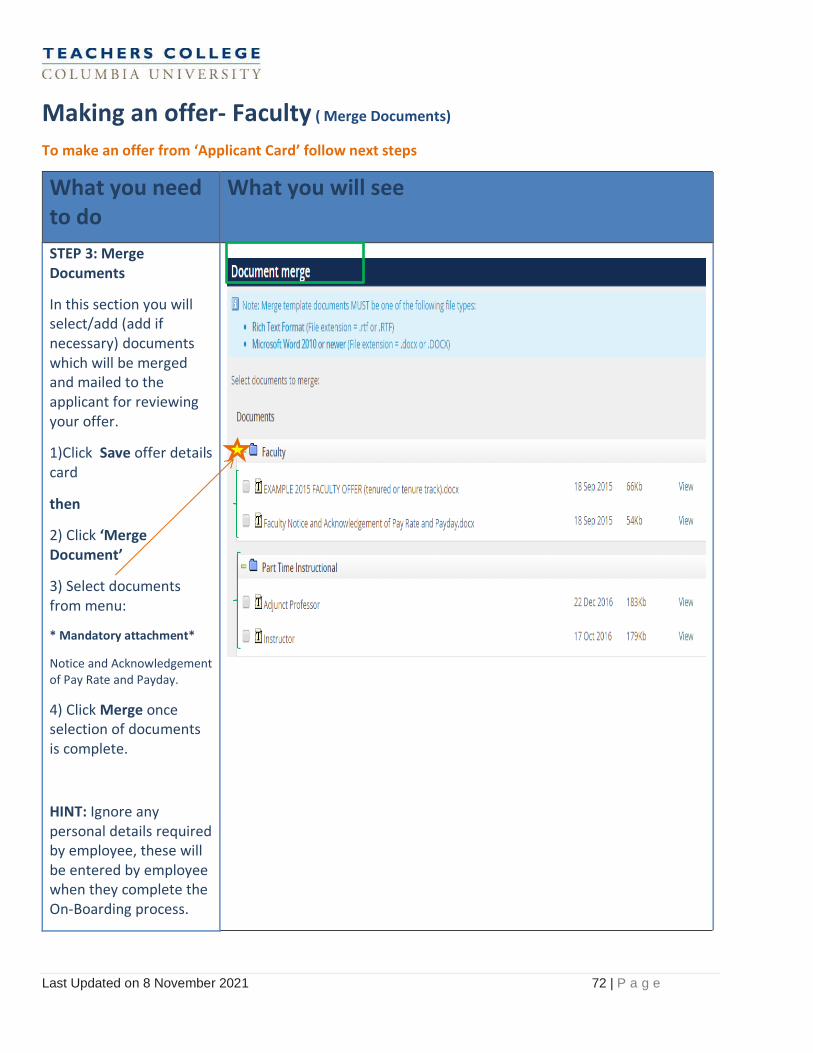
STEP 3: Merge Documents
In this section you will select/add (add if necessary) documents which will be merged and mailed to the applicant for reviewing your offer.
1)Click Save offer details card
then
2) Click ‘Merge Document’
3) Select documents from menu:
* Mandatory attachment*
Notice and Acknowledgement of Pay Rate and Payday.
4) Click Merge once selection of documents is complete.
HINT: Ignore any personal details required by employee, these will be entered by employee when they complete the On-Boarding process.
Last Updated on 8 November 2021 73 | P a g e
Making an offer- Faculty (Selecting Approval Process)
To make an offer from ‘Applicant Card’ follow next steps
What you need to do What you will see
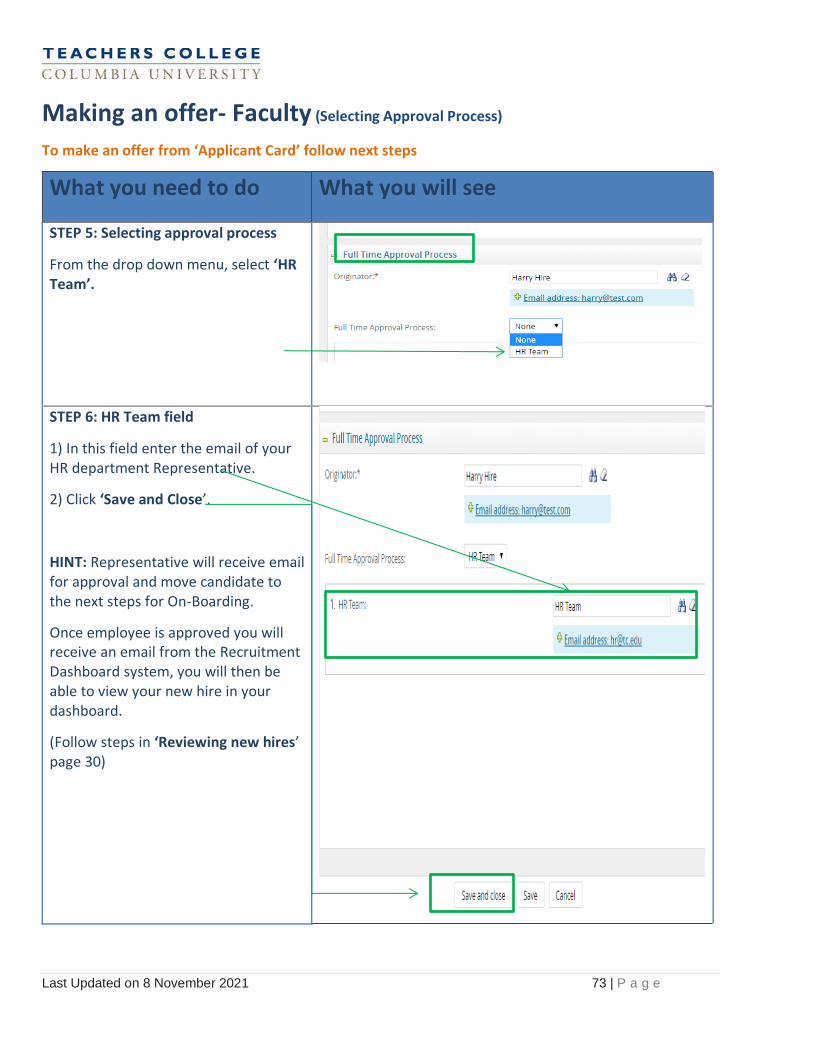
STEP 5: Selecting approval process
From the drop down menu, select ‘HR Team’.
STEP 6: HR Team field
1) In this field enter the email of your HR department Representative.
2) Click ‘Save and Close’.
HINT: Representative will receive email for approval and move candidate to the next steps for On-Boarding.
Once employee is approved you will receive an email from the Recruitment Dashboard system, you will then be able to view your new hire in your dashboard.
(Follow steps in ‘Reviewing new hires’ page 30)
Last Updated on 8 November 2021 74 | P a g e
Managing job overviews
Helpful Hints
Helpful hint What you will see
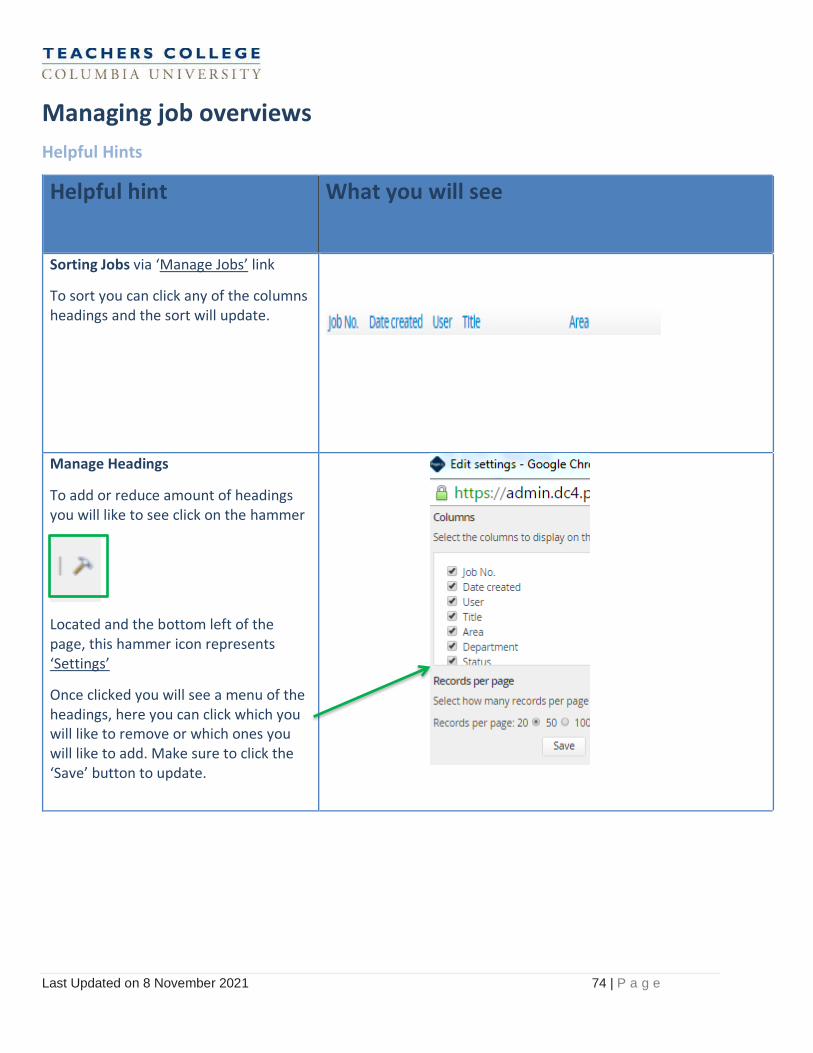
Sorting Jobs via ‘Manage Jobs’ link
To sort you can click any of the columns headings and the sort will update.
Manage Headings
To add or reduce amount of headings you will like to see click on the hammer
Located and the bottom left of the page, this hammer icon represents ‘Settings’
Once clicked you will see a menu of the headings, here you can click which you will like to remove or which ones you will like to add. Make sure to click the ‘Save’ button to update.
Last Updated on 8 November 2021 75 | P a g e
Bulk update to jobs
What you need to do What you will see
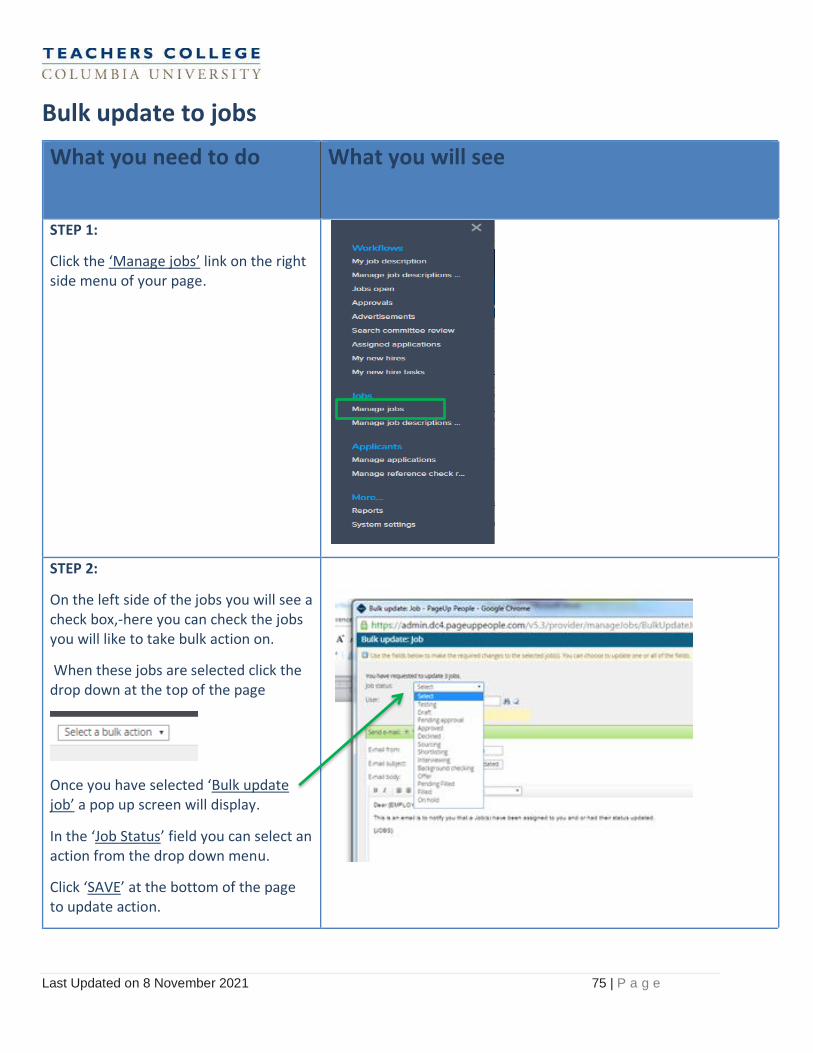
STEP 1:
Click the ‘Manage jobs’ link on the right side menu of your page.
STEP 2:
On the left side of the jobs you will see a check box,-here you can check the jobs you will like to take bulk action on.
When these jobs are selected click the drop down at the top of the page
Once you have selected ‘Bulk update job’ a pop up screen will display.
In the ‘Job Status’ field you can select an action from the drop down menu.
Click ‘SAVE’ at the bottom of the page to update action.

Last Updated on 8 November 2021 76 | P a g e
Managing applications
Search by job, applicants name or application status
What you need to do What you will see
STEP 1:
Click on the ‘Manage applications’ link on the right side menu.
Here you can search for applicants using a specific job.
*Contingent on permissions*
STEP 2:
You can search for a specific job, name or application status by clicking the ‘Search’ tab on the left side of the page.
A page will display with fields to specify the search
To search by job click the binocular icon
Once you have filled in the fields of your choice, hit the ‘Search’ button at the bottom of the page.
Last Updated on 8 November 2021 77 | P a g e
Managing applications Search by answers to questions
What you need to do What you will see
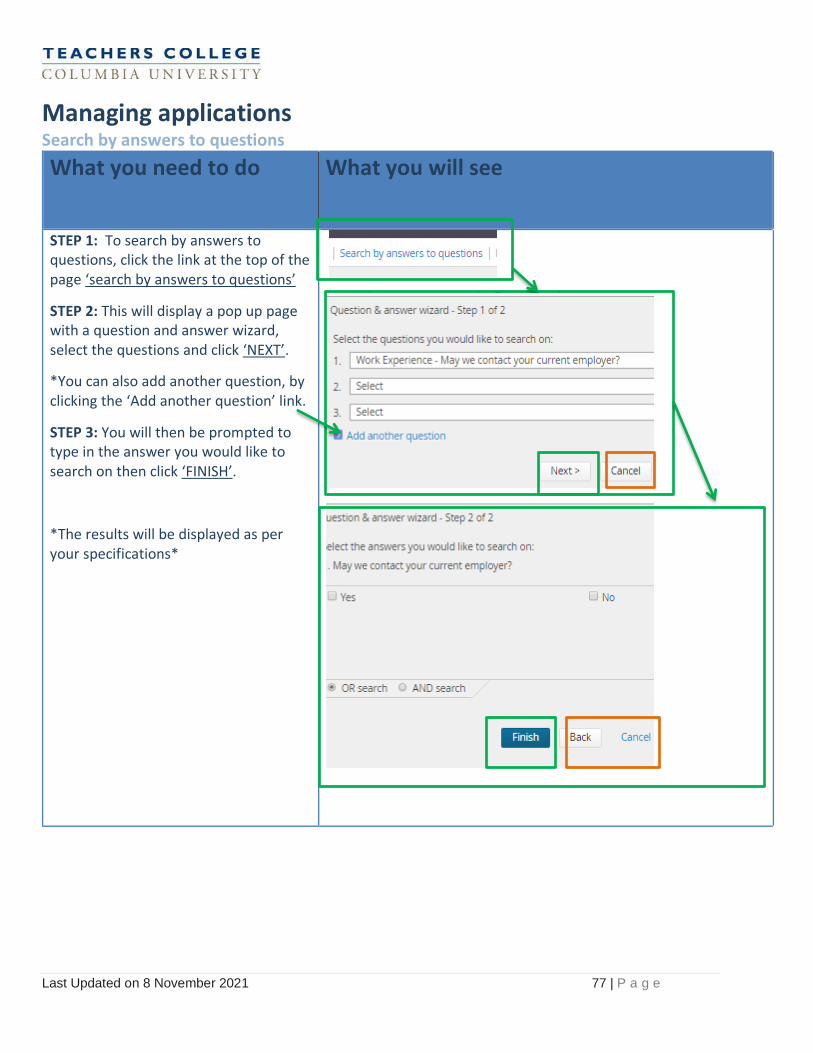
STEP 1: To search by answers to questions, click the link at the top of the page ‘search by answers to questions’
STEP 2: This will display a pop up page with a question and answer wizard, select the questions and click ‘NEXT’.
*You can also add another question, by clicking the ‘Add another question’ link.
STEP 3: You will then be prompted to type in the answer you would like to search on then click ‘FINISH’.
*The results will be displayed as per your specifications*
Last Updated on 8 November 2021 78 | P a g e
Managing applications Viewing Resume and Answers
What you need to do What you will see
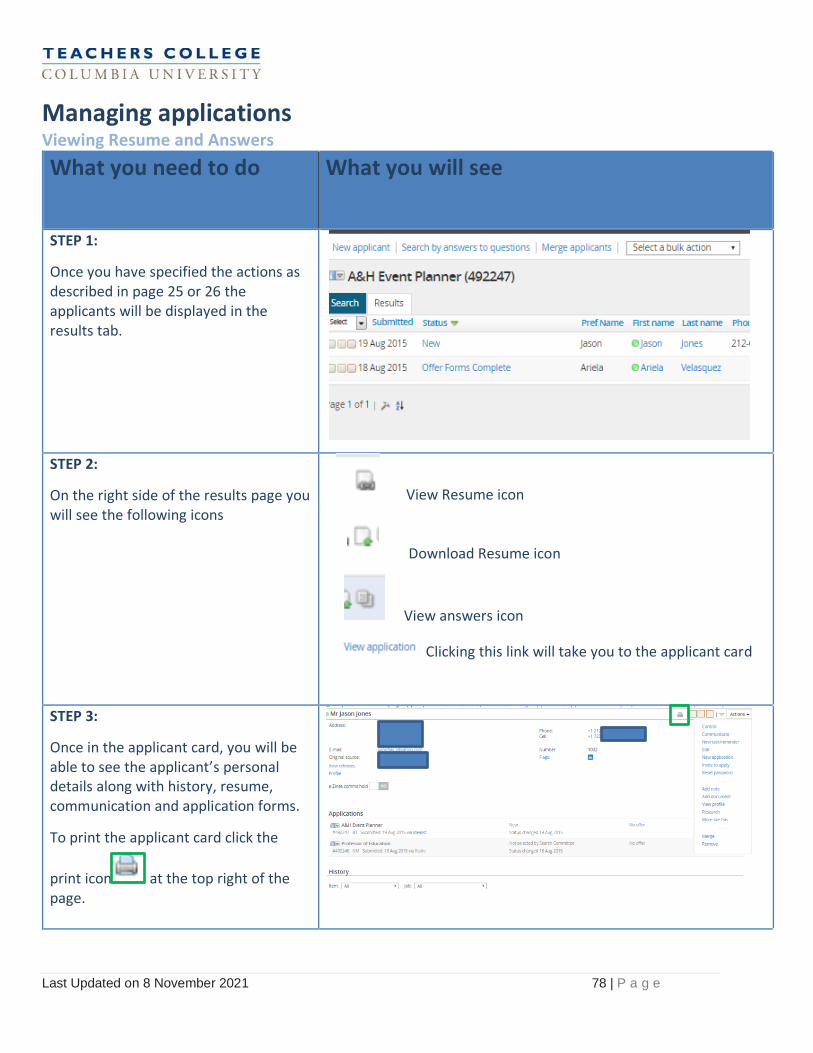
STEP 1:
Once you have specified the actions as described in page 25 or 26 the applicants will be displayed in the results tab.
STEP 2:
On the right side of the results page you will see the following icons
View Resume icon
Download Resume icon
View answers icon
Clicking this link will take you to the applicant card
STEP 3:
Once in the applicant card, you will be able to see the applicant’s personal details along with history, resume, communication and application forms.
To print the applicant card click the
print icon at the top right of the page.
Last Updated on 8 November 2021 79 | P a g e
Managing applications Flags and Applicant actions
What you need to do What you will see
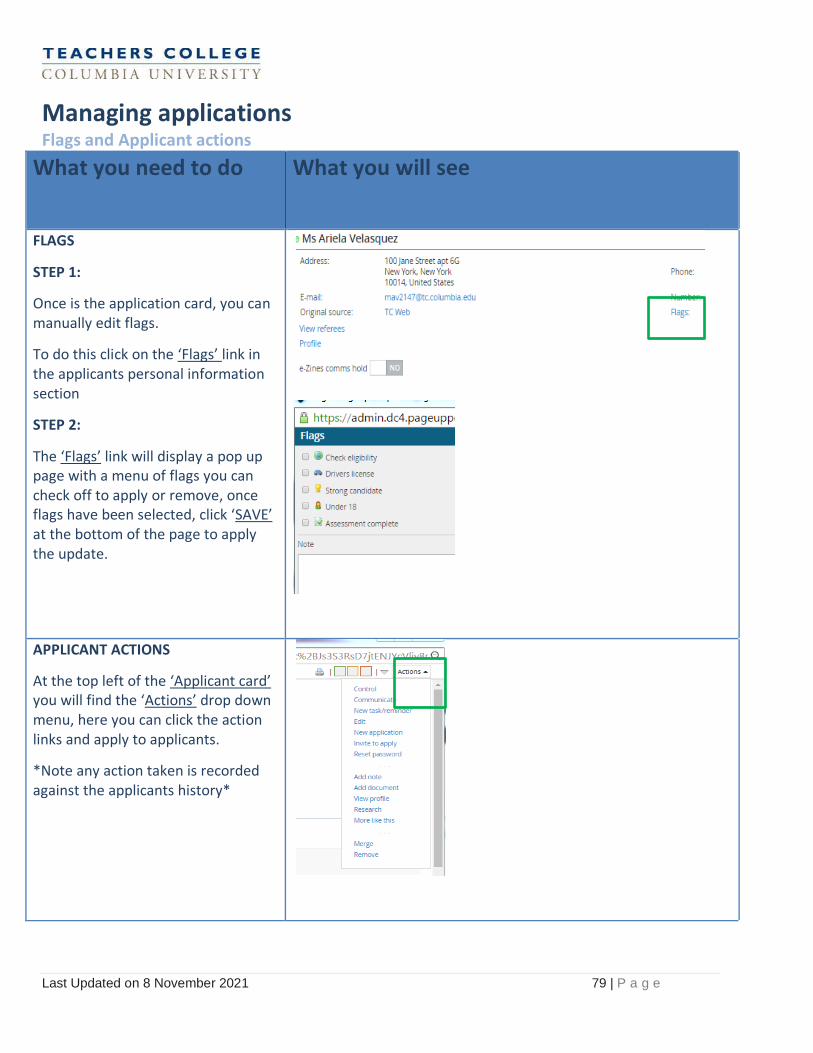
FLAGS
STEP 1:
Once is the application card, you can manually edit flags.
To do this click on the ‘Flags’ link in the applicants personal information section
STEP 2:
The ‘Flags’ link will display a pop up page with a menu of flags you can check off to apply or remove, once flags have been selected, click ‘SAVE’ at the bottom of the page to apply the update.
APPLICANT ACTIONS
At the top left of the ‘Applicant card’ you will find the ‘Actions’ drop down menu, here you can click the action links and apply to applicants.
*Note any action taken is recorded against the applicants history*
Last Updated on 8 November 2021 80 | P a g e
Managing Applications – Attaching New Documents to Applicant Cards
*Contingent on permissions and team settings*
What you need to do What you will see
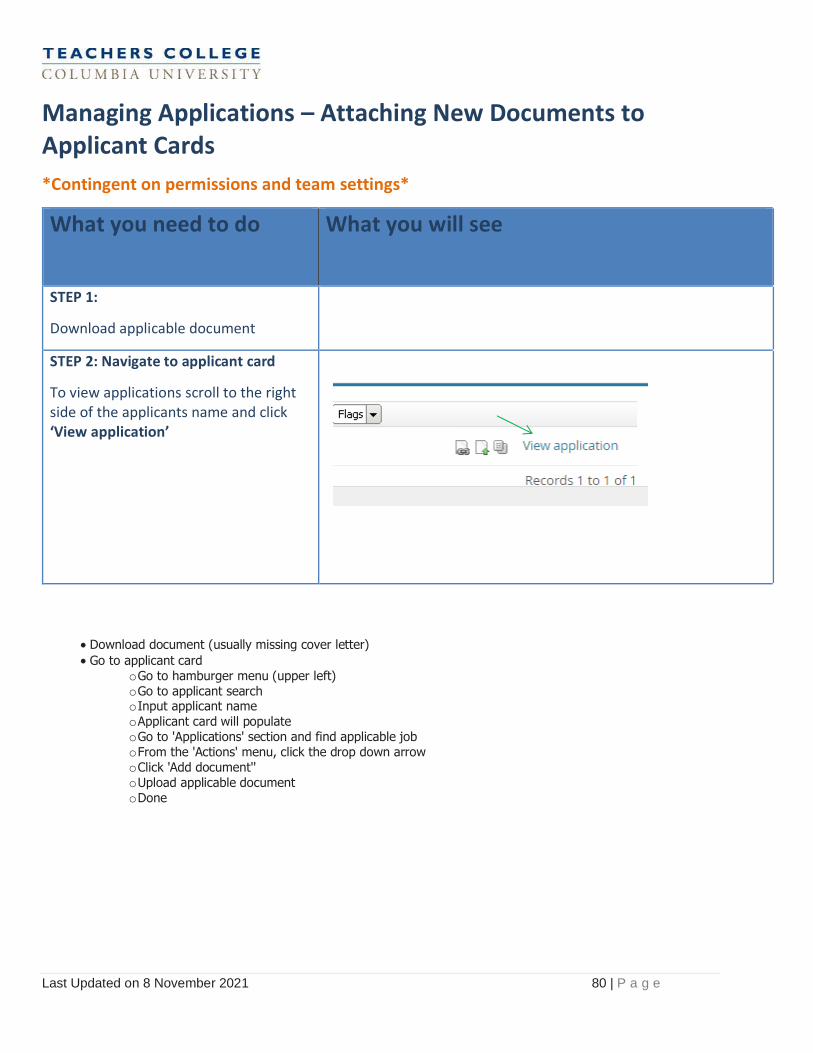
STEP 1:
Download applicable document
STEP 2: Navigate to applicant card
To view applications scroll to the right side of the applicants name and click ‘View application’
• Download document (usually missing cover letter)
• Go to applicant card
o Go to hamburger menu (upper left) o Go to applicant search
o Input applicant name
o Applicant card will populate
o Go to 'Applications' section and find applicable job
o From the 'Actions' menu, click the drop down arrow
o Click 'Add document'' o Upload applicable document o Done
Last Updated on 8 November 2021 81 | P a g e
Managing Applications
Changing application status
What you need to do What you will see
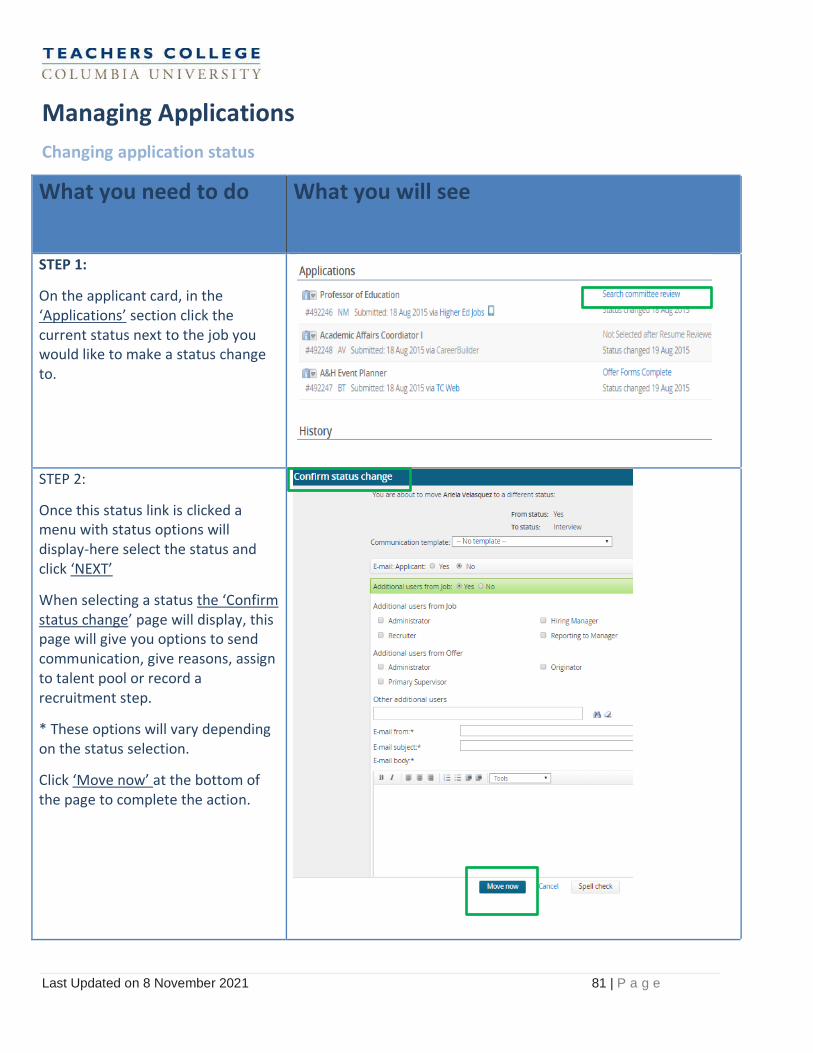
STEP 1:
On the applicant card, in the ‘Applications’ section click the current status next to the job you would like to make a status change to.
STEP 2:
Once this status link is clicked a menu with status options will display-here select the status and click ‘NEXT’
When selecting a status the ‘Confirm status change’ page will display, this page will give you options to send communication, give reasons, assign to talent pool or record a recruitment step.
* These options will vary depending on the status selection.
Click ‘Move now’ at the bottom of the page to complete the action.
Last Updated on 8 November 2021 82 | P a g e
Managing Applications
Viewing an applicant’s resume and application form
What you need to do What you will see
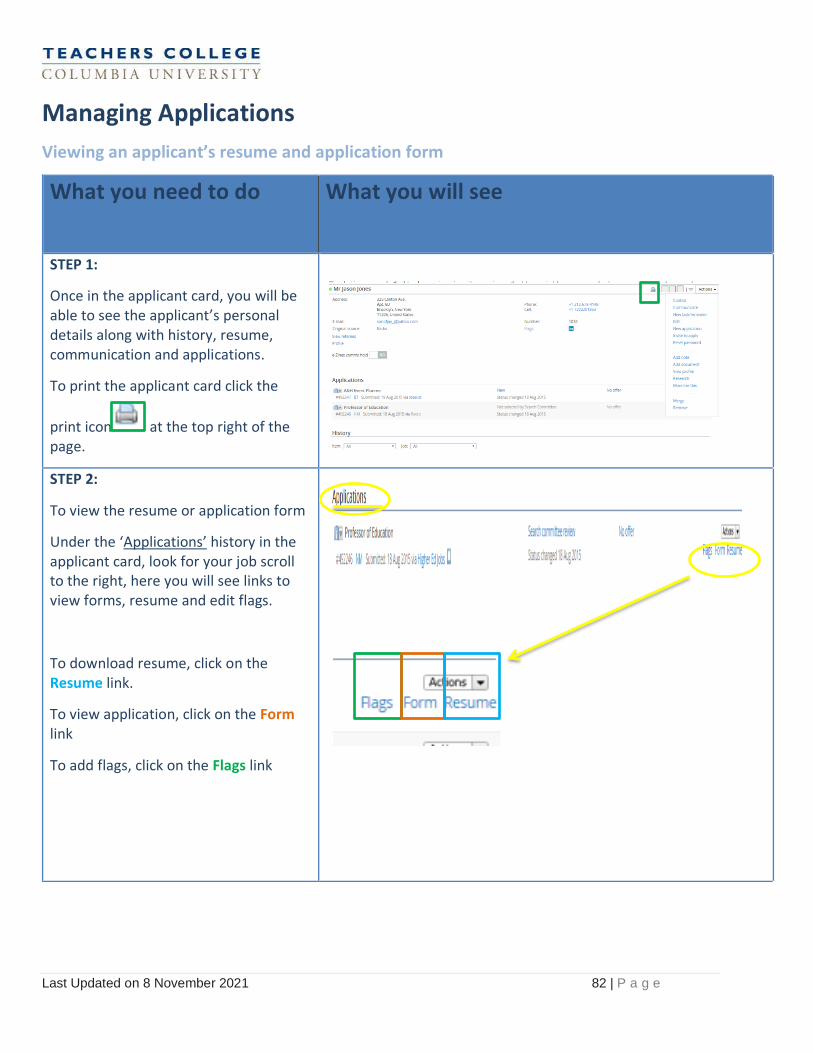
STEP 1:
Once in the applicant card, you will be able to see the applicant’s personal details along with history, resume, communication and applications.
To print the applicant card click the
print icon at the top right of the page.
STEP 2:
To view the resume or application form
Under the ‘Applications’ history in the applicant card, look for your job scroll to the right, here you will see links to view forms, resume and edit flags.
To download resume, click on the Resume link.
To view application, click on the Form link
To add flags, click on the Flags link
Last Updated on 8 November 2021 83 | P a g e
Managing Applications
Actions and Viewing History
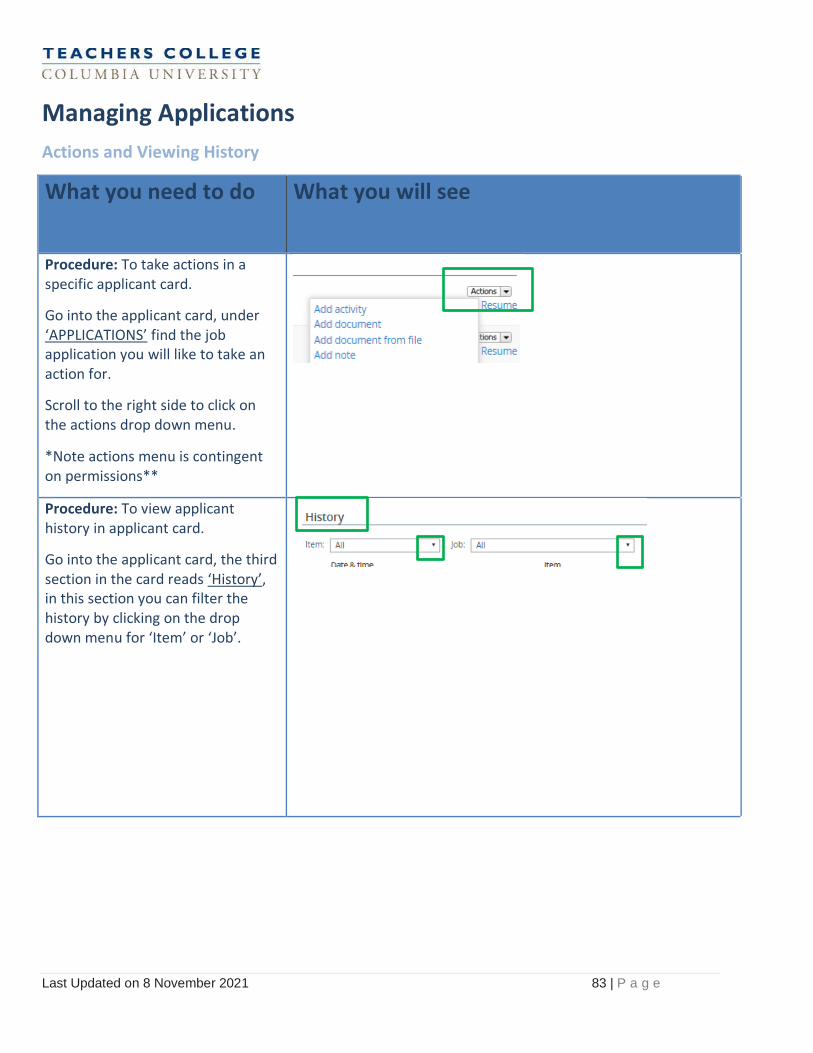
What you need to do What you will see
Procedure: To take actions in a specific applicant card.
Go into the applicant card, under ‘APPLICATIONS’ find the job application you will like to take an action for.
Scroll to the right side to click on the actions drop down menu.
*Note actions menu is contingent on permissions**
Procedure: To view applicant history in applicant card.
Go into the applicant card, the third section in the card reads ‘History’, in this section you can filter the history by clicking on the drop down menu for ‘Item’ or ‘Job’.
Last Updated on 8 November 2021 84 | P a g e
Managing Applications
Bulk actions overview
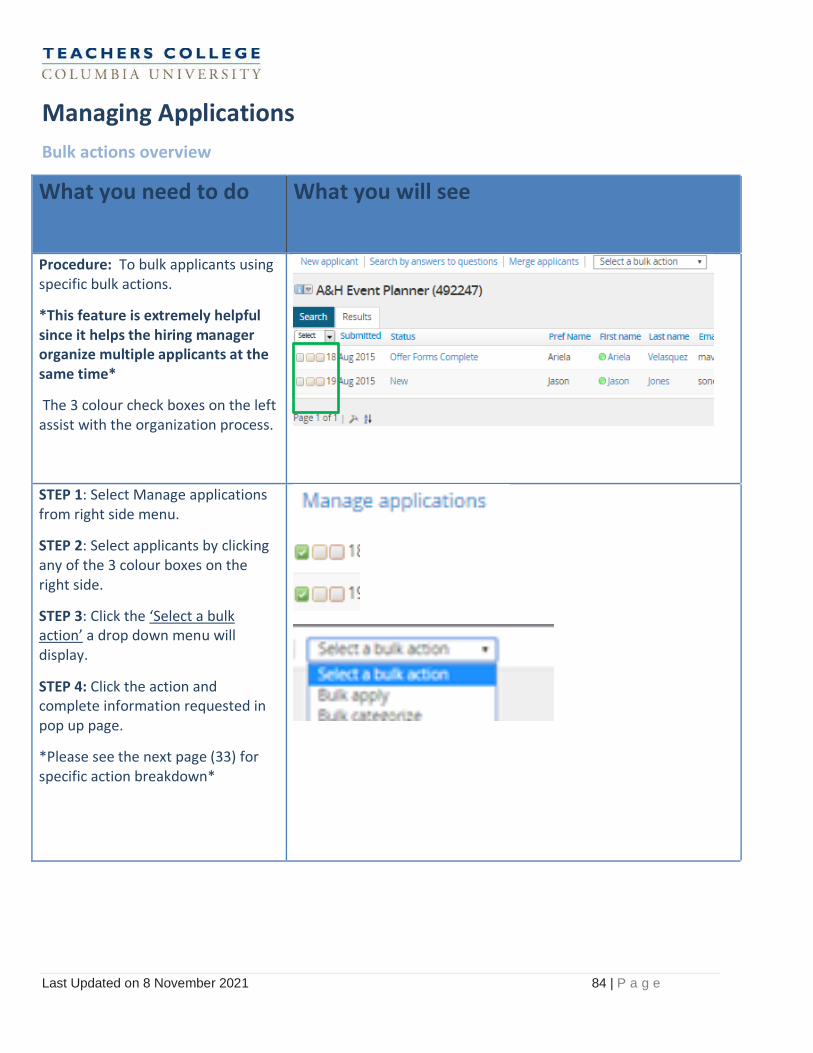
What you need to do What you will see
Procedure: To bulk applicants using specific bulk actions.
*This feature is extremely helpful since it helps the hiring manager organize multiple applicants at the same time*
The 3 colour check boxes on the left assist with the organization process.
STEP 1: Select Manage applications from right side menu.
STEP 2: Select applicants by clicking any of the 3 colour boxes on the right side.
STEP 3: Click the ‘Select a bulk action’ a drop down menu will display.
STEP 4: Click the action and complete information requested in pop up page.
*Please see the next page (33) for specific action breakdown*
Last Updated on 8 November 2021 85 | P a g e
Managing Applications
Bulk Apply and Bulk Categorize
What you need to do What you will see
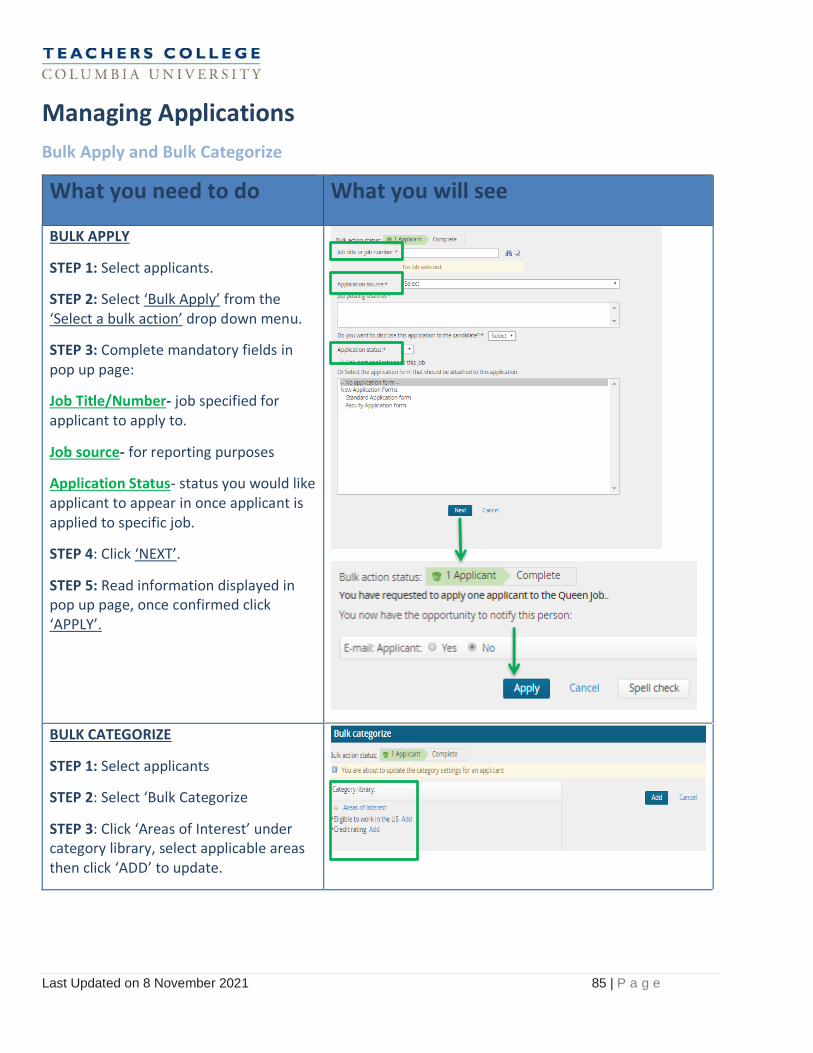
BULK APPLY
STEP 1: Select applicants.
STEP 2: Select ‘Bulk Apply’ from the ‘Select a bulk action’ drop down menu.
STEP 3: Complete mandatory fields in pop up page:
Job Title/Number- job specified for applicant to apply to.
Job source- for reporting purposes
Application Status- status you would like applicant to appear in once applicant is applied to specific job.
STEP 4: Click ‘NEXT’.
STEP 5: Read information displayed in pop up page, once confirmed click ‘APPLY’.
BULK CATEGORIZE
STEP 1: Select applicants
STEP 2: Select ‘Bulk Categorize
STEP 3: Click ‘Areas of Interest’ under category library, select applicable areas then click ‘ADD’ to update.
Last Updated on 8 November 2021 86 | P a g e
Managing Applications
Bulk Assign
What you need to do What you will see
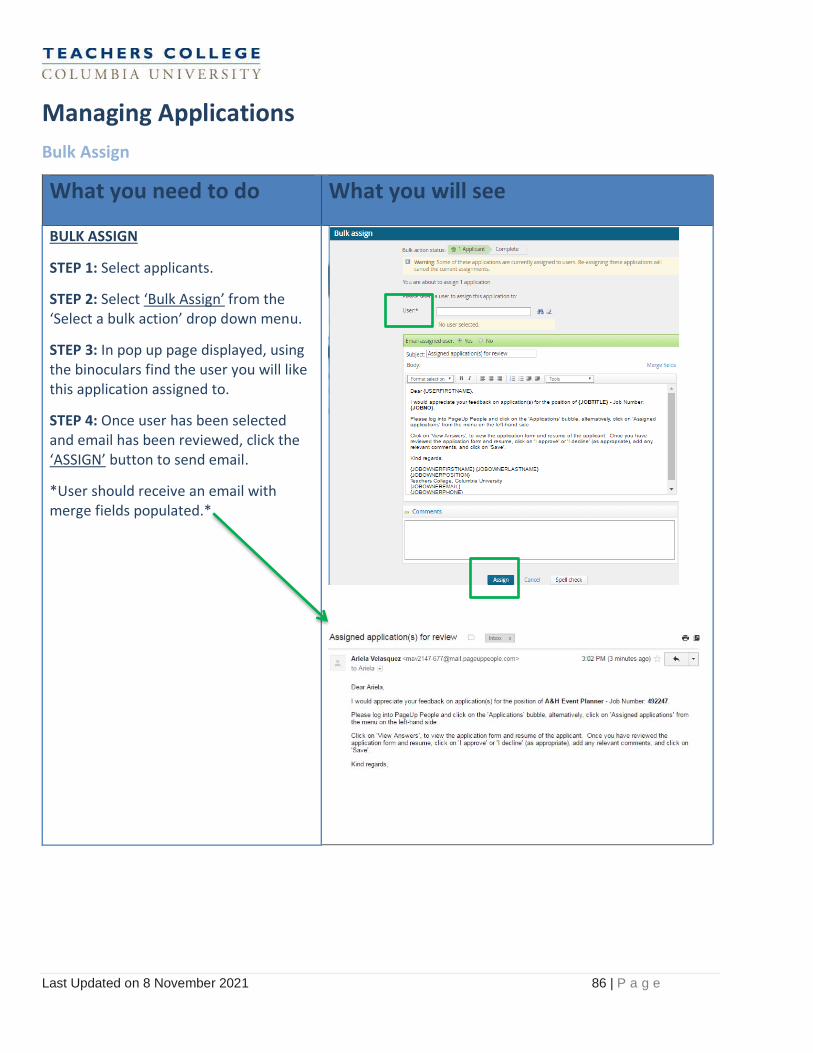
BULK ASSIGN
STEP 1: Select applicants.
STEP 2: Select ‘Bulk Assign’ from the ‘Select a bulk action’ drop down menu.
STEP 3: In pop up page displayed, using the binoculars find the user you will like this application assigned to.
STEP 4: Once user has been selected and email has been reviewed, click the ‘ASSIGN’ button to send email.
*User should receive an email with merge fields populated.*

Last Updated on 8 November 2021 87 | P a g e
Managing Applications
Bulk Communication
What you need to do What you will see
BULK COMMUNICATION
STEP 1: Select applicants.
STEP 2: Select ‘Bulk Communicate’ from the ‘Select a bulk action’ drop down menu.
STEP 3: Select a communication template from list, the preview of template will populate, click ‘NEXT’
STEP 4: Review email or make necessary updates.
At the bottom left corner you have an option to ‘Delay e-mail by’, select delay of your choice. Click ‘SEND’ to email communication to applicant.
Last Updated on 8 November 2021 88 | P a g e
Managing Applications
Bulk compile and send
What you need to do What you will see
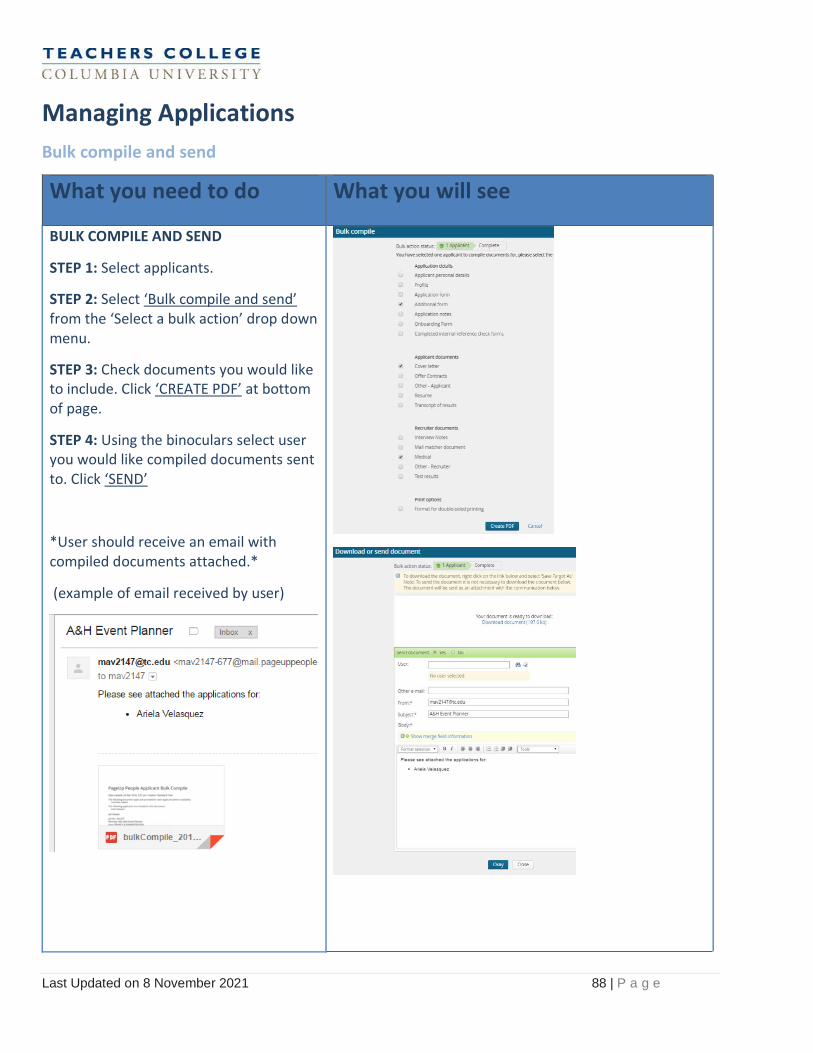
BULK COMPILE AND SEND
STEP 1: Select applicants.
STEP 2: Select ‘Bulk compile and send’ from the ‘Select a bulk action’ drop down menu.
STEP 3: Check documents you would like to include. Click ‘CREATE PDF’ at bottom of page.
STEP 4: Using the binoculars select user you would like compiled documents sent to. Click ‘SEND’
*User should receive an email with compiled documents attached.*
(example of email received by user)
Last Updated on 8 November 2021 89 | P a g e
Managing Applications
Bulk invite to apply/Bulk move
What you need to do What you will see
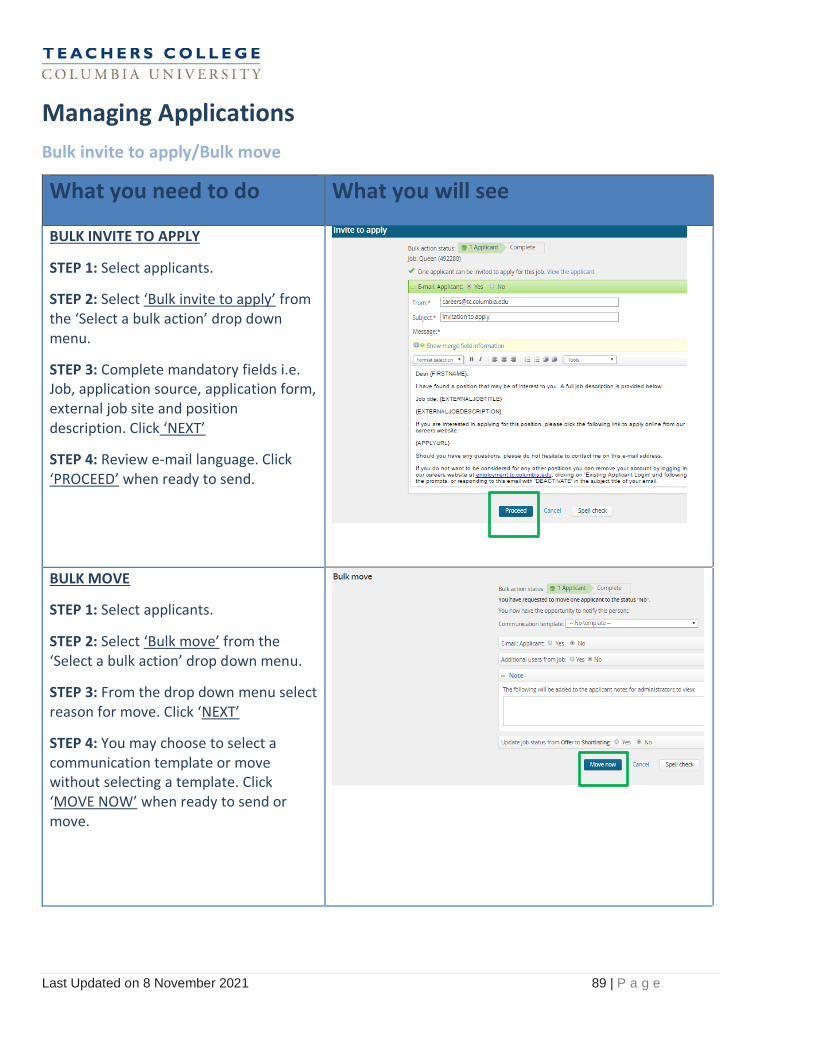
BULK INVITE TO APPLY
STEP 1: Select applicants.
STEP 2: Select ‘Bulk invite to apply’ from the ‘Select a bulk action’ drop down menu.
STEP 3: Complete mandatory fields i.e. Job, application source, application form, external job site and position description. Click ‘NEXT’
STEP 4: Review e-mail language. Click ‘PROCEED’ when ready to send.
BULK MOVE
STEP 1: Select applicants.
STEP 2: Select ‘Bulk move’ from the ‘Select a bulk action’ drop down menu.
STEP 3: From the drop down menu select reason for move. Click ‘NEXT’
STEP 4: You may choose to select a communication template or move without selecting a template. Click ‘MOVE NOW’ when ready to send or move.
Last Updated on 8 November 2021 90 | P a g e
Managing Applications
Bulk move and send
What you need to do What you will see
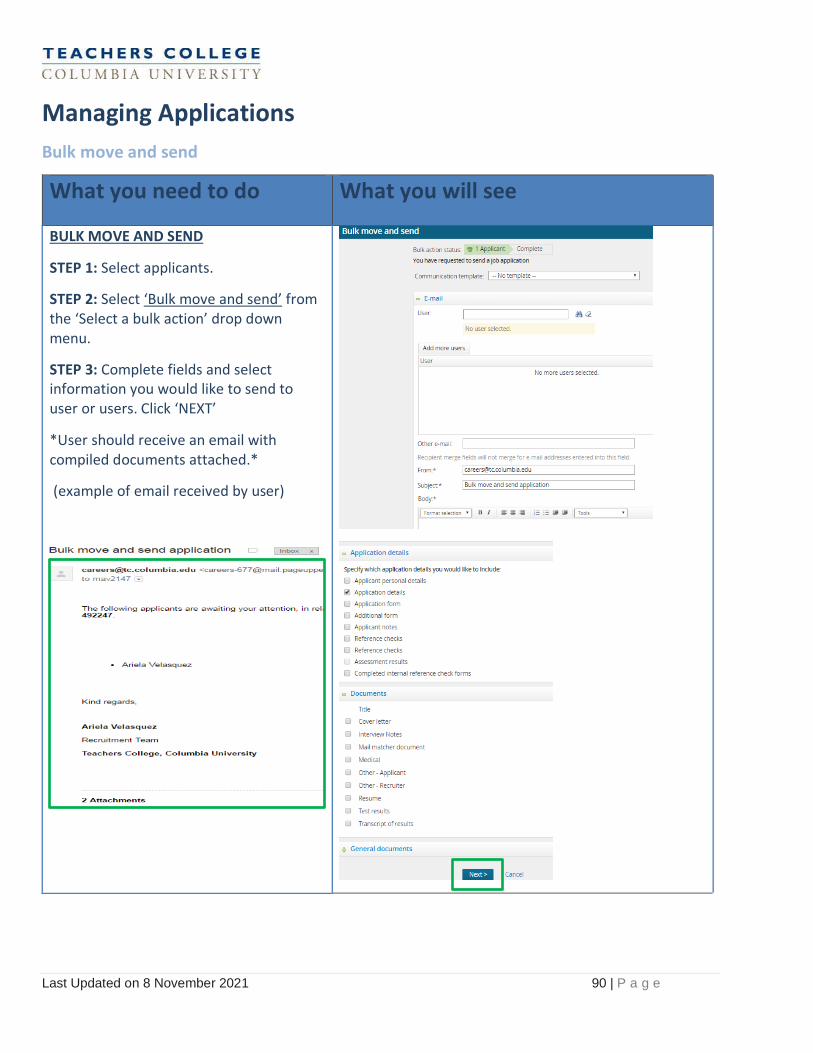
BULK MOVE AND SEND
STEP 1: Select applicants.
STEP 2: Select ‘Bulk move and send’ from the ‘Select a bulk action’ drop down menu.
STEP 3: Complete fields and select information you would like to send to user or users. Click ‘NEXT’
*User should receive an email with compiled documents attached.*
(example of email received by user)
Last Updated on 8 November 2021 91 | P a g e
Managing Applications
Bulk Task Reminder
What you need to do What you will see
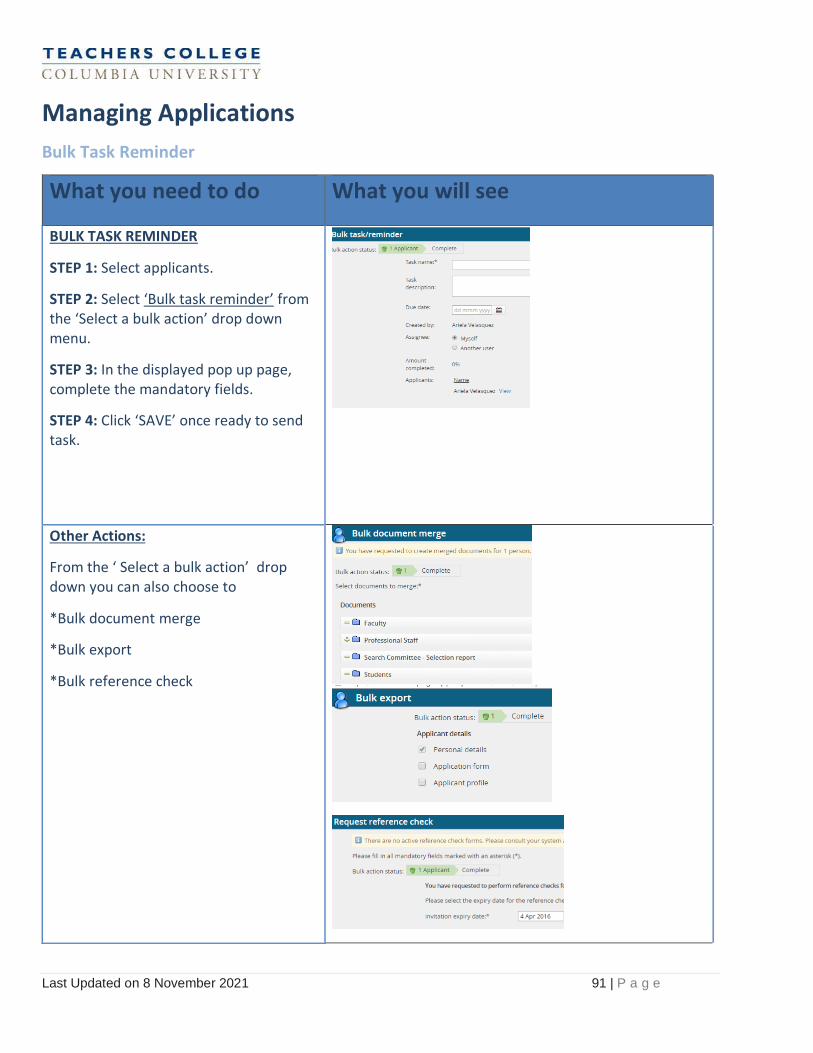
BULK TASK REMINDER
STEP 1: Select applicants.
STEP 2: Select ‘Bulk task reminder’ from the ‘Select a bulk action’ drop down menu.
STEP 3: In the displayed pop up page, complete the mandatory fields.
STEP 4: Click ‘SAVE’ once ready to send task.
Other Actions:
From the ‘ Select a bulk action’ drop down you can also choose to
*Bulk document merge
*Bulk export
*Bulk reference check
Last Updated on 8 November 2021 92 | P a g e
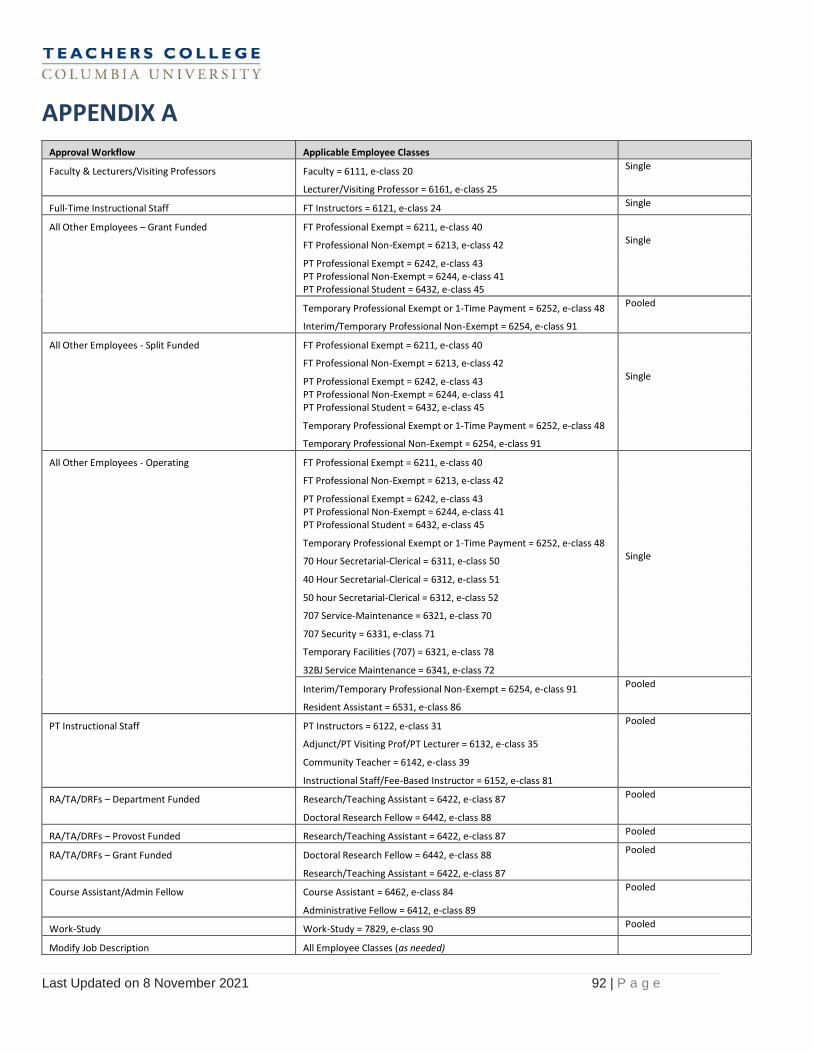
APPENDIX A
Approval Workflow Applicable Employee Classes
Faculty & Lecturers/Visiting Professors Faculty = 6111, e-class 20 Single
Lecturer/Visiting Professor = 6161, e-class 25
Full-Time Instructional Staff FT Instructors = 6121, e-class 24 Single
All Other Employees – Grant Funded FT Professional Exempt = 6211, e-class 40
FT Professional Non-Exempt = 6213, e-class 42 Single
PT Professional Exempt = 6242, e-class 43
PT Professional Non-Exempt = 6244, e-class 41 PT Professional Student = 6432, e-class 45
Temporary Professional Exempt or 1-Time Payment = 6252, e-class 48 Pooled
Interim/Temporary Professional Non-Exempt = 6254, e-class 91
All Other Employees - Split Funded FT Professional Exempt = 6211, e-class 40
FT Professional Non-Exempt = 6213, e-class 42
PT Professional Exempt = 6242, e-class 43 Single
PT Professional Non-Exempt = 6244, e-class 41 PT Professional Student = 6432, e-class 45
Temporary Professional Exempt or 1-Time Payment = 6252, e-class 48
Temporary Professional Non-Exempt = 6254, e-class 91
All Other Employees - Operating FT Professional Exempt = 6211, e-class 40
FT Professional Non-Exempt = 6213, e-class 42
PT Professional Exempt = 6242, e-class 43
PT Professional Non-Exempt = 6244, e-class 41 PT Professional Student = 6432, e-class 45
Temporary Professional Exempt or 1-Time Payment = 6252, e-class 48
70 Hour Secretarial-Clerical = 6311, e-class 50 Single
40 Hour Secretarial-Clerical = 6312, e-class 51
50 hour Secretarial-Clerical = 6312, e-class 52
707 Service-Maintenance = 6321, e-class 70
707 Security = 6331, e-class 71
Temporary Facilities (707) = 6321, e-class 78
32BJ Service Maintenance = 6341, e-class 72
Interim/Temporary Professional Non-Exempt = 6254, e-class 91 Pooled
Resident Assistant = 6531, e-class 86
PT Instructional Staff PT Instructors = 6122, e-class 31 Pooled
Adjunct/PT Visiting Prof/PT Lecturer = 6132, e-class 35
Community Teacher = 6142, e-class 39
Instructional Staff/Fee-Based Instructor = 6152, e-class 81
RA/TA/DRFs – Department Funded Research/Teaching Assistant = 6422, e-class 87 Pooled
Doctoral Research Fellow = 6442, e-class 88
RA/TA/DRFs – Provost Funded Research/Teaching Assistant = 6422, e-class 87 Pooled
RA/TA/DRFs – Grant Funded Doctoral Research Fellow = 6442, e-class 88 Pooled
Research/Teaching Assistant = 6422, e-class 87
Course Assistant/Admin Fellow Course Assistant = 6462, e-class 84 Pooled
Administrative Fellow = 6412, e-class 89
Work-Study Work-Study = 7829, e-class 90 Pooled
Modify Job Description All Employee Classes (as needed)
Last Updated on 8 November 2021 93 | P a g e
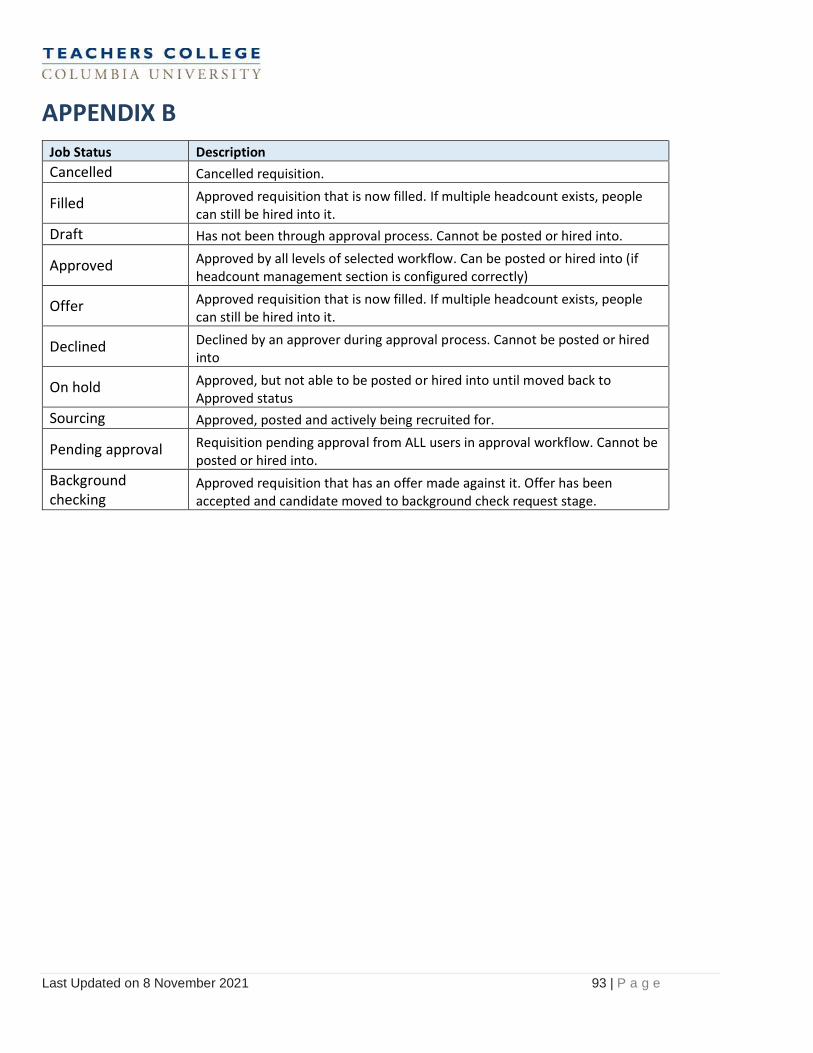
APPENDIX B
Job Status Description
Cancelled Cancelled requisition.
Filled Approved requisition that is now filled. If multiple headcount exists, people can still be hired into it.
Draft Has not been through approval process. Cannot be posted or hired into.
Approved Approved by all levels of selected workflow. Can be posted or hired into (if headcount management section is configured correctly)
Offer Approved requisition that is now filled. If multiple headcount exists, people can still be hired into it.
Declined Declined by an approver during approval process. Cannot be posted or hired into
On hold Approved, but not able to be posted or hired into until moved back to Approved status
Sourcing Approved, posted and actively being recruited for.
Pending approval Requisition pending approval from ALL users in approval workflow. Cannot be posted or hired into.
Background checking
Approved requisition that has an offer made against it. Offer has been accepted and candidate moved to background check request stage.
Last Updated on 8 November 2021 94 | P a g e
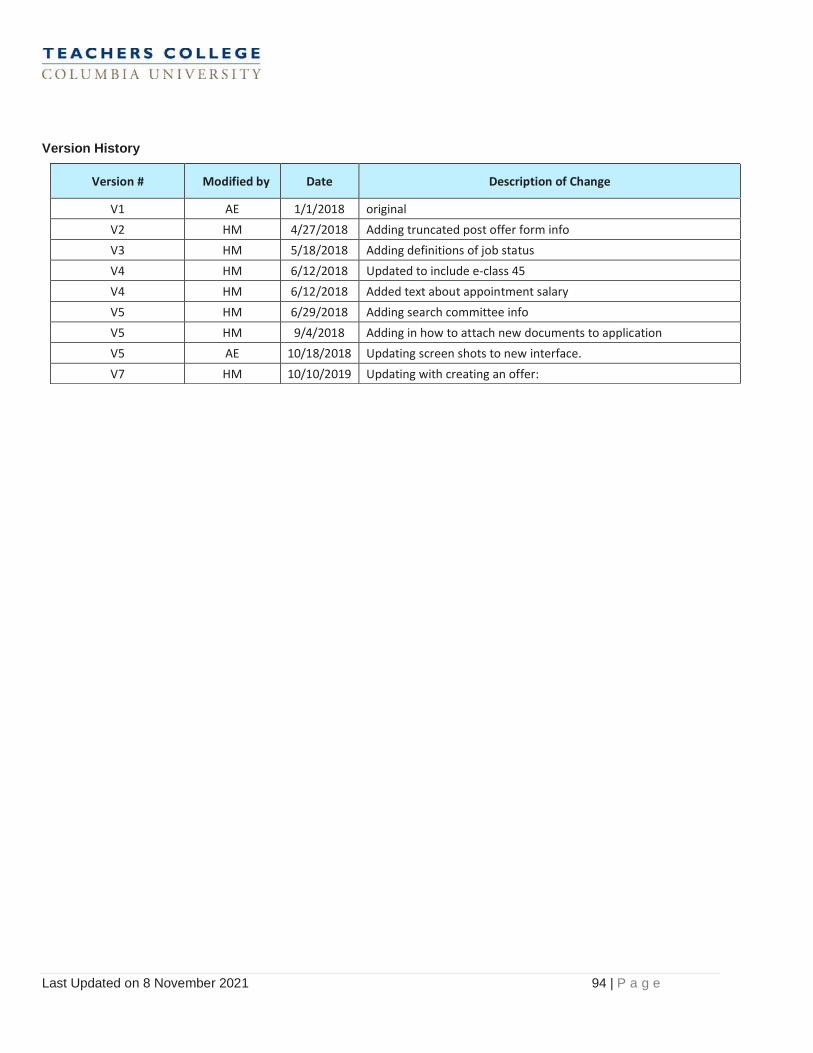
Version History
Version # Modified by Date Description of Change
V1 AE 1/1/2018 original
V2 HM 4/27/2018 Adding truncated post offer form info
V3 HM 5/18/2018 Adding definitions of job status
V4 HM 6/12/2018 Updated to include e-class 45
V4 HM 6/12/2018 Added text about appointment salary
V5 HM 6/29/2018 Adding search committee info
V5 HM 9/4/2018 Adding in how to attach new documents to application
V5 AE 10/18/2018 Updating screen shots to new interface.
V7 HM 10/10/2019 Updating with creating an offer: