Teacher Website Beginning - Dublin City Schools
8
Login onto http://admin.dublinschools.net Enter your username/password Username (first letter of your first name and last name) Ex: Trish Dempsey; username: tdempsey Click on your school: Next, click content management. After that, click on your name Your website is divided into three parts: Teacher Webpages Section 1: Touts or buttons that will help navigate to pages of interests. Right now teachers do have access to create touts. You will need to contact your TST . Section 2: In the editing part of the website this is window 1. Section 2: In the editing part of the website this is window 2.
Transcript of Teacher Website Beginning - Dublin City Schools
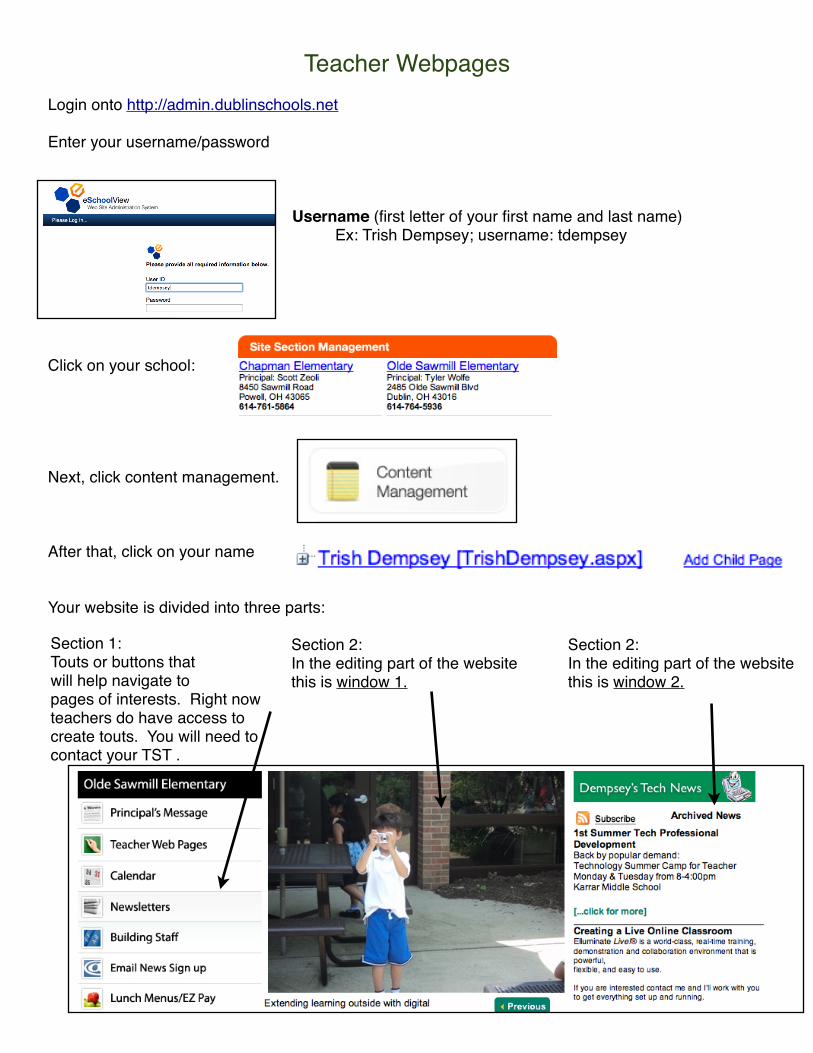
Login onto http://admin.dublinschools.net
Enter your username/password
Username (first letter of your first name and last name) ! Ex: Trish Dempsey; username: tdempsey
Click on your school:
Next, click content management.
After that, click on your name
Your website is divided into three parts:
Teacher Webpages
Section 1:Touts or buttons thatwill help navigate to pages of interests. Right now teachers do have access to create touts. You will need to contact your TST .
Section 2:In the editing part of the website this is window 1.
Section 2:In the editing part of the website this is window 2.
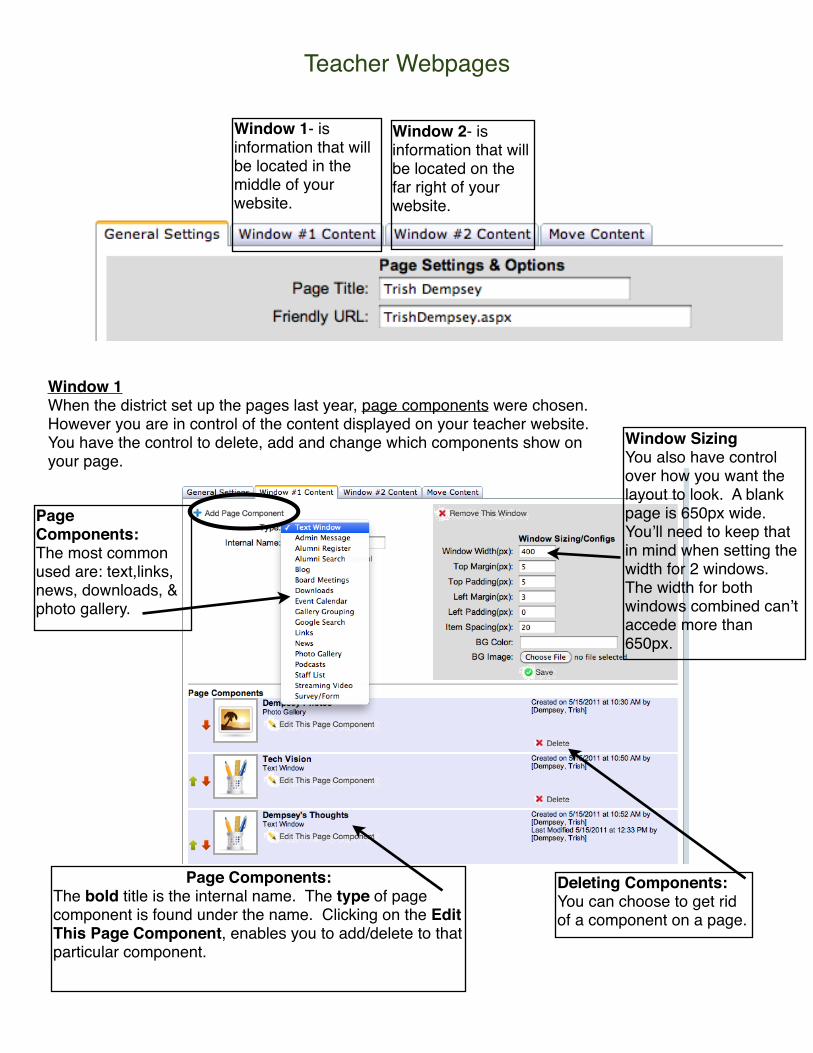
Window 1When the district set up the pages last year, page components were chosen. However you are in control of the content displayed on your teacher website. You have the control to delete, add and change which components show on your page.
Page Components:The most common used are: text,links, news, downloads, & photo gallery.
Teacher Webpages
Window 1- is information that will be located in the middle of your website.
Window 2- is information that will be located on the far right of your website.
Page Components:The most common used are: text,links, news, downloads, & photo gallery.
Window SizingYou also have control over how you want the layout to look. A blank page is 650px wide. Youʼll need to keep that in mind when setting the width for 2 windows. The width for both windows combined canʼt accede more than 650px.
Deleting Components:You can choose to get rid of a component on a page.
Page Components:The bold title is the internal name. The type of page component is found under the name. Clicking on the Edit This Page Component, enables you to add/delete to that particular component.
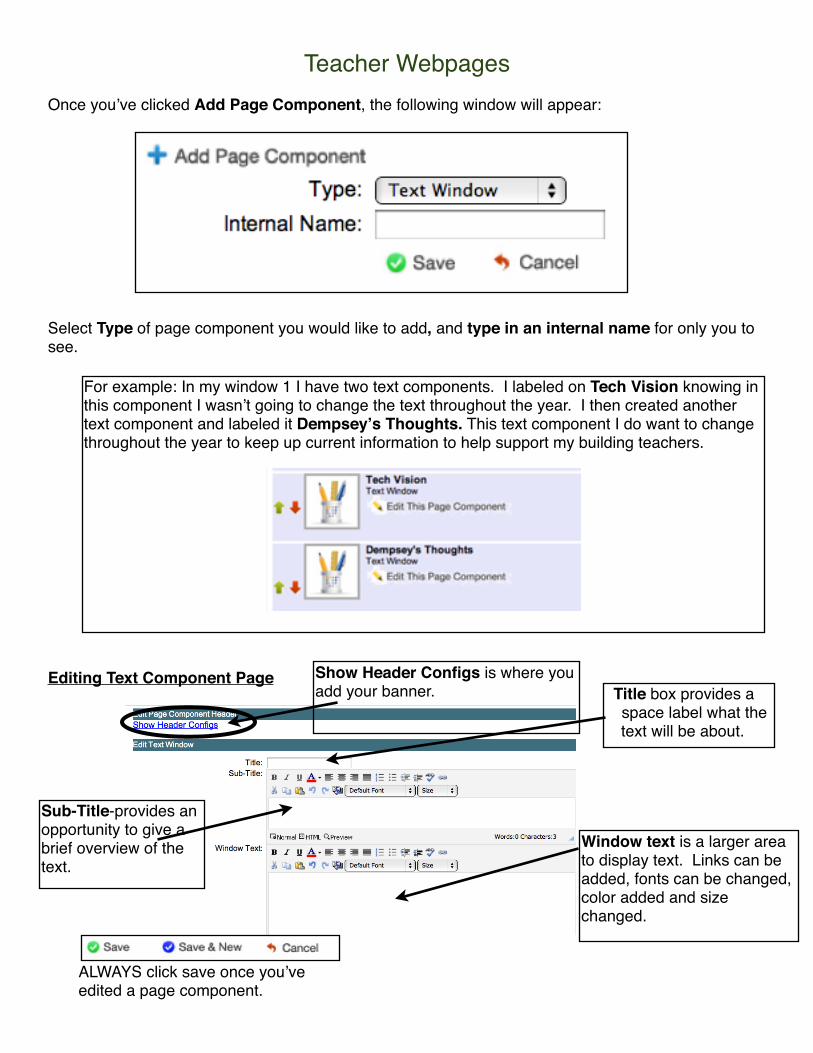
Once youʼve clicked Add Page Component, the following window will appear:
Select Type of page component you would like to add, and type in an internal name for only you to see.
Editing Text Component Page
Teacher Webpages
For example: In my window 1 I have two text components. I labeled on Tech Vision knowing in this component I wasnʼt going to change the text throughout the year. I then created another text component and labeled it Dempseyʼs Thoughts. This text component I do want to change throughout the year to keep up current information to help support my building teachers.
Show Header Configs is where you add your banner. Title box provides a
space label what the text will be about.
Sub-Title-provides an opportunity to give a brief overview of the text.
Window text is a larger area to display text. Links can be added, fonts can be changed, color added and size changed.
ALWAYS click save once youʼve edited a page component.
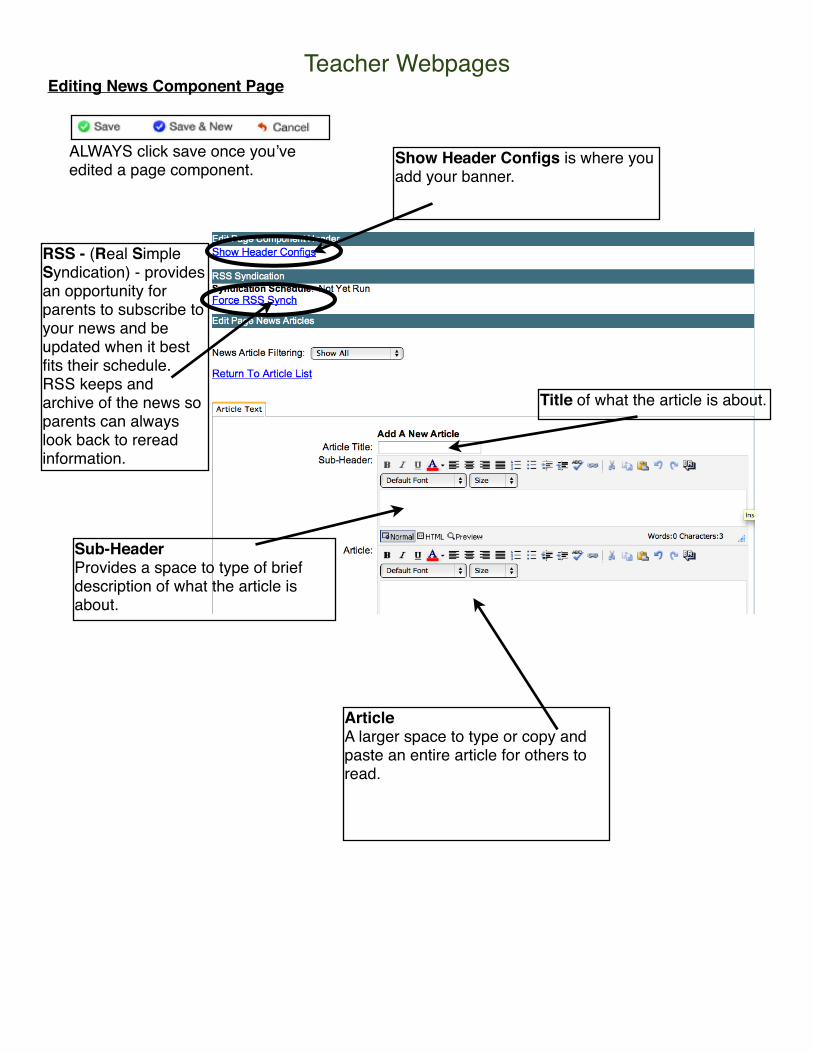
Editing News Component PageTeacher Webpages
Show Header Configs is where you add your banner.
RSS - (Real Simple Syndication) - provides an opportunity for parents to subscribe to your news and be updated when it best fits their schedule. RSS keeps and archive of the news so parents can always look back to reread information.
Title of what the article is about.
Sub-HeaderProvides a space to type of brief description of what the article is about.
ArticleA larger space to type or copy and paste an entire article for others to read.
ALWAYS click save once youʼve edited a page component.
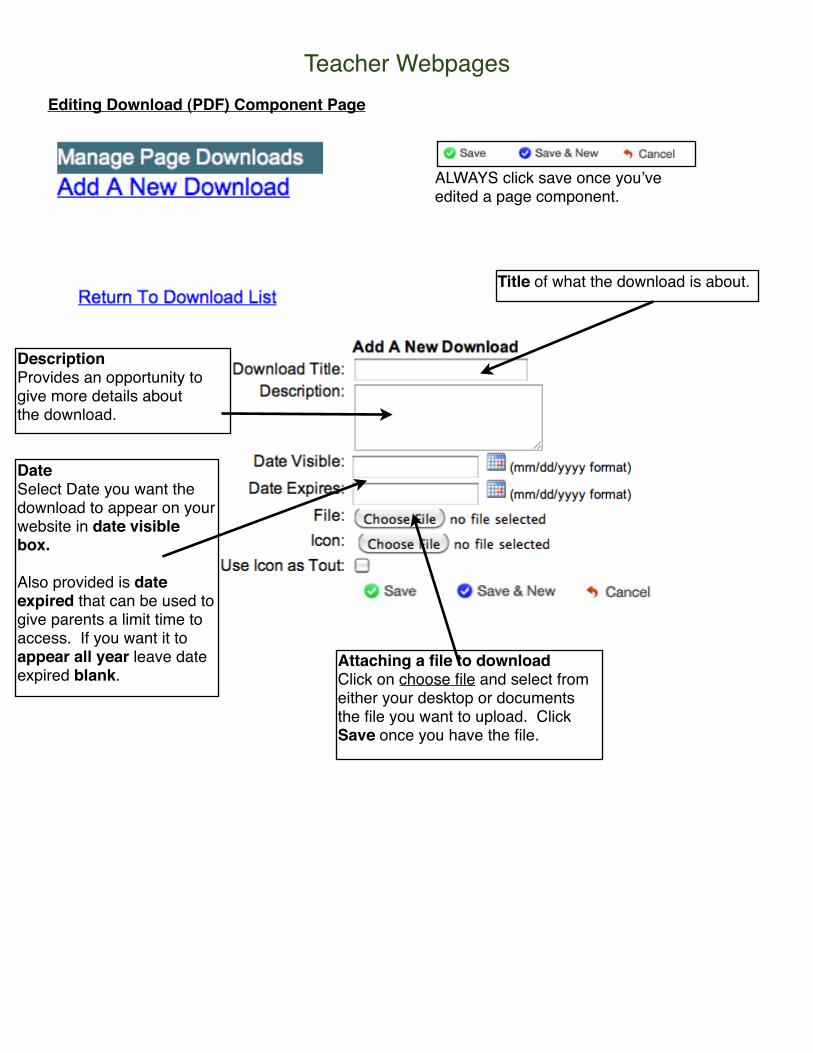
Editing Download (PDF) Component Page
Teacher Webpages
ALWAYS click save once youʼve edited a page component.
Title of what the download is about.
DescriptionProvides an opportunity to give more details about the download.
DateSelect Date you want the download to appear on your website in date visible box.
Also provided is date expired that can be used to give parents a limit time to access. If you want it to appear all year leave date expired blank.
Attaching a file to downloadClick on choose file and select from either your desktop or documents the file you want to upload. Click Save once you have the file.
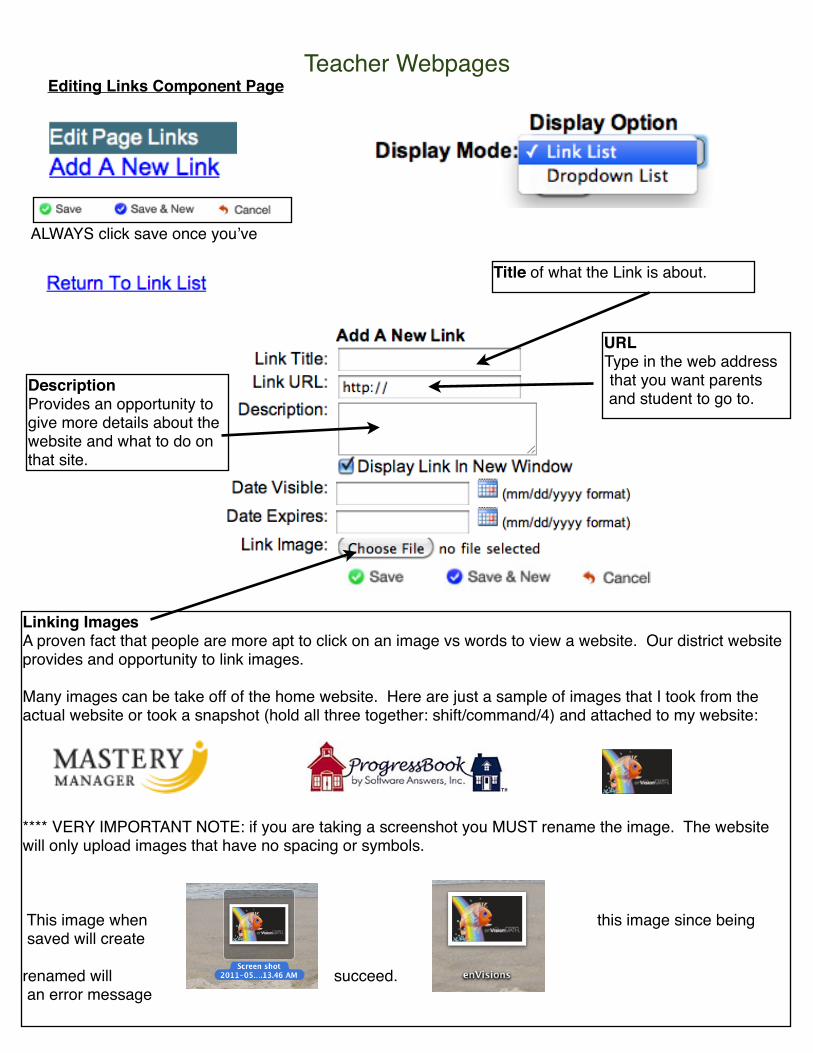
Editing Links Component PageTeacher Webpages
ALWAYS click save once youʼve
Title of what the Link is about.
URLType in the web address that you want parents and student to go to.
DescriptionProvides an opportunity to give more details about the website and what to do on that site.
Linking ImagesA proven fact that people are more apt to click on an image vs words to view a website. Our district website provides and opportunity to link images.
Many images can be take off of the home website. Here are just a sample of images that I took from the actual website or took a snapshot (hold all three together: shift/command/4) and attached to my website:
**** VERY IMPORTANT NOTE: if you are taking a screenshot you MUST rename the image. The website will only upload images that have no spacing or symbols.
This image when !!!!!!!!!!!! ! this image since being saved will create !!!!!
renamed will succeed. an error message

Editing Photo Gallery Component Page
Teacher Webpages
Important to check the pixel size of your photos. If it is larger then the setup width
pictures will not display properly!
Show Header Configs is where you add your banner.
Bulk InsertAllows you to upload 12 images with caption/descriptions at once.
To add just one photo at a time click on New Gallery Photo.
Display ModeThumbnail List- shows all the pictures in at once.
Prev/Next Gallery- shows one photo at a time. Photos can be set advanced automatically or manually.

Adding Child PagesTeachers now have the access to add as many child pages as they deem necessary. A child page is a new blank page that can be linked to your main page. This blank page provides a teacher with more opportunities to expand and share many more digital objects to best help parents and students.
Teacher Webpages
Above you can see my main teacher page has a web address of: TrishDempsey.aspx
Indented below my name is a child page I created about editing Teacher Websites with the web address: teacherwebsites.aspx
On my main teacher page I had to create a link to take teachers, parents, students from one page to the next. Notice the words teacher website is green indicating it is a link. The URL address I had to put in there was: teacherwebsite.aspx.