TC Flex AFO Guide Book - Orthomerica
48
TC AFO SYSTEM TM THE GLOBAL ORTHOTIC SOLUTION TEL: 877.737.8444 | FAX: 877.737.8445 ORTHOMERICA.COM | TCFLEX.COM © 2005 Orthomerica Products, Inc. All Rights Reserved. SM Ordering Information Includes: Orthometry Forms Casting Instructions Practitioner Fitting Instructions and Caregiver Instructions
Transcript of TC Flex AFO Guide Book - Orthomerica

TC AFO SYSTEM
TM
THE GLOBAL ORTHOTIC SOLUTIONTEL: 877.737.8444 | FAX: 877.737.8445
ORTHOMERICA.COM | TCFLEX.COM
© 2005 Orthomerica Products, Inc. All Rights Reserved.
SM
Ordering Information
Includes: Orthometry FormsCasting Instructions
Practitioner Fitting Instructionsand Caregiver Instructions

2
It is our goal to provide the best service, and fabricate the highest quality, most effective orthoses available. Orthomerica's
TC FLEX™ Orthoses are guaranteed for materials, workmanship, fit and function for ninety days plus 14 days after the
orthoses are shipped when they are fabricated from an acceptable impression* of the patient's limb. If there is a problem
with the orthosis, Orthomerica will repair, adjust or replace the orthosis during the warranty period. Inappropriate wear
on the orthosis including excessive wear on the plantar surface secondary to use without a shoe (except in therapy) or
damage due to heat, cold or impact are not covered in the warranty. If there is a problem with the orthosis, the practition-
er should contact customer service immediately, and any concerns of the patient or family should be communicated
through the orthotic facility.
* Quality Cast Criteria is available to Orthomerica customers through the customer service department.
RETURN PROCESS
If a return is necessary, the practitioner or orthotic facility should con-tact customer service during normal business hours, and a returnauthorization number (R.A.) will be provided. This R.A. numbershould be written on the outside of the box, and the orthosis shouldbe returned to:
Orthomerica Products, Inc.R.A. #__________
6333 N. Orange Blossom TrailOrlando, FL 32810
Please have the following information available when you call for theR.A.:
• Facility name, Orthomerica account number, and original order number
• Patient's name or ID number• Type of orthosis
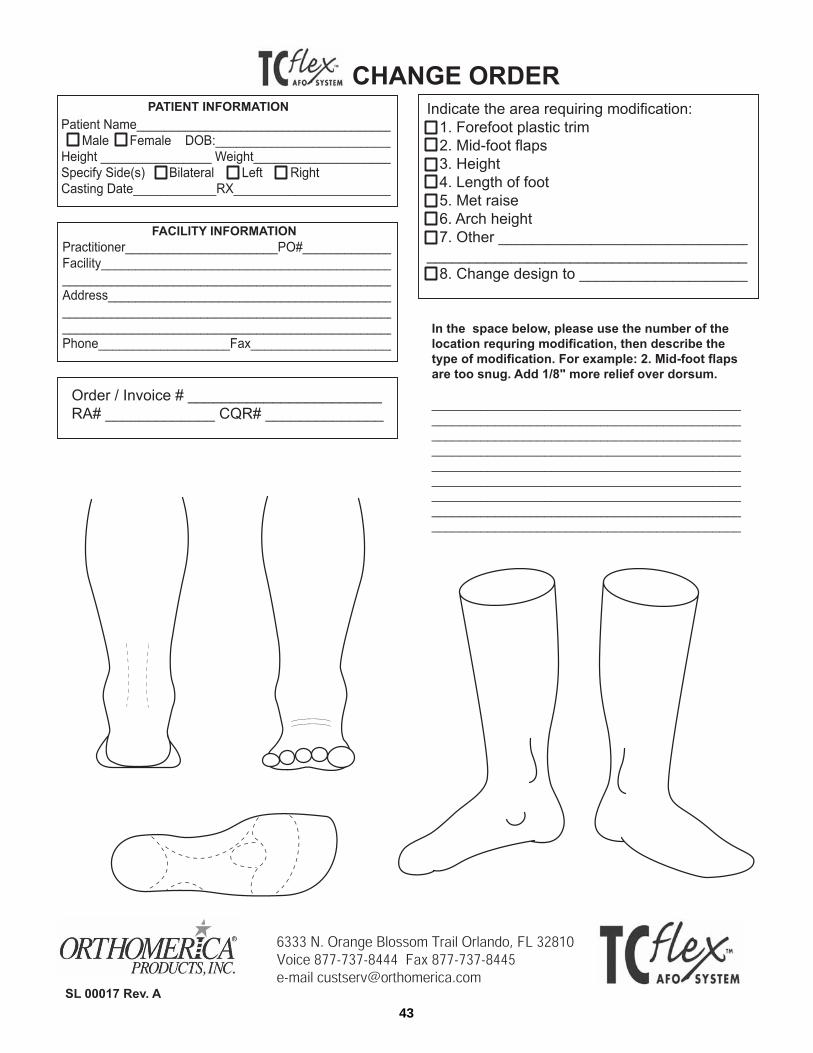
If the orthosis is being refabricated the practitioner should completethe Change Form with the appropriate R.A. number and include it inthe box with the returned item. This form should be used for any itemrequiring replacement, repair, exchange or adjustment. A customerservice representative will contact the practitioner about the details ofthe paperwork upon receipt of the orthosis. No orthosis will beaccepted without a return authorization number.
Include the RA on the outside of the box and on all paperwork.
TC AFO SYSTEM
TM Warranty Information
THE GLOBAL ORTHOTIC SOLUTIONTEL: 877.737.8444 | FAX: 877.737.8445ORTHOMERICA.COM | TCFLEX.COM
© 2005 Orthomerica Products, Inc. All Rights Reserved. SL 00020 Rev A
SM
CREDIT PROCESS
• A new invoice will be issued for the replacement orthosis. • After the returned item has been assessed, Orthomerica will issue
a full credit if the return is a result of an Orthomerica error. • Return shipping charges must be prepaid.

3
TC AFO SYSTEM
TM Table of Contents
The TC Flex System . . . . . . . . . . . . . . . . . . . . . . . . . . . . . . . . . . . . . . . . . . . . . . .4
Casting Instructions . . . . . . . . . . . . . . . . . . . . . . . . . . . . . . . . . . . . . . . . . . . . . . .6
Orthometry Form Instructions . . . . . . . . . . . . . . . . . . . . . . . . . . . . . . . . . . . . .11
Orthometry Forms
Sub-Mo Open Orthosis . . . . . . . . . . . . . . . . . . . . . . . . . . . . . . . . . . . . . . . .13
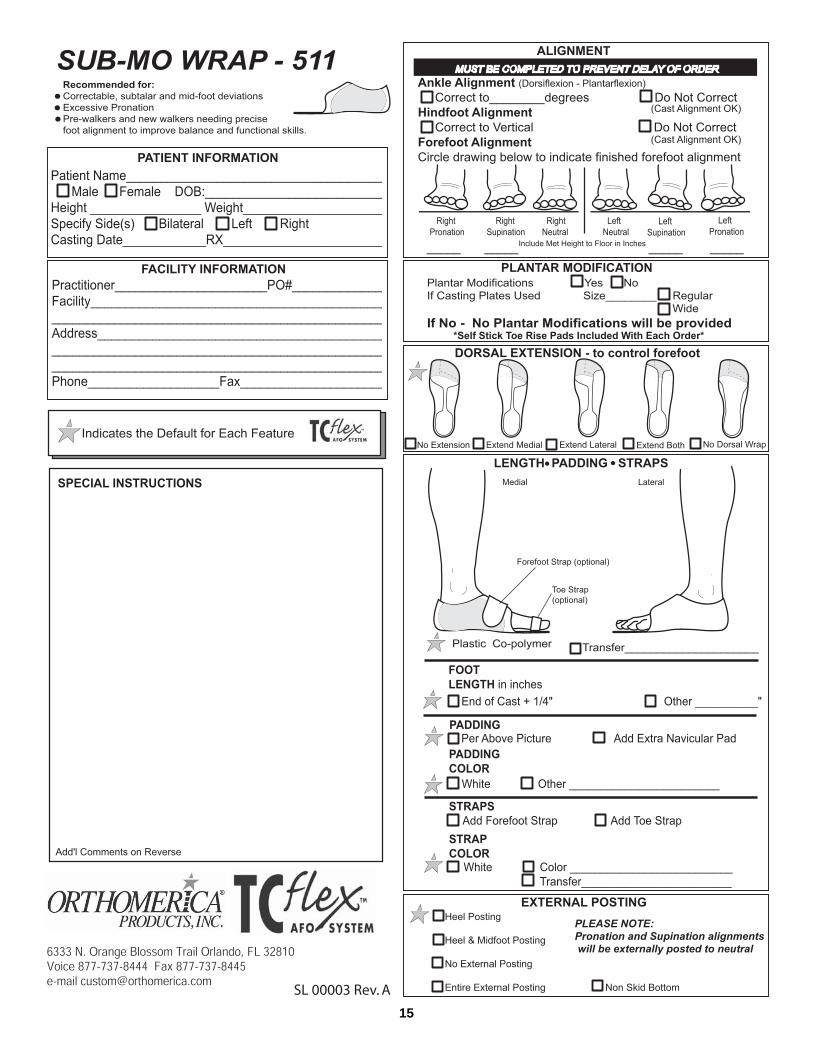
Sub-Mo Wrap Orthosis . . . . . . . . . . . . . . . . . . . . . . . . . . . . . . . . . . . . . . . .15
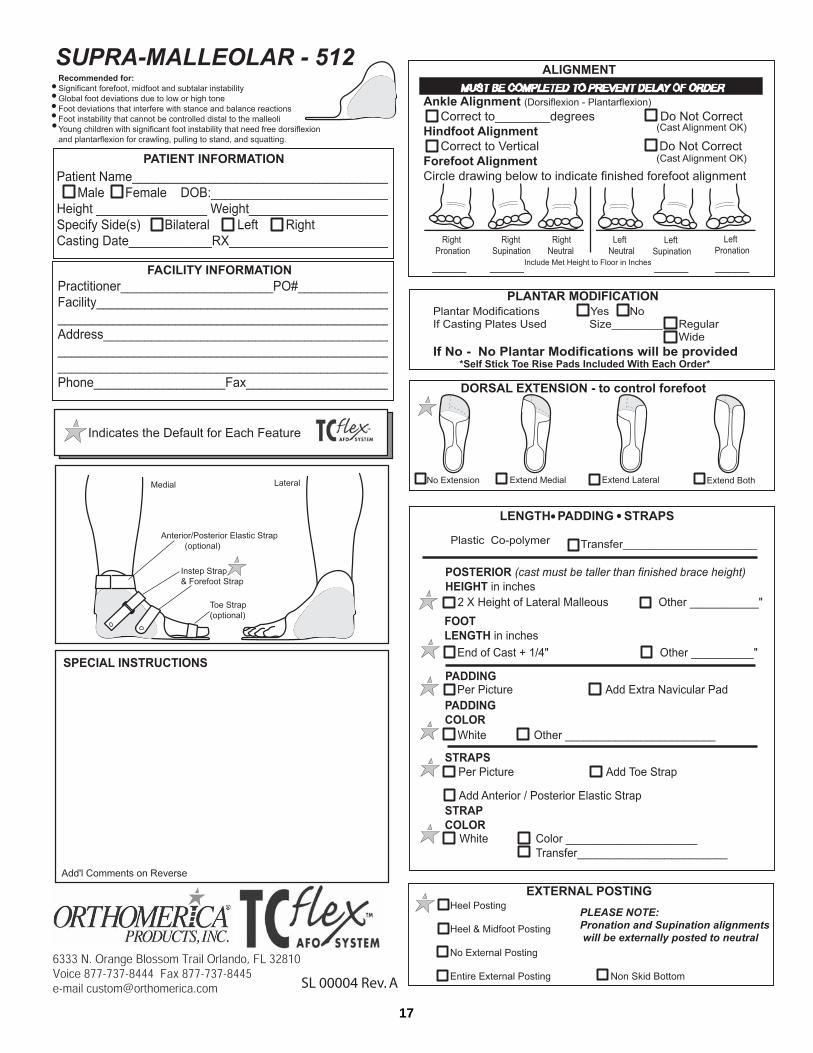
Supra Malleolar (SMO) Orthosis . . . . . . . . . . . . . . . . . . . . . . . . . . . . . . . . .17
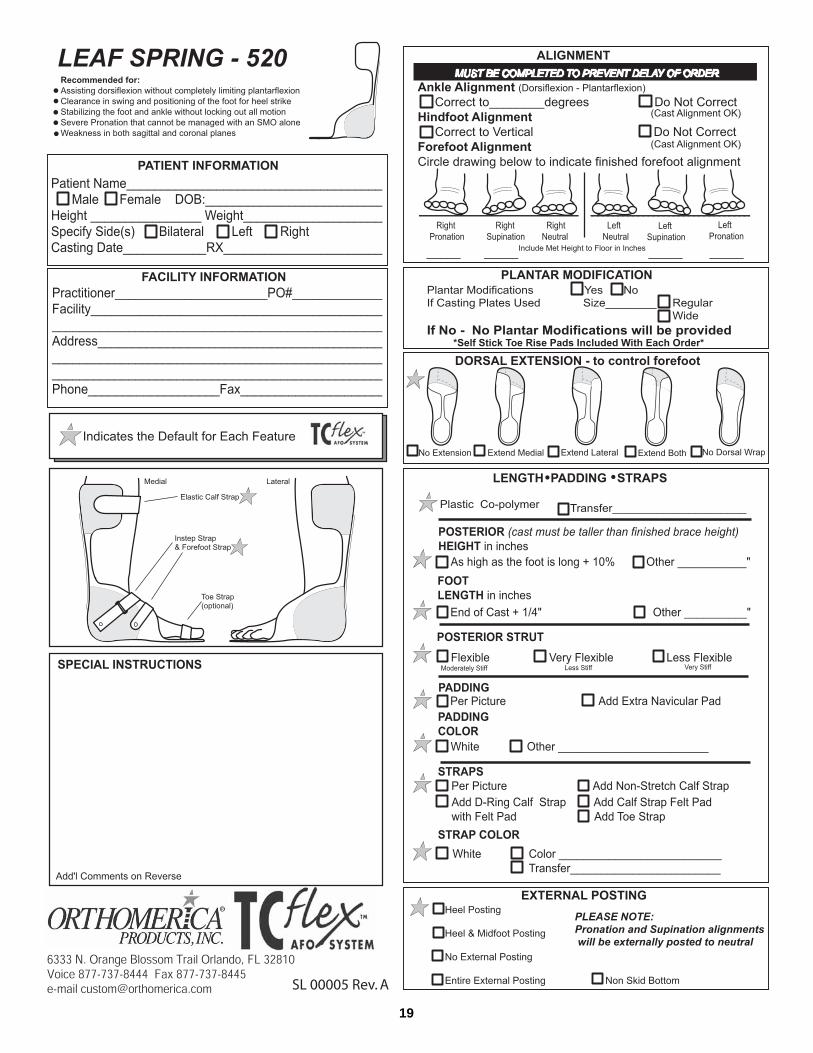
Leaf Spring Orthosis . . . . . . . . . . . . . . . . . . . . . . . . . . . . . . . . . . . . . . . . . .19
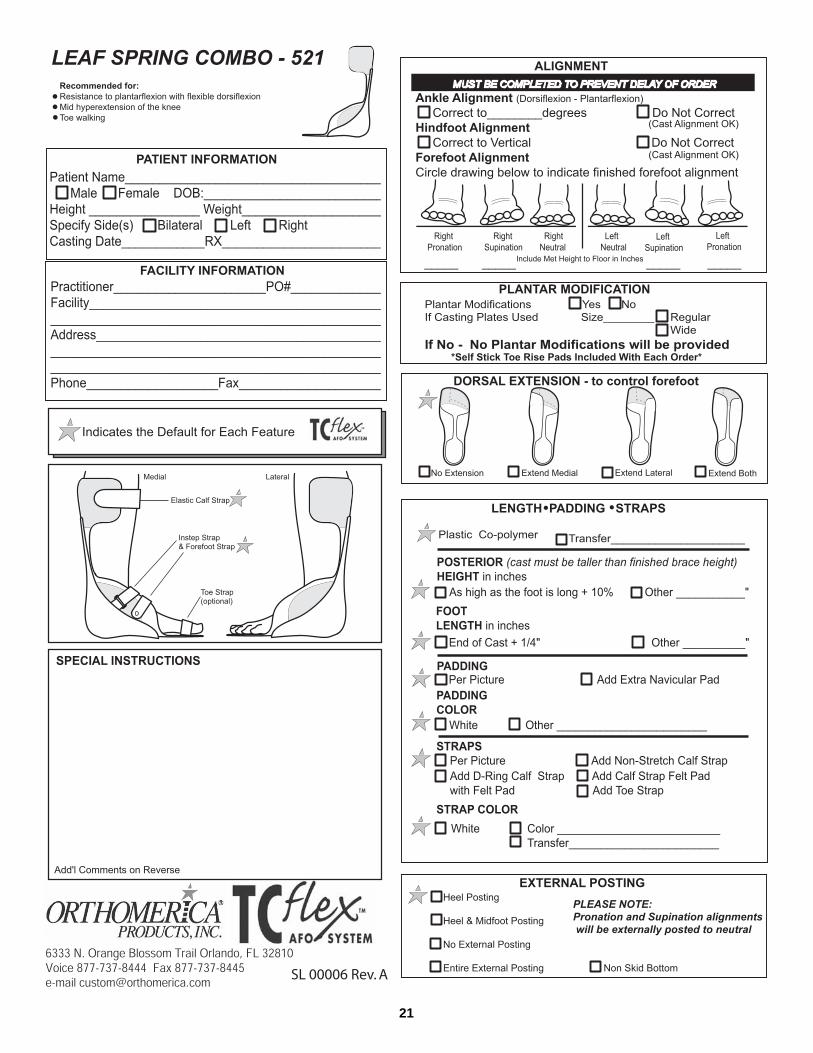
Leaf Spring Combo Orthosis . . . . . . . . . . . . . . . . . . . . . . . . . . . . . . . . . . . .21
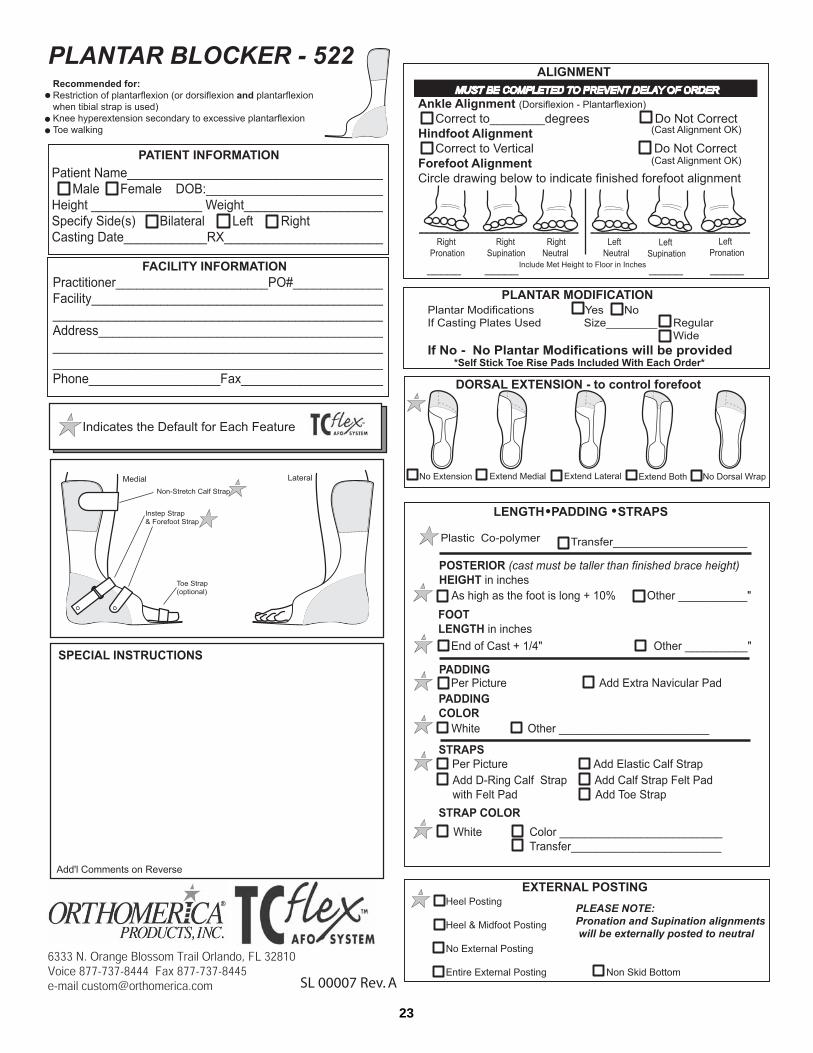
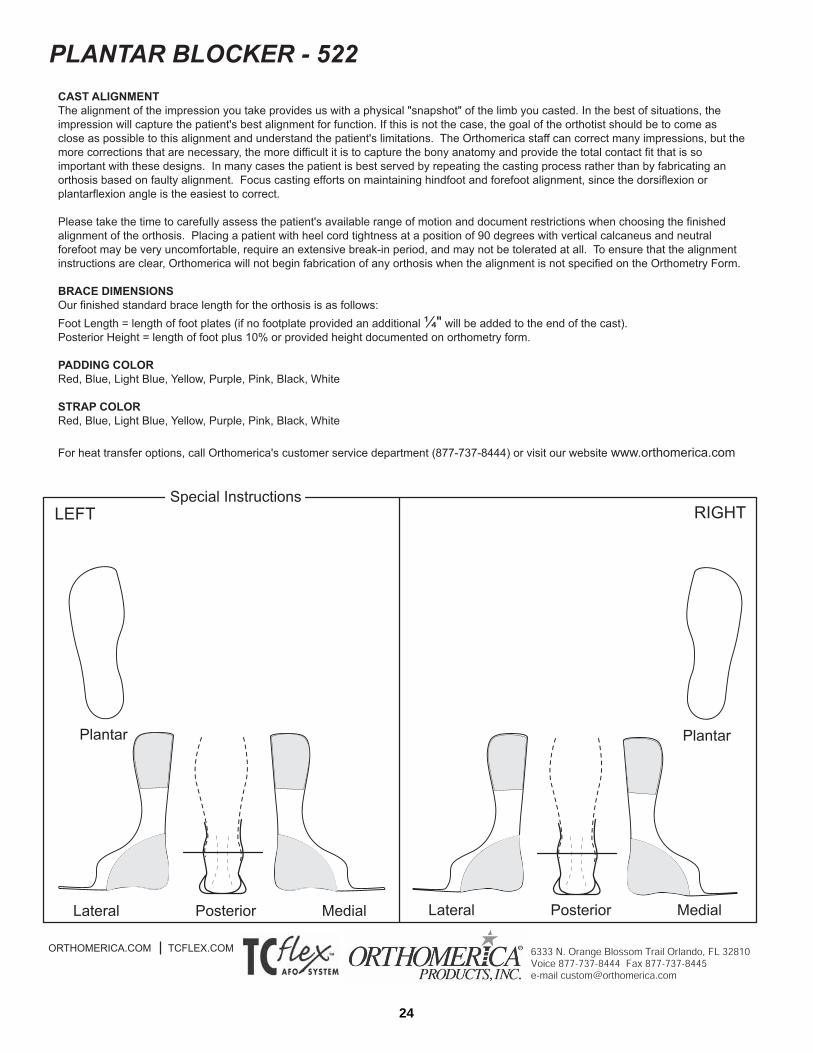
Plantar Blocker Orthosis . . . . . . . . . . . . . . . . . . . . . . . . . . . . . . . . . . . . . . .23
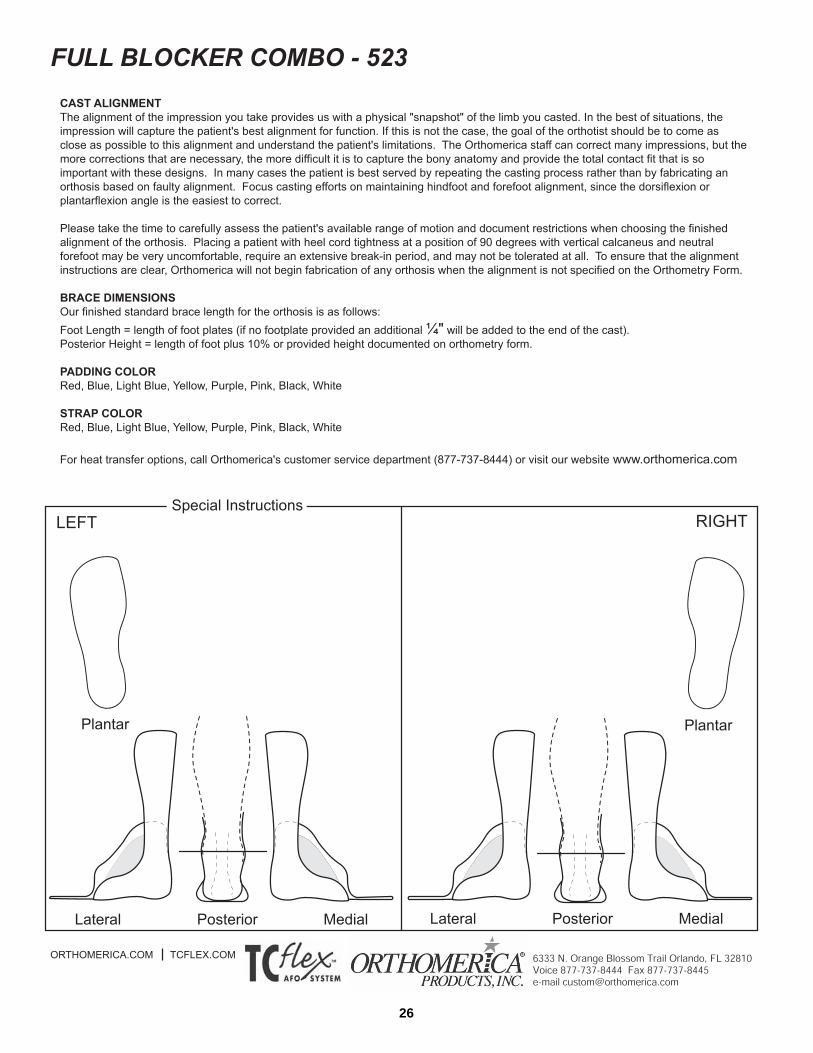
Full Blocker Combo Orthosis . . . . . . . . . . . . . . . . . . . . . . . . . . . . . . . . . . .25
Full Blocker Resting Orthosis . . . . . . . . . . . . . . . . . . . . . . . . . . . . . . . . . . .27
Dorsi-free Overlap Orthosis . . . . . . . . . . . . . . . . . . . . . . . . . . . . . . . . . . . .29
Dorsi-free Stretch Orthosis . . . . . . . . . . . . . . . . . . . . . . . . . . . . . . . . . . . . .31
Articulating Wrap Orthosis . . . . . . . . . . . . . . . . . . . . . . . . . . . . . . . . . . . .33
Articulating Combo Orthosis . . . . . . . . . . . . . . . . . . . . . . . . . . . . . . . . . . .35
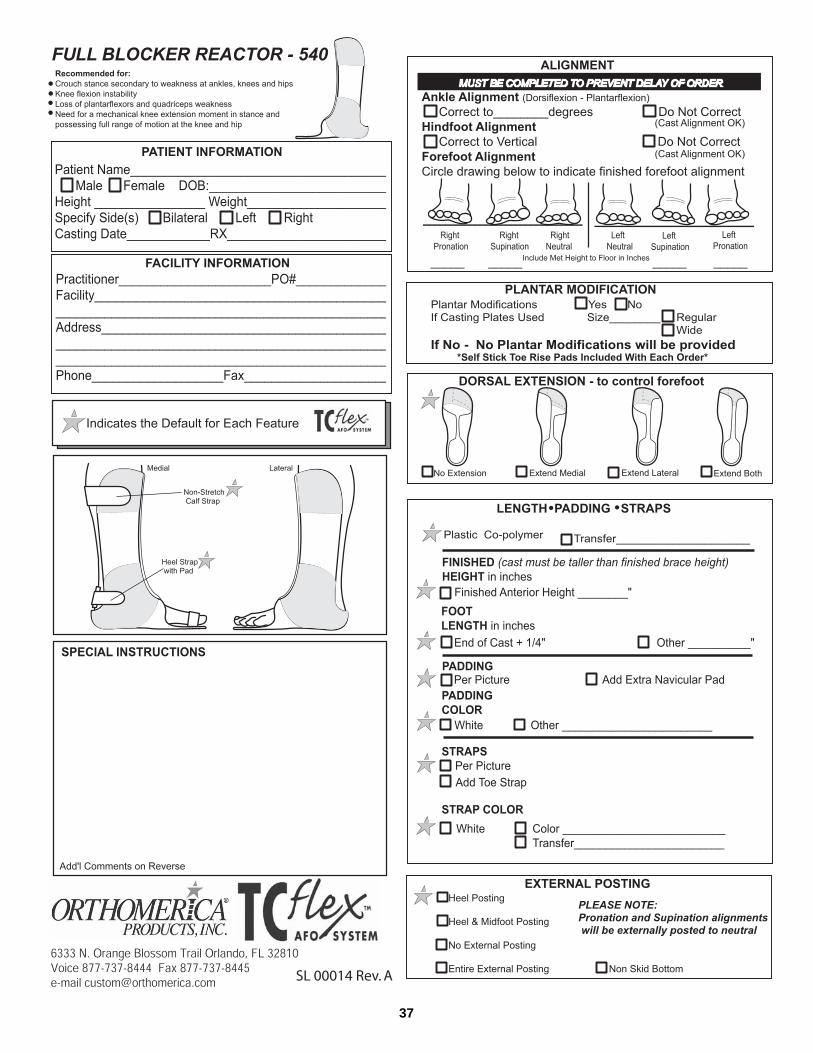
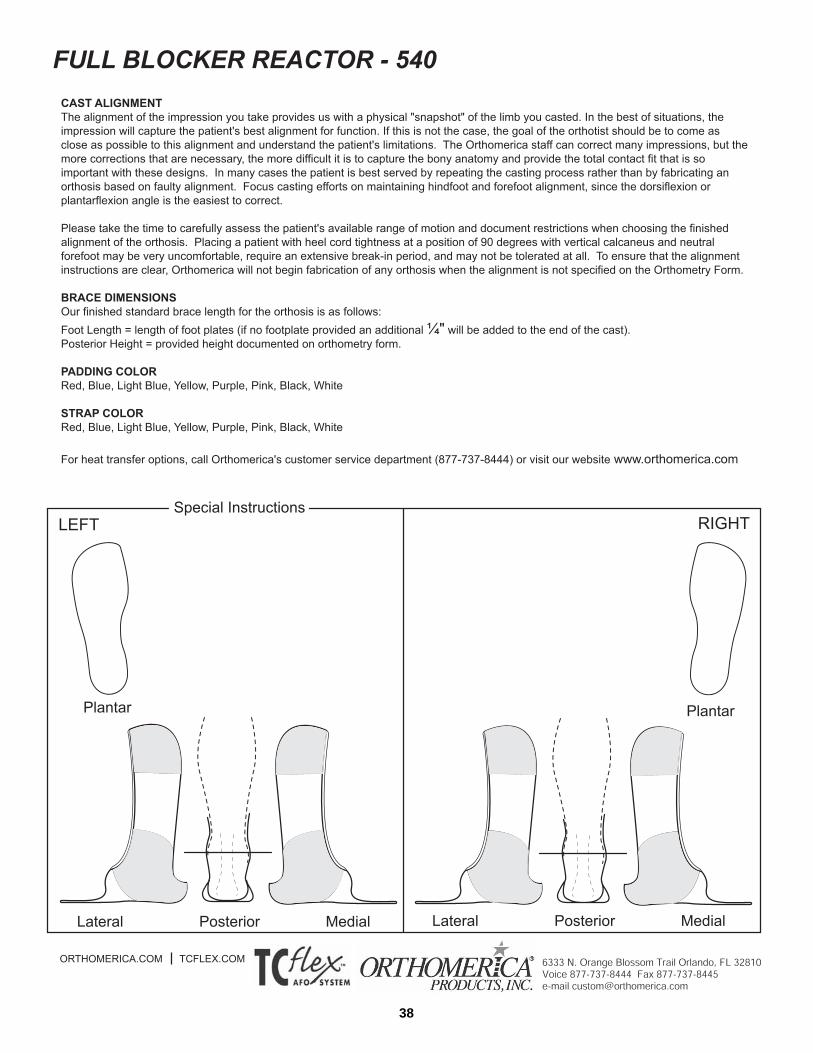
Full Blocker Reactor Orthosis . . . . . . . . . . . . . . . . . . . . . . . . . . . . . . . . . . .37
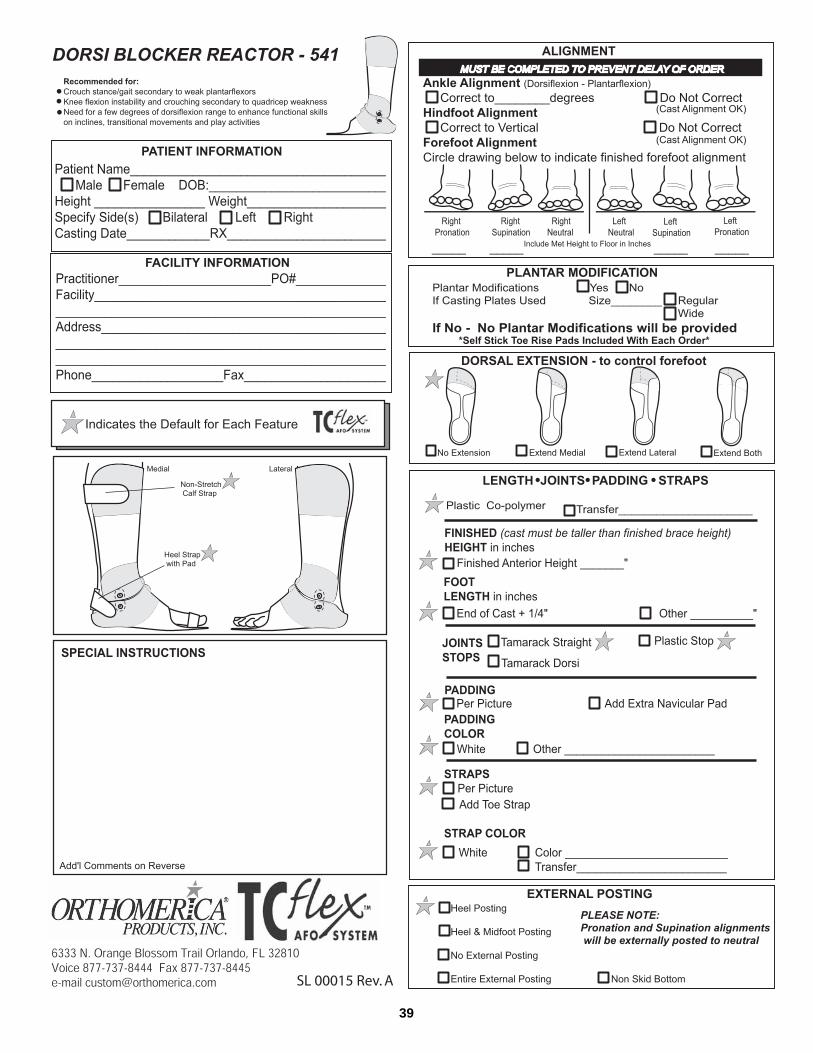
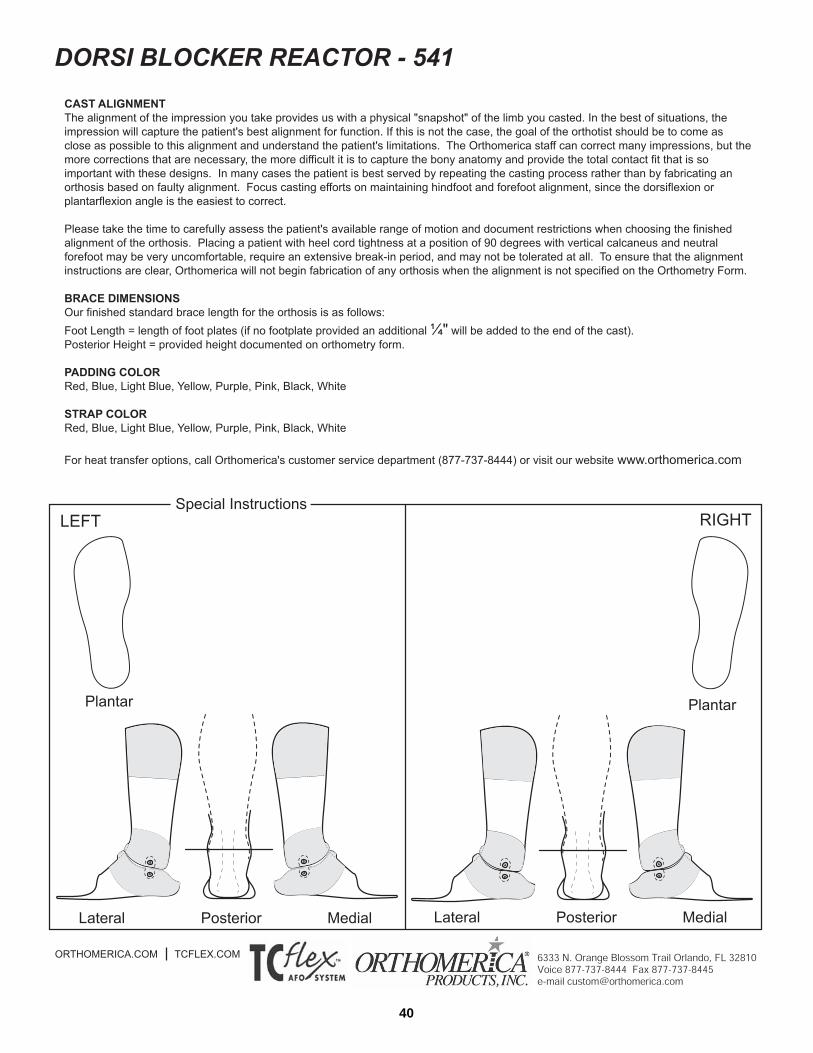
Dorsi-Blocker Reactor Orthosis . . . . . . . . . . . . . . . . . . . . . . . . . . . . . . . . . .39
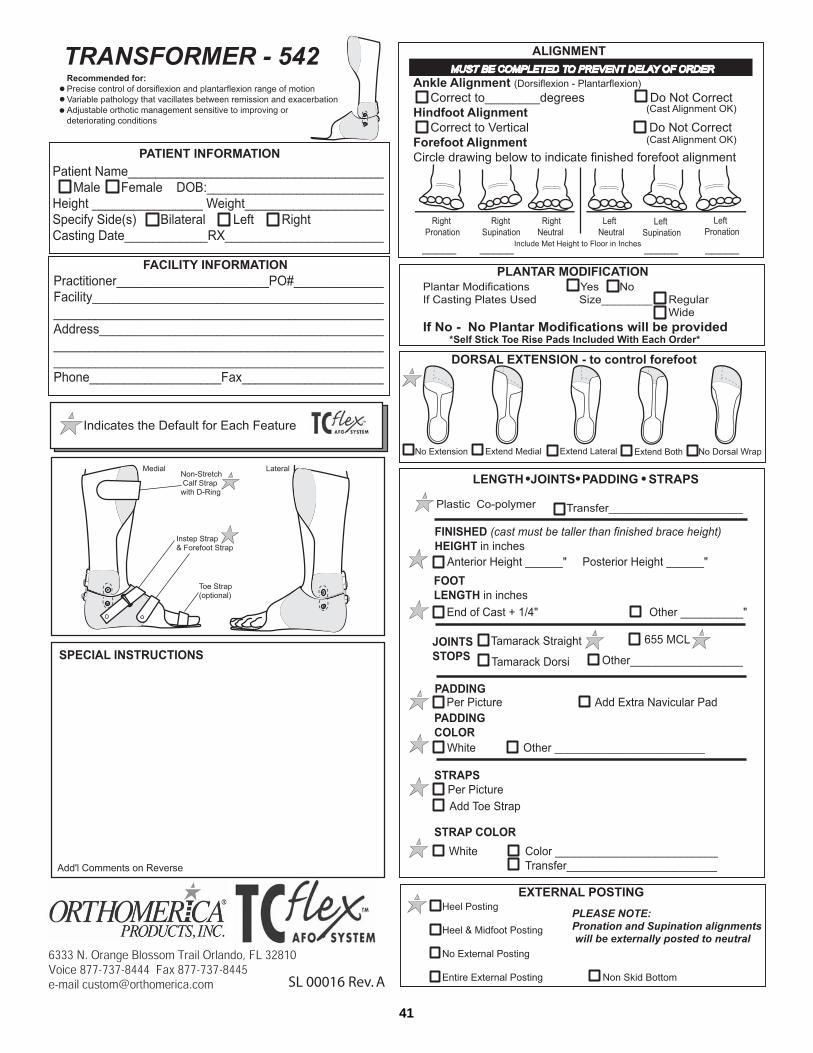
Transformer Orthosis . . . . . . . . . . . . . . . . . . . . . . . . . . . . . . . . . . . . . . . . .41
TC-Flex Change Order . . . . . . . . . . . . . . . . . . . . . . . . . . . . . . . . . . . . . . . . .43
Practitioner Fitting Instructions . . . . . . . . . . . . . . . . . . . . . . . . . . . . . . . . . . . .44
Caregiver Instructions . . . . . . . . . . . . . . . . . . . . . . . . . . . . . . . . . . . . . . . . . . . .46
THE GLOBAL ORTHOTIC SOLUTIONTEL: 877.737.8444 | FAX: 877.737.8445ORTHOMERICA.COM | TCFLEX.COM
© 2005 Orthomerica Products, Inc. All Rights Reserved.
SM
4
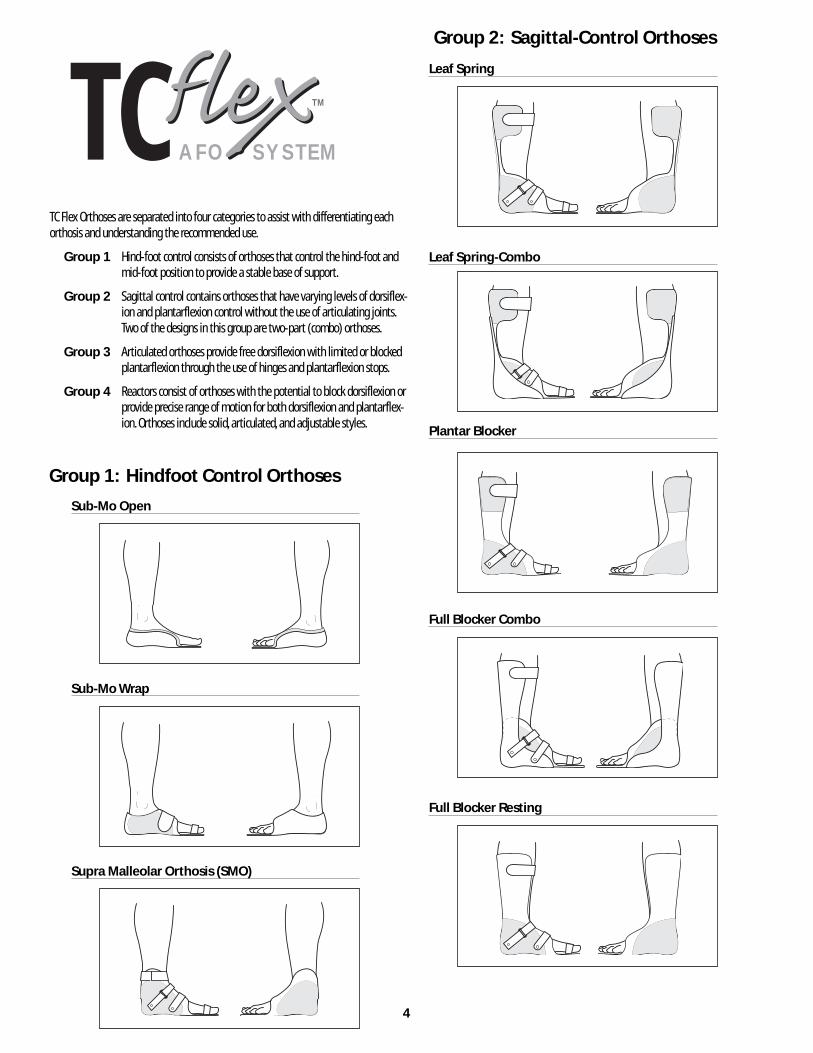
Sub-Mo Open
Sub-Mo Wrap
Supra Malleolar Orthosis (SMO)
Leaf Spring
Leaf Spring-Combo
Plantar Blocker
Full Blocker Combo
Full Blocker Resting
TC AFO SYSTEM
TM
Group 2: Sagittal-Control Orthoses
Group 1: Hindfoot Control Orthoses
TC Flex Orthoses are separated into four categories to assist with differentiating eachorthosis and understanding the recommended use.
Group 1 Hind-foot control consists of orthoses that control the hind-foot and mid-foot position to provide a stable base of support.
Group 2 Sagittal control contains orthoses that have varying levels of dorsiflex-ion and plantarflexion control without the use of articulating joints.Two of the designs in this group are two-part (combo) orthoses.
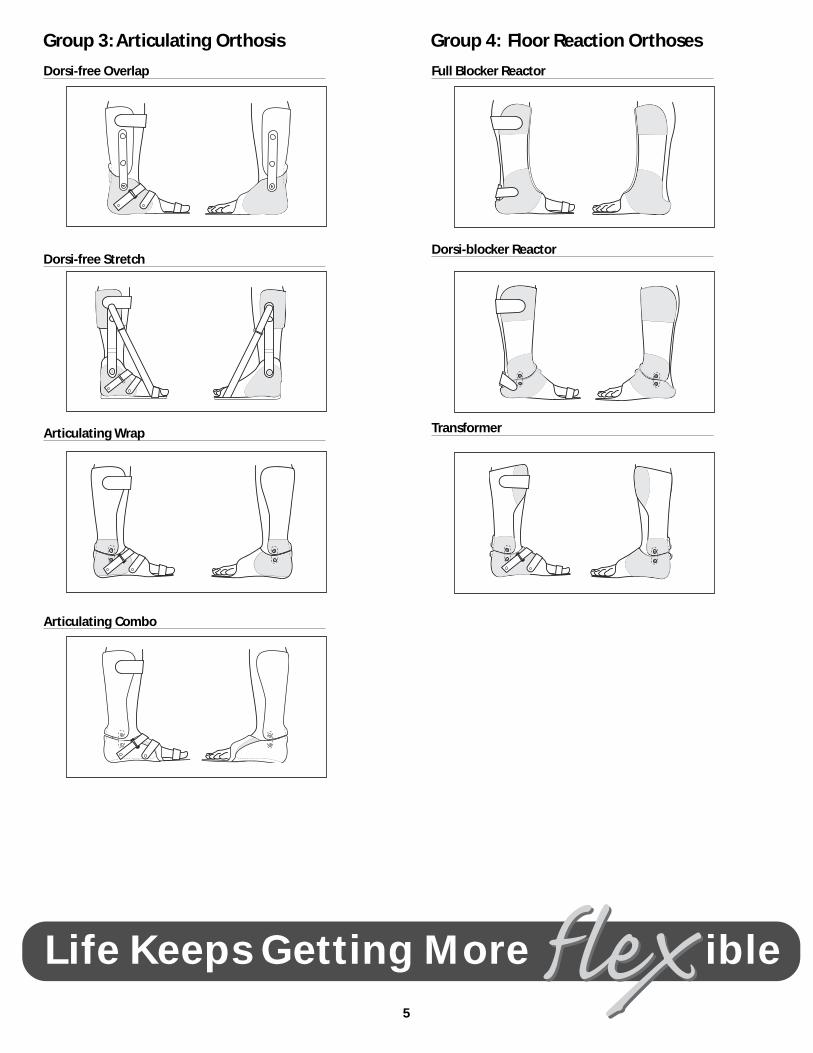
Group 3 Articulated orthoses provide free dorsiflexion with limited or blockedplantarflexion through the use of hinges and plantarflexion stops.
Group 4 Reactors consist of orthoses with the potential to block dorsiflexion orprovide precise range of motion for both dorsiflexion and plantarflex-ion. Orthoses include solid, articulated, and adjustable styles.
5
Full Blocker Reactor
Dorsi-blocker Reactor
Transformer
Dorsi-free Overlap
Dorsi-free Stretch
Articulating Wrap
Articulating Combo
Group 3: Articulating Orthosis Group 4: Floor Reaction Orthoses
Life Keeps Getting More ible
6
CASTING INTRODUCTION
Along with acquiring professional clinical evaluation skills, taking a qualityimpression is fundamental to obtaining the best patient outcomes. We real-ize that every practitioner has developed a unique system of taking impres-sions based on their educational background, residency experience, anddaily practice. It is our hope that the two methods described here will pro-vide new information for those less experienced in casting, and supportpractitioners with more experience who may be interested in learning orrevisiting another method of obtaining a good impression.
The first method uses Orthomerica casting plates to take the impression,and the second method is a freehand casting technique. Please readthrough the instructions, as they may differ from the method you presentlyuse. Please note the following:• Both methods use two layers of stockinet. Please incorporate this into
whatever technique you use so that the volume within the impressionis compatible with our fabrication methods.
• Both methods use fiberglass. We have found this to be superior toplaster if the impression has to be realigned.
• Both methods require delineation of specific landmarks that areimportant in our fabrication process.
• Both methods require a firm and well-aligned impression, especiallyin the coronal and transverse planes. Concentrate on mid-foot andforefoot alignment when you take the impression because the sagittalplane (dorsiflexion and plantarflexion) alignment is much easier tocorrect without cast distortion.
Pre-Cast Assessment
• Evaluate the patient's sagittal and coronal plane range of motion andalignment at the hip, knee and ankle.
• Observe the patient in standing and walking if the patient will be using the orthosis for these positions and document any ankle or knee instability.
• Determine the optimal alignment of the finished orthosis in order to capture this position during the casting procedure.
Casting a Patient with Orthomerica®
TC Casting Plates
Determining The Correct Casting Plate Size
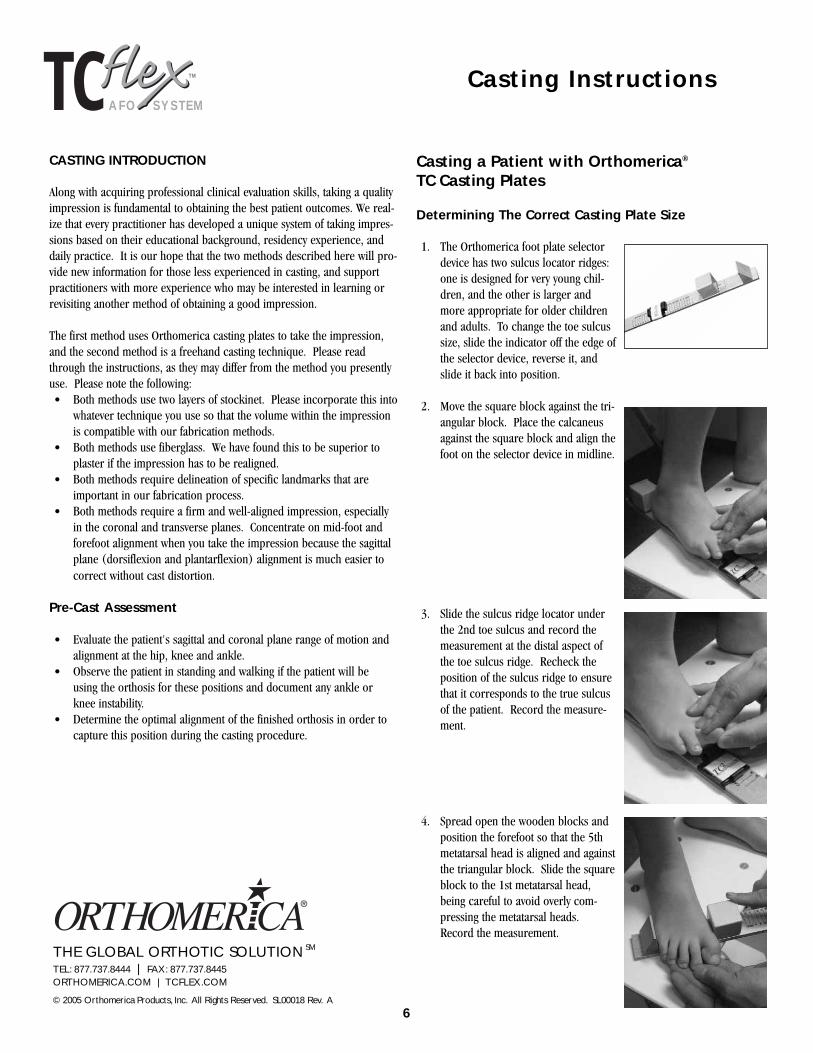
1. The Orthomerica foot plate selectordevice has two sulcus locator ridges:one is designed for very young chil-dren, and the other is larger andmore appropriate for older childrenand adults. To change the toe sulcussize, slide the indicator off the edge ofthe selector device, reverse it, andslide it back into position.
2. Move the square block against the tri-angular block. Place the calcaneusagainst the square block and align thefoot on the selector device in midline.
3. Slide the sulcus ridge locator underthe 2nd toe sulcus and record themeasurement at the distal aspect ofthe toe sulcus ridge. Recheck theposition of the sulcus ridge to ensurethat it corresponds to the true sulcusof the patient. Record the measure-ment.
4. Spread open the wooden blocks andposition the forefoot so that the 5thmetatarsal head is aligned and againstthe triangular block. Slide the squareblock to the 1st metatarsal head,being careful to avoid overly com-pressing the metatarsal heads.Record the measurement.
TC AFO SYSTEM
TM Casting Instructions
THE GLOBAL ORTHOTIC SOLUTIONTEL: 877.737.8444 | FAX: 877.737.8445ORTHOMERICA.COM | TCFLEX.COM
© 2005 Orthomerica Products, Inc. All Rights Reserved. SL00018 Rev. A
SM
7
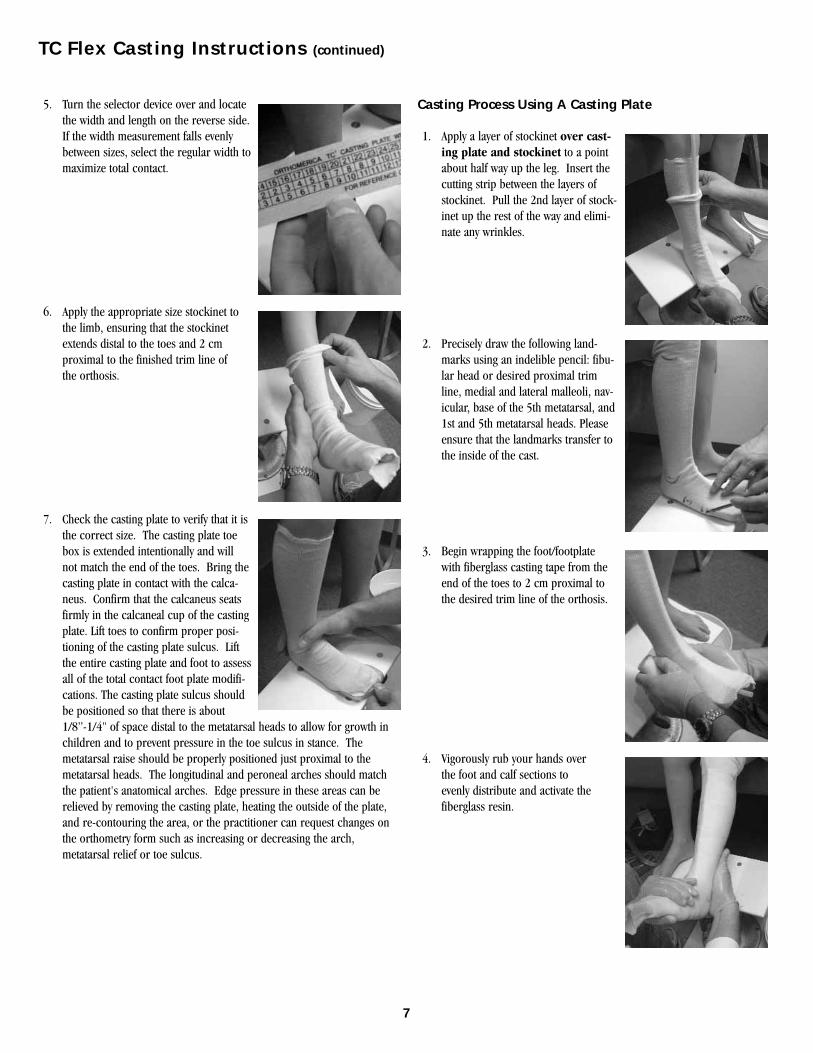
5. Turn the selector device over and locatethe width and length on the reverse side.If the width measurement falls evenlybetween sizes, select the regular width tomaximize total contact.
6. Apply the appropriate size stockinet tothe limb, ensuring that the stockinetextends distal to the toes and 2 cm proximal to the finished trim line of the orthosis.
7. Check the casting plate to verify that it isthe correct size. The casting plate toebox is extended intentionally and willnot match the end of the toes. Bring thecasting plate in contact with the calca-neus. Confirm that the calcaneus seatsfirmly in the calcaneal cup of the castingplate. Lift toes to confirm proper posi-tioning of the casting plate sulcus. Liftthe entire casting plate and foot to assessall of the total contact foot plate modifi-cations. The casting plate sulcus shouldbe positioned so that there is about 1/8”-1/4" of space distal to the metatarsal heads to allow for growth in children and to prevent pressure in the toe sulcus in stance. Themetatarsal raise should be properly positioned just proximal to themetatarsal heads. The longitudinal and peroneal arches should matchthe patient's anatomical arches. Edge pressure in these areas can berelieved by removing the casting plate, heating the outside of the plate,and re-contouring the area, or the practitioner can request changes onthe orthometry form such as increasing or decreasing the arch,metatarsal relief or toe sulcus.
Casting Process Using A Casting Plate
1. Apply a layer of stockinet over cast-ing plate and stockinet to a pointabout half way up the leg. Insert thecutting strip between the layers ofstockinet. Pull the 2nd layer of stock-inet up the rest of the way and elimi-nate any wrinkles.
2. Precisely draw the following land-marks using an indelible pencil: fibu-lar head or desired proximal trimline, medial and lateral malleoli, nav-icular, base of the 5th metatarsal, and1st and 5th metatarsal heads. Pleaseensure that the landmarks transfer tothe inside of the cast.
3. Begin wrapping the foot/footplate with fiberglass casting tape from theend of the toes to 2 cm proximal tothe desired trim line of the orthosis.
4. Vigorously rub your hands over the foot and calf sections to evenly distribute and activate thefiberglass resin.
TC Flex Casting Instructions (continued)

8
5. Align the foot plate to ensure that it ismaking contact with the plantar sur-face of the calcaneus and the cal-caneal clip. Just before the fiberglassbegins to set up, position the ankle inthe desired alignment using a castingstand, floor, or other stable surface.Generally, this position will be easiestto obtain when the hip, knee andankle are positioned at 90 degrees.
6. Exert downward pressure on the kneein midline to help maintain the sagit-tal plane position. Work the fiber-glass intimately around the achilles,malleoli, and calcaneus. (It is moreimportant to capture the properhindfoot, midfoot and forefootalignment than sagittal planealignment.)
7. Mark the midline of the cast verticallyand use hatch marks horizontally tofacilitate proper alignment of the castafter removal.
8. When the cast has almost cured andbefore it becomes extremely rigid,remove the impression by cuttingalong the cutting strip or flexible tubewith a cast cutter, scissors, or othersafe cutting device.
9. Using scissors, cut through the fiber-glass and outside layer of stockinet.Spread the impression open andremove it from the extremity. Removethe layer of stockinet against thepatient's leg.
10. Remove the casting plate and stock-inet inside the impression.
11. Check the impression to ensure that itis firm and completely laminated.Evaluate the alignment and definition.If the impression is acceptable,remove the stockinet and close thecast using electrical tape or staples.Label the impression with thepatient's name or identification num-ber, allow it to cure completely, andship it to Orthomerica with the com-pleted paperwork.
TC Flex Casting Instructions (continued)

9
Hand Casting a Patient for a TC Flex Orthosis
1. Apply a cotton stockinet to theextremity, making sure to extend thestockinet distal to the end of the toesand at least 2 cm proximal to the fin-ished trimline. Apply a second layer ofstockinet half way up the leg andinsert the cutting strip between thelayers.
2. Smooth both layers of stockinet fromthe end of the toes to at least 2 cmproximal to the finished trimline.
3. Precisely draw the following land-marks using an indelible pencil:Fibular head or desired proximal trimline, medial and lateral malleoli, nav-icular, base of the 5th metatarsal, and1st and 5th metatarsal heads. Pleaseensure that the landmarks transfer tothe inside of the cast.
4. Lift up the foot and outline the toesulcus and proximal aspect of themetatarsal heads.
5. Begin wrapping the foot with fiberglass casting tape from the distal end of the toes to 2 cm proximal to the desired trim line of the orthosis.
6. Vigorously rub your hands over the foot and calf sections to evenlydistribute and activate the fiberglassresin.
7. Position one hand with your thumbon one side of the heel web space justdistal to the calcaneus, and yourindex and middle finger between thecalcaneus and the base of the 5thmetatarsal on the opposite side. Withyour other hand place your index fin-ger in the toe sulcus and define themetatarsal arch with your thumb.Concentrate on maintaining a verticalcalcaneus while you position the fore-foot in neutral alignment.
8. Work the fiberglass in completely,delineating the contours of the footwhile defining the calcaneus. You mayfind that it is helpful to change handsthroughout the process to get the bestimpression and forefoot alignment.
TC Flex Casting Instructions (continued)

10
9. When the plaster begins to set up,position the foot on the floor or cast-ing stand and exert downward pres-sure on the knee in midline to helpmaintain the sagittal plane position.
10. Work the fiberglass intimately aroundthe achilles, malleoli, and calcaneus.It is more important to capturethe proper hindfoot, midfoot andforefoot alignment than sagittalplane alignment.
11. Mark the midline of the cast verticallyand use hatch marks horizontally tofacilitate proper alignment of the castafter removal.
12. When the cast has almost cured andbefore it becomes extremely rigid,remove the impression by cuttingalong the cutting strip or flexible tubewith a cast cutter, scissors, or othersafe cutting device. Using scissors, cutthrough the fiberglass and outsidelayer of stockinet.
13. Spread the impression open andremove it from the extremity. Removethe layer of stockinet against thepatient's leg.
14. Check the impression to ensure that itis firm and completely laminated.Evaluate the alignment and definition.
15. If the impression is acceptable,remove the stockinet and close the cast using electrical tape or staples. Label the impression with the patient's name or identification number, allow it to cure completely(approx. 1 hour), and ship it toOrthomerica with the completedpaperwork.
TC Flex Casting Instructions (continued)
TC AFO SYSTEM
TM
ORTHOMERICA PRODUCTS INC. | THE GLOBAL ORTHOTIC SOLUTION
TEL: 877.737.8444 | FAX: 877.737.8445ORTHOMERICA.COM | TCFLEX.COM
© 2005 Orthomerica Products, Inc. All Rights Reserved. SL00018 Rev.A
SMTeam RehabORTHOTIST | THERAPIST | PHYSICIAN | PATIENT
™

11
The TC Flex Orthometry Forms are designed so that each design has its ownform which includes line drawings of default trim lines, straps, and compo-nents specific to each orthosis. The reverse side of the form has space andline drawings to indicate any changes or deviations you require. In addi-tion, this area contains information about the available padding, strap col-ors, and transfer patterns. Certain defaults are standard for each design,and Orthomerica technicians will fabricate the orthosis based on the defaultdesign for the orthosis if the default sections are incomplete. Other sections(like the cast correction position of function) are specific to each patientand must be completed for the orthosis to be processed. If the requiredsections are incomplete, an Orthomerica customer service representativewill contact you for the necessary information. Despite our best efforts,there will most likely be a delay in the standard 4-day turn around timewhen key information is missing on the Orthometry Form.
Type of orthosis and part numberThe name of each orthosis is printed on the top left corner of the orthome-try form along with the Orthomerica part number. A drawing is also placedat the top of the form to assist with choosing the correct Orthometry Form.
Patient InformationOrthomerica is a HIPPA compliant manufacturer. Feel free to write thepatient's name or specific identification number or code in the PatientName area of the form. Complete the entire section and indicate whetherthe orthosis is for the right or left side or bilateral.
Facility InformationComplete the practitioner and facility information including name, customernumber, address, phone, or fax. Add a PO# if required by your facility.
DefaultsThe symbol indicates the default in each section. The default will beused if information is not provided.
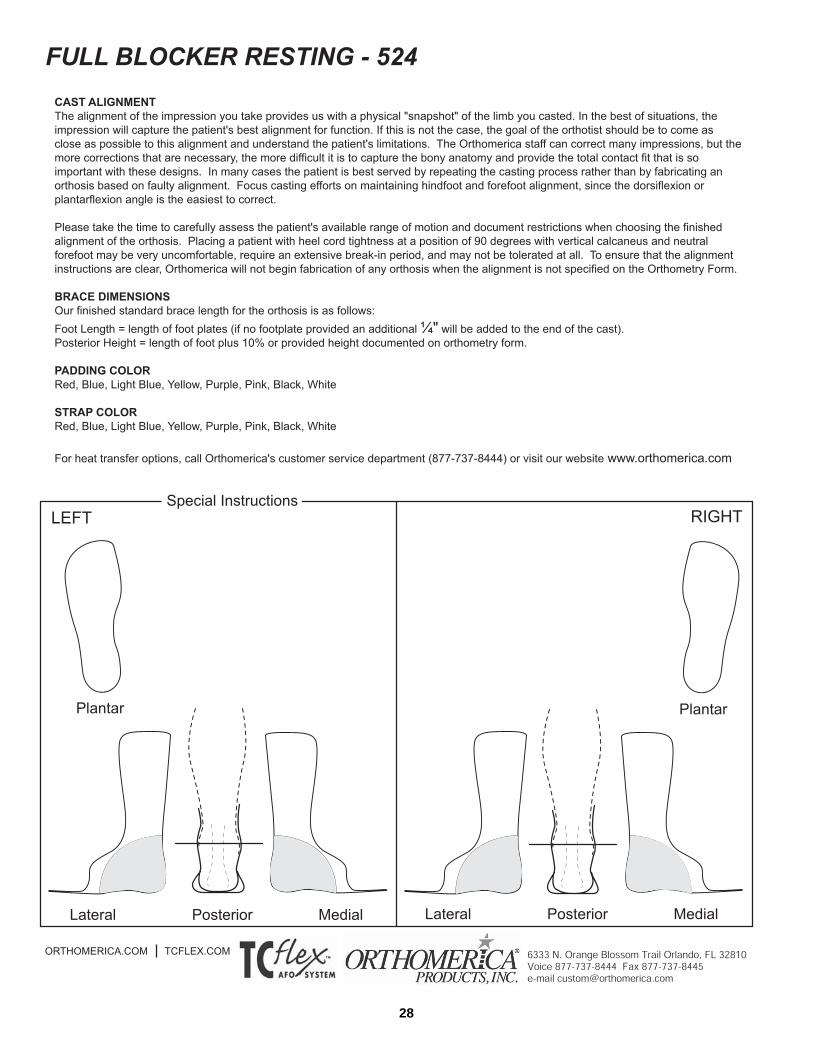
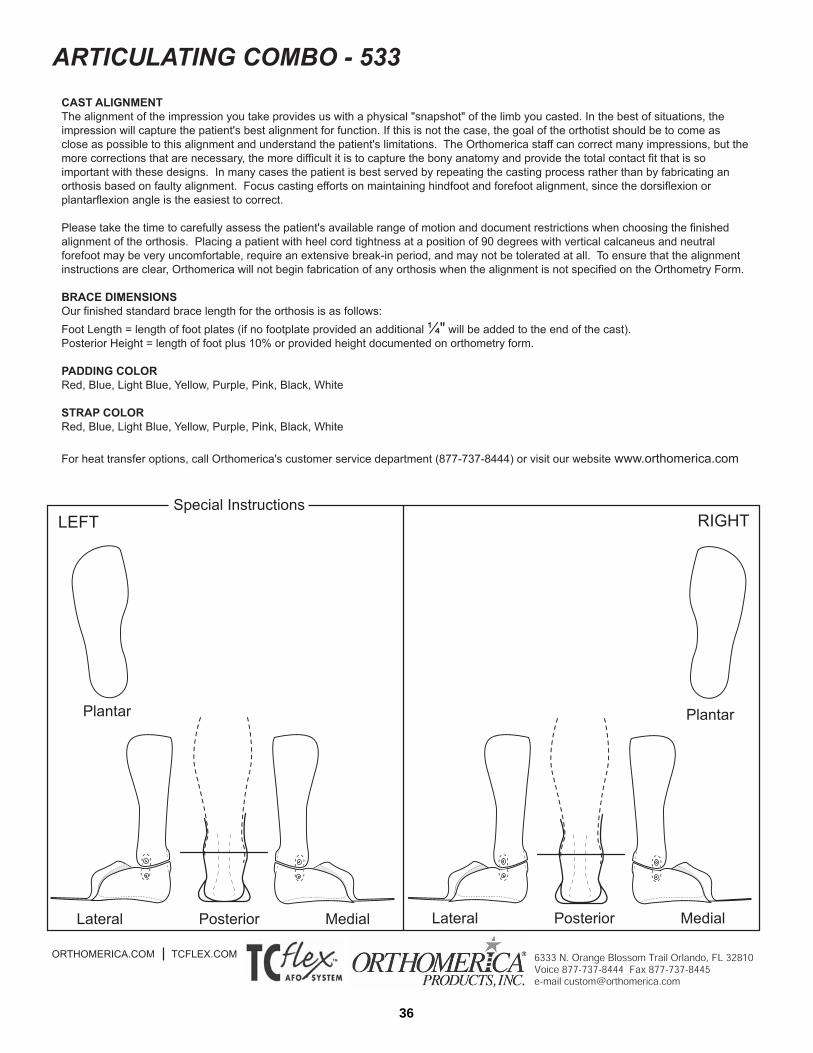
Line DrawingThe default trim lines are shown in the line drawing on each form. Shadedareas indicate foam padding. Default and optional straps are shown foreach design.
Special instructionsPlease note any additional information that will assist Orthomerica in mak-ing the best possible orthosis for your patient. This may include but is notlimited to restrictions in range of motion, special posting, trim linerequests, or other details pertinent to the fabrication of the orthosis.
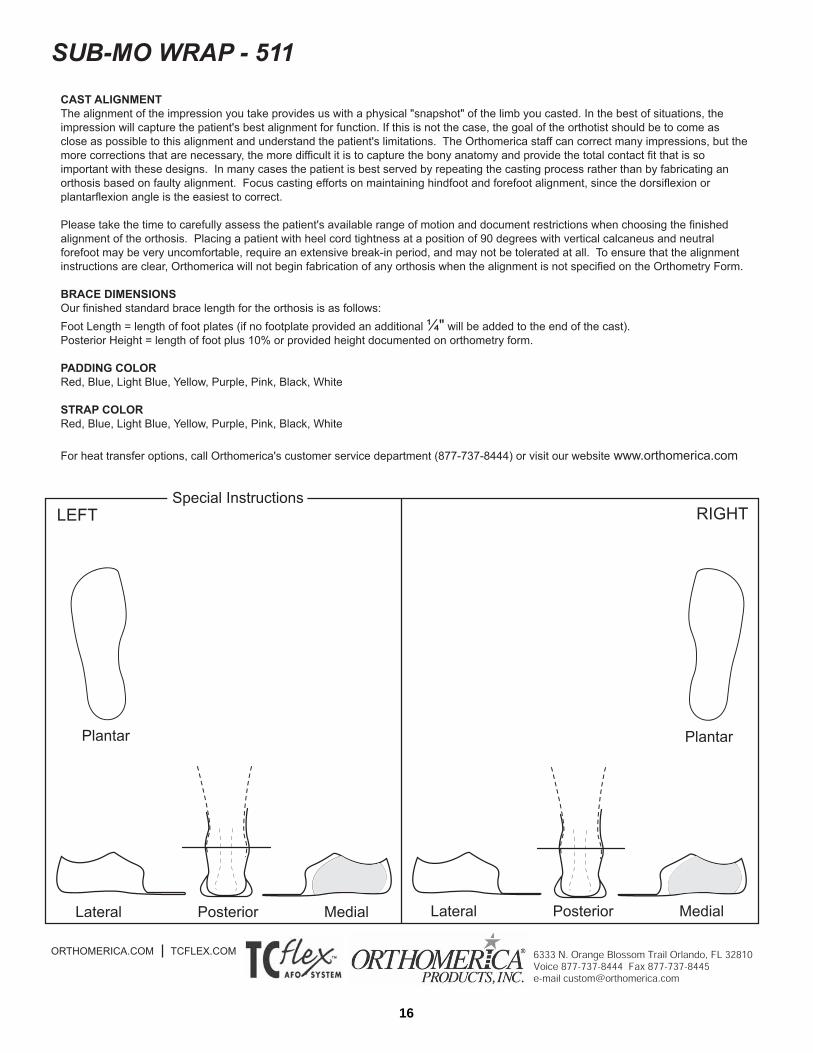
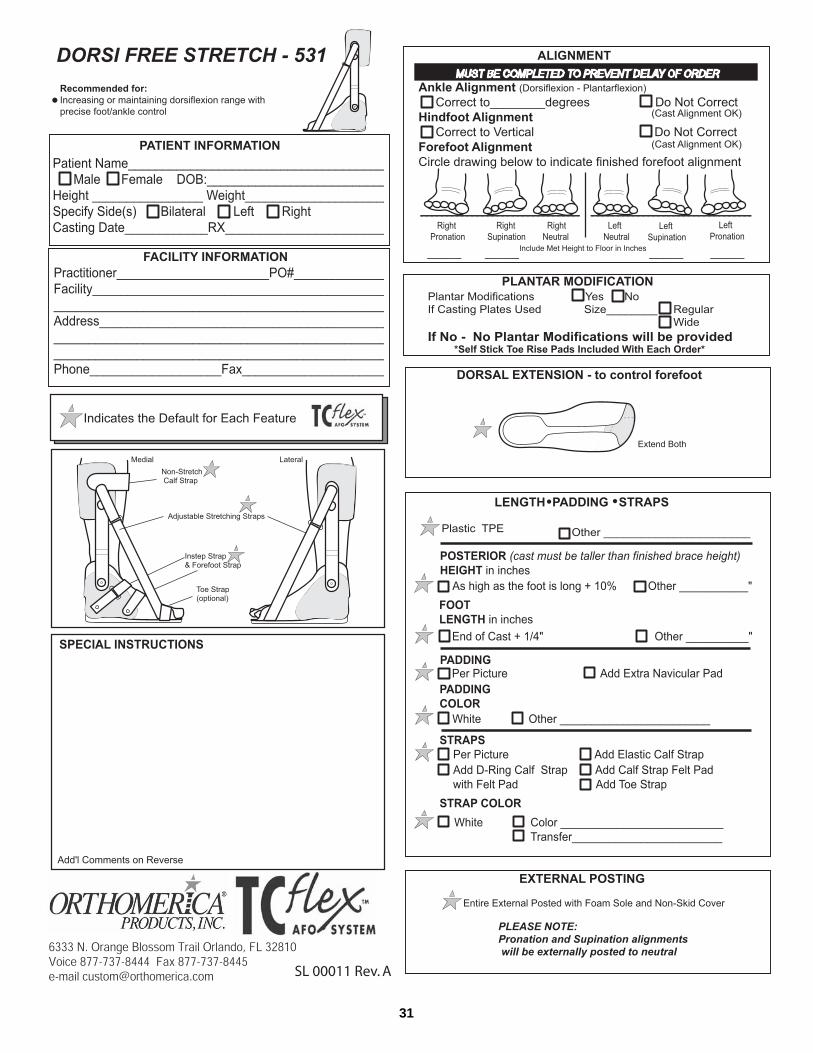
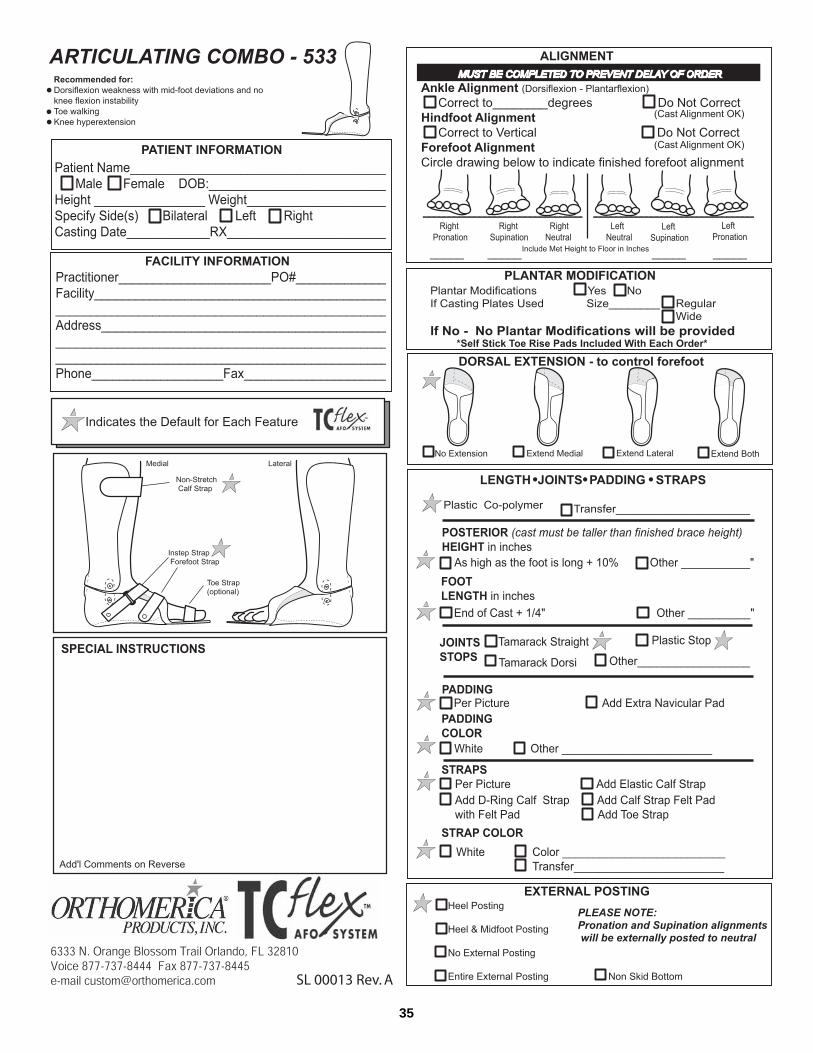
Cast correction: This section must be completed to prevent delay of order.This section is the most important part of the Orthometry form. With inputfrom other health care providers, the practitioner should perform a thor-ough evaluation of the patient's range of motion, muscle strength and weak-
nesses. The practitioner should consider the patient's developmental aswell as occupational activities before determining the optimal alignment forfunction. If the patient has the range of motion available, it isusually best to choose a vertical hind foot with neutral forefoot and anklealignment at 90 degrees or a few degrees of dorsiflexion. Hind footalignment should never be compromised because it is the keyto controlling the midfoot and forefoot position.
If the patient lacks forefoot range of motion, consider posting the forefootin supination or pronation to maintain a vertical calcaneus with the ankleas close to 90 degrees as possible. With the hindfoot vertical, measure andrecord the height from the 1st metatarsal to the floor to post the forefoot insupination. With the hindfoot vertical, measure and record the height fromthe 5th metatarsal to the floor to post the forefoot in pronation. Extrinsicposting is used to post the forefoot to a vertical hindfoot.
If the patient lacks dorsiflexion range, the Transformer is often a goodoption. The ankle motion can be adjusted for both dorsiflexion and plan-tarflexion and the orthotist can use heel wedges to bring the ground up tothe foot to accommodate the limited range. Over time, the ankle joint canbe adjusted to accommodate gains in range of motion. Patients may alsobenefit from the Dorsi-Free Stretch, an orthosis usually worn at night toincrease range of motion.
Patients do not tolerate alignment outside their range of motion capabilities.Botox injections, serial casting, therapeutic intervention and/or surgery maybe used prior to orthotic management to increase range of motion and pro-mote more effective alignment. If these interventions are not available orappropriate, the orthosis should be set in the best possible alignment asthis will still promote improved weightbearing and biomechanics for func-tional activities.
Plantar ModificationTotal contact default plantar modifications include a well-defined calcaneus,peroneal arch, medial longitudinal arch, metatarsal arch and toe rise pad.If these plantar modifications are not desired, check "No" in this category.If a casting plate was used, please indicate the size and width of the castingplate. A removable toe rise pad is the default for this section and is includ-ed with every orthosis.
TC AFO SYSTEM
TM Orthometry Forms
THE GLOBAL ORTHOTIC SOLUTIONTEL: 877.737.8444 | FAX: 877.737.8445ORTHOMERICA.COM | TCFLEX.COM
© 2005 Orthomerica Products, Inc. All Rights Reserved. SL00001 Rev.A
SM
®

12
Dorsal Trim linesThe length of the dorsal trim line can help to control coronal plane forefootdeviations. Mark "Extend Medial" if you wish to control forefoot adduction.Mark "Extend Lateral" if you wish to control forefoot abduction. Indicate"Extend Both" if you wish to control an extremely spastic foot and/or wantto stiffen the anterior portion of the orthosis. "No Dorsal Wrap" is an optionon select designs for those wanting more traditional trim lines. The dorsaltrim line default is plastic ending just proximal to the 1st and 5th metatarsalhead. This provides midline alignment and makes it easier to fit shoes overthe orthosis.
PlasticThe default plastic for most TCFlex designs is 3/32” copolymer althoughTPE is used for the Full Blocker Resting and Dorsi-Free Stretch orthoses.Indicate your choice of transfer design (if any) in this section. Transferpaper changes periodically, and the most current designs are posted on theOrthomerica web site at www.orthomerica.com and the TC Flex website atwww.tcflex.com.
Posterior Height The posterior orthosis height is as high as the foot is long plus 10%.Always cast the patient at least 2 cm proximal to the desired trim line toensure that the orthosis will be at the desired height. Indicate any deviationfrom the default height on the Orthometry Form. (The Reactor Group doesnot have a default height and will be fabricated to the specific measurementindicated by the practitioner or to the top of the cast.)
Foot LengthThe standard foot length is the distance from the most posterior aspect ofthe plantar surface of the calcaneus to the distal end of the impression plus1/4". The practitioner may also record the exact finished foot length in thespace marked "Other".
JointsThe default joint on the Articulating Wrap, Articulating Combo, Dorsi-Blocker Reactor and Transformer is the Tamarack Straight Joint. Theseorthoses are also available with a Tamarack Dorsi Joint. The ArticulatingWrap and Articulating Combo have a plastic plantarflexion stop while theDorsi Blocker Reactor has free plantarflexion with anterior stop. TheTransformer uses a 655 Motion Control Limiter (MCL) as a plantarflexionstop that is adjustable for both dorsiflexion and plantarflexion.
The default joint for the Dorsi-Free Overlap and Dorsi-Free Stretch orthosesis a single axis hinge. The Dorsi-Free Overlap usually comes with a plasticplantarflexion stop, but can be ordered without the stop for patients need-ing significant medial-lateral control without sagittal plane weakness. TheDorsi Free Stretch orthosis does not come with a plantar stop option.
PaddingThe shaded areas in the line drawings indicate the default padding.Practitioners may also request an extra navicular pad by checking the boxin this section. Padding color choices include white, red, blue, light blue,yellow, purple, pink, and black.
StrapsThe default straps are indicated on each line drawing. Additional strapoptions are available by checking the desired box in this section. Strap col-ors include white, red, blue, light blue, yellow, purple, pink, black, and anytransfer pattern selected from the guide located on the Orthomerica site atwww.orthomerica.com and the TC Flex website at www.tcflex.com.
Extrinsic PostingThe default posting is a vertical heel post. If forefoot posting is needed, itwill be fabricated using an extrinsic post aligned to a vertical calcaneus.Other options include a mid-foot/heel post, no extrinsic posting, extrinsicposting on the entire bottom of the orthosis, and non-skid bottom.
Back of the Orthometry FormThe back of the Orthometry Form provides information about color choicesfor padding and straps. It also provides defaults for foot length and theposterior height of the orthosis.
Special Instructions–Line DrawingsPlease use this area to draw or indicate any areas of the orthosis requiringspecial attention from Orthomerica staff. This may include but is not limit-ed to making notations about adding extra relief over bony prominences,drawing in areas of deformity, and requesting specific changes in the totalcontact modifications.
Note: If there is a need for major trim line, design, or mate-rial changes, we recommend that you consider ordering theorthosis as a custom extremity or TC2® design. This willensure that you have the plastic options and components tomeet the needs of your patients.
TC Flex Orthometry Forms (continued)

13

14
15
16
17

18
19

20
21

22
23
24

25
26

27
28

29

30
31

32

33

34
35
36
37
38
39
40
41

42
43

44
1. Sit facing the patient so that the hip andknee are flexed at about 90 degrees andthe foot is positioned on the floor or onyour knee. Apply a medium thicknesssock without excessive embroidery ortrim to the foot and leg, smoothing outall wrinkles. A sock made of blendedfibers or wicking material is preferred toan all cotton sock. Gently bend theankle and align the foot as close as pos-sible to the alignment of the orthosis.
2. Position the orthosis behind the patient'sleg while you spread open the plasticmidfoot flaps.
3. Pull the opened orthosis forward as youposition the patient's heel into the heelcup. Press the patient's knee down andmove the plastic up and down until theheel is firmly seated into the heel cup.The plastic midfoot flaps will close com-fortably around the foot when the heel isin the correct position.
4. Peel open one side of the midfoot flapand slide one edge of the instep padbeneath the plastic. Peel open the othermidfoot flap and slide the rest of theinstep pad beneath the plastic on thatside.
5. Press down on the instep pad and kneeto align and settle the foot and ankleinside the orthosis.
6. Gently slide the foot back into the heelcup.
TC AFO SYSTEM
TM Practitioner Fitting Instructions
THE GLOBAL ORTHOTIC SOLUTIONTEL: 877.737.8444 | FAX: 877.737.8445ORTHOMERICA.COM | TCFLEX.COM
© 2005 Orthomerica Products, Inc. All Rights Reserved. Part No. 505-0000-100
SM
Team RehabORTHOTIST | THERAPIST | PHYSICIAN | PATIENT
™

45
1. Apply the orthosis over a medium weightsock with the heel well-seated in theheel cup, instep pad in place, and strapssecured.
2. Slide the toe rise pad under the patient'stoes without removing the paper toexpose the adhesive. The toe rise padshould be positioned so that the edge ofthe toe rise pad is just in front of themetatarsal heads with a couple millime-ters extra space for growth. If the toerise pad is placed too close to themetatarsal heads, it will cause discom-fort in stance. If the toe rise pad is toofar away from the metatarsal heads, thetoes will not get adequate support, andmay flex and/or claw for stability.
3. Lift the toes to determine the properpositioning of the toe rise pad. If theplastic is transparent, hold the toe padin place while you carefully lift the footuntil you can clearly see the outline ofthe toe pad under the orthosis. Using amarker, outline the toe rise pad positionon the bottom of the orthosis. If theplastic or soling material prevents visualpositioning of the toe pad, lightly outlinethe pad placement on the inside of theorthosis.
4. After removing the orthosis from thepatient's foot, remove the paper fromthe back of the toe rise pad. Positionthe toe rise pad by aligning the edge ofthe pad closest to the metatarsal headswith the outline marked on the bottomof the orthosis. Lift and position theedge of the pad until it is in the correctalignment position. Press the remainingportion of the pad into place.
5. The toe rise and plastic may need tobe trimmed to the correct length, andthis is done after assessing the patientin a weight-bearing or partial weight-bearing position. Allow extra roomfor growth, then mark the properlength of the toe rise pad and/or footplate. Remove the orthosis and trimto the correct length using strongscissors and file or a router to trimand finish the edges.
6. If the orthosis has a toe loop attach-ment, loosen the sock between thefirst and second toes. Place the toestrap between the toes and attach tothe Velcro® tab on the medial size ofthe forefoot flap.
Finding The Right Shoes
Shoes should be worn over the orthosis unless the patient is in therapy. It isadvisable to remove the insoles and spread the laces open before applying theorthosis. Shoes that have laces beginning closer to the toe typically open upmore to accommodate the orthosis. For children, the cartoon character shoesat some of the less expensive shoe stores may be deep enough to accommo-date the orthoses. Stride Rite, K-Swiss, and New Balance shoes are available atsome retail stores, and "Keeping Pace" has an extra depth shoe available toparents at 888-526-0020 or keepingpace.com. Markell TM-2000 shoes andAnswer2 shoes are available to orthotists from SPS (800.767.7776) and haveextra space to accommodate the orthosis. Adult footwear manufacturers likeNew Balance and Rockport carry athletic and professional shoes with remov-able insoles. When purchasing shoes from retail stores it may be necessary tobuy shoes a size or two larger to accommodate the orthosis. If the orthosis isworn on only one side it may be necessary to buy two pairs of the same shoein different sizes.
TC Flex Practitioner Fitting Instructions (continued)
Positioning The Toe Rise Pad
TC AFO SYSTEM
TM
ORTHOMERICA PRODUCTS INC. | THE GLOBAL ORTHOTIC SOLUTION
TEL: 877.737.8444 | FAX: 877.737.8445ORTHOMERICA.COM | TCFLEX.COM
© 2005 Orthomerica Products, Inc. All Rights Reserved. Part No. 505-0000-100
SM
46
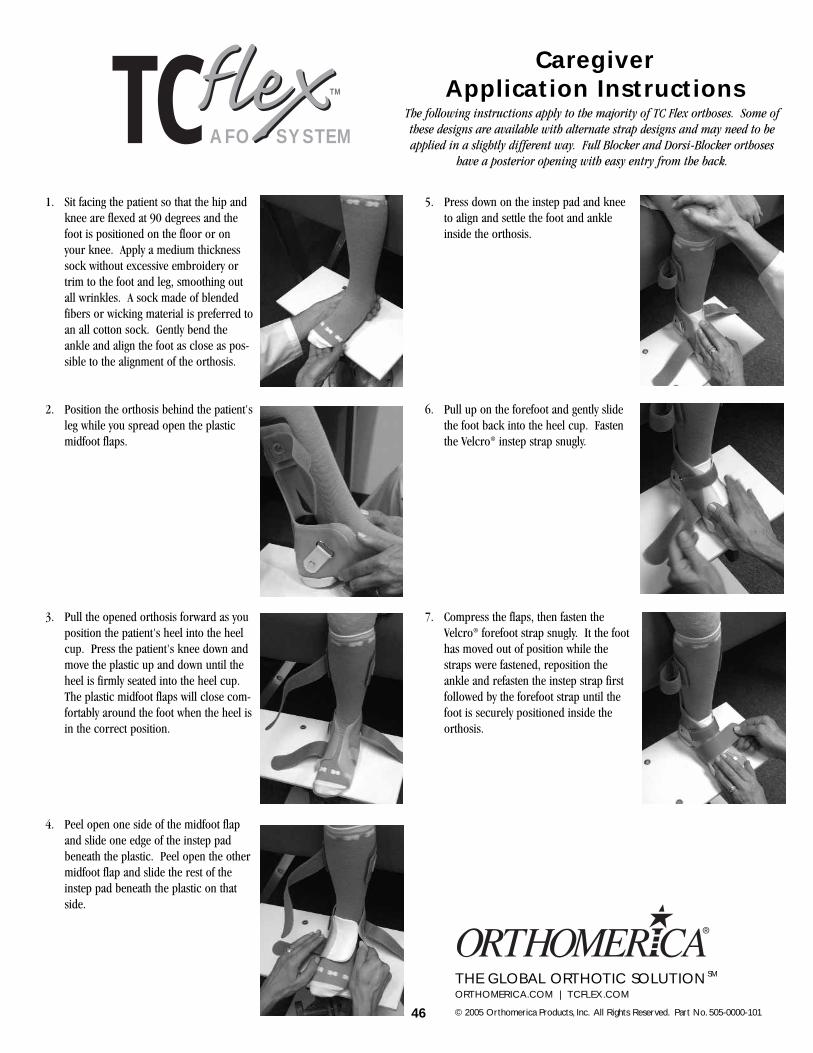
1. Sit facing the patient so that the hip andknee are flexed at 90 degrees and thefoot is positioned on the floor or onyour knee. Apply a medium thicknesssock without excessive embroidery ortrim to the foot and leg, smoothing outall wrinkles. A sock made of blendedfibers or wicking material is preferred toan all cotton sock. Gently bend theankle and align the foot as close as pos-sible to the alignment of the orthosis.
2. Position the orthosis behind the patient'sleg while you spread open the plasticmidfoot flaps.
3. Pull the opened orthosis forward as youposition the patient's heel into the heelcup. Press the patient's knee down andmove the plastic up and down until theheel is firmly seated into the heel cup.The plastic midfoot flaps will close com-fortably around the foot when the heel isin the correct position.
4. Peel open one side of the midfoot flapand slide one edge of the instep padbeneath the plastic. Peel open the othermidfoot flap and slide the rest of theinstep pad beneath the plastic on thatside.
5. Press down on the instep pad and kneeto align and settle the foot and ankleinside the orthosis.
6. Pull up on the forefoot and gently slidethe foot back into the heel cup. Fastenthe Velcro® instep strap snugly.
7. Compress the flaps, then fasten theVelcro® forefoot strap snugly. It the foothas moved out of position while thestraps were fastened, reposition theankle and refasten the instep strap firstfollowed by the forefoot strap until thefoot is securely positioned inside theorthosis.
TC AFO SYSTEM
TM
CaregiverApplication Instructions
THE GLOBAL ORTHOTIC SOLUTIONORTHOMERICA.COM | TCFLEX.COM
© 2005 Orthomerica Products, Inc. All Rights Reserved. Part No. 505-0000-101
SM
The following instructions apply to the majority of TC Flex orthoses. Some ofthese designs are available with alternate strap designs and may need to beapplied in a slightly different way. Full Blocker and Dorsi-Blocker orthoses
have a posterior opening with easy entry from the back.

47
Skin Checks and Wearing Time
During the first two weeks, it is important to remove the orthosis severaltimes a day to check for skin problems and other areas of concern. Anyred marks should disappear within 20 minutes. Marks lasting longershould be reported to your orthotist immediately because an adjustmentmay be needed to relieve the area. If pressure areas occur after wearingthe orthosis for several months, it may indicate that the orthosis is too smalland requires replacement. In some cases, switching to a thinner sock mayhelp alleviate tightness when there has been overall growth, and the ortho-tist may also have strategies to extend the life of the orthosis. Contact yourorthotist whenever you have problems or concerns about the fit or functionof the orthosis.
Finding The Right Shoes
Shoes are an integral component to the orthotictreatment program, and finding the right pair can be challenging. Fortunately, it's gotten easier to findappropriate shoes because of the popularity of athleticfootwear. Athletic shoes withlaces or Velcro® closures tend to be deeper than dressy shoes and often have insoles that can beremoved with varying degrees of difficulty. Generally, the more expensivethe shoe, the more likely it is to have an insole that is easily removed tomake room for the orthosis. Shoes that have a wide toe box and laces thatbegin closer to the toe typically open up more and accommodate the ortho-sis better. New Balance, K-Swiss, Sketchers, Stride Rite, and even shoes atsome of the less expensive shoe stores can be used with some orthoses."Keeping Pace" has an extra depth shoe available to parents at 888-526-0020 or keepingpace.com. Markell TM-2000 shoes and Answer2 shoes areavailable from your orthotist and have extra space to accommodate theorthosis. When purchasing shoes from retail stores it is sometimes neces-sary to buy shoes a size or two larger for the foot with the orthosis. If theorthosis is worn on only one side it may be necessary to buy two pairs ofthe same shoe in different sizes. If you run into problems, your orthotistmay be able to provide you with additional suggestions.
Avoiding The Wrong Shoes
There comes a time when almost every person wearing an orthosis wants towear it with a dressier shoe. Adult footwear manufacturers like Rockport,New Balance and others have made progress in this area by offering busi-ness or dressy shoes with removable insoles and more space.Unfortunately, children's shoe manufacturers have lagged behind in thisarea. For the occasional time a dressy shoe is needed, parents can some-times find lace up styles in boots or shoes at some of the big retail stores orcheaper discount shoe stores. It should be stressed that these shoes do notprovide the same support and stability as laced or Velcro® athletic shoesand should be worn for very brief periods of time. Open back shoes andsandals are not appropriate and should always be avoided. Dressy shoesshould have the same heel height as the shoes the person generally wearswith their orthosis because the heel height has an effect on the biomechani-cal alignment of the orthosis.
Care of TC Flex Orthoses
TC Flex orthoses are manufactured from a variety of thin, high temperatureplastic materials. The specific design and components were selected byyour orthotist to provide the best orthosis based on the functional require-ments of the patient. Orthoses should be worn with shoes when walkingoutside or on hard surfaces that can scratch the bottom of the orthoses.Scratches and excess wear on the bottom can lead to fractures of the ortho-sis. Except in therapy, shoes must be worn over the orthosis or the warran-ty will be voided.
An instep pad is provided with every orthosis and is used inside the mid-foot flaps to protect the skin and prevent pinching. The instep pad is animportant component of the TC Flex system, and the fit of the orthosis isdependent on its inclusion. Contact your orthotist if the instep pad is lostso that it can be replaced as soon as possible.
Your TC Flex orthosis can be cleaned using a soft cloth, mild soap andwater. Wipe out the orthosis regularly and allow it to air dry. Straps can becleaned the same way, but take several hours to dry. Do not dry the strapsusing heat of any kind, including a hair dryer.
If you find that there is sock lint consistently inside the heel cup, it mayindicate that the heel is not completely down in the orthosis. Check yourapplication of the orthosis to seat the heel properly, and if this does notresolve the problem, schedule an appointment with your orthotist for a fit-ting adjustment.
Extremely cold temperatures can cause the plastic to crack if it is suddenlystressed. Generally, the warmth of the patient's body inside the orthosiskeeps the plastic at a warmer temperature and this is not a problem. Allowthe orthosis to reach room temperature before spreading it open if it hasbeen in an extremely cold environment like the car or garage in freezingtemperatures.
Contact your orthotist if any of the straps need repair or replacement. Thestraps are an integral part of the fit and function of the orthosis.
TC Flex Warranty
Orthomerica is dedicated to providing the best orthosis possible. The TCFlex Warranty covers the orthosis for 90 days beginning 14 days after theorthosis is shipped to the orthotist. The warranty covers fit, materials, andworkmanship. Returns are coordinated through the orthotic facility andmust be accompanied by a return authorization number on the outside ofthe box with explanation for the return on the enclosed paper work. Pleasecontact your practitioner with any concerns so that any problems can beresolved quickly.
TC Flex Caregiver Application Instructions (continued)
TC AFO SYSTEM
TM
ORTHOMERICA PRODUCTS INC. | THE GLOBAL ORTHOTIC SOLUTIONORTHOMERICA.COM | TCFLEX.COM
© 2005 Orthomerica Products, Inc. All Rights Reserved. Part No. 505-0000-101
SM

CORPORATE OFFICES505 31ST STREETPO BOX 2927NEWPORT BEACH, CA 92659CUSTOMER SERVICETEL: 800.637.4500, FAX: 800.637.4501BUSINESS OFFICETEL: 949.723.4500, FAX: 949.723.4501
MANUFACTURING, CUSTOM FABRICATION AND DISTRIBUTION6333 N ORANGE BLOSSOM TRAILORLANDO, FL 32810CUSTOMER SERVICETEL: 800.446.6770, FAX: 800.638.9259CUSTOM FABRICATION DEPARTMENTTEL: 877.737.8444, FAX: 877.737.8445BUSINESS OFFICETEL: 407.290.6592, FAX: 407.290.2419
ORTHOMERICA.COM | [email protected] © 2005 ORTHOMERICA PRODUCTS, INC. ALL RIGHTS RESERVED.