Task Management User Guide - docs.oracle.com
179
Oracle Primavera Cloud Task Management User Guide Version 21 October 2021
Transcript of Task Management User Guide - docs.oracle.com

Oracle Primavera Cloud Task Management User Guide
Version 21 October 2021


3
Contents
About This Guide ............................................................................................................................... 9
Tasks Overview ................................................................................................................................. 9
Understanding Tasks App Concepts ............................................................................................... 10
Get Started with Tasks.................................................................................................................... 13
Permissions .......................................................................................................................................... 16
Security Permissions for Tasks ................................................................................................. 16
Understanding View Privileges .................................................................................................. 17
Create a Workspace Permission Set ......................................................................................... 20
Workspace Security Privileges Definitions ........................................................................ 20
Create a Project Permission Set ................................................................................................ 27Project Security Privileges Definitions ............................................................................... 28
Dictionaries ........................................................................................................................................... 47
Calendars Overview.................................................................................................................... 48
Add a Holiday List ............................................................................................................... 48
Add a Calendar ................................................................................................................... 49
Configure Calendar Time Period Settings ......................................................................... 51
Specify Calendar Availability for Assignment .................................................................... 51
Set Calendar Exception Time ............................................................................................. 52
Set the Default Calendar ................................................................................................... 53
Codes Overview .......................................................................................................................... 54Add a Code .......................................................................................................................... 55
Add a Value to a Code ........................................................................................................ 56
Update the Owning Workspace of a Code ........................................................................ 58
Reasons Overview ...................................................................................................................... 58Add a Reason...................................................................................................................... 59
Update the Owning Workspace for a Reason ................................................................... 59
Defaults & Options ............................................................................................................................... 60
Field Labels Overview ................................................................................................................ 60
Access a Standard Field Description ................................................................................. 60
Change a Standard Field Label ......................................................................................... 61
Configured Fields Overview ....................................................................................................... 62
Change a Configured Field Label ...................................................................................... 62
Add a Formula-Based Configured Field: Example ............................................................ 63
Update the Owning Workspace of a Configured Field ...................................................... 64
Task ............................................................................................................................................. 65
Configure Auto Numbering Defaults for a Task ................................................................ 66
Add a Task Field ................................................................................................................. 66
Task Constraint .......................................................................................................................... 67
Configure Auto Numbering Defaults for a Task Constraint .............................................. 67
Add a Task Constraint Field ............................................................................................... 68

Task Management User Guide
4
Project Settings .................................................................................................................................... 68
Details ......................................................................................................................................... 68Assign a Manager to a Project ........................................................................................... 69
Assign a Project Calendar .................................................................................................. 69
Configure Schedule Settings for a Project ........................................................................ 70
Settings ....................................................................................................................................... 71Configure the Task Time Zone Setting .............................................................................. 71
Configure Task Summary Settings .................................................................................... 71
Configure the Auto Numbering Defaults for a Project ...................................................... 72
Dictionaries (Project) .................................................................................................................. 73Calendars (Project-level) .................................................................................................... 73
Add a Holiday List to a Project-level Calendar .................................................................. 73
Add a Project-level Calendar .............................................................................................. 74
Configure Project-level Calendar Time Period Settings .................................................... 75
Specify Project-level Calendar Availability for Assignment............................................... 76
Set Project-level Calendar Exception Time ....................................................................... 77
Promote a Project-level Calendar to the Parent Workspace ............................................ 78
Codes (Project-level) ........................................................................................................... 79
Add a Project-level Code .................................................................................................... 79
Add a Value to a Project-level Code................................................................................... 80
Additional Settings ............................................................................................................................... 80
Assign a Company to a Project .................................................................................................. 80
Work Plan Overview ........................................................................................................................ 81
Working with the Work Plan Page ....................................................................................................... 82
Create a Task on the Work Plan Page ................................................................................................. 83
Add a Task or Task Milestone on the Work Plan Page ............................................................ 83
Create a Task by Import ............................................................................................................. 85
Download an Import Template for Importing Tasks ......................................................... 85
Import Tasks from Microsoft Excel .................................................................................... 86
Manage Tasks on the Work Plan Page ............................................................................................... 86
Add a Hand-off on the Work Plan Page ..................................................................................... 87
Move a Task on the Work Plan Page ........................................................................................ 88
Modify Task Details on the Work Plan Page ............................................................................. 90
Propose and Accept a Task Due Date on the Work Plan Page ............................................... 91
Assign a Constraint to a Task on the Work Plan Page ............................................................. 92
Commit to a Task on the Work Plan Page ................................................................................ 93
Recommit to a Task on the Work Plan Page ............................................................................ 94
Complete a Task on the Work Plan Page.................................................................................. 95
Customize Work Plan Task Cards ........................................................................................................ 96
Customize the Work Plan Display ........................................................................................................ 97
Configure and Apply Tasks Quick Filters ............................................................................................. 98
View Activity Details in the Tasks App ................................................................................................. 99
Set Task Notification Preferences ..................................................................................................... 100
Search the Work Plan Page ............................................................................................................... 101

Contents
5
Print the Planning Board to PDF ........................................................................................................ 101
Hand-offs Overview ....................................................................................................................... 103
Working with the Hand-offs Page ...................................................................................................... 104
Add a Task or Task Milestone on the Hand-offs Page ..................................................................... 105
Add a Hand-off on the Hand-offs Page.............................................................................................. 107
Propose and Accept a Task Due Date on the Hand-offs Page ........................................................ 109
Assign a Constraint to a Task on the Hand-offs Page ...................................................................... 110
Commit to a Task on the Hand-offs Page ......................................................................................... 110
Recommit to a Task on the Hand-offs Page ..................................................................................... 111
Complete a Task on the Hand-offs Page .......................................................................................... 112
Configure and Apply Tasks Quick Filters ........................................................................................... 113
View Activity Details in the Tasks App ............................................................................................... 114
Set Task Notification Preferences ..................................................................................................... 115
Task List Overview ........................................................................................................................ 116
Create a Task on the Task List Page ................................................................................................. 116
Add a Task or Task Milestone on the Task List Page ............................................................. 117
Create a Task by Import ........................................................................................................... 118
Download an Import Template for Importing Tasks ....................................................... 118
Import Tasks from Microsoft Excel .................................................................................. 118
Cut or Copy and Paste a Task on the Task List Page ............................................................. 119
Modify Tasks on the Task List Page .................................................................................................. 119
Assign a User to a Task on the Task List Page ....................................................................... 120
Add Duration to a Task on the Task List Page........................................................................ 120
Add a Due Date to a Task on the Task List Page ................................................................... 121
Propose and Accept a Task Due Date on the Task List Page ................................................ 122
Add a Hand-off on the Task List Page ..................................................................................... 123
Assign a Task to an Activity on the Task List Page ................................................................. 124
Modify Tasks in the Task List Gantt Chart .............................................................................. 124
Assign a Constraint to a Task on the Task List Page ............................................................. 125
Commit to a Task on the Task List Page ................................................................................ 126
Recommit to a Task on the Task List Page ............................................................................ 127
Complete a Task on the Task List Page .................................................................................. 128
Configure and Apply Tasks Quick Filters ........................................................................................... 129
View Activity Details in the Tasks App ............................................................................................... 129
Set Task Notification Preferences ..................................................................................................... 130
Configure the Task List Page Table ................................................................................................... 132
Task List Fields ................................................................................................................................... 133
Constraints Overview .................................................................................................................... 136
Add a Task Constraint on the Constraints Page ............................................................................... 136
Assign a Task to a Constraint on the Constraints Page ................................................................... 137
Add Constraint Notes ......................................................................................................................... 138
Deliver a Constraint ............................................................................................................................ 138
Task Management User Guide
6
Add a File in a Files Detail Window ................................................................................................... 138
Link a File to an Object ...................................................................................................................... 139
Configure and Apply Tasks Quick Filters ........................................................................................... 140
Tasks Analysis Overview ............................................................................................................... 141
View Tasks Analysis Metrics .............................................................................................................. 142
Task Summary Overview ............................................................................................................... 143
Configure Task Summary Settings .................................................................................................... 143
View the Task Summary Panel .......................................................................................................... 144
Task Summary Reference .................................................................................................................. 145
Task Icon Reference ..................................................................................................................... 146
Using Touch-Screen Gestures in Primavera Cloud ....................................................................... 148
Configure View Settings ................................................................................................................ 150
Views Overview ................................................................................................................................... 150
Add a View........................................................................................................................................... 151
Apply a View ........................................................................................................................................ 152
Configure a Column ............................................................................................................................ 152
Configure a Saved Filter ..................................................................................................................... 153
Apply a Saved Filter ............................................................................................................................ 154
Configure and Apply Filtering ............................................................................................................. 155
Configure Grouping Options............................................................................................................... 156
Configure Sorting Options .................................................................................................................. 158
Configure Gantt Bars .......................................................................................................................... 158
Configure Gantt Chart Settings .......................................................................................................... 159
Configure Network Settings ............................................................................................................... 161
Configure Quick Filters ....................................................................................................................... 161
Apply a Quick Filter ............................................................................................................................. 162
Configure Task Counts ....................................................................................................................... 162
Configure a Timescale ........................................................................................................................ 163
Configure Spreadsheet Rows ............................................................................................................ 164
Configure Currency Settings .............................................................................................................. 164
Configure Formatting ......................................................................................................................... 165
Appendix of Referenced Navigation Steps ................................................................................... 167
Navigate to the WBS page ................................................................................................................. 167
Navigate to the Activities page .......................................................................................................... 167
Navigate to the project Activities page.............................................................................................. 167
Navigate to the Baselines page ......................................................................................................... 167
Navigate to the Schedule Comparison page .................................................................................... 168
Navigate to the workspace resource page ....................................................................................... 168
Navigate to the project resources page ............................................................................................ 168
Navigate to the workspace or project resources page .................................................................... 169
Navigate to the workspace roles page .............................................................................................. 169

Contents
7
Navigate to the project roles page .................................................................................................... 169
Navigate to the workspace or project roles page ............................................................................. 169
Navigate to the workspace resource assignments page ................................................................. 170
Navigate to the project or program resource assignments page .................................................... 170
Navigate to the workspace resource analysis page ......................................................................... 170
Navigate to the project or program resource analysis page ............................................................ 171
Navigate to the files page .................................................................................................................. 171
Navigate to the project files page ..................................................................................................... 171
Navigate to the project or portfolio files page .................................................................................. 171
Navigate to the project Details page ................................................................................................. 172
Navigate to the project settings page ............................................................................................... 172
Navigate to the program settings page ............................................................................................. 172
Navigate to the program codes page ................................................................................................ 173
Navigate to a dictionary page ............................................................................................................ 173
Navigate to the Calendars dictionary page ....................................................................................... 173
Navigate to the Codes dictionary page ............................................................................................. 173
Navigate to the Curve Profiles dictionary page ................................................................................ 174
Navigate to the Units of Measure dictionary page ........................................................................... 174
Navigate to the Locations dictionary page ....................................................................................... 174
Navigate to the Currencies dictionary page ...................................................................................... 175
Navigate to the project Calendars dictionary page .......................................................................... 175
Navigate to the project Codes dictionary page ................................................................................. 175
Navigate to an object configuration page ......................................................................................... 176
Navigate to the Activity configuration page ...................................................................................... 176
Navigate to the File configuration page ............................................................................................ 176
Navigate to the Project configuration page ...................................................................................... 176
Navigate to the Program configuration page .................................................................................... 177
Navigate to the Resource/Role configuration page ......................................................................... 177
Navigate to the Resource Assignment configuration page.............................................................. 177
Navigate to the WBS configuration page .......................................................................................... 178
Navigate to the Manage Services page ............................................................................................ 178
Navigate to the Preferences page ..................................................................................................... 178
Copyright ....................................................................................................................................... 179


9
About This Guide
This guide explains how to use the Tasks app in Oracle Primavera Cloud to plan and manage project work tasks.
Project managers, schedulers, superintendents, subcontractors, and trade foremen should read this guide.
Tasks Overview
The Tasks app combines lean construction planning and scheduling principles with general task management functionality to provide a lightweight work management solution for the projects in your organization. Using the Tasks app, break down project responsibilities into tasks to manage work more effectively, without the overhead or complexity of a traditional CPM schedule. You can optionally align your tasks with your CPM schedule for a more detailed breakdown of the work to be performed.
Task management functionality is supported on multiple pages, each designed and optimized for specific purposes:
Work Plan (see "Work Plan Overview" on page 81): Plan tasks in weekly intervals on a virtual planning board. Focus on short-term planning using a planning period task filter and customizing the number of weeks displayed.
Hand-offs (see "Hand-offs Overview" on page 103): View a network diagram of the tasks and task milestones in your project and create hand-off relationships between them. Create hand-offs using a table, by drawing lines between tasks, or by group selection.
Task List (see "Task List Overview" on page 116): Manage private and public tasks in a table format. Create named views to customize the display of columns, grouping and sorting options, and task filters. Sequence tasks and create hand-offs using a Gantt view. Use the Task List page at the program level to plan and manage tasks for multiple projects simultaneously.
While each page specializes in a particular area, you can perform the same task management duties on any of them.
Two additional pages provide supporting functionality. Use the Constraints (see "Constraints Overview" on page 136) page to identify the issues or materials that must be addressed before an associated task can begin. Use the Analysis (see "Tasks Analysis Overview" on page 141) page to monitor a variety of real-time metric charts that track task and company performance.
See Understanding Tasks App Concepts (on page 10) to learn about task management in Primavera Cloud. These concepts are used in processes across the pages in the Tasks app.

Task Management User Guide
10
Understanding Tasks App Concepts
The following concepts are used in processes across the pages in the Tasks app. Processes such as creating tasks, identifying constraints, committing to tasks, and adding hand-offs between tasks occur regularly during daily or weekly planning sessions. They can be performed as many times as necessary and in any order.
Planning Period
The Planning Period enables a team of project collaborators to control the window of time that they want to focus on for planning and scheduling their task work. At the task level, short-term planning periods are ideal, such as displaying tasks for only the current week and the following week.
Tasks
Tasks are identified during planning as the physical work to be performed by the tradespeople on the project. Each task has a name, duration, and associated company responsible for performing the work on the task. A user within the assigned company can also be added to the task to indicate individual responsibility. Task cards are colored according to the associated company's assigned color. Tasks can be assigned to project activities to view your CPM schedule in greater detail, but this is not required. A variety of indicators are available to ensure that tasks associated with an activity align with the activity's dates and status. Tasks can be public or private. Public tasks are visible to all users with access to the app and the project, regardless of their company assignment. To edit public tasks, users must have the required security privileges. Private tasks are only visible and editable to the user who created them and application administrators.
There are two task types: Task and Task Milestone. Regular tasks describe work to be performed and can be public or private. Task milestones are used to mark distinct phases of your project and can only be public. They do not have durations or assigned users, and a company assignment is optional.
Tasks without due dates are called unplanned tasks, and tasks with due dates are called planned tasks. A due date is added to a task to indicate when the company expects to complete it. In scenarios where tasks are part of a chain of tasks belonging to multiple companies, a company can propose a new task due date that can be reviewed and accepted by the superintendent and relevant stakeholders. This provides additional control when changing dates that may affect the tasks of other companies. When a company is confident that it can perform the work on a task, it can create a commitment. Due dates, proposed due dates, and commitment due dates can be updated as needed to accommodate changes to the work plan. When work on a task has finished, the task can be marked complete.
Tasks in the Tasks app display icons that indicate different statuses. Several icons can be selected to edit task details. See Task Icon Reference (on page 146) for icon descriptions.

Understanding Tasks App Concepts
11
Constraints
During project planning sessions, you will identify a variety of conditions that must be met before work on a particular task can begin. These conditions are known as task constraints. A constraint could be a drawing or specification, mandatory inspection, material delivery, or submittal approval that is associated with a specific task. A constraint may impact the start of one or more tasks, and a single task may have multiple constraints. Using constraint functionality is optional, but it enables you to define your project tasks and their requirements in greater detail.
The goal of constraint planning is to ensure all constraints are identified and resolved before the associated task is scheduled to begin. The following steps can be done in any order.
Identify the issues, materials, or other deliverables that your tasks will require before they can begin. These are your constraints. You can add notes and upload files to each constraint.
Designate a company and user as responsible for addressing individual constraints.
Associate one or more public tasks with each constraint to indicate that they will be impacted by the constraint.
Enter dates on each constraint for its promised delivery by the responsible party and for its necessary resolution. The date by which the constraint needs to be resolved will most likely be before the associated task's start date.
When the constraint is actually resolved, deliver the constraint.
Commitments
Commitments are optional submitted agreements to assume responsibility for the work to be performed on a public task. The assigned company and user commit to perform the work by a specific date. If the commitment due date is not met, then the task is overdue. Responsible users can recommit to overdue tasks, providing a new due date, and one or more reasons for why the previous commitment was not met, and any additional comments they may have. Task commitment history can be tracked and reported on according to due dates and reasons, and comments. Commitment history enables you to view trends, evaluate performance, and identify issues with companies and users over time, enabling you to make decisions regarding their future use. When a task is committed or recommitted, any proposed due date is removed, and the task due date is updated to match the committed due date. You cannot commit to task milestones.
Hand-offs
A hand-off is a connection between two tasks that indicates the sequence in which the task work should be performed. Work is "handed off" to the next task to be performed after its preceding task has been completed.

Task Management User Guide
12
Hand-offs are an important tool for accurately modeling the flow of task work during push planning and pull planning. In traditional or push planning, work is planned in sequence from the start of a project or task milestone. Planners "push" work through the sequence according to an established schedule. In pull planning, the sequence of work is determined by responsible parties planning backward from a task milestone or goal. Performers request or "pull" work from their dependencies based on demand for subsequent work to begin and after all prerequisite tasks have been completed. In both methods, hand-offs provide a tool for project stakeholders to properly sequence their tasks.
Tasks can have multiple predecessor and successor hand-offs to accurately detail all of the work dependencies in a project. Hand-off types describe the hand-off relationship between two tasks. Tasks support start and finish hand-off connections, while task milestones only support finish connections. You can create the following hand-off relationships:
Finish to Start (between two tasks; between a task milestone and a task). Finish to Start types indicate that a successor task should start only after its predecessor has finished. In a Finish to Start hand-off, the due date of the predecessor task cannot occur on or after the start date of the successor task.
Finish to Finish (between two tasks; between two task milestones; between a task and a task milestone; between a task milestone and a task). Finish to Finish types indicate that the successor cannot finish until its predecessor finishes. In a Finish to Finish hand-off, the due date of the predecessor task can occur on or before the due date of the successor task.
Start to Start (between two tasks). Start to Start types indicate that the successor task cannot start before the predecessor task has started. In a Start to Start hand-off, the start date of the successor task must be equal to or later than the start date of the predecessor task.
Hand-offs can be created between tasks with the same, different, or no activity assignments. If necessary, you can modify the activity assignment of a task in a hand-off chain without affecting the chain itself. A hand-off chain can also exist across multiple companies. If a hand-off is added between a planned and an unplanned task, the unplanned task is given a due date. Tasks can have multiple hand-offs to describe the variety of relationships a task might have to other tasks. However, two tasks can only have one hand-off between them.
Hand-off Slack
As your project progresses, and tasks are performed, added, and delayed, additional time may be added to the hand-offs between tasks. This is called slack. There are two types of slack in Oracle Primavera Cloud:
Dependency slack: The amount of time a task can be delayed before affecting a successor's start date (for Finish to Start and Start to Start relationships) or finish date (for Finish to Finish relationships). It is calculated for every successor task hand-off.
Task slack: The amount of time a task can be delayed before it affects the start date or finish date of its most immediate successor. The task slack value is a task's lowest dependency slack value.
Slack is a read-only value that can help you determine where flexibility exists between tasks and which tasks may cause delays to your project.
Hand-off Lag

Get Started with Tasks
13
Some tasks in a hand-off relationship require a period of no work between the predecessor and successor task. This is called lag. You can choose to use work days only or work days and non-work days as part of lag. Unlike slack, lag can't be consumed in a hand-off.
In a Finish to Start hand-off, lag is the delay between the predecessor task finish and the successor task start. In a Start to Start hand-off, lag is the delay between the predecessor task start and the successor task start. In a Finish to Finish hand-off, lag is the delay between the predecessor task finish and the successor task finish.
Hand-off Modes
There are two hand-off modes in the Tasks app. Each mode offers different functionality when modifying your tasks.
1) Keep Hand-offs: Use this mode when you want to maintain the relationships and due dates as much as possible, even if slack is affected. In Keep mode, hand-off logic is maintained when due dates are added, changed, or removed. Slack is added or consumed when changing existing due dates. This is the default hand-off mode.
Adding or removing a task due date will do the same to all other tasks in the chain based on their duration and chain position. For example, if you add a due date to the first task in a chain, the subsequent tasks are given a due date calculated from a combination of the predecessor due date and the duration of the task. You cannot remove a due date from a task in a chain with at least one committed task.
When modifying an existing due date of a task in a chain, several scenarios are possible. Moving a task's due date backward or forward in time will reduce dependency slack on the hand-offs in that direction until they reach zero. Dependency slack on the hand-offs in the opposite direction will increase as the due date is moved further away. If a task's due date is moved beyond the due date of a predecessor or successor, then the predecessor or successor due date is adjusted to maintain the sequence and a slack of zero.
2) Break Hand-offs: Use this mode when you want to maintain the due dates of surrounding tasks as much as possible, even if relationships are broken. In Break mode, hand-off logic is not maintained when due dates are added or removed. Slack is added or consumed when changing existing due dates until it reaches zero.
Adding or removing a task's due date will remove the task from any hand-off chains and leave the remaining tasks in the chain unchanged.
Modifying an existing due date of a task in a chain works similar to the Keep Hand-offs mode, except when a task's due date is moved beyond the due date of a predecessor or successor, the hand-off between the two tasks is broken.
In both modes, if a task's due date is moved beyond a completed task's complete date, then the hand-off is broken. Completed tasks cannot be moved.
Get Started with Tasks
This section details the basic configuration of settings you will need before using the Tasks app. Depending on how you plan to use Tasks, some of the settings below may be optional, and most settings can be configured in any order.
Task Management User Guide
14
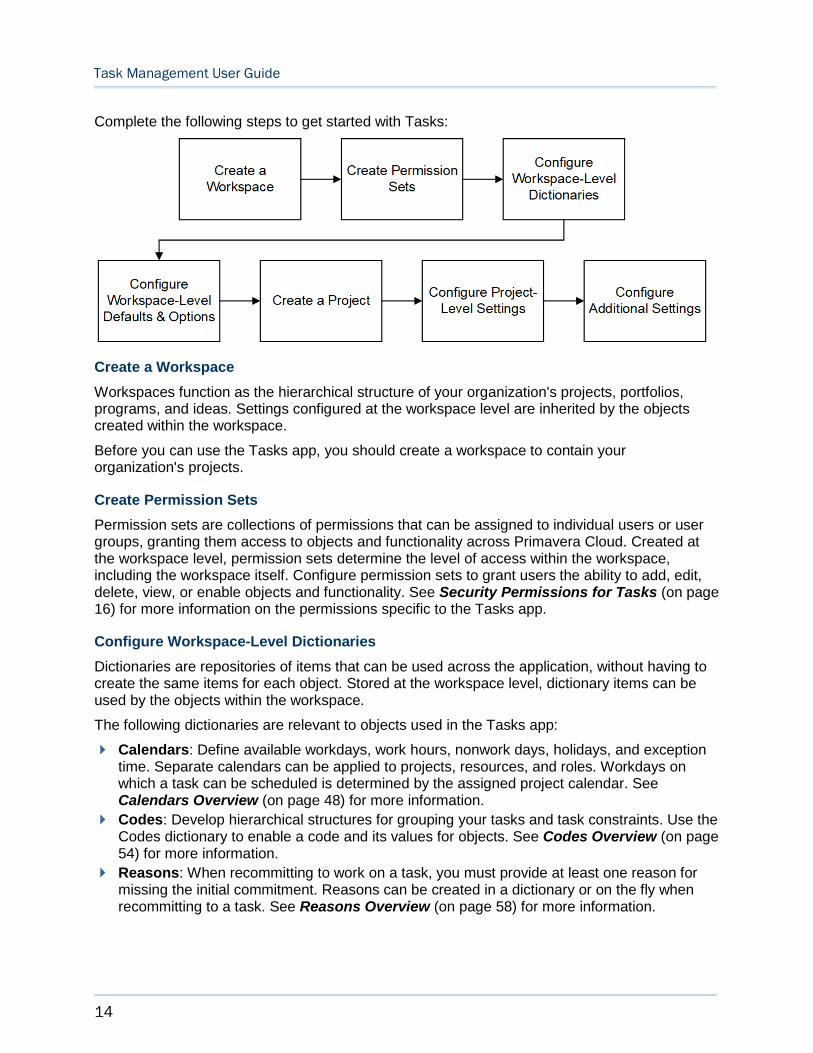
Complete the following steps to get started with Tasks:
Create a Workspace
Workspaces function as the hierarchical structure of your organization's projects, portfolios, programs, and ideas. Settings configured at the workspace level are inherited by the objects created within the workspace.
Before you can use the Tasks app, you should create a workspace to contain your organization's projects.
Create Permission Sets
Permission sets are collections of permissions that can be assigned to individual users or user groups, granting them access to objects and functionality across Primavera Cloud. Created at the workspace level, permission sets determine the level of access within the workspace, including the workspace itself. Configure permission sets to grant users the ability to add, edit, delete, view, or enable objects and functionality. See Security Permissions for Tasks (on page 16) for more information on the permissions specific to the Tasks app.
Configure Workspace-Level Dictionaries
Dictionaries are repositories of items that can be used across the application, without having to create the same items for each object. Stored at the workspace level, dictionary items can be used by the objects within the workspace.
The following dictionaries are relevant to objects used in the Tasks app:
Calendars: Define available workdays, work hours, nonwork days, holidays, and exception time. Separate calendars can be applied to projects, resources, and roles. Workdays on which a task can be scheduled is determined by the assigned project calendar. See Calendars Overview (on page 48) for more information.
Codes: Develop hierarchical structures for grouping your tasks and task constraints. Use the Codes dictionary to enable a code and its values for objects. See Codes Overview (on page 54) for more information.
Reasons: When recommitting to work on a task, you must provide at least one reason for missing the initial commitment. Reasons can be created in a dictionary or on the fly when recommitting to a task. See Reasons Overview (on page 58) for more information.

Get Started with Tasks
15
Configure Workspace-Level Defaults & Options
The default configuration of settings for an object is set at the workspace level. Each new instance of a particular object in the workspace will inherit the attributes set in Defaults & Options. The following options are relevant to the objects used in the Tasks app:
Defaults: Set auto numbering defaults for tasks and task constraints.
Field Labels: View definitions for the fields relevant to each object, updating the names of the fields to suit your organization's standards.
Configured Fields: Create configured fields to capture user-defined data.
Codes: Add codes to an object for additional classification. Assign codes from a parent workspace or codes that belong to other objects.
Defaults & Options Settings
Object Configuration Options Link
Task Defaults, Field Labels, Configured Fields, Codes
See Task (on page 65) for more information.
Task Constraint Defaults, Field Labels, Configured Fields, Codes
See Task Constraint (on page 67) for more information.
Some help topics, such as Field Labels and Configured Fields, can be performed on a wide range of objects and are separate from an object's section. Topics specific to a particular object are found within the object's section.
Create a Project
A project is a formalized plan undertaken to create a service, product, or result. You must create a project before you can use the Tasks app.
Configure Project-Level Settings
Project-level settings include details, default configuration settings inherited from the workspace, and project-specific dictionary items. New projects inherit the default settings configured at the workspace level, but these can be updated at the project level. Settings updated at the project level only apply to that project.
Before using the Tasks app, you should perform the following actions:
Details
Assign a manager (see "Assign a Manager to a Project" on page 69) to designate the person responsible for managing the project.
Assign a calendar (see "Assign a Project Calendar" on page 69) that defines the workdays, nonwork days, holidays, and exception time for your project. Valid workdays for tasks are determined by the assigned project calendar.
Configure the start and finish dates (see "Configure Schedule Settings for a Project" on page 70) of your project.
Settings

Task Management User Guide
16
Set the time zone (see "Configure the Task Time Zone Setting" on page 71) that will be used when tasks and task constraints are marked overdue or due this week.
Configure the settings (see "Configure Task Summary Settings" on page 71) for the Task Summary tool.
Set auto numbering defaults (see "Configure the Auto Numbering Defaults for a Project" on page 72) for the tasks and task constraints in your project if the numbering system you use should differ from the settings inherited from the workspace.
Project Dictionaries
Add project-level calendars (see "Calendars (Project-level)" on page 73) if they only need to be available to a specific project. Project-level calendars support assignment to the project or to activities, resources, and roles within the project, but you can also assign workspace-level calendars to the same objects.
Add project-level activity codes (see "Codes (Project-level)" on page 79) if certain codes should only be available to your project. Project-level codes are only available for activities, but you can use them in the Tasks app to group, sort, and filter by the activities assigned to your tasks. Codes that should be made available to other objects and projects in your workspace should still be added at the workspace level.
Configure Additional Settings
Assign companies (see "Assign a Company to a Project" on page 80) to your project to designate responsibility for tasks and task constraints.
After configuring the settings discussed in this topic, you can begin using the Tasks app. If you need to add or change settings, consult the topics contained in this section.
Permissions
Permission sets determine the level of access to objects and functionality. Configure permission sets to grant users or user groups access to view or complete actions on a variety of objects.
Security Permissions for Tasks
The following security permissions enable access to the objects and functionality within the Tasks app. Create workspace permission sets (see "Create a Workspace Permission Set" on page 20) to enable access to relevant workspace-level data, including dictionaries and object defaults. Create project permission sets (see "Create a Project Permission Set" on page 27) to enable access to page-level functionality and creation and modification privileges for the relevant project objects. Depending on the permission, actions may include add, edit, delete, view, or enable. Depending on how you plan to use Tasks, some of the permissions below may be optional.
To use the Tasks app, users should have the following permissions:

Get Started with Tasks
17
Workspace Permissions
Category Permissions
Configuration Calendars, Codes, Configured Fields, Field Labels, Reasons
Project Permissions
Category Permissions
Project Calendars, Codes, Companies, Project
Schedule (Current) Activities
Tasks Complete Constraints for All Companies, Complete Constraints for My Company, Configure Task Notifications for Others, Constraints, Manage Commitments and Complete All Users' Tasks, Manage Commitments and Complete My Tasks, Tasks for All Companies, Tasks for My Company
Understanding View Privileges
View privileges determine a user's ability to view certain pages or objects.
The View Only (System) permission set is a permission set provided by the application. When assigned to a user, this permission set provides view-only access to all pages and objects in a context except for certain pages and objects with their own View privilege. The pages and objects with their own View privilege have been determined to need an extra layer of security - for example, cost and financial information.
The following pages and objects have their own View privilege for an object permission set, so users need the following privileges to access the page or object. Users with only the View Only (System) permission set will not be able to view the below pages and objects:
Workspace Permission Sets
Configuration
Forms
Resource Costs/Financials
Role Costs/Financials
Work Orders
Workflow Configuration
Workflow Design
Task Management User Guide
18
General
Funding
Funding Costs/Financials
Strategies
Workspace Aggregate Cost Data
Project Permission Sets
Contract
Change Order Costs/Financials
Change Orders
Changes
Changes Costs/Financials
Commitment Costs/Financials
Commitments
Contract Costs/Financials
Contracts
Payment Application Costs/Financials
Payment Application
Potential Change Orders
Potential Change Orders Costs/Financials
Cost
Actuals
Actuals Costs/Financials
Project Budget
Field
Areas
Field Project Settings
Punchlist Issues and Inspections
QA/QC Issues and Inspections
Safety Issues and Inspections
Subcontractor Daily Reports
Superintendent Daily Reports
Funds
Funding
Funding Costs/Financials
Inspections
Inspection Templates
Inspections
Issues

Get Started with Tasks
19
Issues
Project
Project Costs/Financials
Resources
Resource Costs/Financials
Role Costs/Financials
Risk
Risk
Schedule
Scenarios
Work Order
Dispatched Reports
Work Order Rule
Portfolio Permission Sets
Funds
Funding
Funding Costs/Financials
Portfolio
Portfolio Costs
Idea Permission Sets
Idea
Evaluation
Program Permission Sets
Program
Program Costs/Financials
Cost
Program Aggregate Cost Data
Program Budget
Risk
Risk
Funds
Funding
Funding Costs/Financials

Task Management User Guide
20
Create a Workspace Permission Set
Create workspace permission sets to determine a user's level of access to a workspace. Users can only access workspaces that they have been assigned.
To create a workspace permission set:
1) In the object selector, select a workspace.
2) In the sidebar, select Summary & Settings.
3) On the Summary & Settings menu, select Permissions, and then select Workspace.
4) On the Workspace permission sets page, select Add.
5) In the Name field, enter a unique name.
6) In the Description field, enter a description of the permission set.
7) In the Privileges section, expand each category to assign privileges.
8) Select Save.
9) In the Summary & Settings panel, select Close.
Notes:
To assign users to a workspace permission set, use the Securitypage in the Workspace Summary & Settings panel.
To assign a default workspace permission set to a user group, use the Default Permissions tab of the User Groups page.
Tips
Provide clear permission set names and descriptions to help you manage permissions.
You can duplicate existing permission sets by selecting the Add menu and selecting Duplicate. The Administrator (System) permission set cannot be duplicated.
You can delete a permission set by selecting the profile and selecting Delete. You can only delete permission sets that are not currently in use. The View Only (System) and Administrator (System) global permission sets cannot be deleted.
Workspace Security Privileges Definitions
When creating a permission set, use the following definitions to determine the functionality each privilege controls and other privileges that may also be required. Selecting one privilege may automatically select other privileges if they are required for the original privilege to function properly. These other privilege selections cannot be changed without affecting the selection of the original privilege. Any privilege requirements are noted in the definition.
Configuration
Administer Field Email Queue
Enables users to administer emails for the Field app.
Analysis Views
Get Started with Tasks
21
Enables users to add, edit, and delete Analysis Views.
If you select the add, edit, or delete privileges, all privileges are automatically selected.
CBS
Enables users to add, edit, and delete a workspace CBS.
Calendars
Enables users to add, edit, and delete workspace-level calendars. To add or edit a holiday list, both Add and Edit must be enabled.
If Add is selected, Edit is also selected and cannot be changed. If Delete is selected, Add and Edit are also selected and cannot be changed.
Applies to: Workspace-level Calendars dictionary
Charts
Enables users to add, edit, and delete charts.
If you select the add privilege, edit is automatically selected and cannot be changed. If you select the delete privilege, add, edit, and view are automatically selected and cannot be changed.
Codes
Enables users to add, edit, and delete codes and code values data.
If you select the add privilege, edit is automatically selected and cannot be changed. If you select the delete privilege, add, edit, and view are automatically selected and cannot be changed.
Configured Fields
Enables users to add, edit, and delete configured fields.
If you select the add privilege, edit is automatically selected. If you select the delete privilege, add and edit are automatically selected and cannot be changed.
Cost Categories
Enables users to add, edit, or delete cost categories.
If you select the add privilege, edit is automatically selected and cannot be changed. If you select the delete privilege, add, edit, and view are automatically selected and cannot be changed.
Create Inspection Template
Enables users to create inspection templates in the Field app.
Custom Log Types
Enables users to add, edit, or delete custom log types in the workspace Summary & Settings. Users with the Add privilege can also assign a custom log type from a parent workspace or duplicate a custom log type. Users with the Delete privilege can also remove custom log assignments. Users with the Edit privilege can also apply a custom log type to programs and projects and assign and remove configured fields and codes.
If you select the add privilege, edit is automatically selected and cannot be changed. If you select the delete privilege, add and edit are automatically selected and cannot be changed.

Task Management User Guide
22
Currencies
Enables users to add, edit, and delete currencies.
If you select the add privilege, edit is automatically selected and cannot be changed. If you select the delete privilege, add, edit, and view are automatically selected and cannot be changed.
Curve Profiles
Enables users to add, edit, and delete a curve profile.
If you select the add privilege, edit is automatically selected and cannot be changed. If you select the delete privilege, add, edit, and view are automatically selected and cannot be changed.
Evaluation Categories
Enables users to add, edit, or delete evaluation categories.
If you select the add privilege, edit is automatically selected and cannot be changed. If you select the delete privilege, add and edit are automatically selected and cannot be changed.
Field Labels
Enables users to edit field labels.
Folder Templates
Enables users to add, edit, and delete folder templates.
If you select the add, edit, or delete privileges, all privileges are automatically selected.
Forms
Enables users to add, edit, delete, or view forms.
If you select the add privilege, edit, delete, and view are automatically selected. If you select the edit privilege, the view privilege is automatically selected. If you select the delete privilege, add, edit, and view are automatically selected.
Locations
Enables users to add, edit, and delete locations data.
You must assign all privileges.
Manage Field Email
Enables users to create and edit email templates in the Field app.
Manage Issue Custom Fields
Enables users to create and edit configured or custom fields for use in the Field app.
Manage Issue Statuses
Enables users to manage the status of application-wide issues in the Field app.
Manage Items Catalog
Enables users to add, edit, and delete items and standard issues in the items section of the Field app.
Measures

Get Started with Tasks
23
Enables users to add, edit, and delete measures.
If you select the add privilege, edit is automatically selected and cannot be changed. If you select the delete privilege, add and edit are automatically selected and cannot be changed.
Reasons
Enables users to add, edit, and delete reasons.
If you select the add privilege, edit is automatically selected and cannot be changed. If you select the delete privilege, add and edit are automatically selected and cannot be changed.
Report Cycles
Enables users to add, edit, and delete reporting cycles.
If you select the add privilege, edit is automatically selected and cannot be changed. If you select the delete privilege, add and edit are automatically selected and cannot be changed.
Resource Costs/Financials
Enables users to edit and view workspace-level rates on a resource owned by the current workspace or the parent workspace.
If Edit is selected, the View Resource Costs/Financials and Edit Resources privileges are also selected and cannot be changed.
Applies to: Resources
Resources
Enables users to add, edit, and delete workspace-level resources. The Add privilege also enables users to assign a resource from the parent workspace to the current workspace. To promote a resource to the parent workspace, the Add Resource privilege for the parent workspace must be enabled. To assign roles to a resource, the Edit Roles privilege must also be selected. To view and edit workspace rates on a resource owned by the current workspace or the parent workspace, the View and Edit privileges for Resource Costs/Financials must also be selected.
If Add is selected, Edit is also selected and cannot be changed. If Delete is selected, the Add Resources, Edit Resources, Edit Resource Costs/Financials and View Resource Costs/Financials privileges are also selected and cannot be changed.
Applies to: Resources
Risk Matrix Templates
Enables users to add, edit, and delete risk matrixes.
You must assign all security privileges.
Risk Threshold Templates
Enables users to add, edit, and delete risk thresholds.
You must assign all security privileges.
Role Cost/Financials
Enables users to edit and view workspace-level rates on a role owned by the current workspace or the parent workspace.
If Edit is selected, the View Role Costs/Financials and Edit Roles privileges are also selected and cannot be changed.

Task Management User Guide
24
Applies to: Resources
Roles
Enables users to add, edit, and delete workspace-level roles. The Add privilege also enables users to assign a role from the parent workspace to the current workspace. To promote a role to the parent workspace, the Add Role privilege for the parent workspace must be enabled. To assign resources to a role, the Edit Resources privilege must also be selected. To view and edit workspace rates on a role owned by the current workspace or the parent workspace, the View and Edit privileges for Role Costs/Financials must also be selected.
If Add is selected, Edit is also selected and cannot be changed. If Delete is selected, the Add Roles, Edit Roles, Edit Role Costs/Financials and View Role Costs/Financials privileges are also selected and cannot be changed.
Applies to: Resources
Rules of Credit
Enables users to add, edit, and delete rules of credit.
If you select the add privilege, edit is automatically selected and cannot be changed. If you select the delete privilege, add, edit, and view are automatically selected and cannot be changed.
Start Workflows
Enables users to start workflow instances manually from the Start Workflow page.
If the Start Workflows privilege is enabled, the Workflows and Forms view privilege is automatically selected and cannot be removed.
Strategy Types
Enables users to add, edit, or delete strategy types.
If you select the add privilege, edit is automatically selected and cannot be changed. If you select the delete privilege, add and edit are automatically selected and cannot be changed.
Units of Measure
Enables users to add, edit, and delete units of measure.
If you select the add privilege, edit is automatically selected and cannot be changed. If you select the delete privilege, add, edit, and view are automatically selected and cannot be changed.
Views
Enables users to add, edit, and delete workspace views and filters.
If you select the add privilege, edit is automatically selected and cannot be changed. If you select the delete privilege, add, edit, and view are automatically selected and cannot be changed.
Work Orders
Enables users to add, edit, delete, or view work orders.
If you select the add privilege, edit, delete, and view are automatically selected. If you select the edit privilege, the view privilege is automatically selected. If you select the delete privilege, add, edit, and view are automatically selected.
Get Started with Tasks
25
Workflow Configuration
Enables users to add, edit, delete, or view workflow configurations.
If you select the add privilege, edit, delete, and view are automatically selected. If you select the edit privilege, the view privilege is automatically selected. If you select the delete privilege, add, edit, and view are automatically selected.
Workflow Design
Enables users to add, edit, delete, or view workflow designs.
If you select the add privilege, edit, delete, and view are automatically selected. If you select the edit privilege, the view privilege is automatically selected. If you select the delete privilege, add, edit, and view are automatically selected.
Workspace Dashboards
Enables users to add, edit, and delete dashboards at the workspace level.
You must assign all security privileges.
Workspaces
Enables users to add, edit, and delete workspace hierarchy nodes, and edit the workspace ID and name. Workspace nodes at the highest level (root) must be added by an application administrator.
If you select the add privilege, edit is automatically selected. If you select the delete privilege, add and edit are automatically selected.
General
Allow Project Creation to Copy from Existing
Enables users to allow project creation to copy from an existing project.
Funding
Enables users to add, edit, delete, and view funds.
If you select the add privilege, edit and view are automatically selected and cannot be changed. If you select the delete privilege, add, edit, and view are automatically selected and cannot be changed. If you select the add, edit, or delete privilege, the edit and view privilege for Funding Costs/Financials are automatically selected.
Funding Costs/Financials
Enables users to edit and view funds and financial data.
If you select the edit privilege, view is automatically selected and cannot be changed. If you select the edit or view privilege, the view privilege for Funding is automatically selected and cannot be changed.
Ideas
Enables users to add and submit ideas in the workspace.
Import Project
Enables users to import XML files from P6 EPPM and Microsoft Project.
Import Project Excel

Task Management User Guide
26
Enables users to import Microsoft Excel (.xls or .xlsx) files for creating projects.
Portfolios
Enables users to add portfolios.
Print Layouts
Enables users to add print layouts.
Programs
Enables users to add programs to the workspace.
Project Proposals
Enables users to add project proposals from the Project inventory panel or as part of an idea approval workflow. Only users with the Portfolio license can add project proposals.
Applies to: Accept Idea workflow action, Project Inventory
Project Template
Enables users to add project templates.
Projects
Enables users to add projects.
Promote Report to Workspace
Enables users to promote a user or project report to a workspace report.
Recalculate Workspace Costs
Enables users to recalculate workspace costs when editing cost information.
Strategies
Enables users to add, edit, or delete strategies.
If you select the add privilege, edit and view are automatically selected and cannot be changed. If you select the delete privilege, add, edit, and view are automatically selected and cannot be changed.
Workspace Aggregate Cost Data
Enables users to view aggregate cost data for all projects and child workspaces within the workspace. If users also have the Project Costs/Financials privilege, they can access CBS costs in the project from the workspace Cost Sheet page.
Workspace Cost Sheet
Enables users to add and edit the workspace cost sheet.
If you select the edit privilege, the edit privilege for CBS is automatically selected and cannot be changed.
Users and Security
Permission Sets
Enables users to add, edit, and delete global, workspace, project, portfolio, file, and report permission sets.

Get Started with Tasks
27
You must assign all security privileges.
User Groups
Enables users to add, edit, and delete user groups for the workspace. Users with this privilege can edit the user groups from the Workspace Summary & Settings or from the User Groups page in Global Admin.
If you select the add privilege, edit is automatically selected and cannot be changed. If you select the delete privilege, add and edit, are automatically selected and cannot be changed.
Create a Project Permission Set
Create project permission sets to determine a user's level of access to each project. Users can only access projects that they have been assigned.
To create a project permission set:
1) In the object selector, select a workspace.
2) In the sidebar, select Summary & Settings.
3) On the Summary & Settings menu, select Permissions, and then select Project.
4) On the Project permission sets page, select Add.
5) In the Name field, enter a unique name.
6) In the Description field, enter a description of the permission set.
7) In the Privileges section, expand each category to assign privileges.
8) Select Save.
9) In the Summary & Settings panel, select Close.
Notes:
To assign users to a project permission set, use the Security page in the Project Team app.
To assign a default project permission set to a user group, use the Default Permissions tab of the User Groups page.
Tips
Provide clear permission set names and descriptions to help you manage permissions.
You can duplicate existing permission sets by selecting the Add menu and selecting Duplicate. The Administrator (System) permission set cannot be duplicated.
You can delete a permission set by selecting the profile and selecting Delete. You can only delete permission sets that are not currently in use. The View Only (System) and Administrator (System) global permission sets cannot be deleted.

Task Management User Guide
28
Project Security Privileges Definitions
When creating a permission set, use the following definitions to determine the functionality each privilege controls and other privileges that may also be required. Selecting one privilege may automatically select other privileges if they are required for the original privilege to function properly. These other privilege selections cannot be changed without affecting the selection of the original privilege. Any privilege requirements are noted in the definition.
Commissioning
Actual Dates
Enables users to edit the actual dates that work began or ended for commissioning (Cx) steps.
Commissioning Steps
Enables users to view Cx steps.
Complete Commissioning Steps
Enables users to complete Cx steps.
Planned and Forecasted Dates
Enables users to edit the Planned and Forecasted dates for Commissioning steps.
Reopen Commissioning Steps
Enables users to reopen completed Cx steps.
Contract
Contracts
Enables users to add, edit, delete, or view contracts.
The add and delete privileges for contracts also apply to contract line items.
If you select the add privilege, edit and view are automatically selected and cannot be changed.
If you select the edit privilege, the view privilege is automatically selected and cannot be changed.
If you select the delete privilege, all privileges for Contract Costs/Financials are also automatically selected and cannot be changed.
Contract Costs/Financials
Enables users to edit or view contract costs and financial information associated with contracts.
If you select the edit privilege, the view privilege is automatically selected and cannot be changed. The edit and view privileges for Contracts are also selected and cannot be changed.
Contracts Approval
Enables users to approve and withdraw contracts.

Get Started with Tasks
29
If you enable this option, the privileges to edit and view Contract Costs/Financials are selected and cannot be changed.
Commitments
Enables users to add, edit, delete, or view commitments.
The add and delete privileges for commitments also apply to commitment line items.
If you select the add privilege, edit and view are automatically selected and cannot be changed.
If you select the edit privilege, the view privilege is automatically selected and cannot be changed.
If you select the delete privilege, all privileges for Commitment Costs/Financials are also automatically selected and cannot be changed.
Commitment Costs/Financials
Enables users to edit or view commitment costs and financial information associated with commitments.
If you select the edit privilege, the view privilege is automatically selected and cannot be changed.
Commitments Approval
Enables users to approve and withdraw commitments.
If you enable this option, the privileges to edit and view Commitment Costs/Financials are selected and cannot be changed.
Changes
Enables users to add, edit, delete, and view changes.
If you select the add privilege, edit and view are automatically selected and cannot be changed.
If you select the edit privilege, the view privilege is automatically selected and cannot be changed.
Changes Costs/Financials
Enables users edit and view changes.
If you select the edit privilege, the view privilege is automatically selected and cannot be changed.
These privileges also apply to changes.
Close/Reopen/Void Changes
Enables users to close, reopen, or void changes.
Change Orders
Enables users to add, edit, delete, and view change orders.
The add and delete privileges for change orders also apply to change order line items.
If you select the add privilege, edit and view are automatically selected and cannot be changed.
Task Management User Guide
30
If you select the edit privilege, the view privilege is automatically selected and cannot be changed.
If you select the delete privilege, all privileges for Change Order Costs/Financials are also automatically selected and cannot be changed.
In order to add change orders, you also need at least the view privilege for contracts or commitments.
Change Order Costs/Financials
Enables users to edit or view change order costs and financial information associated with change orders.
If you select the edit privilege, the view privilege is automatically selected and cannot be changed. The edit and view privileges for change orders are also selected and cannot be changed.
Change Orders Approval
Enables users to approve and withdraw change orders.
If you enable this option, the privileges to edit and view Change Orders are selected and cannot be changed.
Potential Change Orders
Enables users to add, edit, delete, and view potential change orders.
If you select the add privilege, edit and view are automatically selected and cannot be changed.
If you select the edit privilege, the view privilege is automatically selected and cannot be changed.
If you select the delete privilege, all privileges for Potential Change Orders Costs/Financials are also automatically selected and cannot be changed.
Potential Change Orders Costs/Financials
Enables users to edit and view Potential Change Orders Costs/Financials.
These privileges also apply to potential change orders.
Potential Change Order Proposals
Enables users to add, edit, and delete potential change order proposals.
Approve a Proposal and Close the Potential Change Order
Enables users to approve proposals and close potential change orders.
Withdraw a Potential Change Order
Enables users to withdraw potential change orders.
Payment Applications
Enables users to add, edit, delete, and view payment applications.
If you select the add privilege, edit and view are automatically selected and cannot be changed.
If you select the edit privilege, the view privilege is automatically selected and cannot be changed.

Get Started with Tasks
31
If you select the delete privilege, all privileges for Payment Application Costs/Financials are also automatically selected and cannot be changed.
In order to add payment applications, you also need at least the view privilege for contracts or commitments.
Payment Application Costs/Financials
Enables users to edit or view payment application costs and financial information associated with payment applications.
If you select the edit privilege, the view privilege is automatically selected and cannot be changed. The edit and view privileges for payment applications are also selected and cannot be changed.
Payment Applications Approval
Enables users to approve and withdraw payment applications.
If you enable this option, the privileges to edit and view Payment Applications are selected and cannot be changed.
Cost
Accept Proposed Budget and Request Changes
Enables users to accept a proposed budget for a project or request change.
Applies to: Costs and Funds
Actuals
Enables users to add, edit, delete, or view actual project spending. This privilege does not grant users access to the cost and financial information associated with actuals records. For that, the user must have the Actuals Costs/Financials privilege.
If you select the add privilege, edit and view are automatically selected and cannot be changed.
If you select the edit privilege, the view privilege is automatically selected and cannot be changed.
If you select the delete privilege, all privileges for Actuals and Actuals Costs/Financials are also automatically selected and cannot be changed.
Applies to: Costs and Funds
Actuals Costs/Financials
Enables users to edit or view costs and financials associated with actuals records.
If you select the edit privilege, the view privilege is automatically selected and cannot be changed. The edit and view privilege for Actuals is also automatically selected and cannot be changed.
If you select the view privilege, the view privilege for Actuals is automatically selected and cannot be changed.
Applies to: Costs and Funds
Cash Flow Snapshots
Enables users to add, edit, or delete cash flow snapshots.

Task Management User Guide
32
If you select the add privilege, edit is automatically selected and cannot be changed. If you select the delete privilege, add and edit are automatically selected and cannot be changed.
Applies to: Costs and Funds
Project Budget
Enables users to add, edit, delete, or view budgets.
If you select the add privilege, the edit and view privileges are automatically selected and cannot be changed. If you select the delete privilege, add and edit are automatically selected and cannot be changed. If you select the edit privilege, view is automatically selected and cannot be changed.
If you select the add, edit, delete, or view privileges, the view privilege for Project Costs/Financials is also selected.
If the Project Costs/Financials view privilege is disabled, the Budget page is restricted.
Applies to: Costs and Funds
Project Budget Approval
Enables users to approve project budgets.
If you select the enable privilege, the Project Budget edit and view privileges are selected and cannot be changed, and the Project Costs/Financials view privilege is selected and cannot be changed.
Applies to: Costs and Funds
Project Cost Sheet
Enables users to add, edit, or delete project CBS codes. It also enables users to select and edit budget sources.
If you select the add privilege, edit is automatically selected and cannot be changed. If you select the delete privilege, add and edit are automatically selected and cannot be changed.
Applies to: Costs and Funds
Recalculate Project Costs
Enables users to recalculate project, activity, and resource assignment costs when editing cost information. When run from the Costs and Funds app, only the project objects that are selected at run time will be recalculated. This does not include activity and resource assignments costs. Activities and resource assignments are the only objects whose costs are recalculated from the Activities page in the Schedule app.
If you select the enable privilege, the Edit Project privilege, the Edit Project Costs/Financials privilege, and the view Project Costs/Financials privilege are also selected and cannot be changed.
Applies to: Costs and Funds, Schedule
Documents
Accept RFI Answer
Enables users to officially accept answers to RFIs.
Custom Log Types

Get Started with Tasks
33
Enables users to add, edit, or delete custom logs in the project Summary & Settings. Users with the Add privilege can also assign a custom log from the workspace or duplicate a custom log. Users with the Delete privilege can also remove custom log assignment. Users with the Edit privilege can also assign and remove configured fields and codes at the project level.
To be able to assign user or user group access to a custom log, or to remove that assignment, a user needs the following permissions: the Edit privilege for Custom Log Type (either in a custom Project Permission Set or by assigning the user the built-in Administrator permission set for the project) AND the the built-in Administrator permission set for Custom Logs when the user is assigned to the project or workspace. This also applies to giving users the ability to edit the permissions of custom logs assigned from the workspace.
If you select the add privilege, edit is automatically selected and cannot be changed. If you select the delete privilege, add and edit are automatically selected and cannot be changed.
Manage Submittal Approvals
Enables users to manage submittal approvals.
If you enable this privilege, the Upload Submittals for My Company privilege is also enabled.
RFIs
Enables users to add, edit, and delete RFIs.
If you select the add privilege, edit is automatically selected. If you select the delete privilege, add and edit are automatically selected.
Reply/Forward RFI
Enables users to forward and reply to RFIs.
Spec Sections
Enables users to add, edit, or delete spec sections.
If you select the add privilege, edit is automatically selected. If you select the delete privilege, add and edit are automatically selected.
Submittals
Enables users to add, edit, or delete submittals.
If you select the add privilege, edit is automatically selected. If you select the delete privilege, add and edit are automatically selected.
Upload Submittals for All Companies
Enables users to upload submittals for all companies.
Upload Submittals for My Company
Enables users to upload submittals for their associated companies.
View All RFIs
Enables users to view all published RFIs of any status.
If you enable this permission, then the View Pending RFIs option is also enabled.
View Pending RFIs

Task Management User Guide
34
Enables user to view pending RFIs.
Field
Areas
Enables users to add, edit, delete, and view reports that were dispatched.
If you select the add, edit, or delete privilege, all privileges are automatically selected and cannot be changed.
Field Project Settings
Enables users to delete and view reports that were dispatched.
If you select the delete privilege, view is automatically selected and cannot be changed.
Import Areas
Enables users to import areas from a CSV file and edit and delete areas created through import.
Punchlist Issues and Inspections
Enables users to view punchlist issues and inspections.
QA/QC Issues and Inspections
Enables users to view QA/QC issues and inspections.
Safety Issues and Inspections
Enables users to view safety issues and inspections.
Subcontractor Daily Reports
Enables users to add, edit, or view subcontractor daily reports.
If you select the add privilege, edit and view are automatically selected. If you clear the view privilege, add and edit are automatically cleared.
Superintendent Daily Reports
Enables users to add, edit, or view superintendent daily reports.
If you select the add privilege, edit and view are automatically selected. If you clear the view privilege, add and edit are automatically cleared.
Funds
Funding
Enables users to add, edit, delete, and view funds.
If you select the add privilege, edit and view are automatically selected and cannot be changed. If you select the delete privilege, add, edit, and view are automatically selected and cannot be changed. If you select the add, edit, or delete privilege, the edit and view privilege for Funding Costs/Financials are automatically selected and cannot be changed.
Applies to: Costs and Funds
Funding Costs/Financials
Enables users to edit and view funds and financial data.

Get Started with Tasks
35
If you select the edit privilege, view is automatically selected and cannot be changed. If you select the edit or view privilege, the view privilege for Funding is automatically selected and cannot be changed.
Applies to: Costs and Funds
Inspections
Access Other Users Inspections
Enables users to access inspections of all users in the project.
Conduct Inspections
Enables users to conduct inspections. This privilege should be assigned to inspectors who will conduct onsite inspections.
Completed Inspections
Enables users to delete completed inspections.
Incomplete Inspections
Enables users to delete completed inspections.
Inspection Manager
Enables users with this privilege to complete inspections.
Inspection Templates
Enables users to add, edit, and delete or view inspection templates.
If you select the add, edit, or delete privilege, all three privileges are automatically selected and cannot be changed.
Inspections
Enables users to add, edit, or view inspections.
If you select the add or edit privilege, all privileges are automatically selected and cannot be changed.
Reopen Inspections
Enables users to reopen completed or approved inspections and return the inspection to in progress status.
Request Inspection
Enables users to submit an inspection request.
Issues
Change Issue Status
Enables users to change the status of the issue.
Corrective Actions
Enables users to edit the corrective actions of the issue.
Issues

Task Management User Guide
36
Enables users to add, edit, delete, or view issues.
If you select the add or edit privilege, both privileges are automatically selected and cannot be changed. If you select the Delete privilege, all privileges are automatically selected and cannot be changed.
Manage Field Work Calendar
Enables users to manage the calendar in the Field app including setting holidays and working days.
Manage Issue Statuses
Enables users to manage the issue workflow for the project including categories, statuses, and actions.
Tasks
Complete Constraints for All Companies
Enables users to enter a delivered date on task constraints regardless of assigned company.
If Enable is selected, the Enable privilege for Complete Constraints for My Company and the Edit privilege for Constraints are also selected and cannot be changed.
Applies to: Tasks
Complete Constraints for My Company
Enables users to enter a delivered date on task constraints that belong to the company to which they are assigned.
If Enable is selected, the Edit privilege for Constraints is also selected and cannot be changed.
Applies to: Tasks
Configure Task Notifications for Others
Enables users to configure task notification preferences on behalf of other users and configure default task notification preferences for all users assigned to at least one task in the project.
Applies to: Tasks
Constraints
Enables users to add, edit, and delete task constraints regardless of the user's assigned company. To assign tasks to constraints, or to remove an assignment, the Edit privileges for Tasks for All Companies or Tasks for My Company must also be selected.
If Add is selected, Edit is also selected and cannot be changed. If Delete is selected, Add and Edit are also selected and cannot be changed.
Applies to: Tasks
Manage Commitments and Complete All Users' Tasks
Enables users to commit, recommit, and add reasons to any public task, delete commitments and recommitments on any public task, complete any public task, and complete private tasks that belong to them.

Get Started with Tasks
37
If Enable is selected, the Enable privilege for Manage Commitments and Complete My Tasks and the Edit privilege for Tasks for All Companies are also selected and cannot be changed.
Applies to: Tasks
Manage Commitments and Complete My Tasks
Enables users to commit, recommit, and add reasons to public tasks to which they are assigned, delete commitments and recommitments on public tasks to which they are assigned, complete public and private tasks to which they are assigned, and complete task milestones that belong to the company to which they are assigned.
If Enable is selected, the Edit privilege for Tasks for My Company is also selected and cannot be changed.
Applies to: Tasks
Tasks for All Companies
Enables users to add, edit, and delete any public task regardless of assigned company and any private tasks that belong to them.
If Add is selected, Edit is also selected and cannot be changed. If Delete is selected, Add and Edit are also selected and cannot be changed. Any privilege selected also selects the corresponding privilege for Tasks for My Company.
Applies to: Tasks, Schedule
Tasks for My Company
Enables users to add, edit, and delete public tasks that belong to the company to which they are assigned and private tasks that belong to them.
If Add is selected, Edit is also selected and cannot be changed. If Delete is selected, Add and Edit are automatically selected and cannot be changed.
Applies to: Tasks, Schedule
Project
Add WBS from other projects/templates
Enables users to copy WBS nodes and objects within the nodes from a project template or another project. To use this feature, the Add Activities privilege must also be selected.
Applies to: Schedule, Scope
Alerts
Enables users to add, edit, and delete system alerts that appear when thresholds are met on project-level data. Users do not require privileges to subscribe or unsubscribe themselves to an alert.
If you select the add, edit, or delete privilege, all Alerts privileges are also selected and cannot be changed.
Applies to: Costs and Funds, Schedule, Scope
Baselines
Enables users to add, edit, and delete project baselines. To choose or change a baseline type, the Enable Baselines - Set Project Baselines privilege must also be selected. To modify data within a baseline, privileges in the Schedule (Baselines) section must also be selected.

Task Management User Guide
38
The Add and Edit privileges must be selected together. If Delete is selected, the Add Baselines, Edit Baselines, and Enable Baselines - Set Project Baselines privileges are also selected and cannot be changed.
Applies to: Schedule, Scope
Baselines - Set Project Baselines
Enables users to select a baseline type when adding a baseline or change the type of an existing baseline.
If Enable is selected, the Add Baselines and Edit Baselines privileges are also selected and cannot be changed.
Applies to: Schedule, Scope
Calendars
Enables users to add, edit, and delete project-level calendars. To edit a holiday list or promote a calendar to the parent workspace, the Add and Edit Calendars privileges for the parent workspace must be enabled.
If Add is selected, Edit is also selected and cannot be changed. If Delete is selected, Add and Edit are also selected and cannot be changed.
Applies to: Project-level Calendars dictionary
Close Reporting Periods
Enables users to close the current reporting period to further edits. Closed periods allow for accurate project analysis and reporting.
Applies to: Scope
Codes
Enables users to add, edit, and delete project-level activity codes and code values. To promote a code to the parent workspace, Add, Edit, and the Add Codes privilege for the parent workspace must be enabled.
If Add is selected, Edit is also selected and cannot be changed. If Delete is selected, Add and Edit are also selected and cannot be changed.
Applies to: Project-level Codes dictionary, Schedule
Companies
Enables users to assign or remove companies from a project and change the color associated with each company.
Applies to: Project Team
Currencies
Enables users to change the project currency and its associated exchange rate.
If Edit is selected, the Edit Project privilege is also selected and cannot be changed.
Applies to: Project Settings
Global Change

Get Started with Tasks
39
Enables users to add, edit, or delete public global changes or private global changes that belong to them. Users must have the Add and Edit privileges to copy global changes from another project.
If Add is selected, Edit is also selected and cannot be changed. If Delete is selected, Add and Edit are also selected and cannot be changed.
Applies to: Schedule
Global Change - Run
Enables users to run public global changes or global changes that belong to them. Users must have the Edit Activities privilege selected in the Current, Baselines, or Scenarios section of the Schedule privileges to make changes to activities in the current schedule, baseline, or scenario.
If Enable is selected, the Add Global Change and Edit Global Change privileges are also selected and cannot be changed.
Applies to: Schedule
Project
Enables users to edit and delete projects and project templates.
The Edit privilege enables users to edit project and project template data such as project details, codes, and settings. Some data such as alerts, currencies, and dictionaries have their own privileges.
If Delete is selected, Edit is also selected and cannot be changed.
Applies to: Project Inventory, Project Settings
Project Costs/Financials
Enables users to view and edit project cost fields across the application, including at the portfolio and program levels, for pages to which the user has access. Without the Edit privilege, cost fields will be read-only. Without the View privilege, depending on the page, cost fields may be hidden, show a lock icon instead of a value, or the page may be restricted entirely.
Configured fields with a Data Type of Cost for objects in other contexts, objects with their own Cost/Financials privileges (Changes, Change Estimates, Change Order, Contract, Commitments, Fund, Payment Applications, Potential Change Orders, Project Actuals), and the File object are not controlled by the Project Costs/Financials privileges.
When the View privilege is selected, the following functionality is enabled:
Cost-related field values on the Cost Sheet page are displayed.
All fields on the project Cash Flow page are displayed.
Cost-related field values on the project Budget page are displayed and editable as long as the project Edit Project Budget and View Project Budget privileges are also enabled.
Cost-related project-level field values on the program Summary Cost Sheet page are displayed.
Cost-related project-level field values on the portfolio Budget Planning, Published Views, and Scenario Comparison pages are displayed.
Cost-related project-level risk field values on the project Risk Register page are displayed.

Task Management User Guide
40
Cost-related project-level risk field values on the program Risk Register page are displayed as long as the program View Risk and project View Risk privileges are also enabled.
Cost-related activity and resource assignment field values are displayed.
Cost-related scope field values are displayed.
The Construction Value field in the project details is displayed.
Configured fields with a Data Type of Cost are editable for the following objects as long as the Edit privilege for the corresponding object (Project Budget or Project Cost Sheet) is also enabled: Budget, Budget Changes, Budget Transfers, Project Cost Sheet. These objects do not require the Edit privilege for Project Costs/Financials to be enabled in order to be edited. Cost type configured fields for the Budget Details object can be edited without enabling the Edit privileges for Project Costs/Financials or Project Budget. Cost type configured fields for the Budget Details object are displayed as long as the View Project Costs/Financials and View Project Budget privileges are also enabled.
When the Edit privilege is selected, the following functionality is enabled:
All fields on the project Cash Flow page are editable.
Cost-related project-level risk fields on the project Risk Register page are editable as long as the project Edit Risk and View Risk privileges are also enabled.
Cost-related project-level risk fields on the program Risk Register page are editable as long as the program View Risk, project Edit Risk, and project View Risk privileges are also enabled.
Cost-related activity and resource assignment fields are editable as long as the Edit Activities privilege is also enabled.
Cost-related scope fields are editable as long as the Edit privilege for an individual scope object is also enabled.
Configured fields with a Data Type of Cost are editable for the following objects as long as the Edit privilege for the corresponding object is also enabled: Activity, Custom Log, Project, Resource Assignment, RFI, Risk, Scope Assignment, Scope Item, Submittal, Task, WBS, Work Packages.
Set up store period performance for a project as long as the Edit Project, Enable Store Period Performance, Add Baseline, Enable Baseline - Set Project Baseline, and Enable Recalculate Project Costs privileges are also enabled.
Store period performance for a project as long as the Enable Store Period Performance privilege is also enabled.
Recalculate project costs as long as the Enable Recalculate Project Costs privilege is also enabled.
If the Edit privilege is selected, the View Project Costs/Financials and Edit Project privileges are also selected and cannot be changed.
Applies to: Costs and Funds, Project Details, Risk, Schedule, Scope
Project Dashboards
Enables users to add, edit, and delete dashboards at the project level.
If you select the add, edit, or delete privilege, all Project Dashboards privileges are also selected and cannot be changed.
Get Started with Tasks
41
Applies to: Dashboards
Project Integration
Enables users to run project synchronizations between Primavera Cloud and P6 EPPM or Primavera Gateway. To view project synchronizations, the Edit Project privilege must also be selected.
Applies to: Integration
Promote Report to Project
Enables users to promote user type reports to the project type, making them available to other users of the project.
Applies to: Reports
User Groups
Enables users to add, edit, and delete project-level user groups. Users with the Edit privilege can also edit the permission sets of enabled inherited user groups, assign users to an inherited user group, and remove users from an inherited user group if the user was assigned at the project level. Users with these privileges can configure user groups from the Project Team app or from the User Groups page in Global Admin.
If Add is selected, Edit is also selected and cannot be changed. If Delete is selected, Add and Edit are also selected and cannot be changed.
Applies to: Global Admin, Project Team
Views
Enables users to add, edit, and delete project-level views and filters. Users do not require privileges to add, edit, or delete personal views or filters.
If Add is selected, Edit is also selected and cannot be changed. If Delete is selected, Add and Edit are also selected and cannot be changed.
Applies to: Project-level pages that support named views
WBS
Enables users to add, edit, and delete WBS nodes.
If Add is selected, Edit is also selected and cannot be changed. If Delete is selected, Add and Edit are also selected and cannot be changed.
Applies to: Schedule, Scope
Project Proposals
Project Proposals
Enables users to delete project proposals and edit project proposal data such as project details, codes, and settings. Some data such as alerts, currencies, and dictionaries have their own privileges. Project configured fields with a Data Type of Cost are editable in project proposals as long as the Edit Project Proposals and Edit Project Costs/Financials privileges are enabled. Objects within a project proposal that are not listed here are controlled by the same privileges that control those objects in the project context.

Task Management User Guide
42
You need this privilege to launch a project proposal workflow. This privilege allows users to add project proposals and launch a workflow even if they do not have the Start Workflows privilege.
Applies to: Project Inventory, Project Settings
Project Proposals and WBS Costs/Financials
Enables users to edit and view cost fields for pages within a project proposal to which the user has access. When the Edit privilege is selected, all functionality for the View Project Costs/Financials privilege is enabled, and all fields on the project proposal Cash Flow page are editable. All other cost fields are controlled by the Project Costs/Financials privileges.
If the Edit privilege is selected, the View Project Costs/Financials and Edit Project Proposals privileges are also selected and cannot be changed.
Applies to: Costs and Funds, Project Details
Resources
Resource Costs/Financials
Enables users to edit and view project-level rates on a project resource or a workspace resource assigned to the project.
If Edit is selected, the View Resource Costs/Financials and Edit Resource privileges are also selected and cannot be changed.
Applies to: Resources
Resource Demand
Enables users to add, edit, and delete resource demands. The Edit privilege also enables users to create demand units from the project schedule and recalculate role costs.
If Add is selected, Edit is also selected and cannot be changed. If Delete is selected, Add and Edit are also selected and cannot be changed.
Resources
Enables users to add, edit, and delete project-level resources. The Add privilege also enables users to assign a workspace resource to the project level. To promote a resource to the parent workspace, the Add Resource privilege for the parent workspace must be enabled. To assign roles to a resource, the Edit Roles privilege must also be selected. To view and edit project-level rates on a project resource or a workspace resource assigned to the project, the View and Edit privileges for Resource Costs/Financials must also be selected.
If Add is selected, Edit is also selected and cannot be changed. If Delete is selected, the Add Resources, Edit Resources, Edit Resource Costs/Financials and View Resource Costs/Financials privileges are also selected and cannot be changed.
Applies to: Resources
Role Costs/Financials
Enables users to edit and view project-level rates on a project role or a workspace role assigned to the project.
If Edit is selected, the View Role Costs/Financials and Edit Roles privileges are also selected and cannot be changed.

Get Started with Tasks
43
Applies to: Resources
Roles
Enables users to add, edit, and delete project-level roles. The Add privilege also enables users to assign a workspace role to the project level. To promote a role to the parent workspace, the Add Role privilege for the parent workspace must be enabled. To assign resources to a role, the Edit Resources privilege must also be selected. To view and edit project-level rates on a project role or a workspace role assigned to the project, the View and Edit privileges for Role Costs/Financials must also be selected.
If Add is selected, Edit is also selected and cannot be changed. If Delete is selected, the Add Roles, Edit Roles, Edit Role Costs/Financials and View Role Costs/Financials privileges are also selected and cannot be changed.
Applies to: Resources
Risk
Risk
Enables users to add, edit, delete, or view risks.
If you select the add privilege, edit and view are automatically selected. If you select the delete privilege, add, edit, and view are automatically selected.
Risk Analysis
Enables users to run risk analysis.
Risk Matrix
Enables users to add, edit, delete, or risk matrixes.
If you select the add privilege, edit is automatically selected. If you select the delete privilege, add and edit are automatically selected.
Schedule (Current)
Activities
Enables users to add, edit, and delete activities in the current schedule. To view or edit activity or assignment costs, the View Project Costs/Financials and Edit Project Costs/Financials privileges must also be selected. Some cost fields may be indirectly modified by editing fields they are connected to, even if Edit Project Costs/Financials is disabled. To manage risks or tasks associated with activities in the current schedule, the appropriate Risk and Tasks privileges must also be selected.
If Add is selected, Edit is also selected and cannot be changed. If Delete is selected, Add and Edit are also selected and cannot be changed. When an Activities privilege in the Schedule (Current) section is selected, the same Activities privileges in the Schedule (Baselines) and Schedule (Scenarios) sections are also selected and cannot be changed.
Applies to: Schedule
Level
Enables users to level resources and roles in the current schedule. When the leveler is run, the scheduler is also run, and activities may be modified even if Edit Activities is disabled.

Task Management User Guide
44
If Enable is selected, the Enable Schedule privilege in the Schedule (Current) section and the same Level privileges in the Schedule (Baselines) and Schedule (Scenarios) sections are also selected and cannot be changed.
Applies to: Schedule
Relationships
Enables users to add, edit, and delete relationships between activities in the current schedule.
If Add is selected, Edit is also selected and cannot be changed. If Delete is selected, Add and Edit are also selected and cannot be changed. When a Relationships privilege in the Schedule (Current) section is selected, the same Relationships privileges in the Schedule (Baselines) and Schedule (Scenarios) sections are also selected and cannot be changed.
Applies to: Schedule
Schedule
Enables users to run the scheduler in the current schedule. When the scheduler is run, activities may be modified even if Edit Activities is disabled.
If Enable is selected, the Enable Schedule privileges in the Schedule (Baselines) and Schedule (Scenarios) sections are also selected and cannot be changed.
Applies to: Schedule
Set Baseline as Current Schedule
Enables users to set a project baseline as the current schedule. To use this feature, the Add Baselines and Edit Baselines privileges must also be selected.
Applies to: Schedule
Set Scenario as Current Schedule
Enables users to set a project scenario as the current schedule.
If Enable is selected, the Add Scenarios, Edit Scenarios, and View Scenarios privileges are also selected and cannot be changed.
Applies to: Schedule
Store Period Performance
Enables users to run the store period performance for a schedule.
Applies to: Schedule
Schedule (Baselines)
Activities
Enables users to add, edit, and delete activities in a project baseline. To use this feature, the Add Baselines and Edit Baselines privileges must also be selected. Activities are added to baselines using the Get Activities feature. To view or edit baseline activity or assignment costs, the View Project Costs/Financials and Edit Project Costs/Financials privileges must also be selected. Some cost fields may be indirectly modified by editing fields they are connected to, even if Edit Project Costs/Financials is disabled. To manage risks associated with activities in the baseline, the appropriate Risk privileges must also be selected.
Get Started with Tasks
45
If Add is selected, Edit is also selected and cannot be changed. If Delete is selected, Add and Edit are also selected and cannot be changed.
Applies to: Schedule
Level
Enables users to level resources and roles in a project baseline. To use this feature, the Add Baselines and Edit Baselines privileges must also be selected. When the leveler is run, the scheduler is also run, and activities may be modified even if Edit Activities is disabled.
If Enable is selected, the Enable Schedule privilege is also selected and cannot be changed.
Applies to: Schedule
Relationships
Enables users to add, edit, and delete relationships between activities in a project baseline. To use this feature, the Add Baselines and Edit Baselines privileges must also be selected.
If Add is selected, Edit is also selected and cannot be changed. If Delete is selected, Add and Edit are also selected and cannot be changed.
Applies to: Schedule
Schedule
Enables users to run the scheduler in a project baseline. To use this feature, the Add Baselines and Edit Baselines privileges must also be selected. When the scheduler is run, activities may be modified even if Edit Activities is disabled.
Applies to: Schedule
Schedule (Scenarios)
Activities
Enables users to add, edit, and delete activities in a project scenario. To use this feature, the View Scenarios privilege must also be selected. To view or edit scenario activity or assignment costs, the View Project Costs/Financials and Edit Project Costs/Financials privileges must also be selected. Some cost fields may be indirectly modified by editing fields they are connected to, even if Edit Project Costs/Financials is disabled. To manage risks associated with activities in the scenario, the appropriate Risk privileges must also be selected.
If Add is selected, Edit is also selected and cannot be changed. If Delete is selected, Add and Edit are also selected and cannot be changed.
Applies to: Schedule
Level
Enables users to level resources and roles in a project scenario. To use this feature, the View Scenarios privilege must also be selected. When the leveler is run, the scheduler is also run, and activities may be modified even if Edit Activities is disabled.
If Enable is selected, the Enable Schedule privilege is also selected and cannot be changed.
Applies to: Schedule
Relationships

Task Management User Guide
46
Enables users to add, edit, and delete relationships between activities in a project scenario. To use this feature, the View Scenarios privilege must also be selected.
If Add is selected, Edit is also selected and cannot be changed. If Delete is selected, Add and Edit are also selected and cannot be changed.
Applies to: Schedule
Scenarios
Enables users to add, edit, and delete project scenario details and view scenarios and scenario schedules. To interact with the objects or tools within a scenario, such as activities, leveler, relationships, or scheduler, the corresponding privileges for that object or tool and the View Scenarios privilege must also be selected. If Edit is selected, users can use Get Activities to add activities to the scenario.
If Add is selected, Edit and View are also selected and cannot be changed. If Edit is selected, View is also selected and cannot be changed. If Delete is selected, Add, Edit, and View are also selected and cannot be changed.
Applies to: Schedule
Schedule
Enables users to run the scheduler in a project scenario. To use this feature, the View Scenarios privilege must also be selected. When the scheduler is run, activities may be modified even if Edit Activities is disabled.
Applies to: Schedule
Scope
Approve/Reject Scope Change Requests
Enables users to approve or reject scope change requests, reject individual change items, withdraw approved change requests, and reopen rejected change requests and items. When this privilege is selected, the following add and edit privileges are also selected: Work Packages, Scope Items, Scope Assignments, and Scope Change Requests. The edit and view privileges for Project Costs/Financials are also selected.
PBS
Enables users to add, edit, or delete PBSs.
If you select the add privilege, edit is automatically selected. If you select the delete privilege, add and edit are automatically selected.
Scope Assignments
Enables users to add, edit, or delete scope item assignments. If you have the delete privilege, you can only delete work packages before the baseline is set.
If you select the add privilege, edit is automatically selected. If you select the delete privilege, add and edit are automatically selected.
Scope Change Requests

Get Started with Tasks
47
Enables users to add, edit, or delete scope change requests and pending change items in the Scope Item Changes, Work Package Changes, Scope Item Change Details, and Work Package Change Details pages. This privilege also allows users to add and edit scope items on the Scope Item Change Details page if the user also has the corresponding add and edit Scope Items privileges. Also allows users to add and edit work packages and scope assignments on the Work Package Change Details page if the user also has the corresponding add and edit Work Packages and Scope Assignments privileges.
If you select the add privilege, edit is automatically selected. If you select the delete privilege, add and edit are automatically selected.
Scope Items
Enables users to add, edit, or delete scope items. If you have the delete privilege, you can only delete work packages before the baseline is set.
If you select the add privilege, edit is automatically selected. If you select the delete privilege, add and edit are automatically selected.
Work Packages
Enables users to add, edit, or delete work packages. If you have the delete privilege, you can only delete work packages before the baseline is set.
If you select the add privilege, edit is automatically selected. If you select the delete privilege, add and edit are automatically selected.
Work Order
Dispatched Reports
Enables users to view reports that were dispatched.
Send Work Orders
Enables users to send work orders to the responsible party.
Work Order Rule
Enables users to create dispatch rules for work orders.
If you select the edit privilege, view is automatically selected and cannot be changed.
Dictionaries
Workspace-level dictionaries are repositories of items that can be used across the application, without having to create the same items for each object. Workspace-level dictionary items can be used in the projects, portfolios, programs, ideas, and child workspaces within the workspace. Dictionaries provide for efficient reuse of organizational data. For example, you can create multiple calendars or codes in a workspace and then apply them across activities in multiple projects in that workspace.
Task Management User Guide
48
Calendars Overview
Calendars enable you to define available workdays and work hours in a day, observe national and recognized holidays, and add exceptions to the standard work time. Assign calendars to projects, resources, roles, and activities to specify their time constraints in a uniform way. Calendar assignments are used for scheduling, leveling, risk analysis, and other processes throughout the application.
You can create an unlimited number of calendars to accommodate different work patterns. For example, if some activities require a five day workweek, while others can only be performed part-time (such as Monday, Wednesday, and Friday), you can create different calendars and assign them to the activities and resources in your projects. An activity's Type setting determines whether the activity will use the calendars from its assigned resources and roles or from the project when scheduling its dates.
Before calendars can be assigned, they must be made available to supporting objects. Each workspace-level calendar can be made available to projects, resources/roles, or both. This ensures calendars intended for projects or resources/roles are only available to those types of objects. The calendar marked as the default calendar is automatically made available to projects, resources, and roles within the workspace and is automatically assigned to new projects, resources, and roles when they are created. The calendar assigned to a project also controls the default calendar for new activities within the project. There is one default calendar per workspace. Any calendar in the workspace can be assigned as the default calendar.
You can also create calendars at the project level if they only need to be available to a single project. Project-specific calendars are available for assignment to the project and project activities, resources, and roles. When assigning a calendar to a project, activity, resource, or role, you can choose from a workspace-level or project-level calendar. If a project-level calendar should be made available to more projects, you can promote it to the parent workspace.
The default workspace calendar designation and calendar assignments on individual objects can be changed at any time. Each project, resource, role, and activity must always have a calendar assigned.
Add a Holiday List
Add a holiday list to include any public or company holidays observed by the organization that should be reflected in project and resource schedules. An existing list can be assigned to a calendar during the calendar's creation, or you can assign a calendar's holiday list later. One holiday list can be selected per calendar.
Holiday lists are available to be used throughout the workspace hierarchy. You must have the security privileges required to add and edit calendars in the workspace to add and edit a holiday list.
To add a holiday list:
1) Navigate to the Calendars dictionary page (see page 173).
2) Select Holidays.

Get Started with Tasks
49
3) In the Manage Holiday Lists dialog box, select Add, and then enter a name for the holiday list. You can also select an existing list.
4) Select Edit Holiday List.
5) Select Add to create a new holiday for the list. Enter a name for the holiday. You can also select an existing holiday.
6) Choose when the holiday occurs:
Once on: Select if this holiday is a onetime occurrence.
Repeat every: Select if this holiday occurs on the same date every year.
Note: You can select on a calendar when holidays are recognized as part of the standard work week.
Repeat the: Select if this holiday occurs on a different date each year, but always occurs on the same day and week each year.
7) Continue to enter dates as needed.
8) Save your changes:
In Primavera Cloud:
a. Select Save.
b. In the Summary & Settings panel, select Close.
In Primavera Professional:
Select Save.
This setting is used in the following apps:
Cost and Funds
Resources
Risk
Schedule
Scope
Tasks
Add a Calendar
Add calendars to a workspace so they can be available for assignment to projects, resources, and roles within the workspace.
To add a calendar:
1) Navigate to the Calendars dictionary page (see page 173).
2) Select Add.
3) In the Add Calendar wizard, complete the following steps:
a. Name: Enter a Name and ID for the calendar. Select Next.

Task Management User Guide
50
b. Create Work Week: Specify the standard number of work hours per day by manually entering the number of hours or by selecting the time period on the calendar. Change the time periods on the calendar by dragging the entire block of time or by expanding or reducing the block of time. Select Next.
c. Add Holidays: Choose a holiday list to assign to the calendar. The holidays in the selected list are displayed.
Select the If a holiday falls on standard nonwork time, move option if your calendar has holidays that fall on standard nonwork time and should be marked as holiday time during standard work time. Select where on the calendar the holiday should be reflected.
Notes:
This setting affects the placement of activities and resources/roles during scheduling and leveling. Changes to a holiday's placement on the calendar are not reflected in the Calendar tab of the Calendars dictionary page.
This setting applies to holidays being placed on nonwork time during the standard work week. It is unaffected by unavailable time created by an exception.
Select Finish.
4) Save your changes:
In Primavera Cloud:
a. Select Save.
b. In the Summary & Settings panel, select Close.
In Primavera Professional:
Select Save.
Tips
You can assign a calendar from a higher-level workspace by selecting Assign. You can only modify a calendar from its owning workspace.
To duplicate an existing calendar, select the Context menu next to the calendar, and then select Duplicate. This is useful if you want to modify a calendar assigned from a different workspace.
You can modify a calendar's name and ID values in the calendar list, its standard hours on the Standard Work Week tab, and its holiday list on the Summary tab.
This setting is used in the following apps:
Cost and Funds
Resources
Risk
Schedule
Get Started with Tasks
51
Scope
Tasks
Configure Calendar Time Period Settings
A calendar's time period settings specify the default number of hours in each work period. The standard time period hours defined in the Application Settings are displayed by default, but can be changed after the calendar is created. Time period settings are separate from the calendar's standard work week values, which specify the working hours for each day of the week.
The application calculates and stores time unit values in hourly increments, but you can configure your user preferences to display time units in other increments, such as days or weeks. The values specified for Time Periods are used to convert hours to other time increments for display, and to convert all non-hourly time increments to hours for storage in the database.
To configure a workspace-level calendar's time period settings:
1) Navigate to the Calendars dictionary page (see page 173).
2) Select a calendar.
3) Select the Summary tab.
4) In the Time Periods section, enter the default number of hours in a day, week, month, and year.
5) Save your changes:
In Primavera Cloud:
a. Select Save.
b. In the Summary & Settings panel, select Close.
In Primavera Professional:
Select Save.
This setting is used in the following apps:
Cost and Funds
Resources
Risk
Schedule
Scope
Tasks
Specify Calendar Availability for Assignment
Before calendars can be assigned, they must be made available to supporting objects. Each workspace-level calendar can be made available to projects, resources/roles, or both. Both options as selected by default when a calendar is created. If a calendar is not available to one of these objects, it will not appear as an option when assigning calendars to that type of object.
Task Management User Guide
52
The calendar set as the default calendar is automatically made available to projects, resources, and roles. This can only be changed if you set a different calendar as the default.
To specify calendar availability:
1) Navigate to the Calendars dictionary page (see page 173).
2) Select a calendar.
3) Select the Summary tab.
4) In the Available To section, select Project, Resource/Role, or both.
5) Save your changes:
In Primavera Cloud:
a. Select Save.
b. In the Summary & Settings panel, select Close.
In Primavera Professional:
Select Save.
This setting is used in the following apps:
Cost and Funds
Resources
Risk
Schedule
Scope
Tasks
Set Calendar Exception Time
Exception time is set by selecting periods of time on a calendar that are exceptions to the calendar's standard working hours. Select a period of time on a particular date to specify the new working time for that date. For example, your organization may decide to give employees a half day of vacation time the day before a scheduled holiday. In this case, the first half of the standard work day would be selected, thereby designating it as exception time. You can also set an entire day as unavailable, indicating that the day cannot be worked at all, or available, indicating that the day can be worked without the restriction of standard work hours. Remove changes by setting individual days back to standard working time.
The calendar's Day and Week views enable you to add exception time, but only the Week view supports setting an entire day as unavailable or available. The Month and Year views enable you to see the different working time types at a high level. A legend below the calendar indicates whether each time period displayed is standard, exception, unavailable, or holiday time.
To set calendar exception time:
1) Navigate to the Calendars dictionary page (see page 173).
2) Select a calendar.
3) Select the Calendar tab.

Get Started with Tasks
53
4) Navigate to a time period in the calendar when exception time should be added.
5) In the Day or Week view, make any of the following adjustments to the calendar:
To change the work hours for a day, select a period of time on a specific day. Change the exception time on the calendar by dragging the entire block of time or by expanding or reducing the block of time. The block of time indicates the new work hours for the day.
To set an entire day as nonworking time, select the date menu, and then select Unavailable.
To set an entire day as working time, select the date menu, and then select Available.
To revert any changes you made to a day, select the date menu, and then select Set to Standard. You can also remove individual blocks of exception time by select the Xwithin a block.
6) Save your changes:
In Primavera Cloud:
a. Select Save.
b. In the Summary & Settings panel, select Close.
In Primavera Professional:
Select Save.
7) Exceptions are displayed on the Summary tab.
Tips
Any day can be set as unavailable, available, or with a range of exception time within the day. This includes days set as holidays.
This setting is used in the following apps:
Cost and Funds
Resources
Risk
Schedule
Scope
Tasks
Set the Default Calendar
There is one default calendar per workspace. The calendar set as the default calendar in the workspace-level Calendars dictionary is automatically assigned to new projects, resources, and roles when they are created. The calendars of existing projects, resources, or roles are not affected. Any calendar in the workspace can be assigned as the default calendar. One calendar must always be defined as the default.
Task Management User Guide
54
The default calendar is automatically made available to projects, resources, and roles. This can only be changed if you set a different calendar as the default. The application has a built-in default calendar. The settings in this calendar cannot be changed. After another calendar has been assigned as the default, this calendar can be deleted.
You can also set the default calendar on the Project page in the workspace Defaults & Options. Choose from a list of calendars that are available to the Project object. This will also make the calendar available to resources and roles.
To set the default workspace calendar:
1) Navigate to the Calendars dictionary page (see page 173).
2) In the list of calendars, select the Default option for a calendar.
3) Save your changes:
In Primavera Cloud:
a. Select Save.
b. In the Summary & Settings panel, select Close.
In Primavera Professional:
Select Save.
Tips
If the calendar you selected was only available to Project or Resource/Role, then both options are automatically selected when you select a new default calendar.
This setting is used in the following apps:
Cost and Funds
Resources
Risk
Schedule
Scope
Tasks
Codes Overview
Codes help you categorize your data objects based on characteristics that they share. If you have many instances of an object, codes help you group and filter potentially vast amounts of information spanning different areas of the organization. You can also use codes to arrange objects hierarchically. The application supports an almost unlimited number of codes and values; therefore, you can establish as many as you need to meet the filtering, sorting, and reporting requirements of your organization.
At the workspace level, codes can be created and associated with a wide variety of objects available within the workspace. At the project level, you can create activity codes that will only be available to a single project.
Workspace-level codes can be created for the following objects:

Get Started with Tasks
55
Activities
Custom Logs
Files
Funds
Ideas
Portfolios
Programs
Projects
Reports
Resources/Roles
Risks
Scope Assignments
Scope Items
Strategies
Task Constraints
Tasks
WBSs
Work Packages
Add a Code
Create codes to help categorize and track objects based on attributes they share.
You can apply workspace-level codes to one or more of the following objects: Activities, Custom Logs, Files, Funds, Ideas, Portfolios, Programs, Projects, Reports, Resources/Roles, Risks, Scope Assignments, Scope Items, Strategies, Task Constraints, Tasks, WBSs, and Work Packages.
To add a code to one or more objects:
1) Navigate to the Codes dictionary page (see page 173).
2) In the table, select Add Code.
3) In the new row, in the Name and ID columns, enter a name and ID for the new code.
4) In the Applies to panel, select one or more objects to apply the code.
5) Save your changes:
In Primavera Cloud:
a. Select Save.
b. In the Summary & Settings panel, select Close.
In Primavera Professional:
Select Save.
You can also perform this task on a single object from the Summary & Settings panel inPrimavera Cloud:
1) In the object selector, select a workspace.

Task Management User Guide
56
2) In the sidebar, select Summary & Settings.
3) On the Summary & Settings menu, select Defaults & Options.
4) Select the object, and then select the Codes tab.
Note: To add a code to this object that exists in the current or parent workspace, select Assign. Codes that display for the current workspace are the codes assigned to other objects in the workspace. Codes that display from the parent workspace are only the codes that are assigned to the same object type.
Tips
Individual activity code values can be associated with a color, which can then be used to color activity bars in the Gantt chart on the Activities page.
This setting is used in the following apps:
Cost and Funds
Custom Logs
Dashboards
Files
Portfolio Analysis
Reports
Resources
Risk
Schedule
Scope
Strategic Alignment
Tasks
Workflows and Forms
Add a Value to a Code
Add values to codes so that you can group, sort, and filter objects based on their code values.
To add a code value:
1) Navigate to the Codes dictionary page (see page 173).
2) In the table, select a code or code value.
3) Do either of the following:
In the toolbar, select the Add Code menu, and then select Add Code Value. A new value is beneath the selection.

Get Started with Tasks
57
In the table, select the Context menu, and select Add Code Value.
4) In the Name and ID columns, enter a name and ID for the code value.
5) (Optional) In the Color column, select a color for the code value. Code value colors are used on the Activities page to color activity bars in the Gantt chart according to each activity's assigned codes and code values.
6) Save your changes:
In Primavera Cloud:
a. Select Save.
b. In the Summary & Settings panel, select Close.
In Primavera Professional:
Select Save.
You can also perform this task on a single object from the Summary & Settings panel inPrimavera Cloud:
1) In the object selector, select a workspace.
2) In the sidebar, select Summary & Settings.
3) On the Summary & Settings menu, select Defaults & Options.
4) Select the object, and then select the Codes tab.
This setting is used in the following apps:
Cost and Funds
Custom Logs
Dashboards
Files
Portfolio Analysis
Reports
Resources
Risk
Schedule
Scope
Strategic Alignment
Tasks
Workflows and Forms

Task Management User Guide
58
Update the Owning Workspace of a Code
Update the owning workspace of a code to move it to another workspace that you are assigned. If you move the code to a workspace that is higher in the workspace hierarchy, it will be available to more workspaces.
To update the owning workspace of a code:
1) Navigate to an object configuration page (see page 176).
2) On the object page, select the Codes tab.
3) On the Codes tab, select a code.
4) Select the Context menu, and then select Change Owning Workspace.
5) In the Select Workspace dialog box, select the new owning workspace, and select Select.
6) Save your changes:
In Primavera Cloud:
a. Select Save.
b. In the Summary & Settings panel, select Close.
In Primavera Professional:
Select Save.
This setting is used in the following apps:
Cost and Funds
Custom Logs
Dashboards
Portfolio Analysis
Reports
Resources
Risk
Schedule
Scope
Strategic Alignment
Tasks
Workflows and Forms
Reasons Overview
In contract management, reasons are used to provide additional information about why a contract change is taking place. In task management, reasons are used to identify why a previous task commitment was not met.

Get Started with Tasks
59
Reasons are added at the workspace level, enabling you to use them across multiple projects in your organization. You can set each reason to apply to contract changes, tasks, or both.
Add a Reason
Use reasons to provide additional information about a contract change or task recommitment.
To add a reason:
1) In the object selector, select a workspace.
2) In the sidebar, select Summary & Settings.
3) On the Summary & Settings menu, select Dictionaries, and then select Reasons.
4) On the Reasons page, select Add.
5) In the new row, complete the following fields:
Abbreviation: Enter an abbreviation for the reason.
Name: Enter a description for the reason.
6) In the panel, choose to make the reason available to the following objects:
Changes: The reason is available when adding a change to a contract.
Task: The reason is available when recommitting to tasks.
7) Select Save.
8) In the Summary & Settings panel, select Close.
Tips
You can also add reasons when adding a contract change or recommitting to a task.
This setting is used in the following apps:
Tasks
Update the Owning Workspace for a Reason
Update the owning workspace of a reason to move it to another workspace that you are assigned. If you move a reason to a workspace that is higher in the workspace hierarchy, it will be available to more workspaces.
To update the owning workspace of a reason:
1) In the object selector, select a workspace.
2) In the sidebar, select Summary & Settings.
3) On the Summary & Settings menu, select Dictionaries, and then select Reasons.
4) On the Reasons page, select a reason.
5) Select the Context menu, and then select Change Owning Workspace.
6) In the Select Workspace dialog box, select the new owning workspace, and select Select.
7) Select Save.
8) In the Summary & Settings panel, select Close.

Task Management User Guide
60
This setting is used in the following apps:
Tasks
Defaults & Options
The Defaults & Options section specifies the default configuration of settings for each object in a workspace. Each new instance of a particular object in the workspace will inherit the attributes set in Defaults & Options. Settings for each object may include autonumbering defaults, standard and configured fields, object codes, measures, custom workflows, custom forms, and any other default settings applicable to the object. The available configuration options vary by object.
Field Labels Overview
Standard fields are the default fields found in Oracle Primavera Cloud. Fields can be used to store data, provide details, and accept user input. On many pages, fields can be added as columns in a table, used to sort or group data, or used as filters to reduce the number of items displayed on a page. They can also be found in dialog boxes, detail windows, and settings pages. Fields may be associated with a specific object. For example, the activity object is associated with various activity-related fields, such as Start, Finish, and Duration. These fields can be used on pages that support activities.
The Field Labels tab in the Defaults & Options section of the workspace Summary & Settings provides the default column name, column label, data type, and description of each field associated with an object. Labels are the field names displayed throughout the application. Default field labels may not reflect the terminology of your organization or industry. You can customize labels to meet the needs of your organization in any of the twelve supported languages.
Oracle Primavera Cloud and Primavera Professional documentation uses default field labels. If you change a field label in the application, it will no longer match the label used in documentation. Modified field labels can be reset back to their defaults.
Access a Standard Field Description
You can view the default column name, column label, data type, and description of any standard field in the application. The column label of each field can be modified to match the terminology used by your organization. Fields are associated with objects and can be used in pages that support that object.
To view the details of a standard field:
1) Navigate to an object configuration page (see page 176).
2) On the object page, select the Field Labels tab, and view the Column Name, Column Label, Data Type, and Description columns.
This setting is used in the following apps:
Cost and Funds

Get Started with Tasks
61
Custom Logs
Files
Portfolio Analysis
Resources
Risk
Schedule
Scope
Strategic Alignment
Tasks
Change a Standard Field Label
You can update standard field labels in your native language or update labels in the Localization detail window to customize the field label in other languages. In the table of standard fields, the Column Name field specifies the original field name. The Column Label field specifies the custom label, entered by the user. By default it matches the original field name.
Note: Oracle Primavera Cloud documentation uses default field labels. If you follow these steps to change a field label in the application, it will no longer match the label used in documentation.
To change a standard field label:
1) Navigate to an object configuration page (see page 176).
2) On the object page, select the Field Labels tab.
3) In the table, select a field.
4) In the Column Label field, enter a new label.
5) In the Localization detail window, select the Column Label field of the language, and enter a new label.
6) Save your changes:
In Primavera Cloud:
a. Select Save.
b. In the Summary & Settings panel, select Close.
In Primavera Professional:
Select Save.
Tips
You can restore the default label of a standard field by selecting the Context menu and then selecting Reset Label.

Task Management User Guide
62
New child workspaces inherit the field labels set in the parent workspace. To apply field
labels to all existing child workspaces, select one or more fields, select the Contextmenu, and then select Apply Label to Child Workspace.
This setting is used in the following apps:
Cost and Funds
Custom Logs
Portfolio Analysis
Resources
Risk
Schedule
Scope
Strategic Alignment
Tasks
Configured Fields Overview
Configured fields are user-created fields that allow you to define and maintain data specific to your organization. For example, you can track information such as Strategic Importance or Main Stakeholder.
Configured fields are created in the context of an object and can be used in views on pages that support that object. For example, you can create an Activity configured field and use it on the Activities page as a column, grouping band, sorting option, or filter criterion. Configured fields are global, so they can be used across all workspaces, projects, portfolios, programs, and ideas.
Oracle Primavera Cloud fields are categorized by data type, including: Boolean, cost, date, integer, list, number, or text. For some types of data, you can define a formula or statement to calculate values for a field. For more information on creating or using custom formulas, consult the Oracle Primavera Cloud Expression Language Guide on Oracle Help Center.
Documentation on adding a configured field to a specific object can be found under that object.
Change a Configured Field Label
You can update configured field labels in your native language or update labels in the Localization detail window to customize the field label in other languages. In the table of configured fields, the View Column Name field specifies the original field name. The Column Label field specifies the custom label, entered by the user. By default it matches the original field name.
To change a configured field label:
1) Navigate to an object configuration page (see page 176).
2) On the object page, select the Configured Fields tab.
3) In the table, select a field.

Get Started with Tasks
63
4) In the Column Label field, enter a new label.
5) In the Localization section, select the Column Label field of the language, and enter a new label.
6) Save your changes:
In Primavera Cloud:
a. Select Save.
b. In the Summary & Settings panel, select Close.
In Primavera Professional:
Select Save.
Tips
You can restore the default label of a configured field by selecting the Context menu and then selecting Reset Label.
New child workspaces inherit the field labels set in the parent workspace. To apply field
labels to all existing child workspaces, select one or more fields, select the Contextmenu, and then select Apply Label to Child Workspace.
This setting is used in the following apps:
Cost and Funds
Custom Logs
Files
Portfolio Analysis
Resources
Risk
Schedule
Scope
Tasks
Add a Formula-Based Configured Field: Example
This example demonstrates how to create a configured field to calculate and store the Estimated Final Cost of a project.
Note: For information on creating advanced formulas for measures, refer to the Oracle Primavera Cloud Expression Language Guide on Oracle Help Center.
Let us assume that you will define the Estimated Final Cost of a project as Approved Budget plus Proposed Budget.

Task Management User Guide
64
Creating a Configured Field
1) Navigate to the Project configuration page (see page 176).
2) On the Project page, select Configured Fields.
3) In the table, complete the following fields:
a. In the Column Label column, enter Estimated Final Cost.
b. In the View Column Name column, enter EST_FINAL_COST.
c. In the Data Type column, select Cost.
d. In the Type column, select Formula.
e. In the Summary Calculation column, select Sum.
Defining a Formula
1) In the Formula detail window, in the Field list, select Approved Budget, and select Insert Field.
2) Select +.
3) In the Field list, select Proposed Budget, and select Insert Field.
4) Select Validate Formula.
5) In the Formula validation passed dialog box, select OK.
6) Save your changes:
In Primavera Cloud:
a. Select Save.
b. In the Summary & Settings panel, select Close.
In Primavera Professional:
Select Save.
Tips
To delete a configured field, select the field, select Context, and then select Delete. You cannot delete a configured field if it is used in a form, workflow, or field mapping.
Update the Owning Workspace of a Configured Field
Update the owning workspace of a configured field to move it to another workspace that you are assigned. If you move the field to a workspace that is higher in the workspace hierarchy, it will be available to more workspaces.
To update the owning workspace of a configured field:
1) Navigate to an object configuration page (see page 176).
2) On the object page, select the Configured Fields tab.
3) On the Configured Fields tab, select Manage Shared Data.
4) Select the Context menu, and then select Change Owning Workspace.
5) In the Select Workspace dialog box, select the new owning workspace, and select Select.
6) Save your changes:

Get Started with Tasks
65
In Primavera Cloud:
a. Select Save.
b. In the Summary & Settings panel, select Close.
In Primavera Professional:
Select Save.
This setting is used in the following apps:
Cost and Funds
Custom Logs
Files
Portfolio Analysis
Resources
Risk
Schedule
Scope
Strategic Alignment
Tasks
Task
Set auto numbering task defaults, create and customize field labels, and create new codes.
Defaults
Configure Auto Numbering Defaults for a Task (on page 66)
Field Labels
Access a Standard Field Description (on page 60) Change a Standard Field Label (on page 61)
Configured Fields
Add a Task Field (on page 66) Add a Formula-Based Configured Field: Example (on page 63) Update the Owning Workspace of a Configured Field (on page 64) Change a Configured Field Label (on page 62)
Codes
Add a Code (on page 55) Add a Value to a Code (on page 56) Update the Owning Workspace of a Code (on page 58)
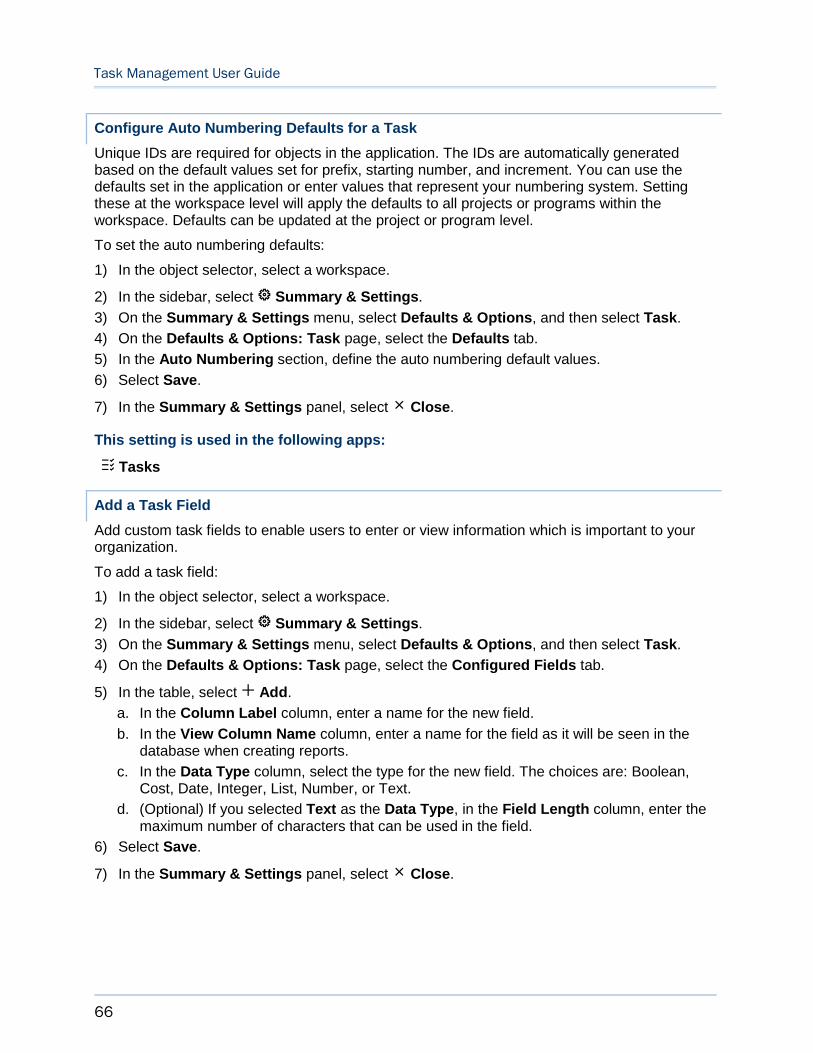
Task Management User Guide
66
Configure Auto Numbering Defaults for a Task
Unique IDs are required for objects in the application. The IDs are automatically generated based on the default values set for prefix, starting number, and increment. You can use the defaults set in the application or enter values that represent your numbering system. Setting these at the workspace level will apply the defaults to all projects or programs within the workspace. Defaults can be updated at the project or program level.
To set the auto numbering defaults:
1) In the object selector, select a workspace.
2) In the sidebar, select Summary & Settings.
3) On the Summary & Settings menu, select Defaults & Options, and then select Task.
4) On the Defaults & Options: Task page, select the Defaults tab.
5) In the Auto Numbering section, define the auto numbering default values.
6) Select Save.
7) In the Summary & Settings panel, select Close.
This setting is used in the following apps:
Tasks
Add a Task Field
Add custom task fields to enable users to enter or view information which is important to your organization.
To add a task field:
1) In the object selector, select a workspace.
2) In the sidebar, select Summary & Settings.
3) On the Summary & Settings menu, select Defaults & Options, and then select Task.
4) On the Defaults & Options: Task page, select the Configured Fields tab.
5) In the table, select Add.
a. In the Column Label column, enter a name for the new field.
b. In the View Column Name column, enter a name for the field as it will be seen in the database when creating reports.
c. In the Data Type column, select the type for the new field. The choices are: Boolean, Cost, Date, Integer, List, Number, or Text.
d. (Optional) If you selected Text as the Data Type, in the Field Length column, enter the maximum number of characters that can be used in the field.
6) Select Save.
7) In the Summary & Settings panel, select Close.

Get Started with Tasks
67
Tips
To delete a configured field, select the field, select Context, and then select Delete. You cannot delete a configured field if it is used in a form, workflow, or field mapping.
This setting is used in the following apps:
Tasks
Task Constraint
Set auto numbering task constraint defaults, create and customize field labels, and create new codes.
Defaults
Configure Auto Numbering Defaults for a Task Constraint (on page 67)
Field Labels
Access a Standard Field Description (on page 60) Change a Standard Field Label (on page 61)
Configured Fields
Add a Task Constraint Field (on page 68) Add a Formula-Based Configured Field: Example (on page 63) Update the Owning Workspace of a Configured Field (on page 64) Change a Configured Field Label (on page 62)
Codes
Add a Code (on page 55) Add a Value to a Code (on page 56) Update the Owning Workspace of a Code (on page 58)
Configure Auto Numbering Defaults for a Task Constraint
Unique IDs are required for objects in the application. The IDs are automatically generated based on the default values set for prefix, starting number, and increment. You can use the defaults set in the application or enter values that represent your numbering system. Setting these at the workspace level will apply the defaults to all projects or programs within the workspace. Defaults can be updated at the project or program level.
To set the auto numbering defaults:
1) In the object selector, select a workspace.
2) In the sidebar, select Summary & Settings.
3) On the Summary & Settings menu, select Defaults & Options, and then select Task Constraint.
4) On the Defaults & Options: Task Constraint page, select the Defaults tab.
5) In the Auto Numbering section, define the auto numbering default values.
6) Select Save.
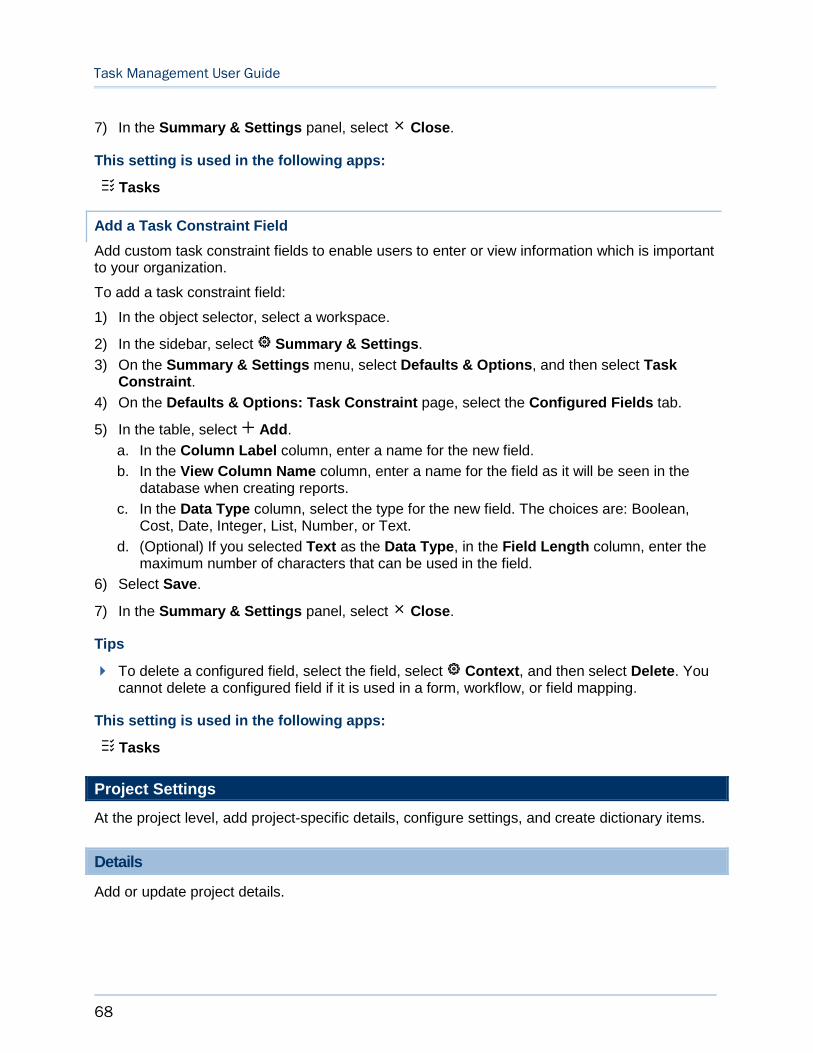
Task Management User Guide
68
7) In the Summary & Settings panel, select Close.
This setting is used in the following apps:
Tasks
Add a Task Constraint Field
Add custom task constraint fields to enable users to enter or view information which is important to your organization.
To add a task constraint field:
1) In the object selector, select a workspace.
2) In the sidebar, select Summary & Settings.
3) On the Summary & Settings menu, select Defaults & Options, and then select Task Constraint.
4) On the Defaults & Options: Task Constraint page, select the Configured Fields tab.
5) In the table, select Add.
a. In the Column Label column, enter a name for the new field.
b. In the View Column Name column, enter a name for the field as it will be seen in the database when creating reports.
c. In the Data Type column, select the type for the new field. The choices are: Boolean, Cost, Date, Integer, List, Number, or Text.
d. (Optional) If you selected Text as the Data Type, in the Field Length column, enter the maximum number of characters that can be used in the field.
6) Select Save.
7) In the Summary & Settings panel, select Close.
Tips
To delete a configured field, select the field, select Context, and then select Delete. You cannot delete a configured field if it is used in a form, workflow, or field mapping.
This setting is used in the following apps:
Tasks
Project Settings
At the project level, add project-specific details, configure settings, and create dictionary items.
Details
Add or update project details.

Get Started with Tasks
69
Assign a Manager to a Project
Assign managers to projects to identify the project manager or person responsible for managing the project.
The user who created the project is automatically assigned as the manager.
To assign a manager to a project:
1) Navigate to the project Details page (see page 172).
2) In the Details section, in the Manager field, select a manager.
3) Save your changes:
In Primavera Cloud:
a. Select Save.
b. In the Summary & Settings panel, select Close.
In Primavera Professional:
Select Save.
You can also do this in the Projects inventory panel.
1) In Primavera Cloud:
In the object selector, select Projects, and then select View All Projects.
In Primavera Professional:
a. On the File menu, select Open.
b. In the Open dialog box, select the Projects or Programs tab, select a project or program, and then select Open.
c. On the Workspace menu, select Projects.
2) In the table, select a project, and then add a manger in the Manager field.
This setting is used in the following apps:
Cost and Funds
Resources
Risk
Schedule
Scope
Strategic Alignment
Tasks
Assign a Project Calendar
Each project must have a calendar assigned. The project calendar determines valid work and nonwork times during the project. The project calendar is automatically assigned to all new activities within the project. Existing activity calendar assignments are not affected. An activity's calendar can be updated at any time.

Task Management User Guide
70
The default calendar in the parent workspace is automatically assigned as the project calendar when the project is created, but this can be changed to suit the needs of the project. When assigning a project calendar, you can select workspace-level or project-level calendars that have been made available to the project object.
To assign a project calendar:
1) Navigate to the project Details page (see page 172).
2) In the Details section, in the Calendar field, select a calendar.
3) In the Select Calendar dialog box, in the Filter By list, select Project to view calendars available at the project level, or Workspace to view calendars available at the workspace level.
4) Select a calendar, and then select Select.
5) Save your changes:
In Primavera Cloud:
a. Select Save.
b. In the Summary & Settings panel, select Close.
In Primavera Professional:
Select Save.
Configure Schedule Settings for a Project
Configure project schedule settings to set planned project start and finish dates, as well as a date by which the project must finish. These dates are also used to drive the project scheduler during the scheduling process.
To configure schedule settings for your project:
1) Navigate to the project Details page (see page 172).
2) In the Schedule section, in the Project Planned Start field, select the start date.
3) In the Project Planned Finish field, select a planned finish date.
4) In the Schedule Must Finish By Date field, select the date the project must finish by.
5) Save your changes:
In Primavera Cloud:
a. Select Save.
b. In the Summary & Settings panel, select Close.
In Primavera Professional:
Select Save.
This setting is used in the following apps:
Resources
Risk
Schedule
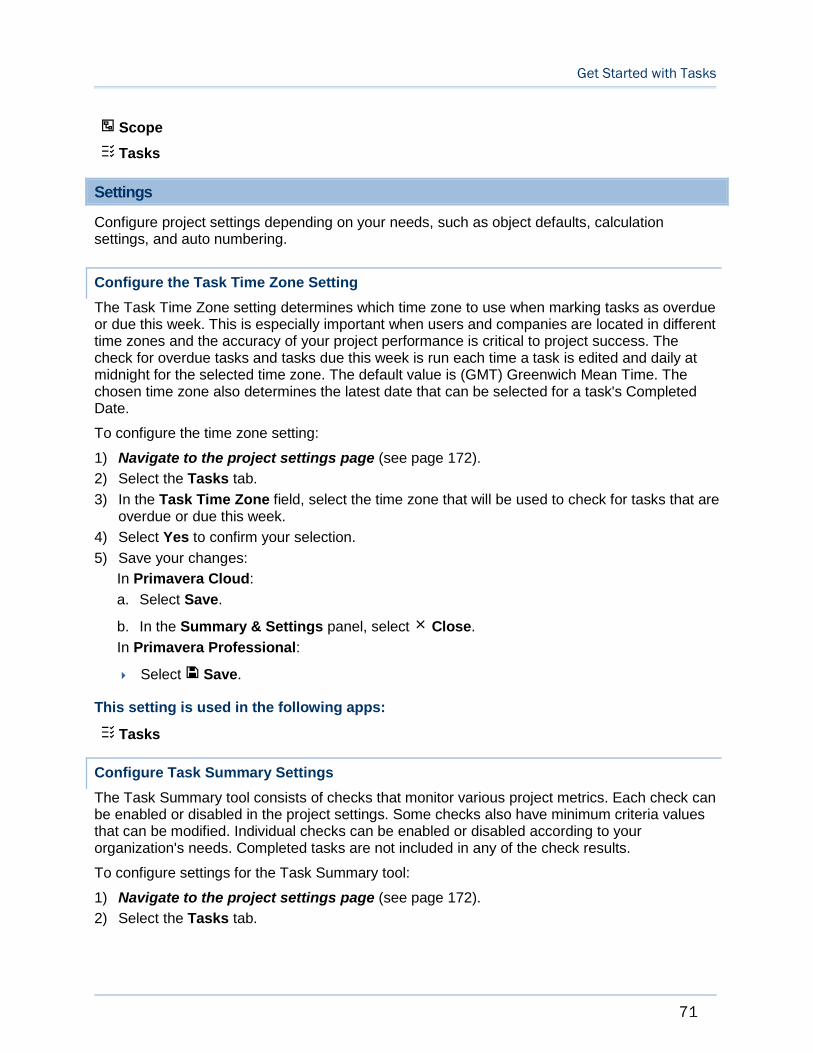
Get Started with Tasks
71
Scope
Tasks
Settings
Configure project settings depending on your needs, such as object defaults, calculation settings, and auto numbering.
Configure the Task Time Zone Setting
The Task Time Zone setting determines which time zone to use when marking tasks as overdue or due this week. This is especially important when users and companies are located in different time zones and the accuracy of your project performance is critical to project success. The check for overdue tasks and tasks due this week is run each time a task is edited and daily at midnight for the selected time zone. The default value is (GMT) Greenwich Mean Time. The chosen time zone also determines the latest date that can be selected for a task's Completed Date.
To configure the time zone setting:
1) Navigate to the project settings page (see page 172).
2) Select the Tasks tab.
3) In the Task Time Zone field, select the time zone that will be used to check for tasks that are overdue or due this week.
4) Select Yes to confirm your selection.
5) Save your changes:
In Primavera Cloud:
a. Select Save.
b. In the Summary & Settings panel, select Close.
In Primavera Professional:
Select Save.
This setting is used in the following apps:
Tasks
Configure Task Summary Settings
The Task Summary tool consists of checks that monitor various project metrics. Each check can be enabled or disabled in the project settings. Some checks also have minimum criteria values that can be modified. Individual checks can be enabled or disabled according to your organization's needs. Completed tasks are not included in any of the check results.
To configure settings for the Task Summary tool:
1) Navigate to the project settings page (see page 172).
2) Select the Tasks tab.

Task Management User Guide
72
3) In the Task Summary Settings section, configure the following settings:
For each check, select the Active option to include the selected check in the Task Summary panel.
For each check that supports minimum criteria values, in the Minimum Criteria field, enter a new value.
4) Save your changes:
In Primavera Cloud:
a. Select Save.
b. In the Summary & Settings panel, select Close.
In Primavera Professional:
Select Save.
Tips
If you are accessing the Tasks tab for the first time, you may be prompted to run the Task Summary checks. Select Run to run the checks.
This setting is used in the following apps:
Tasks
Configure the Auto Numbering Defaults for a Project
Unique IDs are required for a number of objects in the application. For example, in the Scope app, auto numbering defaults can be set for scope items, work packages, scope assignments, change requests, and change items. The IDs are automatically generated for each new object based on the default values set at the workspace level for prefix, suffix, and increment. You can use the defaults or enter values that represent the numbering system used for your project.
To set the auto numbering defaults:
1) Navigate to the project settings page (see page 172).
2) Select the Auto Numbering tab.
3) Define the auto numbering defaults for the objects used in the following areas.
Cost: Actuals, Budget Change, and Budget Transfer
Files: Custom Logs
Ideas: Idea
Tasks: Tasks, Task Constraint
Resources: Resource/Role
Risk: Risk
Schedule: Activity, Schedule Scenario, WBS
Scope: Scope Item, Work Package, Scope Assignment, Change Request, Change Item, and WBS
4) Save your changes:
In Primavera Cloud:

Get Started with Tasks
73
a. Select Save.
b. In the Summary & Settings panel, select Close.
In Primavera Professional:
Select Save.
Tips
Users can manually overwrite the default values when adding these objects in the application.
When importing scope items or scope assignments, if the ID column in the import template is left blank, the Scope Item ID or Scope Assignment ID columns are populated with the auto numbering defaults.
Dictionaries (Project)
Project-level dictionaries contain items that are only available to a single project.
Calendars (Project-level)
Calendars in the project Calendars dictionary are available to be assigned as the default project calendar or to individual activities, resources, and roles in the project. Project-specific calendars are useful when there are calendars that only need to be available to a single project. When assigning a calendar to the project, activity, resource, or role, you can choose from project-level or workspace-level calendars. If a project-level calendar should be made available to more projects, you can promote it to the parent workspace.
For more information about calendars, see Calendars Overview (on page 48).
Add a Holiday List to a Project-level Calendar
Add a holiday list to include any public or company holidays observed by the organization that should be reflected in the project schedule. An existing list can be assigned to a calendar during the calendar's creation, or you can assign a calendar's holiday list later. One holiday list can be selected per calendar.
Holiday lists are available to be used throughout the workspace hierarchy. You must have the security privileges required to add and edit calendars in the parent workspace to add and edit a holiday list.
To add a holiday list to a project-level calendar:
1) Navigate to the project Calendars dictionary page (see page 175).
2) Select Holidays.
3) In the Manage Holiday Lists dialog box, select Add, and then enter a name for the holiday list. You can also select an existing list.
4) Select Edit Holiday List.
5) Select Add to create a new holiday for the list. Enter a name for the holiday. You can also select an existing holiday.
6) Choose when the holiday occurs:

Task Management User Guide
74
Once on: Select if this holiday is a onetime occurrence.
Repeat every: Select if this holiday occurs on the same date every year.
Note: You can select on a calendar when holidays are recognized as part of the standard work week.
Repeat the: Select if this holiday occurs on a different date each year, but always occurs on the same day and week each year.
7) Continue to enter dates as needed.
8) Save your changes:
In Primavera Cloud:
a. Select Save.
b. In the Summary & Settings panel, select Close.
In Primavera Professional:
Select Save.
This setting is used in the following apps:
Cost and Funds
Resources
Risk
Schedule
Scope
Tasks
Add a Project-level Calendar
Add a project-level calendar if it only needs to be available to a particular project. Calendars at the project level can be assigned as the default project calendar or to activities in the project. They cannot be assigned to resources or roles in the project. You can promote project-level calendars to the parent workspace if they should be made available to other projects in the workspace or to resources/roles.
To add a project-level calendar:
1) Navigate to the project Calendars dictionary page (see page 175).
2) Select Add.
3) In the Add Calendar wizard, complete the following steps:
a. Name: Enter a Name and ID for the calendar. Select Next.
b. Create Work Week: Specify the standard number of work hours per day by manually entering the number of hours or by selecting the time period on the calendar. Change the time periods on the calendar by dragging the entire block of time or by expanding or reducing the block of time. Select Next.
c. Add Holidays: Choose a holiday list to assign to the calendar. The holidays in the selected list are displayed.

Get Started with Tasks
75
Select the If a holiday falls on standard nonwork time, move option if your calendar has holidays that fall on standard nonwork time and should be marked as holiday time during standard work time. Select where on the calendar the holiday should be reflected.
Notes:
This setting affects the placement of activities during scheduling and leveling. Changes to a holiday's placement on the calendar are not reflected on the Calendar tab of the Calendars dictionary page.
This setting applies to holidays being placed on nonwork time during the standard work week. It is unaffected by unavailable time created by an exception.
Select Finish.
4) Save your changes:
In Primavera Cloud:
a. Select Save.
b. In the Summary & Settings panel, select Close.
In Primavera Professional:
Select Save.
Tips
To promote a calendar to the parent workspace Calendars dictionary, select a calendar,
select the Context menu, and then select Promote to Workspace.
You can also create a calendar by duplicating an existing calendar. Select the Contextmenu next to the calendar, and then select Duplicate.
This setting is used in the following apps:
Cost and Funds
Resources
Risk
Schedule
Scope
Tasks
Configure Project-level Calendar Time Period Settings
A calendar's time period settings specify the default number of hours in each work period. The standard time period hours defined in the Application Settings are displayed by default, but can be changed after the calendar is created. Time period settings are separate from the calendar's standard work week values, which specify the working hours for each day of the week.
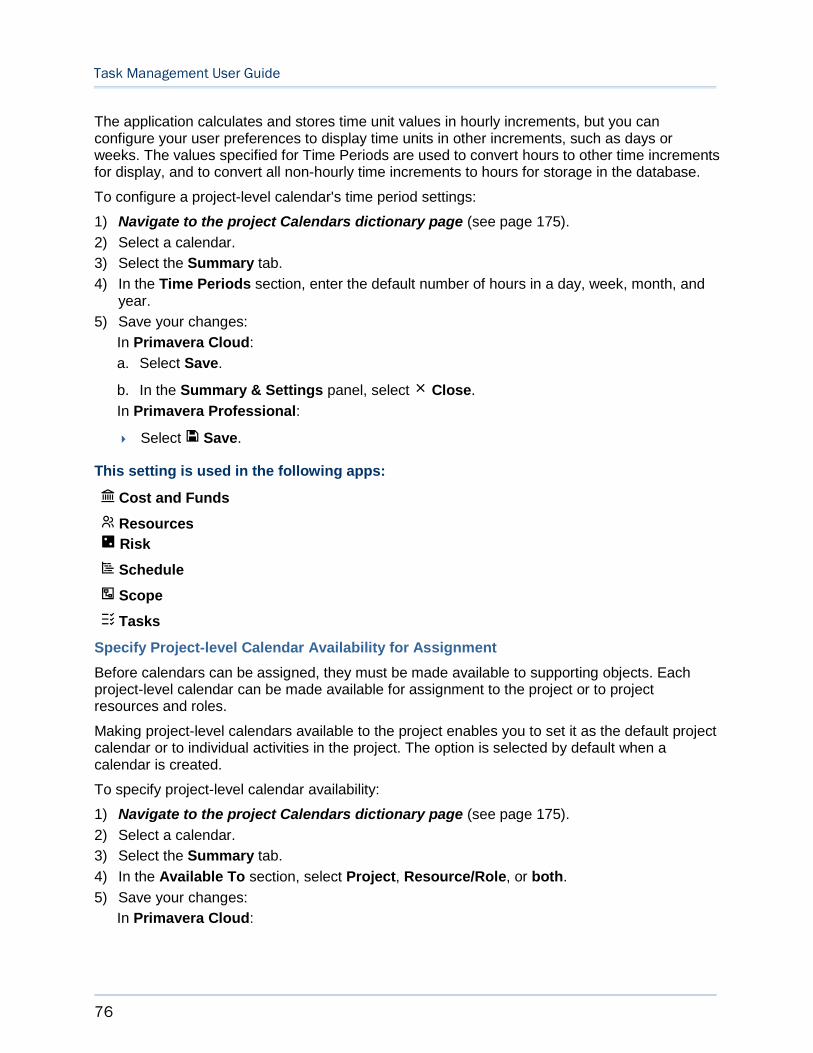
Task Management User Guide
76
The application calculates and stores time unit values in hourly increments, but you can configure your user preferences to display time units in other increments, such as days or weeks. The values specified for Time Periods are used to convert hours to other time increments for display, and to convert all non-hourly time increments to hours for storage in the database.
To configure a project-level calendar's time period settings:
1) Navigate to the project Calendars dictionary page (see page 175).
2) Select a calendar.
3) Select the Summary tab.
4) In the Time Periods section, enter the default number of hours in a day, week, month, and year.
5) Save your changes:
In Primavera Cloud:
a. Select Save.
b. In the Summary & Settings panel, select Close.
In Primavera Professional:
Select Save.
This setting is used in the following apps:
Cost and Funds
Resources
Risk
Schedule
Scope
Tasks
Specify Project-level Calendar Availability for Assignment
Before calendars can be assigned, they must be made available to supporting objects. Each project-level calendar can be made available for assignment to the project or to project resources and roles.
Making project-level calendars available to the project enables you to set it as the default project calendar or to individual activities in the project. The option is selected by default when a calendar is created.
To specify project-level calendar availability:
1) Navigate to the project Calendars dictionary page (see page 175).
2) Select a calendar.
3) Select the Summary tab.
4) In the Available To section, select Project, Resource/Role, or both.
5) Save your changes:
In Primavera Cloud:

Get Started with Tasks
77
a. Select Save.
b. In the Summary & Settings panel, select Close.
In Primavera Professional:
Select Save.
Tips
If you assign a project-level calendar to a project-level resource or role, then the resource or role can't be promoted to the workspace unless you remove the calendar assignment or promote the project calendar to the workspace.
This setting is used in the following apps:
Cost and Funds
Resources
Risk
Schedule
Scope
Tasks
Set Project-level Calendar Exception Time
Exception time is set by selecting periods of time on a calendar that are exceptions to the calendar's standard working hours. Select a period of time on a particular date to specify the new working time for that date. For example, your organization may decide to give employees a half day of vacation time the day before a scheduled holiday. In this case, the first half of the standard work day would be selected, thereby designating it as exception time. You can also set an entire day as unavailable, indicating that the day cannot be worked at all, or available, indicating that the day can be worked without the restriction of standard work hours. Remove changes by setting individual days back to standard working time.
The calendar's Day and Week views enable you to add exception time, but only the Week view supports setting an entire day as unavailable or available. The Month and Year views enable you to see the different working time types at a high level. A legend below the calendar indicates whether each time period displayed is standard, exception, unavailable, or holiday time.
To set project-level calendar exception time:
1) Navigate to the project Calendars dictionary page (see page 175).
2) Select a calendar.
3) Select the Calendar tab.
4) Navigate to a time period in the calendar when exception time should be added.
5) In the Day or Week view, make any of the following adjustments to the calendar:
To change the work hours for a day, select a period of time on a specific day. Change the exception time on the calendar by dragging the entire block of time or by expanding or reducing the block of time. The block of time indicates the new work hours for the day.
Task Management User Guide
78
To set an entire day as nonworking time, select the date menu, and then select Unavailable.
To set a holiday as a work day, select the date menu, and select Available. Adjust the exception time for the new work day by dragging, expanding, and reducing the block of time.
To revert any changes you made to a day, select the date menu, and then select Set to Standard. You can also remove individual blocks of exception time by select the Xwithin a block.
6) Save your changes:
In Primavera Cloud:
a. Select Save.
b. In the Summary & Settings panel, select Close.
In Primavera Professional:
Select Save.
7) Exceptions are displayed on the Summary tab.
Tips
Any day can be set as unavailable, available, or with a range of exception time within the day. This includes days set as holidays.
This setting is used in the following apps:
Cost and Funds
Resources
Risk
Schedule
Scope
Tasks
Promote a Project-level Calendar to the Parent Workspace
If a project-level calendar should be made available to other projects in the workspace, you can promote it to the parent workspace. If the promoted calendar's ID is not unique throughout the parent workspace's hierarchy, the promotion will fail. If this occurs, modify the ID and try again. After the calendar is promoted, it is removed from the project-level Calendars dictionary.
You must have the required security privileges to add a calendar in the parent workspace.
To promote a project-level calendar to the workspace:
1) Navigate to the project Calendars dictionary page (see page 175).
2) In the calendar list, select a calendar, select the Context menu, and then select Promote to Workspace.
3) All changes made to this page are saved automatically.

Get Started with Tasks
79
This setting is used in the following apps:
Cost and Funds
Resources
Risk
Schedule
Scope
Tasks
Codes (Project-level)
In the project Codes dictionary, codes are available to be assigned to activities within the project. Project-specific codes are useful when there are codes that only need to be available to a single project. You can use codes to help you categorize your data based on shared characteristics. Codes can be added as columns, grouping bands, sorting options, filters, and more. If a project-level code should be made available to more areas of your application, you can promote it to the parent workspace.
Add a Project-level Code
Codes enable you to categorize and track objects based on attributes they share. Add codes to the project Codes dictionary if they should only be available to a specific project. You can promote project-level codes if they should be made available to other objects in the project's parent workspace.
You can apply project-level codes to the activities within the project.
To add a project-level code:
1) Navigate to the project Codes dictionary page (see page 175).
2) In the table, select Add Code.
3) In the new row, in the Name and ID columns, enter a name and ID for the new code.
4) In the Applies to panel, Activities is selected by default, making it available for assignment to activities in the project. Clear the Activities option if you do not want the code to be available for assignment.
5) Save your changes:
In Primavera Cloud:
a. Select Save.
b. In the Summary & Settings panel, select Close.
In Primavera Professional:
Select Save.
Tips
Individual activity code values can be associated with a color, which can then be used to color activity bars in the Gantt chart on the Activities page.

Task Management User Guide
80
To promote a code and its values to the parent workspace Codes dictionary, select a code in
the table, select the Context menu, and then select Promote to Workspace. Select Save.
Add a Value to a Project-level Code
Add values to codes so that you can group, sort, and filter objects based on their code values. At the project level, you can add values to project-specific activity codes. Individual activity code values can be associated with a color, which can then be used to color activity bars in the Gantt chart on the Activities page.
To add a code value to a project-level code:
1) Navigate to the project Codes dictionary page (see page 175).
2) In the table, select a code or code value.
3) Do either of the following:
In the toolbar, select the Add Code menu, and then select Add Code Value. A new value is added beneath the selection.
In the table, select the Context menu, and then select Add Code Value.
4) In the Name and ID columns, enter a name and ID for the code value.
5) In the Color column, select a color for the code value.
6) Save your changes:
In Primavera Cloud:
a. Select Save.
b. In the Summary & Settings panel, select Close.
In Primavera Professional:
Select Save.
Tips
Code values can be configured hierarchically to further enhance your object organization.
Select the Context menu next to a code value, and then choose to move the value up, down, left, or right.
Additional Settings
Some settings may need to be configured in other areas of the application.
Assign a Company to a Project
Companies are assigned at the project level to designate responsibility for the work performed on your project. Assign companies to your project, and set a color for each company.

Work Plan Overview
81
Note: When a user or user group is assigned to a project, the companies associated with those users are automatically assigned.
To assign a company to a project:
1) In the object selector, select a project.
2) In the sidebar, hover over Project Team, and select Companies.
3) Select Assign.
4) In the Assign Companies dialog box, select a company, and then select Assign.
5) In the Color field, select a color to associate with the company.
6) Select Save.
Tips
Assign companies to be responsible for the work on your tasks. Associate a color with each company to make company tasks easier to identify.
Work Plan Overview
Use the Work Plan page to sequence and progress tasks on a virtual planning board in daily or weekly intervals. Unplanned tasks are displayed in a hopper, an area of the Work Plan page where tasks can be edited, deleted, or grouped according to their assigned activity. Dragging a task from the hopper to the planning board creates a due date on the task.
Companies may commit to perform work on a task by a due date, marking it as completed when the work has been performed. Tasks can also be placed into future period planning buckets if they are not ready to be performed.
By default, this page displays a planning period of six weeks (one week before the current week and four weeks after the current week). Tasks outside the planning period may not be visible. To modify the current settings, see Configure and Apply Filtering (on page 155).
To learn more about the concepts used on this page, see Understanding Tasks App Concepts (on page 10).
Note: Certain page view settings are not maintained when the page is refreshed using the Safari browser.

Task Management User Guide
82
Working with the Work Plan Page
The Work Plan page provides a planning board for sequencing your task work. Create tasks, and then drag and drop them onto the planning board to build your work plan. The first time you open the Work Plan page, you can choose to watch a video that provides an overview of the page and its features. The video can be viewed at any time by opening the Help menu and accessing the Training Center.
Table of Screen Highlights
Item Description
1 Hopper: The hopper contains all tasks that do not have a due date, also known as unplanned tasks. Add new tasks, group the list of tasks by assigned activity, or drag tasks into the planning board or planning buckets. Each hopper band indicates the number of unplanned tasks assigned to the activity. Bands without numbers have zero assigned tasks. Right-click a hopper band to select all tasks assigned to that activity in the hopper, highlight the activity on the planning board, or set the activity as a quick filter.
2 Planning Board: The planning board displays tasks that have due dates, in weekly or daily intervals. Drag a task to a new date in the planning board, into past or future planning buckets, or into the hopper to remove its due date. Right-click an activity band to select all tasks assigned to that activity on the planning board, highlight the activity in the hopper, or set the activity as a quick filter.

Work Plan Overview
83
Item Description
3 Tasks Cards: Basic task cards are shown in the hopper and planning board. Each task card is colored according to its assigned company. The width of each card in the planning board denotes its duration. Icons on task cards indicate statuses of Complete, Committed, Overdue, Pending, and if a task has hand-offs or a proposed due date. Cards with diamonds indicate milestone tasks. See Task Icon Reference (on page 146) for icon descriptions.
Enable configurable task cards to show a customized set of task details when a basic task card is double-clicked. If the size of the planning board columns are decreased beyond a certain point, smaller, more generic cards may be shown.
4 Planning Board Options: Change the hand-off mode that is selected. Display up to six weeks at a time in the calendar. Enable activity bands to assist you when assigning tasks to activities. Move the planning board time period to previous or future periods. Organize tasks to group them by best fit or by company. Apply quick filters to the tasks on the page.
5 Planning Buckets: Planning buckets display past and future weekly periods according to the currently applied filter. Move a task from the hopper or planning board into a bucket to place it in that time period.
6 Info Bar: Use the info bar at the bottom of the planning board to view details for the selected task or activity. You can use the icons in the info bar to commit, complete, or view hand-offs on the selected task. The bar can be enabled in the view settings.
Create a Task on the Work Plan Page
On the Work Plan page, create public tasks and task milestones manually, or use Microsoft Excel to create or update multiple tasks simultaneously.
To create a task on the Work Plan page:
Add a Task or Task Milestone on the Work Plan Page (on page 83)
Create a Task by Import (on page 85)
Add a Task or Task Milestone on the Work Plan Page
Add tasks to detail the work to be performed on your project. Add task milestones to mark the distinct phases of your project. Tasks added to the planning board have due dates. Tasks added to the hopper do not have due dates.
Depending on your needs, tasks can be added in a variety of ways. The Add button on the toolbar opens the Task Details dialog box, which you can use to complete the most common task fields. You can also quickly add a task with default values directly to the hopper or planning board, add a task as a predecessor or successor to an existing task, or copy and paste an existing task to duplicate it.

Task Management User Guide
84
To learn more about tasks, see Understanding Tasks App Concepts (on page 10).
To add a task or task milestone on the Work Plan page:
1) In the object selector, select a project.
2) In the sidebar, hover over Tasks, and select Work Plan.
3) Add a task or task milestone using any of the following methods:
a. Using the toolbar:
1. On the toolbar, select Add. In the task details dialog box, select the General tab.
2. Type: Select the Task or Task Milestone icon.
Notes:
You can change the task type if the task is not complete and has no commitments.
Task milestones do not support the Assigned User, Duration, Use Only Work Days, or Start Date fields.
3. Task Name: Enter the name of the task.
4. Company: Select the company responsible for performing work on the task.
The color picker displays the color that is selected for the company.
5. Assigned User: Select the user responsible for performing the task. The user must belong to the assigned company.
6. Activity: Select an activity if the task is required to complete the activity.
7. Duration: Enter the amount of time the task will take to complete.
Use Only Work Days: Select this option to allow only the project calendar's work days and ignore non-work days when determining the value for Start and Due Date.
8. Due Date: Select a date by which the task must be completed.
The Start Date field is read-only and is calculated based on the Duration and Due Date of the task.
9. Proposed Due Date: Propose an updated due date by which the task must be completed.
Select Accept to accept the proposed due date. The Due Date field will be updated with the accepted date.
10. Completed Date: The date that the task was completed. This date can be modified after the task is marked completed.
Select Complete to mark the task complete.
11. If task-based configured fields or codes exist in your workspace, you can select the Additional Fields tab to edit configured field and code values for the selected task. These values can also be displayed on other pages in the Tasks app.
12. Select Save.
Note: Select Create Another, and then select Save to create the task

Work Plan Overview
85
without closing the dialog box.
b. Add directly to the hopper:
In the hopper, under an activity band, select Add. A new task is assigned to the activity with default values.
c. Add directly to the planning board:
In the planning board, right-click an activity band, and then select Add Task or Add Task Milestone. A new task with default values is added on the day that you right-clicked.
d. Add tasks with hand-offs:
Right-click a task in the hopper or planning board, and then select Add Task Before, Add Task After, Add Task Milestone Before, or Add Task Milestone After. A new task with default values is added as a predecessor or successor to the existing task.
e. Using copy and paste:
Right-click a selection of one or more tasks in the hopper or planning board, and then select Copy Tasks. Right-click an activity band, and then select Paste Tasks. If you paste tasks on the planning board, the tasks are added on the day column that you right-clicked.
4) All changes made to this page are saved automatically.
Tips
Select Tasks and Activities to display activity bands in the hopper and planning board. Tasks can be added to the "No Activity" band if they do not have assigned activities.
Create a Task by Import
Creating tasks and task milestones using Microsoft Excel enables you to use data from an outside system which can save you time from manual entry.
To create or update a task:
1) Download an Import Template for Importing Tasks (on page 85)
2) Import Tasks from Microsoft Excel (on page 86)
Download an Import Template for Importing Tasks
Download a Microsoft Excel template to use when importing tasks and task milestones. The template contains standard task fields that you can populate for new and existing tasks, as well as all current configured task fields.
To download an import template:
1) In the object selector, select a project.
2) In the sidebar, hover over Tasks, and select Work Plan or Task List.
3) Select the Actions menu, and then select Download Import Template.

Task Management User Guide
86
Tips
The import template is downloaded as a Microsoft Excel file with the default file name TasksImportTemplate.
The top two rows of the worksheet are required when importing tasks from a spreadsheet. You can delete unused columns, but do not change the data in these rows.
You cannot import tasks in the context of a program.
Review the Instructions worksheet for helpful tips on populating the import template.
Import Tasks from Microsoft Excel
You can import tasks and task milestones into the application from a Microsoft Excel (.xls or .xlsx) file. After downloading the import template, follow the instructions to create or update tasks in the spreadsheet. You cannot update committed or completed tasks. The import will fail if there are any invalid values in the spreadsheet. You can download the spreadsheet file to view and fix the errors indicated in the error column at the end of each worksheet, and then import the file again.
You must have sufficient privileges to perform this task.
To import tasks from Microsoft Excel:
1) In the object selector, select a project.
2) In the sidebar, hover over Tasks, and select Work Plan or Task List.
3) Select the Actions menu, and then select Import.
4) In the Import Tasks dialog box, select Browse, select a file, and select Import.
Tips
You cannot import tasks in the context of a program.
Manage Tasks on the Work Plan Page
Plan your tasks on the Work Plan page by adding them to the planning board. Add hand-offs between tasks to define the sequence in which they will be accomplished. View a timeline of your work in daily or weekly intervals, moving individual tasks between past, present, and future periods. Assign constraints to tasks to indicate the items that are preventing the tasks from starting. When ready, commit to work on your tasks, and mark them completed after the work has been performed. All of these processes can be performed as many times as necessary and in any order.
Many of the processes below can be performed using basic or configurable task cards (see "Customize Work Plan Task Cards" on page 96). Both card types support right-click menu functionality and the selection of status icons on the card. Configurable task cards also support the editing of task values without opening the Task Details dialog box.
To modify tasks on the Work Plan page:
Add a Hand-off on the Work Plan Page (on page 87)
Move a Task on the Work Plan Page (on page 88)
Modify Task Details on the Work Plan Page (on page 90)

Work Plan Overview
87
Propose and Accept a Task Due Date on the Work Plan Page (on page 91)
Assign a Constraint to a Task on the Work Plan Page (on page 92)
Commit to a Task on the Work Plan Page (on page 93)
Recommit to a Task on the Work Plan Page (on page 94)
Complete a Task on the Work Plan Page (on page 95)
Add a Hand-off on the Work Plan Page
Add hand-offs between tasks to order the work in a logical sequence. A hand-off signifies the next task to be performed after its preceding task has been completed. Use the Hand-offs panel to view a network diagram of the tasks in a hand-off sequence. Hand-offs can be created between tasks with the same, different, or no activity assignments. You can add hand-offs between two tasks, between two task milestones, or between a task and a task milestone.
To learn more about hand-offs, see Understanding Tasks App Concepts (on page 10).
To add a hand-off on the Work Plan page:
1) In the object selector, select a project.
2) In the sidebar, hover over Tasks, and select Work Plan.
3) Add a hand-off using any of the following methods:
a. Using the Task Details dialog box:
1. Right-click a task in the hopper or planning board, and then select View Task Details. In the Task Details dialog box, select the Hand-offs tab.
2. In the Predecessors or Successors section, select Add, and then select one or more tasks to add as predecessors or successors to the current task.
Note: The Select Task dialog box enables you to filter the list of available tasks by tasks with the same activity assignment as the current task or by tasks with any activity assignment. This includes any task without an activity assignment.
3. Select Select.
4. In the Type field, select the hand-off relationship between the two tasks.
5. (Optional) In the Lag field, enter the lag for the hand-off relationship. Select Lag - Use Only Work Days if you want the lag duration to only include work days.
6. Select Save.
b. Using the right-click menu:
Right-click a task, and then select Add Task Before, Add Task After, Add Task Milestone Before, or Add Task Milestone After. A hand-off path is created between the original task and the new task, even if the original task has existing hand-offs.
c. Using group selection:
Task Management User Guide
88
Select a group of tasks, right-click the selection, and then select Add Hand-offs. Hand-offs are created between the tasks in the order that they were selected, except for tasks with due dates, which are arranged in the chain from earliest to latest.
You can also right-click an activity band in the hopper or planning board, and then select Select All. Right-click the selection, and then select Add Hand-offs. Using this method, hand-offs are created between the tasks in the order that they appear.
4) After hand-offs are added to a task, select the Hand-off icon on a task card or in the info bar, or right-click the card and select View Hand-offs to open the Hand-offs panel.
5) All changes made to this page are saved automatically.
Tips
In the hopper or planning board, right-click one or more task cards and select Remove Hand-offs. This option removes all hand-offs from the tasks in the selection.
A Finish to Start hand-off is created by default when a successor task's due date is after the predecessor's due date. A Finish to Finish hand-off is created by default when both tasks have the same due date. The hand-off type for tasks with different due dates can be Finish to Start, Finish to Finish, or Start to Start. The hand-off type for tasks with the same due date can only be Finish to Finish.
If a task is part of a hand-off chain, changing its due date directly, accepting a proposed due date, or setting a new committed due date will cause the task and other tasks in the chain to be moved. The current hand-off mode determines the movement of a hand-off chain when any of the tasks in the chain are modified:
Keep Hand-offs: Maintain hand-off logic, but allow for the addition or consumption of slack between tasks.
Break Hand-offs: Only maintain hand-off logic until the slack between two tasks reaches zero.
Move a Task on the Work Plan Page
The Work Plan page enables you to plan your tasks and task milestones in an interactive manner similar to an actual planning board. Tasks can be moved to and from the hopper, planning board, or planning buckets. When moving a task to a date on the planning board, the date selected becomes the due date of the task. Move a task from the planning board to the hopper to remove its due date. Move a task to a planning bucket to place it in a past or future week without navigating away from the current view.
When grouping by tasks and activities, you can move tasks to different activity bands to change their activity assignments. Drag and drop or paste tasks directly on the band to move them. Move a task to the "No Activity" band to remove its activity assignment. Tasks set to Use Only Work Days may have their due dates affected by non-work time on the planning board.
To move a task on the Work Plan page:
1) In the object selector, select a project.
Work Plan Overview
89
2) In the sidebar, hover over Tasks, and select Work Plan.
3) In the hopper or planning board, select one or more tasks.
4) Do any of the following:
Modify the Due Date: With configurable task cards (see "Customize Work Plan Task Cards" on page 96) enabled, double-click a basic task card, and then select the Due Date field on the configurable task card to edit it. With configurable task cards disabled, double-click a basic task card to open the Task Details dialog box. Enter or remove the due date for the task, and then select Save. Tasks with due dates will be placed on that date on the planning board. Tasks without due dates will be placed in the hopper.
Cut and paste: Right-click your selection, and select Cut Task. Right-click a destination for your selection, such as a day column, activity band, planning bucket, or the hopper, and then select Paste Task. Your selection is moved.
Copy and paste: Right-click your selection, and select Copy Task. Right-click a destination, and then select Paste Task. Your selection is duplicated. Hand-offs cannot be copied with tasks.
Click and drag: Click and drag your selection to another destination. As you drag your selection, the longest duration in the selection is highlighted.
Move to Hopper: Right-click your selection, and select Move to Hopper. The due dates of the tasks in the selection are removed, and the tasks are placed in the hopper.
Move to Planning Board: Right-click your selection, and select Move to Planning Board. Tasks in the selection are placed on the planning board with a start date of today or the next available work day.
Delete: Right-click your selection, and select Delete Task. Select Yes to confirm.
5) All changes made to this page are saved automatically.
Tips
If you cut and paste or drag and drop one or more chains of tasks, the most recently selected task in each selected chain is used as the driving task. A driving task's placement on the planning board, hopper, or weekly bucket determines its due date, and all other tasks in the same chain are placed on the planning board in relation to the driving task. The current hand-off mode determines the movement of the tasks in a chain.
Paste your selection of tasks in a day column to maintain the assigned activity of each task in the selection. Paste your selection directly on an activity band to move all tasks in the selection to the activity that you selected.
When moving a task into a planning bucket, the task due date is set to the first available valid work day of that time period. Select a bucket to display its time period on the planning board.
You cannot move tasks with commitments into the hopper. You cannot move completed tasks.
The borders of a task appear as dashed lines if the task occurs on a non-work day.
If a task is part of a hand-off chain, changing its due date directly, accepting a proposed due date, or setting a new committed due date will cause the task and other tasks in the chain to be moved. The current hand-off mode determines the movement of a hand-off chain when any of the tasks in the chain are modified:

Task Management User Guide
90
Keep Hand-offs: Maintain hand-off logic, but allow for the addition or consumption of slack between tasks.
Break Hand-offs: Only maintain hand-off logic until the slack between two tasks reaches zero.
Modify Task Details on the Work Plan Page
You can modify task details on the Work Plan page in a variety of ways. Use the Task Details dialog box to view and edit all of the details associated with a specific task. Right-click a task card or select the icons on a task card to quickly access the most common task functions, including commitments, task completion, and adding or removing hand-offs.
To modify task details on the Work Plan page:
1) In the object selector, select a project.
2) In the sidebar, hover over Tasks, and select Work Plan.
3) On the Work Plan page, modify task details using any of the following methods:
Right-click a task in the hopper or planning board, and then select View Task Details. In the Task Details dialog box, you can edit task information, commit or recommit to tasks (milestones do not support commitments), assign constraints, add hand-offs, and contribute to a task discussion.
With configurable task cards (see "Customize Work Plan Task Cards" on page 96) enabled, double-click a basic task card to edit the task details most important to you. Available options depend on the fields you added in the task card settings.
Right-click a basic or configurable task card to access the most common task functions. Available options depend on the number of tasks selected, the selected task types, and whether the selected tasks have existing commitments or hand-offs.
Cut and paste or click and drag a basic task card on the planning board to modify its Due Date. Click and drag the edges of a task to modify its duration and due date. Task milestones do not have durations.
On a task card in the planning board, select the Complete icon to mark the task complete or the Commitments icon to commit to a task without an existing commitment. Select the Pending icon or the Commitments icon to open the Commitments tab of the Task Details dialog box if a commitment already exists. These icons are also available in the info bar at the bottom of the page.
4) All changes made to this page are saved automatically.
Tips
To delete a task, open the Task Details dialog box, select Delete, and then select Yes. You can also select one or more task cards and press Delete to delete them.
After a task is completed, you can no longer edit Company, Assigned User, Duration, Due Date, Proposed Due Date, or Commitment fields. Remove the Completed Date to enable these fields.

Work Plan Overview
91
If a task is part of a hand-off chain, changing its due date directly, accepting a proposed due date, or setting a new committed due date will cause the task and other tasks in the chain to be moved. The current hand-off mode determines the movement of a hand-off chain when any of the tasks in the chain are modified:
Keep Hand-offs: Maintain hand-off logic, but allow for the addition or consumption of slack between tasks.
Break Hand-offs: Only maintain hand-off logic until the slack between two tasks reaches zero.
Propose and Accept a Task Due Date on the Work Plan Page
When a task is part of a hand-off chain, directly modifying its due date may affect the due dates of other tasks in the chain. If the hand-off chain contains tasks from different companies, each company should be aware of the potential changes to their tasks. To solve this issue, updated due dates can be proposed without affecting the actual task due date. This enables the companies with tasks in the chain to review proposed due dates before they are accepted.
When a proposed due date is accepted, it is removed from the task and becomes the current task due date. If the accepted due date occurs on a non-work day, the Use Only Work Days setting is cleared and the due date is updated. If a task with a proposed due date is committed, the proposed due date is removed, and the current due date is updated to match the committed due date.
To learn more about task due dates, see Understanding Tasks App Concepts (on page 10).
To propose and accept a task due date on the Work Plan page:
1) In the object selector, select a project.
2) In the sidebar, hover over Tasks, and select Work Plan.
3) On the Work Plan page, right-click a task in the hopper or planning board, and then select View Task Details.
4) In the Task Details dialog box, in the Proposed Due Date field, select a date by which the task must be completed.
5) Select Save.
6) When you are ready to accept the proposed due date, you can do either of the following:
In the Task Details dialog box, select Accept.
Right-click a basic or configurable task card, and then select Accept Proposed Due Date.
7) All changes made to this page are saved automatically.
Tips
If configurable task cards (see "Customize Work Plan Task Cards" on page 96) are enabled, you can add a proposed due date directly on the card.
The Proposed Due Date icon on a task card or in the info bar indicates that the task has a proposed due date that has not been accepted.
You cannot propose a due date on completed tasks.

Task Management User Guide
92
If a task is part of a hand-off chain, changing its due date directly, accepting a proposed due date, or setting a new committed due date will cause the task and other tasks in the chain to be moved. The current hand-off mode determines the movement of a hand-off chain when any of the tasks in the chain are modified:
Keep Hand-offs: Maintain hand-off logic, but allow for the addition or consumption of slack between tasks.
Break Hand-offs: Only maintain hand-off logic until the slack between two tasks reaches zero.
Assign a Constraint to a Task on the Work Plan Page
Assign constraints to a task to indicate the items that need to be addressed before work on the task can begin. Constraint details include the status of the constraint, the date it is needed by, who is responsible for addressing it, and the type of constraint. Icons next to the Date Needed field indicate if the constraint is overdue or needed within the next 7 days.
Use the Constraints tab in the Task Details dialog box to monitor the current status of all constraints assigned to a task. To only view tasks on the page that have at least one constraint, select Tasks With Constraints from the Constraints quick filter.
To learn more about task constraints, see Understanding Tasks App Concepts (on page 10).
To assign a constraint to a task on the Work Plan page:
1) In the object selector, select a project.
2) In the sidebar, hover over Tasks, and select Work Plan.
3) Right-click a task in the hopper or planning board, and then select View Task Details. In the Task Details dialog box, select the Constraints tab.
4) Select Assign. In the Select Constraints dialog box, select one or more constraints to associate with the current task.
5) Select Select.
6) Select Save.
7) All changes made to this page are saved automatically.
8) The constraints shown on the Constraints tab are read-only. Select a constraint name to view and edit it on the Constraints page.
Tips
In the Constraints detail window, select one or more constraints, and then select the Context menu to remove the selected constraints from the task. Select a constraint name to view it on the Constraints page.
Select the Notes icon next to a constraint to view the notes associated with the constraint. Constraints without notes will not show this icon.

Work Plan Overview
93
Commit to a Task on the Work Plan Page
Commit to tasks to agree to perform their work by a specified date. In the Task Details dialog box, you can track the commitment history of a task, including committed dates, due dates, and reasons missed. You cannot commit to task milestones or completed tasks. If a proposed due date exists for a task, it will be displayed on the Commitments tab. This enables you to review the proposed due date before selecting the same or a different due date for the commitment. When any task is committed, the proposed due date is removed from the task, and the current due date is updated to match the committed due date.
To learn more about task commitments, see Understanding Tasks App Concepts (on page 10).
To commit to a task on the Work Plan page:
1) In the object selector, select a project.
2) In the sidebar, hover over Tasks, and select Work Plan.
3) Commit to a task using any of the following methods:
Select the Commitments icon on a planning board task card with no prior commitments to commit to the task without opening the Task Details dialog box. You can also select the icon in the info bar.
Right-click a task in the hopper or planning board, and then select View Task Details. In the Task Details dialog box, select the Commitments tab. Select a Due Date for the task, and then select Commit. Select Save.
Commit to one or more tasks by right-clicking a selection and selecting Commit Tasks. Only tasks in the selection without an existing commitment will be committed. For pending tasks, the committed due date is set to the task's current due date. For new tasks, the committed due date is set to today's date.
4) All changes made to this page are saved automatically.
Tips
To delete the most recent commitment, select the Delete icon on the Commitments tab, and then select Yes. The task displays the due date of the next commitment in the list.
If a task is part of a hand-off chain, changing its due date directly, accepting a proposed due date, or setting a new committed due date will cause the task and other tasks in the chain to be moved. The current hand-off mode determines the movement of a hand-off chain when any of the tasks in the chain are modified:
Keep Hand-offs: Maintain hand-off logic, but allow for the addition or consumption of slack between tasks.
Break Hand-offs: Only maintain hand-off logic until the slack between two tasks reaches zero.
Task Management User Guide
94
Recommit to a Task on the Work Plan Page
If you are unable to meet the due date of a previous commitment, you can recommit to work on the task. Select one or more reasons for missing the previous commitment, and then select a new due date for the recommitment. You can optionally add comments to further explain the recommitment. Track task commitment history on the Commitments tab of the Task Details dialog box. If a proposed due date exists for a task, it will be displayed on the Commitments tab. This enables you to review the proposed due date before selecting the same or a different due date for the recommitment. When a task is committed, the proposed due date is removed from the task, and the current due date is updated to match the committed due date.
To learn more about task commitments, see Understanding Tasks App Concepts (on page 10).
To recommit to a task on the Work Plan page:
1) In the object selector, select a project.
2) In the sidebar, hover over Tasks, and select Work Plan.
3) Recommit to a task using either of the following methods:
On a task with commitments, select the Pending icon or the Commitments icon on a task card or in the info bar, or right-click the task card and select Recommit to open the Recommit Task dialog box.
Right-click a committed task on the planning board, and then select View Task Details. In the Task Details dialog box, select the Commitments tab.
4) In the Recommit Task or Task Details dialog box, complete the following fields:
Due Date: Select a due date for the recommitment.
Reasons Missed: Select one or more reasons for missing the previous commitment.
Note: You can use the Select Reasons Missed dialog box to add new reasons. Select Manage Reasons to view the Reasons dictionary.
(Optional) In the Comments field, add any comments you may have regarding the recommitment. Comments for each recommitment are visible in the Commitments detail window.
Select Recommit.
(Task Details dialog box only) Select Save.
5) All changes made to this page are saved automatically.
Tips
To delete the most recent commitment, select the Delete icon on the Commitments tab, and then select Yes. The task displays the due date of the next commitment in the list.
You cannot commit to task milestones.
If a task is part of a hand-off chain, changing its due date directly, accepting a proposed due date, or setting a new committed due date will cause the task and other tasks in the chain to be moved. The current hand-off mode determines the movement of a hand-off chain when any of the tasks in the chain are modified:

Work Plan Overview
95
Keep Hand-offs: Maintain hand-off logic, but allow for the addition or consumption of slack between tasks.
Break Hand-offs: Only maintain hand-off logic until the slack between two tasks reaches zero.
Complete a Task on the Work Plan Page
Mark a task or task milestone complete to indicate that all work has been performed on the task. After the task is completed, you cannot modify certain fields, including dates, company, and duration. To enable all fields on the task, remove the completed date.
When a task is marked complete, the completed date on the task is set to the task's due date if it is today's date or earlier. If the task's due date is blank or set to a future date, the completed date is set to today's date. A task's completed date can be modified to a past date after it is marked complete. A task's completed date cannot be set to a nonwork day if Use Only Work Days is enabled. Completing a task due in the future may affect the hand-off sequence of the task.
To complete a task on the Work Plan page:
1) In the object selector, select a project.
2) In the sidebar, hover over Tasks, and select Work Plan.
3) Complete a task using any of the following methods:
Right-click a task in the hopper or planning board, and then select View Task Details. In
the Task Details dialog box, select Complete. Select Save.
Select the Complete icon on a planning board task card.
Select a task in the hopper or planning board, and then select the Complete icon in the info bar.
Right-click a selection of one or more tasks, and then select Complete Tasks.
4) All changes made to this page are saved automatically.
Tips
You cannot mark a task complete if:
The task status is set to Pending and there are one or more commitments.
The task is assigned to another user, and you do not have the required Commit to and Complete All Users' Tasks security privilege.

Task Management User Guide
96
Customize Work Plan Task Cards
The Work Plan page supports the display of multiple task card types. The basic task card found in the hopper and on the planning board shows a task's name, type, and status icons. The color of the card indicates the company assigned to work on the task. When the size of the planning board columns are decreased, a smaller, more generic task card may be shown. You can also enable configurable task cards to display task information most important to you. Customize configurable task cards with task fields and status icons. Just like basic task cards, configurable task cards are colored according to their assigned company.
When enabled, double-click a basic task card in the hopper or planning board to show the configurable task card for that task. Quickly rename a task by editing the task name in the card header. Select a status icon on the card or select a field with an edit icon to modify its value. On non-touchscreen devices, this icon is shown when you hover over an editable field. On touchscreen devices, this icon will always be shown on editable fields. Read-only fields will not have this icon. The right-click menu functions the same for both basic and configurable task cards. Configurable task cards do no support group selection functionality.
If you want to access all of a task's information, you can select the Task Details icon in the card header to open the Task Details dialog box. When configurable task cards are disabled, double-clicking a basic task card will open the Task Details dialog box directly.
To customize basic and configurable task cards:
1) In the object selector, select a project.
2) In the sidebar, hover over Tasks, and select Work Plan.
3) Select Settings.
4) In the Manage Views panel, select the Task Cards tab. Modify task card settings and view the changes in each Preview section.
5) In the Basic Task Card section, select any of the following:
Show Task Icons: Display icons on basic task cards on the planning board.
Wrap Text on Tasks: Wrap long task names to the next line of a basic task card.
6) In the Configurable Task Card section, select Enable Configurable Task Card, and then do any of the following:
Select Add section to add a blank section to the task card. You can add up to eight sections.
In each section, select up to three fields. Each field can only be used once.
Select Hide Label to hide the selected field's name. Some labels cannot be hidden.
Click and drag section dividers to resize the height and width of each section.
Select Delete to delete a section.
7) In the Icons list, choose to show task icon at the top of the card, bottom or the card, or not at all.
8) In the Font Size list, choose to show a standard font size across all fields or enable each field value to fit the available cell space.
9) Select Apply.

Work Plan Overview
97
10) All changes made to this page are saved automatically.
Tips
To open the Task Details dialog box from a configurable task card, double-click a basic task card, and then select Task Details in the configurable task card header, or select the constraints, predecessor, or successors count to open the Task Details dialog box to the respective tab.
To modify the other view options in the Manage Views panel, see Configure View Settings(on page 150).
Customize the Work Plan Display
You can customize the hopper and planning board sections of the Work Plan page according to your preferences. Display up to six weeks at a time on the planning board. Organize tasks to group by best fit or by company. Apply filters to reduce the number of visible tasks. Enable activity bands to separate the display of tasks according to their assigned activities. Tasks not associated with any activities are displayed below a band called "No Activity."
To customize the Work Plan display:
1) In the object selector, select a project.
2) In the sidebar, hover over Tasks, and select Work Plan.
3) You can perform any of the following actions to customize the page display:
Select Settings to configure planning period filters (see "Configure and Apply Filtering" on page 155), quick filters (see "Configure and Apply Tasks Quick Filters" on page 98), and page-specific formatting options (see "Configure Formatting" on page 165).
In the Show list, select Day to display tasks by individual days. Select a Weeks option to display between one and six weeks on the planning board. The number of displayed weeks may be constrained by the current planning period.
Change the time period displayed on the planning board by selecting the previous or next arrows above the planning board. Select Today to return the planning board display to the current day or week.
With a custom planning period enabled, select Skip to beginning or Skip to end to change the planning board display to the first or last day or week in the period.
Note: Select More Info in the planning board options to view the current planning period dates.
Select Tasks Only to display only tasks and task milestones in the hopper and
planning board. Select Tasks and Activities to display tasks and task milestones grouped by their assigned activities.
Note: When a task's due date falls outside of its assigned activity's start and finish dates, the activity grouping band border appears as a dashed

Task Management User Guide
98
line.
In the Organize By list, select Best Fit to minimize unused space in the hopper and planning board. Tasks with hand-off chains are grouped largest to smallest by chain length, and then alphabetically. Select Company to group tasks by their assigned companies. When grouping by company, task hand-off chains are ignored.
Drag the edge of any column on the planning board to change the size of all columns. This enables you to zoom in or out of the timescale. If the column size is decreased enough, smaller cards are used to represent tasks. This enables the application to display more tasks on the planning board. You can still move a card to change its due date, drag its edge to change its duration, and view status icons displayed on the card. Right-click a card to modify task details, commitments, and hand-offs, mark the task complete, or delete the task. Increase the column widths to return the task cards to their normal appearance.
4) All changes made to this page are saved automatically.
Configure and Apply Tasks Quick Filters
You can use quick filters to refine the data displayed on a page. Configure which filters you want to appear in the quick filters list. In the quick filters list, select one or more values on which to filter. Use multiple quick filters to further reduce how much data is displayed. Clear a filter to show more results. Quick filter value selections are not saved with the view.
The functionality described in this topic applies to the following Tasks app pages:
Work Plan
Hand-offs
Task List
Constraints
To configure and apply Tasks quick filters:
1) Navigate to a page, and then select the Settings icon.
2) In the Manage Views panel, select the Quick Filters tab.
3) In the Show section, select the quick filters you want to show in the quick filters list.
4) Select Save, and then select Close.
5) In the Quick Filters list, select applicable filter values.
6) To remove an applied filter, expand a filter list, and then select Clear Filter.
To remove all applied filters, in the Quick Filters list, select Clear All.
Tips
The Work Plan page supports additional quick filter functionality. To quickly apply activity quick filters, select one or more activity bands in the hopper or planning board, right-click the
selection, and then select Set Activities as Quick Filter. To do this, Tasks and Activities must be selected, and the Activity quick filter must be added to the view.

Work Plan Overview
99
View Activity Details in the Tasks App
On pages in the Tasks app, select an activity name to view information about the activity, including displays general activity details and task counts by category.
To use this feature on the Work Plan page, the Tasks and Activities grouping option must be selected. On the Hand-offs page, the page must be organized by Activity. On the Task list page, the table must be grouped by Activity or the Activity column must be displayed.
You can also perform this task on the Task List page in the context of a program.
To view activity details in the Tasks app:
1) In the object selector, select a project.
2) In the sidebar, hover over Tasks, and select Work Plan, Hand-offs, or Task List.
3) Select an activity name.
4) The activity detail popover displays project, WBS, and activity details, as well as the following task counts:
Total Tasks: The total number of tasks assigned to the activity.
Unplanned tasks: Tasks without a due date.
Planned tasks, not completed: Tasks with a due date or committed date that are not complete.
Planned tasks, completed: Tasks with a due date or committed date that are marked as complete.
Planned tasks outside of activity dates: Tasks with a due date before the activity start date or after the activity finish date.
Tasks hidden by filters and security: Tasks that are not visible due to the planning period, enabled task filters or quick filters, or due to the current user's security settings. Tasks with assigned activities that occur within the planning period dates are visible.
Note: The Unplanned tasks; Planned tasks, not completed; and Planned tasks, completed task counts contain the total number of tasks associated with the selected activity. The Planned tasks outside of activity dates and Tasks hidden by filters and security task counts contain tasks already counted in the other categories.
Tips
Task counts are for public tasks only and do not include private tasks.
To choose which task counts to display in the popover, select Settings, and then select Task Counts.

Task Management User Guide
100
Set Task Notification Preferences
Changes in task details have the potential to impact your project's schedule performance. You can stay better informed on task updates by setting up task notifications. When a proposed due date is entered on a task or if a task becomes overdue, you can choose to receive a notification in the application's Inbox, your email, or both. You can adjust the number of notifications you receive by selecting a notification frequency of immediate, daily, or weekly. You can also choose to be notified for all tasks or only those tasks to which you are assigned.
All users can set their own notification preferences if they have access to the project. Users with the privilege to set notification preferences for others can also configure notification preferences on behalf of other users and configure a default set of preferences for all users assigned to at least one task in the project. This privilege is intended for application administrators and superintendents responsible for overseeing other users. The default set of preferences do not apply to users who configure their own set of preferences or have their own set of preferences configured for them.
Task notification preferences are set per project and can be configured on the Work Plan, Hand-offs, and Task List pages. The preferences are the same across all pages. Notifications are disabled by default for all users.
To set task notification preferences:
1) In the object selector, select a project.
2) In the sidebar, hover over Tasks, and select Work Plan, Hand-offs, or Task List.
3) Select the Actionsmenu, and then select Set Notification Preferences.
4) In the Set Notification Preferences dialog box, select Assign User to add or remove users from the list, or select the option whose preferences you want to set:
Note: This section is only visible to users with the required privilege. Users without the privilege will only see preferences for themselves.
My Preferences: Configure your own notification preferences.
Task Assigned User (default preferences): Configure the default notification preferences for all users assigned to at least one task. These preferences do not apply to users with their own configured preferences.
Existing User: Select the name of a user in the list to configure notification preferences on their behalf.
5) In the Preferences section, configure the following settings for the Overdue Due Date and Proposed Due Date notification types:
Note: Each notification type has its own set of preferences and notifications.
a. Inbox: A notification is sent to the selected user's application Inbox.
b. Email: A notification is sent to the selected user's email.
c. Frequency:
Immediate: A notification is sent as soon as a task meets your notification criteria.

Work Plan Overview
101
Daily Digest: A daily notification is sent at midnight with a list of tasks that currently meet the notification criteria.
Weekly Digest: A weekly notification is sent at midnight on Sunday with a list of tasks that currently meet the notification criteria.
6) Select Receive notifications for only my assigned tasks to limit notifications to only tasks to which the selected user is assigned. If this option is disabled, the selected user will receive notifications on all tasks in the project that meet their notification criteria.
7) Select Set.
8) All changes made to this page are saved automatically.
Tips
When a notification is received on the Inbox page or in an email, select View Task to view the relevant tasks on the Task List page.
Select the Context menu next to an existing user to delete them from the list. The My Preferences and Task Assigned User options cannot be removed.
Search the Work Plan Page
The search function on the Work Plan page enables you to search for tasks, task milestones, or activities located in the hopper or planning board. Search results are displayed below the search field.
To use the search function on the Work Plan page:
1) In the object selector, select a project.
2) In the sidebar, hover over Tasks, and select Work Plan.
3) In the Search field on the toolbar, enter a search term. Results matching the string will appear automatically.
4) Select a search result to indicate that item in the hopper or planning board.
Print the Planning Board to PDF
Customize the planning board on the Work Plan page, and then print the layout as a PDF. On the planning board, configure options such as planning period, task filtering, quick filters, and formatting. These settings affect the display of tasks in your print layout. In the print settings, configure page formatting, date ranges, and display options. Enable headers and footers to include links, images, company legends, and fields variables.
Note: To display colors in your printout, ensure that background graphics and colors are enabled in your browser's print settings.
To print the planning board on the Work Plan page:
1) In the object selector, select a project.
2) In the sidebar, hover over Tasks, and select Work Plan.
3) Configure the page view according to your needs, including filtering and formatting.

Task Management User Guide
102
4) In the Show list, select Day to display tasks by individual days. Select a Weeks option to display between one and six weeks on the planning board. The number of displayed weeks may be constrained by the current planning period.
Note: With Day selected, you cannot edit week options in the print settings.
5) Select Print to open the Print Planning Board panel.
6) In the Settings panel, configure the following options:
a. Page:
Paper Size: Select a standard paper size or enter custom print dimensions.
Orientation: Select a Landscape or Portrait page orientation.
Margins: select the length of the top, left, right, and bottom margins of the layout.
Note: You can also click and drag the borders in the print preview to adjust each margin.
Show Watermark: Select this option, and then enter text to appear as a watermark on each page.
Pages: Print all pages or a specific range of pages.
b. Date Range:
Select Selected Weeks to print the weeks currently displayed on the planning board. The number of weeks displayed is controlled by the Planning Period and Show list settings.
Select Custom Week Range (up to 1 year) to choose a custom time span, from the start of one week to the end of another week. The number of available weeks may be constrained by the current planning period.
c. Options:
Weeks Per Page: Choose to print up to six weeks per page. The limit is determined by the number of weeks you selected in the Show list and the current Planning Period.
Font Size: Modify the size of the text in the main content area of the print preview.
Show Task Icons: Select this option to display icons on task cards.
Wrap Text on Tasks: Select this option to wrap long task names to the next line of a task card.
Page Break on Activities: Select this option to start a new page for each activity on the planning board.
Note: To use this option, Tasks and Activities must be selected on the planning board.
7) To modify the print header or footer settings, hover over the print preview, and select Edit
Header or Edit Footer.
8) In edit mode, use the floating toolbar to configure the following header and footer options:

Hand-offs Overview
103
With text selected, apply bold, italics, or underline formatting, and change the size and color of the text.
Alignment: Align each line of text to the left, center, or right side of a section.
Insert Link: Add link text and a URL. Choose to open the link in a new browser tab or window, or open the link in the current browser tab.
Company Legend: Add a company legend to the selected section of the header or footer.
Add Image: Insert the company logo, the image for the current project, or the image for the current workspace.
Add Revision Box: Add a revision box to the selected section. Text can be entered in edit mode or after printing.
Add Field: Add field variables to the selected section.
Note: Field variable text that is only partially formatted may not display properly. Ensure the entire variable is formatted correctly.
Toggle Dividers: Toggle the display of section divider lines in the printout.
Sections: Display up to three separate sections in the header or footer.
9) In the Settings panel, configure separate options to show the header and footer on all pages, only the first page, or only the last page of the print layout.
10) Select Return to Preview to exit the edit mode.
11) In the thumbnail selector, select individual page thumbnails to review the order, number, and appearance of the pages in the print layout. Continue to modify print settings according to your needs.
12) When you are finished, select Print to print the layout to a PDF file. You can then view the layout or print it to a physical format.
Tips
Use the floating toolbar to adjust the zoom settings of the print preview. Select Continuous to enable continuous scrolling of the print preview.
Hand-offs Overview
Use the Hand-offs page to view a network diagram of the tasks and task milestones in your project. The page is optimized for creating and modifying task hand-offs in a variety of ways. You can also add tasks, assign constraints, create hand-offs between tasks, and commit to perform the task work.
By default, this page displays a planning period of six weeks (one week before the current week and four weeks after the current week). Tasks outside the planning period may not be visible. To modify the current settings, see Configure and Apply Filtering (on page 155).
To learn more about the concepts used on this page, see Understanding Tasks App Concepts (on page 10).

Task Management User Guide
104
Working with the Hand-offs Page
Use the Hand-offs page to view a network diagram of the tasks and task milestones in your project and create hand-off relationships between them. You can also add new tasks, commit to tasks, and edit task details on this page. Hand-offs can be created between tasks by using a table, by graphically drawing hand-off lines to connect task cards, or by updating a group selection. Group tasks on the page by activity, company, or no grouping.
Table of Screen Highlights
Item Description
1
Hand-off Modes: Select Keep Hand-offs or Break Hand-offs. Each mode determines the movement of a hand-off chain when any of the tasks in the chain are modified.
2 Details: Double-click a task or task milestone to edit its details. Select a hand-off line to view predecessor, successor, type, lag, and slack information. Right-click a card to view task details, add tasks and hand-offs, or remove hand-offs. Right-click a hand-off line to delete it.
3 Diagram Toolbar: Use the toolbar to Zoom, Pan, and Select tasks in the diagram. Toggle the display of task hand-off lines.

Hand-offs Overview
105
Item Description
4 Info Bar: Use the info bar at the bottom of the page to view details for the selected task card. You can use the icons in the info bar to commit or complete the selected task. See Task Icon Reference (on page 146) for icon descriptions.
5 Auto Reorganize: Use the Auto Reorganize feature to automatically organize tasks according to their hand-off chain lengths. Tasks are sorted by hand-off chain length, with the longest chains at the top.
When enabled, tasks are automatically organized as they are created or deleted and whenever hand-offs are added or removed. By default, this option is disabled, and tasks remain in place until the page is refreshed or the option is enabled. Auto Reorganize is also available from the Actions menu.
Add a Task or Task Milestone on the Hand-offs Page
Add tasks to detail the work to be performed on your project. Add task milestones to mark the distinct phases of your project.
Depending on your needs, tasks can be added in a variety of ways. The Add button on the toolbar opens the Task Details dialog box, which you can use to complete the most common task fields. You can also quickly add a task with default values directly to the page without opening the dialog box or add a task as a predecessor or successor to an existing task.
To learn more about tasks, see Understanding Tasks App Concepts (on page 10).
To add a task or task milestone on the Hand-offs page:
1) In the object selector, select a project.
2) In the sidebar, hover over Tasks, and select Hand-offs.
3) Add a task or task milestone using any of the following methods:
a. Using the toolbar:
1. On the toolbar, select Add. In the task details dialog box, select the General tab.
2. Type: Select the Task or Task Milestone icon.
Notes:
You can change the task type if the task is not complete and has no commitments.
Task milestones do not support the Assigned User, Duration, Use Only Work Days, or Start Date fields.
3. Task Name: Enter the name of the task.
4. Company: Select the company responsible for performing work on the task.
The color picker displays the color that is selected for the company.

Task Management User Guide
106
5. Assigned User: Select the user responsible for performing the task. The user must belong to the assigned company.
6. Activity: Select an activity if the task is required to complete the activity.
7. Duration: Enter the amount of time the task will take to complete.
Use Only Work Days: Select this option to allow only the project calendar's work days and ignore non-work days when determining the value for Start and Due Date.
8. Due Date: Select a date by which the task must be completed.
The Start Date field is read-only and is calculated based on the Duration and Due Date of the task.
9. Proposed Due Date: Propose an updated due date by which the task must be completed.
Select Accept to accept the proposed due date. The Due Date field will be updated with the accepted date.
10. Completed Date: The date that the task was completed. This date can be modified after the task is marked completed.
Select Complete to mark the task complete.
11. If task-based configured fields or codes exist in your workspace, you can select the Additional Fields tab to edit configured field and code values for the selected task. These values can also be displayed on other pages in the Tasks app.
12. Select Save.
Note: Select Create Another, and then select Save to create the task without closing the dialog box.
b. Add directly to the page:
Right-click an empty area of the page, and then select Add Task or Add Task Milestone. A new task with default values is added to the page. If the page is organized by activity or company, the task is automatically assigned to the activity or company section where you clicked.
c. Add tasks with hand-offs:
Right-click a task, and then select Add Task Before, Add Task After, Add Task Milestone Before, or Add Task Milestone After. A new task with default values is added as a predecessor or successor to the existing task.
4) All changes made to this page are saved automatically.
Tips
Right-click a selection of one or more tasks, and then select Assign Activity to assign the same activity to all of the selected tasks. In the Assign Activity dialog box, leave the Activity field blank to remove any existing activity assignment from the selected tasks.
Double-click a task to modify its general details, configured field and code values, commitments, hand-offs, and discussions.

Hand-offs Overview
107
To delete a task, open the Task Details dialog box, select Delete, and then select Yes. You can also select one or more task cards and press Delete to delete them or right-click the selection and select Delete Tasks.
Add a Hand-off on the Hand-offs Page
The Hand-offs page enables you to create hand-offs between tasks using a variety of methods, including using a tabular format in the Task Details dialog box, drawing lines between tasks, or by using group selection. You can add hand-offs between two tasks, between two task milestones, or between a task and a task milestone.
On the page, tasks can be ungrouped or they can be grouped by activity or company. This makes it easier to see hand-off chains according to their associated activities or by their assigned companies. Hand-offs can be created between tasks with the same, different, or no activity assignments.
To learn more about hand-offs, see Understanding Tasks App Concepts (on page 10).
To add a hand-off on the Hand-offs page:
1) In the object selector, select a project.
2) In the sidebar, hover over Tasks, and select Hand-offs.
3) Add a hand-off using any of the following methods:
a. Using the Task Details dialog box:
1. Double-click a task or task milestone. In the Task Details dialog box, select the Hand-offs tab.
2. In the Predecessors or Successors section, select Add, and then select one or more tasks to add as predecessors or successors to the current task.
Note: The Select Task dialog box enables you to filter the list of available tasks by tasks with the same activity assignment as the current task or by tasks with any activity assignment. This includes any task without an activity assignment.
3. Select Select.
4. In the Type field, select the hand-off relationship between the two tasks.
5. (Optional) In the Lag field, enter the lag for the hand-off relationship. Select Lag - Use Only Work Days if you want the lag duration to only include work days.
6. Select Save.
b. Using hand-off lines:
1. Hover over a card. On either edge of the card, select the circle, which represents the start of a hand-off.
2. Select a circle on a different task card to complete the hand-off line.
c. Using the right-click menu:

Task Management User Guide
108
Right-click a task, and then select Add Task Before, Add Task After, Add Task Milestone Before, or Add Task Milestone After. A hand-off path is created between the original task and the new task, even if the original task has existing hand-offs.
d. Using group selection:
1. Select the Select tool in the diagram toolbar, and then click and drag to highlight multiple tasks. You can also Ctrl + click to select multiple tasks. To use Ctrl + click,
the Select tool must not be selected.
The Select tool is used to create hand-offs in the order that the selected tasks appear. Ctrl + click is used to create hand-offs in the order that tasks are selected, except for tasks with due dates, which are arranged in the chain from earliest to latest.
2. Right-click any card in the selection and select Add Hand-offs.
4) All changes made to this page are saved automatically.
Tips
To remove hand-offs, do either of the following:
Right-click one or more task cards and select Remove Hand-offs. This option removes all hand-offs from the tasks in the selection.
Right-click one or more hand-off lines and select Remove Hand-offs. This option only removes the lines you select.
Select a hand-off line to view predecessor, successor, type, lag, and slack information.
A Finish to Start hand-off is created by default when a successor task's due date is after the predecessor's due date. A Finish to Finish hand-off is created by default when both tasks have the same due date. The hand-off type for tasks with different due dates can be Finish to Start, Finish to Finish, or Start to Start. The hand-off type for tasks with the same due date can only be Finish to Finish.
If a task is part of a hand-off chain, changing its due date directly, accepting a proposed due date, or setting a new committed due date will cause the task and other tasks in the chain to be moved. The current hand-off mode determines the movement of a hand-off chain when any of the tasks in the chain are modified:
Keep Hand-offs: Maintain hand-off logic, but allow for the addition or consumption of slack between tasks.
Break Hand-offs: Only maintain hand-off logic until the slack between two tasks reaches zero.
If you are navigating using a keyboard, you must complete this task on the Work Plan or Task List page.

Hand-offs Overview
109
Propose and Accept a Task Due Date on the Hand-offs Page
When a task is part of a hand-off chain, directly modifying its due date may affect the due dates of other tasks in the chain. If the hand-off chain contains tasks from different companies, each company should be aware of the potential changes to their tasks. To solve this issue, updated due dates can be proposed without affecting the actual task due date. This enables the companies with tasks in the chain to review proposed due dates before they are accepted.
When a proposed due date is accepted, it is removed from the task and becomes the current task due date. If the accepted due date occurs on a non-work day, the Use Only Work Days setting is cleared and the due date is updated. If a task with a proposed due date is committed, the proposed due date is removed, and the current due date is updated to match the committed due date.
To learn more about task due dates, see Understanding Tasks App Concepts (on page 10).
To propose and accept a task due date on the Hand-offs page:
1) In the object selector, select a project.
2) In the sidebar, hover over Tasks, and select Hand-offs.
3) On the Hand-offs page, double-click a task or task milestone to open the Task Detailsdialog box.
4) In the Task Details dialog box, in the Proposed Due Date field, select a date by which the task must be completed.
5) Select Save.
6) When you are ready to accept the proposed due date, you can do either of the following:
In the Task Details dialog box, select Accept.
Right-click a task card, and then select Accept Proposed Due Date.
7) All changes made to this page are saved automatically.
Tips
The Proposed Due Date icon on a task card or in the info bar indicates that the task has a proposed due date that has not been accepted.
You cannot propose a due date on completed tasks.
If a task is part of a hand-off chain, changing its due date directly, accepting a proposed due date, or setting a new committed due date will cause the task and other tasks in the chain to be moved. The current hand-off mode determines the movement of a hand-off chain when any of the tasks in the chain are modified:
Keep Hand-offs: Maintain hand-off logic, but allow for the addition or consumption of slack between tasks.
Break Hand-offs: Only maintain hand-off logic until the slack between two tasks reaches zero.

Task Management User Guide
110
Assign a Constraint to a Task on the Hand-offs Page
Assign constraints to a task to indicate the items that need to be addressed before work on the task can begin. Constraint details include the status of the constraint, the date it is needed by, who is responsible for addressing it, and the type of constraint. Icons next to the Date Needed field indicate if the constraint is overdue or needed within the next 7 days.
Use the Constraints tab in the Task Details dialog box to monitor the current status of all constraints assigned to a task. To only view tasks on the page that have at least one constraint, select Tasks With Constraints from the Constraints quick filter.
To learn more about task constraints, see Understanding Tasks App Concepts (on page 10).
To assign a constraint to a task on the Hand-offs page:
1) In the object selector, select a project.
2) In the sidebar, hover over Tasks, and select Hand-offs.
3) Double-click a task or task milestone. In the Task Details dialog box, select the Constraintstab.
4) Select Assign. In the Select Constraints dialog box, select one or more constraints to associate with the current task.
5) Select Select.
6) Select Save.
7) All changes made to this page are saved automatically.
8) The constraints shown on the Constraints tab are read-only. Select a constraint name to view and edit it on the Constraints page.
Tips
In the Constraints detail window, select one or more constraints, and then select the Context menu to remove the selected constraints from the task. Select a constraint name to view it on the Constraints page.
Select the Notes icon next to a constraint to view the notes associated with the constraint. Constraints without notes will not show this icon.
Commit to a Task on the Hand-offs Page
Commit to tasks to agree to perform their work by a specified date. In the Task Details dialog box, you can track the commitment history of a task, including committed dates, due dates, and reasons missed. You cannot commit to task milestones or completed tasks. If a proposed due date exists for a task, it will be displayed on the Commitments tab. This enables you to review the proposed due date before selecting the same or a different due date for the commitment. When a task is committed, the proposed due date is removed from the task, and the current due date is updated to match the committed due date.
To learn more about task commitments, see Understanding Tasks App Concepts (on page 10).
To commit to a task on the Hand-offs page:

Hand-offs Overview
111
1) In the object selector, select a project.
2) In the sidebar, hover over Tasks, and select Hand-offs.
3) Commit to a task using any of the following methods:
Select the Commitments icon in the info bar for a task with no prior commitments to commit to the task without opening the Task Details dialog box.
Right-click a task, and then select Commit. In the Commit Tasks dialog box, select a Due Date for the task, and then select Commit.
Double-click a task. In the Task Details dialog box, select the Commitments tab. Select a Due Date for the task, and then select Commit. Select Save.
Commit to a group of tasks by right-clicking a selection and selecting Commit Tasks. Only tasks in the selection without an existing commitment will be committed. For pending tasks, the committed due date is set to the task's current due date. For new tasks, the committed due date is set to today's date or the next valid work day.
4) All changes made to this page are saved automatically.
Tips
To delete the most recent commitment, select the Delete icon on the Commitments tab, and then select Yes. The task displays the due date of the next commitment in the list.
If a task is part of a hand-off chain, changing its due date directly, accepting a proposed due date, or setting a new committed due date will cause the task and other tasks in the chain to be moved. The current hand-off mode determines the movement of a hand-off chain when any of the tasks in the chain are modified:
Keep Hand-offs: Maintain hand-off logic, but allow for the addition or consumption of slack between tasks.
Break Hand-offs: Only maintain hand-off logic until the slack between two tasks reaches zero.
Recommit to a Task on the Hand-offs Page
If you are unable to meet the due date of a previous commitment, you can recommit to work on the task. Select one or more reasons for missing the previous commitment, and then select a new due date for the recommitment. You can optionally add comments to further explain the recommitment. Track task commitment history on the Commitments tab of the Task Details dialog box. If a proposed due date exists for a task, it will be displayed on the Commitments tab. This enables you to review the proposed due date before selecting the same or a different due date for the recommitment. When a task is committed, the proposed due date is removed from the task, and the current due date is updated to match the committed due date.
To learn more about task commitments, see Understanding Tasks App Concepts (on page 10).
To recommit to a task on the Hand-offs page:
1) In the object selector, select a project.
2) In the sidebar, hover over Tasks, and select Hand-offs.
Task Management User Guide
112
3) Recommit to a task using either of the following methods:
On a task with commitments, select the Pending icon or the Commitments icon in the info bar, or right-click the task card and select Recommit to open the Recommit Task dialog box.
Right-click a committed task card, and then select View Task Details. In the Task Details dialog box, select the Commitments tab.
4) In the Recommit Task or Task Details dialog box, complete the following fields:
Due Date: Select a due date for the recommitment.
Reasons Missed: Select one or more reasons for missing the previous commitment.
Note: You can use the Select Reasons Missed dialog box to add new reasons. Select Manage Reasons to view the Reasons dictionary.
(Optional) In the Comments field, add any comments you may have regarding the recommitment. Comments for each recommitment are visible in the Commitments detail window.
Select Recommit.
(Task Details dialog box only) Select Save.
5) All changes made to this page are saved automatically.
Tips
To delete the most recent commitment, select the Delete icon on the Commitments tab, and then select Yes. The task displays the due date of the next commitment in the list.
You cannot commit to task milestones.
If a task is part of a hand-off chain, changing its due date directly, accepting a proposed due date, or setting a new committed due date will cause the task and other tasks in the chain to be moved. The current hand-off mode determines the movement of a hand-off chain when any of the tasks in the chain are modified:
Keep Hand-offs: Maintain hand-off logic, but allow for the addition or consumption of slack between tasks.
Break Hand-offs: Only maintain hand-off logic until the slack between two tasks reaches zero.
Complete a Task on the Hand-offs Page
Mark a task or task milestone complete to indicate that all work has been performed on the task. After the task is completed, you cannot modify certain fields, including dates, company, and duration. To enable all fields on the task, remove the completed date.
When a task is marked complete, the completed date on the task is set to the task's due date if it is today's date or earlier. If the task's due date is blank or set to a future date, the completed date is set to today's date. A task's completed date can be modified to a past date after it is marked complete. A task's completed date cannot be set to a nonwork day if Use Only Work Days is enabled. Completing a task due in the future may affect the hand-off sequence of the task.

Hand-offs Overview
113
To complete a task on the Hand-offs page:
1) In the object selector, select a project.
2) In the sidebar, hover over Tasks, and select Hand-offs.
3) Complete a task using any of the following methods:
Double-click a task to open the Task Details dialog box. In the Task Details dialog box,
select Complete. Select Save.
Select a task, and then select the Complete icon in the info bar.
Right-click a selection of one or more tasks, and then select Complete Tasks.
4) All changes made to this page are saved automatically.
Tips
You cannot mark a task complete if:
The task status is set to Pending and there are one or more commitments.
The task is assigned to another user, and you do not have the required Commit to and Complete All Users' Tasks security privilege.
Configure and Apply Tasks Quick Filters
You can use quick filters to refine the data displayed on a page. Configure which filters you want to appear in the quick filters list. In the quick filters list, select one or more values on which to filter. Use multiple quick filters to further reduce how much data is displayed. Clear a filter to show more results. Quick filter value selections are not saved with the view.
The functionality described in this topic applies to the following Tasks app pages:
Work Plan
Hand-offs
Task List
Constraints
To configure and apply Tasks quick filters:
1) Navigate to a page, and then select the Settings icon.
2) In the Manage Views panel, select the Quick Filters tab.
3) In the Show section, select the quick filters you want to show in the quick filters list.
4) Select Save, and then select Close.
5) In the Quick Filters list, select applicable filter values.
6) To remove an applied filter, expand a filter list, and then select Clear Filter.
To remove all applied filters, in the Quick Filters list, select Clear All.

Task Management User Guide
114
Tips
The Work Plan page supports additional quick filter functionality. To quickly apply activity quick filters, select one or more activity bands in the hopper or planning board, right-click the
selection, and then select Set Activities as Quick Filter. To do this, Tasks and Activities must be selected, and the Activity quick filter must be added to the view.
View Activity Details in the Tasks App
On pages in the Tasks app, select an activity name to view information about the activity, including displays general activity details and task counts by category.
To use this feature on the Work Plan page, the Tasks and Activities grouping option must be selected. On the Hand-offs page, the page must be organized by Activity. On the Task list page, the table must be grouped by Activity or the Activity column must be displayed.
You can also perform this task on the Task List page in the context of a program.
To view activity details in the Tasks app:
1) In the object selector, select a project.
2) In the sidebar, hover over Tasks, and select Work Plan, Hand-offs, or Task List.
3) Select an activity name.
4) The activity detail popover displays project, WBS, and activity details, as well as the following task counts:
Total Tasks: The total number of tasks assigned to the activity.
Unplanned tasks: Tasks without a due date.
Planned tasks, not completed: Tasks with a due date or committed date that are not complete.
Planned tasks, completed: Tasks with a due date or committed date that are marked as complete.
Planned tasks outside of activity dates: Tasks with a due date before the activity start date or after the activity finish date.
Tasks hidden by filters and security: Tasks that are not visible due to the planning period, enabled task filters or quick filters, or due to the current user's security settings. Tasks with assigned activities that occur within the planning period dates are visible.
Note: The Unplanned tasks; Planned tasks, not completed; and Planned tasks, completed task counts contain the total number of tasks associated with the selected activity. The Planned tasks outside of activity dates and Tasks hidden by filters and security task counts contain tasks already counted in the other categories.
Tips
Task counts are for public tasks only and do not include private tasks.
To choose which task counts to display in the popover, select Settings, and then select Task Counts.

Hand-offs Overview
115
Set Task Notification Preferences
Changes in task details have the potential to impact your project's schedule performance. You can stay better informed on task updates by setting up task notifications. When a proposed due date is entered on a task or if a task becomes overdue, you can choose to receive a notification in the application's Inbox, your email, or both. You can adjust the number of notifications you receive by selecting a notification frequency of immediate, daily, or weekly. You can also choose to be notified for all tasks or only those tasks to which you are assigned.
All users can set their own notification preferences if they have access to the project. Users with the privilege to set notification preferences for others can also configure notification preferences on behalf of other users and configure a default set of preferences for all users assigned to at least one task in the project. This privilege is intended for application administrators and superintendents responsible for overseeing other users. The default set of preferences do not apply to users who configure their own set of preferences or have their own set of preferences configured for them.
Task notification preferences are set per project and can be configured on the Work Plan, Hand-offs, and Task List pages. The preferences are the same across all pages. Notifications are disabled by default for all users.
To set task notification preferences:
1) In the object selector, select a project.
2) In the sidebar, hover over Tasks, and select Work Plan, Hand-offs, or Task List.
3) Select the Actionsmenu, and then select Set Notification Preferences.
4) In the Set Notification Preferences dialog box, select Assign User to add or remove users from the list, or select the option whose preferences you want to set:
Note: This section is only visible to users with the required privilege. Users without the privilege will only see preferences for themselves.
My Preferences: Configure your own notification preferences.
Task Assigned User (default preferences): Configure the default notification preferences for all users assigned to at least one task. These preferences do not apply to users with their own configured preferences.
Existing User: Select the name of a user in the list to configure notification preferences on their behalf.
5) In the Preferences section, configure the following settings for the Overdue Due Date and Proposed Due Date notification types:
Note: Each notification type has its own set of preferences and notifications.
a. Inbox: A notification is sent to the selected user's application Inbox.
b. Email: A notification is sent to the selected user's email.
c. Frequency:
Immediate: A notification is sent as soon as a task meets your notification criteria.

Task Management User Guide
116
Daily Digest: A daily notification is sent at midnight with a list of tasks that currently meet the notification criteria.
Weekly Digest: A weekly notification is sent at midnight on Sunday with a list of tasks that currently meet the notification criteria.
6) Select Receive notifications for only my assigned tasks to limit notifications to only tasks to which the selected user is assigned. If this option is disabled, the selected user will receive notifications on all tasks in the project that meet their notification criteria.
7) Select Set.
8) All changes made to this page are saved automatically.
Tips
When a notification is received on the Inbox page or in an email, select View Task to view the relevant tasks on the Task List page.
Select the Context menu next to an existing user to delete them from the list. The My Preferences and Task Assigned User options cannot be removed.
Task List Overview
Use the Task List page to create, manage, and commit to tasks in a table format. The page enables you to customize the configuration of the table using named views. The Gantt view provides a graphical display of your tasks along a timeline. Add hand-offs between tasks using the Gantt view or Hand-offs detail window. The Task List page supports the use of public tasks, which are visible to everyone, or private tasks, which are only visible to you. You can also open the Task List page in the context of a program to manage the tasks of multiple projects simultaneously.
By default, this page displays a planning period of six weeks (one week before the current week and four weeks after the current week). Tasks outside the planning period may not be visible. To modify the current settings, see Configure and Apply Filtering (on page 155).
To learn more about the concepts used on this page, see Understanding Tasks App Concepts (on page 10).
Create a Task on the Task List Page
On the Task List page, create tasks and task milestones manually, or use Microsoft Excel to create or update multiple tasks simultaneously. Quickly create or duplicate tasks using cut, copy, and paste functionality.
To create a task:
Add a Task or Task Milestone on the Task List Page (on page 117)
Create a Task by Import (on page 85)
Cut or Copy and Paste a Task on the Task List Page (on page 119)

Task List Overview
117
Add a Task or Task Milestone on the Task List Page
Add tasks to detail the work to be performed on your project. Add task milestones to mark the distinct phases of your project. Tasks on the Task List page can be set to public or private. When a task milestone is added, it is automatically set to public.
Depending on your needs, tasks can be added in a variety of ways. The Add button on the toolbar adds a new task with default values. You can also add a task to a specific group in the table, add a task as a predecessor or successor to an existing task, or copy and paste an existing task to duplicate it.
To learn more about tasks, see Understanding Tasks App Concepts (on page 10).
To add a task or task milestone on the Task List page:
1) In the object selector, select a project or program.
2) In the sidebar, hover over Tasks, and select Task List.
3) Add a task or task milestone using any of the following methods:
a. Using the toolbar:
1. On the toolbar, select Add. In the new row, complete the following fields:
Note: To add a task in the context of a program, the page must be grouped by Project.
2. Task Name: Enter a task name.
3. Type: Select Task. This is the default option.
Notes:
You can change the task type if the task is not complete and has no commitments.
Task milestones do not support the Assigned User, Duration, Start Date, Use Only Work Days, or Visibility fields.
4. Visibility: Select the visibility of the task.
Public: Visible to everyone in your assigned company and the Primavera Cloud owning company.
Private: Only visible to you.
5. Company: Select a company name.
Note: When adding a task, the Company field will default to the company that is assigned to the user who added the task.
b. Add tasks directly to a specific group:
When the page is grouped by a field, right-click or select the menu for a task in a group, and then select Add Above or Add Below. A new task is added under to the selected group. If the page is not grouped, tasks added using this method are given default values.
c. Add tasks with hand-offs:

Task Management User Guide
118
Right-click a task, and then select Add Task Before, Add Task After, Add Task Milestone Before, or Add Task Milestone After. A new task with default values is added as a predecessor or successor to the existing task.
d. Using copy and paste:
Right-click a selection of one or more tasks, and then select Copy Rows. Right-click a grouping band or activity within the group, and then select Paste Row. The tasks are added to the group.
4) All changes made to this page are saved automatically.
Create a Task by Import
Creating tasks and task milestones using Microsoft Excel enables you to use data from an outside system which can save you time from manual entry.
To create or update a task:
1) Download an Import Template for Importing Tasks (on page 85)
2) Import Tasks from Microsoft Excel (on page 86)
Download an Import Template for Importing Tasks
Download a Microsoft Excel template to use when importing tasks and task milestones. The template contains standard task fields that you can populate for new and existing tasks, as well as all current configured task fields.
To download an import template:
1) In the object selector, select a project.
2) In the sidebar, hover over Tasks, and select Work Plan or Task List.
3) Select the Actions menu, and then select Download Import Template.
Tips
The import template is downloaded as a Microsoft Excel file with the default file name TasksImportTemplate.
The top two rows of the worksheet are required when importing tasks from a spreadsheet. You can delete unused columns, but do not change the data in these rows.
You cannot import tasks in the context of a program.
Review the Instructions worksheet for helpful tips on populating the import template.
Import Tasks from Microsoft Excel
You can import tasks and task milestones into the application from a Microsoft Excel (.xls or .xlsx) file. After downloading the import template, follow the instructions to create or update tasks in the spreadsheet. You cannot update committed or completed tasks. The import will fail if there are any invalid values in the spreadsheet. You can download the spreadsheet file to view and fix the errors indicated in the error column at the end of each worksheet, and then import the file again.
You must have sufficient privileges to perform this task.

Task List Overview
119
To import tasks from Microsoft Excel:
1) In the object selector, select a project.
2) In the sidebar, hover over Tasks, and select Work Plan or Task List.
3) Select the Actions menu, and then select Import.
4) In the Import Tasks dialog box, select Browse, select a file, and select Import.
Tips
You cannot import tasks in the context of a program.
Cut or Copy and Paste a Task on the Task List Page
To save time entering data, the Task List page supports cut, copy, and paste operations for tasks and task milestones. The cut operation enables you to easily move tasks around in the table. Use the copy operation to duplicate tasks in the table. You can perform these operations on a single task, or you can perform them on multiple activities. When the new tasks are created, they are automatically assigned a task ID according the auto numbering settings defined for the project. Hand-offs are not included in copied tasks.
To cut or copy and paste tasks on the Task List page:
1) In the object selector, select a project.
2) In the sidebar, hover over Tasks, and select Task List.
3) In the table, select one or more task or task milestone rows, select the Context menu, and then select Cut Rows or Copy Rows.
4) Select a new row in the table, select the Context menu, and then select Paste Rows.
5) All changes made to this page are saved automatically.
Tips
You can cut, copy, and paste tasks across a variety of grouping bands. When pasting tasks across group bands, the new tasks will assume the attribute of the group band into which it is pasted. For example, if a task is copied or cut from the Company A grouping and pasted in the Company B grouping, the Company attribute of the new task will be changed to Company B.
You cannot cut, copy, or paste tasks on the Task List page in the context of a program.
Modify Tasks on the Task List Page
Edit task details on the Task List page using the columns in the table. Modify task names, dates, assigned company, and other details. Add hand-offs to tasks from the Context menu or the Hand-offs detail window. Assign constraints to tasks to indicate the items that are preventing the tasks from starting. You can also edit some task details, including hand-offs, in the Gantt view.
Several task details can be modified by selecting individual task icons. See Task Icon Reference (on page 146) for icon descriptions.
To modify tasks on the Task List page:

Task Management User Guide
120
Assign a User to a Task on the Task List Page (on page 120)
Add Duration to a Task on the Task List Page (on page 120)
Add a Due Date to a Task on the Task List Page (on page 121)
Propose and Accept a Task Due Date on the Task List Page (on page 122)
Add a Hand-off on the Task List Page (on page 123)
Assign a Task to an Activity on the Task List Page (on page 124)
Modify Tasks in the Task List Gantt Chart (on page 124)
Assign a Constraint to a Task on the Task List Page (on page 125)
Commit to a Task on the Task List Page (on page 126)
Recommit to a Task on the Task List Page (on page 127)
Complete a Task on the Task List Page (on page 128)
Assign a User to a Task on the Task List Page
You can assign a user to a task to designate the user responsible for the task. The user you assign to the task must belong to the company assigned to the task. Task milestones cannot be assigned a user.
To assign a user to a task on the Task list page:
1) In the object selector, select a project or program.
2) In the sidebar, hover over Tasks, and select Task List.
3) In the table, select the task.
4) In the Assigned User column, select the user.
5) All changes made to this page are saved automatically.
Tips
To remove the assigned user from a task, open the Select Assigned User dialog box, and select Remove.
Add Duration to a Task on the Task List Page
Add duration to a task to specify the amount of time the task will take to complete. After adding a duration and due date, your tasks will display on the Gantt chart according to their sequence. Because task milestones indicate the beginning or end of a phase in your project, they do not have duration.
To add duration to a task on the Task list page:
1) In the object selector, select a project or program.
2) In the sidebar, hover over Tasks, and select Task List.
3) In the table, select the task.
4) In the Duration column, enter a value for the duration of the task.

Task List Overview
121
Note: The value of the entered duration must be in whole days greater than zero.
5) All changes made to this page are saved automatically.
Tips
If a task is part of a hand-off chain, changing its due date directly, accepting a proposed due date, or setting a new committed due date will cause the task and other tasks in the chain to be moved. The current hand-off mode determines the movement of a hand-off chain when any of the tasks in the chain are modified:
Keep Hand-offs: Maintain hand-off logic, but allow for the addition or consumption of slack between tasks.
Break Hand-offs: Only maintain hand-off logic until the slack between two tasks reaches zero.
Add a Due Date to a Task on the Task List Page
Define the due date for a task or task milestone to specify when it is expected to be completed. After adding a duration and due date, your tasks will display on the Gantt chart according to their sequence.
To learn more about task due dates, see Understanding Tasks App Concepts (on page 10).
To add a due date to a task on the Task list page:
1) In the object selector, select a project or program.
2) In the sidebar, hover over Tasks, and select Task List.
3) In the table, select the task.
4) In the Due Date column, select a due date for the task.
5) All changes made to this page are saved automatically.
Tips
To select a due date that occurs on a non-work day, select the task, and then clear the check box in the Use Only Work Days column. Task milestones can always be assigned to a non-work day.
If a task is part of a hand-off chain, changing its due date directly, accepting a proposed due date, or setting a new committed due date will cause the task and other tasks in the chain to be moved. The current hand-off mode determines the movement of a hand-off chain when any of the tasks in the chain are modified:
Keep Hand-offs: Maintain hand-off logic, but allow for the addition or consumption of slack between tasks.
Break Hand-offs: Only maintain hand-off logic until the slack between two tasks reaches zero.

Task Management User Guide
122
Propose and Accept a Task Due Date on the Task List Page
When a task is part of a hand-off chain, directly modifying its due date may affect the due dates of other tasks in the chain. If the hand-off chain contains tasks from different companies, each company should be aware of the potential changes to their tasks. To solve this issue, updated due dates can be proposed without affecting the actual task due date. This enables the companies with tasks in the chain to review proposed due dates before they are accepted.
When a proposed due date is accepted, it is removed from the task and becomes the current task due date. If the accepted due date occurs on a non-work day, the Use Only Work Days setting is cleared and the due date is updated. If a task with a proposed due date is committed, the proposed due date is removed, and the current due date is updated to match the committed due date.
To learn more about task due dates, see Understanding Tasks App Concepts (on page 10).
To propose and accept a task due date on the Task List page:
1) In the object selector, select a project or program.
2) In the sidebar, hover over Tasks, and select Task List.
3) On the Task List page, select a task.
4) In the Proposed Due Date column, select a proposed due date for the task.
5) When you are ready to accept the proposed due date, right-click the task or select the Context menu, and then select Accept Proposed Due Date.
6) All changes made to this page are saved automatically.
Tips
The Proposed Due Date icon in the State column indicates that the task has a proposed due date that has not been accepted.
You cannot propose a due date on completed tasks.
If a task is part of a hand-off chain, changing its due date directly, accepting a proposed due date, or setting a new committed due date will cause the task and other tasks in the chain to be moved. The current hand-off mode determines the movement of a hand-off chain when any of the tasks in the chain are modified:
Keep Hand-offs: Maintain hand-off logic, but allow for the addition or consumption of slack between tasks.
Break Hand-offs: Only maintain hand-off logic until the slack between two tasks reaches zero.

Task List Overview
123
Add a Hand-off on the Task List Page
Add hand-offs between tasks and task milestones to order the work in a logical sequence. A hand-off signifies the next task to be performed after its preceding task has been completed. Use the Hand-offs detail window to add predecessor or successor tasks. Use the Gantt chart to view your tasks and hand-offs in a time-phased format. Hand-offs can be created between tasks with the same, different, or no activity assignments. You can add hand-offs between two tasks, between two task milestones, or between a task and a task milestone.
To learn more about hand-offs, see Understanding Tasks App Concepts (on page 10).
To add a hand-off on the Task List Page:
1) In the object selector, select a project or program.
2) In the sidebar, hover over Tasks, and select Task List.
3) Add a hand-off using any of the following methods:
a. Using the Hand-offs detail window:
1. In the table, select a task or task milestone, and then select the Hand-offs detail window.
2. In the Predecessors or Successors section, select Add, and then select one or more tasks to add as predecessors or successors to the current task.
Note: The Select Task dialog box enables you to filter the list of available tasks by tasks with the same activity assignment as the current task or by tasks with any activity assignment. This includes any task without an activity assignment.
3. Select Select.
4. In the Type field, select the hand-off relationship between the two tasks.
5. (Optional) In the Lag field, enter the lag for the hand-off relationship. Select Lag - Use Only Work Days if you want the lag duration to only include work days.
b. Using the right-click menu:
Right-click a task, and then select Add Task Before, Add Task After, Add Task Milestone Before, or Add Task Milestone After. A hand-off path is created between the original task and the new task, even if the original task has existing hand-offs.
c. Using group selection:
Select a group of tasks, right-click the selection, and then select Add Hand-offs. Hand-offs are created between the tasks in the order that they were selected, except for tasks with due dates, which are arranged in the chain from earliest to latest.
4) All changes made to this page are saved automatically.
Tips
In the Hand-offs detail window, select a task, and then select Go to to display that task's predecessors and successors.
Task Management User Guide
124
A Finish to Start hand-off is created by default when a successor task's due date is after the predecessor's due date. A Finish to Finish hand-off is created by default when both tasks have the same due date. The hand-off type for tasks with different due dates can be Finish to Start, Finish to Finish, or Start to Start. The hand-off type for tasks with the same due date can only be Finish to Finish.
If a task is part of a hand-off chain, changing its due date directly, accepting a proposed due date, or setting a new committed due date will cause the task and other tasks in the chain to be moved. The current hand-off mode determines the movement of a hand-off chain when any of the tasks in the chain are modified:
Keep Hand-offs: Maintain hand-off logic, but allow for the addition or consumption of slack between tasks.
Break Hand-offs: Only maintain hand-off logic until the slack between two tasks reaches zero.
Assign a Task to an Activity on the Task List Page
If there are tasks or task milestones in your project that are associated with an activity, you can assign them to that activity. This enables you to keep track of the tasks required to complete an activity. Multiple tasks can be assigned to an activity. The activity type must be Activity Dependent or Resource Dependent. Private tasks assigned to an activity will remain private. You can group, sort, and filter tasks in the table or Gantt chart according to their assigned activity.
To assign a task to an activity:
1) In the object selector, select a project or program.
2) In the sidebar, hover over Tasks, and select Task List.
3) In the table, select the task.
4) Do either of the following:
In the Activity column, select the activity to which you want to assign the task.
Right-click one or more tasks and select Assign Activity to assign the same activity to all of the selected tasks. In the Assign Activity dialog box, leave the Activity field blank to remove any existing activity assignment from the selected tasks.
5) All changes made to this page are saved automatically.
Tips
You can add a new task directly to an existing activity from the Tasks detail window on the Activities page.
Modify Tasks in the Task List Gantt Chart
The Task List Gantt chart provides a graphical representation of the durations and sequence of tasks across a timeline. You can modify tasks and task milestones directly in the chart. You can add tasks, adjust their durations and dates, and sequence them by creating task hand-offs. Hover over a task to view its start and finish dates. For task milestones, you can create hand-offs and view the milestone finish date.

Task List Overview
125
To modify task details in the Gantt chart:
1) In the object selector, select a project or program.
2) In the sidebar, hover over Tasks, and select Task List.
3) Select the Gantt icon.
4) In the Gantt chart, you can make the following changes:
To create a task, right-click a row, and then select Add Above or Add Below. Enter a task name.
Note: If you want the task to be a milestone, select Task Milestone in the Type column. Task milestones appear as diamonds in the chart.
To modify a task's start or finish date and its duration, select the left edge or right edge of a task bar and drag it to a new date. The new date and duration are shown next to the bar as you drag it.
To modify a task's start and finish dates without changing its duration, select the middle of the bar and drag it to a new date. The new start and finish dates are shown next to the bar as you drag it.
To add a task hand-off, hover over the left edge or right edge of a task bar. Select the circle that appears, and drag it to an edge of a different task bar. A popover shows the proposed hand-off relationship. You can also do this for task milestones.
To delete a hand-off, right-click a hand-off line, and then select Remove Hand-off.
To delete a task or task milestone, right-click a task bar or diamond, and select Delete.
5) All changes made to this page are saved automatically.
Tips
You can select multiple task bars and edit their durations or dates at the same time.
You cannot modify the dates or duration of a completed task. You cannot modify the dates or duration of activity bars.
If a task is part of a hand-off chain, changing its due date directly, accepting a proposed due date, or setting a new committed due date will cause the task and other tasks in the chain to be moved. The current hand-off mode determines the movement of a hand-off chain when any of the tasks in the chain are modified:
Keep Hand-offs: Maintain hand-off logic, but allow for the addition or consumption of slack between tasks.
Break Hand-offs: Only maintain hand-off logic until the slack between two tasks reaches zero.
Assign a Constraint to a Task on the Task List Page
Assign constraints to a task to indicate the items that need to be addressed before work on the task can begin. Constraint details include the type of constraint, its status, who is responsible for addressing the constraint, and the dates by which it is promised, needed, and actually delivered. Icons next to the Date Needed field indicate if the constraint is overdue or needed within the next 7 days.

Task Management User Guide
126
Use the Constraints detail window to monitor the statuses of all constraints assigned to a task. To only view tasks on the page that have at least one constraint, select Tasks with Constraintsfrom the Constraints quick filter.
To learn more about task constraints, see Understanding Tasks App Concepts (on page 10).
To assign a constraint to a task on the Task List Page:
1) In the object selector, select a project or program.
2) In the sidebar, hover over Tasks, and select Task List.
3) In the table, select a task or task milestone, and then select the Constraints detail window.
4) In the detail window, select Assign, and then select one or more constraints to associate with the current task.
5) Select Select.
6) All changes made to this page are saved automatically.
7) The constraints shown in the Constraints detail window are read-only. Select a constraint name to view and edit it on the Constraints page.
Tips
You cannot assign a constraint to a private task.
In the Constraints detail window, select one or more constraints, and then select the Context menu to remove the selected constraints from the task. Select a constraint name to view it on the Constraints page.
Select the Notes icon next to a constraint to view the notes associated with the constraint. Constraints without notes will not show this icon.
Commit to a Task on the Task List Page
Commit to tasks to agree to perform their work by a specified date. In the Commitments detail window, you can track the commitment history of a task, including committed dates, due dates, reasons missed, and comments. You cannot commit to private tasks, task milestones, or completed tasks. If a proposed due date exists for a task, it will be displayed in the Commit Task dialog box. This enables you to review the proposed due date before selecting the same or a different due date for the commitment. When a task is committed, the proposed due date is removed from the task, and the current due date is updated to match the committed due date.
To learn more about task commitments, see Understanding Tasks App Concepts (on page 10).
To commit to a task on the Task List page:
1) In the object selector, select a project or program.
2) In the sidebar, hover over Tasks, and select Task List.
3) Commit to a task using either of the following methods:
In the table, select a task, select the Context menu, and then select Commit. In the Commit Task dialog box, select a Due Date for the commitment. Select Commit.

Task List Overview
127
Commit to one or more tasks by right-clicking a selection and selecting Commit Tasks. Only tasks in the selection without an existing commitment will be committed. For pending tasks, the committed due date is set to the task's current due date. For new tasks, the committed due date is set to today's date.
4) All changes made to this page are saved automatically.
Tips
The Commitments detail window contains a task's entire commitment history, but you can also add the Original Committed Due Date and Current Committed Due Date columns to the table to quickly reference the progression of each task's commitment dates.
To delete the most recent commitment, in the Commitments detail window, select a
commitment, select the Context menu, and then select Delete. The task displays the due date of the next commitment in the list.
If a task is part of a hand-off chain, changing its due date directly, accepting a proposed due date, or setting a new committed due date will cause the task and other tasks in the chain to be moved. The current hand-off mode determines the movement of a hand-off chain when any of the tasks in the chain are modified:
Keep Hand-offs: Maintain hand-off logic, but allow for the addition or consumption of slack between tasks.
Break Hand-offs: Only maintain hand-off logic until the slack between two tasks reaches zero.
Recommit to a Task on the Task List Page
If you are unable to meet the due date of a previous commitment, you can recommit to work on the task. Select one or more reasons for missing the previous commitment, and then select a new due date for the recommitment. You can optionally add comments to further explain the recommitment. Track task commitment history in the Commitments detail window. If a proposed due date exists for a task, it will be displayed in the Recommit Task dialog box. This enables you to review the proposed due date before selecting the same or a different due date for the recommitment. When a task is committed, the proposed due date is removed from the task, and the current due date is updated to match the committed due date.
To learn more about task commitments, see Understanding Tasks App Concepts (on page 10).
To recommit to a task on the Task List page:
1) In the object selector, select a project or program.
2) In the sidebar, hover over Tasks, and select Task List.
3) In the table, select the task, select the Context menu, and then select Recommit.
4) In the Recommit Task dialog box, complete the following fields:
Due Date: Select a due date for the recommitment.
Reasons Missed: Select one or more reasons for missing the previous commitment.

Task Management User Guide
128
Note: You can use the Select Reasons Missed dialog box to add new reasons. Select Manage Reasons to view the Reasons dictionary.
(Optional) In the Comments field, add any comments you may have regarding the recommitment. Comments for each recommitment are visible in the Commitments detail window.
Select Recommit.
5) All changes made to this page are saved automatically.
Tips
The Commitments detail window contains a task's entire commitment history, but you can also add the Original Committed Due Date and Current Committed Due Date columns to the table to quickly reference the progression of each task's commitment dates.
To delete the most recent commitment, in the Commitments detail window, select a
commitment, select the Context menu, and then select Delete. The task displays the due date of the next commitment in the list.
You cannot commit to task milestones.
If a task is part of a hand-off chain, changing its due date directly, accepting a proposed due date, or setting a new committed due date will cause the task and other tasks in the chain to be moved. The current hand-off mode determines the movement of a hand-off chain when any of the tasks in the chain are modified:
Keep Hand-offs: Maintain hand-off logic, but allow for the addition or consumption of slack between tasks.
Break Hand-offs: Only maintain hand-off logic until the slack between two tasks reaches zero.
Complete a Task on the Task List Page
Mark a task or task milestone complete to indicate that all work has been performed on the task. After the task is completed, you cannot modify certain fields, including dates, company, and duration. To enable all fields on the task, remove the completed date.
When a task is marked complete, the completed date on the task is set to the task's due date if it is today's date or earlier. If the task's due date is blank or set to a future date, the completed date is set to today's date. A task's completed date can be modified to a past date after it is marked complete. A task's completed date cannot be set to a nonwork day if Use Only Work Days is enabled. Completing a task due in the future may affect the hand-off sequence of the task.
To complete a task on the Task List page:
1) In the object selector, select a project or program.
2) In the sidebar, hover over Tasks, and select Task List.
3) Complete a task using any of the following methods:
In the table, select the task, select the Context menu, and then select Complete.

Task List Overview
129
In the Complete column, select the Complete icon.
Right-click a selection of one or more tasks, and then select Complete Rows.
4) All changes made to this page are saved automatically.
Tips
You cannot mark a task complete if:
The task status is set to Pending and there are one or more commitments.
The task is assigned to another user, and you do not have the required Commit to and Complete All Users' Tasks security privilege.
Configure and Apply Tasks Quick Filters
You can use quick filters to refine the data displayed on a page. Configure which filters you want to appear in the quick filters list. In the quick filters list, select one or more values on which to filter. Use multiple quick filters to further reduce how much data is displayed. Clear a filter to show more results. Quick filter value selections are not saved with the view.
The functionality described in this topic applies to the following Tasks app pages:
Work Plan
Hand-offs
Task List
Constraints
To configure and apply Tasks quick filters:
1) Navigate to a page, and then select the Settings icon.
2) In the Manage Views panel, select the Quick Filters tab.
3) In the Show section, select the quick filters you want to show in the quick filters list.
4) Select Save, and then select Close.
5) In the Quick Filters list, select applicable filter values.
6) To remove an applied filter, expand a filter list, and then select Clear Filter.
To remove all applied filters, in the Quick Filters list, select Clear All.
Tips
The Work Plan page supports additional quick filter functionality. To quickly apply activity quick filters, select one or more activity bands in the hopper or planning board, right-click the
selection, and then select Set Activities as Quick Filter. To do this, Tasks and Activities must be selected, and the Activity quick filter must be added to the view.
View Activity Details in the Tasks App
On pages in the Tasks app, select an activity name to view information about the activity, including displays general activity details and task counts by category.

Task Management User Guide
130
To use this feature on the Work Plan page, the Tasks and Activities grouping option must be selected. On the Hand-offs page, the page must be organized by Activity. On the Task list page, the table must be grouped by Activity or the Activity column must be displayed.
You can also perform this task on the Task List page in the context of a program.
To view activity details in the Tasks app:
1) In the object selector, select a project.
2) In the sidebar, hover over Tasks, and select Work Plan, Hand-offs, or Task List.
3) Select an activity name.
4) The activity detail popover displays project, WBS, and activity details, as well as the following task counts:
Total Tasks: The total number of tasks assigned to the activity.
Unplanned tasks: Tasks without a due date.
Planned tasks, not completed: Tasks with a due date or committed date that are not complete.
Planned tasks, completed: Tasks with a due date or committed date that are marked as complete.
Planned tasks outside of activity dates: Tasks with a due date before the activity start date or after the activity finish date.
Tasks hidden by filters and security: Tasks that are not visible due to the planning period, enabled task filters or quick filters, or due to the current user's security settings. Tasks with assigned activities that occur within the planning period dates are visible.
Note: The Unplanned tasks; Planned tasks, not completed; and Planned tasks, completed task counts contain the total number of tasks associated with the selected activity. The Planned tasks outside of activity dates and Tasks hidden by filters and security task counts contain tasks already counted in the other categories.
Tips
Task counts are for public tasks only and do not include private tasks.
To choose which task counts to display in the popover, select Settings, and then select Task Counts.
Set Task Notification Preferences
Changes in task details have the potential to impact your project's schedule performance. You can stay better informed on task updates by setting up task notifications. When a proposed due date is entered on a task or if a task becomes overdue, you can choose to receive a notification in the application's Inbox, your email, or both. You can adjust the number of notifications you receive by selecting a notification frequency of immediate, daily, or weekly. You can also choose to be notified for all tasks or only those tasks to which you are assigned.

Task List Overview
131
All users can set their own notification preferences if they have access to the project. Users with the privilege to set notification preferences for others can also configure notification preferences on behalf of other users and configure a default set of preferences for all users assigned to at least one task in the project. This privilege is intended for application administrators and superintendents responsible for overseeing other users. The default set of preferences do not apply to users who configure their own set of preferences or have their own set of preferences configured for them.
Task notification preferences are set per project and can be configured on the Work Plan, Hand-offs, and Task List pages. The preferences are the same across all pages. Notifications are disabled by default for all users.
To set task notification preferences:
1) In the object selector, select a project.
2) In the sidebar, hover over Tasks, and select Work Plan, Hand-offs, or Task List.
3) Select the Actionsmenu, and then select Set Notification Preferences.
4) In the Set Notification Preferences dialog box, select Assign User to add or remove users from the list, or select the option whose preferences you want to set:
Note: This section is only visible to users with the required privilege. Users without the privilege will only see preferences for themselves.
My Preferences: Configure your own notification preferences.
Task Assigned User (default preferences): Configure the default notification preferences for all users assigned to at least one task. These preferences do not apply to users with their own configured preferences.
Existing User: Select the name of a user in the list to configure notification preferences on their behalf.
5) In the Preferences section, configure the following settings for the Overdue Due Date and Proposed Due Date notification types:
Note: Each notification type has its own set of preferences and notifications.
a. Inbox: A notification is sent to the selected user's application Inbox.
b. Email: A notification is sent to the selected user's email.
c. Frequency:
Immediate: A notification is sent as soon as a task meets your notification criteria.
Daily Digest: A daily notification is sent at midnight with a list of tasks that currently meet the notification criteria.
Weekly Digest: A weekly notification is sent at midnight on Sunday with a list of tasks that currently meet the notification criteria.
6) Select Receive notifications for only my assigned tasks to limit notifications to only tasks to which the selected user is assigned. If this option is disabled, the selected user will receive notifications on all tasks in the project that meet their notification criteria.
7) Select Set.

Task Management User Guide
132
8) All changes made to this page are saved automatically.
Tips
When a notification is received on the Inbox page or in an email, select View Task to view the relevant tasks on the Task List page.
Select the Context menu next to an existing user to delete them from the list. The My Preferences and Task Assigned User options cannot be removed.
Configure the Task List Page Table
You can add, sort, align, group by, hide, pin, and adjust to fit the content in the columns directly from the Task List table without opening the view settings. Each column in the table supports a menu with several options that vary depending on the column. Pinned columns are located in a section at the beginning of the Task List table. They do not move when the rest of the table is scrolled horizontally. This makes it easier to see the most important task fields, such as Name or State, when a large number of columns are displayed.
Columns that support grouping can be grouped from the menu. Additional grouping options, such as grouping interval and sort order, must be modified from the Manage Views panel. All of the column header options configured, except for the adjust to fit and alignment options, will be saved to the Named View currently set for the page.
To configure the Task List page table:
1) In the object selector, select a project or program.
2) In the sidebar, hover over Tasks, and select Task List.
3) To add columns to the table:
a. Select the Open Column Selector icon.
b. In the column dropdown, next to a column name, select Show or Hide to add or remove the column from the table.
4) To configure an existing column, right-click a column title or select Open Column Menu, and then select any of the following:
Sort: Hover over the Sort option and then select to sort the column by Ascending or Descending. Use Ctrl + click to add the column to an existing sort sequence.
Align Column: Hover over Align Column and then select from Align Left, Align Center, and Align Right to determine the alignment of the content in your columns.
Group By Column: Group activities by the selected column. You can also group by multiple columns or turn off a column grouping. This option is only available for fields that support grouping.
Hide Column: Remove the column from the table.
Adjust to fit content: Expand or shrink the width of the column to fit its contents. You can also double-click a column's right edge to adjust it.
Find and Replace: Displays the Find and Replace popover. If the column is read-only, then only Find is displayed. This option is only available for string fields.

Task List Overview
133
Pin Column: Adds the column to the pinned section of the Task List table. You can also click and drag columns between the pinned and unpinned sections.
5) All changes made to this page are saved automatically.
Tips
Select Settings to manage all page view settings. See Configure View Settings (on page 150) for more information.
The Task Name or ID field must always be displayed.
Click and drag a column title to change the column order.
Task List Fields
Depending on your settings, the following fields might appear on the page as table columns, spreadsheet rows, or in detail windows. Fields that are generic across the application, such as Name, may not be included here.
Dates
Completed Date
The date when the task was completed.
Current Committed Due Date
The current due date of the task commitment.
Due Date
The date by which the task is expected to be completed.
Original Committed Due Date
The original due date of the task commitment.
Proposed Due Date
The date proposed for the task due date. Proposed Due Dates do not affect task Due Dates until they are accepted.
Start Date
The date when the task is set to begin.
If the task is set to allow non-work days, the date is calculated as Due Date minus Duration plus 1 day.
If the task is not set to allow non-work days, the date is calculated as Due Date minus the sum of Duration plus Non-Work Days, plus 1 day.
This is a read-only field.
Durations
Duration
The total amount of expected time required to complete the task, in days.
Slack

Task Management User Guide
134
The amount of time a task can be delayed before it affects the start date of its most immediate successor. This is a read-only field.
General
Activity
The activity to which the task is assigned. The activity must have a Type of Activity Dependent or Resource Dependent.
Assigned User
The person responsible for the task.
Commitment Count
The number of commitments on a task.
Company
The name of the company that owns the task.
Constraint Count
The number of constraints assigned to the selected task or task milestone.
Constraint Impact
Indicates whether the selected task or task milestone has any constraints assigned.
Flag
Identifies tasks that are important to the user. Select a flag on a task to mark it as important. This field cannot be removed from the view.
ID
The unique identifier assigned to the task.
Predecessor Count
The number of predecessor hand-offs assigned to the task.
State
Indicates if a task is in any of the following states:
The task's dates are outside of its assigned activity Start and Finish dates.
The assigned activity is complete but the task is not.
The task is complete but the assigned activity is not.
The task is overdue.
The task is committed and the number of commitments.
The task is pending and should be recommitted.
This field is read-only and cannot be removed from the view.
Status
The current status of the task. Valid values are New, Pending, Committed, and Completed.
This is a read-only field.

Task List Overview
135
Status - Completion
Indicates the completion status of the activity and its assigned tasks.
Status - Dates
Indicates the overall date status of the activity’s assigned tasks.
Outside Activity: A task’s dates are outside of the activity’s Start and Finish dates.
Inside Activity: All of the tasks’ dates are within the activity’s Start and Finish dates.
No Tasks Assigned: No tasks are assigned to the activity.
This is a read-only field.
Successor Count
The number of successor hand-offs assigned to the task.
Task Check - Commitments
Tasks that contain commitments to due dates.
Task Check - Due This Week
Tasks that are due within the calendar week from Sunday to Saturday.
Task Check - Overdue
Tasks that have not been completed by their due date.
Task Check - Pending
Tasks that have a due date but are not committed, or tasks that are committed but the due date has been changed.
Task Check - Planned Outside Activity Dates
Tasks with due dates that occur before the activity start date or after the activity end date.
Task Check - Scheduled on Non-work Days
Task Check - Tasks with Slack
Task slack is the amount of time a task can be delayed before it impacts the start date of the most immediate hand-off successor.
Task Check - Unaccepted Proposed Due Date
Tasks that have a proposed due date value that has not yet been accepted.
Task Check - Unassigned
Tasks that do not have a user assigned.
Task Check - Unplanned
Tasks without a due date.
Type
The type of task. Valid values are Task and Task Milestone.
Use Only Work Days

Task Management User Guide
136
Enables the user to allow only the project calendar's work days and ignore non-work days when determining the value for Start and Due Date.
Visibility
The visibility of task. Valid values are Private and Public.
WBS
The WBS that the activity is associated with.
Constraints Overview
Use the Constraints page to identify and categorize the issues, materials, and deliverables in your project that may prevent you from beginning work on a task. Assign each task constraint to the company and user responsible for addressing it. Provide separate dates for when the constraint is promised to be resolved, when the constraint needs to be resolved, and when the constraint is actually resolved. For each constraint, you can enter a detailed description, upload or link related files, and associate it with one or more existing tasks.
By default, this page displays a planning period of six weeks (one week before the current week and four weeks after the current week). Constraints outside the planning period may not be visible. You can edit the current planning period settings by selecting the Planning Period icon on the page toolbar. You can also edit planning period and other settings in the Manage Views panel. See Configure and Apply Filtering (on page 155) for more information.
To learn more about the concepts used on this page, see Understanding Tasks App Concepts (on page 10).
Add a Task Constraint on the Constraints Page
Use the Constraints page to identify any issues or items that may delay the start of a task. This could be a document, drawing, issue, inspection, material, or approval. You can specify the constraint type during creation.
When adding a constraint, you should designate a responsible party, the date the constraint is promised by, and the date the constraint is needed by. Icons are displayed in the Date Needed field if the constraint is needed in the next 7 days or if it is overdue. After a constraint has been resolved, it can be delivered.
The Status field in the table indicates the current state of each constraint. Constraints without a Promised Date are marked Not Planned. Constraints with a Promised Date are marked Planned. Constraints with a Delivered Date are marked Delivered.
To learn more about task constraints, see Understanding Tasks App Concepts (on page 10).
To add a task constraint on the Constraints page:
1) In the object selector, select a project.
2) In the sidebar, hover over Tasks, and select Constraints.
3) On the toolbar, select Add. In the new row, complete the following fields:

Constraints Overview
137
Name: The name of the constraint.
ID: The unique ID of the constraint.
Type: The type of the constraint.
Responsible Company: The company responsible for addressing the constraint. By default, a new constraint is assigned to the current user's company.
(Optional) Responsible Party: The user responsible for addressing the constraint. The selected user's company is always displayed in the Responsible Company field. By default, a new constraint is assigned to the current user.
(Optional) Promised Date: The date by which the responsible party agrees to deliver the constraint.
Date Needed: The date by which the constraint must be delivered without impacting an associated task.
(Optional) Delivered Date: The date that the constraint is actually delivered. This date cannot be in the future.
4) All changes made to this page are saved automatically.
Tips
In the table, select a constraint, and then select the Context menu to add a new constraint, delete the constraint, duplicate the constraint, or deliver the constraint.
Assign a Task to a Constraint on the Constraints Page
Identify the tasks that will be impacted by each constraint on the Constraints page. If a task can't begin before a constraint is resolved, then it should be associated with that constraint. You can assign multiple tasks to a single constraint, and the same task can be assigned to multiple constraints. Task data on the Constraints page is read-only.
To assign a task to a constraint on the Constraints page:
1) In the object selector, select a project.
2) In the sidebar, hover over Tasks, and select Constraints.
3) In the table, select a constraint, and then select the Impacted Tasks detail window.
4) In the detail window, select Assign, and then select one or more tasks to associate with the current task constraint.
5) Select Select.
6) All changes made to this page are saved automatically.
Tips
In the Impacted Tasks detail window, select one or more tasks, and then select the Context menu to assign a new task to the current constraint or remove the selected tasks from the constraint.
Select a task name from the Impacted Tasks detail window to view the task on the Task List page.
You cannot assign a private task to a constraint.

Task Management User Guide
138
Add Constraint Notes
The Notes detail window enables you to provide additional details for each task constraint on the Constraints page. This may be a detailed description of the constraint, excerpts from a specification, or text copied from an email chain. Text that is pasted will retain its formatting, but you can also format the text using the included tools.
To add constraint notes:
1) In the object selector, select a project.
2) In the sidebar, hover over Tasks, and select Constraints.
3) In the table, select a constraint, and then select the Notes detail window.
4) In the detail window, enter and format your constraint notes.
5) All changes made to this page are saved automatically.
Deliver a Constraint
After a constraint has been resolved, you can deliver the constraint. The delivered date of the constraint is automatically set to the current date, but you can modify this from the Delivered Date column. The Status of the constraint is updated to Delivered.
To deliver a constraint:
1) In the object selector, select a project.
2) In the sidebar, hover over Tasks, and select Constraints.
3) On the Constraints page, select a constraint row, select the Context menu, and then select Deliver.
4) All changes made to this page are saved automatically.
Tips
Clear the Delivered Date column to remove the delivery of the constraint and return the status to Not Planned (if no Promised Date is set) or Planned (if a Promised Date is set).
To deliver multiple constraints at one time, use Ctrl + click to select multiple constraints,
select the Context menu, and then select Deliver.
You can also deliver a constraint by entering a date in the Delivered Date column.
Add a File in a Files Detail Window
Use the Files detail window to add relevant files that support your data. For example, you might add architectural drawings, pictures, or product specifications to activities on the Activities page.
The following objects support the Files detail window:
Activities
Inspections
Issues
Logs
Constraints Overview
139
PBSs
Portfolio Funds
Projects
Project Funds
Risks
Scope Assignments
Scope Items
Strategies
Submittals
Task Constraints
WBSs
Work Packages
To add a file in a Files detail window:
1) Navigate to a page whose object supports files.
2) In the table, select an object row, and then select the Files detail window.
Note: A screen reader will read the Files detail window as File Attachments.
3) In the Files detail window, select Add.
4) In the Add File dialog box, in the Select Folder section, select a folder in the project library.
5) In the File field, select Browse, and then select one or more files.
6) Select Upload.
Tips
Use the projects inventory panel to add files at the project level. This enables you to link a file to one or more objects in the project, such as activities, WBSs, or risks.
Files that you add in the Files detail window can also be accessed from the project File List page.
Built-in virus scanning functionality automatically scans your files during upload and check in. If an issue is detected with a file, you are notified and the contents of the file are deleted from the database. You can upload another version of the file that is not corrupted. You can't preview a file until virus scanning is completed and you refresh the page.
Link a File to an Object
You can link existing files to objects contained within a project instead of adding them to each object. Linking ensures the same version of a file is used everywhere that it is linked. The application enables you to associate files in the Files detail window of the object. The files are still available from the File List page at the project level.
The following objects support the Files detail window:
Activities
Inspections

Task Management User Guide
140
Issues
Logs
PBSs
Portfolio Funds
Projects
Project Funds
Risks
Scope Assignments
Scope Items
Strategies
Submittals
Task Constraints
WBSs
Work Packages
To link a file to an object:
1) Navigate to a page whose object supports files.
2) In the table, select an object row, and then select the Files detail window.
Note: A screen reader will read the Files detail window as File Attachments.
3) In the Files detail window, select Link.
4) In the Link File dialog box, select a file, and select Add from Available.
You can select one or more files to link.
5) Select OK.
Tips
Use the projects inventory panel to add files at the project level. This enables you to link a file to one or more objects in the project, such as activities, WBSs, or risks.
To remove a linked file, select the file, select the Context menu, and select Unlink.
Configure and Apply Tasks Quick Filters
You can use quick filters to refine the data displayed on a page. Configure which filters you want to appear in the quick filters list. In the quick filters list, select one or more values on which to filter. Use multiple quick filters to further reduce how much data is displayed. Clear a filter to show more results. Quick filter value selections are not saved with the view.
The functionality described in this topic applies to the following Tasks app pages:
Work Plan
Hand-offs
Task List
Constraints

Tasks Analysis Overview
141
To configure and apply Tasks quick filters:
1) Navigate to a page, and then select the Settings icon.
2) In the Manage Views panel, select the Quick Filters tab.
3) In the Show section, select the quick filters you want to show in the quick filters list.
4) Select Save, and then select Close.
5) In the Quick Filters list, select applicable filter values.
6) To remove an applied filter, expand a filter list, and then select Clear Filter.
To remove all applied filters, in the Quick Filters list, select Clear All.
Tips
The Work Plan page supports additional quick filter functionality. To quickly apply activity quick filters, select one or more activity bands in the hopper or planning board, right-click the
selection, and then select Set Activities as Quick Filter. To do this, Tasks and Activities must be selected, and the Activity quick filter must be added to the view.
Tasks Analysis Overview
The Analysis page in the Tasks app displays a variety of charts that are useful for monitoring project task performance. The page includes charts that track overall project task performance, task performance by company, and the most common reasons for work delays. You can filter the display of data by the current week, across a six-week time period, or across a custom date range. You can also use quick filters to limit the analysis results by one or more companies. The data in each chart represents the most current task information.
Project Planned Percent Complete
The Planned Percent Complete (PPC) metric indicates the completion performance of your project's committed tasks over time. Calculated as the number of completed tasks divided by the number of task commitments, PPC enables you to track your actual work against your planned work. Daily PPC metrics are calculated up to and including the previous day. Weekly PPC metrics are calculated up to and including the previous week. Individual bars in the chart display the PPC value for the corresponding time period. Hover over past bars to show committed, completed, and PPC values for the tasks in the time period. Bars for the current day and week display PPC as Pending since PPC is only calculated up to the previous day or week. Future period bars display the number of committed tasks.
You can enable the display of two PPC values above the chart. The Total Project PPC value is calculated from the beginning of the project up to the previous week. The Time Frame PPCvalue is calculated for the committed tasks that fall within the selected time frame. You can configure additional options in the chart settings.

Task Management User Guide
142
Company Planned Percent Complete
Each bar in the chart represents the PPC value of tasks assigned to a particular company in your project. This metric enables you to view each company's task completion performance against what they had planned. Company PPC is only calculated up to and including the previous day or week.
Reasons for Missed Commitments
There are many reasons why the completion of a task may be delayed. When a commitment date is missed, the task must be recommitted with a new date and a reason for missing the commitment. Metrics for reasons for missed commitments are tracked on tasks with recommitted due dates up to and including the previous day. Use the chart to track the reasons for delayed tasks. Reasons with high occurrences may prompt you to take action to reduce them. You can toggle the chart format between a bar chart and a pie chart.
Reasons for Missed Commitments Over Time
Track the number of missed commitments over time to view trends in the usage of a particular reason by time and by company. Each bar represents the total number of missed commitments for a time period, and each colored section of a bar represents a different reason for missing a commitment. Hover over a colored section to view the number of times a reason has been used during that time period, a breakdown of the usage by company, and the reason's usage as a percentage of all reasons used during that time. You can also toggle the display of individual reasons across the entire chart. The values in this chart are calculated up to and including the previous day.
Company Planned Percent Complete Over Time
Each line in the chart represents the PPC value of tasks assigned to a single company as it changes over time. Hover over a plot point to view the Company PPC value for that particular time period. Some PPC values may be shared by more than one company. To view all the plot points on a PPC value, use the Quick Filter to toggle the display of companies across the Analysis page, or select a company name on the X-axis of the chart to only toggle that company's line. Company PPC is only calculated up to and including the previous day or week.
View Tasks Analysis Metrics
Use the Analysis page to view various task performance metrics. Filter task data by the current week, over a six-week time period, or over a custom date range. Use quick filters to limit the analysis results to the companies you choose.
To view Tasks analysis metrics:
1) In the object selector, select a project.
2) In the sidebar, hover over Tasks, and select Analysis.
3) In the Time Frame list, select one of the following:
This Week: Displays the current week's task metric data.
6 Week Window: Displays task metric data for the previous four weeks, the current week, and the next week.
Task Summary Overview
143
Custom: Displays weekly task metric data for a user-defined date range:
From: Select a start date for the custom time period.
To: Select an end date for the custom time period.
4) In the Quick Filters list, select the companies you want to include in the analysis results.
5) Hover over individual bars for additional chart details.
Tips
With the 6 Week Window or Custom filters selected, select Date range of data to view the dates specified by the filter.
In the Project Planned Percent Complete chart, select Settings to configure the following chart options:
In the Planned Percent Complete (PPC) section, under When calculating PPC, honor Company quick filter?, select Yes to only include companies that are selected in the quick filter in the PPC calculation, or select No to ignore the quick filter and include all companies in the calculation.
In the Show section, enable or disable the Total Project PPC label, the Time Frame PPC label, and a Zero PPC label on bars with a 0% PPC value.
In the Reasons for Missed Commitments chart, select Bar Chart or Pie Chart to change the display of the data.
In the Company Planned Percent Complete Over Time chart, select a company name in the X-axis to toggle the display of its line.
Task Summary Overview
The Task Summary panel is a tool in the Tasks app that enables you to view high-level status information for the public tasks and task milestones in your project. This can be useful in planning meetings when tracking or monitoring your tasks according to their statuses. The panel contains a configurable selection of checks that indicate certain details about your tasks, including overdue status, tasks with slack, tasks with commitments, and unplanned tasks. Some checks include minimum criteria threshold values that determine if a task will be included in the check's count. You can prioritize and update your tasks according to their various statuses.
Task Summary details, including check criteria values, can be modified in the project settings. Individual checks can be enabled or disabled according to your organization's needs.
The Task Summary panel is available at the project level for the Work Plan, Hand-offs, and Task List pages.
Configure Task Summary Settings
The Task Summary tool consists of checks that monitor various project metrics. Each check can be enabled or disabled in the project settings. Some checks also have minimum criteria values that can be modified. Individual checks can be enabled or disabled according to your organization's needs. Completed tasks are not included in any of the check results.

Task Management User Guide
144
To configure settings for the Task Summary tool:
1) Navigate to the project settings page (see page 172).
2) Select the Tasks tab.
3) In the Task Summary Settings section, configure the following settings:
For each check, select the Active option to include the selected check in the Task Summary panel.
For each check that supports minimum criteria values, in the Minimum Criteria field, enter a new value.
4) Save your changes:
In Primavera Cloud:
a. Select Save.
b. In the Summary & Settings panel, select Close.
In Primavera Professional:
Select Save.
Tips
If you are accessing the Tasks tab for the first time, you may be prompted to run the Task Summary checks. Select Run to run the checks.
This setting is used in the following apps:
Tasks
View the Task Summary Panel
Use the Task Summary panel to view a high-level status overview for the tasks in your project. This enables you to prioritize and update your tasks according to their status. The panel includes a variety of checks that can be configured in the project settings. Some checks also have configurable minimum criteria threshold values.
To view the Task Summary panel:
1) In the object selector, select a project.
2) In the sidebar, hover over Tasks, and select Work Plan, Hand-offs, or Task List.
3) Select Task Summary.
4) In the panel, select a check to view the check's description and the tasks that meet the check's criteria. Select a task to indicate it on the page.
5) Modify the task's details that relate to a check. All changes made to this page are saved automatically.
6) Select the Refresh icon in the Task Summary panel to recalculate all checks and view updated values.

Task Summary Overview
145
Tips
If you are accessing the Tasks Summary panel for the first time, you may be prompted to run the Task Summary checks. Select Run to run the checks.
Filtered tasks that meet a check's criteria are still included in the panel. Filtered tasks appear
with a More Info icon next to them, but the tasks are not selectable. Clear the relevant filters to be able to select the task in the panel.
Completed tasks are not included in the checks.
Checks can also be added as columns on the Task List page.
Task Summary Reference
The Task Summary tool is used in the Tasks app to monitor various metrics related to your project's tasks. Use this topic to refer to the name and description for each check. Some checks also support minimum criteria values. The default criteria values are listed below.
Check Name Description Default Minimum Criteria
Overdue Tasks that have not been completed by their due date.
1 day
Due This Week Tasks that are due within the calendar week from Sunday to Saturday based on the Task Time Zone Setting.
Not Applicable
Tasks With Slack Task slack is the amount of time a task can be delayed before it impacts the start date of the most immediate hand-off successor.
1 day
Commitments Tasks that contain commitments to due dates.
1 commitment
Unassigned Tasks that do not have a user assigned.
Not Applicable
Pending Tasks that have a due date but are not committed, or tasks that are committed but the due date has been changed.
Not Applicable

Task Management User Guide
146
Unplanned Tasks without a due date. Not Applicable
Planned Outside Activity Dates
Tasks with due dates that occur before the activity start date or after the activity end date.
Not Applicable
Scheduled on Non-work Days
Tasks that occur on non-work days as defined by the project calendar when Use Only Work Days is selected.
Not Applicable
Unaccepted Proposed Due Date
Tasks that have a proposed due date value that has not yet been accepted.
Not Applicable
Task Icon Reference
There are a variety of icons on pages in the Tasks app that indicate different task details. Some icons can be selected to quickly update the corresponding task. Others can be selected to open the relevant tab of the Task Details dialog box. Hover over an icon for more information.
Task icons can be found on the following pages in the Tasks app:
Work Plan (see "Work Plan Overview" on page 81): Icons may be shown and selected on task cards on the planning board and in the info bar for a selected task. Some icons are shown in the Task Details dialog box.
Hand-offs (see "Hand-offs Overview" on page 103): Icons may be shown on task cards, in the Task Details dialog box, and in the info bar for a selected task. Some icons can be selected in the info bar.
Task List (see "Task List Overview" on page 116): Icons are read-only in the State column in the table. The Task Complete icon can be selected in the Complete column.
The table below lists each task icon, its description, and possible interactions.
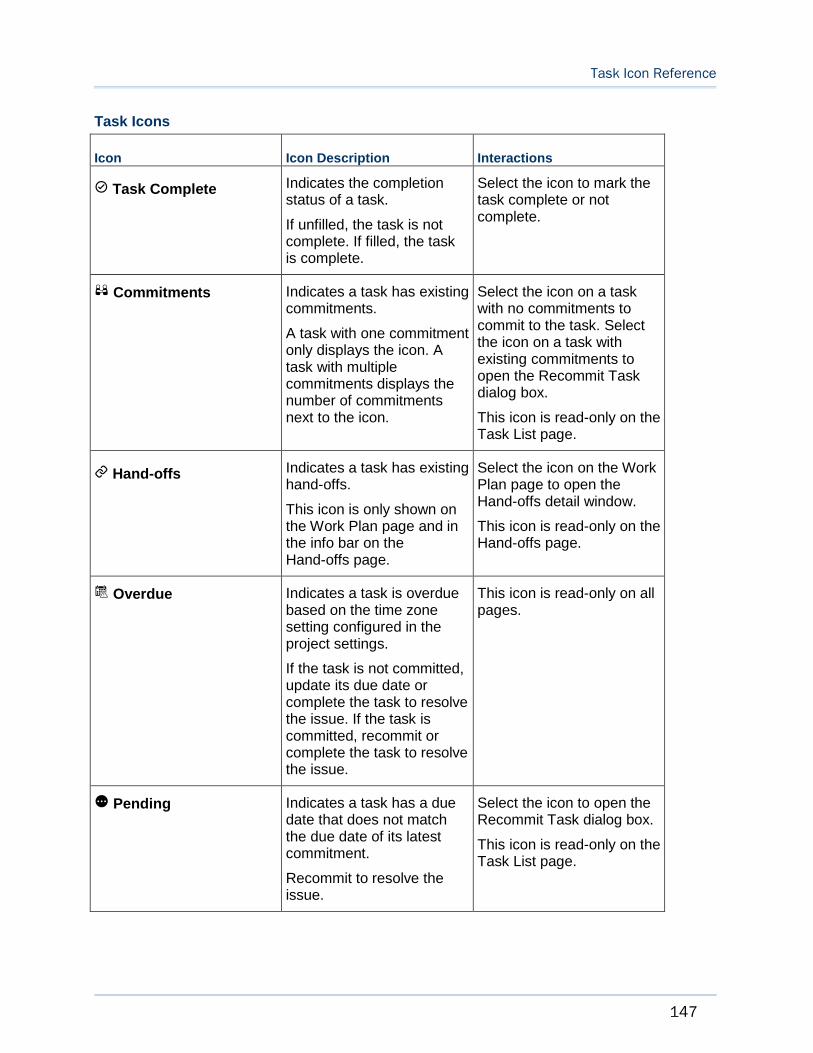
Task Icon Reference
147
Task Icons
Icon Icon Description Interactions
Task Complete Indicates the completion status of a task.
If unfilled, the task is not complete. If filled, the task is complete.
Select the icon to mark the task complete or not complete.
Commitments Indicates a task has existing commitments.
A task with one commitment only displays the icon. A task with multiple commitments displays the number of commitments next to the icon.
Select the icon on a task with no commitments to commit to the task. Select the icon on a task with existing commitments to open the Recommit Task dialog box.
This icon is read-only on the Task List page.
Hand-offs Indicates a task has existing hand-offs.
This icon is only shown on the Work Plan page and in the info bar on the Hand-offs page.
Select the icon on the Work Plan page to open the Hand-offs detail window.
This icon is read-only on the Hand-offs page.
Overdue Indicates a task is overdue based on the time zone setting configured in the project settings.
If the task is not committed, update its due date or complete the task to resolve the issue. If the task is committed, recommit or complete the task to resolve the issue.
This icon is read-only on all pages.
Pending Indicates a task has a due date that does not match the due date of its latest commitment.
Recommit to resolve the issue.
Select the icon to open the Recommit Task dialog box.
This icon is read-only on the Task List page.

Task Management User Guide
148
Proposed Due Date Indicates that a task has a proposed due date that has not been accepted.
Accept the proposed due date to resolve the issue.
This icon is read-only on all pages.
Status Indicates the status of a task in relation to its assigned activity.
The following statuses are possible:
The task's dates are outside of its assigned activity's Start and Finish dates.
The assigned activity is complete but the task is not.
The task is complete but the assigned activity is not.
This icon is only shown on the Task List page.
This icon is read-only on the Task List page.
Using Touch-Screen Gestures in Primavera Cloud
You can use touch-screen devices to navigate pages, open menus, select items, and enter data in the Primavera Cloud web application. The gestures required to perform actions in the application are described below.
Note: Touch-screen functionality is not officially supported for Primavera Cloud and has not been fully tested. Some gestures may not work with all devices or specific device browsers.
The following actions can be performed using touch-screen gestures:
Common Page Actions
Select: Tap a table cell, row, icon, button, list, menu, or link to select it.
Edit cell in a table: Tap the cell to select it. Tap and hold your finger on the cell for a full second, and then release your finger. You can now edit the value.

Using Touch-Screen Gestures in Primavera Cloud
149
Select multiple rows in a table: This action is not supported in Primavera Cloud using a touch-screen device.
Focus on a Gantt bar: Open a Gantt chart view on a page. Double tap a row in the chart to shift the timescale to display the beginning of the bar.
Zoom: Pinch inward with two fingers to zoom in. Pinch outward with two fingers to zoom out.
Page-Specific Actions
Activities Page
Create an activity relationship between Gantt bars: In the Gantt chart, tap an activity bar. On either edge of the bar, tap the circle, which represents the start of the relationship. Drag your finger to the edge of another activity bar. A popover shows the proposed relationship. Release your finger to create the relationship.
Modify an activity bar's start and finish dates: In the Gantt chart, tap an activity bar to select it. Tap and hold your finger on the selection for a full second, and then drag your finger to another day in the chart. The new start and finish dates are shown next to the bar as you drag it.
Hand-offs Page
Select a task card: Tap the task card to select it.
Select multiple task cards: Do either of the following:
Tap each task card that you want to select. Tap a selected card to deselect it. Tap another part of the screen to deselect all selected cards.
Select the Select tool in the diagram toolbar, and then tap and drag to highlight multiple tasks.
Right-click a selection: Tap one or more cards to select them. Tap and hold your finger on the selection for a full second, and then release your finger. The right-click menu is displayed.
Add a hand-off: Tap a single task card. On either edge of the card, tap the circle, which represents the start of a hand-off. Tap a different task card, and then tap a circle on the edge of the card to complete the hand-off line.
Task List Page
Add a hand-off between Gantt bars: In the Gantt chart, tap a task bar. Tap the circle that appears, and drag your finger to the edge of a different task bar. A popover shows the proposed hand-off relationship. Release your finger to create the relationship. You can also do this for task milestones.
Modify a task bar's start and finish dates: In the Gantt chart, tap a task bar to select it. Tap and hold your finger on the selection for a full second, and then drag your finger to another day in the chart. The new start and finish dates are shown next to the bar as you drag it.
Work Plan Page
Open the task details: With configurable task cards disabled, tap a task card to open the Task Details dialog box.

Task Management User Guide
150
View a configurable task card: With configurable task cards enabled, tap a task card to view the configurable task card. Tap the Task Details icon in the header of the configurable task card to open the Task Details dialog box.
Edit a configurable task card: When viewing a configurable task card, tap a field to edit its value. Editable fields will show an edit icon in the corner of the field. Read-only fields will not show this icon.
Select multiple task cards: This action is not supported on the Work Plan page using a touch-screen device.
Right-click a task card: Tap and hold your finger on the task card for a full second, and then release your finger. The right-click menu is displayed.
Move a task card: Tap and hold your finger on a task card for a full second, and then drag your finger to another day, activity band, or planning bucket.
Modify task duration: Tap and hold your finger for a full second on the left edge or right edge of a task card, and then drag it to another day on the planning board. As you drag your selection, the new duration is highlighted.
Modify the planning board timescale: Tap and drag a column header on the planning board to change the size of all columns. This enables you to zoom in or out of the timescale. If the column size is decreased enough, smaller cards are used to represent tasks. This enables the application to display more tasks on the planning board. You can still move a card to change its due date, drag its edge to change its duration, and view status icons displayed on the card. Increase the column widths to return the task cards to their normal appearance.
Configure View Settings
A view is a configured visual layout of a page.
The following section contains view options common throughout Oracle Primavera Cloud. Available options will vary by page.
Note: Certain page view settings are not maintained when the page is refreshed using the Safari browser.
Views Overview
A view is a configured visual layout of a page. Views allow you to customize content and layout choices such as column selection, filtering, grouping, and sorting. Some pages support additional view options, such as Gantt charts, Gantt bars, and spreadsheet rows. Selecting the best view for your needs can facilitate the process of managing data in Primavera Cloud and Primavera Professional.

Configure View Settings
151
Some pages support the ability to save named views. Named views can be saved as one of the three following types: personal, project, and workspace. Personal views are private and only accessible to the user who created them. Project views are saved at the project level and can be accessed by other members of the project. Likewise, workspace views are saved at the workspace level and are available to all users in the workspace. Available view types may vary by page. A fourth named view type, standard, can be found on the Activities page. Standard views are views that come with Primavera Cloud and contain pre-configured view options. They are read-only, but you can modify the view options and save the modifications as a new view.
On pages that support named views, you can create any number of views necessary to display your layouts. Personal, project, and workspace named views can be added, modified, and deleted in the Manage Views panel on a page. On pages without named views, available view options are configured in the Settings panel and are applied and saved to the page.
Available view options will vary by page. The title of the Settings icon may be specific to the grid or detail window that the icon pertains to. For example, the title of the icon for the Activities grid is Activities Grid Settings.
Add a View
Some pages support the ability to add and save named views. Named views can be configured and applied at any time. Add multiple views to display different layouts.
There are four types of named views:
Personal: Only accessible to the user who created them.
Project: Accessible by other members of the project.
Workspace: Accessible by all members of the workspace.
Standard: Accessible by all users. Only available on the Activities page. You cannot add, edit, or delete standard views, but you can modify the view and save the changes as a new view of another type.
Notes:
Your security privileges determine your ability to create project and workspace views.
View options may vary per page.
To add a view:
1) Navigate to a page, and then select the Settings icon.
2) In the Manage Views panel, select a view type, select the Context menu, and then select Add.
3) Enter a name for the new view.
4) Select Save.
5) In the Manage Views panel, select Close.

Task Management User Guide
152
Tips
On the Context menu next to an existing view, you can cut, copy, and paste the view into any of the view types. Select Delete to delete the view. Select Set Active to apply the view to the page.
Apply a View
Select a view to apply its display settings to a page.
Note: You can only apply a view on pages that support named views.
To apply a view:
1) Navigate to a page, and then select the Settings icon.
2) In the Manage Views panel, select a view.
3) Select the Context menu, and then select Set Active.
Tips
For quicker selection, the View list displays a list of the five most recently applied views. Select a view to apply it.
Configure a Column
Configure columns to select and position the columns of data that appear on a page.
Note: View options may vary per page. The title of the Settings icon may be specific to the grid or detail window that the icon pertains to.
To configure a column:
1) Navigate to a page, and then select the Settings icon.
2) In the Manage Views or Settings panel, select the Columns tab.
3) In the Available Columns section, select columns and select Add Column to Selected Columns to add them to the Selected Columns section.
4) Use the up and down arrows to change the positioning of the columns in the Selected Columns section.
5) Apply the view:
In the Manage Views panel:
a. Select Save.
b. Select Close.
In the Settings panel:
Select Apply.

Configure View Settings
153
Tips
You can choose to show or hide the discussion icon in a table. Select the Settings icon and, in the Standard Column Options section, select the Show Discussion Indicatoroption.
Configure a Saved Filter
Filters reduce the data displayed on a page without deleting or otherwise removing it. Data that has been filtered out is still used for all calculations and reports. Some pages offer saved filters, which enable you to create multiple filters and apply them later.
Filters can be saved as one of three types: workspace, project, or personal. Workspace filters are accessible to all users in the workspace. Project filters are accessible to all users in a project. Personal filters are private and only accessible to the user who created them. Users can view and edit all visible filters for a page, but can only apply a filter if it is accessible by the current view. For example, workspace views can only apply workspace filters, but personal views can apply workspace, project, and personal filters. Project views can apply project and personal views, if applicable. To apply a filter that is not accessible by the current view, you can cut or copy it to a type that is accessible to the view. A fourth filter type, standard, contains read-only filters that come with Primavera Cloud. Standard filters cannot be added, edited, or deleted, but then can be copied to a different type filter and then modified.
Applied filters are saved to the selected view. On a page without named views, saved filters are saved and applied to the page.
Note: View options may vary per page. The title of the Settings icon may be specific to the grid or detail window that the icon pertains to.
To configure a saved filter:
1) Navigate to a page, and then select the Settings icon.
2) In the Manage Views or Settings panel, select the Saved Filters tab, and then select Manage Filters.
3) In the Manage Filters panel, in the navigation tree, select a filter type, select the Contextmenu, and then select Add.
Note: Filters applied in the Manage Filters panel are applied to the currently active view. To change the active view, in the Manage Views
panel, select the Context menu next to a view, and then select Set Active.
4) Enter a name for the new filter.
5) Do the following to define the filter criteria:
a. In the Match list, select an option to define the filter conditions:
All of the following: Data is filtered only if it matches all the specified rules.
Any of the following: Data is filtered if it matches any of the specified rules.
Task Management User Guide
154
b. Select Add a filter condition.
c. In the first empty row, use the following fields to define a filter rule:
Field: The data field to which the rule is applied.
Operator: The comparison operation for the rule.
Value: The value against which the rule compares the data field.
d. Add rows for each filter rule you want to define.
e. Add filter groups to define additional sets of conditions.
6) Select Save.
Tips
On the page, select Filters to open the Manage Filters panel, apply a recently used filter, or clear filters currently in use.
For information on applying a saved filter, see Apply a Saved Filter (on page 154).
Apply a Saved Filter
Apply a filter to reduce the data displayed on a page without deleting or otherwise removing it. Data that has been filtered out is still used for all calculations and reports. Saved filters enable you to create multiple filters and apply them later.
Applied filters are saved to the selected view. On a page without named views, applied filters are saved to the page. For information on configuring a saved filter, see Configure a Saved Filter(on page 153).
Note: View options may vary per page. The title of the Settings icon may be specific to the grid or detail window that the icon pertains to.
To apply a saved filter:
1) Navigate to a page, and then select the Settings icon.
2) In the Manage Views or Settings panel, select the Saved Filters tab.
3) In the Manage Views panel, select the view to which you want to apply the filter.
Note: In the Settings panel, applied filters are saved directly to the page.
4) In the Match field, select an option to define the filter application conditions:
All applied: Data is filtered only if it matches all of the selected filters.
Any applied: Data is filtered if it matches any of the selected filters.
5) In the filters tree, select the filters to apply to the view.
Note: If you want to edit a filter before you apply it, select Manage Filters. Any filter in the Manage Filters panel can be edited, but you can only apply a filter if it is accessible by the currently active view. To
change the active view, in the Manage Views panel, select the

Configure View Settings
155
Context menu next to a view, and then select Set Active.
6) Apply the view:
In the Manage Views panel:
a. Select Save.
b. Select Close.
In the Settings panel:
Select Apply.
Tips
Some pages include several standard filters, preconfigured for your use. You can apply them to your view at any time.
On the page, select Filters to open the Manage Filters panel, apply a recently used filter, or clear filters currently in use.
When you apply a filter to a view, the filter icon changes to indicate that the data on the page has a filter applied.
Configure and Apply Filtering
On pages without saved filters, you can configure and apply filtering options as part of the current view. Filters reduce the data displayed on a page without deleting or otherwise removing it. Data that has been filtered out is still used for all calculations and reports.
On pages with named views, you can configure a different set of filtering options for each view. On pages without named views, filtering options are applied to the page.
Notes:
For information on configuring a saved filter, see Configure a Saved Filter (on page 153).
View options may vary per page.
To configure and apply filtering options:
1) Navigate to a page, and then select the Settings icon.
2) In the Manage Views or Settings panel, select the Filtering tab.
3) In the Manage Views panel, select the view to which you want to apply the filter.
Note: In the Settings panel, filtering options are configured and applied directly to the page.
4) Add a filter:
a. In the Match list, select an option to define the filter conditions:
All of the following: Data is filtered only if it matches all the specified rules.
Any of the following: Data is filtered if it matches any of the specified rules.
b. Select Add a filter condition.

Task Management User Guide
156
c. In the first row, use the following fields to define a filter rule:
Field: The data field to which the rule is applied.
Operator: The comparison operation for the rule.
Value: The value against which the rule compares the data field.
d. Add rows for each filter rule you want to define.
e. Add filter groups to define additional sets of conditions.
5) Apply the view:
In the Manage Views panel:
a. Select Save.
b. Select Close.
In the Settings panel:
Select Apply.
In addition to the standard filtering options, the Work Plan, Hand-offs, Task List, and Constraints pages in the Tasks app also support the ability to configure and apply planning period options from the Filtering tab. On the Work Plan, Hand-offs, and Task List pages, you are filtering activities and tasks based on their start and finish dates. On the Constraints page, you are filtering task constraints based on their dates needed, promised dates, and assigned task start and finish dates.
To configure planning period filtering options:
1) On the Filtering tab, in the Planning Period section, select one of the following:
All Weeks: Select to display all objects regardless of their dates.
Rolling Time Frame: Select to filter objects according to a planning period:
Weeks Before: Display any object whose dates occur within the specified number of weeks before the current date.
Weeks After: Display any object whose dates occur within the specified number of weeks after the current date.
Tips
Tasks that fall outside the planning period may still be visible if any of the following are true:
Any of its dates occur within the period.
Assigned activity dates occur within the period.
It is part of a hand-off chain that occurs within the period.
Depending on the fields selected in the standard filtering options, the Work Plan, Hand-offs, and Task List pages support the filtering of tasks by a variety of task values, including the activities and WBS nodes with which the tasks may be associated.
Configure Grouping Options
Configure grouping options for views to specify how data is grouped on a page. You can customize the color and appearance of your grouping bands by level.

Configure View Settings
157
Note: View options may vary per page. The title of the Settings icon may be specific to the grid or detail window that the icon pertains to.
To configure grouping:
1) Navigate to a page, and then select the Settings icon.
2) In the Manage Views or Settings panel, select the Grouping tab.
3) To configure the grouping options, select the Configure tab and do the following:
a. In the Group By section, select your grouping options:
Group By: Defines how data is grouped together on the page.
Sort Order: Defines how data is sorted within groupings.
Grouping Interval: Specifies an interval by which to separate your groupings. This field is only available when grouping by hierarchical fields.
Note: To add grouping rows, select the Context menu, and select Add Above or Add Below.
b. In the Band Options section, select view options:
Show field title: Displays the title of the field by which data is grouped in a band.
Show field rollups: Displays the calculated total of all data in a grouping band.
Hide if empty: Hides grouping bands that do not contain any data.
In the Display text in band using field, select an option to specify the text to appear in the band.
Note: This field only applies to group by fields that have both an ID and name.
4) To configure grouping band color options, select the Theme tab and do the following:
a. In the Style list, select a grouping style.
b. In the Colors list, select a default or custom color theme.
c. To add a custom theme, select Add Custom Colors, and then choose up to six colors for the custom theme. Each color corresponds to a grouping band level. You can create multiple custom color themes and select them in the Colors list. After choosing a custom
theme from the list, you can edit its individual colors or select Remove Custom Colors to delete the theme.
5) Apply the view:
In the Manage Views panel:
a. Select Save.
b. Select Close.
In the Settings panel:
Select Apply.

Task Management User Guide
158
Configure Sorting Options
Configure sorting options to specify how data is arranged on a page.
Note: View options may vary per page. The title of the Settings icon may be specific to the grid or detail window that the icon pertains to.
To configure sorting options on a page:
1) Navigate to a page, and then select the Settings icon.
2) In the Manage Views or Settings panel, select the Sorting tab.
3) Complete the following fields to define a sort order:
Sort By: Select a column by which to order the data.
Order: Select a direction in which to arrange the sorted data.
4) To define additional levels of sorting, select the Context menu, and then select Add Above or Add Below.
5) Apply the view:
In the Manage Views panel:
a. Select Save.
b. Select Close.
In the Settings panel:
Select Apply.
Configure Gantt Bars
To visually distinguish the different bars displayed in the Gantt chart, you can configure bar settings for the Gantt chart view on a page. Some bars, such as the Current bar, have additional configuration options.
You can configure Gantt bars on the following pages:
Activities
To configure Gantt chart bars:
1) Navigate to a page, and then select the Settings icon.
2) In the Manage Views or Settings panel, select the Bars tab.
3) To add a new bar, do the following:
a. Select Add, and then select Bar.
b. In the Bar Type list, select one of the available bar types.
c. In the Height list, specify a bar height.
d. In the Bar Color list, use the color picker to select a color for the bar. Optionally you can select a theme from the Theme list to apply a pre-configured color theme for all bars in the Gantt chart.
e. Click and drag one or more bars to change the order in which they appear.

Configure View Settings
159
4) To configure the Current bar, select the bar and do any of the following:
Select Show Progress to show activity progress as a separate bar color. Select a Progress Color from the list.
If you want to color your activities according to their assigned code values, select the check box next to Color by Activity Code, and then select a workspace-level or project-level activity code. The code's values and their associated colors are shown below the list. Select Configure to configure the code value colors in the corresponding Codes dictionary. If Show Progress is enabled, you can configure the same options for Progress Color by Activity Code. Other bars also support the ability to color by activity code.
Select Swap Colors to switch the positions of the bar and progress colors or the bar and progress activity codes.
In the Progress Style list, select a progress style.
Select Show Critical to represent critical activities with a red bar instead of the colors selected for the Current bar.
5) To configure labels for a bar, do the following:
a. Select the bar, select Add, and then select Label.
b. In the Label Field list, select a label for the bar.
c. In the Color list, use the color selector to select a font color.
d. In the Height list, select a font height.
e. Click and drag the label to position it next to or inside the bar.
6) Apply the view:
In the Manage Views panel:
a. Select Save.
b. Select Close.
In the Settings panel:
Select Apply.
Tips
Select the Summary Bar. Enable Show Expanded Summary Bars to show summary bars for each expanded and collapsed grouping band in the Gantt view. When this option is disabled, a summary bar will only be displayed if its corresponding grouping band is collapsed.
To preview how your Gantt chart bars will look, select Preview.
To reset your Gantt chart settings to the default configuration, select Reset.
Configure Gantt Chart Settings
Configure Gantt chart settings to determine how the chart will display.
You can configure Gantt chart settings on the following pages:
Activities
Task List

Task Management User Guide
160
Note: View options may vary per page. The title of the Settings icon may be specific to the grid or detail window that the icon pertains to.
To configure Gantt chart settings:
1) Navigate to a page, and then select the Settings icon.
2) In the Manage Views or Settings panel, select the Gantt tab.
3) In the Show section, define your chart display options:
Data date line: Determines whether to show the project data date in the Gantt chart.
Relationship lines: Determines whether to show activity relationship lines in the Gantt chart.
Critical relationships: Determines whether to show relationships for activities that must start or finish on time to ensure the project completes on schedule.
Non-driving relationships: Determines whether to show relationships for activities not on the longest path to project completion.
Sight Lines: Determines whether to show lines of demarcation for the selected timescale.
Non-working time shading: Determines whether to gray out time periods in which no work will be performed, as defined by the project calendar.
Progress Spotlight: Enables the Progress Spotlight highlighting feature in the Gantt chart.
4) In the Timescale list, select a timescale for the Gantt chart:
Week/Day: The Gantt chart is divided into weeks which are then divided into days.
Month/Week: The Gantt chart is divided into months which are then divided into weeks.
Quarter/Month: The Gantt chart is divided into quarters which are then divided into months.
Year/Month: The Gantt chart is divided into years which are then divided into months.
Year/Quarter: The Gantt chart is divided into years which are then divided into quarters.
5) Apply the view:
In the Manage Views panel:
a. Select Save.
b. Select Close.
In the Settings panel:
Select Apply.
Tips
You can also enable some or all of these options by selecting Gantt Settings under the Gantt chart.

Configure View Settings
161
Configure Network Settings
The Activity Network is a view that displays a full diagram of the activities and relationships in your project. Configure the number of activity-related fields to display in each activity box.
You can configure network settings on the following pages:
Activities
To configure Activity Network settings:
1) Navigate to a page, and then select the Settings icon.
2) In the Manage Views or Settings panel, select the view to configure.
3) Select the Network Setting tab.
4) In the Customize Activity Box Fields section, display up to eight additional fields across two columns. Select One field per line to limit the display to a single column of four fields.
5) In the Preview section, you can preview the display of an activity box based on your selected fields.
6) Apply the view:
In the Manage Views panel:
a. Select Save.
b. Select Close.
In the Settings panel:
Select Apply.
Configure Quick Filters
You can use quick filters to reduce the number of visible items on a page.
Notes:
View options may vary per page.
Due to slight differences in functionality, some pages in the application have their own set of help topics for quick filters.
To configure quick filters:
1) Navigate to a page, and then select the Settings icon.
2) In the Manage Views or Settings panel, select the Quick Filters tab.
3) In the Show section, select up to three quick filters to apply to the view.
4) Apply the view:
In the Manage Views panel:
a. Select Save.
b. Select Close.
In the Settings panel:
Select Apply.

Task Management User Guide
162
Apply a Quick Filter
You can use quick filters to refine the data displayed on a page. In a filter list, select one or more values on which to filter. Use multiple quick filters to further reduce how much data is displayed. Clear a filter to show more results. Quick filter selections are not saved with the view.
Notes:
View options may vary per page.
Due to slight differences in functionality, some pages in the application have their own set of help topics for quick filters.
To apply a quick filter to a page:
1) In the Quick Filters list, select applicable filter values.
2) To remove a filter, expand a filter list, and select Clear Filter.
Configure Task Counts
Task counts display the number of tasks of a specific status that are assigned to an activity. Use the Task Counts tab to configure which task counts are displayed in the activity details popover. Activity details provide additional information about the activities in your project, including associated WBS, start and finish dates, and activity percent complete. All task counts are enabled by default. Task counts are for public tasks only and do not include private tasks.
You can configure task counts on the following pages:
Work Plan
Hand-offs
Task List
Note: View options may vary per page. The title of the Settings icon may be specific to the grid or detail window that the icon pertains to.
To configure task counts:
1) Navigate to a page, and then select the Settings icon.
2) In the Manage Views or Settings panel, select the Task Counts tab.
3) Select the task counts that you want to display:
Total Tasks: The total number of tasks assigned to the activity.
Unplanned tasks: Tasks without a due date.
Planned tasks, not completed: Tasks with a due date or committed date that are not complete.
Planned tasks, completed: Tasks with a due date or committed date that are marked as complete.

Configure View Settings
163
Planned tasks outside of activity dates: Tasks with a due date before the activity start date or after the activity finish date.
Tasks hidden by filters and security: Tasks that are not visible due to the planning period, enabled task filters or quick filters, or due to the current user's security settings. Tasks with assigned activities that occur within the planning period dates are visible.
Note: The Unplanned tasks; Planned tasks, not completed; and Planned tasks, completed task counts contain the total number of tasks associated with the selected activity. The Planned tasks outside of activity dates and Tasks hidden by filters and security task counts contain tasks already counted in the other categories.
4) Apply the view:
In the Manage Views panel:
a. Select Save.
b. Select Close.
In the Settings panel:
Select Apply.
Configure a Timescale
Configure the timescale interval for a page.
Note: View options may vary per page. The title of the Settings icon may be specific to the grid or detail window that the icon pertains to.
To configure a timescale:
1) Navigate to a page, and then select the Settings icon.
2) On the Manage Views or Settings panel, select Timescale.
3) In the Timescale Standards Settings section, select a timescale interval.
4) Apply the view:
In the Manage Views panel:
a. Select Save.
b. Select Close.
In the Settings panel:
Select Apply.

Task Management User Guide
164
Note: If you are changing the timescale on the Time Phase view of the Fund Sources page, remember this: You can only distribute quantities for a time-phased fund if the Timescale setting you choose here matches that fund's Distribution Type value. For example, if you want to distribute quantities for a fund that has a Distribution Type value of Yearly, you must first set the Timescale value to Yearly.
Tips
You can also change the timescale interval by right-clicking on the timescale on a page and selecting an option.
Configure Spreadsheet Rows
Configure spreadsheet rows to show summary and spread values for each item in a table. For example, a resource spreadsheet lists all of the available resources in a project. Each resource may display separate rows for demand hours, commitment hours, demand costs, and commitment costs. Each field row can show values across a timescale and rolled up to a summary level.
Note: View options may vary per page. The title of the Settings icon may be specific to the grid or detail window that the icon pertains to.
To configure a spreadsheet row:
1) Navigate to a page, and then select the Settings icon.
2) In the Manage Views or Settings panel, select the Spreadsheet Rows tab.
3) In the Available Spreadsheet Rows section, select rows and select Add Row to Selected Rows to add them to the Selected Spreadsheet Rows section.
4) Use the up and down arrows to change the positioning of the columns in the Selected Spreadsheet Rows section.
5) Apply the view:
In the Manage Views panel:
a. Select Save.
b. Select Close.
In the Settings panel:
Select Apply.
Configure Currency Settings
Configure the currency display settings on a page. Currency settings are user-specific and are saved with the view.
On project-level pages that support currencies, you can choose to view your costs in terms of the application's base currency or the current set for the project.

Configure View Settings
165
Note: View options may vary per page. The title of the Settings icon may be specific to the grid or detail window that the icon pertains to.
To configure a currency view:
1) Navigate to a page, and then select the Settings icon.
2) On the Manage Views or Settings panel, select Currency.
3) Configure the following settings:
Select Show currency symbols to display the symbol of the currency.
Note: This option is only enabled if the Show currency symbol option is also enabled in the user preferences.
Select Show currency banner to display the chosen currency in the page toolbar.
In the View Costs in section, choose whether to display costs in the Base Currency or Project Currency. If Base Currency is selected, cost fields will be read-only. If both currencies are the same, this field is disabled.
4) Apply the view:
In the Manage Views panel:
a. Select Save.
b. Select Close.
In the Settings panel:
Select Apply.
Configure Formatting
Configure the formatting on a page.
The Work Plan page in the Tasks app contains additional page formatting options.
Note: View options may vary per page. The title of the Settings icon may be specific to the grid or detail window that the icon pertains to.
To configure the formatting:
1) Navigate to a page, and then select the Settings icon.
2) In the Manage Views or Settings panel, select the Formatting tab.
3) In the Read-only Styling section, select Highlight Read-only cells to highlight read-only cells on the page.
4) (Work Plan page only) Do any of the following:
In the Band Options section, select Hide if empty on Hopper or Hide if empty on Planning Board to hide empty grouping bands in the hopper or planning board for activities that have not been assigned any tasks.
In the Planning Board Options section, select Show Info Bar to display details for the selected task or activity below the planning board.

Task Management User Guide
166
5) Apply the view:
In the Manage Views panel:
a. Select Save.
b. Select Close.
In the Settings panel:
Select Apply.
167
Appendix of Referenced Navigation Steps
Navigate to the WBS page
In Primavera Cloud:
a) In the object selector, select a project.
b) In the sidebar, hover over Schedule or Scope, and select WBS.
In Primavera Professional:
a) On the File menu, select Open.
b) In the Open dialog box, select the Projects tab, select a project, and then select Open.
c) On the Project menu, select WBS.
Navigate to the Activities page
In Primavera Cloud:
a) In the object selector, select a project or program.
b) In the sidebar, hover over Schedule, and select Activities.
In Primavera Professional:
a) On the File menu, select Open.
b) In the Open dialog box, select the Projects or Programs tab, select a project or program, and then select Open.
c) On the Project or Program menu, select Activities.
Navigate to the project Activities page
In Primavera Cloud:
a) In the object selector, select a project.
b) In the sidebar, hover over Schedule, and select Activities.
In Primavera Professional:
a) On the File menu, select Open.
b) In the Open dialog box, select the Projects tab, select a project, and then select Open.
c) On the Project menu, select Activities.
Navigate to the Baselines page
In Primavera Cloud:
a) In the object selector, select a project.

Task Management User Guide
168
b) In the sidebar, hover over Scope or Schedule, and select Baselines.
In Primavera Professional:
a) On the File menu, select Open.
b) In the Open dialog box, select the Projects tab, select a project, and then select Open.
c) On the Project menu, select Baselines.
Navigate to the Schedule Comparison page
In Primavera Cloud:
a) In the object selector, select a project.
b) In the sidebar, hover over Schedule, and select Schedule Comparison.
In Primavera Professional:
a) On the File menu, select Open.
b) In the Open dialog box, select the Projects tab, select a project, and then select Open.
c) On the Project menu, select Schedule Comparison.
Navigate to the workspace resource page
In Primavera Cloud:
a) In the object selector, select a workspace.
b) In the sidebar, hover over Resources, and select Resource List.
In Primavera Professional:
a) On the File menu, select Open.
b) In the Open dialog box, select the Projects or Programs tab, select a project or program, and then select Open.
c) On the Workspace menu, select Resources.
Navigate to the project resources page
In Primavera Cloud:
a) In the object selector, select a project.
b) In the sidebar, hover over Resources, and select Resource List.
In Primavera Professional:
a) On the File menu, select Open.
b) In the Open dialog box, select the Projects tab, select a project, and then select Open.
c) On the Project menu, select Resources.

Appendix of Referenced Navigation Steps
169
Navigate to the workspace or project resources page
In Primavera Cloud:
a) In the object selector, select a workspace or project.
b) In the sidebar, hover over Resources, and select Resource List.
In Primavera Professional:
a) On the File menu, select Open.
b) In the Open dialog box, select the Projects or Programs tab, select a project or program, and then select Open.
c) On the Workspace or Project menu, select Resources.
Navigate to the workspace roles page
In Primavera Cloud:
a) In the object selector, select a workspace.
b) In the sidebar, hover over Resources, and select Role List.
In Primavera Professional:
a) On the File menu, select Open.
b) In the Open dialog box, select the Projects or Programs tab, select a project or program, and then select Open.
c) On the Workspace menu, select Roles.
Navigate to the project roles page
In Primavera Cloud:
a) In the object selector, select a project.
b) In the sidebar, hover over Resources, and select Role List.
In Primavera Professional:
a) On the File menu, select Open.
b) In the Open dialog box, select the Projects tab, select a project, and then select Open.
c) On the Project menu, select Roles.
Navigate to the workspace or project roles page
In Primavera Cloud:
a) In the object selector, select a workspace or project.
b) In the sidebar, hover over Resources, and select Role List.
In Primavera Professional:

Task Management User Guide
170
a) On the File menu, select Open.
b) In the Open dialog box, select the Projects or Programs tab, select a project or program, and then select Open.
c) On the Workspace or Project menu, select Roles.
Navigate to the workspace resource assignments page
In Primavera Cloud:
a) In the object selector, select a workspace.
b) In the sidebar, hover over Resources, and select Assignment List.
In Primavera Professional:
a) On the File menu, select Open.
b) In the Open dialog box, select the Projects or Programs tab, select a project or program, and then select Open.
c) On the Workspace menu, select Resource Assignments.
Navigate to the project or program resource assignments page
In Primavera Cloud:
a) In the object selector, select a project or program.
b) In the sidebar, hover over Resources or Schedule, and select Assignment List.
In Primavera Professional:
a) On the File menu, select Open.
b) In the Open dialog box, select the Projects or Programs tab, select a project or program, and then select Open.
c) On the Project or Program menu, select Resource Assignments.
Navigate to the workspace resource analysis page
In Primavera Cloud:
a) In the object selector, select a workspace.
b) In the sidebar, hover over Resources, and select Analysis.
In Primavera Professional:
a) On the File menu, select Open.
b) In the Open dialog box, select the Projects or Programs tab, select a project or program, and then select Open.
c) In the Workspace menu, select Resource Analysis.
Appendix of Referenced Navigation Steps
171
Navigate to the project or program resource analysis page
In Primavera Cloud:
a) In the object selector, select a project or program.
b) In the sidebar, hover over Resources, and select Analysis.
In Primavera Professional:
a) On the File menu, select Open.
b) In the Open dialog box, select the Projects or Programs tab, select a project or program, and then select Open.
c) On the Project or Program menu, select Resource Analysis.
Navigate to the files page
In Primavera Cloud:
a) In the object selector, select a project, portfolio, program, or idea.
b) In the sidebar, hover over Files, and select File List.
In Primavera Professional:
a) On the File menu, select Open.
b) In the Open dialog box, select the Projects or Programs tab, select a project or program, and then select Open.
c) On the Project or Program menu, select Files.
Navigate to the project files page
In Primavera Cloud:
a) In the object selector, select a project.
b) In the sidebar, hover over Files, and select File List.
In Primavera Professional:
a) On the File menu, select Open.
b) In the Open dialog box, select the Projects tab, select a project, and then select Open.
c) On the Project menu, select Files.
Navigate to the project or portfolio files page
In Primavera Cloud:
a) In the object selector, select a project or portfolio.
b) In the sidebar, hover over Files, and select File List.
In Primavera Professional:
Task Management User Guide
172
a) On the File menu, select Open.
b) In the Open dialog box, select the Projects tab, select a project, and then select Open.
c) On the Project menu, select Files.
Navigate to the project Details page
In Primavera Cloud:
a) In the object selector, select a project.
b) In the sidebar, select Summary & Settings.
c) On the Summary & Settings menu, select Details.
In Primavera Professional:
a) On the File menu, select Open.
b) In the Open dialog box, select the Projects tab, select a project, and then select Open.
c) On the Project menu, select Details.
Navigate to the project settings page
In Primavera Cloud:
a) In the object selector, select a project.
b) In the sidebar, select Summary & Settings.
c) On the Summary & Settings menu, select Settings.
In Primavera Professional:
a) On the File menu, select Open.
b) In the Open dialog box, select the Projects tab, select a project, and then select Open.
c) On the Project menu, select Project Settings.
Navigate to the program settings page
In Primavera Cloud:
1) In the object selector, select a program.
2) In the sidebar, select Summary & Settings.
a) On the Summary & Settings menu, select Settings.
In Primavera Professional:
a) On the File menu, select Open.
b) In the Open dialog box, select the Programs tab, select a program, and then select Open.
c) On the Program menu, select Details.

Appendix of Referenced Navigation Steps
173
Navigate to the program codes page
In Primavera Cloud:
1) In the object selector, select a program.
a) In the sidebar, select Summary & Settings.
b) On the Summary & Settings menu, select Codes.
In Primavera Professional:
a) On the File menu, select Open.
b) In the Open dialog box, select the Programs tab, select a program, and then select Open.
c) On the Program menu, select Program Codes.
Navigate to a dictionary page
In Primavera Cloud:
a) In the object selector, select a workspace.
b) In the sidebar, select Summary & Settings.
c) On the Summary & Settings menu, select Dictionaries, and then select a dictionary item.
In Primavera Professional:
a) On the File menu, select Open.
b) In the Open dialog box, select the Projects or Programs tab, select a project or program, and then select Open.
c) On the Dictionaries menu, select a dictionary item.
Navigate to the Calendars dictionary page
In Primavera Cloud:
a) In the object selector, select a workspace.
b) In the sidebar, select Summary & Settings.
c) On the Summary & Settings menu, select Dictionaries, and then select Calendars.
In Primavera Professional:
a) On the File menu, select Open.
b) In the Open dialog box, select the Projects or Programs tab, select a project or program, and then select Open.
c) On the Dictionaries menu, select Workspace, and then select Calendars.
Navigate to the Codes dictionary page
In Primavera Cloud:
a) In the object selector, select a workspace.
Task Management User Guide
174
b) In the sidebar, select Summary & Settings.
c) On the Summary & Settings menu, select Dictionaries, and then select Codes.
In Primavera Professional:
a) On the File menu, select Open.
b) In the Open dialog box, select the Projects or Programs tab, select a project or program, and then select Open.
c) On the Dictionaries menu, select Workspace, and then select Codes.
Navigate to the Curve Profiles dictionary page
In Primavera Cloud:
1) In the object selector, select a workspace.
2) In the sidebar, select Summary & Settings.
3) On the Summary & Settings menu, select Dictionaries, and then select Curve Profiles.
In Primavera Professional:
a) On the File menu, select Open.
b) In the Open dialog box, select the Projects or Programs tab, select a project or program, and then select Open.
c) On the Dictionaries menu, select Workspace, and then select Curve Profiles.
Navigate to the Units of Measure dictionary page
In Primavera Cloud:
a) In the object selector, select a workspace.
b) In the sidebar, select Summary & Settings.
c) On the Summary & Settings menu, select Dictionaries, and then select Units of Measure.
In Primavera Professional:
a) On the File menu, select Open.
b) In the Open dialog box, select the Projects or Programs tab, select a project or program, and then select Open.
c) On the Dictionaries menu, select Workspace, and then select Units of Measure.
Navigate to the Locations dictionary page
In Primavera Cloud:
a) In the object selector, select a workspace.
b) In the sidebar, select Summary & Settings.
c) On the Summary & Settings menu, select Dictionaries, and then select Locations.
In Primavera Professional:

Appendix of Referenced Navigation Steps
175
a) On the File menu, select Open.
b) In the Open dialog box, select the Projects or Programs tab, select a project or program, and then select Open.
c) On the Dictionaries menu, select Workspace, and then select Locations.
Navigate to the Currencies dictionary page
In Primavera Cloud:
a) In the object selector, select a workspace.
b) In the sidebar, select Summary & Settings.
c) On the Summary & Settings menu, select Dictionaries, and then select Currencies.
In Primavera Professional:
a) On the File menu, select Open.
b) In the Open dialog box, select the Projects or Programs tab, select a project or program, and then select Open.
c) On the Dictionaries menu, select Workspace, and then select Currencies.
Navigate to the project Calendars dictionary page
In Primavera Cloud:
a) In the object selector, select a project.
b) In the sidebar, select Summary & Settings.
c) On the Summary & Settings menu, select Dictionaries, and then select Calendars.
In Primavera Professional:
a) On the File menu, select Open.
b) In the Open dialog box, select the Projects tab, select a project, and then select Open.
c) On the Dictionaries menu, select Project, and then select Calendars.
Navigate to the project Codes dictionary page
In Primavera Cloud:
a) In the object selector, select a project.
b) In the sidebar, select Summary & Settings.
c) On the Summary & Settings menu, select Dictionaries, and then select Codes.
In Primavera Professional:
a) On the File menu, select Open.
b) In the Open dialog box, select the Projects tab, select a project, and then select Open.
c) On the Dictionaries menu, select Project, and then select Codes.
Task Management User Guide
176
Navigate to an object configuration page
In Primavera Cloud:
a) In the object selector, select a workspace.
b) In the sidebar, select Summary & Settings.
c) On the Summary & Settings menu, select Defaults & Options, and then select an object.
In Primavera Professional:
a) On the File menu, select Open.
b) In the Open dialog box, select the Projects or Programs tab, select a project or program, and then select Open.
c) On the Workspace menu, select Configuration, and then select an object.
Navigate to the Activity configuration page
In Primavera Cloud:
a) In the object selector, select a workspace.
b) In the sidebar, select Summary & Settings.
c) On the Summary & Settings menu, select Defaults & Options, and then select Activity.
In Primavera Professional:
a) On the File menu, select Open.
b) In the Open dialog box, select the Projects or Programs tab, select a project or program, and then select Open.
c) On the Workspace menu, select Configuration, and then select Activity.
Navigate to the File configuration page
In Primavera Cloud:
a) In the object selector, select a workspace.
b) In the sidebar, select Summary & Settings.
c) On the Summary & Settings menu, select Defaults & Options, and then select File.
In Primavera Professional:
a) On the File menu, select Open.
b) In the Open dialog box, select the Projects or Programs tab, select a project or program, and then select Open.
c) On the Workspace menu, select Configuration, and then select Files.
Navigate to the Project configuration page
In Primavera Cloud:

Appendix of Referenced Navigation Steps
177
a) In the object selector, select a workspace.
b) In the sidebar, select Summary & Settings.
c) On the Summary & Settings menu, select Defaults & Options, and then select Project.
In Primavera Professional:
a) On the File menu, select Open.
b) In the Open dialog box, select the Projects or Programs tab, select a project or program, and then select Open.
c) On the Workspace menu, select Configuration, and then select Project.
Navigate to the Program configuration page
In Primavera Cloud:
a) In the object selector, select a workspace.
b) In the sidebar, select Summary & Settings.
c) On the Summary & Settings menu, select Defaults & Options, and then select Program.
In Primavera Professional:
a) On the File menu, select Open.
b) In the Open dialog box, select the Projects or Programs tab, select a project or program, and then select Open.
c) On the Workspace menu, select Configuration, and then select Program.
Navigate to the Resource/Role configuration page
In Primavera Cloud:
a) In the object selector, select a workspace.
b) In the sidebar, select Summary & Settings.
c) On the Summary & Settings menu, select Defaults & Options, and then select Resource/Role.
In Primavera Professional:
a) On the File menu, select Open.
b) In the Open dialog box, select the Projects or Programs tab, select a project or program, and then select Open.
c) On the Workspace menu, select Configuration, and then select Resource/Role.
Navigate to the Resource Assignment configuration page
In Primavera Cloud:
a) In the object selector, select a workspace.
b) In the sidebar, select Summary & Settings.

Task Management User Guide
178
c) On the Summary & Settings menu, select Defaults & Options, and then select Resource Assignment.
In Primavera Professional:
a) On the File menu, select Open.
b) In the Open dialog box, select the Projects or Programs tab, select a project or program, and then select Open.
c) On the Workspace menu, select Configuration, and then select Resource Assignment.
Navigate to the WBS configuration page
In Primavera Cloud:
a) In the object selector, select a workspace.
b) In the sidebar, select Summary & Settings.
c) On the Summary & Settings menu, select Defaults & Options, and then select WBS.
In Primavera Professional:
a) On the File menu, select Open.
b) In the Open dialog box, select the Projects or Programs tab, select a project or program, and then select Open.
c) On the Workspace menu, select Configuration, and then select WBS.
Navigate to the Manage Services page
In Primavera Cloud:
a) In the header, select your username.
b) On the User menu, select Manage Services.
In Primavera Professional:
On the User menu, select Manage Services.
Navigate to the Preferences page
In Primavera Cloud:
a) In the header, select your username.
b) On the User menu, select Preferences.
In Primavera Professional:
On the User menu, select Preferences.

179
Oracle Primavera Cloud Task Management User Guide
Copyright © 2014, 2021, Oracle and/or its affiliates. Oracle and Java are registered trademarks of Oracle and/or its affiliates. Other names may be trademarks of their respective owners.
Intel and Intel Inside are trademarks or registered trademarks of Intel Corporation. All SPARC trademarks are used under license and are trademarks or registered trademarks of SPARC International, Inc. AMD, Opteron, the AMD logo, and the AMD Opteron logo are trademarks or registered trademarks of Advanced Micro Devices. UNIX is a registered trademark of The Open Group.
This software and related documentation are provided under a license agreement containing restrictions on use and disclosure and are protected by intellectual property laws. Except as expressly permitted in your license agreement or allowed by law, you may not use, copy, reproduce, translate, broadcast, modify, license, transmit, distribute, exhibit, perform, publish or display any part, in any form, or by any means. Reverse engineering, disassembly, or decompilation of this software, unless required by law for interoperability, is prohibited.
The information contained herein is subject to change without notice and is not warranted to be error-free. If you find any errors, please report them to us in writing.
If this is software or related documentation that is delivered to the U.S. Government or anyone licensing it on behalf of the U.S. Government, the following notice is applicable:
U.S. GOVERNMENT END USERS: Oracle programs, including any operating system, integrated software, any programs installed on the hardware, and/or documentation, delivered to U.S. Government end users are “commercial computer software" pursuant to the applicable Federal Acquisition Regulation and agency-specific supplemental regulations. As such, use, duplication, disclosure, modification, and adaptation of the programs, including any operating system, integrated software, any programs installed on the hardware, and/or documentation, shall be subject to license terms and license restrictions applicable to the programs. No other rights are granted to the U.S. Government.
This software or hardware is developed for general use in a variety of information management applications. It is not developed or intended for use in any inherently dangerous applications, including applications that may create a risk of personal injury. If you use this software or hardware in dangerous applications, then you shall be responsible to take all appropriate failsafe, backup, redundancy, and other measures to ensure its safe use. Oracle Corporation and its affiliates disclaim any liability for any damages caused by use of this software or hardware in dangerous applications.
This software or hardware and documentation may provide access to or information on content, products and services from third-parties. Oracle Corporation and its affiliates are not responsible for and expressly disclaim all warranties of any kind with respect to third-party content, products, and services. Oracle Corporation and its affiliates will not be responsible for any loss, costs, or damages incurred due to your access to or use of third-party content, products, or services.
Copyright


![Chapter 1: Installing Activiti - Packt · Create manual task ... Create alfresco user task Create alfresco mail task . Script Task H R Approval C] ... User Task . SimpleLeaveprocess.bpmn](https://static.fdocuments.us/doc/165x107/5ae9a6de7f8b9ad73f8c213b/chapter-1-installing-activiti-packt-manual-task-create-alfresco-user-task.jpg)


![samu User Interface Guide - docs.oracle.com · [1]Oracle® Hierarchical Storage Manager and StorageTek QFS Software samu User Interface Guide Release 6.1.2 E48431-07 February 2018](https://static.fdocuments.us/doc/165x107/5c4ce86593f3c30e0212c9d8/samu-user-interface-guide-docs-1oracle-hierarchical-storage-manager-and.jpg)