Target For Today! Rules - Khyber Pass...
44
by Steve Dixon, Bob Best and Shawn Rife Technical Advisor: Joe Osentoski Legion Wargames © 2016 TABLE OF CONTENTS 1.0 INTRODUCTION 1 2.0 PRE-MISSION STEPS 6 3.0 STARTING THE MISSION 11 4.0 THE ZONES 11 5.0 COMBAT 13 6.0 IN THE TARGET ZONE 22 7.0 ENDING THE MISSION 25 8.0 POST MISSION DEBRIEFING 26 9.0 ADDITIONAL GERMAN AIRCRAFT 26 10.0 OPTIONAL RULES 27 11.0 SOURCES 41 Cover paintings: "Remember...Returning is Secondary" & "Flak Time" by Roy Grinnell Used by permission, ©Roy Grinnell Studios www.roygrinnell.com 1.0 INTRODUCTION……...…………………………….… “Your assignment to the B-17 airplane means that you are no longer just a pilot. You are now an airplane commander, charged with all the duties and responsibilities of a command post. “You are now flying a 10-man weapon. It is your airplane and your crew. You are responsible for the safety and efficiency of the crew at all times— not just when you are flying and fighting, but for the full 24 hours of every day while you are in command. “Your crew is made of specialists. Each man—whether he is the navigator, bombardier, engineer, radio operator, or one of the gunners—is an expert in his line. But how well he does his job, and how efficiently he plays his part as a member of your combat team, will depend to a great extent on how well you play your own part as the airplane commander.” PILOT TRAINING MANUAL FOR THE FLYING FORTRESS B-17 - HQ AAF TARGET FOR TODAY is a solitaire game that recreates American's Daylight Strategic Bombing Campaign against Nazi Occupied Europe during the Second World War. Considerable research, including review of many oral histories gathered from veterans who flew heavy bombers in the Daylight Strategic Bombing Campaign was done to make TARGET FOR TODAY function as closely as possible to reality. The game was designed to provide YOU, the player with the ultimate gaming experience depicting the same types of events and decision making processes experienced by our veterans who flew the real- life missions. Now, YOU are in command of an individual bomber on an individual mission over Hitler’s Third Reich —flying either the B-17F or G Model Flying Fortress or the B-24D, or J Model Liberator bomber. A series of individual missions are strung together in the campaign game to form the player's tour of duty. Just as it was in real life, the objective of the game for the player is to survive your tour of duty and rotate home. The US Army Air Forces suffered one of the highest casualty rates of any branch of the military services including the US Marine Corps during World War II. The heavy bomber groups of the 8th Air Force flew a combined total of 10,631 strike missions over Europe during the period of this game. The 8th Air Force lost 4145 bombers on these missions. Surviving your tour of duty could be difficult! Two single mission examples for the Schweinfurt raids give an example of just how deadly the skies over Hitler's Europe could be. On August 17th, 1943, 315 B-17 bombers struck Schweinfurt. 60 of the bombers were shot down giving a loss rate of 19% for the mission. Schweinfurt was struck again by 228 B-17s on October 14, 1943 and a further 62 were shot down constituting 27% of the attacking force. A tour of duty was finally set at 25 missions in the 8th Air Force in 1943. Can you survive the "Magic 25"?
Transcript of Target For Today! Rules - Khyber Pass...

by Steve Dixon, Bob Best and Shawn Rife
Technical Advisor: Joe Osentoski Legion Wargames © 2016
TABLE OF CONTENTS
1.0 INTRODUCTION 1
2.0 PRE-MISSION STEPS 6
3.0 STARTING THE MISSION 11
4.0 THE ZONES 11
5.0 COMBAT 13
6.0 IN THE TARGET ZONE 22
7.0 ENDING THE MISSION 25
8.0 POST MISSION DEBRIEFING 26
9.0 ADDITIONAL GERMAN AIRCRAFT 26
10.0 OPTIONAL RULES 27
11.0 SOURCES 41
Cover paintings:
"Remember...Returning is Secondary" &
"Flak Time"
by Roy Grinnell Used by permission, ©Roy Grinnell Studios
www.roygrinnell.com
1.0 INTRODUCTION……...…………………………….…
“Your assignment to the B-17 airplane means that you are no longer just a pilot. You are now an airplane commander, charged with all the duties and responsibilities of a command post.
“You are now flying a 10-man weapon. It is your airplane and your crew. You are responsible for the safety and efficiency of the crew at all times—not just when you are flying and fighting, but for the full 24 hours of every day while you are in command.
“Your crew is made of specialists. Each man—whether he is the navigator, bombardier, engineer, radio operator, or one of the gunners—is an expert in his line. But how well he does his job, and how efficiently he plays his part as a member of your combat team, will depend to a great extent on how well you play your own part as the airplane commander.”
PILOT TRAINING MANUAL FOR THE FLYING FORTRESS B-17 - HQ AAF
TARGET FOR TODAY is a solitaire game that recreates American's Daylight Strategic Bombing Campaign against Nazi Occupied Europe during the Second World War.
Considerable research, including review of many oral histories gathered from veterans who flew heavy bombers in the Daylight Strategic Bombing Campaign was done to make TARGET FOR TODAY function as closely as possible to reality. The game was designed to provide YOU, the player with the ultimate gaming experience depicting the same types of events and decision making processes experienced by our veterans who flew the real-life missions.
Now, YOU are in command of an individual bomber on an individual mission over Hitler’s Third Reich —flying either the B-17F or G Model Flying Fortress or the B-24D, or J Model Liberator bomber.
A series of individual missions are strung together in the campaign game to form the player's tour of duty. Just as it was in real life, the objective of the game for the player is to survive your tour of duty and rotate home.
The US Army Air Forces suffered one of the highest casualty rates of any branch of the military services including the US Marine Corps during World War II. The heavy bomber groups of the 8th Air Force flew a combined total of 10,631 strike missions over Europe during the period of this game. The 8th Air Force lost 4145 bombers on these missions. Surviving your tour of duty could be difficult!
Two single mission examples for the Schweinfurt raids give an example of just how deadly the skies over Hitler's Europe could be.
On August 17th, 1943, 315 B-17 bombers struck Schweinfurt. 60 of the bombers were shot down giving a loss rate of 19% for the mission. Schweinfurt was struck again by 228 B-17s on October 14, 1943 and a further 62 were shot down constituting 27% of the attacking force.
A tour of duty was finally set at 25 missions in the 8th Air Force in 1943. Can you survive the "Magic 25"?

~ ~
1.1 GAME RULES
“TARGET FOR TODAY” is an advanced update of Glen Frank’s famous and classic Avalon Hill game B-17, QUEEN OF THE SKIES. Some familiarity with that game is assumed, but “TARGET FOR TODAY” is a completely new game—you do not need to own B-17, QUEEN OF THE SKIES to play it. New tables are included and the rules are organized according to the sequence of play in any typical mission. “TARGET FOR TODAY” is designed so that each individual mission is fast and easy to play. The campaign game that comprise your tour of duty offers the player a game that is rich in detail making the game as realistic as possible while still remaining playable.
It is suggested that the player read the rules then fly a few practice missions to random targets to learn the game systems. After getting comfortable with the basic mission rules, the player can add optional rules that will raise the realism level in the game system.
Note that certain rules are marked Optional. This means that beginners (or anyone interested in a quicker game) should feel free to skip that section if desired and ignore its provisions during play.
1.2 GAME EQUIPMENT The following items are contained in your game box:
Battle Board.
Rules Manual.
Game Tables Manual.
Target Listing & Gazetteer Manual.
Pilot's Flight Operating Instructions Manual 5 Mission Log Sheets - One each for: B-17F, B-17G, YB-40, B-24D and B-24J Bomber models.
5 Crew Placement Sheets - One each for: B-17F, B-17G, YB-40, B-24D and B-24J Bomber models.
Bomber Group Game Formation Board.
Composite Mission Record.
Zone Worksheet.
Counter Sheet - 1.2" Aircraft Counters (56 each).
Counter Sheet - .6" Game Markers (176 each).
2 Six-Sided Dice.
2 Ten-Sided Dice.
1.3 DICE
TARGET FOR TODAY requires two different colored six-sided dice and two different colored ten-sided dice that are included. Throughout the rules, the notation “1D6” means roll one six-sided die that gives a result between 1 and 6. The notation “2D6” means rolling two six-sided dice and adding the results together to get a result between 2 and 12. The notation 1D6 + 1D6 found on some tables like 2-2D, 2-2E and 2-3 means that the player should select a colored die to be the 10’s digit and the second die will become the 1’s digit of a two-digit number. Rolling two dice on these tables will thus generate 36 different random numbers ranging from a low of “11” to a high of “66.”
(Example: the first 1D6 die roll is a 2 while the second 1D6 die roll is a 5. The result would be read as "25" on that table.
The notation 1D10 means rolling one ten-sided die. The result is a number between 1 and 10. Note "0" is ten (10) not Zero (0)
The notation 1D10 + 1D10 means that the player should select a colored 10 sided die to be the 10’s digit and the second die will become the 1’s digit of a two-digit number. Some tables will require you to roll 1D10 + 1D10 dice to get a result from 1- 100. Before you roll specify one colored die to be the "tens" number and the second die to be the "ones" number.
(Example: the first 1D10 die roll is a 6 while the second 1D10 die roll is a 4. The result would be read as "64" on that table. Note: "00" results is read as one hundred (100), NOT zero (0).
1.4 COUNTER IDENTIFICATION
The playing pieces.
Bomber Crew Counters:
Burgundy band (bomber crew) Green band (extra/optional crew members) Grey band (additional YB-40 crew) Black band (optional group and mission lead crew)
German Fighter Pilot Ace & Green

~ ~
Fire Fire Extinguisher
Heat Out Oxygen Out
Light Wound Serious Wound Killed in Action
Target Marker - Used to mark the zone location on the Strategic Movement Track.
Bomber Marker - Used to record movement on the Strategic Movement Track.
Bomber gun Fire Marker
German Fighter Damage Marker - (-1) is the die roll modifier. FCA - Fighter Continues Attack.
Me-190 Fighter Counter 3 w/ explosion background represents number of attacks fighter can make. The "1942" is the year this version was introduced.
Me-410 Fighter Counter 2 w/ explosion background represents the unit can only attack in two combat rounds.
(Optional Rules) Abbeville Boys - The "S" is JG-26's unit symbol. 3 w/ explosion background represents number of attacks. Note "Ace" Symbol (lower left)
Bomber Type Card - placed on combat board to indicate which bomber is flying the current mission.
Bomber types available: YB-40 B-17F, B17-G B-24D, B-24J
1.5 TARGET FOR TODAY - FORMS
TARGET FOR TODAY uses several different forms during the course of play. The forms that require the player to write information on them to keep track of the game processes should be copied before use by the player. Only ONE master copy of each form is provided in the game. Permission to copy them is granted to the player. The player should make photocopies of the Mission Log Sheet, the Zone Worksheet, the Composite Mission Record and the Bomber Group Game Assignment Sheet before starting play.
Mission Log Sheet - Each individual bomber type has its own Mission Log Sheet. The player should select the Mission Log Sheet that corresponds with the Bomber type that they wish to fly, for example, the B-17G or B-24J bomber.
The Player enters the campaign number, mission number, and the number of missions this bomber has flown along with the bomber's name, base location, target city, target type, Bomber Group combat box position and plane number in the header area. The on or off target and bombing percentage are entered after making the bomb run on the target. Next enter the crew identification information in the appropriate boxes. During play the player tracks his ammunition usage in the Turret/Gun Ammunition Section and records damage and any other pertinent information in the Notes box.

~ ~
Zone Worksheet - The player uses the Zone Work Sheet for recording the actions in each individual zone as the mission progresses. Record the zone number in the upper left hand corner of the box.
Use the boxes to the right to record your dice roll modifiers and table results for various actions that happen in each zone the bomber is currently in. Note that the Zone Weather (Wx) box can be used for Weather over the Base if this is zone 1 or for the Targets visibility if this is the target zone. Use the Combat Calculations/Notes box as needed to help you keep track of the action in the zone. Any bomber damage results should be noted on the bomber's Mission Log Sheet. Crew status (injuries, aircraft shot down, etc) should be recorded in the status box next to the crewmember's name on the Mission Log Sheet. The Zone Worksheet contains three boxes for three (3) zones. Use as many pages as necessary to record one zone's activity per box to complete the mission.
Crew Placement Sheet - The player places his crew counters in the correct crew station boxes on the bomber diagram. Also place the bomber's fire extinguishers in the Fire Extinguisher box.
Information on additional attacking fighters that are added when the bomber occupies certain Bomber Group positions or is out of formation in the zone is listed in the red boxes below the crew placement diagram for the player's convenience.
A three dimensional view of the 18 bomber Combat Box formation is shown on the right side of the sheet. The high cell, low cell and middle cell are all shown along with the Mission Lead position and the Tail-end Charlie positions. The bomber numbers correspond with the bomber numbers on the Bomber Group Game Assignment Sheet.
Composite Mission Record - The player completes the Composite Mission Record if they are playing a Tour of Duty Campaign rather than just a single mission. After the mission is complete the player records results of the mission, the names and status of the crew and the name of the bomber flying the mission in the Composite Mission Record Sheet. This will give you a record of each mission flown in your tour of duty.
Bomber Group Game Assignment Sheet - If the player is playing the Optional Rules Bomber Group Game then they should complete the Bomber Group Game Assignment Sheet to track the status of each bomber in the Bomber Group. (See Optional Rule 10.4.)
Historical Table of Organization information for both the 8th and 15th Air Forces can be found in the Target Listing and Gazetteer manual.
The player can use this information to complete the heading information for the Bomber Group Game Assignment Sheet or they can make up their own unit information to fit in with any ongoing role-playing story line or other type of game they might be playing.
The Battle Board - The Battle Board is where the combat actions take place for each zone. The player places his large sized bomber counter in the center of the board. As German fighters are generated from the tables, the German fighter counters are placed in the appropriate attack sector and elevation boxes. Each box shows its clock sector and High, Level or Low attack elevation. Vertical Climb and Dive boxes are also shown.
The track along the right of the Battle Board area is the Strategic Movement Track. The bottom box (Zone 1) is considered your Air Base. Place the bomber movement counter in the Air Base zone at the start of the game. Place the Target counter in the correct zone on the Strategic Movement Track. The target's location zone can be found in the Target Listing and Gazetteer Manual and is explained later in the rules.
The player will move his bomber one zone at a time toward the target and then after reaching his target turn the bomber around and move it one zone at a time back to the air base as called for by the rules. The procedure is explained in the rules below.
1.6 THE ANATOMY OF A BOMBING MISSION (Designer Notes)
Here is the background within which the player will be flying their bombing missions in Target For Today.
You, as the pilot of your bomber have just left the briefing hut. You meet your crew, jump into a jeep and drive to the flight line where your crew chief has your bomber ready to go. You make the customary walk-around but you know you will find nothing wrong as your ground crew is top-notch. Boarding your bomber you go through the start-up check list. When the engines are purring smoothly and all the crew members check in on the intercom saying that everything is A-OK, you give the thumbs up to the Crew Chief who pulls the wheel chocks. You taxi out and join the other bombers on the taxiway waiting to takeoff. That comes quickly as bombers take off at 30 second intervals.

~ ~
You retract the landing gear and start climbing to rendezvous with the multi-colored "formation bomber" that flies lazy circles over the British country side while the bomb group sorts itself out into the defensive combat boxes for the mission. (This occurs in zone 1 on the Strategic Mission Track).
Later in the war the bombing missions could number upwards of 1000 bombers. Early war missions numbered from 100 to 300 bombers. Depending on the number of bombers the bombing formation may cover several miles in length as it moves toward its target.
German radar and ground observer stations report the buildup of bombers assembling over England. It takes time to assemble large bombing missions. The German fighter direction stations have time to alert the defending German fighter groups. Pilots move to their planes and await word on the direction and possible target of the bombing strike. The Germans wait to order the fighters into the air until they can determine where the main effort will come. Some fighter units stage to outlaying airfields closer to the projected path of the bombing mission.
With larger raids the Americans will send smaller groups of bombers to attack lesser targets to create a diversion to distract and confuse the German Fighter Direction Centers, but today your bomber is assigned to the main strike, a target deep in Germany. Your Bomb Group has assembled with bombers from other wings and air divisions in the 8th Air Force and today's bombing mission now turns toward Germany. You enter what has become known as the "Bomber Autobahn" that leads from England across the channel to the Dutch coast and then into the heart of Germany. (This occurs in zones 2 to 15 on the Strategic Mission Track).
While your bombers are forming up so are your fighter escorts. They will be assembling and will meet your bombers along the "Bomber Autobahn" providing you an escort. The fighter groups are assigned to escort the bombers in certain areas and are then relieved by fresh escort units for the next leg of the mission.
As you approach the Dutch coast line your bomb group makes its first turn. The bombing formations make several turns during the mission to avoid known anti-aircraft artillery (Flak) concentrations and also to try to confuse the Germans as to the true target of the mission.
The German strategy is to watch the raid form and when it starts toward the continent they will order their fighters into the air with the idea of assembling a large
group of attacking fighters in the path of the oncoming bombers. The attacking fighters will form two groups, an attack group for the bombers, and a high group that will attempt to intercept the American fighter escorts. The Germans might field between 200 and 400 fighters.
When the German fighters engage the bomber formations combat may run for 50 to 100 miles before the fighters disengage to land, refuel and rearm at staging airfields positioned along the "Bomber Autobahn". The fighters will takeoff and again intercept the bomber formations, continuing their attacks. There may be lulls in the fighting as the German fighters cannot engage all of the bombers. It might be a "milk-run" for your group but sheer terror for another bomb group just ahead or behind your combat box.
German fighters will attack right up until the bombers begin receiving heavy anti-aircraft fire at the target. (This is the target zone on the Strategic Mission Track). This is when you will turn your bomber onto the bomb run and fly straight and level for up to a minute to allow your bombardier to line up on the target and drop the bombs. This is probably the longest minute of your life as heavy flak bursts around your plane and many bombers are lost on the bomb run.
Surviving the bomb run you turn your bomber back toward your base. The German fighters have landed, refueled and rearmed at staging bases along the bomber's flight path. They are now forming to attack you on your return flight.
Allied fighter escorts are also flying toward you to provide escort against the attackers. More running gun fights ensue as your formation makes its way home.
Thankfully, your bomber received little damage and you did not have to leave the protection of the formation to become a straggler and easy prey for the patrolling German fighters. You finally cross the English coast and you can see your airbase ahead. The landing goes well and you are met by your crew chief and driven back to the debriefing hut.
Many missions lasted 6-8 hours and the strain on the crew was monumental. You survived this mission and tomorrow you will be doing it all over again!

~ ~
2.0 PRE-MISSION STEPS
“If we succeeded, we will have the primary satisfaction of ending the war.” – Gen. Carl A. Spaatz, USAAF
2.1 SET-UP
Go to Table 2-1 Campaign Selection and decide what campaign time frame you wish to fly your mission or start your tour of duty in. You can start your tour of duty on any date you wish. Table 2-1 is found in the Target Listings and Gazetteer Handbook. Select from one of the six available campaigns. The table includes the historical time period of the campaign, the type of bomber(s) available, the available basing (8th Air Force in England or 15th Air Force in Italy, 15th Air Force missions begin in December 1943) and the tour length (the number of missions required to complete your tour of duty for that campaign and theater of operations).
Historical Note: A Numbered Air Force was an organization in the United States Army Air Forces (and still exists in the United States Air Force today) overseeing operational units such as wings, groups, and squadrons. The two Numbered Air Forces most responsible for carrying the strategic air war to Germany in World War II were the Eighth Air Force (the “Mighty Eighth”) and the Fifteenth Air Force.
The Eighth (originally known as VIII Bomber Command) was activated early in 1942 under the command of Major General Ira C. Eaker, and set up shop at High Wycombe Airdrome in England. Flying B-17 and B-24s from as many
as 55 different airfields in England, 8 AF ended the war as the largest of the deployed combat Army Air Forces in numbers of personnel and aircraft.
The Fifteenth, meanwhile, was activated on 1 November 1943, under the command of Major General James H. “Jimmy” Doolittle (of “Doolittle Raid” fame). With bases in Italy (15 AF was headquartered at the Italian port of
Bari on the Adriatic Sea), heavy bombers could now hit important targets in the Balkans, Czechoslovakia, Austria, and southern and eastern Germany. German Armaments Minister Albert Speer would later remark: “I could see the omens of the war’s end almost every day in the blue southern sky when the bombers of the American Fifteenth Air Force crossed the Alps.”
Next lay out the game components. Decide which type of bomber you wish to fly and then select the appropriate Crew Placement Sheet and Mission Log Sheet for that bomber. Then pick a set of crew counters and place them on the Crew Placement Sheet of the bomber of your choice.
The B-24J and the B-17G have additional choices on Turret and Gun Types to be made that will be explained later in the rules. Make those choices now if you are using one of the bomber choices that have the options and mark your choices in the Notes box on the Mission Log Sheet.
Table 2-9 "B-24J Nose Turret Type" in the Game Tables Booklet is used to determine what type of nose turret your B-24J has. It makes a difference when your bomber takes damage as the turrets operate on two different systems. The Emerson A-15 Electric Nose Turret was used on all late war B-24 Liberators, except those produced at the Consolidated San Diego plant. B-24 Liberators produced at the Consolidated San Diego plant used modified A-6B Hydraulic Tail Turrets mounted in the front of the aircraft to function as a nose turret
If you are using the B-17G there are options for the radio room gun. (See the optional rules section for the B-17G).
There are also optional rules that will allow you to fly specialized bombers or if your crew survives long enough you can become a Lead Bomber Crew. These options will increase the realism level and the complexity of the game. They are all explained later in the rules. Note any choices on the Mission Log Sheet.
If you are playing a campaign game (multiple single missions) then complete a Composite Mission Sheet as well.
Next, lay out the Zone Worksheet. You will record your bomber's mission progress here.
Lay out the Battle Board. The Battle Board is where combat is resolved and the track along the bottom is where you will mark your bomber's progress as it moves from its base to the target and back for each individual mission.
2.2 HOW TO WIN
In the Single Mission game your objective is to complete the mission and return your crew and bomber to base. Getting your bombs on target is an added bonus.
In the campaign game of “TARGET FOR TODAY” your goal is to complete the number of missions specified in the tour length column of Table 2-1 and bring you and your crew safely back to your base and earn a ticket home to a relatively safe job.

~ ~
2.3 THE SIX CAMPAIGNS OFFERED IN TARGET FOR TODAY
Campaign 1 - (8th Air Force) August 1942 through April 1943 - was a trial period for the proponents of daylight precision bombing. The inexperienced crews had to prove the value of the concept, as well as the fitness of themselves and their equipment. During these early months of the American air war, both the bomber forces and the German air defenses were evenly matched—with each side experimenting and learning.
Campaign 2 - (8th Air Force) May 1943 through November 1943—saw the extension of bombing missions across much of Germany. But German fighter defenses were at peak strength and efficiency, and bomber losses were high. Following the heavy casualties of the “Black Thursday” Schweinfurt raid in October 1943, deep strikes into Germany were suspended until an escort was introduced that could follow the bombers to and from their targets.
Campaign 3 - (8th Air Force) - December 1943 through May 1944--- That escort was found —the P-51 Mustang— It began to arrive in December 1943…During this period, the tide was turned. Planners targeted the Luftwaffe in an operation known as “Big Week” (20–25 February 1944) and succeeded brilliantly—losses were so heavy German planners were forced into a hasty dispersal of industry and their day fighter arm never fully recovered.
Campaign 4 - (15th Air Force) - November 1943 through May 1944. It was at this same time that the B-17s and B-24s of Fifteenth Air Force began flying in force from bases around Foggia, Italy—Most of Hitler’s Third Reich was now in bomber range.
Campaign 5 - (8th and 15th Air Forces) June through November 1944 simulates the missions of both the 8th Air Force and the 15th Air Force. During part of this period, 15th AF carried a larger share of the offensive’s burden, as 8th AF had much of its attention turned to the “tactical” air battle in support of the Normandy invasion. It was not until September 1944 that 8th Air Force could resume in earnest the strategic bombing campaign of Germany.
Campaign 6 - (8th and 15th Air Forces) December 1944 through April 1945 focuses on the Reich’s true Achilles heel—petroleum, oil, and lubrication (POL) infrastructure. It is during this sixth and final campaign that Germany’s final defeat was ensured.
2.4 TARGET SELECTION.
Target selection was initially made from within 8th Air Force's Headquarters in England when it was the sole unit conducting daylight strategic bombing of Europe. When 15th Air Force was activated on November 1st, 1943 to begin daylight strategic bombing of Europe a joint command structure was created to coordinate target selection. Within this command structure the Combined Strategic Targets Committee or "Jockey Committee" as it was sometimes referred too, began target selection for both the 8th and the 15th Air Forces to insure a coordinated bombing campaign.
You will find the tables to generate the "Jockey Committee's" target listings by Campaign in the Daylight Strategic Bombing - Europe Target Listings and Gazetteer booklet.
Each campaign has its own set of target selection tables. These tables are numbered 2-2 thru 2-7M. Campaign #1 represents the initial starting period for the American Daylight Bombing Campaign. Heavy bomber units were in limited supply. Axis targets were selected mainly from France and the Low Countries and most were within effective fighter escort range. Campaign #1 ends in April 1943 about the time the heavy bomber force began unescorted daylight bombing missions into Germany. Table 2-2 Campaign #1 Targets is organized differently than the other campaigns target tables. This is because there are fewer targets available to bomb.
For Table 2-2 the player rolls once on the table to find the target city and the target type. After determining the result of the dice roll record the target city and type on the both the Mission Log Sheet and the Composite Mission Record. Find the Target City in the Gazetteer and record the information for each zone on the Zone Worksheet. Each zone is listed and will be recorded on the zone worksheet as each new zone is entered.
Table's 2-3A thru 2-7M is organized differently than Table 2-2. The player Rolls first on the Target Type Table, (Example - See Table 2-3A for Campaign 2 Target Types.)
After determining the result of the dice roll, cross index the roll to find the target type and continue to the "Go to Table." column to complete the next action. (Example - You roll (1D10 + 1D10) and get a "58". The target type is "Industry". The go to table 2-3D labeled Industry Targets)

~ ~
The player then rolls on the table found in the "Go to Table." column to determine the Target City. Continuing with our example above we have; (Example - Table 2-3D, the player rolls 1D10 + 1D10. The roll is "00", which is read as one hundred (100). The target city is "Schweinfurt".
For our example we have an "Industry" type target in the target city of "Schweinfurt". Record the information on both the Mission Log Sheet and the Composite Mission Record if you are flying multiple missions.
Now, find "Schweinfurt" in the alphabetized Air Force Flight Log Gazetteer - Tables 2-8A (8th Air Force) and 2-8B (15th Air Force). The Gazetteer shows all the target locations by cross-indexing the target name on the left with the target zone number on the top. The last column entry for the target is its zone location.
Assume we are flying an 8th Air Force Mission from our base in England. Find Schweinfurt in Table 2-8A (for 8th Air Force Missions) in our example above for Schweinfurt, the last entries on the table is found in Zone 9. Place the Target Marker on the Strategic Movement Track in the Zone 9 space on the Battle Board. The Gazetteer will be further explained in later sections.
2.5 DETERMINING FORMATION POSITION FOR YOUR BOMBER
The lowest autonomous heavy bomber units operating in both the 8th and 15th Air Forces were the Bomber Groups. The Air Force chain of command was somewhat flexible with several bomber groups making up a Bomb Wing. Two or more Bomb Wings were assigned to an Air Division. The Air Divisions were assigned to the 8th or 15th Air Force.
Bomber Group composition varied during the war. Early in the war a bomb group consisted of three squadrons and fielded about 35 bombers plus a reserve. Later in the war the Bomber Groups received a fourth squadron and bomber strength rose to 48 bombers plus a reserve.
General Lemay's Combat Box formation shown on the Crew Placement Sheet is composed of 18 bombers. Generally the Bomber Group tried to send one to two of these combat boxes on a mission depending on bomber availability. Each squadron assigned to the Bomb Group contributed bombers to fill the three six-bomber cells in the combat box. The assumption for TARGET FOR TODAY will be that your bomber is flying in one of the Combat Boxes your bomb group has fielded for the current mission.
Your Bomb Group's Combat Box will be composed of three cells with six planes in each cell arranged in a high cell, a middle cell and a low cell. (See the Bomb Group formation area on the Crew Placement Sheet)
The Bomb Group Formation area on the Crew Placement Sheet shows an 18 bomber Combat Box from three different views to help the player visualize what the combat box formation looks like. There is the top view looking down into the formation from above. The front view of the Combat Box as would be seen by a German fighter attacking from 12 o'clock level comes next. The third view is of the Combat Box from the left side as would be seen by a German fighter attacking from 9 o'clock.
Note the grouping of the High, Middle and Low Cells in the Combat Box formation. Note that the Middle Cell contains bombers numbered 1 to 6. The High Cell contains bombers numbered 7 to 12 and the Low Cell contains bombers numbered 13 to 18.
"Tail End Charlie" bombers are numbers 11 and 18 because they are the easiest aircraft to attack.
Cell Leaders - Each cell has a leader. The Middle Cell Leader is bomber number 1 and is also the Bomb Group Mission Lead aircraft. The High Cell Leader is bomber number 7. The Low Cell Leader is Bomber number 13.
Roll 1D6 on Table 2-10A to determine your bomber's cell position within the Combat Box. It will be High Cell, Middle Cell or Low Cell. Note the cell result on your Mission Log Sheet.
The Middle Cell within the Combat Box receives a -1 dice roll modifier on Table 5-2 Number of German Fighter Waves, while the Low position receives a +1 dice roll modifier on the same table. There is no modifier for the High Cell. Note any modifiers in your Notes box on the Mission Log Sheet and you may wish to also note them in the notes boxes of each zone your bomber enters on the Zone Worksheet.
When the bomber is "out of formation" only, not "disrupted formation", (see section 4.7) both the Middle Cell and Low Cell die roll modifiers are zero (0).
Next you will determine your position within your six-plane cell that was determined on Table 2-10A.
Roll 2D6 on Table 2-10B and cross index the Cell rolled on Table 2-10A with dice roll for Bomber position in that cell. (See Bomber Group Combat Box Formation Diagram - Bombers are numbered 1-18, with 1-6 being in the Middle Cell,7-12 being in the High Cell and 13-18 being in the Low Cell.)

~ ~
If the result of your dice roll on Table 2-10B was Cell Leader (Bomber # 1, 7 or 13), add one Me 109 at 12 o'clock Level to attacking fighters for this position. (Do NOT add this fighter if the results of the roll on Tables 5-3A, B, or C is "None, or No Attacks")
If you were assigned to the High Cell on Table 2-10A and you rolled 11 or 12 on Table 2-10B your bomber is in the “Tail-end Charlie” position for the High Cell (Bomber #11). Add one Me 109 at 6 o'clock High to attacking fighters if you are assigned to this position. (Do NOT add this fighter if the results of the roll on Tables 5-3A, B, or C is "None, or No Attacks")
If you were assigned to the Low Cell on Table 2-10A and you rolled 11 or 12 on Table 2-10B your bomber is in the “Tail-end Charlie” position for the Low Cell (Bomber #18). Add one Me 109 at 6 o'clock Low to attacking fighters if you are assigned to this position. (Do NOT add this fighter if the results of the roll on Tables 5-3A, B, or C is "None, or No Attacks")
Check Table 2-10A and B Table Notes for other modifiers affecting bomber assignments in the Bomb group's combat box.
Add the dice roll modifiers and any extra fighter attacks to the Zone Work sheet and Mission Log Sheet if so desired.
2.5.1 (OPTIONAL RULE) EARLY BOMBING FORMATIONS
An early heavy bomber combat formation was used from September 1942 until General Curtis LeMay developed the "Javelin Down" Combat Box formation shown on the 1943 Crew Placement Sheet. (See Design Note below) The early formation can be found in optional rules section 10.2.
Design Note: After some early experimentation, a group combat formation was instituted in September 1942 based on a nine-plane line-abreast squadron organization. This formation consisted of a high squadron, with a lead squadron offset to the left and some 500 feet lower. While compact, flexibility suffered. Collision risks were higher with pilots unused to the rigors of formation flying (a specialized skill) and the fire from waist gunners was greatly restricted to reduce the risk of hitting neighboring friendly aircraft. Also, in the early missions, aircraft aborts due to mechanical failure were so common that the formations were often terribly disrupted before reaching the French coast.
In late 1942, Colonel Curtis LeMay, commander of the 305th
Bombardment Group (Heavy), designed the 18-aircraft “Javelin Down” formation, which stacked planes within an element and squadrons within a group downwards in the direction of the sun.
This aided gunners on the higher aircraft in seeing lower aircraft without being blinded by glare. In the front elevation the formation resembled a set of stairs, but in profile and plan resembled a spear point. Unlike earlier group formations in which the lead bomber had flown in the lowest position, it now was placed in the center of the formation vertically. The formation became the basis for the numerous variations of combat boxes that followed.
While harder to fly, demanding better pilots, each of these “high-lead-low” group combat formation variants offered two distinct advantages. First, the bomber gunners were able to fire in all directions unimpeded, or to concentrate fire on a single target if the need arose. Second, the bombing pattern was relatively compact, enabling more substantial damage to the target.
2.6 THE AIR FORCE FLIGHT LOG GAZETTEER
The Target Listings and Gazetteer Manual contain the lists of targets by Campaign (Tables 2-1 thru 2-7M), the Flight Log Gazetteer and the 8th & 15th AF Table of Organization. Examine the Flight Log Gazetteer, Table 2-8A (for 8th Air Force targets from England) and Table 2-8B (for 15th Air Force targets from Italy). Note that all target cities are listed in alphabetical order. The Gazetteer gives modifiers, country codes and shows if the zone is water or land for bailout or crash landings for each zone the bomber must travel thru to reach the target city.
NOTE: The zones in the Gazetteer run from 2 thru 15 as zone 1 is your airbase and is not listed in the table.
The last block containing data in the row of the assigned target city is the “Designated Target Zone.” Place the Target Marker on the Strategic Movement Track on that zone’s space on the Battle Board. Zones beyond the designated target zone will not be entered on this mission. Exception: See Optional Rule 10.13 Shuttle Missions
Next enter the information for each zone in the boxes on the Zone Worksheet. You can enter them all at once or get them from the Gazetteer as you move to each new zone box on the Zone Worksheet as you choose. The data found in each zone in the Gazetteer is in the format xx/yy.
The number to the left of the slash is the modification, if any, to the roll on Table 5-1 when determining the actual German Fighter Resistance in the zone.
The letter(s) to the right of the slash is a code identifying whether the zone is over water or land and its country affiliation:

~ ~
W = Water, A = Albania, Au = Austria, B = Belgium, Bu = Bulgaria, C = Corsica, Cz = Czechoslovakia, E=England, F = France; G = Germany, Gr = Greece, H = Hungary, I = Italy, L=Luxembourg, N=Netherlands, No=Norway, P=Poland, R = Rumania, S=Switzerland, U = Ukraine, Y = Yugoslavia.
This information comes into play when a bomber is forced down in a zone or the crew must bail out. Where a zone shows two code letters, the player has a choice of where to come down if the bomber is under control. If forced to land or bail out involuntarily in such a zone, roll 1D6: on a roll of “1-3” the first letter applies (i.e., water), on a roll of “4-6” the second letter applies (i.e., land).
Zones highlighted in gray on Table 2-8B are “Alps” mountain zones. Roll for weather conditions using Table 4-1A Weather over the Alps and apply the results in the zone.
Zone 1 on the Strategic Movement Track on the Battle Board is considered the bomber's air base. Zone 1 (not shown in the Gazetteer Tables) is automatically “NA / E” for Table 2-8A and “NA / I” for Table 2-8B.
The Flight Log Gazetteer uses Table 2-8C - Zone Control Chart to show the changes to zone allegiance as the war progressed and the Allies successfully took control of Axis occupied areas.
Before noting the target city's information in the zone boxes on the Mission Log Sheet, check Table 2-8C for modifications to the information. Find the campaign you are playing in the Campaign Column of Table 2-8C. Read to the right and the table will give any corrections to the zone information given in Tables 2-8A and 2-8B.
(Example; if you are playing Campaign 1, the Axis controls any zone with a -1,0, or +1 to the left of the "/" mark, while the Allies control any zone with an "NA" or a "-2" to the left of the "/" mark.
2.7 DETERMINING THE MISSION'S FIGHTER ESCORT
Table 2-13, is used to determine fighter escort for your bomber's current mission. Table 2-13 is broken down into sections for each of the six campaigns. Use the section that corresponds to your campaign number. As the war progressed the Allies were able to send fighter escort deeper and deeper into occupied Europe. Each campaign section of Table 2-13 shows a range of zones on the left side of the table.
Across the top is the level of coverage corresponding to those zones. Roll 1D10 for each of the zone ranges in the campaign section of the table. The die roll determines if the fighter escort coverage is Nonexistent, Poor, Fair or Good.
Example; you are playing Campaign #3. Your target is in zone 6. You roll once to determine the level of coverage for zones 2-5; you will roll a second time to determine the level of coverage in zones 6-10.
The die roll for zones 2-5 is 7. Cross-index from the 2-5 zone entry until you find "7" (falling between 7-10 in the Good Column). Fighter coverage is "Good" in zones 2-5. (Note: Column heading (None) is marked "N/A", so there will always be some level of coverage in the zone range 2-5.)
The second die roll for zones 6-10 is 3. Cross-index from the 6-10 zone entry and you find the fighter coverage is Poor. When your bomber's movement along the Strategic Movement Track is in zones 2-5 coverage is "Good" when it reaches zone 6 and beyond, coverage falls to "Poor".
Record the fighter escort coverage in the appropriate modifier boxes on each zone box affected on the Zone Worksheet. This value will be the column you will use on Table 5-4 when you roll to determine the number of German fighters driven off during their attack in each zone as the bomber moves to and from the target.
2.8 THE BOMBER'S CREW MEMBERS
There are many role playing aspects to TARGET FOR TODAY Crew members can be named and personal histories generated to suit the player's taste. Crew counters are provided and are placed in the designated boxes on the Crew Placement Sheet during setup. There are also optional crew member counters that can be used with some of the optional rules modules.
Crew Position Boxes with a place for the crew member's name are shown on the Mission Log Sheet and the Composite Mission Record. Record any wounds, frostbite, heroic deeds, etc., received by crew members in their status box next to the crew member's name on both forms.
Select the correct crewmen to man the bomber you selected to use and place them on the Crew Placement Sheet. Wound status counters are placed on the crew member's counter on the Crew Placement Sheet as directed.

~ ~
Typical B-17F and G models carried 10 man crews. Four officers (Pilot, Co-Pilot, Bombardier and Navigator) and 6 enlisted men (Engineer/Top Turret Gunner, Two Waist Gunners, Ball Turret gunner, Tail Gunner and Radio Operator) made up the crew. There was no nose gunner for the chin turret on the B-17G. It was operated by either the Bombardier or Navigator as were cheek guns.
Typically, the B24D Liberator carried a 10 man crew. Four officers (Pilot, Co-Pilot, Navigator and Bombardier) and six enlisted men ( Engineer/Top Turret Gunner, Radio operator, Two Waist Gunners, Ball Turret Gunner and Tail Gunner)
The B24J Model with the nose turret also carried a ten man crew. There were the following differences in the enlisted personnel's job duties. (Engineer/Top Turret Gunner, Radio operator/waist gunner, a second waist gunner, nose gunner, tail gunner and ball gunner). Place crew counters accordingly.
2.9 CREW PLACEMENT SHEET AND BATTLE BOARD
Place the fire extinguishers in their box next to the bomber on the Crew Placement Sheet. Place the appropriate turret gunnery markers nearby.
Place the large bomber counter in the middle of the Battle Board combat area.
Lastly, place the small bomber counter on the Strategic Movement Track in Zone 1 facing toward the Designated Target Zone number.
The mission is ready to begin.
3.0 STARTING THE MISSION
“Takeoff was routine by our standard, which measured any incident as routine that eluded disaster.”— John Muirhead, Those Who Fall
3.1 TAKE-OFF PROCEDURE
English weather can be hideous, while Italian weather is less so. Tables 3-1 Weather over The Base (Take-Off) and Table 3-2 Take-Off will determine whether your bomber and crew enjoy a safe start to their mission…or an emergency right away.
Consult Table 3-1- Weather over the Base (Take-Off), to determine the weather for takeoff. Note the weather (Wx) in the zone box you labeled "Zone 1" on the Zone Worksheet.
Modifiers on Table 3-1 can cause the die roll result to be "Mission Scrubbed". This is for the tour of duty player who is keeping track of the days in their tour. If your mission is scrubbed, mark off another day on your tour of duty calendar and roll again for better weather tomorrow, or disregard the result and consider the weather to be "POOR" and continue with the mission. The choice is yours.
Next, consult Table 3-2 Take-Off and roll 1D10 to determine your success. If you "crash" go to table 3-3 and determine the results of the crash. If there is a mid-air collision your six plane cell has taken two losses. The remaining four bombers in your cell fly in a "disrupted formation" for the remainder of the mission. (See section 4.7) Your bomber is moved to lead position with the associated die roll modifiers in the formation table and the adding of one enemy fighter attacking from 12 o'clock - Level as called for by Rule 2.5.)
If you take off successfully your bomber counter is now airborne over Zone 1. You have successfully assembled with your bomb group and you are ready to move into Zone 2 heading toward your target.
“The four throttle handles are pushed down as far as they can go. We’re at maximum power, the only time in the flight when such power is needed. The engine roar is deafening as we speed down the runway with 6,000 pounds of bombs and 11,000 pounds of high-octane gasoline. Any engine failure or pilot error now, and we turn into a greasy black fireball in the newsreels, a letter home… a statistic in a report.” - Sam Halpert, A Real Good War
4.0 SEQUENCE OF PLAY IN THE ZONES
“I am the bomber 17 — Proud machine — sleek and powerful,
Made by man to kill his foe, Made of steel and wood and metal, Built to fight and drop destruction.”
— Robert Cromwell, 'Skyward: A Ballad of the Bomber'
4.1 MOVEMENT
Each turn, move your BOMBER counter one Zone (square) closer along the Strategic Movement Track on the Battle Board to the Zone containing the target—or one Zone closer to the base when returning after bombing the target or aborting the mission prior to bombing.

~ ~
4.2 WEATHER IN THE ZONE
Determine the weather for the current zone entered and note it on the Zone Worksheet.
For normal zones, roll on Table 4-1 to determine the weather. Roll for weather each time the bomber enters a new zone, NOT each turn the bomber spends in a zone. The modifiers under Table 4-1 are cumulative. Note the modifiers for other tables.
If this is an Alps Mountain Zone (Marked in Gray on Table 2-8B - 15th Air Force Gazetteer), AND, 100% Cloud Cover was rolled on Table 4-1 then roll for additional weather results on Table 4-1A Weather over the Alps and follow the table notes.
4.3 CHECKING FOR MISSION RECALL
Check for mission recall on Table 4-2 Mission Recall. Many missions were recalled due to poor weather. You will ONLY roll on Table 4-2 if the weather result for the zone is "100% Cloud Cover" from Table 4-1. Roll 2D10 on Table 4-2 Mission Recall Table to see if your mission is recalled. Roll on Table 4-2 when entering any and all zones beginning with Zone 2 and prior to the Designated Target Zone (non-inclusive).
Do not roll on this Table if bomber is out-of-formation and the radio is not functioning or if returning to base.
4.4 CHECK FOR MECHANICAL FAILURE
While the B-17 and the B-24 were reliable aircraft, mass-produced engines, turbo-chargers, and other systems of the aircraft were subject to malfunction—often at very ill-timed moments. Upon reaching Zone 2, and each zone thereafter, roll two D10 dice on Table 4-3A. On a roll of “01-03” a possible random mechanical failure has occurred in your B-17 Bomber. On a roll of "01 to 05" a possible random mechanical malfunction has occurred in your B-24 Bomber. (A result of 06-100 is no mechanical problems) If a mechanical failure occurs, roll two D10 dice and consult Table 4-3B for the B-17 Bomber or Table 4-3C for the B-24 Bomber.
4.5 CONTRAILS
At certain altitudes and conditions, the exhaust of a bomber’s engines became visible to the naked eye. “Contrails” (as these came to be called) tended to attract enemy fighters and helped flak crew determine the bombers’ altitude. Accordingly upon reaching Zone 2, roll 1D10 on Table 4-4 to see if Contrails form. Record the formation of "contrails" in the appropriate box on the Zone Worksheet as each zone is entered. Roll for contrails in each zone.
4.6 ABORTING THE MISSION
“Nothing was shaping up right. Three of our planes had turned back with mechanical troubles. We were thirty-nine guns weaker…Two more peeled off and headed home. I found myself wishing that fighters would jump us early. An attack would be the only thing that would hold them; then the formation would be their refuge and they couldn’t leave.”
— John Muirhead, Those Who Fall
“Aborting a mission” means the bomber turns around and heads for home without bombing the target. Historically, the decision to abort was the pilot’s. “Mission Recall” (Table 4-2) can require an abort. Note that certain events on Table 4-3A, B or C can also require the player to abort the mission or give that option to the player. For game purposes, unless specifically required to abort, players having the option to abort may choose instead to continue the mission. However, in all cases, players may only abort (voluntarily or otherwise) after any and all combat in the zone has taken place (If applicable).
If aborting, begin the return flight to base by turning the bomber counter around on the Strategic Movement Track facing toward the track square labeled Zone 1 (Bomber's Base). If turning around (aborting), the bomber will spend another turn in the same Zone, (bombs may be jettisoned beforehand unless in Zone 1), and (if applicable) resolving combat again per the procedure in Section 5.0.
Aborted missions only count toward the required number of Campaign missions (see Table 2-1) if any of the following circumstances occur due to German fighter attacks or German flak:
a. Bomb bay doors, intercom, or Norden bombsight inoperable.
b. Compartment heat or suit heater inoperable for one or more crewmen.
c. Pilot, Co-Pilot, Bombardier, or Navigator seriously wounded or KIA.
d. One or more engines out (if two or more engines are out, the bomber must abort)
e. Oxygen out for one or more crewmen (and no alternative oxygen station exists. See Section 5.14 Loss of Oxygen and its effects)
f. Electrical system failure. g. If the bomber is forced “out of formation” for any
other reason. If the target has not been bombed when the bomber is forced to abort, the bombs may be jettisoned for safety (exception: You cannot jettison bombs in Zone 1).

~ ~
4.7 DISRUPTED FORMATIONS AND BEING OUT OF FORMATION
Tight formation flying by the heavy bombers allowed them to mass their fire against attacking enemy aircraft. The Germans attempted to break up the six-plane cell formations, disrupting their massed gunfire to make it easier to attack the bombers. Your bomber will be flying in a six-bomber cell. This six-bomber formation is described in Section 2.5. Your bomber is always considered to be “in formation” from the moment of take-off until landing unless the six-plane cell formation is disrupted or your bomber is forced to leave the formation because of damage or to keep crew members alive.
A six cell bomber formation may be "Temporarily Disrupted" when a result on the German Fighter Resistance Tables call for "Rockets or Bombs attacking the bomber" (See note "f" to tables 5-3 A, B and C) The bombers may return to normal formation in the first zone they are not again attacked by German fighters and if there is no losses to the six-cell bomber formation.
Add one Bf-109 fighter attacking from 12 o'clock Level to the fighters rolled for on Table 5-3A, B or C if your six-cell formation is "disrupted". This fighter always attacks the bomber, even if the other fighters are driven off. This fighter cannot be driven off by fighter escort.
NOTE: Your bomber can only be in one of three states. It is either "In formation" or "In DISRUPTED formation" or "Out of formation". Only ONE of the above modifiers will apply.
Always add one extra fighter per wave to the number of fighters attacking the bomber when the bomber is "out of formation" or "in disrupted formation". Do NOT add the extra fighter if there are no fighters attacking the bomber in the zone. (Use Tables 5-9 and 5-9A to generate the attack position for extra fighters called for by the rules when no information is give on the attacking fighter's attack position)
If your bomber is forced “out of formation” it is possible to later regain formation if all engines are fully functional and the bomber returns to formation altitude again. (Roll for any frostbite results for crew members if their suit heater units are out and the bomber returns to formation altitude- above 10,000 feet)
A roll on Table 4-8 is made to see if your bomber can rejoin the formation. Apply the die roll modifiers listed below the table. All die roll modifiers are cumulative.
The bomber will be considered out of formation and at formation altitude if it fails to regain the formation. However, in any situation where your bomber rejoins an existing formation, your bomber will be considered to be a "Tail-end Charlie" with all appropriate die roll and German fighter attack modifiers.
When out of formation the bomber still receives the same level of fighter escort in the zones that the mission received.
5.0 COMBAT
5.1 DETERMINING GERMAN FIGHTER RESISTANCE
German fighter resistance in any given zone depended upon several factors. The fighters had to find the bombers. Visibility in the zone played a key role. Cloud cover helped hide the bombers while contrails were visible from miles away and pointed right to the bomber's location. Friendly fighter escort also presented problems for the intercepting German fighters.
Roll on Table 5-1 German Fighter Resistance Levels in the zone to determine the resistance level. Cross-index the campaign you are playing with the die roll to get the resistance level. There are dice roll modifiers for various conditions that will affect the result. Record the resistance level on the Zone Worksheet. A result of “None” on Table 5-1 always means NO German fighters encountered this turn (do not roll on Tables 5-2 through 5-4 below).
Any Table 2-8A or B Table "Flight Log Gazetteer" Zone Marked with "NA" always means NO German fighters encountered this turn (do not roll on Tables 5-2 through 5-4 below).
5.2 DETERMINE THE NUMBER OF GERMAN FIGHTER WAVES ATTACKING THE BOMBER
Roll on Table 5-2 Number of German Fighter Waves to determine how many waves will attack the bomber this turn. There can be anywhere from 0 to 3 waves that will attack the bomber. Record the number of waves of attacking fighters in the appropriate box for that zone on the Zone Worksheet.
5.3 DETERMINE THE NUMBER AND ATTACK ANGLES OF GERMAN FIGHTERS IN EACH WAVE ATTACKING THE BOMBER
If you have at least one wave of German fighters attacking your bomber go to Table 5-3 A, B or C. Find the Table that has the campaign you are playing in the header.

~ ~
Then find the column with the resistance level for the zone that you just rolled for on Table 5-1. Roll 2D6 and cross index the die roll with the correct resistance level column. The result is the number and type of German fighters that will be attacking your bomber in this wave.
Table 5-3 gives the clock sector along with the High (H), Level (Lv) or Low (Lo) position of each attacking fighter. Lay out the fighter counters in the correct clock sections on the Battle Board.
Place the fighter counter in the correct High, Level or Low box as indicated by the result from Table 5-3. Be sure to add in any extra fighters called for by the bomber's position in the formation, etc., or any other rule requiring the addition of extra fighters.
Table notes for Tables 5-3A, B and C explain how to read the tables and what the abbreviations mean. There is also a list of table notes that refer to various optional rules that may be in play. Ignore them if you are not using the optional rules.
If a "Random Event or No Attack" result is rolled on Table 5-3A, B, or C. Roll 1D6 per the table notes to determine which option to take. Refer to Table 5-3D Random Events if that result is obtained.
5.3.1 RANDOM EVENTS TABLE
Table 5-3D Random Events is checked before entering the next zone. All events listed in the table take effect in the next zone after rolling for them in the current zone. Some events apply only for the next zone, some for the duration of the mission, while others can be carried over into future missions.
5.4 FRIENDLY FIGHTER ESCORTS
If the results of the roll on Table 5-2 are one, two, or three waves, roll on Table 5-4 to determine how many fighters in each wave are driven off by the fighter escort.
On Table 5-4, the column headers, POOR COVER, FAIR COVER and GOOD COVER are determined from Table 2-13's die roll made earlier. Do not roll on Table 5-4 if there was a "No fighter Escort" result rolled on Table 2-13.
Table 5-4 shows the number of German fighters that are driven off by the fighter escorts.
The player removes the number of German fighters called for by the results of the die roll from the fighters laid out on the Battle Board.
In each column, the first number is the number of attacking fighters driven off in the first wave. The number in parentheses is the number of attacking fighters driven off in each of the successive waves called for by Table 5-2.
It is the player's choice which German fighters are removed from each wave keeping in mind that some fighters because of position or type cannot be driven off by the escorts. After removing the fighters drive off by the escorts, the remainder of the fighters attacks the bomber.
German Jet fighters may NOT be removed by Escort Fighters. (See German Jet rules)
Vertical Dive attacking fighters may NOT be driven off by the Fighter Escorts.
Out of Formation Bombers receive the same level of fighter escort as the mission formation bombers receive.
5.5 THE BOMBER'S DEFENSIVE FIRE
The bomber fires first in all combat rounds. All results against the fighters are assessed before any German fighter combat against the bomber takes place.
Table 5-5 Defensive Fire Allocation shows the fields of fire of all guns and turrets on the B-17 and B-24 bombers. The player decides what guns and turrets the bomber will fire against each attacking fighter. Guns and turrets on the bomber may not fire outside of their field of fire sectors shown on Table 5-5.
The player must now decide which of his bomber's guns and turrets are firing at what German fighters. The gun or turret must be able to fire into the sector containing the fighter per Table 5-5.
More than one gun or turret can be targeted at the same fighter.
The gun or turret must be operational to fire on the fighter.
Not all fighters' need be targeted. The player can fire at as many or as few fighters as he wishes.
Guns and turrets can only fire once during each round of combat that occurs during the wave.
Place a marker for each of the bomber's guns and turrets firing in the current combat round next to the fighter. Once allocated the fire marker must fire in that round and may not be reallocated if the fighter is shot down prior to the gun/turret firing.

~ ~
Assign any hit damage to the fighter before moving on to the next combat.
If multiple guns fire at the same fighter and a Kill result is obtained during the course of that combat, then the credit for the kill is shared between the guns firing on the fighter.
Example: If the top turret and the left waist gun are firing at an attacking fighter from the 9 o'clock high position and the fighter is destroyed after both guns have fired on the target then each gun would receive credit for 1/2 of a Kill. If three guns were firing then each would get 1/3 kill credit.
5.5.1 DETERMINE ACE OR GREEN STATUS FOR GERMAN FIGHTERS
After targeting the bomber's guns but before resolving combat roll once on Table 5-5A to determine the experience level of each German fighter pilot attacking the bomber.
If the pilot is Green there is a -1 die roll modifier to hit bomber. A +1 die roll modifier for the bomber gunners to hit the fighter and a +1 die roll modifier on the Collision Table 5-16.
If the pilot is an Ace there is a +1 die roll modifier to hit the bomber. A -1 die roll modifier to hit the fighter and a -1 die roll modifier to the Collision Table 5-16.
Place the Ace or Green counters next to their respective fighters. Determine Ace or Green Status after the player places his fire markers from his bomber's guns but before resolving the bomber's defensive fire.
5.5.2 BOMBER GUNS/TURRETS - SPECIAL CONSIDERATIONS
Some bomber guns/turrets have special considerations.
Nose Section Guns - Both B-24D and the B-17F heavy bomber types had limited nose compartment space; only two crewmen may be in the nose section of either model. There are three guns in this section, the Nose Gun, the Right Cheek, and the Left Cheek Guns. A maximum of two of these three guns may be fired at the same time, including the Nose and either one of the cheek guns. The two cheek guns may not be fired simultaneously.
Tail Guns Passing Shot - German fighters quickly learned that it was very dangerous to approach either a B-17 or a B-24 Heavy Bomber from the rear, as this put them within range of the twin guns for a relatively long period of time.
When attacks from the rear dropped off, tail gunners developed a new technique: shooting at fighters attacking from the front as they passed the rear of the bomber.
Accordingly, the Tail Guns may be allocated to any fighter attacking from the 10:30, 12, or 1:30 positions, whether High, Level, or Low. However, this defensive fire is not resolved until after all other defensive fire and all German offensive fire is resolved. Thus the target fighter could be shot down, or the Tail Guns themselves be knocked out, before the Tail Guns get a chance to fire.
Procedure - After the fighter has fired at the bomber but BEFORE going to the next combat round move the fighter counter to the 6 o'clock fire sector facing away from the bomber. The fighter will exit either 6 o'clock High or 6 o'clock Low. (Player determines randomly)
Tail Guns fire Passing Shots using Table 5-6.
Tail Guns may not fire Passing Shots if the intercom is out and/or the Tail Guns are jammed or damaged.
Tail Guns may only fire once per round of combat. If tail guns fired in their regular combat phase they may NOT fire Passing Shots.
Tail guns may not use spray fire on passing shots.
No ammunition is marked off unless the Tail Guns actually shoot.
Ace Gunners - Once a gunner has shot down 5 or more fighters in his career, he is an Ace Gunner and may add +1 to his defensive fire rolls. Ace Gunners lose this bonus when frostbitten and when wounded. The bonus is retained if the intercom is knocked out. A gunner becomes an Ace at the instant of his 5th kill, and the bonus takes effect with his next defensive fire.
AREA SPRAY FIRE (Optional Rule) - Area Spray Fire represents the "hosing" of an area with a long burst of an un-aimed spray of bullets. Although usually ineffec-tive as far as hits were concerned, it could drive off an attacking fighter because of the numerous tracer rounds filling the sky in front of the fighter. Area Spray fire was not a favored tactic because it quickly burned up ammunition. However if you are flying the YB-40 Gunship Escort Model with its large ammunition
capacity it might be a favorable tactic. Mark off three bursts of ammunition rather than the normal one burst each time a gun position or turret uses Spray Fire.

~ ~
Area Spray Fire could also jam a gun because of the long burst that could cause overheating. Roll on Table 5-6A rather than Table 5-6 to determine results of Spray fire.
Area Spray Fire is an optional rule which players may include for additional interest. Place an Area Spray Fire marker on top of any gun marker that will use spray fire during the Defensive Fire Phase.
Ace Gunners employing Area Spray Fire do not add 1 to their die roll.
5.5.3 BOMBER DEFENSIVE FIRE PROCEDURE
After each gun's target marker has been placed on an attacking fighter, mark off one ammunition box on the Mission Log Sheet. The ammunition available for each machine gun or turret position is shown on the Mission Log Sheet by a box next to the gun position. . Each box represents a single "burst" of fire. When all the boxes are checked off the gun or turret is out of ammunition.
Ammunition may be shifted from one gun firing position to another. As the bomber enters a zone, any crewman my leave his station, move to any gun position/turret with ammunition available and move some or all of that gun/turret's remaining ammunition to a gun position/turret that is out of ammunition. The crewman may NOT fire a gun or perform any other duties like fire fighting while so engaged in the current zone. After the player designates the crewman to perform the transfer he simply crosses off however many boxes of ammunition that the crewman is moving from the gun position/turret with ammunition and erases an equal number of boxes on the gun position/turret that is out of ammunition.
After placing all the bomber gun target counters and the German fighter pilot's ace or green status markers, the player rolls on Table 5-6 Bomber Defensive Fire Resolution for each turret or gun to determine if a hit is obtained on the fighter.
There are notes for Table 5-6 that explain gun jams and an extensive list of die roll modifiers for the table that are cumulative.
If a hit was obtained on Table 5-6, roll for damage to the attacking fighter on Table 5-7 Hit Damage against German Fighters. The possible results are:
FCAB = Fighter continues this attack, then breaks off after the attack even if a hit was obtained on Table 5-8 - German Offensive Fire. It will only attack once no matter how many re-attacks are listed on its Fighter counter. There is no die roll modifier on Table 5-8 German Offensive Fire.
FCA = Fighter damaged but continues attack, –1 die roll modifier on Table 5-8 during the German fighter attack phase. FCA results accumulate on one fighter: 2 FCA results = -2 modifier on Table 5-8; 3 FCA results = fighter Destroyed and may not fire on B-17/B-24.
FBOA = Fighter damaged and breaks off after this attack, even if a hit was obtained on Table 5-8 German Offensive Fire. A –2 die roll modifier is used on Table 5-8 for the current attack. The fighter may not attack again. If the fighter already has one or more FCA results, the fighter is destroyed at the conclusion of the attack.
Destroyed = Fighter is destroyed and may not fire at B-17/B-24.
A MISS result on Table 5-8 ends that fighter's attack at the point it is rolled and the fighter cannot attack again. Remove the fighter counter from the Battle Board.
Detailed German Fighter Damage (Optional Rule)
For those players desiring a more detailed game experience refer to Tables 5-7A and B for detailing damage to attacking German fighters after rolling on Table 5-7.
5.5.4 ATTACK WAVES AND COMBAT ROUNDS DEFINED
Each wave of German fighters can have up to three combat rounds per wave. The number of rounds of combat in each wave is determined by the attacking fighter's attack value. The attack value is shown on each fighter counter and is the number of times it can attack during the wave.
The attack value is affected by damage to the fighter and whether the bomber is able to drive off the fighter in any particular combat round.
The attack value shown on the fighter counter is merely the maximum number of attacks that the fighter can make if it scores a HIT result each time the fighter rolls on Table 5-8.
The sequence of combat in the wave is as follows;
All fighter combats are resolved in the first round of the first wave.
Any surviving fighters eligible for a second round of combat re-attack and are placed back on the Battle Board. The player rolls for each fighter on Table 5-9 and 5-9A to determine the new attacking sector and level.
The player now reallocates his bomber's gun and turret target counters per the bomber defensive fire rules. The bomber then fires on the fighters attacking in the second round of combat of the first wave.

~ ~
The fighter's ace or green status remains the same as it was in the first round of combat.
Any fighters eligible for a third round of combat again re-attack. Determine their setup positions from Tables 5-9 and 5-9A just as was done in the second round of combat. The bomber fires on the fighters attacking in the third round of combat of the first wave just as it did in the first and second rounds of combat.
Combat ends for the first wave of attacking fighters.
The second wave of attacking fighters begins their first round of combat. Follow the same setup procedure as in the first wave. The Bomber fires on the fighters attacking in the first round of combat of the second wave.
Continue in this manner until all waves called for by Table 5-2 have attacked and been fired upon by the bomber. Combat then ends for this zone.
The bomber can fire all turrets/guns eligible to fire at attacking fighters in each of the 3 possible rounds of combat per wave.
The bomber can fire each of its eligible guns at attacking fighters in every wave called for by Table 5-2. Whether the turret/gun fired in a previous round of combat or wave does not matter.
5.5.5 FIGHTERS ELIGIBLE FOR A SUCCESSIVE ROUND OF COMBAT
Fighters eligible for a Successive Round Attack - Any fighter that received a MISS result from the bomber's defensive fire on Table 5-6 or any fighter that received an FCA result on Table 5-7 AND rolls a HIT on Table 5-8 during the current combat round, is eligible to re-attack the bomber in the next combat round up to the number of times shown for the attack value on the fighter counter.
The fighter must comply with the table notes for any damage received after each round of attacks. Any FCA hits received by the fighter are carried forward into the next successive combat round.
Three FCA results means the fighter is destroyed. (See Table 5-7 Note b)
Example; if the fighter counter has an attack value of 3, then it can attack in each of the three combat rounds in its attack wave. If the fighter receives a FCAB result on Table 5-7 in the second round of combat then it will complete the second round of combat and then break off its attack - no third round combat attack is allowed.
If the same fighter receives an FCA result in the first combat round it would use -1 die roll modifier when rolling on Table 5-8. In the second combat round the same fighter receives another FCA result it would use -2 die roll modifier on Table 5-8 for this attack. It would use -2 die roll modifier on Table 5-8 if it received two FCA results in a single combat round as well.
The fighter would be eliminated and removed from the Battle Board at the point it received its third FCA result.
For the same fighter, if it receives an FCAB or a FBOA result in any combat round then that will end its attacks after completing the current attack.
FCAB and FBOA results have different die roll modifiers for German Offensive fire on Table 5-8
Any attacking fighter making a Vertical Climb or Vertical Dive attack may NOT make ANY successive round attacks no matter what its attack value is. In order to attack in a successive round the fighter must attack from High, Level or Low in one of the clock positions; (12, 1:30, 3, 6, 9, or 10:30) to be eligible to attack in a successive round and it must have rolled a Hit in the previous round on Table 5-8.
NOTE: After completing all combats in each of the three combat rounds of the first wave, the player then repeats the same combat procedure for the second wave. After completing the three combat rounds for the second wave the player will complete the combat procedure again for the third wave.
Each following wave attack starts with a new selection of German fighters in Table 5-3 and proceeds through the wave combat round attack sequence.
5.6 GERMAN OFFENSIVE FIRE PROCEDURE -RESOLVING HITS ON THE BOMBER
During offensive fire, each German Fighter that scores a hit on Table 5-8 against the bomber rolls 2D6 on Table 5-10. Cross index the die roll against the attacking fighter's clock section to determine the number of shell hits on the bomber.
Check table 5-11 for the Hit Effect Multiplier. Cross index the attacking fighter type in the campaign number that you are playing with a 1D6 roll to determine any hit multiplier.
Multiply the number of hits rolled on Table 5-10 by the resulting hit multiplier from Table 5-11. This result is the number of shell hits on the bomber.

~ ~
5.7 DETERMINING BOMBER DAMAGE
Finding the bomber damage tables:
If you are flying a B-17 F or G Model bomber use the Area Damage Tables, Table 5-12 and Table 5-13 found in the Pilot's Flight Operating Instructions Manual to resolve the damage to your bomber.
If you are using the optional rules YB-40 Gunship Model Bomber you will find its Area Damage Tables in the Pilot's Manual for the B-17 F & G Model Bombers.
If you are flying a B-24 D or J Model bomber use the Area Damage Tables, Table 5-14 and Table 5-15 to resolve the damage to your bomber. These Tables are found in the Pilot's Flight Operating Instructions Manual for the B-24 D & J Model Bombers.
Resolving damage to the bomber
Select the appropriate clock sector and elevation (High, Level or Low) that the attacking fighter is firing from for the appropriate bomber type (on either Table 5-12 or Table 5-14). Then roll 2D12 and cross index the result with the appropriate column to determine the area hit by the attacking fighter. Roll once for each shell hit. (Note that Walking Hits negate any other hits rolled by the fighter.)
After rolling on the appropriate Area Damage Table go to Table 5-13 for the B-17 models or Table 5-15 for the B-24 Models. These tables show the different sections of the bomber and the effects of a hit on them.
Table 5-13 is a series of sub-tables labeled A-1 to A-8 for the B-17 F and G model bombers, while Table 5-15 sub-tables are labeled B-1 to B-8 for the B-24 D and J model bombers.
Note that there are separate tables for the B-24D and B-24J's Nose, Flight Deck - Pilot/Co-Pilot Compartment and Flight Deck - Top Turret/ Radio room as there were significant differences in the two bomber layouts.
(Example: Suppose you are flying the B-24 J model bomber. The J model has the nose turret and its nose damage table is marked "NOSE/B-24J" rather than the table marked "NOSE/B-24D")
Table 5-13 for the B-17F and G Models: Nose (A-1) Pilot Compartment (A-2) Bomb Bay (A-3) Radio Room (A-4) Waist (A-5) Tail (A-6) Wings (A-7) Instruments (A-8)
Note: Instruments do not show up as a section in the area damage tables for the B-17F and G Model bombers. Instrument damage comes from hits to other compartments of the bomber. You are referred to the Instrument Tables from die roll results in other compartments.
Table 5-15 for the B-24D and J Models: Nose (B-1)* Flight Deck - Pilot/Co-Pilot Compartment (B-2)* Flight Deck - Top Turret/Radio Room (B-3)* Bomb Bay (B-4) Waist (B-5) Tail (B-6) Wings (B-7) Instruments (B-8)
* - There are separate Nose, Flight Deck - Pilot/Co-Pilot Compartment and Flight Deck - Top Turret/Radio Room tables for the B-24D and the B-24J models.
Note: Instruments do not show up as a section in the area damage tables for the B-24D and J Model bombers. Instrument damage comes from hits to other compartments of the bomber. You are referred to the Instrument Tables from die roll results in other compartments.
After locating the correct area that the shell hit (from Table 5-12 or Table 5-14 depending upon the bomber type and model you are flying) roll 2D6 on Table 5-13 (for the B-17 bomber types) or Table 5-15 (for the B-24 bomber types) to determine the effects of the damage.
Record the damage/effects of the shell hit in the "Damage Notes" section on the Mission Log Sheet and follow any instructions given.
Roll once for each shell hit scored by the attacking fighter unless directed otherwise by the table notes.
Continue the process until all fighters in each wave have resolved their attacks and all shell damage has been recorded for the bomber.

~ ~
5.8 MID-AIR COLLISIONS
After resolving the effects of the fighter's offensive fire, roll 2D6 on Table 5-16 to determine whether the attacking fighter pilot presses his attack close enough to possibly (either intentionally or inadvertently) cause a collision with the bomber.
Add +1 to the die roll if the attacking fighter is a Ju-88 C-6 or a Me-110, Me-210 or Me-410.
Subtract (-1) for each action if the attacking fighter did not score any hits on the bomber or if the bomber took “Evasive Action” during combat, (see Section 5.9)
If the results are <2-10, there is no threat of collision and the fighter can re-attack if eligible to do so. A die roll of 11-12, means a possible collision. Roll 1D6: 1-5, fighter misses, no collision, this fighter cannot make anymore re-attacks. 6, fighter collides with bomber.
If the fighter collides with the bomber, roll once on Table 5-12 or 5-14 depending upon the type of bomber you are flying. (Found in their respective bomber's Pilot's Flight Operating Information Manuals)
Look under the appropriate clock position of the attacking fighter to determine the section of the bomber hit by the fighter. If the result is “Superficial Damage”, the fighter misses, there is no collision. Any other non-compartment result should just be re-rolled by the player.
Once the section hit by the fighter is determined, the result of collision is the same as “Flak Burst Inside Plane” (BIP), see Section 6.5 for the applicable compartment/section hit.
5.9 EVASIVE ACTION
“Evasive Action” represents the dips, dives, banks, and weaves that a pilot could put his bomber through in an attempt to dodge enemy fighter attacks. Flying like this necessarily threw off the aim of the bomber's gunners, and wasn’t possible if the bomber was heavily damaged. Due to the proximity of friendly planes and the danger of collision, bomber's flying in formation may not use “Evasive Action.”
“Evasive Action” is only allowed for bombers flying “Out of Formation” or in a "Disrupted Formation".
Bomber defensive fire Table 5-6 and German offensive fire Table 5-8, have a -1 die roll modifier if the bomber is taking Evasive Action.
If the bomber is out of formation and bombing the target there is a -2 die roll modifier on Table 6-6 Bomb Run.
No “Evasive Action” is allowed if:
The bomber is in formation.
Two or more engines are out.
Electrical system is out.
Anyone other than the Pilot or Copilot is flying the plane. (See Tables 7-1 and 7-2)
Any damage previously received that specifically prohibits “Evasive Action.
5.10 ENGINES OUT
Both the B-17 and the B-24 bomber design had four engines. Crews found that the plane could continue to fly, even with only one engine still functioning. However, each successive loss of another engine meant new problems and more danger.
ONE ENGINE OUT - With one engine out, both bomber types can only stay in formation if they jettison their bomb load immediately. If either bomber is already in the Target Zone when the engine is knocked out, it may bomb the target and still remain in formation. Otherwise, if the bomber decides to keep its bomb load aboard and continues to the target with one engine out, it is Out of Formation and subject to all of the additional hazards of being Out of Formation.
The bomber must spend 2 turns in each zone (while it still has its bombs) due to slowness caused by the weight of the bombs. The bomber must therefore roll for waves of German fighters twice per zone on Table 5-2. Complete the full combat procedure for the first turn in the zone and then complete the full combat procedure for the second turn in that same zone.
Do not check for weather, contrails, mission recall or mechanical failure again for this second turn in the same zone.
Once the bomber has dropped its bombs, it may continue its mission at the normal rate of speed of 1 turn per zone.
TWO OR THREE ENGINES OUT - The Bomber must jettison its bombs, drop from formation, and spend 2 turns in each zone due to slowing down. Roll for waves of German fighters twice per zone on Table 5-2. Complete the full combat procedure for the first turn in the zone and then complete the full combat procedure for the second turn in that same zone.
Do not check for weather, contrails, mission recall or mechanical failure again for this second turn in the same zone.

~ ~
The Bomber must also drop to 10,000 feet and is subject to Light Flak if over land. Roll on the Light Flak column of Table 6-3. (See Table 6-3 and Section 6.4)
When a Bomber has two or more engines out, attacking fighters add (+1) to their German Offensive Fire die rolls on Table 5-8. The B-17 may not take Evasive Action.
ONE ENGINE OPERATING - If the bomber has only one engine operating, it may go one zone further, then it must either crash land, or the crew must bail out. (See Tables 7-1, 7-2 and 7-3)
However, the crew may throw overboard all bombs, guns, ammo, and fire extinguishers, and fly 2 zones past the zone in which the third engine was lost. When landing with only one engine, subtract -3 from the landing roll on Tables 7-1 and 7-2.
NO ENGINES OPERATING - The Bomber must either crash land in its present zone on either Tables 7-1 and 7-2 (find this zone in the Flight Log Gazetteer to determine if the Bomber is over land or water, or if you have a choice), or the crew must bail out on Table 7-3 or 7-4. Once the last engine is out, the player must immediately choose either to attempt the crash landing or bail out. If crash landing with all engines out, landing die roll is -7 on Tables 7-1 and 7-2.
5.11 WOUNDED CREWMEN
Roll for Crew Wounds on Table 5-17 to determine the status of a wounded crewman. Place the correct wound counter with the crewman on the Crew Placement Sheet and note the crewman's wounds in the status box next to his name on the Mission Log Sheet. Record wounds on the Composite Mission Record Sheet if you are playing a Tour of Duty campaign Table. Table 5-17's Table Notes show the effect of multiple wounds.
Roll on Table 5-17 under note b) to determine if wounded crewmen may fly the next mission. Note the results on the Composite Mission Record at the end of the mission.
Whenever a crew member is Wounded or Killed In Action (KIA), place the correct counter type in his Crew Box on the Crew Placement Sheet.
When a crew member is seriously wounded or KIA, he can no longer fire any guns or perform any other functions. However, another crew member may take over his position. Simply take the counter of the crew member taking over and place it in the position vacated by the wounded man.
Remove KIA crewmen from the Crew Placement Board. (They are assumed to have been placed in an out of the way section of the plane.) Wounded men must be placed where they have a source of heat and oxygen.
5.11.1 (OPTIONAL RULE) DETAILED WOUNDS
For the player who wants a more detailed experience for his crewmembers, detailed wound tables are provided.
For each wound rolled for on Table 5-17, find the result on the appropriate Detailed Wound Table (Tables 5-17A, B and C). Continue rolling on the appropriate table for additional details on the specific wound.
5.11.2 CREW MOVEMENT
During turns when no waves of attacking fighters appear, or after all fighters are driven off by either friendly fighter cover or other Bombers (by rolling a "No Attackers" result on Table 5-3), crew movements are made with no penalty. These safe turns are the only time crew movements may be made if the intercom system is out.
If crew movements are made in a zone where the Bomber is attacked, certain penalties accrue. The moving crew members may not fire any guns from either their old or new position, until the attacks (both initial and successive) of one wave of fighters have been resolved. Crew movements can be made within the same compartment with no penalty. For example, the Waist Gunners can switch guns during an attack. The navigator or bombardier may switch freely between the nose gun and either cheek gun or between cheek guns.
There is no penalty for moving a wounded crewman.
5.11.3 CREW REPLACEMENT EFFECTS
A crew member now occupying another wounded man's position on the Crew Placement Board assumes any wounds/damage taken by the position while he occupies it.
For example, if the Navigator moves up to the Bombardier's position to replace a seriously wounded Bombardier, any damage from shell hits that would normally affect or wound the Bombardier now affect the Navigator. Conversely, the bombardier who was moved to the navigator's position will now take any wounds/damage called for against the navigator from the damage tables.

~ ~
5.11.4 WOUNDED OR KILLED PILOT OR CO-PILOT
Any crew member may fly the Bomber if the Pilot and Copilot are both seriously wounded or KIA, but the first one to take over flying must be the Engineer (someone else may take over the Top Turret if tactically desirable). If the Engineer is subsequently or already seriously wounded or KIA, then anyone else may take over, with appropriate modifiers to the landing (See Table 7-1 and 7-2).
Only during an emergency can a single man fly the bomber for an extended length of time. Therefore, the Pilot and Co-pilot may not leave their positions to fire guns. If both are still functioning with no worse than a light wound, the Co-pilot may temporarily vacate his post to fight an oxygen fire. Otherwise, the Pilot and Co-pilot must stay in their normal positions.
5.12 HEAT OUT AND FROSTBITE
The bombers normally flew above 20,000 feet where air temperatures dropped well below freezing. Crew members wore electrically heated suits that plugged into the bombers electrical system to ward off the cold. Damage to the bomber or a system malfunction could cause a crew member's suit heater to fail. To keep the crew member from being injured from frostbite the bomber can descend below 10,000 feet where the air is warmer. The bomber can travel one more zone at mission altitude (20,000 feet) before frostbite sets in.
Each zone thereafter that the bomber stays in formation and at mission altitude the player will roll on Table 5-18 "Frostbite" to check for the extent of injury to that crew member. Check the dice roll modifiers below Table 5-18. All die roll modifiers are cumulative.
Roll for each affected crew member. Record any frostbite result in the status box next to the crewman's name on the Mission Log Sheet and also on the Composite Mission Record. Place a frostbite counter with the crewman on the Crew Placement Sheet.
When the bomber descends to 10,000 feet, no longer roll on Table 5-18. After descending to 10,000 feet, the bomber will be "out of Formation" with all that that implies.
After landing, roll 1D6 for each frostbitten crewman. On a roll of 1-3 the crewman recovers and can fly the next mission. On a roll of 4-6 the frostbite is severe and the crewman is invalided home. (Apply appropriate die roll modifiers below Table 5-18 to the die roll) Record the results on the Composite Mission Record.
Then, select a new crewman for the next mission. (See Table 5-18 Notes)
A (-1) die roll modifier on the Table 5-6 on the Bomber Defensive Fire table apply if the frostbitten crewman is firing a gun/turret.
Crewmen who have severe frostbite may not operate a gun.
For the player who wants a more detailed experience for his crewmembers. Detailed frostbite tables are provided.
(See Table 5-18A.)
5.13 OXYGEN FIRES
Oxygen fires in the crew sections can result from shell hit damage to the bomber. When a fire occurs place a fire marker in the designated compartment. Record the fire location on the Mission Log Sheet.
When an oxygen fire occurs the closest crew member immediately stops what he is doing, moves to the compartment with the fire and attempts to put it out. There is no movement penalty to do this and he moves as soon as the fire starts no matter where the player is in the combat phase. The crewman is assumed to pick up a fire extinguisher on his way to the fire.
Each extinguisher is represented by an individual counter placed on the Crew Placement Chart. Each may be sprayed once and then it’s empty. A crewman may immediately attempt 3 times (depending on the availability of unused fire extinguishers) to put out a fire. Roll once on Table 5-19 for each attempt to extinguish the fire.
Used extinguishers are removed from play.
If the fire is not out after the 3rd try (or when all available extinguishers are exhausted), the crew must immediately bailout using Table 7-3.
A crewman may not operate a gun during an attack in which he is fighting a fire.
There are 5 portable fire extinguishers in the B-17.
There are 3 portable fire extinguishers in the B-24D.
There is 1 portable fire extinguisher in the B-24J.
5.14 LOSS OF OXYGEN AND ITS EFFECTS
Bomber crews went on oxygen above 10,000 feet because of the thin atmosphere. Each crew station had an oxygen supply connection that the crewman plugged his oxygen mask into.

~ ~
Crew members used small portable oxygen bottles to move between stations when the bomber was at high altitude. Crew members quickly lost consciousness if their oxygen was interrupted. The oxygen system was also a potential fire hazard.
To keep the crew member who lost his oxygen alive the bomber must drop out of formation and descend to 10,000 feet.
If the oxygen is knocked out in a particular section that crew member can move to a vacant oxygen supply connection in another section if one is available.
Example: A gunner is killed in the waist gun position. His oxygen connection point is vacant. The radio operator's compartment takes a shell hit knocking out the radio room oxygen. The radio operator can move to the waist gunner's position and suffer no ill effects from lack of oxygen. The bomber would not have to descend to 10,000 feet.
After descending to 10,000 feet, if the bomber has additional crew members killed and enough oxygen connection points become available for the surviving crew members the bomber may again climb to mission altitude (above 20,000 feet).
When the bomber is flying at 10,000 feet it can be targeted by random flak gun positions that it may pass over. When the bomber enters a zone while flying at 10,000 feet, roll three times on Table 6-3's Light Flak column. If a hit is obtained complete the flak cycle and record the hits on the Mission Log Sheet.
After completing all combat in the zone and recording damage to your bomber and crew move your bomber to the next zone.
6.0. IN THE TARGET ZONE
6.1 DETERMINE TARGET ZONE WEATHER
Roll on Table 4-1 to determine the weather in the Target Zone just as you did for each preceding zone. A result of:
Clear Conditions - causes -1 die roll modifiers when rolling for target visibility on Table 6-1
Haze - causes no modifiers.
50% Cloud Cover - causes +1 die roll modifiers when rolling for target visibility on Table 6-1. (No die roll modifiers to either table if a "Mickey" radar equipped bomber is with the bomb group's combat box)
100% Cloud Cover - causes +2 die roll modifiers when rolling for target visibility on Table 6-1. (No die roll modifiers to either table if a "Mickey" radar equipped bomber is with the bomb group's combat box)
If Contrails form (see Table 4-4) there is a +1 die roll when rolling for flak over the target.
Record the Target Zone weather on the Zone Worksheet.
6.2 DETERMINE THE TARGET VISIBLITY
Regardless of the weather at altitude, bomber crews often found their targets obscured from visual observation by cloud cover and/or smoke below. (Of course, visibility worked both ways—if the Bomber had trouble seeing the ground then so did antiaircraft gunners seeing the bomber!)
After resolving all fighter combat in the Designated Target Zone, roll one die on Table 6-1. The table result will be die roll modifiers on Table 6-2 FLAK and Table 6-6 Bomb Run. Use the Zone Worksheet to record the results.
6.3 GERMAN FIGHTER ATTACKS
Complete the German fighter attack sequence and bomber defensive fire as outlined in Section 5.0 just as you would for any other zone.
6.3.1 (OPTIONAL RULE) THE MISSION LEAD BOMBER.
Perform a second German fighter attack in the sequence of play if you are using the optional Lead Crew - Navigator rules. This is done for the bombers that elect to "go around" if they are "Off Course" entering the target zone (See Section 10.7.2)
6.4 ANTI-AIRCRAFT FIRE (FLAK) ON THE BOMB RUN.
The word FLAK comes from the German word fliegerabwehrkanonen, meaning flieger (or flyer in English) + abwehr (or defense) + kanonen (or cannons, as in antiaircraft guns). Most potential bombing targets of any value were protected by batteries of flak guns. When bombers were nearing the target, they had to fly straight and level for several minutes to maximize their accuracy. During these minutes, the bombers were most vulnerable to aimed fire and barrages from the flak guns below. Most flak damage consisted of near misses which could do some internal damage or throw off the Bomber's aim.
After determining target visibility and completing fighter combat against the bomber, the player checks for anti-aircraft fire (Flak) on the bomb run.

~ ~
To determine the level of anti-aircraft fire the bomber receives on the bomb run to the target roll 1D6 on Table 6-2. Record the result on the Zone Worksheet.
After determining level of flak, cross-index the result with a roll of 2D6 on Table 6-3 to determine any hit made on the bomber. Roll three times on Table 6-3 to see if the Bomber is hit. Exception: NO roll on Table 6-3 is made if the result from Table 6-2 was “No Flak.”
For each hit recorded from Table 6-3, roll on Table 6-4 to determine the number of shell hits on the Bomber.
For each shell hit, roll once on Table 6-5 to determine the section of the Bomber hit. Record sections hit on the Mission Log Sheet.
After finding the area hit by each flak shell hit, go to tables 15-13, Sub-Tables A1 thru A8 or Table 15-15, sub-tables B1 thru B8 depending on the bomber type you are flying to determine the damage done. The tables are found in the Pilot's Flight Operating Instructions Manual for your bomber. Roll 2D6 on the appropriate table for section rolled on Table 6-5. Record all damage and any effects of the damage on the Mission Log Sheet.
6.5 FLAK BURSTS INSIDE PLANE (BIP)
Occasionally, a flak shell would actually explode inside the plane, generally with catastrophic consequences.
BIP Effects - When a BIP result is rolled on Flak Shell Hits table (Table 6-4), it has the following effects:
All crewmen in this compartment are KIA.
If the area hit is a Wing, the Tail, or the Pilot Compartment, the Bomber dives out of control to the ground and the remaining crewmen immediately bailout according to Table 7-4, the Uncontrolled Bailout table.
If the Bomb Bay is hit with the bombs still aboard, the Bomber Explodes and the entire crew is KIA.
If the area hit is the Nose, empty Bomb Bay, Radio Room, or Waist, the following occurs:
The Bomber immediately falls out of formation.
No Evasive Action is possible for the Bomber.
The Bomber must spend two turns in each upcoming zone, rolling twice for German fighter waves. (If the zone currently occupied is the target zone and flak over the target inflicted the BIP, the Bomber must spend two turns in the target zone after turning around.)
The Bomber is assumed to have received every damage result possible on the damage table for that compartment. (Examine the correct damage table and assume each number from 2 to 12 has been rolled.) Record this damage on the Mission Log Sheet.
If the Bomber makes it back to base it is considered a total write-off. Get a new bomber for the next mission.
6.6 BOMBING THE TARGET
After completing the anti-aircraft fire on the bomb run, determine the bombing results on the target by rolling on Table 6-6.
If your bomber is NOT the Mission Lead Bomber (Bomber #1) and/or you are NOT using the Optional Rules for Radar equipped bombers roll on Table 6-6 using the Standard Game Die Roll Modifiers.
If you are using the Mission Lead Bomber rules or the Radar Equipped Bomber Rules, then use the Optional Lead Crew and "Mickey" Radar Equipped Bomber Die Roll Modifiers on Table 6-6 and follow the rules for Mission Lead Bombers and/or Radar Equipped Bombers in the optional rules section.
Standard Game Die Roll Modifiers:
Bombing techniques evolved as the war progressed. Early in the war each individual bomber's bombardier using a Norden Bomb Sight found the target on the bomb run and determined when to drop the bombs. This caused uneven results and was later changed. It was found that having the entire 18 bomber combat box drop on command from the Mission Lead Bomber gave better On-Target results.
In the standard game, these are the two ways your bomber will drop its bombs. Both techniques assume the bomber is equipped with its Norden Bomb Sight and the bombardier is lining up the target on the bomb run and releases either when the conditions are right in his own system or when he receives the drop signal from the Mission Lead Bomber.
If your bombardier is bombing the target, releasing the bombs when his system is lined up then your Bombardier is Bombing Manually and uses the -3 Die Roll Modifier on Table 6-6.
If your bombardier is releasing your bomber's bombs on command from the Lead Bomber in your Combat box then he uses the -2 bombing on command die roll modifier on Table 6-6.
If the bomber is out of formation and bombing the target then the bombardier is always bombing manually and uses the -3 modifier on Table 6-6.

~ ~
There are other types of bombing covered in the optional rules and these systems will use the optional die roll modifiers listed under Table 6-6.
The other Standard Game die roll modifiers are self-explanatory. Record the results of the Bomb Run on the Mission Log Sheet and on the Composite Mission Record Sheet.
Bombing Accuracy:
Next, determine the Bombing Accuracy on Table 6-7. Use the on-target or off target result from Table 6-6 as the column header to use on Table 6-7. Cross index the die roll on Table 6-7 with the correct column to determine the percentage of bombs hitting within 1000 feet of the aiming point. This was the standard used to measure bombing accuracy by the Army Air Force during the war. Record the percentage results on the Mission Log Sheet and the Composite Mission Record Sheet.
Heading Home:
Turn Around - After the bomb run is resolved, begin the return flight to base by turning the Bomber counter around on the Strategic Movement Track and facing it toward Zone 1 -- your base. The Bomber will spend a second turn in the Designated Target Zone. (It's possible to spend up to three turns in the target zone if your bomber has several engines out.)
After turning your bomber around and heading home, resolve additional flak (See Section 6-7) and any Fighter attacks again per the procedure in Section 5.0. Use the previously rolled for weather effects in the Zone (Do not roll again on Table 4-1 for weather on any of the possible turns spent in the target zone).
6.7 ADDITIONAL FLAK
Bombers could continue to be targeted by antiaircraft gunners on the run out from the target, i.e., after bombs away. Accordingly, immediately after completion of the bomb run, roll again on Table 6-2 thru Table 6-5 and complete the Anti-Aircraft Fire sequence detailed in section 6.4. Record any damage received on the Mission Log Sheet.
6.8 SECOND FIGHTER ATTACK
German fighters generally ended their attack on the bombers when the flak batteries began shooting at the bombers. The fighters generally would loiter in the target area until the bombers cleared the flak on their return flight. After the additional flak attacks are resolved, determine any German fighter attacks on the bomber.
Resolve combat per the procedure in Section 5.0. Use the previously rolled for weather effect in the target zone.
After resolving the entire German fighter attacks in the target zone move your bomber one zone closer to your base and resolve all procedures for the new zone. Continue in this manner until you reach your base zone and are ready to land your bomber.
7.0. ENDING THE MISSION There are several ways the mission can end. You can return to your base in England or Italy and land successfully. You can crash at your base as a result of damage to the bomber or pilot error. You might not make it all the way home and be forced to "crash" land in enemy territory or ditch (land in the water) in any of several bodies of water that missions were flown over.
You can also be shot down over enemy territory where you can possibly bail out. If you safely bailout you may be able to escape and evade to friendly territory or you may be captured and become a prisoner of war. If your bomber has received a lot of damage you might be able to divert to a neutral country (Switzerland). If you divert to Switzerland, you will be interned for the rest of the war thus ending your bomber crew's career.
The location of the Bomber counter on the Strategic Movement Track determines where the plane will land. Refer to the Flight Log Gazetteer, Tables 2-8A, B and C and cross-reference the zone the Bomber now occupies with the Mission Target. Table's 2-8A, B and C will tell you what country you are in and who controls it.
The letter notation to the right of the slash mark will detail whether the bomber is over water, land, or over some of both.
For example, a Bomber which has to land in Zone 3 during a mission to Bremen will land in the water (W). A Bomber which has to land in Zone 4 during a mission to Rotterdam has the choice of coming down in the water or in the Netherlands (W-N).
7.1 LANDING AT YOUR BASE
Landing at your base in either England or Italy happens when the bomber reaches the base zone on the Strategic Movement Track.
When the bomber enters the airbase zone, roll for weather over your base on table 3-1. Apply the table modifiers and roll for the weather. (Disregard the reference to the mission being scrubbed if you roll BAD weather.)

~ ~
Then, roll 2D6 on Table 7-1. Damage received in combat plus circumstances described in the notes and dice roll modifiers for this table may affect the success of the landing by increasing or decreasing the landing dice roll. An unsuccessful landing can mean the destruction of the Bomber and death or injury for the crew.
7.2 DITCHING (LANDING) IN WATER
Crews of bombers downed in the sea face the additional hazards of drowning and exposure. Landing a bomber in the sea is an act of desperation, and should only occur if the plane is forced out of the sky in a zone totally over water. Ditching in the sea is preferable only to bailing out into the sea. A bomber landing in the sea is lost. Crewmen rescued from the sea in Zones 2-5 are returned to England; those rescued from the sea in Zones 6 or 7 are captured.
Roll for landings in water on Table 7-2. Refer to the table notes and die roll modifiers to determine the disposition of the crew. The modifiers below Table 7-2 are cumulative.
7.3 LANDING IN EUROPE
A bomber landing in Europe is automatically assumed to be "crash" landing in some open area, not an airfield. Roll for landings in Europe on Table 7-1, refer to the table notes and die roll modifiers to determine the disposition of the crew. Bombers which land in Europe are considered lost.
See optional rules for diverting your bomber to a neutral country or landing on a diversion airfield.
7.4 BAILING OUT
Crewmembers may bail out of a damaged bomber that is still under control on Table 7-3 or from an uncontrolled bomber (as may be directed from the Damage Tables) on Table 7-4.
Roll for each crewman separately. Seriously wounded crewmen may not bail out. Crewmen with two light wounds may bail out with a (-1) die roll modifier in a controlled bailout (Table 7-3). Crewmen with two light wounds may make an uncontrolled bailout with NO die roll modifier on Table 7-4.
See Table Notes for tables 7-3 and 7-4 for details of bailing out. Remember to check Table 2-8C "Zone Control Chart" to determine who is in control of the zone your crew is bailing out into. Table 2-8C is found in the Target Listing and Gazetteer manual.
7.4.1 (OTIONAL RULE) CREW CAPTURE
In real life crew members that escaped capture and were returned by Partisans or the Underground were taken off of flying status. There were notable exceptions and the player can determine if his crew member is pulled from flying status or is returned to flying duty.
7.5 (OPTIONAL RULE) AWARDS
Air Crewmen may be eligible for medals for heroic acts. Medals were awarded to individuals for extraordinary achievement, either against the enemy or in saving a fellow soldier, or even bringing a plane home despite its excessive damage. If the player feels he has a crewman who deserves a medal, roll 1d10 on Table 9-2 Awards to determine if the award was issued.
8.0 POST MISSION DEBRIEFING
Before beginning the next mission, players must resolve the fate of any returning seriously wounded and/or frostbitten crew members (see Tables 5-17, 5-18 and sections 5.11 Crew Wounds 5.12 Heat Out/Frostbite), then record the results of the just completed mission on the Composite Mission Record. Note the percentage of bombs dropped on the target in the appropriate column. A destroyed bomber and crew members who will not be flying again, for one reason or another, are crossed out. Notes can be added to lost crewmen to describe their fate, such as: KIA (killed in action; DOW (died of wounds); LAS (lost at sea); IH (invalided home); and BO-C (bailed out-captured). Decorations for Heroic acts can also be recorded if you are using that optional rule.
Also note enemy fighters destroyed during the mission in order to keep a running tally of a gunner's progress towards ace status.
When a bomber or crew member is lost, select a new bomber or crewmen and give them a new name in preparation for the next mission.
9.0 ADDITIONAL GERMAN AIRCRAFT RULES
9.1 THE GERMAN JETS
German jets first appeared in combat over Germany in July 1944. The Me262 was joined by the Me-163 Komet rocket fighter. The He-162 Volksjaeger (People's Fighter) appeared in January 1945. The player will meet the following German jets in the later campaigns.

~ ~
Me-262 - This plane was the best jet fighter designed by the Germans. It is armed with four 30mm cannons and has a good range and high speed that allowed it to "run away" from escorting fighters if the need arose.
Me163 - The Me-163 Rocket fighter was based on a glider design and used two fuel types that were highly volatile when mixed together. The Me-163 fighter carried enough fuel for 7.5 minutes of flight. They would take off near the bomber's fight path, climb rapidly to be above the bomber formations and then glide down and make its attack. The Me-163 carried two 30mm cannons.
He-162 - Named the Volksjäger or "people's Fighter, it was designed and built quickly, and made primarily of wood as metals were in very short supply and prioritized for other aircraft types. The He-162 carried two 20mm cannons. It can only make one attack on the bombers. The He-162 had very short flight duration as it had a small fuel bladder.
9.2 RULES FOR USING GERMAN JETS
German Jets have been seeded in Tables 5-3C. Jet Fighters cannot be driven off by friendly fighter escorts.
Except for the Me-163 Rocket Fighter, the Jets act just like normal piston engine aircraft during fighter wave combat rounds. They can initiate the number of combat rounds as listed in their respective attack value in the lower right hand corner of the fighter counter and they meet the other eligibility requirements to re-attack in a successive round of combat.
Me-163 Rocket Fighter can only attack one time from above the bomber because of fuel limitations and the nature of its glider design.
To determine clock position for the attacking Me-163 Rocket Fighter, roll 1D6.
Roll 1D6, 1 - 2, Vertical Dive attack; 3-6, Roll on Table 5-9 to determine the clock angle of the attack.
All attacks rolled on Table 5-9 are "High" angle attacks. Me-163s attacking from a vertical dive add one extra hit to the result shown on Table 5-10.
Additional fighters assigned to attack the bomber because of cell position or because the bomber is out of formation are assigned NORMALLY along with the Jet Fighters.
Roll for jet pilot quality as per Section 5.5.1 rules.
Roll for German Jet Offensive Fire normally on Table 5-8.
9.2.1 (OPTIONAL RULE) EARLY INTRODUCTION OF GERMAN JETS
The player can add to the game action by using the rules below if they so choose.
There is a chance you could meet the German Jets if you are flying in Campaigns 5 or 6. Jets only appear in Zones over Germany.
Optional "What-if" Scenario - Hitler set the Jet program back by at least 8 months by requiring that the Me-262 jet fighter be able to drop bombs. It was possible that Jets could have been deployed in the fall of 1943 if Hitler had not interfered in the program. If you would like to fly a "what if" mission, allow Jets to be introduced during Campaigns 3 and 4.
The jets will appear when a 15, 25, 35, 45, 55 or 65 are rolled on Table 5-3B or 5-3C. If one of the above numbers is rolled, disregard the table results shown and instead roll on Table 9-1 German Jets, substituting the resulting number of German Jets in their place.
Roll on Table 5-9 and 5-9A to determine each attacking Jet's clock position and elevation of the attack. (Me-163 roll for attack clock position per section 9.2)
9.3 RULES FOR OTHER GERMAN FIGHTERS
9.3.1 FOCKE-WULF's Ta-152H FIGHTER
Ta-152H Fighter - The Ta 152H Höhenjäger or High-Altitude Fighter was designed to attack the rumored American B-29 Bombers should they be used against Germany. The Ta-152H was propeller driven and could operate at high altitude. It had heavy armament to allow it to deal quickly with enemy aircraft. It had three weapons: one 30 mm cannon centered within the propeller hub and two 20 mm cannons located in the wing roots.
The Ta-152H fighter was very short ranged and can only make one attack on the bomber. There is no second or third round attack for this fighter type.
9.3.2 THE JU 88 C-6
The Ju88C-6 was originally intended as a fighter-bomber and heavy fighter by adding fixed, forward-firing guns to the nose while retaining some bomb carrying ability of the A-series bomber. The C-series had a solid metal nose, and retained the A-series style vertical tail, as well as the ventral gondola under the crew compartment, although this was sometimes removed at unit level in order to reduce weight and drag and thus enhance aircraft performance. The Ju-88C was later used as a night fighter and this became its main role.

~ ~
The fighter version of the Ju- 88 C-6 was armed with one 20 mm Cannon and three 7.92 mm Machineguns placed in a new metal nose. In the game the Ju-88 C-6 appears in Tables 5-3A, and B.
The Ju88 does not make frontal (12 o'clock) or vertical climb or dive attacks. It can attack from all other clock sectors. Only "Ace" pilots fly the Ju88 C-6. (See Section 5.5.1)
10.0 THE OPTIONAL RULES
PLAYERS TAKE NOTE! - The optional rules contained in this section are designed to give the gamer the ultimate gaming experience from playing TARGET FOR TODAY The player should be aware that using some of the optional rules modules presented in this section could conflict with rules presented in other optional rules modules or with rules presented in the Standard Game rules. In cases of conflict the player should resolve them it what appears to be the most logical manner.
10.1 (OPTIONAL RULE) JG 26 - THE ABBEVILLE KIDS
JG 26 was a highly trained German fighter unit with considerable combat experience by the beginning of the USAAF's Daylight Strategic Bombing Campaign. Stationed in the Netherlands and in Northern France JG-26 had many clashes with the 8th Air Force's initial daylight bombing forays into France and the Low Countries.
JG26 found the bombers weakness in the early line abreast formations and the bomber's lightly armed nose. JG 26 pioneered the frontal attacks on the bombers that lead to heavier armament being installed and a change in the formations flown by the heavy bombers. The new combat box formation designed by General Curtis E. LeMay placed the bombers so that each bomber's gun gave the maximum protection to the bomber formations.
As the 8th Air Force Bomber Command encounters with the Luftwaffe grew more intense the legend of the yellow nosed ME 109s and FW-190s began to emerge. They were referred to as “The Abbeville Kids” We reflect the legend and the high skill level of this famous unit with this special rule.
JG 26 is a threat to any B17 formation because there is a higher than normal chance of encountering skilled fliers in greater numbers, especially expert and ace skilled pilots. Pilots from JG 26 are highly motivated and are known to press home their attacks with more intensity than the average fighter unit.
Encounters with JG 26 occur in a limited geographic area. JG 26 will be encountered only on missions to Abbeville, Amiens, Antwerp, Lille, Meaulte, Paris, Romilly-Sur-Seine and St. Omer. They may also be encountered in Zone 3 on deeper penetrations into northern and central Germany.
The JG 26 optional rule is implemented in the form of Table Notes to Tables 5-3 A and B.
i) If target is in northern France, 50% chance the entire group of attackers is from JG-26. Roll 1D6, 1-3; Attackers are from JG-26. 4-6, Treat as normal (Non-JG-26) fighters.
j) If in Zone Three, and target is Germany, and Gazetteer says /F, /B, /N, or /G 50% chance Me109s are from JG-26.
Waves on the tables marked with the i) and j) table notes have a 50% chance of all attackers being from JG-26.
When JG 26 appears any extra ME-109s that are encountered due to Bomber formation position will also be JG 26 fighters.
All fighter escort cover rolls on Table 5-4 against JG 26 are read in the POOR column.
JG26 Expert Pilot Performance - Treat each attacking JG-26 Fighter as an Ace Pilot from Table 5-5A. Consider each JG-26 fighter counter to be an Ace. Each fighter counter has an Ace symbol on it. Do not check for Ace or Green status in the combat sequence.
JG -26 Experts always make successive re-attacks up to the limit of their fighter counter re-attack value even if a MISS result is rolled on Table 5-8.
Ignore the "-2 if fighter is FBOA" and the "-1 if fighter is FCA" die roll modifier when rolling on Table 5-8 for JG-26 fighters.
If JG 26 is not encountered proceed through the combat steps in the normal fashion.
10.2 (OPTIONAL RULE) EARLY BOMBER FORMATION - 1942 It took some experimentation to get a bomber formation that allowed good mutual protection from the bombers and also allowed the target to be bombed with a good chance of placing the bombs on target. That formation was called the Combat Box and it came about in mid-1943 after considerable experimentation by General Curtis LeMay. It is the formation shown on the 1943 Crew Placement Sheet.
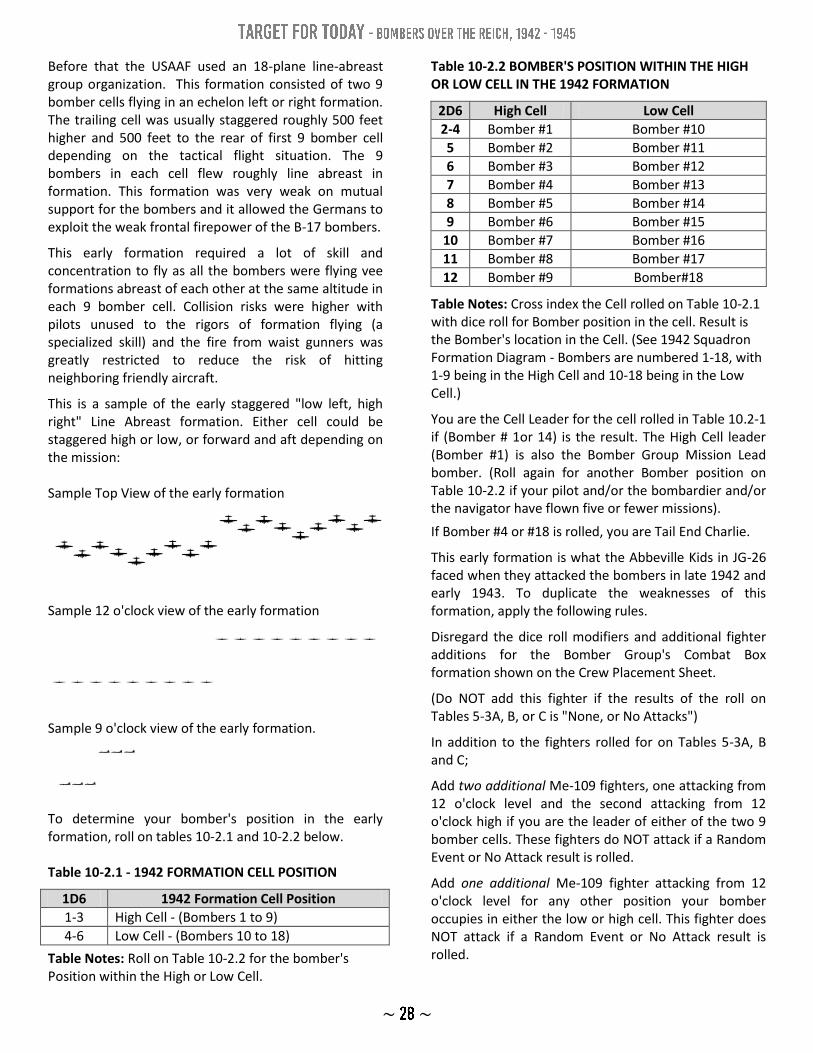
~ ~
Before that the USAAF used an 18-plane line-abreast group organization. This formation consisted of two 9 bomber cells flying in an echelon left or right formation. The trailing cell was usually staggered roughly 500 feet higher and 500 feet to the rear of first 9 bomber cell depending on the tactical flight situation. The 9 bombers in each cell flew roughly line abreast in formation. This formation was very weak on mutual support for the bombers and it allowed the Germans to exploit the weak frontal firepower of the B-17 bombers.
This early formation required a lot of skill and concentration to fly as all the bombers were flying vee formations abreast of each other at the same altitude in each 9 bomber cell. Collision risks were higher with pilots unused to the rigors of formation flying (a specialized skill) and the fire from waist gunners was greatly restricted to reduce the risk of hitting neighboring friendly aircraft.
This is a sample of the early staggered "low left, high right" Line Abreast formation. Either cell could be staggered high or low, or forward and aft depending on the mission: Sample Top View of the early formation
Sample 12 o'clock view of the early formation
Sample 9 o'clock view of the early formation.
To determine your bomber's position in the early formation, roll on tables 10-2.1 and 10-2.2 below. Table 10-2.1 - 1942 FORMATION CELL POSITION
1D6 1942 Formation Cell Position
1-3 High Cell - (Bombers 1 to 9)
4-6 Low Cell - (Bombers 10 to 18)
Table Notes: Roll on Table 10-2.2 for the bomber's Position within the High or Low Cell.
Table 10-2.2 BOMBER'S POSITION WITHIN THE HIGH OR LOW CELL IN THE 1942 FORMATION
2D6 High Cell Low Cell
2-4 Bomber #1 Bomber #10
5 Bomber #2 Bomber #11
6 Bomber #3 Bomber #12
7 Bomber #4 Bomber #13
8 Bomber #5 Bomber #14
9 Bomber #6 Bomber #15
10 Bomber #7 Bomber #16
11 Bomber #8 Bomber #17
12 Bomber #9 Bomber#18
Table Notes: Cross index the Cell rolled on Table 10-2.1 with dice roll for Bomber position in the cell. Result is the Bomber's location in the Cell. (See 1942 Squadron Formation Diagram - Bombers are numbered 1-18, with 1-9 being in the High Cell and 10-18 being in the Low Cell.)
You are the Cell Leader for the cell rolled in Table 10.2-1 if (Bomber # 1or 14) is the result. The High Cell leader (Bomber #1) is also the Bomber Group Mission Lead bomber. (Roll again for another Bomber position on Table 10-2.2 if your pilot and/or the bombardier and/or the navigator have flown five or fewer missions).
If Bomber #4 or #18 is rolled, you are Tail End Charlie.
This early formation is what the Abbeville Kids in JG-26 faced when they attacked the bombers in late 1942 and early 1943. To duplicate the weaknesses of this formation, apply the following rules.
Disregard the dice roll modifiers and additional fighter additions for the Bomber Group's Combat Box formation shown on the Crew Placement Sheet.
(Do NOT add this fighter if the results of the roll on Tables 5-3A, B, or C is "None, or No Attacks")
In addition to the fighters rolled for on Tables 5-3A, B and C;
Add two additional Me-109 fighters, one attacking from 12 o'clock level and the second attacking from 12 o'clock high if you are the leader of either of the two 9 bomber cells. These fighters do NOT attack if a Random Event or No Attack result is rolled.
Add one additional Me-109 fighter attacking from 12 o'clock level for any other position your bomber occupies in either the low or high cell. This fighter does NOT attack if a Random Event or No Attack result is rolled.

~ ~
If your bomber is on either outer end of the formation in the Low Cell, in addition to the above 12 o'clock level fighter, add one additional fighter attacking from 3 o'clock low. This fighter does NOT attack if a Random Event or No Attack result is rolled. If your bomber is on either outer end of the formation in the High Cell, in addition to the above 12 o'clock level fighter, add one additional fighter attacking from 3 o'clock high. This fighter does NOT attack if a Random Event or No Attack result is rolled. The only waist guns that can fire in the 3 or 9 o'clock level positions are the bombers in the outer end positions in the low or high cells that do not have a bomber next to them. If your bomber is not occupying an outer end position in your formation then your waist guns may not fire at 3 or 9 o'clock level. Note that each bomber in the formation end position will only have one waist gun able to fire at either 3 or 9 o'clock level. Change any fighters rolled for on Tables 5-3A, B, or C attacking your bomber from 3 or 9 o'clock level to a 3 or 9 o'clock high or low position unless you occupy the end position on the 9 bomber cell and there is no other bomber next to the 3 or 9 o'clock position attacked. With the waist guns masked and not able to fire at the 3 or 9 o'clock level positions its highly likely that other bomber's waist gunners may accidently fire on your bomber as they track attacking German fighters. To see if your bomber is hit by friendly fire Roll 1D6 with 1-4, Miss and 5-6, being a Hit. If a Hit result is rolled, roll one time on the Area Damage Tables found in the Pilot's Flight Operating Instruction Manual for the bomber you are flying. After determining the bomber section hit roll for damage on the Bomber Damage Tables. Record the results on the Mission Log sheet. On the bomb run your bomber's bombardier will use the "-3 Bombardier is bombing manually" die roll modifier. Use the regular Out of Formation rules if your bomber drops out of an Early Bomber Formation.
10.3 (OPT. RULE) DEPUTY MISSION LEAD BOMBER
For added realism a Deputy Mission Leader is always designated for the Bomber group as they were in real life. The Deputy Mission Leader takes over in the event that the Mission Leader is shot down or has to abort the mission. Pick either the High or Low Cell Leader to fill this responsibility and make the appropriate notations on the Bomber Group Game Assignment Sheet (See Bomber Group Game Rule 10.4)
10.4 (OPT. RULE) THE BOMBER GROUP GAME
10.4.1 BOMBER GROUP GAME RULES
These optional rules allow the player to fly his bomber within the context of either the 18 plane LeMay 1943 Bomber Group Combat Box or the earlier 1942 Line Abreast Bomber Formation. The player can determine what happens with the other 17 bombers flying in his Bomber Group combat formation in an easy to use abbreviated way.
Only your plane will use all the rules in TARGET FOR TODAY The rest of the Bomber Group is abstracted, and their destiny is determined by the following rules.
10.4.2 BOMBER GROUP GAME BASICS
Select the formation you wish to use. Then determine your bomber's position in the Bomber Group's Combat Box per the standard TARGET FOR TODAY rules. Once determined, record your bomber's name in the "Bomber Name" Column next to the appropriate bomber position number (Bombers 1 to 18 on the Bomber Group Game Assignment Sheet). The bomber numbers correspond to the Bomber Group Formation Diagram on either the 1942 or 1943 Bomber Group Game Formation Board.
Next, at the top of the Bomber Group Game Assignment Sheet fill in the Air Force, Air Division, Wing, Group and Squadron you are assigned to. This can be done historically or you can use a designation that fits in with the role playing or other type of game you may be playing or hosting. Historical Table of Organization data for the 8th and 15th Air Forces are given in Table 10-100 in the Target Listings and Gazetteer Manual.
Note that the Bomber Group Game Assignment Sheet can also be used by a game master to host a multi-player event, either live or via email/internet, by recording other player's names in Bomber Position Column and track bomber damage in the other columns.
Then fill in the names of the planes for the remaining 17 bomber positions.

~ ~
10.4.3 DETERMINING BOMBER DAMAGE
All damage taken by your bomber during the course of the mission is determined by the standard rules of TARGET FOR TODAY. Each plane in the Bomber Group, other than yours, takes six (6) hits before it is shot down.
In each zone your bomber enters on the Strategic Movement Track, starting with zone 2, roll on Table 10-4.1 to see if German fighters will attack other bombers in your Bomber Group Combat Box. Use the following tables to determine which bombers in your Bomber Group becomes the subject of an attack. This is determined after all attacks against your own bomber are resolved using the Standard TARGET FOR TODAY rules. If your bomber is not attacked in its current zone, then none of the other 17 bombers in your Bomber Group are attacked either. Move your bomber to the next zone and continue.
Should your bomber be shot down during the mission and you want to continue playing The Bomber Group Game without your bomber, simply move the bomber group to the next zone and roll on Table 10-4.1 to see if German fighters will attack other bombers in your Bomber Group Combat Box. You can complete the mission without your bomber being present.
Select the formation type column you are using. Then roll 1d10 on Table 10-4.1 to determine which Cell in the Bomber Group formation you are using faces an attack.
Table 10-4.1 Bomber Cell Attacked
Roll 1D10 1943 Combat
Box 1942 Line Abreast
1 No Attacks No Attacks
2 Middle Cell Low Cell
3 No Attacks No Attacks
4 High Cell High Cell
5 High Cell High Cell
6 No Attacks No Attacks
7 Low Cell Low Cell
8 Middle Cell High Cell
9 Low Cell Low Cell
10 No Attacks No Attacks
Once the Cell to be attacked is determined, roll 1d10 on Tables 10-4.2 thru 10-4.4 for the 1943 Combat Box or 2D6 on Tables 10-4.3A thru 10-4.4A for the 1942 Line Abreast formation to determine which plane in that Cell is attacked. If your plane number is rolled, ignore the result and roll again.
The bomber numbers in the tables correspond to the bomber numbering on the 1942 and 1943 Group Game Assignment sheets.
The 1942 Line Abreast Assignment sheet assumes a staggered high left formation with group lead shown as plane #1 on the Bomber Group Game Formation Board.
Table 10-4.2 Middle Cell - 1943 Combat Box
Roll 1D10 Plane
1 Bomber 1- Lead
2 No Attacks
3 Bomber 2
4 No Attacks
5 Bomber 3
6 Bomber 4
7 No Attacks
8 Bomber 5
9 No Attacks
10 Bomber 6
Table 10-4.3 High Cell - 1943 Combat Box
Roll 1D10 Plane
1 Bomber 7
2 No Attacks
3 Bomber 8
4 No Attacks
5 Bomber 9
6 No Attacks
7 Bomber 10
8 No Attacks
9 Bomber 11
10 Bomber 12

~ ~
Table 10-4.4 Low Cell - 1943 Combat Box
Roll 1D10 Plane
1 No Attacks
2 Bomber 13
3 Bomber 14
4 No Attacks
5 Bomber 15
6 No Attacks
7 Bomber 16
8 Bomber 17
9 No Attacks
10 Bomber 18
Table 10-4.3A High Cell - 1942 Line Abreast Formation
Roll 2D6 Plane
2 No Attacks
3 Bomber 8
4 Bomber 6
5 Bomber 4 - Tail
6 Bomber 2
7 Bomber 1 - Lead
8 Bomber 3
9 Bomber 5
10 Bomber 7
11 Bomber 9
12 No Attacks
Table 10-4.3B Low Cell - 1942 Line Abreast Formation
Roll 2D6 Plane
2 No Attacks
3 Bomber 18 - Tail
4 Bomber 17
5 Bomber 16
6 Bomber 15
7 Bomber 14 - Lead
8 Bomber 13
9 Bomber 12
10 Bomber 11
11 Bomber 10
12 No Attacks
If a "No Attacks" result is rolled then the fighter attacks end and play reverts back to your Bomber moving to the next zone. If a "Bomber #" result is obtained continue to Table 10.4.5 Fighter Attack Results Table.
If "No Attack" result is obtained and this is the target zone go to Section 10.4.4 for Flak Combat determination.
If a bomber is rolled for that is already shot down, re-roll until a bomber still in the formation is found.
Roll 2D6 on Table 10-4.5 Fighter Attack Results to determine the result of the fighter attack. If the enemy fighter misses, play proceeds per standard game rules if this is NOT the target zone. Note that there are no repeat attacks by enemy fighters.
If this is the target zone go to the Flak results Section 10.4.4.
Table 10-4.5
Fighter Attack Results
Roll 2D6 Results
2 Bomber Shot Down
3 Bomber - 4 Hits
4 Fighter Shot Down
5 Bomber - 2 Hits
6 Fighter Damaged
7 Fighter Misses
8 Fighter Damaged
9 Bomber - 1 Hit
10 Fighter Shot Down
11 Bomber - 3 Hits
12 Bomber - 4 Hits
10.4.4 DETERMINING FLAK IN THE TARGET ZONE
Should the player’s bomber encounter flak in the Target Zone, determine results per the standard rules. Then use Table 10-4.1 Bomber Cell Attacked to determine which non-player plane will face flak on the bomb run. Roll 2D6 on Table 10-4.6 to determine the result.

~ ~
Table 10-4.6
Flak Attack Results
Roll 2D6 Results
2 Bomber Shot Down
3 Bomber - 4 Hits
4 Miss
5 Bomber - 2 Hits
6 Miss
7 Bomber - 1 Hit
8 Miss
9 Bomber - 1 Hit
10 Miss
11 Bomber - 3 Hits
12 Bomber - 4 Hits
Each of the non-player bombers in the Bomber Group require any combination of flak or fighter hits totaling 6 hits to be shot down. Hits are cumulative during the mission. Record all fighter and flak hits for each bomber on the status line after the bomber's number on the Bomber Group Game Assignment Sheet.
10.4.5 BOMBING THE TARGET
When bombing the target in The Bomber Group Game you can either use the bombing rules as outlined in 6.6 BOMBING THE TARGET for each bomber reaching the target or you can use the following simplified bombing table to determine the squadron's results.
10.4.5.1 SIMPLIFIED BOMBING TABLE
The results of the Group's bomb run can be determined by rolling once on Table 10-4.7 and following the instructions.
Table 10-4.7
Bomb Run Table - Bomber Group Play
Roll 2D6 Group Bomb Run
4 or < OFF TARGET Roll on Table 6-7 under the OFF TARGET Column
5 - 12 > ON TARGET Roll on Table 6-7 under the ON TARGET Column
Die Roll Modifiers:
-1 if player’s bomber is damaged while over target prior to bomb run (Flak or Fighter)
-2 if player’s bomber is shot down while over target prior to bomb run (Flak or Fighter)
-2 if "Target Visibility" is "Target completely obscured" on Table 6-1
+1 if "Target Visibility" is "Clear conditions apply" on Table 6-1
10.4.6 MAKING IT HOME
After you land at your base, roll on Table 10-4.8 for each bomber in your Bomber Group to determine if the bomber returned home safely. Roll for the weather over the base on Table 3-1. A POOR result gets a -1 die roll modifier on Table 10-4.8 and a BAD result gets a -2 die roll modifier on Table 10-4.8.
Roll 1d10 for each bomber. Find the die roll in the table on the appropriate number of hits row for the die roll number and determine if the bomber returns safely or was lost on the mission. Damaged bombers are considered repaired for the next mission.
Table 10-4.8
Safe Return and Landing
Number of Bomber Hits
Roll 1D10
Bomber Lost Bomber Safe
0 < 0 1 - 10
1-2 < 1 2 - 10
3-4 < 2 3 - 10
5 < 3 4 - 10
Die Roll Modifiers:
-1 if weather over base is POOR.
-2 if weather over base is BAD.
10.5 (OPTIONAL RULE) ADDITIONAL U.S. BOMBER AIRCRAFT.
10.5.1 (OPTIONAL RULE) YB-40 ARMED ESCORT MODEL
In June, 1941 the US Army Air Corps began a project aimed at creating an armed bomber escort. A Boeing B-17F Bomber was chosen as the prototype for conversion. The prototype was named the YB-40. It first flew November 10th, 1942.

~ ~
Additional guns, turrets and armor plating were added along with a maximum load of ammunition. An extra crewman was added as an ammunition handler to transfer ammunition from the bomb bay to the guns in need. The YB-40 carried no bombs.
With the added weight the YB-40 flew at a speed equal to a bomb-laden B-17F or G model. But once the B-17s dropped their bomb load on the target their top speed increased and they soon out distanced the YB-40s who still carried the majority of their added weight.
The YB-40's flew a number of combat missions over Europe claiming several German fighters and losing some of their numbers to fighters and flak before they were removed from service in favor of the more nimble and longer ranged Allied fighters.
The YB-40 Model carries 16 machine guns. Two each in powered chin turret, forward top turret, ball turret, and an added top turret that replaced the radio room single gun. There were also double gun mounts in the tail and in power-assisted double gun waist positions. The two single cheek guns in the nose were retained. Additional armor was added for crew and around the engines and extra ammunition was carried, nearly tripling the amount available in the regular B-17F.
The YB-40's Radio Room Top Turret had the following fields of fire:
Clock 12:00 1:30 3:00 6:00 9:00 10:30
Elevation H H H, Lv H H, Lv H
An 11th crewman was added as an “ammunition stocker.” While his assigned position at take-off was in the radio room he “floated” between compartments transferring ammunition as needed from the extra stored in the bomb bay to any gun position that needed replenishment.
The Ammunition Stocker can move 20 boxes of ammunition between the bomb bay and gun positions that need it or between other gun positions that have extra ammunition and gun positions that need it per zone.
On the YB-40 Mission Log Sheet, the shaded boxes show ammunition that is stored in the bomb bay. When ammunition is moved simply place an x in the box of ammunition that is in the bomb bay and erase a similar number of boxes that have been used at the gun positions you want to replenish.
Decide what compartment the ammo stocker is in before fighters attack in each zone and before any flak is rolled for on the bomb run or if the bomber is out of formation and at 10,000 feet. If the ammunition stocker is in the compartment that is hit, roll 1d6 on table 10.5.1 below:
Table 10-5.1
Ammunition Stocker wounds
Roll 1D6 Wound Results
1-3 MISS - Ammo Stocker not hit
4-6 HIT - Roll on Table 5-17 Bomber Crew Wounds.
The YB-40 was slower than the regular B-17 bombers after they had dropped their bombs. To reflect this, the YB-40 should be considered out of formation starting with the first zone it enters after leaving the target zone.
The German fighters learned to respect the YB-40 because of the extra armor plate and heavier armament. After the first wave of fighters attack do not add any additional fighters for being out of formation in the zone.
There was no Bombardier as the YB-40 carried no bombs. This position was filled by a Chin Turret Gunner. The Radio Operator now serves as Aft Top Turret Gunner.
The specific rules for using the YB-40 are found in the Pilot's Flight Operating Instructions Manual for the B-17 F & G Model Bombers.
10.5.2 (OPTIONAL RULE) B-17E MODEL
The B-17E Model version was first used by the 8th Air Force over Europe. In 1942 the Americans were experimenting with unescorted daylight long-range bombing missions. High losses resulted as soon as German fighter pilots discovered that the B-17E was vulnerable to a frontal attack.
The B-17E is identical to the B-17F Model used in the Standard Game except that it lacks cheek guns and the nose gun was originally a .30-caliber light machine gun. The .30 caliber light machine gun lacked the range and hitting power of the heavier .50 Caliber machine gun.
Use the damage tables for the B-17F Model that is found in the B-17F and G Model Pilot's Flight Operating Instructions Manual. The only difference is the lack of nose armament.

~ ~
If flying the B-17E Model (e.g., August 1942 missions), make the following changes:
There is no firing of cheek guns.
The only machinegun that can fire into the 12 o'clock High, Level and Low positions is the .30 Caliber nose gun.
Use the following .30 Caliber gun die roll modifiers when rolling on Table 5-6 Bomber Defensive Fire Resolution. (Die roll modifiers are cumulative.)
- 2 for being a .30 Caliber machine gun.
–1 for defensive fire versus Ace fighter pilot (See Table 5-5A)
–1 for defensive fire if bomber is performing “Evasive Action” (See Rules Section 5.9)
-1 if the gunner is suffering from Frostbite.
0 rather than +1 for defensive fire versus Green fighter pilot (See Table 5-5A)
+1 for defensive fire by bomber Ace gunner (5+ credited kills)
10.5.3 (OPTIONAL RULE) B-17G RADIO ROOM GUN
With the introduction of the Sperry top turret atop and behind the B-17G's cockpit, the radio compartment gun position was gradually phased out. In January 1944 the radio room gun was given an improved field of fire by a frameless hatch with a K-5 mount that allowed 90 degrees movement of gun in zenith [azimuth]. However, the gun was installed only in early production batches of the B-17G, and the gun was eliminated altogether in later production B-17G bombers.
If you are flying an early or late production B-17G, make the following changes to the bomber.
In Campaigns 3 & 4, early B-17G Models now have improved Field of Fire for radio room gun. The radio Room gun may now fire into the 3 and 9 o'clock high angles as well as at Vertical Dive attacks and 6 o'clock high attacks.
In Campaigns 5 & 6, B-17G models have the radio room gun removed. Cross it and the ammunition off of the Mission Log Sheet.
10.6 (OPTIONAL RULE) ADDITIONAL CREW POSITIONS
Super-Cargo or "Wing Weenies" would sometimes "ride along" with the bomber crew or take the place of gunner crew members on bomber missions with or without permission from the plane commander.
Anyone who remembers the Movie Twelve O'clock High will remember that Major Stovall, the 918th
Bomb Group's Adjutant "stowing away" with the Group's Chaplin to fly as gunners on one of the bomber missions deep into Germany.
In real life other non-flying Headquarters personnel also "Stowed away" from time to time on bomber missions. Sometimes both flying and non-flying personnel had legitimate reasons to be flying with the bomber crews.
Some ideas for personnel to be accompanying the bomber crew on its mission might be:
Non-flying ground personnel "stowing away".
Headquarters personnel needing a few hours to maintain their flight pay and flight status.
A Group or Wing Commander accompanying your Bomber to see how you are performing.
A Movie Camera Crews sometimes accompanied the bomber to get that fantastic combat footage that we all like to watch on TV. One camera crew was "lost" when a bomber they were assigned to was shot down while they were filming "Memphis Belle's" historic completion of her 25 mission tour. "Memphis Belle" was the first bomber to complete the 25 combat missions over Europe and rotate home.
There are a couple of ways you can simulate this.
Substitute the super cargo crewman for one of your personnel. (Such as a Gunner)
Add the crewman to the crew in a compartment (usually the waist or radio room). Any hits on that compartment that calls for casualties should be divided between whoever is occupying it at the player's discretion.
If a senior officer such as the Wing or Group Commander accompanies your bomber on a mission that person may fly the plane in which case you as the pilot would be "bumped" to the co-pilot's seat and the co-pilot would be left at home. Or the Senior Officer may just ride along in the co-pilot's seat or elsewhere in the plane. Place them at your discretion.
This can really add to the role playing nature of TARGET FOR TODAY and is a fun addition that portrays a slice of real life action during the Strategic Bombing Campaign.

~ ~
10.7 (OPTIONAL RULE) LEAD BOMBER CREWS
When 8th Air Force bomber crews began the Daylight Strategic Bombing campaign in 1942, each Bomber Group commander used his best crews to lead the Bomber Group's bombers to the target. The best performing Navigators were chosen for the Lead Crew. Some navigators were more talented than others and navigators with several missions under their belt performed better in the Lead Crew role. As the European winter weather set in some Bomber Group commanders began using two navigators on lead bomber crews to aid the Bomber Group's ability to achieve pin-point navigation accuracy to reach the target.
Another significant problem for the 8th and 15th Air Forces in the early days of operations, one totally unforeseen, was that of target identification. In the early days of daylight bombing, each bombardier sighted for his individual aircraft through the famous Norden Bombsight. However, there was a significant difference in finding a town in America, with easy checkpoints on training runs, and finding one in wartime Europe where the close proximity of towns to each other and enemy action sometimes meant the wrong target got bombed.
General LeMay devised a solution. He started a "Lead Crew" school that taught teams of bombardiers and navigators to recognize certain sets of targets from the air. If a target that a particular "lead crew" was familiar with was selected for a mission, they were placed in the lead bombers on the belief that they would most readily recognize it—and thus that the entire group would bomb it with a reasonable chance of success. And it worked, as these specialists became an elite and important facet of the American effort. General LeMay's new Combat Box formation meant that, instead of each plane dropping its bombs individually, all bombardiers released their bombs on command when the Lead Bomber dropped its bombs. This was called "Dropping on lead's command." (Note that late in the war, the bombardier was replaced with a togglier. Where the bombardier was a commissioned officer, the toggliers were enlisted men. When a togglier was on the aircraft, it did not carry a Norden Bombsight.)
Modifications for recreating the impact of lead crews, beginning with missions in April 1943, are presented below:
10.7.1 Navigators
"The navigator's job is to direct your flight from departure to destination and return. He must know the
exact position of the airplane at all times. "- Pilot Training Manual for the B-l7 Flying Fortress.
If your bomber is the Mission Lead Bomber and your Navigator has flown in the lead bomber position in the lead (middle) Cell of the Bomber Group against the same "target type" at least twice before, you are entitled to a "+1" die roll modifier on Table 10-7.1. See the Gazetteer's "Target Types" tables (i.e., marshalling yards, industries, dockyards) to pick you Navigator's specialty. Record his specialty on his Composite Mission Record and the Mission Log Sheet.
If your bomber is flying as lead bomber in the middle cell or is out of formation, upon entry into each zone, a check must be made to verify the bomber is on course. Upon entering the new zone, check to see if you are On Course in that zone. Roll 1D6 on Table 10-7.1 and record the results on the Mission Log Sheet.
Table 10-7.1
On Course
Roll 1D6 Result
< 1 Off Course in that zone
2 - 6+ On Course
Die Roll Modifiers for Table 10-7.1 (Cumulative):
-2 if Navigator equipment is inoperable. (From damage to the Navigation Equipment result found in the Nose Section of bomber's damage tables - See Pilot's Flight Operating Instructions Manual for your bomber type.) *
-2 if weather in current zone is "100% cloud cover" (Disregard if your bomber is a radar equipped Path Finder bomber and the radar is operational).
-2 if Navigator is killed or seriously wounded *
-1 if weather in current zone is "50% cloud cover". (Disregard if bomber is a radar equipped Path).
-1 if Radio is out *
-1 if Navigator is a novice (five or fewer missions) (Disregard if KIA or SW)
+1 if Navigator is a veteran (ten or more missions) (Disregard if KIA or SW)
+ 1 if weather in the zone is "Clear Conditions"
+1 if two navigators are aboard the Lead Crew bomber.
+1 if your Lead Navigator has flown against the same "target type" at least twice before.

~ ~
Player Note: If any asterisked (*) die roll modifier above becomes applicable, your bomber will drop out of Mission Lead position and turn the Bomber Group Combat Box over to the Deputy Lead Bomber. Your bomber is NOT out of formation. It has just changed to a non-Lead Bomber position in the formation. .
Effects of being "off course" are as follows:
Subtract one (-1) on any die roll on Table 5-4 to see how many German fighters might be driven off by your escorts for that zone (reflecting reduced chances of successful rendezvous with escort if you are off course.).
If the zone is the designated target zone, apply a negative modifier on Table 6-6 equal to the number of zones your bomber was off course on the outbound leg to the target. (Example - if the bomber was off course in zones 3 and 4 while traveling to the target in zone 5, the modifier would be -2).
This modifier can be negated by "Going Around".
The "Going Around" Option -
If you are off-course when you enter the target zone you must decide if you will bomb anyway (using the die roll modifier calculated above for being off course) or if you will go around to get positioned on the correct bomb run path. If you go around, add an extra attack roll sequence by German fighters before you enter the bomb run.
Repeat the German Fighter Attack sequence as outlined in Section 5.0 for this extra attack as the bombers are "going around". The German fighters get to attack your Bomber Group Combat Box again.
If you "go around" do NOT subtract the off course die roll modifier calculated above on the bomb run.
There is no need to check for "off course" results when returning to base. It is assumed your navigation will be close enough to your base in the airbase zone that "going around" to get you back on course will not be necessary if you were off course.
10.7.2 Turn Sequence in the Target Zone.
The bomber enters the target zone - Turn 1 German fighters attack the bomber per section 5.0.
If the bomber is off course and you decide to go around to avoid the "Off Course" bomb run penalty, the German fighter attack sequence is rolled for a second time to reflect the time needed for the bombers to "Go Around" to get lined up for the bomb run.
If you do NOT go around there is NO second German fighter attack sequence but you WILL have the "Off Course" penalty on the Table 6-6.
Next you will resolve any flak over the target and complete the bombing.
After completing the bombing sequence turn the bomber around to face your base.
Turn 2 in the target hex begins with the player resolving any flak attacks again as the bomber leaves the target and then resolving another German fighter attack sequence.
Weather is only rolled for once in the target zone and that is upon entering the zone.
10.7.3 Lead Bomber Crew Positions.
Precise navigation of the Mission Lead Bomber was critical. In recognition of this the Bomber Group /Mission Lead Bomber (Bomber #1 on the Crew Placement Sheet) and the designated Deputy Lead aircraft usually carried two navigators - one in the Radio Compartment next to the Radio Operator and a second navigator performing dead reckoning navigation in the nose compartment performing visual "pilotage navigation".
The nose turret offered a really good view of the terrain. The Pilotage Navigator acted as the nose turret gunner on bomber models equipped with nose turrets. He used the regular Navigator's station in the nose on models equipped with just a nose gun such as the B-24D and the B-17E and F Models.
The make-up of the lead crews was typically five officers; a Pilot, a Co-Pilot, a Dead Reckoning Navigator, the Pilotage Navigator/nose gunner and the Bombardier. The five enlisted men held the following positions; Engineer/Top Turret Gunner, radio operator/waist gunner, a second waist gunner, ball turret gunner and a tail turret gunner.
Having two Navigators gives a +1 die roll modifier on Table 10-7.1.
10.7.4 Bombardiers
The Lead Crew Bombardier is doing the aiming for the Bomber Group's Combat Box bombers on the bomb run.
If flying as Mission Lead Bomber (Bomber #1 on the Bomber Group's Combat Box diagram on the Crew Placement Sheet) in the Middle Cell of the Combat Box and your bomber receives a hit from fighters before bombing the target that results in an "automatically Off-Target" result such as;

~ ~
Norden Bombsight is damaged.
Bomb controls are inoperative.
Bomb Bay Doors are Inoperable.
Control Cables damaged
Then, your bomber will turn the formation over to the Deputy Lead Bomber to direct the bomb run.
Your bomber will use the "Bombs on Command" die roll modifier just as if you were any other non-Lead Bomber in the formation.
Your bomber does not drop out of formation.
If the above damage was caused by flak while on the bomb run (in which case it's too late) the entire Combat Box's bombing will automatically be "Off Target".
If your bomber is the Mission Lead Bomber and your bombardier has flown in the lead bomber position in the lead (middle) Cell of the Bomber Group's Combat Box against the same "target type" at least twice before, you are entitled to a "+1" die roll modifier on Table 6-6 (See Gazetteer "Target Types" tables (i.e., marshalling yards, industries, dockyards) to pick you bombardier's specialty). Record his specialty on his Composite Mission Record and the Mission Log Sheet.
10.8 (OPTIONAL RULE) "TOGGLIERS"
General LeMay's new formation meant that, instead of each plane dropping its bombs individually, all bombardiers released their bombs when the bombardier saw the bombs leave the bomb bay of the lead aircraft. This was called "Dropping on lead's command."
Note that late in the war, the bombardier was replaced with a togglier. Where the bombardier was a commissioned officer, the toggliers were enlisted men. When a togglier was on the aircraft, it did not carry a Norden Bombsight.
To simulate using a togglier: beginning in June 1944, a bombardier who is killed, seriously wounded and sent home, or completes his required tour of duty is replaced by a togglier instead, unless the aircraft is a "Pathfinder" (see rule 10.9 Pathfinder Bombers) and/or carries a veteran navigator (ten or more missions) with a designated target system bonus.
Also, roll 1D6 for new crews that begin a tour of duty in June 1944 or later: on a result of "1-4", the crew will carry a togglier instead of a bombardier, and is not eligible to become a lead crew.
If you are using the optional Togglier" rule, your bombardier will drop on lead's command unless your bomber is bombing the target while out of formation.
If using a togglier, your bomber will never fly as lead; if formation casualties cause your bomber to take lead in the middle formation, then the mission must be aborted; if out of formation, any bomb run would be automatically off-target but bomb load may be jettisoned.
If "dropping on lead's command", roll normally on Table 6-6 the Bomb Run, but use the -2 "Bombardier is bombing on command" die roll modifier.
A roll of "2" on the Nose damage tables for the bomber you are flying (damage to the Norden bombsight) no longer has any effect on bombing accuracy when using a "togglier". (Nose damage tables are found in the bomber's Pilot Flight Operating Instructions Manuals.)
The bomb run is no longer automatically "Off Target" for loss of the Norden bomb sight.
If "dropping on lead's command", apply a "-1" modifier (cumulative with any other modifiers) if the bomber is flying in a "disrupted formation"
Apply a "+1" modifier if "tight formation" random event was rolled for in the previous zone. No modifier is applied if the bomber is in a "disrupted formation" at the time an "extra tight" formation was rolled on the Random Events table.
10. 9 (OPTIONAL RULE) PATHFINDER FORCE (PFF) BOMBERS
Note: This rule should be used in conjunction with the "Lead Crew" rules in Section 10.7.
Inclement weather and the usual cloud cover above the European continent often obscured the targets of AAF Bomb Groups, thereby limiting bombing effectiveness. The effort to compensate culminated in the development of an airborne RADAR set designated as APS 15 by its developer (the Massachusetts Institute of Technology), but known to the Air Forces as H2X (and later H2S), or its more commonly used name of "Mickey." The name "Mickey" came from the giant mouse-like appearance of the large circular antennas of the first operational radar set. With the introduction of H2X radar, radar-equipped B-17G and B-24J "Pathfinder" bombers could more easily pick out targets through overcast conditions than bombers relying simply on visual bombsights.

~ ~
From the spring of 1944 on, nearly every bombing mission was led by a "Mickey" equipped Pathfinder bomber. The Norden was still more accurate than radar, but the AAF preferred to have 40-50% accuracy at the primary target if visual bombing was not possible.
On "Pathfinder" bombers, the ball turret was replaced by a fiberglass radome, which housed the receiver and the rotating antenna. It could be cranked down on the mission and of course cranked back up for landing.
The transmitter was on the right side of the fuselage right behind the rear bulkhead of the radio room. The radar operator sat in the radio room opposite the radio operator in the B-17G and he sat in the waist compartment in the B-24J model bomber.
Experiments with radar operations first began at Alconbury Field in the late summer of 1943. The 482nd Bomb Group was created specifically to develop Pathfinder techniques. The 482nd provided the Pathfinder lead bombers to the other bomb groups from the winter of 1943 to March 1944. As the war progressed and radar equipped aircraft became more available, the Pathfinders were doled out to the individual groups and that is where they would stay.
For players who desire to simulate flying these vital "Pathfinder" bombers, implement the following rules changes:
Only B-17G and B-24J Models can fly as Pathfinder bombers. A Pathfinder bomber may fly only with a non-novice pilot, navigator, and bombardier (i.e., each must have more than five missions). Pathfinder bombers always fly as the lead bomber in the middle cell of the Combat Box.
On a PFF bomber, there are no Ball Turret guns. The Ball Turret gunner is replaced by a Radar Operator who sits in the Radio Room with the Radio Operator (for ease of reference, you can place counters for each side by side on the Crew Placement Board) in the B-17G. The Radar Operator sits in the Waist Compartment in the B-24J bomber.
Radar Bombing -
Use the Optional Rule die roll modifiers under Table 6-7 for Lead Crew and "Mickey" Equipped Radar Bombers when determining the accuracy die roll for the bomb run.
To get the benefit of using a Radar Equipped Pathfinder Bomber on the bomb run all radar bombing mechanisms and systems must be working and the radar operator must not be injured.
To see if the radar is successful in locating the target, do the following for the weather in the target zone modifiers:
If weather in the target zone is "Target mostly obscured" or "Target completely obscured" roll 1D6 to determine the correct die roll modifier.
If the result is "1", then use the indicated die roll modifier for the indicated weather condition on Table 6-6.
If the result is "2-6", then no die roll modifier is applied to the roll on Table 6-6.
For the B-17G Bomber -
Change the following dice roll entries on Table 5-13 - A-4 RADIO ROOM (B-17 F & G Models) and Table 5-13 - A-5 WAIST (B-17 F & G Models) found in the Pilot's Flight Operating Instructions Manual for the B-17G.
On Table 5-13 A-4 ("Radio Room") change the die roll entries from:
Table 5-13 - A-4 RADIO ROOM (B-17 F & G Models)
Die Roll Area Hit Effect
7-10 Superficial No Effect
To:
Table 5-13 - A-4 RADIO ROOM (B-17 F & G Models)
Die Roll Area Hit Effect
7 Superficial No Effect
8 Radar Operator
Roll 1d6: 1-3, Miss. 4-6, Roll for wounds on Table 5-17.
9-10 Radar Equipment
No Radar bombing
On Table 5-13 - A-5 WAIST (B-17 F & G Models) change the die roll entries from:
Table 5-13 - A-5 WAIST (B-17 F & G Models)
Die Roll Area Hit Effect
9 Ball Turret Roll 1D6.
To:
Table 5-13 - A-5 WAIST (B-17 F & G Models)
Die Roll Area Hit Effect
9 Radome Roll 1d6: 1-2, Superficial damage; 3-6, Radar equipment out, radar bombing not allowed.

~ ~
For the B-24J Bomber -
Change the following dice roll entries on Table 5-15 - B-3 TOP TURRET/RADIO ROOM (B-24J Model) and Table 5-15 - B-5 WAIST (B-24J Model) found in the Pilot's Flight Operating Instructions Manual for the B-24J Bomber.
On Table 5-15 B-3 ("Top Turret/Radio Room") change the die roll entries from:
Table 5-15 - B-3 TOP TURRET/ RADIO ROOM (B-24J Model)
Die Roll Area Hit Effect
7 Superficial No Effect
9 Superficial No Effect
To:
Table 5-15 - B-3 TOP TURRET/RADIO ROOM (B-24J Model)
Die Roll Area Hit Effect
7 Radar Operator
Roll 1d6: 1-3, Miss. 4-6, Roll for wounds on Table 5-17.
9 Radar Equipment
No Radar bombing
On Table 5-15 - B-5 WAIST (B-24J Model) change the die roll entries from:
Table 5-15 - B-5 WAIST (B-24J Model)
Die Roll Area Hit Effect
9 Ball Turret Roll 1D6.
To:
Table 5-15 - B-5 WAIST (B-24J Model)
Die Roll Area Hit Effect
9 Radome Roll ID: 1-2, Superficial damage; 3-6, Radar equipment out, radar bombing not allowed.
For both pathfinder bomber models -
If the Bombardier is KIA or seriously wounded, or if the Norden Bombsight is knocked out, the bomb run would still be automatically off-target (see the "Lead Crew" rules) (the Mickey operator worked directly with the bombardier in feeding drop angles to the Norden bombsight optics).
A Pathfinder Force pilot, navigator, or bombardier who is killed, seriously wounded and sent home, or completes his required tour of duty, may be immediately replaced by a non-novice crew member for subsequent missions.
10. 10 (OPTIONAL RULE) SELECTING A HISTORICAL BOMBER UNIT FOR YOUR BOMBER
The Target Listings and Gazetteer Manual contain a Table of Organization for bomber units assigned to both the 8th and 15th Air Force. If you wish to establish a story line that includes historical USAAF unit assignments then refer to Table 10-100 Table of Organization of the 8th and 15th Air Forces in the Target Listings and Gazetteer Manual for historical unit identifications.
10.11 (OPTIONAL RULE) SELECTING A HISTORICAL TOUR OF DUTY FOR YOUR BOMBER
This option allows the player to fly a real life tour of duty as was flown by pilots and crews of the 367th Bomb Squadron, 306th Bomb Group. If you are playing this game you have most likely seen the movie 12 O'clock High, starring Gregory Peck. The movie storyline revolved around the happening in the mythical 918th Bomb Group. However the story of the 918th Bomb Group was based on real life events that happened in the real 306th Bomb Group in the early days of the Daylight Strategic Bombing Campaign. The movie producer altered the name of the real life 306th Bomb Group by multiplying the group numbers by 3 to come up with the 918th Bomb Group name in the movie.
The 367th Bomb Squadron was one of the squadrons assigned to the 306th Bomb Group. Below is the mission record from the 367th's combat diary for the first 25 completed missions flown by that unit. Missions that were cancelled or aborted are not listed here.
The player can fly the missions listed below in lieu of rolling for each mission in his tour of duty. Use the target type listed and the city name in the list below. In some 367th combat diary entries the exact target type was not listed merely the city that they flew to. Industrial has been listed for the target type in these cases. The zone of each target is also listed. The player can find all cities listed in the Gazetteer.
You can fly either the combat box formation or the optional line abreast combat formation show in rule 10.2 early Bomber Formation.

~ ~
DATE CITY/TARGET ZONE
9 Oct 42 Lille/Industry* 4
7 Nov 42 Brest/U-Boats 8
8 Nov 42 Lille/Industry* 4
9 Nov 42 Saint Nazaire/Machine Shops 7
12 Dec 42 Rouen/Rail Yards 4
20 Dec 42 Romilly Sur Seine/Rail Yards 5
3 Jan 43 St. Nazaire/U-Boats 7
13 Jan 43 Lille/Industry* 4
23 Jan 43 Lorient/Industry* 9
27 Jan 43 Wilhelmshave/Shipping 7
2 Feb 43 Emden/Industry* 7
16 Feb 43 Saint Nazaire/U-Boat Locks 7
26 Feb 43 Wilhelmshaven/Industry* 7
28 Feb 43 Brest/Industry* 8
6 Mar 43 Lorient/Power Station 9
8 Mar 43 Rennes/Rail Yard 8
12 Mar 43 Rouen/Rail Yard 4
13 Mar 43 Amiens/Rail Yards 5
18 Mar 43 Vegesack/U-boats 6
28 Mar 43 Rouen/Rail Yards 4
31 Mar 43 Rotterdam/Ship yard 3
4 Apr 43 Paris/Renault Works 5
5 Apr 43 Antwerp/Erla A/C Works 4
16 Apr 43 Lorient/Power Station 9
17 Apr 43 Bremen/ FW aircraft Works 7
* - No target type given in 367th's Combat Diary.
10. 12 (OPTIONAL RULE) ALTERNATE LANDING OPTIONS.
Switzerland:
During the mission if your bomber receives damage that will not allow you to return to your base (e.g. multiple engines out) you may wish to divert to Switzerland rather than try to crash land or bail out over enemy territory. Switzerland is in zones 10 and 11 for both England and Italian based bombers.
Sweden:
For bombers flying from England against targets in Northeastern Germany or Poland, you may divert to Sweden rather than try to crash land or bail out over enemy territory. Sweden is in zones 11 and 12 for England based bombers.
If you decide to divert to Switzerland or Sweden you must be able to fly there from the zone you are currently in. Roll for landing upon arrival on Table 7-1 to see if your crew and bomber survive. If you divert to Switzerland or Sweden you and your crew are interned for the rest of the war. Game over!
Island of Vis divert base:
The Island of Vis in the Adriatic Sea was held by the Allies and had a short runway. If your bomber is damaged you can divert to Vis if need be. Bombing missions in the following countries will allow you to divert to Vis;
Au = Austria R= Rumania
Cz = Czechoslovakia U = Ukraine
H = Hungary Y = Yugoslavia
P= Poland
Consider Vis to be in zone 2 for diverting purposes.
Follow Table 7-1 die roll modifiers for landing on Vis.
10.13 (OPT. RULE) SHUTTLE MISSIONS TO RUSSIA.
At the Tehran Conference in late November 1943 between Stalin, Roosevelt and Churchill, Stalin agreed to permit USAAF heavy bombers to fly shuttle missions to Russia to bomb enemy targets in eastern Germany and the Balkans without having to fly back to England and Italy. The Soviets made three airfields available near Kiev, Ukraine.
The first mission flew from Italy on June 2 1944. Four days later, the AAF flew from their Russian bases, bombed a target in Rumania and returned to Russia. On June 11, the planes returned to Italy, bombing another Rumanian target on the way.
B-17s and P-51s from England made their first shuttle mission on June 21, 1944. In the following months several more shuttle raids were flown from England and Italy. The shuttle mission of 13 September 1944 was the last one flown as the Russians had advanced so far westward that the Russian bases were no longer needed.
To fly a shuttle mission to Russia the player can elect to shuttle to Russia if:

~ ~
The date of the mission falls between June and September 1944.
The decision to conduct a shuttle mission must be made before the mission begins.
The target city must be located in zones 12, 13, 14 or 15 in any of the countries listed below:
A = Albania, Bu = Bulgaria, Cz = Czechoslovakia, G = Eastern Germany, H = Hungary, P=Poland, R = Rumania, U = Ukraine, Y = Yugoslavia.
Start and fly the mission normally up to the point the player's bomber has bombed the target city. After the player's bomber bombs the target city instead of turning back toward its base, the bomber continues flying away from his base toward zone 15. Continue to complete the sequence of play and all combats for each zone entered by the bomber until your bomber counter reaches zone 15.
Use the target zone modifier for all zones entered after leaving the target zone and moving toward zone 15.
After reaching zone 15 the player will complete one more full zone sequence of play and combat. This is to simulate interception of the bombers by German and other Axis allied air units. (Call this final zone, Zone 16 for the purposes of this rule). Combat in Zone 16 represents the flight from zone 15 to the landing fields outside of Kiev, Ukraine. The reason only one more zone is used to represent this flight is that the Germans had no organized ground control intercept stations for intercepting large bomber raids. Interception in the eastern Reich was spotty, so only the combat in our one "Zone 16" is used.
After completing all the combats in Zone 16 you will complete the landing sequence just as you would if your bomber was returning to its base in England or Italy.
You next mission will leave from the Kiev bases, just as it would from either England or Italy. Select your target city and place the target marker on the correct zone on the Strategic Mission Track. Then begin the mission. The first zone entered will be the "Zone 16" discussed above. Zone 16 and all the zones up to your target zone will use the zone modifiers for the Target City zone.
Complete the full zone sequence of play and any combat for "zone 16", and then move your bomber onto zone 15 on the Strategic Mission Track.
Continue the sequence of play for each zone moving your bomber from zone 15 to zone 14, etc. until you reach zone 2. Then conduct your landing in either England or Italy. Bomb your target city when you enter its zone.
11.0 SOURCES Extensive research was done for this game, including interviews with surviving bomber crewmembers, personal memoirs, official government documents on the Strategic Bombing Campaign in Europe and flights in surviving B-17 and B-24 aircraft. Many books and monographs written by former bomber crewmen were reviewed. I have listed some of the more easily obtained material below if the player wishes to do further research on the Daylight Strategic Bombing Campaign in Europe.
Books:
Operation Pointblank 1944 by Steven J. Zaloga. Osprey Publications, 2011.
Fw 190 Sturmbocke vs. B-17 Flying Fortress - Europe 1944-45 by Robert Forsyth. Osprey Publications. 2009.
Bf-109 Defense of the Reich Aces by John Weal. Osprey Publications. 2006.
Fifteenth Air Force Against the Axis by Kevin A. Mahoney. The Scarecrow Press, Inc. 2013.
The Mighty Eight by Roger A. Freeman. Double Day & Co., Inc. 1970.
Consolidated B-24 Liberator by Martin W. Bowman. The Crowood Press. 1998.
B-24 Liberator in Detail by Bert Kinzey. Squadron Signal Publications. 2000.
The Ragged Irregulars of Bassingbourn - The 91st Bomb Group by Marion H. Havelaar. Schiffer Military History Book. 1995.
Missions by the Numbers - 485th Bomb Group (H) by Sammy Schneider. Tarnaby Books. 2000.
Luftwaffe Viermot Aces, 1942-1945 by Robert Forsyth. Osprey Publications. 2011.
B-17 Flying Fortress Units of the Eighth Air Force Martin Bowman. 2002. (Two Volumes)
The German Jets in Combat by Jeffrey Ethell & Alfred Price. Jane's London. 1979.
Official Government Sources:
United States European War Strategic Bombing Survey Summary Report. United States Government Printing Office. 30 September 1945.
367th Bomb Squadron/306st Bomb Group Combat Diary 1942-45. 306th Bomb Group (H) Historical Assoc.
WWII 8th AAF Combat Chronology - January 1942 through December 1945. Eighth Air Force Historical Society.
Boeing Model B-17F Field Service Manual (Restricted) Boeing Aircraft Company. 1943.

~ ~

~ ~

~ ~
GAME CREDITS GAME DESIGN BASED ON THE DESIGNS BY: Glen Frank, Bruce Shelley, and Vincent Frattali
TARGET FOR TODAY GAME DESIGN: Steve Dixon
GAME DEVELOPMENT: Bob Best, Shawn Rife Joe Osentoski - Technical Assistance
GRAPHICS: Randy Lein Vincent Bourguignon Felipe Santamaria Brandon Pennington Steve Dixon
PRODUCTION COORDINATOR: Randy Lein
PLAYTEST COORDINATOR: Steve Dixon
PLAYTESTERS: Steve Dixon, Bob Best, Ron Plunk, Kevin Verdon, David Vencil, Bradley Newcomer, Joe Gandera, Jim Pink, Allen Lott, David Mack, Mike Bowen, Jim Miller, Todd Zirkle, and Ed Strecker.
SPECIAL THANKS: Permission was sought from the many players who contributed to the game with their own modifications to B17QOTS over the years, and some of these have been incorporated or modified into TFT. A special thanks to Art Dittus, Bruce Peckham, Tom Cundiff, and a host of others. A blown hard drive led to the loss of all my emails where the names were kept. Our apologies to those who said “yes” but are not listed.