
Taking Critical Measurements Critical Measureme… · Taking Critical Measurements ... Vernier...
17
The La Shawn Bauer Collection – A Systematic Approach to Appraisal Data Collection Taking Critical Measurements High Sierra Gem Lab & La Shawn Bauer, GG Email: [email protected] © January 2010 Page 1 of 17 Taking Critical Measurements: Unfortunately today, the vast majority of appraisals seriously lack vital and critical measurements. It is caused by a combination of not knowing any better and out-and-out sheer laziness. Once again Professionalism must rise above it all and appraisers need to accept their professional responsibilities and do the very best job they can. That is why you are getting paid to do what you do. A professional job equals a professional fee for professional services rendered. Taking Critical Measurements is actually very easy to perform and it only takes a few moments to do those tasks. First off, we first need to look at the tools and equipment required and/or needed to perform the simple yet precision oriented task required of us as professional appraisers and that is to quickly yet accurately measure the items(s) we are being paid to appraise in a professional manner. Tools needed and/or required: Ring Mandrel, Vernier Slide Gauge, Digital/Dial Calipers, Digital/Dial Leverage Style Gauge with high setting attachment, Table Gauge Transparency, Various Diamond Shape & Size Transparencies, and Calibration Blocks. Ring Mandrels: Ring Mandrels can be made from a variety of materials, solid metal, hollow metal or injected plastic. The most important aspect is that you first need to measure each of the ring size markings and record those measurements and then check those measurements against published and accepted ring size measurements to assure accuracy and repeatability.
Transcript of Taking Critical Measurements Critical Measureme… · Taking Critical Measurements ... Vernier...

The La Shawn Bauer Collection – A Systematic Approach to Appraisal Data Collection
Taking Critical Measurements
High Sierra Gem Lab & La Shawn Bauer, GG Email: [email protected]
© January 2010
Page 1 of 17
Taking Critical Measurements:
Unfortunately today, the vast majority of appraisals seriously lack vital and critical measurements.
It is caused by a combination of not knowing any better and out-and-out sheer laziness.
Once again Professionalism must rise above it all and appraisers need to accept their professional
responsibilities and do the very best job they can. That is why you are getting paid to do what you do. A
professional job equals a professional fee for professional services rendered.
Taking Critical Measurements is actually very easy to perform and it only takes a few moments to do
those tasks.
First off, we first need to look at the tools and equipment required and/or needed to perform the simple
yet precision oriented task required of us as professional appraisers and that is to quickly yet accurately
measure the items(s) we are being paid to appraise in a professional manner.
Tools needed and/or required:
Ring Mandrel, Vernier Slide Gauge, Digital/Dial Calipers, Digital/Dial Leverage Style Gauge with high
setting attachment, Table Gauge Transparency, Various Diamond Shape & Size Transparencies, and
Calibration Blocks.
Ring Mandrels:
Ring Mandrels can be made from a variety of materials, solid metal, hollow metal or injected plastic.
The most important aspect is that you first need to measure each of the ring size markings and record
those measurements and then check those measurements against published and accepted ring size
measurements to assure accuracy and repeatability.
The La Shawn Bauer Collection – A Systematic Approach to Appraisal Data Collection
Taking Critical Measurements
High Sierra Gem Lab & La Shawn Bauer, GG Email: [email protected]
© January 2010
Page 2 of 17
***Important Safety Reminder***
Double check to make sure the culet of the stone DOES NOT protrude past the bottom of the inside of the
ring shank before you slide the ring down the ring mandrel or you might end up chipping or breaking the
culet or pavilion of the stone.
Another important aspect is that when you slide the ring down onto the ring mandrel you need to visually
check that the entire inside of the ring’s surface is in direct contact with the ring mandrel because a lot of
the times the ring may be out of round due to wear or from sizing a ring beyond its accepted capabilities.
Some rings have to be sized oval or egg-shaped due to stone setting issues. Double check to make sure the
inside of the ring’s surface is in contact with the ring mandrel. If not and there is a perceptible air gap then
you must make an estimated and educated guess as to the true size of the ring. You should also record and
make a note in your report stating the ring is not perfectly round.
I personally use a simple comment in my reports as, Round, Slightly Out-of-Round, Ovaled or Egg-
Shaped due to stone setting issues.
***You should measure and record the ring size to the closest ¼ size***
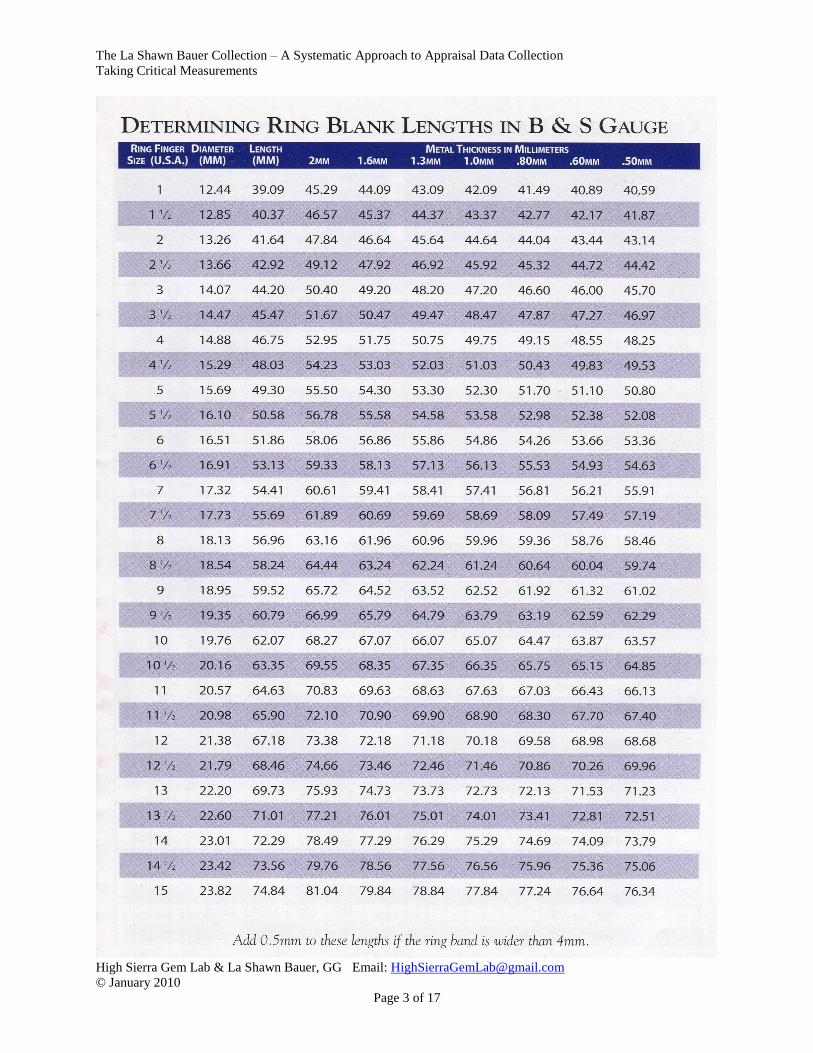
On the following page is a chart of ring size diameters please double check your ring mandrels against the
printed and accepted ring size diameters.
Use the printed ring size diameter and don’t mistakenly use the length measurement by mistake.
Start now and build a “Laboratory Equipment Maintenance, Re-Calibration and Re-Certification
Log/Journal”
On one page list the ring mandrels you generally use and record each size and half size on your ring
manual and then double check it against the chart on the following page and make any notes and
comments as to the variances so you can see where your ring mandrel is accurate and where it is
inaccurate.
As you will see a mere 0.50mm / 1/2mm difference in ring size diameter is equal to ½ ring size so please
be aware of these tolerances and inaccuracies.
You also need to remember the RING SIZE is in fact an Identifying Attribute, so please record it and treat
it as such.
Another attribute associated with ring size is to list if the ring is a closed back, open back, closed back
with pierced bridge gallery and such.
I personally list these features in all of my own appraisals.
Closed Back, Closed Back Solid, Closed Back / Cleaning Hole(s), Closed Back Hollow Shoulders, Open
Back, Open Back / Pierced Gallery – Cast, Open Back / Pierced Gallery - Hand Pierced, Semi-Open
Back, Underside Pieced Gallery, Cast – Pierced Gallery, Hand Fabricated – Pierced Gallery, Sizing Balls,
Speed Bumps, Inside Sizing Spring, Arthritic Adjustable Ring Shank
The La Shawn Bauer Collection – A Systematic Approach to Appraisal Data Collection
Taking Critical Measurements
High Sierra Gem Lab & La Shawn Bauer, GG Email: [email protected]
© January 2010
Page 3 of 17
The La Shawn Bauer Collection – A Systematic Approach to Appraisal Data Collection
Taking Critical Measurements
High Sierra Gem Lab & La Shawn Bauer, GG Email: [email protected]
© January 2010
Page 4 of 17
***Important Note***
If you have a ring with sizing balls, speed bumps or inside sizing spring you can still measure and record
an accurate size of the ring by using the inside diameter measuring side of your calipers and measure
across the inside of the ring in several areas and average them out and then use the handy-dandy
conversion chart and you can estimate the original ring size.
However make sure you make a notation or comment within your report stating that the ring has sizing
balls, speed bumps, inside ring spring or if it has an adjustable arthritic shank as these are important
indentifying attributes.
Additional Measurements to record and insert into your reports:
***Important Reminder***
Remember, these critical measurements are in fact Identifying Attributes, so please record them and treat
them as such.
Top of Mounting Measurements:
Width & Thickness
Shank, Top of Shoulders:
Width & Thickness
Shank, Bottom of Ring Shank:
Width & Thickness
There is a very important reason why these measurements need to be taken and recorded in your report
and I’ll explain them later towards the end of the article.
***Important Note***
I personally measure and record these measurements out to the closest 0.10mm 1/10mm.
All Six (6) of these measurements can be taken and recorded in less than Two (2) Minutes.
Therefore, there is absolutely no acceptable excuse as to why you as a Professional Appraiser DID NOT
measure, record and report these critical measurements within your report.
*** Important Reminder ***
Remember you are holding yourself out and projecting yourself as a professional to your clients so you
better act in a professional manner and perform a reasonable degree of due diligence when performing
your duties and tasks as a professional appraiser of gems and jewelry.
The La Shawn Bauer Collection – A Systematic Approach to Appraisal Data Collection
Taking Critical Measurements
High Sierra Gem Lab & La Shawn Bauer, GG Email: [email protected]
© January 2010
Page 5 of 17
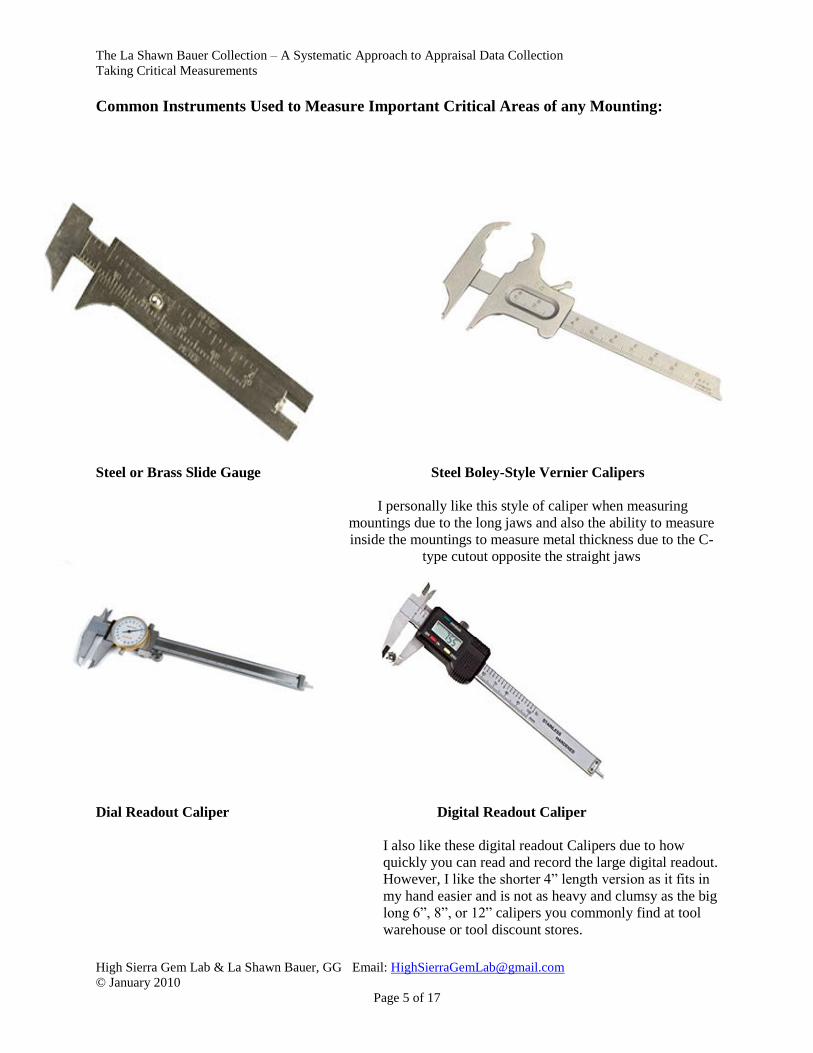
Common Instruments Used to Measure Important Critical Areas of any Mounting:
Steel or Brass Slide Gauge Steel Boley-Style Vernier Calipers
I personally like this style of caliper when measuring
mountings due to the long jaws and also the ability to measure
inside the mountings to measure metal thickness due to the C-
type cutout opposite the straight jaws
Dial Readout Caliper Digital Readout Caliper
I also like these digital readout Calipers due to how
quickly you can read and record the large digital readout.
However, I like the shorter 4” length version as it fits in
my hand easier and is not as heavy and clumsy as the big
long 6”, 8”, or 12” calipers you commonly find at tool
warehouse or tool discount stores.
The La Shawn Bauer Collection – A Systematic Approach to Appraisal Data Collection
Taking Critical Measurements
High Sierra Gem Lab & La Shawn Bauer, GG Email: [email protected]
© January 2010
Page 6 of 17
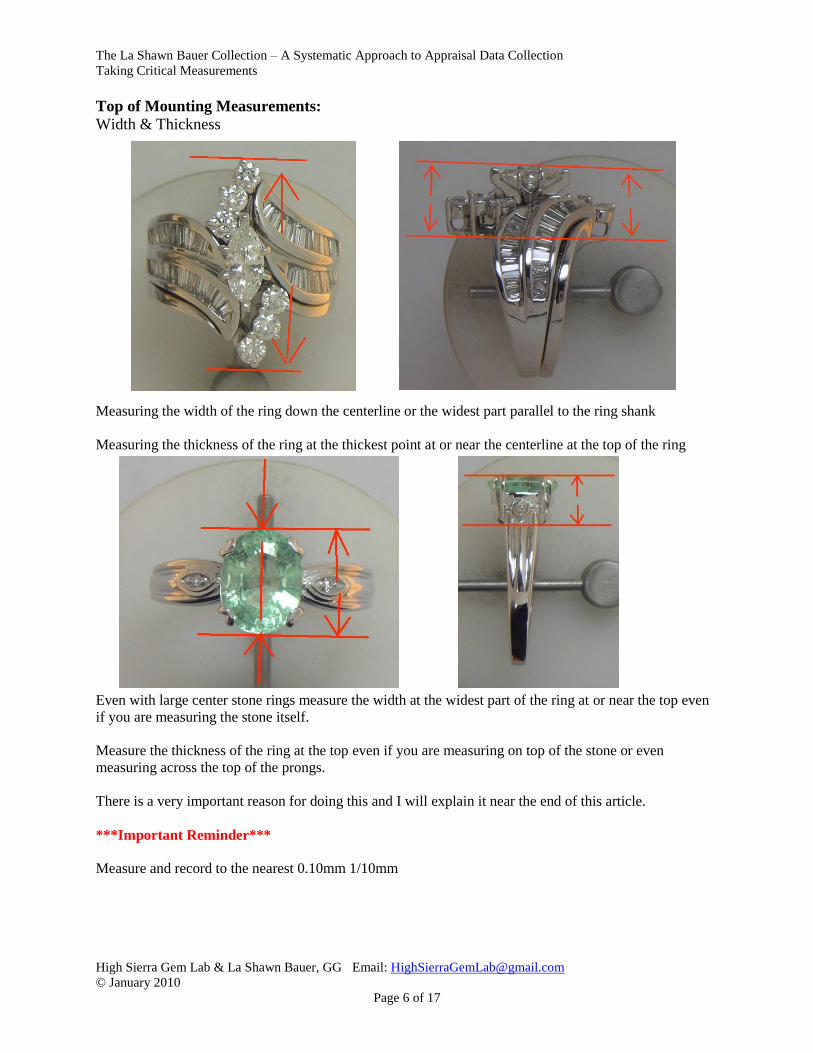
Top of Mounting Measurements:
Width & Thickness
Measuring the width of the ring down the centerline or the widest part parallel to the ring shank
Measuring the thickness of the ring at the thickest point at or near the centerline at the top of the ring
Even with large center stone rings measure the width at the widest part of the ring at or near the top even
if you are measuring the stone itself.
Measure the thickness of the ring at the top even if you are measuring on top of the stone or even
measuring across the top of the prongs.
There is a very important reason for doing this and I will explain it near the end of this article.
***Important Reminder***
Measure and record to the nearest 0.10mm 1/10mm

The La Shawn Bauer Collection – A Systematic Approach to Appraisal Data Collection
Taking Critical Measurements
High Sierra Gem Lab & La Shawn Bauer, GG Email: [email protected]
© January 2010
Page 7 of 17
Shank, Top of Shoulders:
Width & Thickness
Measuring the Width and Thickness of the Ring Shank at the Top of the Shoulders can be subjective in
some instants.
If you look closely at this ring shank you will see that it tapers inward ever so slightly near the center
head.
In this case measure where the ring shank near the top is the widest.
***Important Reminder***
Measure and record to the nearest 0.10mm 1/10mm
The La Shawn Bauer Collection – A Systematic Approach to Appraisal Data Collection
Taking Critical Measurements
High Sierra Gem Lab & La Shawn Bauer, GG Email: [email protected]
© January 2010
Page 8 of 17
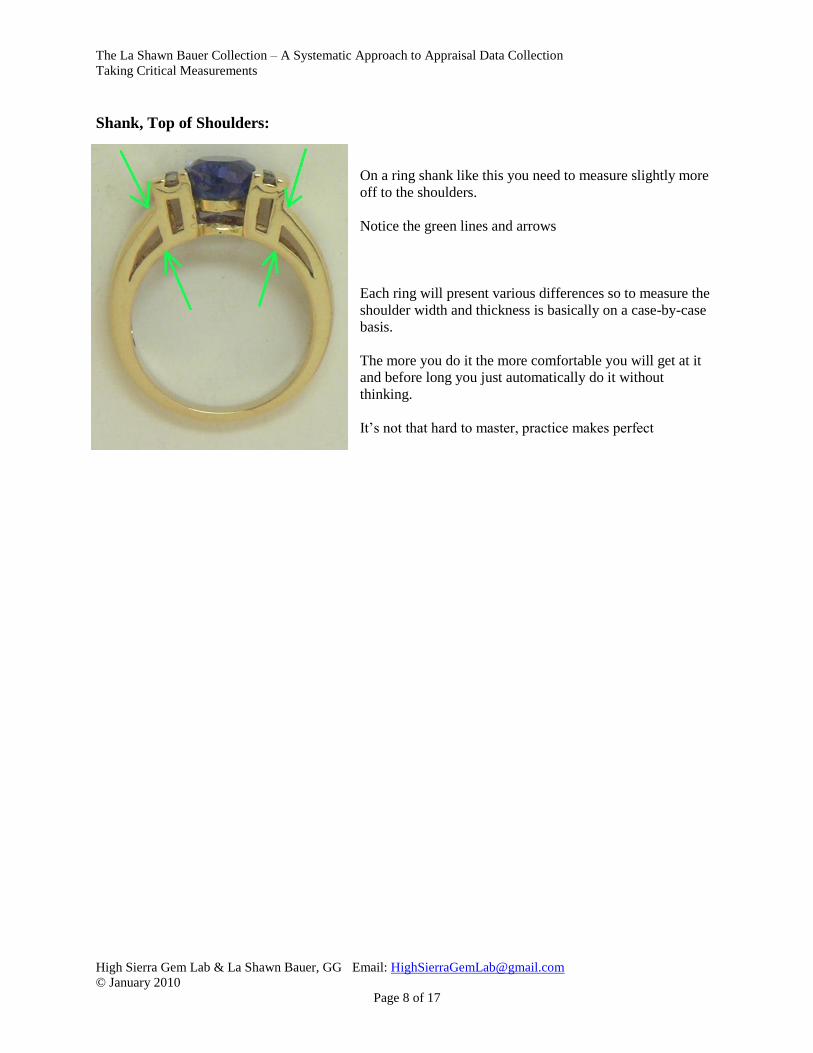
Shank, Top of Shoulders:
On a ring shank like this you need to measure slightly more
off to the shoulders.
Notice the green lines and arrows
Each ring will present various differences so to measure the
shoulder width and thickness is basically on a case-by-case
basis.
The more you do it the more comfortable you will get at it
and before long you just automatically do it without
thinking.
It’s not that hard to master, practice makes perfect

The La Shawn Bauer Collection – A Systematic Approach to Appraisal Data Collection
Taking Critical Measurements
High Sierra Gem Lab & La Shawn Bauer, GG Email: [email protected]
© January 2010
Page 9 of 17
Shank, Bottom of Ring Shank:
Width & Thickness
Measuring the Width and Thickness at the Bottom of the Ring Shank is pretty straight forward
***Important Reminder***
Measure and record to the nearest 0.10mm 1/10mm
***Important Repair Notice***
If the bottom of the ring shank is less than 1.0mm thick then you should advise your client to have the
ring re-shanked as there is a possible durability issue. However you DO NOT need to list this comment or
notation is your report. Just give your client a friendly reminder.
The La Shawn Bauer Collection – A Systematic Approach to Appraisal Data Collection
Taking Critical Measurements
High Sierra Gem Lab & La Shawn Bauer, GG Email: [email protected]
© January 2010
Page 10 of 17
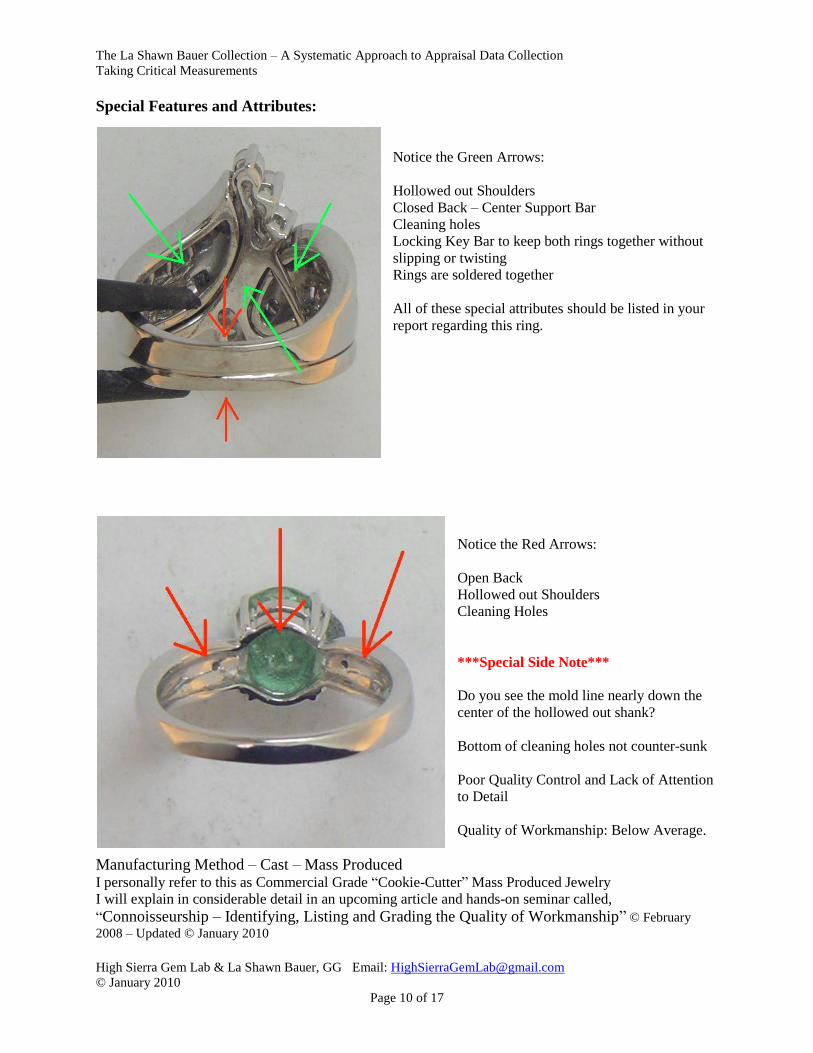
Special Features and Attributes:
Notice the Green Arrows:
Hollowed out Shoulders
Closed Back – Center Support Bar
Cleaning holes
Locking Key Bar to keep both rings together without
slipping or twisting
Rings are soldered together
All of these special attributes should be listed in your
report regarding this ring.
Notice the Red Arrows:
Open Back
Hollowed out Shoulders
Cleaning Holes
***Special Side Note***
Do you see the mold line nearly down the
center of the hollowed out shank?
Bottom of cleaning holes not counter-sunk
Poor Quality Control and Lack of Attention
to Detail
Quality of Workmanship: Below Average.
Manufacturing Method – Cast – Mass Produced I personally refer to this as Commercial Grade “Cookie-Cutter” Mass Produced Jewelry
I will explain in considerable detail in an upcoming article and hands-on seminar called,
“Connoisseurship – Identifying, Listing and Grading the Quality of Workmanship” © February
2008 – Updated © January 2010
The La Shawn Bauer Collection – A Systematic Approach to Appraisal Data Collection
Taking Critical Measurements
High Sierra Gem Lab & La Shawn Bauer, GG Email: [email protected]
© January 2010
Page 11 of 17
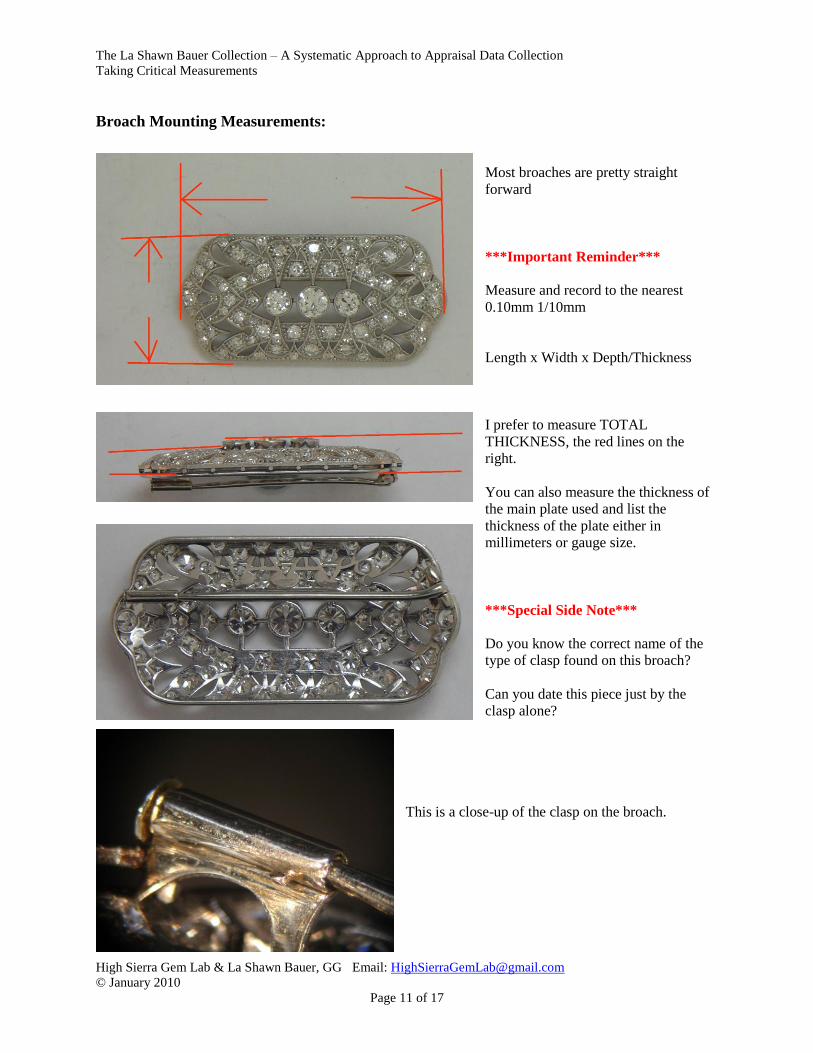
Broach Mounting Measurements:
Most broaches are pretty straight
forward
***Important Reminder***
Measure and record to the nearest
0.10mm 1/10mm
Length x Width x Depth/Thickness
I prefer to measure TOTAL
THICKNESS, the red lines on the
right.
You can also measure the thickness of
the main plate used and list the
thickness of the plate either in
millimeters or gauge size.
***Special Side Note***
Do you know the correct name of the
type of clasp found on this broach?
Can you date this piece just by the
clasp alone?
This is a close-up of the clasp on the broach.

The La Shawn Bauer Collection – A Systematic Approach to Appraisal Data Collection
Taking Critical Measurements
High Sierra Gem Lab & La Shawn Bauer, GG Email: [email protected]
© January 2010
Page 12 of 17
Pendant Mounting Measurements:
Measuring Length, Width and Thickness of an unusual shaped pendant
You can also measure the diameter of the wire that makes the arrow shaft
You can also measure the width and thickness of the feather portion of the arrow
***Special Side Note***
This was a custom-made, hand assembled pendant.
It IS NOT Hand-Fabricated nor is it Hand-made because the marquise head and split bezel are pre-made
items and those pieces make up approximately 50% of the item so it really can’t be called anything other
than Hand-Assembled and Custom-Made.
***Important Side Note*** This is the KEY!
The reason for taking these measurements is because if you have these measurements recorded and also
have clear well focused pictures of the item, Top View, Side View, Profile View, Bottom View or Back
View you can if need be use a digital image measuring program and with your measurements inputted
into the program the reference measurement(s) you can then effectively measure any portion of the item
with relative accuracy.
The La Shawn Bauer Collection – A Systematic Approach to Appraisal Data Collection
Taking Critical Measurements
High Sierra Gem Lab & La Shawn Bauer, GG Email: [email protected]
© January 2010
Page 13 of 17
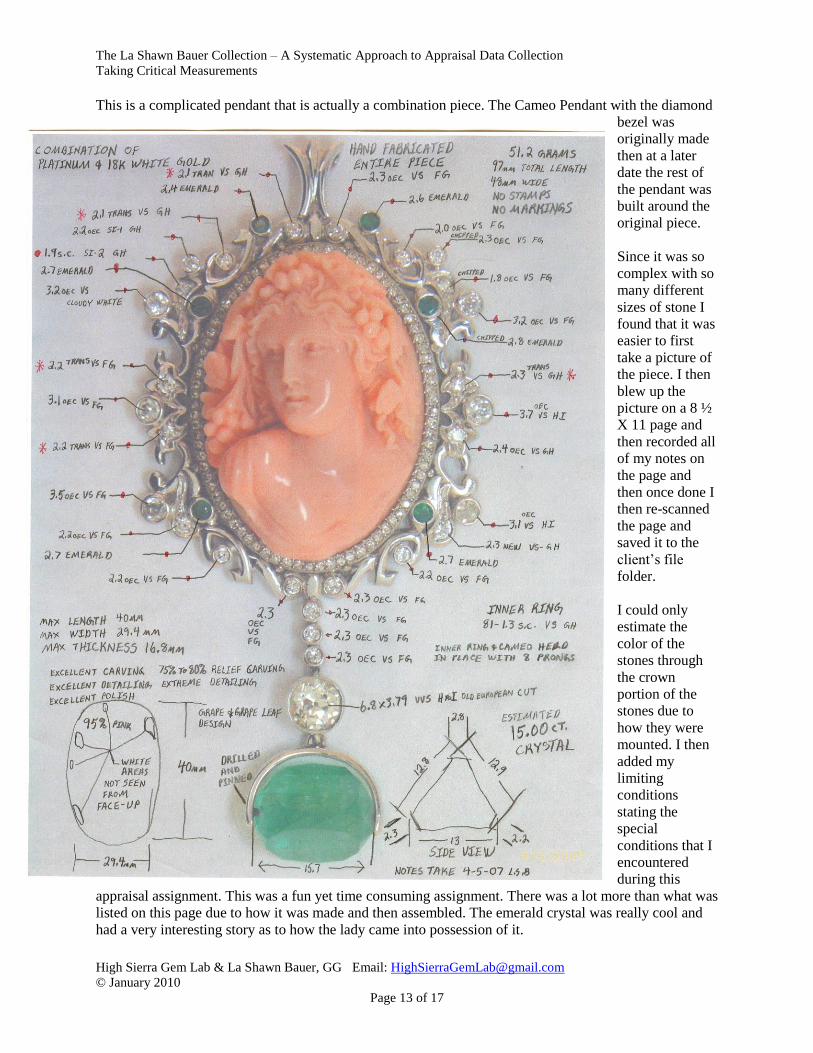
This is a complicated pendant that is actually a combination piece. The Cameo Pendant with the diamond
bezel was
originally made
then at a later
date the rest of
the pendant was
built around the
original piece.
Since it was so
complex with so
many different
sizes of stone I
found that it was
easier to first
take a picture of
the piece. I then
blew up the
picture on a 8 ½
X 11 page and
then recorded all
of my notes on
the page and
then once done I
then re-scanned
the page and
saved it to the
client’s file
folder.
I could only
estimate the
color of the
stones through
the crown
portion of the
stones due to
how they were
mounted. I then
added my
limiting
conditions
stating the
special
conditions that I
encountered
during this
appraisal assignment. This was a fun yet time consuming assignment. There was a lot more than what was
listed on this page due to how it was made and then assembled. The emerald crystal was really cool and
had a very interesting story as to how the lady came into possession of it.
The La Shawn Bauer Collection – A Systematic Approach to Appraisal Data Collection
Taking Critical Measurements
High Sierra Gem Lab & La Shawn Bauer, GG Email: [email protected]
© January 2010
Page 14 of 17
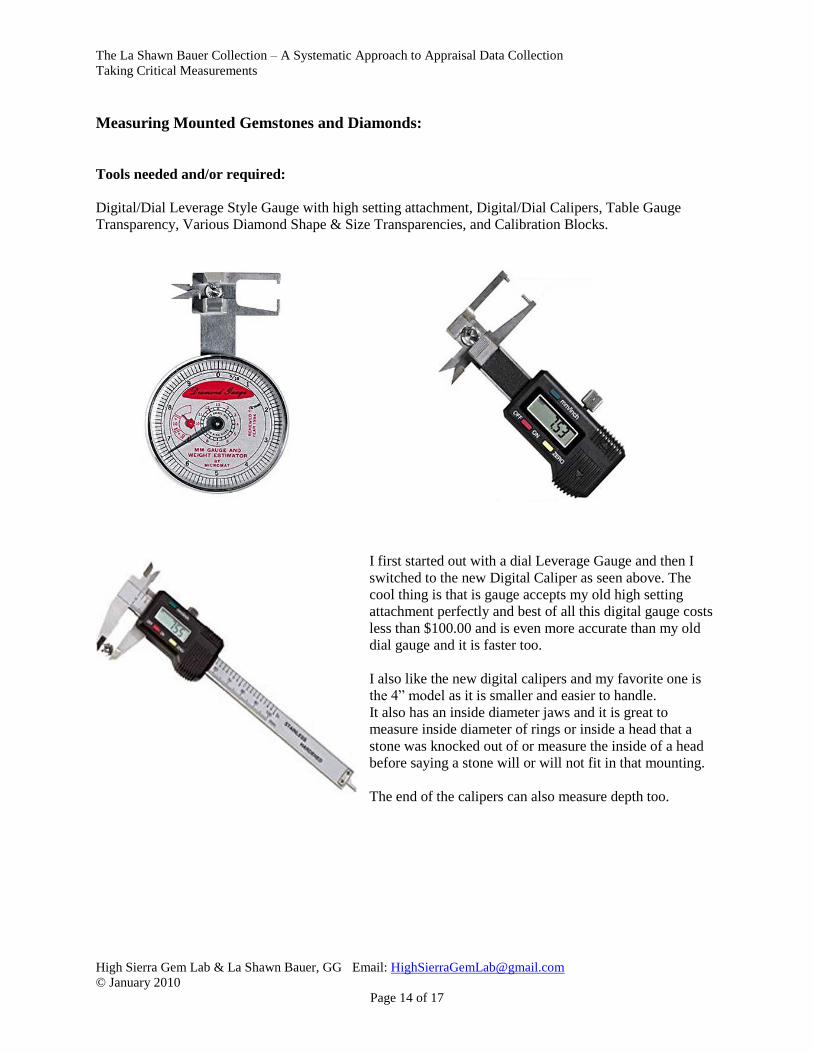
Measuring Mounted Gemstones and Diamonds:
Tools needed and/or required:
Digital/Dial Leverage Style Gauge with high setting attachment, Digital/Dial Calipers, Table Gauge
Transparency, Various Diamond Shape & Size Transparencies, and Calibration Blocks.
I first started out with a dial Leverage Gauge and then I
switched to the new Digital Caliper as seen above. The
cool thing is that is gauge accepts my old high setting
attachment perfectly and best of all this digital gauge costs
less than $100.00 and is even more accurate than my old
dial gauge and it is faster too.
I also like the new digital calipers and my favorite one is
the 4” model as it is smaller and easier to handle.
It also has an inside diameter jaws and it is great to
measure inside diameter of rings or inside a head that a
stone was knocked out of or measure the inside of a head
before saying a stone will or will not fit in that mounting.
The end of the calipers can also measure depth too.

The La Shawn Bauer Collection – A Systematic Approach to Appraisal Data Collection
Taking Critical Measurements
High Sierra Gem Lab & La Shawn Bauer, GG Email: [email protected]
© January 2010
Page 15 of 17
Transparences:
Transparences are also very helpful too in estimating stone size be it straight or tapered baguettes.
To correctly and properly measure mounted gemstones is only slightly different than measuring them
when they are loose.
Every gemologist should be able to measure gemstones mounted or loose.
Diameter, Width, Length and Depth.
***Extremely Important***
The most important aspect of the measuring process of mounted gemstones is to correctly and clearly
state how the measurements were taken.
Method of Measurements taken:
Actual
Approximate
Estimated
Actual-Digital Diameter-Digital Depth
Actual-Table Gage Diameter-Digital Depth
Actual-Table Gage Diameter-Table Gage Depth
Actual-Digital Diameter-Table Gage Depth
Actual-Table Gage Diameter-Estimated Depth
Actual-Digital Diameter-Estimated Depth
Approximate-Estimated Diameter-Estimated Depth
Or any various combination
The La Shawn Bauer Collection – A Systematic Approach to Appraisal Data Collection
Taking Critical Measurements
High Sierra Gem Lab & La Shawn Bauer, GG Email: [email protected]
© January 2010
Page 16 of 17
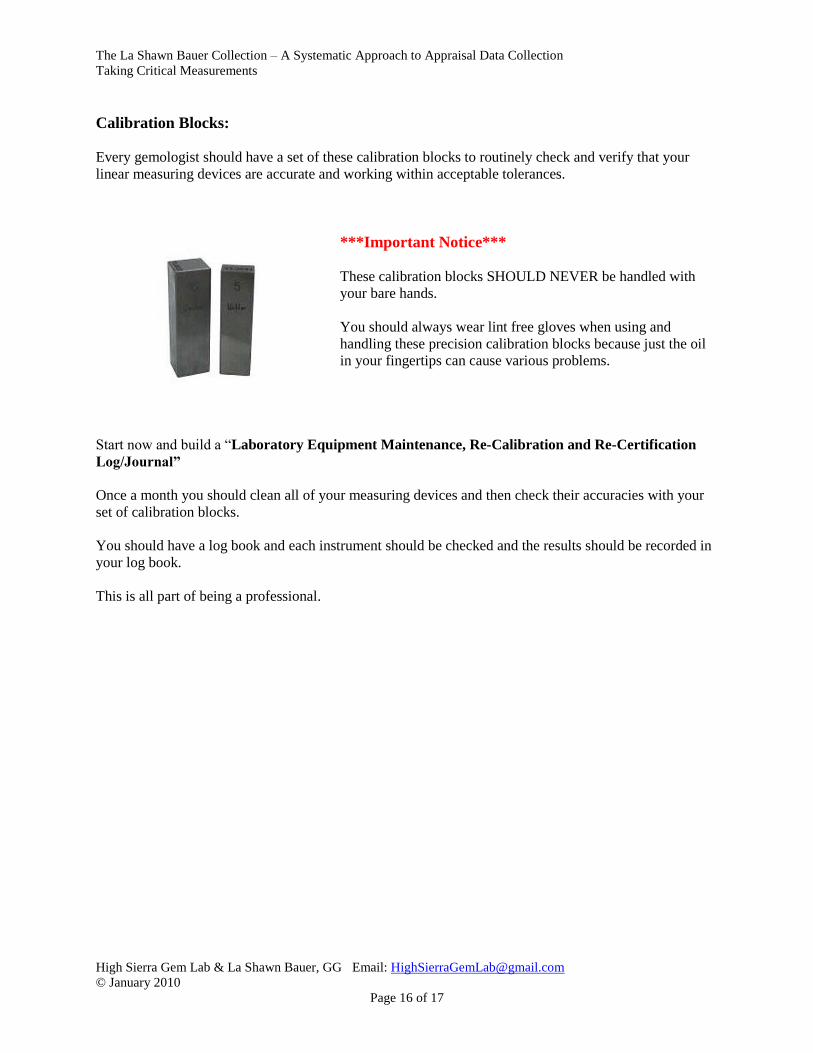
Calibration Blocks:
Every gemologist should have a set of these calibration blocks to routinely check and verify that your
linear measuring devices are accurate and working within acceptable tolerances.
***Important Notice***
These calibration blocks SHOULD NEVER be handled with
your bare hands.
You should always wear lint free gloves when using and
handling these precision calibration blocks because just the oil
in your fingertips can cause various problems.
Start now and build a “Laboratory Equipment Maintenance, Re-Calibration and Re-Certification
Log/Journal”
Once a month you should clean all of your measuring devices and then check their accuracies with your
set of calibration blocks.
You should have a log book and each instrument should be checked and the results should be recorded in
your log book.
This is all part of being a professional.

The La Shawn Bauer Collection – A Systematic Approach to Appraisal Data Collection
Taking Critical Measurements
High Sierra Gem Lab & La Shawn Bauer, GG Email: [email protected]
© January 2010
Page 17 of 17
The Moon over the Black Rock Desert, Northern Nevada also the Home of Burning Man
This was a simple A-Focal Photograph taken through my 90mm Stellarvue Refractor Telescope
You are only viewing the picture at 50% of actual size.
Using my trustee Pentax Optio 33WR
Thanks for taking time to read my article and I hope you learned a thing or two and had fun all at the
same time. Please email me with your comments and suggestions.
To learn more about my systematic approach to appraisal data collection check it out at
http://gemologyonline.com/LaShawn/appraisal.html
While you are at it checkout GemologyOnline at http://www.gemologyonline.com/
Better yet register and become a member of one of the best gemology sites on the web.