TABLE OF CONTENTS TABLE OF CONTENTS 1 … arrow 2.. TABLE OF CONTENTS TABLE OF CONTENTS 1 FreeStyle...
2
1 FreeStyle Optium Neo At-A-Glance Logbook Up Button Power Button • Turns meter on and off and returns to the Home screen USB Port • Insert a data cable here for uploading test results to a computer (data management system required) Strip Port • Insert a test strip here Test Strip • Insert the test strip into the meter Target Area • Apply blood or control solution to the white target area at the end of the test strip Display Window • Displays meter Home screen (shown here) • Displays your test results and other important information Down Button 2 Meter Symbols Symbol What It Means Symbol What It Means Logbook Breakfast insulin dose Meter ready for sample application Lunch insulin dose Control solution result Dinner insulin dose Units of insulin Fasting test Insulin Ketone Morning long-acting insulin dose Low battery Evening long-acting insulin dose Connected to computer Insulin dose setup Setup mode Low blood glucose or pattern High blood glucose or pattern 3 Quick Start – Testing Your Blood Glucose 1. Wash and dry hands before and after testing. Note: Check test strip expiry date. 2. Insert strip. 3. Lance test site and apply blood. 4. View result. For more information on how to perform a test, see Section 7. 4 Intended Use The FreeStyle Optium Neo Blood Glucose and Ketone Monitoring System is for use outside the body only (in vitro diagnostic use) for self testing or professional use as an aid in the management of diabetes. Use for measuring glucose in fresh whole blood samples taken from fingers, forearm, upper arm or the base of the thumb. Use for measuring ketone (β-hydroxybutyrate) in fresh whole blood samples from fingers only. The system may also aid in the management of diabetes by providing the user with suggested recommendations to insulin dose(s) based on healthcare professional entered data. IMPORTANT: • Use only FreeStyle Optium blood glucose test strips and FreeStyle Optium blood β-Ketone test strips. Other test strips may produce inaccurate results. • See test strip instructions for use for more information about sample types. • Read the instructions in this Owner’s Setup Guide. Failure to follow instructions may cause incorrect results. Practice the testing procedures before using the meter. • Follow your healthcare professional’s advice when testing blood glucose levels and blood ketone levels. • Observe caution when using around children. Small parts may constitute a choking hazard. IMPORTANT: • Only use a test strip once. • Read the test strip instructions for use before performing your first blood glucose or ketone test. It contains important information and will tell you how to store and handle the test strips. • The meter and its accessories are for use by a single person. • Refer to the lancing device insert for detailed instructions on how to use the lancing device. • Do not put urine on the test strip. Check your ketone: • When you have an illness • When your blood glucose is above 13.3 mmol/L • When you and your healthcare professional feel it is necessary 5 Getting to Know Your Meter Turning Your Meter On and Off To turn your meter on: • Press the , or • Insert a strip To turn your meter off: • Press and hold the for 3 seconds, or • Do nothing for 2 minutes Checking Your Meter Screen Every Time You Turn It On Meter Off Screen Your meter screen should be fully black when powered off. Each time you turn on your meter, a white start-up test screen will appear for 1 second. If you see any white segments in the black off screen, or any black segments in the white test screen, there may be a problem with the meter. Contact Customer Care. Note: If the meter battery is low, the will appear in both the meter off screen and start-up test screen. Start-up Test Screen ➧ 6 Setting Up the Meter To confirm that the date and time are set correctly, follow the steps below. Set Time 1. Start with meter off (no test strip inserted) • Press to turn on the meter 2. Press and hold the time (11:50) on the screen for 3 seconds until the screen changes. (e.g. 1:23 PM) (e.g. 13:23) 3. Set Time Format (12 hour or 24 hour clock) • Press or to change • Press to continue Note: Your meter can display either a 12 h (1:23 PM) or 24 h (13:23) time format. If you prefer the 12 h format, there is no “AM”. If setting a PM time, continue to press until you see the “PM”. 4. Set Hour • The hour blinks. Press or to set the hour • Press to continue 5. Set Minutes • The minutes blink. Press or to set the minutes • Press to continue minute hour minute hour 10 View Logbook Your meter logbook can store up to 1,000 events – including blood glucose, ketone, and control solution results, insulin doses, and other meter information. Viewing Your Logbook Events 1. While on the Home screen, press to view your logbook events. Examples: Blood Glucose Result 2. Press to scroll through to view your logbook events. Units of Insulin Insulin Dose Fasting Result - Control Solution Result Viewing Your Blood Glucose Averages 1. While on the Home screen, press to open the logbook. 2. While in the logbook, press any time to view your 7-day average. [ ] • Press to view 14-day average. [ ] • Press to view 30-day average. [ ] • Press to return to your logbook events. Notes: • Averages do not include glucose control solution results. • Control solution results not marked as control solution tests may cause averages to be inaccurate. • appear on the meter screen when there are no current events or averages to view. • blood glucose test results are included as 1.1 mmol/L when calculating averages. • blood glucose test results are included as 27.8 mmol/L when calculating averages. Press or to scroll through 7-, 14- and 30-day averages. Your average Number of tests in this average Prepare to Test 1. Select your test site. Test site choices for blood glucose testing are fingers, forearm, upper arm, or base of the thumb. Use only fingertip blood samples for blood ketone testing. Note: Avoid moles, veins, bones, and tendons. Bruising may occur at the test site. If bruising occurs, consider selecting another site. 2. Wash your hands and the test site with soap and warm water. • Rinse and dry thoroughly. • Do not use lotion or cream on the test site. 3. Check test strip expiry date. Do not use expired test strips; they may cause inaccurate results. Do not use blood samples from alternative sites when: • You think your blood glucose is low or changing rapidly • You have been diagnosed with hypoglycaemic unawareness • Alternative site results do not match the way you feel • You are within two hours of eating a meal, taking insulin, or exercising Performing a Blood Glucose or Blood Ketone Test 1. Open the foil test strip packet at the notch and tear down to remove the test strip. 2. Insert the test strip into the meter until it stops. This will turn on the meter. Notes: • Be sure to check that your meter screen is working properly each time you turn your meter on. If you see any white segments in the black off screen, or any black segments in the white test screen, there may be a problem with the meter. (See Section 5, Getting to Know Your Meter, for more details) • The meter turns off after 3 minutes of inactivity. Remove and reinsert the unused test strip to restart the meter. The blinks, indicating the meter is ready for you to apply a sample to the test strip. Note: KET will appear on the screen if you have inserted a purple blood ketone strip. 7 Testing Your Blood Glucose or Blood Ketone 8 Understanding Blood Glucose Test Results and Patterns 3. Obtain a blood sample. Use the lancing device to obtain a blood sample. (See lancing device instructions for use for more information.) 4. Apply blood to the test strip. Bring the blood drop to the white area at the end of the test strip. The blood is drawn into the test strip. Hold blood to test strip until you see 3 short lines on the meter screen. This means you have applied enough blood. Notes: • If you are testing blood glucose, you will see a 5-second countdown. If you are testing blood ketone, you will see a 10-second countdown. • Do not remove the test strip from the meter during the countdown. • If the countdown does not start, you may not have applied enough blood to the test strip. See test strip instructions for use for re-application instructions. If the countdown still does not start, remove the used strip and discard it correctly. Start a new test with a new test strip. ➧ - Blood Glucose Result example Blood Ketone Result example 5. View the result. The test is complete when the result appears on the meter screen (examples shown). The result is stored in memory. Note: If you see a this means the meter can suggest a new meal insulin dose. Ignore this if you’re not about to eat a meal and take your meal insulin dose. 6. Press and hold to turn off the meter. Discard the used test strip correctly. The meter displays blood glucose results in mmol/L. The unit of measurement is preset. You cannot change this setting. Low Blood Glucose Results If You See . . . What It Means What To Do Appears when result is lower than 3.9 mmol/L or the target set on the meter by your healthcare professional. Follow your healthcare professional’s advice to treat low blood glucose. A pattern of low glucose has developed. If 2 low results occur within the past 5 days AND both are within the same 3-hour time period, the meter will display a blinking . Follow your healthcare professional’s advice to treat low blood glucose. Appears when result is lower than 1.1 mmol/L Severe low blood glucose or There may be a problem with the test strip. Repeat the test with a new test strip. If the result is LO, contact your healthcare professional immediately. Note: If you see the error messages E-3 or E-4, consult the Error Messages section in this Owner’s Setup Guide. A solid red arrow A blinking red arrow IMPORTANT: Contact your healthcare professional if you have symptoms that do not match your test result, and you have followed the instructions in this Owner’s Setup Guide. High Blood Glucose Results If You See . . . What It Means What To Do Appears when result is higher than 13.3 mmol/L or the target set on the meter by your healthcare professional. Follow your healthcare professional’s advice to treat high blood glucose. A pattern of high glucose has developed. If 3 high results occur within the past 5 days AND all are within the same 3-hour time period, the meter will display a blinking . Follow your healthcare professional’s advice to treat high blood glucose. Blood glucose level is higher than or equal to 13.3 mmol/L. Check blood ketone if checking ketones is part of your diabetes management program. Appears when result is higher than 27.8 mmol/L Severe high blood glucose or There may be a problem with the test strip. Repeat the test with a new test strip. If the result is HI, contact your healthcare professional immediately. IMPORTANT: The meter displays results from 1.1 - 27.8 mmol/L. Low or high blood glucose results can indicate a potentially serious medical condition. A solid yellow arrow A blinking yellow arrow The meter displays ketone results in mmol/L, from 0.0 - 8.0 mmol/L. The unit of measurement is preset. You cannot change this setting. Blood ketone is expected to be below 0.6 mmol/L. 2 High blood ketone may be caused by illness, fasting, vigorous exercise, or uncontrolled blood glucose levels. 1-3 Repeat a blood ketone test using a new blood ketone test strip when: • HI appears on the display • Your result is unusually high • You question your result • Your blood ketone result is 0.0 mmol/L, but your blood glucose is higher than 16.7 mmol/L IMPORTANT: Follow your healthcare professional’s advice before you make any changes to your diabetes management program. Display What It Means What To Do Result is between 0.6 – 1.5 mmol/L. High blood ketone. A problem requiring medical assistance may be occurring. Follow your healthcare professional’s advice. Result is higher than 1.5 mmol/L. You may be at risk of developing diabetic ketoacidosis (DKA). 2-6 Contact your healthcare professional immediately. Appears when result is higher than 8.0 mmol/L. Very high blood ketone or There may be a problem with the test strip. Repeat the test with a new test strip. If the result is HI, contact your healthcare professional immediately. 9 Understanding Blood Ketone Test Results Set Date 6. Set Month • The month blinks. Press or to set the month • Press to continue 7. Set Day • The day blinks. Press or to set the day • Press to continue 8. Set Year • Press or to set the year • Press to save. Setup complete month day month day TABLE OF CONTENTS TABLE OF CONTENTS 11 Glucose and Ketone Control Solutions Performing a Control Solution Test 12 Transferring Meter Data to a Computer 13 Error Messages 14 Taking Care of Your Meter Changing Batteries Cleaning Your Meter 15 Troubleshooting 16 Insulin Dose Logging Set Up for Insulin Dose Logging How to Use Insulin Dose Logging How to Log Additional Rapid-Acting Insulin Doses 17 Meter Specifications 18 Other Symbols 19 References 1 FreeStyle Optium Neo At-A-Glance 2 Meter Symbols 3 Quick Start - Testing Your Blood Glucose 4 Intended Use 5 Getting to Know Your Meter Turning Your Meter On and Off Checking Your Meter Screen Every Time You Turn it On 6 Setting Up the Meter 7 Testing Your Blood Glucose or Blood Ketone Prepare to Test Performing a Blood Glucose or Blood Ketone Test 8 Understanding Blood Glucose Test Results and Patterns Low Blood Glucose Results High Blood Glucose Results 9 Understanding Blood Ketone Test Results 10 View Logbook Viewing Your Logbook Events Viewing Your Blood Glucose Averages Blood Glucose and Ketone Monitoring System Owner’s Setup Guide User’s Manual
Transcript of TABLE OF CONTENTS TABLE OF CONTENTS 1 … arrow 2.. TABLE OF CONTENTS TABLE OF CONTENTS 1 FreeStyle...
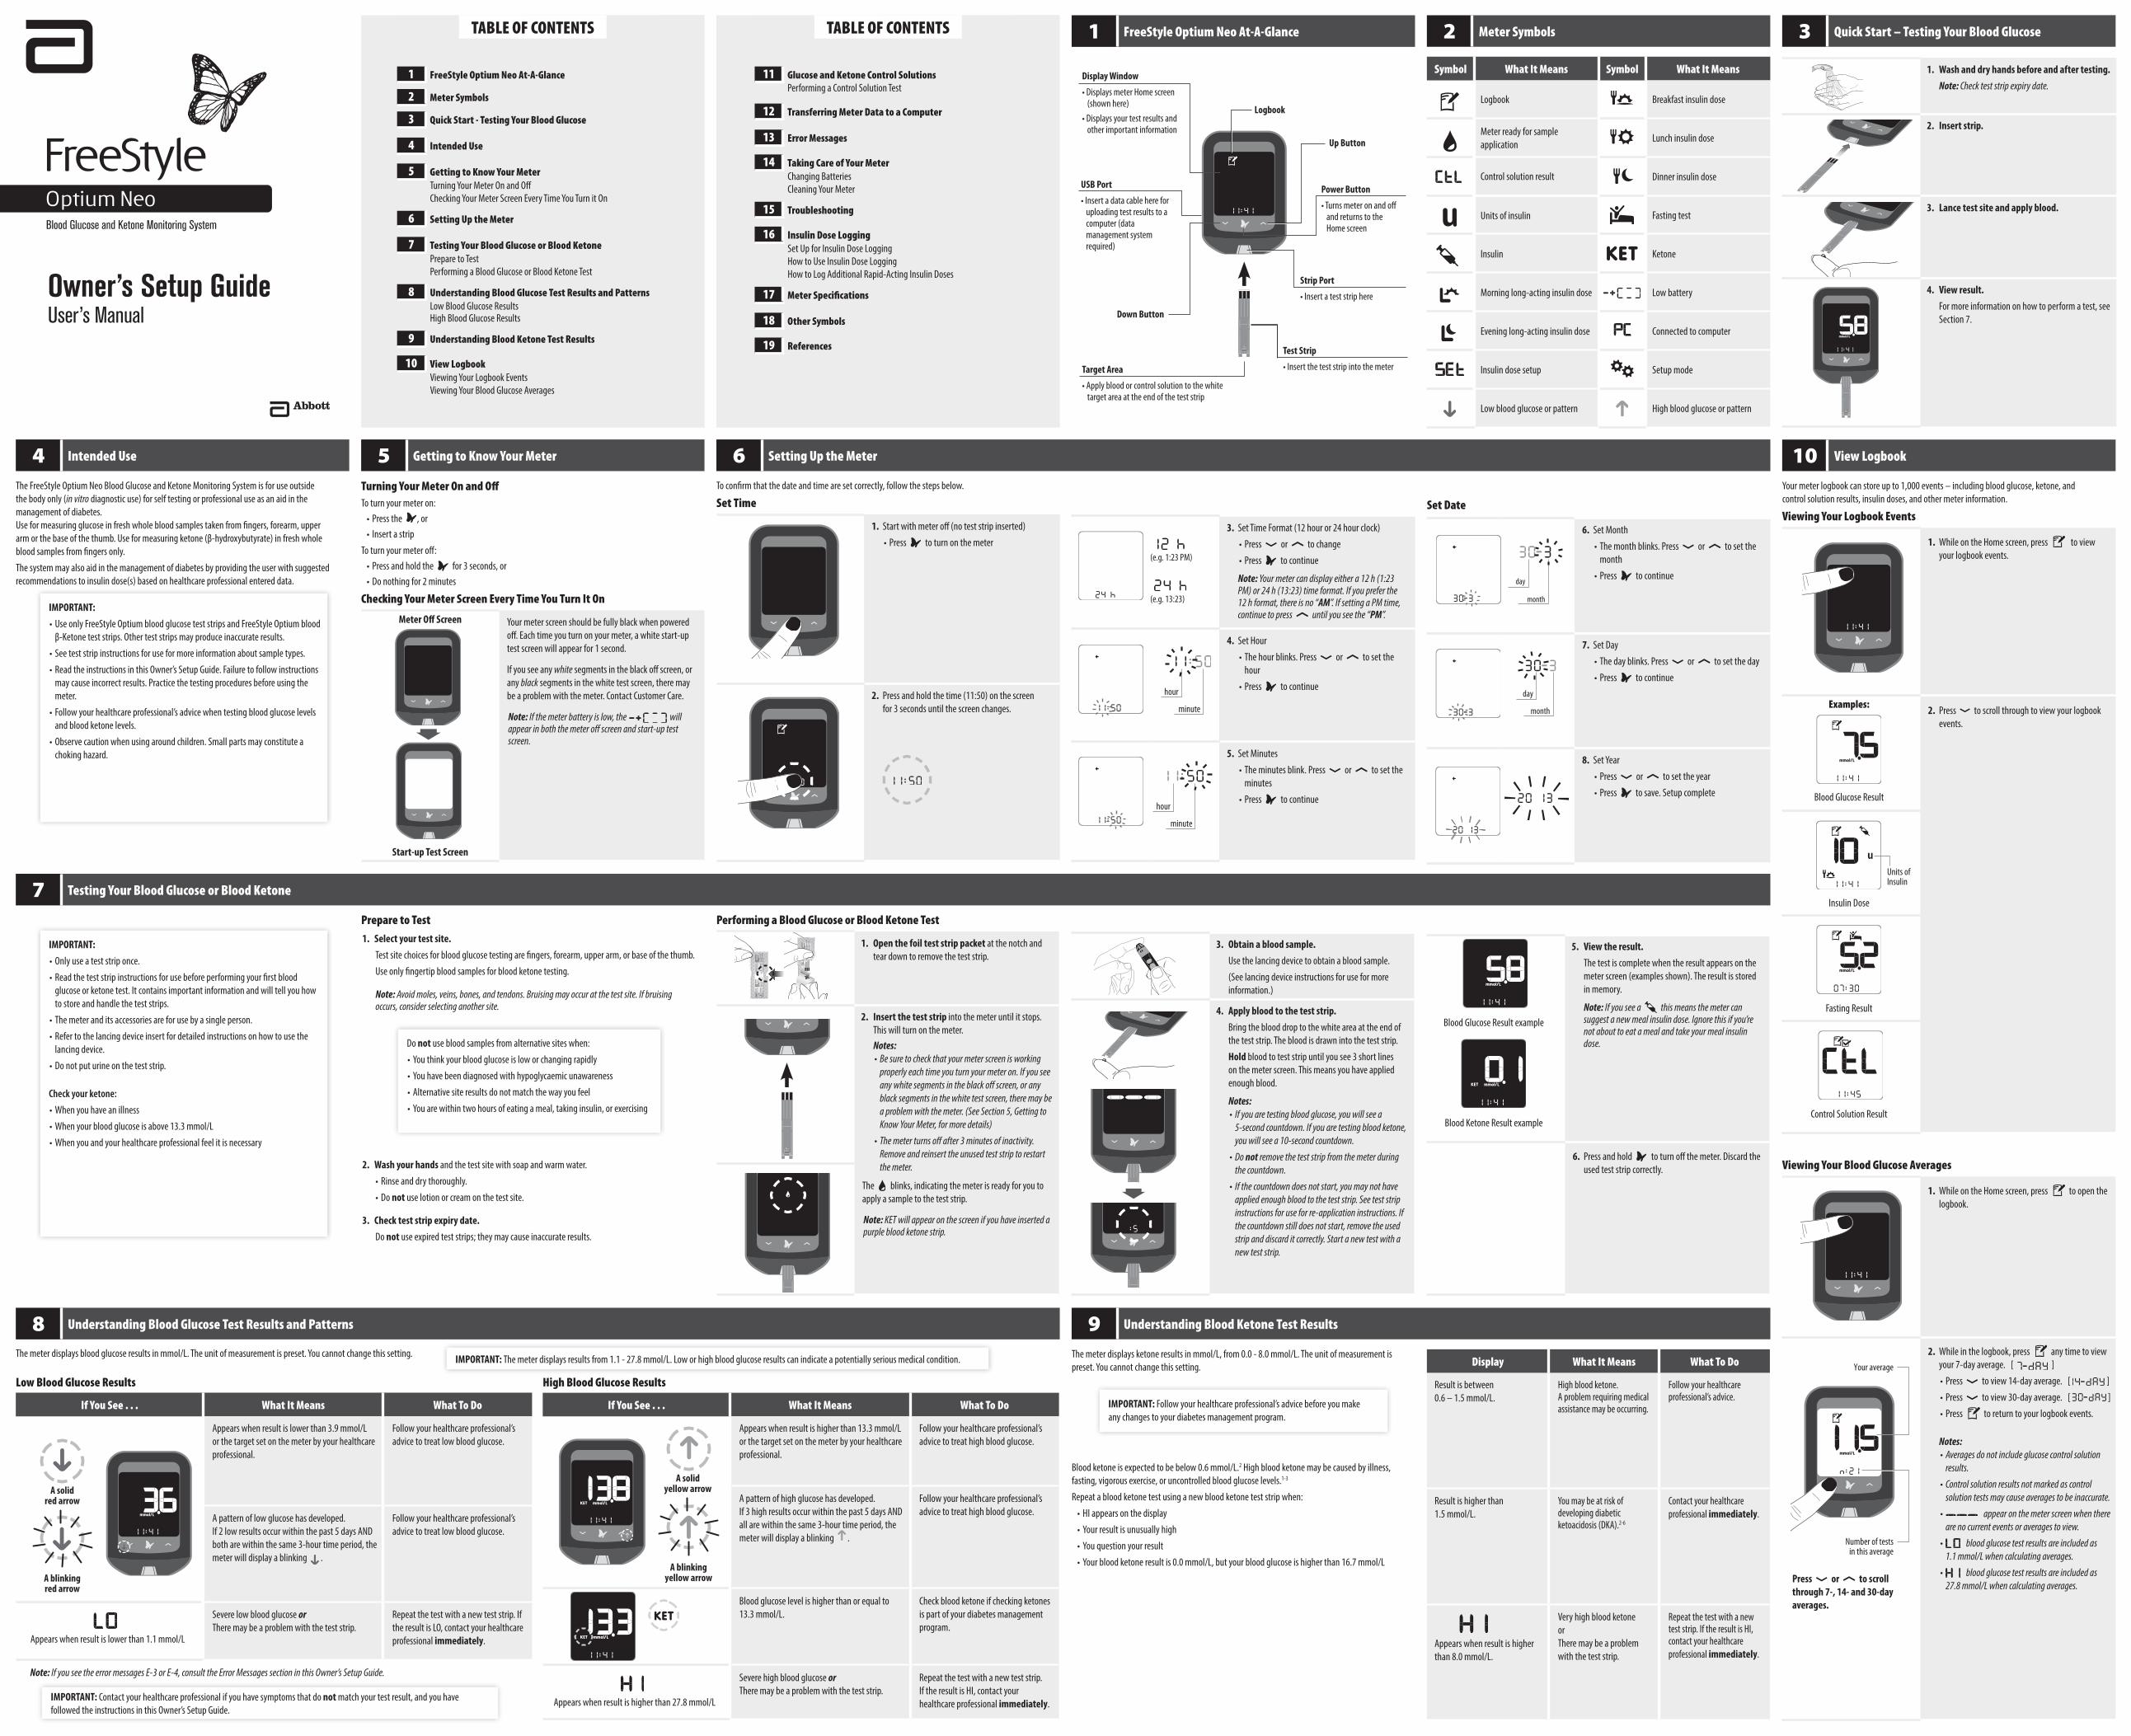
1 FreeStyle Optium Neo At-A-Glance
Logbook
Up Button
Power Button
• Turns meter on and o� and returns to the Home screen
USB Port
• Insert a data cable here for uploading test results to a computer (data management system required)
Strip Port
• Insert a test strip here
Test Strip
• Insert the test strip into the meterTarget Area
• Apply blood or control solution to the white target area at the end of the test strip
Display Window
• Displays meter Home screen (shown here)
• Displays your test results and other important information
Down Button
2 Meter Symbols
Symbol What It Means Symbol What It Means
Logbook Breakfast insulin dose
Meter ready for sample application
Lunch insulin dose
Control solution result Dinner insulin dose
Units of insulin Fasting test
Insulin Ketone
Morning long-acting insulin dose Low battery
Evening long-acting insulin dose Connected to computer
Insulin dose setup Setup mode
Low blood glucose or pattern High blood glucose or pattern
3 Quick Start – Testing Your Blood Glucose
1. Wash and dry hands before and after testing.Note: Check test strip expiry date.
2. Insert strip.
3. Lance test site and apply blood.
4. View result.For more information on how to perform a test, see Section 7.
4 Intended Use
The FreeStyle Optium Neo Blood Glucose and Ketone Monitoring System is for use outside the body only (in vitro diagnostic use) for self testing or professional use as an aid in the management of diabetes.Use for measuring glucose in fresh whole blood samples taken from fingers, forearm, upper arm or the base of the thumb. Use for measuring ketone (β-hydroxybutyrate) in fresh whole blood samples from fingers only.
The system may also aid in the management of diabetes by providing the user with suggested recommendations to insulin dose(s) based on healthcare professional entered data.
IMPORTANT:• Use only FreeStyle Optium blood glucose test strips and FreeStyle Optium blood
β-Ketone test strips. Other test strips may produce inaccurate results.
• See test strip instructions for use for more information about sample types.
• Read the instructions in this Owner’s Setup Guide. Failure to follow instructions may cause incorrect results. Practice the testing procedures before using the meter.
• Follow your healthcare professional’s advice when testing blood glucose levels and blood ketone levels.
• Observe caution when using around children. Small parts may constitute a choking hazard.
IMPORTANT:• Only use a test strip once.
• Read the test strip instructions for use before performing your first blood glucose or ketone test. It contains important information and will tell you how to store and handle the test strips.
• The meter and its accessories are for use by a single person.
• Refer to the lancing device insert for detailed instructions on how to use the lancing device.
• Do not put urine on the test strip.
Check your ketone:• When you have an illness
• When your blood glucose is above 13.3 mmol/L
• When you and your healthcare professional feel it is necessary
5 Getting to Know Your Meter
Turning Your Meter On and OffTo turn your meter on:
• Press the , or• Insert a strip
To turn your meter off:• Press and hold the for 3 seconds, or• Do nothing for 2 minutes
Checking Your Meter Screen Every Time You Turn It On
Meter Off Screen Your meter screen should be fully black when powered off. Each time you turn on your meter, a white start-up test screen will appear for 1 second.
If you see any white segments in the black off screen, or any black segments in the white test screen, there may be a problem with the meter. Contact Customer Care.
Note: If the meter battery is low, the will appear in both the meter off screen and start-up test screen.
Start-up Test Screen
➧
6 Setting Up the Meter
To confirm that the date and time are set correctly, follow the steps below.
Set Time
1. Start with meter off (no test strip inserted)
• Press to turn on the meter
2. Press and hold the time (11:50) on the screen for 3 seconds until the screen changes.
(e.g. 1:23 PM)
(e.g. 13:23)
3. Set Time Format (12 hour or 24 hour clock)
• Press or to change
• Press to continue
Note: Your meter can display either a 12 h (1:23 PM) or 24 h (13:23) time format. If you prefer the 12 h format, there is no “AM”. If setting a PM time, continue to press until you see the “PM”.
4. Set Hour
• The hour blinks. Press or to set the hour
• Press to continue
5. Set Minutes
• The minutes blink. Press or to set the minutes
• Press to continue
minute
hour
minute
hour
10 View Logbook
Your meter logbook can store up to 1,000 events – including blood glucose, ketone, and control solution results, insulin doses, and other meter information.
Viewing Your Logbook Events
1. While on the Home screen, press to view your logbook events.
Examples:
Blood Glucose Result
2. Press to scroll through to view your logbook events.
Units of Insulin
Insulin Dose
Fasting Result
-Control Solution Result
Viewing Your Blood Glucose Averages
1. While on the Home screen, press to open the logbook.
2. While in the logbook, press any time to view your 7-day average. [ ]
• Press to view 14-day average. [ ]
• Press to view 30-day average. [ ]
• Press to return to your logbook events.
Notes:• Averages do not include glucose control solution
results.
• Control solution results not marked as control solution tests may cause averages to be inaccurate.
• appear on the meter screen when there are no current events or averages to view.
• blood glucose test results are included as 1.1 mmol/L when calculating averages.
• blood glucose test results are included as 27.8 mmol/L when calculating averages.
Press or to scroll through 7-, 14- and 30-day averages.
Your average
Number of tests in this average
Prepare to Test1. Select your test site.
Test site choices for blood glucose testing are fingers, forearm, upper arm, or base of the thumb.
Use only fingertip blood samples for blood ketone testing.
Note: Avoid moles, veins, bones, and tendons. Bruising may occur at the test site. If bruising occurs, consider selecting another site.
2. Wash your hands and the test site with soap and warm water.
• Rinse and dry thoroughly.
• Do not use lotion or cream on the test site.
3. Check test strip expiry date.Do not use expired test strips; they may cause inaccurate results.
Do not use blood samples from alternative sites when:
• You think your blood glucose is low or changing rapidly
• You have been diagnosed with hypoglycaemic unawareness
• Alternative site results do not match the way you feel
• You are within two hours of eating a meal, taking insulin, or exercising
Performing a Blood Glucose or Blood Ketone Test
1. Open the foil test strip packet at the notch and tear down to remove the test strip.
2. Insert the test strip into the meter until it stops. This will turn on the meter.Notes:• Be sure to check that your meter screen is working
properly each time you turn your meter on. If you see any white segments in the black off screen, or any black segments in the white test screen, there may be a problem with the meter. (See Section 5, Getting to Know Your Meter, for more details)
• The meter turns off after 3 minutes of inactivity. Remove and reinsert the unused test strip to restart the meter.
The blinks, indicating the meter is ready for you to apply a sample to the test strip.
Note: KET will appear on the screen if you have inserted a purple blood ketone strip.
Abbo
tt D
iabe
tes C
are
Ltd.
Rang
e Ro
adW
itney
, Oxo
n, O
X29
0YL
Mad
e in
UK.
Bloo
d G
luco
seSe
nsor
Ele
ctro
deAb
bott
Dia
bete
s Car
e Lt
d.Ra
nge
Road
Witn
ey, O
xon,
OX2
9 0Y
LM
ade
in U
K.
4˚C
7 Testing Your Blood Glucose or Blood Ketone
8 Understanding Blood Glucose Test Results and Patterns
3. Obtain a blood sample.Use the lancing device to obtain a blood sample.
(See lancing device instructions for use for more information.)
4. Apply blood to the test strip.Bring the blood drop to the white area at the end of the test strip. The blood is drawn into the test strip.
Hold blood to test strip until you see 3 short lines on the meter screen. This means you have applied enough blood.
Notes:• If you are testing blood glucose, you will see a
5-second countdown. If you are testing blood ketone, you will see a 10-second countdown.
• Do not remove the test strip from the meter during the countdown.
• If the countdown does not start, you may not have applied enough blood to the test strip. See test strip instructions for use for re-application instructions. If the countdown still does not start, remove the used strip and discard it correctly. Start a new test with a new test strip.
➧-
Blood Glucose Result example
Blood Ketone Result example
5. View the result.The test is complete when the result appears on the meter screen (examples shown). The result is stored in memory.
Note: If you see a this means the meter can suggest a new meal insulin dose. Ignore this if you’re not about to eat a meal and take your meal insulin dose.
6. Press and hold to turn off the meter. Discard the used test strip correctly.
The meter displays blood glucose results in mmol/L. The unit of measurement is preset. You cannot change this setting.
Low Blood Glucose Results
If You See . . . What It Means What To Do
Appears when result is lower than 3.9 mmol/L or the target set on the meter by your healthcare professional.
Follow your healthcare professional’s advice to treat low blood glucose.
A pattern of low glucose has developed.If 2 low results occur within the past 5 days AND both are within the same 3-hour time period, the meter will display a blinking .
Follow your healthcare professional’s advice to treat low blood glucose.
Appears when result is lower than 1.1 mmol/L
Severe low blood glucose orThere may be a problem with the test strip.
Repeat the test with a new test strip. If the result is LO, contact your healthcare professional immediately.
Note: If you see the error messages E-3 or E-4, consult the Error Messages section in this Owner’s Setup Guide.
A solid red arrow
A blinkingred arrow
IMPORTANT: Contact your healthcare professional if you have symptoms that do not match your test result, and you have followed the instructions in this Owner’s Setup Guide.
High Blood Glucose Results
If You See . . . What It Means What To Do
Appears when result is higher than 13.3 mmol/L or the target set on the meter by your healthcare professional.
Follow your healthcare professional’s advice to treat high blood glucose.
A pattern of high glucose has developed.If 3 high results occur within the past 5 days AND all are within the same 3-hour time period, the meter will display a blinking .
Follow your healthcare professional’s advice to treat high blood glucose.
Blood glucose level is higher than or equal to 13.3 mmol/L.
Check blood ketone if checking ketones is part of your diabetes management program.
Appears when result is higher than 27.8 mmol/L
Severe high blood glucose orThere may be a problem with the test strip.
Repeat the test with a new test strip.If the result is HI, contact your healthcare professional immediately.
IMPORTANT: The meter displays results from 1.1 - 27.8 mmol/L. Low or high blood glucose results can indicate a potentially serious medical condition.
A solid yellow arrow
A blinkingyellow arrow
The meter displays ketone results in mmol/L, from 0.0 - 8.0 mmol/L. The unit of measurement is preset. You cannot change this setting.
Blood ketone is expected to be below 0.6 mmol/L.2 High blood ketone may be caused by illness, fasting, vigorous exercise, or uncontrolled blood glucose levels.1-3
Repeat a blood ketone test using a new blood ketone test strip when:
• HI appears on the display
• Your result is unusually high
• You question your result
• Your blood ketone result is 0.0 mmol/L, but your blood glucose is higher than 16.7 mmol/L
IMPORTANT: Follow your healthcare professional’s advice before you make any changes to your diabetes management program.
Display What It Means What To Do
Result is between0.6 – 1.5 mmol/L.
High blood ketone.A problem requiring medical assistance may be occurring.
Follow your healthcare professional’s advice.
Result is higher than1.5 mmol/L.
You may be at risk of developing diabetic ketoacidosis (DKA).2-6
Contact your healthcare professional immediately.
Appears when result is higher than 8.0 mmol/L.
Very high blood ketoneorThere may be a problem with the test strip.
Repeat the test with a new test strip. If the result is HI, contact your healthcare professional immediately.
9 Understanding Blood Ketone Test Results
Set Date
6. Set Month
• The month blinks. Press or to set the month
• Press to continue
7. Set Day
• The day blinks. Press or to set the day
• Press to continue
8. Set Year
• Press or to set the year
• Press to save. Setup complete
month
day
month
day
TABLE OF CONTENTSTABLE OF CONTENTS
11 Glucose and Ketone Control SolutionsPerforming a Control Solution Test
12 Transferring Meter Data to a Computer
13 Error Messages
14 Taking Care of Your MeterChanging BatteriesCleaning Your Meter
15 Troubleshooting
16 Insulin Dose LoggingSet Up for Insulin Dose LoggingHow to Use Insulin Dose Logging How to Log Additional Rapid-Acting Insulin Doses
17 Meter Specifications
18 Other Symbols
19 References
1 FreeStyle Optium Neo At-A-Glance
2 Meter Symbols
3 Quick Start - Testing Your Blood Glucose
4 Intended Use
5 Getting to Know Your MeterTurning Your Meter On and OffChecking Your Meter Screen Every Time You Turn it On
6 Setting Up the Meter
7 Testing Your Blood Glucose or Blood KetonePrepare to TestPerforming a Blood Glucose or Blood Ketone Test
8 Understanding Blood Glucose Test Results and PatternsLow Blood Glucose Results High Blood Glucose Results
9 Understanding Blood Ketone Test Results
10 View LogbookViewing Your Logbook EventsViewing Your Blood Glucose Averages
Blood Glucose and Ketone Monitoring System
Owner’s Setup GuideUser’s Manual
Abbott Diabetes Care Ltd.Range RoadWitney, OxonOX29 0YL, UK
A control solution test should be performed when you are not sure of your results and want to confirm that your meter and test strips are working properly.
IMPORTANT:• Use only Optium glucose and ketone control solutions with the meter.
• Control solution results should fall within the control solution range printed on the test strip instructions for use.
• Check that the LOT number printed on the test strip foil packet and instructions for use match.
• Do not use control solution past its expiry date. Discard control solution 3 months after opening or on the expiry date printed on the bottle, whichever comes first. (Example: open April 15, discard July 15; write the discard date on the side of the bottle.)
• The control solution range is a target range for control solution only, not for blood glucose levels.
• Replace the cap securely on the bottle immediately after use.
11 Glucose and Ketone Control Solutions
Performing a Control Solution Test
1. Open the foil test strip packet at the notch and tear down to remove the test strip.
2. Insert the test strip until the meter turns on.
Notes:• Be sure to check that your meter screen is working
properly each time you turn your meter on. If you see any white segments in the black off screen, or any black segments in the white test screen, there may be a problem with the meter. (See Section 5, Getting to Know Your Meter, for more details.)
• The meter turns off after 3 minutes of inactivity. Remove and reinsert the unused test strip to restart the meter.
IMPORTANT: (continued)• Do not add water or other liquid to control solution.
• Control solution results do not reflect your blood glucose.
• Contact Customer Care for information on how to obtain control solution.
Abbo
tt Di
abet
es C
are
Ltd.
Rang
e Ro
adW
itney
, Oxo
n, O
X29
0YL
Mad
e in
UK.
Bloo
d Gl
ucos
eSe
nsor
Ele
ctro
deAb
bott
Diab
etes
Car
e Lt
d.Ra
nge
Road
Witn
ey, O
xon,
OX2
9 0Y
LM
ade
in U
K.
4˚C
The blinks, indicating the meter is ready for you to apply a sample to the test strip.
Note: KET will appear on the screen if you have inserted a purple blood ketone strip.
3. Press and hold the down arrow for 3 seconds to mark the test as a control solution test. The
appears. The meter is now ready for you to apply control solution to the test strip.
IMPORTANT: The test result will be saved to memory as a blood result if not marked as a control solution test. This may affect your blood glucose averages.
4. Apply control solution to the test strip.Shake the control solution bottle to mix the solution. Apply a drop of control solution to the white area at the end of the test strip in the area shown. The control solution is drawn into the test strip.
5. Hold the control solution to the test strip until:• You see 3 short lines on the meter screen. This
means you have applied enough control solution and the meter is reading the control solution.
Notes:• If you are testing with a blood glucose strip, you
will see a 5-second countdown. If you are testing with a blood ketone strip, you will see a 10-second countdown.
• Do not remove the test strip from the meter during the countdown.
• If the countdown does not start, remove and discard the used test strip, turn off the meter and try again with a new strip.
➧
Examples:6. View the result.
The test is complete (examples shown) when the result appears on the meter screen. The result is stored in memory as a control solution result.
Compare the control solution result to the range printed on the blood glucose or blood ketone test strip instructions for use. The result should fall within the range.
Note: KET appears with the result if performing a ketone control solution test.
Out of Range Control Solution Results:• Repeat the test if control solution results are outside
the range printed on the test strip instructions for use.
• Stop using the meter if control solution results are consistently outside the range printed on the test strip instructions for use. Contact Customer Care.
12 Transferring Meter Data to a Computer
Transferring meter data to a computer requires a compatible data management system. You will also need a micro USB cable to connect your meter’s USB port to your computer.
For more information, please contact Customer Care.
WARNING: To avoid the possibility of electric shock, never perform a blood glucose test while the meter is connected to the computer.
13 Error Messages
15 Troubleshooting
What It Means What To Do
1. Test strip is inserted in the strip port and nothing happens.
Test strip is not inserted properly or fully into the meter 1. With the contact bars (3 black lines) facing up, insert the test strip into the meter until it stops. This turns on the meter.
2. If the meter still does not turn on, contact Customer Care.
No batteries are installed; Batteries installed incorrectly Refer to Section 14, Taking Care of Your Meter, on how to properly install batteries.
Dead batteries Change batteries. Reset date and time, if needed.
Meter may be plugged into a computer (PC appears on meter screen) Unplug the meter from the computer.
Problem with the test strip Try a new test strip.
Problem with the meter Contact Customer Care.
2. The test does not start after applying the blood sample.
Blood sample is too small 1. See test strip instructions for use for re-application instructions.2. Repeat the test using a new test strip.3. If the test still does not start, contact Customer Care.
Sample applied after meter turns off 1. Review the testing instructions.2. Repeat the test using a new test strip.3. If the test still does not start, contact Customer Care.
Problem with meter or test strip 1. Repeat the test using a new test strip.2. If the test still does not start, contact Customer Care.
17 Meter Specifications
14 Taking Care of Your Meter
Message What It Means What To Do
The temperature is too hot or too cold for the meter to work properly
1. Move the meter and test strips to a location where the temperature is within the test strip operating range. (See test strip instructions for use for the appropriate range.)
2. Wait for the meter and test strips to adjust to the new temperature.
3. Repeat the test using a new test strip.
4. If the error reappears, contact Customer Care.
Meter error 1. Turn off the meter.2. Repeat the test using a new test
strip.3. If the error reappears, contact
Customer Care.
Message What It Means What To Do
Blood drop is too smallorIncorrect test procedureorThere may be a problem with the test strip
1. Review the testing instructions.2. Repeat the test using a new test strip.3. If the error reappears, contact
Customer Care.
The blood glucose level may be too high to be read by the systemorThere may be a problem withthe test strip
1. Repeat the test using a new test strip.2. If the error reappears, contact
Customer Care.
Blood was applied to the test strip too soon
1. Review the testing instructions.2. Repeat the test using a new test strip.3. If the error reappears, contact
Customer Care.
Message What It Means What To Do
Meter error 1. Check that you are using the correct strip for this meter. (See test strip instructions for use to verify your strip is compatible with this meter.)
2. Repeat the test using a test strip for use with your meter.
3. If the error reappears, contact Customer Care.
No coding requiredorTest strip may be damaged, used, or the meter does not recognise it
1. Check that you are using the correct test strip for this meter. (See test strip instructions for use to verify your strip is compatible with this meter.)
2. Repeat the test using a test strip for use with your meter.
3. If the error reappears, contact Customer Care.
Meter error 1. Turn off the meter.2. Repeat the test using a new test strip.3. If the error reappears, contact
Customer Care.
Changing Batteries
You will see this screen when your batteries are low.
Note: Your meter settings and logbook information will be saved when you change the batteries.
Step Action
1. Turn meter over and slide open the battery door on the side as shown.
IMPORTANT: After you first see this warning, you can perform approximately 28 tests before you need to change the batteries.
WARNING: Batteries should be kept away from small children. If swallowed, contact a healthcare professional immediately.
Step Action
2. Remove the old batteries.
3. Install new batteries with (+) facing up.
Note: The meter uses 2 replaceable CR 2032 coin cell batteries.
4. Slide the door back into place until it clicks.
Note: The next time you turn your meter on, it may prompt you to reset the time and date. (Refer to Section 6, Setting Up the Meter).
Note: When you no longer need the meter, remove the batteries and dispose of the batteries and meter in accordance with your local government regulations.
The batteries in this product should be removed and disposed in accordance with local regulations for separate collection of spent batteries.
Cleaning Your Meter
Step Action
1 Clean the outside of the meter using a damp cloth and:
• Mild detergent/soap and water, or
• 70% isopropyl alcohol, or
• A mixture of 1 part household bleach, 9 parts water
2 Allow the meter to dry.
IMPORTANT: Do not place the meter in water or other liquids. Avoid getting dust, dirt, blood, control solution, water, or any other substance in the meter’s test strip port and USB port.
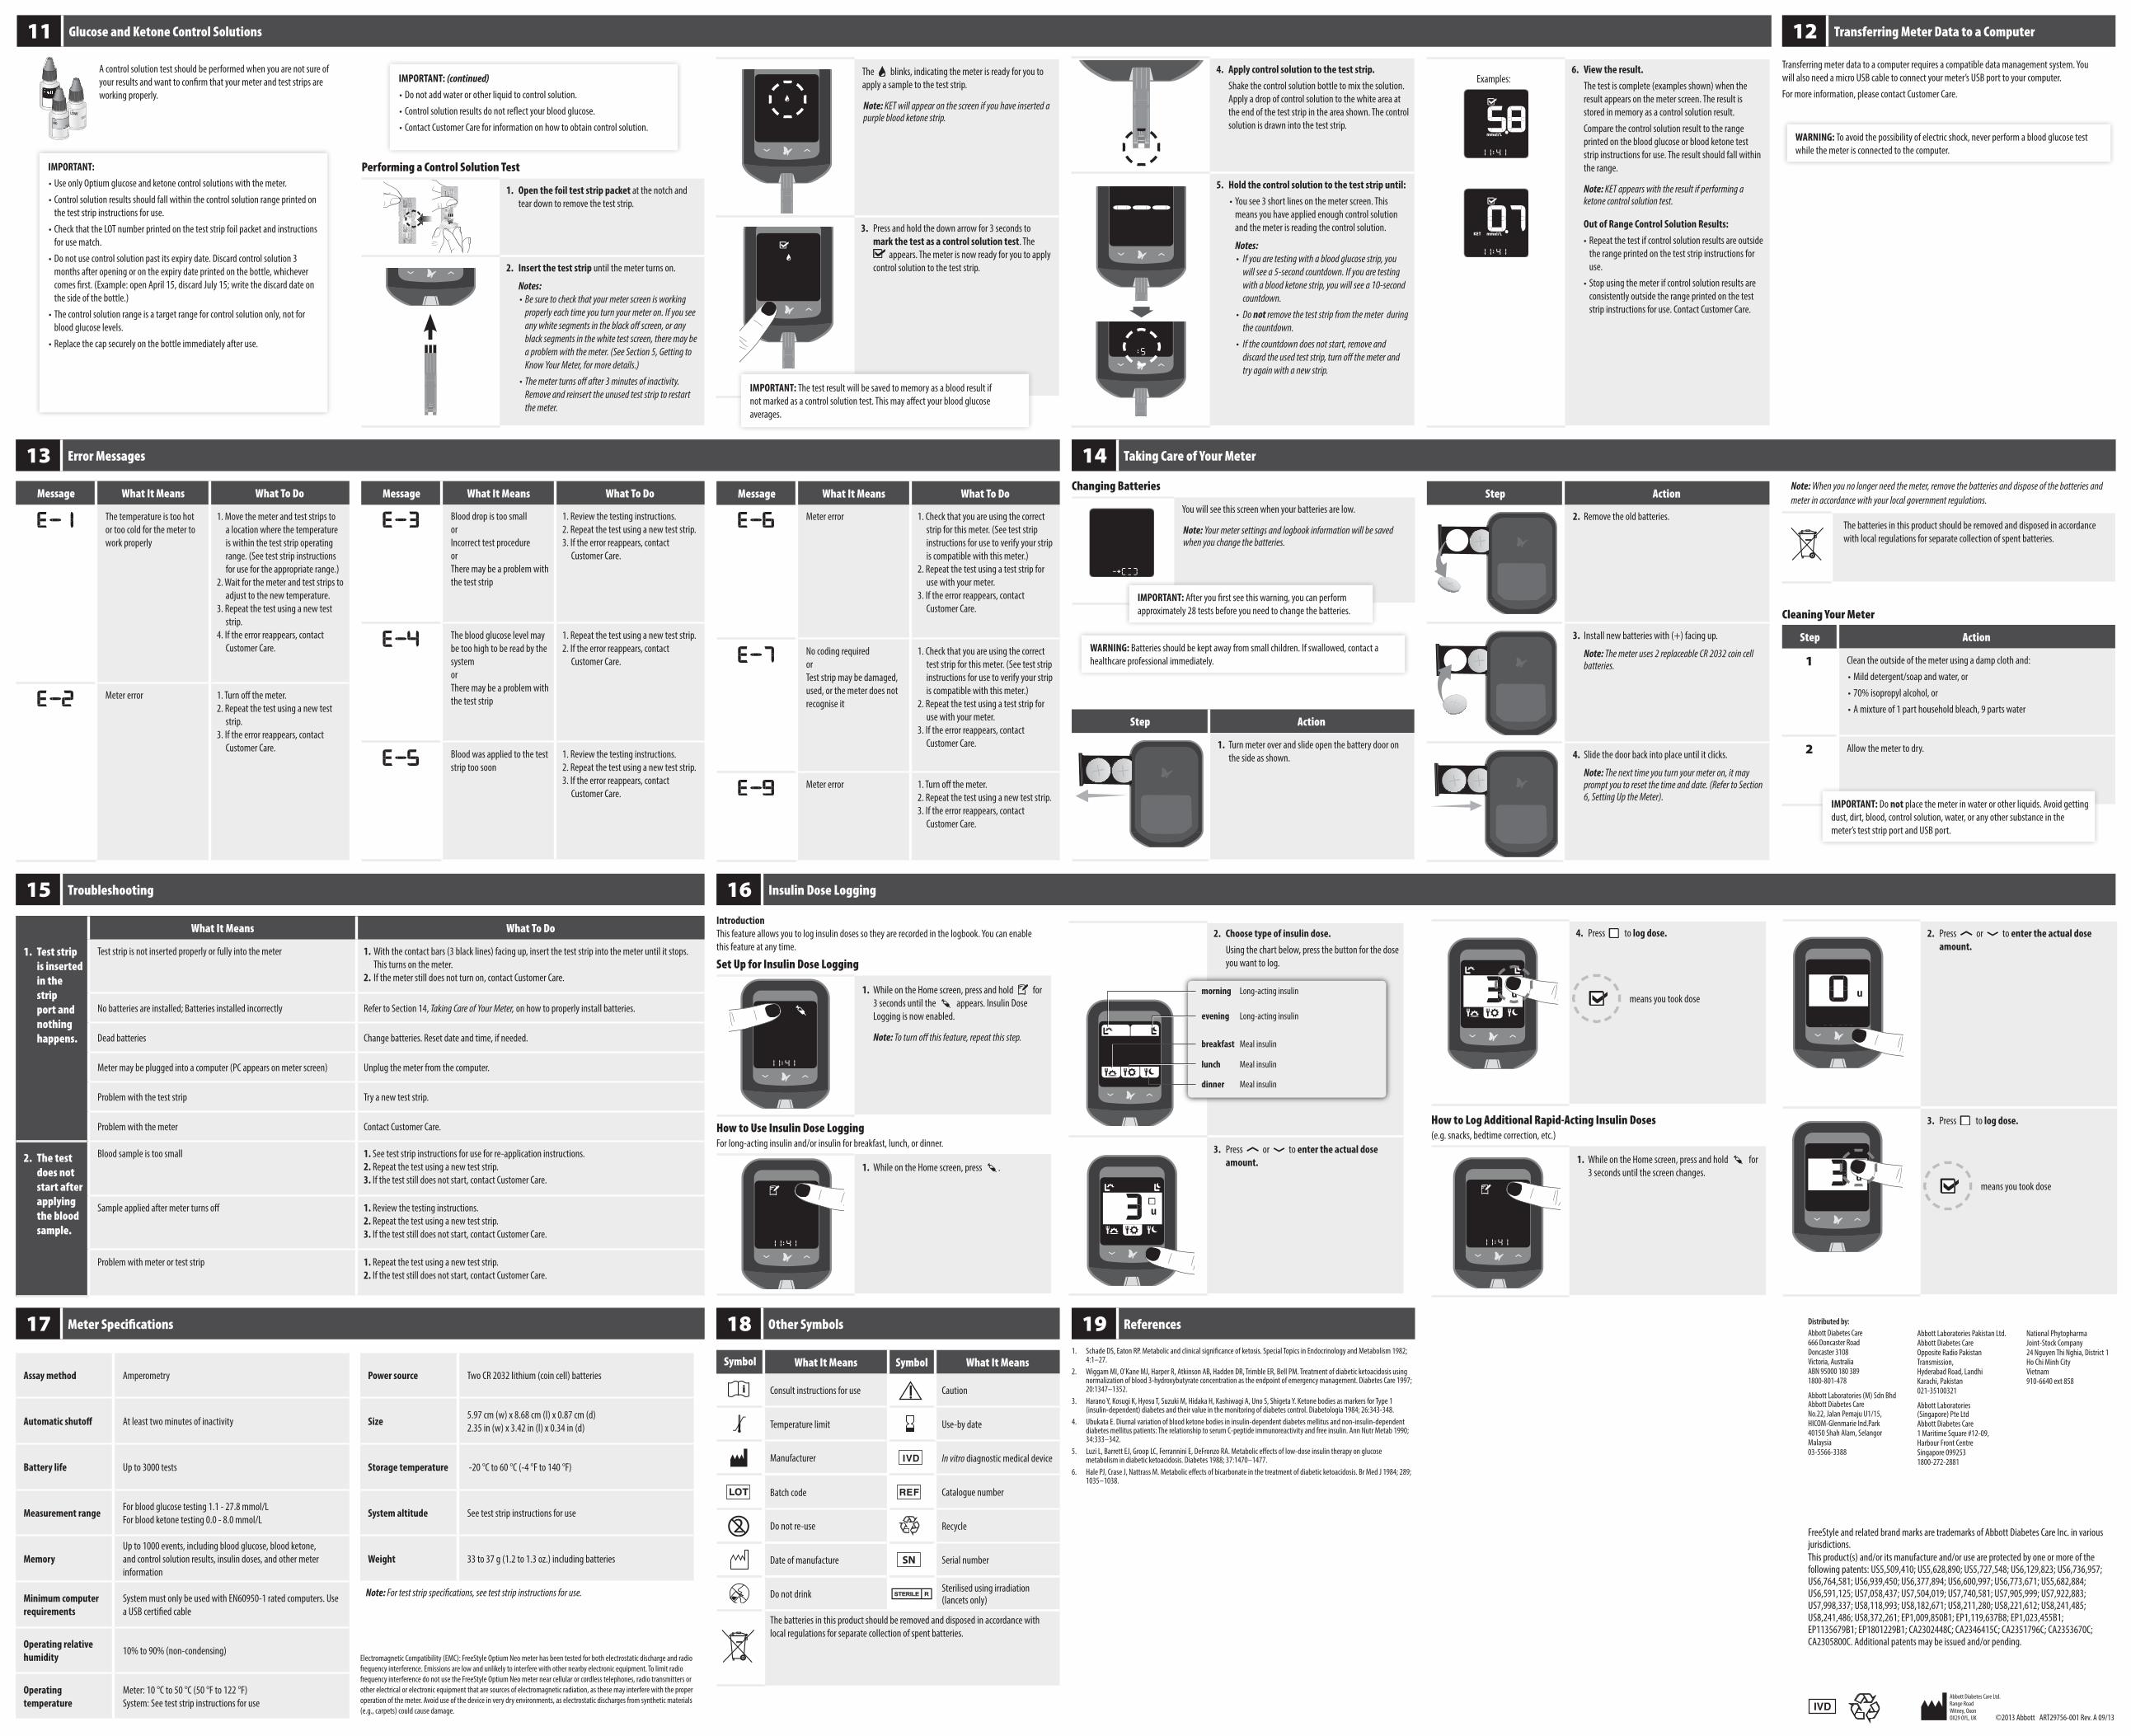
16 Insulin Dose Logging
IntroductionThis feature allows you to log insulin doses so they are recorded in the logbook. You can enable this feature at any time.
Set Up for Insulin Dose Logging
1. While on the Home screen, press and hold for 3 seconds until the appears. Insulin Dose Logging is now enabled.
Note: To turn off this feature, repeat this step.
How to Use Insulin Dose LoggingFor long-acting insulin and/or insulin for breakfast, lunch, or dinner.
1. While on the Home screen, press .
2. Choose type of insulin dose.Using the chart below, press the button for the dose you want to log.
3. Press or to enter the actual dose amount.
2. Press or to enter the actual dose amount.
3. Press to log dose.
means you took dose
Assay method Amperometry
Automatic shutoff At least two minutes of inactivity
Battery life Up to 3000 tests
Measurement range For blood glucose testing 1.1 - 27.8 mmol/LFor blood ketone testing 0.0 - 8.0 mmol/L
MemoryUp to 1000 events, including blood glucose, blood ketone, and control solution results, insulin doses, and other meter information
Minimum computer requirements
System must only be used with EN60950-1 rated computers. Use a USB certified cable
Operating relative humidity 10% to 90% (non-condensing)
Operating temperature
Meter: 10 °C to 50 °C (50 °F to 122 °F)System: See test strip instructions for use
Power source Two CR 2032 lithium (coin cell) batteries
Size 5.97 cm (w) x 8.68 cm (l) x 0.87 cm (d)2.35 in (w) x 3.42 in (l) x 0.34 in (d)
Storage temperature -20 °C to 60 °C (-4 °F to 140 °F)
System altitude See test strip instructions for use
Weight 33 to 37 g (1.2 to 1.3 oz.) including batteries
Note: For test strip specifications, see test strip instructions for use.
Electromagnetic Compatibility (EMC): FreeStyle Optium Neo meter has been tested for both electrostatic discharge and radio frequency interference. Emissions are low and unlikely to interfere with other nearby electronic equipment. To limit radio frequency interference do not use the FreeStyle Optium Neo meter near cellular or cordless telephones, radio transmitters or other electrical or electronic equipment that are sources of electromagnetic radiation, as these may interfere with the proper operation of the meter. Avoid use of the device in very dry environments, as electrostatic discharges from synthetic materials (e.g., carpets) could cause damage.
18 Other Symbols
Symbol What It Means Symbol What It Means
Consult instructions for use
Caution
Temperature limit Use-by date
Manufacturer In vitro diagnostic medical device
Batch code Catalogue number
Do not re-use Recycle
Date of manufacture Serial number
Do not drink Sterilised using irradiation(lancets only)
The batteries in this product should be removed and disposed in accordance with local regulations for separate collection of spent batteries.
19 References
1. Schade DS, Eaton RP. Metabolic and clinical significance of ketosis. Special Topics in Endocrinology and Metabolism 1982; 4:1–27.
2. Wiggam MI, O’Kane MJ, Harper R, Atkinson AB, Hadden DR, Trimble ER, Bell PM. Treatment of diabetic ketoacidosis using normalization of blood 3-hydroxybutyrate concentration as the endpoint of emergency management. Diabetes Care 1997; 20:1347–1352.
3. Harano Y, Kosugi K, Hyosu T, Suzuki M, Hidaka H, Kashiwagi A, Uno S, Shigeta Y. Ketone bodies as markers for Type 1 (insulin-dependent) diabetes and their value in the monitoring of diabetes control. Diabetologia 1984; 26:343-348.
4. Ubukata E. Diurnal variation of blood ketone bodies in insulin-dependent diabetes mellitus and non-insulin-dependent diabetes mellitus patients: The relationship to serum C-peptide immunoreactivity and free insulin. Ann Nutr Metab 1990; 34:333–342.
5. Luzi L, Barrett EJ, Groop LC, Ferrannini E, DeFronzo RA. Metabolic effects of low-dose insulin therapy on glucose metabolism in diabetic ketoacidosis. Diabetes 1988; 37:1470–1477.
6. Hale PJ, Crase J, Nattrass M. Metabolic effects of bicarbonate in the treatment of diabetic ketoacidosis. Br Med J 1984; 289; 1035–1038.
FreeStyle and related brand marks are trademarks of Abbott Diabetes Care Inc. in various jurisdictions.This product(s) and/or its manufacture and/or use are protected by one or more of the following patents: US5,509,410; US5,628,890; US5,727,548; US6,129,823; US6,736,957; US6,764,581; US6,939,450; US6,377,894; US6,600,997; US6,773,671; US5,682,884; US6,591,125; US7,058,437; US7,504,019; US7,740,581; US7,905,999; US7,922,883; US7,998,337; US8,118,993; US8,182,671; US8,211,280; US8,221,612; US8,241,485; US8,241,486; US8,372,261; EP1,009,850B1; EP1,119,637B8; EP1,023,455B1; EP1135679B1; EP1801229B1; CA2302448C; CA2346415C; CA2351796C; CA2353670C; CA2305800C. Additional patents may be issued and/or pending.
©2013 Abbott ART29756-001 Rev. A 09/13
4. Press to log dose.
means you took dose
How to Log Additional Rapid-Acting Insulin Doses(e.g. snacks, bedtime correction, etc.)
1. While on the Home screen, press and hold for 3 seconds until the screen changes.
breakfast Meal insulin
lunch Meal insulin
dinner Meal insulin
evening Long-acting insulin
morning Long-acting insulin
Distributed by:Abbott Diabetes Care666 Doncaster RoadDoncaster 3108Victoria, AustraliaABN 95000 180 3891800-801-478
Abbott Laboratories (M) Sdn BhdAbbott Diabetes CareNo.22, Jalan Pemaju U1/15,HICOM-Glenmarie Ind.Park40150 Shah Alam, SelangorMalaysia03-5566-3388
Abbott Laboratories Pakistan Ltd.Abbott Diabetes CareOpposite Radio PakistanTransmission,Hyderabad Road, LandhiKarachi, Pakistan021-35100321
Abbott Laboratories (Singapore) Pte LtdAbbott Diabetes Care1 Maritime Square #12-09,Harbour Front CentreSingapore 0992531800-272-2881
National PhytopharmaJoint-Stock Company24 Nguyen Thi Nghia, District 1Ho Chi Minh CityVietnam910-6640 ext 858