Table of Contents - Street · PDF fileWater hardness memory aid 13 So is ... The automatic...
26
Transcript of Table of Contents - Street · PDF fileWater hardness memory aid 13 So is ... The automatic...

Table of Contents Page
Things to watch Disposal methods Packaging from your new machine 3
Old appliance 3
Safety and Warnings 3
This is your new washing machine
Your new washing machine 4
Environmental / Conservation Issues 4
Getting to know your machine 5
The programme selector / programs 6
The spin speed selector 7
The start time voters 8
Additional functions “Prewash” button 9
“Short Wash” button 9
“Higher Water Level” button 9
“Intensive” button 9
The detergent dispenser 10
Preparing information for detergents and laundry Laundry Detergent 11
Sorting laundry 12
Preserve and laundry equipment from damage 12
Stain removal 12
First commissioning
The first wash cycle 13
Water hardness memory aid 13
So is washed
Switch on / loading laundry 14
Setting the wash programme / start programme 15
End programmes with rinse hold 16
End of the programme 17
Special programmes
Soaking 18
Strengthen 18
Dyeing 18
Decolourise 18
Change programme 18
Maintenance Care Cleaning the machine 19
Descaling the machine 19
Cleaning the drum 19
Water supply hose 19
Antifreeze 19
Cleaning the detergent drawer 20
Cleaning the drain pump 21
Cleaning the water inlet filter 22
Problem solving Fixing minor faults yourself 23
Customer service 26

Disposal Methods
Packaging from your new machine
Dispose of packing material properly.
Packaging materials are not toys for children.
All packaging materials used are
environmentally friendly and recyclable.
The boxes are made of 80% to 100% recycled
paper.
Wood parts are not chemically treated.
The films are made of polyethylene (PE),
banding is made of polypropylene (PP) and
the CFC-free cushions are made of expanded
polystyrene (PS). These materials are pure
hydrocarbon compounds and recyclable.
Due to the treatment and reuse saves raw
materials and reduces waste volumes.
In Germany you can return the packaging to
the dealer from whom you bought the device.
Old Appliance Disable discarded appliances:
Pull out the mains plug, cut the cord and
discard with mains plug.
Break the door lock so that playing children
cannot become locked and endangering their
lives.
The old machine contains valuable materials
that should be supplied to a recycling centre.
Please help within this way in an
environmentally responsible disposal or
recycling.
Addresses of recyclables centres for the
disposal of this product, find out about your
local government.
Safety and Warnings
Note before commissioning: Read the enclosed documents carefully. They
contain important information about
installation, use and safety of the device.
The documents, if required for a subsequent
owner, keep it safely.
Install the machine according to the
installation instructions. Remove and keep
transit bolts.
Do not connect a machine with visible
damage. When in doubt, contact customer
service or dealer.
When washing, note:
Operate the appliance cold only with potable
water.
Only use the device in the household for
washing machine washable fabrics in washing
lye.
Do not leave children unsupervised with the
device.
Keep pets away from the unit.
When washing with high temperatures, do
not touch the washing machine door.
Caution when draining hot detergent solution.
At the end of the program:
Do not reach into the rotating drum.
Switch off the appliance after program has
ended.
Close on a system without Aqua-Stop faucet.
To protect the device, pay attention:
Do not climb on the appliance.
Do not lean on the machine door or the door.
Note when transporting:
The Transport locks must be installed.
Be careful when transporting the machine!
Risk of injury!
Do not lift the unit by its projecting parts!

Your new appliance
A product based on the proven and equipped
with nine, the textile and detergent
development accordingly use appropriate
content and services with a wide range of
programs for all washable fabrics.
The upper water system has been further
improved. In addition to the constant water
shower from above the laundry is wetted
directly from the front already at start of
washing.
The automatic load automatically adjusts
consumption levels and times based on a
fuzzy control on the respective amount of
laundry and textile.
The laundry agitator with the openings for
the upper hand in an asymmetrical shape, so
that when appropriately matched washing
movements a gentle or stronger mechanical
action acting on the textile.
The variable detergent drawer is designed for
all commercially available compact and liquid
detergent. In conjunction with the "intensive"
button the separate addition of stain removal
salts and powder bleach is allowed.
The eco-ball closure of the tub reliably brings
the full detergent usage.
The foam detection decide on the number of
rinses.
The washing, rinsing and spin times are
reduced automatically depending on the
program selection and loading, where you can
decide the speed selector, if the laundry is
spun at high or low speeds or with a special,
longer interval spin.
Environmental / Conservation Issues
On economical and Environmentally-friendly
wash when containing the maximum amount
of laundry:
Cotton items 5 kg
Clean, delicate wash and wool 2 kg
To save energy:
More often the energy-saving program
cooking Wash 60 C e use instead Cottons 90
C. This program is achieved by a prolonged
washing time with significantly lower energy
one the 90 C program comparable cleaning.
To save water, energy and detergent:
Dispense with lightly to normally soiled
washing prewash.
To save energy and time:
On low soiled laundry, press the "Short Wash"
button.
How to save detergent:
Detergent according to water hardness,
degree of soiling and wash load dosing and
follow the instructions on the detergent
packages.
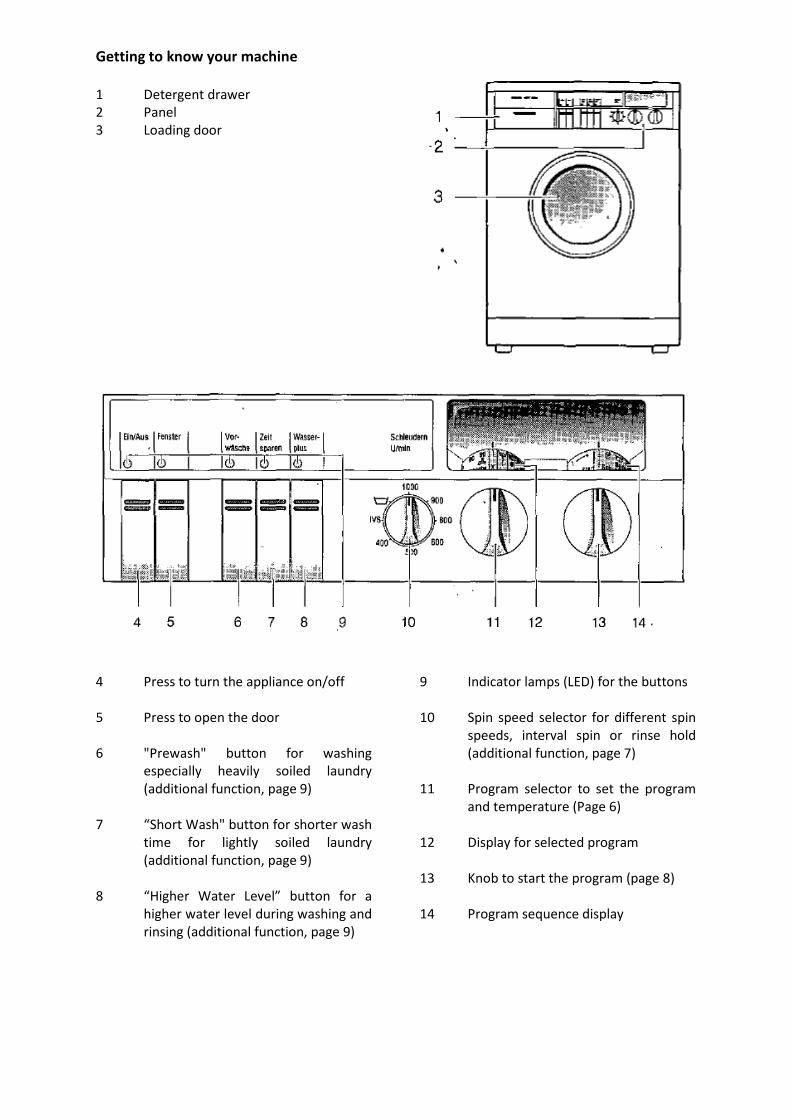
Getting to know your machine
1 Detergent drawer
2 Panel
3 Loading door
4 Press to turn the appliance on/off
5 Press to open the door
6 "Prewash" button for washing
especially heavily soiled laundry
(additional function, page 9)
7 “Short Wash" button for shorter wash
time for lightly soiled laundry
(additional function, page 9)
8 “Higher Water Level” button for a
higher water level during washing and
rinsing (additional function, page 9)
9 Indicator lamps (LED) for the buttons
10 Spin speed selector for different spin
speeds, interval spin or rinse hold
(additional function, page 7)
11 Program selector to set the program
and temperature (Page 6)
12 Display for selected program
13 Knob to start the program (page 8)
14 Program sequence display
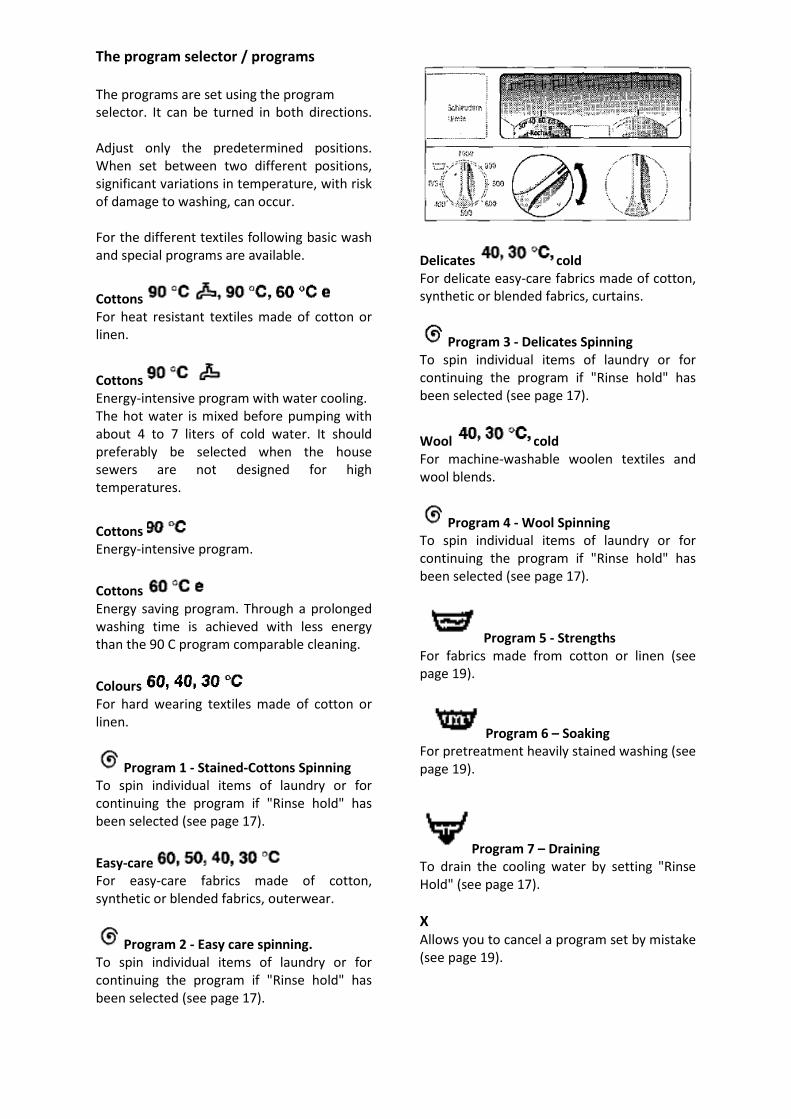
The program selector / programs
The programs are set using the program
selector. It can be turned in both directions.
Adjust only the predetermined positions.
When set between two different positions,
significant variations in temperature, with risk
of damage to washing, can occur.
For the different textiles following basic wash
and special programs are available.
Cottons
For heat resistant textiles made of cotton or
linen.
Cottons
Energy-intensive program with water cooling.
The hot water is mixed before pumping with
about 4 to 7 liters of cold water. It should
preferably be selected when the house
sewers are not designed for high
temperatures.
Cottons
Energy-intensive program.
Cottons
Energy saving program. Through a prolonged
washing time is achieved with less energy
than the 90 C program comparable cleaning.
Colours
For hard wearing textiles made of cotton or
linen.
Program 1 - Stained-Cottons Spinning
To spin individual items of laundry or for
continuing the program if "Rinse hold" has
been selected (see page 17).
Easy-care
For easy-care fabrics made of cotton,
synthetic or blended fabrics, outerwear.
Program 2 - Easy care spinning.
To spin individual items of laundry or for
continuing the program if "Rinse hold" has
been selected (see page 17).
Delicates cold
For delicate easy-care fabrics made of cotton,
synthetic or blended fabrics, curtains.
Program 3 - Delicates Spinning
To spin individual items of laundry or for
continuing the program if "Rinse hold" has
been selected (see page 17).
Wool cold
For machine-washable woolen textiles and
wool blends.
Program 4 - Wool Spinning
To spin individual items of laundry or for
continuing the program if "Rinse hold" has
been selected (see page 17).
Program 5 - Strengths
For fabrics made from cotton or linen (see
page 19).
Program 6 – Soaking
For pretreatment heavily stained washing (see
page 19).
Program 7 – Draining
To drain the cooling water by setting "Rinse
Hold" (see page 17).
X Allows you to cancel a program set by mistake
(see page 19).

The spin speed selector The spin speed selector provides the option to
select different spin speeds, interval spin and
rinse hold.
The spin speed selector can be rotated in both
directions.
Adjust only the Predetermined positions.
When set between two different positions,
significant variations in temperature, with risk
of damage to washing, can occur.
Basic position
(The Spin speed selector pointing upward)
The textiles are automatically rotated at the
maximum spin speed. This depends on your
device type and by the setting program (see
table below).
Use the spin speed selector to alter the spin
speed.
For laundry care in the spin cycle with
delicates, woollens and delicates are
automatically limited (see table) and not
exceeded even at higher positions of
adjustment.
For delicate fabrics, you should select a lower
spin speed for gentle fabric care.
The lowest spin speed is 400 revolutions per
minute (rev / min).
Saving Note:
If the laundry is to be dried in a tumble dryer,
select a high spin speed, as well dewatered
laundry to tumble drying requires much less
energy and time.
IVS – Intermediate Spinning
The laundry is gently spun and scattered in
several intervals. In this setting, the program
extended by 7 - 15 minutes.
Wool is projected only on an interval due to
the shrinking danger.
Rinse Hold
The laundry remains in the last rinse water
(Exit program see page 16).
WFF 20… WFF 18… WFF 17… WFF 16…
Hot Wash /
Coloureds 1000 900 850 800
Easy Care 900 900 850 800
Delicates 600 600 600 600
Wool 900 900 850 800

The knob for start and program flow
The programs are started with the knob for
starting. Turn the knob clockwise. The
program sequence display rotates with it and
can be set to the start position.
The knob for start can also be rotated
counterclockwise. The program sequence
displays but then does not rotate with it.
Always turn clockwise to adjust.
Program Flow The knob for start also displays the current
program status.
After starting the display of the start time
voters running in overdrive on the top of your
location program.
During the wash program, the individual
program sections are displayed on the display
screen.
Symbols on the indicator disc.
Prewash
Main wash
Rinsing
Softening / final rinse
Rinse Hold
Spin

Additional functions
The basic wash programs are designed for
normal to slightly soiled household linen. For
special requirements additional functions can
be selected by pressing the corresponding
buttons.
What are the additional features and how to
use them, refer to the following:
"Prewash" button
In particularly start soiled laundry, with strong
stains or Professional wash.
1/3 of the detergent in chamber | Fill.
Please note:
When wool program is selected, prewash is
not running, in order to protect the fiber.
"Short wash" button
For low to lightly-soiled laundry. The washing
time is shortened.
“Higher Water Level” button
The water levels are increased in the washing
process, another rinse cycle is switched.
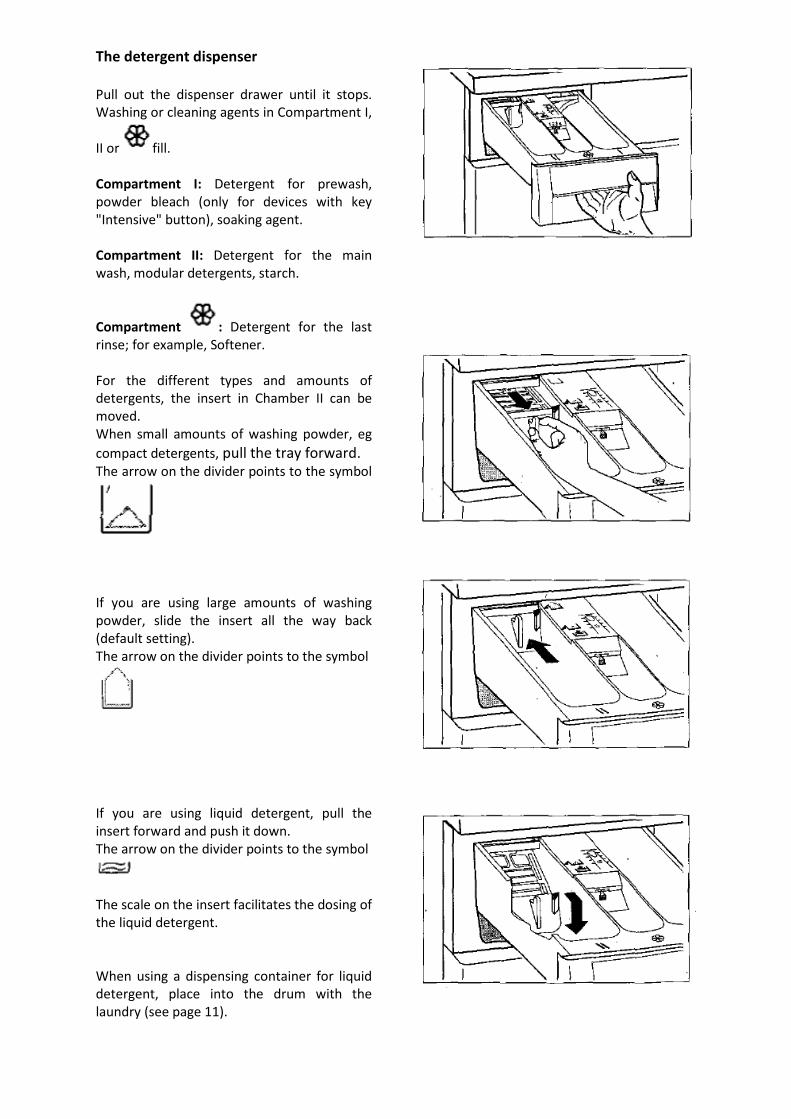
The detergent dispenser
Pull out the dispenser drawer until it stops.
Washing or cleaning agents in Compartment I,
II or fill.
Compartment I: Detergent for prewash,
powder bleach (only for devices with key
"Intensive" button), soaking agent.
Compartment II: Detergent for the main
wash, modular detergents, starch.
Compartment : Detergent for the last
rinse; for example, Softener.
For the different types and amounts of
detergents, the insert in Chamber II can be
moved.
When small amounts of washing powder, eg
compact detergents, pull the tray forward.
The arrow on the divider points to the symbol
If you are using large amounts of washing
powder, slide the insert all the way back
(default setting).
The arrow on the divider points to the symbol
If you are using liquid detergent, pull the
insert forward and push it down.
The arrow on the divider points to the symbol
The scale on the insert facilitates the dosing of
the liquid detergent.
When using a dispensing container for liquid
detergent, place into the drum with the
laundry (see page 11).

Laundry Detergent You can use any commercially available
powder or liquid detergents for drum type
washing machines.
Never use solvent-based cleaning agents in
washing machines! There is a risk of
explosion!
Keep detergents and fabric care additives
where they are inaccessible to children.
Amount of detergent
Only the correct dosage leads to good
washing results, follow the instructions on the
packaging of the detergent. Use the insert for
liquid detergent in the detergent drawer or
use the dosage aids, eg. Dosing balls, sacs that
are attached to the detergents.
The amount of detergent depends on:
Water hardness
The degree of soiling
The amount of laundry
Dosing of the particular detergent.
Insufficient amount of detergent is noticeable
only after repeated underdosing:
The laundry is gray or not clean.
It can form point-like, gray-brown spots (fat
lice) on the laundry.
The radiators calcify.
Too much detergent has the result:
An unnecessarily high amount of pollution
A small washing action by excessive foaming,
and thus poor washing results.
The detergent quantities indicated on the
packets refer to full drum loads.
With smaller amounts of laundry or low
soiling level, reduce the amount of detergent.
Notes
Liquid detergents and start time delay
(Start time delay see page 8).
In Start time delay a dispensing container for
liquid detergents, eg. Ball, use, otherwise the
liquid detergent slowly runs out of the
detergent drawer and thickened. If this
happens repeatedly, it can lead to blockages
caused by detergent deposits.
Wait until the end of the program before
removing laundry!
Softeners
In the water hardness ranges 2-4 special
softeners may be used. See package details!
The amount of detergent in this case,
according to hardness range 1 meter. First,
pour in the detergent, then pour the water
softener in the same chamber, so the liquids
are better blended.
Soaking
Fill in chamber 1 of the detergent drawer.
Select “Soaking” Program (see page 18).
Fabric conditioner
Pour into chamber . Do not exceed the
"max", as these are usually flushed with the
detergent together beginning of the program,
and no fabric softener only in the program
section. Stir liquid softener before filling, in
order to avoid clogging the overflow.
Fine finishes and natural strength.
Pour into chamber II of the detergent drawer.
Select program strengths (see page 18).
Bleach, stain remover
Powdered bleach and stain salts can be used
additionally for textiles with bleachable stains.
At Staging of "intensive" button (not all
devices) means fill in chamber I. Without
button "Intensive": first, the detergent, then
pour the bleach powder or stain remover into
compartment II.

Preparing laundry
Sorting laundry
Sort the laundry according to the care
symbols that are specified on the care labels.
Knitwear made of wool or wool rich must
"does not felt" to be in "non-felting" or
"machine washable" with the addition.
Otherwise, there is risk of felting!
You may just wash laundry in the machine,
which is marked with the following care
symbols:
Cottons
Coloureds
Easy-care laundry
Machine-washable wool
Laundry that is labeled with the following care
symbols should not be washed in the
machine:
Hand-wash
Do not wash
Sort the laundry by color. Wash white and
colored items separately, white laundry is
otherwise gray.
Do not wash new colored washing with other
washing. Risk of discoloration!
Do not overload laundry. Overcrowding
impairs the washing results.
Maximum loading amounts:
Hot wash Coloureds 5 kg
Easy care, delicates, wool 2 kg
Preserve laundering and equipment from
damage.
Allow items that have been with solvent-
based cleaning agents, eg. Stain removers,
benzine, pretreated, to air-dry before
washing. Risk of explosion!
Remove foreign bodies and metal parts, eg.
Safety pins, paper clips, out of the laundry.
Brush sand out of pockets and collars.
Close zippers, studs you to remuneration.
Remove curtain runners or tie them into a
washing bag or pouch.
Wash particularly delicate items, such as
Tights or curtains, or small items, such as
Socks or handkerchiefs in a washing bag or
pillowcase.
Turn trousers, knitwear and knitted textiles,
e.g. Knitted underwear, T-shirts, sweatshirts,
inside out.
Stain removal
Stubborn stains are sometimes not removed
by washing once. Stains should, therefore, be
removed as soon as possible, as long as they
are fresh, are removed or at least treated.
Dried stains are more difficult or impossible to
remove.
Fresh stain: Try it first with soap and water.
Do not rub on the fabric, but only pat.
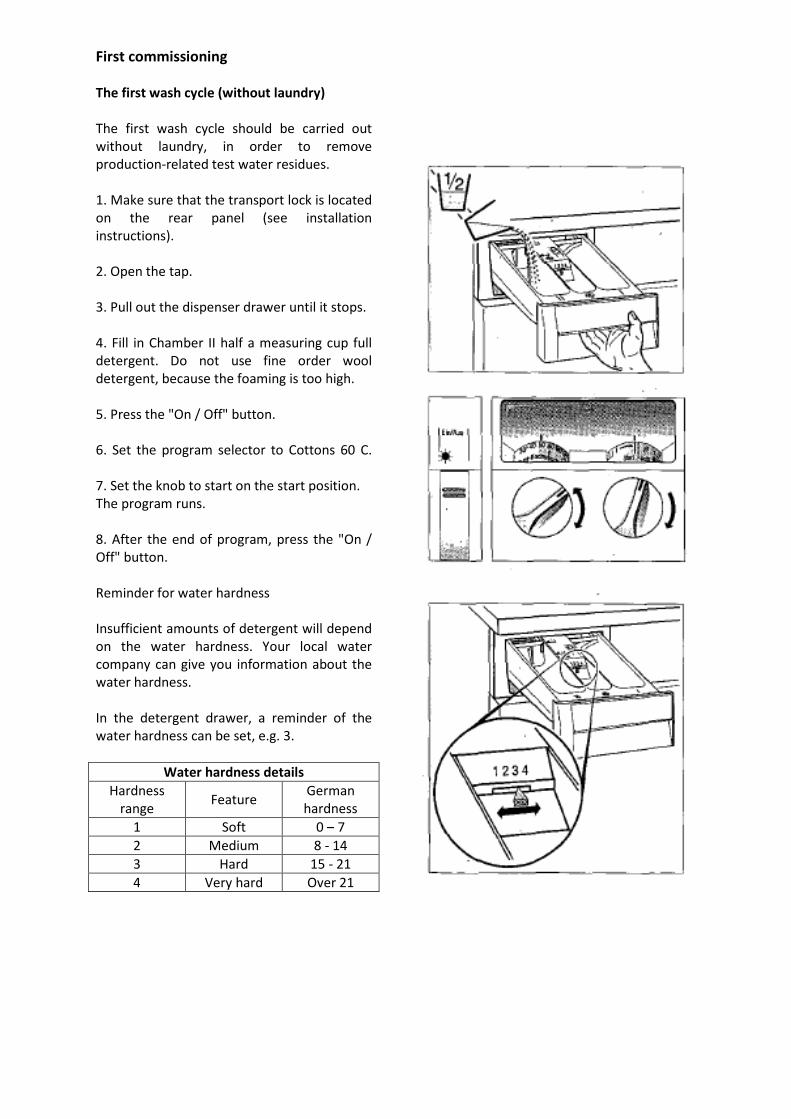
First commissioning
The first wash cycle (without laundry)
The first wash cycle should be carried out
without laundry, in order to remove
production-related test water residues.
1. Make sure that the transport lock is located
on the rear panel (see installation
instructions).
2. Open the tap.
3. Pull out the dispenser drawer until it stops.
4. Fill in Chamber II half a measuring cup full
detergent. Do not use fine order wool
detergent, because the foaming is too high.
5. Press the "On / Off" button.
6. Set the program selector to Cottons 60 C.
7. Set the knob to start on the start position.
The program runs.
8. After the end of program, press the "On /
Off" button.
Reminder for water hardness
Insufficient amounts of detergent will depend
on the water hardness. Your local water
company can give you information about the
water hardness.
In the detergent drawer, a reminder of the
water hardness can be set, e.g. 3.
Water hardness details
Hardness
range Feature
German
hardness
1 Soft 0 – 7
2 Medium 8 - 14
3 Hard 15 - 21
4 Very hard Over 21
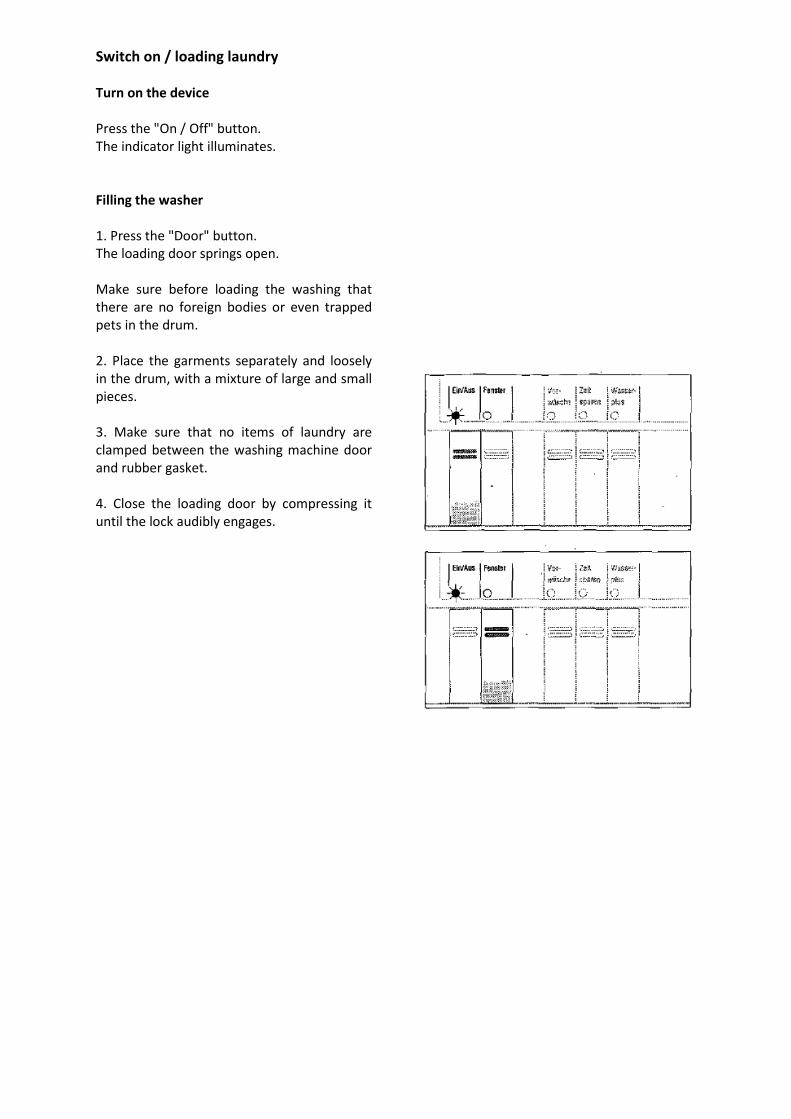
Switch on / loading laundry
Turn on the device
Press the "On / Off" button.
The indicator light illuminates.
Filling the washer
1. Press the "Door" button.
The loading door springs open.
Make sure before loading the washing that
there are no foreign bodies or even trapped
pets in the drum.
2. Place the garments separately and loosely
in the drum, with a mixture of large and small
pieces.
3. Make sure that no items of laundry are
clamped between the washing machine door
and rubber gasket.
4. Close the loading door by compressing it
until the lock audibly engages.

Setting the wash program / start program
Setting the wash program
Set the program selector to the
desired program,
eg. Coloured Cottons 60 C.
For special requirements, eg. if you want to
wash heavily soiled laundry or additionally use
bleach or stain remover, you can select
additional functions.
For accurate information on the additional
functions, see page 9.
Tip: A brief overview of the program and
additional buttons is located in the detergent
drawer.
Starting the program
Make sure that the loading door is
completely closed.
In the washing machine door is not closed, a
safety switch prevents the operation of the
unit.
Turn the program start knob
clockwise to the start position.
End of program:
If you...
• did not select the additional function
"Rinse hold", read page 17.
• have selected the additional function
"Rinse hold", read page 16.

End programs with Rinse Hold.
Precondition: You have selected the
additional function "Rinse Hold".
The laundry is in the final rinse water. The
display shows the rinse hold. The door can be
opened only after spinning the laundry or
after pumping of the rinse water.
You have two ways to exit the program:
The laundry will be spun
Set the spin speed selector to the
desired numbers of revolution, eg.
600, or IVS.
The water is pumped out, the washing
is spun.
Or
The laundry is to be removed dripping
wet.
Set the program selector to 7. The
rinsing water is pumped out.

End of the programme / Turning off the device
End of program
- The program start knob is in
the end position.
-The “Door” lamp is
extinguished.
To remove the laundry:
Press the "Door" button.
The loading door springs
open.
Remove any foreign objects (eg.
paper clips) from the drum and
rubber seal! Otherwise, there is a risk
of rusting!
Leave the machine door open slightly,
so that it can dry out.
Turning off the device
1. Press the "On / Off" button. The
light goes out.
For a device without Aqua-Stop:
2. Close the tap.
For a device with Aqua-Stop (see
figure) this is not necessary because
the safety device automatically locks
the water supply directly behind the
faucet at the end of the program.
Special programs / Change program
Soaking (program 6)
1. Insert the same color wash only.
2. Fill Chamber I with soak detergent.
Read the information on the
packaging!
3. Press the "On / Off" button.
4. Set program selector to 6.
5. Set knob start to the starting
position.
The program runs
The soak program lasts 2.5 hours. The
soaking liquor is pumped off briefly to
have a washing optimum water level.
Now you have two options:
Use soaking water for
washing.
Set and start the wash
program. No additional
washing can be added.
Or
Fresh water for washing use:
6. A spin program perform.
7. Set After spinning washing
program.
8. Press the “Prewash” button.
9. Fill detergent only in compartment
II.
10. Start the wash program.
Strengths (Program 5)
The washing should not be treated
with fabric softener.
1. Dissolve starching agents in water.
Read the information on the
packaging!
2. Switch on the device.
3. Turn the program selector to
5.
4. Set the knob to start on the start
position.
5. When adding the water, pull the
detergent drawer out slightly and
place starching agent in Chamber II.
6. Close the detergent drawer.
The strength program lasts about 25
minutes and ends with a short gentle
spin.
To dye
Dyeing is possible in your washing
machine with limitations.
Please use only environmentally
friendly dyeing agents. Observe the
manufacturer's instructions for
application and suitability for washing
machines.
A later staining of the laundry by color
deposits on equipment components
cannot be ruled out.
Note: After each dyeing, perform a
boil wash program (90 C) without
laundry. Add 1/2 measuring cup full of
detergent into chamber II.
Decolorize
Decolorizing is not possible in the
device. Discoloring agent may contain
sulfur or chlorine and damage parts.
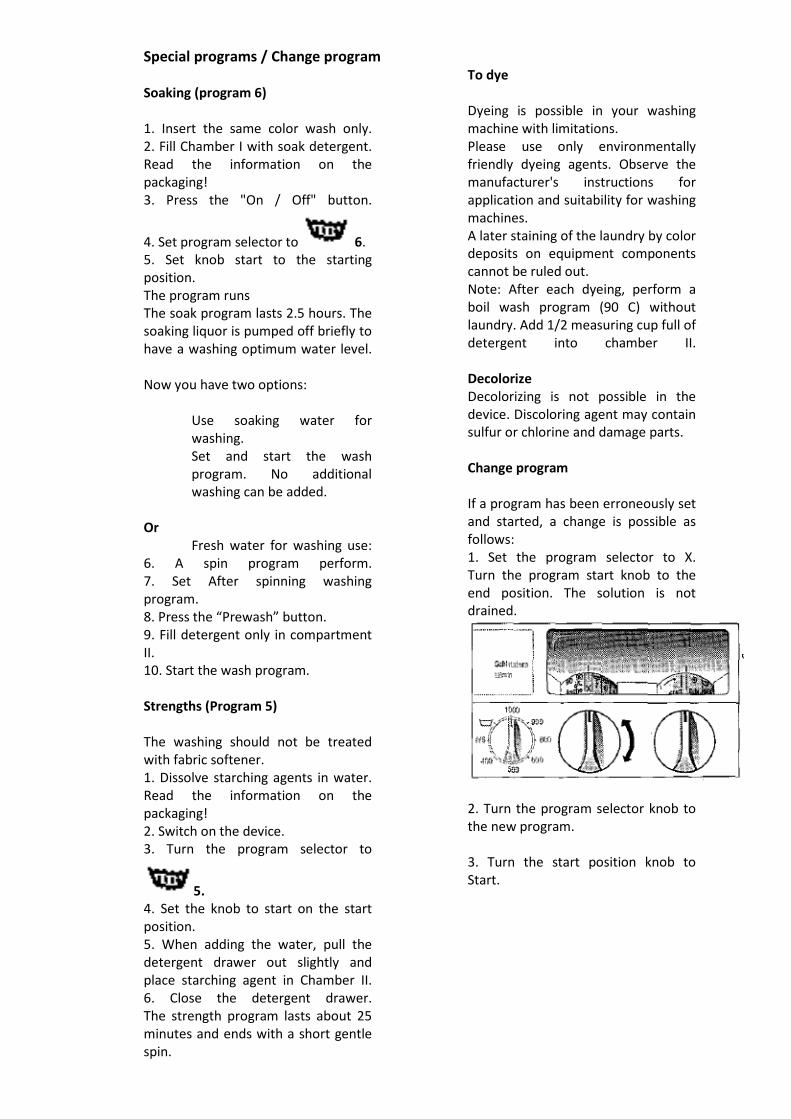
Change program
If a program has been erroneously set
and started, a change is possible as
follows:
1. Set the program selector to X.
Turn the program start knob to the
end position. The solution is not
drained.
2. Turn the program selector knob to
the new program.
3. Turn the start position knob to
Start.
Maintenance / Care / Cleaning
Cleaning the machine
Do not use solvents! These
substances can damage parts, toxic
vapors and are explosive!
Do not spray the machine with a jet of
water!
Clean the cabinet and panel with
soapy water or with a commercial
solvent-free, non-abrasive detergent.
Descaling the machine
With the correct dosage of detergent,
a descaling is generally not required.
Descaling agents contain acids, which
can attack parts of the appliance and
cause discoloration to laundry.
If you still want to descale, note the
manufacturer's instructions on the
application.
Cleaning the drum
Remove rust stains caused by broken-
down metal parts with chlorine-free
cleaning agents. Never use steel wool!
Water supply hose
Only for models without Aqua-stop:
To avoid water damage, have it
checked by a specialist after about 5
years of operation.
Frost protection
If the unit is in a room that is
susceptible to frost, any remaining
water must be removed immediately
from the drain pump and the water
inlet hose.
Emptying the drain pump
See ‘Cleaning the drain pump’ (page
21).
Draining the water supply hose
Turn off the tap.
For devices without Aqua-Stop:
Unscrew the hose to the
water tap; let the water run
into a container. Screw the
hose back to the tap.
For devices with Aqua-Stop:
Unscrew the hose and allow it
to lie on the on the floor. Turn
on any wash program for
about 40 seconds. Residual
water runs out of the inlet
hose. (Use wipes). Screw the
hose back to the tap.

Maintenance / Care / Cleaning
Cleaning the detergent drawer
1. Pull out the dispenser drawer until it stops.
2. Press and hold the back of the fabric
softener compartment-cover, pressed and
pull out the detergent drawer.
3. Take out the insert.
4. Clean chambers under running water.
5. Put the insert back into the detergent
drawer.
6. Put the detergent drawer into the machine.

Maintenance / Care / Cleaning
Cleaning the drain pump
Cleaning is necessary:
If the pump is blocked by foreign
bodies (eg. Buttons, brackets) and the
water is not drained.
If lint is present after washing of
textiles.
When the pump is clogged, up to 20 liters of
water may leak. Provide a bucket.
Cleaning process:
1. Remove the plinth at the front panel.
Danger of scalding! Allow hot detergent
solution to cool.
2. Pull breech plug from evacuation tube.
Allow water to leak into the plinth. If
necessary, repeat the process several times.
3 Replace plug seal and insert drainage hose.
4. Remove the pump cover.
5. Remove foreign bodies and deposits of
fluff. Clean the pump interior. Pump impeller
must be able to rotate.
6. Close pump tightly.
7. Re-attach and close plinth.
8. Pour about 2 liters of water into the
detergent chamber I and perform program 7
(pumping). This prevents unused detergent
from flowing in the next wash into the
drainage system.
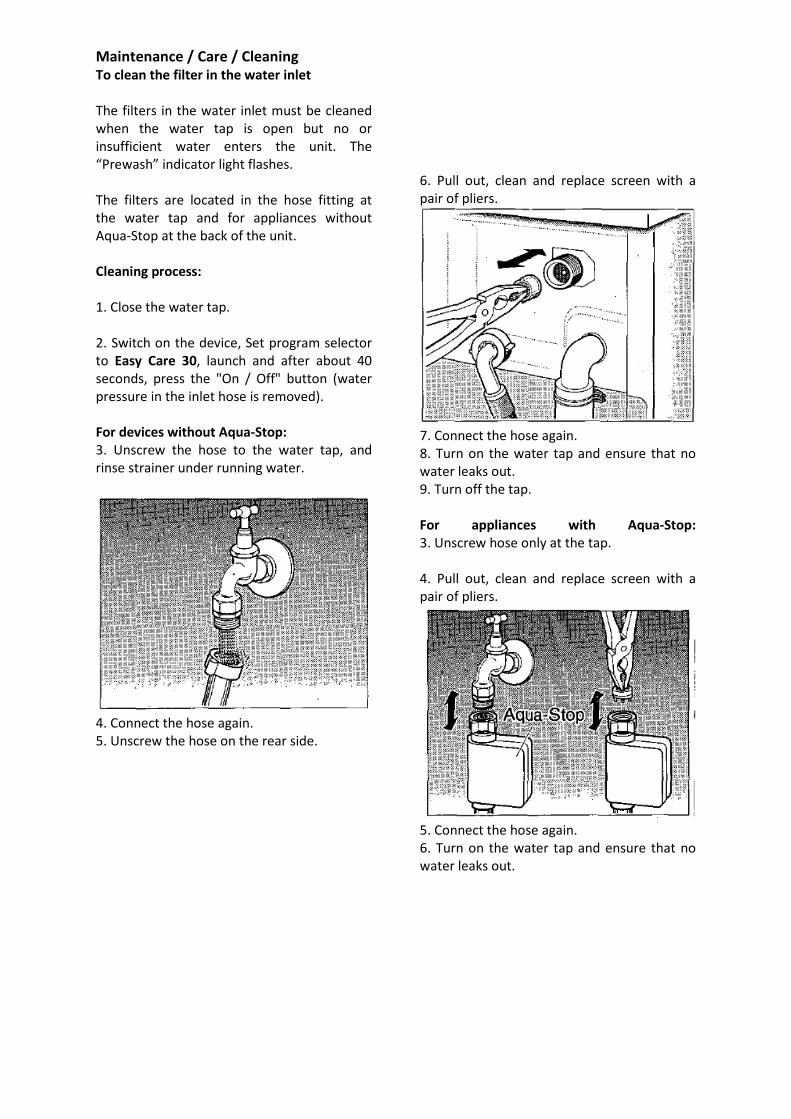
Maintenance / Care / Cleaning To clean the filter in the water inlet
The filters in the water inlet must be cleaned
when the water tap is open but no or
insufficient water enters the unit. The
“Prewash” indicator light flashes.
The filters are located in the hose fitting at
the water tap and for appliances without
Aqua-Stop at the back of the unit.
Cleaning process:
1. Close the water tap.
2. Switch on the device, Set program selector
to Easy Care 30, launch and after about 40
seconds, press the "On / Off" button (water
pressure in the inlet hose is removed).
For devices without Aqua-Stop:
3. Unscrew the hose to the water tap, and
rinse strainer under running water.
4. Connect the hose again.
5. Unscrew the hose on the rear side.
6. Pull out, clean and replace screen with a
pair of pliers.
7. Connect the hose again.
8. Turn on the water tap and ensure that no
water leaks out.
9. Turn off the tap.
For appliances with Aqua-Stop:
3. Unscrew hose only at the tap.
4. Pull out, clean and replace screen with a
pair of pliers.
5. Connect the hose again.
6. Turn on the water tap and ensure that no
water leaks out.
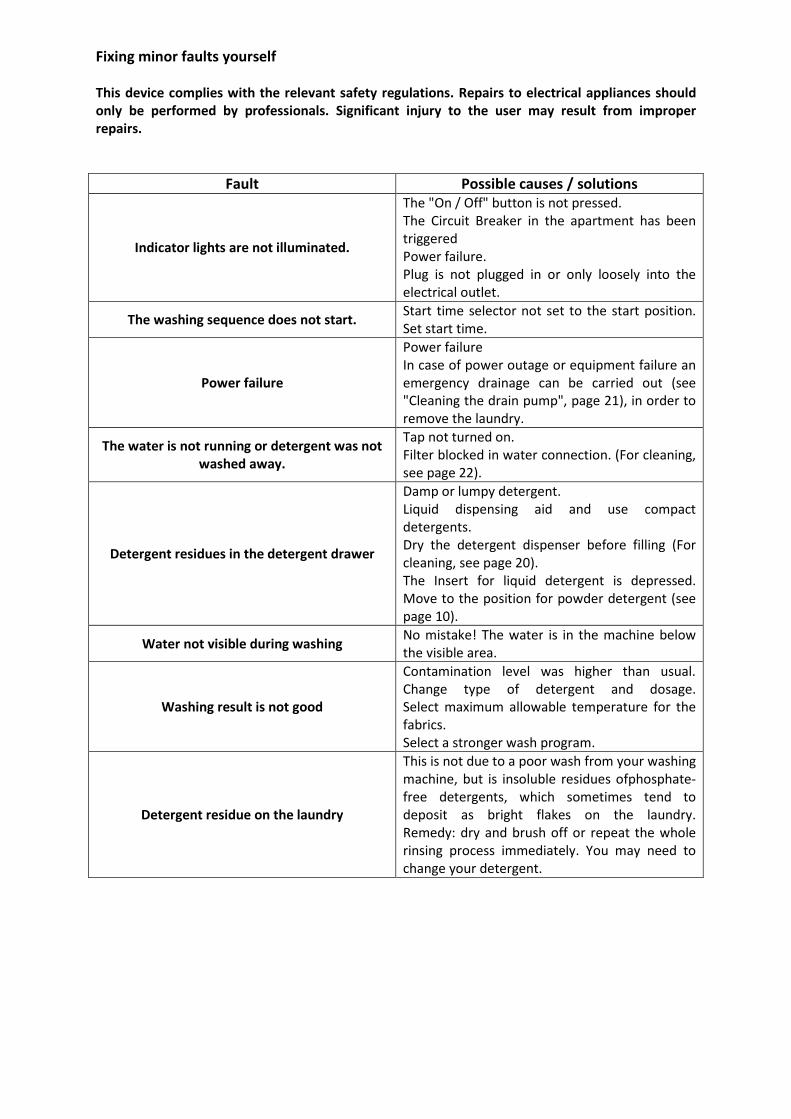
Fixing minor faults yourself
This device complies with the relevant safety regulations. Repairs to electrical appliances should
only be performed by professionals. Significant injury to the user may result from improper
repairs.
Fault Possible causes / solutions
Indicator lights are not illuminated.
The "On / Off" button is not pressed.
The Circuit Breaker in the apartment has been
triggered
Power failure.
Plug is not plugged in or only loosely into the
electrical outlet.
The washing sequence does not start. Start time selector not set to the start position.
Set start time.
Power failure
Power failure
In case of power outage or equipment failure an
emergency drainage can be carried out (see
"Cleaning the drain pump", page 21), in order to
remove the laundry.
The water is not running or detergent was not
washed away.
Tap not turned on.
Filter blocked in water connection. (For cleaning,
see page 22).
Detergent residues in the detergent drawer
Damp or lumpy detergent.
Liquid dispensing aid and use compact
detergents.
Dry the detergent dispenser before filling (For
cleaning, see page 20).
The Insert for liquid detergent is depressed.
Move to the position for powder detergent (see
page 10).
Water not visible during washing No mistake! The water is in the machine below
the visible area.
Washing result is not good
Contamination level was higher than usual.
Change type of detergent and dosage.
Select maximum allowable temperature for the
fabrics.
Select a stronger wash program.
Detergent residue on the laundry
This is not due to a poor wash from your washing
machine, but is insoluble residues ofphosphate-
free detergents, which sometimes tend to
deposit as bright flakes on the laundry.
Remedy: dry and brush off or repeat the whole
rinsing process immediately. You may need to
change your detergent.
Fixing minor faults yourself
Grey residue on washing
For contamination caused by ointments, grease
or oil, the normal does is sometimes is not
enough. Increase the dosage during the next
wash.
Remedy: Select a maximum allowable
temperature for the fabrics.
Grey stains on the laundry
These stains may be caused by cosmetics or
fabric softener and have reached already before
washing outside the device to the laundry.
Remedy: after soaking in liquid detergents, some
stains can wash out again.
Foam escapes from the detergent drawer
Too much detergent has been used. Turn the
device off for 5-10 minutes using the "On / Off"
button. As the foam dissipates, place a
tablespoon of fabric softener with 1/2 litre of
water mixed type in the detergent drawer. At
the next wash cycle, adjust the dose of
detergent.
After the last rinse, foam can be seen
Washing items individually may lead to excessive
foaming; however, this has no effect on the
rinsing result.
Motor noise No mistake! In the running-in phase, the drive
motor can cause noise during operation.
Repeated spinning
The fuzzy-controlled imbalance control system
has detected an imbalance. This is removed by
washing several times.
The IVS-spin (spin interval) was set at the speed
selector.
Vibration during washing and spinning
Transport brackets are not removed. Notes in
the corresponding installation instructions!
Feet were not fixed during installation. Align the
unit with a spirit level and re-secure the feet as
per set-up instructions.
Program time extension
When too much foam exists, the foam detection
has an extra rinse cycle and an additional spin
switched to improve the wash results.
With strong imbalances during spinning program
time extensions may occur by repeatedly
distributing the laundry. Remedy: Wash large
and small pieces together in order to reduce the
imbalance.
Fixing minor faults yourself
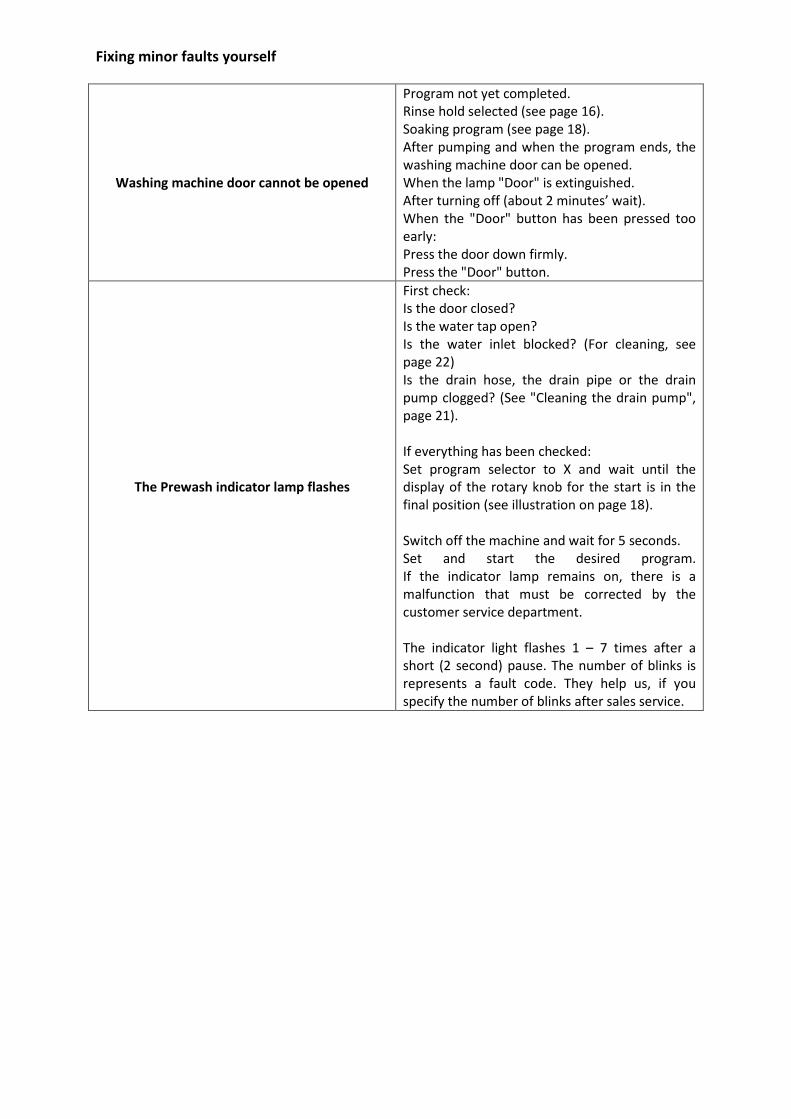
Washing machine door cannot be opened
Program not yet completed.
Rinse hold selected (see page 16).
Soaking program (see page 18).
After pumping and when the program ends, the
washing machine door can be opened.
When the lamp "Door" is extinguished.
After turning off (about 2 minutes’ wait).
When the "Door" button has been pressed too
early:
Press the door down firmly.
Press the "Door" button.
The Prewash indicator lamp flashes
First check:
Is the door closed?
Is the water tap open?
Is the water inlet blocked? (For cleaning, see
page 22)
Is the drain hose, the drain pipe or the drain
pump clogged? (See "Cleaning the drain pump",
page 21).
If everything has been checked:
Set program selector to X and wait until the
display of the rotary knob for the start is in the
final position (see illustration on page 18).
Switch off the machine and wait for 5 seconds.
Set and start the desired program.
If the indicator lamp remains on, there is a
malfunction that must be corrected by the
customer service department.
The indicator light flashes 1 – 7 times after a
short (2 second) pause. The number of blinks is
represents a fault code. They help us, if you
specify the number of blinks after sales service.
Customer service
Before you call customer service, please
check whether you can solve the problem
yourself (see the "Fixing minor faults
yourself" section).
Please note that, even during the warranty
period, there is a cost for any inspection of
the device.
If you cannot resolve a fault, switch off and
unplug the appliance, turn off the tap and call
customer service.
The nearest customer service centre to you
can be found in the enclosed address list.
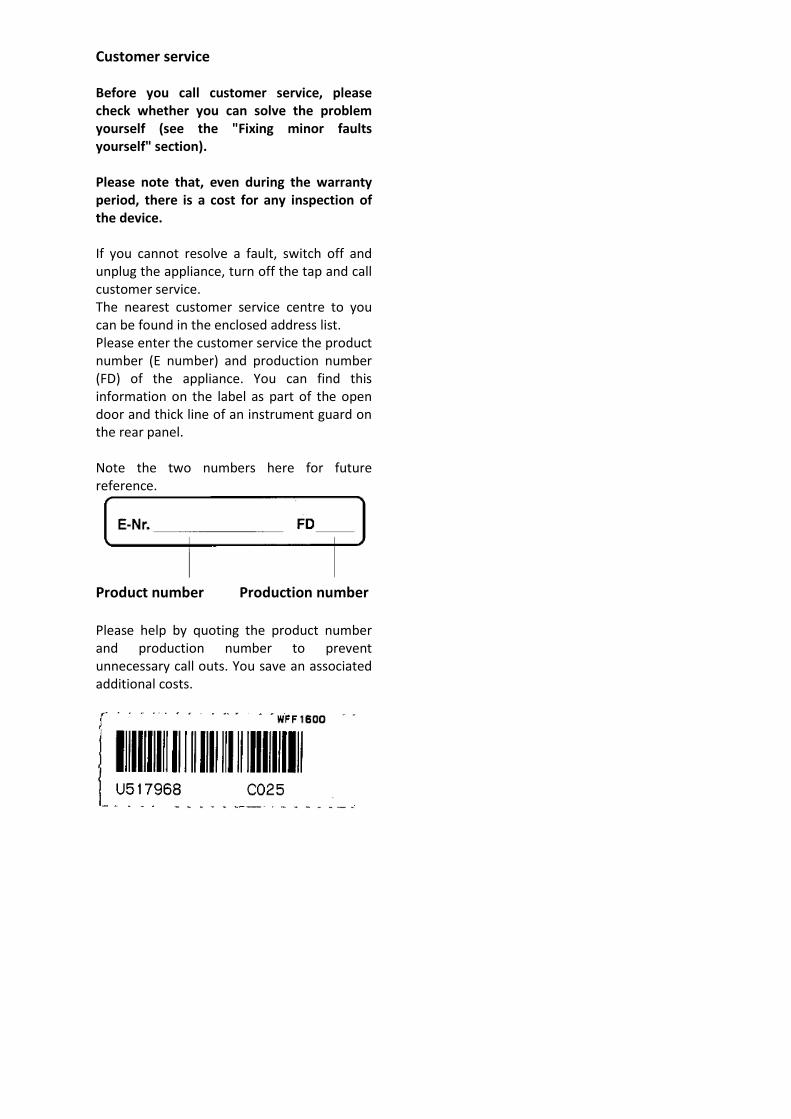
Please enter the customer service the product
number (E number) and production number
(FD) of the appliance. You can find this
information on the label as part of the open
door and thick line of an instrument guard on
the rear panel.
Note the two numbers here for future
reference.
Product number Production number
Please help by quoting the product number
and production number to prevent
unnecessary call outs. You save an associated
additional costs.