Table of Contents How to save documents using various software –Location –File Name –File Type...
25
Table of Contents • How to save documents using various software – Location – File Name – File Type suffixes • How to insert pictures and save them – Internet Explorer – Netscape – Clip Art
-
Upload
francis-gardner -
Category
Documents
-
view
221 -
download
1
Transcript of Table of Contents How to save documents using various software –Location –File Name –File Type...

Table of Contents
• How to save documents using various software– Location– File Name– File Type suffixes
• How to insert pictures and save them– Internet Explorer– Netscape– Clip Art

How to Save Documents
Using various computer software programs

How to Save Files
Which ever
program you are
using, go to File
Save As…

3 Things to Look for When Saving
2. The File Name. What are you going to name your file?
3. And the File Type
1. The Location where the file to be saved is going to be placed

What is the location where you are going to save to?
Documents can be saved to various locations within the computer or to external drives.
Looking at My Documents is a good way to find out the possibilities and places where to save.

Locations to Save on Computers in the Lab
• Also depending where the professor would like their students to save their files is where you, the lab assistant must make sure the students save their files properly.
• It is always good to make suggest to students to save backup copies of all of their work in two different locations.

Why Use FoldersBecause the computers in the labs are used by many students, everybody
uses and shares the same computer space to work on and save their documents. The only way to maintain one’s own private space within Work Space is to create a personalized folder with one’s own name to identify who it belongs to.
A folder can be created in a couple of places within a computer. Folders can be created in the Desktop, and any computer drive such as the 31/2 Floppy (A:), Work Space (D:), CD Drive (E:), Shared on ‘edpac-win2000’ (Z:).
The example on how to create a folder will be demonstrated once on the desktop, to avoid redundancy, and will be able to be applied to all other computer drives as well.

How to Create a Folder
•Right click on the Desktop
•Go to New, then Folder
•Then a new folder will
appear on the Desktop ready
to be named

File Name
• When giving a document a file name, make it relevant to the document or assignment.
• It is best if documents are given short and simple file names. This is true when uploading (publishing) documents onto the internet because you avoid the hassle of typing out treacherous URL’s which is going to be hard to remember every time you want to view your website.
• If you are going to upload a document on to the internet it is recommended not to use capital letters, spaces, or symbol characters. If you must use a space to separate words use an underscore ( _ ) or dash ( - ) to represent a space.
• Examples of proper file names would consist of:
– pic– data2– presentation– carrot– assignment_4
– nancy– ocean_life– index– 20-questions– msinfo

Choose the File Type

Know How to Change Suffixes
Depending on the type of software you are
working with when you save, a different type of
suffix will apply to the end of your file name.

File Types
Microsoft (DOC)
Power Point (PPT)
Excel (EXL)
Inspiration (ISF)
Hyperstudio (STK)
As a Web Page (HTML)
Rich Text Format (RTF)

How to Insert Pictures
From Internet Explorer, Netscape, and Clip Art

How to Insert a Picture From
After you have selected the picture you want to use
1. Right click on the picture and go to file Save Picture As…
2. Choose the Location of where the picture is to be saved
3. Give the picture a File Name
4. Picture should default to a jpeg File Type
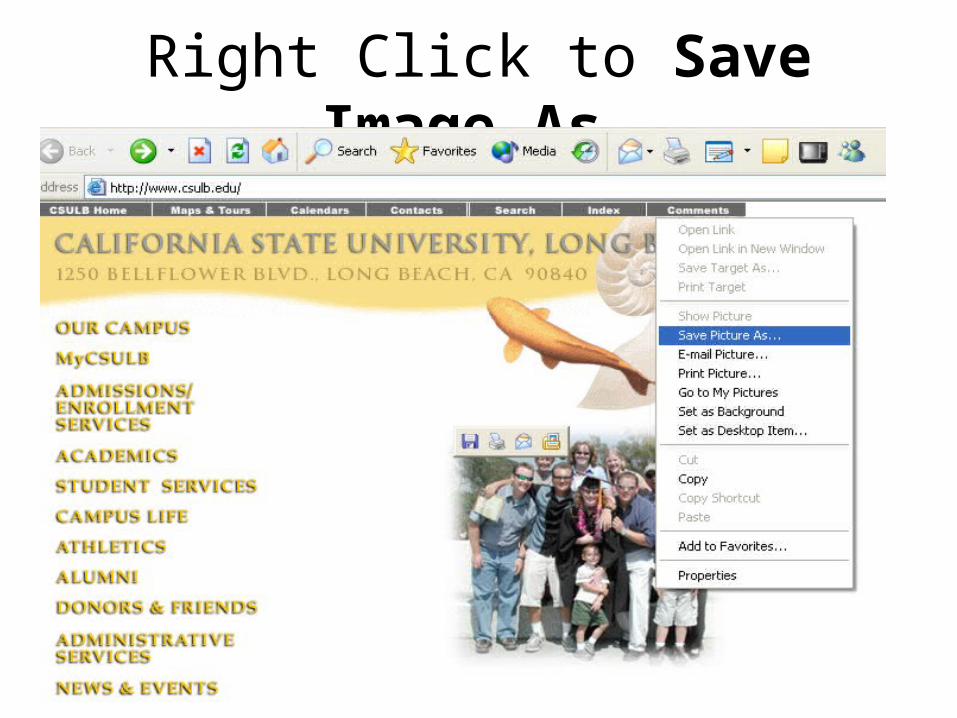
Right Click to Save Image As…

Save Picture
Location
File Name
File Type

How to Insert an Image From
After you have selected the image you want to use
1. Right click on the image and go to file Save Image As…
2. Choose the Location of where the image is to be saved
3. Give the image a File Name
4. Image should default to a gif File Type

Right Click to Save Image As…

Save Image
Location
File Name
File Type

How to Insert a Picture Using Clip Art
Go to Insert on the menu
task bar at the top of
the screen
Go and click on Picture
and then to Clip Art

Search for Clip ArtWith Microsoft XP you are required to do a search in order to obtain a picture
Type in the name of the image you would like to search for

Select the Clip ArtClick on the right hand side of the picture you want select

Insert the Clip ArtOnce the dialog box pops up select Insert and the image should appear in your word document

And the Picture is Inserted

Suggestions
• Instead of copying and pasting pictures from the internet, it is recommended to save them and then to insert them.


![SUFFIXES in English · Word formation – English suffixes 1 SUFFIXES in English NOUN suffixes STATES Suffix Mainly added to Usual meaning Examples -dom [NOUNS] [VERBS] the condition](https://static.fdocuments.us/doc/165x107/5fdbbc0ae57015529348d091/suffixes-in-word-formation-a-english-suffixes-1-suffixes-in-english-noun-suffixes.jpg)
![[CATEGORIZED] in other words, into grammatical … [FORMING PARTS OF SPEECH] ... -ant -ed -fy-fully ... Noun Suffixes Adjective Suffixes Verb Suffixes Adverb Suffixes-ability-ful -able-ite-ows-ate](https://static.fdocuments.us/doc/165x107/5ad529437f8b9a6d708c8b88/categorized-in-other-words-into-grammatical-forming-parts-of-speech-.jpg)