Table of Contents · Fig.KMS 1.8 shows the different option under the New menu: Fig.KMS 1.8...
50
Transcript of Table of Contents · Fig.KMS 1.8 shows the different option under the New menu: Fig.KMS 1.8...

KMS User Manual
Ver.3.0 Copyright © NIC, 2011 Page 2
Table of Contents
Introduction ....................................................................................................................................................................................................3
What Knowledge Management System Offers? ...............................................................................................................................................4
Login into Knowledge Management System (KMS) ........................................................................................................................................5
KMS Sections.................................................................................................................................................................................................7
Knowledge Repository ..............................................................................................................................................................................8
Upload Documents: ...................................................................................................................................................................................9
Central Document Library: ................................................................................................................................................................. 10
My Repository ................................................................................................................................................................................... 26
My Preferences .......................................................................................................................................................................................... 27
My Documents .......................................................................................................................................................................................... 29
Shared ............................................................................................................................................................................................... 30
Subscribed ........................................................................................................................................................................................ 31
Published .......................................................................................................................................................................................... 31
Pending ............................................................................................................................................................................................. 32
Other Services and Features ....................................................................................................................................................................... 34
Advanced Search ............................................................................................................................................................................... 34
Reports ...................................................................................................................................................................................................... 35
Total Documents ............................................................................................................................................................................... 35
Type Wise ..................................................................................................................................................................................... 35
User Wise ..................................................................................................................................................................................... 36
Total Download................................................................................................................................................................................. 37
Document Wise ............................................................................................................................................................................. 37
User Wise ..................................................................................................................................................................................... 38
Admin Module ............................................................................................................................................................................................. 39
Priority Notice ......................................................................................................................................................................................... 40
Manual Notice Board: .............................................................................................................................................................................. 42
Manual Ext. Notice Board ........................................................................................................................................................................ 42
Notice Board (RSS) .................................................................................................................................................................................. 42
Ext. Notice Board (RSS) ........................................................................................................................................................................... 42
Manage Tabs............................................................................................................................................................................................ 42
Types ....................................................................................................................................................................................................... 44
Category .................................................................................................................................................................................................. 45
Audience .................................................................................................................................................................................................. 46
Language ................................................................................................................................................................................................. 48

KMS User Manual
Ver.3.0 Copyright © NIC, 2011 Page 3
Introduction
Knowledge Management controls the life cycle of documents in your organization — how they are created, reviewed, published, and used. Although the term "management" implies top-down control of information, an effective knowledge management system should reflect the culture of the organization using it. The tools you use for knowledge management should be flexible, allowing you to tightly control documents' life cycles if that fits your enterprise's culture and goals, but also letting you implement a more loosely structured system if that better suits your enterprise.
A well-designed knowledge management system promotes finding and sharing information easily. It organizes content in a logical way, and makes it easy to standardize content creation and presentation across an organization. It promotes knowledge management and information mining. It provides features at each stage of a document's life cycle, from template creation to document authoring, reviewing, publishing, auditing, and ultimately archiving.

KMS User Manual
Ver.3.0 Copyright © NIC, 2011 Page 4
What Knowledge Management System Offers?
With Knowledge Management System you can easily create, upload, share, and edit documents online.
Here are a few specific things you can do:
Upload DOC, PDF, HTML or plain text documents, create documents from scratch, and download them.
Edit documents online simultaneously with anyone you choose, and invite others to view them
Create Documents using advanced online editor (TinyMCE)
Create Links
Advanced Editing Support using Check out and Check in Options
MIS Reports for Administrators
Folder Subscriptions for easy navigation
Centralized Document Repository with folder wise categorization
Keep track of who made changes to a document and when, and roll back to any version.
Publish documents online to other users.
Upload new Images and Videos, edit and can share with anyone.
Manage subscriptions and sharing of Docs.

KMS User Manual
Ver.3.0 Copyright © NIC, 2011 Page 5
Login into Knowledge Management System (KMS)
1. Enter the User id in the User Name text box, as shown in Fig.KMS 1.1:
Fig.KMS 1.1
2. Enter the password in the Password text box, as shown in Fig.KMS 1.2:
Fig.KMS 1.2

KMS User Manual
Ver.3.0 Copyright © NIC, 2011 Page 6
3. Click the Login button in Fig. as a result, the applicant logs into eOffice Portal as shown in Fig.KMS 1.3:
Fig.KMS 1.3
4. Now, after Clicking the Knowledge Management System ( ) Link under Browse Application
tab, the Knowledge Management System Page appears as shown in Fig.KMS 1.4:
Fig.KMS 1.4

KMS User Manual
Ver.3.0 Copyright © NIC, 2011 Page 7
KMS Sections
Knowledge Management System has five sections:
1. Knowledge Repository
2. Upload Documents
3. My Preferences
4. Documents
Let’s learn about these sections one by one.
KMS User Manual
Ver.3.0 Copyright © NIC, 2011 Page 8
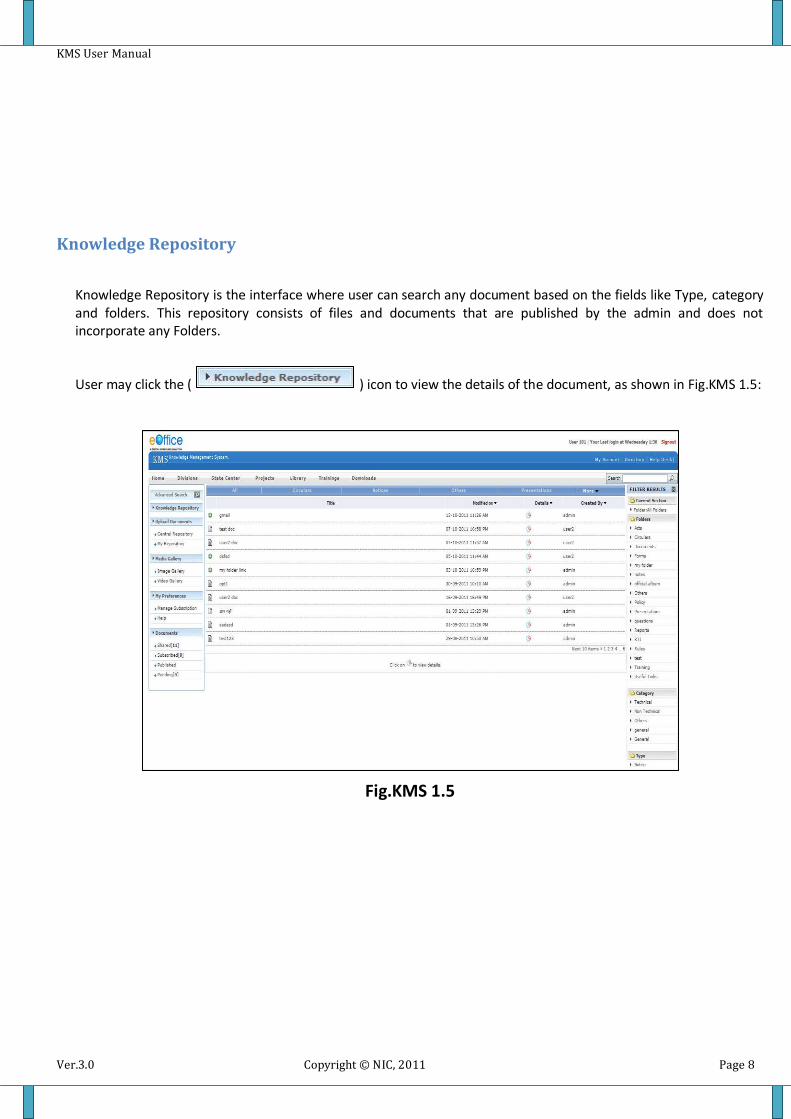
Knowledge Repository
Knowledge Repository is the interface where user can search any document based on the fields like Type, category and folders. This repository consists of files and documents that are published by the admin and does not incorporate any Folders.
User may click the ( ) icon to view the details of the document, as shown in Fig.KMS 1.5:
Fig.KMS 1.5

KMS User Manual
Ver.3.0 Copyright © NIC, 2011 Page 9
\
Upload Documents:
Upload Documents is repository of all types of documents depending upon the requirement of the organizations.
It comprise of two options:
a) Central Repository
b) My Repository
Let’s learn about these options one by one.
KMS User Manual
Ver.3.0 Copyright © NIC, 2011 Page 10
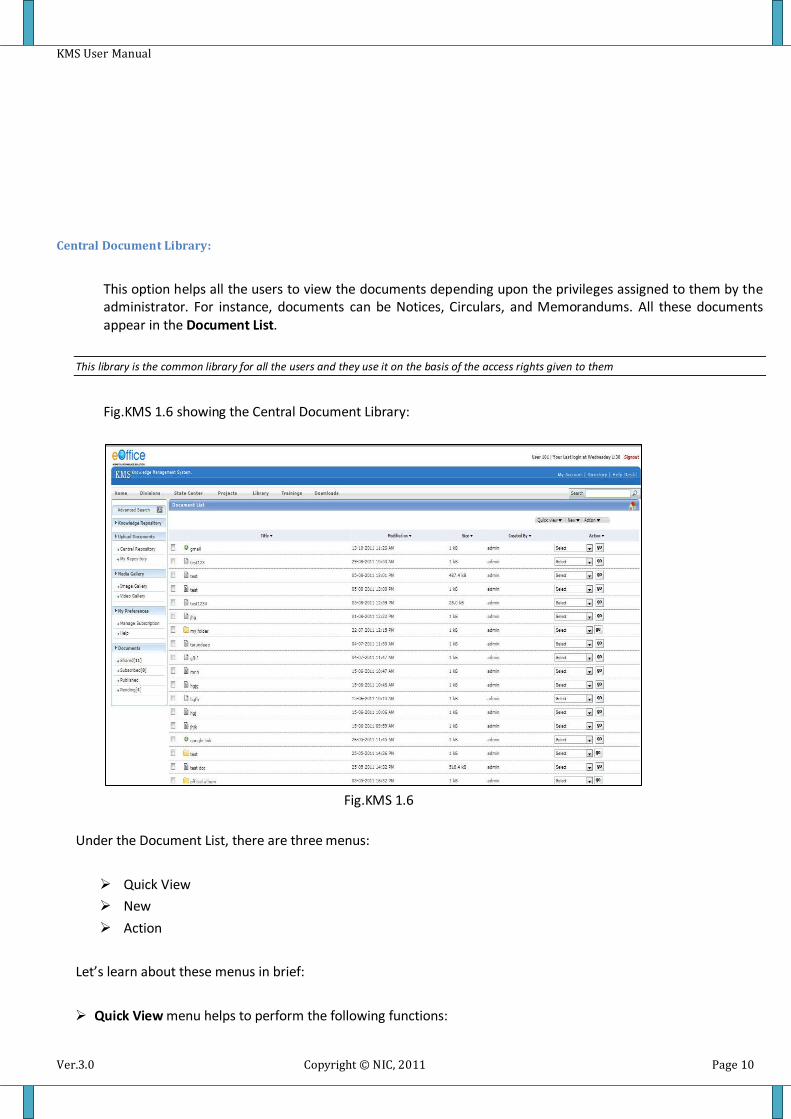
Central Document Library:
This option helps all the users to view the documents depending upon the privileges assigned to them by the administrator. For instance, documents can be Notices, Circulars, and Memorandums. All these documents appear in the Document List.
This library is the common library for all the users and they use it on the basis of the access rights given to them
Fig.KMS 1.6 showing the Central Document Library:
Fig.KMS 1.6
Under the Document List, there are three menus:
Quick View
New
Action
Let’s learn about these menus in brief:
Quick View menu helps to perform the following functions:

KMS User Manual
Ver.3.0 Copyright © NIC, 2011 Page 11
Fig.KMS 1.7 shows the different option under the Quick View menu:
Fig.KMS 1.7
Display the documents in the List View mode using the List View option.
Display the documents in the Detail View mode using the Detail View option.
Display the documents in the Publishing Status mode depicting the status of the publishing of the documents using the Publishing Status View option.
Display the documents in the default status view mode using the Default Action View option.
New menu helps to perform the following functions:
Fig.KMS 1.8 shows the different option under the New menu:
Fig.KMS 1.8
Uploading a new document
Help the user to upload a new document.
To upload document, user has to perform following steps:
o Click the Document option under the New Menu link, as shown in Fig.KMS 1.9:
Fig.KMS 1.9
o Provide Title and other mandatory metadata fields.

KMS User Manual
Ver.3.0 Copyright © NIC, 2011 Page 12
o Click the upload ( ) button after browsing a file to upload and filling metadata fields, as shown in Fig.KMS 1.10:
Fig.KMS 1.10
As a result, Viewing Rights for the uploaded page appears, as shown in Fig.KMS 1.11:
Fig.KMS 1.11
o Select the appropriate Viewing rights and click the Save Button, as shown in Fig.KMS 1.12:
Fig.KMS 1.12
Creating a online document
Help the user to upload a new document.
o Click the Online Document option under the New Menu link, as shown in Fig.KMS 1.13.

KMS User Manual
Ver.3.0 Copyright © NIC, 2011 Page 13
Fig.KMS 1.13
o Provide Title and other mandatory metadata fields and click the Next ( ) button, as shown in Fig.KMS 1.14.
Fig.KMS 1.14
As a result, Viewing Rights for the uploaded page appears, as shown in Fig.KMS 1.15.
Fig.KMS 1.15
o Select the appropriate Viewing rights and click the Next ( ) Button, as shown in Fig.KMS 1.16.

KMS User Manual
Ver.3.0 Copyright © NIC, 2011 Page 14
Fig.KMS 1.16
As a result, Document Text page appears, as shown in Fig.KMS 1.17:
Fig.KMS 1.17
o Enter the Text in the space provided and click the Save ( ) button, as shown in Fig.KMS 1.18:

KMS User Manual
Ver.3.0 Copyright © NIC, 2011 Page 15
Fig.KMS 1.18
As a result, Online Document gets uploaded.
Creating a link
Help the user to upload a new link.
To upload a quick link, user has to perform following steps:
o Click the Quick Link option under the New Menu link, as shown in Fig.KMS 1.19:
Fig.KMS 1.19
o Provide Title, description and Link URL, and click the Upload ( ) button as shown in Fig.KMS 1.20:

KMS User Manual
Ver.3.0 Copyright © NIC, 2011 Page 16
Fig.KMS 1.20
As a result, Viewing Rights for the uploaded Documents page appears, as shown in Fig.KMS 1.21:
Fig.KMS 1.21
o Select the appropriate Viewing rights and click the Save ( ) Button, as shown in Fig.KMS 1.22:
Fig.KMS 1.22
Creating a Subfolder
Help the user to upload a new Folder.
To upload a new Folder, user has to perform following steps:
o Click the Folder option under the New Menu link, as shown in Fig.KMS 1.23:

KMS User Manual
Ver.3.0 Copyright © NIC, 2011 Page 17
Fig.KMS 1.23
o Provide Title and description, and click the Upload ( ) button as shown in Fig.KMS 1.24:
Fig.KMS 1.24
Action menu helps to perform the following functions:
Fig.KMS 1.25 shows the different option under the Actions menu:
Fig.KMS 1.25
Edit the documents using the Edit ( ) option.
User can also edit the documents using the Edit option under the Actions menu.
Delete the documents using the Delete ( ) option.
User can also delete the documents using the Delete option under the Actions menu.
Rename the document using the Rename ( ) option.
Cut the document using the Cut ( ) option.
Copy the document using the Copy ( ) option.

KMS User Manual
Ver.3.0 Copyright © NIC, 2011 Page 18
Paste the document using the Paste ( ) option.
Managing Documents - Actions menu
There are few options available under Actions Menu of documents which help the user to perform various tasks on selected document.
Fig.KMS 1.26 shows various options available under Action Menu:
Fig.KMS 1.26
Various options available under Action menu are:
Edit: Helps the user to edit the document depending upon the access rights assigned.
To edit the document, user has to perform following steps:
o Select the document which needs to be edit and then select the Edit option from the Action Menu, as shown in Fig.KMS 1.27:
Fig.KMS 1.27
o Click the Go ( ) button (Fig.KMS 1.27), as a result the Edit page of that selected document appears.
o Make the necessary changes and click the Save /upload Button to save the changes.

KMS User Manual
Ver.3.0 Copyright © NIC, 2011 Page 19
Delete: Helps the user to delete the document depending upon the access rights assigned.
To delete the document, user has to perform following steps:
o Select the document which needs to be removed and then select the Delete option from the Action Menu, as shown in Fig.KMS 1.28:
Fig.KMS 1.28
o Click the Go ( ) button (Fig.KMS 1.28), as a result the following message appears, as shown in Fig.KMS 1.29.
Fig.KMS 1.29
o Click the OK ( ) button (Fig.KMS 1.29) to delete that selected document.
Sharing: Helps the user to share the document with other user or group of users and give access rights accordingly as per requirement.
To Share the document, user has to perform following steps:
o Select the document which needs to be shared and then select the Sharing option from the Action Menu,
as shown in Fig.KMS 1.30:

KMS User Manual
Ver.3.0 Copyright © NIC, 2011 Page 20
Fig.KMS 1.30
o Click the Go ( ) button (Fig.KMS 1.30), as a result Sharing options appears on same page, as shown in Fig.KMS 1.31:
Fig.KMS 1.31
o Search the users/Groups and Add to the sharing List, and give the Access Rights as per requirement, as shown in Fig.KMS 1.32:
Fig.KMS 1.32
o Click the Share ( ) Button (Fig.KMS 1.32), as a result the selected document gets shared with the selected group of users with the assigned access rights.
KMS User Manual
Ver.3.0 Copyright © NIC, 2011 Page 21
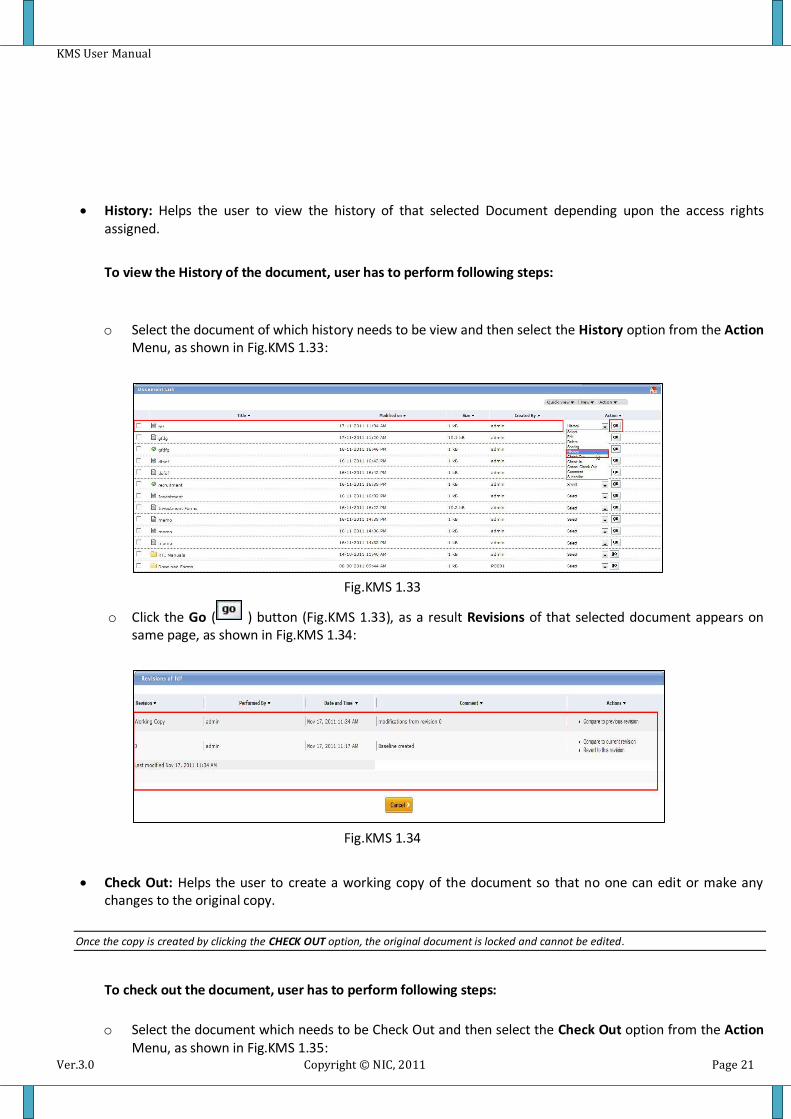
History: Helps the user to view the history of that selected Document depending upon the access rights assigned.
To view the History of the document, user has to perform following steps:
o Select the document of which history needs to be view and then select the History option from the Action
Menu, as shown in Fig.KMS 1.33:
Fig.KMS 1.33
o Click the Go ( ) button (Fig.KMS 1.33), as a result Revisions of that selected document appears on same page, as shown in Fig.KMS 1.34:
Fig.KMS 1.34
Check Out: Helps the user to create a working copy of the document so that no one can edit or make any changes to the original copy.
Once the copy is created by clicking the CHECK OUT option, the original document is locked and cannot be edited.
To check out the document, user has to perform following steps:
o Select the document which needs to be Check Out and then select the Check Out option from the Action
Menu, as shown in Fig.KMS 1.35:

KMS User Manual
Ver.3.0 Copyright © NIC, 2011 Page 22
Fig.KMS 1.35
o Click the Go ( ) button (Fig.KMS 1.35), as a Check Out Message appears on same page, as shown in Fig.KMS 1.36:
Fig.KMS 1.36
o Click the Check Out ( ) option (Fig.KMS 1.36) to finally check out that selected Document, as a result a working copy of that document is created so that no one can edit or make any changes to the original copy.
Check In: When the user is done with the edited document and want to merge it with the old version of the document simply click the check-in option.
To Check In the document, user has to perform following steps:
o Select the working copy of the checked out document which needs to be Check In and then select the
Check In option from the Action Menu, as shown in Fig.KMS 1.37.

KMS User Manual
Ver.3.0 Copyright © NIC, 2011 Page 23
Fig.KMS 1.37
o Click the Go ( ) button (Fig.KMS 1.37), as a Check-in Message appears on same page, as shown in Fig.KMS 1.38.
Fig.KMS 1.38
o Enter the Check-in message and Click the Check In ( ) (Fig.KMS 1.38) option to finally check-in that selected Document, as a result a working copy will replace the existing item with the working copy.
Cancel Check out: If for any reason it become necessary to cancel a check out and user don’t want to save any of our changes, simply navigate to the working copy and click Cancel check-out option.
To Cancel Check Out the document, user has to perform following steps:
o Select the working copy of the checked out document and then select the Cancel Check Out option from
the Action Menu, as shown in Fig.KMS 1.39:
Fig.KMS 1.39

KMS User Manual
Ver.3.0 Copyright © NIC, 2011 Page 24
o Click the Go ( ) button (Fig.KMS 1.39), as a Cancel Check Out Message appears on same page, as shown in Fig.KMS 1.40.
Fig.KMS 1.40
o Click the Cancel Check Out ( ) option (Fig.KMS 1.40) to cancel the check out process of that selected Document, as a result of Canceling the check-out will delete the working copy, and any modifications made to it will be lost. The existing version of the content will become unlocked then.
Comment: Helps the user to comment on any document depending upon the access rights assigned.
To Comment on any document, user has to perform following steps:
o Select the document on which the comment needs to be done and then select the Comment option from
the Action Menu, as shown in Fig.KMS 1.41.
Fig.KMS 1.41
o Click the Go ( ) button (Fig.KMS 1.41), as a Previous Notes by Users message appears on same page, as shown in Fig.KMS 1.42.

KMS User Manual
Ver.3.0 Copyright © NIC, 2011 Page 25
Fig.KMS 1.42
o Click the Add New Note ( ) Button (Fig.KMS 1.42), as a result Add New Note page appears in new window, as shown in Fig.KMS 1.43.
Fig.KMS 1.43
o Enter the note and click the Submit ( ) button, as shown in Fig.KMS 1.44.
Fig.KMS 1.44
As a result comment is done on that selected document.
Subscribe: Helps the users to subscribe to the folders, which they want to view frequently.
To Subscribe any document, user has to perform following steps:
o Select the document which needs to be subscribed and then select the Subscribe option from the Action
Menu, as shown in Fig.KMS 1.45:

KMS User Manual
Ver.3.0 Copyright © NIC, 2011 Page 26
Fig.KMS 1.45
o Click the Go ( ) button (Fig.KMS 1.45), as a result Subscribe Document/Online Document message appears on same page, as shown in Fig.1.46:
Fig.KMS 1.46
o Click the Subscribe ( ) Button (Fig.KMS 1.46), as a result the selected document gets subscribed and user can view the details frequently.
My Repository
My Repository is the user specific library that is separate for each and every user of eOffice. Functionalities and menus are same as that of Central Repository Document.
For Various Action Menu options, please refer to Central Repository Section.

KMS User Manual
Ver.3.0 Copyright © NIC, 2011 Page 27
My Preferences
My Preferences sections provide the information regarding the user subscriptions, and help for understanding KMS.
It comprise of two options:
a) Manage Subscription
b) Help
Let’s learn about these options one by one.
a) Manage Subscription: Helps to perform the folder subscription using the Manage Subscription (
) link under the My Preferences section. This feature helps user to know the latest activities done in the folder which the user has subscribed and also facilitates, if user want to unsubscribe the already subscribed Folder/Document.

KMS User Manual
Ver.3.0 Copyright © NIC, 2011 Page 28
To manage the subscription of already subscribed documents, user has to perform following steps:
o Click the Manage Subscription link under My Preferences in the left portlet, as shown in Fig.KMS 1.47:
Fig.KMS 1.47
o Select the Folder or Document/link to unsubscribe and click the Unsubscribe ( ) Button, as shown in Fig.KMS 1.48:
Fig.KMS 1.48
As a result the subscribed Folder or Document/link gets unsubscribed.
b) Help- This option provides the help to the users for understanding Knowledge Management System (KMS). It includes User Manual, Quick Start Guide and Online Help.
To get Help on Knowledge Management System, user has to perform following steps:
o Click the Help link under My Preferences in the left portlet, as shown in Fig.KMS 1.49:
Fig.KMS 1.49
o Click the required link to get the help document, as shown in Fig.KMS 1.50:
Fig.KMS 1.50

KMS User Manual
Ver.3.0 Copyright © NIC, 2011 Page 29
My Documents
My Documents contains different types of documents that are used in an organization.
Fig.KMS 1.51 shows the different options under the Documents section:

KMS User Manual
Ver.3.0 Copyright © NIC, 2011 Page 30
Fig.KMS 1.51
It comprise of four options:
a) Shared b) Subscribed c) Published
d) Pending
Let’s learn about these options one by one.
Shared
This option provides a list of all the documents in the Document List that are shared within the organization.
To View shared documents/Folders, user has to perform following steps:
o Click the Shared link under Documents in the left portlet, as shown in Fig.KMS 1.52:
Fig.KMS 1.52
As a result, Shared Document List page appears, as shown in Fig.KMS 1.53:
Fig.KMS 1.53

KMS User Manual
Ver.3.0 Copyright © NIC, 2011 Page 31
o Click the required shared Document/Folder to view the details.
For various actions that can be performed under Shared Documents, refer to Actions menu of Central Repository section.
Subscribed
This option provides a list of all the documents in the Subscribed Folder(s) Document List that are subscribed.
To view the subscribed Documents, user has to perform following steps:
o Click the Subscribed link under Documents in the left portlet, as shown in Fig.KMS 1.54.
Fig.KMS 1.54
As a result, Subscribed Folder (s) Documents page appears, as shown in Fig.KMS 1.55:
Fig.KMS 1.55
o Click the required subscribed Document to view the details.
Published
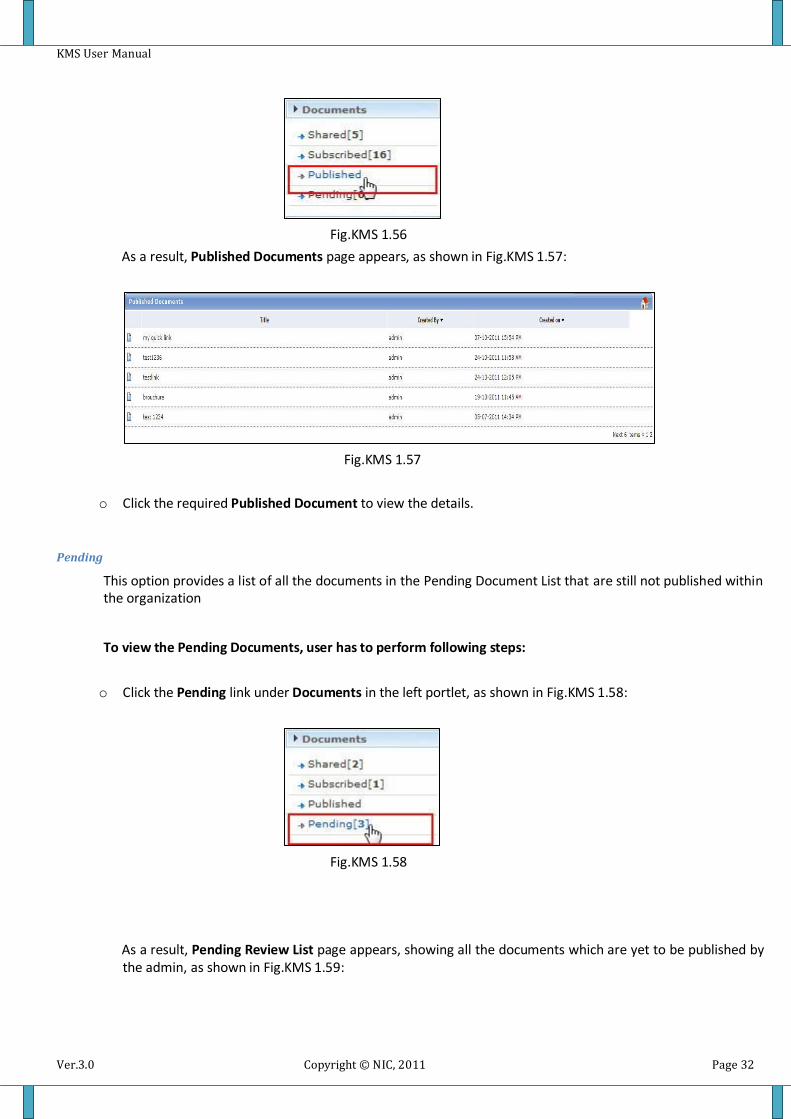
This option provides a list of all the documents in the Published Document List that are published within the organization.
To view the subscribed Documents, user has to perform following steps:
o Click the Published link under Documents in the left portlet, as shown in Fig.KMS 1.56:
KMS User Manual
Ver.3.0 Copyright © NIC, 2011 Page 32
Fig.KMS 1.56
As a result, Published Documents page appears, as shown in Fig.KMS 1.57:
Fig.KMS 1.57
o Click the required Published Document to view the details.
Pending
This option provides a list of all the documents in the Pending Document List that are still not published within the organization
To view the Pending Documents, user has to perform following steps:
o Click the Pending link under Documents in the left portlet, as shown in Fig.KMS 1.58:
Fig.KMS 1.58
As a result, Pending Review List page appears, showing all the documents which are yet to be published by the admin, as shown in Fig.KMS 1.59:

KMS User Manual
Ver.3.0 Copyright © NIC, 2011 Page 33
Fig.KMS 1.59

KMS User Manual
Ver.3.0 Copyright © NIC, 2011 Page 34
Other Services and Features
Advanced Search
This option helps the user to search any kind of document weather it is text file, doc file. Pdf file etc. search can be filtered on basis of Type of Document, Category Language type, Creation date, modification date etc.

KMS User Manual
Ver.3.0 Copyright © NIC, 2011 Page 35
Reports
MIS Reports for administrator is required for filtering out the total number of Downloads, Documents, Online Documents, Links and Folders on basis of user wise, Type wise or Document wise that are used in an organization.
Fig.KMS 1.60 shows the different options under the Reports section.
Fig.KMS 1.60
It comprise of two options:
a) Total Documents b) Total Downloads
Let’s learn about these options one by one.
Total Documents
This option contains the MIS Reports of total documents generated. It is further categorized into 2 modules:
Type Wise
This module contains the MIS reports of all documents on the basis of total no. of document type such as Documents, Folders, Online Documents, Links etc
To get Type Wise Document report user has to perform following steps:
o Click the Type Wise link under Total Documents of Reports section in the left portlet, as shown in Fig.KMS 1.61:

KMS User Manual
Ver.3.0 Copyright © NIC, 2011 Page 36
Fig.KMS 1.61
As a result, Total Folder/Document Report page appears, showing all different types of documents, as showing in Fig.KMS 1.62:
Fig.KMS 1.62
User Wise
This module contains the MIS reports of all the documents on the basis of total no. of download.
To get User Wise Document report user has to perform following steps:
o Click the User Wise link under Total Documents of Reports section in the left portlet, as shown in Fig.KMS 1.63:
Fig.KMS 1.63
As a result, Search user page appears, as shown in Fig.KMS 1.64:

KMS User Manual
Ver.3.0 Copyright © NIC, 2011 Page 37
Fig.KMS 1.64
o Enter any user and click the Search users ( ) button (Fig.KMS 1.64), as result different types of documents appears, as shown in Fig.KMS 1.65:
Fig.KMS 1.65
Total Download
This option contains the MIS Reports of total downloads.
It is further categorized into 2 modules:
Document Wise
This module contains the MIS reports of all downloads on the basis of total no. of documents.
To get Document Wise Download report, user has to perform following steps:
o Click the Document Wise link under Total Downloads of Reports section in the left portlet, as shown in Fig.KMS 1.66:

KMS User Manual
Ver.3.0 Copyright © NIC, 2011 Page 38
Fig.KMS 1.66
As a result, Total no. Downloads on different documents page appears, as shown in Fig.KMS 1.67:
Fig.KMS 1.67
User Wise
This module contains the MIS reports of all downloads on the basis of total no. of users.
To get user Wise Download report, user has to perform following steps:
o Click the User Wise link under Total Downloads of Reports section in the left portlet, as shown in Fig.KMS 1.68:
Fig.KMS 1.68
As a result, Search user page appears, as shown in Fig.KMS 1.69:
Fig.KMS 1.69
KMS User Manual
Ver.3.0 Copyright © NIC, 2011 Page 39
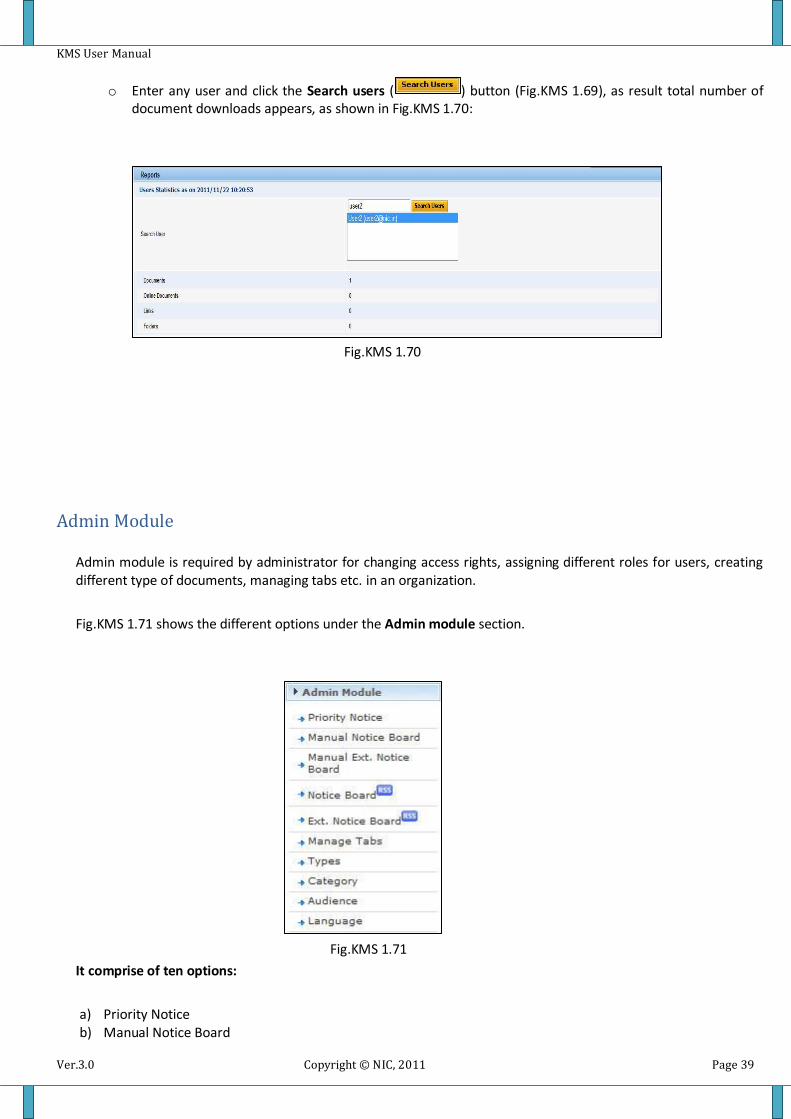
o Enter any user and click the Search users ( ) button (Fig.KMS 1.69), as result total number of document downloads appears, as shown in Fig.KMS 1.70:
Fig.KMS 1.70
Admin Module
Admin module is required by administrator for changing access rights, assigning different roles for users, creating different type of documents, managing tabs etc. in an organization.
Fig.KMS 1.71 shows the different options under the Admin module section.
Fig.KMS 1.71
It comprise of ten options:
a) Priority Notice b) Manual Notice Board

KMS User Manual
Ver.3.0 Copyright © NIC, 2011 Page 40
c) Manual Ext. Notice Board d) Notice Board e) Ext. Notice Board f) Manage Tabs g) Types h) Category i) Audience j) Language
Let’s learn about these options one by one:
Priority Notice This option facilitates the admin to set the priority level for notices. Admin can assign priority to any notice, can change the state/type of existing priority notices or even can change the state to personal notice. The notices which are not personal get displayed in Notice tab under eOffice Dashboard.
To set the priority Notice, user has to perform following steps:
o Click the Priority Notice link under Admin Module section in the left portlet, as shown in Fig.KMS 1.72:
Fig.KMS 1.72
As a result, following page appears, as shown in Fig.KMS 1.73:

KMS User Manual
Ver.3.0 Copyright © NIC, 2011 Page 41
Fig.KMS 1.73
o Click the Make Priority Notice ( ) link of any document which needs to be prioritize, as shown in Fig.KMS 1.74:
Fig.KMS 1.74
As a result, Enter Document Details page appears, as shown in Fig.KMS 1.75:
Fig.KMS 1.75

KMS User Manual
Ver.3.0 Copyright © NIC, 2011 Page 42
o Select the appropriate Display order which represents the priority of the notice and also enter the Last
Date which represents the validity of the notice priority and then click the Save ( ) Button, as shown in following Fig.KMS 1.76:
Fig.KMS 1.76
As a result the notice gets prioritized and gets displayed under eOffice Dashboard Notice section.
Manual Notice Board: This option facilitates the admin to view the recent updates made on different type of documents, whether it is notices, links, Folders etc. User can perform various actions on those documents as well.
For various actions that can be performed under Manual Notice Board, refer to Actions menu of Central Repository section.
Manual Ext. Notice Board
This option is the Administrator module for running scripts in case notice is not reflecting.
Notice Board (RSS)
This option facilitates the user to subscribe to a feed, it is added to the Common Feed List. Updated information from the feed is automatically downloaded to user’s computer and can be viewed in Internet Explorer and other programs.
Ext. Notice Board (RSS)
This option facilitates the user to subscribe to a feed, it is added to the Common Feed List. Updated information from the feed is automatically downloaded to user’s computer and can be viewed in Internet Explorer and other programs.
Manage Tabs
This option facilitates the admin to manage the Main Tab Name and Sub Tab Name bar which appears under Knowledge Repository screen.
To manage the Tabs, user has to perform following steps:

KMS User Manual
Ver.3.0 Copyright © NIC, 2011 Page 43
o Click the Manage Tabs link under Admin Module section in the left portlet, as shown in Fig.KMS 1.77:
Fig.KMS 1.77
As a result, following page appears, as shown in Fig.KMS 1.78:
Fig.KMS 1.78
o Check the options as per requirement under the Main Tab Name and Sub Tab Name respectively which
appears in Knowledge Repository Section and click the Submit ( ) button, as shown in Fig.KMS 1.79:

KMS User Manual
Ver.3.0 Copyright © NIC, 2011 Page 44
Fig.KMS 1.79
Types
This option facilitates the admin to change the status of the existing type of document or even offers to create new document type.
To add new Notice Type, user has to perform following steps:
o Click the Types link under Admin Module section in the left portlet, as showing in Fig.KMS 1.80:
Fig.KMS 1.80
As a result, Manage Type page appears, as shown in Fig.KMS 1.81:

KMS User Manual
Ver.3.0 Copyright © NIC, 2011 Page 45
Fig.KMS 1.81
o Click the Add New Link (Fig.KMS 1.81), as a result Add New Type page appears, as shown in Fig.KMS 1.82:
Fig.KMS 1.82
o Enter the appropriate Type Code and Type Name (Fig.KMS 1.81) and Click the Submit ( ) button, as shown in Fig.KMS 1.83:
Fig.KMS 1.83
Click the Enable or Disable link to set the Type status of the Notice. If status is TRUE then the notice type is enabled and if the status is FALSE then the notice type is disabled.
Category
This option facilitates the admin to change the status of the existing category of the document like General, Non technical, others etc. or even offers to create new category.
To add new Notice Category, user has to perform following steps:
o Click the Category link under Admin Module section in the left portlet, as shown in Fig.KMS 1.84:

KMS User Manual
Ver.3.0 Copyright © NIC, 2011 Page 46
Fig.KMS 1.84
As a result, Manage Category page appears, as shown in Fig.KMS 1.85:
Fig.KMS 1.85
o Click the Add New Link (Fig.KMS 1.85), as a result Add New Category page appears, as shown in Fig.KMS 1.86:
Fig.KMS 1.86
o Enter the appropriate Category Code and Category Name and click the Submit ( ) button, as shown in Fig.KMS 1.87:
Fig.KMS 1.87
Click the Enable or Disable link to set the Category status of the Notice. If status is TRUE then the notice category is enabled and if the status is FALSE then the notice category is disabled.
Audience
This option facilitates the admin to change the status of the existing audience type like All users, Restricted users, Selected users etc. or even offer to create new audience type.
To add new Notice Audience, user has to perform following steps:

KMS User Manual
Ver.3.0 Copyright © NIC, 2011 Page 47
o Click the Audience link under Admin Module section in the left portlet, as shown in Fig.KMS 1.88:
Fig.KMS 1.88
As a result, Manage Audience page appears, as shown in Fig.KMS 1.89:
Fig.KMS 1.89
o Click the Add New Link (Fig.KMS 1.89), as a result Add New Audience page appears, as shown in Fig.KMS 1.90:
Fig.KMS 1.90
o Enter the appropriate Audience Code and Audience Name and Click the Submit ( ) button, as shown in Fig.KMS 1.91:
Fig.KMS 1.91

KMS User Manual
Ver.3.0 Copyright © NIC, 2011 Page 48
Click the Enable or Disable link to set the Audience status of the Notice. If status is TRUE then the notice Audience mode is enabled and if the status is FALSE then the notice Audience mode is disabled.
Language
This option facilitates the admin to change the status of the existing language like English, Hindi or even offer to create new language.
To add new Notice Language, user has to perform following steps:
o Click the Language link under Admin Module section in the left portlet, as shown in Fig.KMS 1.92:
Fig.KMS 1.92
As a result, Manage Language page appears, as shown in Fig.KMS 1.93:
Fig.KMS 1.93
o Click the Add New Link (Fig.KMS 1.93), as a result Add New Language page appears, as shown in Fig.KMS 1.94:
Fig.KMS 1.94

KMS User Manual
Ver.3.0 Copyright © NIC, 2011 Page 49
o Enter the appropriate Language Code and Language Name and Click the Submit ( ) button, as shown in Fig.KMS 1.95:
Fig.KMS 1.95
Click the Enable or Disable link to set the Language status of the Notice. If status is TRUE then the notice Language mode is enabled and if the status is FALSE then the notice Language mode is disabled.

KMS User Manual
Ver.3.0 Copyright © NIC, 2011 Page 50