Table of Contents: Employee Self-Service Kiosk
35
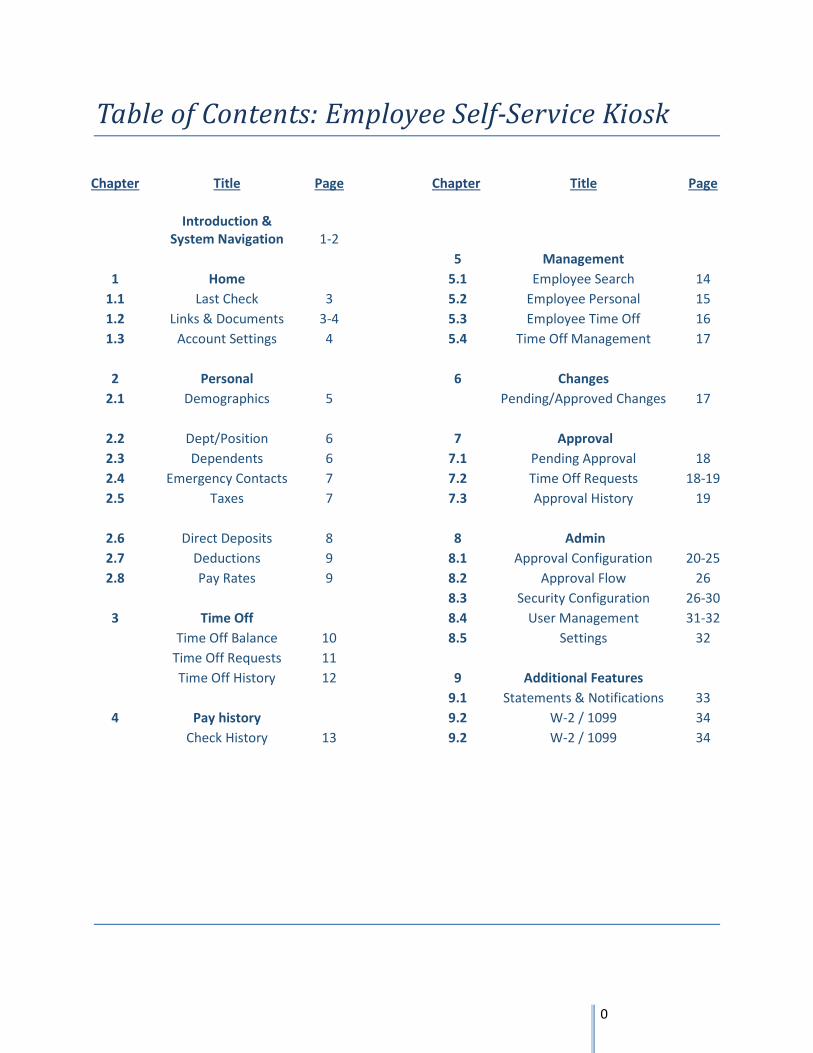
0 Table of Contents: Employee Self-Service Kiosk Chapter Title Page Chapter Title Page Introduction & System Navigation 1-2 5 Management 1 Home 5.1 Employee Search 14 1.1 Last Check 3 5.2 Employee Personal 15 1.2 Links & Documents 3-4 5.3 Employee Time Off 16 1.3 Account Settings 4 5.4 Time Off Management 17 2 Personal 6 Changes 2.1 Demographics 5 Pending/Approved Changes 17 2.2 Dept/Position 6 7 Approval 2.3 Dependents 6 7.1 Pending Approval 18 2.4 Emergency Contacts 7 7.2 Time Off Requests 18-19 2.5 Taxes 7 7.3 Approval History 19 2.6 Direct Deposits 8 8 Admin 2.7 Deductions 9 8.1 Approval Configuration 20-25 2.8 Pay Rates 9 8.2 Approval Flow 26 8.3 Security Configuration 26-30 3 Time Off 8.4 User Management 31-32 Time Off Balance 10 8.5 Settings 32 Time Off Requests 11 Time Off History 12 9 Additional Features 9.1 Statements & Notifications 33 4 Pay history 9.2 W-2 / 1099 34 Check History 13 9.2 W-2 / 1099 34
Transcript of Table of Contents: Employee Self-Service Kiosk
0
TableofContents:EmployeeSelf-ServiceKiosk
Chapter Title Page Chapter Title Page
Introduction &
System Navigation 1-2
5 Management
1 Home 5.1 Employee Search 14
1.1 Last Check 3 5.2 Employee Personal 15
1.2 Links & Documents 3-4 5.3 Employee Time Off 16
1.3 Account Settings 4 5.4 Time Off Management 17
2 Personal 6 Changes
2.1 Demographics 5 Pending/Approved Changes 17
2.2 Dept/Position 6 7 Approval
2.3 Dependents 6 7.1 Pending Approval 18
2.4 Emergency Contacts 7 7.2 Time Off Requests 18-19
2.5 Taxes 7 7.3 Approval History 19
2.6 Direct Deposits 8 8 Admin
2.7 Deductions 9 8.1 Approval Configuration 20-25
2.8 Pay Rates 9 8.2 Approval Flow 26
8.3 Security Configuration 26-30
3 Time Off 8.4 User Management 31-32
Time Off Balance 10 8.5 Settings 32
Time Off Requests 11
Time Off History 12 9 Additional Features
9.1 Statements & Notifications 33
4 Pay history 9.2 W-2 / 1099 34
Check History 13 9.2 W-2 / 1099 34

1
Introduction
In order for you to be able to access the Admin Module, you should first register yourself on Employee Self
Service (or have your ReadyPay contact set up a non-employee Admin login for you through ReadyPay
Online). Next, access ReadyPay Online. If you do not have access, your ReadyPay contact can access the
ESS User Administration area for you. Your name should be found in the list of employees and ‘Employee
Role’ will be showing next to it. Click on the role and select ‘Admin’ from the pull-down menu that appears.
Then click the disk button to save. You will then be able to log back into Self Service to see the Admin
module.
System Navigation
<Figure I.A>
2
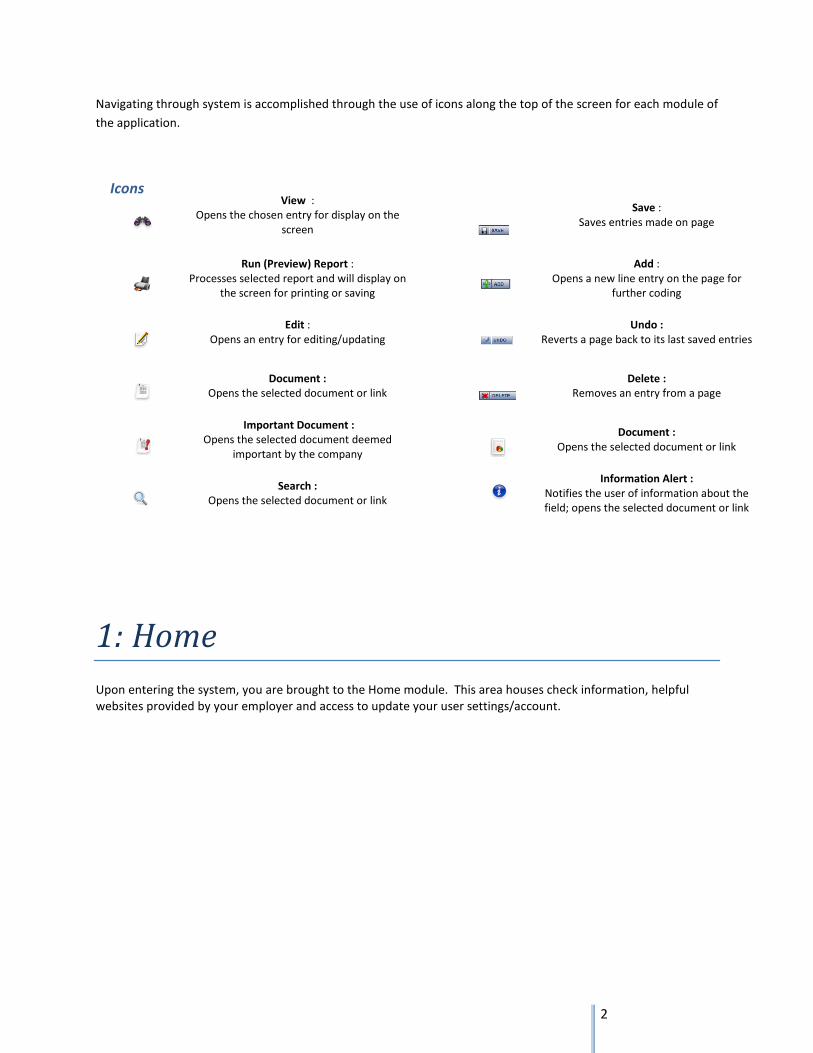
Navigating through system is accomplished through the use of icons along the top of the screen for each module of
the application.
Icons
View :
Opens the chosen entry for display on the
screen
Save :
Saves entries made on page
Run (Preview) Report :
Processes selected report and will display on
the screen for printing or saving
Add :
Opens a new line entry on the page for
further coding
Edit :
Opens an entry for editing/updating
Undo :
Reverts a page back to its last saved entries
Document :
Opens the selected document or link
Delete :
Removes an entry from a page
Important Document :
Opens the selected document deemed
important by the company
Document :
Opens the selected document or link
Search :
Opens the selected document or link
Information Alert :
Notifies the user of information about the
field; opens the selected document or link
1:Home
Upon entering the system, you are brought to the Home module. This area houses check information, helpful
websites provided by your employer and access to update your user settings/account.
3
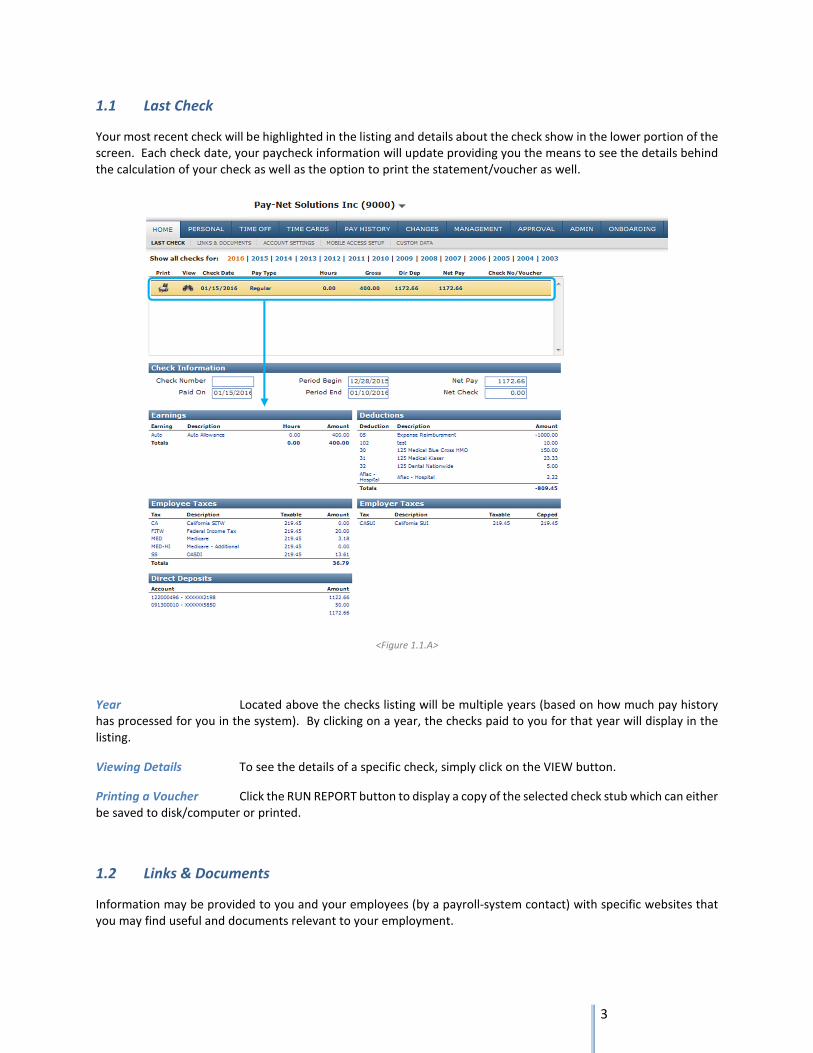
1.1 Last Check
Your most recent check will be highlighted in the listing and details about the check show in the lower portion of the
screen. Each check date, your paycheck information will update providing you the means to see the details behind
the calculation of your check as well as the option to print the statement/voucher as well.
<Figure 1.1.A>
Year Located above the checks listing will be multiple years (based on how much pay history
has processed for you in the system). By clicking on a year, the checks paid to you for that year will display in the
listing.
Viewing Details To see the details of a specific check, simply click on the VIEW button.
Printing a Voucher Click the RUN REPORT button to display a copy of the selected check stub which can either
be saved to disk/computer or printed.
1.2 Links & Documents
Information may be provided to you and your employees (by a payroll-system contact) with specific websites that
you may find useful and documents relevant to your employment.

4
Links Each Link shown on the screen is an external website you may click (on the icon) to see. Examples
might be to look up a doctor who takes your insurance or to see other software applications you may need to use
such as a timekeeping system.
Documents Change forms, direct deposit forms, employee handbooks or other employee-relevant information
may be displayed here.
<Figure 1.2.A>
1.3 Account Settings
At any time, you may update your Self Service password and email address (if email address was required during
registration). If your employer has provided you with access to other payroll-related software, you may enter your
logins for those here also to allow for single sign-on. Single sign-on allows you to toggle between Self Service and
that specified product by clicking any available icons for Benefits or Time and Attendance.
<Figure 1.3.A>

5
2:Personal
The Personal Module allows you to view information your company has stored for you in the payroll
system, not all of which affects payroll directly. Here you can view things like your address, pay rates,
deductions, taxes and direct deposits.
2.1 Demographics
Home of the most basic employee information, housed here are your legal name, address, contact information and
other personal data.
<Figure 2.1.A>

6
2.2 Dept/Position
The information housed on this screen is primarily used by your employer to track information about the job you
are assigned to do and who you report to.
<Figure 2.2.A>
2.3 Dependents
Typically specified when enrolling in insurance and benefits, the dependents you specify may be stored in the system
by your employer for reporting purposes. They would be stored here.
<Figure 2.3.A>
7
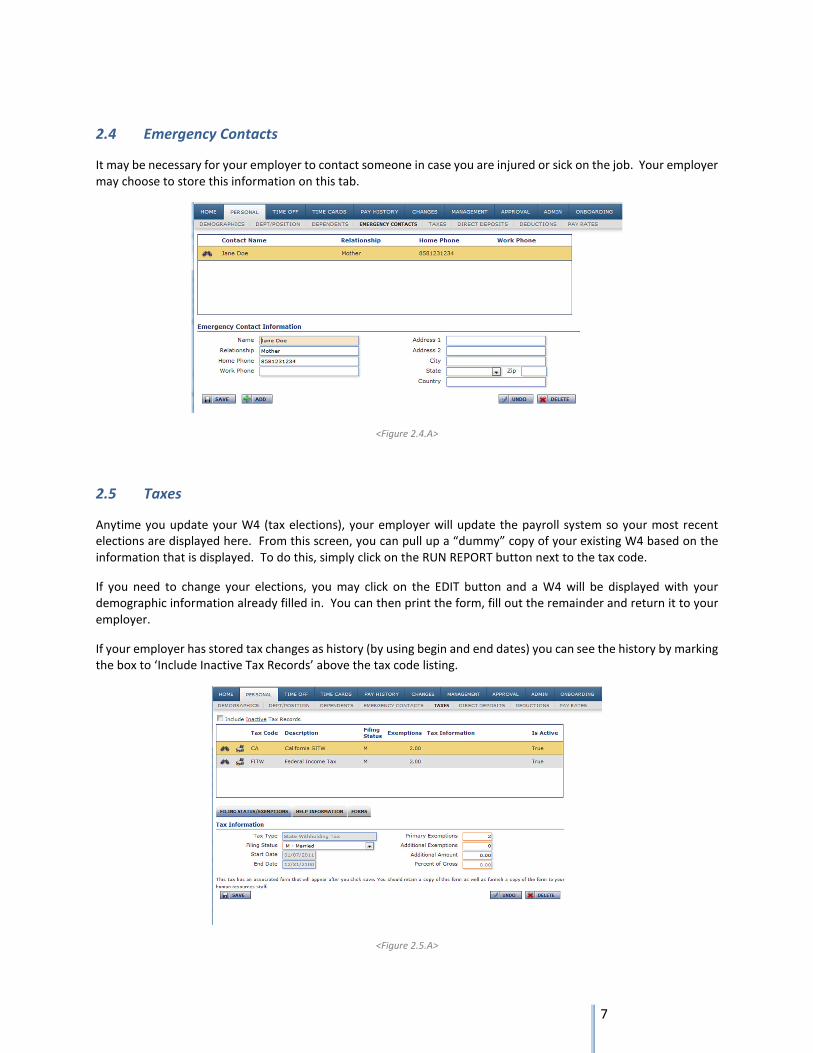
2.4 Emergency Contacts
It may be necessary for your employer to contact someone in case you are injured or sick on the job. Your employer
may choose to store this information on this tab.
<Figure 2.4.A>
2.5 Taxes
Anytime you update your W4 (tax elections), your employer will update the payroll system so your most recent
elections are displayed here. From this screen, you can pull up a “dummy” copy of your existing W4 based on the
information that is displayed. To do this, simply click on the RUN REPORT button next to the tax code.
If you need to change your elections, you may click on the EDIT button and a W4 will be displayed with your
demographic information already filled in. You can then print the form, fill out the remainder and return it to your
employer.
If your employer has stored tax changes as history (by using begin and end dates) you can see the history by marking
the box to ‘Include Inactive Tax Records’ above the tax code listing.
<Figure 2.5.A>

8
2.6 Direct Deposits
As you change bank accounts or add one, your employer will update the payroll system so your most recent direct
deposit accounts and elections are displayed here. From this screen, you can pull up a “dummy” copy of your direct
deposit election form based on the information that is displayed. To do this, simply click on the RUN REPORT button
next to the account.
If your employer has stored direct deposit changes as history (by using begin and end dates) you can see the history
by marking the box to ‘Include Inactive Direct Deposits’ above the accounts listing.
<Figure 2.6.A>
To sign up for electronic vouchers (i.e. paperless pay stubs), read through and acknowledge the Direct Deposit
Authorization.
<Figure 2.6.B>
9
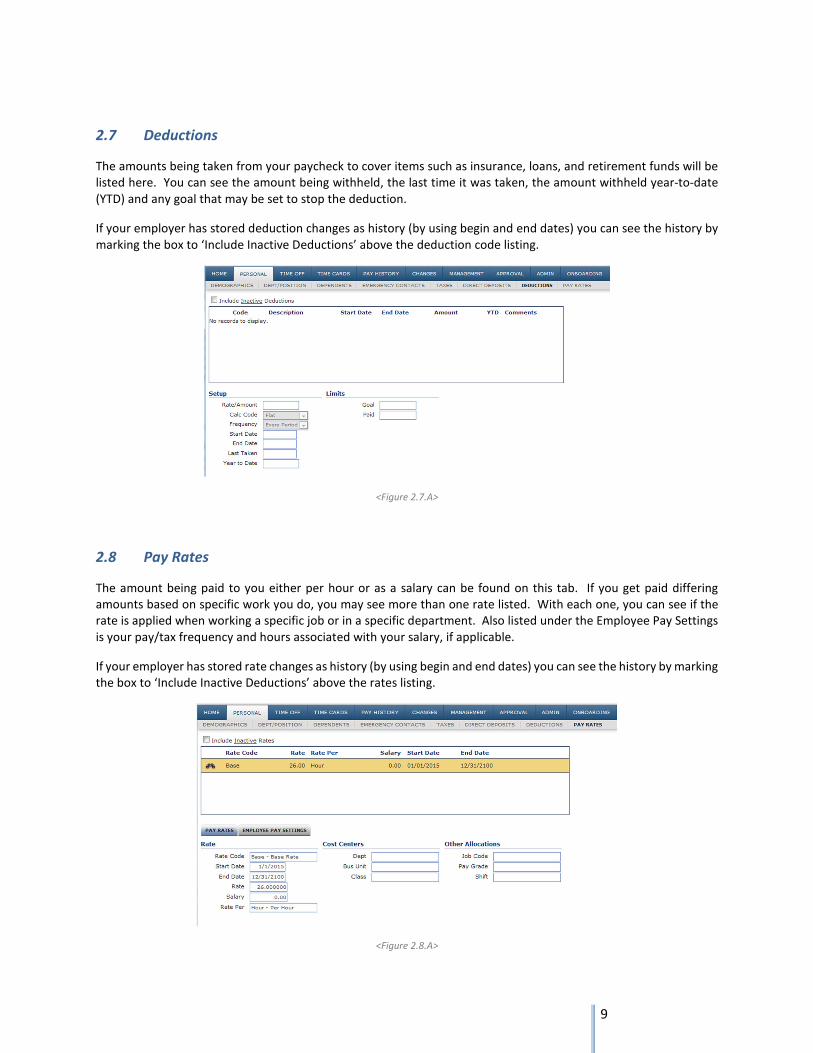
2.7 Deductions
The amounts being taken from your paycheck to cover items such as insurance, loans, and retirement funds will be
listed here. You can see the amount being withheld, the last time it was taken, the amount withheld year-to-date
(YTD) and any goal that may be set to stop the deduction.
If your employer has stored deduction changes as history (by using begin and end dates) you can see the history by
marking the box to ‘Include Inactive Deductions’ above the deduction code listing.
<Figure 2.7.A>
2.8 Pay Rates
The amount being paid to you either per hour or as a salary can be found on this tab. If you get paid differing
amounts based on specific work you do, you may see more than one rate listed. With each one, you can see if the
rate is applied when working a specific job or in a specific department. Also listed under the Employee Pay Settings
is your pay/tax frequency and hours associated with your salary, if applicable.
If your employer has stored rate changes as history (by using begin and end dates) you can see the history by marking
the box to ‘Include Inactive Deductions’ above the rates listing.
<Figure 2.8.A>
10
3:TimeOff
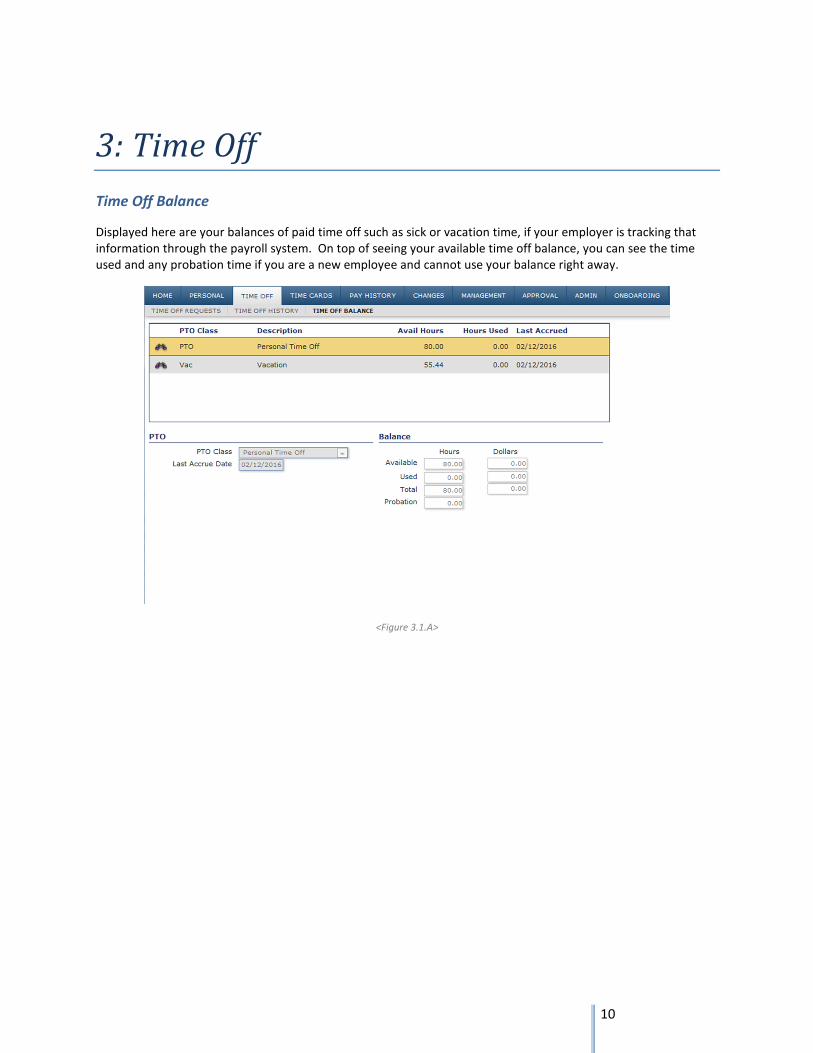
Time Off Balance
Displayed here are your balances of paid time off such as sick or vacation time, if your employer is tracking that
information through the payroll system. On top of seeing your available time off balance, you can see the time
used and any probation time if you are a new employee and cannot use your balance right away.
<Figure 3.1.A>
11
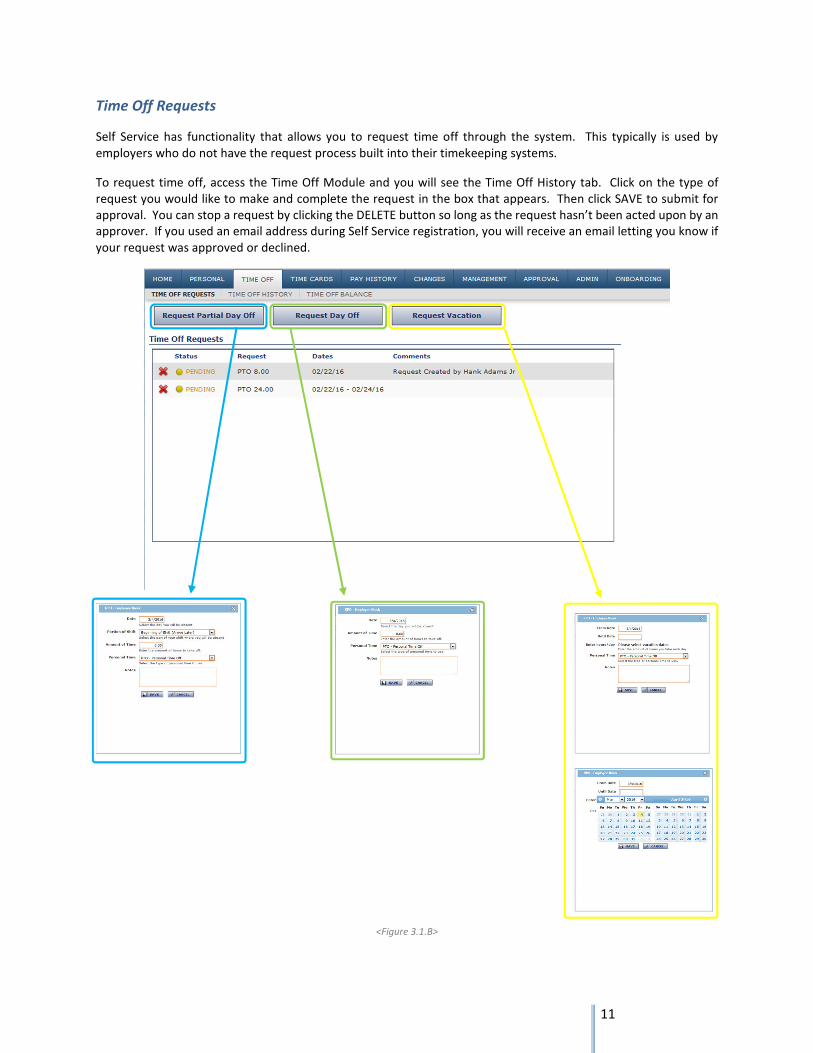
Time Off Requests
Self Service has functionality that allows you to request time off through the system. This typically is used by
employers who do not have the request process built into their timekeeping systems.
To request time off, access the Time Off Module and you will see the Time Off History tab. Click on the type of
request you would like to make and complete the request in the box that appears. Then click SAVE to submit for
approval. You can stop a request by clicking the DELETE button so long as the request hasn’t been acted upon by an
approver. If you used an email address during Self Service registration, you will receive an email letting you know if
your request was approved or declined.
<Figure 3.1.B>

12
Time Off History
Displayed here is your time off history. You can review past requests, time off used, etc. You can narrow the
results displayed by time off type and/or certain date ranges.
<Figure 3.1.C>
13
4:PayHistory
Check History
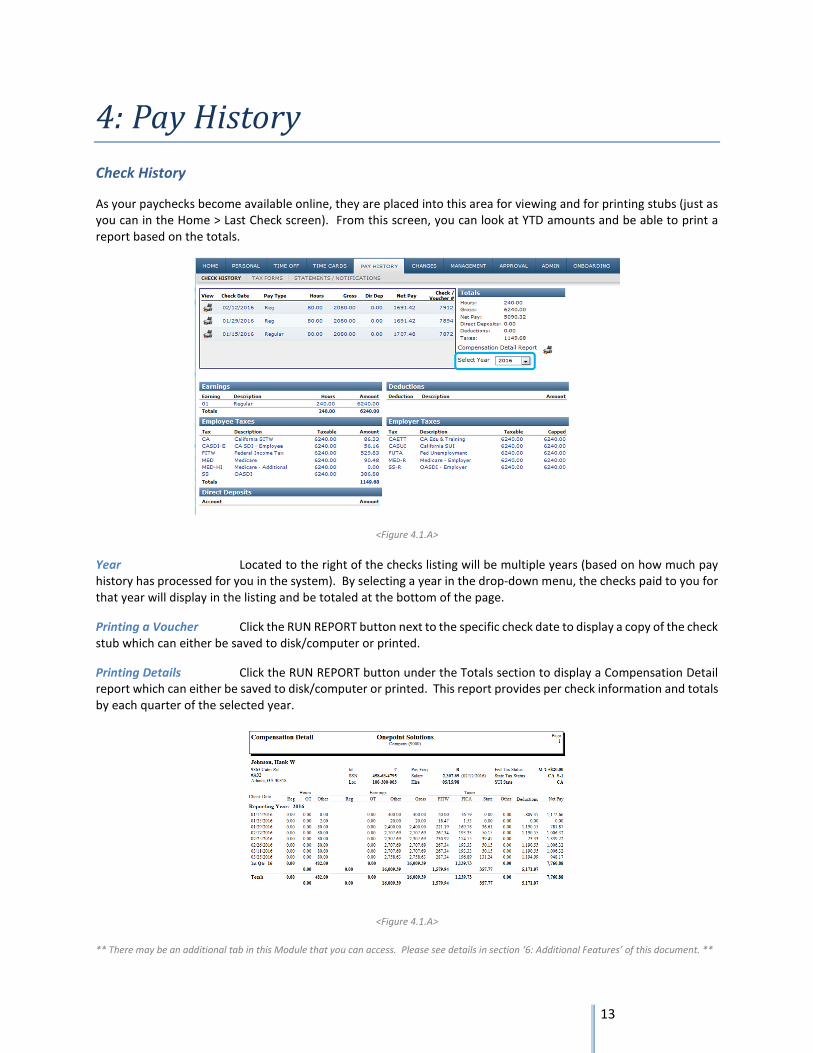
As your paychecks become available online, they are placed into this area for viewing and for printing stubs (just as
you can in the Home > Last Check screen). From this screen, you can look at YTD amounts and be able to print a
report based on the totals.
<Figure 4.1.A>
Year Located to the right of the checks listing will be multiple years (based on how much pay
history has processed for you in the system). By selecting a year in the drop-down menu, the checks paid to you for
that year will display in the listing and be totaled at the bottom of the page.
Printing a Voucher Click the RUN REPORT button next to the specific check date to display a copy of the check
stub which can either be saved to disk/computer or printed.
Printing Details Click the RUN REPORT button under the Totals section to display a Compensation Detail
report which can either be saved to disk/computer or printed. This report provides per check information and totals
by each quarter of the selected year.
<Figure 4.1.A>
** There may be an additional tab in this Module that you can access. Please see details in section ‘6: Additional Features’ of this document. **

14
5:Management
For each area an employee can change, you as an administrator can change the same fields on their
records as well. Along with those rights, you may also grant yourself access to issue pay rate changes and
to approve time off requests as well.
5.1 Employee Search
You can search for an employee by filtering for certain information. You can create an on-screen view of employee
lists based on specified criteria.
<Figure 5.1.A>
The following criteria can be used to filter your employee list:
Sort You can list the employees in a specific order. By default, all employees will be in alphabetical
order. The list of preset sorts includes employee ID, department, social security number, and employee status.
Filter Used in conjunction with the Sort function, the Filter allows you to select a specific group of
employees. For instance, in Sort, you can select ‘Name.’ In Filter, you can limit the employee list to only ‘Active
Employees’. The returned list of employees will be all active employees in alphabetical order. All Filters are
customizable.
Cost Center You can limit your employee list to include only the employees in a cost center, based on your
selections in the Branch and Department dropdown lists (level of department structure). Keep in mind, a company
can have five levels of cost center structure and each would be selectable here.
Name You can search your available employees for a specific name(s) by typing the full or portion of the
name. Your employee list will then reflect anyone meeting your search term.
Emp ID You may search your available employees for a specific employee identification number by typing
it in the Emp ID field. Any employee whose ID contains your search term will be displayed in the search results.
15
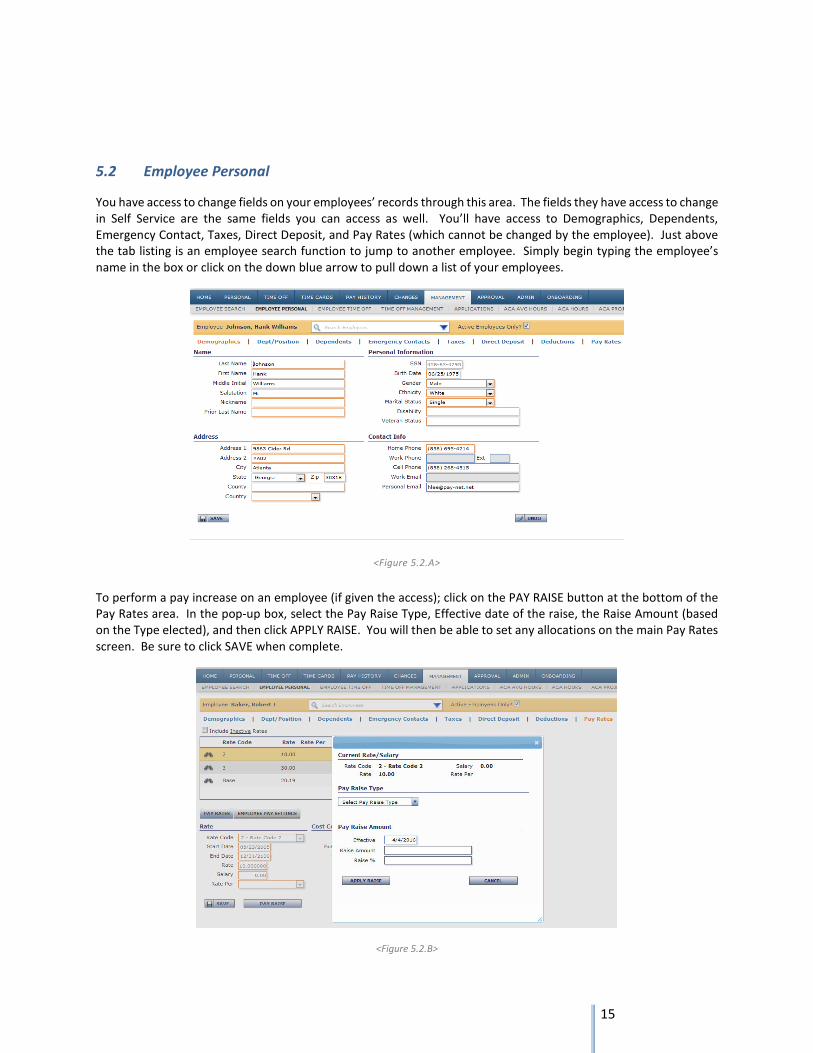
5.2 Employee Personal
You have access to change fields on your employees’ records through this area. The fields they have access to change
in Self Service are the same fields you can access as well. You’ll have access to Demographics, Dependents,
Emergency Contact, Taxes, Direct Deposit, and Pay Rates (which cannot be changed by the employee). Just above
the tab listing is an employee search function to jump to another employee. Simply begin typing the employee’s
name in the box or click on the down blue arrow to pull down a list of your employees.
<Figure 5.2.A>
To perform a pay increase on an employee (if given the access); click on the PAY RAISE button at the bottom of the
Pay Rates area. In the pop-up box, select the Pay Raise Type, Effective date of the raise, the Raise Amount (based
on the Type elected), and then click APPLY RAISE. You will then be able to set any allocations on the main Pay Rates
screen. Be sure to click SAVE when complete.
<Figure 5.2.B>

16
5.3 Employee Time Off
Displayed under Time Off Balance are your selected employee’s balances of paid time off such as sick or vacation
time, if your employer is tracking that information through the payroll system. On top of seeing their available time
off balance, you can see the time used and any probation time if they are a new employee and cannot use their
balance right away.
<Figure 5.3.A>
You may request time off on behalf of the selected employee in the Time Off Request area, if you’ve set up the
access. Please see section 9.3 in this document for instructions.
<Figure 5.3.B>
17
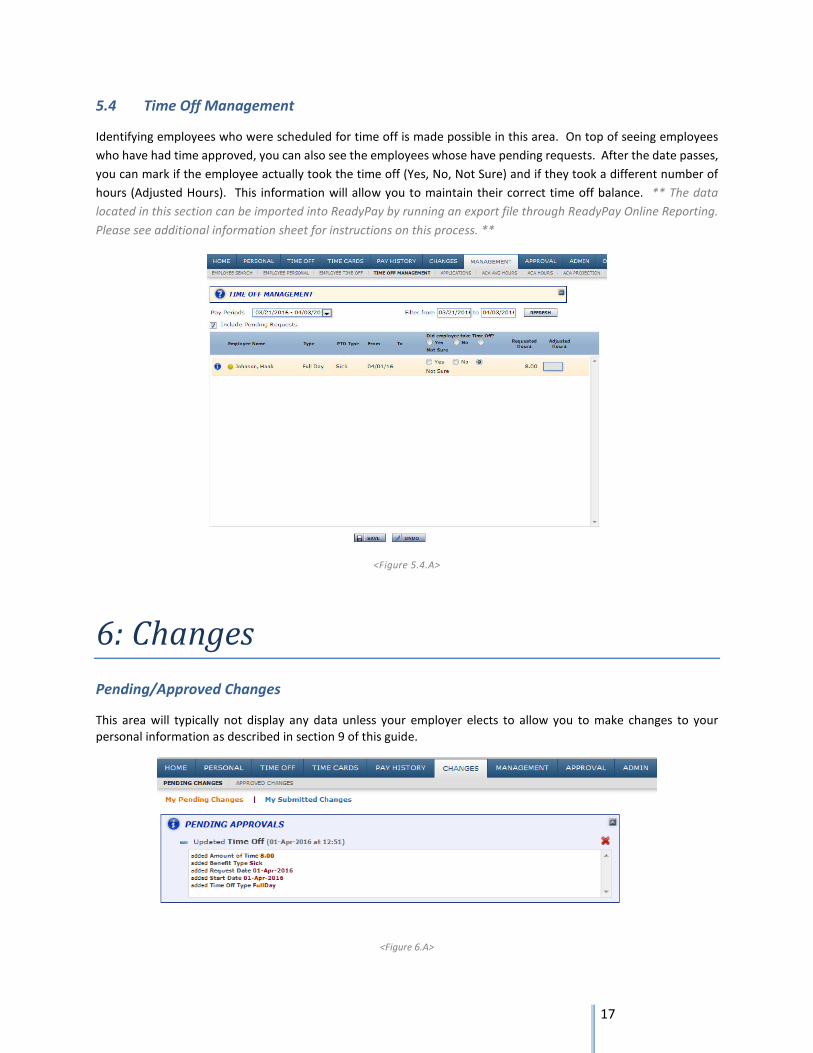
5.4 Time Off Management
Identifying employees who were scheduled for time off is made possible in this area. On top of seeing employees
who have had time approved, you can also see the employees whose have pending requests. After the date passes,
you can mark if the employee actually took the time off (Yes, No, Not Sure) and if they took a different number of
hours (Adjusted Hours). This information will allow you to maintain their correct time off balance. ** The data
located in this section can be imported into ReadyPay by running an export file through ReadyPay Online Reporting.
Please see additional information sheet for instructions on this process. **
<Figure 5.4.A>
6:Changes
Pending/Approved Changes
This area will typically not display any data unless your employer elects to allow you to make changes to your
personal information as described in section 9 of this guide.
<Figure 6.A>

18
7:Approval
When a request is made by an employee and it is your turn to approve the item, you will not only see an
orange bar across the top of Self Service signaling the requests, but you will also have the changes shown
in your Approval Module. You may click on the requests in the orange header to be taken to the Approval
Module. Changes you make to your own Personal information can also show up to be approved as well.
7.1 Pending Approval
All employee record changes to be approved by you will show in this area. Each request may be made up of several
fields and you have the ability to pick and choose what you want to approve and what you need to decline. By
clicking a RED X button, you are declining the item. By clicking a GREEN CHECK button, you are approving. For each
item you decline, you will be asked to provide a reason for your action which we be displayed for the employee in
their Self Service.
<Figure 7.1.A>
7.2 Time Off Requests
To review the request, click on the VIEW button next to the employee’s name. You may click on the Calendar View
to see all employees’ time off requests. In the Calendar View, there is a checkbox in the upper left-hand corner of
the screen to Show Completed Requests so you may get a good view of everyone who is off on a particular day. You
may click on a request (yellow item) to review the details.
<Figure 7.2.A>

19
Once the request is open, you will be able to review the type of request, the number of hours and dates being
requested off, and what the employee’s accrual balance would be should the request be approved. Any transactions
regarding that particular policy will be displayed to the right of the balance information. The bottom of the screen
provides a look at the days of the week the request affects.
<Figure 7.2.B>
7.3 Approval History
All requests that have either been approved or declined by you will be displayed in this section with the most recent
being first.
<Figure 7.2.C>
20
8:Admin
Allowing your employees to change their own information in Employee Self Service is completely defined
by your role as Administrator. To allow changes, you must set up an approval process to ensure someone
verifies the information being changed.
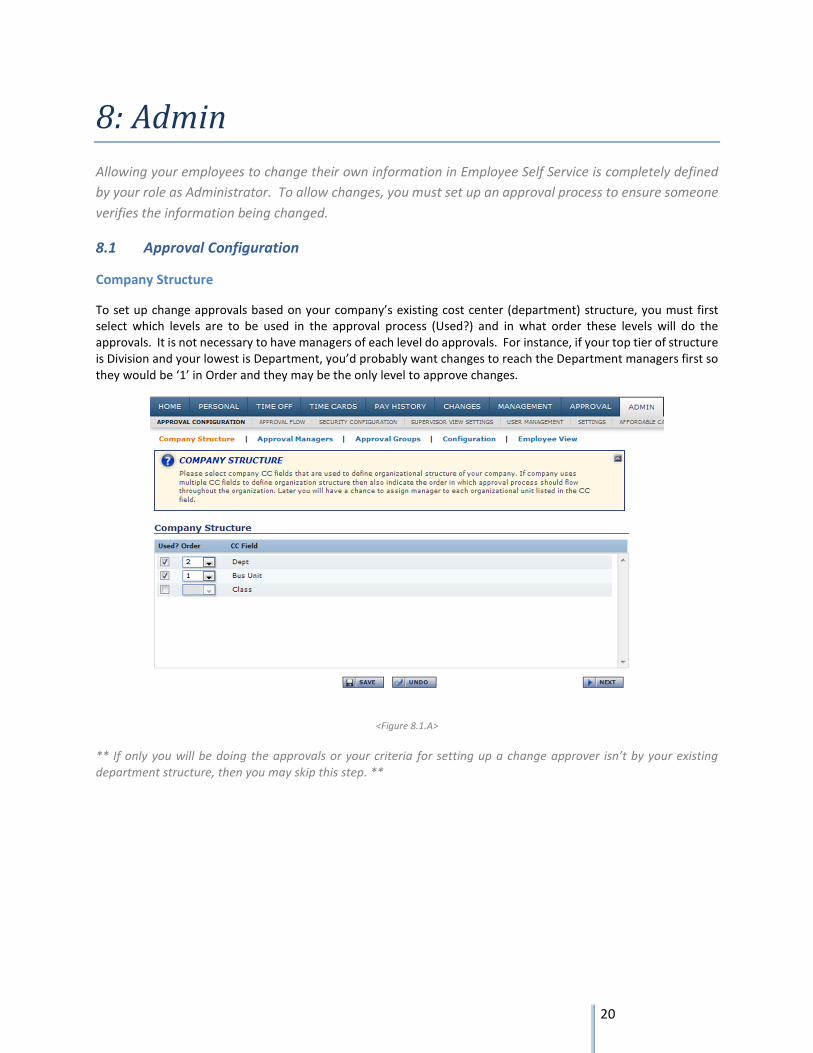
8.1 Approval Configuration
Company Structure
To set up change approvals based on your company’s existing cost center (department) structure, you must first
select which levels are to be used in the approval process (Used?) and in what order these levels will do the
approvals. It is not necessary to have managers of each level do approvals. For instance, if your top tier of structure
is Division and your lowest is Department, you’d probably want changes to reach the Department managers first so
they would be ‘1’ in Order and they may be the only level to approve changes.
<Figure 8.1.A>
** If only you will be doing the approvals or your criteria for setting up a change approver isn’t by your existing
department structure, then you may skip this step. **

21
Approval Managers
If using Organization Structure, the Approval Managers area will open up for you to select the manager(s) for each
cost center code. The managers must first be set up as supervisors in ReadyPay. If they are tied to the cost center
in ReadyPay, they will already be displayed next to their codes in Self Service.
<Figure 8.1.B>
Select the Management level pull-down menu at the top of the screen to set up the approving managers for each
level of company structure. For each cost center code, mark the ‘Supervisor’ check box for each approving manager
of that code and whether or not they should receive alerts of employee requests to be approved by marking the
‘Notify?’ check box. These settings allow for multiple managers to perform the approval process for a single cost
center code.
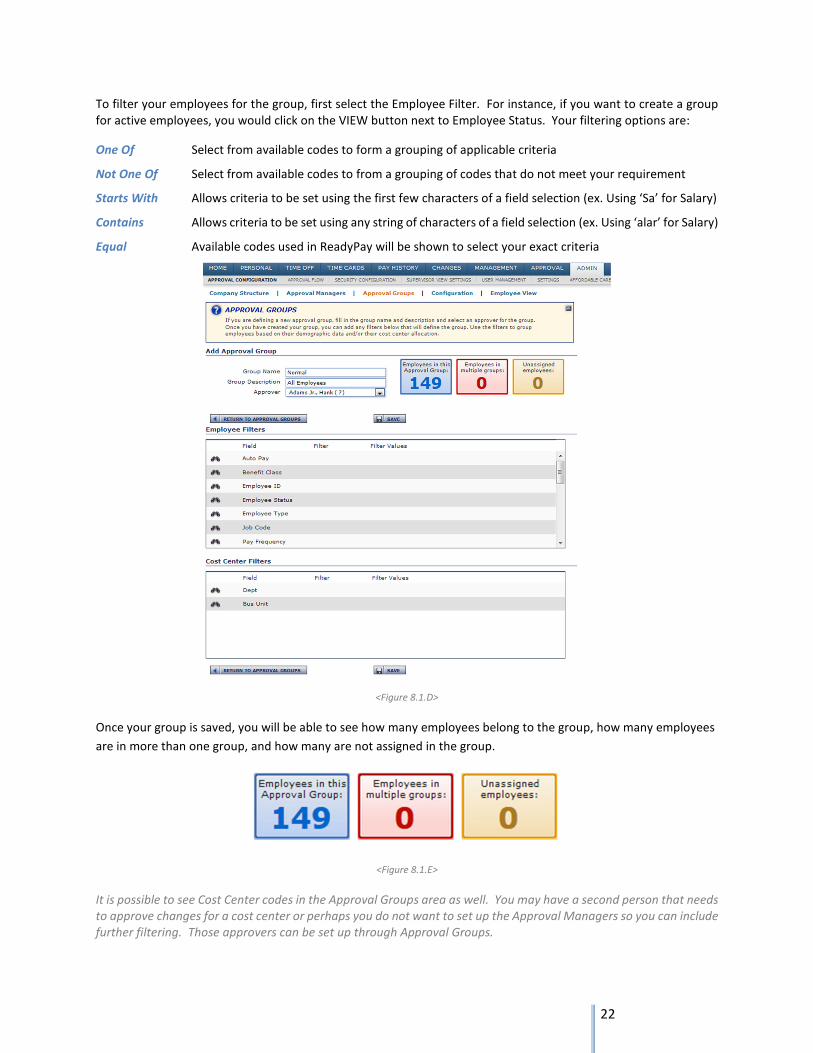
Approval Groups
To set up change approvals based on other factors such as employee status, employee type, auto-pay type and user
defined options, you should first click the ADD button to set up the new Approval Group. Enter a Name and
Description for your Group. If you want someone other than an Administrator (or before the Administrator) approve
changes from the group, select an Approver from the pull-down menu (list of employees in your company).
<Figure 8.1.C>
22
To filter your employees for the group, first select the Employee Filter. For instance, if you want to create a group
for active employees, you would click on the VIEW button next to Employee Status. Your filtering options are:
One Of Select from available codes to form a grouping of applicable criteria
Not One Of Select from available codes to from a grouping of codes that do not meet your requirement
Starts With Allows criteria to be set using the first few characters of a field selection (ex. Using ‘Sa’ for Salary)
Contains Allows criteria to be set using any string of characters of a field selection (ex. Using ‘alar’ for Salary)
Equal Available codes used in ReadyPay will be shown to select your exact criteria
<Figure 8.1.D>
Once your group is saved, you will be able to see how many employees belong to the group, how many employees
are in more than one group, and how many are not assigned in the group.
<Figure 8.1.E>
It is possible to see Cost Center codes in the Approval Groups area as well. You may have a second person that needs
to approve changes for a cost center or perhaps you do not want to set up the Approval Managers so you can include
further filtering. Those approvers can be set up through Approval Groups.

23
Configuration
As a default, all screens and fields are read-only to your employees. In this tab, you are able to “open up” tabs/fields
for editing by employees and secure those you don’t want them to change. There are five Personal tabs available
for editing by employees; Demographics, Dependents, Direct Deposits, Emergency Contacts and Taxes. You also can
allow for Time Off requests and Pay Rates changes (for managers/administrators only). To allow access for changing
a tab, you should mark the check box for ‘Enable field level approval configuration’. You should also set the approval
process by choosing which of the following approvals should be made in the process:
Approval Not Required Changes made to the tab by employees do not have to be approved
Read Only? No access to change fields on the tab by the employee (read further to see overrides)
Cost Center A cost center Approval Manager should approve the requests for the tab (will display if
the Organization Structure area is in use)
Group Admin An Approval Group approver should approve the requests for the tab
Admin Any Administrator in Self Service should approve the requests for the tab
<Figure 8.1.F>
Next to the tab name will be a small white triangle you can click on to expand the tab selection. Underneath you
will find an area for Approval Groups and Fields where you can override the tab approval. The Approval Groups area
allows you to route the approval process through different channels than just your main approver. Under Fields,
you can change the approval method for a specific field by marking the check box for ‘Override Approval?’ and
selecting a different approval process.
24
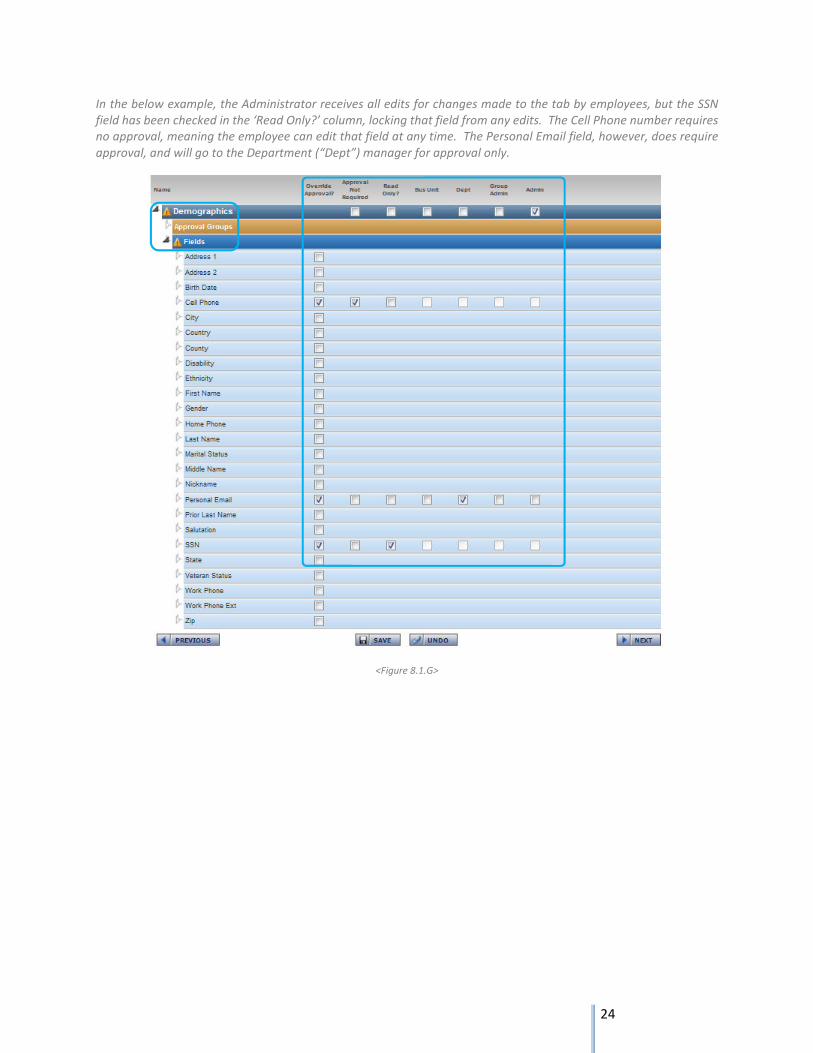
In the below example, the Administrator receives all edits for changes made to the tab by employees, but the SSN
field has been checked in the ‘Read Only?’ column, locking that field from any edits. The Cell Phone number requires
no approval, meaning the employee can edit that field at any time. The Personal Email field, however, does require
approval, and will go to the Department (“Dept”) manager for approval only.
<Figure 8.1.G>
25
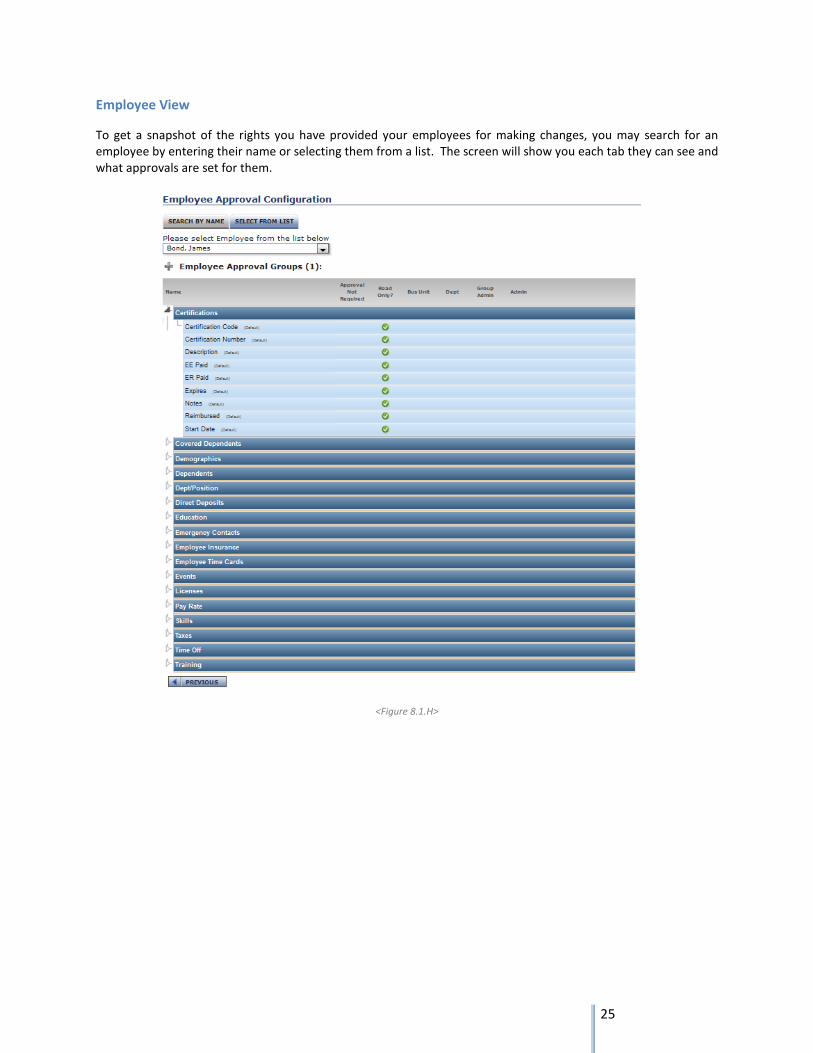
Employee View
To get a snapshot of the rights you have provided your employees for making changes, you may search for an
employee by entering their name or selecting them from a list. The screen will show you each tab they can see and
what approvals are set for them.
<Figure 8.1.H>
26
8.2 Approval Flow
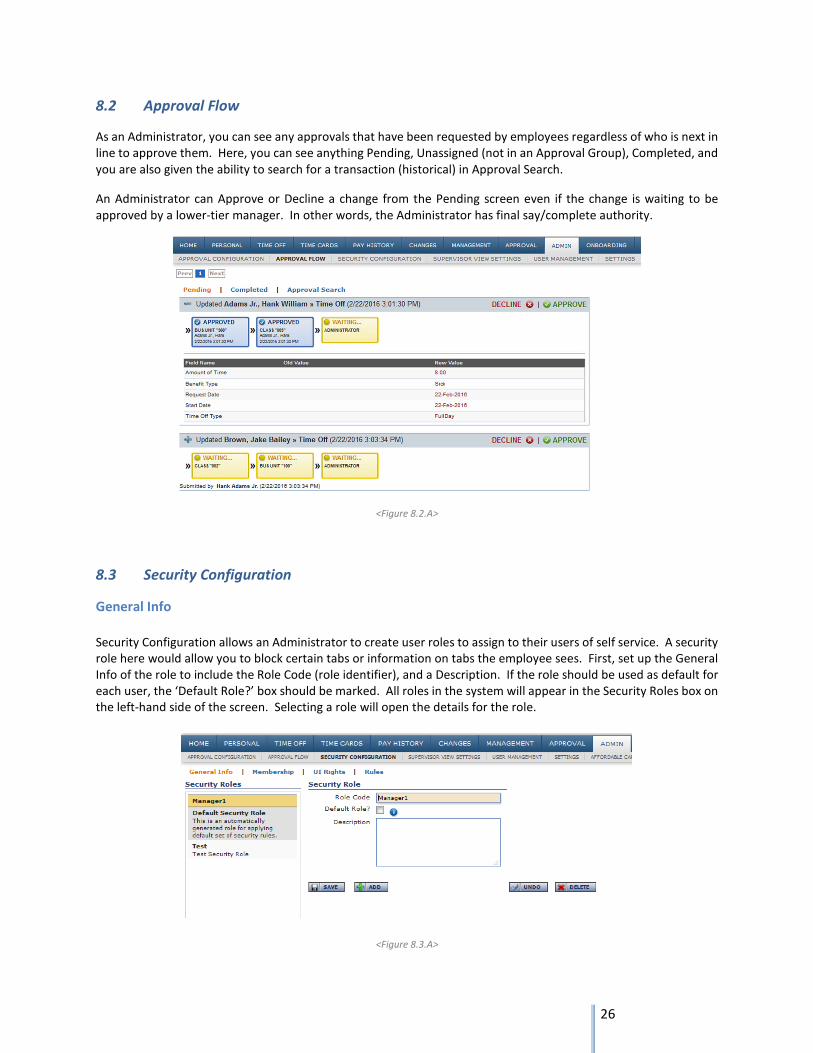
As an Administrator, you can see any approvals that have been requested by employees regardless of who is next in
line to approve them. Here, you can see anything Pending, Unassigned (not in an Approval Group), Completed, and
you are also given the ability to search for a transaction (historical) in Approval Search.
An Administrator can Approve or Decline a change from the Pending screen even if the change is waiting to be
approved by a lower-tier manager. In other words, the Administrator has final say/complete authority.
<Figure 8.2.A>
8.3 Security Configuration
General Info
Security Configuration allows an Administrator to create user roles to assign to their users of self service. A security
role here would allow you to block certain tabs or information on tabs the employee sees. First, set up the General
Info of the role to include the Role Code (role identifier), and a Description. If the role should be used as default for
each user, the ‘Default Role?’ box should be marked. All roles in the system will appear in the Security Roles box on
the left-hand side of the screen. Selecting a role will open the details for the role.
<Figure 8.3.A>
27
Membership
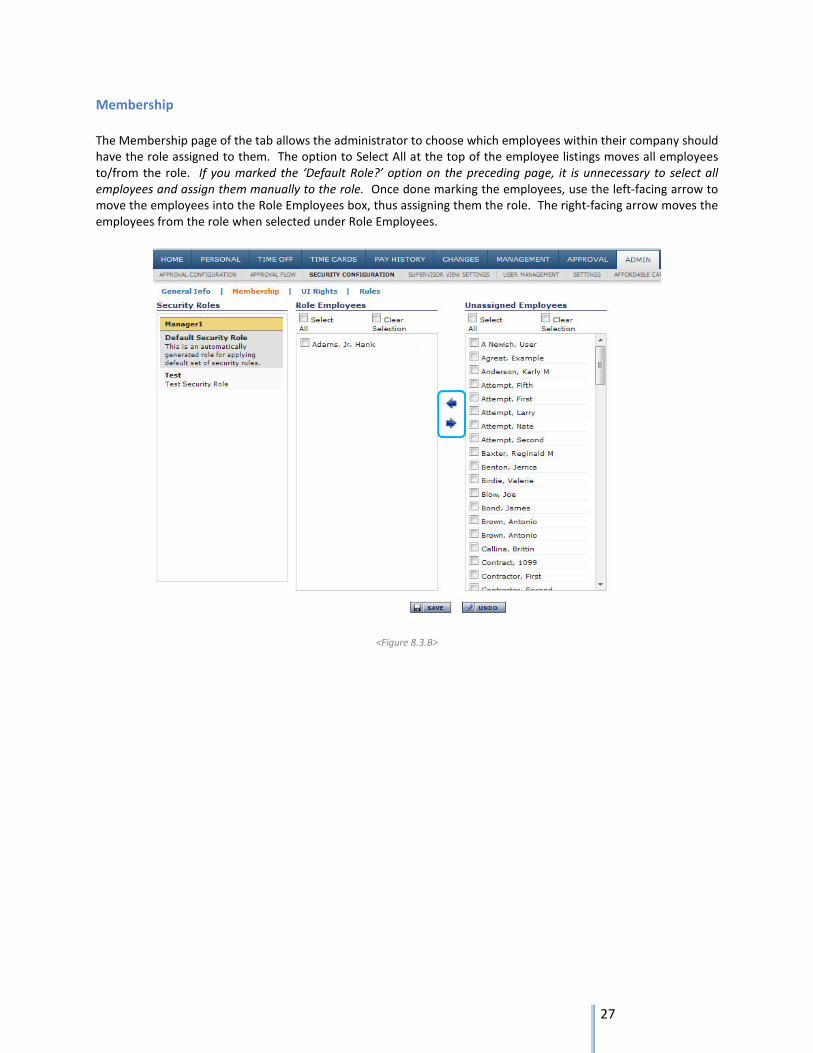
The Membership page of the tab allows the administrator to choose which employees within their company should
have the role assigned to them. The option to Select All at the top of the employee listings moves all employees
to/from the role. If you marked the ‘Default Role?’ option on the preceding page, it is unnecessary to select all
employees and assign them manually to the role. Once done marking the employees, use the left-facing arrow to
move the employees into the Role Employees box, thus assigning them the role. The right-facing arrow moves the
employees from the role when selected under Role Employees.
<Figure 8.3.B>

28
UI Rights
An administrator can block entire pages of self service from being accessed by the Role Employees. Checkboxes can
be marked to block entire modules (Home, Personal, Time Off, Pay History, Changes) or individual screens within
the modules. While the employee cannot see certain areas like Management or Approval, it is not necessary to
block those pages on the UI Rights because of their role as an Employee on their Self Service account.
<Figure 8.3.C>
29
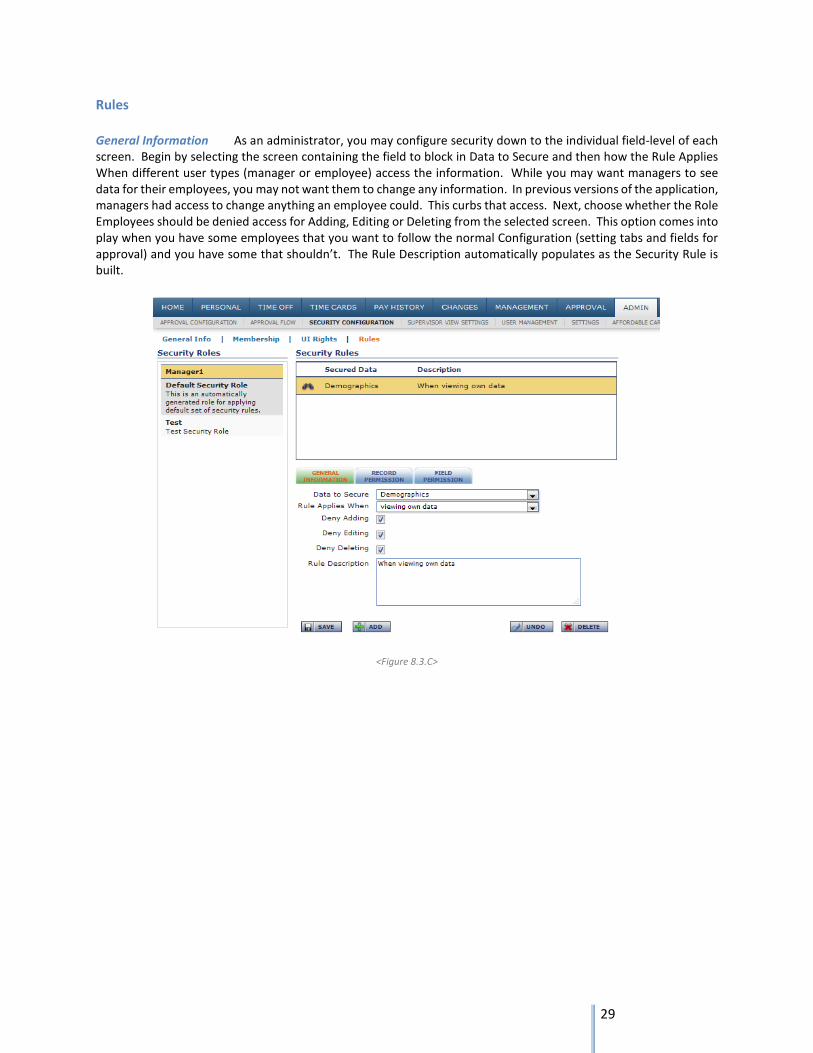
Rules
General Information As an administrator, you may configure security down to the individual field-level of each
screen. Begin by selecting the screen containing the field to block in Data to Secure and then how the Rule Applies
When different user types (manager or employee) access the information. While you may want managers to see
data for their employees, you may not want them to change any information. In previous versions of the application,
managers had access to change anything an employee could. This curbs that access. Next, choose whether the Role
Employees should be denied access for Adding, Editing or Deleting from the selected screen. This option comes into
play when you have some employees that you want to follow the normal Configuration (setting tabs and fields for
approval) and you have some that shouldn’t. The Rule Description automatically populates as the Security Rule is
built.
<Figure 8.3.C>
30
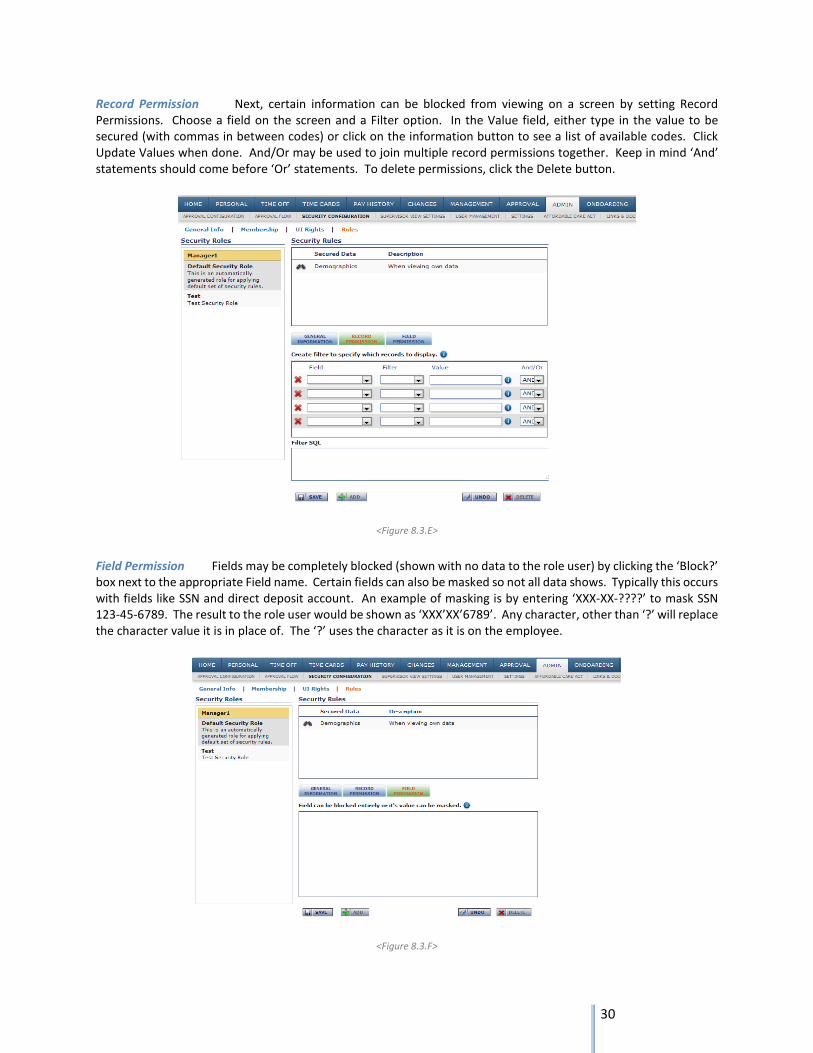
Record Permission Next, certain information can be blocked from viewing on a screen by setting Record
Permissions. Choose a field on the screen and a Filter option. In the Value field, either type in the value to be
secured (with commas in between codes) or click on the information button to see a list of available codes. Click
Update Values when done. And/Or may be used to join multiple record permissions together. Keep in mind ‘And’
statements should come before ‘Or’ statements. To delete permissions, click the Delete button.
<Figure 8.3.E>
Field Permission Fields may be completely blocked (shown with no data to the role user) by clicking the ‘Block?’
box next to the appropriate Field name. Certain fields can also be masked so not all data shows. Typically this occurs
with fields like SSN and direct deposit account. An example of masking is by entering ‘XXX-XX-????’ to mask SSN
123-45-6789. The result to the role user would be shown as ‘XXX’XX’6789’. Any character, other than ‘?’ will replace
the character value it is in place of. The ‘?’ uses the character as it is on the employee.
<Figure 8.3.F>
31
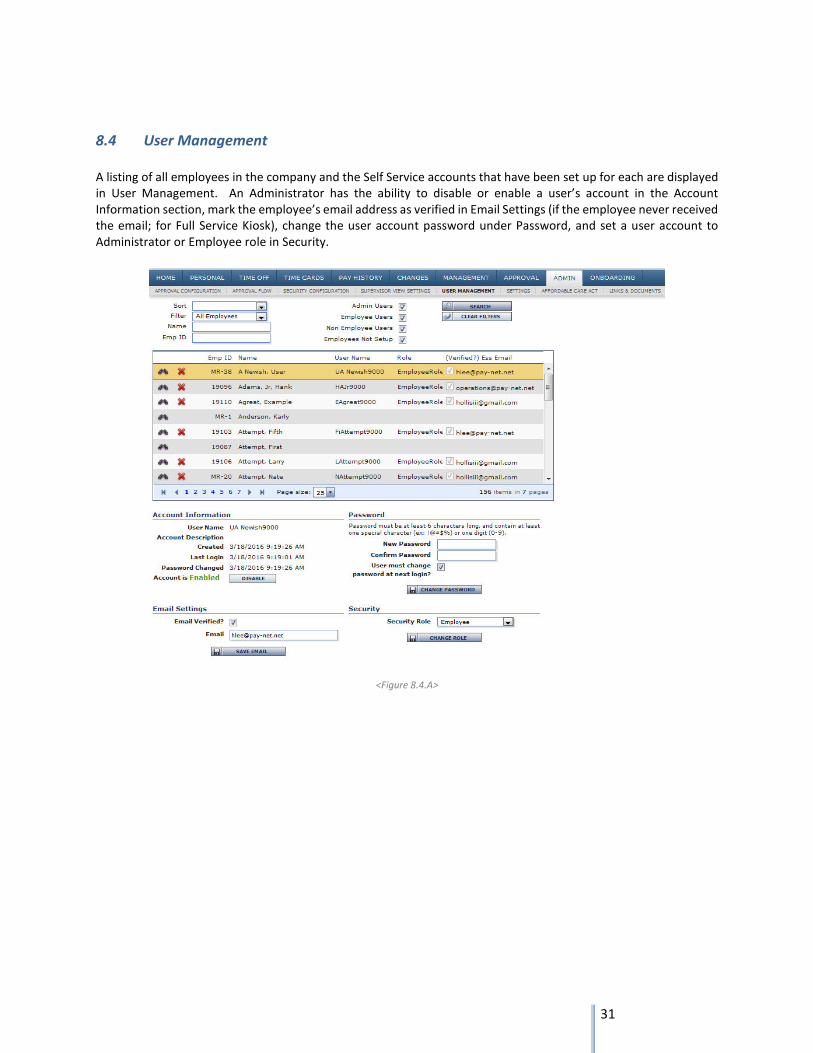
8.4 User Management
A listing of all employees in the company and the Self Service accounts that have been set up for each are displayed
in User Management. An Administrator has the ability to disable or enable a user’s account in the Account
Information section, mark the employee’s email address as verified in Email Settings (if the employee never received
the email; for Full Service Kiosk), change the user account password under Password, and set a user account to
Administrator or Employee role in Security.
<Figure 8.4.A>

32
For an employee without an account, an Administrator can click VIEW to create the user account from the screen.
<Figure 8.4.B>
8.5 Settings
The Settings tab allows an Administrator to change the Company Logo that appears at the top of the screen. Logos
need to be 200X50 pixels or less and should be of type .bmp, .gif, .jpg, or .png. Choose Browse to select the file and
UPLOAD to set it. The logo can be RESET at any time to the service bureau’s logo. To set the Landing Page for users
so they do not see their Last Check information as the default, simply click on the page to set and confirm. Click the
RESET LANDING PAGE button to set to the system default, Last Check.
<Figure 8.5.A>

33
9:AdditionalFeatures
There are several features of the system that are employer-elected and may be set up by you for your use
as well as for your employees. The features are described in this section.
9.1 Statements & Notifications
One of the key features of the system is your ability to receive your pay stubs in an electronic format. Enrolling in
Electronic Direct Deposit Vouchers will stop the printing of paper stubs for you. Simply CLICK TO ENROLL. If you
used an email address when registering your account on Self Service, you will also be enrolled to receive Email
Notifications when your stub is available online on your check date. You can un-enroll/unsubscribe at any time. **
It is not necessary to enroll to receive your stub online. This simply turns off paper printing. **
<Figure 9.1.A>
34
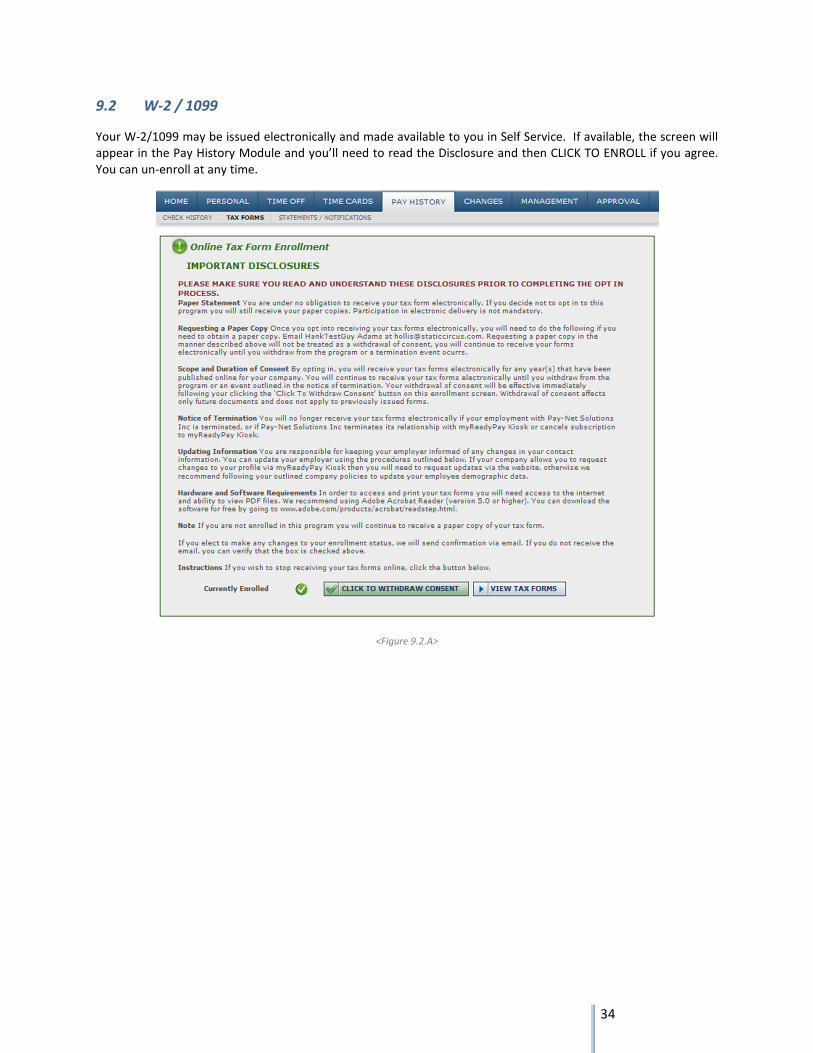
9.2 W-2 / 1099
Your W-2/1099 may be issued electronically and made available to you in Self Service. If available, the screen will
appear in the Pay History Module and you’ll need to read the Disclosure and then CLICK TO ENROLL if you agree.
You can un-enroll at any time.
<Figure 9.2.A>