Table of Contents - Bridgewater Bank
35
1 re
Transcript of Table of Contents - Bridgewater Bank

1
re

2
Table of Contents Introduction .....................................................................................................................................................3
Getting Started ............................................................................................................................................. 4
General Information ................................................................................................................................ 4
Setup Out of Band ................................................................................................................................... 5
Establish Payees ....................................................................................................................................... 6
Payees Table .............................................................................................................................................. 8
Create Batch ................................................................................................................................................... 9
Creating a Free Form Batch ............................................................................................................... 10
Creating a Batch from a Template ................................................................................................... 14
Creating a Batch by File Import ......................................................................................................... 18
NACHA File Import ................................................................................................................................. 19
Manage Batch Templates ........................................................................................................................ 21
Create Template ...................................................................................................................................... 21
Maintenance Templates ...................................................................................................................... 23
Search Templates ................................................................................................................................... 23
Payment Activity ........................................................................................................................................ 24
Current Activity ....................................................................................................................................... 24
ACH Dashboard .................................................................................................................................. 25
Search Transactions .......................................................................................................................... 26
Activity Table ....................................................................................................................................... 27
Payment Statuses Displayed in the Activity Table............................................................... 28
Future Payments .................................................................................................................................... 29
Filter Transactions ............................................................................................................................. 30
Payment History ...................................................................................................................................... 31
Search Transactions ........................................................................................................................... 31
Recurring Transfers ............................................................................................................................... 32
Activity Table ....................................................................................................................................... 32
ACH Reversals ............................................................................................................................................. 34

3
Introduction
Welcome to Bridgewater Bank ACH Origination! Automated Clearing House or ACH is amongst the fastest growing services provided by banks. The ability to originate ACH files has many advantages such as allowing you to offer additional benefits to your clients including direct deposit and rent collection services, dramatically reducing the time and expense of manually processing payments, and the ability to predict cash flow. An ACH file is a transfer of funds created electronically in a standard ACH format and sent through the Federal Reserve to either credit or debit a business or an individual’s account. The ACH Network provides for the interbank clearing of electronic payments and is governed by the National Automated Clearing House Association or NACHA, who provides the guidance to the ACH Network. All banks and the clients they’ve granted ACH origination to must comply with the NACHA Operating Rules.

4
Getting Started
General Information
• Contact the Business Services Team for technical support. They can be reached M – F, 8:30am-4:30pm at 952.542.5100 (ask for Business Services) or [email protected].
• The cutoff time for next day settlement ACH is 4pm and same-day settlement ACH is 12:30pm.
o Same-day settlement ACH is available upon request and additional fees apply. Please contact Business Services if interested.
• Bridgewater offers the following SEC Codes. (SEC Codes are a 3-character code assigned to each ACH transaction to identify the payment type.)
o CCD – business to business transfers o CTX – business to business transfers that can include 9,999 characters of
information associated with the payment o PPD – business to consumer transfers. These transfers require the
business to have a written authorization in place which is clear, understandable, and includes how the consumer can revoke if the entry is recurring. The authorizations must be stored for two years after the last live entry.
• Bridgewater follows the Federal Reserve’s processing dates. You can originate ACH transactions on holidays, but they will technically not be initiated until the following business day. For a most up-to-date Federal Reserve Holiday calendar, reference http://www.federalreserve.gov/aboutthefed/k8.htm.
• Bridgewater strongly recommends dual control where one online user initiates an ACH transfer and another user within the same company approves. For more information on user settings needed to establish this, reach out to Business Services.

5
Setup Out of Band
You will need to establish your Out of Band PIN to initiate ACH files. This feature allows automated multi-layered security to ensure your funds are safe.
• Select My Settings – My Profile
• Select Credentials located on the right-hand side of the screen
• Enter PIN • Select Update Credentials
To reset your Out of Band credentials, please call The Bridge support at 952.542.5100 or email [email protected].

6
Establish Payees
Prior to initiating your free form or templated files, you must ensure Payees are established. Payees are not required for files imported in a NACHA format.
• Select Payee Maintenance under the Payment & Transfers tab • Select Create Payee
• Enter the Payee Information
o Payee Name: Enter Name of Payee o Payee ID: Enter ID associated with Payee o Payee Type: Enter if this Payee is a Business or Individual (this will assign
the correct SEC code – CCD or PPD) o Display Name: Enter Nickname of Payee o Address (Optional): Enter Address of Payee o Email (Optional) Enter Email of Payee (this can be used to send receipt of
payment) • Select Add Account
• Enter the Account Information o Account Name: Payee Name will flood over o Beneficiary ID Type: Select the correct Beneficiary ID Type (typically
Account Number unless used for International Wires) o Account Number: Enter the Account Number o Select ACH information
You can also select Wire Information if you intend to send wires to this Payee. See the Wire User Guide for wire payment details.

7
• Enter the Receiving Bank Information o Bank ID: Enter the routing (ABA) number o Enter the Bank Name o Enter the Account Type o Notes: Bank Lookup: You can select Bank Lookup to find bank
information
Note: Due to various consumer protection laws, authorizations of debits to a consumer account (PPD Debits) must be obtained by a signed document. Physical Authorization should always be selected. These authorizations must be retained for two years after the last PPD debit entry was made.
• Add another account for same payee or select Save

8
Payees Table
The Payee Table displays summary information about payees and their accounts. Users can view payee details, edit or delete a payee, or make a payment from this location.
• Data can be sorted by selecting the table headings Display Name, Payee ID, Payee Name, and Payee Type. The heading which is currently being used to sort the table will display a triangle to the right. Selecting the triangle will change the order from ascending to descending.
• Edit – Select Edit to edit the details of the Payee. o Note: The user will be notified the changes being saved will affect all
future payments and may require approval for those utilizing dual control.
• Make Payment- Select Make Payment to initiate a payment from the Payee section.

9
Create Batch
The creation of a batch occurs in four simple steps (Select, Request, Review, and Complete). These steps are displayed across the top of the screen for the duration of the process.
To view how to setup templates, go to the Manage Batch Templates section
NOTE: The application saves a draft every 20 seconds while creating or editing a batch or template and displays a notification banner to advise the user of this action.

10
Creating a Free Form Batch
Steps below follow the workflow with The Bridge.
1.) Select
• Select ACH Payments under the Payment & Transfer tab • Select the ACH Company payments should be made from • Select the file type – Debit or Credit • Select a Batch Type (options are based on entitlements)
o Business CCD (Cash Concentration or Disbursement) – Transfer of funds
between business accounts o Individual
PPD (Pre-arranged Payment or Deposit) – Transfer of funds between business and individual
2.) Request • Select the Payment Date: The date will display the earliest available payment
date. To make a future dated payment, select the calendar icon and choose the appropriate date.
• (Optional) Check the Save as Template box and enter a Template Name to save this batch for future use
• Enter the Company Discretionary Data: Include a short description related to the payment.
• Enter the Company Entry Description: Include a 10-character description of the batch.

11
o Commonly used Company Entry Descriptions include: ACH XFER PAYROLL PAYMENT COLLECTION
• (Optional) Select Notify Me to receive notifications on this particular file. Status changes include:
o Pending Actions (recommended) – Action needed The batch may require approval or modifications.
o System Events – The batch has been delivered to the financial institution. o Complete – Unsuccessful (recommended) – The batch delivery attempt
failed. o Complete – Successful (recommended) – The batch delivery attempt was
successful. o Early Action Taken – The batch is dated for the future and was approved
prior to the day it is schedule to be sent to the financial institution. o Early Action Removed – The batch is part of a recurring series or is dated
for the future and transaction information, such as a payee or the entire batch, has been canceled or deleted.
o Expired (recommended) – The batch has expired.
NOTE: Setup notifications on all files by going to My Settings – Subscriptions – ACH Payment Status Change Notification
• Enter Payees: The user may select from existing payees or create and save new payees.
o Create a New Payee: Details located in the Getting Started section. o Selecting an Existing Payee

12
Start typing the Payee’s Name. The Account field will auto populate an account number.
NOTE: If the account information is not correct, select the pencil icon to Edit the Payee’s Name or Account
Enter the Amount (Optional) Enter Addenda information. This information will be
sent with the affiliated ACH transfer. Repeat to add additional payees as needed. If the number of
payees exceeds 10, select the Add Payees button to add more. The payees created will move to the Payee section and the user will be granted additional fields.
A few helpful tips regarding the payee table.
Exclude box: Selecting this box, excludes this payee from the batch. The text will turn gray notifying the user this payee has been excluded. This feature is commonly used when creating a template from a free form batch. The user may want to add the payee to a template, but not issue a payment.
Go to page: This field allows the user to skip to the desired page to search for payees within the batch.
Items to display: Select the appropriate option to be able to view payees in groupings of 10, 20, or 50.
Search Payees Record: Expand this field to be able to search for a payee within the batch.
• Select Request Batch to continue to the Review step. 3.) Review
• (Optional) Select Search Payee Records to verify details of a specific transaction.
• Select Confirm to complete the transaction or Edit to be taken back to the Request page

13
4.) Complete • Confirmation message will display in a green banner at the top of the page:
o The Transaction Number is associated with this specific transaction. This reference number can be used to search for the transaction.
o The Date and Time stamp will show the exact date and time the transfer was completed.
• (Optional) Select Print to print the confirmation page • Select Return to be taken back to the ACH Payments page

14
Creating a Batch from a Template
A template is a batch that includes previously defined payees and other information which may be used to quickly create batches. For more information on creating or modifying a template, refer to the Manage Batch Template section. To create a batch from an existing template, follow the steps below.
1.) Select • Enter the name of the template within the Select Template field.
2.) Request • The ACH Batch Details correlated with the template such as the ACH Company,
Batch Type, and Offset Accounts will prepopulate and cannot be edited • Select the Payment Date (The date displayed will be the soonest payment date.
If the system’s default date is accepted, the batch will be processed at the next possible opportunity).
• (Optional) Enter the Company Discretionary Data: Include a short description related to the payment.
• Enter the Company Entry Description: Include a 10-character description of the batch.
o Commonly used Company Entry Descriptions include: ACH XFER PAYROLL PAYMENT COLLECTION
• (Optional) Select Notify Me to receive notifications on this particular file. Status changes include:
o Pending Actions (recommended) – Action needed The batch may require approval or modifications.
o System Events – The batch has been delivered to the financial institution. o Complete – Unsuccessful (recommended) – The batch delivery attempt
failed. o Complete – Successful (recommended) – The batch delivery attempt was
successful.

15
o Early Action Taken – The batch is dated for the future and was approved prior to the day it is scheduled to be sent to the financial institution.
o Early Action Removed – The batch is part of a recurring series or is dated for the future and transaction information, such as a payee or the entire batch, has been canceled or deleted.
o Expired (recommended) – The batch has expired.
• (Optional) Select Recurring Options if applicable. o Once Recurring Options is selected, a window will populate where
schedule settings can be created. o Select a Start Date to schedule the date of the intended first payment o Select an expiration date
Transaction Repeats Indefinitely: transaction will continue indefinitely until manually deleted
Transactions Repeats Until End Date: transaction will continue until the date defined
Fixed Number of Transactions: transaction will continue the number of times defined
o Select the frequency (Daily, Weekly, Bi-Weekly, Semi-Monthly, Monthly or Annually)
• Note: Dual users will require additional approval. Approvers can approve 10
transfers in advance. The email for pending approval is generated the day before the effective date of the transfer.

16
o Select Save
A few helpful tips regarding the payee table.
Go to page: This field allows the user to skip to the desired page to search for payees within the batch.
Items to display: Select the appropriate option to be able to view payees in groupings of 10, 20, or 50.
Search Payees Record: Expand this field to be able to search for a payee within the batch.
• Enter the necessary information or edit the template as needed o Exclude box: Selecting this box, excludes this payee from the batch. The
text will turn gray notifying the user this payee has been excluded. o Select the Edit icon to edit information on the payee
Note: Changes to the payee are permanent and may affect other templates and payments
o Review the Account to be debited or credited for the payee o (Mixed Debit and Credit batch only) Select the appropriate transaction
type – Debit or Credit o Verify or Enter the Amount of the transfer o (Optional) Enter the Addenda information o (Optional) Select Additional Payees to add payees to the batch.
• Select Request Batch to confirm the transaction.

17
3.) Review
Verify the details of the payment.
• (Optional) Select Search Payee Records to verify details of a specific transaction.
• Select Confirm to complete the transaction or Edit to be taken back to the Request page
4.) Complete
The batch has been completed and will be delivered for processing.
• Confirmation message will display in a green banner at the top of the page: o The Transaction Number is associated with this specific transaction. This
reference number can be used to search for the transaction. o The Date and Time stamp will show the exact date and time the transfer
was completed. • (Optional) Select Print to print the confirmation page • Select Return to be taken back to the ACH Payments page

18
Creating a Batch by File Import
ACH files can be imported into the system through Transaction Import. This feature is located on the right-hand side and can accept NACHA, Delimited, XML, Fixed Width, EDI829, and ISO20022 file types.
NOTE: For more information regarding other import file types, please contact Bridgewater Bank. To import a NACHA formatted file, follow the steps below.

19
NACHA File Import
Select Upload of the appropriate import file type
Search to find the saved NACHA file Select Upload File
Select if your file has offsets within the NACHA file Select Save
Complete reverification Out of Band
Receive confirmation your file has been imported successfully

20
Select OK in the lower left-hand corner to upload another file

21
Manage Batch Templates Templates may be viewed, created, and edited from Manage Batch Templates. This feature is located on the right-hand side under ACH Payments.
Create Template
• Select the Create Template button at the bottom of the Search Templates table.
• Select the Template Settings o Select the ACH Company the payments are going to be sent from o Select Debit, Credit or Mixed Batch o Select a Batch Type o Select Ok
• Enter the Batch Template details o Enter Template Name o Select Offset Account o (Optional) Enter the Company Discretionary Data: Include a short

22
description related to the payment. o Enter the Company Entry Description: Include a 10-character description
of the batch. Commonly used Company Entry Descriptions include:
• ACH XFER • PAYROLL • PAYMENT • COLLECTION
• Enter the Payee details o Type the Payee’s Name. As you type, a drop-down list of payees
matching the information will populate. o Enter a Dollar Amount o (Optional) Enter Addenda information o (Optional) Select Payee End Date
o Repeat to add additional payees as needed. If the number of payees exceeds 10, select the Add Payees button to add more. The payees created will move to the Payee section and the user will be granted additional fields.
o Note: You can also create new payees. See the Creating a Payee section for more details.
• Select Save Template

23
Maintenance Templates
• Select Manage Batch Templates • Select Edit to edit details within the template • Select the Red X on the left-hand side of the template to Delete
Search Templates
• Enter relevant information to locate a specific template. o Note: All templates will display if all information is blank o Template Name: Enter a portion of the template name and a relevant
listing will appear o Batch Type: Select the appropriate Batch Type o ACH Company: Select the ACH Company associated with the template o Payee Name: Enter the name of the payee associated with the template o Payee ID: Enter any portion of the payee’s identifier and the relevant
listing will appear • Select Search Templates
24
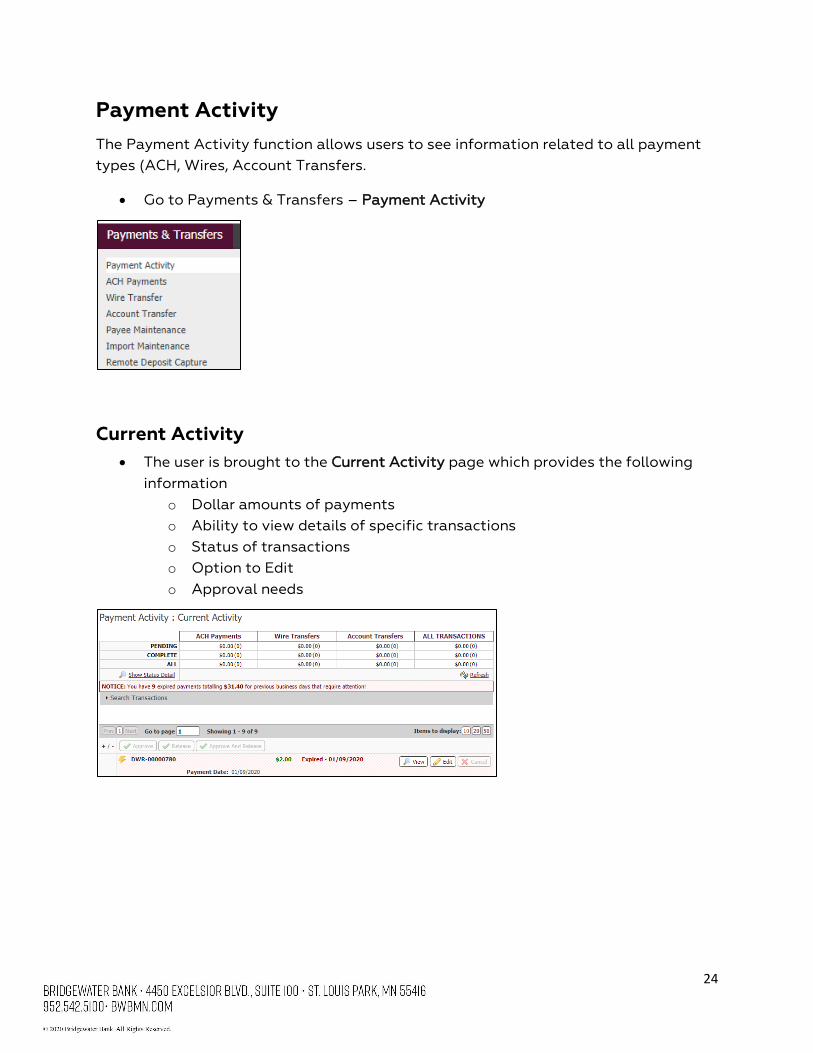
Payment Activity The Payment Activity function allows users to see information related to all payment types (ACH, Wires, Account Transfers.
• Go to Payments & Transfers – Payment Activity
Current Activity • The user is brought to the Current Activity page which provides the following
information o Dollar amounts of payments o Ability to view details of specific transactions o Status of transactions o Option to Edit o Approval needs

25
ACH Dashboard
• The ACH Dashboard includes the following details o Pending – dollar amount and number of all pending ACH payments o Completed – dollar amount and number of all completed ACH payments o All – dollar amount and number of all ACH activity which will be delivered
to the Bank o Show Status Detail – provides a more granular view of the pending and
completed transactions Pending Approval – dollar amount and number of ACH
transactions pending approval Other Pending – ACH transactions that are pending delivery to the
bank Successful – dollar amount and number of all completed ACH
payments delivered to the Bank Unsuccessful – dollar amount and number of ACH transactions
which failed their delivery to the Bank. o Refresh – select refresh if the user made any changes and would like to
update the dashboard o Search Transactions
• Additional information within the Dashboard o Expired Payments: When ACH transactions pending approval are not
addressed, the payment will expire. o A Notice will generate when a user has an expired payment. This notice
informs the user of the number of expired payments and total dollars amount of all items.
o Refresh will dismiss the notice.

26
Search Transactions
o Expand the Search Transactions section to quickly locate a specific transaction. Any combination of fields may be used to filter search results. Tran Number – Enter any portion of the transaction number Name - Enter any portion of the series’ name in this field. Amount – Enter the total amount of the batch created Status – Select the appropriate status you wish to view Entry Method – Enter whether the batch was created manually or
imported Import File – Enter any portion of the file name of an imported file Payee – Enter any portion of a payee name Payee Account – Enter the account number of the payee
o Select Search

27
Activity Table The Activity Table displays summary information about current day ACH batches.
• Approve – approve ACH transfers under dual control o Note: You can bulk approve by selecting multiple boxes of the
corresponding payments and selecting Approve
• View – Allows the user to view the content of the ACH transaction. o Users under dual control can Reject the transfer from this option to
require the transfer to be edited • Approve – approve ACH Transfers under dual control • Cancel – Allows the user to cancel the ACH transactions. • Edit – Allows the user to edit ACH transactions with the status of Rejected or
Pending Approval.

28
Payment Statuses Displayed in the Activity Table • Canceled – The ACH transaction has been canceled by a user and not sent to
the Bank. • Completed- The ACH transaction was successful delivered to the Bank. • Expired – The ACH transaction was under dual control, not approved prior to the
cut-off time, and not delivered to the Bank. • Pending Delivery – The ACH transaction has been completed by the user and is
pending delivery to the Bank. • Pending Approval – The ACH transaction requires approval by another user with
approval entitlements. • Rejected – The ACH transaction has been rejected by the approver and is able
to be edited by the initiator. Once the modifications are complete, the initiator can resubmit the payment.
• Reversed – The ACH transaction was reversed. • Unsuccessful – The ACH transaction was not delivered to the Bank.

29
Future Payments
• Under Payment Activity, select Future Payments on the right-hand side of the screen
• A calendar will display the transactions that will process on that day • Select the Forward Arrow on the left-hand side to advance to the next month • Select the Week option to view transactions in weekly increments
• Select a single transaction on the calendar by clicking on the transaction name or ID.
• If there are multiple transactions in the day, click on the white space of that date to view the additional transactions.
• Recurring transactions will have an icon of a calendar and clock. Hovering over this icon will show the details of the recurring frequency.

30
Filter Transactions
• Expand the Filter Transactions section to filter future dated transaction activity. o Product – select the payment type o Included Transactions – all, recurring, or one-time o Entry Method – manual or imported files o Import File – enter a portion of the name of the imported file
• The information will display immediately beneath this section

31
Payment History
• Under Payment Activity, select Payment History
Search Transactions
• Select the ACH Payments tab • Enter the Search Criteria
o Show From – select the date range o Tran Number – enter any portion of the transaction number o Payee – enter any portion of the payee o Name – enter any portion of the transaction’s name o Amount – enter the amount of the transaction o Status – select the status of the transaction o Entry Method – select if the transaction was created manually or
imported o Import File – enter any portion of the import file’s name o Recurring Payments Only – select the box to show recurring payments
• Select Search o User can also Print or Export this information

32
Recurring Transfers
• Under Payment Activity, select Recurring Transfers
• Select the ACH Payments tab • Enter the Search Criteria
o Name - enter any portion of the transaction’s name o Amount – enter the amount of the transaction o Status – select the status of the transaction o Payee – enter a portion of the payee’s name o Payee Account – enter the payee’s account
• Select Search
Activity Table The Activity Table displays summary information about previous ACH batches.
• The user will see the status of the recurring series on the left-hand side o Completed – series has been completed and will no longer reoccur o Canceled – series has been canceled o Scheduled – series is active and generating payments
• The user will see the Action options on the right-hand side o View – provides details of the ACH transaction
Allows the user to view past transfers and up to 10 future transfers

33
If under dual control, the user can approve future dated transfers o Edit – allows the user to edit the transaction o Cancel – allows the user to cancel the series o Delete – allows the user to cancel the series and remove it from the list o Recurring Frequency – provides details of the series including start and
end dates • The details of the series including the initiator will also be included

34
ACH Reversals ACH reversals allow for the recall of a previously submitted ACH transfer. The reversal does not guarantee funds will be returned.
• ACH Reversals may be submitted if the meet the following requirements: o The dollar amount was incorrect o The account information was incorrect o A duplicate entry was submitted o Must be sent within 5 days of the original entry and 24 hours after
discovery o Must be for the full dollar amount of the original entry o A reasonable attempt to notify the receiver has been made
Always contact the Business Services Department prior to initiating a reversal entry to ensure it is sent correctly.
• After ensuring the criteria is met, go to Payment Activity – Payment History
• Enter the search criteria to find the appropriate ACH transaction • Select the Request Reversal of the appropriate ACH transaction
• The Create Reversal screen will display along with the details of the ACH transfer
• You can either select to reverse the entire file or an individual item by selecting Reverse Batch or Reverse Selected respectively
• Review the details of the reversal and select Confirm

35
• Complete the Out of Band reverification • You will receive confirmation you reversal has been completed • The status will now appear as Reversed