Table of C ontents - WPS Office · Table of C ontents 1. The Basic Applications of Kingsoft Writer...
157
1 Table Table Table Table of of of of Contents ontents ontents ontents 1. The Basic Applications of Kingsoft Writer............................................................... 7 1.1. Introduction to Kingsoft Writer................................................................. 7 1.2. The Basic Operations of Kingsoft Writer................................................... 7 1.2.1. Writing................................................................................................ 7 1.2.2. Moving and Copying Text or Objects................................................. 7 1.2.3. Deleting Text or Objects..................................................................... 9 1.2.4. Undoing and Redoing......................................................................... 9 1.2.5. Selecting Text and Objects............................................................... 10 1.2.6. Paste Text Smart Labels.................................................................... 12 1.2.7. Setting White Text on a Blue Background........................................ 13 1.2.8 Automatic Capitalization at the Beginning of a Sentence................... 15 1 The Home Tab....................................................................................................... 16 1.1 Clipboard...................................................................................................... 16 1.1.1 The Paste Function........................................................................... 16 1.1.2 The Cut Function.............................................................................. 17 1.1.3 The Copy Function............................................................................17 1.1.4 Format Painter..................................................................................17 1.2 Setting the Font Format............................................................................... 18 1.2.1 Setting Font, Font size, and Font Name for a Character.................. 18 1.2.2 Altering the Case.............................................................................. 19 1.2.3 Clearing Formatting.......................................................................... 20 1.2.4 Character Shading............................................................................ 20 1.2.5 Enclosing Characters........................................................................ 20 1.2.6 Setting Character Spacing................................................................ 21 1.3. Paragraphs............................................................................................... 22 1.3.1. Bullets and Numbering.....................................................................22 1.3.2. Setting an Indent for a Paragraph.................................................... 27 1.3.3. Showing and Hiding Paragraph Marks............................................. 28 1.3.4. Adding or Changing Tab Stops..........................................................29 1.3.5. Alignment......................................................................................... 31 1.3.6. Line Spacing...................................................................................... 32 1.3.7. Shading............................................................................................. 33 1.3.8. Setting Borders................................................................................. 33 1.4. Styles....................................................................................................... 34 1.4.1. Using a Style..................................................................................... 34 1.4.2. Creating a New Style........................................................................ 34
Transcript of Table of C ontents - WPS Office · Table of C ontents 1. The Basic Applications of Kingsoft Writer...
1
TableTableTableTable ofofofof CCCContentsontentsontentsontents
1. The Basic Applications of Kingsoft Writer...............................................................71.1. Introduction to Kingsoft Writer.................................................................71.2. The Basic Operations of Kingsoft Writer...................................................7
1.2.1. Writing................................................................................................71.2.2. Moving and Copying Text or Objects................................................. 71.2.3. Deleting Text or Objects.....................................................................91.2.4. Undoing and Redoing.........................................................................91.2.5. Selecting Text and Objects............................................................... 101.2.6. Paste Text Smart Labels....................................................................121.2.7. Setting White Text on a Blue Background........................................131.2.8 Automatic Capitalization at the Beginning of a Sentence...................15
1 The Home Tab....................................................................................................... 161.1 Clipboard......................................................................................................16
1.1.1 The Paste Function...........................................................................161.1.2 The Cut Function..............................................................................171.1.3 The Copy Function............................................................................171.1.4 Format Painter..................................................................................17
1.2 Setting the Font Format............................................................................... 181.2.1 Setting Font, Font size, and Font Name for a Character.................. 181.2.2 Altering the Case..............................................................................191.2.3 Clearing Formatting..........................................................................201.2.4 Character Shading............................................................................ 201.2.5 Enclosing Characters........................................................................ 201.2.6 Setting Character Spacing................................................................ 21
1.3. Paragraphs...............................................................................................221.3.1. Bullets and Numbering.....................................................................221.3.2. Setting an Indent for a Paragraph.................................................... 271.3.3. Showing and Hiding Paragraph Marks............................................. 281.3.4. Adding or Changing Tab Stops..........................................................291.3.5. Alignment.........................................................................................311.3.6. Line Spacing......................................................................................321.3.7. Shading.............................................................................................331.3.8. Setting Borders.................................................................................33
1.4. Styles....................................................................................................... 341.4.1. Using a Style.....................................................................................341.4.2. Creating a New Style........................................................................ 34
2
1.4.3. Modifying the Style..........................................................................361.4.4. Applying a Style................................................................................371.4.5. Deleting a Style.................................................................................37
1.5. Editing......................................................................................................381.5.1. Finding..............................................................................................381.5.2. Going To............................................................................................391.5.3. Replacing..........................................................................................391.5.4. Selecting...........................................................................................40
2. The Insert Tab........................................................................................................412.1. Page Breaks............................................................................................. 412.2. Tables.......................................................................................................41
2.2.1. Inserting Tables from the Toolbar.................................................... 422.2.2. Inserting Tables using the Dialog Box...............................................42
2.3. Table Tools...............................................................................................432.3.1. Drawing a Table................................................................................432.3.2. Drawing and Erasing Lines in a Table............................................... 442.3.3. Selecting a Cell, Row, or Column......................................................452.3.4. Entering Contents into the Table......................................................472.3.5. Formatting Contents in the Table.....................................................472.3.6. Moving and Zooming Tables............................................................ 482.3.7. Table Properties............................................................................... 492.3.8. Inserting / Deleting the Cell, Row or Column from a Table............. 542.3.9. Merging or Splitting Cells................................................................. 552.3.10. Rows and Columns...........................................................................572.3.11. Aligning Style in a Table....................................................................622.3.12. Text Direction................................................................................... 622.3.13. Fast Calculation in a Table................................................................632.3.14. Repeat Headings.............................................................................. 632.3.15. Converting Tables into Text.............................................................. 632.3.16. Formula............................................................................................ 64
2.4. Illustrations..............................................................................................662.4.1. Pictures.............................................................................................662.4.2. Clip Art..............................................................................................67
2.5. Picture Tools............................................................................................672.5.1. Picture Adjust...................................................................................682.5.2. Picture Styles....................................................................................712.5.3. Zooming and Cropping.....................................................................742.5.4. Object Effect.....................................................................................77
2.6. Object Alignment.................................................................................... 782.6.1. The Relationship between Objects and Objects..............................78

3
2.6.2. The Relationship between Objects and Text....................................822.7. Links.........................................................................................................83
2.7.1. Hyperlinks.........................................................................................832.7.2. Bookmarking.................................................................................... 852.7.3. Cross-Referencing.............................................................................86
2.8. Headers and Footers............................................................................... 872.8.1. Headers and Footers........................................................................ 872.8.2. Page Numbers.................................................................................. 87
2.9. The Header & Footer Tab........................................................................892.9.1. Headers and Footers........................................................................ 892.9.2. Auto Text.......................................................................................... 902.9.3. Date / Time.......................................................................................902.9.4. Fields................................................................................................ 912.9.5. Pictures.............................................................................................912.9.6. Clip Art..............................................................................................922.9.7. Navigation........................................................................................ 932.9.8. Setting Headers and Footers............................................................93
2.10. Text..........................................................................................................982.10.1. Text Boxes.........................................................................................982.10.2. Fields.............................................................................................. 1052.10.3. WordArt..........................................................................................106
2.11. The WordArt Tab................................................................................... 1082.11.1. WordArt..........................................................................................1082.11.2. WordArt Fill.................................................................................... 1112.11.3. WordArt Outline.............................................................................1122.11.4. WordArt Effects..............................................................................1122.11.5. Inserting a Drop Cap.......................................................................1152.11.6. Date and Time................................................................................1162.11.7. Objects........................................................................................... 117
2.12. Symbols................................................................................................. 1182.12.1. Equations........................................................................................1182.12.2 Symbols........................................................................................... 118
3. The Page Layout Tab............................................................................................1203.1. Page Setup.............................................................................................120
3.1.1. Text Direction................................................................................. 1203.1.2. Margins...........................................................................................1203.1.3. Size................................................................................................. 1213.1.4. Columns..........................................................................................1223.1.5. Breaks.............................................................................................125
3.2. Page Borders......................................................................................... 127

4
3.2.1. Adding a Page Border.....................................................................1273.2.2. Adding Borders and Shading to Text.............................................. 128
4. References Tab.................................................................................................... 1294.1. Table of Contents.................................................................................. 129
4.1.1. Inserting a Table of Contents......................................................... 1294.1.2. Update ToC.....................................................................................1314.1.3. Deleting a Table of Contents.......................................................... 1324.1.4. Adding Text.....................................................................................132
4.2. Footnotes and Endnotes....................................................................... 1324.2.1. Inserting a Footnote or an Endnote...............................................1324.2.2. Editing Footnotes or Endnotes.......................................................1344.2.3. Converting Footnotes and Endnotes..............................................1354.2.4. Locating Footnotes/Endnotes........................................................135
4.3. Captions.................................................................................................1354.3.1. Adding Captions............................................................................. 1354.3.2. Cross-Referencing...........................................................................137
5. Mailings Tab........................................................................................................ 1385.1. Mailings.................................................................................................138
6. The Review Tab....................................................................................................1406.1. Proofing.................................................................................................140
6.1.1. Checking Spelling........................................................................... 1406.1.2. Word Count....................................................................................140
6.2. Changes and Comments........................................................................1416.2.1. Tracking Modifications................................................................... 1416.2.2. Changing Tracking Options.............................................................1416.2.3. Modifying the Document...............................................................1436.2.4. Inserting Comments.......................................................................1446.2.5. Deleting Comments........................................................................1456.2.6. Accepting, Rejecting and Viewing Comments............................... 145
6.3. Protecting your Work............................................................................1457. View Tab.............................................................................................................. 146
7.1. Document View.....................................................................................1477.1.1. Outline............................................................................................1477.1.2. Setting a Custom Background Color and Text Color...................... 1487.1.3. Print Preview..................................................................................148
7.2. Show......................................................................................................1507.2.1. Document Maps.............................................................................1507.2.2. Rulers..............................................................................................1507.2.3. Gridlines......................................................................................... 1517.2.4. Markup...........................................................................................151

5
7.2.5. Task Pane........................................................................................1517.2.6. Zooming..........................................................................................153
8. Develop Tools Tab................................................................................................1548.1. Form Field..............................................................................................154
8.1.1. Design of the Form Fields...............................................................1548.1.2. Protect Form.................................................................................. 156

6
ChapterChapterChapterChapter 2222
KingsoftKingsoftKingsoftKingsoft WriterWriterWriterWriter 2012201220122012
Kingsoft Writer 2012 emphasizes on the different development, in 2012
version, it completely adjusted technical line, and focus on
compatibility. In the Kingsoft Writer module, we reserve the macro
code, also can read and write with Microsoft each other; application of
advanced technology against macro viruses, and it is compatible with
Microsoft including all shapes and operating. At the same time,
Kingsoft Writer 2012 also has lots of features, such as export to PDF
file, enclose characters, mail merge, wordart, 3-D effects, etc., you can
process text in the entertainment status, enjoy the funs that Kingsoft
Writer brings.

7
1.1.1.1. TheTheTheThe BasicBasicBasicBasic ApplicationsApplicationsApplicationsApplications ofofofof KingsoftKingsoftKingsoftKingsoft WriterWriterWriterWriter
1.1.1.1.1.1.1.1. IntroductionIntroductionIntroductionIntroduction totototo KingsoftKingsoftKingsoftKingsoftWriterWriterWriterWriter
Kingsoft Writer is the most important and most used software in Kingsoft Office. It
contains a number of helpful tools to allow users to easily enhance their documents.
Whether a simple letter, or a lengthy manuscript, Kingsoft Writer can help users
create aesthetically pleasing documents with ease.
This chapter will introduce all of the functions of Kingsoft Writer including the basic
operations, and the movement and copying text.
1.2.1.2.1.2.1.2. TheTheTheThe BasicBasicBasicBasic OperationsOperationsOperationsOperations ofofofof KingsoftKingsoftKingsoftKingsoftWriterWriterWriterWriter
1.2.1.1.2.1.1.2.1.1.2.1. WritingWritingWritingWriting
To begin writing, simply create a new file and use the cursor to choose where on the
page you wish to insert the text. The insertion point will move from left to right
during the imput. If you insert the wrong words or characters, you can click
BackspaceBackspaceBackspaceBackspace to delete the incorrect letters. The text will automatic shift down a line
when placed at the end of a line. Clicking EnterEnterEnterEnter will begin a new paragraph. You can
also insert the; date, time, special symbols, etc.
1.2.2.1.2.2.1.2.2.1.2.2. MovMovMovMovinginginging andandandand CopyCopyCopyCopyinginginging TextTextTextText orororor ObjectObjectObjectObjectssss
After selecting the text or object, you can execute a multitude of different operations
on the selected text that includes moving it, copying it, or highlighting it. You can
implement these orders using the command order, shortcut key, or mouse.
How to move or copy text or objects:
(1) Select the text or object you want to move or copy.
Choose one of these commands based on your requirements:
� If you want to move the text or object, click cutcutcutcut, and move the contents to the

8
clipboard.
� If you want to copy the text or object, click copycopycopycopy, and copy the contents to the
clipboard.
(2) Move the insertion point to your desired location.
(3) Click paste.This method is suitable for a long-distance (file to file) copy or move. For theshort-distance alternative, you can use the mouse directly (this is perfect for movingand copying within the window).
1.2.2.1.1.2.2.1.1.2.2.1.1.2.2.1. MovMovMovMovinginginging TextTextTextText orororor ObjectObjectObjectObjectssss UsingUsingUsingUsing thethethetheMouseMouseMouseMouse
To move text or objects using the mouse:
(1) Using the mouse, highlight the text you want to move, shown as follows:
1.2—1 Selecting text using the mouse
(2) Move the selected content to a new location and release the mouse:

9
1.2—2 Moving text using the mouse
1.2.2.2.1.2.2.2.1.2.2.2.1.2.2.2. CopyCopyCopyCopyinginginging TextTextTextText orororor anananan ObjectObjectObjectObject UsingUsingUsingUsing thethethetheMouseMouseMouseMouse
To copy text or objects using the mouse employ the same method as before, press
CtrlCtrlCtrlCtrl before you release the mouse.
1.2.3.1.2.3.1.2.3.1.2.3. DeletDeletDeletDeletinginginging TextTextTextText orororor ObjectObjectObjectObjectssss
To delete the selected content simply:
� Press DeleteDeleteDeleteDelete on the keyboard
� Execute the CutCutCutCut operation
1.2.4.1.2.4.1.2.4.1.2.4. UndoUndoUndoUndoinginginging andandandand RedRedRedRedoingoingoingoing
Kingsoft Writer offers UndoUndoUndoUndo andandandand RedoRedoRedoRedo functions that allow you to reverse recent
actions. To use this function (choose one of them):
� In the QuickQuickQuickQuickAccessAccessAccessAccess toolbar, click the UndoUndoUndoUndo button.
� Press <Ctrl+Z><Ctrl+Z><Ctrl+Z><Ctrl+Z>.
To Undo something many times, simply repeat the procedures above.
After executing the UndoUndoUndoUndo function, if you want to reverse your decision, you can use
thethethethe RedoRedoRedoRedo function, The methods are as follows (choose one of them):

10
� In the FastFastFastFast AccessAccessAccessAccess toolbar, click the RedoRedoRedoRedo button.
� Press <Ctrl+Y><Ctrl+Y><Ctrl+Y><Ctrl+Y> shortcut key.
1.2.5.1.2.5.1.2.5.1.2.5. SelectSelectSelectSelectinginginging TextTextTextText andandandand ObjectObjectObjectObjectssss
In Kingsoft Writer, you can select text using the mouse, keyboard, or a combination of
the two., However, if you select an object you can only use the mouse, or a
combination of the two.
1.2.5.1.1.2.5.1.1.2.5.1.1.2.5.1. SeleSeleSeleSelectingctingctingcting TextTextTextText
The method for selecting text varies based upon the amount of text that it is
attempting to be selected. The methods are as follows:
� To select a sentence or a word: double click using the mouse on the sentence or
word you wish to select.
� To select a line: place the cursor to the left of text, when the pointer changes to an
arrowhead, click.
� To select several lines: place the cursor to the left of the text, click, and drag the
cursor to the end of the last line you wish to select, then release the mouse.
� To select a paragraph: double click to the left of the text that you want to select.
� To select any size of text: place the cursor at the beginning, and click and drag the
cursor to the end of the desired passage, then release.
When you wish to select the entire text either press <Ctrl+A><Ctrl+A><Ctrl+A><Ctrl+A> or go to the Editing
section of the HomeHomeHomeHome tab and choose SelectSelectSelectSelect AllAllAllAll in the Selectelectelectelect tab. Furthermore, when
the cursor is at the beginning or the end of the desired passage, press
<shift+ctrl+end><shift+ctrl+end><shift+ctrl+end><shift+ctrl+end> or <shift+ctrl+home><shift+ctrl+home><shift+ctrl+home><shift+ctrl+home> and you can select all the text.
If you wish to cancel selecting choose any one of the following options:
� Press EscEscEscEsc on the keyboard.
� Click using the mouse in any location of the file.
� Move the cursor using the keyboard.
Below is a table outlining the keyboard-based methods for selecting text:
Keyboard Control Effect

11
Shift+↑ Select a row above
Shift+↓ Select a row below
Shift+← Select a character to the left
Shift+→ Select a character to the right
Ctrl+Shift+←Select everything up to the end of the
last word or sentence
Ctrl+Shift+→Select everything up to the end of the
next word or sentence
Ctrl+Shift+↑Select everything up to the beginning
of the paragraph
Ctrl+Shift+↓Select everything up to the end of the
paragraph
Shift+HomeSelect everything up to the beginning
of the line
Shift+EndSelect everything up to the end of
line
Shift+PageUp Select everything up to the last screen
Shift+PageDnSelect everything up to the next
screen
Ctrl+Shift+HomeSelect everything up to the beginning
of the file
Ctrl+Shift+EndSelect everything up to the end of the
file
Ctrl+A Select the entire fileTable 1.2- 1 Table explaining the keyboard instructions for text selection
1.2.5.2.1.2.5.2.1.2.5.2.1.2.5.2. SelectSelectSelectSelect inginginging anananan ObjectObjectObjectObject
There are numerous different methods to select an object. The difference between
editing and selecting; the former has the cursor flashing on the screen, suggesting that
the character can be entered at the cursor; while the latter has no cursor, the

12
replacement for the selected object will appear at the zoom point. This is shown in
figure 1.2-3.
Figure 1.2—3 Selecting and editing an object (text)
To select an object simply:
� Click the object that you want to select.
� If you want to select several objects, press ShiftShiftShiftShift andandandand click on every object you
wish to select.
� If you want to cancel the selection of an object you can;
���� Press EscEscEscEsc
� Use the mouse to click outside the selected area
� When several objects are selected, you can cancel the selection of some of
them by holding the shiftshiftshiftshift key and clicking on those objects you wish to de-select.
1.2.6.1.2.6.1.2.6.1.2.6. PastePastePastePaste TextTextTextText SmartSmartSmartSmart LabelsLabelsLabelsLabels
Kingsoft Office provides paste formatting options, you can paste the contents of the
default format settings to facilitate operating. The method is as follows:
(1) Using the ApplicationApplicationApplicationApplication menu in the top left hand corner, , click the
OptionsOptionsOptionsOptions dialog box in the bottom right.
(2) In the EditEditEditEdit tab, in the CutCutCutCut andandandand PastePastePastePaste Options,Options,Options,Options, you can choose default paste
method in the DefaultDefaultDefaultDefault PastePastePastePaste FormatFormatFormatFormat sectionsectionsectionsection. See below:

13
Figure 1.2—4 The cut and Paste options
Kingsoft Writer offers three ways to paste; formatted text, matching the current format,
unformatted text.
� When you select FormattedFormattedFormattedFormatted Text,Text,Text,Text, is that when you presses <Ctrl<Ctrl<Ctrl<Ctrl ++++ V>V>V>V> key
combination, by default, paste content by "the source text format"
� When the user selects the MatchMatchMatchMatch thethethethe CurrentCurrentCurrentCurrent Format,Format,Format,Format, is that when the user
presses <Ctrl+V><Ctrl+V><Ctrl+V><Ctrl+V> key combination, by default, paste content by "the current
cursor position in text format”.
� When the user selects the PlainTextPlainTextPlainTextPlainText, it indicates that when the user presses <Ctrl<Ctrl<Ctrl<Ctrl
++++ V>V>V>V> key combination, by default, paste the contents by the PlainPlainPlainPlain TextTextTextText ....
1.2.7.1.2.7.1.2.7.1.2.7. SetSetSetSettingtingtingtingWhiteWhiteWhiteWhite TextTextTextText onononon aaaa BlueBlueBlueBlue BackgroundBackgroundBackgroundBackground
Kingsoft Writer offers a white and blue display style. To set this up simply follow
these instructions:
(1) Using the ApplicationApplicationApplicationApplication menu in the top left corner of the screen, ,
select the OptionsOptionsOptionsOptions dialog box in the bottom right.
(2) In the GeneralGeneralGeneralGeneral andandandand SaveSaveSaveSave tab, in the GeneralGeneralGeneralGeneral OptionsOptionsOptionsOptions group, choose the BlBlBlBluuuueeee

14
Background,Background,Background,Background,WhiteWhiteWhiteWhite TextTextTextText check box:
Figure 1.2—5 Setting White Text on a Blue Background
(3) Click the OKOKOKOK button. The effect should look like this:
Figure 1.2—6White Text on a Blue Background

15
1.2.81.2.81.2.81.2.8AutomaticAutomaticAutomaticAutomatic CCCCapitalizapitalizapitalizapitalizationationationation atatatat thethethethe BBBBeginningeginningeginningeginning ofofofof aaaa SSSSentenceentenceentenceentence
If you enter the text in English via Kingsoft Writer it will automatically change the
first lowercase letter at the beginning of the sentence into an uppercase letter, in order
to adapt to English languages rules. If you do not want this to happen, you can open
EditEditEditEdit in the OptionsOptionsOptionsOptions dialog box, and choose the Capitalizeapitalizeapitalizeapitalize firstfirstfirstfirst letterletterletterletter ofofofof thethethethe namesnamesnamesnames
ofofofof thethethethe weekweekweekweek check box.

16
1111 TheTheTheThe HomeHomeHomeHome TabTabTabTab
1.11.11.11.1 ClipboardClipboardClipboardClipboard
After selecting text or an object, you can execute different operations, such as move,
copy, delete, etc. You can complete these commands using the command order,
shortcut key, or mouse.
1.1.11.1.11.1.11.1.1 TheTheTheThe PastePastePastePaste FunctionFunctionFunctionFunction
To paste a selection of text or an object:
(1) Open the ClipboardClipboardClipboardClipboard in the HomeHomeHomeHome tab, and click PastePastePastePaste. Shown as follows:
Figure 1.1—1 The paste options
(2) Kingoft Writer offers four paste formats:
� FormattedFormattedFormattedFormatted texttexttexttext: paste by "the source text format"
� MatchMatchMatchMatch thethethethe currentcurrentcurrentcurrent formatformatformatformat: paste contents by "the current cursor position in text
format"
� PlainPlainPlainPlain text:text:text:text: paste contents by "plain text format"
� SpecialSpecialSpecialSpecial paste:paste:paste:paste: you can select the paste format based on your requirements, for
example, clear format, object conversion, etc.
(3) Press <Ctrl+V><Ctrl+V><Ctrl+V><Ctrl+V>....
(4) Right-click and select PastePastePastePaste on the opened shortcut menu.
You also can set a default paste format based on your preferences. To do this;

17
(1)(1)(1)(1) Open the PastePastePastePaste drop-down menu and choose SetSetSetSet DefaultDefaultDefaultDefault Paste.Paste.Paste.Paste.
(2) Select EditEditEditEdit in the opened OptionsOptionsOptionsOptions dialog box, and find DefaultDefaultDefaultDefault PastePastePastePaste FormatFormatFormatFormat....
You can then choose one of the FormattedFormattedFormattedFormatted TextTextTextText, MatchMatchMatchMatch thethethethe CurrentCurrentCurrentCurrent FormatFormatFormatFormat or
PlainPlainPlainPlain texttexttexttext options.
1.1.21.1.21.1.21.1.2 TheTheTheThe CutCutCutCut FunctionFunctionFunctionFunction
To cut text, or an object, follow these simple procedures:
(1)(1)(1)(1) Open the ClipboardClipboardClipboardClipboard in the HomeHomeHomeHome tab and click Cut.Cut.Cut.Cut.
(2) Press <Ctrl+X><Ctrl+X><Ctrl+X><Ctrl+X>.
(3) Click the right mouse button and select CutCutCutCut on the opened shortcut menu.
1.1.31.1.31.1.31.1.3 TheTheTheThe CopyCopyCopyCopy FunctionFunctionFunctionFunction
In order to copy something:
(1)(1)(1)(1) Open the ClipboardClipboardClipboardClipboard in the HomeHomeHomeHome tab and click Copy.Copy.Copy.Copy.
(2) Press <Ctrl+C><Ctrl+C><Ctrl+C><Ctrl+C>.
(3) Click the right mouse button and select CopyCopyCopyCopy on the opened shortcut menu.
1.1.41.1.41.1.41.1.4 FormatFormatFormatFormat PainterPainterPainterPainter
In order to use format paint simply:
(1) Place the cursor on the text or object that you want to copy the format of.
(2) Open the ClipboardClipboardClipboardClipboard in the HomeHomeHomeHome tab and click FormatFormatFormatFormat
PainterPainterPainterPainter .
(3) The cursor will change into the format painter shape .
(4) Move the cursor to the text or paragraph that you wish to change the format of,
and select it.
Tip: If need to use format painter continuously, you can double click the FormatFormatFormatFormat
PainterPainterPainterPainter button .

18
1.21.21.21.2 SettingSettingSettingSetting thethethethe FontFontFontFont FormatFormatFormatFormat
1.2.11.2.11.2.11.2.1 SettingSettingSettingSetting Font,Font,Font,Font, FontFontFontFont size,size,size,size, andandandand FontFontFontFont NameNameNameName forforforfor aaaa CharacterCharacterCharacterCharacter
Kingsoft Writer offers a number of fonts, font size, and different formats for
characters. When you need to change the appearance of certain words, first select
these words, then set the font that you prefer.
1.2.1.11.2.1.11.2.1.11.2.1.1 SetSetSetSettingtingtingting thethethethe FontFontFontFont
Follow these steps to set the font:
(1) Select the word that you want to change.
(2) In the HomeHomeHomeHome tab, in the FontFontFontFont group, choose FontFontFontFont NameNameNameName
then choose the appropriate font from the pull-down menu:
Figure 1.2—1 Setting the Font
1.2.1.21.2.1.21.2.1.21.2.1.2 SetSetSetSettingtingtingting thethethethe FontFontFontFont SizeSizeSizeSize
In order to alter the font size:
(1) Select the words for which you wish to change their font size.
(2) In the HomeHomeHomeHome tab, in the FontFontFontFont group, choose FontFontFontFont sizesizesizesize , then choose the
appropriate font size from the pull-down menu. You also can select any number
between 1 and 638 in the FontFontFontFont sizesizesizesize pull-down menu.
In addition, you can, in the HomeHomeHomeHome tab, in the FontFontFontFont group, click the button and

19
button to increase and decrease the font size.
1.2.1.31.2.1.31.2.1.31.2.1.3 SettingSettingSettingSetting thethethethe FontFontFontFont StyleStyleStyleStyle
The button toggles the boldness of the selected text.
The button toggles whether the selected text is italicised or not.
The button. Toggle whether the selected text is underlined or not.
The button is used to alter the color of the text. Click the icon to unlock a menu
revealing available colors. Click on the preferred one..
The button is used to highlight text.
1.2.21.2.21.2.21.2.2 AlteringAlteringAlteringAltering thethethethe CaseCaseCaseCase
To alter the case you need to:
(1) Select the word that you want to change.
(2) Go to the HomeHomeHomeHome tab, in the FontFontFontFont group, and click ChangeChangeChangeChange CaseCaseCaseCase . This will
open the ConvertConvertConvertConvert CaseCaseCaseCase dialog box, as shown below:
Figure 1.2—2 Altering the Case
(3) Select the style that you prefer.
(4) Click the OKOKOKOK button.

20
1.2.31.2.31.2.31.2.3 ClearingClearingClearingClearing FormattingFormattingFormattingFormatting
To clear formatting:
(1) Select the word that you want to clear.
(2) In the HomeHomeHomeHome tab, select the FontFontFontFont group and click Clear Formatting . This will
clear all pattern and formatting for the text that you have selected.
1.2.41.2.41.2.41.2.4 CharacterCharacterCharacterCharacter ShadingShadingShadingShading
In order to shade characters simply:
(1) Select the applicable character.
(2) In the HomeHomeHomeHome tab, select the FontFontFontFont group and click CharacterCharacterCharacterCharacter ShadingShadingShadingShading . You
can then add shading to the selected character.
1.2.51.2.51.2.51.2.5 EnclosingEnclosingEnclosingEnclosing CharactersCharactersCharactersCharacters
To enclose a character:
(1) Select the character that you want to enclose.
� For a Chinese character, full-width symbol, number, or letter, you must only
select one character at a time.
� For a half-width symbol, number, or letter, you can select at least two characters
at a time.
(2) In the HomeHomeHomeHome tab, select the FontFontFontFont group and click EncloseEncloseEncloseEnclose CharactersCharactersCharactersCharacters.... Open the
EncloseEncloseEncloseEnclose CharactersCharactersCharactersCharacters dialog box, as shown below:

21
Figure 1.2—3 Enclosing Characters
(3) Select the appropriate style and click the OKOKOKOK button. you can set enclose
characters to characters.
For example, to modify the text "WPS ®®®®.", is the ®®®®. as "WPS" on the mark, the steps
are as follows:
(1) Type in "WPS" and insert the brand symbol. Enter and select "R", then choose the
FontFontFontFont option from the HomeHomeHomeHome tab and click encloseencloseencloseenclose characterscharacterscharacterscharacters.... Choose the shrinkshrinkshrinkshrink texttexttexttext
option and click the OKOKOKOK button.
(2) Select the edited symbol ®®®®.
(3) In the FontFontFontFont group, click OldOldOldOld ToolsToolsToolsTools using the right mouse button. Open the FontFontFontFont
tab in the FontFontFontFont dialog box.
(4) Select the EfEfEfEfffffectectectect group and choose the SuperscriptSuperscriptSuperscriptSuperscript check box.
(5) Click the OKOKOKOK button to finish the process.
1.2.61.2.61.2.61.2.6 SettingSettingSettingSetting CharacterCharacterCharacterCharacter SpacingSpacingSpacingSpacing
In the HomeHomeHomeHome tab, select the FontFontFontFont group and click OldOldOldOld ToolsToolsToolsTools using the right mouse
button. This should open the FontFontFontFont dialog box as shown below:

22
Figure 1.2—4 Setting character spacing
In the CharacterCharacterCharacterCharacter SpacingSpacingSpacingSpacingmenu, you can adjust the Scale,Scale,Scale,Scale, SpacingSpacingSpacingSpacing, and PositionPositionPositionPosition of a
character.
1.3.1.3.1.3.1.3. ParagraphParagraphParagraphParagraphssss
1.3.1.1.3.1.1.3.1.1.3.1. BulletsBulletsBulletsBullets andandandand NumberingNumberingNumberingNumbering
Kingsoft Writer comes with a vast array of bullet and numbering options which can be
used to organize and present information clearly.
1.3.1.1.1.3.1.1.1.3.1.1.1.3.1.1. InsertingInsertingInsertingInserting BulletBulletBulletBullet PointsPointsPointsPoints andandandand NumberNumberNumberNumberssss
The steps needed to add bullets and numbering to a document are as follows:
(1) In the HomeHomeHomeHome tab, select the ParagraphParagraphParagraphParagraph group and click the bullet point icon next
to the drop-down arrow. This will open the bullet point option menu shown below:

23
Figure 1.3—1 The bullet point option menu
(2) You can choose one of the bullet point varieties from the list, or alternatively you
can choose the CustomizeCustomizeCustomizeCustomize option,,,, open the BulletsBulletsBulletsBullets andandandand NumberingNumberingNumberingNumbering dialog box, and
choose either the BulletedBulletedBulletedBulleted or NumberedNumberedNumberedNumbered tab:
Figure 1.3—2 The Bulleted or Numbered tab
(3) Insert the bullet or number.
(4) Press the EnterEnterEnterEnter key. Kingsoft Writer will automatically insert the next bullet point
or number.
Tips:
To stop the automatic insertion of further bullets or numbers into a list you can either
use the BackspaceBackspaceBackspaceBackspace key to delete the last bullet or number in the list, or press EnterEnterEnterEnter
twice.
1.3.1.2.1.3.1.2.1.3.1.2.1.3.1.2. AddAddAddAddinginginging BulletBulletBulletBullet PointsPointsPointsPoints totototo ExiExiExiExisssstingtingtingting TextTextTextText
In order to add bullet points to pre-existing text you need to:
(1) Select the appropriate passage.

24
(2) Click the bullet point icon next to the drop-down arrow in the ParagraphParagraphParagraphParagraph section
of the HomeHomeHomeHome tab and choose the bullet point variety that you like. If there are no
suitable bullet varieties, select Customize,Customize,Customize,Customize, and open the BulletsBulletsBulletsBullets andandandand numberingnumberingnumberingnumbering
dialog box.
(3) The default option for bullet points in the menu is NoNoNoNonenenene and the CustomizeCustomizeCustomizeCustomize
button in the botton right is grey and unavailable. Change this by choosing any bullet
point vareity and clicking the CustomizeCustomizeCustomizeCustomize button. This will open the CustomizeCustomizeCustomizeCustomize
BBBBulletedulletedulletedulleted LLLListististist dialog box, as shown below:
Figure 1.3—3 The Bullet and Numbering dialog box
(4) You can establish the relevant settings in the opened CustomizeCustomizeCustomizeCustomize BBBBulletedulletedulletedulleted LLLListististist
dialog box. If you need a special symbol as a bullet then click the CharacterCharacterCharacterCharacter button,
open the CharacterCharacterCharacterCharacter dialog box, and select one of the special symbols.
(5) You can also also click the AdvancedAdvancedAdvancedAdvanced button and set bullet position and text
position. Click OKOKOKOK to add bullet points to your selected passage:

25
Figure 1.3—4 Paragraphs with bullet points
1.3.1.3.1.3.1.3.1.3.1.3.1.3.1.3. AutoAutoAutoAuto NumberNumberNumberNumberinginginging
It you want to add numbers to pre-existing text simply:
(1) Select the appropriate paragraph.
(2) Go to the ParagraphParagraphParagraphParagraph section of the HomHomHomHome tab, select the BulletsBulletsBulletsBullets option next to
the drop-down arrow. You can then choose your preferred bullet point variety. If there
are no suitable varieties, select Customize,Customize,Customize,Customize, and open the BulletsBulletsBulletsBullets andandandand NumberingNumberingNumberingNumbering
dialog box.
(3) The default bullet option is NoNoNoNo in the BulletsBulletsBulletsBullets tab, and the CustomizeCustomizeCustomizeCustomize button in the
button right will be grey and unavailable. Choose any bullet style and click the
CustomizeCustomizeCustomizeCustomize button.
(4) Select the NumberNumberNumberNumber stylestylestylestyle drop-down list from the CustomizeCustomizeCustomizeCustomize NumberedNumberedNumberedNumbered ListListListList
dialog box. You can then select your preferred number style. In the NumberNumberNumberNumber FormatFormatFormatFormat
text box, enter the desired character, shown as follows:

26
Figure 1.3—5 The Bullets and Numbering dialog box
(5) You can also click the AdvancedAdvancedAdvancedAdvanced button and set number position and text position.
Click the OKOKOKOK button to insert numbers to your selected passage.
1.3.1.4.1.3.1.4.1.3.1.4.1.3.1.4. AddAddAddAddinginginging OutlineOutlineOutlineOutline NumberedNumberedNumberedNumbered
If you want to add outline numbered:
1) Choose the MoreMoreMoreMore NumberingNumberingNumberingNumbering option from the NumberingNumberingNumberingNumbering drop-down list
located in the ParagraphParagraphParagraphParagraph section of the HomeHomeHomeHome tab.
2) Select the OutlineOutlineOutlineOutline NumberedNumberedNumberedNumbered tab, as shown below:
Figure 1.3—6 The Outline Numbered tab
3) Click the desired list format. To customize the outline numbered list choose a

27
custom format then click the CustomizeCustomizeCustomizeCustomize button from the CustomizeCustomizeCustomizeCustomize outlineoutlineoutlineoutline
numberednumberednumberednumbered ListListListList dialog box.
4) Set outline numbered in the CustomizeCustomizeCustomizeCustomize numberednumberednumberednumbered listlistlistlist dialog box.
5) Click OKOKOKOK to complete the process.
6) Insert list item and press thethethethe EnterEnterEnterEnter key after each entry.
7)7)7)7) Place the insertion point after the list item, then press TabTabTabTab or shift+tabshift+tabshift+tabshift+tab. The list
item can then be adjusted to an appropriate level:
Figure 1.3—7 Outline numbered text
1.3.2.1.3.2.1.3.2.1.3.2. SetSetSetSettingtingtingting anananan IndentIndentIndentIndent forforforfor aaaa ParagraphParagraphParagraphParagraph
There are three types of indented paragraph:
� Left (right) indent: every line of the paragraph is indented to the left (right).
decrease indent and increase indent in combination can produce nested, generally
used to refer to the text.
� First line indent: the first line of the paragraph is idented in order to differentiate
it with the previous paragraph.
� Hanging indent: the first line of the paragraph in addition to all rows of the left
margin than the right indent.
There are several ways to indent a paragraph; you can use the tab button, paragraph
dialog box, or the shortcut key. You can also use the ruler to indent paragraphs. For

28
example, select the ParagraphParagraphParagraphParagraph section in the HomeHomeHomeHome tab and click DecreaseDecreaseDecreaseDecrease
IndentIndentIndentIndent or IncreaseIncreaseIncreaseIncrease IndentIndentIndentIndent ..
In addition, you can select the OldOldOldOld ToolsToolsToolsTools option from the ParagraphParagraphParagraphParagraph tab. In the
ParagraphParagraphParagraphParagraph dialog box, select the IndentsIndentsIndentsIndents andandandand SpacingSpacingSpacingSpacing option, and choose
IndentationIndentationIndentationIndentation.... You can then set precise indentation measurements.
Figure 1.3—8 The Indentation and Spacing tab
1.3.3.1.3.3.1.3.3.1.3.3. ShowShowShowShowinginginging andandandand HidHidHidHidinginginging ParagraphParagraphParagraphParagraph MarksMarksMarksMarks
There are two ways to show or hide paragraph marks:
(1) In the HomeHomeHomeHome tab, select the ParagraphParagraphParagraphParagraph section and click Show/Show/Show/Show/ HideHideHideHide ParagraphParagraphParagraphParagraph
MarksMarksMarksMarks.... This will allow you to toggle whether your paragraphy marks are hidden or
revealed.
(2) In the Application menu in the top left corner, , select the OptionsOptionsOptionsOptions
dialog box in the bottom right. Choose the ViewViewViewView tab option. In the FormattingFormattingFormattingFormatting
MarksMarksMarksMarks section toggle with the Show/Show/Show/Show/ HideHideHideHide ParagraphParagraphParagraphParagraph MarksMarksMarksMarks option as necessary....

29
1.3.4.1.3.4.1.3.4.1.3.4. AddAddAddAddinginginging orororor ChangChangChangChanginginginging TabTabTabTab StopsStopsStopsStops
Tab stop is a term describing the location where the cursor stops after the Tab key has
been pressed. That is to say, when a tab stop is in place, you can immediately jump to
another position on the page by pressing the Tab key. Additionally, you can use tab
stops to align your text into columns quickly and easily.
There are two types of tab stop: the default tab stop, and the custom tab stop. The
default tab stop from the ruler from the left position is automatically set. The default
spacing of two characters can be modified by the user. A custom tab stop is set up
manually. After a custom tab stop has been established, all the custom tab stops to the
left of the default tab stop are cleared. Users can use the horizontal ruler and the TabsTabsTabsTabs
dialog box to set up tab stops.
1.3.4.1.1.3.4.1.1.3.4.1.1.3.4.1. AddAddAddAddinginginging LeaderLeaderLeaderLeader TabTabTabTab StopsStopsStopsStops
You can use the tab stops with leader, the steps are as follows:
(1) Place the cursor on a blank line..
(2) In the HomeHomeHomeHome tab, in the ParagraphParagraphParagraphParagraph section,,,, click the TabsTabsTabsTabs icon. This should
open the TabsTabsTabsTabs dialog box, shown below:
Figure 1.3—9 The Tabs dialog box
(3) In the LeaderLeaderLeaderLeader tab, choose "……”
(4) Click thethethethe SetSetSetSet button, and then click OKOKOKOK.

30
(5) Enter a word at the beginning of the line, press the TabTabTabTab key, move insertion point
to tab that had been set, and a leader will be appear in the left of insertion.
1.3.4.2.1.3.4.2.1.3.4.2.1.3.4.2. AddAddAddAddinginginging TabTabTabTab StopsStopsStopsStops
There is a TabTabTabTab MarkerMarkerMarkerMarker button on the horizontal ruler. Clicking this button opens a
drop-down menu that is shown below. It includes LeftLeftLeftLeft TabTabTabTab ,,,, CenterCenterCenterCenter TabTabTabTab ,,,, RightRightRightRight
TabTabTabTab and DecimalDecimalDecimalDecimal TabTabTabTab .
Figure 1.3—10 The tab menu
(1) Click on the ruler where you want to set the tab stop, the ruler will appear on the
appropriate type of tabs.
(2) By repeat the above steps, you can set different tab alignments.
(2) Press the TabTabTabTab key, move the insertion point at the tab stops, then enter the text in
this alignment.
Figure 1.3—11 Aligning text using tab
1.3.4.3.1.3.4.3.1.3.4.3.1.3.4.3. ChangChangChangChanginginginging TabTabTabTab StopsStopsStopsStops
If you want to change the tab settings, select the ParagraphParagraphParagraphParagraph group in the TabTabTabTab StopsStopsStopsStops
section, or double-click the tab marker on the ruler. In the TabTabTabTab StopsStopsStopsStops dialog box enter
or select the value for the distance between stations tab in the DefaultDefaultDefaultDefault TabTabTabTab StopsStopsStopsStops
fine-tuning. Click the OKOKOKOK button to complete the changes.

31
1.3.4.4.1.3.4.4.1.3.4.4.1.3.4.4. RemovRemovRemovRemovinginginging aaaa TabTabTabTab StopStopStopStop
There are two ways to remove a tab stop.
� Using the horizontal ruler.
Place the insertion point within the paragraph from which you want to remove the
tabs, or select the tab stops you want to add text blocks on the ruler shows the current
paragraph or text block tab stops. Place the cursor upon the tab stop symbol that you
want to remove, drag it off the horizontal ruler, and release the mouse.
� Using the dialog box.
(1) Make sure the insertion point is in the paragraph from which you wish to remove
the tabs.
(2) Select the TabsTabsTabsTabs option from the ParagraphParagraphParagraphParagraph section and open the TabTabTabTab dialog box.
(3) Click the ClearClearClearClear button or ClearClearClearClearAll.All.All.All.
(4) Click OOOOKKKK to complete.
1.3.5.1.3.5.1.3.5.1.3.5. AlignmentAlignmentAlignmentAlignment
Kingsoft Writer offers five different alignment alternatives: AlignAlignAlignAlign Left,Left,Left,Left, AlignAlignAlignAlign Right,Right,Right,Right,
Centered,Centered,Centered,Centered, JustifyJustifyJustifyJustify,,,, and DistributeDistributeDistributeDistribute. The steps to applying one of these options are as
follows:
(1) Select the text you want to align.
(2) Click the AlignmentAlignmentAlignmentAlignment button from the ParagraphParagraphParagraphParagraph section of the HomeHomeHomeHome tab.
You can also set alignment using the ParagraphParagraphParagraphParagraph dialog box, the steps are as follows:
(1) Position the insertion point where you want to align the text.
(2) Click the OldOldOldOld ToolsToolsToolsTools button from the ParagraphParagraphParagraphParagraph section of the HomeHomeHomeHome tab using
the right mouse button..Open the IndentsIndentsIndentsIndents andandandand SpacingSpacingSpacingSpacing tab in the ParagraphParagraphParagraphParagraph dialog
box:

32
Figure 1.3—12 The Indentation and Spacing tab
(3) In the GeneralGeneralGeneralGeneral sectionsectionsectionsection, select a type of alignment.
(4) Click the OKOKOKOK button to apply the selected alignment.
1.3.6.1.3.6.1.3.6.1.3.6. LineLineLineLine SpacingSpacingSpacingSpacing
In order to set up line spacing follow these simple steps:
(1) In the HomeHomeHomeHome tab, in the ParagraphParagraphParagraphParagraph section,,,, click on the LineLineLineLine SpacingSpacingSpacingSpacing drop-down
list and select the value that you like to set for the line spacing. Select OthersOthersOthersOthers, open
ParagraphParagraphParagraphParagraph dialog box as shown following figure:

33
Figure 1.3—13 The Paragraph dialog box
(2) In the SpacingSpacingSpacingSpacing section you can select the exact distance between the lines that
you would like.
(3) Click OKOKOKOK to complete.
1.3.7.1.3.7.1.3.7.1.3.7. ShadingShadingShadingShading
In the HomeHomeHomeHome tab, in the ParagraphParagraphParagraphParagraph section,,,, select ShadingShadingShadingShading ColorColorColorColor.... You can then
choose the color that you would like for a word or paragraph from the FillFillFillFill list.
Tips: When you add shading it only applies to the word or paragraph rather than the
whole page.
1.3.8.1.3.8.1.3.8.1.3.8. SetSetSetSettingtingtingting BorderBorderBorderBorderssss
Select the OutsideOutsideOutsideOutside BorderBorderBorderBorder option from the ParagraphParagraphParagraphParagraph section of the HomeHomeHomeHome tab. You
can then choose a variety of different borders from the drop-down list to be applied to
the selected text or cell.

34
1.4.1.4.1.4.1.4. Styletyletyletylessss
A style is a collection of formatting instructions that you can use repeatedly
throughout the document to improve efficiency and presentation. .
1.4.1.1.4.1.1.4.1.1.4.1. UsUsUsUsinginginging aaaa StyleStyleStyleStyle
To make use of a style:
(1) Position the cursor in the paragraph for which you want to change the format.
(2) In the HomeHomeHomeHome tab, in the StyleStyleStyleStyle group, select OldOldOldOld ToolsToolsToolsTools with the right mouse button.
This will open the StyleStyleStyleStyle andandandand FormattingFormattingFormattingFormatting task window shown below:
Figure 1.4—1 The Style and Formatting task window
(3) Kingsoft Writer lists the main styles in the StyleStyleStyleStyle andandandand FormattingFormattingFormattingFormatting task window.
When you select one of them, that style will be applied to the paragraph in which the
cursor is located.
Tips: It is quicker to use the StyleStyleStyleStyle section of the HomeHomeHomeHome tab to select the style you like.
If you do not see the style you want, click the button to expand the StyleStyleStyleStyle library.
1.4.2.1.4.2.1.4.2.1.4.2. CreatCreatCreatCreatinginginging aaaa NewNewNewNew StyleStyleStyleStyle
The steps to creating a new style are as follows:

35
(1) In the HomeHomeHomeHome tab, in the StyleStyleStyleStyle group, click the NewNewNewNew StyleStyleStyleStyle icon and open
the NewNewNewNew StyleStyleStyleStyle dialog box. You can also click NewNewNewNew StyleStyleStyleStyle in the StyleStyleStyleStyle andandandand FormattingFormattingFormattingFormatting
task window to open the NewNewNewNew StyleStyleStyleStyle dialog box:
Figure 1.4—2 The New Style dialog box
(2) Enter the style name in the NameNameNameName option.
(3) Click the FormatFormatFormatFormat button and open the drop-down list. There are six formatting
options: Font,Font,Font,Font, Paragraph,Paragraph,Paragraph,Paragraph, Tabs,Tabs,Tabs,Tabs, Border,Border,Border,Border, Numbering,Numbering,Numbering,Numbering, and Shortcut,Shortcut,Shortcut,Shortcut, you can choose
any one of them to set the style.
(4) Click OKOKOKOK to complete.
(5) The new style will appear in the FormattingFormattingFormattingFormatting totototo ApplyApplyApplyApply list in the StyleStyleStyleStyle andandandand
FormattingFormattingFormattingFormatting task window.
1.4.2.1.1.4.2.1.1.4.2.1.1.4.2.1. StyleStyleStyleStyle ReferenceReferenceReferenceReference FiledFiledFiledFiled
To use style reference filed:
(1) Select the HeaderFooterHeaderFooterHeaderFooterHeaderFooter option from the HeaderHeaderHeaderHeader andandandand FooterFooterFooterFooter section of the
InsertInsertInsertInsert tab to edit either the page Header or Footer.

36
(2)(2)(2)(2) Move the cursor to the position where you want to insert the StyleRefStyleRefStyleRefStyleRef.
(3) In the Insert tab, in the TextTextTextText section, select the FieldsFieldsFieldsFields option to open the FieldsFieldsFieldsFields
dialog box, shown as follows:
Figure 1.4—3 The Fields dialog box
(4) Select StyleRefStyleRefStyleRefStyleRef from the FieldsFieldsFieldsFields list; choose a style in the FieldFieldFieldField CodeCodeCodeCode such as text.
(5) Click the OKOKOKOK button, insert the field will be in the HeadingHeadingHeadingHeading 1111 in reference to the
dynamic content displayed on each header or footer.
1.4.3.1.4.3.1.4.3.1.4.3. ModifyModifyModifyModifyinginginging thethethethe StyleStyleStyleStyle
If you are not satisfied with the default style or the style you have customized, you are
able to modify it by following these steps:
(1) In the HomeHomeHomeHome tab, in the StyleStyleStyleStyle group, select the OldOldOldOld ToolsToolsToolsTools option using the right
mouse button. This will open the StyleStyleStyleStyle andandandand FormattingFormattingFormattingFormatting task window.
(2) Select the style that you want to modify in the ClickClickClickClick FormattingFormattingFormattingFormatting totototo ApplyApplyApplyApply
section, and then choose theModifyModifyModifyModify option in the pop-up menu by right-clicking:
Figure 1.4—4 The shortcut menu
(3) Open theModifyModifyModifyModify StyleStyleStyleStyle dialog box:

37
Figure 1.4—5 The Modify Style dialog box
(4) If you want to check and modify more options, select the FormatFormatFormatFormat option from
the dialog box and modify any options you like.
(5) Click OKOKOKOK to close the dialog box.
Tip: If you modify the style using the StyleStyleStyleStyle andandandand FormattingFormattingFormattingFormatting task window, all other
documents in the same style of text will also be modified.
1.4.4.1.4.4.1.4.4.1.4.4. ApplyApplyApplyApplyinginginging aaaa StyleStyleStyleStyle
There are two ways to apply a style:
(1) Click the style that you would like from the StyleStyleStyleStyle section of the Home tab.
(2) In the StyleStyleStyleStyle andandandand FormattingFormattingFormattingFormatting task window, in the ClickClickClickClick FormattingFormattingFormattingFormatting totototo ApplyApplyApplyApply list,
simply click the style you prefer and it will be applied.
1.4.5.1.4.5.1.4.5.1.4.5. DeletDeletDeletDeletinginginging aaaa StyleStyleStyleStyle
To delete a style, select DeleteDeleteDeleteDelete from the shortcut menu, as shown in Figure 1.4-4.
However, it is not possible to delete the style that comes with Kingsoft Writer.
You can use Kingsoft Writer to provide the StyleStyleStyleStyle andandandand FormattingFormattingFormattingFormatting task window to set
directly on the document format, the steps are as follows:
(1) Position the insertion point where you wish to change the style.
(2) In the StyleStyleStyleStyle section of the HomeHomeHomeHome tab, select the OldOldOldOld ToolsToolsToolsTools option using the right

38
mouse button. This opens the StyleStyleStyleStyle andandandand FormattingFormattingFormattingFormatting task window:
Figure 1.4—6 The Style and Formatting task window
(3) Select the style that you want to modify in the ClickClickClickClick FormattingFormattingFormattingFormatting totototo ApplyApplyApplyApply
section. Choose DeleteDeleteDeleteDelete in the pop-up menu by right-clicking, you can then delete the
user-defined style.
1.5.1.5.1.5.1.5. EditingEditingEditingEditing
1.5.1.1.5.1.1.5.1.1.5.1. FindFindFindFindinginginging
To find a word or phrase in your document you need to:
Select FindFindFindFind in the EditingEditingEditingEditing section of the HomeHomeHomeHome tab
(1) Using the drop-down list, open the Findindindind //// ReplaceReplaceReplaceReplace dialog box, shown as
follows:

39
Figure 1.5—1 The Find / Replace dialog box
(2) Go to the FindFindFindFind tab, enter the text you want to find in the FindFindFindFind whatwhatwhatwhat box.
(3) Select the FindFindFindFind NextNextNextNext button to start the search, if the search option is not in the
text, there will be a dialog box alerting you that Kingsoft Writer has finished
searching the document.
(4) To search for the next result matching your search option, click FindFindFindFind NextNextNextNext again.
(5) Click CloseCloseCloseClose to return to the text.
1.5.2.1.5.2.1.5.2.1.5.2. GoGoGoGoinginginging ToToToTo
To find and go to a word or phrase in your document you need to:
(1) Select FindFindFindFind in the EditingEditingEditingEditing section of the HomeHomeHomeHome tab . Using the
drop-down list, open the Findindindind //// ReplaceReplaceReplaceReplace dialog box shown below:
Figure 1.5—2 The GoGoGoGo totototo tab
(2) Select one of the Page, Section, or Bookmark options in the GoGoGoGo totototo whatwhatwhatwhat section.
(3) Click OKOKOKOK to complete.
1.5.3.1.5.3.1.5.3.1.5.3. ReplacReplacReplacReplacinginginging
To find and replace a word or phrase in your document you need to:
(1) Go to the EditingEditingEditingEditing section in the HomeHomeHomeHome tab, select ReplaceReplaceReplaceReplace to open the

40
FindFindFindFind //// ReplaceReplaceReplaceReplace dialog box:
Figure 1.5—3 The Replace tab
(2) Enter the TextTextTextText in the FindFindFindFind whatwhatwhatwhat box.
(3) Enter the FileFileFileFile in the ReplaceReplaceReplaceReplace whatwhatwhatwhat box.
Tip: If you do not enter any characters into the Replace text box, the program will
delete all results matching the search criteria.
(4) Click the FindFindFindFind NextNextNextNext button to start the search. When a match is found it will
return to the document to display the text. You can then do one of the following:
���� To search for the next text match, click FindFindFindFind NextNextNextNext
� To replace what you have entered in the FindFindFindFind whatwhatwhatwhat section with what you have in
the ReplaceReplaceReplaceReplace withwithwithwith box, simply click ReplaceReplaceReplaceReplace.
���� To replace all of your search results in one go with the same replacement, click
ReplaceReplaceReplaceReplaceAll.All.All.All.
Figure 1.5—4 A pop-up alert detailing the number of replacements
� Click the OKOKOKOK button to return to the FindFindFindFind andandandand ReplaceReplaceReplaceReplace dialog box, then click the
CloseCloseCloseClose button to return to the document.
� When you find the results of incorrect replacement, you can click on the UndoUndoUndoUndo
button in the QuickQuickQuickQuickAccessAccessAccessAccess toolbar to undo the replace operation.
1.5.4.1.5.4.1.5.4.1.5.4. SelectSelectSelectSelectinginginging
To find and select a word or phrase in your document you need to:

41
Choose the SelectSelectSelectSelect option from the SelectSelectSelectSelect drop-down list located in the
EditingEditingEditingEditing section of the HomeHomeHomeHome tab.� To select the entire contents of the document, choose AllAllAllAll SelectSelectSelectSelect....
� To select something hidden, stacked, or behind the shape of the text, select the
SelectSelectSelectSelect ObjectsObjectsObjectsObjects option, and then draw a box in the shape of the above.
���� To select other objects, such as pictures, SmartArt graphics, or charts, press and
hold CtrlCtrlCtrlCtrl while you select the object.
2.2.2.2. TheTheTheThe InsertInsertInsertInsert TabTabTabTab
2.1.2.1.2.1.2.1. PagePagePagePage BreakBreakBreakBreakssss
Kingsoft Writer will automatically begin a new page when the previous one is filled.
However, you can also break the page manually at a specified location in order to
meet your individual demands. To insert a break in the page, follow these steps:
(1) Place the insertion point where you wish to make the break.
(2) In the InsertInsertInsertInsert tab, select the PagesPagesPagesPages section, click the PagePagePagePage BreakBreakBreakBreak buttonto insert the page break.
Tips:
� <Ctrl+Enter><Ctrl+Enter><Ctrl+Enter><Ctrl+Enter> is a shortcut that will also insert a page break.
���� To delete a page break, place the insertion point in the page break, and then press
Delete.Delete.Delete.Delete.
2.2.2.2.2.2.2.2. TablesTablesTablesTables
Tables in Kingsoft Writer are made up of multiple rows and columns, in which you
can insert items such as text, numbers, and graphics in order to help you analyze them
quickly and present information more conveniently.

42
2.2.1.2.2.1.2.2.1.2.2.1. InsertInsertInsertInsertinginginging TablesTablesTablesTables fromfromfromfrom thethethethe ToolbarToolbarToolbarToolbar
To insert a table using the ToolbarToolbarToolbarToolbar:
(1) Position the insertion point where you wish the table to be placed.
(2) In the InsertInsertInsertInsert tab, in the PagesPagesPagesPages group, click the icon. This will open the
table drawing window shown in figure 2.2-1.
(3) Press the left mouse button and drag the cursor to draw a table to whatever
dimensions you like. Kingsoft Writer automatically adjusts the number of rows and
columns in the table according to the preset cell width when the width of the table
border increases or decreases:
Figure 2.2—1 Specifying the number of rows and columns in a table
(4) Release the mouse when you are satisfied with the dimensions of your table..
2.2.2.2.2.2.2.2.2.2.2.2. InsertInsertInsertInsertinginginging TablesTablesTablesTables usingusingusingusing thethethethe DialogDialogDialogDialog BoxBoxBoxBox
To insert a table using the dialog box:
(1) Position the insertion point where you wish to insert the table.

43
(2) In the InsertInsertInsertInsert tab, in the PagesPagesPagesPages group, select InsertInsertInsertInsert TableTableTableTable from the TableTableTableTable
drop-down list and open the dialog box:
Figure 2.2—2 The Insert Table dialog box
(3) Enter the number of rows and columns you want and choose the appropriate
column width.
(4) There are two options in theAAAAuuuutomatictomatictomatictomatic sizingsizingsizingsizing section:
� FixedFixedFixedFixed columncolumncolumncolumn widthwidthwidthwidth:::: column width becomes an exact value that can be specified
in the adjacent numerical scroll-through list. .
� AutomaticAutomaticAutomaticAutomatic columncolumncolumncolumn widthwidthwidthwidth:::: means the width of the columns is the same as the
width of the page.
2.3.2.3.2.3.2.3. TableTableTableTable ToolsToolsToolsTools
You can use the TableTableTableTable ToolsToolsToolsTools tab in the operation to insert, adjust, or modify a table.
2.3.1.2.3.1.2.3.1.2.3.1. DrawDrawDrawDrawinginginging aaaa TableTableTableTable
To draw complex tables follow these steps:
(1) Select the InsertInsertInsertInsert tab, in the TablesTablesTablesTables section of that tab choose DrawDrawDrawDraw TableTableTableTable from
the TablesTablesTablesTables drop-down list. You can also select the TableTableTableTable ToolsToolsToolsTools tab, in the DrawDrawDrawDraw
BordersBordersBordersBorders section,,,, and click DrawDrawDrawDraw TableTableTableTable .
(2) In the TableTableTableTable ToolsToolsToolsTools tab, click the LineLineLineLine StyleStyleStyleStyle andandandand LineLineLineLine WidthWidthWidthWidth list in the DrawDrawDrawDraw
BordersBordersBordersBorders group , specify the line.
(3) Click DrawDrawDrawDraw TableTableTableTable ---- the mouse point will be changed into a pen.
(4) In the editing area,drag the mouse to draw a table in the size and shape that you
need.
44
(5) When you are satisfied, release the mouse.
(6) Using the DrawDrawDrawDraw TableTableTableTable button, draw horizontal, vertical, or diagonal lines in the
box to form a cell.
(7) After you have finished drawing your table, click DrawDrawDrawDraw TableTableTableTable again, this will
revert the mouse back to its normal shape.
2.3.2.2.3.2.2.3.2.2.3.2. DrawDrawDrawDrawinginginging andandandand ErasErasErasErasinginginging LineLineLineLinessss inininin aaaa TableTableTableTable
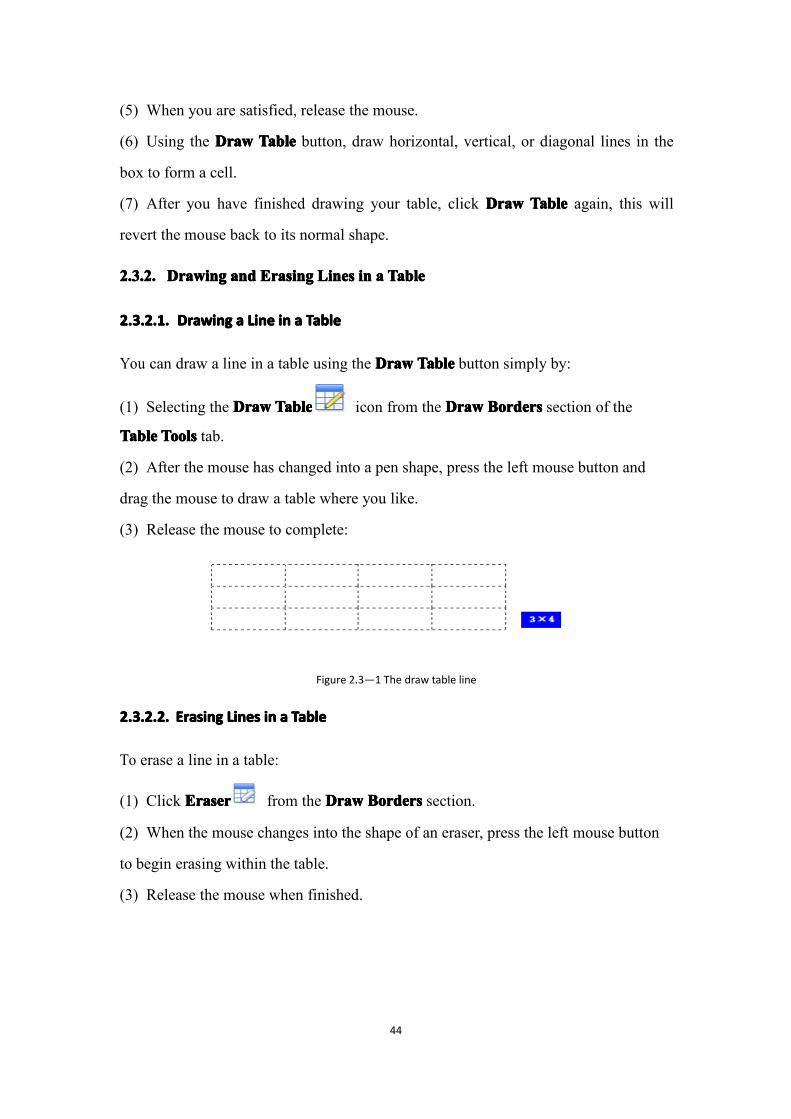
2.3.2.1.2.3.2.1.2.3.2.1.2.3.2.1. DrawDrawDrawDrawinginginging aaaa LineLineLineLine inininin aaaa TableTableTableTable
You can draw a line in a table using the DrawDrawDrawDraw TableTableTableTable button simply by:
(1) Selecting the DrawDrawDrawDraw TableTableTableTable icon from the DrawDrawDrawDraw BordersBordersBordersBorders section of the
TableTableTableTable ToolsToolsToolsTools tab.
(2) After the mouse has changed into a pen shape, press the left mouse button and
drag the mouse to draw a table where you like.
(3) Release the mouse to complete:
Figure 2.3—1 The draw table line
2.3.2.2.2.3.2.2.2.3.2.2.2.3.2.2. ErasErasErasErasinginginging LinesLinesLinesLines inininin aaaa TableTableTableTable
To erase a line in a table:
(1) Click EraserEraserEraserEraser from the DrawDrawDrawDraw BordersBordersBordersBorders section.
(2) When the mouse changes into the shape of an eraser, press the left mouse button
to begin erasing within the table.
(3) Release the mouse when finished.

45
2.3.3.2.3.3.2.3.3.2.3.3. SelectSelectSelectSelectinginginging aaaa Cell,Cell,Cell,Cell, RowRowRowRow,,,, orororor ColumnColumnColumnColumn
2.3.3.1.2.3.3.1.2.3.3.1.2.3.3.1. SelectSelectSelectSelectinginginging aaaa CellCellCellCell
� Select a Cell: Move the cursor to the left of the cell, when it transforms into an
arrow pointing up and right, you can select the cell.
Figure 2.3—2 Selecting a cell
� Selecting Continuous Cells: Either hold down the left mouse button and drag it
over the desired cells, or select the first cell you want to select, then hold the
ShiftShiftShiftShift key, and click the last cell that you want.
� Selecting Non-continuous Cells: Select the first cell that you want, then hold the
CtrlCtrlCtrlCtrl key, and individually click every other cell that you need.
2.3.3.2.2.3.3.2.2.3.3.2.2.3.3.2. SSSSelectelectelectelectinginginging aaaa RowRowRowRow orororor ColumnColumnColumnColumn
� Selecting a single line: Move the cursor to the left of the line, click when it
becomes an arrow pointing up and right. This will select the line:
Figure 2.3—3 Selecting a row
� Selecting a single column: Move the cursor to the top of the line, click when it
becomes a black arrow pointing downwards. This will select the column:
Figure 2.3—4 Selecting a column
� Selecting several non-continuous rows or columns: select a row or column, hold
the CtrlCtrlCtrlCtrl key, and then select any further rows or columns that you would like.
� Selecting several continuous rows or columns: select the first row or column,
46
hold the ShiftShiftShiftShift key, then select the last row or column that you need.
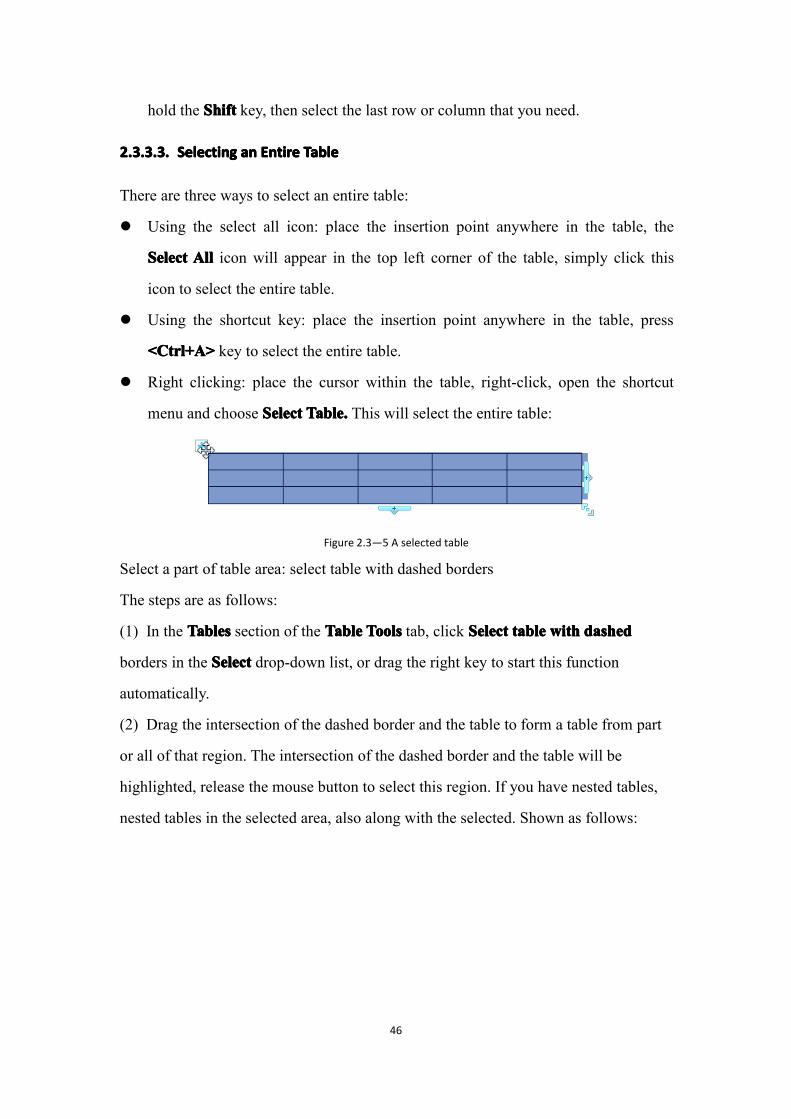
2.3.3.3.2.3.3.3.2.3.3.3.2.3.3.3. SelectSelectSelectSelectinginginging anananan EntireEntireEntireEntire TableTableTableTable
There are three ways to select an entire table:
� Using the select all icon: place the insertion point anywhere in the table, the
SelectSelectSelectSelect AllAllAllAll icon will appear in the top left corner of the table, simply click this
icon to select the entire table.
� Using the shortcut key: place the insertion point anywhere in the table, press
<Ctrl+A><Ctrl+A><Ctrl+A><Ctrl+A> key to select the entire table.
� Right clicking: place the cursor within the table, right-click, open the shortcut
menu and choose SelectSelectSelectSelect TableTableTableTable.... This will select the entire table:
Figure 2.3—5 A selected table
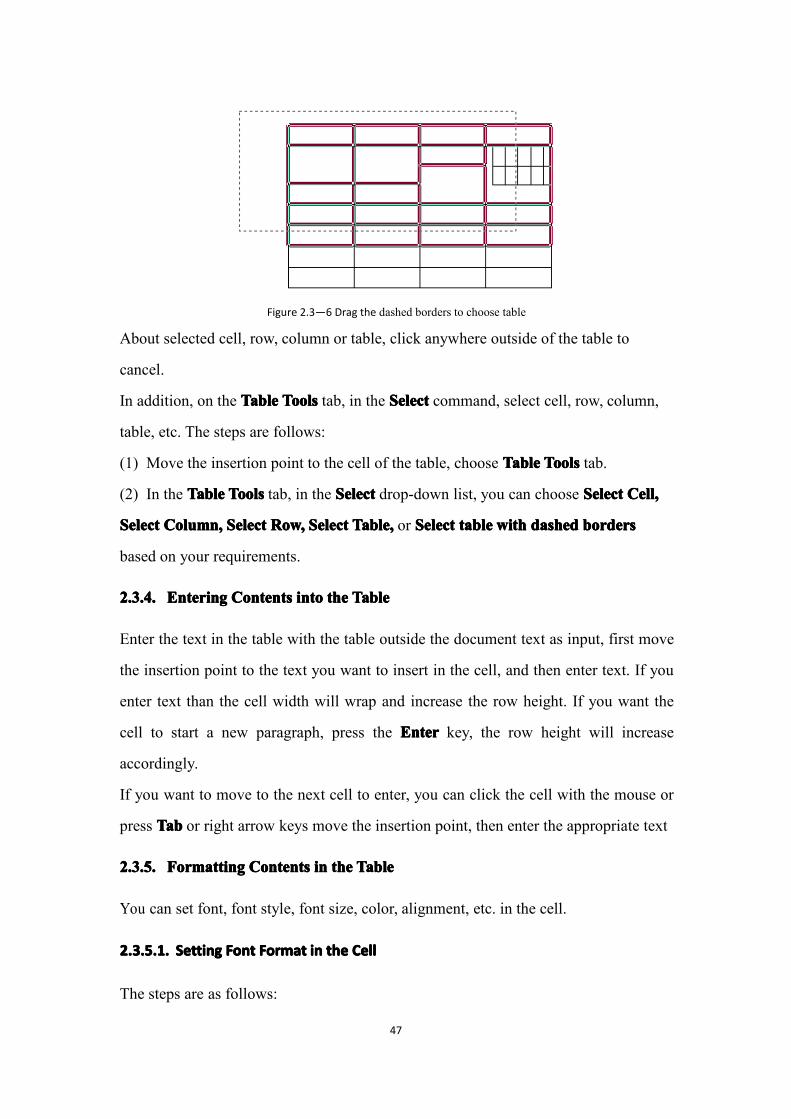
Select a part of table area: select table with dashed borders
The steps are as follows:
(1) In the TablesTablesTablesTables section of the TableTableTableTable ToolsToolsToolsTools tab, click SelectSelectSelectSelect tabletabletabletable withwithwithwith dasheddasheddasheddashed
borders in the SelectSelectSelectSelect drop-down list, or drag the right key to start this function
automatically.
(2) Drag the intersection of the dashed border and the table to form a table from part
or all of that region. The intersection of the dashed border and the table will be
highlighted, release the mouse button to select this region. If you have nested tables,
nested tables in the selected area, also along with the selected. Shown as follows:
47
Figure 2.3—6 Drag the dashed borders to choose table
About selected cell, row, column or table, click anywhere outside of the table to
cancel.
In addition, on the TableTableTableTable ToolsToolsToolsTools tab, in the SelectSelectSelectSelect command, select cell, row, column,
table, etc. The steps are follows:
(1) Move the insertion point to the cell of the table, choose TableTableTableTable ToolsToolsToolsTools tab.
(2) In the TableTableTableTable ToolsToolsToolsTools tab, in the SelectSelectSelectSelect drop-down list, you can choose SelectSelectSelectSelect Cell,Cell,Cell,Cell,
SelectSelectSelectSelect Column,Column,Column,Column, SelectSelectSelectSelect Row,Row,Row,Row, SelectSelectSelectSelect Table,Table,Table,Table, or SelectSelectSelectSelect tabletabletabletable withwithwithwith dasheddasheddasheddashed bordersbordersbordersborders
based on your requirements.
2.3.4.2.3.4.2.3.4.2.3.4. EnterEnterEnterEnteringinginging ContentsContentsContentsContents inininintotototo thethethethe TableTableTableTable
Enter the text in the table with the table outside the document text as input, first move
the insertion point to the text you want to insert in the cell, and then enter text. If you
enter text than the cell width will wrap and increase the row height. If you want the
cell to start a new paragraph, press the EnterEnterEnterEnter key, the row height will increase
accordingly.
If you want to move to the next cell to enter, you can click the cell with the mouse or
press TabTabTabTab or right arrow keys move the insertion point, then enter the appropriate text
2.3.5.2.3.5.2.3.5.2.3.5. FormattingFormattingFormattingFormatting ContentsContentsContentsContents inininin thethethethe TableTableTableTable
You can set font, font style, font size, color, alignment, etc. in the cell.
2.3.5.1.2.3.5.1.2.3.5.1.2.3.5.1. SetSetSetSettingtingtingting FontFontFontFont FormatFormatFormatFormat inininin thethethethe CellCellCellCell
The steps are as follows:

48
(1) Select the cell for which you want to set font.
(2) Go to the FonFonFonFont section of the HomeHomeHomeHome tab and select the OldOldOldOld ToolsToolsToolsTools button in the
bottom right. This will open the FontFontFontFont dialog box where you can set font, font style,
font size, color, etc.
(3) Click the OKOKOKOK button to exit.
2.3.5.2.2.3.5.2.2.3.5.2.2.3.5.2. AlignAlignAlignAligninginginging StyleStyleStyleStyle inininin thethethethe TableTableTableTable
The steps are as follows:
(1) Select the cells for which you want to set align style, and go to the TableTableTableTable ToolsToolsToolsTools
tab.
(2) In the AlignAlignAlignAlign StyleStyleStyleStyle group, select the vertical align style you prefer.
2.3.6.2.3.6.2.3.6.2.3.6. MovMovMovMovinginginging andandandand ZoomZoomZoomZoominginginging TableTableTableTablessss
2.3.6.1.2.3.6.1.2.3.6.1.2.3.6.1. MovMovMovMovinginginging aaaa TableTableTableTable
Kingsoft Writer offers two ways to move a table:
� Use the SelectSelectSelectSelect AllAllAllAll icon:
(1) Place the insertion point anywhere in the table, the SelectSelectSelectSelect AllAllAllAll label will then
appear in the upper left corner of the table.
(2) Drag the SelectSelectSelectSelect AllAllAllAll icon using the left mouse button to move the table to a new
location.
� Use <ALT><ALT><ALT><ALT>+the left mouse button:
Place the insertion point anywhere in the table, press the <Alt><Alt><Alt><Alt> key and the left mouse
button. This will cause the cursor to change into this icon . You can then move the
table:
Figure 2.3—7 Moving a table

49
2.3.6.2.2.3.6.2.2.3.6.2.2.3.6.2. ZoomZoomZoomZoominginginging aaaa TableTableTableTable
The steps are as follows:
(1) Place the insertion point anywhere in the table. This will produce a resize handle
in the bottom right corner.
(2) Place the cursor on the resize handle, when it becomes a diagonal double-headed
arrow, hold down the left mouse button to drag.
(3) When you drag, the table will appear as a dotted border,shown below:
Figure 2.3—8 Drag resize handle to zoom table
(4) When the table is the right size, release the left mouse button.
2.3.7.2.3.7.2.3.7.2.3.7. TableTableTableTable PropPropPropPropertiesrtiesrtiesrties
You can set table properties, including alignment, wrapping, row height, column
width, and cell size, using the TablesTablesTablesTables PropertiePropertiePropertieProperties dialog box.
2.3.7.1.2.3.7.1.2.3.7.1.2.3.7.1. TheTheTheThe AlignmentAlignmentAlignmentAlignment ofofofof aaaa TableTableTableTable
There are nine styles of alignment; you can choose a style by following these steps:
(1) Place the insertion point anywhere in the table, and select TableTableTableTable Tools.Tools.Tools.Tools.
(2) In the TablesTablesTablesTables group, select TableTableTableTable PropertiePropertiePropertieProperties. You can also right-click and choose
TableTableTableTable PropertiesPropertiesPropertiesProperties from the opened shortcut menu:
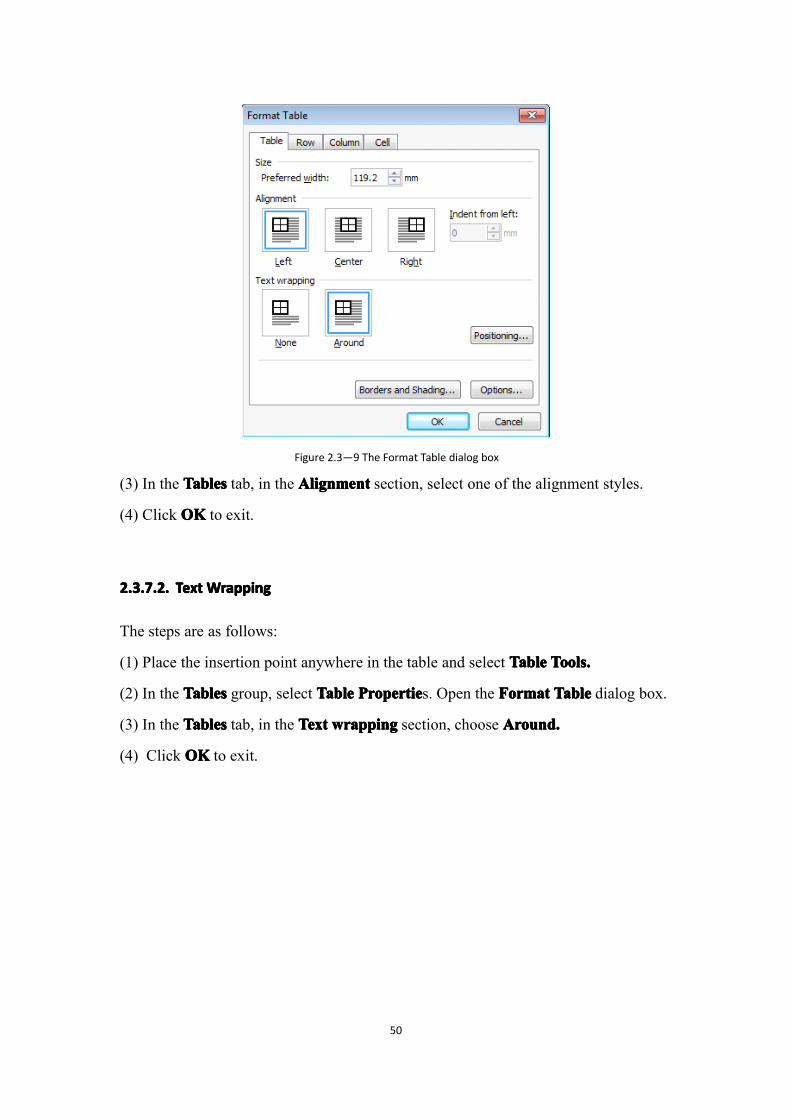
50
Figure 2.3—9 The Format Table dialog box
(3) In the TablesTablesTablesTables tab, in the AlignmentAlignmentAlignmentAlignment section, select one of the alignment styles.
(4) Click OKOKOKOK to exit.
2.3.7.2.2.3.7.2.2.3.7.2.2.3.7.2. TextTextTextText WrappingWrappingWrappingWrapping
The steps are as follows:
(1) Place the insertion point anywhere in the table and select TableTableTableTable Tools.Tools.Tools.Tools.
(2) In the TablesTablesTablesTables group, select TableTableTableTable PropertiePropertiePropertieProperties. Open the FormatFormatFormatFormat TableTableTableTable dialog box.
(3) In the TablesTablesTablesTables tab, in the TextTextTextText wrappingwrappingwrappingwrapping section, choose Around.Around.Around.Around.
(4) Click OKOKOKOK to exit.

51
:Figure 2.3—10 Text wrapping
2.3.7.3.2.3.7.3.2.3.7.3.2.3.7.3. AddAddAddAddinginginging BordersBordersBordersBorders andandandand ShadingShadingShadingShading
You can insert different borders and shading based on your needs by following these
steps:
(1) Place the insertion point anywhere in the table and find TableTableTableTable ToolsToolsToolsTools.
(2) In the TablesTablesTablesTables group, select TableTableTableTable Properties.Properties.Properties.Properties. Open the FormatFormatFormatFormat TableTableTableTable dialog box.
(3) In the TablesTablesTablesTables tab,select the BordersBordersBordersBorders //// ShadingShadingShadingShading option and open the BordersBordersBordersBorders ////
ShadingShadingShadingShading dialog box, shown as follows:
Figure 2.3—11 The Borders/Shading dialog box
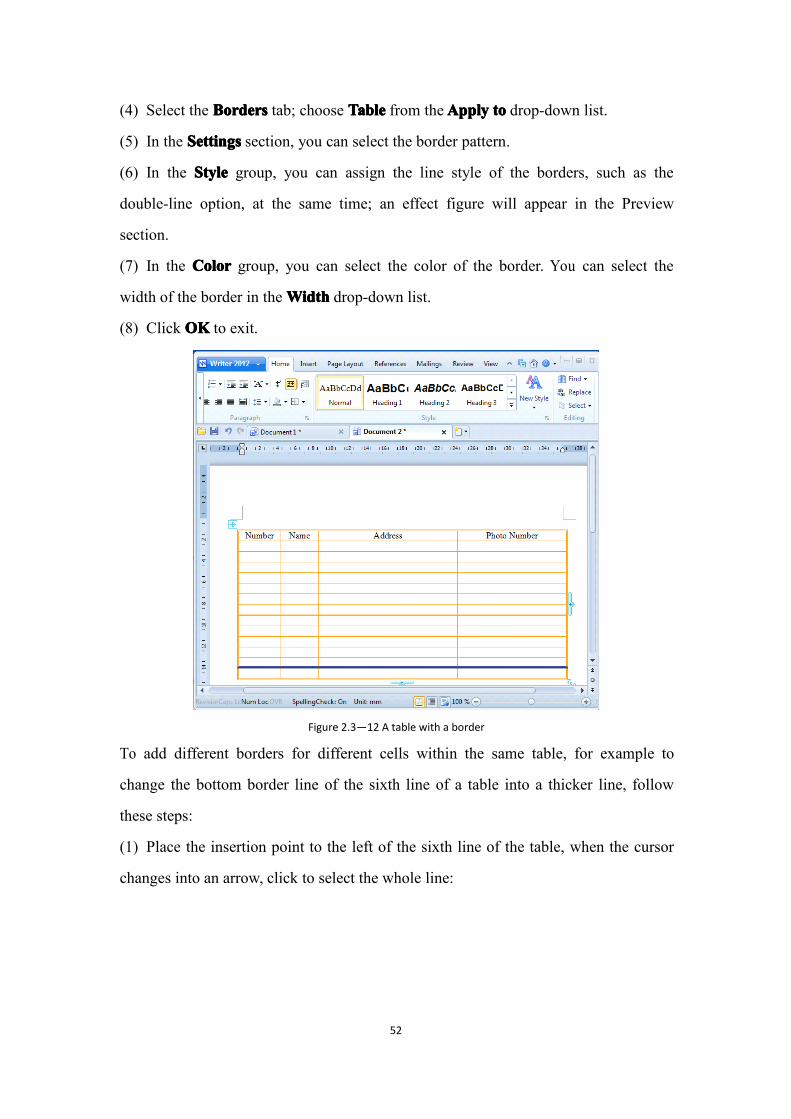
52
(4) Select the BordersBordersBordersBorders tab; choose TableTableTableTable from theApplApplApplApplyyyy totototo drop-down list.
(5) In the SettingSettingSettingSettingssss section, you can select the border pattern.
(6) In the StyleStyleStyleStyle group, you can assign the line style of the borders, such as the
double-line option, at the same time; an effect figure will appear in the Preview
section.
(7) In the ColorColorColorColor group, you can select the color of the border. You can select the
width of the border in theWidthWidthWidthWidth drop-down list.
(8) Click OKOKOKOK to exit.
Figure 2.3—12 A table with a border
To add different borders for different cells within the same table, for example to
change the bottom border line of the sixth line of a table into a thicker line, follow
these steps:
(1) Place the insertion point to the left of the sixth line of the table, when the cursor
changes into an arrow, click to select the whole line:
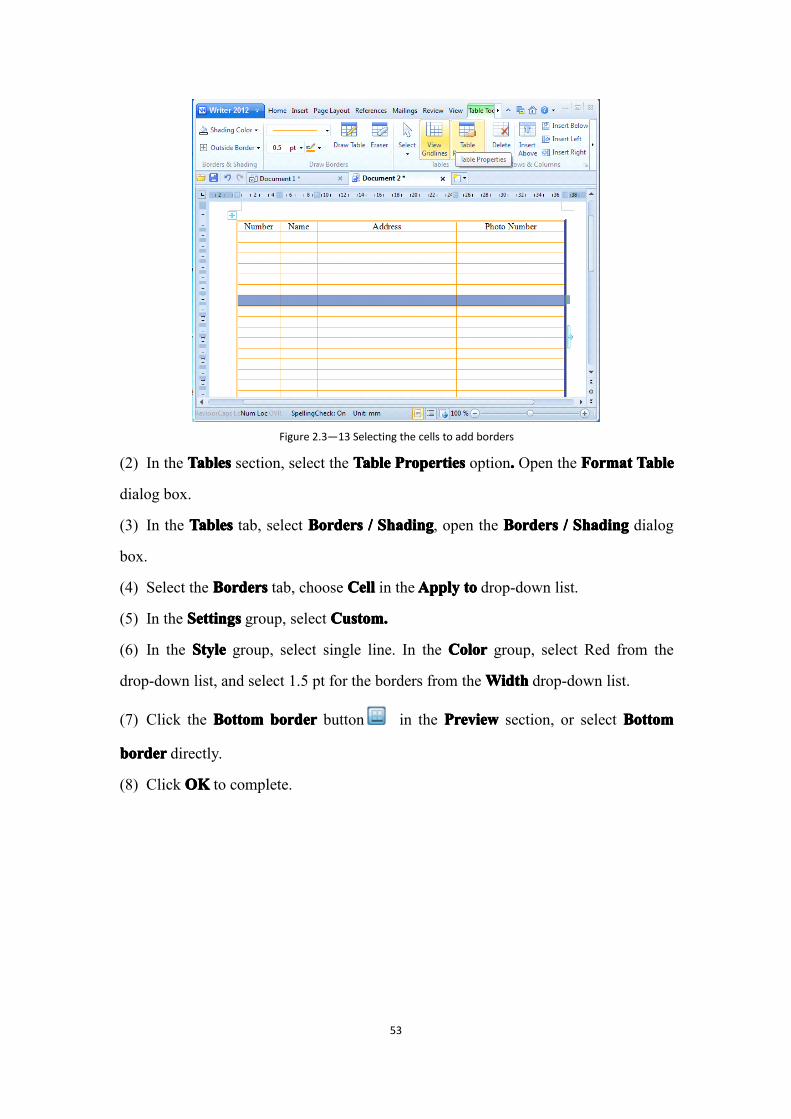
53
Figure 2.3—13 Selecting the cells to add borders
(2) In the TablesTablesTablesTables section, select the TableTableTableTable PropertiesPropertiesPropertiesProperties option.... Open the FormatFormatFormatFormat TableTableTableTable
dialog box.
(3) In the TablesTablesTablesTables tab, select BordersBordersBordersBorders //// ShadingShadingShadingShading, open the BordersBordersBordersBorders //// ShadingShadingShadingShading dialog
box.
(4) Select the BordersBordersBordersBorders tab, choose CellCellCellCell in theApplApplApplApplyyyy totototo drop-down list.
(5) In the SettingSettingSettingSettingssss group, select Custom.Custom.Custom.Custom.
(6) In the StyleStyleStyleStyle group, select single line. In the ColorColorColorColor group, select Red from the
drop-down list, and select 1.5 pt for the borders from theWidthWidthWidthWidth drop-down list.
(7) Click the BottomBottomBottomBottom borderborderborderborder button in the PreviewPreviewPreviewPreview section, or select BottomBottomBottomBottom
borderborderborderborder directly.
(8) Click OKOKOKOK to complete.

54
Figure 2.3—14 Borders shown in bold
2.3.8.2.3.8.2.3.8.2.3.8. InsertInsertInsertInsertinginginging //// DeletDeletDeletDeletinginginging thethethethe Cell,Cell,Cell,Cell, RowRowRowRow orororor ColumnColumnColumnColumn fromfromfromfrom aaaa TableTableTableTable
2.3.8.1.2.3.8.1.2.3.8.1.2.3.8.1. DeletDeletDeletDeletinginginging aaaa RowRowRowRow orororor ColumnColumnColumnColumn
To delete a row or column from a table, place the insertion point anywhere in the table,
and then follow either of the options below:
� In the Table Tools tab, in the RowsRowsRowsRows &&&& ColumnsColumnsColumnsColumns section, select DeletDeletDeletDelete from the
drop-down list. You can then choose to DeleteDeleteDeleteDelete Rows,Rows,Rows,Rows, DeleteDeleteDeleteDelete Columns,Columns,Columns,Columns, DeleteDeleteDeleteDelete
Cells,Cells,Cells,Cells, or DeleteDeleteDeleteDelete Table.Table.Table.Table.
� Right-click and open the shortcut menu, select DeleteDeleteDeleteDelete Rows,Rows,Rows,Rows, DeleteDeleteDeleteDelete Columns,Columns,Columns,Columns,
DeleteDeleteDeleteDelete Cells,Cells,Cells,Cells, or DeleteDeleteDeleteDelete Table.Table.Table.Table.
2.3.8.2.2.3.8.2.2.3.8.2.2.3.8.2. InsertInsertInsertInsertinginginging RowRowRowRowssssorororor ColumnColumnColumnColumnssss
Select the position where you would like to insert a new row or column. The selected
row or column number should be the same as the number of rows or columns to be
inserted. You then execute any of the following actions:
� Place the insertion point in the cell where you want to insert the rows or columns.
Go to the TableTableTableTable ToolsToolsToolsTools tab and select any command you want from the RowsRowsRowsRows &&&&
ColumnsColumnsColumnsColumns group. This section offers InsertInsertInsertInsert Above,Above,Above,Above, InsertInsertInsertInsert Below,Below,Below,Below, InsertInsertInsertInsert LeftLeftLeftLeft and

55
InsertInsertInsertInsert RightRightRightRight options. Select one option based on your requirements.
� Place the insertion point in the cell where you wish to insert a row or column.,
Right-click and select InsertInsertInsertInsert, choose ColumnsColumnsColumnsColumns totototo thethethethe Left,Left,Left,Left, ColumnsColumnsColumnsColumns totototo thethethethe
Right,Right,Right,Right, RowsRowsRowsRowsAboveAboveAboveAbove or RowsRowsRowsRows BelowBelowBelowBelow:
Figure 2.3—15 The Insert Row or Column menu
2.3.9.2.3.9.2.3.9.2.3.9. MergMergMergMerginginginging orororor SplitSplitSplitSplittingtingtingting CellsCellsCellsCells
Knowing how to join or split table cells can come in handy when you are working
with a table. You can join two or more adjacent cells into one cell, and you can also
split a cell that has been joint.
2.3.9.1.2.3.9.1.2.3.9.1.2.3.9.1. MergMergMergMerginginginging CellsCellsCellsCells
To merge cells:
(1) Select the cells that you want to join into one cell.
(2) In the TableTableTableTable ToolsToolsToolsTools section, in the MergeMergeMergeMerge group, click the MergeMergeMergeMerge CellsCellsCellsCells
button to combine the selected cells.
2.3.9.2.2.3.9.2.2.3.9.2.2.3.9.2. SplitSplitSplitSplittingtingtingting CellsCellsCellsCells
To split cells:
(1) Select the cell that you want to split into multiple cells.
(2) In the TableTableTableTable ToolsToolsToolsTools section,,,, in the MergeMergeMergeMerge group, click the SplitSplitSplitSplit CellsCellsCellsCells
button , and open the SplitSplitSplitSplit CellsCellsCellsCells dialog box.

56
Figure 2.3—16 The Split Cells dialog dox
(3) Enter the number of columns or rows that you want to split into the NumberNumberNumberNumber ofofofof
columnscolumnscolumnscolumns and NumberNumberNumberNumber ofofofof rowsrowsrowsrows sections.
(4) If you select several cells, you can choose the JoinJoinJoinJoin cellscellscellscells beforebeforebeforebefore splitsplitsplitsplit check box to
merge cells before the split.
(5) Click OKOKOKOK to complete.
2.3.9.3.2.3.9.3.2.3.9.3.2.3.9.3. SplitSplitSplitSplittingtingtingting TablesTablesTablesTables
Kingsoft Writer provides a table splitting function, there are two ways to use it:
1. Split tables through command:
You can split tables via command in the TableTableTableTable ToolsToolsToolsTools tab::::
(1) Place the insertion point in the cell that you want to split, go to the TableTableTableTable
ToolsToolsToolsTools tab.
(2) In the TableTableTableTable ToolsToolsToolsTools tab, in the MergeMergeMergeMerge section, select SplitSplitSplitSplit TableTableTableTable bybybyby RowRowRowRow or
SplitSplitSplitSplit TableTableTableTable bybybyby ColumnColumnColumnColumn from the SplitSplitSplitSplit TableTableTableTable drop-down list.
(3) Place the cursor between the two lines on the border that you want to split,
show bright state, click the border can be split table.
2. Split tables using the right-click menu:
The steps to splitting tables are as follows:
(1) Place the insertion point in a cell.
(2) Right-click and select SplitSplitSplitSplit TableTableTableTable in the opened shortcut menu. Choose
SplitSplitSplitSplit TableTableTableTable bybybyby RowRowRowRow or SplitSplitSplitSplit TableTableTableTable bybybyby ColumnColumnColumnColumn based on your requirements.
Tips: To select a certain row in the table, you can select SplitSplitSplitSplit TableTableTableTable bybybyby Row,Row,Row,Row, to select
a certain column in the table, you can choose SplitSplitSplitSplit TableTableTableTable bybybyby Column.Column.Column.Column.

57
Figure 2.3—17 Selecting a row and splitting the table
2.3.10.2.3.10.2.3.10.2.3.10. RowRowRowRowssss andandandand ColumnColumnColumnColumnssss
1.1.1.1. AdjustAdjustAdjustAdjustinginginging thethethethe RowRowRowRow HeightHeightHeightHeight
You can quickly modify row height using the mouse, or by going to the TableTableTableTable
PropertiesPropertiesPropertiesProperties section of TableTableTableTable ToolsToolsToolsTools.... Here you can specify the exact row height.
2.2.2.2. AdjustAdjustAdjustAdjustinginginging thethethethe RowRowRowRow HeightHeightHeightHeight usingusingusingusing thethethethe MMMMouseouseouseouse
The steps are as follows:
(1) Move the cursor to the bottom border line that you want to adjust the row height
for. The cursor should then change into an arrow.
(2) Press the left mouse button and drag up or down, a dotted line will appear to
indicate the proposed new line height. This is detailed as follows:

58
Figure 2.3—18 Adjusting row height using the mouse
(3) Once you are satisfied with the new row height simply release the left mouse
button.
3.3.3.3. AdjustAdjustAdjustAdjustinginginging thethethethe RowRowRowRow HeightHeightHeightHeight usingusingusingusing TableTableTableTable PropertiesPropertiesPropertiesProperties
The steps are as follows:
(1) Select the desired number of rows for which you want to adjust the height. Go to
the TableTableTableTable ToolsToolsToolsTools tab.
(2) In the TablesTablesTablesTables section, select TableTableTableTable PropertiesPropertiesPropertiesProperties and open the TableTableTableTable PropertiesPropertiesPropertiesProperties
dialog box.
(3) Select the RowRowRowRow tab. See below:

59
Figure 2.3—19 The Row tab
(4) Choose the SpecifySpecifySpecifySpecify heightheightheightheight check box, and set the exact height in the text box to
the right.
(5) The RowRowRowRow heightheightheightheight isisisis section offers two options; AtAtAtAt leastleastleastleast and ExactlyExactlyExactlyExactly.
� If you select AtAtAtAt leastleastleastleast, the row height will always be the minimum possible and
will automatically adjust to the content.
� If you select ExactlyExactlyExactlyExactly, the row height will be a fixed value. If the contents of the
cell exceed this fixed height, Kingsoft Writer will not display or print the excess.
(6) In the OptionsOptionsOptionsOptions group, there are two check boxes: AllowAllowAllowAllow totototo breakbreakbreakbreak rowrowrowrow acrossacrossacrossacross
pagespagespagespages and RepeatRepeatRepeatRepeat asasasas headerheaderheaderheader rowrowrowrow atatatat thethethethe toptoptoptop ofofofof eacheacheacheach page.page.page.page.
� If you activate the AllowAllowAllowAllow totototo breakbreakbreakbreak rowrowrowrow acrossacrossacrossacross pagespagespagespages option,any overly long lines
will be split and spread across multiple pages, as opposed to having the whole
line move to the next page.
� Choose RepeatRepeatRepeatRepeat asasasas headerheaderheaderheader rowrowrowrow atatatat thethethethe toptoptoptop ofofofof eacheacheacheach pagepagepagepage check box is only
effective in the treatment form the first line.
(7) Clicking either the PreviousPreviousPreviousPrevious RowRowRowRow button or the NextNextNextNext RowRowRowRow button will allow you
to set the height of other rows.
(8) Click the OKOKOKOK button.
4. Adjusting Column Width
You can quickly modify column width using the mouse, or by going to the TableTableTableTable

60
PropertiesPropertiesPropertiesProperties section of the TableTableTableTable ToolsToolsToolsTools tab. Here you can specify the exact column
width.
5. Adjusting Column Width using the mouse
The steps are as follows:
(1) Move the cursor to the bottom border line of the column for which you wish to
adjust the width. The cursor should then change into an arrow.
(2) Hold the left mouse button and drag up or down, a dotted line will appear to
indicate the proposed width:
Figure 2.3—20 Adjusting the column width using the mouse
(3) When you are satisfied, simply release the mouse.
Tips:
� To adjust the width of a certain column, select a cell and drag the right hand
border line to change the width of the entire column.
� Kingsoft Writer provides the adsorption table border adjustment function when
the cell borders you want to move closer to other closest moves to the border, it
will automatically align adsorption, and to highlight, as shown below: greatly
improve the efficiency of border adjustment operation.
� Pressing the Shift key while holding the left mouse button will alter the columns
in the column width without affecting the column next to the column width.

61
Figure 2.3—21 Adjust the table using adsorption
6. Adjusting the ColumnWidth using Table Properties
The steps are as follows:
(1) Place the insertion point in a cell within the column for which you wish to adjust
the width or select one row or several rows that you want to adjust, and go to the
TableTableTableTable ToolsToolsToolsTools tab.
(2) In the TablesTablesTablesTables group, select TableTableTableTable PropertiesPropertiesPropertiesProperties and open the TableTableTableTable PropertiesPropertiesPropertiesProperties
dialog box.
(3) Select the ColumnColumnColumnColumn tab, shown as follows:
Figure 2.3—22 The Column tab
(4) Select the SpecifySpecifySpecifySpecify heightheightheightheight check box, and set the exact width in the text box to the
right.
(5) Click the PreviousPreviousPreviousPrevious ColumnColumnColumnColumn button or the NextNextNextNext ColumnColumnColumnColumn button to set the width of

62
another column.
(6) Click OKOKOKOK.
Tips: Kingsoft Writer can be automatically adjusted according to the size of the
window column width, simply place the insertion point in the table, on the TableTableTableTable
ToolsToolsToolsTools tab, in the AdjustAdjustAdjustAdjust group, click AutoSizeAutoSizeAutoSizeAutoSize totototoWindowWindowWindowWindow button.
2.3.11.2.3.11.2.3.11.2.3.11. AlignAlignAlignAligninginginging StyleStyleStyleStyle inininin aaaa TableTableTableTable
The steps to setting table alignment are as follows:
(1) Select the cell that you want to set alignment and go to the TableTableTableTable ToolsToolsToolsTools tab.
(2) In the TableTableTableTable ToolsToolsToolsTools tab, in the AlignAlignAlignAlign StyleStyleStyleStyle section, select the align style you prefer:
Figure 2.3—23 Text Direction
2.3.12.2.3.12.2.3.12.2.3.12. TextTextTextText DirectionDirectionDirectionDirection
To set text direction simply:
(1) Place the insertion point in the cell that you want to set text direction.
(2) In the TableTableTableTable ToolsToolsToolsTools tab, in the AlignAlignAlignAlign StyleStyleStyleStyle group, select the TextTextTextText DirectionDirectionDirectionDirection
icon, and open the TextTextTextText OrientationOrientationOrientationOrientation dialog box, shown as follows:
Figure 2.3—24 The Text Orientation dialog box
(3) Select your desired text direction, and click the OKOKOKOK button to exit.
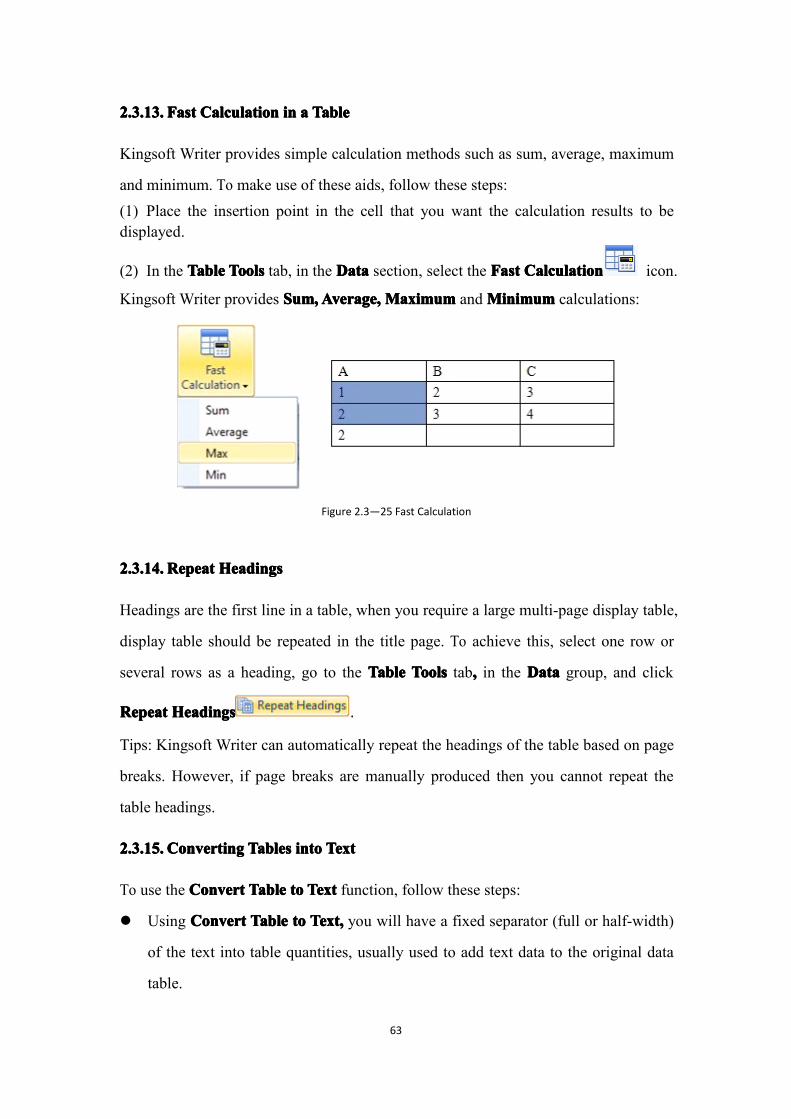
63
2.3.13.2.3.13.2.3.13.2.3.13. FastFastFastFast CalculationCalculationCalculationCalculation inininin aaaa TableTableTableTable
Kingsoft Writer provides simple calculation methods such as sum, average, maximum
and minimum. To make use of these aids, follow these steps:(1) Place the insertion point in the cell that you want the calculation results to bedisplayed.
(2) In the TableTableTableTable ToolsToolsToolsTools tab, in the DataDataDataData section, select the FastFastFastFast CalculationCalculationCalculationCalculation icon.
Kingsoft Writer provides Sum,Sum,Sum,Sum,Average,Average,Average,Average, MaximumMaximumMaximumMaximum andMinimumMinimumMinimumMinimum calculations:
Figure 2.3—25 Fast Calculation
2.3.14.2.3.14.2.3.14.2.3.14. RepeatRepeatRepeatRepeat HeadingsHeadingsHeadingsHeadings
Headings are the first line in a table, when you require a large multi-page display table,
display table should be repeated in the title page. To achieve this, select one row or
several rows as a heading, go to the TableTableTableTable ToolsToolsToolsTools tab,,,, in the DataDataDataData group, and click
RepeatRepeatRepeatRepeat HeadingsHeadingsHeadingsHeadings .
Tips: Kingsoft Writer can automatically repeat the headings of the table based on page
breaks. However, if page breaks are manually produced then you cannot repeat the
table headings.
2.3.15.2.3.15.2.3.15.2.3.15. ConvertConvertConvertConvertinginginging TableTableTableTablessss inininintotototo TextTextTextText
To use the ConvertConvertConvertConvert TableTableTableTable totototo TextTextTextText function, follow these steps:
� Using ConvertConvertConvertConvert TableTableTableTable totototo Text,Text,Text,Text, you will have a fixed separator (full or half-width)
of the text into table quantities, usually used to add text data to the original data
table.

64
� Using ConvertConvertConvertConvert TableTableTableTable totototo Text,Text,Text,Text, choose the ConvertConvertConvertConvert nestednestednestednested tablestablestablestables check box. You
will convert a nested table into a one-time text, usually used to copy web content
into a single text.
� Using ConvertConvertConvertConvert TableTableTableTable totototo Text,Text,Text,Text, you can also convert data into a database table.
In the TableTableTableTable ToolsToolsToolsTools tab, in the DataDataDataData group, click ConvertConvertConvertConvert TableTableTableTable totototo TextTextTextText and open
the dialog box shown as follows:
Figure 2.3—26 The Convert Table to Text dialog box
You can also open this dialogue box by going to the TablesTablesTablesTables section of the InsertInsertInsertInsert tab,
and selecting either ConvertConvertConvertConvert TextTextTextText totototo TableTableTableTable or ConvertConvertConvertConvert TableTableTableTable totototo TextTextTextText.....
2.3.16.2.3.16.2.3.16.2.3.16. FormulaFormulaFormulaFormula
2.3.16.1.2.3.16.1.2.3.16.1.2.3.16.1. AutomaticallyAutomaticallyAutomaticallyAutomatically makemakemakemake CalculatCalculatCalculatCalculationsionsionsions usingusingusingusing thethethethe FormulaFormulaFormulaFormula FieldFieldFieldField
The steps are as follows:
1. Method 1:
(1) Automatically make calculations using the Formula Field.
(2) In the DataDataDataData section of the TableTableTableTable ToolsToolsToolsTools tab, click Formula , and open the
Formula dialog box:

65
Figure 2.3—27 The Formula dialog box
(3) In the FormulaFormulaFormulaFormula box, modify or enter the formula.
(4) In the NumberNumberNumberNumber formatformatformatformat box, choose or customize the number format.
(5) In the PastePastePastePaste functionfunctionfunctionfunction drop-down list, choose the required function. The selected
function will automatically paste to the FormulaFormulaFormulaFormula box.
(6) In the TableTableTableTable areaareaareaarea drop-down list, choose the required area. The selected area will
automatically update the corresponding parameter of the function in the FormulaFormulaFormulaFormula
box.
(7) Click OKOKOKOK to close the dialogue box. The calculation result will then be shown in
the cell.
2.2.2.2. MethodMethodMethodMethod 2:2:2:2:
(1) In the TextTextTextText section of the InsertInsertInsertInsert tab, click FieldsFieldsFieldsFields , and open the FieldsFieldsFieldsFields dialog
box.
(2) You can enter the corresponding formula in the FieldFieldFieldField CodesCodesCodesCodes. See the following
figure:

66
Figure 2.3—28 The Fields dialog box
(3) When finished, right-click and select the ToggleToggleToggleToggle FiledFiledFiledFiled CodesCodesCodesCodes button to yield
results.
3.3.3.3. MethodMethodMethodMethod 3:3:3:3:
(1) Place the insertion point in the cell where you want the calculation results to be
displayed, then press Ctrl+F9Ctrl+F9Ctrl+F9Ctrl+F9 to insert the field markup { }.
(2) Right-click, select EditEditEditEdit FiledFiledFiledFiled in the opened shortcut menu and enter the formula
consisting of =, function, number and cell name.
(3) Right-click and select ToggleToggleToggleToggle FieldFieldFieldField CodesCodesCodesCodes from the drop-down menu. The
formula calculation result will then be displayed.
Caution: Do not use keyboard to insert the field markup.
2.4.2.4.2.4.2.4. IllustrationsIllustrationsIllustrationsIllustrations
Kingsoft Writer allows you to easily brighten up your work by inserting an array of
clip art files and pictures. Writer includes a large clip art library containing a
multitude of images stored in different categories and in different folders, allowing for
ease of access. You can also insert pictures from an external source.
2.4.1.2.4.1.2.4.1.2.4.1. PiPiPiPictureturetureturessss
To insert pictures from an external source, follow these steps:(1) Place the cursor where you want to insert the picture.
(2) In the IllustrationsIllustrationsIllustrationsIllustrations section of the InsertInsertInsertInsert tab, click PicturePicturePicturePicture , and open the
InsertInsertInsertInsert PicturePicturePicturePicture dialog box.

67
(3) Select a file from the FromFromFromFrom FileFileFileFile section. You can then select the picture that you
wish to insert in the list box below.
(4) Click the OpenOpenOpenOpen button to insert the picture into the current document.
Tips: You can also open the folder where the picture is located, select the picture, and
drag it to the appropriate location to avoid the tedious search.
2.4.2.2.4.2.2.4.2.2.4.2. ClipClipClipClipArtArtArtArt
The steps to insert clip art are as follows:
(1) Move the cursor to the location where you want to insert the graphic.
(2) In the IllustrationsIllustrationsIllustrationsIllustrations section of the InsertInsertInsertInsert tab, click , and open the ClipClipClipClip ArtArtArtArt
task window.
(3) Select the category of the ClipClipClipClipArtArtArtArt in the ClipClipClipClipArtArtArtArt task window.
(4) In the CategoryCategoryCategoryCategory under the PreviewPreviewPreviewPreview box, the preview image appears in this
category.
(5) Double-click the clip art you want in the PreviewPreviewPreviewPreview section, to insert it into the
document:
Figure 2.4—1 The Insert Clip Art dialog box
2.5.2.5.2.5.2.5. PicturePicturePicturePicture ToolsToolsToolsTools
Select the inserted picture or clip art to bring up the PicturePicturePicturePicture ToolsToolsToolsTools menu. This menu
will allow you to adjust or modify any inserted pictures or clip art....

68
2.5.1.2.5.1.2.5.1.2.5.1. PicturePicturePicturePictureAdjustAdjustAdjustAdjust
2.5.1.1.2.5.1.1.2.5.1.1.2.5.1.1. ColorColorColorColor
To change the color of the inserted picture:
(1) Select the appropriate picture or clip art, and go to the PicturePicturePicturePicture ToolsToolsToolsTools tab.
(2) In the PicturePicturePicturePicture AdjustAdjustAdjustAdjust section, select the ColorColorColorColor drop-down menu. You can then
choose between Automatic,Automatic,Automatic,Automatic, Grayscale,Grayscale,Grayscale,Grayscale, Black_WhiteBlack_WhiteBlack_WhiteBlack_White,,,, orWashoutWashoutWashoutWashout options.
(3) If you select the AutomaticAutomaticAutomaticAutomatic option, the picture will be the same color as the
original.
(4) If you select GrGrGrGreeeeyscale,yscale,yscale,yscale, the picture will change into shades of grey proportionate
to the original colors.
(5) If you select Black_White,Black_White,Black_White,Black_White, the picture will be converted into a pure black and
white picture.
(6) If you select Washout,Washout,Washout,Washout, the picture will be changed into the most appropriate for
the watermark image brightness and contrast of colors.
(7) In the PicturePicturePicturePicture AdjustAdjustAdjustAdjust section, select the AdjustAdjustAdjustAdjust PicturePicturePicturePicture drop-down menu, this
includes the MoreMoreMoreMore Contrast,Contrast,Contrast,Contrast, LessLessLessLess ContrastContrastContrastContrast option thatthatthatthat allows you to adjust the
image saturation and brightness. The higher the contrast ratio, the less the grey the
color, the lower the contrast, the more grey the color.
(8) In the PicturePicturePicturePicture AdjustAdjustAdjustAdjust section, select the AdjustAdjustAdjustAdjust PicturePicturePicturePicture drop-down menu, this
includes the MoreMoreMoreMore BrightnessBrightnessBrightnessBrightness and LessLessLessLess BrightnessBrightnessBrightnessBrightness options that allow you to adjust
the picture brightness. The brighter the color, the more white, the darker the color, the
more black. See below:

69
Figure 2.5—1 Adjusting the picture brightness
2.5.1.2.2.5.1.2.2.5.1.2.2.5.1.2. CompressCompressCompressCompressinginginging PicturesPicturesPicturesPictures
To compress pictures resolution:
(1) Select the appropriate picture and bring up the PicturePicturePicturePicture ToolsToolsToolsTools tab.
(2) In the PicturePicturePicturePicture AdjustAdjustAdjustAdjust group, select CompressCompressCompressCompress PicturesPicturesPicturesPictures, and open the CompressCompressCompressCompress
PicturesPicturesPicturesPictures dialog box, shown as follows:
Figure 2.5—2 The Compress Picture dialog box
(3) In the ApplyApplyApplyApply totototo section you can choose SelectedSelectedSelectedSelected picturespicturespicturespictures or AllAllAllAll picturespicturespicturespictures inininin
document.document.document.document.
(4) In the ChangeChangeChangeChange resolutionresolutionresolutionresolution section, select the type of resolution that you want to
apply.
(5) In the OptionsOptionsOptionsOptions section, choose CompressCompressCompressCompress picturespicturespicturespictures or the DeleteDeleteDeleteDelete croppedcroppedcroppedcropped areasareasareasareas
ofofofof picturespicturespicturespictures check box.
(6) Click the OKOKOKOK button to compress the selected pictures.

70
2.5.1.3.2.5.1.3.2.5.1.3.2.5.1.3. ChangingChangingChangingChanging PicturePicturePicturePicturessss
To change the picture from an original file, follow these steps:
(1) Select the appropriate picture, and bring up the PicturePicturePicturePicture ToolsToolsToolsTools tab.
(2) In the PicturePicturePicturePicture AdjustAdjustAdjustAdjust section, click ChangeChangeChangeChange PicturePicturePicturePicture, or right-click the picture,
and select the ChangeChangeChangeChange PicturePicturePicturePicture option.
(3) In the ChangeChangeChangeChange PicturePicturePicturePicture dialog box, choose had been changed picture.
(4) Click the OpenOpenOpenOpen button to exit.
(5) The original picture will have changed into to a new picture that you want, though
the document layout will be exactly the same as before.
(6) In addition, you can right-click the picture, select ChangeChangeChangeChange Picture,Picture,Picture,Picture, and open the
ChangeChangeChangeChange PicturePicturePicturePicture dialog box.
Figure 2.5—3 The Change Picture shortcut menu
2.5.1.4.2.5.1.4.2.5.1.4.2.5.1.4. ResetResetResetResettingtingtingting PicturePicturePicturePicturessss
To reset pictures back to their original format, follow these steps:
(1) Select the appropriate picture and bring up the PicturePicturePicturePicture ToolsToolsToolsTools tab.
(2) In the PicturePicturePicturePicture AdjustAdjustAdjustAdjust section, select ResetResetResetReset PicturePicturePicturePicture.... The picture will then
immediately return to its original state.
(3) After drawing a graphic object you have the option to add special effects to it, this

71
includes the ability to, change the line, change the fill color, add shading, or add a
three-dimensional effect.
2.5.2.2.5.2.2.5.2.2.5.2. PicturePicturePicturePicture StylesStylesStylesStyles
2.5.2.1.2.5.2.1.2.5.2.1.2.5.2.1. ChangChangChangChanginginginging ShapeShapeShapeShape StyleStyleStyleStyle
To change the line style to shapes, select the DrawingDrawingDrawingDrawing ToolsToolsToolsTools tab, go the ShapeShapeShapeShape StylesStylesStylesStyles
section and select the ShapeShapeShapeShape OutlineOutlineOutlineOutline drop-down menu. You can then choose your
preferred line style from the StyleStyleStyleStyle PalettePalettePalettePalette list....
Figure 2.5—4 The Line Style Palette list
���� To set dash style, select DashDashDashDash StyleStyleStyleStyle from the PicturePicturePicturePicture OutlineOutlineOutlineOutline drop-down menu.
Choose a dashed line or dotted line from the DashDashDashDash StyleStyleStyleStyle list menu....
� To set the selected shapes as a straight line or an arrow, go to the DrawingDrawingDrawingDrawing ToolsToolsToolsTools
tab, in the ShapeShapeShapeShape StyleStyleStyleStyle section, select ArrowArrowArrowArrow StyleStyleStyleStyle from the ShapeShapeShapeShape OutlineOutlineOutlineOutline
drop-down list. You can then select one of the arrows from the ArrowArrowArrowArrow StyleStyleStyleStyle
menu....
Tips: To set the exact width of the line and arrow style, you can right-click the shape,
select FormatFormatFormatFormat Object,Object,Object,Object, and choose SetSetSetSetAutoShapeAutoShapeAutoShapeAutoShape Defaults.Defaults.Defaults.Defaults.

72
2.5.2.2.2.5.2.2.2.5.2.2.2.5.2.2. ChangChangChangChanginginginging ShapeShapeShapeShape FillFillFillFill
To fill in objects with different colors, patterns, textures, and other effects, follow
these steps:
(1) Select the appropriate shape and go to the DrawingDrawingDrawingDrawing ToolsToolsToolsTools tab.
(2) In the ShapeShapeShapeShape StylesStylesStylesStyles tab,,,, select the color you like from the ShapeShapeShapeShape FillFillFillFill drop-down
list, shown below:
Figure 2.5—5 The Shape Fill list
� If you select NoNoNoNo FillFillFillFill from the ShapeShapeShapeShape FillFillFillFill list, the picture will become
transparent.
� You can also set Gradiant,Gradiant,Gradiant,Gradiant, Texture,Texture,Texture,Texture, PatternPatternPatternPattern or PicturePicturePicturePicture in the PicturePicturePicturePicture FillFillFillFill
drop-down list.
(3) Select Gradiant, open the GradientGradientGradientGradient option in the FillFillFillFill EffectsEffectsEffectsEffects dialog box:

73
Figure 2.5—6 The Fill Effects dialog box
(4) Choose one of effects in the FillFillFillFill EffectsEffectsEffectsEffects dialog box, and click OKOKOKOK.
2.5.2.3.2.5.2.3.2.5.2.3.2.5.2.3. LineLineLineLine ColorColorColorColor andandandand StylesStylesStylesStyles
Kingsoft Writer provides a plethora of line color and styles, to choose one simply
follow these steps:
(1) Select the appropriate shape.
(2) In the DrawingDrawingDrawingDrawing ToolsToolsToolsTools tab, in the ShapeShapeShapeShape StylesStylesStylesStyles section, choose the ShapeShapeShapeShape OutlineOutlineOutlineOutline
option.
(3) If want to set the line style, Writer offers LineLineLineLine StyleStyleStyleStyle Palette,Palette,Palette,Palette, DashDashDashDash Style,Style,Style,Style, andddd
ArrowArrowArrowArrow StyleStyleStyleStyle options.
(4)(4)(4)(4) Alternatively, you can double click the shape, and open the dialog box shown
below:

74
Figure 2.5—7 The Colors and Lines tab
(5)(5)(5)(5) Make the appropriate settings and click OK.OK.OK.OK.
Tips: In the ShapeShapeShapeShape StyleStyleStyleStyle tab, select OldOldOldOld ToolsToolsToolsTools from the bottom right to open the
FormatFormatFormatFormat ObjectObjectObjectObject dialog box. You can then make the appropriate settings and click OK.OK.OK.OK.
2.5.3.2.5.3.2.5.3.2.5.3. ZoomZoomZoomZoominginginging andandandand CropCropCropCroppingpingpingping
2.5.3.1.2.5.3.1.2.5.3.1.2.5.3.1. ZoomZoomZoomZoominginginging aaaa PicturePicturePicturePicture
To set the size of a picture select the SizeSizeSizeSize option in the opened FormatFormatFormatFormat ObjectObjectObjectObject dialog
box:
1. Adjust manual
(1) Click the picture that you want to zoom, it appears around 8 to punctuate.
(2) To zoom the image horizontally or vertically, move the cursor to any of the four
sides of the picture to the handle. To zoom the picture along the diagonal direction,
move the cursor to the handle in any of the four corners of the picture, the mouse
pointer will transform into two arrows pointing in different directions.
(3) Press the left mouse button, drag the mouse along the zoom direction, a dashed
box will indicate the potential change in the size of the picture.
(4) Release the left mouse button when you are satisfied with the changes.

75
Figure 2.5—8 Before and After magnifying a picture
2.2.2.2. ZoomZoomZoomZoom usingusingusingusing aaaa DialogDialogDialogDialog BoxBoxBoxBox
You can set the size of a picture using a dialog box:
(1) Highlight the picture that you want to zoom and bring up the PicturePicturePicturePicture ToolsToolsToolsTools tab.
(2) In the PicturePicturePicturePicture StylesStylesStylesStyles section, select the OldOldOldOld ToolsToolsToolsTools button from the bottom right.
This will open the FormatFormatFormatFormat ObjectObjectObjectObject dialog box.
(3) Select the SizeSizeSizeSize tab. In the SizeSizeSizeSize andandandand RRRRotateotateotateotate section, enter the exact height and
rotation. You can also set the zoom ratio of the vertical and horizontal in the ZoomZoomZoomZoom
section. If you tick the LockLockLockLock aspectaspectaspectaspect ratioratioratioratio check box, you can set the not equal vertical
and horizontal zoom ratio.
(4) Click the OKOKOKOK button.
Figure 2.5—9 The Size tab
2.5.3.2.2.5.3.2.2.5.3.2.2.5.3.2. CropCropCropCroppingpingpingping PicturePicturePicturePicturessss
There are two ways to crop a picture:

76
1. Crop using the Dialog Box
(1) Right-click the picture that you want to crop, select the FormatFormatFormatFormat ObjectObjectObjectObject
command in the shortcut menu, this will produce the FormatFormatFormatFormat ObjectObjectObjectObject dialog box.
(2) Go to the CropCropCropCrop fromfromfromfrom section of the PicturePicturePicturePicture tab,enter values into the Left,Left,Left,Left, Top,Top,Top,Top,
RightRightRightRight and BottomBottomBottomBottom sections to crop the picture by those amounts.
(3) Click the OKOKOKOK button to complete.
Figure 2.5—10 The Picture tab
2. Crop Manually
(1) Select the picture that you want to crop.
(2) Go to the PicturePicturePicturePicture sizesizesizesize section of the PicturePicturePicturePicture ToolsToolsToolsTools tab and select Crop. This
will cause eight handles to appear around the picture, shown as follows:
Figure 2.5—11 The Control handles
� To crop the image horizontally or vertically, move the cursor to any of four
handles on the side of the picture. To crop the picture along the diagonal
direction, move the cursor to any of the four handles in the corner of the

77
picture. The cursor will automatically transform into two arrows facing in
opposite directions.
� Hold the left mouse button and drag the cursor in the zoom direction, a
dashed box will indicate the potential amount of the picture that will be
cropped.
� Release the left mouse button when satisfied.
2.5.4.2.5.4.2.5.4.2.5.4. ObjectObjectObjectObject EfEfEfEffectectectect
You can add 3-D or shadow effect to a picture by following these steps:
(1) Select the appropriate picture.
(2)(2)(2)(2) In the PicturePicturePicturePicture StylesStylesStylesStyles section of the PicturePicturePicturePicture ToolsToolsToolsTools tab, select ObjectObjectObjectObject Effect.Effect.Effect.Effect.
(3) Select ShadowShadowShadowShadow SettingSettingSettingSetting and 3-D3-D3-D3-D SettingsSettingsSettingsSettings in the toolbar and choose your preferred
styles.
2.5.4.1.2.5.4.1.2.5.4.1.2.5.4.1. ShadowShadowShadowShadow SettingSettingSettingSettingssss
The steps to set shadow are as follows:
(1) Select the appropriate picture.
(2) In the ShadowShadowShadowShadow SettingSettingSettingSetting section of the PicturePicturePicturePicture ToolsToolsToolsTools tab, select ShadowShadowShadowShadow StyleStyleStyleStyle.
(3) To adjust the size and direction of the shadow, select the shadow spinner to the
right of the ShadowShadowShadowShadow OnOnOnOn //// OffOffOffOff buttonbuttonbuttonbutton:
Figure 2.5—12 The shadow setting menu
(4) The four functions of the shadow spinner:
� Shift Shadow Up: move the shadow to the top of the object.
� Shift Shadow Down: move the shadow to the bottom of the object.
� Shift Shadow Left: move the shadow to the left of the object.
� Shift Shadow Right: move the shadow to the right of the object.

78
2.5.4.2.2.5.4.2.2.5.4.2.2.5.4.2. SetSetSetSettingtingtingting thethethethe ColorColorColorColor ofofofof thethethethe ShadowShadowShadowShadow
To change the color of a shadow:
(1) Go to the ShadowShadowShadowShadow SettingSettingSettingSetting section of the DrawingDrawingDrawingDrawing ToolsToolsToolsTools tab, and select the arrow
beside the ShadowShadowShadowShadow ColorColorColorColor button. You can then select any color that you like from the
ColorColorColorColor dialog box, shown as follows:
Figure 2.5—13 Setting the color of a shadow
(2) Select your color preference and click OKOKOKOK.
(3) Select SemitransparentSemitransparentSemitransparentSemitransparent ShadowShadowShadowShadow to meet your personal demands in the ColorColorColorColor
PanelPanelPanelPanel.
2.6.2.6.2.6.2.6. ObjectObjectObjectObject AlignmentAlignmentAlignmentAlignment
In Kingsoft Office 2012, the inserted contents can be divided into two categories; text,
and objects. The latter category includes tables, text boxes, pictures, AutoShape,
WordArt, and a variety of OLE objects. This chapter will show you how to deal with
the relationship between objects and text, and between objects and objects.
2.6.1.2.6.1.2.6.1.2.6.1. TheTheTheThe RelationshipRelationshipRelationshipRelationship betweenbetweenbetweenbetween ObjectObjectObjectObjectssss andandandand ObjectObjectObjectObjectssss
In Kingsoft Office, the relationship between objects centers upon three areas,
alignment, stacking sequence, and grouping.

79
2.6.1.1.2.6.1.1.2.6.1.1.2.6.1.1. TheTheTheThe AlignmentAlignmentAlignmentAlignment ofofofof ObjectsObjectsObjectsObjects
In the Writer, you can adjust the position of the objects on the page, as well as the size
and space between several objects.
You can adjust the position of objects using the DrawingDrawingDrawingDrawing ToolsToolsToolsTools tab, the PicturePicturePicturePicture ToolsToolsToolsTools
tab, or the ArrangeArrangeArrangeArrange andandandandAlignAlignAlignAlign option in theWordArtWordArtWordArtWordArt tab.
For example, insert shape, and explain relevant object layout.
Select the shape that you want to insert and go to the ArrangeArrangeArrangeArrange section of the DrawingDrawingDrawingDrawing
ToolsToolsToolsTools tab. Select the AlignAlignAlignAlign drop-down list, shown as follows:
Figure 2.6—1 The Align drop-down list
2.6.1.2.2.6.1.2.2.6.1.2.2.6.1.2. AlignAlignAlignAligninginginging ObjectsObjectsObjectsObjects
Kingsoft provides six alignment options: align left, align center, align right, align top,
align middle, and align bottom.
The following example shows how to align multiple different objects:
(1) Hold the CtrlCtrlCtrlCtrl key and select three objects that you want to align:

80
Figure 2.6—2 Selecting multiple objects
(2) In the ArrangeArrangeArrangeArrange section of the DrawingDrawingDrawingDrawing ToolsToolsToolsTools tab, select AlignAlignAlignAlign CenterCenterCenterCenter andandandand
RelativeRelativeRelativeRelative totototo PagePagePagePage in the AlignAlignAlignAlign drop-down list. The effect should look as follows:
Figure 2.6—3 Aligning objects
2.6.1.3.2.6.1.3.2.6.1.3.2.6.1.3. AdjustAdjustAdjustAdjustinginginging SizeSizeSizeSize andandandand SpaceSpaceSpaceSpace
When you select two or more objects, these objects can be adjusted with the current
selected object contour, width, or other dimensions. In addition, when you select three
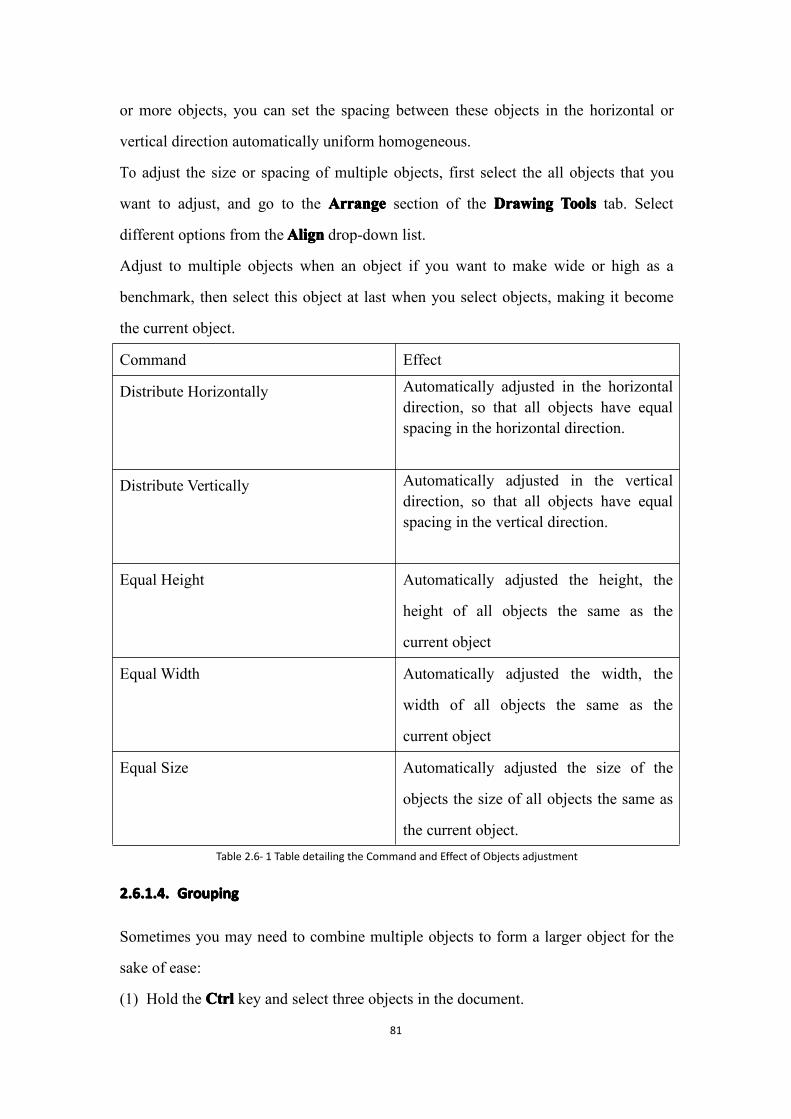
81
or more objects, you can set the spacing between these objects in the horizontal or
vertical direction automatically uniform homogeneous.
To adjust the size or spacing of multiple objects, first select the all objects that you
want to adjust, and go to the ArrangeArrangeArrangeArrange section of the DrawingDrawingDrawingDrawing ToolsToolsToolsTools tab. Select
different options from theAlignAlignAlignAlign drop-down list.
Adjust to multiple objects when an object if you want to make wide or high as a
benchmark, then select this object at last when you select objects, making it become
the current object.
Command Effect
Distribute Horizontally Automatically adjusted in the horizontaldirection, so that all objects have equalspacing in the horizontal direction.
Distribute Vertically Automatically adjusted in the verticaldirection, so that all objects have equalspacing in the vertical direction.
Equal Height Automatically adjusted the height, the
height of all objects the same as the
current object
Equal Width Automatically adjusted the width, the
width of all objects the same as the
current object
Equal Size Automatically adjusted the size of the
objects the size of all objects the same as
the current object.Table 2.6- 1 Table detailing the Command and Effect of Objects adjustment
2.6.1.4.2.6.1.4.2.6.1.4.2.6.1.4. GroupingGroupingGroupingGrouping
Sometimes you may need to combine multiple objects to form a larger object for the
sake of ease:
(1) Hold the CtrlCtrlCtrlCtrl key and select three objects in the document.

82
(2) Right-click and select GroupingGroupingGroupingGrouping //// GroupGroupGroupGroup from the opened shortcut menu.
After you have combined objects, should you wish to cancel the combination, select
the combined object and right-click. You can then select GroupingGroupingGroupingGrouping //// UngroupUngroupUngroupUngroup from
the opened shortcut menu.
2.6.2.2.6.2.2.6.2.2.6.2. TheTheTheThe RelationshipRelationshipRelationshipRelationship betweenbetweenbetweenbetween ObjectObjectObjectObjectssss andandandand TextTextTextText
The relationship between objects and text centres primarily on objects wrapping.
There are two wrapping options: one is in front of the text, the other is behind the text.
To appply either of these settings, follow these steps:
(1) Select the appropriate object, right-click and select the FormatFormatFormatFormat ObjectObjectObjectObject option
from the opened shortcut menu. This will open the FormatFormatFormatFormat ObjectObjectObjectObject dialog box:
Figure 2.6—4 Setting the object format
(2) Go to theWrappingWrappingWrappingWrapping section of the LayoutLayoutLayoutLayout tab and select BehindBehindBehindBehind TextTextTextText:

83
Figure 2.6—5 Setting the Wrapping style
(3) Click OKOKOKOK to complete. The effect should be similar to that shown below:
Figure 2.6—6 An object placed behind text
2.7.2.7.2.7.2.7. LinksLinksLinksLinks
2.7.1.2.7.1.2.7.1.2.7.1. HyperlinkHyperlinkHyperlinkHyperlinkssss
The create a hyperlink, follow these steps:
(1) Select the appropriate text.

84
(2) Go to the LinkLinkLinkLink section of the InsertInsertInsertInsert tab and select HyperlinkHyperlinkHyperlinkHyperlink.... ThisThisThisThis will produce
an InsertInsertInsertInsert HyperlinkHyperlinkHyperlinkHyperlink dialog box, shown as follows:
Figure 2.7—1 The Insert Hyperlink dialog box
(3) The TextTextTextText totototo displaydisplaydisplaydisplay box will show the content that you had selected in step 1. If it
is text, you can edit it directly.
(4) Select the type of hyperlink you want in the LinkLinkLinkLink totototo tab.
� Select ExistingExistingExistingExisting FileFileFileFile orororor WebWebWebWeb PagePagePagePage and choose the text or web page address that
you want to link to on the right.
� Select the LocationLocationLocationLocation inininin ThisThisThisThis DocumentDocumentDocumentDocument option, the title or bookmark name of
the current file will appear on the right. You can then choose the file position
where you want to insert the link.
Figure 2.7—2 Selecting hyperlink location in the document
� Select the E-mailE-mailE-mailE-mail AddressAddressAddressAddress option, enter the E-mail address into the text box,
and enter the E-mail subject into the SubjectSubjectSubjectSubject box, shown as follows:

85
Figure 2.7—3 Hyperlink to E-mail Address
(5) Click the ScreenTipScreenTipScreenTipScreenTip button to produce the SetSetSetSet HyperlinkHyperlinkHyperlinkHyperlink ScreenTipScreenTipScreenTipScreenTip dialog box.
Set when the mouse pointer put over the hyperlink, the prompts will appear above.
(6) Click OKOKOKOK . The hyperlink will normally be blue and underlined.
2.7.2.2.7.2.2.7.2.2.7.2. BookmarkBookmarkBookmarkBookmarkinginginging
You can quickly locate a specific section of a document using the bookmark function.
To set up a bookmark simply:
(1) Place the insertion point where you want to insert the bookmark.
(2) In the LinkLinkLinkLink section of the InsertInsertInsertInsert tab, select BookmarkBookmarkBookmarkBookmark and open the BookmarkBookmarkBookmarkBookmark
dialog box, shown as follows:
Figure 2.7—4 The Bookmark dialog box
(3) Enter a bookmark name, or choose an existing bookmark name, from the
BookmarkBookmarkBookmarkBookmark NameNameNameName text box. Then clickAddAddAddAdd.
(4) If there are numerous bookmarks in thedocument, you can choose a sort method
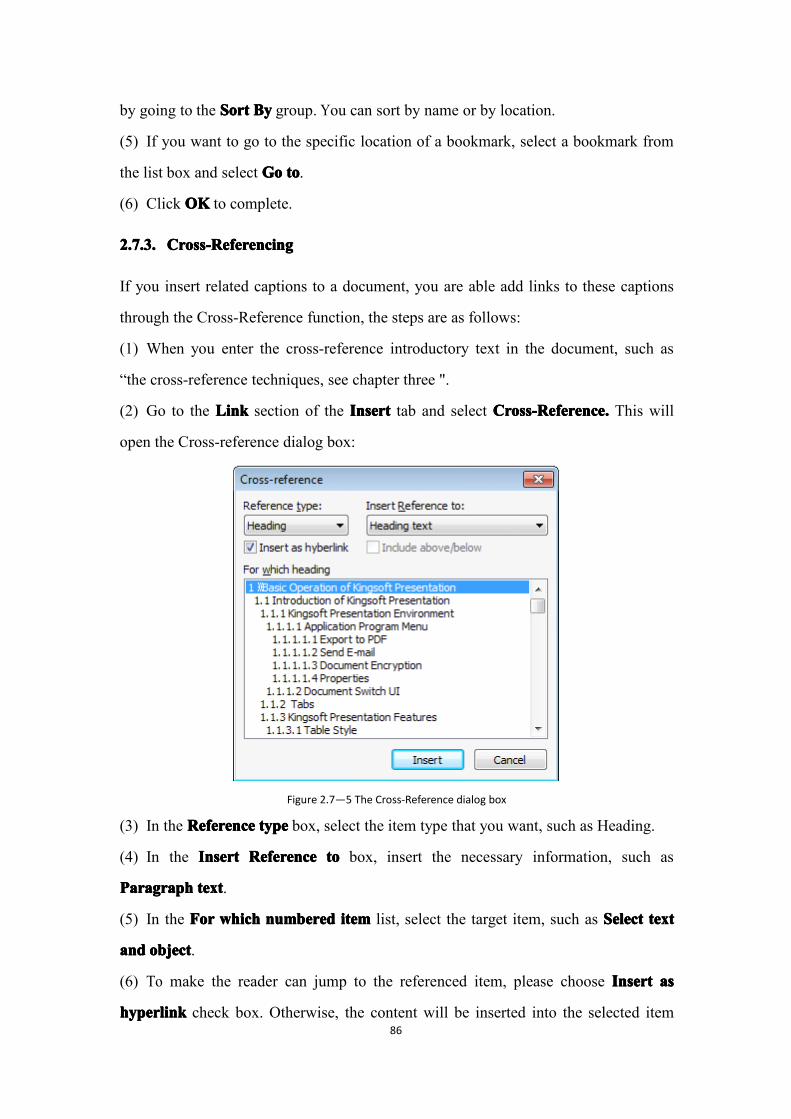
86
by going to the SortSortSortSort ByByByBy group. You can sort by name or by location.
(5) If you want to go to the specific location of a bookmark, select a bookmark from
the list box and select GoGoGoGo totototo.
(6) Click OKOKOKOK to complete.
2.7.3.2.7.3.2.7.3.2.7.3. Cross-ReferencCross-ReferencCross-ReferencCross-Referencinginginging
If you insert related captions to a document, you are able add links to these captions
through the Cross-Reference function, the steps are as follows:
(1) When you enter the cross-reference introductory text in the document, such as
“the cross-reference techniques, see chapter three ".
(2) Go to the LinkLinkLinkLink section of the InsertInsertInsertInsert tab and select Cross-ReferenceCross-ReferenceCross-ReferenceCross-Reference.... This will
open the Cross-reference dialog box:
Figure 2.7—5 The Cross-Reference dialog box
(3) In the ReferenceReferenceReferenceReference typetypetypetype box, select the item type that you want, such as Heading.
(4) In the InsertInsertInsertInsert ReferenceReferenceReferenceReference totototo box, insert the necessary information, such as
ParagraphParagraphParagraphParagraph texttexttexttext.
(5) In the ForForForFor whichwhichwhichwhich numberednumberednumberednumbered itemitemitemitem list, select the target item, such as SelectSelectSelectSelect texttexttexttext
andandandand objectobjectobjectobject.
(6) To make the reader can jump to the referenced item, please choose InsertInsertInsertInsert asasasas
hyperlinkhyperlinkhyperlinkhyperlink check box. Otherwise, the content will be inserted into the selected item

87
directly.
(7) Click the InsertInsertInsertInsert button to add the next cross-reference:
Figure 2.7—6 The Cross-Reference dialog box
2.8.2.8.2.8.2.8. HeaderHeaderHeaderHeaderssss andandandand FooterFooterFooterFooterssss
2.8.1.2.8.1.2.8.1.2.8.1. HeaderHeaderHeaderHeaderssss andandandand FooterFooterFooterFooterssss
Headers and footers are areas at the top and bottom of the page where you can add
additional text or graphics. Placing important information in the header or footer, such
as page number, creation date, document title, or author's name, is a clever way to
ensure that this information is always conveniently located and easy to access
irrespective of how much the document is edited.
In the Header&FooteHeader&FooteHeader&FooteHeader&Footer section of the InsertInsertInsertInsert tab, select HeaderFooterHeaderFooterHeaderFooterHeaderFooter to open the
Header&FooterHeader&FooterHeader&FooterHeader&Footer tab, shown as follows:
Figure 2.8—1 The Header & Footer tab
2.8.2.2.8.2.2.8.2.2.8.2. PagePagePagePage NumbersNumbersNumbersNumbers
Page numbers are highly useful in aiding in the navigation of multi-page documents.
You can manually insert page breaks, set a different page format, can also need to

88
specify the starting page number for the current document.
2.8.2.1.2.8.2.1.2.8.2.1.2.8.2.1. SetSetSetSettingtingtingting PagePagePagePage FormatFormatFormatFormat
To insert page numbers using the header and footer, follow these steps:
(1) Go to the Header&FooterHeader&FooterHeader&FooterHeader&Footer section of the InsertInsertInsertInsert tab and select the PagePagePagePage NumberNumberNumberNumber
option. This will open the PagePagePagePage NumberNumberNumberNumber dialog box:
Figure 2.8—2 Inserting page numbers
(2) Select the position where you want the numbers to be inserted from the PositionPositionPositionPosition
drop-down list.
(3) In the AlignmentAlignmentAlignmentAlignment drop-down list, choose AlignmentAlignmentAlignmentAlignment for the selected page
number.
(4) In the NumberNumberNumberNumber formatformatformatformat drop-down list, choose the number format for page
numbers.
(5) If you cancel the ShowShowShowShow numbernumbernumbernumber onononon firstfirstfirstfirst pagepagepagepage check box, the first page will not
show the page number.
(6) Click the MoreMoreMoreMore button and open the PagePagePagePage numberingnumberingnumberingnumbering section. You can select
ContinueContinueContinueContinue fromfromfromfrom perviousperviousperviouspervious sectionsectionsectionsection or StartStartStartStart at.at.at.at. If you select the StartStartStartStart atatatat option,,,, you
need to enter the first page number in the spinner on the right.

89
Figure 2.8—3 Setting the page numbering
(7) Click OKOKOKOK to complete.
Tips: After inserting page numbers, you can set the font for the numbers by selecting
the TTTTextextextext FFFFontontontont setting. However, any changes made in one page will affect the format
for every page in the document.
2.8.2.2.2.8.2.2.2.8.2.2.2.8.2.2. SpecifySpecifySpecifySpecifyinginginging thethethethe StartingStartingStartingStarting PagePagePagePage NumberNumberNumberNumber
The steps to specifying the starting page number are as follows:
(1) Go to the Header&FooterHeader&FooterHeader&FooterHeader&Footer section of the InsertInsertInsertInsert tab and select the PagePagePagePage NumberNumberNumberNumber
option. This will open the PagePagePagePage NumberNumberNumberNumber dialog box.
(2) Click the MoreMoreMoreMore button and open the PagePagePagePage numberingnumberingnumberingnumbering section. Select StartStartStartStart at,at,at,at,
and enter the first page number in the spinner on the right.
(3) Click the OKOKOKOK button to complete.
2.9.2.9.2.9.2.9. TheTheTheThe HeaderHeaderHeaderHeader &&&& FooterFooterFooterFooter TabTabTabTab
2.9.1.2.9.1.2.9.1.2.9.1. HeaderHeaderHeaderHeaderssss andandandand FooterFooterFooterFooterssss
(1) If you want to set the layout of a header or a footer, go to the Header&FooterHeader&FooterHeader&FooterHeader&Footer
tab and select HeaderFooterHeaderFooterHeaderFooterHeaderFooter OptionOptionOptionOption.... Open the PagePagePagePage SetupSetupSetupSetup dialog box, and select the
LayoutLayoutLayoutLayout tab, shown as follows:

90
Figure 2.9—1 The Layout tab
(2) Choose the SectionSectionSectionSection StartStartStartStart option from the SectionSectionSectionSection group..
(3) In the HeadersHeadersHeadersHeaders andandandand footersfootersfootersfooters group, you can choose the DifferentDifferentDifferentDifferent oddoddoddodd andandandand eveneveneveneven
or DifferentDifferentDifferentDifferent firstfirstfirstfirst pagepagepagepage options. You can also enter the distance in the HeaderHeaderHeaderHeader andandandand
FFFFooterooterooterooter spinner box.
(4) Choose ApplApplApplApplyyyy totototoWholeWholeWholeWhole DocumentDocumentDocumentDocument from the Preview section.
(5) Click OKOKOKOK to complete.
2.9.2.2.9.2.2.9.2.2.9.2. AutoAutoAutoAuto TextTextTextText
To insert AutoAutoAutoAuto TextTextTextText, go to the InsertInsertInsertInsert section of the Header&FooterHeader&FooterHeader&FooterHeader&Footer tab and select
AutoAutoAutoAuto TextTextTextText.... This includes the Page,Page,Page,Page, PagePagePagePage X,X,X,X, TotalTotalTotalTotal ofofofof YYYY Page,Page,Page,Page, and PagePagePagePage XXXX ofofofof YYYY
options.... YYYYou can quickly insert either a header or a footer using these controls.
2.9.3.2.9.3.2.9.3.2.9.3. DateDateDateDate //// TimeTimeTimeTime
To insert a time into a header or footer, go to the InsertInsertInsertInsert section of the
Header&FooterHeader&FooterHeader&FooterHeader&Footer tab and select DateDateDateDate //// TimeTimeTimeTime. This will open the DateDateDateDate //// TimeTimeTimeTime dialog
box, shown as follows:

91
Figure 2.9—2 The Date/Time dialog box
In the AvailableAvailableAvailableAvailable formatformatformatformat list, choose the date format you like and click OKOKOKOK.
2.9.4.2.9.4.2.9.4.2.9.4. FieldsFieldsFieldsFields
To insert fields into a header or footer, go to the InsertInsertInsertInsert section of the Header&FooterHeader&FooterHeader&FooterHeader&Footer
tab and select FieldsFieldsFieldsFields.... This will open the FieldsFieldsFieldsFields dialog box:
Figure 2.9—3 The Fields dialog box
In the FieldsFieldsFieldsFields namesnamesnamesnames list, choose the field name you prefer then click the OKOKOKOK button to
complete.
2.9.5.2.9.5.2.9.5.2.9.5. PicturePicturePicturePicturessss
To insert a picture into a header or footer,go to the InsertInsertInsertInsert section of the
Header&FooterHeader&FooterHeader&FooterHeader&Footer tab, select PicturePicturePicturePicture and open thethethethe InsertInsertInsertInsert PicturePicturePicturePicture dialog box:

92
Figure 2.9—4 The Insert Picture dialog box
Select the picture that you want to insert and click the OpenOpenOpenOpen button. You can then
insert the picture into the header or footer.
2.9.6.2.9.6.2.9.6.2.9.6. ClipClipClipClipArtArtArtArt
To insert ClipArt into a header or footer, go to the InsertInsertInsertInsert section of the
Header&FooterHeader&FooterHeader&FooterHeader&Footer tab, select ClipClipClipClip ArtArtArtArt to open the ClipClipClipClip ArtArtArtArt task window, shown as
follows:
Figure 2.9—5 The Clip Art task window
Double click the clip art that you would like to insert into the header or footer.

93
2.9.7.2.9.7.2.9.7.2.9.7. NavigationNavigationNavigationNavigation
If you need to switch quickly between the header and the footer, click SwitchSwitchSwitchSwitch
BetweenBetweenBetweenBetween HeaderHeaderHeaderHeader andandandand FooterFooterFooterFooter in the NavigationNavigationNavigationNavigation section.
If you want to finish editing the header and footer, select CloseCloseCloseClose iiiin the NavigationNavigationNavigationNavigation
section.
2.9.8.2.9.8.2.9.8.2.9.8. SetSetSetSettingtingtingting HeaderHeaderHeaderHeaderssss andandandand FooterFooterFooterFooterssss
2.9.8.1.2.9.8.1.2.9.8.1.2.9.8.1. CreatCreatCreatCreatinginginging thethethethe SameSameSameSame HeaderHeaderHeaderHeader andandandand FooterFooterFooterFooter forforforfor EachEachEachEach PagePagePagePage
To reproduce the same header and footer for every page, simply follow these steps:
(1) Go to the InsertInsertInsertInsert section of the Header&FooterHeader&FooterHeader&FooterHeader&Footer tab and select Header&FooterHeader&FooterHeader&FooterHeader&Footer
to enter the edit area. This will show all of the different functions of the
Header&FooterHeader&FooterHeader&FooterHeader&Footer tab:
Figure 2.9—6 The Header & Footer tab
(2) In the header area enter text or insert shapes, and can use these commands to set
format like handle text. If you need to insert page numbers, dates, etc., select different
commands in the InsertInsertInsertInsert section of the HeaderHeaderHeaderHeader &&&& FooterFooterFooterFooter tab.
(3) Select SwitchSwitchSwitchSwitch BetweenBetweenBetweenBetween HeaderHeaderHeaderHeader andandandand FooterFooterFooterFooter from the NavigationNavigationNavigationNavigation section and
move the insertion point to the footer area. Then you can enter the text into the footer.
(4) Click CloseCloseCloseClose in the NavigationNavigationNavigationNavigation section to exit.
2.9.8.2.2.9.8.2.2.9.8.2.2.9.8.2. CreatCreatCreatCreatinginginging DifferentDifferentDifferentDifferent HeaderHeaderHeaderHeaderssss andandandand FooterFooterFooterFooterssss forforforfor EEEEvenvenvenven andandandand OddOddOddOdd PagePagePagePagessss
Establishing different headers and footers for odd and even pages is often necessary
for two-sided printing:
(1) Go to the InsertInsertInsertInsert section of the Header&FooterHeader&FooterHeader&FooterHeader&Footer tab and select the
Header&FooterHeader&FooterHeader&FooterHeader&Footer option to enter the editing menu.
(2) In the HeaderHeaderHeaderHeader &&&& FooterFooterFooterFooter tab, select HeaderFooterHeaderFooterHeaderFooterHeaderFooter OptionOptionOptionOption,,,, and open the PagePagePagePage
SetupSetupSetupSetup dialog box. Then select the LayoutLayoutLayoutLayout tab, shown as follows:
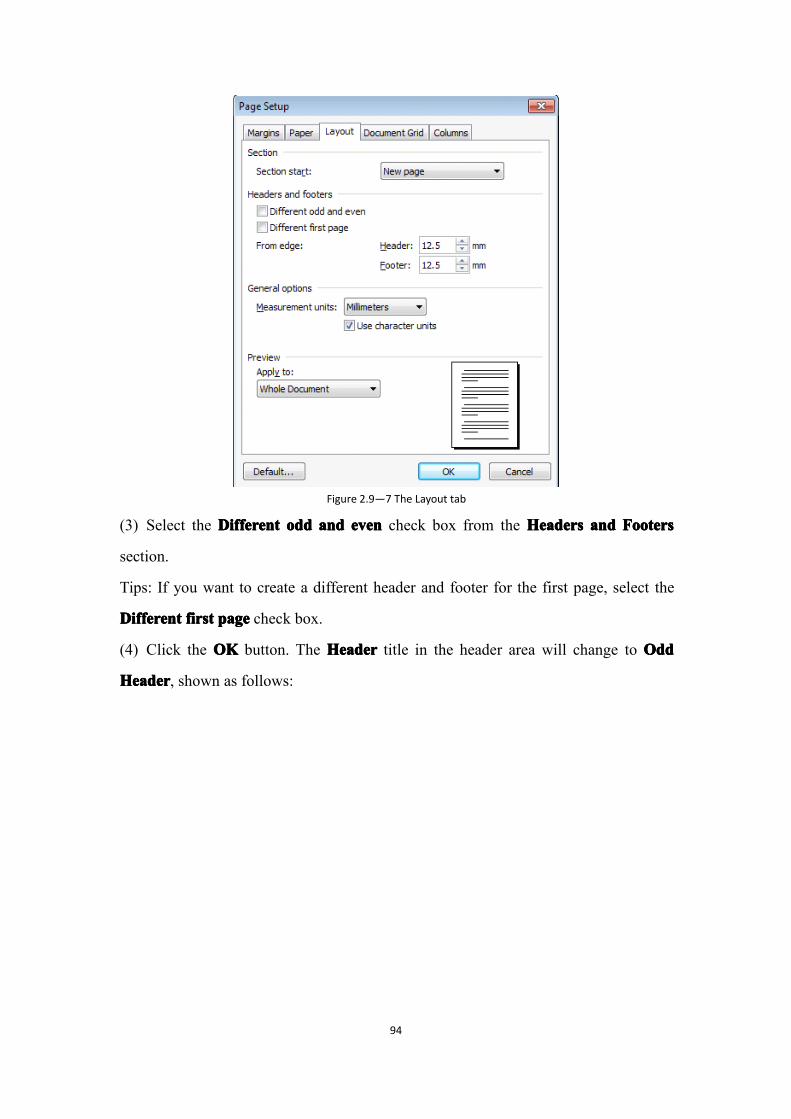
94
Figure 2.9—7 The Layout tab
(3) Select the DifferentDifferentDifferentDifferent oddoddoddodd andandandand eveneveneveneven check box from the HeadersHeadersHeadersHeaders andandandand FootersFootersFootersFooters
section.
Tips: If you want to create a different header and footer for the first page, select the
DifferentDifferentDifferentDifferent firstfirstfirstfirst pagepagepagepage check box.
(4) Click the OKOKOKOK button. The HeaderHeaderHeaderHeader title in the header area will change to OddOddOddOdd
HeaderHeaderHeaderHeader, shown as follows:
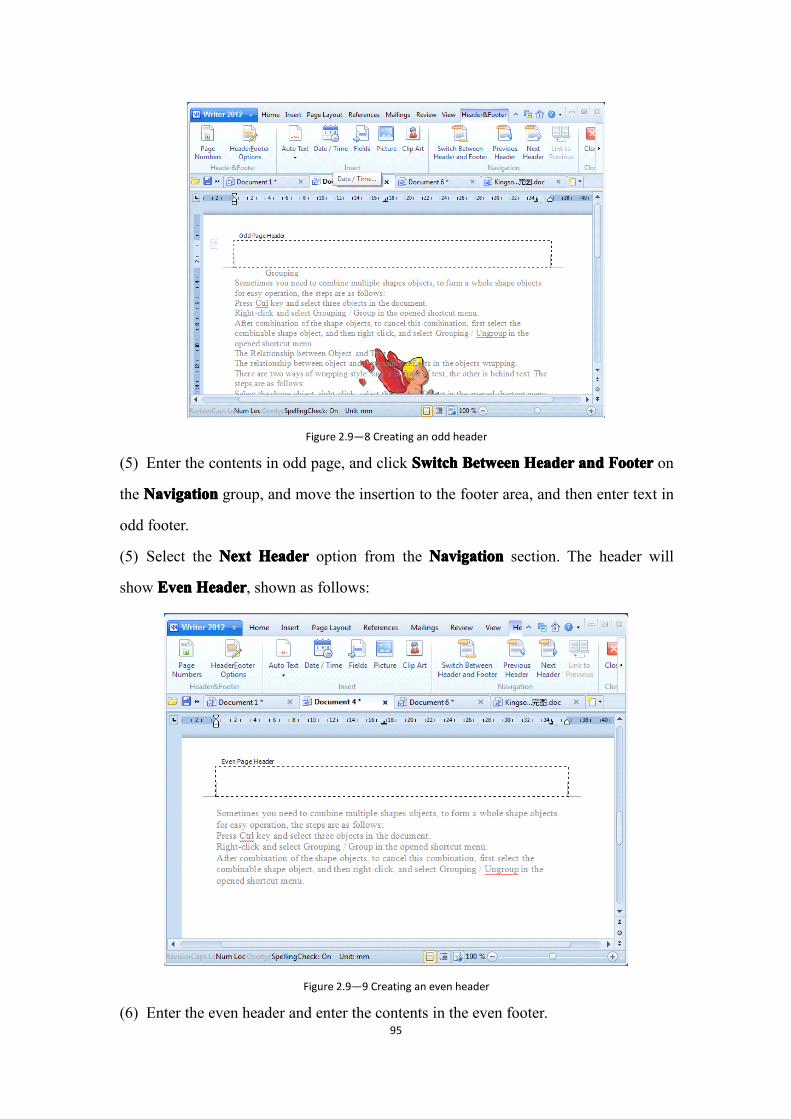
95
Figure 2.9—8 Creating an odd header
(5) Enter the contents in odd page, and click SwitchSwitchSwitchSwitch BetweenBetweenBetweenBetween HeaderHeaderHeaderHeader andandandand FooterFooterFooterFooter on
the NavigationNavigationNavigationNavigation group, and move the insertion to the footer area, and then enter text in
odd footer.
(5) Select the NextNextNextNext HeaderHeaderHeaderHeader option from the NavigationNavigationNavigationNavigation section. The header will
show EvenEvenEvenEven HeaderHeaderHeaderHeader, shown as follows:
Figure 2.9—9 Creating an even header
(6) Enter the even header and enter the contents in the even footer.

96
(7) Click the CloseCloseCloseClose option contained within the NavigationNavigationNavigationNavigation section to exit.
2.9.8.3.2.9.8.3.2.9.8.3.2.9.8.3. ModifyModifyModifyModifyinginginging HeaderHeaderHeaderHeaderssss andandandand FooterFooterFooterFooterssss
In the text edit mode, the header and footer area will be grey to signify that the
document area in the body can not edit the contents of the header and footer. To edit
the contents of a header or footer, follows these steps:
(1) Bring up the Header&FooterHeader&FooterHeader&FooterHeader&Footer tab, or double click either the header or the footer
to enter the header and footer section.
(2) Modify the contents of the header or footer, or makeup the content of the header
and footer, for example, change the horizontal position of the header and footer.
(3) To exit, click CloseCloseCloseClose in the NavigationNavigationNavigationNavigation section of the Header&FooterHeader&FooterHeader&FooterHeader&Footer tab.
2.9.8.4.2.9.8.4.2.9.8.4.2.9.8.4. AdjustAdjustAdjustAdjustinginginging thethethethe VerticalVerticalVerticalVertical PositionPositionPositionPosition ofofofof thethethethe HeaderHeaderHeaderHeader andandandand FooterFooterFooterFooter
The steps are as follows:
(1) Enter the HeaderHeaderHeaderHeader andandandand FooterFooterFooterFooter edit area and bring up the Header&FooterHeader&FooterHeader&FooterHeader&Footer tab.
(2) Select HeaderFooterHeaderFooterHeaderFooterHeaderFooter OptionsOptionsOptionsOptions from the Headers&FootersHeaders&FootersHeaders&FootersHeaders&Footers section, and,,,, open the
PagePagePagePage SetupSetupSetupSetup dialog box. Then select the LayoutLayoutLayoutLayout tab.
(3) Go to the HeaderHeaderHeaderHeader andandandand FooterFooterFooterFooter spinner box in the MarginsMarginsMarginsMargins section, enter the
distance that you would like the header or footer to be from the border of the page.
(4) Click the OKOKOKOK button to complete.
2.9.8.5.2.9.8.5.2.9.8.5.2.9.8.5. DoseDoseDoseDose NotNotNotNot UseUseUseUse HeaderHeaderHeaderHeader andandandand FooterFooterFooterFooter inininin HomeHomeHomeHome PagePagePagePage
The steps are as follows:
(1) Enter the HeaderHeaderHeaderHeader andandandand FooterFooterFooterFooter edit area and bring up the Header&FooterHeader&FooterHeader&FooterHeader&Footer tab.
(2) Select the HeaderFooterHeaderFooterHeaderFooterHeaderFooter OptionsOptionsOptionsOptions from the Headers&FootersHeaders&FootersHeaders&FootersHeaders&Footers section,,,, open the
PagePagePagePage SetupSetupSetupSetup dialog box and select the LayoutLayoutLayoutLayout tab.
(3) Select the DifferentDifferentDifferentDifferent firstfirstfirstfirst pagepagepagepage check box from the HeaderHeaderHeaderHeader andandandand FooterFooterFooterFooter section,
shown as follows:

97
Figure 2.9—10 Selecting a different first page
(4) Click the OKOKOKOK button to complete.
(5) Enter the PrintPrintPrintPrint PreviewPreviewPreviewPreview view, after setting, the effect shown as follows:
Figure 2.9—11 TheTheTheThe DifferentDifferentDifferentDifferent firstfirstfirstfirst pagepagepagepage effect
Page number starts
from the second
page
No page number onfirst page

98
2.9.8.6.2.9.8.6.2.9.8.6.2.9.8.6. DeletDeletDeletDeletinginginging HeaderHeaderHeaderHeaderssss andandandand FooterFooterFooterFooterssss
To remove a header or a footer, simply enter the header and footer edit view and
delete the entire contents. Exit the header or footer to complete the process.
Tips: If the document is not broken into sub-sections, then deleting the contents of a
header or footer will delete the contents for all other headers and footers. If the
document has been broken into sub-sections, you can delete a header or footer for
only one section, as long as start up the LinkLinkLinkLink totototo PreviousPreviousPreviousPrevious function in the NavigationNavigationNavigationNavigation
group on the Header&FooterHeader&FooterHeader&FooterHeader&Footer tab.
2.10.2.10.2.10.2.10. TextTextTextText
2.10.1.2.10.1.2.10.1.2.10.1. TextTextTextText BoxBoxBoxBoxeseseses
There are two types of text box; the horizontal and the vertical. In Kingsoft Writer, the
contents of a text box can be highlighted so as to catch the readers' eye.
2.10.1.1.2.10.1.1.2.10.1.1.2.10.1.1. InsertInsertInsertInsertinginginging TextTextTextText BoxBoxBoxBoxeseseses
The insert a text box, simply:
(1) Go to the TextTextTextText section of the InsertInsertInsertInsert tab, choose the HorizontalHorizontalHorizontalHorizontal TextTextTextText BoxBoxBoxBox or
VerticalVerticalVerticalVertical TextTextTextText BoxBoxBoxBox options from the TextTextTextText BoxBoxBoxBox drop-down list.
(2) Click or drag the mouse to add a text box to the document.
(3) When the text box reaches the desired size, release the left mouse button. You are
then free to enter the contents:
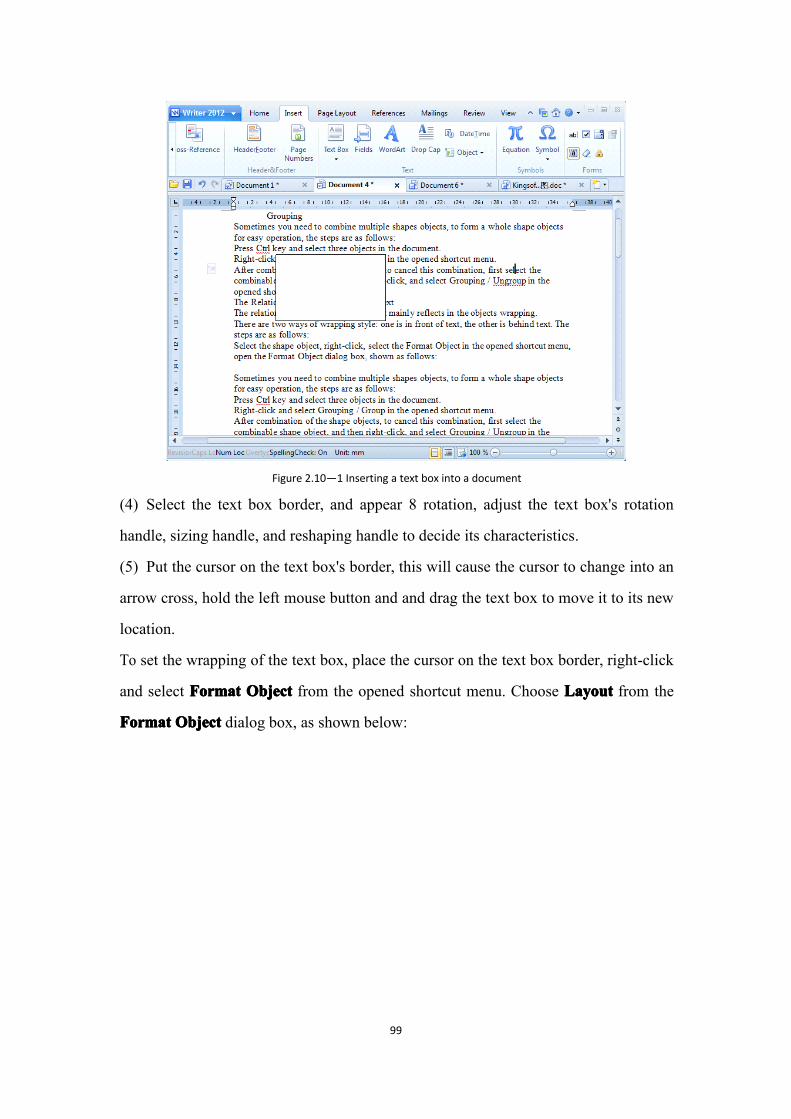
99
Figure 2.10—1 Inserting a text box into a document
(4) Select the text box border, and appear 8 rotation, adjust the text box's rotation
handle, sizing handle, and reshaping handle to decide its characteristics.
(5) Put the cursor on the text box's border, this will cause the cursor to change into an
arrow cross, hold the left mouse button and and drag the text box to move it to its new
location.
To set the wrapping of the text box, place the cursor on the text box border, right-click
and select FormatFormatFormatFormat ObjectObjectObjectObject from the opened shortcut menu. Choose LayoutLayoutLayoutLayout from the
FormatFormatFormatFormat ObjectObjectObjectObject dialog box, as shown below:

100
Figure 2.10—2 The Layout tab
Choose the SquareSquareSquareSquare option from theWrappingWrappingWrappingWrapping StyleStyleStyleStylemenu:
Figure 2.10—3 The Square wrapping style
2.10.1.2.2.10.1.2.2.10.1.2.2.10.1.2. AddAddAddAddinginginging aaaa TextTextTextText BoxBoxBoxBoxwithwithwithwith aaaa CommentCommentCommentComment
To insert a text box with a comment, follow these steps:

101
Figure 2.10—4 The Comment list
(1) Go to the IllustrationsIllustrationsIllustrationsIllustrations section of the InsertInsertInsertInsert tab, select CommentCommentCommentComment from the
ShapesShapesShapesShapes drop-down list.
Figure 2.10—5 Inserting a comment
(2) Choose one of the shapes from the CommentCommentCommentComment section,,,, click or drag the mouse to
where you want to insert the comment. You are then free to create the comment, the
insertion will blink to enter text.
2.10.1.3.2.10.1.3.2.10.1.3.2.10.1.3. LinkingLinkingLinkingLinking TextTextTextText BoxBoxBoxBoxeseseses
You can connect several text boxes together by creating links between them. This will,

102
allow the text to automatically jump to the next linked text box if the current one gets
filled. Similarly, if you delete text in the previous linked text box, text in the other text
boxes will rearrange automatically.
To link text boxes, follow these steps:
(1) Create two text boxes in different positions in the document.
(2) Enter the contents in the first text box, and exceed its limit.
(3) Select the first text box and go to the DrawingDrawingDrawingDrawing ToolsToolsToolsTools tab.
(4) Click CreateCreateCreateCreate TextTextTextText BoxBoxBoxBox LinkLinkLinkLink in the TextTextTextText BoxBoxBoxBox section. This will transform the
cursor into .
(5) Move the cursor to the second text box and select it. This will create a link
between the two text boxes. The text will now automatically jump to the next linked
text box when the first one is full.
(6) In the TextTextTextText BoxBoxBoxBox section, select either the PreviousPreviousPreviousPrevious TextTextTextText BoxBoxBoxBox or NextNextNextNext TextTextTextText BoxBoxBoxBox
options to switch between the two text boxes.
(7) Click BreakBreakBreakBreak TextTextTextText BoxBoxBoxBox LinkLinkLinkLink in the TextTextTextText BoxBoxBoxBox section to cancel the link.
2.10.1.4.2.10.1.4.2.10.1.4.2.10.1.4. WrappingWrappingWrappingWrapping BetweenBetweenBetweenBetween TextTextTextText BoxesBoxesBoxesBoxes
When you establish the layout of a document, especially with newspapers and
magazines, you may encounter two overlapping text boxes. This prevents the contents
of either text box being displayed fully. Kingsoft Writer can easily rectify this
problem, simply follow these steps:
(1) Insert two text boxes, and partly overlap them, shown as follows:

103
Figure 2.10—6 Two overlapping text boxes
(2) Select the text box that is underneath the other text box, double-click tits border.
Open the FormatFormatFormatFormat ObjectObjectObjectObject dialog box and select LayoutLayoutLayoutLayout tab, shown as follows:
Figure 2.10—7 Setting the Tight wrapping style
(3) In theWrappingWrappingWrappingWrapping StyleStyleStyleStyle section, select Tight.Tight.Tight.Tight.
(4) Next, choose the text box on top and double click its border. Open the FormatFormatFormatFormat
ObjectObjectObjectObject dialog box:

104
Figure 2.10—8 The Text box tab
(5) Go to the TextTextTextText BoxBoxBoxBox tab, choose the AllowAllowAllowAllow texttexttexttext totototo bebebebe wrappedwrappedwrappedwrapped bybybyby thethethethe externalexternalexternalexternal
objectsobjectsobjectsobjects check box.
(6) Click the OKOKOKOK button to complete.
2.10.1.5.2.10.1.5.2.10.1.5.2.10.1.5. AchieveAchieveAchieveAchieveMulti-lineMulti-lineMulti-lineMulti-line TextTextTextText bybybyby TextTextTextText
The steps are as follows:
(1) Double-click the text box border, open the FormatFormatFormatFormat ObjectObjectObjectObject dialog box and select
the TextTextTextText BoxBoxBoxBox tab.
(2) Choose your preferred options, shown as follows:
(3) Click OKOKOKOK to complete.
Figure 2.10—9

105
2.10.2.2.10.2.2.10.2.2.10.2. FieldsFieldsFieldsFields
Fieldsare equal to data or placeholders that may change in a document. You can insert
all kinds of information and preserve them at the latest status by inserting different
fields at different insertion points. Some common functions, like date and time, are
usually realized by the application of fields.
2.10.2.1.2.10.2.1.2.10.2.1.2.10.2.1. InsertInsertInsertInsertinginginging FieldsFieldsFieldsFields
To insert a field:
(1) Place the insertion point where you want to insert the field.
(2) Go to the TextTextTextText section of the InsertInsertInsertInsert tab, select FieldsFieldsFieldsFields and open the FieldsFieldsFieldsFields dialog
box:
Figure 2.10—10 The Fields dialog box
(3) Make the appropriate changes.
(4) Click OKOKOKOK to complete.
� If you want to hide or reveal the field code of a specified field, select either the
field or the field result, and press Shift+F9.Shift+F9.Shift+F9.Shift+F9.
���� If you want to hide or reveal all the field codes in a document, press Alt+F9.Alt+F9.Alt+F9.Alt+F9.
� Update the field to show the latest field result.
(1) If you want to update a single field, select either this field or the field result,
and press F9.F9.F9.F9.
(2) If you want to update all the fields in a document, click SelectSelectSelectSelect AllAllAllAll on the
EditingEditingEditingEditing group and press F9.F9.F9.F9.

106
2.10.2.2.2.10.2.2.2.10.2.2.2.10.2.2. EditEditEditEditinginginging FieldsFieldsFieldsFields
(1) If you want to hide or reveal the field code of a specified field, select either this
field or the field result and press Shift+F9.Shift+F9.Shift+F9.Shift+F9.
(2) If you want to hide or reveal all the field codes in a document, press Alt+F9.Alt+F9.Alt+F9.Alt+F9.
(3) Update the field to show the latest field result.
���� If you want to update a single field, select either this field or the field result and
press F9.F9.F9.F9.
���� If you want to update all the fields in a document, choose SelectSelectSelectSelect AllAllAllAll from the
EditingEditingEditingEditing section and press F9F9F9F9.
(4) Click the right mouse button to update and edit fields..
2.10.2.3.2.10.2.3.2.10.2.3.2.10.2.3. DeletDeletDeletDeletinginginging FieldsFieldsFieldsFields
Select either the field or the field result and right-click. Select DeleteDeleteDeleteDelete from the opened
shortcut menu, or press DeleteDeleteDeleteDelete on the keyboard, to delete the selected field object.
2.10.3.2.10.3.2.10.3.2.10.3. WordArtWordArtWordArtWordArt
WordArt is used to apply special effects to text. The program allows the user to
decorate, stretch, or rotate text, as well as to adjust the character spacing. Of course,
there are further options, such as formatting WordArt and resetting the shape of the
WordArt.
2.10.3.1.2.10.3.1.2.10.3.1.2.10.3.1. IIIInsertnsertnsertnsertingingingingWordArtWordArtWordArtWordArt
To insert WordArt, follow these steps:
(1) Place the insertion point where you want to insert the WordArt.
In the InsertInsertInsertInsert tab, in the TextTextTextText section, select theWordArtWordArtWordArtWordArt icon to open theWordArtWordArtWordArtWordArt dialog box shown as follows:

107
Figure 2.10—11 The WordArt galley
(2)(2)(2)(2) Select one of the WordArt styles, click the OKOKOKOK button and open the WordArtWordArtWordArtWordArt
GalleryGalleryGalleryGallery dialog box:
Figure 2.10—12 The Edit WordArt text box
(3)(3)(3)(3) Enter the desired contents in the TextTextTextText box. Here you can also set font type, font
size, boldness and whether it is italicised or not, by using the available toolbar.
(4)(4)(4)(4) When satisfied, click the OKOKOKOK button:

108
Figure 2.10—13 WordArt effect
Once the WordArt had been inserted into the document, selecting it allows you to
move or magnify it, as you would with other objects. You can also edit the WordArt
using theWordArtWordArtWordArtWordArt tab.
2.11.2.11.2.11.2.11. TheTheTheTheWordArtWordArtWordArtWordArt TabTabTabTab
After inserting WordArt, the WordArt tab will appear. You can format WordArt using
different commands in the WordArt tab, such as changing the WordArt gallery, or
setting WordArt effects.
2.11.1.2.11.1.2.11.1.2.11.1. WordArtWordArtWordArtWordArt
Available commands in the WordArt tab:
� To insert new WordArt, go to the WordArtWordArtWordArtWordArt group, click the WordArtWordArtWordArtWordArt
icon and select the new WordArt style in the opened WordArtWordArtWordArtWordArt GalleryGalleryGalleryGallery dialog
box.
� To edit the selected WordArt, go to the WordArtWordArtWordArtWordArt group, click the EditEditEditEdit

109
TexTexTexText icon and open the EditEditEditEditWordArtWordArtWordArtWordArt TextTextTextText dialog box.� To adjust the letters in WordArt to the same height, go to theWordArtWordArtWordArtWordArt group and
select the WordArt Same Letter Height icon.
� To change the text direction in WordArt (i.e. from horizontal to vertical text, or
vice versa), go to the WordArtWordArtWordArtWordArt group and select the WordArtWordArtWordArtWordArt VerticalVerticalVerticalVertical TextTextTextText
option.
� To choose the alignment, go to the WordArtWordArtWordArtWordArt group and select the WordArtWordArtWordArtWordArt
AlignmentAlignmentAlignmentAlignment icon. This includes the LeftLeftLeftLeft Alignment,Alignment,Alignment,Alignment, CenterCenterCenterCenter Alignment,Alignment,Alignment,Alignment,
RightRightRightRight Alignment,Alignment,Alignment,Alignment, WordWordWordWord Justify,Justify,Justify,Justify, LetterLetterLetterLetter JustifyJustifyJustifyJustify and StretchStretchStretchStretch JustifyJustifyJustifyJustify optionsoptionsoptionsoptions,,,,
shown as follows:
Figure 2.11—1 The Alignment list
� To choose one of the character spacing settings, go to the WordArtWordArtWordArtWordArt group and
select theWordArtWordArtWordArtWordArt CharacterCharacterCharacterCharacter SpacingSpacingSpacingSpacing icon. This includes the VeryVeryVeryVery Tight,Tight,Tight,Tight,
WordWordWordWordArtArtArtArt Tight,Tight,Tight,Tight, WordWordWordWordArtArtArtArt Normal,Normal,Normal,Normal, Loose,Loose,Loose,Loose, VeryVeryVeryVery LooseLooseLooseLoose options. The dialog box
should look as follows:
Figure 2.11—2 The Character Spacing list

110
� To set the format for WordArt, go to theWordArtWordArtWordArtWordArt StyleStyleStyleStyle group and select the OldOldOldOld
ToolsToolsToolsTools option in the bottom right. This will open the FormatFormatFormatFormat ObjectObjectObjectObject dialog box
where you can set WordArt color, line, size, layout, wrapping, etc.
Figure 2.11—3 The Format Object menu
� To further change the style of the WordArt, go to the WordArtWordArtWordArtWordArt StyleStyleStyleStyle group and
selectWordArtWordArtWordArtWordArt StylesStylesStylesStyles.... Open theWordArtWordArtWordArtWordArt ShapeShapeShapeShape list, shown below:
Figure 2.11—4 The WordArt Shape menu
� To adjust the positional relationship between WordArt and text, go to the
ArrangeArrangeArrangeArrange group and select WrappingWrappingWrappingWrapping StyleStyleStyleStyle.... Choose a wrapping style you like in
theWrappingWrappingWrappingWrapping list.

111
Figure 2.11—5 The Wrapping Style list
2.11.2.2.11.2.2.11.2.2.11.2. WordArtWordArtWordArtWordArt FillFillFillFill
Fill WordArt by:
(1) Selecting the WordArt that you want to fill, and finding theWordArtWordArtWordArtWordArt tab.
(2) In the WordArtWordArtWordArtWordArt tab, in the WordArtWordArtWordArtWordArt StylesStylesStylesStyles section,choose a color from the
WordArtWordArtWordArtWordArt FillFillFillFill drop-down list.
� To cancel WordArt fill, select NoNoNoNo FillFillFillFill.
� To add or change gradiant, select GradiantGradiantGradiantGradiant. In the opened FillFillFillFill EffectsEffectsEffectsEffects dialog
box, in the GradientGradientGradientGradient tab, you are free to set color, transparency, shading styles,
etc.
� To add or change texture, select TextureTextureTextureTexture. In the opened FillFillFillFill EffectsEffectsEffectsEffects dialog
box, in the TextureTextureTextureTexture tab, select the texture you like. To customize texture, select
the OtherOtherOtherOther TextureTextureTextureTexture option and choose the texture you prefer.
� To add or change a pattern, select Pattern.Pattern.Pattern.Pattern. In the opened FillFillFillFill EffectsEffectsEffectsEffects dialog
box, in the PatternPatternPatternPattern tab, select the pattern you prefer.
� To add or change a picture, select PicturePicturePicturePicture. Find the folder which contains the
picture that you want to use, select this picture and click Insert. If you select a
non-contiguous piece of text and apply a picture fill, each of the selected text will
be filled with the whole picture. Picture can not span multiple selected text.
(3) Click the OKOKOKOK button to apply.

112
2.11.3.2.11.3.2.11.3.2.11.3. WordArtWordArtWordArtWordArt OutlineOutlineOutlineOutline
To change the WordArt outline, the steps are follows: select theWordArtWordArtWordArtWordArt tab, and go
to the WordArtWordArtWordArtWordArt StylesStylesStylesStyles group. Select LineLineLineLine StyleStyleStyleStyle in the WordArtWordArtWordArtWordArt OutlineOutlineOutlineOutline drop-down
list and choose a line style you like in the LineLineLineLine StyleStyleStyleStyle list, shown as follows:
Figure 2.11—6 The Outline list
To set dash style, select DashDashDashDash StyleStyleStyleStyle in theWordArtWordArtWordArtWordArt OutlineOutlineOutlineOutline drop-down list, choose a
dash line that you like in the DashDashDashDash StyleStyleStyleStyle list.
Tips:
� To set the exact width of line, you can tight-click this shape, select FormatFormatFormatFormat
Object,Object,Object,Object, open the SetSetSetSetAutoShapeAutoShapeAutoShapeAutoShape DefaultsDefaultsDefaultsDefaults dialog box.
� Click the OldOldOldOld ToolsToolsToolsTools button in the bottom right of the ShapeShapeShapeShape StylesStylesStylesStyles section. You
can also open the SetSetSetSet AutoShapeAutoShapeAutoShapeAutoShape DefaultsDefaultsDefaultsDefaults dialog box and establish the desired
settings, then click OK.
2.11.4.2.11.4.2.11.4.2.11.4. WordArtWordArtWordArtWordArt EffectsEffectsEffectsEffects
You can add either the Shadow or 3-D effect to text using WordArt. The subsequent
passage informs you on how to do this.
2.11.4.1.2.11.4.1.2.11.4.1.2.11.4.1. EstablishingEstablishingEstablishingEstablishing thethethethe ShadowShadowShadowShadow EffectEffectEffectEffect
You can set or cancel the shadow effect using the ShadowShadowShadowShadow SettingSettingSettingSetting tab:
(1) Select the relevent WordArt.
(2) Go to the ShadowShadowShadowShadow SettingSettingSettingSetting section of the WordArtWordArtWordArtWordArt tab, select different shadow

113
effects from the ShadowShadowShadowShadow StyleStyleStyleStyle drop-down list. If you want to cancel the shadow
effect, select NoNoNoNo ShadowShadowShadowShadow.
(3) To customize shadow color, go to the ShadowShadowShadowShadow SettingSettingSettingSetting section and choose color
from the ShadowShadowShadowShadow ColorColorColorColor drop-down list. You can also select the MoreMoreMoreMore ShadowShadowShadowShadow ColorColorColorColor
option,,,, and open the ColorColorColorColor dialog box, shown as follows:
Figure 2.11—7 Setting the shadow color
(4) Select the color that you prefer, and click the OKOKOKOK button.
(5) In the ShadowShadowShadowShadow ColorColorColorColor drop-down list, select SemitransparentSemitransparentSemitransparentSemitransparent ShadowShadowShadowShadow to change
the transparency of the shadow.
(6) To adjust size and direction of the shadow, go to the ShadowShadowShadowShadow SettingSettingSettingSetting section and
select the spinner button to the right of the ShadowShadowShadowShadow OnOnOnOn /Off/Off/Off/Off option:.
Figure 2.11—8 The Shadow Setting menu
(7) The five shadow spinner options are:
� Shift Shadow Up: the shadow will be above the object.
� Shift Shadow Down: the shadow will be below the object.
� Shift Shadow Left: the shadow will fall to the left of the object.
� Shift Shadow Right:the shadow will fall to the right of the object.

114
2.11.4.2.2.11.4.2.2.11.4.2.2.11.4.2. ApplyingApplyingApplyingApplying thethethethe 3-D3-D3-D3-D EffectEffectEffectEffect
You can apply or remove the 3-D effect using the 3-D3-D3-D3-D SettingSettingSettingSetting tab, the steps are as
follows:
(1) Select the appropriate WordArt.
(2) Go to the 3-D3-D3-D3-D SettingSettingSettingSetting section of the WordArtWordArtWordArtWordArt tab, select different 3-D effects
from the 3-D3-D3-D3-D StyleStyleStyleStyle drop-down list. If you want to cancel the shadow, select NoNoNoNo
3-D3-D3-D3-D.
(3) To customize the 3-D color, go to the the 3-D3-D3-D3-D SettingSettingSettingSetting section and choose a color
from the 3-D3-D3-D3-D ColorColorColorColor drop-down list. You can also select MoreMoreMoreMore 3-D3-D3-D3-D Color,Color,Color,Color, and open
the ColorColorColorColor dialog box, shown as follows:
Figure 2.11—9 The 3-D color options
Select the color you prefer and click OKOKOKOK.
(4) To adjust the depth, direction, lighting, angles, and surfaces of the 3-D effect,
select the appropriate option from the drop-down list:
Figure 2.11—10 Establishing the 3-D effect
(5) The five options offered by the 3-D spinner are:
� Tilt Up: to move up slightly
� Tilt Down: to move down slightly

115
� Tilt Left: to move left slightly
� Tilt Right: to move right slightly
2.11.5.2.11.5.2.11.5.2.11.5. InsertingInsertingInsertingInserting aaaa DropDropDropDrop CapCapCapCap
Drop caps are often used in formal articles, especially newspaper articles. Kingsoft
Writer offers this function for your convenience To insert a drop cap follow these
steps:
Figure 2.11—11 The Drop Cap effect
(1) Place the insertion point where you want to insert the drop cap.
(2) Go to the TextTextTextText section of the InsertInsertInsertInsert tab, select DropDropDropDrop CapCapCapCap and open the DropDropDropDrop CapCapCapCap
dialog box, shown as follows:

116
Figure 2.11—12 The Drop Cap dialog box
(3) In the PositionPositionPositionPosition section, select the style of drop cap, such as Dropped.Dropped.Dropped.Dropped.
(4) In the FontFontFontFont drop-down list, choose the font for the drop cap.
(5) In the LinesLinesLinesLines totototo dropdropdropdrop text box, choose the number of lines that the drop cap will
occupy.
(6) In the DistanceDistanceDistanceDistance fromfromfromfrom texttexttexttext box, set the distance between the drop cap and the text.
(7) Click OKOKOKOK to complete.
To cancel the drop cap, place the insertion point where you want to cancel the drop
cap paragraph. Go to the TextTextTextText section of the InsertInsertInsertInsert tab and select the DropDropDropDrop CapCapCapCap
option.... In the opened DropDropDropDrop CapCapCapCap dialog box, select None,None,None,None, and click OKOKOKOK.
2.11.6.2.11.6.2.11.6.2.11.6. DateDateDateDate andandandand TimeTimeTimeTime
It is not difficult to insert time and date into a document, simply:
(1) Place the insertion point where you want to insert the date and time.
(2) Go to the TextTextTextText section of the InsertInsertInsertInsert tab, select DateTimeDateTimeDateTimeDateTime and open the DateDateDateDate ////
TimeTimeTimeTime dialog box, shown as follows:

117
Figure 2.11—13 The Date/Time dialog box
(3) In the AvailableAvailableAvailableAvailable formatsformatsformatsformats list, choose the style of date and time.
(4) To update the date and time, select the UpdateUpdateUpdateUpdate automaticallyautomaticallyautomaticallyautomatically check box. When
you print this file, the printed date and time is the latest.
(5) Click the OKOKOKOK button to insert the current date into the document.
2.11.7.2.11.7.2.11.7.2.11.7. ObjectObjectObjectObjectssss
To insert an object:
(1) Go to the TextTextTextText section of the InsertInsertInsertInsert tab, select ObjectObjectObjectObject from the ObjectObjectObjectObject drop-down
list. This will open the InsertInsertInsertInsert ObjectObjectObjectObject dialog box, shown as follows:
Figure 2.11—14 The Insert Object dialog box
(2) Select the contents you would like to install and and click OKOKOKOK.
Writer also possesses the ability to insert text located in other files:
(1) Select the position where you would like to insert the text.
(2) Go to the TextTextTextText section of the InsertInsertInsertInsert tab, select FileFileFileFile from the ObjectObjectObjectObject drop-down

118
list.
(3) In the opened InsertInsertInsertInsert FileFileFileFile dialog box, select the file you need and click OpenOpenOpenOpen to
insert.
2.12.2.12.2.12.2.12. SymbolsSymbolsSymbolsSymbols
2.12.1.2.12.1.2.12.1.2.12.1. EquationEquationEquationEquationssss
To use the equation editor, follow these steps:
(1) Place the insertion point where you want to insert the equation.
(2) Go to the SymbolsSymbolsSymbolsSymbols section of the InsertInsertInsertInsert tab, select EquationEquationEquationEquation and open the
EquationEquationEquationEquation EditorEditorEditorEditor:
Figure 2.12—1 The Equation Editor
(3) You can create your equation using the EquationEquationEquationEquation EditorEditorEditorEditor.
After you have finished editing an equation, press F3F3F3F3 or click UpdateUpdateUpdateUpdate on the FileFileFileFile
menu to update it. You can even update the equation by closing the equation editing
box or clicking ExitExitExitExit in the FileFileFileFilemenu.
2.12.22.12.22.12.22.12.2 SymbolSymbolSymbolSymbolssss
To insert a symbol:

119
Figure 2.12—2 The Insert Symbol menu
(1) Place the insertion point where you want to insert the equation.
(2) Go to the SymbolSymbolSymbolSymbols section of the InsertInsertInsertInsert tab, select the SymbolSymbolSymbolSymbol option. This
shows recently used symbols and the available custom symbols in the symbol list.
(3) If the symbol you want to insert is not in the symbol library, select MoreMoreMoreMore
SymbolsSymbolsSymbolsSymbols from the symbol list. This opens the SymbolSymbolSymbolSymbol dialog box.
(4) If the symbol you want to insert is not in the SymbolSymbolSymbolSymbol dialog box, try the FrontFrontFrontFront
drop-down list.
(5) Select the symbol you want from the dialog box and click the InsertInsertInsertInsert button.
(6) Choose CloseCloseCloseClose to exit the SymbolSymbolSymbolSymbol dialog box.

120
3.3.3.3. TheTheTheThe PagePagePagePage LayoutLayoutLayoutLayout TabTabTabTab
3.1.3.1.3.1.3.1. PagePagePagePage SetupSetupSetupSetup
3.1.1.3.1.1.3.1.1.3.1.1. TextTextTextText DirectionDirectionDirectionDirection
To set text direction:
(1) Go to the PagePagePagePage SetupSetupSetupSetup section of the PagePagePagePage LayoutLayoutLayoutLayout tab, select the TextTextTextText directiondirectiondirectiondirection
option. This will open the TextTextTextText OrientationOrientationOrientationOrientation dialog box, shown as follows:
Figure 3.1—1 The Text Orientation dialog box
(2) Select a text direction from the OrientationOrientationOrientationOrientation section, this will display a preview of
the potential changes.
(3) In the ApplyApplyApplyApply totototo drop-down list, select the text direction to be applied either to the
WholeWholeWholeWhole DocumentDocumentDocumentDocument or from ThisThisThisThis pointpointpointpoint ForwardForwardForwardForward.
(4) Click OKOKOKOK.
3.1.2.3.1.2.3.1.2.3.1.2. MarginsMarginsMarginsMargins
Go to the PagePagePagePage SetupSetupSetupSetup section of the PagePagePagePage LayoutLayoutLayoutLayout tab, select the MarginsMarginsMarginsMargins option.
This opens the PagePagePagePage setupsetupsetupsetup dialog box. Select theMarginsMarginsMarginsMargins tab, as detailed below:

121
Figure 3.1—2 The Margins tab
You can set the following options using theMarginsMarginsMarginsMargins tab:.
(1) Select the Top,Top,Top,Top, Bottom,Bottom,Bottom,Bottom, LeftLeftLeftLeft or RiRiRiRightghtghtght tuning boxes to set the value of the
margins.
(2) In the OrientationOrientationOrientationOrientation group, select the paper orientation, you can choose from
PortraitPortraitPortraitPortrait or LandscapeLandscapeLandscapeLandscape.... The default paper orientation is Portrait.Portrait.Portrait.Portrait.
(3) In the MultipleMultipleMultipleMultiple PagesPagesPagesPages section, you can choose NormalNormalNormalNormal, BookBookBookBook foldfoldfoldfold or ReverseReverseReverseReverse
BookBookBookBook FoldFoldFoldFold options for the multi-page mode.
(4) Click ApplyApplyApplyApply totototo from the drop-down list to select the style application.
(5) Click the OKOKOKOK button to see the results.
3.1.3.3.1.3.3.1.3.3.1.3. SizeSizeSizeSize
If you want to set the paper size:
(1) Go to the PagePagePagePage SetupSetupSetupSetup section of the PagePagePagePage LayoutLayoutLayoutLayout tab, select the SizeSizeSizeSize option.
Open the PaperPaperPaperPaper tab in the PagePagePagePage SetupSetupSetupSetup dialog box, shown as follows:
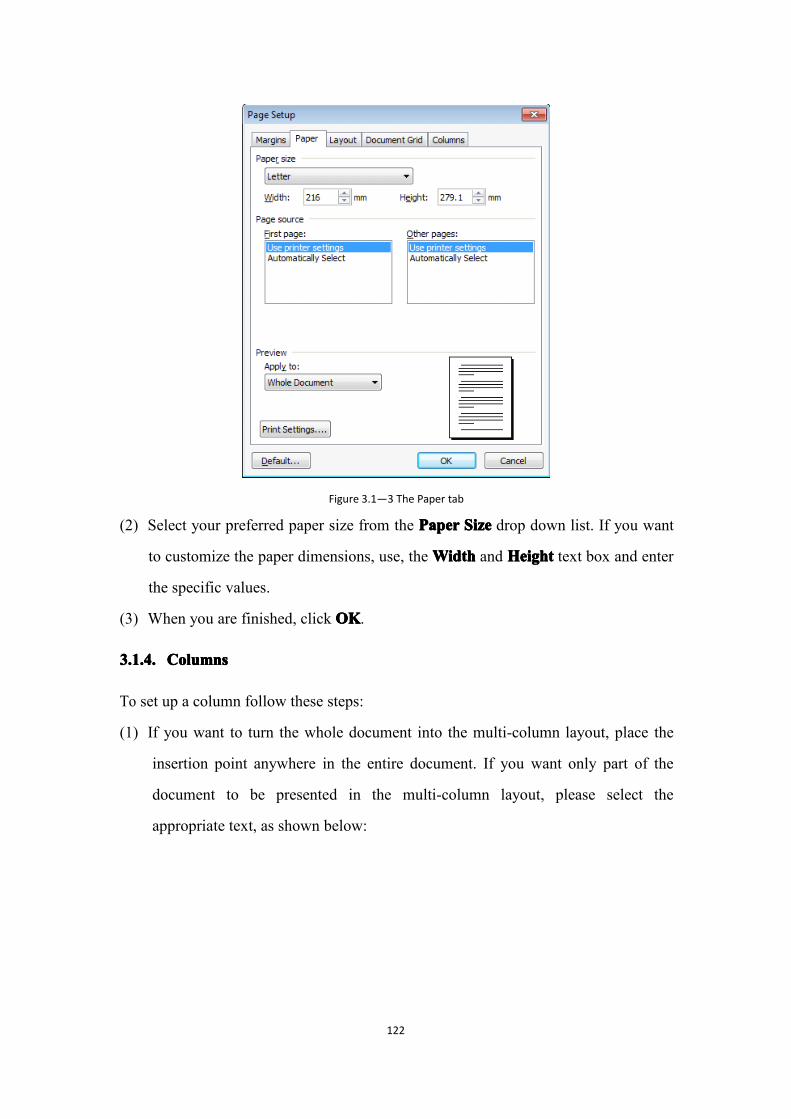
122
Figure 3.1—3 The Paper tab
(2) Select your preferred paper size from the PaperPaperPaperPaper SizeSizeSizeSize drop down list. If you want
to customize the paper dimensions, use, theWidthWidthWidthWidth and HeightHeightHeightHeight text box and enter
the specific values.
(3) When you are finished, click OKOKOKOK.
3.1.4.3.1.4.3.1.4.3.1.4. ColumnsColumnsColumnsColumns
To set up a column follow these steps:
(1) If you want to turn the whole document into the multi-column layout, place the
insertion point anywhere in the entire document. If you want only part of the
document to be presented in the multi-column layout, please select the
appropriate text, as shown below:

123
Figure 3.1—4 Selecting the text
(2) Go to the PagePagePagePage SetupSetupSetupSetup section of the PagePagePagePage LayoutLayoutLayoutLayout tab, select the number of
columns you want from the ColumnsColumnsColumnsColumns drop-down list.
(3) If you want to set more columns, select the MoreMoreMoreMore ColumnsColumnsColumnsColumns option from the
ColumnsColumnsColumnsColumns drop-down list. This will open the ColumnsColumnsColumnsColumns dialog box, shown as
follows:
Figure 3.1—5 The Columns dialog box
(4) Select the format that you want from the PresentPresentPresentPresent section. For example, click
Two.Two.Two.Two.
(5) In the ApplyApplyApplyApply drop-down list box, specify the scope of the application as either

124
WholeWholeWholeWhole DocumentDocumentDocumentDocument or from ThisThisThisThis pointpointpointpoint ForwardForwardForwardForward.
(6) If you want to establish a line between the two columns, select the LineLineLineLine BetweenBetweenBetweenBetween
check box.
(7) In the WidthWidthWidthWidth andandandand spacingspacingspacingspacing section, enter the values you want for the column
spacing and width, or click the EqualEqualEqualEqual columncolumncolumncolumn widthwidthwidthwidth check box.
(8) Click the OKOKOKOK button, the results are shown below:
Figure 3.1—6 Formatting the text into two columns
3.1.4.1.3.1.4.1.3.1.4.1.3.1.4.1. ModifyModifyModifyModifyinginginging ColumnColumnColumnColumnssss
To modify an existing column:
(1) Move the insertion point to the column you wish to modify.
(2) Go to the PagePagePagePage SetupSetupSetupSetup section of the PagePagePagePage LayouLayouLayouLayout tab,, select theMoreMoreMoreMore ColumnsColumnsColumnsColumns
option from the ColumnsColumnsColumnsColumns drop-down list. This will open the ColumnsColumnsColumnsColumns dialog
box.
(3) Select the format that you want to use from the PresetPresetPresetPreset section.
(4) To change a column width or the spacing of the columns, go to the WidthWidthWidthWidth and
SpacingSpacingSpacingSpacing box and enter the appropriate width and spacing values.
(5) Click the OKOKOKOK button to complete.
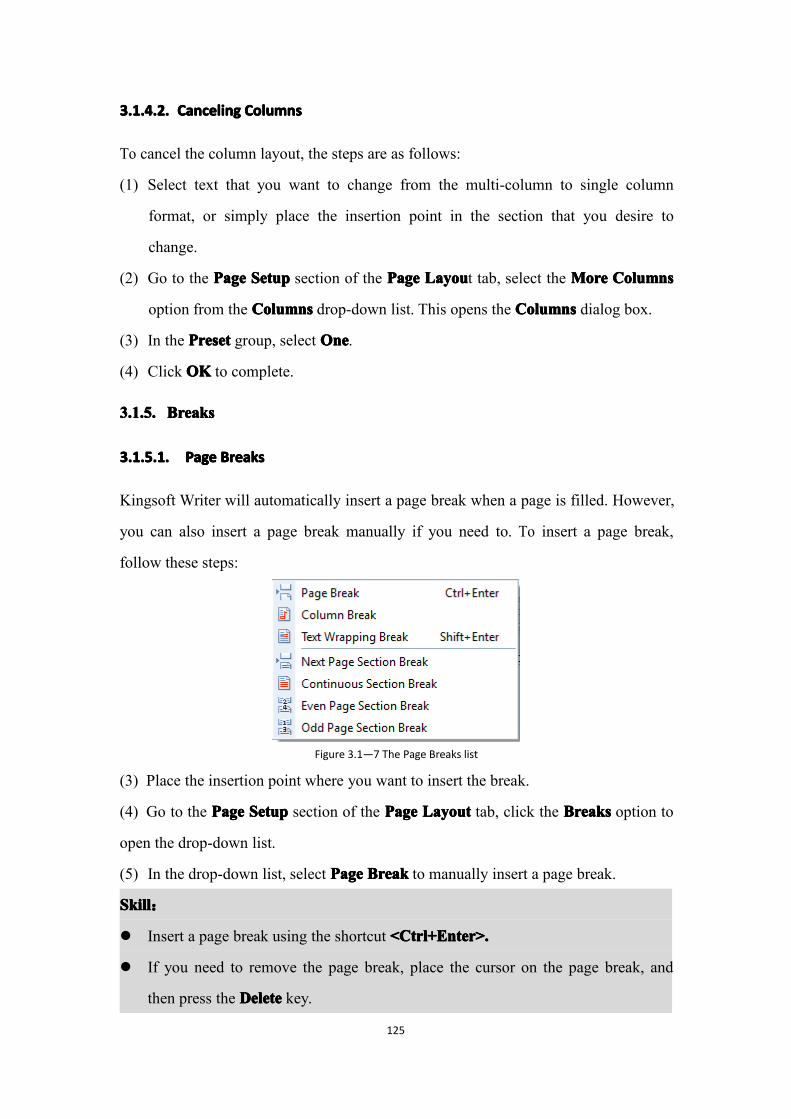
125
3.1.4.2.3.1.4.2.3.1.4.2.3.1.4.2. CancelingCancelingCancelingCanceling ColumnColumnColumnColumnssss
To cancel the column layout, the steps are as follows:
(1) Select text that you want to change from the multi-column to single column
format, or simply place the insertion point in the section that you desire to
change.
(2) Go to the PagePagePagePage SetupSetupSetupSetup section of the PagePagePagePage LayouLayouLayouLayout tab, select the MoreMoreMoreMore ColumnsColumnsColumnsColumns
option from the ColumnsColumnsColumnsColumns drop-down list. This opens the ColumnsColumnsColumnsColumns dialog box.
(3) In the PresetPresetPresetPreset group, select OneOneOneOne.
(4) Click OKOKOKOK to complete.
3.1.5.3.1.5.3.1.5.3.1.5. BreaksBreaksBreaksBreaks
3.1.5.1.3.1.5.1.3.1.5.1.3.1.5.1. PagePagePagePage BreakBreakBreakBreakssss
Kingsoft Writer will automatically insert a page break when a page is filled. However,
you can also insert a page break manually if you need to. To insert a page break,
follow these steps:
Figure 3.1—7 The Page Breaks list
(3) Place the insertion point where you want to insert the break.
(4) Go to the PagePagePagePage SetupSetupSetupSetup section of the PagePagePagePage LayoutLayoutLayoutLayout tab, click the BreaksBreaksBreaksBreaks option to
open the drop-down list.
(5) In the drop-down list, select PagePagePagePage BreakBreakBreakBreak to manually insert a page break.
SkillSkillSkillSkill:
� Insert a page break using the shortcut <Ctrl+Enter>.<Ctrl+Enter>.<Ctrl+Enter>.<Ctrl+Enter>.
� If you need to remove the page break, place the cursor on the page break, and
then press the DeleteDeleteDeleteDelete key.

126
3.1.5.2.3.1.5.2.3.1.5.2.3.1.5.2. ColumnColumnColumnColumn BreakBreakBreakBreak
To insert a column:(1) Place the insertion point where you want to insert the column.
(2) Go to the PagePagePagePage SetupSetupSetupSetup section of the PagePagePagePage LayoutLayoutLayoutLayout tab, select the ColumnColumnColumnColumn BreakBreakBreakBreak
option from the BreaksBreaksBreaksBreaks drop-down list.
3.1.5.3.3.1.5.3.3.1.5.3.3.1.5.3. TextTextTextText WrappingWrappingWrappingWrapping BreakBreakBreakBreak
To change the text line:(1) Place the insertion point where you want to change the text line.
(2) Go to the PagePagePagePage SetupSetupSetupSetup section of the PagePagePagePage LayoutLayoutLayoutLayout tab, select the TextTextTextText WrappingWrappingWrappingWrapping
BreakBreakBreakBreak option from the BreaksBreaksBreaksBreaks drop-down list.
3.1.5.4.3.1.5.4.3.1.5.4.3.1.5.4. SectionSectionSectionSection BreakBreakBreakBreak
Using Writer, you can insert section breaks into documents. Section breaks include
continuous section breaks, next page section breaks, odd page section breaks, and
even page section breads:
Figure 3.1—8 The four varieties of section break
� Next Page Section Break
Insert a NextNextNextNext PagePagePagePage SectionSectionSectionSection BreakBreakBreakBreak to start a new section on the next page.
� Continuous Section Break
Insert a ContinuousContinuousContinuousContinuous SectionSectionSectionSection BreakBreakBreakBreak to start a new section on the same page.
� Even Page Section Break
Insert an Even Page Section Break to start a new section from the next
even-numbered page.
� Odd Page Section Break

127
Insert an Odd Page Section Break to start a new section from the next odd page.
To insert a section break, go to the PagePagePagePage SetupSetupSetupSetup section of the PagePagePagePage LayoutLayoutLayoutLayout tab, select
one of the different section break options from the BreaksBreaksBreaksBreaks drop-down list.
Tip: If you delete a section break, just position the mouse in the section break, and
then press the delete key。
3.2.3.2.3.2.3.2. PagePagePagePage BorderBorderBorderBorderssss
3.2.1.3.2.1.3.2.1.3.2.1. AddAddAddAddinginginging aaaa PagePagePagePage BorderBorderBorderBorder
To add a page border to your documents, follow these steps:
(1) Go to the PagePagePagePage BorderBorderBorderBorder section of the PagePagePagePage LayoutLayoutLayoutLayout tab, select PagePagePagePage BorderBorderBorderBorder
and open the PagePagePagePage BorderBorderBorderBorder tab in the BordersBordersBordersBorders /Shading/Shading/Shading/Shading dialog box, shown as
follows:
Figure 3.2—1 The Borders/Shading dialog box
(2) In the StyleStyleStyleStyle list box, select the border,variety, such as double line, dotted line,
etc.
(3) In the ColorColorColorColor drop-down list, select the color of the border line.
(4) In theWidthWidthWidthWidth drop-down list, select the width of the border line.
(5) In the ApplyApplyApplyApply totototo drop-down list, select the scope of the application.
(6) Click the OKOKOKOK button to complete the procedure.

128
3.2.2.3.2.2.3.2.2.3.2.2. AddAddAddAddinginginging BordersBordersBordersBorders andandandand ShadingShadingShadingShading totototo TextTextTextText
In addition to adding a border to the pages, you can also add borders and shading to
the text and paragraphs.
3.2.2.1.3.2.2.1.3.2.2.1.3.2.2.1. AddAddAddAddinginginging BordersBordersBordersBorders
To add a border:
(1) Select the text that you want to add the border to.
(2) Go to the PagePagePagePage BordersBordersBordersBorders section in the PagePagePagePage BorderBorderBorderBorder tab, open the BordersBordersBordersBorders ////
ShadingShadingShadingShading dialog box and select the BordersBordersBordersBorders tab, see below:
Figure 3.2—2 The Borders/Shading dialog box
(3) In the SettingsSettingsSettingsSettings group, select a border style, such as BoxBoxBoxBox, CustomCustomCustomCustom, etc.
(4) In the StyleStyleStyleStyle list box, select the line of the border, such as double line or dotted
line, etc.
(5) In the ColorColorColorColor drop-down list, select the color of the border line.
(6) In theWidthWidthWidthWidth drop-down list, select the width of the border line.
(7) In the ApplyApplyApplyApply totototo drop-down list, select the scope of the application. Either select
the text you want to apply the border to, or, if you had already selected the text,
omit this step. You can then click the OKOKOKOK button to complete the process.
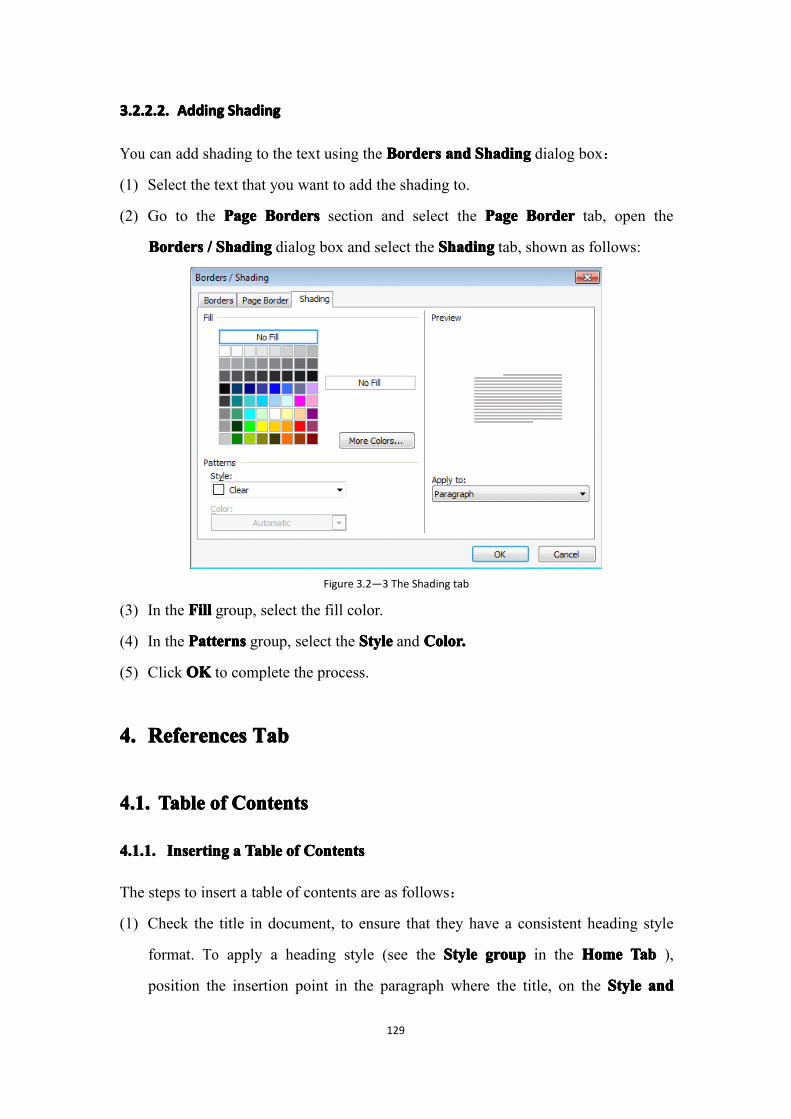
129
3.2.2.2.3.2.2.2.3.2.2.2.3.2.2.2. AddAddAddAddinginginging ShadingShadingShadingShading
You can add shading to the text using the BordersBordersBordersBorders andandandand ShadingShadingShadingShading dialog box:
(1) Select the text that you want to add the shading to.
(2) Go to the PagePagePagePage BordersBordersBordersBorders section and select the PagePagePagePage BorderBorderBorderBorder tab, open the
BordersBordersBordersBorders //// ShadingShadingShadingShading dialog box and select the ShadingShadingShadingShading tab, shown as follows:
Figure 3.2—3 The Shading tab
(3) In the FiFiFiFillllllll group, select the fill color.
(4) In the PatternsPatternsPatternsPatterns group, select the StyleStyleStyleStyle and Color.Color.Color.Color.
(5) Click OKOKOKOK to complete the process.
4.4.4.4. ReferencesReferencesReferencesReferences TabTabTabTab
4.1.4.1.4.1.4.1. TableTableTableTable ofofofof ContentsContentsContentsContents
4.1.1.4.1.1.4.1.1.4.1.1. InsertInsertInsertInsertinginginging aaaa TableTableTableTable ofofofof ContentsContentsContentsContents
The steps to insert a table of contents are as follows:
(1) Check the title in document, to ensure that they have a consistent heading style
format. To apply a heading style (see the StyleStyleStyleStyle groupgroupgroupgroup in the HomeHomeHomeHome TabTabTabTab ),
position the insertion point in the paragraph where the title, on the StyleStyleStyleStyle andandandand

130
FormattingFormattingFormattingFormatting task window, in the ClickClickClickClick FormattingFormattingFormattingFormatting totototo applyapplyapplyapply drop-down list,
select a heading style.
(2) Place the insertion point where you want to insert the table of contents, this is
usually at the beginning of the document.
(3) In the TableTableTableTable ofofofof ContentsContentsContentsContents section of the ReferencesReferencesReferencesReferences tab, select the InsertInsertInsertInsert TableTableTableTable ofofofof
ContentsContentsContentsContents option,,,, and open the TableTableTableTable ofofofof ContentContentContentContent dialog box, shown as follows:
Figure 4.1—1 The Table of Contents menu
� Selecting the ShowShowShowShow pagepagepagepage numbersnumbersnumbersnumbers check box will display numbers beside
each title.
� Selecting the RightRightRightRight alignalignalignalign pagepagepagepage numbersnumbersnumbersnumbers check box will align the page
numbers to the right.
� Selecting the UseUseUseUse hyperlinkshyperlinkshyperlinkshyperlinks check box will make the table of contents
automatically generate hyperlinks with the corresponding contents.
(4) In the TabTabTabTab leaderleaderleaderleader drop-down list, you can specify the distance of the break
between the title and the page number.
(5) In the ShowShowShowShow levelslevelslevelslevels tuning box, you can specify the title level that shows in the
table of contents (when you specify 1, only Heading style 1 shows in the
directory. When you select 2, the styles of heading 1 and heading 2 will both
appear in the directory).
(6) Click the OKOKOKOK button, the results are shown as follows:

131
Figure 4.1—2 An inserted contents table
4.1.2.4.1.2.4.1.2.4.1.2. UpdateUpdateUpdateUpdate ToCToCToCToC
Updating the ToC is very simple, go to the TableTableTableTable ofofofof ContentContentContentContent section of the
ReferencesReferencesReferencesReferences tab, select the UpdateUpdateUpdateUpdate ToCToCToCToC option,,,, or right-click and open the shortcut
menu. Select UpdateUpdateUpdateUpdate FieldFieldFieldField and open the UpdateUpdateUpdateUpdate TableTableTableTable ofofofof ContentsContentsContentsContents dialog box,
shown as follows:
Figure 4.1—3 The Update Table Of Contents dialog box
� If you select the UpdateUpdateUpdateUpdate pagepagepagepage numbersnumbersnumbersnumbers onlyonlyonlyonly option, then only the numbers of
the existing catalog will be updated, the table of contents will not increase or
change.
� If you select UpdateUpdateUpdateUpdate entireentireentireentire tabletabletabletable, it will re-create and update the whole contents
table.
Skill:Skill:Skill:Skill: If you want to copy the whole table of contents to another file, and then save or
print alone, you must be disconnected link with the original text, otherwise, it will

132
appear page number errors when you save and print the page. The specific method is
that select the whole table of contents, and press <Ctrl+Shift+F9> key.
4.1.3.4.1.3.4.1.3.4.1.3. DeletDeletDeletDeletinginginging aaaa TableTableTableTable ofofofof ContentsContentsContentsContents
To delete a table of contents, select the entire thing and press <Delete><Delete><Delete><Delete>.
4.1.4.4.1.4.4.1.4.4.1.4. AddAddAddAddinginginging TextTextTextText
To format a table of contents to include the text without a heading style,follow these
steps:
(1) Select the text included in the contents table.
(2) Go to the TableTableTableTable ofofofof ContentContentContentContent section of the ReferencesReferencesReferencesReferences tab and click the AddAddAddAdd
TextTextTextText option....
(3) Select the level you want....
(4) Repeat steps 1 to step 3 until all the text you want is displayed in the table of
contents.
4.2.4.2.4.2.4.2. FootnotesFootnotesFootnotesFootnotes andandandand EndnotesEndnotesEndnotesEndnotes
Footnotes and endnotes are used to provide modifications, comments, or references
for a written document. Footnotes, located at the bottom of the current page or below
the text, explain what the text means or add further detail, while endnotes are printed
references located at the end of a document.
A footnote or endnote consists of two related parts: the note reference mark, and the
corresponding note text. The note reference mark appears in both the document and
the note area. You can enter note text of any length.
4.2.1.4.2.1.4.2.1.4.2.1. InsertInsertInsertInsertinginginging aaaa FootnoteFootnoteFootnoteFootnote orororor anananan EndnoteEndnoteEndnoteEndnote
The steps are as follows:
(1) Place the insertion point where you want the footnote or endnote mark to be
located.
(2) Go to the FootnoteFootnoteFootnoteFootnotes section of the ReferencesReferencesReferencesReferences tab, select the InsertInsertInsertInsert
Footnotes/EndnotesFootnotes/EndnotesFootnotes/EndnotesFootnotes/Endnotes option to open the FootnoteFootnoteFootnoteFootnote andandandand EndnoteEndnoteEndnoteEndnote dialog box,
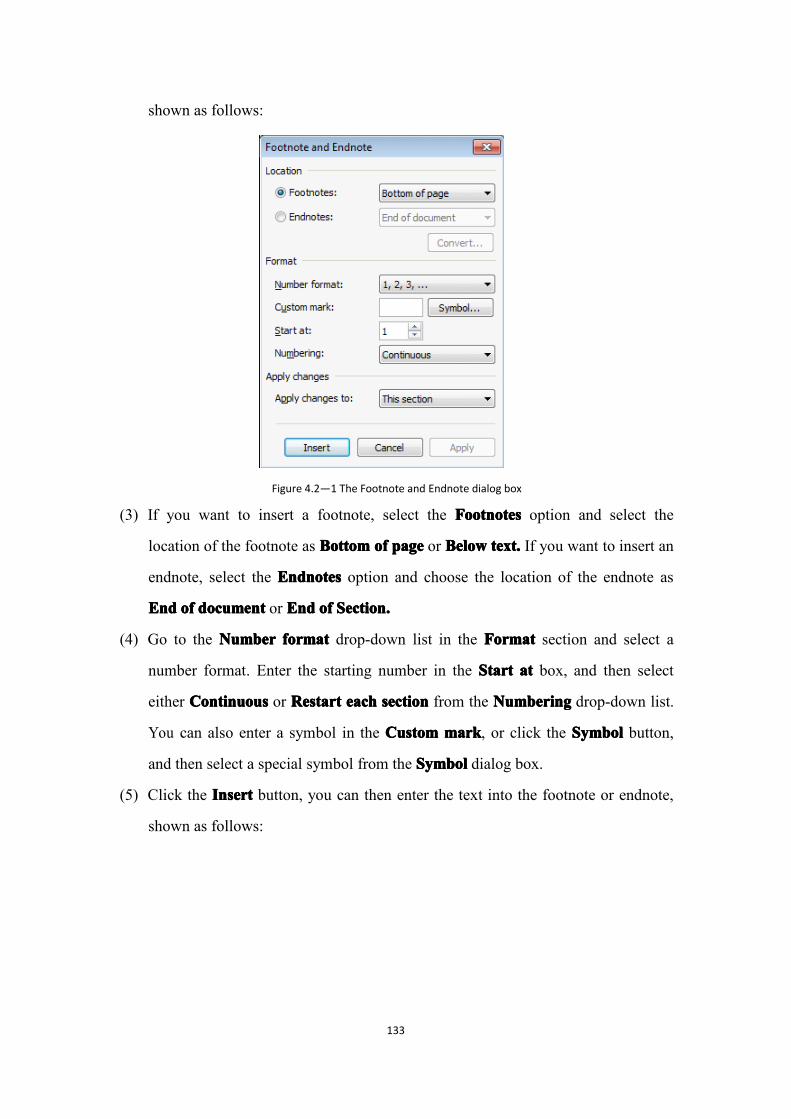
133
shown as follows:
Figure 4.2—1 The Footnote and Endnote dialog box
(3) If you want to insert a footnote, select the FootnFootnFootnFootnotesotesotesotes option and select the
location of the footnote as BottomBottomBottomBottom ofofofof pagepagepagepage or BelowBelowBelowBelow text.text.text.text. If you want to insert an
endnote, select the EndnotesEndnotesEndnotesEndnotes option and choose the location of the endnote as
EndEndEndEnd ofofofof documentdocumentdocumentdocument or EndEndEndEnd ofofofof Section.Section.Section.Section.
(4) Go to the NumberNumberNumberNumber formatformatformatformat drop-down list in the FormatFormatFormatFormat section and select a
number format. Enter the starting number in the StartStartStartStart atatatat box, and then select
either ContinuousContinuousContinuousContinuous or RestartRestartRestartRestart eacheacheacheach sectionsectionsectionsection from the NumberingNumberingNumberingNumbering drop-down list.
You can also enter a symbol in the CustomCustomCustomCustom markmarkmarkmark, or click the SymbolSymbolSymbolSymbol button,
and then select a special symbol from the SymbolSymbolSymbolSymbol dialog box.
(5) Click the InsertInsertInsertInsert button, you can then enter the text into the footnote or endnote,
shown as follows:

134
Figure 4.2—2 The effect of footnotes
4.2.2.4.2.2.4.2.2.4.2.2. EditEditEditEditinginginging FootnotesFootnotesFootnotesFootnotes orororor EndnotesEndnotesEndnotesEndnotes
If you want to move a note:
(1) Select the the appropriate note.
(2) Move the cursor over the note and hold the left mouse button. Drag the note to
the new location, then release the button.
You can also use the CutCutCutCut and PastePastePastePaste command to move footnotes.
If you want to copy a note:
(1) Select the the appropriate note.
(2) Move the cursor over the note, and hold the CtrlCtrlCtrlCtrl key while dragging the mouse.
You can then copy the note to a new location, and insert text into the note area.
In addition, you can also use the CopyCopyCopyCopy and PastePastePastePaste command to copy the footnote.
To delete a footnote or an endnote, select it and then press Delete.Delete.Delete.Delete. You should also
delete the note reference mark in the document so that the other reference numbers
can update accordingly..
Tips:Tips:Tips:Tips: To see a footnote or an endnote, double-click on the reference number.

135
4.2.3.4.2.3.4.2.3.4.2.3. ConvertConvertConvertConvertinginginging FootnotesFootnotesFootnotesFootnotes andandandand EndnotesEndnotesEndnotesEndnotes
Footnotes can be converted into endnotes, and vice versa. To do this, follow these
steps:
(1) Right-click the footnote or endnote.
(2) Open the shortcut menu and select ConvertConvertConvertConvert ToToToTo EndnoteEndnoteEndnoteEndnote or ConvertConvertConvertConvert ToToToTo
FootnoteFootnoteFootnoteFootnote:
Figure 4.2—3 Converting footnotes and endnotes
4.2.4.4.2.4.4.2.4.4.2.4. LocatingLocatingLocatingLocating Footnotes/EndnotesFootnotes/EndnotesFootnotes/EndnotesFootnotes/Endnotes
To go to a footnote or an endnote, follow these steps:
(1) Place the cursor in the text that includes the footnote or endnote.
(2) Go to the FootnoteFootnoteFootnoteFootnotes section of the ReferencesReferencesReferencesReferences tab and select the GoGoGoGo totototo thethethethe
Footnotes/EndnotesFootnotes/EndnotesFootnotes/EndnotesFootnotes/Endnotes option. This will open the FootnoteFootnoteFootnoteFootnote andandandand EndnoteEndnoteEndnoteEndnote dialog
box, shown as follows:
Figure 4.2—4 The View Footnotes menu
(3) Select either ViewViewViewView footnotefootnotefootnotefootnote areaareaareaarea or SeeSeeSeeSee endnoteendnoteendnoteendnote areaareaareaarea and click OKOKOKOK.... You can
then view the batch of footnotes or endnotes in the document.
4.3.4.3.4.3.4.3. CaptionsCaptionsCaptionsCaptions
4.3.1.4.3.1.4.3.1.4.3.1. AddAddAddAddinginginging CaptionsCaptionsCaptionsCaptions
If you want to add captions to the existing tables, charts, formulas, or other items:

136
(1) Select an item for which you want to insert a caption.
(2) Go to the CaptionsCaptionsCaptionsCaptions section of the ReferencesReferencesReferencesReferences tab and select the CaptionCaptionCaptionCaption option....
This will open the CaptionCaptionCaptionCaption dialog box.
(3) Select the desired label from the LabelLabelLabelLabel drop-down list, such as Equation,Equation,Equation,Equation, FigureFigureFigureFigure
or TableTableTableTable.
(4) If these labels do not meet your needs, click the NewNewNewNew labellabellabellabel button and open the
NewNewNewNew labellabellabellabel dialog box. Enter the name in the LabelLabelLabelLabel option, then click the OKOKOKOK
button to return to the CaptionCaptionCaptionCaption dialog box. At this point, the new label will
appear in the LabelLabelLabelLabel drop-down list.
Figure 4.3—1 The Caption dialog box Figure 4.3—2 The New Label dialog box
(5) Kingsoft Writer also provides an adding chapter numbers function. Select the
NumberingNumberingNumberingNumbering option, and open the CaptionCaptionCaptionCaption NumberingNumberingNumberingNumbering dialog box, shown as
follows. Choose the IncludeIncludeIncludeInclude ChapterChapterChapterChapter numbernumbernumbernumber check box, this allows you to add
chapter numbers to the document.
Figure 4.3—3 Setting the caption numbering
(6) Click the OKOKOKOK button to complete. If you want to add text, you can enter the text
in the end of caption, shown as follows:
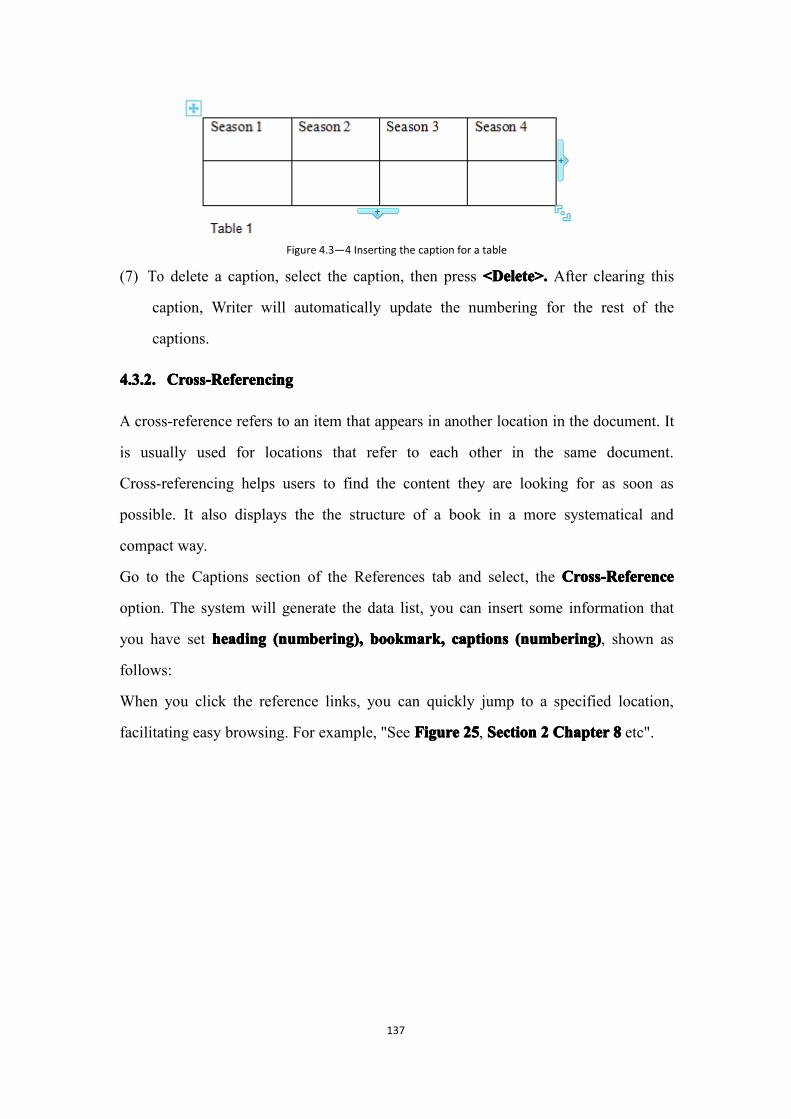
137
Figure 4.3—4 Inserting the caption for a table
(7) To delete a caption, select the caption, then press <Delete>.<Delete>.<Delete>.<Delete>. After clearing this
caption, Writer will automatically update the numbering for the rest of the
captions.
4.3.2.4.3.2.4.3.2.4.3.2. Cross-ReferencCross-ReferencCross-ReferencCross-Referencinginginging
A cross-reference refers to an item that appears in another location in the document. It
is usually used for locations that refer to each other in the same document.
Cross-referencing helps users to find the content they are looking for as soon as
possible. It also displays the the structure of a book in a more systematical and
compact way.
Go to the Captions section of the References tab and select, the Cross-ReferenceCross-ReferenceCross-ReferenceCross-Reference
option. The system will generate the data list, you can insert some information that
you have set headingheadingheadingheading (numbering),(numbering),(numbering),(numbering), bookmark,bookmark,bookmark,bookmark, captionscaptionscaptionscaptions (numbering)(numbering)(numbering)(numbering), shown as
follows:
When you click the reference links, you can quickly jump to a specified location,
facilitating easy browsing. For example, "See FigureFigureFigureFigure 25252525, SectionSectionSectionSection 2222 ChapterChapterChapterChapter 8888 etc".

138
Figure 4.3—5 The cross-reference settings
5.5.5.5. MailingsMailingsMailingsMailings TabTabTabTab
5.1.5.1.5.1.5.1. MailingsMailingsMailingsMailings
To create a mail merge:
(1) Open or create the main document.
(2) Go to the StartStartStartStart MailMailMailMail MarginMarginMarginMargin section of the MailingsMailingsMailingsMailings tab and select the OpenOpenOpenOpen
DataDataDataData SourceSourceSourceSource option. Open the relevant data source, shown as follows:

139
Figure 5.1—1 Selecting from the Data Source dialog box
(3) Select the InsertInsertInsertInsert MergeMergeMergeMerge FieldsFieldsFieldsFields option from the WriteWriteWriteWrite &&&& InsertInsertInsertInsert FieldsFieldsFieldsFields section.
This opens the InsertInsertInsertInsert MergeMergeMergeMerge FieldFieldFieldField dialog box:
Figure 5.1—2 The Insert Merge Field dialog box
(4) Choose the data field that you want to insert.
(5) Click the InsertInsertInsertInsert button to complete the merge.
(6) Select the MailMailMailMail MergeMergeMergeMerge RecipientsRecipientsRecipientsRecipients option from the StartStartStartStart MailMailMailMail MarginMarginMarginMargin section.
In the opened dialog box, select the recipients, you are then free to send the
merged mail.
Tips:Tips:Tips:Tips:
� You can check which kinds of files are accepted as the data source using the
OpenOpenOpenOpen DataDataDataData SourceSourceSourceSource dialog box. Simply selectg the drop-down arrow of the Files
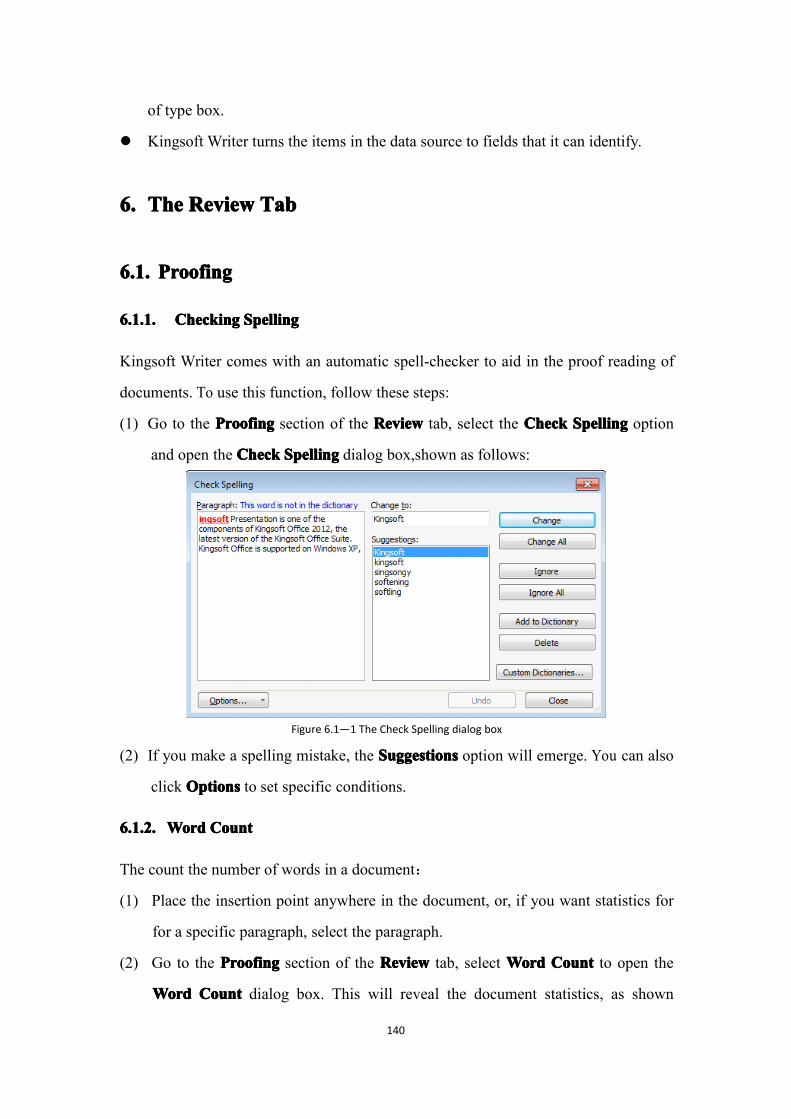
140
of type box.
� Kingsoft Writer turns the items in the data source to fields that it can identify.
6.6.6.6. TheTheTheThe ReviewReviewReviewReview TabTabTabTab
6.1.6.1.6.1.6.1. ProofingProofingProofingProofing
6.1.1.6.1.1.6.1.1.6.1.1. CheckCheckCheckCheckinginginging SpellingSpellingSpellingSpelling
Kingsoft Writer comes with an automatic spell-checker to aid in the proof reading of
documents. To use this function, follow these steps:
(1) Go to the ProofingProofingProofingProofing section of the ReviewReviewReviewReview tab, select the CheckCheckCheckCheck SpellingSpellingSpellingSpelling option
and open the CheckCheckCheckCheck SpellingSpellingSpellingSpelling dialog box,shown as follows:
Figure 6.1—1 The Check Spelling dialog box
(2) If you make a spelling mistake, the SuggestionsSuggestionsSuggestionsSuggestions option will emerge. You can also
click OptionsOptionsOptionsOptions to set specific conditions.
6.1.2.6.1.2.6.1.2.6.1.2. WordWordWordWord CountCountCountCount
The count the number of words in a document:
(1) Place the insertion point anywhere in the document, or, if you want statistics for
for a specific paragraph, select the paragraph.
(2) Go to the ProofingProofingProofingProofing section of the ReviewReviewReviewReview tab, select WordWordWordWord CountCountCountCount to open the
WordWordWordWord CountCountCountCount dialog box. This will reveal the document statistics, as shown

141
below:
Figure 6.1—2 The Word Count dialog box
(3) If you want to include footnotes and endnotes in the word count, select the
IncludeIncludeIncludeInclude footnotesfootnotesfootnotesfootnotes andandandand endnotesendnotesendnotesendnotes check box.
(4) Click CloseCloseCloseClose to complete.
6.2.6.2.6.2.6.2. ChangeChangeChangeChangessss andandandand CommentCommentCommentCommentssss
6.2.1.6.2.1.6.2.1.6.2.1. TrackTrackTrackTrackingingingingModificationsModificationsModificationsModifications
To track modfications:
(1) Select the text that you want to modify.
(2) Go to the ChangeChangeChangeChange andandandand CommentCommentCommentComment section of the ReviewReviewReviewReview tab, either select the
TrackTrackTrackTrack ModificationsModificationsModificationsModifications option from the TrackTrackTrackTrack ModificationsModificationsModificationsModifications drop-down list, or
press <Shift+Ctrl+E><Shift+Ctrl+E><Shift+Ctrl+E><Shift+Ctrl+E>,,,, to enter the modification mode.
(3) If you want to exit the modification mode,, go to the trackedtrackedtrackedtracked changeschangeschangeschanges andandandand
commentscommentscommentscomments section and again select TrackTrackTrackTrack Modifications.Modifications.Modifications.Modifications.
6.2.2.6.2.2.6.2.2.6.2.2. ChangChangChangChanginginginging TrackingTrackingTrackingTracking OptionsOptionsOptionsOptions
The steps to change tracking options are as follows:
(1) Go to the ChangeChangeChangeChange andandandand CommentCommentCommentComment section of the ReviewReviewReviewReview tab, select ChangeChangeChangeChange
TrackingTrackingTrackingTracking OptionsOptionsOptionsOptions from the TrackTrackTrackTrack ModificationsModificationsModificationsModifications drop-down list. This opens the
OptionsOptionsOptionsOptions dialog box, you can then select the TrackTrackTrackTrack ModificationsModificationsModificationsModifications tab, shown as
follows:

142
Figure 6.2—1 The Track Modifications tab dialog box
(2) In theMarkupMarkupMarkupMarkup section, you can adjust the InsertionsInsertionsInsertionsInsertions, DeletionsDeletionsDeletionsDeletions,,,, and CommentCommentCommentComment
ColorColorColorColor options.
(3) In the BalloonsBalloonsBalloonsBalloons option group, you can set ShowShowShowShowAuthor.Author.Author.Author.
(4) Select the UserUserUserUser informationinformationinformationinformation tab, here you can enter the Name,Name,Name,Name, Initials,Initials,Initials,Initials,............etc.
Figure 6.2—2 The User information tab
(5) Click OKOKOKOK to finish.

143
6.2.3.6.2.3.6.2.3.6.2.3. ModifyModifyModifyModifyinginginging thethethethe DocumentDocumentDocumentDocument
To modify a document:
(1) Open the document that you want to modify, and enter the modifying status.
(2) You can edit the document as an ordinary document. However, any changes
made will be marked in the document, shown as follows:
Figure 6.2—3 Modifying text using track modification
Tips:Tips:Tips:Tips: To view a modification, place the cursor in the modified section. This will open the prompt,
including the name, time, and operation of the modification.
(3) In the ChangeChangeChangeChange andandandand CommentsCommentsCommentsComments section, there are four options for modifying text;
FinalFinalFinalFinal ShowingShowingShowingShowing MarkupMarkupMarkupMarkup, FinalFinalFinalFinal, OriginalOriginalOriginalOriginal ShowingShowingShowingShowing MarkupMarkupMarkupMarkup,,,, and OriginalOriginalOriginalOriginal. The
following figure demonstrates the OriginalOriginalOriginalOriginal ShowingShowingShowingShowing MarkupMarkupMarkupMarkup option which lists
the process of the modifications. If you want to clearly see the effect of the
revised document, select the FinalFinalFinalFinal ShowingShowingShowingShowingMarkupMarkupMarkupMarkup option....

144
Figure 6.2—4 The Original Showing Markup view
6.2.4.6.2.4.6.2.4.6.2.4. InsertInsertInsertInsertinginginging CommentCommentCommentCommentssss
Comments are notes attached to specific points in a document. The inserted comments
do not become part of the document until the author accepts them. If you are not
satisfied with the comments you are making, you can delete them as you deem fit. To
do this, follow theses steps:
(1) Place the insertion point where you want to insert the comment.
(2) Go to the ChangeChangeChangeChange andandandand CommentCommentCommentComment section of the ReviewReviewReviewReview tab, and select InsertInsertInsertInsert
Comment.Comment.Comment.Comment.
(3) Enter your comment in the comment balloon.
Figure 6.2—5 Inserting comments
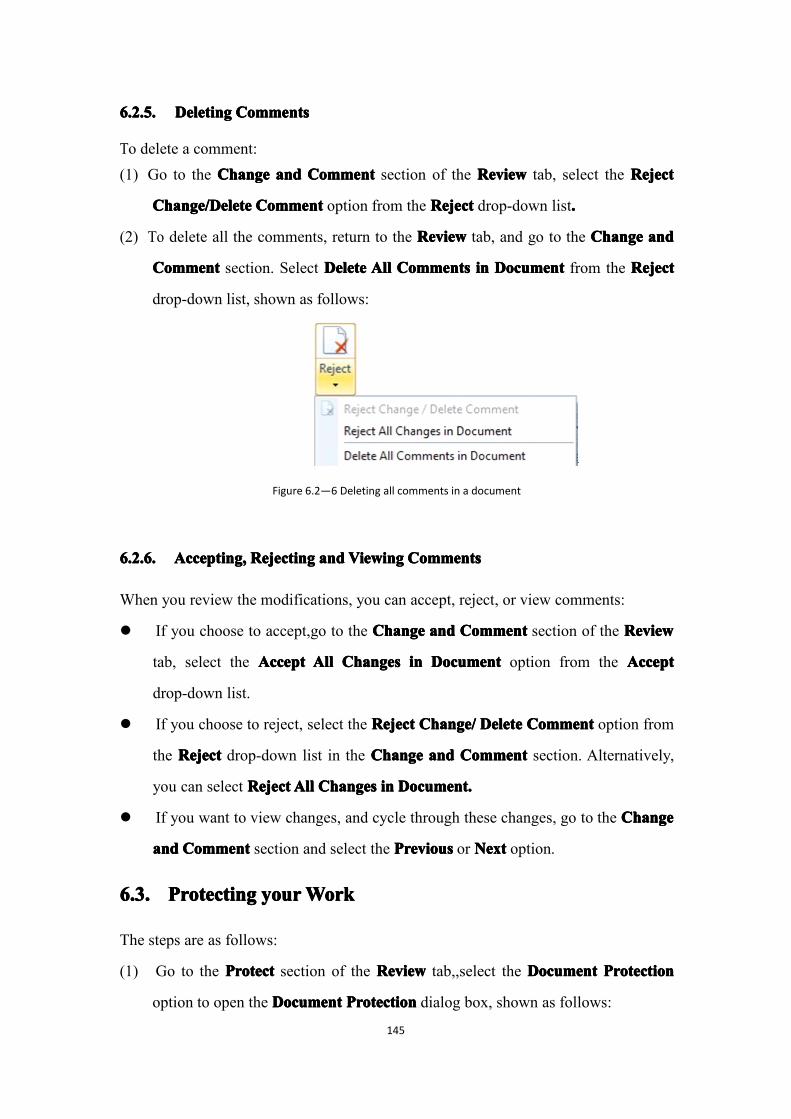
145
6.2.5.6.2.5.6.2.5.6.2.5. DeletDeletDeletDeletinginginging CommentCommentCommentCommentssss
To delete a comment:(1) Go to the ChangeChangeChangeChange andandandand CommentCommentCommentComment section of the ReviewReviewReviewReview tab, select the RejectRejectRejectReject
Change/DeleteChange/DeleteChange/DeleteChange/Delete CommentCommentCommentComment option from the RejectRejectRejectReject drop-down list....
(2) To delete all the comments, return to the ReviewReviewReviewReview tab, and go to the ChangeChangeChangeChange andandandand
CommentCommentCommentComment section. Select DeleteDeleteDeleteDelete AllAllAllAll CommentsCommentsCommentsComments inininin DocumentDocumentDocumentDocument from the RejectRejectRejectReject
drop-down list, shown as follows:
Figure 6.2—6 Deleting all comments in a document
6.2.6.6.2.6.6.2.6.6.2.6. AcceptAcceptAcceptAcceptinginginging,,,, RejectRejectRejectRejectinginginging andandandand ViewViewViewViewinginginging CCCCommentsommentsommentsomments
When you review the modifications, you can accept, reject, or view comments:
� If you choose to accept,go to the ChangeChangeChangeChange andandandand CommentCommentCommentComment section of the ReviewReviewReviewReview
tab, select the AcceptAcceptAcceptAccept AllAllAllAll ChangesChangesChangesChanges inininin DocumentDocumentDocumentDocument option from the AcceptAcceptAcceptAccept
drop-down list.
� If you choose to reject, select the RejectRejectRejectReject Change/Change/Change/Change/ DeleteDeleteDeleteDelete CommentCommentCommentComment option from
the RejectRejectRejectReject drop-down list in the ChangeChangeChangeChange andandandand CommentCommentCommentComment section. Alternatively,
you can select RejectRejectRejectReject AllAllAllAll ChangesChangesChangesChanges inininin Document.Document.Document.Document.
� If you want to view changes, and cycle through these changes, go to the ChangeChangeChangeChange
andandandand CommentCommentCommentComment section and select the PreviousPreviousPreviousPrevious or NextNextNextNext option.
6.3.6.3.6.3.6.3. ProtectProtectProtectProtectinginginging youryouryouryourWorkWorkWorkWork
The steps are as follows:
(1) Go to the ProtectProtectProtectProtect section of the ReviewReviewReviewReview tab,,select the DocumentDocumentDocumentDocument ProtectionProtectionProtectionProtection
option to open the DocumentDocumentDocumentDocument ProtectionProtectionProtectionProtection dialog box, shown as follows:

146
Figure 6.3—1 Protecting form fields in the Document Protection dialog box
(2) Select the FormFormFormForm FieldsFieldsFieldsFields option and enter a password to complete the protection.
(3) Go to the ProtectProtectProtectProtect section and select the DocumentDocumentDocumentDocument ProtectionProtectionProtectionProtection option again, and
enter the password again.
7.7.7.7. ViewViewViewView TabTabTabTab

147
7.1.7.1.7.1.7.1. DocumentDocumentDocumentDocument ViewViewViewView
7.1.1.7.1.1.7.1.1.7.1.1. OutlineOutlineOutlineOutline
To set the outline: go to the DocumentDocumentDocumentDocument ViewViewViewView section of the ViewViewViewView tab, select the
OutlineOutlineOutlineOutline option and choose the OutlineOutlineOutlineOutline tab. Alternatively, you can click the OutlineOutlineOutlineOutline
button in the bottom left corner of the screen to start the outline view, shown as
follows:
Figure 7.1—1 The Outline tab
The functions of the commands in the OutlineOutlineOutlineOutline tab:
� Elevated to the title 1111: upgrade to HeadingHeadingHeadingHeading 1111 where the cursor stops the
paragraph....
� Improved: upgrade a level where the cursor stops the paragraph, such as upgrade
from heading 3 to heading 2.
� Outline level: Displays the style level where the current cursor stops the
paragraph, you can quickly adjust the paragraph style.
� Reduce: reduce a level where the current cursor stops the paragraph.
� Reduced to TextTextTextText: reduce to the text where the cursor stops the paragraph.
� Move: move the cursor on the paragraph above the previous paragraph.
� Down: Move the cursor after a period of falling under paragraph square.
� Fold/Unfold: the folds of the lower style will start in the lower style folding.
� Display level: displays the styles, and you can set.
� Display the first line: Choose ShowShowShowShow thethethethe firstfirstfirstfirst linelinelineline check box, the document
content more than one line of text passages only the first lines, and end of the line
displays ellipsis.
� Display format: Choose DisplayDisplayDisplayDisplay formatformatformatformat check box, this will change all the text
in the document according to established format.

148
� Update the directory: press the update directory button to update the documents
directory.
� Go to the directory: From the document directory press this button to jump to the
designated location.
� Close outline view: click the CloseCloseCloseClose outlineoutlineoutlineoutline viewviewviewview, then close the outline view. This
returns the page to view mode.
7.1.2.7.1.2.7.1.2.7.1.2. SettingSettingSettingSetting aaaa CustomCustomCustomCustom BackgroundBackgroundBackgroundBackground ColorColorColorColor andandandand TextTextTextText ColorColorColorColor
To customize the background color and text color, follow these steps:
(1) Go to the DocumentDocumentDocumentDocument ViewViewViewView section of the ViewViewViewView tab, select the BackgroundBackgroundBackgroundBackground option
to open the BackgroundBackgroundBackgroundBackground dialog box, shown as follows:
Figure 7.1—2 The Custom Background and Schemes menu
(2) You can set the background and text color using either the SchemesSchemesSchemesSchemes of CustomCustomCustomCustom
tab. If you do nothing, the system will set the background and text color to the
default.
7.1.3.7.1.3.7.1.3.7.1.3. PrintPrintPrintPrint PreviewPreviewPreviewPreview
To enter print preview: go to the DocumentDocumentDocumentDocument section of the ViewViewViewView tab,and select the
PrintPrintPrintPrint PPPPreviewreviewreviewreview option. This will take you to the print preview mode. You can also
adjust the preview effect in the PrintPrintPrintPrint PreviewPreviewPreviewPreview tab.
(1) If you need to print, select the PrintPrintPrintPrint PreviewPreviewPreviewPreview tab from the PrintPrintPrintPrint section and click
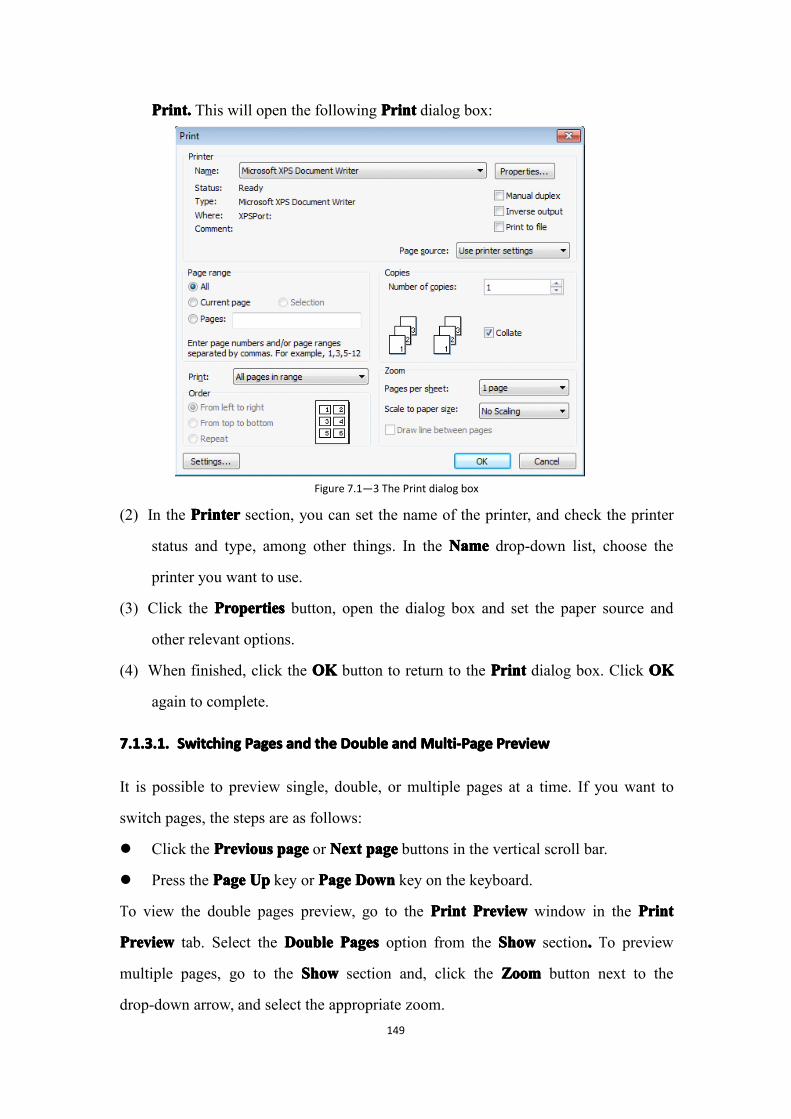
149
PrintPrintPrintPrint.... This will open the following PrintPrintPrintPrint dialog box:
Figure 7.1—3 The Print dialog box
(2) In the PrinterPrinterPrinterPrinter section, you can set the name of the printer, and check the printer
status and type, among other things. In the NameNameNameName drop-down list, choose the
printer you want to use.
(3) Click the PropertiesPropertiesPropertiesProperties button, open the dialog box and set the paper source and
other relevant options.
(4) When finished, click the OKOKOKOK button to return to the PrintPrintPrintPrint dialog box. Click OKOKOKOK
again to complete.
7.1.3.1.7.1.3.1.7.1.3.1.7.1.3.1. SwitchSwitchSwitchSwitchinginginging PagesPagesPagesPages andandandand thethethethe DoubleDoubleDoubleDouble andandandandMulti-PageMulti-PageMulti-PageMulti-Page PreviewPreviewPreviewPreview
It is possible to preview single, double, or multiple pages at a time. If you want to
switch pages, the steps are as follows:
� Click the PreviousPreviousPreviousPrevious pagepagepagepage or NextNextNextNext pagepagepagepage buttons in the vertical scroll bar.
� Press the PagePagePagePage UpUpUpUp key or PagePagePagePage DownDownDownDown key on the keyboard.
To view the double pages preview, go to the PrintPrintPrintPrint PreviewPreviewPreviewPreview window in the PrintPrintPrintPrint
PreviewPreviewPreviewPreview tab. Select the DoubleDoubleDoubleDouble PagesPagesPagesPages option from the ShowShowShowShow section.... To preview
multiple pages, go to the ShowShowShowShow section and, click the ZoomZoomZoomZoom button next to the
drop-down arrow, and select the appropriate zoom.

150
Figure 7.1—4 Magnifying options
7.1.3.2.7.1.3.2.7.1.3.2.7.1.3.2. ChangChangChangChanginginginging thethethethe ProportionProportionProportionProportion ofofofof PrintPrintPrintPrint PreviewPreviewPreviewPreview
To change the ratio of the print preview, you need enter the print preview mode.
Under the 100% status, place the cursor on the page, when the cursor changes to the
shape, click, and the page will magnify to the appropriate degree. To revert to the
100% status, place the cursor back on the screen, when the cursor changes to the
shape, click.
7.2.7.2.7.2.7.2. ShowShowShowShow
7.2.1.7.2.1.7.2.1.7.2.1. DocumentDocumentDocumentDocument MapMapMapMapssss
To open the document map: Go to the ShowShowShowShow section of the ViewViewViewView tab and select the
DocumentDocumentDocumentDocument MapMapMapMap option.... The default mode is PlacePlacePlacePlace onononon LeftLeftLeftLeft, click DocumentDocumentDocumentDocument MapMapMapMap
again to remove this option. In the DocumentDocumentDocumentDocument MapMapMapMap drop-down list, you can select the
PlacePlacePlacePlace onononon Left,Left,Left,Left, PlacePlacePlacePlace onononon RightRightRightRight, and VisibleVisibleVisibleVisible options to set the location of the
document map.
7.2.2.7.2.2.7.2.2.7.2.2. RulersRulersRulersRulers
You can also use the ruler to indent paragraphs signs, the indentation mark is shown
as follows:
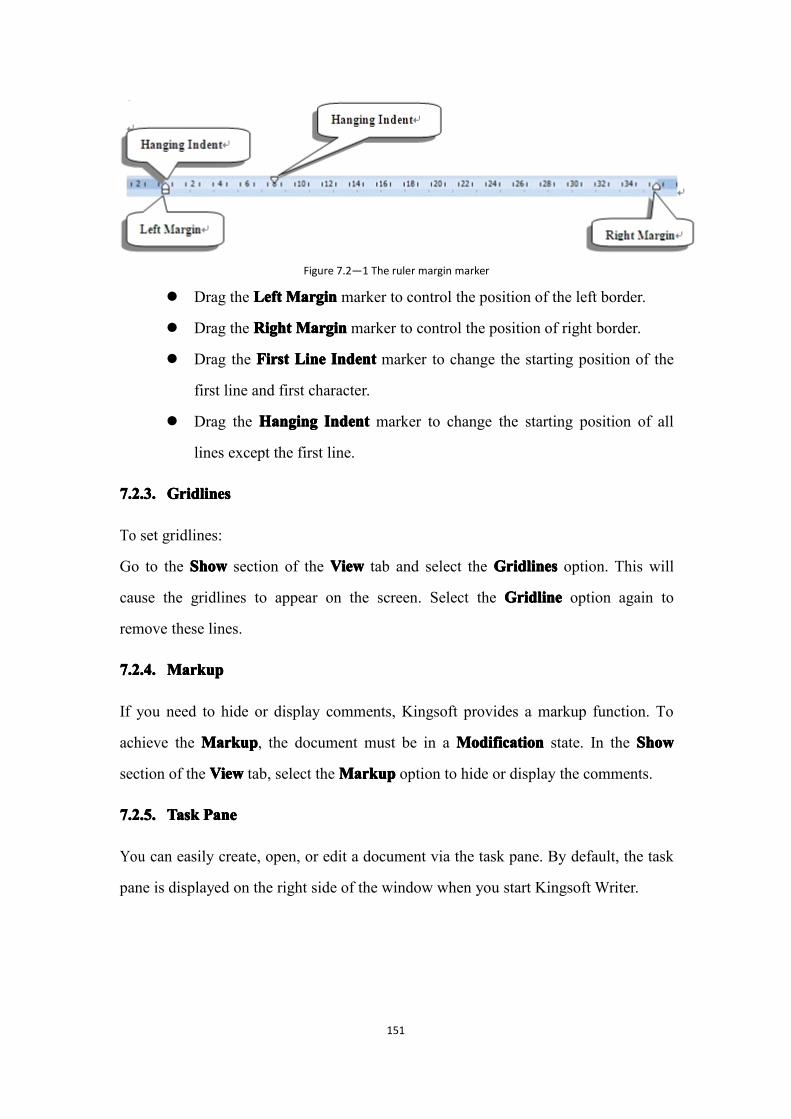
151
Figure 7.2—1 The ruler margin marker
� Drag the LeftLeftLeftLeft MarginMarginMarginMargin marker to control the position of the left border.
� Drag the RightRightRightRight MarginMarginMarginMarginmarker to control the position of right border.
� Drag the FirstFirstFirstFirst LineLineLineLine IndentIndentIndentIndent marker to change the starting position of the
first line and first character.
� Drag the HangingHangingHangingHanging IndentIndentIndentIndent marker to change the starting position of all
lines except the first line.
7.2.3.7.2.3.7.2.3.7.2.3. GridlinesGridlinesGridlinesGridlines
To set gridlines:
Go to the ShowShowShowShow section of the ViewViewViewView tab and select the GridlinesGridlinesGridlinesGridlines option. This will
cause the gridlines to appear on the screen. Select the GridlineGridlineGridlineGridline option again to
remove these lines.
7.2.4.7.2.4.7.2.4.7.2.4. MarkupMarkupMarkupMarkup
If you need to hide or display comments, Kingsoft provides a markup function. To
achieve the MarkupMarkupMarkupMarkup, the document must be in a ModificationModificationModificationModification state. In the ShowShowShowShow
section of the ViewViewViewView tab, select theMarkupMarkupMarkupMarkup option to hide or display the comments.
7.2.5.7.2.5.7.2.5.7.2.5. TaskTaskTaskTask PanePanePanePane
You can easily create, open, or edit a document via the task pane. By default, the task
pane is displayed on the right side of the window when you start Kingsoft Writer.

152
Figure 7.2—2 The Task window
7.2.5.1.7.2.5.1.7.2.5.1.7.2.5.1. UsingUsingUsingUsing thethethethe TaskTaskTaskTask PanePanePanePane
To use the task pane:
(1) Open the task list in the top of the window and select different tasks. This will
cause the contents of the task pane to change. Writer provides the NewNewNewNew BlandBlandBlandBland
DocumentDocumentDocumentDocument, ClipClipClipClip ArtArtArtArt, AutoshapeAutoshapeAutoshapeAutoshape, FormatFormatFormatFormat andandandand StyleStyleStyleStyle,,,, and BackupBackupBackupBackup
managementmanagementmanagementmanagement functions.
(2) Select one fo the commands in the task pane to execute the corresponding action.
(3) Click the CloseCloseCloseClose button in the top right corner of the task pane to close it.
(4) In the ShowShowShowShow section of the ViewViewViewView tab, select the TaskTaskTaskTask Pane,Pane,Pane,Pane, or press the
<Ctrl+F1><Ctrl+F1><Ctrl+F1><Ctrl+F1> shortcut, you can display and hide the task pane.
7.2.5.2.7.2.5.2.7.2.5.2.7.2.5.2. TheTheTheThe ControlControlControlControl TaskTaskTaskTask PanePanePanePane isisisis AutomaticallyAutomaticallyAutomaticallyAutomatically EnabledEnabledEnabledEnabled atatatat StartupStartupStartupStartup
You can toggle whether to automatically start the task pane via the StartupStartupStartupStartup TaskTaskTaskTask
WindowWindowWindowWindow in the OptionsOptionsOptionsOptions dialog box, the steps are as follows:
(1) In the ApplicationApplicationApplicationApplication menu, in the top left corner, select OptionsOptionsOptionsOptions
from the bottom right, and open the OptionsOptionsOptionsOptions dialog box. Choose the ViewViewViewView tab:

153
Figure 7.2—3 The View tab
(2) In the ShowShowShowShow section, select or de-select the StartupStartupStartupStartup TaskTaskTaskTask WindowWindowWindowWindow check box to
complete.
7.2.6.7.2.6.7.2.6.7.2.6. ZoomZoomZoomZoominginginging
The steps are as follows:(1) Go to the ZoomZoomZoomZoom section of the ViewViewViewView tab..
(2) Select the 100%100%100%100% icon, the document will then be displayed in accordance
with the ratio of 100%.(3) Alternatively, select the ZoomZoomZoomZoom option, open the ZoomZoomZoomZoom dialog box, and enter the
proportion you need.(4) Cick OKOKOKOK to complete the process.

154
8.8.8.8. DevelopDevelopDevelopDevelop ToolsToolsToolsTools TabTabTabTab
8.1.8.1.8.1.8.1. FormFormFormForm FieldFieldFieldField
8.1.1.8.1.1.8.1.1.8.1.1. DesignDesignDesignDesign ofofofof thethethethe FormFormFormForm FieldsFieldsFieldsFields
(1) Open Kingsoft Writer, create a form and enter information, shown as follows:
Name GenderHobby ……
(2) Place the cursor after the NameNameNameName cell. Go to the FormFormFormForms section of the DevelopDevelopDevelopDevelop
ToolsToolsToolsTools tab and select TextTextTextText formformformform fieldfieldfieldfield.... YYYYou can then insert text in a cell-type form
domain.
(3) Select the TextTextTextText FormFormFormForm FieldFieldFieldField option, this allows you to set and modify the
properties of form fields:
Figure 8.1—1 The Text Form Field Options dialog box
� Type:Type:Type:Type: You can choose different types of input:
� NormalNormalNormalNormal texttexttexttext: allows to enter text, numbers, symbols and spaces.
� NumberNumberNumberNumber: you can only enter numbers.
� DateDateDateDate: you can only enter a valid date.
� CurrentCurrentCurrentCurrent datedatedatedate: no input, automatically displays the current date.

155
� CurrentCurrentCurrentCurrent timetimetimetime: no input, automatically displays the current time.
� DefaultDefaultDefaultDefault texttexttexttext: the text in the input box will be displayed as the default text.
� MaximumMaximumMaximumMaximum lengthlengthlengthlength: select an acceptable maximum character length, the default
setting is UnlimitedUnlimitedUnlimitedUnlimited.
� TextTextTextText FormatFormatFormatFormat: the text input box, set the format will be here.
� RunRunRunRun macromacromacromacro on:on:on:on: when the cursor is in or out of the text box, Kingsoft Writer
will perform macro operations.
� AddAddAddAdd HelpHelpHelpHelp TextTextTextText: click the AddAddAddAdd HelpHelpHelpHelp TextTextTextText button, you can set the input state,
display the help information.
(4) Place the cursor after the GenderGenderGenderGender cell and select the Drop-downDrop-downDrop-downDrop-down FromFromFromFrom FieldFieldFieldField
option from the FormsFormsFormsForms section.... Double-click this form field to open the
Drop-downDrop-downDrop-downDrop-down FormFormFormForm FieldsFieldsFieldsFields dialog box. Here you can establish the settings you
prefer:
Figure 8.1—2 The Drop-down Form Field Options dialog box
� Select the AddAddAddAdd button, in the IIIItemtemtemtem inininin Drop-downDrop-downDrop-downDrop-down listlistlistlist box, enter and edit the
relevant information.
� RunRunRunRun macromacromacromacro onononon: in the RunRunRunRun macromacromacromacro onononon section, place the cursor in or out of the
zone, Kingsoft Writer will perform macro operations.
� DomainDomainDomainDomain settingssettingssettingssettings: in the DomainDomainDomainDomain settingssettingssettingssettings section, you can set a bookmark
name whether make a calculation in this area.
(5) Place the cursor after the "Favourite" secion and select the FormFormFormForm FieldFieldFieldField CheckCheckCheckCheck

156
option from the FormsFormsFormsForms section.... Double-click this form field to open the CheckCheckCheckCheck
formformformform FilledFilledFilledFilled OptionsOptionsOptionsOptions dialog box. You are then free to set your preferred options,
as shown below:
Figure 8.1—3 The Form Field Options checkbox
� BoxBoxBoxBox sizesizesizesize: you can toggle the size of the set to AutoAutoAutoAuto or fixed.fixed.fixed.fixed.
� DefaultDefaultDefaultDefault: you can toggle whether the check box will be selected as part of the
default settings.
� RunRunRunRun macromacromacromacro onononon: you can set when the text cursor into or out of the zone,
Kingsoft Writer will perform macro operations.
� DomainDomainDomainDomain settingssettingssettingssettings: you can set a bookmark name whether make a calculation in
this area.
8.1.2.8.1.2.8.1.2.8.1.2. ProtectProtectProtectProtect FormFormFormForm
The methods to the protect form are as follows:
� Go to the FormsFormsFormsForms section of the DevelopDevelopDevelopDevelop ToolsToolsToolsTools tab and select the ProtectProtectProtectProtect FormFormFormForm
option to exit the design mode of the form fields. At this point, you can only fill,
select, or modify the form, you can not edit or delete. To return to the edit mode,
select the ProtectProtectProtectProtect FormFormFormForm option again....
� Go to the ProtectProtectProtectProtect section of the ReviewReviewReviewReview tab, select ProtectProtectProtectProtect DocumentDocumentDocumentDocument and open
the ProtectProtectProtectProtect DocumentDocumentDocumentDocument dialog box. Choose the FormFormFormForm FieldFieldFieldField option and enter the

157
password to complete the protection. In the FormsFormsFormsForms section of the DevelopDevelopDevelopDevelop toolstoolstoolstools
tab, select ProtectProtectProtectProtect FormFormFormForm and enter the password to return to the edit mode,
shown as follows:
Figure 8.1—4 Protecting form fields in the Document Protection menu