WORLD WAR 2 Evacuation. WHAT HAVE WE ALREADY LEARNT ABOUT EVACUATION ? Evacuation.
All images courtesy of TruTech Tools Ltd.
B y J i m B e r g m a n n
w w w . r s e s j o u r n a l . c o m12 RSES Journal SEPTEMBER 2012
Proper a/C and refrigeration system installation begins with quality
techniques and good piping practices.
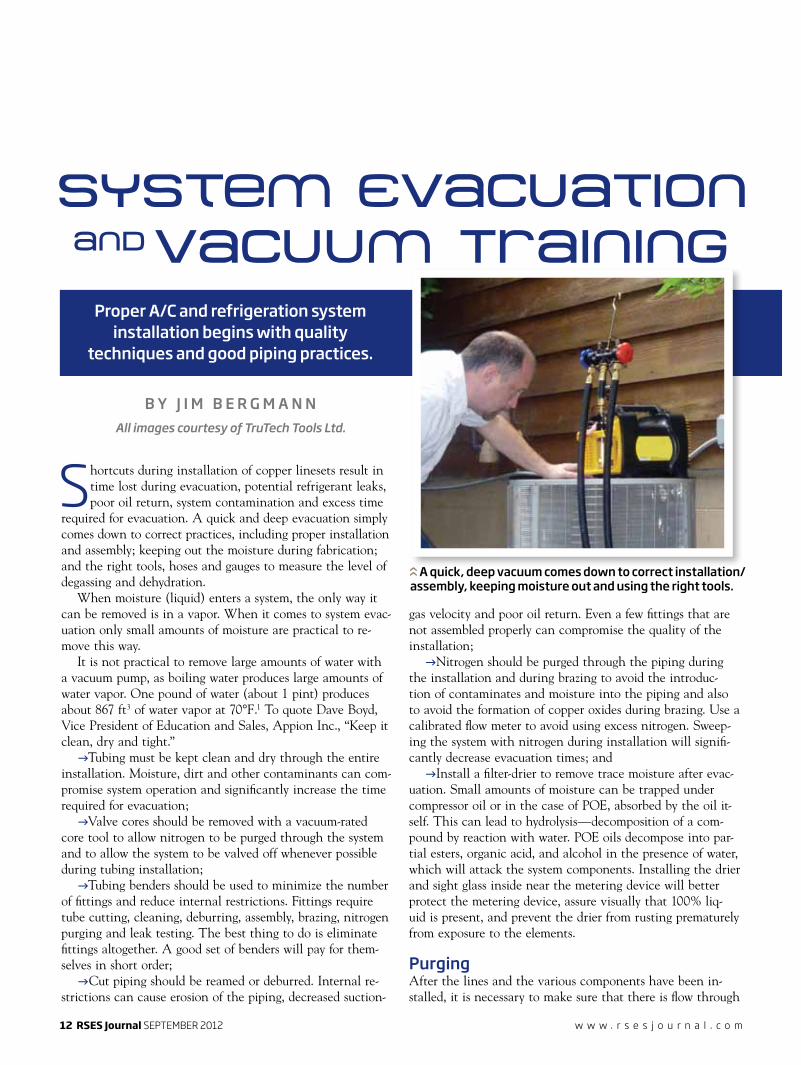
a quick, deep vacuum comes down to correct installation/assembly, keeping moisture out and using the right tools.
Shortcuts during installation of copper linesets result in time lost during evacuation, potential refrigerant leaks, poor oil return, system contamination and excess time
required for evacuation. A quick and deep evacuation simply comes down to correct practices, including proper installation and assembly; keeping out the moisture during fabrication; and the right tools, hoses and gauges to measure the level of degassing and dehydration.
When moisture (liquid) enters a system, the only way it can be removed is in a vapor. When it comes to system evac-uation only small amounts of moisture are practical to re-move this way.
It is not practical to remove large amounts of water with a vacuum pump, as boiling water produces large amounts of water vapor. One pound of water (about 1 pint) produces about 867 ft3 of water vapor at 70°F.1 To quote Dave Boyd, Vice President of Education and Sales, Appion Inc., “Keep it clean, dry and tight.”gTubing must be kept clean and dry through the entire
installation. Moisture, dirt and other contaminants can com-promise system operation and significantly increase the time required for evacuation;gValve cores should be removed with a vacuum-rated
core tool to allow nitrogen to be purged through the system and to allow the system to be valved off whenever possible during tubing installation; gTubing benders should be used to minimize the number
of fittings and reduce internal restrictions. Fittings require tube cutting, cleaning, deburring, assembly, brazing, nitrogen purging and leak testing. The best thing to do is eliminate fittings altogether. A good set of benders will pay for them-selves in short order;gCut piping should be reamed or deburred. Internal re-
strictions can cause erosion of the piping, decreased suction-
gas velocity and poor oil return. Even a few fittings that are not assembled properly can compromise the quality of the installation;gNitrogen should be purged through the piping during
the installation and during brazing to avoid the introduc-tion of contaminates and moisture into the piping and also to avoid the formation of copper oxides during brazing. Use a calibrated flow meter to avoid using excess nitrogen. Sweep-ing the system with nitrogen during installation will signifi-cantly decrease evacuation times; and gInstall a filter-drier to remove trace moisture after evac-
uation. Small amounts of moisture can be trapped under compressor oil or in the case of POE, absorbed by the oil it-self. This can lead to hydrolysis—decomposition of a com-pound by reaction with water. POE oils decompose into par-tial esters, organic acid, and alcohol in the presence of water, which will attack the system components. Installing the drier and sight glass inside near the metering device will better protect the metering device, assure visually that 100% liq-uid is present, and prevent the drier from rusting prematurely from exposure to the elements.
PurgingAfter the lines and the various components have been in-stalled, it is necessary to make sure that there is flow through
System Evacuation Vacuum Trainingand

SEPTEMBER 2012 RSES Journal 13w w w . r s e s j o u r n a l . c o m
Circle Reader Service No. 25
the entire system by purging with a dry gas, such as dry nitrogen, from the liquid side to the suction side to the suction line of the system. Purging will not only carry out small drops of water (if present) but it will also pick up some of the system moisture.
Pressure test with a dry gasA standing pressure test is used to check for leaks by us-ing a dry gas, such as dry nitrogen. Technicians never hope to find leaks while in a vacuum, but it happens. When air leaks in, moisture comes along for the ride, which can take hours to remove if the amount is exces-sive. A temperature-compensated pressure test with a digital manifold will make the process fast and efficient. When using a digital manifold with high-resolution pres-sure sensors, leaks will also be apparent. If installing a typical residential system, the test can be performed and verified in about 15 minutes. Performing this test will again pick up some additional moisture that will not have to be removed during the evacuation process. When re-leasing this high-pressure gas, do not relieve the pressure all the way to atmospheric. Take it down to about 1 psig so air cannot get back into the system.
Test the vacuum pumpAttach the micron gauge directly to the vacuum pump via the 1/4-in. connection and verify that the pump is ca-pable of achieving a vacuum level of 100 microns or less. A good quality pump will easily achieve levels at or be-low 20 microns. Pump blank offs are notorious for leak-ing, so do not depend upon one for isolating the vacuum pump. Use core tools to isolate the pump and the hoses to minimize the chance of gas permeation through the hoses. Remember, even the best vacuum-rated hoses will leak, which is why isolation is a necessity. If the pump cannot achieve 100 microns or less, change the oil to a high-quality, low-vapor-pressure oil. Many times several oil changes are required to remove significant amounts of water from a wet pump. Compared to system breakdown, oil is inexpensive, so change it often. If the pump still will not achieve a deep vacuum, it may be time for re-placement or service.
evacuationA/C and refrigeration systems are designed to operate with only oil and refrigerant flowing through them. When a typical system is installed and/or serviced, air and mois-ture enter the system. Oxygen, nitrogen and moisture are all detrimental to system operation. Removal of the air
System Evacuation Vacuum Training
w w w . r s e s j o u r n a l . c o m
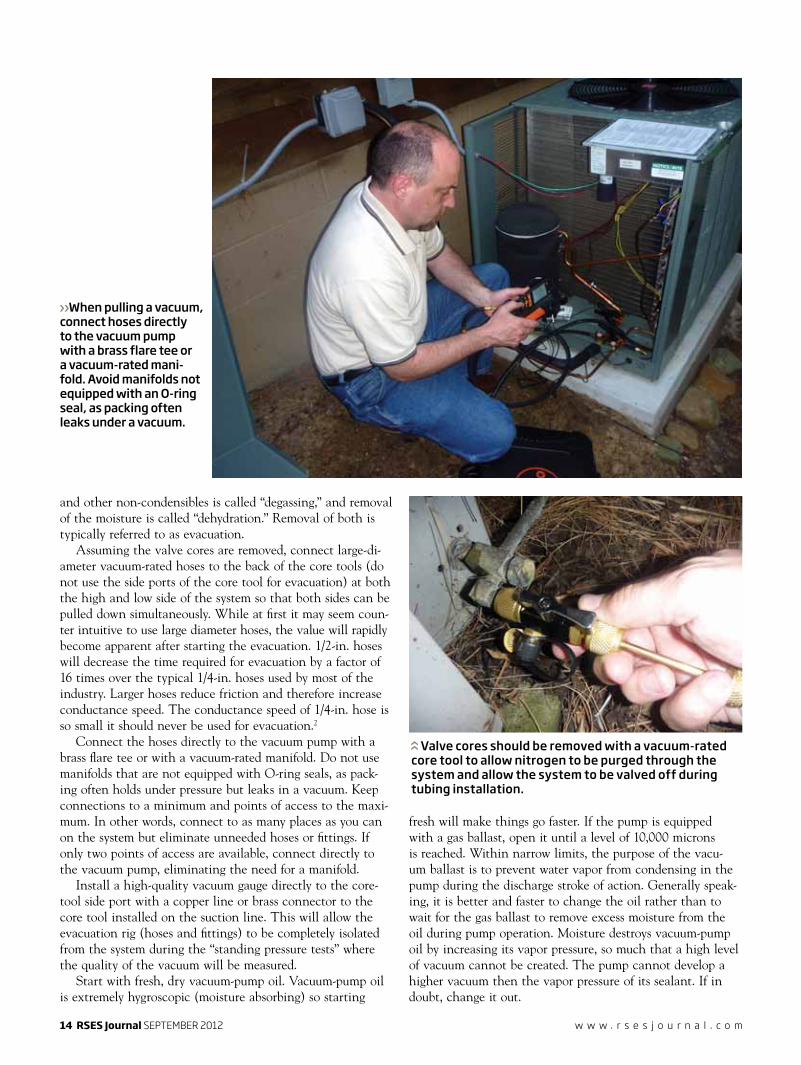
When pulling a vacuum, connect hoses directly to the vacuum pump with a brass flare tee or a vacuum-rated mani-fold. avoid manifolds not equipped with an O-ring seal, as packing often leaks under a vacuum.
recovery/recyclingUnits manufacturedBefore 11/15/1993
recovery/recyclingUnits manufactured
On/after 11/15/1993
appliance/Componentnormally Containing<200 lb refrigerant
0 in. Hg Vacuum
0 in. Hg Vacuum
appliance/Componentnormally Containing≥200 lb refrigerant
4 in. Hg Vacuum
10 in. Hg Vacuum
14 RSES Journal SEPTEMBER 2012
and other non-condensibles is called “degassing,” and removal of the moisture is called “dehydration.” Removal of both is typically referred to as evacuation.
Assuming the valve cores are removed, connect large-di-ameter vacuum-rated hoses to the back of the core tools (do not use the side ports of the core tool for evacuation) at both the high and low side of the system so that both sides can be pulled down simultaneously. While at first it may seem coun-ter intuitive to use large diameter hoses, the value will rapidly become apparent after starting the evacuation. 1/2-in. hoses will decrease the time required for evacuation by a factor of 16 times over the typical 1/4-in. hoses used by most of the industry. Larger hoses reduce friction and therefore increase conductance speed. The conductance speed of 1/4-in. hose is so small it should never be used for evacuation.2
Connect the hoses directly to the vacuum pump with a brass flare tee or with a vacuum-rated manifold. Do not use manifolds that are not equipped with O-ring seals, as pack-ing often holds under pressure but leaks in a vacuum. Keep connections to a minimum and points of access to the maxi-mum. In other words, connect to as many places as you can on the system but eliminate unneeded hoses or fittings. If only two points of access are available, connect directly to the vacuum pump, eliminating the need for a manifold.
Install a high-quality vacuum gauge directly to the core-tool side port with a copper line or brass connector to the core tool installed on the suction line. This will allow the evacuation rig (hoses and fittings) to be completely isolated from the system during the “standing pressure tests” where the quality of the vacuum will be measured.
Start with fresh, dry vacuum-pump oil. Vacuum-pump oil is extremely hygroscopic (moisture absorbing) so starting
fresh will make things go faster. If the pump is equipped with a gas ballast, open it until a level of 10,000 microns is reached. Within narrow limits, the purpose of the vacu-um ballast is to prevent water vapor from condensing in the pump during the discharge stroke of action. Generally speak-ing, it is better and faster to change the oil rather than to wait for the gas ballast to remove excess moisture from the oil during pump operation. Moisture destroys vacuum-pump oil by increasing its vapor pressure, so much that a high level of vacuum cannot be created. The pump cannot develop a higher vacuum then the vapor pressure of its sealant. If in doubt, change it out.
Valve cores should be removed with a vacuum-rated core tool to allow nitrogen to be purged through the system and allow the system to be valved off during tubing installation.
SEPTEMBER 2012 RSES Journal 15w w w . r s e s j o u r n a l . c o m
Circle Reader Service No. 26
First standing test—Pull a vac-uum until a level of 1,000 microns is reached (if using large-diameter hoses and core tools, evacuation of the line-set and evaporator coil will take less than 15 minutes for a typical residen-tial system of up to 5 tons). Isolate the vacuum with the core tools allowing the pump to continue to run and re-cord the leak rate (after about a five minute stabilization period) indicat-ed by the vacuum gauge, if equipped. Leak rate is simply derived from a drop in vacuum over a unit of time, typi-cally displayed in microns per second. A rise in the pressure after a short sta-bilization period indicates there is still moisture in the system or the pres-ence of a small system leak. Use a brass connector between the micron gauge and the access fitting to prevent leaks. Hoses are all gas permeable and will indicate leakage under a standing pressure test.
Second standing test—Open the core tools and allow the system to continue the evacuation process un-til the vacuum level is 500 microns or less. Then repeat the “first stand-ing test” to determine if there is a de-crease in leak rate after the stabiliza-tion of the vacuum. If there is no leak in the system, the second leak rate should be considerably less then the first, indicating progress in the job of dehydration.
moisture vs. a system leakIf the leak rate has not decreased, two things may be happening: the system is still contaminated with moisture (pos-sibly trapped under the compressor oil); or the system has a small leak that was not detected by the initial high-pres-sure test (some leaks are more apparent under vacuum than pressure).
A high-quality, high-resolution vac-uum gauge can indicate a leak much faster than a pressure gauge due to the sensitivity of the instrument. While
the micron gauge is quite capable, test-ing for a leak in a vacuum is not ac-ceptable practice over a standing pres-sure test, as moisture is drawn into the system during the evacuation process. If a leak is found under vacuum, break the vacuum with dry nitrogen and try to find it under a pressure. DO NOT open the system to atmosphere under a vacuum. Doing so undermines all the time and effort up to this point.
If the system has a leak, the vac-uum gauge will continue to rise un-til atmospheric pressure has been reached. However, if the system is vacuum-tight but still contains mois-ture, the rise will level off when the vapor pressure equalizes in the system (typically between 20,000 and 25,000 microns between 72°F and 80°F). At that point, the vacuum reading will become stable. (Note: A system that continues to level off at 3,500–4,500 microns may have turned system mois-ture to ice. Should this occur, the system temperature may have to be raised by an external heat source to get the moisture out of the system.)
If the system indicates moisture, a multiple evacuation with a nitrogen sweep will significantly reduce the amount of moisture in the system. To perform this procedure, reduce the system pressure to between 1,000 and 2,500 microns. Isolate the vacuum pump with the core tools and discon-nect the vacuum hose from the low side of the system. Break the system vacuum with nitrogen introduced at the side port of the core tool. Break the vacuum with nitrogen to the equiv-alent of atmospheric pressure (760,000 microns) then purge nitrogen through the system at 1–3 psig from the high to the low side, letting it vent out the open port of the core tool. Do not pressurize the system, as this will not remove moisture. There is no need to pressurize the system unless performing a leak check.

w w w . r s e s j o u r n a l . c o m16 RSES Journal SEPTEMBER 2012
Increasing the system pressure will actually cause the wa-ter to drop out of the nitrogen similar to that of compressed air in an air compressor. Nitrogen does not absorb water, but entrains it and helps it move along out of the system, allow-ing the liquid water to warm, evaporate and increase the water-vapor pressure without introducing additional moisture into the system. If the system is drying out, deeper levels of vacuum are quickly achieved indicating progress in the job of dehydration. If desired or required, repeat this process un-til the moisture is removed. Typically no more than a triple evacuation with sweep should be required. If marked prog-ress is not achieved during this process, repeat the nitrogen purge to remove liquid moisture that may exist. If a leak is indicated, it must be repaired before the evacuation can be completed.
After the second drop test, check the condition of the vacuum pump oil. Oil that is milky contains moisture and will not allow a finishing vacuum to be achieved due to the increase of vapor pressure and loss of sealing caused by the moisture in the oil. If the oil is wet, change it with clean, dry oil. If in doubt, change it out.
Verify the vacuum pump can achieve low levels of vacuum prior to evacuation. A pump that will not achieve below 100 microns is in need of service; a good pump will achieve 20 microns or less.
Finishing vacuumAfter the second standing test, allow the vacuum pump to run until the system is preferably below 200 microns. (With a good pump 50–100 microns is easily achievable.) Isolate the vacuum rig with the core tools and allow the system to stand for 15–30 minutes. If the micron level does not rise above 500 microns, the evacuation is complete. If the pressure rises above 500, open the core tools again and allow the evacu-ation to continue. Experience and a high-resolution micron gauge will allow for shorter evaluation times.
After the evacuation is complete, if working on a new in-stallation, keep the pump isolated and open (crack) the liq-uid-line service, letting a small amount of refrigerant into the system. When the vacuum gauge indicates “high pressure” of above 760,000 microns, reinstall the valve cores and remove the vacuum gauge and core tools. (Note: Refrigerant may make the vacuum sensor act as if under a vacuum or erratic af-ter removal until the refrigerant vapor is out of the vacuum sen-sor. The sensor is calibrated for air and a refrigerant atmosphere will affect the calibration.) After the core tools have been re-moved, completely open the liquid line first, then the suction line to prevent migration of the refrigerant oil. (Follow the manufacturer’s recommendations if different.)
If servicing an existing installation, break the vacuum with the required system refrigerant prior to removing the core tools, then continue the commissioning procedure as re-quired by the manufacturer.
After evacuating the system, purge the hoses of your manifold with virgin refrigerant to avoid the introduction of moisture or atmosphere into the system.
References:1. Refrigeration Air Conditioning Technology, 5th Edition, 2005.2. Review of Vacuum for Service Engineers, 1988.
Jim Bergmann is an HVAC Instructor at Cuyahoga Valley Ca-reer Center in Brecksville, OH, and the co-owner of TruTech Tools Ltd. He is also an author and technical writer, and fre-quently travels across the country to speak at events, such as instructor workshops and RSES events. He can be reached at [email protected]. For more information, visit www.trutechtools.com.
a pump that will not achieve below 100 microns is in need of service; a good pump will achieve 20 microns or less.