Sys Admin 4.4 - Amazon Simple Storage Service€¦ · System Administrator & User Guide ... MICROS...
23
Concepts & Themes Category Groups Page 29 of 140 mymicros.net System Administrator & User Guide Category Groups A category group is a collection of database items that are combined for reporting purposes. MICROS POS systems use this concept for menu items. For example, menu items can be organized into major groups and family groups. Reports can then be run against one or more of these groups. There is no hierarchy required - family groups do not necessarily have to be a subset of major groups. Please note, there is no limitation to the number of groups that can be created for reporting purposes in mymicros.net. Also, an infinite number of levels may be created to for complex hierarchies if need be. Keep in mind that groups can be created for not only menu items, but also tenders, discounts, service charges, revenue centers, and taxes. Normalizing Data from Multiple Sites The biggest challenge in creating an enterprise database is normalizing data posted from different restaurants, into one consolidated enterprise reports. This means taking every piece of data that each and every store is tracking and converting it into one uniform classification that can be used to create comprehensive and complete reports. Simplifying Normalization Unless all of the restaurants are using MICROS Enterprise Management, or unless the staff that administers all of the databases is disciplined to a fault, the names and object numbers for database items will be different in various stores. This can make it difficult to create consolidated reports. For the average data warehouse, this is an enormous stumbling block. Fortunately, the Enterprise Information Portal uses a superior data warehouse, capable of accomplishing this arduous task. Data items from different POS systems, or different data items from the same POS system, can be normalized to allow consolidated enterprise reporting. The myInsight Data Warehouse addresses the normalization issue with the following features: A Master Item is designated in one specific store for each data item: menu items, discounts, etc. Role Portlets Features and actions that members of this Employee Class can view, perform, or authorize, as defined in Employee Class Privileges. Report Roles Reports available to members of this Employee Class mymicros.net MICROS POS Analogy
-
Upload
vuonghuong -
Category
Documents
-
view
218 -
download
0
Transcript of Sys Admin 4.4 - Amazon Simple Storage Service€¦ · System Administrator & User Guide ... MICROS...

Concepts & ThemesCategory Groups
Page 29 of 140mymicros.netSystem Administrator & User Guide
Category Groups A category group is a collection of database items that are combined for reporting purposes.
MICROS POS systems use this concept for menu items. For example, menu items can be organized into major groups and family groups. Reports can then be run against one or more of these groups. There is no hierarchy required - family groups do not necessarily have to be a subset of major groups.
Please note, there is no limitation to the number of groups that can be created for reporting purposes in mymicros.net. Also, an infinite number of levels may be created to for complex hierarchies if need be. Keep in mind that groups can be created for not only menu items, but also tenders, discounts, service charges, revenue centers, and taxes.
Normalizing Data from Multiple Sites
The biggest challenge in creating an enterprise database is normalizing data posted from different restaurants, into one consolidated enterprise reports. This means taking every piece of data that each and every store is tracking and converting it into one uniform classification that can be used to create comprehensive and complete reports.
SimplifyingNormalization
Unless all of the restaurants are using MICROS Enterprise Management, or unless the staff that administers all of the databases is disciplined to a fault, the names and object numbers for database items will be different in various stores. This can make it difficult to create consolidated reports.
For the average data warehouse, this is an enormous stumbling block. Fortunately, the Enterprise Information Portal uses a superior data warehouse, capable of accomplishing this arduous task. Data items from different POS systems, or different data items from the same POS system, can be normalized to allow consolidated enterprise reporting.
The myInsight Data Warehouse addresses the normalization issue with the following features:
� A Master Item is designated in one specific store for each data item: menu items, discounts, etc.
Role Portlets Features and actions that members of this Employee Class can view, perform, or authorize, as defined in Employee Class Privileges.
Report Roles Reports available to members of this Employee Class
mymicros.net MICROS POS Analogy

Page 30 of 140
Concepts & ThemesNormalizing Data from Multiple Sites
mymicros.netSystem Administrator & User Guide
� Similar items from other stores are aligned to this Master Item.� Aligned items print as a single line item on detail reports, as if they were
identical items.� When the myInsight Data Warehouse encounters a new (unaligned) item, it
attempts to align it automatically to an existing Master Item.� If the system cannot align a data item automatically, the item appears on
exception reports for the System Administrator to review.� The System Administrator can align data items manually.� Master Items can be given multiple aliases. An alias is an alternate name that
the automatic alignment process can use when attempting to find a match for a new data item.
Master Items Similar database items may have different names, sizes, and prices in different restaurants' POS systems. However, they may be alike enough that the enterprise wants to combine them into a single item for reporting purposes. For an explanation on how this is possible, please see the example below.
Four restaurants of the same enterprise serve a variation of the same menu item:
The organization decides that the Columbia location will be the master store, therefore the menu item Co-Cola is designated as the master item. The others will be aligned to this master item so that mymicros.net can generate consolidated reports. Sales and revenue data are combined, and appear as a single line item.
A menu item sales report will display the following reports totals for the period of “Yesterday”:
* 100 + 200 + 300 + 400 = 1,000
** (100 * 1.29) + (200 * 1.25) + (300 * 1.00) + (400 * 1.50) = 1,279.00
Columbia Naples Los Angeles ChicagoMenu Item Name Co-Cola Cola Cola-Pop SodaPrice 1.29 1.25 1.00 1.50Number Sold Yesterday
100 200 300 400
Menu Item Number Sold* Revenue**Co-Cola 1,000 1,279.00

Concepts & ThemesAlignment
Page 31 of 140mymicros.netSystem Administrator & User Guide
MICROS specifies the Master Store based on the information provided by the customer during the initial Site Setup.
For menu items, multiple restaurants can be used to define master items. This is especially useful in an enterprise that includes different restaurant concepts. For example, the chicken items at the Columbia store could be designated as master items, along with the seafood items at the Naples store, and the pizza items from Chicago.
For all other master items (discounts, tenders, tax, etc.), a single location is designated as the master restaurant, but a different restaurant can be the master location for each item. For example, Las Vegas might be the master location for discounts and Columbia could be the master location for menu items.
Alignment When one of the stores in the enterprise enters a new item in its database, that item may be similar to an existing database item. If so, it can be aligned with an existing Master Item in the Data Warehouse, so that report totals for the two items can post as a single line item.
The data warehouse will try to do this by itself. The automatic Alignment process compares the new item to existing Master Items. If there is a match, the new item is aligned to the Master Item, and treated as the same item for reporting purposes.
Inevitably, some database items will elude this process, and will not align automatically. When this occurs, the Sys Admin must align the new item using a Manual Alignment menu.
The types of categories which can be aligned include the following:
Note MICROS recommends that organizations using Enterprise Management (EM) designate the EM Server as the Master Store.
� Accounts � Activities � Adjustments� Allowances � Cashiers � Cost Centers� Cost Groups � Discounts* � Employee Classes� Family Groups* � Financial Managers � Financial Manager
Configuration� Forecast Day
Parts� Forecast Elements � Job Categories
� Job Codes* � Labor Categories* � Major Groups*� Menu Items* � Order Types* � Reason Codes

Page 32 of 140
Concepts & ThemesAlignment
mymicros.netSystem Administrator & User Guide
The above mentioned categories also include alignment categories for the myLabor and myInventory Product. Since myLabor and myInventory both operate via the Enterprise Information Portal (EIP), they have been included in this list. Items marked with an asterisk (*) are those which will specifically be used to carry-out mymicros.net functions.
Alignment &Aliasing
The following points illustrate the automatic and manual alignment processes.
1. During installation of mymicros.net, Master Items for menu items, discounts etc., are defined based on Master Store selection. At this point, database items are not aligned.
2. Totals for all stores post to the data warehouse approximately every 15 minutes via the RTA2
3. Unaligned data (items that are not aligned to a Master Item) post as separate line items on detail reports. The database descriptor is followed by the store number entered in the Locations menu. If no store number exists for a location, the first eight characters of the location name display.
In this example, the menu item Co-Cola at the Columbia store is the Master Item. The other menu items post as separate line items on reports. Note that the Los Angeles store does not have a store number recorded in the Locations menu.
� Revenue Centers* � Service Charges* � Taxes*� Tender Medias* � Units of Measure � Vendors
Note For organizations implementing the Multiple Master Store Feature, Master Items may be defined separately.
2. The RTA is sometimes referred to as the .Connect Agent. These terms are used synony-mously. In this document, the term RTA will be used
Menu Item Number Sold RevenueCo-Cola 100 129.00Pop-Cola/Los Ange 125 250.00Cola/2798 100 300.00Soda/5210 400 600.00Co-Cola/2322 200 400.00Co -Cola/4065 50 62.50

Concepts & ThemesAlignment
Page 33 of 140mymicros.netSystem Administrator & User Guide
4. Once each day, the data warehouse attempts to automatically align data items. Typically, this takes place at 6:00 A.M. EST. Alignment can be based on matching any one of the following:� Name1� Name2 (menu items only)� POS Number (in a MICROS POS, this is the object number)� Name 1 and POS Number.
Using the POS number requires absolute confidence that all restaurant databases are completely identical. It is recommended only for enterprises using MICROS Enterprise Management or its equivalent.
In our example, the Alignment Rules are set to compare menu items based on the Name1 field. Using this rule, the data warehouse aligns the menu item from the Dallas store (Store 2322) to the master item from the Columbia store. Items from Columbia and Dallas are now treated as a single line item in detail reports.
Note that the last item in the list did not align. This is because the name is not spelled exactly the same as the Master Item - there is a space in the description just before the dash.
5. The remaining menu items are flagged as unaligned items and appear on the Unaligned Menu Items Report. On a regular basis, the System Administrator should run the alignment report to see what items are not being consumed by standard alignment rules:
Menu Item Number Sold RevenueCo-Cola 300 529.00Pop-Cola/Los Ange 125 250.00Cola/2798 100 300.00Soda/5210 400 600.00Co -Cola/4065 50 62.50
Unaligned Menu Items
Menu Item Name
New Master Name POS Number Location
Pop-Cola Pop-Cola/Los Ange
12345 Los Angeles
Cola Cola/2798 61687 NaplesSoda Soda/5210 35167 ChicagoCo -Cola Co -Cola/4065 12345 Portland

Page 34 of 140
Concepts & ThemesAlignment
mymicros.netSystem Administrator & User Guide
6. If a System Administrator performs periodic aliasing and alignment tasks, all menu items can be accounted for:
The following diagram shows the process flow for alignment:
Co-Cola has five aliases in addition to its own nameIf one of the locations ads a menu item in the future that has any of the following names...
...the new item will automatically align to this Master Item:
Co-Cola Co-ColaPop-ColaColaSodaCo -Cola

Page 86 of 140
Warehouse AdministrationMiscellaneous
mymicros.netSystem Administrator & User Guide
4. Save
Field DescriptionMenu Item Alignment Based On
Select from four possible methods of alignment:1. POS Number2. Name 13. Name 24. Name 1 and POS Number
General Alignment Type
Select from 3 possible methods of general alignment:1. POS Item Number Only2. POS Name Only3. POS Item Number and Name
BOH Align Type Select from 3 possible methods of back-of-house alignment:1. POS Item Number Only2. POS Name Only3. POS Item Number and Name
Chart Hours Start Enter the starting time (in 24-hour format) for all charts in the portal
Chart Hours End Enter the ending time for all charts in the portal (also 24-hour format)
Standard Food Cost %
Enter a default food cost percentage to be used if none is found in the Master table or included in the data sent from the POS (usually 26%)
Menu Item Name Change
Define how the system will handle a new menu item:� Replace an Old Name or � Create a New Menu Item
Number of Attempts
Enter the number of alignment attempts made for each item (default = 30)
Enable Menu Item Aliasing
Enable this option to activate the aliasing feature (one menu item with multiple possible names)
Enable Other Table Aliasing
Enable this option to allow unaligned menu items to alias with items found in other database tables, not just the Menu Item Master Table
Other Alignment Rules
[Reserved for MICROS Custom Programming]Variable definitions will be entered in this field.
Warehouse AdministrationMiscellaneous
Page 113 of 140mymicros.netSystem Administrator & User Guide
Administeringthe Alignment
Procedure
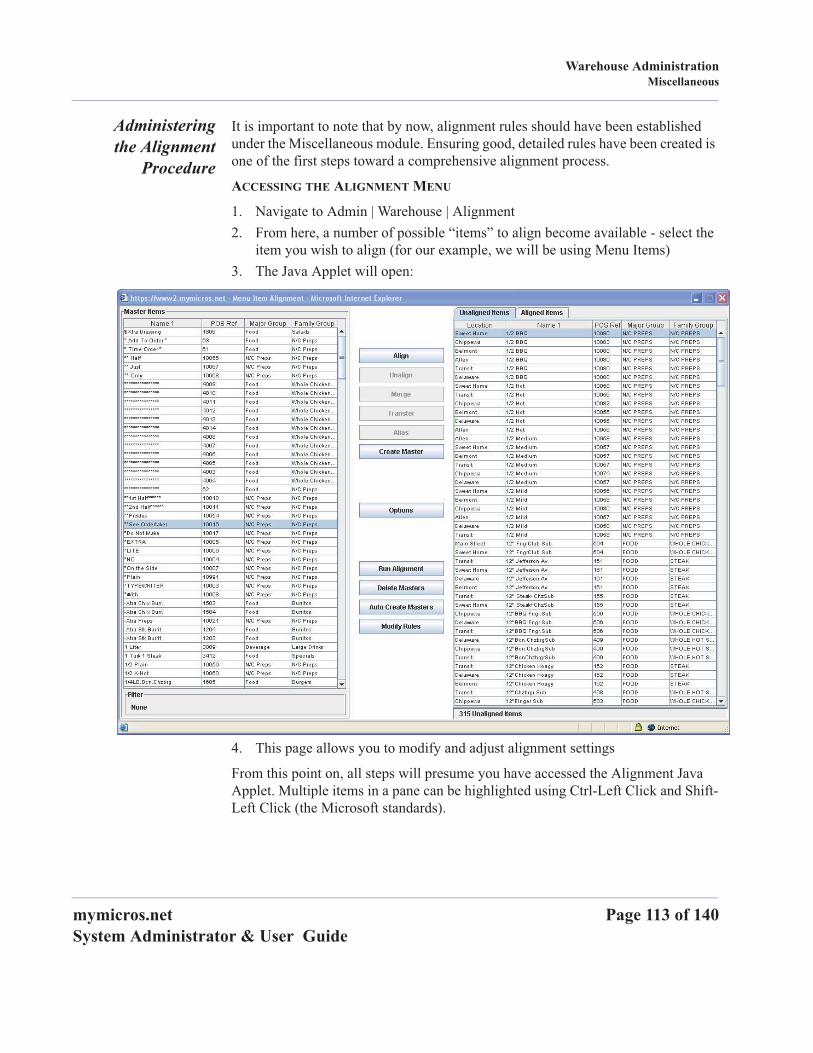
It is important to note that by now, alignment rules should have been established under the Miscellaneous module. Ensuring good, detailed rules have been created is one of the first steps toward a comprehensive alignment process.
ACCESSING THE ALIGNMENT MENU
1. Navigate to Admin | Warehouse | Alignment2. From here, a number of possible “items” to align become available - select the
item you wish to align (for our example, we will be using Menu Items)3. The Java Applet will open:
4. This page allows you to modify and adjust alignment settings
From this point on, all steps will presume you have accessed the Alignment Java Applet. Multiple items in a pane can be highlighted using Ctrl-Left Click and Shift-Left Click (the Microsoft standards).

Page 114 of 140
Warehouse AdministrationMiscellaneous
mymicros.netSystem Administrator & User Guide
ALIGN MENU ITEMS
1. Select unaligned items from the Unaligned Items Tab

Warehouse AdministrationMiscellaneous
Page 115 of 140mymicros.netSystem Administrator & User Guide
2. Select a Master Item to which to align those items
Page 116 of 140
Warehouse AdministrationMiscellaneous
mymicros.netSystem Administrator & User Guide
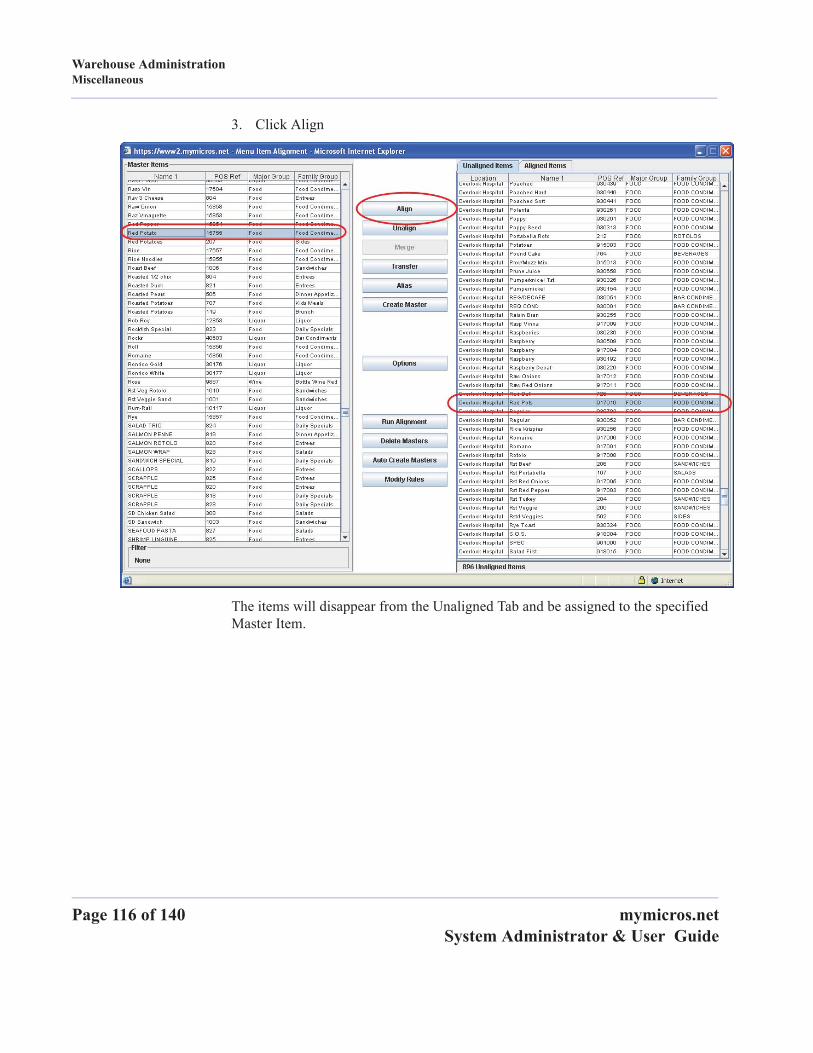
3. Click Align
The items will disappear from the Unaligned Tab and be assigned to the specified Master Item.

Warehouse AdministrationMiscellaneous
Page 117 of 140mymicros.netSystem Administrator & User Guide
UNALIGN ITEMS
1. Select a Master Item from which items will be unaligned

Page 118 of 140
Warehouse AdministrationMiscellaneous
mymicros.netSystem Administrator & User Guide
1. Select aligned items from the Aligned Items Tab

Warehouse AdministrationMiscellaneous
Page 119 of 140mymicros.netSystem Administrator & User Guide
2. Click Unalign

Page 120 of 140
Warehouse AdministrationMiscellaneous
mymicros.netSystem Administrator & User Guide
MERGE ITEMS
Images in this section have been cropped to show better detail and to save space.
1. Highlight 2 or more Master Items to be consolidated and click Merge
2. From the pop-up box, select the Master Item to which the other Master Items will now belong and click OK
Old Master Items become inactive.
TRANSFER ITEMS
Images in this section have been cropped to show greater detail and to save space.

Warehouse AdministrationMiscellaneous
Page 121 of 140mymicros.netSystem Administrator & User Guide
1. Select the Master Item from which an aligned item will be transferred elsewhere
2. Select the aligned items to be transferred
3. Click Transfer
4. From the pop-up window, select the “destination” for the transferred items and click OK

Page 122 of 140
Warehouse AdministrationMiscellaneous
mymicros.netSystem Administrator & User Guide
ALIAS ITEMS
During data loads, the automatic alignment process attempts to align (match) any newly encountered items to existing master items. Any existing items that are already aligned to a master item can be aliased-that is, their definitions can be added to the master item's definition, for matching purposes. The result is that the alignment process has the master item's definition and all of the aliased items' definitions to work with. This increases the chance that the alignment process will find a match for the new item.
Images in this section have been cropped to show greater detail and to save space.
1. Select the Master Item to which the menu item is aligned
2. Select an item from the Aligned Tab you wish to alias
3. Click Alias

Warehouse AdministrationMiscellaneous
Page 123 of 140mymicros.netSystem Administrator & User Guide
The Status column for that item now displays Alias:
To “unalias” the menu item, follow the same instructions above. If you notice, when you select that menu item, the Alias button changes to read “Unalias”:
Other Options CREATE MASTER
Masters can be created based on unaligned menu items. For example, if an organization develops a new “lite fare” menu, those items may not necessary automatically align with existing Menu Item Masters. This feature allows you to take those “misfit” items and create a category entirely for them.
Images in this section have been cropped to show greater detail and to save space.

Page 124 of 140
Warehouse AdministrationMiscellaneous
mymicros.netSystem Administrator & User Guide
1. Select unaligned menu item(s) from the Unaligned Tab
2. Click Create Master
3. From the pop-up window, modify the Name 1 field (if necessary), provide as much additional information as known, and click Create

Warehouse AdministrationMiscellaneous
Page 125 of 140mymicros.netSystem Administrator & User Guide
The Baba Ghanoush now has it’s own Menu Item Master:
OPTIONS
The Options button allows you to select filters for the master items that are displayed.
On the Filter Master Items tab, you can filter by
� None � Name Starts With� Name Contains � Family Group� Major Group

Page 126 of 140
Warehouse AdministrationMiscellaneous
mymicros.netSystem Administrator & User Guide
On the View Columns Tab, you can adjust the number of columns shown in the Tabs.
Options include:
RUN ALIGNMENT
You may choose to expedite the alignment process by using this function. For example, this can be used if a new location has been added to an organization and, rather than wait for the back office alignment process to execute, the menu items are needed to align immediately.
1. Click the Run Alignment button:
A processing indicator will appear:
2. When complete, a process complete dialog box will appear; click OK:
� Location � Name 1� Name 2 � POS Ref� Major Group � Family Group
Warehouse AdministrationMiscellaneous
Page 127 of 140mymicros.netSystem Administrator & User Guide
DELETE MASTERS
This button will delete all master items. Please note, once this button is clicked, the process cannot be reversed. This button is ideal for situations where an error has been made in the development of Master Items and it is necessary to erase all of the masters and start over.
The steps to complete this are similar to those of Run Alignment: click the button and when the process is completed, a dialog box will appear informing you of the deletion.
AUTO CREATE MASTERS
This function allows you to automatically generate master items. For example, if you have an existing organization with, Location A and Location B, with Location A being the Master Store. You have decided to add Location C. You would also like to make Location C the Master Store. You may access the alignment menu and first delete all Masters (see Delete Masters) and then click the Auto Create Masters button which will base all new masters on the configurations at Location C.
The steps to complete this are similar to those of Run Alignment and Delete Masters: click the button and when the process is completed, a dialog box will appear informing you of the automatically created master items.
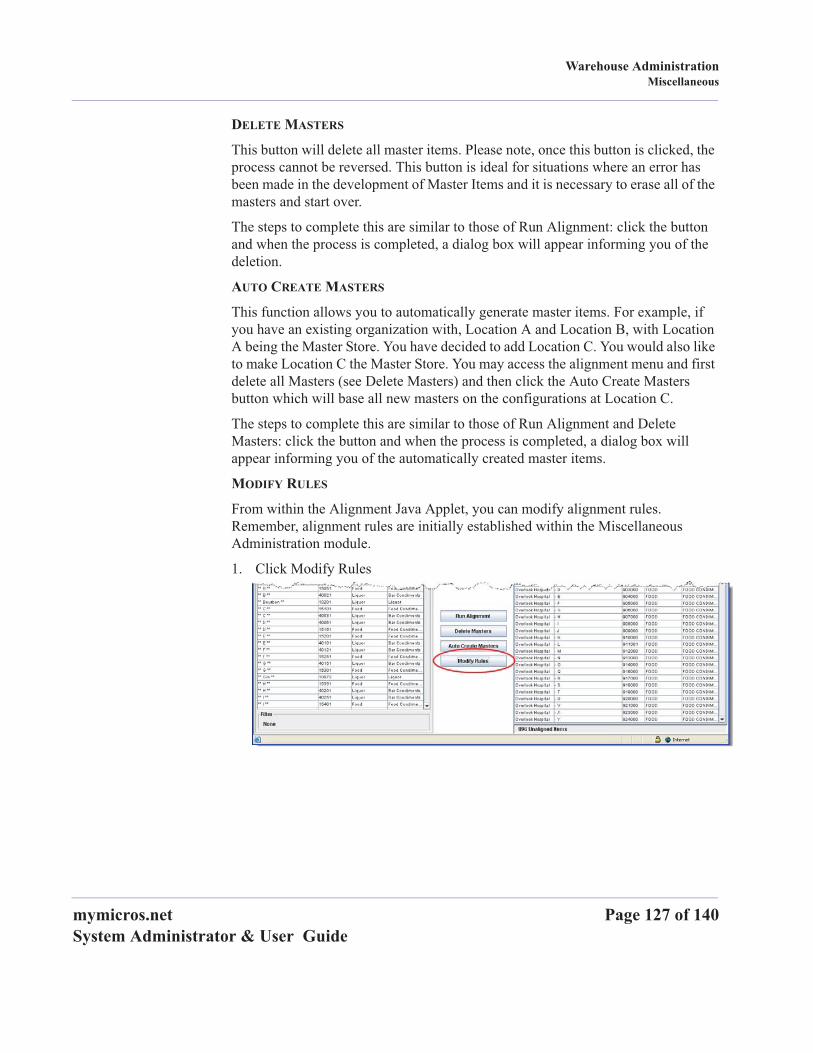
MODIFY RULES
From within the Alignment Java Applet, you can modify alignment rules. Remember, alignment rules are initially established within the Miscellaneous Administration module.
1. Click Modify Rules

Page 128 of 140
Warehouse AdministrationMiscellaneous
mymicros.netSystem Administrator & User Guide
2. Change the fields as necessary and click Create
� Strip Characters - enter the characters that will be stripped out or ignored during the alignment process [like slashes (/), apostrophes (‘), etc.)
Multiple MasterStores