Synthes ProPlan CMF Connect 1.4 Manual -...
59
Synthes ProPlan CMF Connect 1.4 April 2014 L-26006-02 User Manual TM
Transcript of Synthes ProPlan CMF Connect 1.4 Manual -...
Synthes ProPlan CMF Connect 1.4 April 2014
L-26006-02
User Manual
TM

L-26006-02 DSUS/CMF/0414/0027 1
1
/ Contact Information
www.synthescss.com
North America International
Synthes Inc (USA), 1302 Wrights Lane East, West Chester, PA 19380 Phone: +1 866 332 7486 [email protected]
Synthes GmbH (International), Eimattstrasse 3, 4436 Oberdorf, Switzerland Phone: +41 61 965 61 66 [email protected]
Canada Manufactured by:
Synthes Canada Ltd., 2566 Meadowpine Boulevard, Mississauga, Ontario L5N 6P9 Phone: +1 888 855 5513 [email protected]
Materialise NV Technologielaan 15 B-3001 Leuven Belgium Phone: +32 16 744 531
L-26006-02 DSUS/CMF/0414/0027 2
2
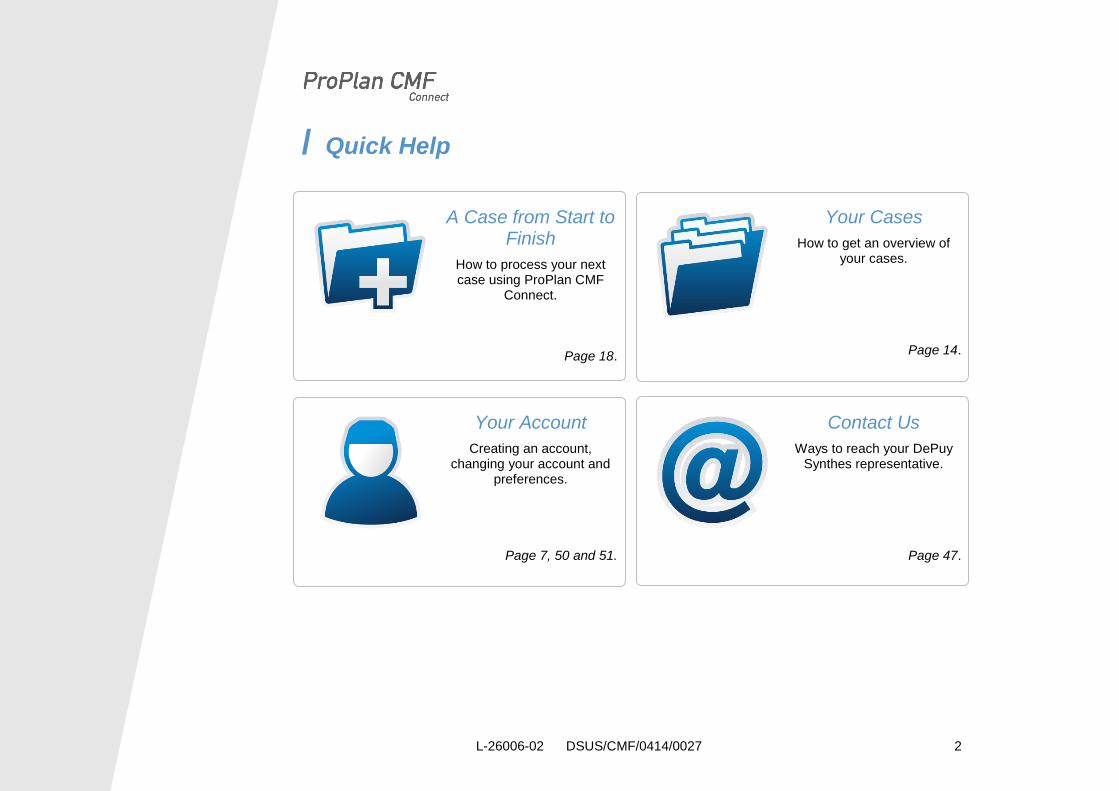
/ Quick Help
A Case from Start to Finish
How to process your next case using ProPlan CMF
Connect.
Page 18.
Your Cases
How to get an overview of your cases.
Page 14.
Your Account
Creating an account, changing your account and
preferences.
Page 7, 50 and 51.
Contact Us
Ways to reach your DePuy Synthes representative.
Page 47.
L-26006-02 DSUS/CMF/0414/0027 3
3
Contents / Contact Information ......................................................................................................................................... 1
/ Quick Help ....................................................................................................................................................... 2
A Case from Start to Finish ................................................................................................................................. 2
Your Cases .......................................................................................................................................................... 2
Your Account ....................................................................................................................................................... 2
Contact Us ........................................................................................................................................................... 2
/ The ProPlan CMF Services Workflow ............................................................................................................. 5
/ Getting started with ProPlan CMF Connect ..................................................................................................... 6
Installing ProPlan CMF Connect ......................................................................................................................... 6
Installation Issue? ................................................................................................................................................ 6
Creating an Account ............................................................................................................................................ 7
Sign In ................................................................................................................................................................. 9
Sign In Error ...................................................................................................................................................... 10
ProPlan CMF Online Server Status ................................................................................................................... 11
The Welcome Screen ........................................................................................................................................ 12
/ Case Management ........................................................................................................................................ 14
View Your Cases ............................................................................................................................................... 14
Creating a Case ................................................................................................................................................. 18
General Case Workflow .................................................................................................................................... 20
Step 1: 3D Model Preparation ........................................................................................................................... 21
Download and Fill Out the Request for Service Form ................................................................................... 21
Uploading Your Request for Service Form .................................................................................................... 25
Uploading Your CT/MRI Images and Additional Files ................................................................................... 29
Approve All Uploads ...................................................................................................................................... 34
Step 2: Surgical Planning .................................................................................................................................. 35

L-26006-02 DSUS/CMF/0414/0027 4
4
Step 3: Guide Design and Production ............................................................................................................... 36
Step 4: Shipment ............................................................................................................................................... 37
/ The 3D Model ................................................................................................................................................ 38
Viewing .............................................................................................................................................................. 38
Discussing the Surgical Plan ............................................................................................................................. 39
Select ............................................................................................................................................................. 40
Measure Distance .......................................................................................................................................... 41
Measure Angle ............................................................................................................................................... 42
Add Text Annotation ...................................................................................................................................... 43
Erase .............................................................................................................................................................. 44
Show/Hide Objects ........................................................................................................................................ 45
/ Mouse and Keyboard Control ........................................................................................................................ 46
Mouse ................................................................................................................................................................ 46
Keyboard ........................................................................................................................................................... 46
/ Communication .............................................................................................................................................. 47
Messages .......................................................................................................................................................... 48
E-mail ................................................................................................................................................................ 49
Web Meetings .................................................................................................................................................... 49
/ Your Account ................................................................................................................................................. 50
Editing Your Account ......................................................................................................................................... 50
Preferences ....................................................................................................................................................... 51
/ System Requirements ................................................................................................................................... 52
/ Troubleshooting ............................................................................................................................................. 53
/ End User License Agreement (EULA) ........................................................................................................... 55
Disclaimer .......................................................................................................................................................... 58
L-26006-02 DSUS/CMF/0414/0027 5
5
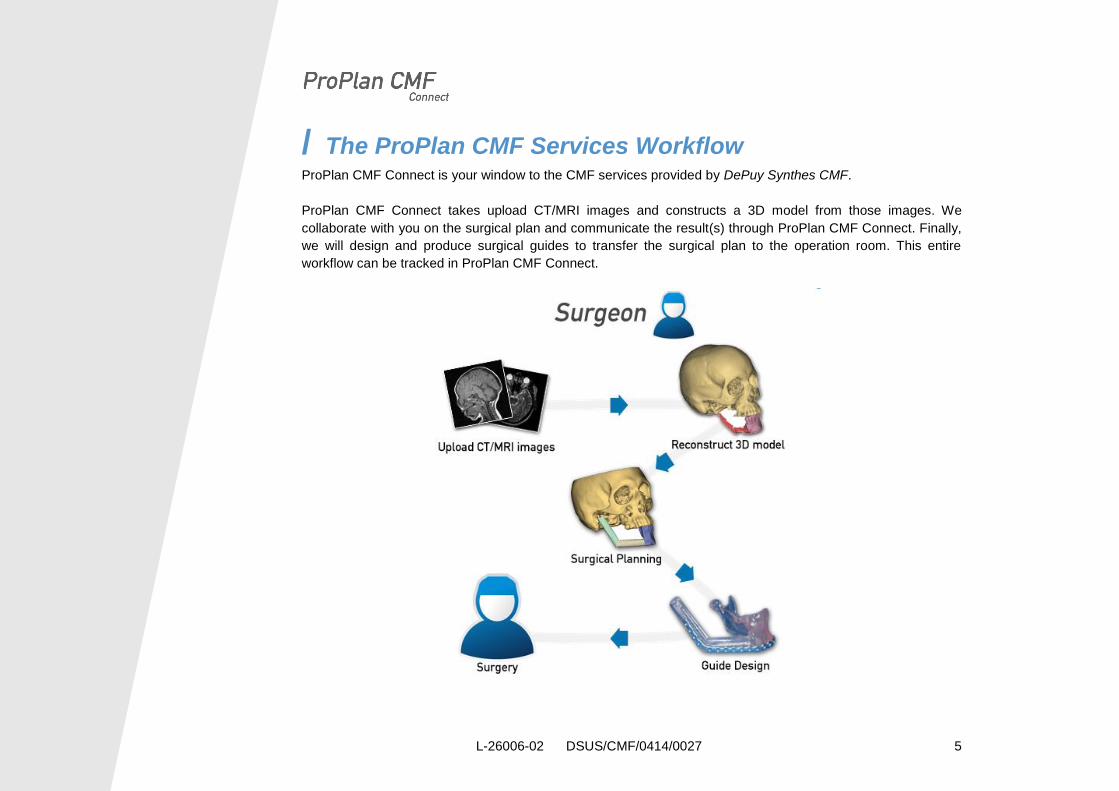
/ The ProPlan CMF Services Workflow ProPlan CMF Connect is your window to the CMF services provided by DePuy Synthes CMF.
ProPlan CMF Connect takes upload CT/MRI images and constructs a 3D model from those images. We
collaborate with you on the surgical plan and communicate the result(s) through ProPlan CMF Connect. Finally,
we will design and produce surgical guides to transfer the surgical plan to the operation room. This entire
workflow can be tracked in ProPlan CMF Connect.
L-26006-02 DSUS/CMF/0414/0027 6
6
/ Getting started with ProPlan CMF Connect
Installing ProPlan CMF Connect
1. First go to the Synthes ProPlan CMF Connect installation page
(http://link.materialise.com/Synthes/ProPlanCMFConnect/).
2. Once you click “Install”, your browser will ask if you would like to download the setup.exe
installer file.
3. Click “Accept”. The “Application Install” window will appear and the installation will begin.
4. Confirm the installation by clicking “Install”.
5. Synthes ProPlan CMF Connect is now installed and will start automatically.
If it does not automatically start, click the ProPlan CMF Connect icon on your desktop.
6. Now you will see the End User License Agreement (EULA): ProPlan CMF Connect can only be used after
the EULA is accepted.
Always up to date
Synthes ProPlan CMF Connect will always be up to date. When you open ProPlan CMF Connect, the program
will first check whether an update is available. If there is, the latest version will be downloaded and installed
automatically.
Installation Issue?
If you are having an issue installing ProPlan CMF Connect, you can contact Synthes Product Development team (See contact info at the beginning of the user guide) for assistance.
L-26006-02 DSUS/CMF/0414/0027 7
7
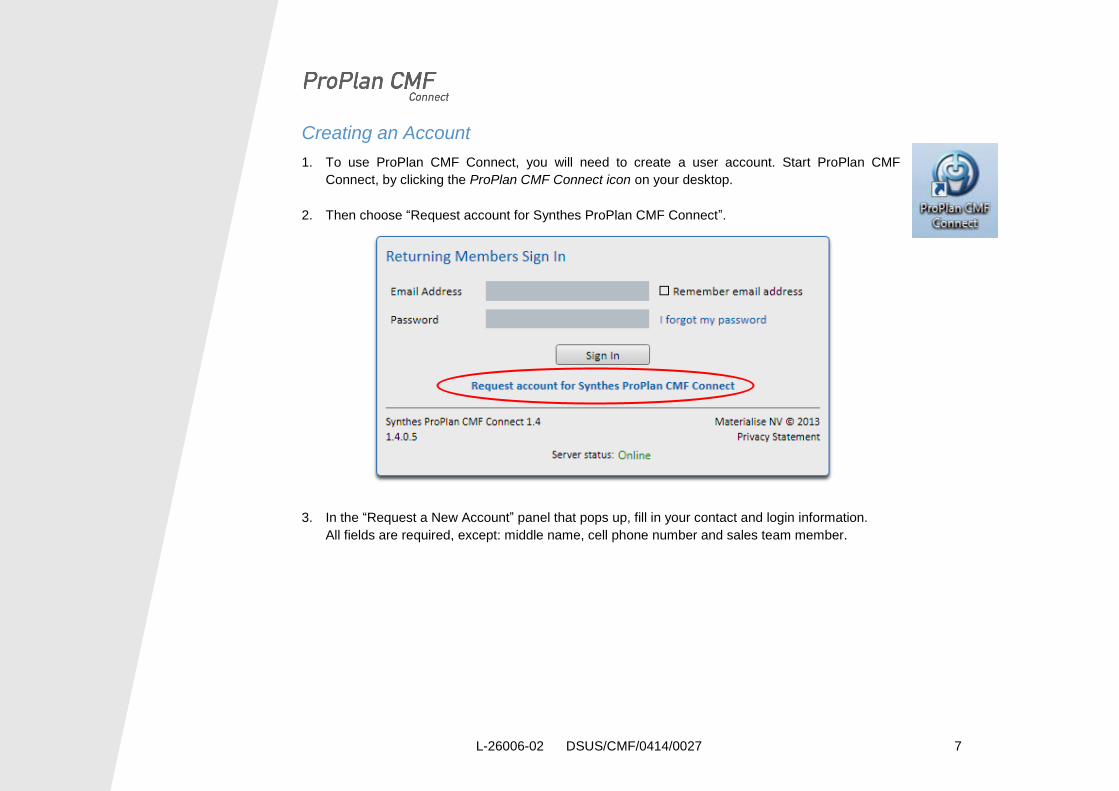
Creating an Account
1. To use ProPlan CMF Connect, you will need to create a user account. Start ProPlan CMF
Connect, by clicking the ProPlan CMF Connect icon on your desktop.
2. Then choose “Request account for Synthes ProPlan CMF Connect”.
3. In the “Request a New Account” panel that pops up, fill in your contact and login information.
All fields are required, except: middle name, cell phone number and sales team member.
L-26006-02 DSUS/CMF/0414/0027 8
8
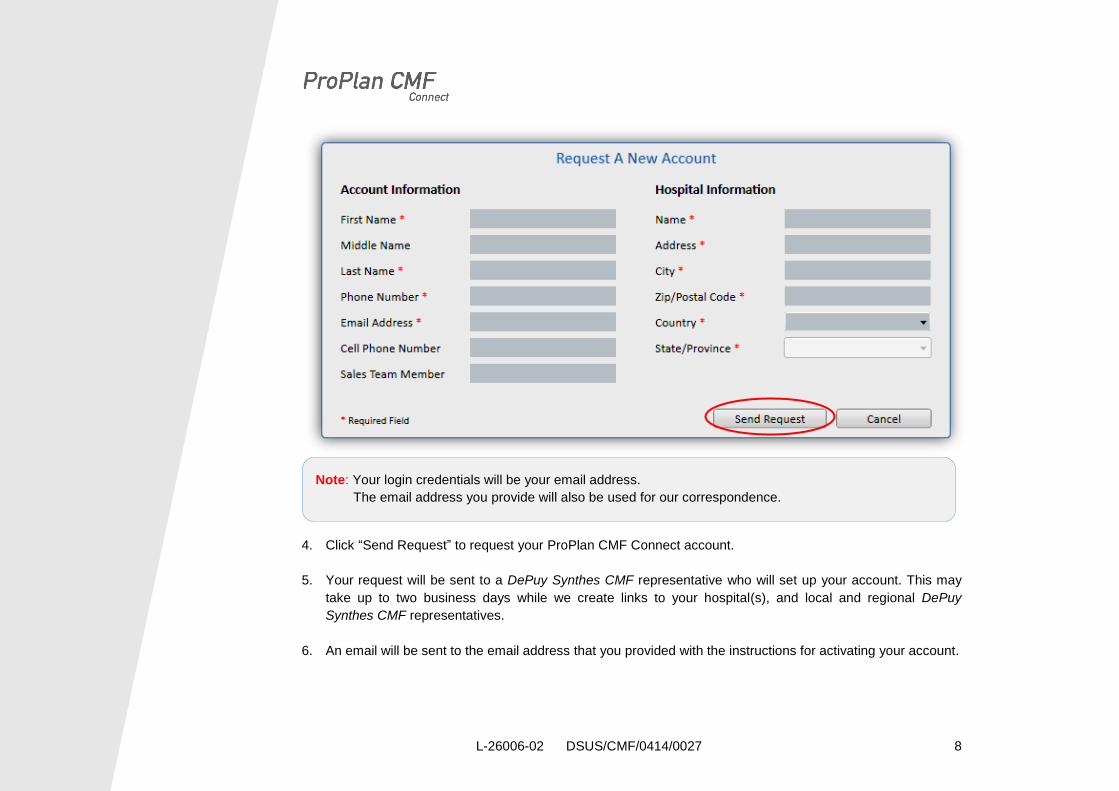
4. Click “Send Request” to request your ProPlan CMF Connect account.
5. Your request will be sent to a DePuy Synthes CMF representative who will set up your account. This may
take up to two business days while we create links to your hospital(s), and local and regional DePuy
Synthes CMF representatives.
6. An email will be sent to the email address that you provided with the instructions for activating your account.
Note: Your login credentials will be your email address.
The email address you provide will also be used for our correspondence.
L-26006-02 DSUS/CMF/0414/0027 9
9
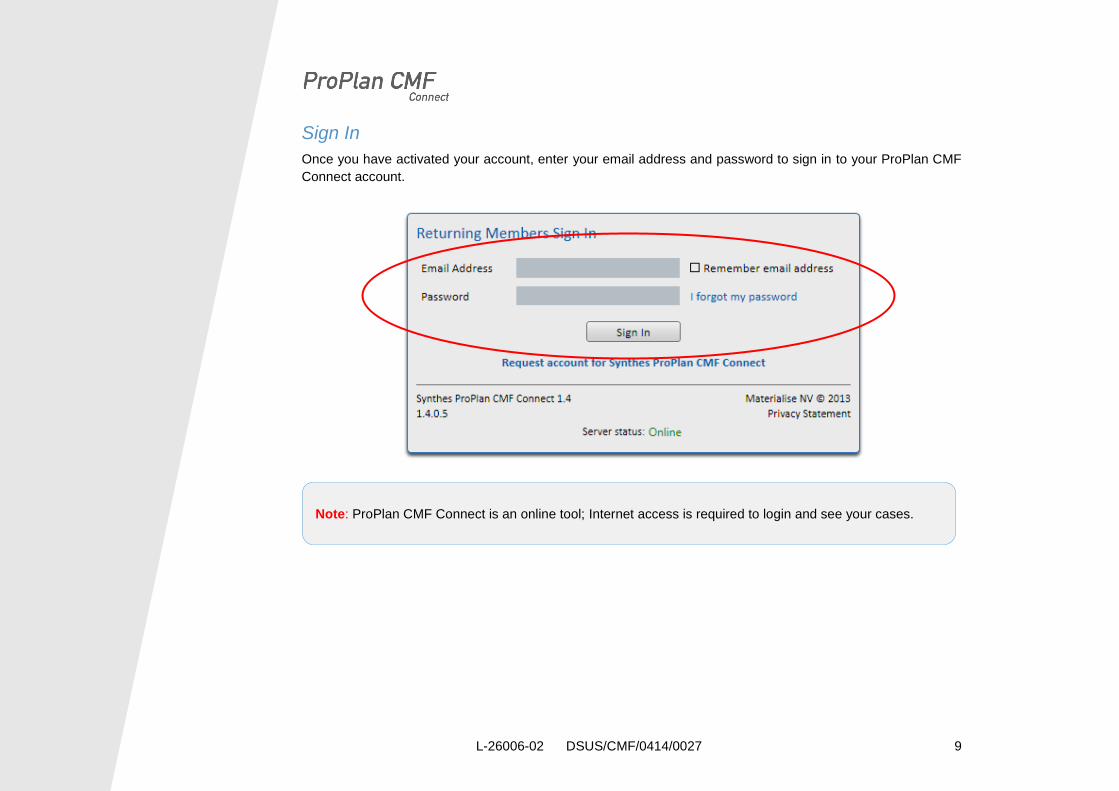
Sign In
Once you have activated your account, enter your email address and password to sign in to your ProPlan CMF
Connect account.
Note: ProPlan CMF Connect is an online tool; Internet access is required to login and see your cases.

L-26006-02 DSUS/CMF/0414/0027 10
10
Sign In Error
If you failed to sign in, an error message will pop up with one of the following notifications:
One or more fields are not valid.
The email address and/or the password is/are incorrect.
Your account has been disabled. Please contact Synthes for assistance at
Your sign in details are correct, but your account is disabled.
Your account is not enabled for access to ProPlan CMF Connect. Please contact Synthes for
assistance at [email protected].
Your sign in details are correct, but you do not have the access right to ProPlan CMF Connect.
L-26006-02 DSUS/CMF/0414/0027 11
11
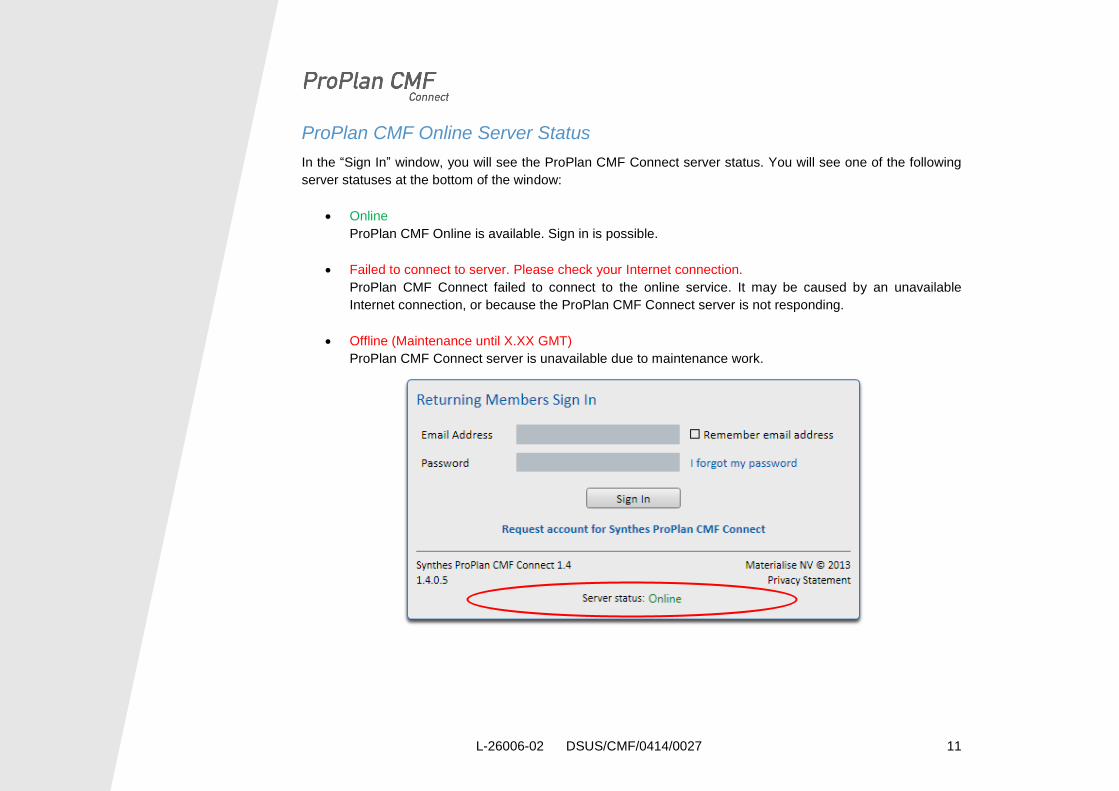
ProPlan CMF Online Server Status
In the “Sign In” window, you will see the ProPlan CMF Connect server status. You will see one of the following
server statuses at the bottom of the window:
Online
ProPlan CMF Online is available. Sign in is possible.
Failed to connect to server. Please check your Internet connection.
ProPlan CMF Connect failed to connect to the online service. It may be caused by an unavailable
Internet connection, or because the ProPlan CMF Connect server is not responding.
Offline (Maintenance until X.XX GMT)
ProPlan CMF Connect server is unavailable due to maintenance work.
L-26006-02 DSUS/CMF/0414/0027 12
12
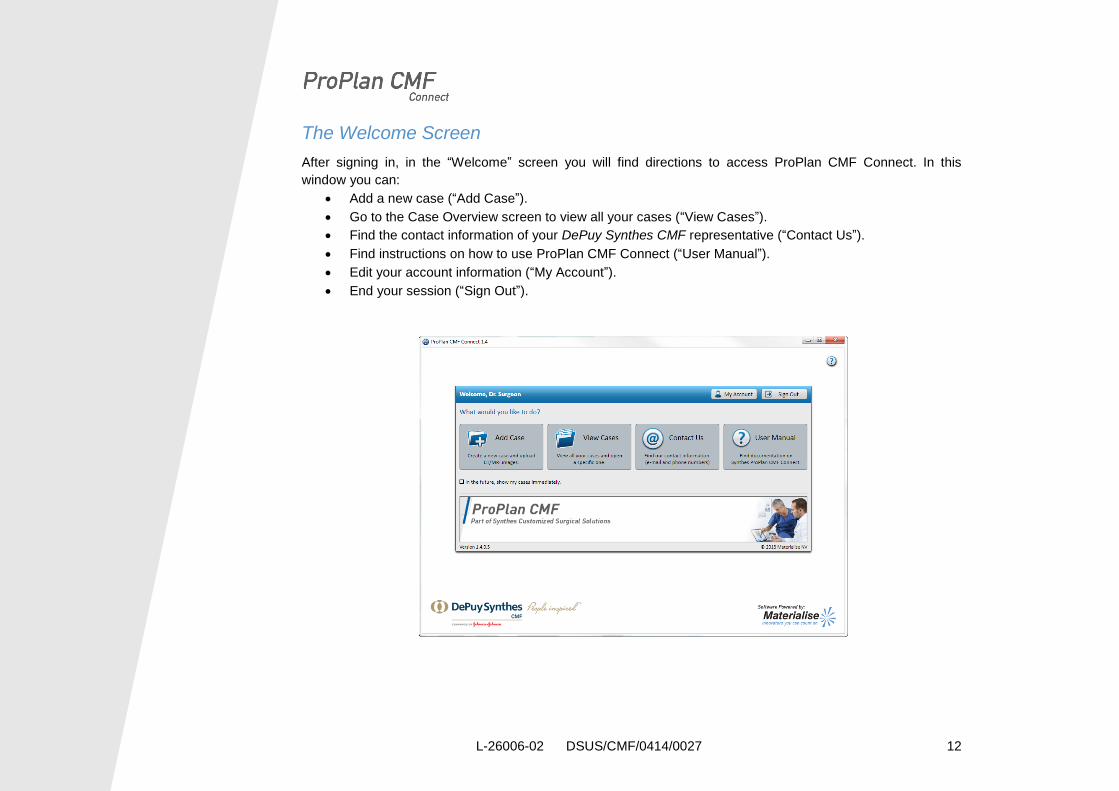
The Welcome Screen
After signing in, in the “Welcome” screen you will find directions to access ProPlan CMF Connect. In this
window you can:
Add a new case (“Add Case”).
Go to the Case Overview screen to view all your cases (“View Cases”).
Find the contact information of your DePuy Synthes CMF representative (“Contact Us”).
Find instructions on how to use ProPlan CMF Connect (“User Manual”).
Edit your account information (“My Account”).
End your session (“Sign Out”).
L-26006-02 DSUS/CMF/0414/0027 13
13
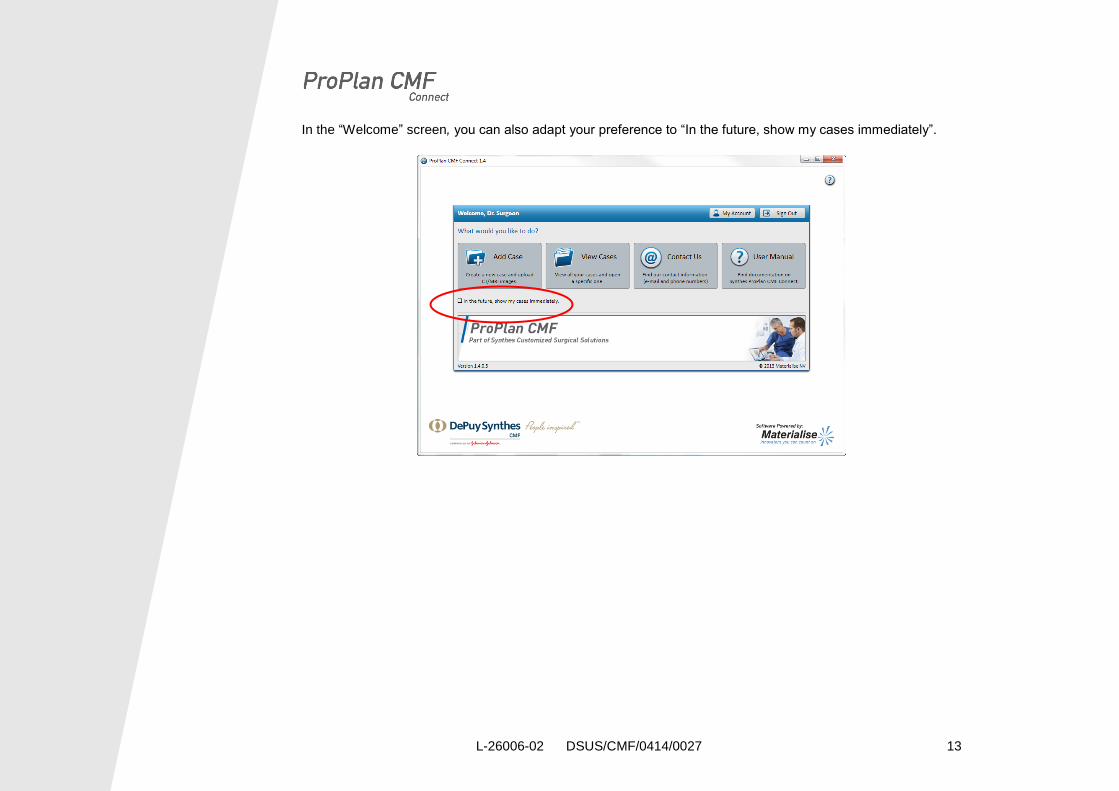
In the “Welcome” screen, you can also adapt your preference to “In the future, show my cases immediately”.
L-26006-02 DSUS/CMF/0414/0027 14
14
/ Case Management
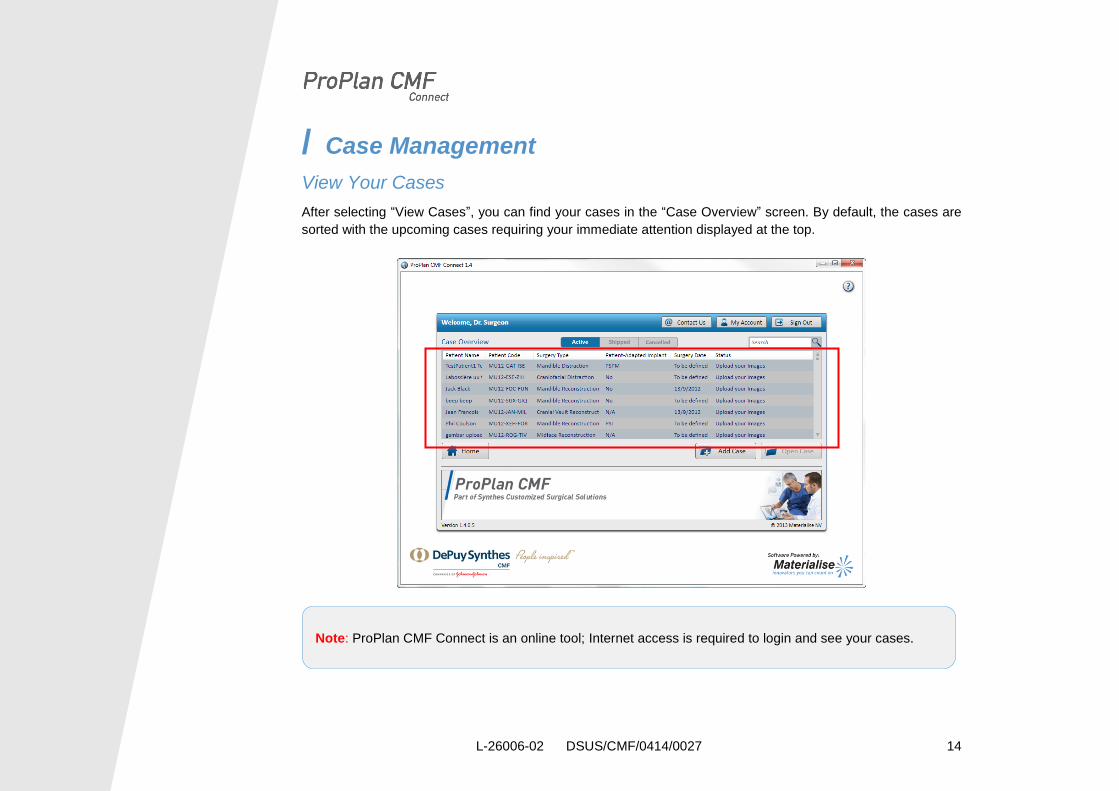
View Your Cases
After selecting “View Cases”, you can find your cases in the “Case Overview” screen. By default, the cases are
sorted with the upcoming cases requiring your immediate attention displayed at the top. 1
Note: ProPlan CMF Connect is an online tool; Internet access is required to login and see your cases.
L-26006-02 DSUS/CMF/0414/0027 15
15
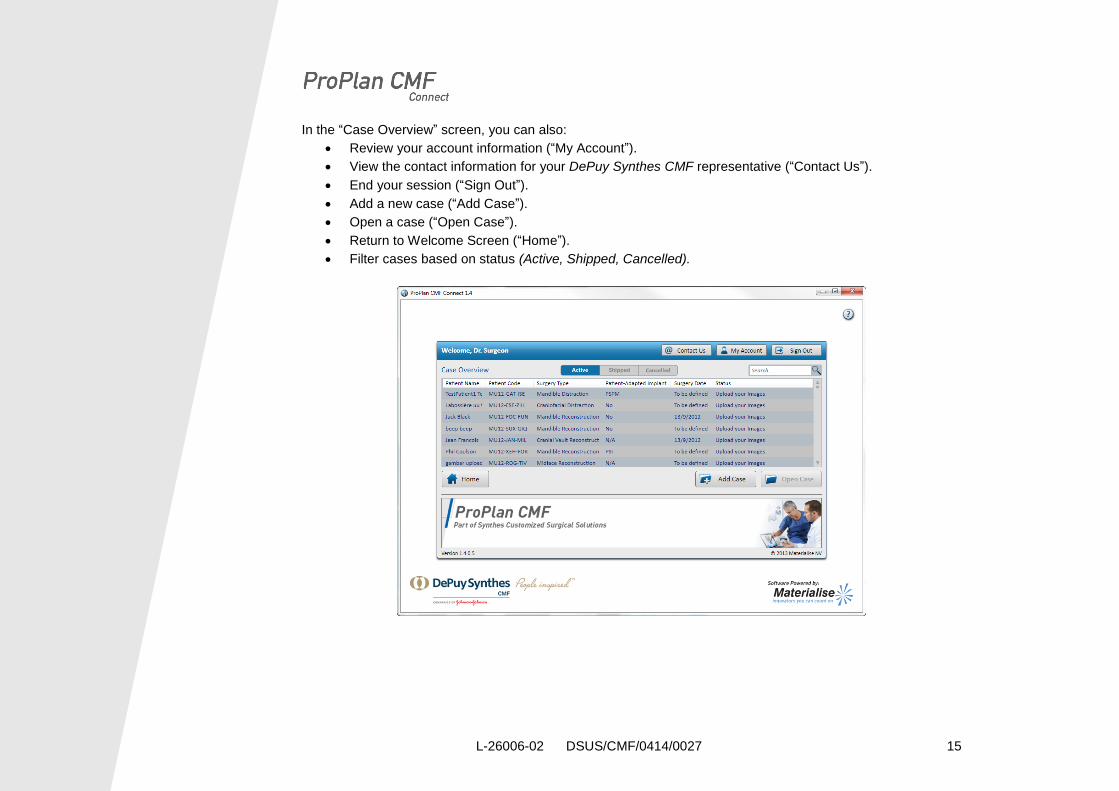
In the “Case Overview” screen, you can also:
Review your account information (“My Account”).
View the contact information for your DePuy Synthes CMF representative (“Contact Us”).
End your session (“Sign Out”).
Add a new case (“Add Case”).
Open a case (“Open Case”).
Return to Welcome Screen (“Home”).
Filter cases based on status (Active, Shipped, Cancelled).

L-26006-02 DSUS/CMF/0414/0027 16
16
Case Filter
Use the case filter buttons at the top of the case list to switch between Active, Shipped and Cancelled cases.
L-26006-02 DSUS/CMF/0414/0027 17
17
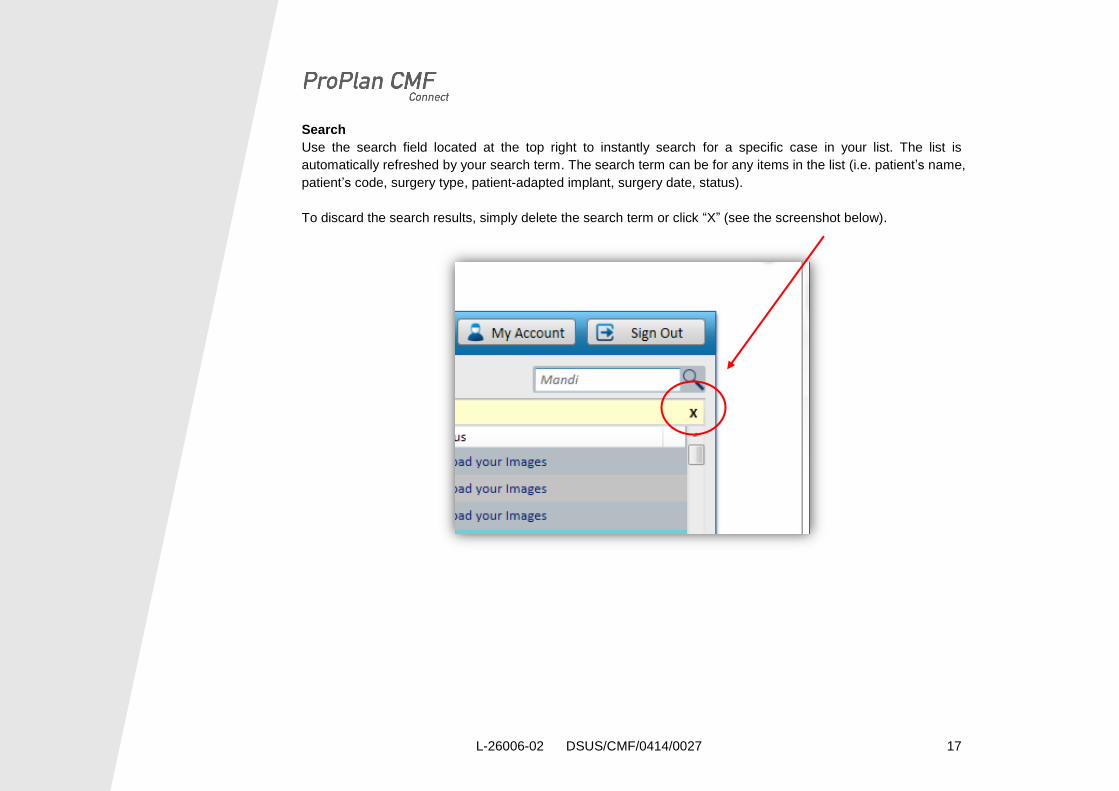
Search
Use the search field located at the top right to instantly search for a specific case in your list. The list is
automatically refreshed by your search term. The search term can be for any items in the list (i.e. patient’s name,
patient’s code, surgery type, patient-adapted implant, surgery date, status).
To discard the search results, simply delete the search term or click “X” (see the screenshot below).
L-26006-02 DSUS/CMF/0414/0027 18
18
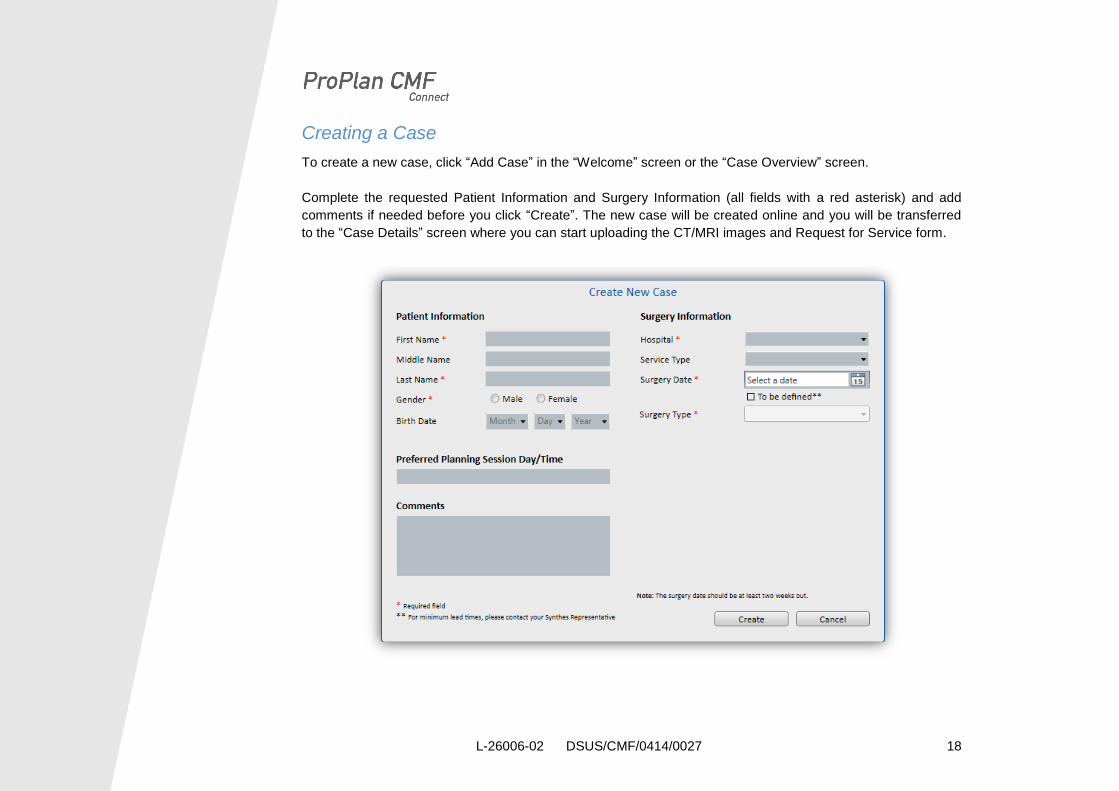
Creating a Case
To create a new case, click “Add Case” in the “Welcome” screen or the “Case Overview” screen.
Complete the requested Patient Information and Surgery Information (all fields with a red asterisk) and add
comments if needed before you click “Create”. The new case will be created online and you will be transferred
to the “Case Details” screen where you can start uploading the CT/MRI images and Request for Service form.
L-26006-02 DSUS/CMF/0414/0027 19
19
Surgery Type
Depending on the surgery type, the sub-options will differ:
Craniofacial Distraction/Mandible Distraction
o Surgical Side Head – Left, Right, Middle, Both
o Order Additional Bone Models – None, Pre-operative, Planned outcome
o Patient-Adapted Implant – PSI, PSPC, PSPM, No
Mandible Reconstruction
o Surgical Side Head – Left, Right, Middle, Both
o Graft Type – Fibula free flap, Iliac crest graft, Scapula free flap, Other graft
o Surgical Side Graft – Left, Right
o Cutting Guide Style – Slots, Flanges
o Order Additional Bone Models – None, Pre-operative, Planned outcome
o Patient-Adapted Implant – PSI, PSPC, PSPM, No
Midface Reconstruction
o Surgical Side Head – Left, Right, Middle, Both
o Graft Type – Fibula free flap, Iliac crest graft, Scapula free flap, Other graft
o Surgical Side Graft – Left, Right
o Cutting Guide Style – Slots, Flanges
o Order Additional Bone Models – None, Pre-operative, Planned outcome
o Patient-Adapted Implant – PSI, PSPC, PSPM, No
Orthognathics
o Order Additional Bone Models – None, Pre-operative, Planned outcome
o Patient-Adapted Implant – PSI, PSPC, PSPM, No
Cranial Vault Reconstruction
Anatomical Models
o Patient-Adapted Implant – PSI, PSPC, PSPM, No
L-26006-02 DSUS/CMF/0414/0027 20
20
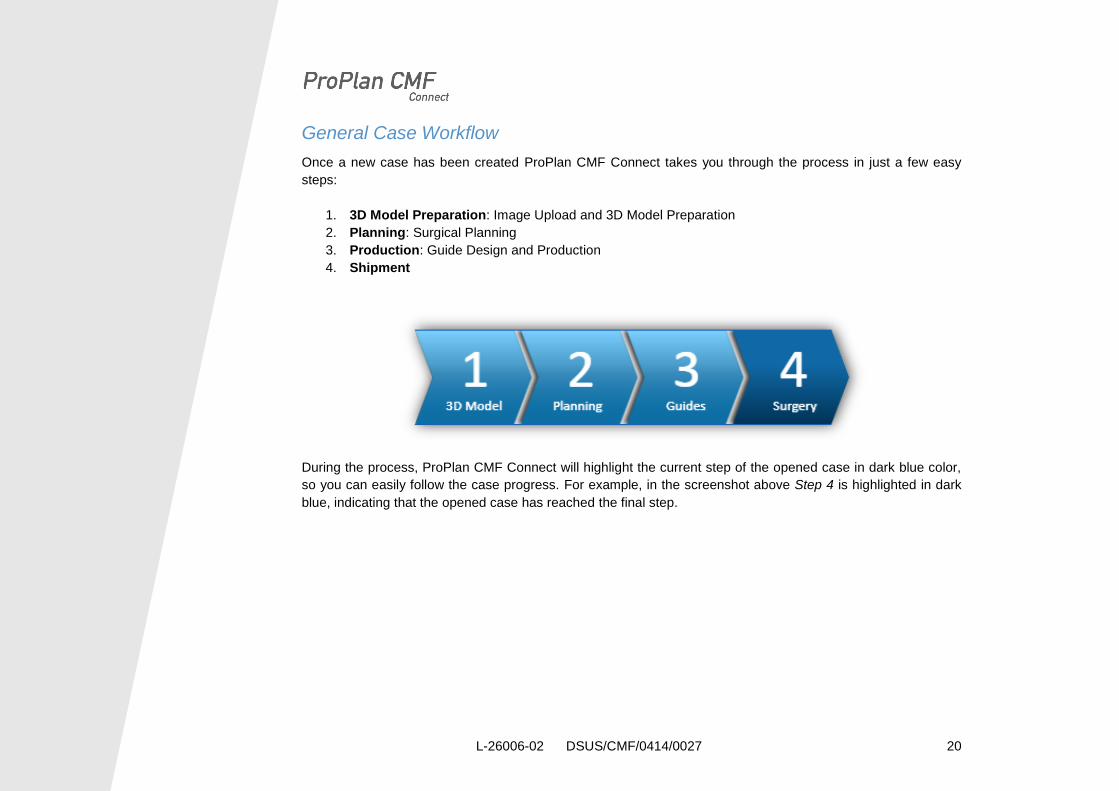
General Case Workflow
Once a new case has been created ProPlan CMF Connect takes you through the process in just a few easy
steps:
1. 3D Model Preparation: Image Upload and 3D Model Preparation
2. Planning: Surgical Planning
3. Production: Guide Design and Production
4. Shipment
During the process, ProPlan CMF Connect will highlight the current step of the opened case in dark blue color,
so you can easily follow the case progress. For example, in the screenshot above Step 4 is highlighted in dark
blue, indicating that the opened case has reached the final step.
L-26006-02 DSUS/CMF/0414/0027 21
21
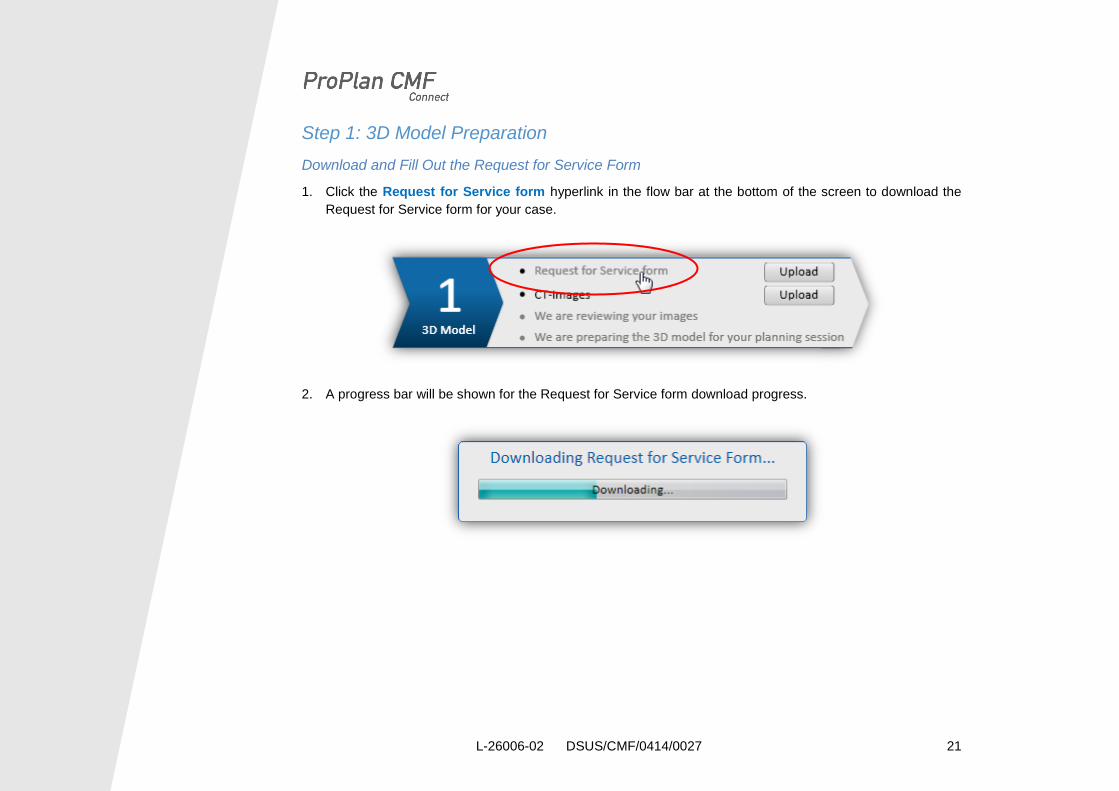
Step 1: 3D Model Preparation
Download and Fill Out the Request for Service Form
1. Click the Request for Service form hyperlink in the flow bar at the bottom of the screen to download the
Request for Service form for your case.
2. A progress bar will be shown for the Request for Service form download progress.

L-26006-02 DSUS/CMF/0414/0027 22
22
3. Once the Request for Service form downloaded, it will be automatically opened in the default PDF reader.
Please fill the Request for Service form out with all case details.
L-26006-02 DSUS/CMF/0414/0027 23
23
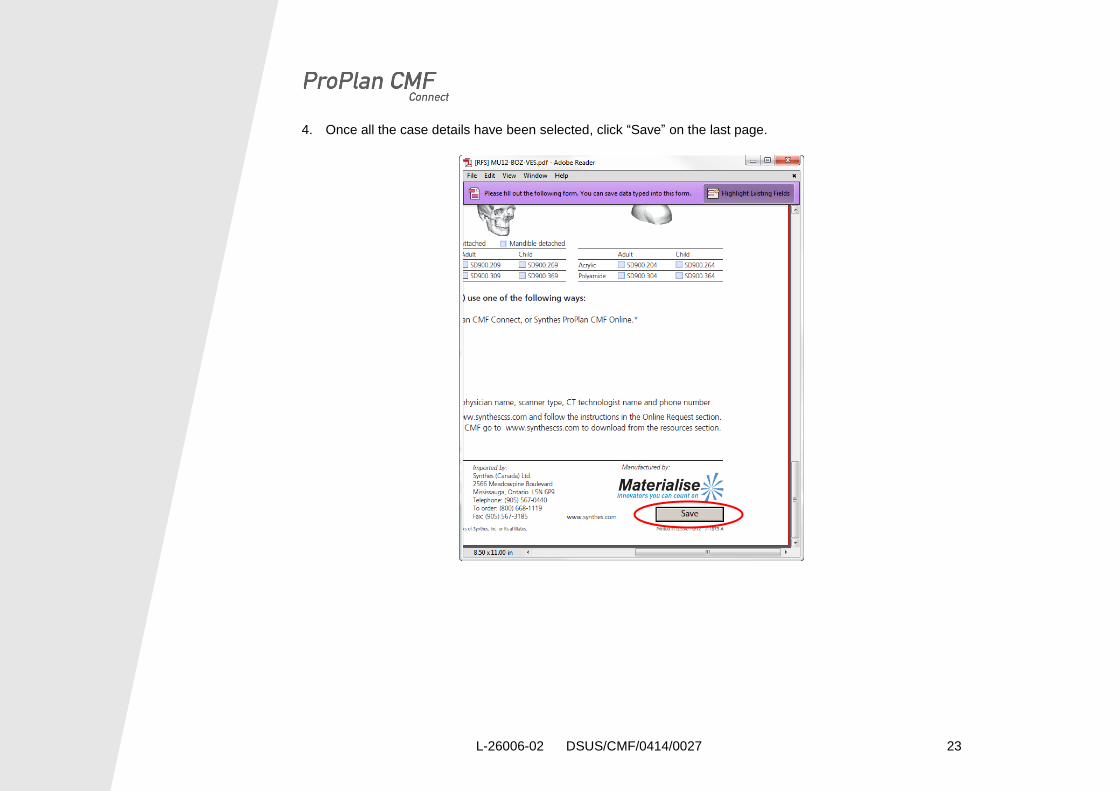
4. Once all the case details have been selected, click “Save” on the last page.

L-26006-02 DSUS/CMF/0414/0027 24
24
5. A “Save As” window will be shown, click “Save” without changing the text.
6. After clicking “Save”, there will be a dialog asking for confirmation to replace the existing empty template of
the Request for Service form. Click “Yes” to replace it. Close the PDF reader and the form is now ready for
upload.
L-26006-02 DSUS/CMF/0414/0027 25
25
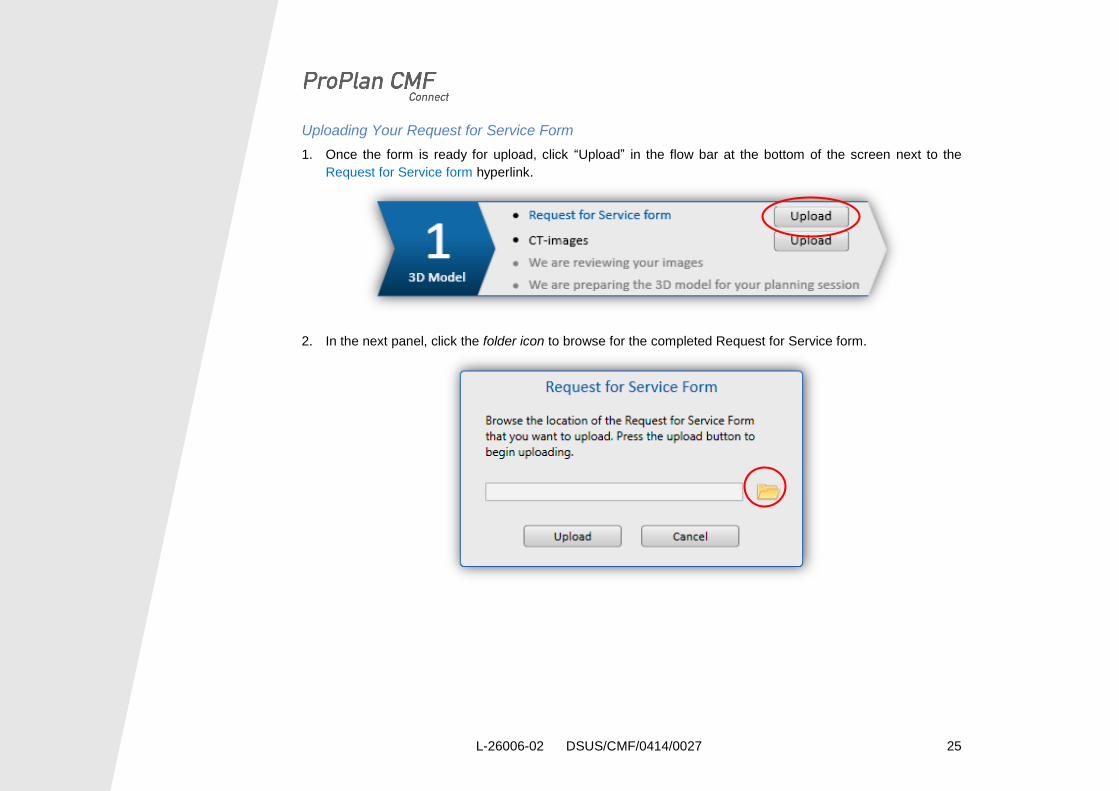
Uploading Your Request for Service Form
1. Once the form is ready for upload, click “Upload” in the flow bar at the bottom of the screen next to the
Request for Service form hyperlink.
2. In the next panel, click the folder icon to browse for the completed Request for Service form.
L-26006-02 DSUS/CMF/0414/0027 26
26
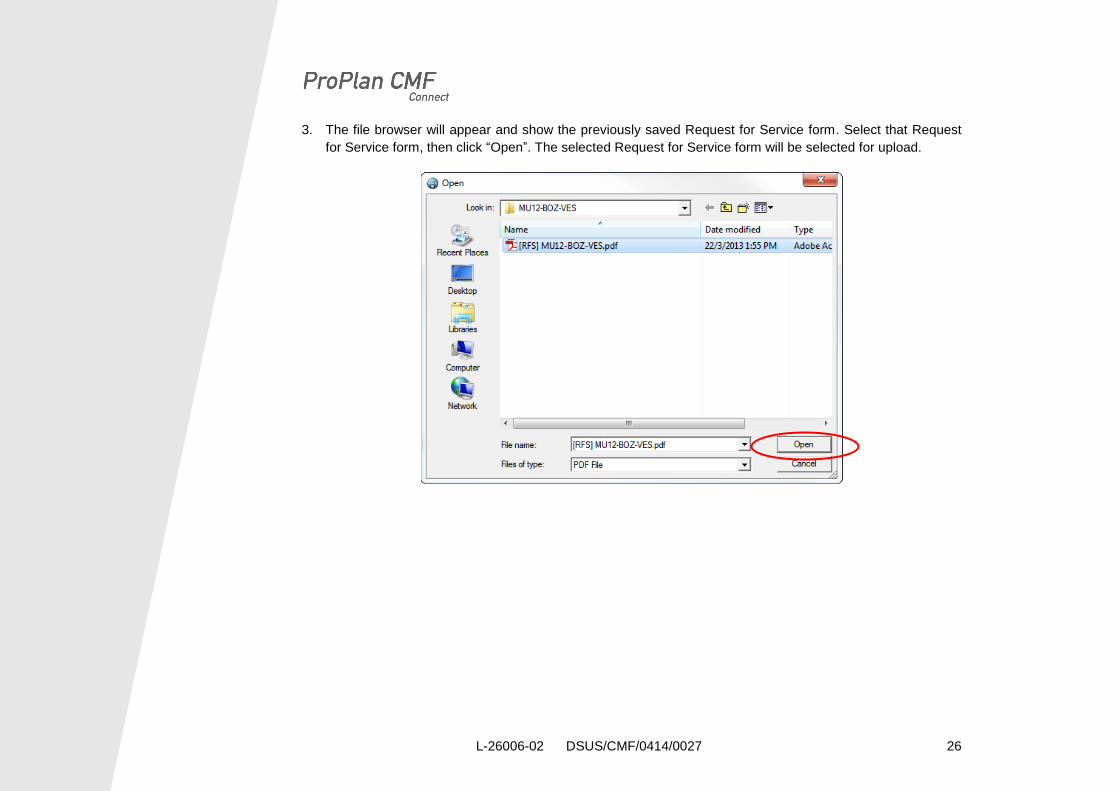
3. The file browser will appear and show the previously saved Request for Service form. Select that Request
for Service form, then click “Open”. The selected Request for Service form will be selected for upload.
L-26006-02 DSUS/CMF/0414/0027 27
27
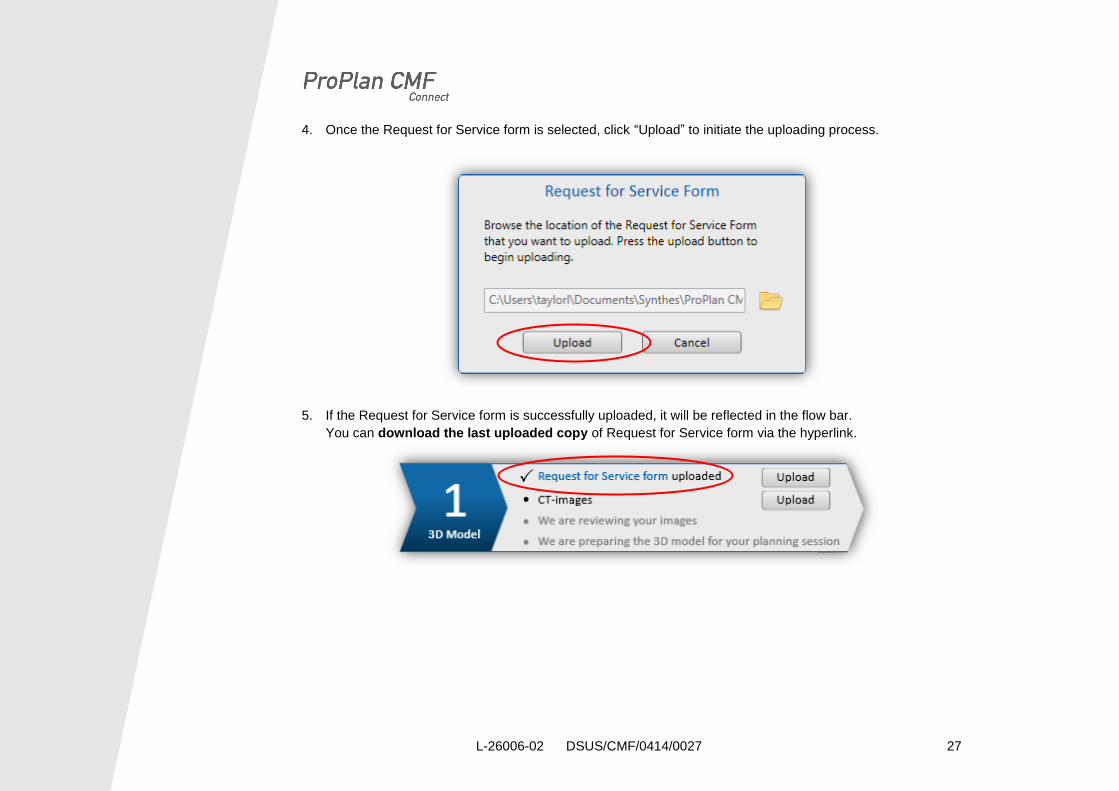
4. Once the Request for Service form is selected, click “Upload” to initiate the uploading process.
5. If the Request for Service form is successfully uploaded, it will be reflected in the flow bar.
You can download the last uploaded copy of Request for Service form via the hyperlink.
L-26006-02 DSUS/CMF/0414/0027 28
28
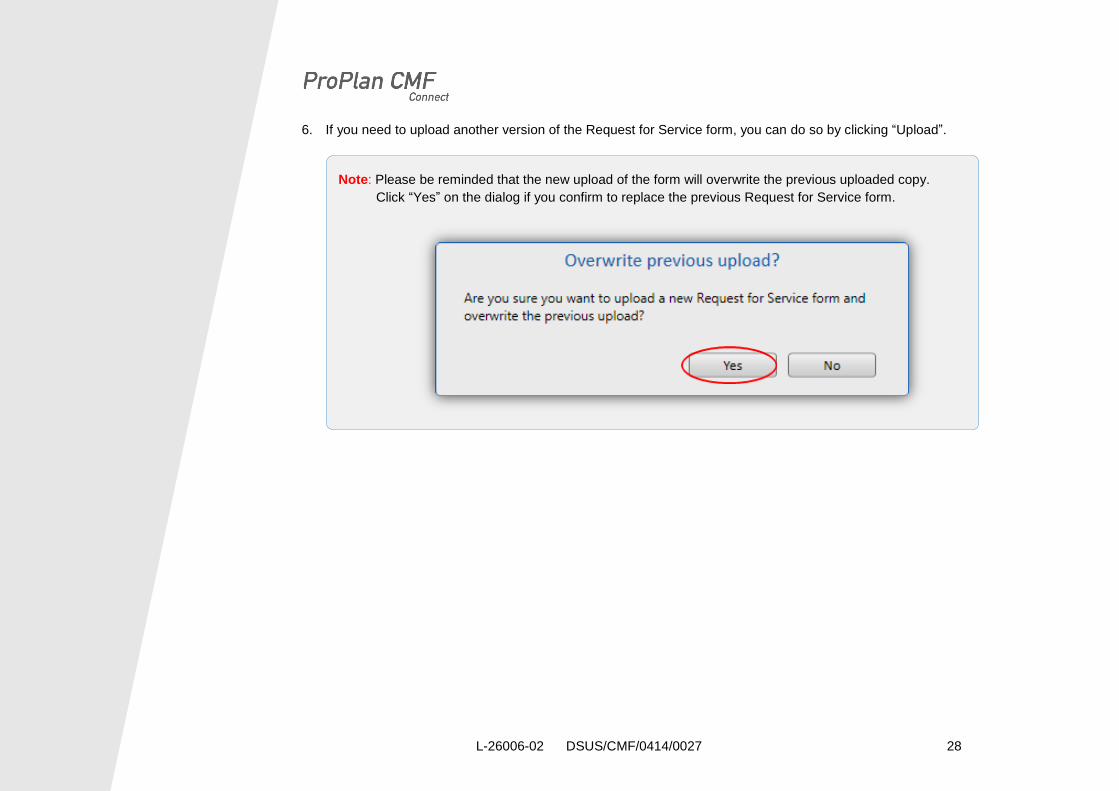
6. If you need to upload another version of the Request for Service form, you can do so by clicking “Upload”.
Note: Please be reminded that the new upload of the form will overwrite the previous uploaded copy.
Click “Yes” on the dialog if you confirm to replace the previous Request for Service form.
L-26006-02 DSUS/CMF/0414/0027 29
29
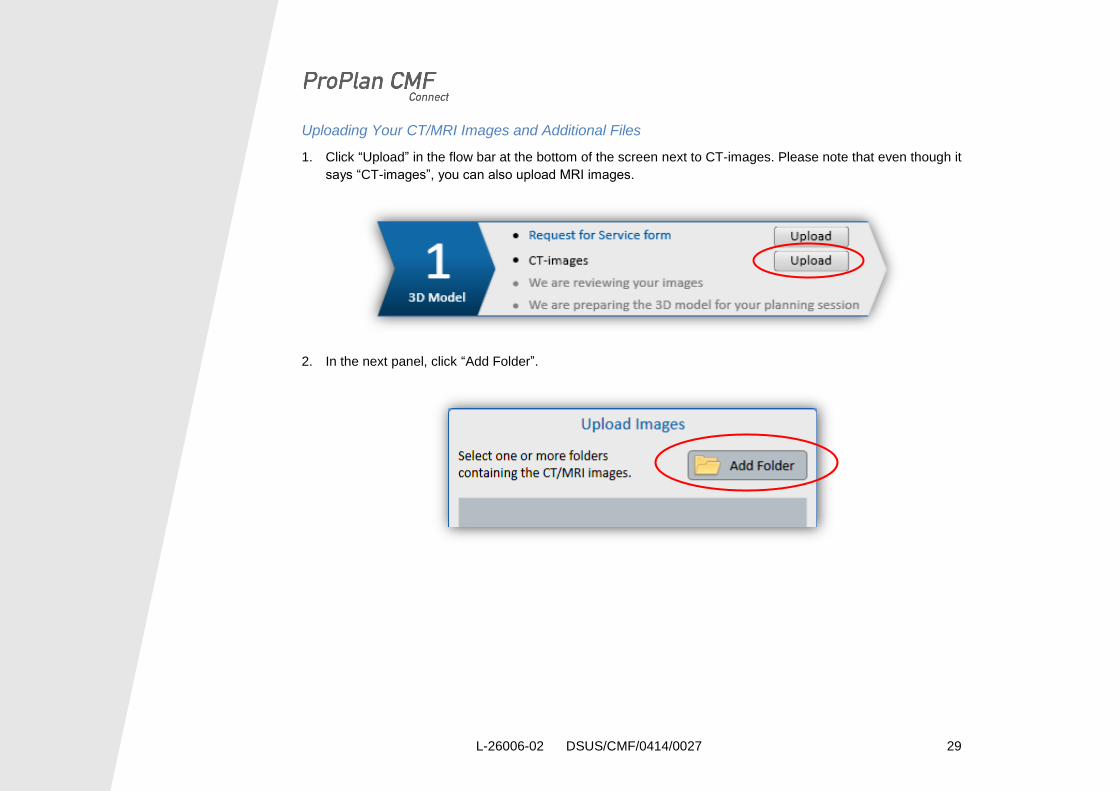
Uploading Your CT/MRI Images and Additional Files
1. Click “Upload” in the flow bar at the bottom of the screen next to CT-images. Please note that even though it
says “CT-images”, you can also upload MRI images.
2. In the next panel, click “Add Folder”.
L-26006-02 DSUS/CMF/0414/0027 30
30
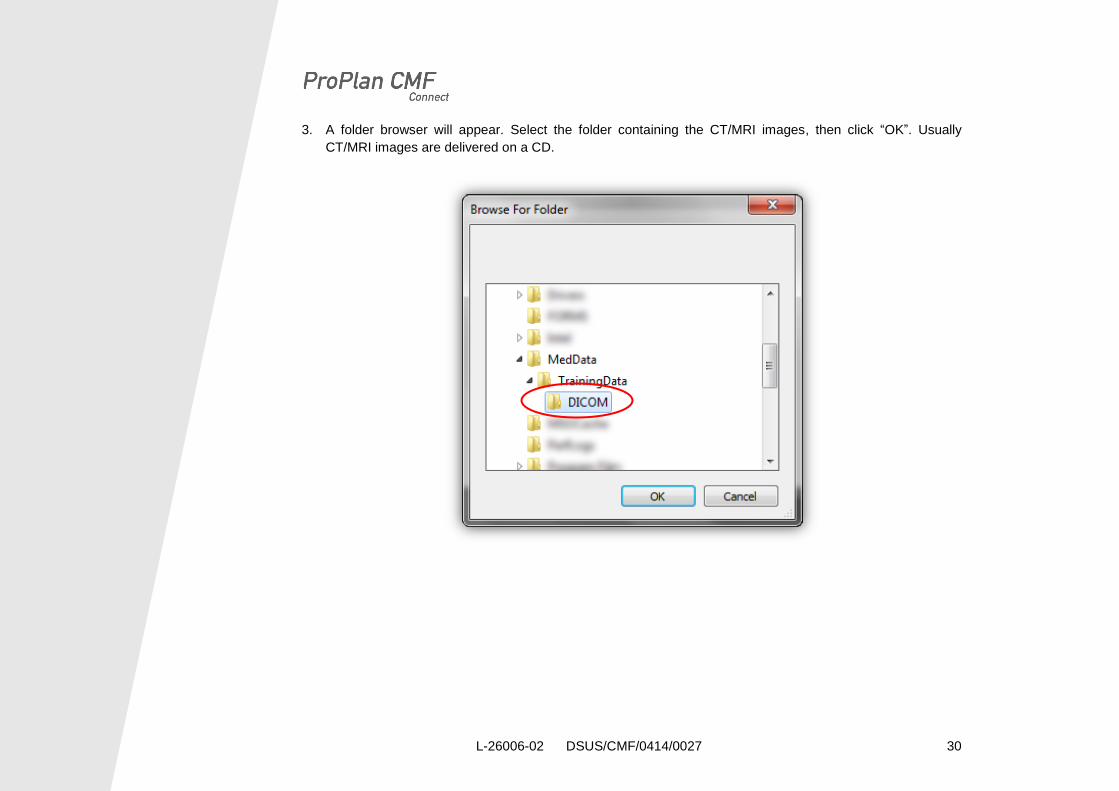
3. A folder browser will appear. Select the folder containing the CT/MRI images, then click “OK”. Usually
CT/MRI images are delivered on a CD.
L-26006-02 DSUS/CMF/0414/0027 31
31
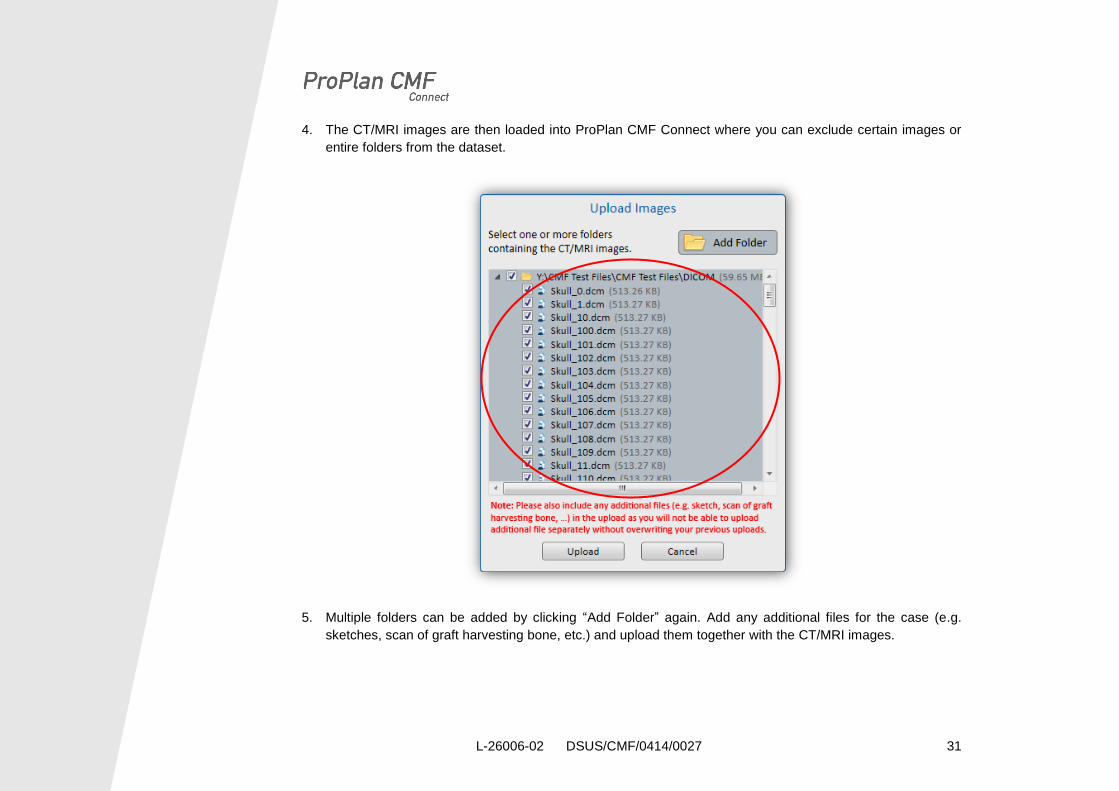
4. The CT/MRI images are then loaded into ProPlan CMF Connect where you can exclude certain images or
entire folders from the dataset.
5. Multiple folders can be added by clicking “Add Folder” again. Add any additional files for the case (e.g.
sketches, scan of graft harvesting bone, etc.) and upload them together with the CT/MRI images.

L-26006-02 DSUS/CMF/0414/0027 32
32
6. Click “Upload” to start uploading the images to our server. Depending on the size of the image set and your
Internet connection speed, this may take a while.

L-26006-02 DSUS/CMF/0414/0027 33
33
7. If the CT-images are successfully uploaded, it will be reflected in the flow bar.
You can download the last uploaded copy of CT-images via the hyperlink.
8. If you need to upload another set of CT-images, you can do so by clicking “Upload”.
Note: Please be reminded that the new upload will overwrite the previous uploaded copy. Click “Yes” at the dialog if you confirm to replace the previous uploaded CT-images.
L-26006-02 DSUS/CMF/0414/0027 34
34
Approve All Uploads
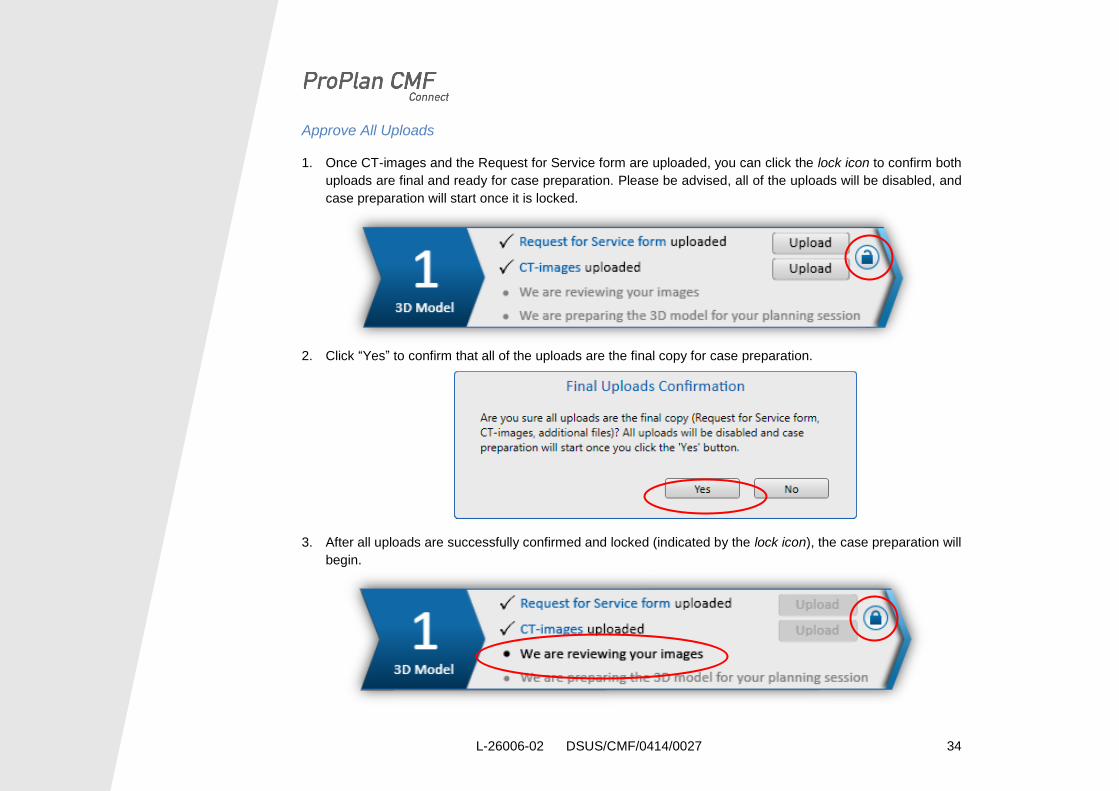
1. Once CT-images and the Request for Service form are uploaded, you can click the lock icon to confirm both
uploads are final and ready for case preparation. Please be advised, all of the uploads will be disabled, and
case preparation will start once it is locked.
2. Click “Yes” to confirm that all of the uploads are the final copy for case preparation.
3. After all uploads are successfully confirmed and locked (indicated by the lock icon), the case preparation will
begin.

L-26006-02 DSUS/CMF/0414/0027 35
35
Step 2: Surgical Planning
The surgical plan is a 3D reconstruction (segmentation) based on the uploaded CT/MRI images. See page 38
for more details on controlling the view of the 3D model.
While the actual surgical planning will happen in our advanced planning products, via personal or web-based
meetings, the results will be available in ProPlan CMF Connect for your review.
Once we have finished the surgical plan, you will be notified via email to approve the surgical plan. Your written
approval is required to approve or reject the surgical plan. If you have any concerns about the surgical plan,
please notify us and a clinical engineer will contact you. Once we receive your approval, we will begin to design
the surgical guide(s).

L-26006-02 DSUS/CMF/0414/0027 36
36
Step 3: Guide Design and Production
Once the surgical plan is approved, we will start designing the surgical guide(s), which transfer the virtual
surgical plan to the operation room.
Once the surgical guide design(s) is/are ready, they can be previewed in ProPlan CMF Connect.
Your written approval is required to approve or reject the surgical guides. If you have any concerns about the
surgical plan, please notify us and a clinical engineer will contact you.
L-26006-02 DSUS/CMF/0414/0027 37
37
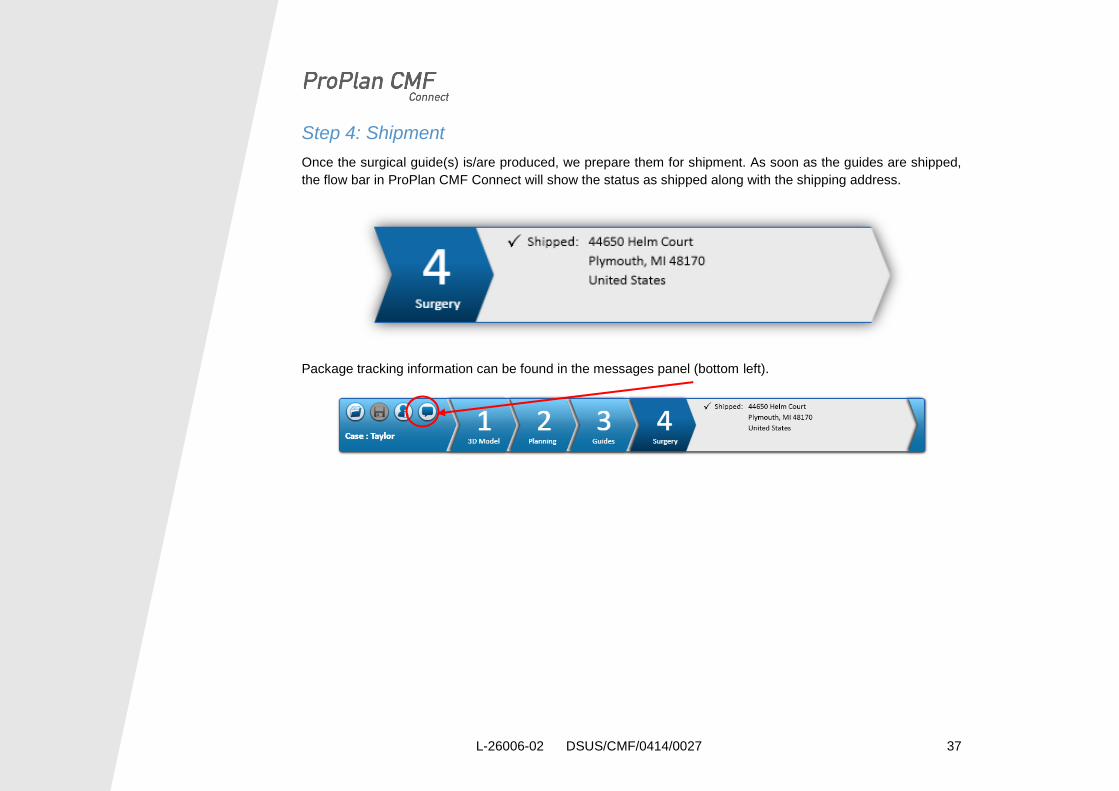
Step 4: Shipment
Once the surgical guide(s) is/are produced, we prepare them for shipment. As soon as the guides are shipped,
the flow bar in ProPlan CMF Connect will show the status as shipped along with the shipping address.
Package tracking information can be found in the messages panel (bottom left).
L-26006-02 DSUS/CMF/0414/0027 38
38
/ The 3D Model
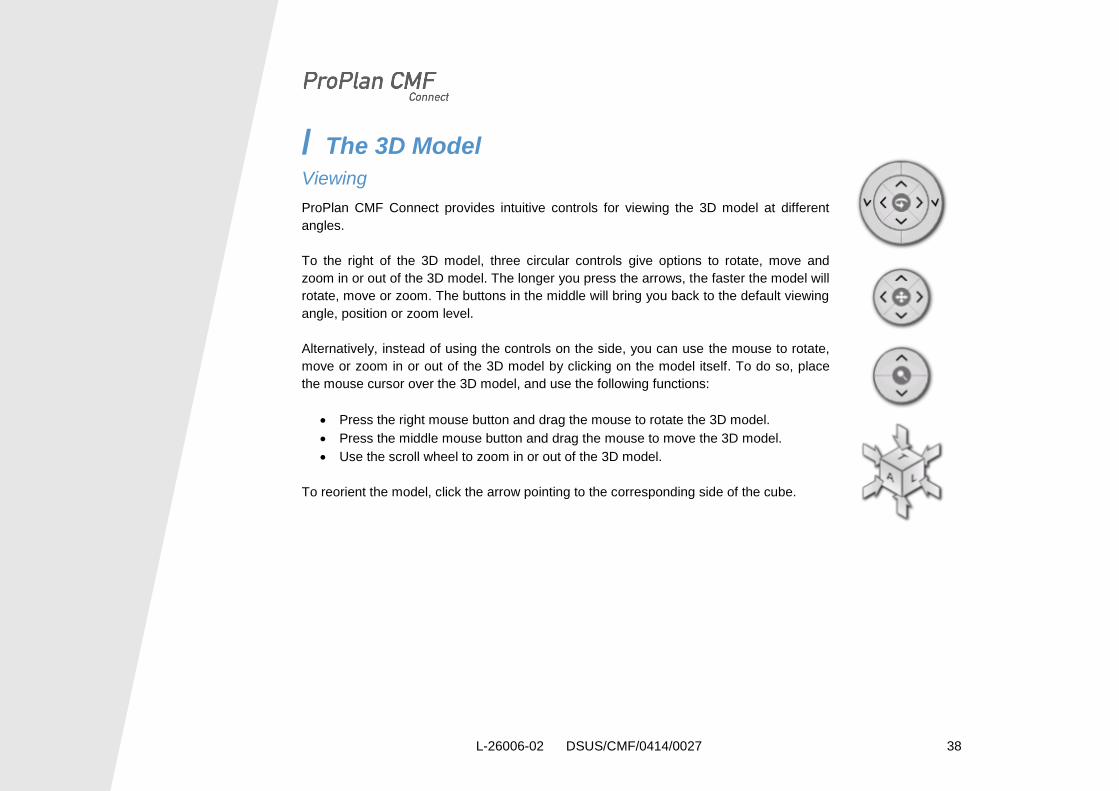
Viewing
ProPlan CMF Connect provides intuitive controls for viewing the 3D model at different
angles.
To the right of the 3D model, three circular controls give options to rotate, move and
zoom in or out of the 3D model. The longer you press the arrows, the faster the model will
rotate, move or zoom. The buttons in the middle will bring you back to the default viewing
angle, position or zoom level.
Alternatively, instead of using the controls on the side, you can use the mouse to rotate,
move or zoom in or out of the 3D model by clicking on the model itself. To do so, place
the mouse cursor over the 3D model, and use the following functions:
Press the right mouse button and drag the mouse to rotate the 3D model.
Press the middle mouse button and drag the mouse to move the 3D model.
Use the scroll wheel to zoom in or out of the 3D model.
To reorient the model, click the arrow pointing to the corresponding side of the cube.
L-26006-02 DSUS/CMF/0414/0027 39
39
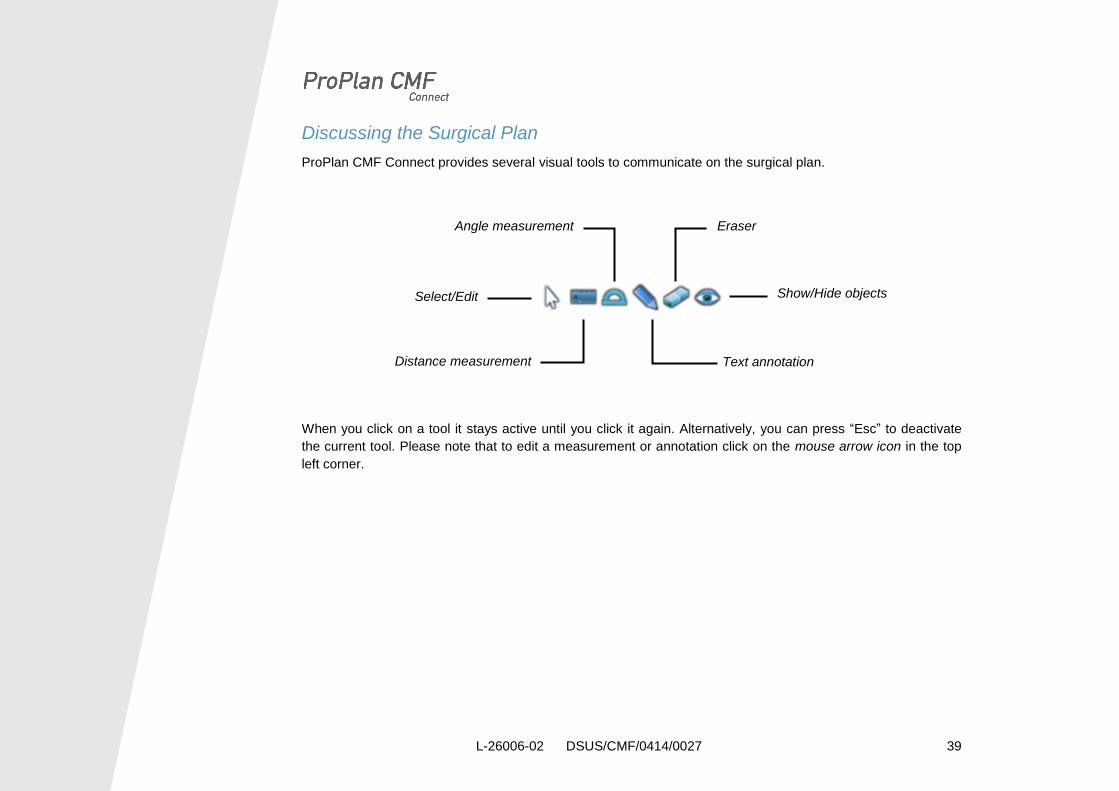
Discussing the Surgical Plan
ProPlan CMF Connect provides several visual tools to communicate on the surgical plan.
When you click on a tool it stays active until you click it again. Alternatively, you can press “Esc” to deactivate
the current tool. Please note that to edit a measurement or annotation click on the mouse arrow icon in the top
left corner.
Angle measurement
Select/Edit
Distance measurement Text annotation
Eraser
Show/Hide objects
L-26006-02 DSUS/CMF/0414/0027 40
40
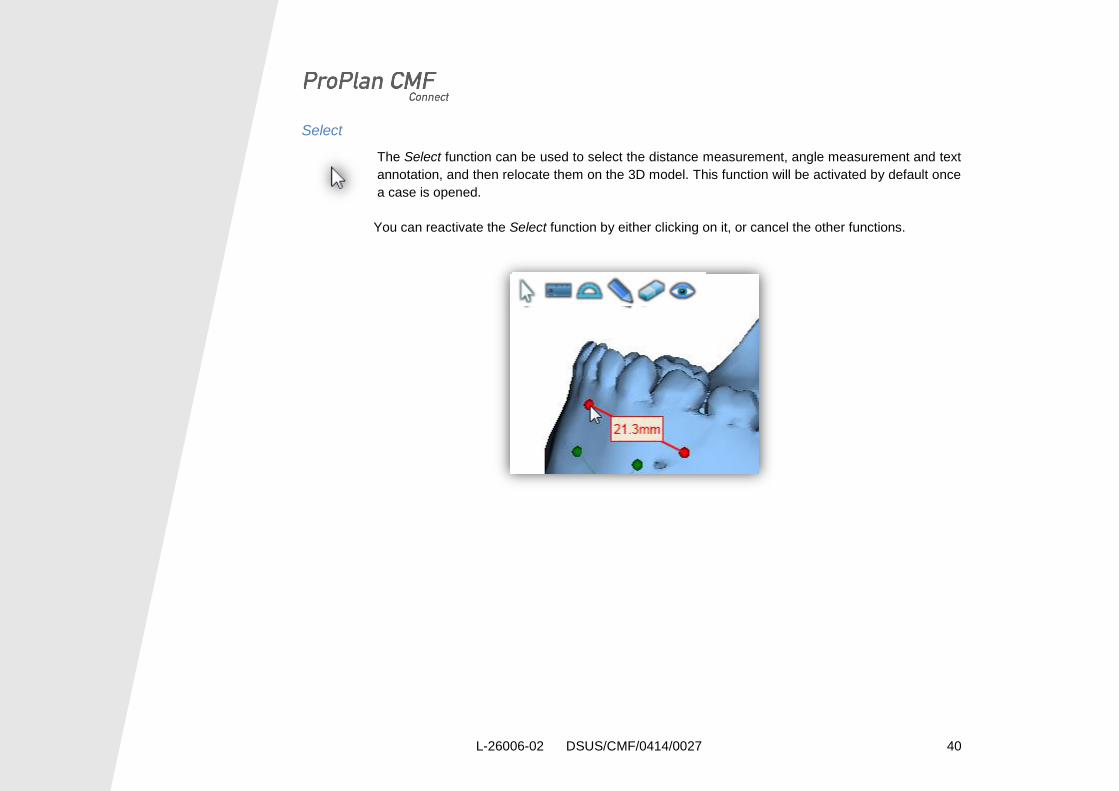
Select
The Select function can be used to select the distance measurement, angle measurement and text
annotation, and then relocate them on the 3D model. This function will be activated by default once
a case is opened.
You can reactivate the Select function by either clicking on it, or cancel the other functions.
L-26006-02 DSUS/CMF/0414/0027 41
41
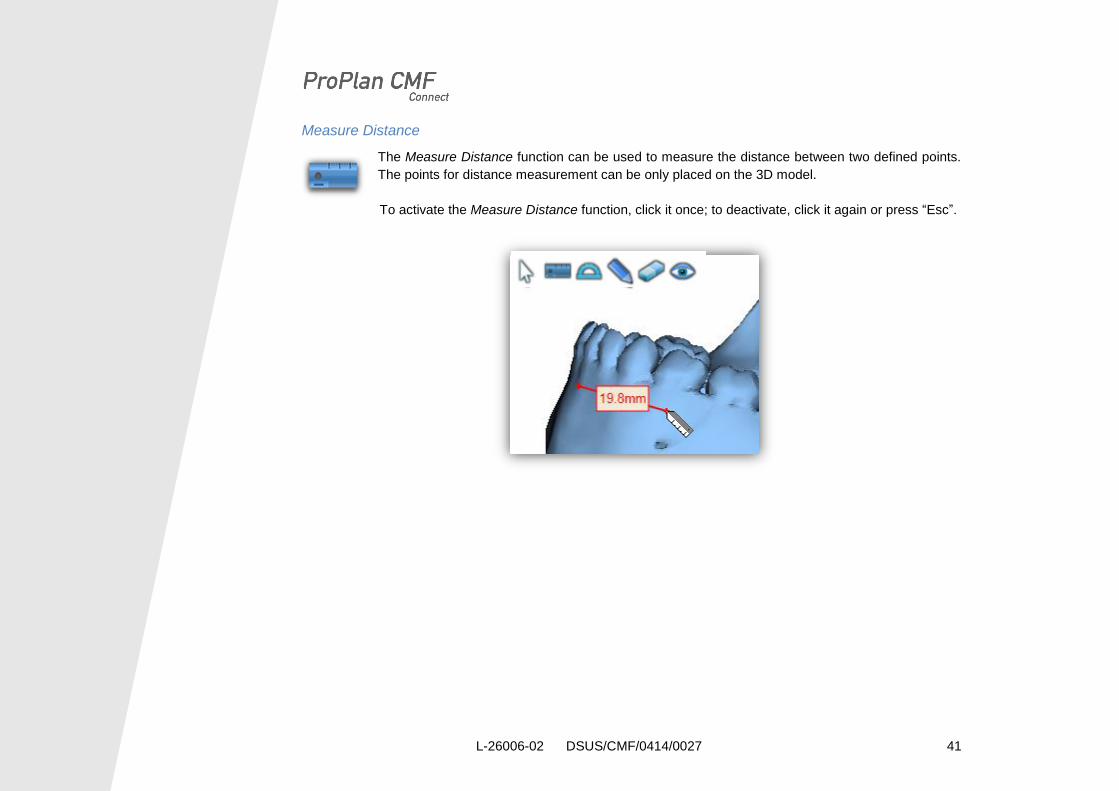
Measure Distance
The Measure Distance function can be used to measure the distance between two defined points.
The points for distance measurement can be only placed on the 3D model.
To activate the Measure Distance function, click it once; to deactivate, click it again or press “Esc”.
L-26006-02 DSUS/CMF/0414/0027 42
42
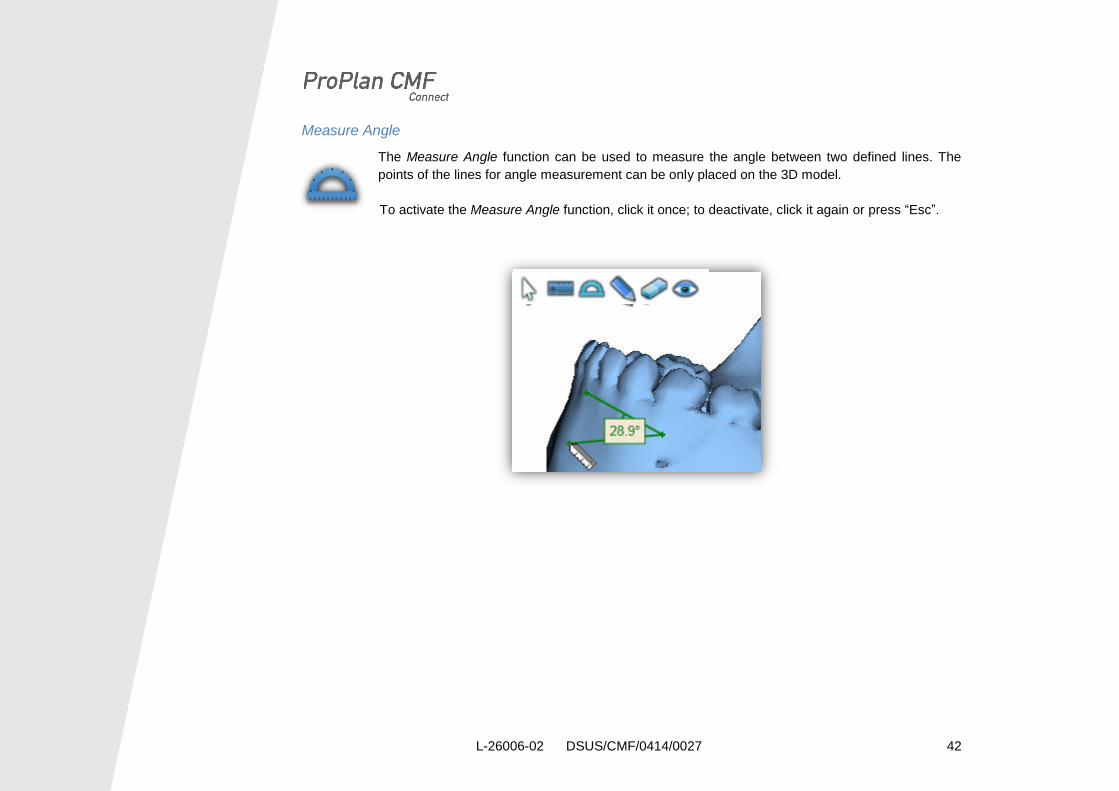
Measure Angle
The Measure Angle function can be used to measure the angle between two defined lines. The
points of the lines for angle measurement can be only placed on the 3D model.
To activate the Measure Angle function, click it once; to deactivate, click it again or press “Esc”.
L-26006-02 DSUS/CMF/0414/0027 43
43
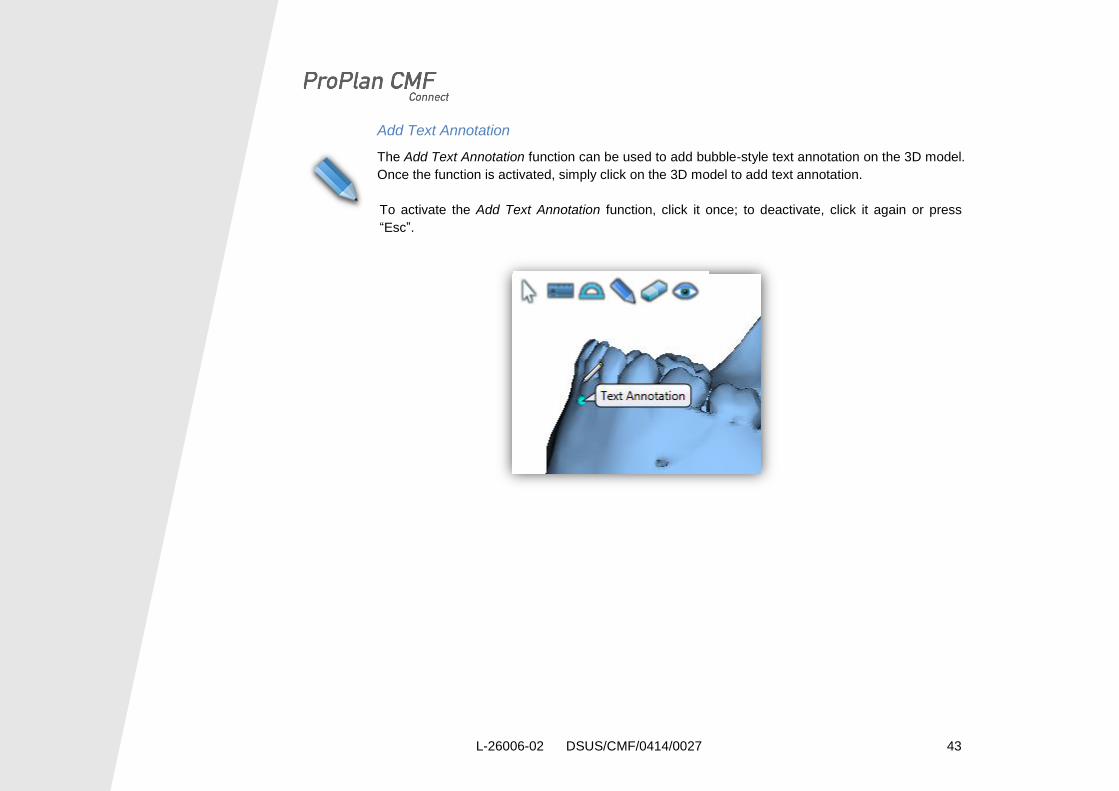
Add Text Annotation
The Add Text Annotation function can be used to add bubble-style text annotation on the 3D model.
Once the function is activated, simply click on the 3D model to add text annotation.
To activate the Add Text Annotation function, click it once; to deactivate, click it again or press
“Esc”.
L-26006-02 DSUS/CMF/0414/0027 44
44
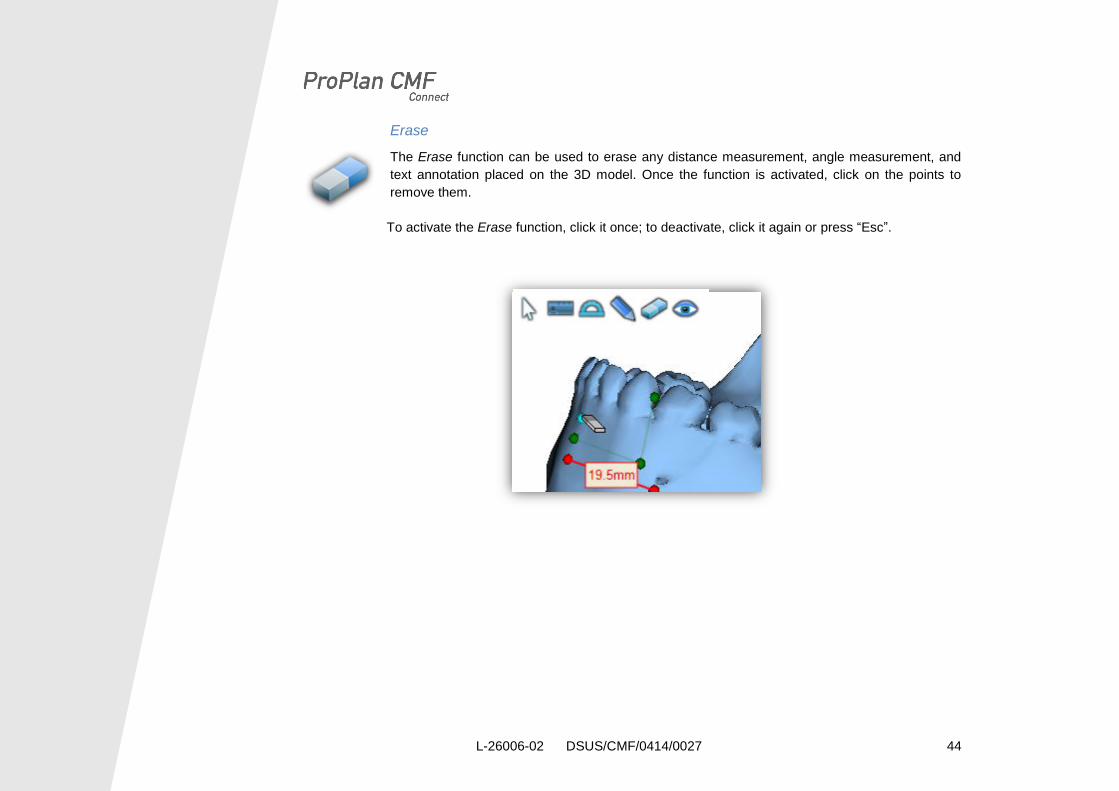
Erase
The Erase function can be used to erase any distance measurement, angle measurement, and
text annotation placed on the 3D model. Once the function is activated, click on the points to
remove them.
To activate the Erase function, click it once; to deactivate, click it again or press “Esc”.

L-26006-02 DSUS/CMF/0414/0027 45
45
Show/Hide Objects
The 3D model usually consists of several parts such as different bones, implants, guides, etc.
These parts can be shown or hidden individually by clicking the show/hide objects icon.
To hide the object, simply click on the eye icon associated to the object in the Show/Hide panel.
To unhide the object, click on the red cross icon.
L-26006-02 DSUS/CMF/0414/0027 46
46
/ Mouse and Keyboard Control
In most ProPlan CMF Connect screens, the mouse buttons behave similar to other software applications (e.g.
browsers, email, etc.). However, when viewing the 3D model of a specific case, there are additional functions to
be able to move, rotate and zoom the 3D model. Likewise, certain keyboard keys have received a special
function.
Mouse
Button Behavior
Left Mouse Button Behavior is dependent on the selected tool (see page 39)
Right Mouse Button Rotates the 3D model
Middle Mouse Button Moves the 3D model
Scroll Wheel Zooms in or out the 3D model
Keyboard
Key Behavior
Esc Deselects the current tool
Enter Sends the message / Accepts the text annotation
Ctrl+Enter Creates a new text line
L-26006-02 DSUS/CMF/0414/0027 47
47
/ Communication
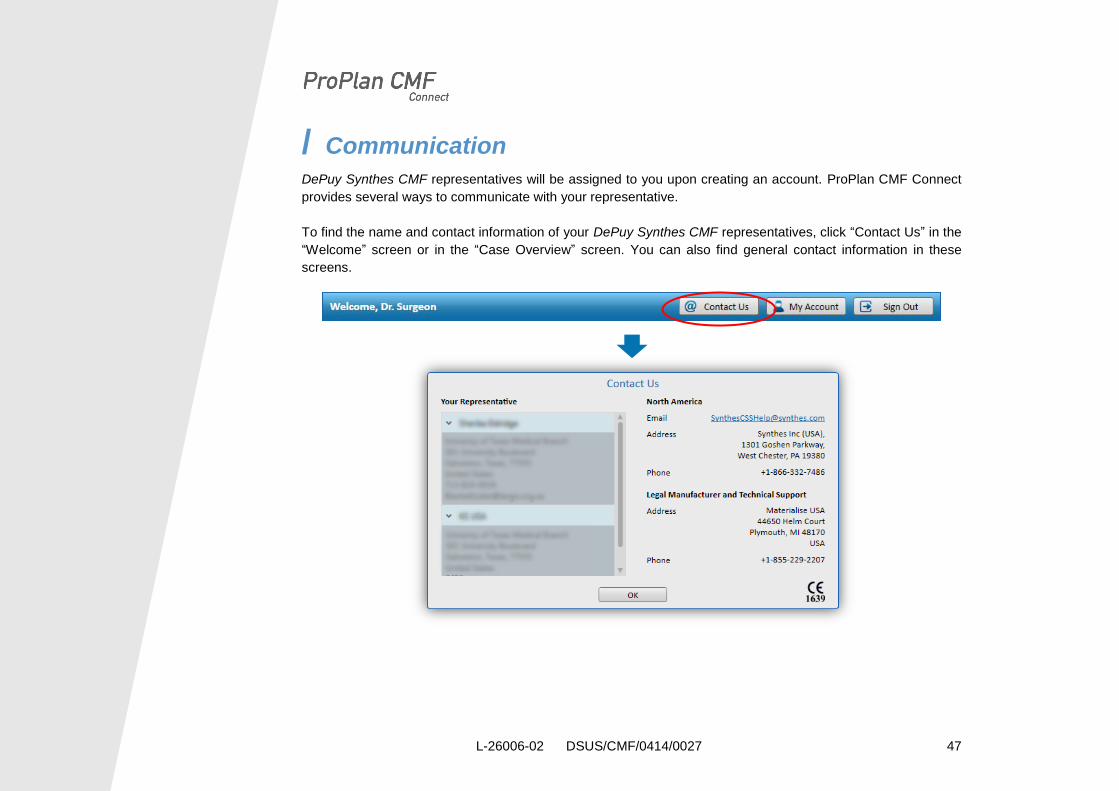
DePuy Synthes CMF representatives will be assigned to you upon creating an account. ProPlan CMF Connect
provides several ways to communicate with your representative.
To find the name and contact information of your DePuy Synthes CMF representatives, click “Contact Us” in the
“Welcome” screen or in the “Case Overview” screen. You can also find general contact information in these
screens.
L-26006-02 DSUS/CMF/0414/0027 48
48
Messages
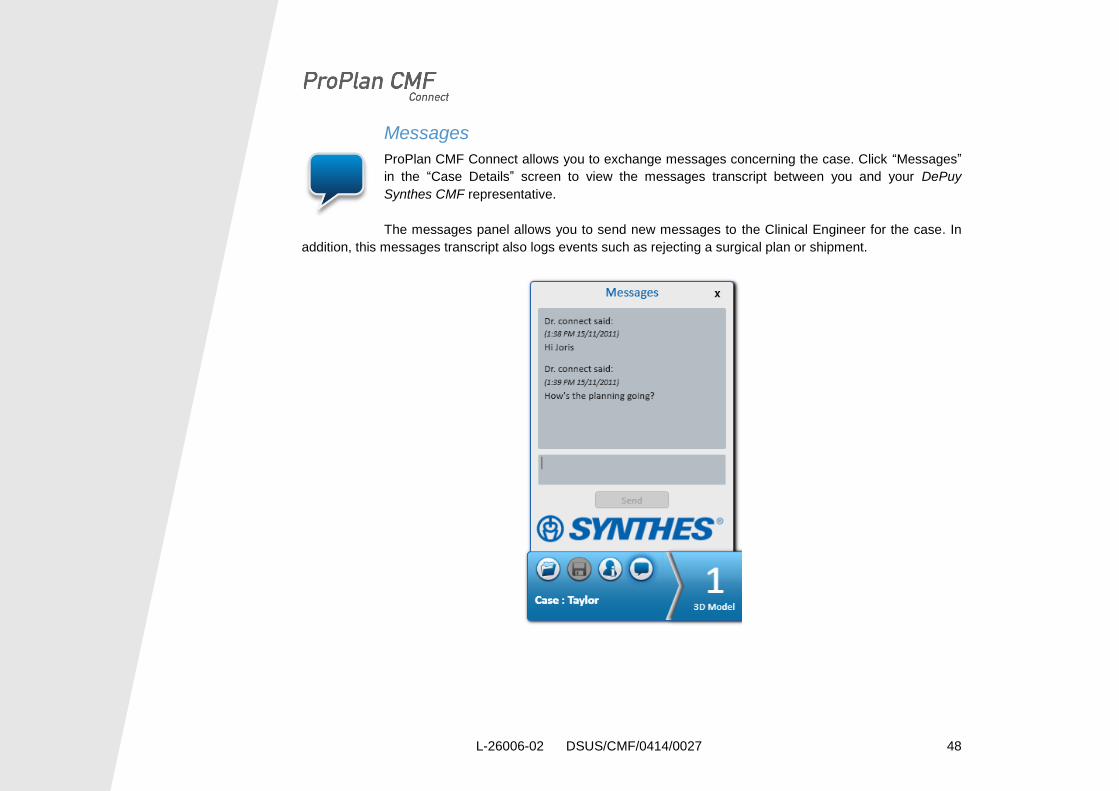
ProPlan CMF Connect allows you to exchange messages concerning the case. Click “Messages”
in the “Case Details” screen to view the messages transcript between you and your DePuy
Synthes CMF representative.
The messages panel allows you to send new messages to the Clinical Engineer for the case. In
addition, this messages transcript also logs events such as rejecting a surgical plan or shipment.
L-26006-02 DSUS/CMF/0414/0027 49
49
During the workflow, e-mail messages will be automatically sent to you to inform about important changes or to
inform about a case requiring attention.
Web Meetings
While ProPlan CMF Connect offers tools to communicate on the surgical plan, the actual surgery planning is
done by the Clinical Engineer in our advanced planning software ProPlan CMF.
During web meetings, you will connect to the Clinical Engineer who will share his or her screen to collaborate on
the surgical plan.
L-26006-02 DSUS/CMF/0414/0027 50
50
/ Your Account
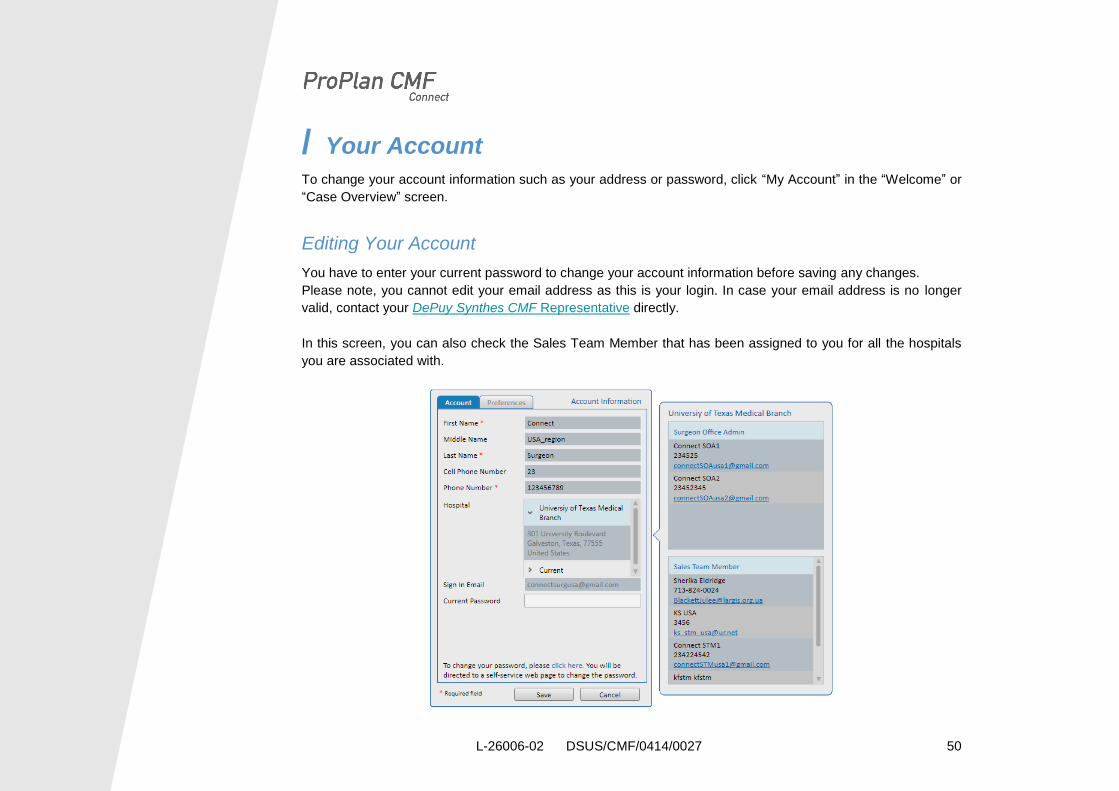
To change your account information such as your address or password, click “My Account” in the “Welcome” or
“Case Overview” screen.
Editing Your Account
You have to enter your current password to change your account information before saving any changes.
Please note, you cannot edit your email address as this is your login. In case your email address is no longer
valid, contact your DePuy Synthes CMF Representative directly.
In this screen, you can also check the Sales Team Member that has been assigned to you for all the hospitals
you are associated with.
L-26006-02 DSUS/CMF/0414/0027 51
51
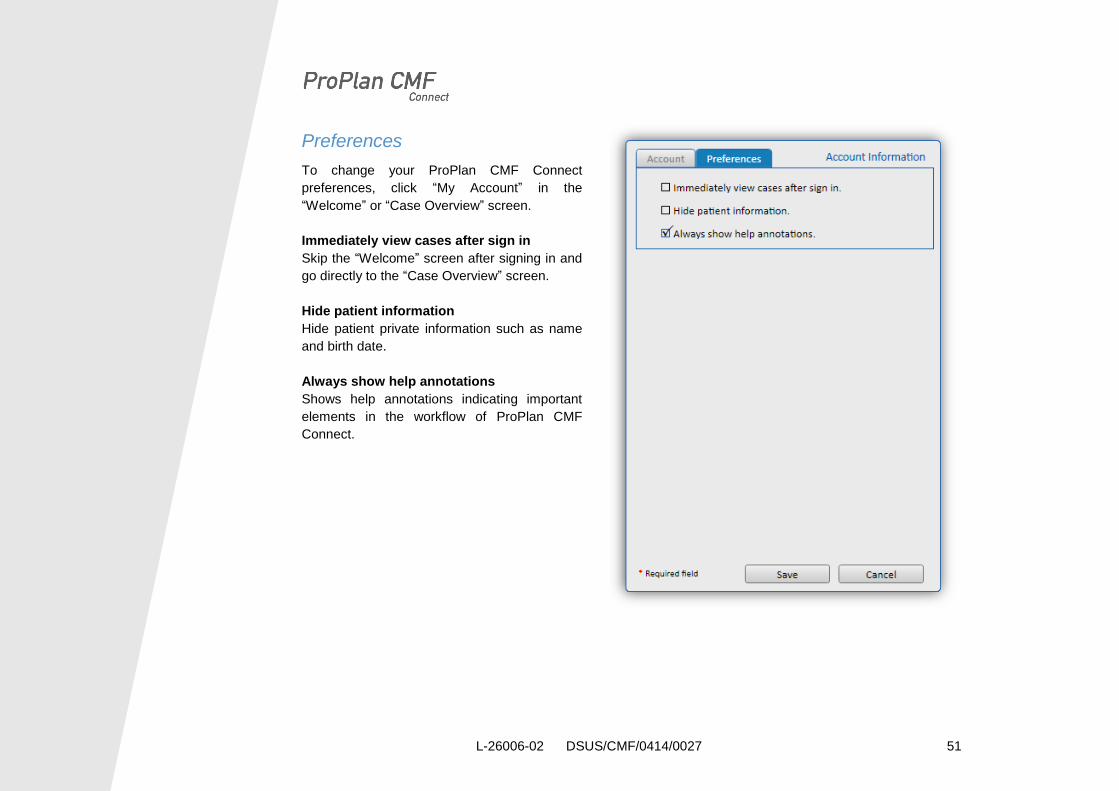
Preferences
To change your ProPlan CMF Connect
preferences, click “My Account” in the
“Welcome” or “Case Overview” screen.
Immediately view cases after sign in
Skip the “Welcome” screen after signing in and
go directly to the “Case Overview” screen.
Hide patient information
Hide patient private information such as name
and birth date.
Always show help annotations
Shows help annotations indicating important
elements in the workflow of ProPlan CMF
Connect.
L-26006-02 DSUS/CMF/0414/0027 52
52
/ System Requirements To run ProPlan CMF Connect, you need at least these system requirements:
Intel Pentium 4 2.4GHz or equivalent
512 MB RAM
1 GB of available disk space
Graphics card & screen supporting at least 1024x768 resolution with true color visual (24 or 32 bit) and
256MB of memory
Three-button optical mouse with scroll wheel
1.5MBit/s Internet connection
Microsoft Windows XP Service Pack 2, Windows Vista, Windows 7 or higher
Microsoft .NET 3.5 Framework SP1 or higher
Adobe Reader 7.0 or higher
L-26006-02 DSUS/CMF/0414/0027 53
53
/ Troubleshooting
In case you have questions when using the software, please consult the list of solutions below. If your question
is still outstanding, please contact the DePuy Synthes CMF Product Development Team (See contact info at the
beginning of the user guide) for assistance.
I cannot log in.
Double check your email address and password.
Verify you are connected to the Internet.
More details on page 10.
My email address is/will not be valid anymore.
Contact your DePuy Synthes CMF Product Development Team . He/she will change your email address.
I don’t know the surgery date yet.
During the case creation, select To be defined. This can be changed once you know the exact date.
The surgery date needs to be changed.
Open the specific case and click “Patient Information”. Click “Edit Case Details” and adjust the surgery
date. Though your the Materialise clinical engineer will automatically be notified, you might want to
inform him/her in case the surgery is set to a much earlier date to ensure that the surgical guides will be
delivered in time.
The surgery location needs to be changed.
Open the specific case and click “Patient Information”. Click “Edit Case Details” and change the hospital.
The Materialise clinical engineer will be automatically notified about the change.
I don’t know which CT/MRI images I need to upload.
CT/MRI images are usually DICOM images (.dcm) made available on a CD. You can select the top
folder on the CD to upload.
Uploading CT/MRI images is slow.

L-26006-02 DSUS/CMF/0414/0027 54
54
The size of the images can sum up to a high volume which can take a while to upload depending on
your Internet connection. When the total size exceeds 1 GB, consider sending a hard copy (CD) by post.
I cannot open or save a case.
Verify you are connected to the Internet. ProPlan CMF Connect stores your cases online.
I can’t see a 3D model.
Check whether “3D Model is ready” is checked in Step 1 of the bottom bar in the “Case Details” screen.
If not, the reconstruction (segmentation) is not yet complete.
The 3D model may lie out of view. Click the middle button of the move control (see page 38). This will
put the model in the center of your screen.
Check the “Show/Hide Objects” panel (see page 45). Make sure at least one item has an active eye
icon. If no items are listed, there’s no 3D model available.
I received an email telling me the status of a case has changed, but this is not reflected in ProPlan CMF
Connect.
Try logging out and in again. This will refresh the case list.
Not all my cases are shown in the case list.
If there is text in the search field, remove the text to show all cases.
Check the “Shipped” or “Cancelled” tabs for cases which may have changed status.
How do I know what current action in a step needs to be completed?
You can browse through the different steps. Completed actions are marked with a checkmark in each
step. The current action is the first black item without a checkmark.
I see an issue in the uploaded images, the 3D model, the surgical plan or the designed guide(s).
Contact the clinical engineer as soon as possible. Small issues can be communicated via the messages
panel in ProPlan CMF Connect. However, if there is an important issue, call the engineer to take
immediate action.

L-26006-02 DSUS/CMF/0414/0027 55
55
/ End User License Agreement (EULA) COMPUTER PROGRAM LICENSE AGREEMENT
This End-User License Agreement (“EULA”) is a legal agreement between you and Materialise for the
Materialise software that accompanies this EULA, which includes computer software and may include
associated media, printed materials, “online” or electronic documentation, and Internet-based services
(“Software”). BY INSTALLING OR OTHERWISE USING THE SOFTWARE, YOU AGREE TO BE BOUND BY
THE TERMS HEREOF.
DEFINITIONS
Licensor: Synthes USA, LLC having its principal offices at 1302 Wrights Lane East, West Chester, PA 19380.
Licensee: Holder of the license.
Licensed Material: Media containing the software and the user documentation.
Software: Computer programs in machine-readable form (object code and/or common intermediate language).
1. License Grant
Licensor hereby grants Licensee, which accepts, a personal, non-exclusive license to use the Licensed Material,
only as authorized in this License Agreement. The Software is made available in machine-readable form.
Licensee agrees that he may not reverse assemble, reverse compile or otherwise translate the Software or any
part thereof. Licensee agrees that he does not have the right to assign, sub license, transfer, pledge, lease, rent
or share his rights proceeding from this License Agreement, nor sell Licensed Material or any part or copy
thereof.
2. Licensor’s Rights
Licensee acknowledges and agrees that the Software and User documentation are proprietary products of
Licensor protected under copyright law. Licensee further acknowledges and agrees that all right, title and
interest in and to the Licensed Material, associated intellectual property rights, are and shall remain with the
Licensor. This License Agreement does not convey to Licensee any interest in or to the Licensed Material, but
only a limited right of use, revocable in accordance with the terms of this License Agreement.
3. License Fees
The Software is granted on a royalty-free basis.
L-26006-02 DSUS/CMF/0414/0027 56
56
4. Term
This License Agreement is effective upon the first use of the Software on a computer, and shall continue until
terminated. Each of the Parties may terminate this License Agreement at any time. Upon such termination, the
Licensee will destroy any Licensed Material in his possession or will return the Licensed Material and any
copies or extracts there from the Licensor.
5. Warranty
The Software is provided “AS-IS”. Licensor disclaims all representations and warranties, express or implied,
with respect to the Software, including, without limitation, warranties of fitness for a particular use or purpose,
merchantability and non-infringement. Licensor makes no warranties that the Software will operate without
interruption or be error-free. The entire risk as to the quality and performance of the Software shall be borne by
Licensee.
6. Limitation of Liability
It is the clinician's ultimate obligation to exercise his/her professional judgment in any decision to follow or not
follow treatment planning recommendations made by this device (software). Licensor’s cumulative liability to
Licensee for any loss or damages resulting from any claims, demands or actions arising out of or relating to this
Agreement shall not exceed the license fee paid to Licensor for use of the Licensed Material. Licensor cannot
be held liable for any claims, demands or actions, arising from the faulty performance of the Software, if such
faulty performance is caused by the input of data from the Licensee or any third party. In no event shall Licensor
be liable for any indirect, incidental, consequential, special or exemplary damages or lost profits, even if
Licensor has been advised of the possibility of such damages.
7. Governing Law
This License Agreement shall be construed and governed in accordance with the laws of the Commonwealth of
Pennsylvania.
8. Severability
Should any court or competent jurisdiction declare any term of this License Agreement void or unenforceable,
such declaration shall have no effect on the remaining terms hereof.
L-26006-02 DSUS/CMF/0414/0027 57
57
9. No Waiver
The failure of either party to enforce any rights granted hereunder or to take action against the other party in the
event of any breach hereunder shall not be deemed a waiver by that party as to subsequent enforcement of
rights or subsequent actions in the event of future breaches.
10. Privacy notice
If in the course of usage of the Software, the Licensee sends data, which are equivalent to private information or
protected health information, Licensor commits to not use or disclose such information other than as permitted
or required for the fulfillment of services to Licensee. Licensor shall use appropriate safeguards to prevent use
or disclosure of such information other than as required for the fulfillment of these services
L-26006-02 DSUS/CMF/0414/0027 58
58
Disclaimer
Synthes, Materialise, Synthes ProPlan CMF Connect and other names mentioned in this document are
registered trademarks and/or trade names either owned by or licensed to Materialise and Synthes. No user has
any right, title, or interest in those marks or names not previously expressly granted in writing to such user by
Materialise and Synthes.


![CMF Presentation[]](https://static.fdocuments.us/doc/165x107/58894fed1a28abde5a8b708b/cmf-presentationpdf-file.jpg)