Sybase ETLinfocenter.sybase.com/.../pdf/etl_inst.pdf · desktop to create and design data...
48
Installation Guide Sybase ETL 4.8
Transcript of Sybase ETLinfocenter.sybase.com/.../pdf/etl_inst.pdf · desktop to create and design data...
Installation Guide
Sybase ETL4.8

DOCUMENT ID: DC01013-01-0480-01
LAST REVISED: March 2009
Copyright © 2009 by Sybase, Inc. All rights reserved.
This publication pertains to Sybase software and to any subsequent release until otherwise indicated in new editions or technical notes. Information in this document is subject to change without notice. The software described herein is furnished under a license agreement, and it may be used or copied only in accordance with the terms of that agreement.
To order additional documents, U.S. and Canadian customers should call Customer Fulfillment at (800) 685-8225, fax (617) 229-9845.
Customers in other countries with a U.S. license agreement may contact Customer Fulfillment via the above fax number. All other international customers should contact their Sybase subsidiary or local distributor. Upgrades are provided only at regularly scheduled software release dates. No part of this publication may be reproduced, transmitted, or translated in any form or by any means, electronic, mechanical, manual, optical, or otherwise, without the prior written permission of Sybase, Inc.
Sybase trademarks can be viewed at the Sybase trademarks page at http://www.sybase.com/detail?id=1011207. Sybase and the marks listed are trademarks of Sybase, Inc. ® indicates registration in the United States of America.
Java and all Java-based marks are trademarks or registered trademarks of Sun Microsystems, Inc. in the U.S. and other countries.
Unicode and the Unicode Logo are registered trademarks of Unicode, Inc.
All other company and product names mentioned may be trademarks of the respective companies with which they are associated.
Use, duplication, or disclosure by the government is subject to the restrictions set forth in subparagraph (c)(1)(ii) of DFARS 52.227-7013 for the DOD and as set forth in FAR 52.227-19(a)-(d) for civilian agencies.
Sybase, Inc., One Sybase Drive, Dublin, CA 94568.

Contents
Installation Guide iii
About This Book ............................................................................................................................ v
CHAPTER 1 Introduction ..................................................................................... 1About Sybase ETL ........................................................................... 1
Sybase ETL Development......................................................... 1Sybase ETL Server ................................................................... 2
Before you begin .............................................................................. 2Obtaining licenses ..................................................................... 2Reviewing system requirements ............................................... 3Determining the installation directory ........................................ 7Determining the installation mode ............................................. 8
CHAPTER 2 Installation ....................................................................................... 9Installing Sybase ETL Development ................................................ 9
Installing Sybase ETL Development in GUI mode .................... 9Installing Sybase ETL Development in silent mode ................ 11
Installing Sybase ETL Server ......................................................... 11Installing Sybase ETL Server in GUI mode............................. 12Installing Sybase ETL Server in non-GUI modes.................... 14
Installing SQL Anywhere as an ETL repository.............................. 17
CHAPTER 3 PostInstallation Tasks .................................................................. 19Checking for a valid installation...................................................... 19
Sybase ETL Development....................................................... 19Sybase ETL Server ................................................................. 21
Configuring file settings for Sybase ETL Server on UNIX.............. 21Configuring connectivity between Sybase ETL components ......... 22
CHAPTER 4 Upgrading ...................................................................................... 23Upgrading Sybase ETL Development ............................................ 23Upgrading Sybase ETL Server ...................................................... 25
Upgrading Sybase ETL Server on Windows ........................... 25

Contents
iv Sybase ETL
Upgrading Sybase ETL Server on UNIX and Linux ................ 26Migrating projects and jobs ..................................................... 26
Migrating repository from Sybase IQ to SQL Anywhere ................ 27
CHAPTER 5 Uninstallation ................................................................................. 31Uninstalling Sybase ETL Development.......................................... 31Uninstalling Sybase ETL Server .................................................... 32
CHAPTER 6 Installing Drivers for Sybase IQ Connectivity............................. 33Installing connectivity drivers ......................................................... 33Configuring SQL Anywhere ODBC drivers for Sybase IQ 12.7 ..... 34Configuring Open Client drivers for Sybase IQ 12.7 and 15.0 ....... 36
Index ............................................................................................................................................. 37
Installation Guide v
About This Book
Audience This guide is for data administrators and developers who are responsible for installing and configuring Sybase® ETL components, namely, Sybase ETL Development and Sybase ETL Server.
How to use this book The Sybase ETL Installation Guide is structured as follows:
• Chapter 1, “Introduction” is an overview of the Sybase ETL components. It also outlines the requirements for preparing your environment before you begin to install.
• Chapter 2, “Installation” describes how to install Sybase ETL components.
• Chapter 3, “PostInstallation Tasks” describes the tasks you must perform after you have installed the Sybase ETL components.
• Chapter 4, “Upgrading” describes how to upgrade from an earlier version to the current version of Sybase ETL components.
• Chapter 5, “Uninstallation” describes how to uninstall Sybase ETL components.
• Chapter 6, “Installing Drivers for Sybase IQ Connectivity” describes steps for installing and configuring drivers for connecting to Sybase IQ.
Related documents This section describes the Sybase ETL documentation set, which you can find on the Getting Started CD and the SyBooks™ CDs. The Sybase ETL Getting Started CD includes:
• Sybase ETL Release Bulletin for your platform – contains last-minute information that was too late to be included in the books.
• Sybase ETL Installation Guide for your platform (this document) – describes installation procedures for the components of the Sybase ETL.
The Sybase ETL SyBooks CD includes:
• Sybase ETL New Features Guide – describes the new features in Sybase ETL 4.8.

vi Sybase ETL
• Sybase ETL Users Guide – describes how to transform data from data providers to data targets.
• Sybase Software Asset Management Quick Start Guide – describes how to complete a simple installation for an environment with a small number of Sybase products and users.
• Sybase Software Asset Management Users Guide – describes asset management configuration concepts and tasks.
Other sources of information
Use the Sybase Getting Started CD, the SyBooks CD, and the Sybase Product Manuals Web site to learn more about your product:
• The Getting Started CD contains release bulletins and installation guides in PDF format, and may also contain other documents or updated information not included on the SyBooks CD. It is included with your software. To read or print documents on the Getting Started CD, you need Adobe Acrobat Reader, which you can download at no charge from the Adobe Web site using a link provided on the CD.
• The SyBooks CD contains product manuals and is included with your software. The Eclipse-based SyBooks browser allows you to access the manuals in an easy-to-use, HTML-based format.
Some documentation may be provided in PDF format, which you can access through the PDF directory on the SyBooks CD. To read or print the PDF files, you need Adobe Acrobat Reader.
Refer to the SyBooks Installation Guide on the Getting Started CD, or the README.txt file on the SyBooks CD for instructions on installing and starting SyBooks.
• The Sybase Product Manuals Web site is an online version of the SyBooks CD that you can access using a standard Web browser. In addition to product manuals, you will find links to EBFs/Maintenance, Technical Documents, Case Management, Solved Cases, newsgroups, and the Sybase Developer Network.
To access the Sybase Product Manuals Web site, go to Product Manuals at http://www.sybase.com/support/manuals/.
Sybase certifications on the Web
Technical documentation at the Sybase Web site is updated frequently.
❖ Finding the latest information on product certifications
1 Point your Web browser to Technical Documents at http://www.sybase.com/support/techdocs/.
About This Book
Installation Guide vii
2 Click Certification Report.
3 In the Certification Report filter select a product, platform, and timeframe and then click Go.
4 Click a Certification Report title to display the report.
❖ Finding the latest information on component certifications
1 Point your Web browser to Availability and Certification Reports at http://certification.sybase.com/.
2 Either select the product family and product under Search by Base Product; or select the platform and product under Search by Platform.
3 Select Search to display the availability and certification report for the selection.
❖ Creating a personalized view of the Sybase Web site (including support pages)
Set up a MySybase profile. MySybase is a free service that allows you to create a personalized view of Sybase Web pages.
1 Point your Web browser to Technical Documents at http://www.sybase.com/support/techdocs/.
2 Click MySybase and create a MySybase profile.
Sybase EBFs and software maintenance
❖ Finding the latest information on EBFs and software maintenance
1 Point your Web browser to the Sybase Support Page at http://www.sybase.com/support.
2 Select EBFs/Maintenance. If prompted, enter your MySybase user name and password.
3 Select a product.
4 Specify a time frame and click Go. A list of EBF/Maintenance releases is displayed.
Padlock icons indicate that you do not have download authorization for certain EBF/Maintenance releases because you are not registered as a Technical Support Contact. If you have not registered, but have valid information provided by your Sybase representative or through your support contract, click Edit Roles to add the “Technical Support Contact” role to your MySybase profile.
viii Sybase ETL
5 Click the Info icon to display the EBF/Maintenance report, or click the product description to download the software.
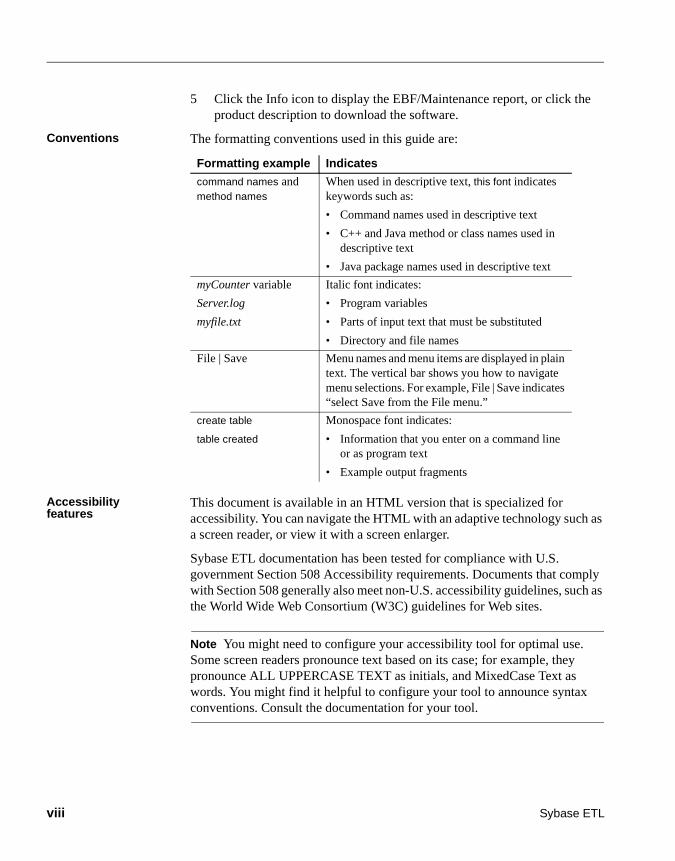
Conventions The formatting conventions used in this guide are:
Accessibility features
This document is available in an HTML version that is specialized for accessibility. You can navigate the HTML with an adaptive technology such as a screen reader, or view it with a screen enlarger.
Sybase ETL documentation has been tested for compliance with U.S. government Section 508 Accessibility requirements. Documents that comply with Section 508 generally also meet non-U.S. accessibility guidelines, such as the World Wide Web Consortium (W3C) guidelines for Web sites.
Note You might need to configure your accessibility tool for optimal use. Some screen readers pronounce text based on its case; for example, they pronounce ALL UPPERCASE TEXT as initials, and MixedCase Text as words. You might find it helpful to configure your tool to announce syntax conventions. Consult the documentation for your tool.
Formatting example Indicates
command names and method names
When used in descriptive text, this font indicates keywords such as:
• Command names used in descriptive text
• C++ and Java method or class names used in descriptive text
• Java package names used in descriptive text
myCounter variable
Server.log
myfile.txt
Italic font indicates:
• Program variables
• Parts of input text that must be substituted
• Directory and file names
File | Save Menu names and menu items are displayed in plain text. The vertical bar shows you how to navigate menu selections. For example, File | Save indicates “select Save from the File menu.”
create table
table created
Monospace font indicates:
• Information that you enter on a command line or as program text
• Example output fragments

About This Book
Installation Guide ix
For information about how Sybase supports accessibility, see Sybase Accessibility at http://www.sybase.com/accessibility. The Sybase Accessibility site includes links to information on Section 508 and W3C standards.
If you need help Each Sybase installation that has purchased a support contract has one or more designated people who are authorized to contact Sybase Technical Support. If you cannot resolve a problem using the manuals or online help, please have the designated person contact Sybase Technical Support or the Sybase subsidiary in your area.

x Sybase ETL
Installation Guide 1
C H A P T E R 1 Introduction
This chapter is an overview of Sybase ETL and its components. It also outlines the requirements for preparing your environment for an installation of the Sybase ETL components. Sybase recommends that you read this chapter before proceeding with the installation.
About Sybase ETLSybase ETL provides extract, transform, and load (ETL) capabilities to consolidate data or copies of data from multiple heterogeneous data sources into one or more data targets, using a comprehensive set of transformation functions.
Sybase ETL includes two components that are installed separately:
• Sybase ETL Development
• Sybase ETL Server
Sybase ETL DevelopmentSybase ETL Development is a graphical user interface (GUI) tool for creating and designing data transformation projects and jobs. This tool provides a complete simulation and debugging environment to speed the development of ETL transformation flows. ETL Development is available only on Windows.
Topic PageAbout Sybase ETL 1
Before you begin 2

Before you begin
2 Sybase ETL
ETL Development is divided into two major subcomponents:
• ETL Development desktop – provides the graphical user interface. Use the desktop to create and design data transformation projects.
• ETL Development engine – controls actual processing, such as connecting to databases and executing procedures.
Sybase ETL ServerSybase ETL Server is scalable and distributed grid engine, which connects to data sources, and extracts and loads data to data targets or data sinks, using transformation flows designed using ETL Development.
Before you beginThis section describes the tasks you must complete before you begin installing the Sybase ETL components.
Obtaining licenses ETL Development You do not need a license file to install and run Sybase ETL Development.
ETL Server ETL Server uses the Sybase Software Asset Management (SySAM) licensing mechanism for license administration and asset management tasks. After you purchase ETL Server, go to the SPDC to generate and download the licenses. See the Sybase Software Asset Management Users Guide.
Before generating licenses, decide whether you are using a served or an unserved license model. For information on how to determine which is appropriate for your site, see Chapter 1, “Getting Started” in the Sybase Software Asset Management Users Guide.
By default, ETL Server comes with a 30-day trial license. You can install and use ETL Server for a grace period of 30 days without a license. To continue using it after the end of the grace period, you must obtain valid licenses from the SPDC, and apply the license in one of these ways:

CHAPTER 1 Introduction
Installation Guide 3
• Copy the license to the licenses folder of the installation directory.
• Apply the license to a previously deployed license server.
See “Installing Sybase ETL Server” on page 11.
Reviewing system requirementsBefore installing ETL Development and ETL Server, make sure your system meets the software and hardware requirements.
Sybase ETL Development
This section describes platforms, operating systems, and disk space requirements for ETL Development.
Operating system
The platform and operating systems supported by ETL Development are:
• Windows XP Professional with Service Pack 3 – 32-bit and 64-bit
• Windows Vista – 32-bit and 64-bit Windows Vista Business, Business N, and Enterprise editions
• Windows 2003 – 32-bit and 64-bit Windows 2003 Standard and Enterprise editions
• Windows 2008 – 32-bit and 64-bit Standard, Enterprise, and Data Center editions
Disk space
The minimum amount of disk space required by the ETL Development is 630MB.
Sybase ETL Server
This section describes platforms, operating systems, databases, and database interfaces that ETL Server supports.
Before you begin
4 Sybase ETL
Operating systems
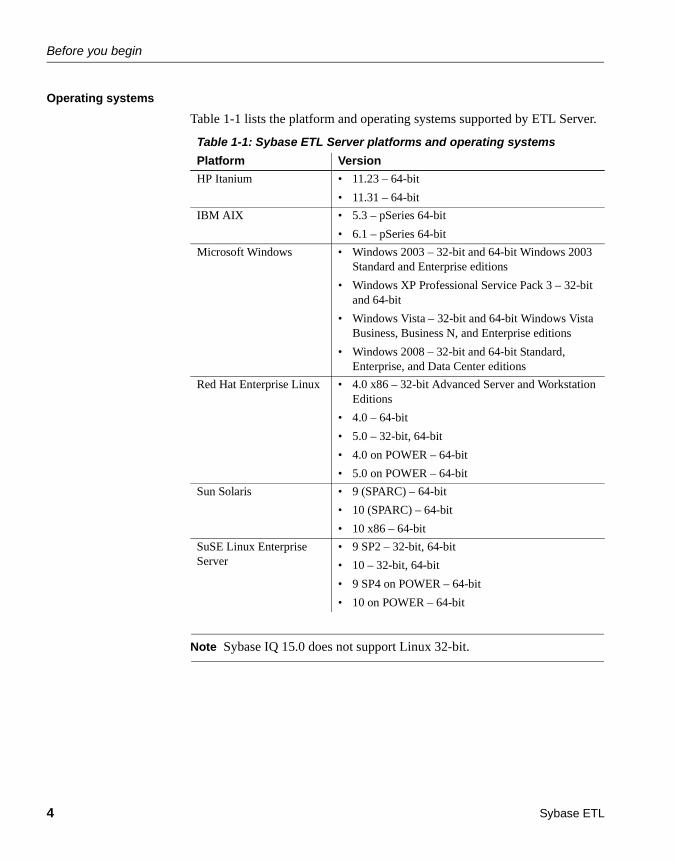
Table 1-1 lists the platform and operating systems supported by ETL Server.
Table 1-1: Sybase ETL Server platforms and operating systems
Note Sybase IQ 15.0 does not support Linux 32-bit.
Platform Version
HP Itanium • 11.23 – 64-bit
• 11.31 – 64-bit
IBM AIX • 5.3 – pSeries 64-bit
• 6.1 – pSeries 64-bit
Microsoft Windows • Windows 2003 – 32-bit and 64-bit Windows 2003 Standard and Enterprise editions
• Windows XP Professional Service Pack 3 – 32-bit and 64-bit
• Windows Vista – 32-bit and 64-bit Windows Vista Business, Business N, and Enterprise editions
• Windows 2008 – 32-bit and 64-bit Standard, Enterprise, and Data Center editions
Red Hat Enterprise Linux • 4.0 x86 – 32-bit Advanced Server and Workstation Editions
• 4.0 – 64-bit
• 5.0 – 32-bit, 64-bit
• 4.0 on POWER – 64-bit
• 5.0 on POWER – 64-bit
Sun Solaris • 9 (SPARC) – 64-bit
• 10 (SPARC) – 64-bit
• 10 x86 – 64-bit
SuSE Linux Enterprise Server
• 9 SP2 – 32-bit, 64-bit
• 10 – 32-bit, 64-bit
• 9 SP4 on POWER – 64-bit
• 10 on POWER – 64-bit

CHAPTER 1 Introduction
Installation Guide 5
The platforms that are supported only in Sybase IQ 12.7 are listed in Table 1-2.
Table 1-2: Supported platforms for Sybase ETL Server in Sybase IQ 12.7
For a complete list of supported operating systems on each platform, see the Sybase platform certifications Web site at http://certification.sybase.com.
Disk space
The minimum amount of disk space required by the ETL Server is 560MB.
Interfaces
The interfaces supported by ETL Development for connecting to destination or source databases from a component, are:
• Sybase
• DB2
• ODBC – you must install the ODBC driver on the same computer as Sybase ETL Development, and you must define a system data source name (DSN) for the target.
• Oracle
• OLE DB
• SQLite Persistent – support for test environments only.
See “Database connection settings,” in Chapter 5, “Components” in the Sybase ETL 4.8 Users Guide.
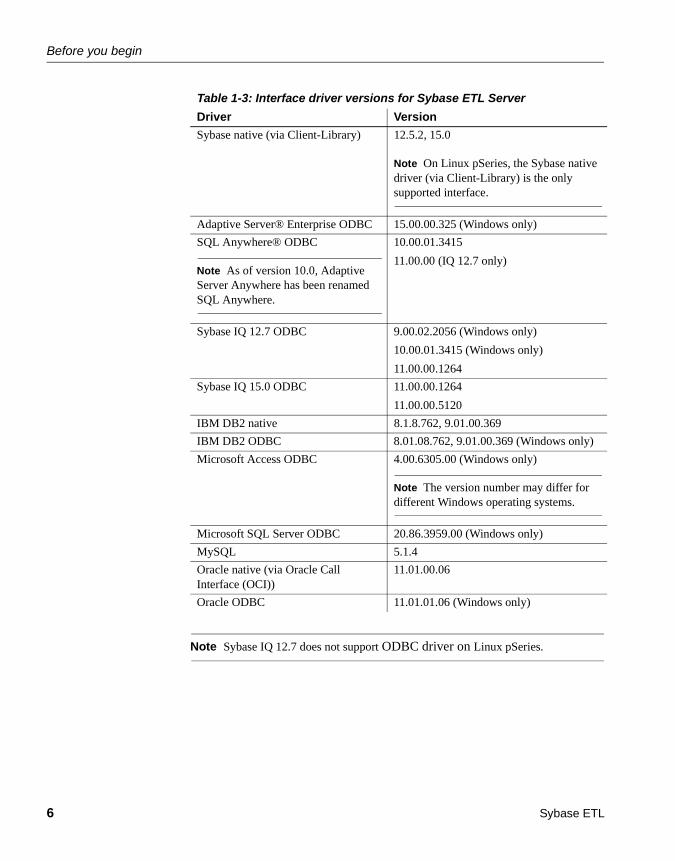
Table 1-3 lists the interface drivers supported by ETL Server.
Platform Version
Red Hat Enterprise Linux • 4.0 x86 – 32-bit Advanced Server and Workstation Editions
• 4.0 – 64-bit
• 5.0 – 32-bit
• 4.0 on POWER – 64-bit
SuSE Linux Enterprise Server • 9 SP2 – 32-bit, 64-bit
• 10 – 32-bit
• 9 SP4 on POWER – 64-bit
Before you begin
6 Sybase ETL
Table 1-3: Interface driver versions for Sybase ETL Server
Note Sybase IQ 12.7 does not support ODBC driver on Linux pSeries.
Driver Version
Sybase native (via Client-Library) 12.5.2, 15.0
Note On Linux pSeries, the Sybase native driver (via Client-Library) is the only supported interface.
Adaptive Server® Enterprise ODBC 15.00.00.325 (Windows only)
SQL Anywhere® ODBC
Note As of version 10.0, Adaptive Server Anywhere has been renamed SQL Anywhere.
10.00.01.3415
11.00.00 (IQ 12.7 only)
Sybase IQ 12.7 ODBC 9.00.02.2056 (Windows only)
10.00.01.3415 (Windows only)
11.00.00.1264
Sybase IQ 15.0 ODBC 11.00.00.1264
11.00.00.5120
IBM DB2 native 8.1.8.762, 9.01.00.369
IBM DB2 ODBC 8.01.08.762, 9.01.00.369 (Windows only)
Microsoft Access ODBC 4.00.6305.00 (Windows only)
Note The version number may differ for different Windows operating systems.
Microsoft SQL Server ODBC 20.86.3959.00 (Windows only)
MySQL 5.1.4
Oracle native (via Oracle Call Interface (OCI))
11.01.00.06
Oracle ODBC 11.01.01.06 (Windows only)
CHAPTER 1 Introduction
Installation Guide 7
Databases
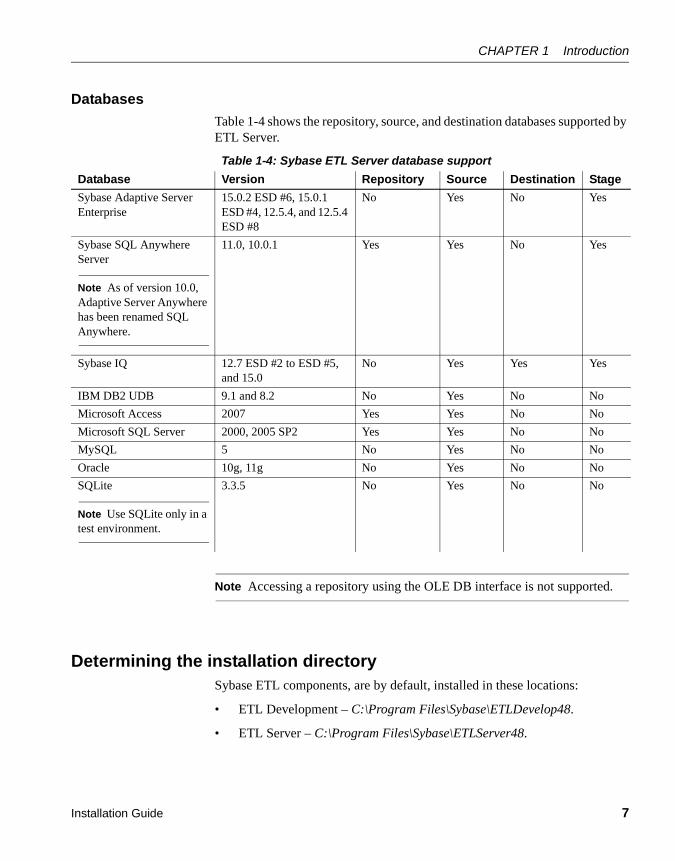
Table 1-4 shows the repository, source, and destination databases supported by ETL Server.
Table 1-4: Sybase ETL Server database support
Note Accessing a repository using the OLE DB interface is not supported.
Determining the installation directory Sybase ETL components, are by default, installed in these locations:
• ETL Development – C:\Program Files\Sybase\ETLDevelop48.
• ETL Server – C:\Program Files\Sybase\ETLServer48.
Database Version Repository Source Destination Stage
Sybase Adaptive Server Enterprise
15.0.2 ESD #6, 15.0.1 ESD #4, 12.5.4, and 12.5.4 ESD #8
No Yes No Yes
Sybase SQL Anywhere Server
Note As of version 10.0, Adaptive Server Anywhere has been renamed SQL Anywhere.
11.0, 10.0.1 Yes Yes No Yes
Sybase IQ 12.7 ESD #2 to ESD #5, and 15.0
No Yes Yes Yes
IBM DB2 UDB 9.1 and 8.2 No Yes No No
Microsoft Access 2007 Yes Yes No No
Microsoft SQL Server 2000, 2005 SP2 Yes Yes No No
MySQL 5 No Yes No No
Oracle 10g, 11g No Yes No No
SQLite
Note Use SQLite only in a test environment.
3.3.5 No Yes No No
Before you begin
8 Sybase ETL
The installer checks for any existing Sybase folder in the C:\Program Files directory. If it locates a Sybase directory, it by default installs the components in this directory. If it cannot locate such a directory, it creates one and installs the components in the new directory.
Warning! Do not install ETL Development or ETL Server in the same directory as Sybase IQ 15.0.
Determining the installation modeYou can install ETL Development and ETL Server using:
• GUI mode – allows you to install the components using a graphical user interface.
• Non-GUI modes (console or silent ) – allows you to install the components using the console mode or using silent mode, which requires no interaction.
Installation Guide 9
C H A P T E R 2 Installation
Before installing Sybase ETL components:
• Close any open applications or utilities.
• Make sure that the target computer meets the hardware requirements and operating system requirements for installing Sybase ETL components. See “Reviewing system requirements” on page 3.
• Make sure that you have the necessary licenses available in your installation environment. See “Obtaining licenses” on page 2.
Installing Sybase ETL DevelopmentYou can install ETL Development using the setup program provided in your installation media, or download and extract the Sybase ETL component images from the Sybase Product Download Center (SPDC) at http://sybase.subscribenet.com.
You can install ETL Development using either GUI mode or silent mode. However, Sybase recommends that you use GUI mode. See “Installing Sybase ETL Development in GUI mode.”
Installing Sybase ETL Development in GUI mode1 Launch the setup program.
The setup program should start automatically. If it does not, select Start | Run and browse to Setup_ETLDevelopment.exe.
Topic PageInstalling Sybase ETL Development 9
Installing Sybase ETL Server 11
Installing SQL Anywhere as an ETL repository 17

Installing Sybase ETL Development
10 Sybase ETL
2 Specify the language to use for installation. Click OK. The Welcome window displays. Click Next.
3 Read the License Agreement. Select “I accept the agreement” and click Next.
If you do not find a license agreement that matches your location, or if the license agreement is unreadable on your system, you can read all available license agreements at the Local Sybase Software Licenses Web site at http://sybase.com/softwarelicenses and re-run the setup program.
4 The installer prompts you to close all other applications, specifically GridNode, before proceeding. Click Next.
Note To terminate GridNode, run the GridNode --shutdown command.
5 Click Browse to select an installation directory, click Next to accept the default directory, or enter a new directory to be created. Sybase recommends that you use only alphanumeric characters for the installation path.
Warning! Do not install ETL Development in the same installation directory as Sybase IQ.
6 Specify the Start Menu folder in which you want to create a program shortcut. To create the shortcut in the default folder, click Next. Otherwise, click Browse to specify a new folder.
7 Select “Install for All Users” if you want to be able to launch the application on user accounts with restricted access rights.
When started the first time on a user account, all files requiring write privileges are copied to the user directory, typically at:
• Windows 2003 and Windows XP – C:\Documents and Settings\<login user>\Application Data\SYBASE\ ETL Development\<product version>\Demodata.
• Vista and Windows 2008 – C:\Users\<login user>\AppData\Roaming\SYBASE\ ETL Development\<product version>\Demodata
Depending on whether you have selected “Install for All Users,” log files are located in the \log subdirectory of either the user or the installation directory.

CHAPTER 2 Installation
Installation Guide 11
Select “Create a desktop icon” to create an icon for ETL Development on the desktop. Click Next.
8 The installation summary window displays. Review the information, and click Install.
9 Once installation is complete, the installer displays a Readme file. View the contents of the file and click Next.
10 Click Finish.
Installing Sybase ETL Development in silent modeAt the command prompt, navigate to the installation directory and enter:
Setup_ETLDevelopment.exe \VERYSILENT \DIR=installationdirectory \TASKS="Desktopicon,Allusers"
where:
• DIR – is the directory path where you want to install ETL Development. Sybase recommends that you use only alphanumeric characters and do not include white spaces in the installation path, when installing in silent mode.
• (Optional) TASKS – are the additional tasks you want the installer to perform, such as creating a desktop icon for ETL Development, or installing for all users.
Installing Sybase ETL ServerThis section describes how to install ETL Server using GUI mode and non-GUI modes. You can install ETL Server using the setup program provided in your installation media, or download and extract the Sybase ETL component images from the Sybase Product Download Center (SPDC).
Note You can install ETL Server using the GUI mode only on Windows.

Installing Sybase ETL Server
12 Sybase ETL
Installing Sybase ETL Server in GUI modeOn Windows 1 Launch the setup program.
The setup program should start automatically. If it does not, select Start | Run and browse to SybaseETLServer.exe.
2 Select the language to use for installation. Click OK. The Welcome window displays. Click Next.
3 Select the product edition you want to configure.
• Evaluation – allows you to install and use ETL Server without a license for a grace period of 30 days. To continue using ETL Server after the end of the grace period, you must obtain valid licenses from the SPDC. See “Obtaining licenses” on page 2.
• Licensed Edition – requires you to provide a license for installation.
4 Read the License Agreement. Select “I accept the agreement” and click Next.
If the license agreement is unreadable on your system, you can read all available license agreements at the Local Sybase Software Licenses Web site at http://sybase.com/softwarelicenses and rerun the setup program.
5 The installer prompts you to close all other applications, specifically GridNode, before proceeding. Click Next.
Note To terminate GridNode, run the GridNode --shutdown command.
6 Select the installation directory. Click Next to accept the default directory, click Browse to select a different installation directory, or enter a new directory to be created. Sybase recommends that you use only alphanumeric characters in the installation path.
Warning! Do not install ETL Server in the same installation directory as Sybase IQ.
7 Specify the Start Menu folder in which you want to create a program shortcut. To install in the default folder, click Next. Otherwise, click Browse to specify a new folder.
8 Keep “Register as Windows System Service” selected if you want to start or stop ETL Server using services.

CHAPTER 2 Installation
Installation Guide 13
Select “Install for All Users,” if you want to be able to launch the application on user accounts with restricted access rights.
When started the first time on a user account, all files requiring write privileges are copied to the user directory, typically at:
• Windows 2003 and Windows XP – C:\Documents and Settings\<login user>\Application Data\SYBASE\ ETL Server\<product version>\Demodata.
• Vista and Windows 2008 – C:\Users\<login user>\AppData\Roaming\SYBASE\ ETL Server\<product version>\Demodata
Depending on whether you have selected “Install for All Users,” log files are located in the \log subdirectory of either the user or the installation directory.
Click Next.
9 The installation summary window displays. Review the information, and click Install.
10 Once installation is complete, the installer displays a Readme file. View the contents of the file and click Next.
11 If you have installed the Licensed Edition, the installer prompts you to select the license method. You can select one of these options:
• Use previously deployed license server – if you have a previously deployed license server, enter the license server host name of the machine where the license server is running, and the license server port number if the port number you are using is not the same as the default. Click Next.
• License file – click Browse to select the location of the license file. Click Next.
Note After you provide the license, the installer verifies whether the license is valid. If the installer cannot verify a valid license, you can continue with the installation; however, the product will stop working in 30 days, unless you obtain and install an appropriate license.
12 A final window appears, indicating that the installation was successful. Click Finish.

Installing Sybase ETL Server
14 Sybase ETL
On UNIX and Linux You cannot install ETL Server on UNIX and Linux using the GUI mode. To install ETL Server on these platforms, use the non-GUI modes. See “Installing Sybase ETL Server in non-GUI modes.”
Installing Sybase ETL Server in non-GUI modesYou can install ETL Server using either the console or silent mode. On Windows, ETL Server can be installed using silent mode only. On UNIX and Linux, ETL Server can be installed using console mode or silent mode.
On Windows using silent mode
At the command prompt, navigate to the installation directory and enter:
SybaseETLServer.exe /VERYSILENT /DIR=<installationdirectory> /TASKS="InstallAsService,Allusers"
where:
• DIR – is the directory path where you want to install ETL Server. Sybase recommends that you use only alphanumeric characters and do not include white spaces in the installation path.
• (Optional) TASKS – are the additional tasks you want the installer to perform, such as installing ETL Server as a Windows service or installing for all users.
On UNIX and Linux using console mode
1 At the command prompt, change to the installation directory, and launch the setup program:
SybaseETLServer.shar
2 Specify if you want to install the evaluation copy or a licensed copy.
• Evaluation copy – enter “1” to install and use ETL Server without a license for a grace period of 30 days. To continue using ETL Server after the end of the grace period, you must obtain valid licenses from the SPDC.
• Licensed copy – enter “2” to install and use ETL Server with a license.
3 A list of countries or regions appear. Select your location and press Enter. If you agree to the terms of the license agreement, enter “Y” to continue the installation. If you disagree with the terms of the license, enter “N” to exit the installation.

CHAPTER 2 Installation
Installation Guide 15
If you do not find a license agreement that matches your location, or if the license agreement is unreadable on your system, you can read all available license agreements at the Local Sybase Software Licenses Web site at http://sybase.com/softwarelicenses and rerun the setup program.
4 Enter the destination directory where you want to install ETL Server.
If the directory exists, this message appears:
The specified directory already exists and will be overwritten. [y/n]
5 Enter “Y” to install for all users, if you want to be able to launch the application on user accounts with restricted access rights.
When started the first time on a user account, all files requiring write privileges are copied to the user directory, typically, $HOME/SYBASE/Sybase ETL Server/<product_version>/Demodata.
Depending on whether you have selected to install for users, the log files will be located in the \log subdirectory of either the user or the installation directory.
6 If you have installed the licensed copy, select one of these license methods:
• Use license file – enter “1” to provide the location of the license file.
Note After you provide the license, the installer verifies whether the license is valid. If the installer cannot verify a valid license, you can continue with the installation; however, the product will stop working in 30 days, unless you obtain and install an appropriate license.
• Use previously deployed license server – enter “2” if you have a previously deployed license server.
Enter the license server host name of the machine where the license server is running, and the license server port number if the port number you are using is not the same as the default.
7 If the software is installed successfully, a message appears indicating a successful installation.

Installing Sybase ETL Server
16 Sybase ETL
On UNIX and Linux using silent mode
1 At the command prompt, navigate to the installation directory and enter:
SybaseETLServer.shar --silent --destination <dest> --all-user
where:
• destination <dest> – is the directory path where you want to install ETL Server. Sybase recommends that you use only alphanumeric characters and do not include white spaces in the installation path.
• all-user – allows you to launch the application on user accounts with restricted access rights.
2 After successful installation, copy the license into the licenses folder of the installation directory.
If you want to deploy the license to an existing license server, create a .lic file and copy it to the licenses folder after you have added this information:
• License server host name of the machine where the license server is running.
• License server port number if the port number you are using is not the same as the default.
For example:
"SERVER sysamserver ANY 27000USE_SERVER"
where, sysamserver is the hostname of the machine where the license server is running, and 27000 is the default port number of the license server. See the Sybase Software Asset Management Users Guide.
After successful installation:
• Check for a valid installation of components. See “Checking for a valid installation” on page 19.
• Configure ETL Development and ETL Server connectivity. See “Configuring connectivity between Sybase ETL components” on page 22.

CHAPTER 2 Installation
Installation Guide 17
Installing SQL Anywhere as an ETL repositoryTo use SQL Anywhere as an ETL repository, you must install it using its installer, which is packaged with ETL Server and ETL Development.
Note Sybase recommends that you use a SQL Anywhere repository rather than a Microsoft Access or SQLite Persistent repository if your database includes wide tables and very large columns.
1 Install ETL Development or ETL Server.
2 Run the SQL Anywhere 11 installer:
Windows –
a Navigate to the installation directory.
b Unzip and extract the SQLAnywhere11.zip file.
By default, the files are extracted to the installation directory.
c Navigate to the SQLAnywhere folder and double-click setup.exe.
UNIX and Linux –
a Navigate to the installation directory.
b Unzip and extract the SQLAnywhere11.tar.gz file.
By default, the files are extracted in the installation directory.
c Using a command prompt, navigate to the folder where you have extracted the file, and enter:
./setup
3 Select the language for installation and click OK.
4 Select Install SQL Anywhere 11.
5 On the Welcome window, click Next.
6 On the License Agreement window, select the geographic location where you are installing to display the agreement appropriate to your region. Read the license agreement. Select “I accept the terms of this agreement” and click Next.
7 Enter the license key.
• On Windows – the license key is available in the SA11_license_key.txt file in the installation directory.
Installing SQL Anywhere as an ETL repository
18 Sybase ETL
• On UNIX and Linux – the license key is available in the SA11_license_key.txt file in the installation directory.
Click Next.
If you have entered an incorrect license key, click Back, and reenter the key. To install an Evaluation Edition of SQL Anywhere for 60 days, click Next.
8 Accept the default Server license information and click Next.
9 Select the Setup type and click Next.
10 Click Install.
11 On successful installation, the installer displays:
Setup has finished installing SQL Anywhere 11 on your computer.
You can select to view the README file or the iAnywhere Online Resources. Click Finish to proceed.
12 Click Finish to complete the setup.
After installing SQL Anywhere, you must configure the SQL Anywhere ODBC drivers. See “Configuring SQL Anywhere ODBC drivers for Sybase IQ 12.7” on page 34.

Installation Guide 19
C H A P T E R 3 PostInstallation Tasks
Checking for a valid installationThis section describes how to verify a valid and successful installation of ETL Development and ETL Server.
Sybase ETL DevelopmentVerfiy that ETL Development has been successfully installed.
❖ Starting Sybase ETL Development
1 In Windows, select Start | Programs | Sybase | Sybase ETL Development 4.8 | Sybase ETL Development.
The Welcome window displays. To prevent this window from displaying every time the application starts, unselect Show on Startup, and click Close.
2 The repository login window appears, showing these default values:
• Connection – Repository
• Client – transformer
• Client user name – TRANSFORMER
• Password – transformer
Topic PageChecking for a valid installation 19
Configuring file settings for Sybase ETL Server on UNIX 21
Configuring connectivity between Sybase ETL components 22
Checking for a valid installation
20 Sybase ETL
These values are automatically set the first time you log in. On subsequent logins, you might need to select or enter this information.
3 Click Logon. If you can successfully log in to ETL Development, the installation is successful.
Note The installer creates an initial set of data sources. If these repository data sources are lost for any reason, ETL Development cannot open until you restore them following the procedures below.
❖ Restoring the initial set of ODBC data sources of the demo repository
1 Configure the ODBC user data source:
a Select Start | Settings | Control Panel | Administrative Tools | Data Sources (ODBC).
b Click Add.
c Select Microsoft Access Driver from the list. Click Finish.
d In the Data Source Name field, enter DEMO_Repository.
e Click Select and browse to the Demodata folder of the installation directory.
f Select the ETLDEMO_REP.MDB database and click OK.
2 Set up the repository connection:
a Select File | Open Repository to open the Repository window.
b Select Repository from the Connection list and select Edit.
c Select ODBC from the Interface list.
d Select DEMO_Repository from the Host list.
e Click Save.
3 Configure the additional ODBC user data sources required by the projects in the demo repository:
• Driver – Microsoft Access
• Name – ETLDEMO_DWH; Database – DEMO_DWH.MDB
• Name – ETLDEMO_GER; Database – DEMO_GER.MDB
• Name – ETLDEMO_US; Database – DEMO_US.MDB

CHAPTER 3 PostInstallation Tasks
Installation Guide 21
The database files for these user data sources are also located in the Demodata folder of the installation directory.
Sybase ETL ServerTo check for valid installation of ETL Server, navigate to the directory where ETL Server is installed, using a command prompt, and enter:
• Windows –
GridNode.exe -ll
• UNIX and Linux –
GridNode.sh -ll
If your installation is valid and successful, the license information displays.
Configuring file settings for Sybase ETL Server on UNIX
On UNIX installations, initialization (.ini) file settings are not read by ETL Server, unless you have a GridNode.ini file. To specify the settings:
1 Make a copy of the Default.ini file in the etc folder of your installation directory and rename the file GridNode.ini.
2 Specify the general settings to be shared by all applications in the Default.ini file.
3 Specify exclusive settings for ETL Server in the GridNode.ini file.
4 Remove the information on general settings from the GridNode.ini file.
Configuring connectivity between Sybase ETL components
22 Sybase ETL
Configuring connectivity between Sybase ETL components
To configure connectivity between ETL Development and ETL Server:
1 Open ETL Development and select File | Preferences.
2 Select Engine.
3 In the Execution engine server field, specify the IP address or machine name of the grid engine server.
4 Click Save.

Installation Guide 23
C H A P T E R 4 Upgrading
Upgrading Sybase ETL DevelopmentBefore upgrading ETL Development:
• Go to the Windows Task Manager and click the Processes tab to check for the GridNode.exe process. Select the GridNode.exe process and click End Process.
Note Make sure “Show Processes From All Users” is selected.
• Back up your existing Microsoft Access demo repository. To do this:
• Navigate to the directory where these databases are installed. The location depends on the options you have selected during install.
If you selected "Install for all users," the default repositories are in:
• For Windows 2003 and Windows XP – C:\Documents and Settings\<login user>\Application Data\SYBASE\ ETL Development\<product version>\Demodata.
• For Vista and Windows 2008 – C:\Users\<login user>\AppData\Roaming\SYBASE\ ETL Development\<product version>\Demodata
Topic PageUpgrading Sybase ETL Development 23
Upgrading Sybase ETL Server 25
Migrating repository from Sybase IQ to SQL Anywhere 27

Upgrading Sybase ETL Development
24 Sybase ETL
If you did not select "Install for all users," the default repositories are in the DemoData folder of your installation directory.
Note Sybase recommends that you use a copy of the existing repository since the current version of ETL Server may change the existing repository to accommodate new features. If you alter the current version of the repository, it may become unusable for earlier versions.
❖ Upgrading ETL Development
1 Install the current version of ETL Development. You can:
• Leave the earlier version and install the new version in a different directory, or
• Uninstall the earlier version and install the new version. See “Uninstalling ETL Development in GUI mode” on page 31. Before uninstalling, back up the .ini files in the etc directory.
2 Copy the .ini files from the etc folder of the earlier installation directory to the new installation directory.
3 To use projects and jobs from earlier versions, migrate them to the current version. See “Migrating projects and jobs” on page 26.
4 Start the new ETL Development version. In the ETL Development Repository Login window, select the repository to connect to and provide the user name and password that was used to connect to the repository in the earlier version.

CHAPTER 4 Upgrading
Installation Guide 25
Upgrading Sybase ETL Server
Upgrading Sybase ETL Server on WindowsBefore upgrading ETL Server, go to the Windows Task Manager and click the Processes tab to check for any active GridNode.exe process. If a GridNode.exe process is running, select it and click End Process.
Note Make sure “Show Processes From All Users” is selected.
❖ Upgrading Sybase ETL Server on Windows
1 Install the new version of ETL Server. You can:
• Leave the earlier version and install the new version in a different directory. See “Installing Sybase ETL Server” on page 11.
• Uninstall the earlier version and install the new version. See “Uninstalling Sybase ETL Server” on page 32.
Note If you are uninstalling the earlier version, create a backup of the ODBC or native connectivity files, which includes the .odbc.ini file or the ODBC or native drivers.
2 Start the new ETL Server.
• To start the ETL Server directly, enter:
GridNode
• To start the ETL Server as a service, enter:
GridNode --install
3 To verify whether the server has started, go to the Windows Task Manager and click the Processes tab to check if the GridNode.exe process is running.

Upgrading Sybase ETL Server
26 Sybase ETL
Upgrading Sybase ETL Server on UNIX and LinuxBefore upgrading ETL Server:
• Shut down any running GridNode. At the command prompt, enter:
./GridNode.sh --shutdown
• Verify that the GridNode has shut down successfully:
ps -e | grep GridNode
If the GridNode is still running, kill the process.
❖ Upgrading Sybase ETL Server on UNIX and Linux
1 Install the new version of ETL Server in a new installation directory.
2 Copy the .ini files from the etc folder of the earlier installation directory to the new installation directory.
3 Start the new ETL Server.
• To start the ETL Server directly, enter:
GridNode.sh
• To start the ETL Server as a service, enter:
GridNode --install
4 To verify whether the server has started, enter:
ps -e | grep GridNode
After successfully upgrading, you may uninstall the older version of ETL Server. See “Uninstalling Sybase ETL Server” on page 32.
Migrating projects and jobs You can migrate projects and jobs from earlier versions of Sybase ETL using either of these methods:
• Reuse the old projects and jobs – create a backup of the existing repository and copy it into the Demodata folder of the new installation directory. Reuse the old projects and jobs.
CHAPTER 4 Upgrading
Installation Guide 27
• Transfer old projects and jobs from the earlier repository to the new repository – create a backup of the existing repository and copy it into the Demodata folder of the new installation directory. Open the existing and the new repository and transfer the old projects and jobs from the existing repository to the new repository. See Chapter 3, “Projects and Jobs” in the Sybase ETL 4.8 Users Guide.
Migrating repository from Sybase IQ to SQL Anywhere Sybase ETL 4.8 does not support Sybase IQ repository. If you are using a Sybase IQ repository from an earlier version of ETL, you must migrate your existing ETL repository from Sybase IQ to SQL Anywhere.
To migrate from a Sybase IQ repository to a SQL Anywhere repository:
• Create a SQL Anywhere database.
• Connect to the new SQL Anywhere repository using Sybase ETL Development.
• Run SQL commands to migrate the repository data.
❖ Creating a SQL Anywhere database
1 Start Sybase Central.
2 Select Tools | SQL Anywhere 11 | Create Database.
3 Read the information on the Welcome page and click Next.
4 Select “Create a database on this computer” and click Next.
5 Specify the full path for your database file. For example:
c:\temp\mysample.db
6 Click Finish.
If the specified directory does not exist, click Yes to confirm its creation.
7 Once the database creation is complete, click Close.
See “Creating a SQL Anywhere database” in SQL Anywhere 11.0 Guide.
After creating the SQL Anywhere database, create an entry in the sql.ini file or create an ODBC DSN to connect to this database. Then, use ETL Development to create tables in the database for the new repository.
Migrating repository from Sybase IQ to SQL Anywhere
28 Sybase ETL
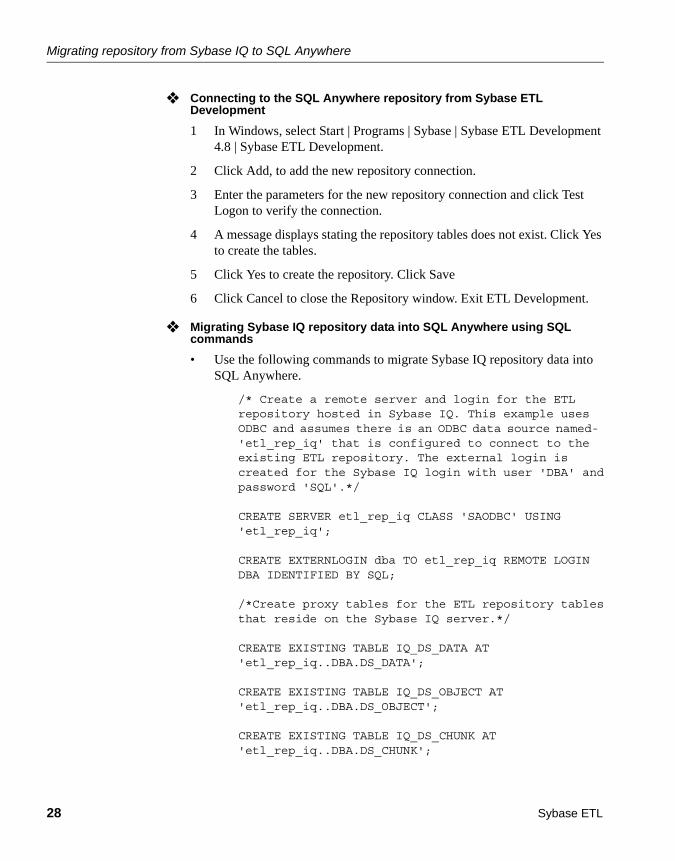
❖ Connecting to the SQL Anywhere repository from Sybase ETL Development
1 In Windows, select Start | Programs | Sybase | Sybase ETL Development 4.8 | Sybase ETL Development.
2 Click Add, to add the new repository connection.
3 Enter the parameters for the new repository connection and click Test Logon to verify the connection.
4 A message displays stating the repository tables does not exist. Click Yes to create the tables.
5 Click Yes to create the repository. Click Save
6 Click Cancel to close the Repository window. Exit ETL Development.
❖ Migrating Sybase IQ repository data into SQL Anywhere using SQL commands
• Use the following commands to migrate Sybase IQ repository data into SQL Anywhere.
/* Create a remote server and login for the ETLrepository hosted in Sybase IQ. This example usesODBC and assumes there is an ODBC data source named- 'etl_rep_iq' that is configured to connect to theexisting ETL repository. The external login iscreated for the Sybase IQ login with user 'DBA' andpassword 'SQL'.*/
CREATE SERVER etl_rep_iq CLASS 'SAODBC' USING'etl_rep_iq';
CREATE EXTERNLOGIN dba TO etl_rep_iq REMOTE LOGINDBA IDENTIFIED BY SQL;
/*Create proxy tables for the ETL repository tablesthat reside on the Sybase IQ server.*/
CREATE EXISTING TABLE IQ_DS_DATA AT'etl_rep_iq..DBA.DS_DATA';
CREATE EXISTING TABLE IQ_DS_OBJECT AT'etl_rep_iq..DBA.DS_OBJECT';
CREATE EXISTING TABLE IQ_DS_CHUNK AT'etl_rep_iq..DBA.DS_CHUNK';

CHAPTER 4 Upgrading
Installation Guide 29
CREATE EXISTING TABLE IQ_TRON_PERFORMANCE AT'etl_rep_iq..DBA.TRON_PERFORMANCE';
/*Remove any existing data from the local repositorytables.*/
TRUNCATE TABLE DS_OBJECT;
TRUNCATE TABLE DS_DATA;
TRUNCATE TABLE DS_CHUNK;
TRUNCATE TABLE TRON_PERFORMANCE;
/*Copy data from the Sybase IQ tables to the newrepository tables.*/
INSERT INTO DS_OBJECT SELECT * FROM IQ_DS_OBJECT;
INSERT INTO DS_DATA SELECT * FROM IQ_DS_DATA;
INSERT INTO DS_CHUNK SELECT * FROM IQ_DS_CHUNK;
INSERT INTO TRON_PERFORMANCE SELECT * FROMIQ_TRON_PERFORMANCE;
Note It is assumed that the Sybase ETL repository database name is etl_rep_iq and that you are connecting to Sybase IQ through an ODBC data source named etl_rep_iq. You must modify the commands as needed for your environment.

Migrating repository from Sybase IQ to SQL Anywhere
30 Sybase ETL
Installation Guide 31
C H A P T E R 5 Uninstallation
Before uninstalling:
• Log in to your machine using an account with administrator privileges.
• Shut down all Sybase applications and processes.
• Move any log, database, or user-created files that you want to keep from the installation directory to another location.
• Determine the mode of uninstallation—GUI or silent mode. Sybase recommends that you use the GUI mode to uninstall.
Uninstalling Sybase ETL Development ❖ Uninstalling ETL Development in GUI mode
1 Select Start | Settings | Control Panel | Add or Remove Programs. Select Sybase ETL Development 4.8 and click Remove.
The Uninstaller Wizard Welcome window displays. Click Next.
2 A status bar appears, displaying the progress of the uninstallation. When the uninstallation is complete, click OK to exit the uninstaller.
Note Some files and directories remain after uninstallation. Move any files that you want to keep to another location, then manually delete these files and directories.
Topic PageUninstalling Sybase ETL Development 31
Uninstalling Sybase ETL Server 32
Uninstalling Sybase ETL Server
32 Sybase ETL
Uninstalling Sybase ETL ServerUninstall ETL Server in GUI mode and console mode.
You cannot use console mode to uninstall on Windows, or GUI mode to uninstall on UNIX and Linux.
❖ Uninstalling Sybase ETL Server in GUI mode (Windows)
1 Select Start | Settings | Control Panel | Add or Remove Programs. Select Sybase ETL Server 4.8 and click Remove to launch the uninstaller.
Click Yes to confirm that you want to completely remove ETL Server and all of its components.
2 A status bar displays the progress of the uninstallation. When the uninstallation is complete, click OK to exit the uninstaller.
❖ Uninstalling Sybase ETL Server in console mode (UNIX and Linux)
1 At the command prompt, navigate to the installation directory and enter:
./uninstall
2 Enter Yes to confirm that you want to completely remove ETL Server and all of its components.
Note Some files and directories may not be removed during uninstallation. You have to manually delete these files and directories.
❖ Uninstalling Sybase ETL Server in silent mode (UNIX and Linux)
• At the command prompt, navigate to the installation directory and enter:
./uninstall --silent
ETL Server and all of its components are silently uninstalled.
Installation Guide 33
C H A P T E R 6 Installing Drivers for Sybase IQ Connectivity
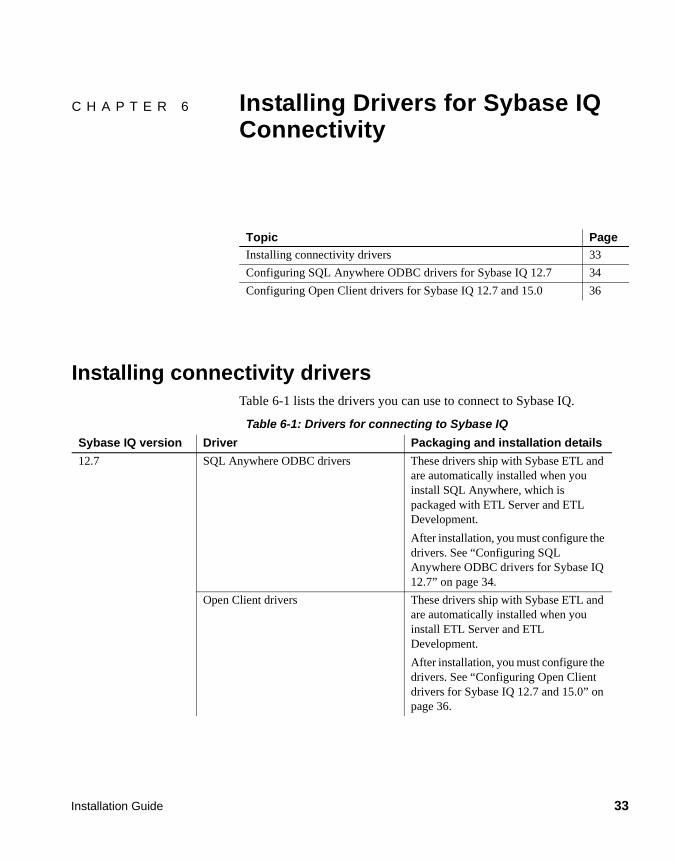
Installing connectivity driversTable 6-1 lists the drivers you can use to connect to Sybase IQ.
Table 6-1: Drivers for connecting to Sybase IQ
Topic PageInstalling connectivity drivers 33
Configuring SQL Anywhere ODBC drivers for Sybase IQ 12.7 34
Configuring Open Client drivers for Sybase IQ 12.7 and 15.0 36
Sybase IQ version Driver Packaging and installation details
12.7 SQL Anywhere ODBC drivers These drivers ship with Sybase ETL and are automatically installed when you install SQL Anywhere, which is packaged with ETL Server and ETL Development.
After installation, you must configure the drivers. See “Configuring SQL Anywhere ODBC drivers for Sybase IQ 12.7” on page 34.
Open Client drivers These drivers ship with Sybase ETL and are automatically installed when you install ETL Server and ETL Development.
After installation, you must configure the drivers. See “Configuring Open Client drivers for Sybase IQ 12.7 and 15.0” on page 36.

Configuring SQL Anywhere ODBC drivers for Sybase IQ 12.7
34 Sybase ETL
Configuring SQL Anywhere ODBC drivers for Sybase IQ 12.7
These conventions are used in this section:
• <installation_directory> is where SQL Anywhere is installed.
• <lib_version> is the subdirectory containing the SQL Anywhere 11 drivers. Depending on your configuration, the name of the subdirectory is lib32 or lib64.
• $USERHOME is the home directory that contains the .odbc.ini file.
The .odbc.ini file contains the ODBC driver configuration information, such as the data source name (DSN) definitions. Driver managers such as unixODBC look for the .odbc.ini file specified in the ODBCINI environment variable. For more information on .odbc.ini, see the unixODBC Web site at http://www.unixodbc.org/internals.html.
1 In the <installation_directory>, create a symbolic link called libodbc.so to the supplied SQL Anywhere 11 ODBC driver file:
ln -s <installation_directory>/<lib_version>/libdbodbc11.so libodbc.so
15.0 Sybase IQ 32-bit ODBC drivers Manually download and install these drivers from Sybase EBFs and software maintenance at http://www.sybase.com/support. Sybase IQ Network Client includes these drivers.
Note Windows and Linux-x86 require 32-bit ODBC drivers for both 32-bit and 64-bit platforms.
Open Client drivers These drivers ship with Sybase ETL and are automatically installed when you install Sybase ETL Server and ETL Development.
After installation, you must configure the drivers. See “Configuring Open Client drivers for Sybase IQ 12.7 and 15.0” on page 36.
Sybase IQ version Driver Packaging and installation details
CHAPTER 6 Installing Drivers for Sybase IQ Connectivity
Installation Guide 35
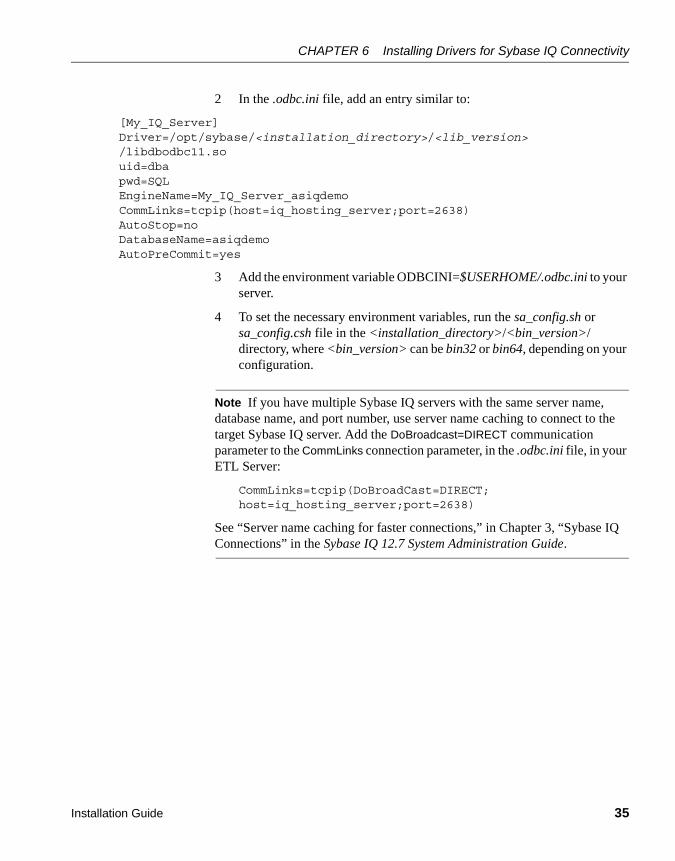
2 In the .odbc.ini file, add an entry similar to:
[My_IQ_Server]Driver=/opt/sybase/<installation_directory>/<lib_version>/libdbodbc11.souid=dbapwd=SQLEngineName=My_IQ_Server_asiqdemoCommLinks=tcpip(host=iq_hosting_server;port=2638)AutoStop=noDatabaseName=asiqdemoAutoPreCommit=yes
3 Add the environment variable ODBCINI=$USERHOME/.odbc.ini to your server.
4 To set the necessary environment variables, run the sa_config.sh or sa_config.csh file in the <installation_directory>/<bin_version>/ directory, where <bin_version> can be bin32 or bin64, depending on your configuration.
Note If you have multiple Sybase IQ servers with the same server name, database name, and port number, use server name caching to connect to the target Sybase IQ server. Add the DoBroadcast=DIRECT communication parameter to the CommLinks connection parameter, in the .odbc.ini file, in your ETL Server:
CommLinks=tcpip(DoBroadCast=DIRECT;host=iq_hosting_server;port=2638)
See “Server name caching for faster connections,” in Chapter 3, “Sybase IQ Connections” in the Sybase IQ 12.7 System Administration Guide.

Configuring Open Client drivers for Sybase IQ 12.7 and 15.0
36 Sybase ETL
Configuring Open Client drivers for Sybase IQ 12.7 and 15.0
❖ Configuring Open Client drivers on Windows
1 Set these environment variables:
SYBASE = <install_dir>\ocsSYBASE_OCS = OCS-15_0PATH = %SYBASE%\%SYBASE_OCS%\bin;%SYBASE%\%SYBASE_OCS%\dll
2 Use the dsedit utility to create an entry for your server in the sql.ini file. For example:
[myiqserver]master=TCP,myiqhost,2638query=TCP,myiqhost,2638
❖ Configuring Open Client drivers on UNIX and Linux
1 Navigate to the installation directory and use a text editor to open the GridNode.sh file.
2 Locate and uncomment these lines to set the environment variables:
#SYBASE=<install_dir>/ocs#export SYBASE#SYBASE_OCS=OCS-15_0#export SYBASE_OCS#LD_LIBRARY_PATH=<install_dir>/ocs/OCS15_0/lib:${LD_LIBRARY_PATH}#export LD_LIBRARY_PATH#LIBPATH=<install_dir>/ocs/OCS-15_0/lib:${LIBPATH}#export LIBPATH
3 Create an entry for your server in the <install_dir>/ocs/interfaces file. For example:
myiqservermaster tcp ether myiqhost 2638query tcp ether myiqhost 2638
Installation Guide 37
AAbout Sybase ETL 1accessibility viii
Bbefore you begin 2
Cchecking for valid installation 19configuring
connectivity between Sybase ETL components 22
file settings for Sybase ETL Server 21conventions viii
Ddefault installation directory
Sybase ETL Development 7Sybase ETL Server 7
disk space requirementsSybase ETL Development 3Sybase ETL Server 5
Iinstallation
modes 8overview 9prerequisites 9
installation modesGUI mode 8non-GUI modes 8
installation prerequisites 2determining installation directory 7determining installation mode 8obtaining licenses 2reviewing system requirements 3
installingSQL Anywhere ETL repository 17SQL Anywhere repository 17Sybase ETL Development in GUI mode 9Sybase ETL Development in silent mode 11Sybase ETL Server in GUI mode 12Sybase ETL Server in non-GUI mode 14
installing Sybase ETL Serveron UNIX and Linux 14, 16on Windows 12, 14
Mmigrating
projects and jobs 26repository from Sybase IQ to SQL Anywhere 27
Ooperating system requirements 3
Ppostinstallation tasks 19preinstallation tasks 1prerequisites for
installation 2uninstallation 31upgrading 23
Index

Index
38 Sybase ETL
Rrestoring ODBC data source 20
Sselect 28Sybase ETL
subcomponents 2Sybase ETL Development
configuring connectivity with Sybase ETL Server 22installation 9licenses 2starting 19supported operating systems 3
Sybase ETL Server 2configuring connectivity with Sybase ETL Development
22configuring file settings on UNIX 21supported databases 7supported interfaces 5supported operating systems 4SySAM licenses 2
Sybase Technical Support ix
Ttypographical conventions viii
Uuninstalling
prerequisites 31uninstalling Sybase ETL Server
on UNIX and Linux 32on Windows 32
upgradingSybase ETL Development 23, 24Sybase ETL Server 25, 26
upgrading prerequisitesSybase ETL Development 23Sybase ETL Server 25, 26
upgrading Sybase ETL Serveron UNIX and Linux 26
on Windows 25
Vverifying valid installation 19
Sybase ETL Development 19Sybase ETL Server 21