swedx soundbar SQ-88T5-A2 Design and specifications are subject to change without notice. Design and...
10
User’s Guide SQ-88T5 www.swedx.com
-
Upload
truongkiet -
Category
Documents
-
view
236 -
download
0
Transcript of swedx soundbar SQ-88T5-A2 Design and specifications are subject to change without notice. Design and...

User’s GuideSQ-88T5
Design and specifications are subject to change without notice.
www.swedx.com

Design and specifications are subject to change without notice.2

Design and specifications are subject to change without notice.
INDEX
Safety precautions 4
Description of the soundbar and the subwoofer 6
Description of the remote control 7
8
9
Connections
Specifications
Functions 8
3

Design and specifications are subject to change without notice.4
Safety precaution
When used in the directed manner, this unit has been designed and manufactured to ensure your personal safety. However, improper use can result in potential electrical shock or fire hazards. Please read al l safety and operating instructions careful ly before installation and use. Be sure to keep these instructions handy for future reference. Take special note of all warnings listed in these instructions and on the unit.
The lightning flash with arrowhead symbol within an equilateral is intended to alert the user to the presence of uninsulated dangerous voltage within the product enclosure that may be of sufficient magnitude to constitute a risk of electric shock to persons.
The exclamation point within an equilateral triangle is intended to alert the user to the presence of important operating and maintenance (serving) instructions in the literature accompanying the appliance
.l Water and Moisture: The unit should not be used near water, for example near a bathtub,
kitchen sink, laundry tub, swimming pool or in a wet basement.l Ventilation: The unit should be situated so that its location or position does not interfere with its
proper heat ventilation, for example, it should not be situated on a bed, sofa, rug or similar surface that may block ventilation openings. Also, it should not be placed in a built-in installation, such as a bookcase or cabinet, which may impede the flow of air through the ventilation openings.
l Heat: The unit should be situated away from heat sources such as radiators, heat ducts, stoves or appliance (including amplifiers) that generate heat.
l Power Source: The unit should be connected to a power supply of the type described in the operating instructions or as marked on the unit.
l Power-cord Protection: Power supply cords should be routed so that they are subject to wear or abuse. It is always best to have a clear area from where the cord exists the unit to where it is plugged into an AC outlet.
l Cleaning---the unit should be cleaned only as recommended. see the maintenance section of this manual for cleaning instructions.
l Objects and liquid Entry: Be careful that objects do not fall and liquids are not spilled into any openings or vents located on the unit.
l Attachments: Do not use attachments that are not recommended by the product manufacturer.l Lightning and power surge protection: Unplug the unit from the wall outlet and disconnect the
antenna or cable system during a lightning storm. This will prevent any damage to the unit.l Overloading: Do not overload wall outlets, extension cords, or integral convenience receptacles
as this can result in a risk of fire or electric shock.
WARNING
RISK OF ELECTRIC SHOCKDO NOT OPEN
CAUTION:TO REDUCE THE RISK OF ELECTRIC SHOCK, DO NOT
REMOVE COVER(OR BACK). REFER SERVICING TO
QUALIFIED SERVICE PERSONNEL

l Damage requiring service: The unit should be serviced by qualified service personnel when:A. The power supply cord or plug has been damaged.B. Objects have fallen, or liquid has been spilled into the unit.C. The unit has been exposed to rain.D. The unit has been dropped or the enclosure damaged.E. The unit exhibits a marked change in performance or does not operate normally.
l Periods of Non-use: If the unit is to be left un-used for an extended period of time ,such as a month or longer, the power cord should be unplugged form the unit go prevent damage or corrosion.
l Service: The user should not attempt to service the unit beyond those methods described in the user's qualified service personnel.
Design and specifications are subject to change without notice.5
Contents
Included items:
2 x AAA Battery Remote ControlUser’s Guide AC Cable Soundbar+Woofer
POW
ER
MUTE
VOL
MEN
U
SU
RR
OU
ND
SUBWOOFER
MUSIC
MOVIE
NORM
AL
REPEAT
NEW
S
USB/SD
EQ
SOURCE
VOL
SOURCE
User´s Guide
Woofer to Soundbarcable

Design and specifications are subject to change without notice.6
MUTE SOURCE VOL - VOL +
POWER
Description of the soundbar and the subwoofer
Front View
MUTE SOURCE VOL - VOL +
POWER
1
2
3 4 5 6 7
1. LED display2. Remote sensor3. Mute button4. Source selection button5. Standby/Power button6. Volume down button7. Volume up button
Back View
6 7 8 9 10 11 12
1. Subwoofer connection2. SD card reader3. Power switch On/Off4. USB input5. Power input (110-240 V @ 50-60 Hz)6. Coaxial input7. Optical Input8. AUX1 input9. AUX2 input10. AUX3 input11. Head phone input12. Subwoofer signal output
1 2 3 4 5
1Subwoofer
1. Subwoofer connectionConnect the subwoofer to the soundbar (input 1) using the included cable
Design and specifications are subject to change without notice.
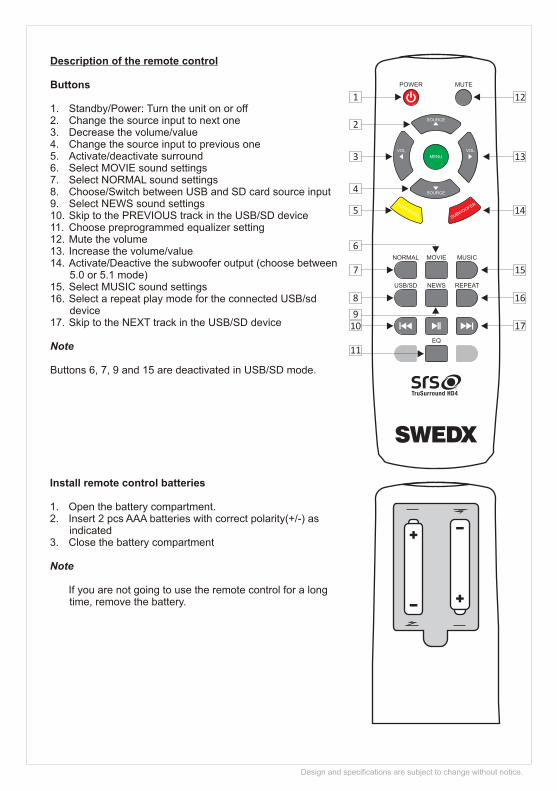
Description of the remote control
Buttons
1. Standby/Power: Turn the unit on or off2. Change the source input to next one3. Decrease the volume/value4. Change the source input to previous one5. Activate/deactivate surround6. Select MOVIE sound settings7. Select NORMAL sound settings8. Choose/Switch between USB and SD card source input9. Select NEWS sound settings10. Skip to the PREVIOUS track in the USB/SD device11. Choose preprogrammed equalizer setting12. Mute the volume13. Increase the volume/value14. Activate/Deactive the subwoofer output (choose between
5.0 or 5.1 mode)15. Select MUSIC sound settings16. Select a repeat play mode for the connected USB/sd
device17. Skip to the NEXT track in the USB/SD device
Note
Buttons 6, 7, 9 and 15 are deactivated in USB/SD mode.
POWER MUTE
VOL
MENU
SURROUNDSUBWOOFER
MUSICMOVIENORMAL
REPEATNEWSUSB/SD
EQ
SOURCE
VOL
SOURCE
1
2
3
4
5
6
7
8
910
11
12
13
14
15
16
17
Install remote control batteries
1. Open the battery compartment.2. Insert 2 pcs AAA batteries with correct polarity(+/-) as
indicated3. Close the battery compartment
Note
If you are not going to use the remote control for a long time, remove the battery.

Design and specifications are subject to change without notice.
Functions
Press Menu buttons to adjust available values. When pressing MENU button it will choose respective adjustable values according to below:
1. S (0-60 DB). Adjust the subwoofer output level2. TB (0-100). Adjust bass level3. DF (0-100). Adjust surround level 4. DC (0-100). Adjust CENTER speakers effect5. C (0-60 DB). Adjust CENTER speakers volume6. M (0-60 DB). Adjust MAIN volume
Note
1. The proper combination of input and output mode (Both the Active Subwoofer and the supply source, i.e CD,MP3,VCD,DVD…..)will produce optimize sound quality. Please refer to both instruction Manual.
2. Some DVD device has high level signal output. When the Master Volume is turn high until the distortion occurs, please turn down the Master Volume to prevent damaged to the speaker unit and amplifier.
When this product is subjected to strong external interference(mechanical shock, excessive static electricity, abnormal supply voltage due to lighting ,etc.) or it is operated incorrectly, it may malfunction. If such problem occurs do the following to reset the system.
1. Set the system to STANDBY mode and turn the POWER on again.2. If the system is not restored using the previous operation, turn off the MAIN
POWER switch, unplug the power cord plug for few minutes and try to Power on it again.
VOL
MENU
VOL
Connections
Connect the woofer to the soundbar using the included cable.
Connect your devices to the soundbar. Choose the appropriate source input depending on the made connections, i.e If you insert an USB device then choose USB as the source input. Refer to the available source inputs, page 6.
Note
- Do not connect the power cord into the AC outlet until all connection are made and are correct.
- Please turn on the unit before turn on the external active subwoofer.
- Please turn off the external active subwoofer before turn off the unit.
MUTE SOURCE VOL - VOL +
POWER

Design and specifications are subject to change without notice.9
Specifications
Amplifier
Rated Output Power 140W+60WFrequency Response 30 - 16000 Hz, -3dBSignal to Noise Ratio >65dBAUX1-3 Input 1.0V RMS 20kohmCoaxial Input 0.5V RMS 75ohmTotal Harmonic Distortion <1%
L/R Speakers
Speaker Impedance 3 inch speakers 8ohmSensitivity >82dB/m/W
SubwooferSpeaker Impedance 50ohmSpeaker Driver 6.5 inch subwoofer + 1 passive subwoofer Sensitivity >78dB/m/W
Dimension / Weight W x H x D / KG
Main Unit 960 x 105 x 120 mm / 5.2 kgSubwoofer 265 x 255 x 265 mm / 5.6 kg
Box - Main Unit 1020 x 155 x 165 mm / 6 kgBox - Subwoofer 325 x 315 x 310 mm / 6.4 kg
General Information
AC Power 110-230V - 50-60HzOperation Power Consumption 28WStandby Power Consumption <10WEco Standby Power Consumption <1WUSB Direct Full Speed Ver1.1
TruSurround HD4, SRS and the symbol are trademarks of SRS Labs, Inc. TruSurround HD4 technology is incorporated under license from SRS Labs, Inc.
is a trademark of SRS Labs, Inc. TruSurround HD4 technology is incorporated under license from SRS Labs, Inc.

Design and specifications are subject to change without notice.19
www.swedx.com