Supermicro Unified Storage Appliance powered by … · Configure your laptop with a static IP: ......
10
1 Copyright © 2017 Nexenta Systems, ALL RIGHTS RESERVED www.nexenta.com Part Number: 9000-nxs-smc-5.0-0000010-B May 2017 Quick Start Guide About this Document The Supermicro Unified Storage Appliance powered by Nexenta is a full featured storage appliance providing high-performance block and file services. The main chassis contains two storage controllers running NexentaStor 5 software-defined storage configured for high- availability and up to 24 devices (SSDs or HDDs depending on the specific configuration ordered). For more information on NexentaStor 5, please visit: https://nexenta.com/products/nexentastor This document will walk you through: • Hardware installation (power and cabling) of the Supermicro Unified Storage Appliance • Configuration of the management network interfaces for NexentaStor software • Online activation of your NexentaStor software licenses • Opening a Supermicro USA Installation Service case with Nexenta To complete the initial installation, you will need: • A laptop that can be connected directly to the appliance nodes to perform basic configuration • Two standard 10GBASE-T cables connected to the onboard management interface on each storage node • IP configuration information (address, netmask, default route, DNS, NTP) for your management network • Internet access from the management network to complete online activation of your NexentaStor software • Your NexentaStor 5 Activation Token that was sent over email by Nexenta Supermicro Unified Storage Appliance powered by Nexenta All-Flash Hybrid & All-Disk
Transcript of Supermicro Unified Storage Appliance powered by … · Configure your laptop with a static IP: ......

1
Copyright © 2017 Nexenta Systems, ALL RIGHTS RESERVED www.nexenta.com
Part Number: 9000-nxs-smc-5.0-0000010-B May 2017
Quick Start Guide About this Document The Supermicro Unified Storage Appliance powered by Nexenta is a full featured storage appliance providing high-performance block and file services. The main chassis contains two storage controllers running NexentaStor 5 software-defined storage configured for high-availability and up to 24 devices (SSDs or HDDs depending on the specific configuration ordered). For more information on NexentaStor 5, please visit: https://nexenta.com/products/nexentastor This document will walk you through: • Hardware installation (power and cabling) of the Supermicro Unified Storage Appliance • Configuration of the management network interfaces for NexentaStor software • Online activation of your NexentaStor software licenses • Opening a Supermicro USA Installation Service case with Nexenta
To complete the initial installation, you will need: • A laptop that can be connected directly to the appliance nodes to perform basic
configuration • Two standard 10GBASE-T cables connected to the onboard management interface on each
storage node • IP configuration information (address, netmask, default route, DNS, NTP) for your
management network • Internet access from the management network to complete online activation of your
NexentaStor software • Your NexentaStor 5 Activation Token that was sent over email by Nexenta
Supermicro Unified Storage Appliance powered by Nexenta
All-Flash
Hybrid & All-Disk

2
Copyright © 2017 Nexenta Systems, ALL RIGHTS RESERVED www.nexenta.com
Part Number: 9000-nxs-smc-5.0-0000010-B May 2017
Supermicro Unified Storage Appliance Installation The following links describe the steps to physically install the 4U appliance into a rack.
4U Unified Storage Appliance: https://www.supermicro.com/products/system/4U/6048/SSG-6048R-DE2CR24L.cfm?parts=SHOW
3
Copyright © 2017 Nexenta Systems, ALL RIGHTS RESERVED www.nexenta.com
Part Number: 9000-nxs-smc-5.0-0000010-B May 2017
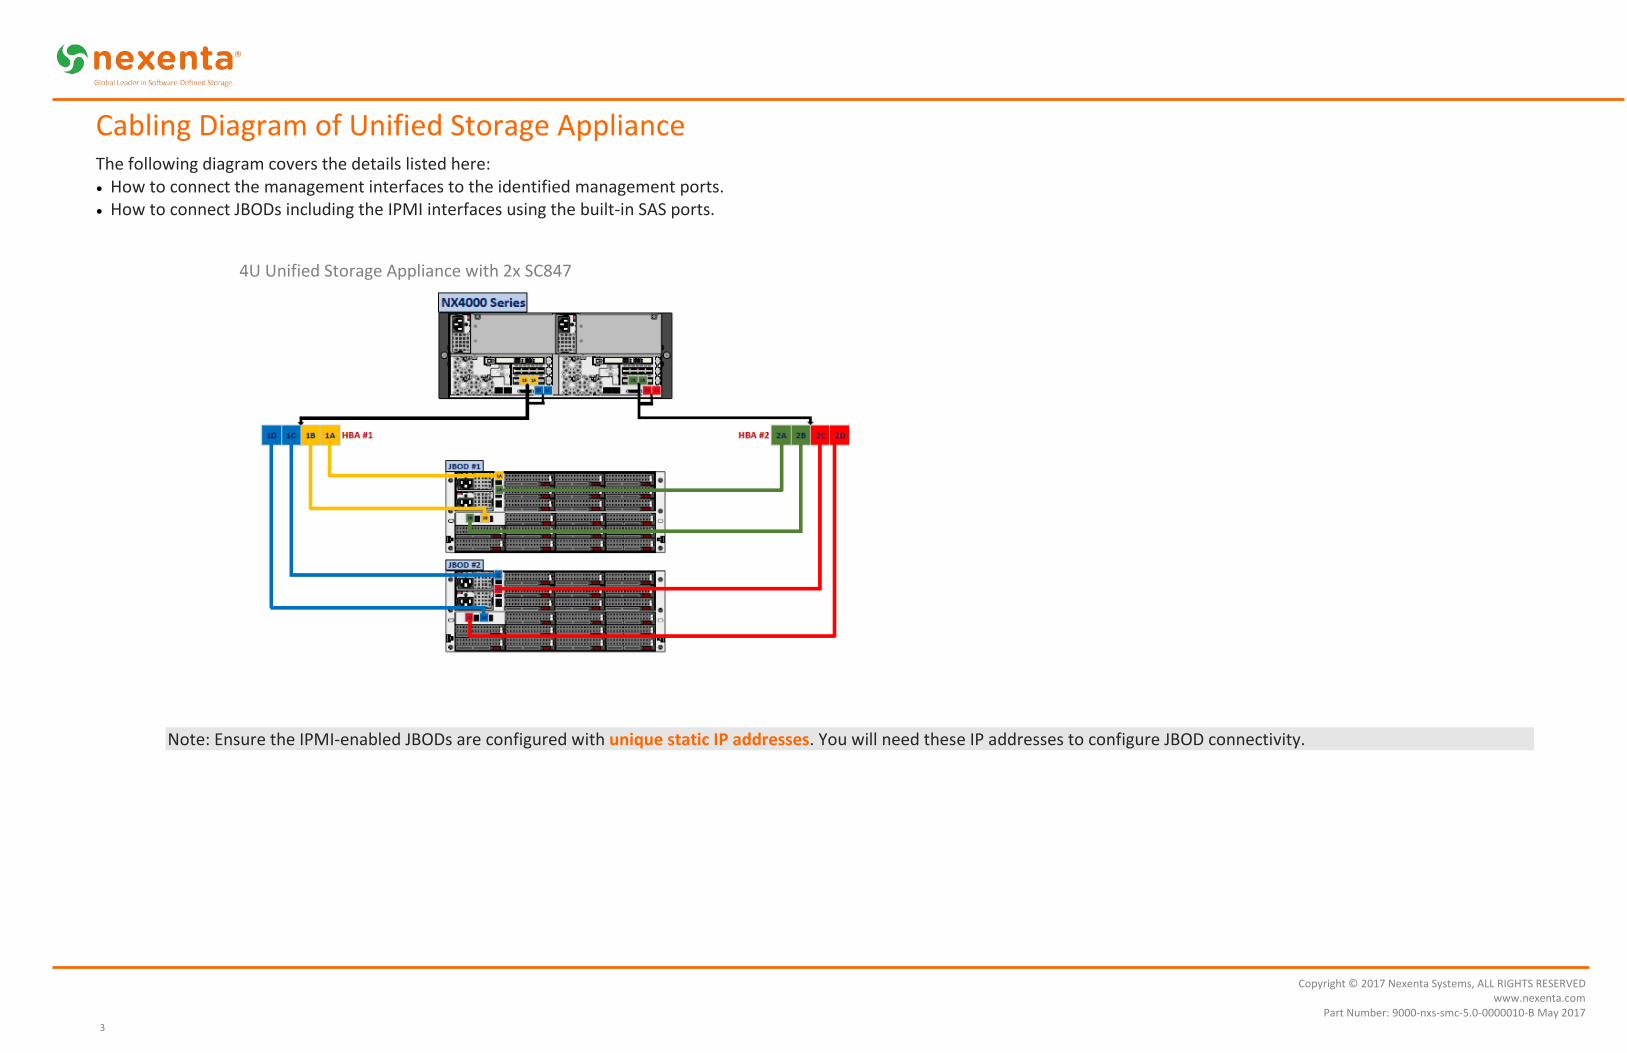
Cabling Diagram of Unified Storage Appliance The following diagram covers the details listed here: • How to connect the management interfaces to the identified management ports. • How to connect JBODs including the IPMI interfaces using the built-in SAS ports.
4U Unified Storage Appliance with 2x SC847
Note: Ensure the IPMI-enabled JBODs are configured with unique static IP addresses. You will need these IP addresses to configure JBOD connectivity.

4
Copyright © 2017 Nexenta Systems, ALL RIGHTS RESERVED www.nexenta.com
Part Number: 9000-nxs-smc-5.0-0000010-B May 2017
4U Unified Storage Appliance Overview • Connect the left side on-board ports to your management network • Configure your laptop with a static IP: 192.168.128.1 / netmask:255.255.255.0 • Connect your laptop to the right side port on Node A and ssh to 192.168.128.10 (user: admin; password: Nexent@123) • Run through the configuration steps outlined in the following pages with the Node A Management IP • Connect your laptop to the right side port on Node B and ssh to 192.168.128.11 (user: admin; password: Nexent@123) • Repeat through the configuration steps with the Node B Management IP

5
Copyright © 2017 Nexenta Systems, ALL RIGHTS RESERVED www.nexenta.com
Part Number: 9000-nxs-smc-5.0-0000010-B May 2017
Pre-Configuration Checklist/ Network Firewall Settings The Supermicro Unified Storage Appliance ships with NexentaStor 5 pre-installed. Before you proceed, you must have:
Depending on the features and services used on the NexentaStor 5.0 software, your network firewall will need to have the ports listed below open.
• Your desired hostnames for NodeA and NodeB • IP address and Netmask for NodeA management interface • IP address and Netmask for NodeB management interface • Default gateway information to provide internet access from each node • Domain Name Server (DNS) information • Network Time Protocol (NTP) server information • NexentaStor 5 license Activation Token
Interfaces and Services Protocol and Ports Used
Management Interface TCP ports 22 (SSH), 6557, 5557, 8443 (REST API)
HA heartbeats: UDP and TCP port 1195
SNMP (UDP 161, 162), DNS (53 UDP/TCP) , NTP (UDP 123), ICAP (port 1344)
https://licensingservice.nexenta.com/ (443) (ssl) https://logcollector.nexenta.com (443/20/21/7000-8000) (ssl/ftp) https://prodpkg.nexenta.com (443) (ssl)
Support Bundles : TCP port 21 (FTP)
Mail server: TCP port 25 or 587 for relay only (SMTP)
Data interfaces for High Performance Replication
TCP port 6000 (default) , configurable.
Front-end iSCSI Target interfaces TCP port 3260
Front-end SMB interfaces UDP ports: 137, 138, TCP ports 137, 139
Front-end CIFS interfaces UDP and TCP port 445
Front-end NFSv3 interfaces UDP ports: 111, 2049, 4045, 32768:65535 TCP ports: 111, 2049, 4045, 32768:65535
Front-end NFSv4 interfaces TCP port: 2049

6
Copyright © 2017 Nexenta Systems, ALL RIGHTS RESERVED www.nexenta.com
Part Number: 9000-nxs-smc-5.0-0000010-B May 2017
Configure Host Name and Date Execute the following steps on each node
• Configure your laptop with a static IP address 192.168.128.1 / netmask 255.255.255.0
• Start with Node A (the left side node) 1. Connect the bottom left 10GbE port to your Management network 2. Connect your laptop to the bottom right 10GbE IPMI port 3. Login to Node A using ssh to 192.168.128.10 (user: admin; password: Nexent@123) 4. Update NodeA’s hostname (replace nodeA with your desired new hostname):
CLI@nodeA>config set system.hostName=<newnameA>
5. Set the timezone for your appliance as an offset to GMT (GMT+1, GMT+2, etc.). For example: CLI@nodeA>config set system.timeZone=Etc/GMT-8
NOTE - In order to conform to the POSIX style, those zone names beginning with "Etc/GMT" have their sign reversed from the standard ISO 8601 convention. In the "Etc" area, zones west of GMT have a positive sign and the east has a negative sign in their name (e.g "Etc/GMT-14" is 14 hours ahead/east of GMT.)
6. Reboot NodeA to apply the timezone change CLI@nodeA>reboot
7. Log back into Node A using ssh to 192.168.128.10 (user: admin; password: Nexent@123)
8. Set the date as mm/day/year hr:min:sec. For example: CLI@newnameA>config set system.date=2/15/2017 22:00:00
7
Copyright © 2017 Nexenta Systems, ALL RIGHTS RESERVED www.nexenta.com
Part Number: 9000-nxs-smc-5.0-0000010-B May 2017
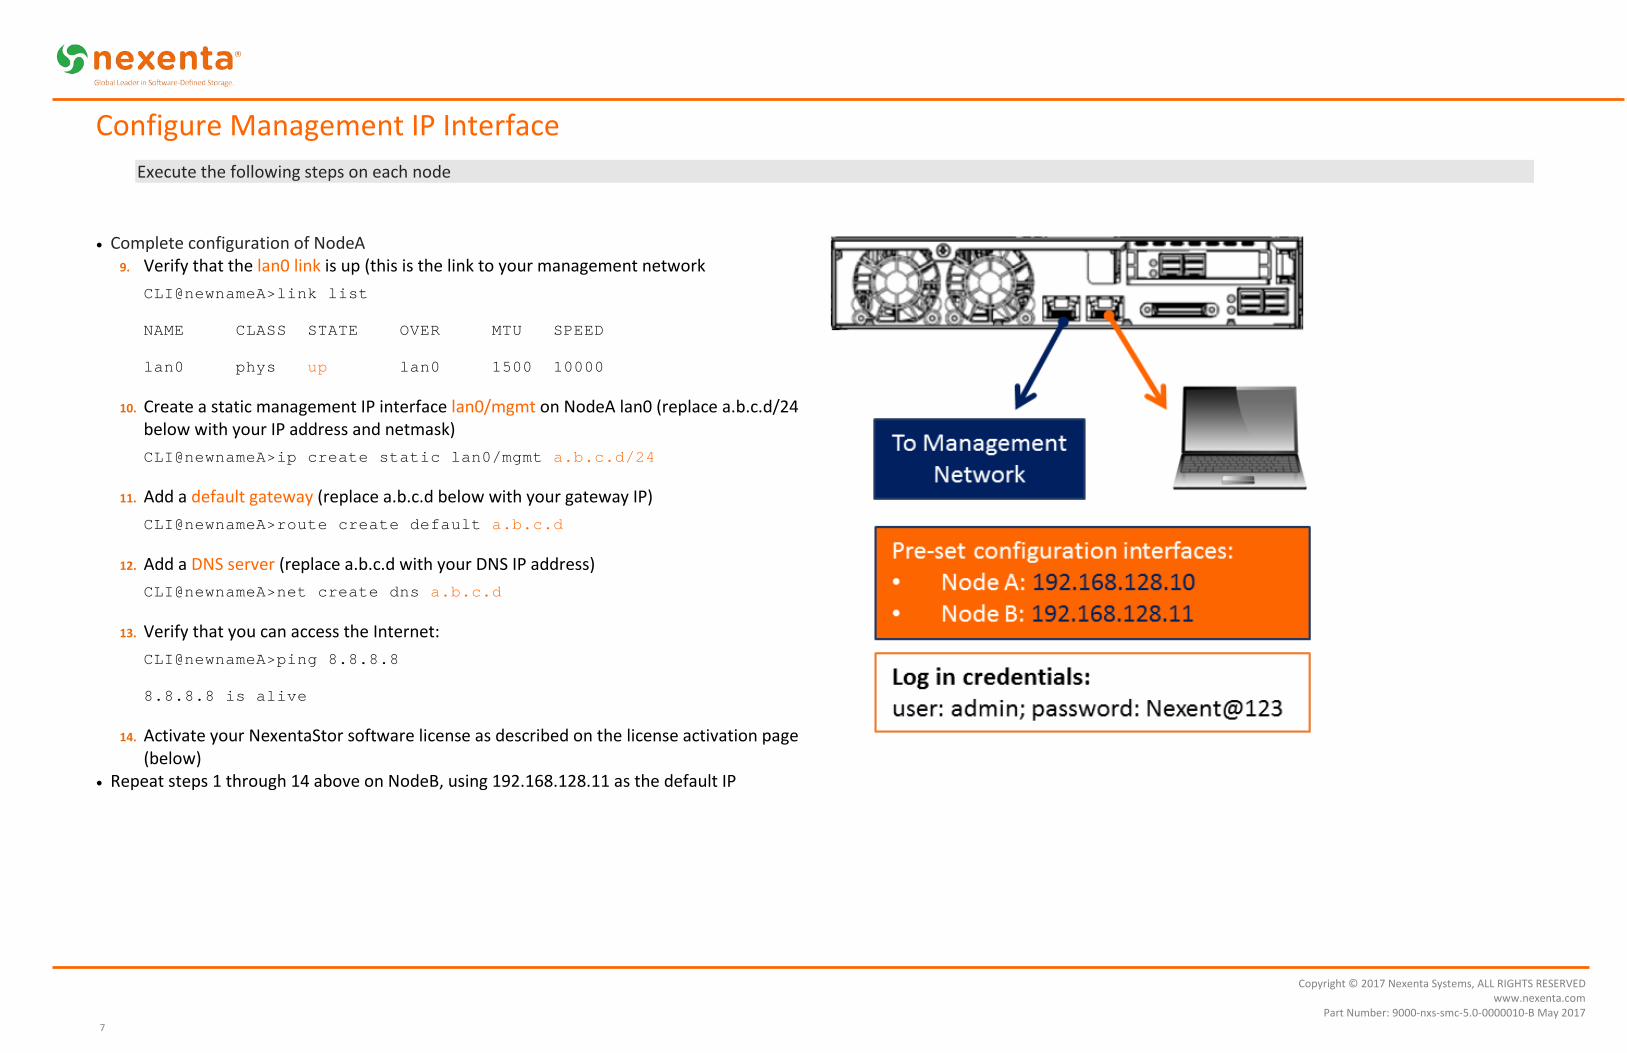
Configure Management IP Interface Execute the following steps on each node
• Complete configuration of NodeA 9. Verify that the lan0 link is up (this is the link to your management network
CLI@newnameA>link list
NAME CLASS STATE OVER MTU SPEED
lan0 phys up lan0 1500 10000
10. Create a static management IP interface lan0/mgmt on NodeA lan0 (replace a.b.c.d/24 below with your IP address and netmask) CLI@newnameA>ip create static lan0/mgmt a.b.c.d/24
11. Add a default gateway (replace a.b.c.d below with your gateway IP) CLI@newnameA>route create default a.b.c.d
12. Add a DNS server (replace a.b.c.d with your DNS IP address) CLI@newnameA>net create dns a.b.c.d
13. Verify that you can access the Internet: CLI@newnameA>ping 8.8.8.8
8.8.8.8 is alive
14. Activate your NexentaStor software license as described on the license activation page (below)
• Repeat steps 1 through 14 above on NodeB, using 192.168.128.11 as the default IP

8
Copyright © 2017 Nexenta Systems, ALL RIGHTS RESERVED www.nexenta.com
Part Number: 9000-nxs-smc-5.0-0000010-B May 2017
Activate NexentaStor Software License License activation is an online process that requires an activation token that you should have received from Nexenta. The activation token has the following format: XXXXXXXX-XXXX-XXXX-XXXX-XXXXXXXXXXXX. Note: only one activation token is issued for a 2 node appliance. That token must be used to activate the NexentaStor software on each node.
• Activate the product license using your activation token. You will be asked to click through the EULA and accept it. CLI@newname#> license activate XXXXXXXX-XXXX-XXXX-XXXX-XXXXXXXXXXXX
• Verify that your NexentaStor software was successfully activated CLI@newname#> license show
PROPERTY VALUE
guid 3d39ef85-a209-4436-960c-ac9e985893fe (example only)
valid yes
status ok
type ENTERPRISE
product NexentaStor
version 5.x (example only)
licensee [email protected] (example only)
serial SR-DEV-NS-201727883
features <list of features>
issued Fri Mar 20 08:00:00 yyyy (example only)
expires Tue Mar 20 08:00:00 yyyy (example only)
capacity xxx T
maintenance Mon Mar 13 08:00:00 yyyy - Tue Mar 27 08:00:00 yyyy (valid)
• Once your software is activated, you should be able to update the admin password: CLI@newname#>user passwd –p newpass admin
Note: Passwords should be at least 9 characters long and contain at least 3 of the following classes of characters: lowercase, uppercase, numeric, and special (for example, !, @, CLI@nexenta>,$, %, ^).
Note: The system responses shown here by executing the command CLI@newname#> license show are merely examples.
Note: If you do not have the activation token, do the following:
• Login to your account at https://portal.nexenta.com
• Navigate to “Support” -> “Cases” • Click on “Add New Case” • Type “ Request for Activation Token” in the
Subject line • Follow the prompts on the screen to complete the
case entry and open a case with Nexenta Tech Support

9
Copyright © 2017 Nexenta Systems, ALL RIGHTS RESERVED www.nexenta.com
Part Number: 9000-nxs-smc-5.0-0000010-B May 2017
Complete Installation After the initial configuration, to receive support for remote configuration, do the following:
1. Login to your account at https://portal.nexenta.com If you do not have an account, you can request for an account at https://portal.nexenta.com/UserRegistration
2. Navigate to “Support” -> “Cases” 3. Click on “Add New Case” 4. Type “ SuperMicro Appliance Remote Configuration” in the Subject line 5. Follow the prompts on the screen to complete the case entry and open a case with
Nexenta Tech Support Before setting up a remote configuration session with Nexenta Support team, deploy NexentaFusion OVA in a virtual environment. NexentaFusion is a graphical user interface that provides centralized management of multiple NexentaStor appliances. For information on the prerequisites and instructions on how to download and deploy NexentaFusion refer to “NexentaStor and NexentaFusion Installation 1.0 QuickStart” listed in https://nexenta.com/products/documentation.
Prerequisites for Remote Configuration For Nexenta Support team to remotely configure your appliance, you must ensure that you have the following setup.
1. For High Availability (HA) configurations, you must have a stable and reachable NTP system for the cluster to function properly. The hosts should be able to reach the NTP servers on the management network. It should ideally be a physical host or at a minimum a VM that is NOT hosted on NexentaStor provided Supermicro Unified Storage Appliance. IP address(es) for NTP server(s) should be provided.
2. For any Ethernet based services such as NFS, SMB and iSCSI, you must have a DNS server. It should ideally be a physical host or at a minimum a VM that is NOT hosted on NexentaStor provided Supermicro Unified Storage Appliance.
To facilitate the remote configuration process, ensure that your appliance has remote access.
Needed Information Based on your configuration needs, provide the following information when you open a request for remote configuration support.
For Supermicro Unified Storage Appliance Cluster Configuration 1. Provide the static IP address you configured on each node. 2. Provide the hostname of each node, if you reconfigured them as explained in the
section “Configure Host Name and Date”. 3. A valid e-mail address and SMTP server information (hostname, login ….) for alerts
For FC installations 1. A SAN fabric map, including zoning information for the NexentaStor, FC switches and
FC clients (servers). 2. Client OS type and versions as well as any multi-pathing driver types and versions.
For Ethernet based services (NFS, SMB and iSCSI) 1. Specify whether the connections will utilize port trunking or single ports. If port
trunking, ensure the switches support LACP and the number of allowable ports in each trunk.
2. A static IP (or IPs) as well as hostnames for each service. Also ensure that the IP subnet is not the same as the management network subnet.
For Any Shares 1. Identify if quotas will be required. If quotas will be needed, document quotas per
share as necessary.
For SMB services 1. Identify whether the configuration will be in workgroup or AD. 2. For AD, provide a proper domain admin account to perform the join. 3. Specify the desired share names. 4. Further configuration of share permissions must be done from a Windows hosts
using domain admin account privileges.
For NFS services 1. Identify whether services will be provided with v3 or v4. 2. For v4 services, specify any special ACL configurations (permissions) that may be
required. 3. Specify if any special NFS service settings may be required, for e.g., no_root_squash.

10
Copyright © 2017 Nexenta Systems, ALL RIGHTS RESERVED www.nexenta.com
Part Number: 9000-nxs-smc-5.0-0000010-B May 2017
For iSCSI services 1. Identify the client OS type and versions and multi-pathing driver. 2. Provide a network map between the NexentaStor appliance and the iSCSI clients
(servers). 3. Identify any special requirements for group mapping names. 4. Details on the desired number of LUNs, size, thin or thick. Also designate which LUN
should be LUN0.
For SNMP 1. Indicate any specific configuration requirements.
For SMTP SMTP must be configured and verified prior to production deployment.
1. A valid email address is required for alerting and notifications. Nexenta suggests an alias such as [email protected] which would include all storage admin team members at the company.
2. SMTP addresses and port information (if non-standard). 3. SMTP email alias.
For LDAP or NIS services 1. Specify if any particular requirements are needed. Provide domain and account
information for those services.
Access Product Documentation
https://nexenta.com/products/documentation