Sun Solaris 8 Operating System Installation - cisco.com · CHAPTER 2-1 Cisco Media Gateway...
58
CHAPTER 2-1 Cisco Media Gateway Controller Software Installation and Configuration Guide (Releases 9.1 through 9.6) OL-1150-15 2 Sun Solaris 8 Operating System Installation This chapter provides instructions for installing the Sun Solaris 8 operating system and Solstice DiskSuite on the Netra and Sun Fire platforms. Overview The following sections in this chapter describe the installation of software on the hardware platform for your solution. There are points in the procedures when your responses to prompts will depend on the disk drive size or other particulars of your system. These are pointed out as you follow the procedures. Table 2-1 Guide to this Chapter Section Page Supported Platforms 2 Supported Disk Drives 2 Before You Start 3 – Cautions, Notes, and Tips 3 Loading the Solaris 8 Operating System 4 – Devices on Supported Platforms 4 – Booting from a Local CD-ROM 4 – Installing the Solaris 8 Operating System 15 – Verifying Network Time Protocol (NTP) Packages 31 Configuring a Second Disk Drive 32 – Installing the Solstice DiskSuite (CSCOh016) 32 – Rebooting from the Mirrored (Secondary) Disk 34 – Removing the Solstice DiskSuite 36 Installing the Log and Spool File Systems (CSCOh005) 37 – Uninstalling the Log and Spool File System 43 Configuring Additional Ethernet Interfaces 45 Installing the Alarm Software 46
Transcript of Sun Solaris 8 Operating System Installation - cisco.com · CHAPTER 2-1 Cisco Media Gateway...

Cisco Media Gateway Controller Software InstallationOL-1150-15
C H A P T E R 2
Sun Solaris 8 Operating System InstallationThis chapter provides instructions for installing the Sun Solaris 8 operating system and Solstice DiskSuite on the Netra and Sun Fire platforms.
OverviewThe following sections in this chapter describe the installation of software on the hardware platform for your solution.
There are points in the procedures when your responses to prompts will depend on the disk drive size or other particulars of your system. These are pointed out as you follow the procedures.
Table 2-1 Guide to this Chapter
Section Page
Supported Platforms 2
Supported Disk Drives 2
Before You Start 3
– Cautions, Notes, and Tips 3
Loading the Solaris 8 Operating System 4
– Devices on Supported Platforms 4
– Booting from a Local CD-ROM 4
– Installing the Solaris 8 Operating System 15
– Verifying Network Time Protocol (NTP) Packages 31
Configuring a Second Disk Drive 32
– Installing the Solstice DiskSuite (CSCOh016) 32
– Rebooting from the Mirrored (Secondary) Disk 34
– Removing the Solstice DiskSuite 36
Installing the Log and Spool File Systems (CSCOh005) 37
– Uninstalling the Log and Spool File System 43
Configuring Additional Ethernet Interfaces 45
Installing the Alarm Software 46
2-1 and Configuration Guide (Releases 9.1 through 9.6)

Chapter 2 Sun Solaris 8 Operating System InstallationSupported Platforms
Note For procedures on migrating to Solaris 8 and Cisco MGC 9.2(2) software, refer to Appendix 12, “Migrating to Solaris 8 and Cisco MGC 9.2 and Up.”
Supported PlatformsThis document describes the specific steps necessary to install the Solaris 8 Operating System software and Solstice DiskSuite on the Netra t and Sun Fire platforms. The following platforms are supported:
• Netra 240
• Netra 440
• Sun Fire V120
• Sun Fire V210
• Netra 120
• Netra t1 100/105
• Netra t 1120/1125
• Netra t 1400/1405
• Netra 20
Supported Disk DrivesThe following disk drives are supported:
• 18 GB
• 36 GB
• 73 GB
• 146 GB
– Installing Lights Out Management Software 47
– Alarm Card Software Installation for Netra t 1120/1125 50
Installing the Solaris 8 Patch Cluster (CSCOh015) 51
Installing the BAMS Disk Array on a Netra t 140x Host 54
– Installing the RAID Manager Software 55
– Configuring the RAID Module 55
Troubleshooting 57
– Netra t 10x 57
– Swap File Size Input 57
Table 2-1 Guide to this Chapter
Section Page
2-2Cisco Media Gateway Controller Software Installation and Configuration Guide (Releases 9.1 through 9.6)
OL-1150-15
Chapter 2 Sun Solaris 8 Operating System InstallationBefore You Start
Before You StartBe sure to read the following cautions, notes, and tips before installing the Solaris 8 operating system.
Cautions, Notes, and Tips
Caution During the installation of the software package on the Netra t 112X machines, leave the front panel open to prevent damage to the CD or machine because the CD-ROM drive will automatically eject the CD.
Note The Cisco PGW 2200 PSTN Gateway (hereafter referred to as Cisco PGW 2200) is the new name for the Cisco VSC 3000 and Cisco SC 2200. Some parts of this document may use these older names.
Note The procedures in this chapter require a working knowledge of the system administration procedures for the Sun Solaris (UNIX) operating system.
Note Be sure to have the required information listed in Chapter 1, “Preparing for Sun Solaris Operating System and Cisco MGC Software Installation,” before you begin the installation process.
Note The Sun Netra 20 requires Solaris 8 Software Release 2/02 or later.
The Sun Netra 220 and 440 require Solaris 8 Software Release 2/04 or later.
Note Allow at least two hours down time for the installation of the Sun Solaris 8 operating system.
Note The text in the screens displayed throughout this document may differ slightly from the text displayed on your console. The screen displays are for reference only and should be treated as examples.
Note Most of the steps in the installation process ask you to press F2 to continue. However, F2 does not apply to all console types. In this case, you should press Esc+2 instead.
Tip During the installation process, monitor system output frequently for error messages and correct any error conditions before continuing with the installation.
2-3Cisco Media Gateway Controller Software Installation and Configuration Guide (Releases 9.1 through 9.6)
OL-1150-15
Chapter 2 Sun Solaris 8 Operating System InstallationLoading the Solaris 8 Operating System
Note In order to use Cisco Voice Services Provisioning Tool (Cisco VSPT) to provision MGC, you need to install SUNWtftp package for Solaris 8 after you install the Solaris 8 operating system. You can download that package from the Sun website.
Loading the Solaris 8 Operating SystemThis section provides instructions for loading the Solaris 8 operating system.
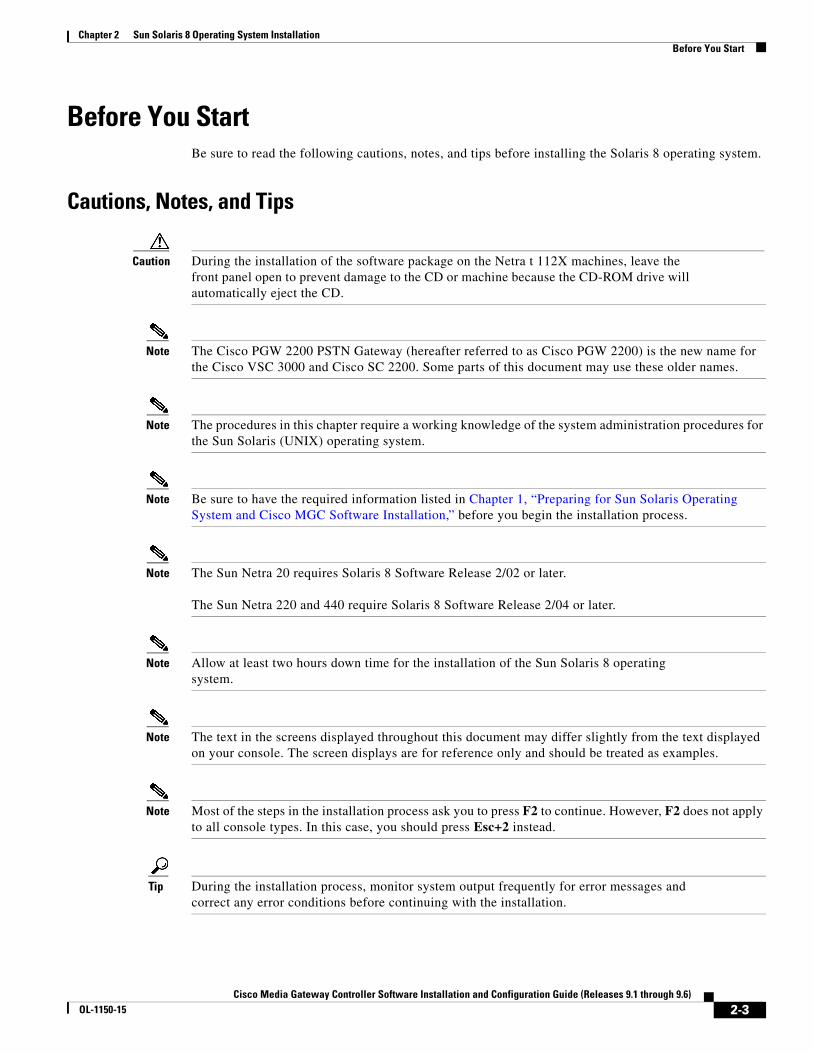
Devices on Supported PlatformsThe following table shows the Ethernet and disk drive device names for each platform type. This table is referenced throughout this chapter.
Booting from a Local CD-ROMThe instructions and sample screen shots in this section were written to correspond with the Solaris 10/01 installation disk(s). Other Solaris installations are similar, with slight variations. These instructions will note the differences between the sets of installation instructions.
Step 1 Connect to the target system through a console.
Table 2-2 Device Names on Supported Cisco MGC Software Platforms
Platform Type
Ethernet Interfaces Disk Drives
First Second Third Fourth First Second Third Fourth
Netra t 100/105 hme0 hme1 or qfe01
1. These interfaces are supported only on platforms hosting the BAMS application. Support for the "bge" and “ce” interfaces requires Solaris Environment Patches 2.0(11) or later, and BAMS 3.13 Patch 13 or later.
n/a n/a c0t0d0 c0t0d1 n/a n/a
Netra t 1120/1125
hme0 hme1 n/a n/a c0t0d0 c0t0d1 n/a n/a
Netra t 1400/1405
hme0 hme1 or ce02
2. Support for these “ce” interfaces requires Solaris Environment Patches 2.0(8) or later, and MGC 9.4(1) with the latest patches.
n/a n/a c0t0d0 c0t0d1 n/a n/a
Sun Fire V120 / Netra 120
eri0 eri1 or qfe01
or ce01 qfe11 or ce11 qfe21 or ce21 c1t0d0 c1t1d0 n/a n/a
Sun Fire V210 / bge03
3. Support for these “bge” and “ce” interfaces require Solaris Environment Patches 2.0(11) or later, and Cisco MGC 9.4(1) patch CSCOgs028 or later.
bge13 bge21 bge31 c1t0d0 c1t1d0 n/a n/a
Netra 20 eri0 hme0 or ce02 n/a n/a c1t0d0 c1t1d0 n/a n/a
Netra 240 bge03 bge13 bge24
4. This device is not used currently.
bge34 c1t0d0 c1t1d0 n/a n/a
Netra 440 ce03 ce13 n/a n/a c1t0d0 c1t1d0 c1t2d04 c1t3d04
2-4Cisco Media Gateway Controller Software Installation and Configuration Guide (Releases 9.1 through 9.6)
OL-1150-15
Chapter 2 Sun Solaris 8 Operating System InstallationLoading the Solaris 8 Operating System
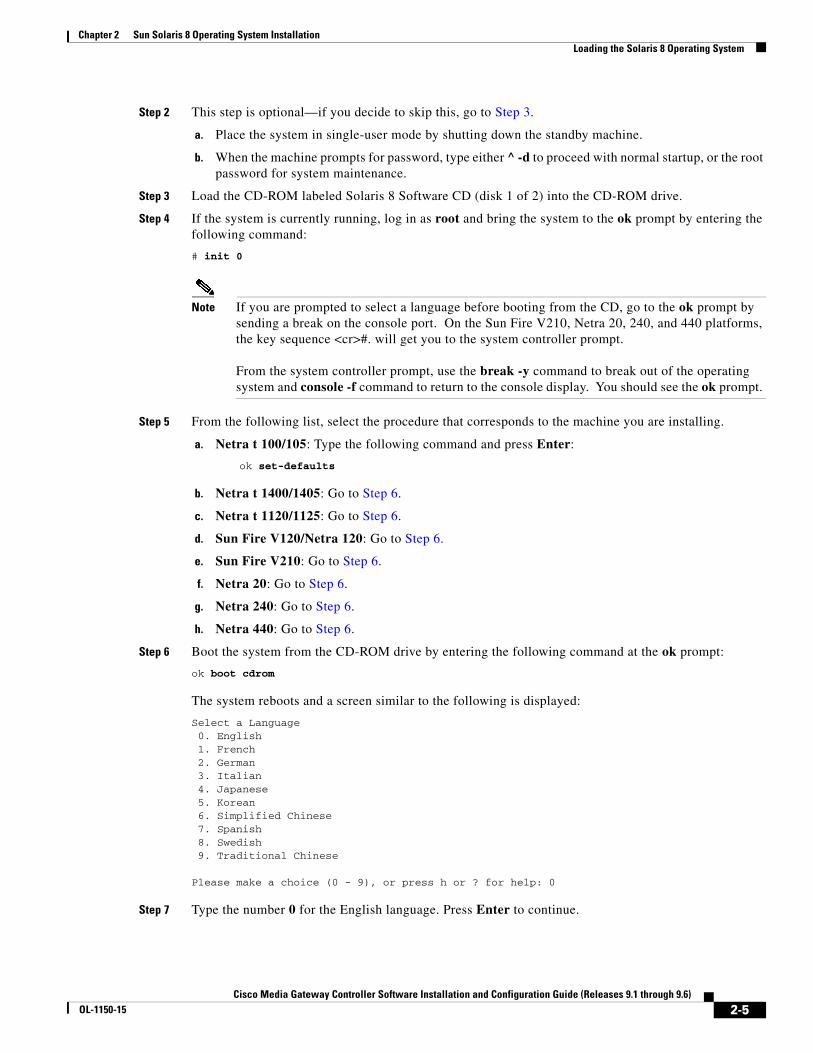
Step 2 This step is optional—if you decide to skip this, go to Step 3.
a. Place the system in single-user mode by shutting down the standby machine.
b. When the machine prompts for password, type either ̂ -d to proceed with normal startup, or the root password for system maintenance.
Step 3 Load the CD-ROM labeled Solaris 8 Software CD (disk 1 of 2) into the CD-ROM drive.
Step 4 If the system is currently running, log in as root and bring the system to the ok prompt by entering the following command:
# init 0
Note If you are prompted to select a language before booting from the CD, go to the ok prompt by sending a break on the console port. On the Sun Fire V210, Netra 20, 240, and 440 platforms, the key sequence <cr>#. will get you to the system controller prompt.
From the system controller prompt, use the break -y command to break out of the operating system and console -f command to return to the console display. You should see the ok prompt.
Step 5 From the following list, select the procedure that corresponds to the machine you are installing.
a. Netra t 100/105: Type the following command and press Enter:
ok set-defaults
b. Netra t 1400/1405: Go to Step 6.
c. Netra t 1120/1125: Go to Step 6.
d. Sun Fire V120/Netra 120: Go to Step 6.
e. Sun Fire V210: Go to Step 6.
f. Netra 20: Go to Step 6.
g. Netra 240: Go to Step 6.
h. Netra 440: Go to Step 6.
Step 6 Boot the system from the CD-ROM drive by entering the following command at the ok prompt:
ok boot cdrom
The system reboots and a screen similar to the following is displayed:
Select a Language0. English1. French2. German3. Italian4. Japanese5. Korean6. Simplified Chinese7. Spanish8. Swedish9. Traditional Chinese
Please make a choice (0 - 9), or press h or ? for help: 0
Step 7 Type the number 0 for the English language. Press Enter to continue.
2-5Cisco Media Gateway Controller Software Installation and Configuration Guide (Releases 9.1 through 9.6)
OL-1150-15

Chapter 2 Sun Solaris 8 Operating System InstallationLoading the Solaris 8 Operating System
Note Other language choices are not supported.
A screen similar to the following is displayed:
Select a Locale
0. English (C - 7-bit ASCII) 1. Albania (ISO8859-2) 2. Australia (ISO8859-1) 3. Belgium-Flemish (ISO8859-1) 4. Belgium-Flemish (ISO8859-15 - Euro) 5. Bosnia (ISO8859-2) 6. Brazil (ISO8859-1) 7. Brazil (UTF-8) 8. Bulgaria (ISO8859-5) 9. Canada-English (ISO8859-1) 10. Catalan, Spain (ISO8859-1) 11. Catalan, Spain (ISO8859-15 - Euro) 12. Croatia (ISO8859-2) 13. Czech Republic (ISO8859-2) 14. Denmark (ISO8859-1) 15. Denmark (ISO8859-15 - Euro) 16. Egypt (ISO8859-6) 17. Egypt (UTF-8) 18. Egypt (UTF-8)
Press Return to show more choices.Please make a choice (0 - 55), or press h or ? for help:
Step 8 See the following selections:
a. If you are using the 10/01 installation CDs: If your system is located in the USA, type 53 (en_US.ISO8859-1) and press Enter to continue.
If your location is not in the USA, type the number 0 for English and press Enter to continue.
a. If you are using the 2/02 installation CDs: If your system is located in the USA, type 48—the number that corresponds to USA (en_US.ISO8859-1)—and press Enter to continue.
b. If you are using the 2/04 installation CDs: If your system is located in the USA, type 49—the number that corresponds to USA (en_US.ISO8859-1)—and press Enter to continue.
If your location is not in the USA, type the number 0 for English and press Enter to continue.
Note Only the USA and English locales are supported.
2-6Cisco Media Gateway Controller Software Installation and Configuration Guide (Releases 9.1 through 9.6)
OL-1150-15

Chapter 2 Sun Solaris 8 Operating System InstallationLoading the Solaris 8 Operating System
A screen similar to the following is displayed:
What type of terminal are you using? 1) ANSI Standard CRT 2) DEC VT52 3) DEC VT100 4) Heathkit 19 5) Lear Siegler ADM31 6) PC Console 7) Sun Command Tool 8) Sun Workstation 9) Televideo 910 10) Televideo 925 11) Wyse Model 50 12) X Terminal Emulator (xterms) 13) OtherType the number of your choice and press Return:
Step 9 Enter the number that corresponds to the terminal you are using and press Enter. For example, if you are using an X terminal emulator, type 12 and press Enter.
A screen similar to the following is displayed:
- The Solaris Installation Program --------------------------------------------
The Solaris installation program is divided into a series of short sections where you'll be prompted to provide information for the installation. At the end of each section, you'll be able to change the selections you've made before continuing.
About navigation... - The mouse cannot be used. - If your keyboard does not have function keys, or they do not respond, press ESC; the legend at the bottom of the screen will change to show the ESC keys to use for navigation.
------------------------------------------------------------------------------- F2_Continue F6_Help
Step 10 Press F2 to continue.
A screen similar to the following is displayed:
- Identify This System --------------------------------------------------------
On the next screens, you must identify this system as networked or non-networked, and set the default time zone and date/time.
If this system is networked, the software will try to find the information it needs to identify your system; you will be prompted to supply any information it cannot find.
> To begin identifying this system, press F2.
------------------------------------------------------------------------------- F2_Continue F6_Help
Step 11 Press F2 to continue.
2-7Cisco Media Gateway Controller Software Installation and Configuration Guide (Releases 9.1 through 9.6)
OL-1150-15

Chapter 2 Sun Solaris 8 Operating System InstallationLoading the Solaris 8 Operating System
A screen similar to the following is displayed:
- Network Connectivity --------------------------------------------------------
Specify Yes if the system is connected to the network by one of the Solaris or vendor network/communication Ethernet cards that are supported on the Solaris CD. See your hardware documentation for the current list of supported cards. Specify No if the system is connected to a network/communication card that is not supported on the Solaris CD, and follow the instructions listed under Help.
Networked --------- [X] Yes [ ] No
------------------------------------------------------------------------------- F2_Continue F6_Help
Step 12 Use the arrow keys to navigate and press the space bar to make your selection. Verify that Yes is selected and press F2 to continue.
A screen similar to the following is displayed:
- DHCP ------------------------------------------------------------------------
On this screen you must specify whether or not this system should use DHCP for network interface configuration. Choose Yes if DHCP is to be used, or No if the interfaces are to be configured manually.
WARNING: Because this machine booted from the network, DHCP support will not be enabled, if selected, until after the system reboots.
Use DHCP -------- [ ] Yes [X] No
------------------------------------------------------------------------------- F2_Continue F6_Help
Step 13 Verify that No is selected and press F2 to continue.
2-8Cisco Media Gateway Controller Software Installation and Configuration Guide (Releases 9.1 through 9.6)
OL-1150-15

Chapter 2 Sun Solaris 8 Operating System InstallationLoading the Solaris 8 Operating System
A screen similar to the following is displayed:
- Primary Network Interface ---------------------------------------------------
On this screen you must specify which of the following network adapters is the system's primary network interface. Usually the correct choice is the lowest number. However, do not guess; ask your system administrator if you're not sure.
> To make a selection, use the arrow keys to highlight the option and press Return to mark it [X].
Primary network interface ------------------------- [X] hme0 [ ] hme1
------------------------------------------------------------------------------- F2_Continue F6_Help
Note This screen may show a different interface, depending on the platform and PCI card that are installed. For details, refer to Table 2-2 on page 2-4 (Device Names on Supported Cisco MGC Software Platforms).
Step 14 Select the proper port and press F2 to continue.
A screen similar to the following is displayed:
- Host Name -------------------------------------------------------------------
On this screen you must enter your host name, which identifies this system on the network. The name must be unique within your domain; creating a duplicate host name will cause problems on the network after you install Solaris.
A host name must be at least two characters; it can contain letters, digits, and minus signs (-).
Host name:
------------------------------------------------------------------------------- F2_Continue F6_Help
Step 15 Type the host name of the target Netra machine, then press F2 to continue.
Note For machine-specific information such as host name, refer to your notes in Table 1-2 on page 1-4, “Required Machine-specific Information”, if you used the checklist to note down the host name.
2-9Cisco Media Gateway Controller Software Installation and Configuration Guide (Releases 9.1 through 9.6)
OL-1150-15

Chapter 2 Sun Solaris 8 Operating System InstallationLoading the Solaris 8 Operating System
A screen similar to the following is displayed:
- IP Address ------------------------------------------------------------------
On this screen you must enter the Internet Protocol (IP) address for this system. It must be unique and follow your site's address conventions, or a system/network failure could result.
IP addresses contain four sets of numbers separated by periods (for example 129.200.9.1).
IP address:
-------------------------------------------------------------------------------
F2_Continue F6_Help
Step 16 Enter the IP address of this machine in dotted decimal format and press F2 to continue.
Note Refer to “Required Information Checklist”, Table 1-3 on page 1-4, if you used the checklist to note down the IP address.
A screen similar to the following is displayed:
- Subnets ---------------------------------------------------------------------
On this screen you must specify whether this system is part of a subnet. If you specify incorrectly, the system will have problems communicating on the network after you reboot.
> To make a selection, use the arrow keys to highlight the option and press Return to mark it [X].
System part of a subnet ----------------------- [X] Yes [ ] No
------------------------------------------------------------------------------- F2_Continue F6_Help
Step 17 Verify that Yes is selected (use the arrow keys to move the cursor to Yes and press the spacebar to select it). Press F2 to continue.
A screen similar to the following is displayed:
- Netmask ------------------------------------------------------------------------
On this screen you must specify the netmask of your subnet. A default netmask is shown; do not accept the default unless you are sure it is correct for your subnet. A netmask must contain four sets of numbers separated by periods (for example 255.255.255.0).
Netmask:
---------------------------------------------------------------------------------- F2_Continue F6_Help
2-10Cisco Media Gateway Controller Software Installation and Configuration Guide (Releases 9.1 through 9.6)
OL-1150-15
Chapter 2 Sun Solaris 8 Operating System InstallationLoading the Solaris 8 Operating System
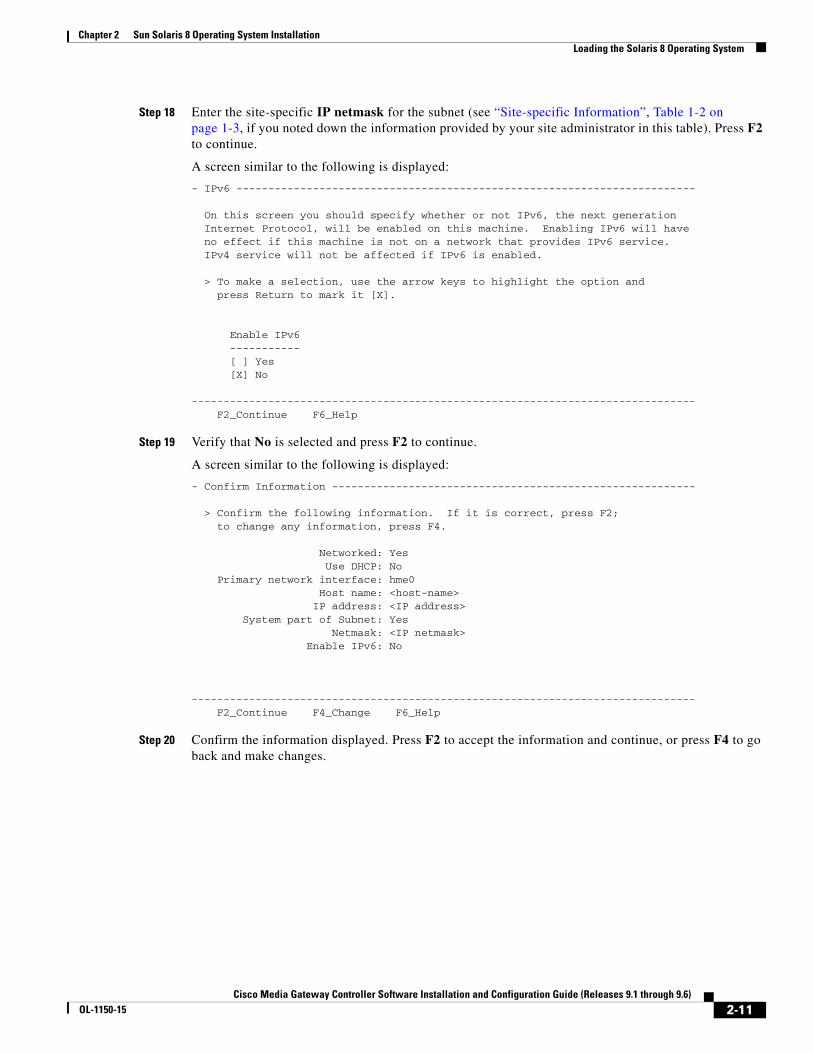
Step 18 Enter the site-specific IP netmask for the subnet (see “Site-specific Information”, Table 1-2 on page 1-3, if you noted down the information provided by your site administrator in this table). Press F2 to continue.
A screen similar to the following is displayed:
- IPv6 ------------------------------------------------------------------------
On this screen you should specify whether or not IPv6, the next generation Internet Protocol, will be enabled on this machine. Enabling IPv6 will have no effect if this machine is not on a network that provides IPv6 service. IPv4 service will not be affected if IPv6 is enabled.
> To make a selection, use the arrow keys to highlight the option and press Return to mark it [X].
Enable IPv6 ----------- [ ] Yes [X] No
------------------------------------------------------------------------------- F2_Continue F6_Help
Step 19 Verify that No is selected and press F2 to continue.
A screen similar to the following is displayed:
- Confirm Information ---------------------------------------------------------
> Confirm the following information. If it is correct, press F2; to change any information, press F4.
Networked: Yes Use DHCP: No Primary network interface: hme0 Host name: <host-name> IP address: <IP address>
System part of Subnet: Yes Netmask: <IP netmask>
Enable IPv6: No
------------------------------------------------------------------------------- F2_Continue F4_Change F6_Help
Step 20 Confirm the information displayed. Press F2 to accept the information and continue, or press F4 to go back and make changes.
2-11Cisco Media Gateway Controller Software Installation and Configuration Guide (Releases 9.1 through 9.6)
OL-1150-15
Chapter 2 Sun Solaris 8 Operating System InstallationLoading the Solaris 8 Operating System
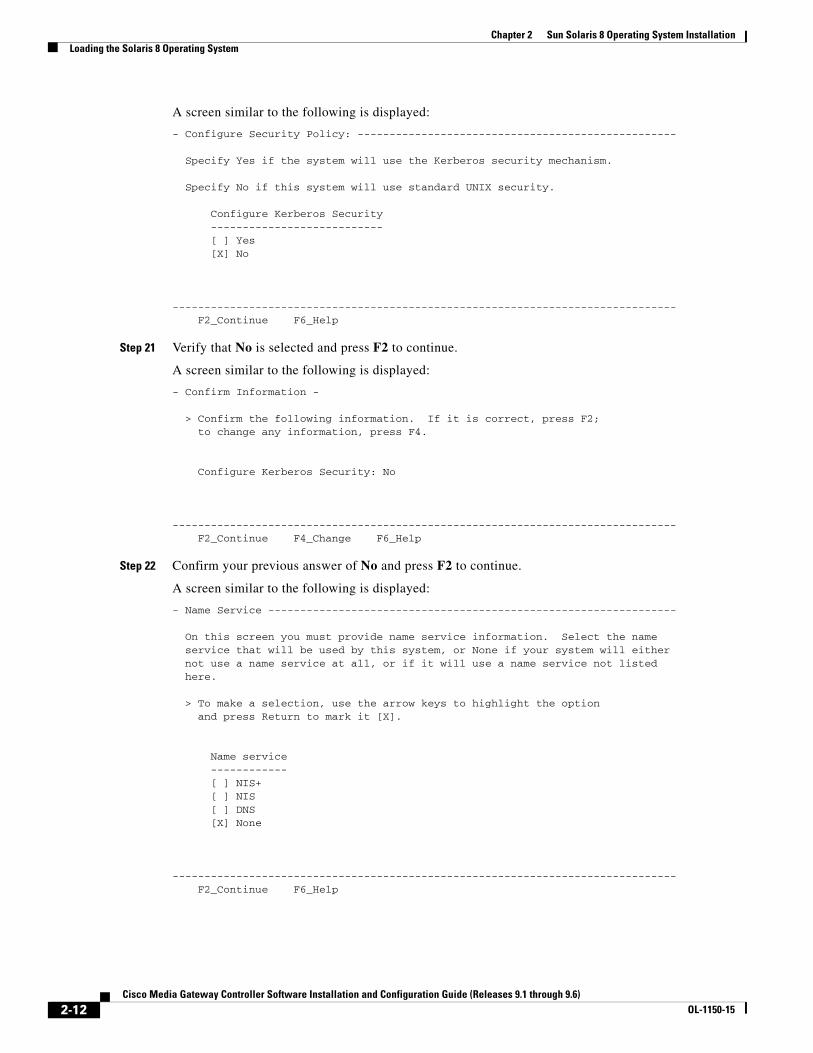
A screen similar to the following is displayed:
- Configure Security Policy: --------------------------------------------------
Specify Yes if the system will use the Kerberos security mechanism.
Specify No if this system will use standard UNIX security.
Configure Kerberos Security --------------------------- [ ] Yes [X] No
------------------------------------------------------------------------------- F2_Continue F6_Help
Step 21 Verify that No is selected and press F2 to continue.
A screen similar to the following is displayed:
- Confirm Information -
> Confirm the following information. If it is correct, press F2; to change any information, press F4.
Configure Kerberos Security: No
------------------------------------------------------------------------------- F2_Continue F4_Change F6_Help
Step 22 Confirm your previous answer of No and press F2 to continue.
A screen similar to the following is displayed:
- Name Service ----------------------------------------------------------------
On this screen you must provide name service information. Select the name service that will be used by this system, or None if your system will either not use a name service at all, or if it will use a name service not listed here.
> To make a selection, use the arrow keys to highlight the option and press Return to mark it [X].
Name service ------------ [ ] NIS+ [ ] NIS [ ] DNS [X] None
------------------------------------------------------------------------------- F2_Continue F6_Help
2-12Cisco Media Gateway Controller Software Installation and Configuration Guide (Releases 9.1 through 9.6)
OL-1150-15

Chapter 2 Sun Solaris 8 Operating System InstallationLoading the Solaris 8 Operating System
Step 23 Use the arrow keys to move the cursor to None and press the spacebar to select it. Press F2 to continue.
A screen similar to the following is displayed:
- Confirm Information ---------------------------------------------------------
> Confirm the following information. If it is correct, press F2; to change any information, press F4.
Name service: None
------------------------------------------------------------------------------- F2_Continue F4_Change F6_Help
Step 24 Confirm your previous answer of None and press F2 to continue.
A screen similar to the following is displayed:
- Time Zone -------------------------------------------------------------------
On this screen you must specify your default time zone. You can specify a time zone in three ways: select one of the geographic regions from the list, select other - offset from GMT, or other - specify time zone file.
> To make a selection, use the arrow keys to highlight the option and press Return to mark it [X].
Regions ----------------------------------
[ ] Asia, Western [ ] Australia / New Zealand [ ] Canada [ ] Europe [ ] Mexico [ ] South America [X] United States[ ] other - offset from GMT[ ] other - specify time zone file
------------------------------------------------------------------------------- F2_Continue F6_Help
Step 25 Select the local time zone where the system is located.
Note The following two steps are examples of how to set the time zone, in this case, to United States Eastern time.
a. Use the arrow keys to move the cursor to United States and press the spacebar to select it, then press F2 to continue.
A screen similar to the following is displayed:
- Time Zone -------------------------------------------------------------------
> To make a selection, use the arrow keys to highlight the option and press Return to mark it [X].
Time zones ---------------- [X] Eastern [ ] Central
2-13Cisco Media Gateway Controller Software Installation and Configuration Guide (Releases 9.1 through 9.6)
OL-1150-15
Chapter 2 Sun Solaris 8 Operating System InstallationLoading the Solaris 8 Operating System
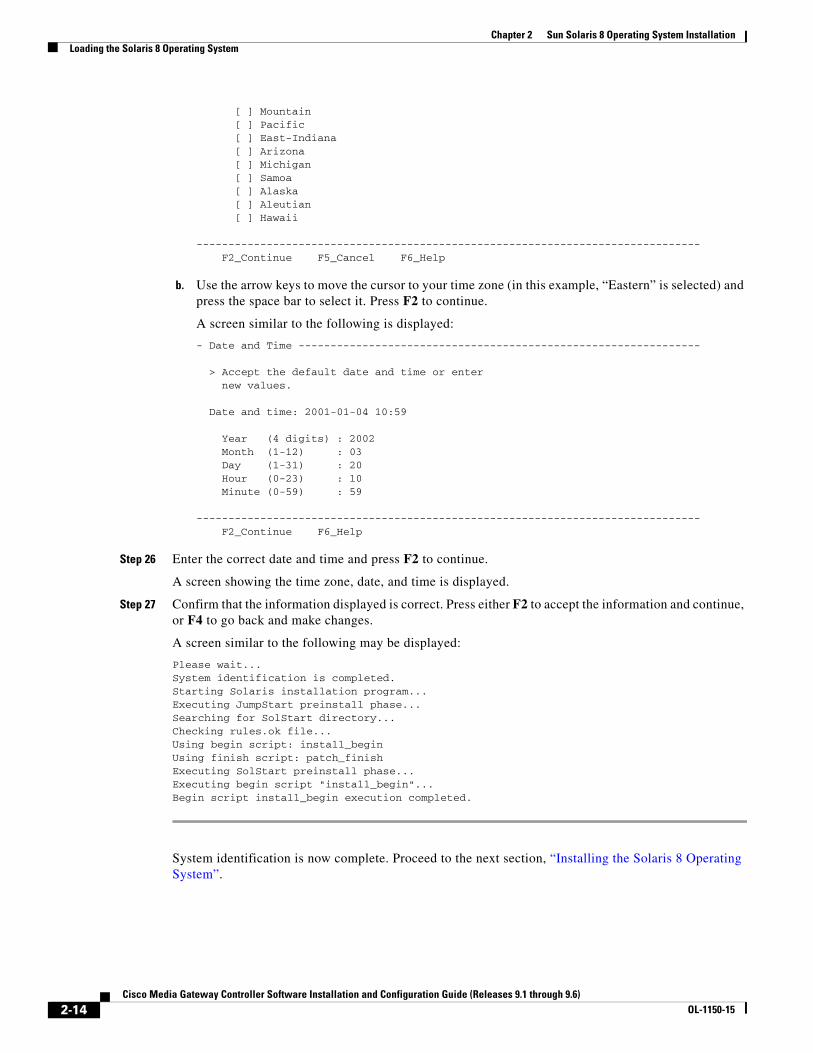
[ ] Mountain [ ] Pacific [ ] East-Indiana [ ] Arizona [ ] Michigan [ ] Samoa [ ] Alaska [ ] Aleutian [ ] Hawaii
------------------------------------------------------------------------------- F2_Continue F5_Cancel F6_Help
b. Use the arrow keys to move the cursor to your time zone (in this example, “Eastern” is selected) and press the space bar to select it. Press F2 to continue.
A screen similar to the following is displayed:
- Date and Time ---------------------------------------------------------------
> Accept the default date and time or enter new values.
Date and time: 2001-01-04 10:59
Year (4 digits) : 2002 Month (1-12) : 03 Day (1-31) : 20 Hour (0-23) : 10 Minute (0-59) : 59
------------------------------------------------------------------------------- F2_Continue F6_Help
Step 26 Enter the correct date and time and press F2 to continue.
A screen showing the time zone, date, and time is displayed.
Step 27 Confirm that the information displayed is correct. Press either F2 to accept the information and continue, or F4 to go back and make changes.
A screen similar to the following may be displayed:
Please wait...System identification is completed.Starting Solaris installation program...Executing JumpStart preinstall phase...Searching for SolStart directory...Checking rules.ok file...Using begin script: install_beginUsing finish script: patch_finishExecuting SolStart preinstall phase...Executing begin script "install_begin"...Begin script install_begin execution completed.
System identification is now complete. Proceed to the next section, “Installing the Solaris 8 Operating System”.
2-14Cisco Media Gateway Controller Software Installation and Configuration Guide (Releases 9.1 through 9.6)
OL-1150-15
Chapter 2 Sun Solaris 8 Operating System InstallationLoading the Solaris 8 Operating System
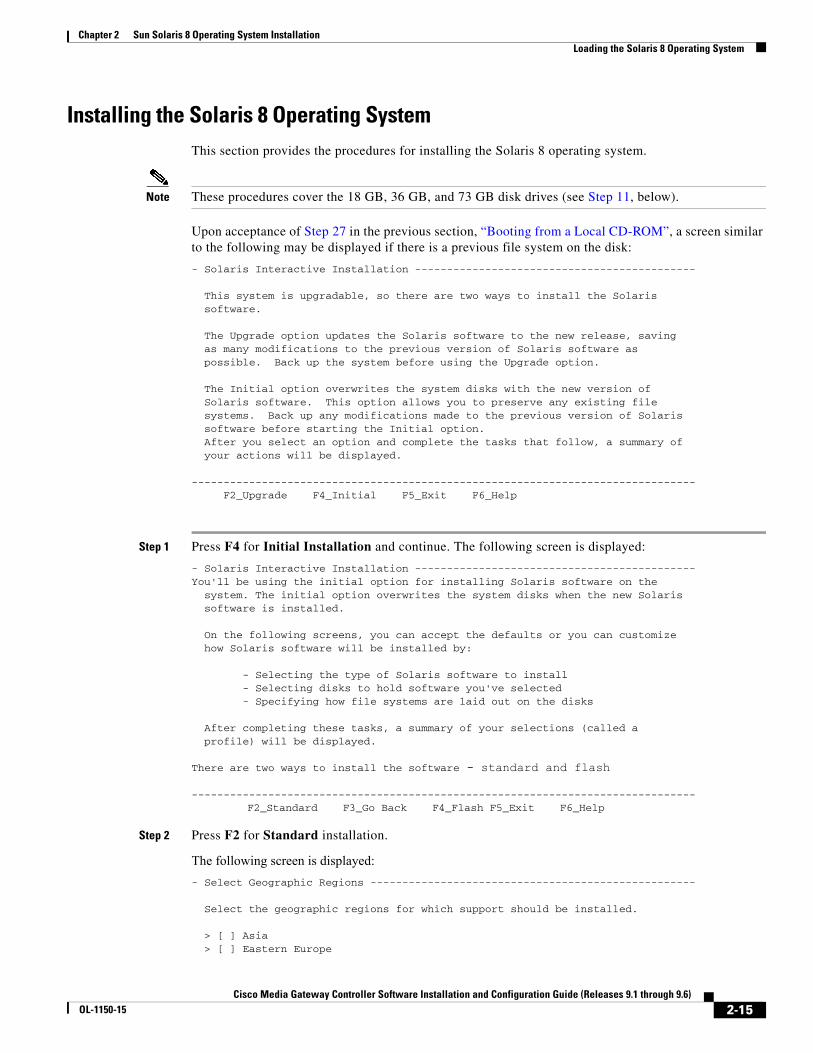
Installing the Solaris 8 Operating SystemThis section provides the procedures for installing the Solaris 8 operating system.
Note These procedures cover the 18 GB, 36 GB, and 73 GB disk drives (see Step 11, below).
Upon acceptance of Step 27 in the previous section, “Booting from a Local CD-ROM”, a screen similar to the following may be displayed if there is a previous file system on the disk:
- Solaris Interactive Installation --------------------------------------------
This system is upgradable, so there are two ways to install the Solaris software.
The Upgrade option updates the Solaris software to the new release, saving as many modifications to the previous version of Solaris software as possible. Back up the system before using the Upgrade option.
The Initial option overwrites the system disks with the new version of Solaris software. This option allows you to preserve any existing file systems. Back up any modifications made to the previous version of Solaris software before starting the Initial option.
After you select an option and complete the tasks that follow, a summary of your actions will be displayed.
------------------------------------------------------------------------------- F2_Upgrade F4_Initial F5_Exit F6_Help
Step 1 Press F4 for Initial Installation and continue. The following screen is displayed:
- Solaris Interactive Installation --------------------------------------------You'll be using the initial option for installing Solaris software on the system. The initial option overwrites the system disks when the new Solaris software is installed.
On the following screens, you can accept the defaults or you can customize how Solaris software will be installed by:
- Selecting the type of Solaris software to install - Selecting disks to hold software you've selected - Specifying how file systems are laid out on the disks
After completing these tasks, a summary of your selections (called a profile) will be displayed.
There are two ways to install the software - standard and flash
------------------------------------------------------------------------------- F2_Standard F3_Go Back F4_Flash F5_Exit F6_Help
Step 2 Press F2 for Standard installation.
The following screen is displayed:- Select Geographic Regions ---------------------------------------------------
Select the geographic regions for which support should be installed.
> [ ] Asia > [ ] Eastern Europe
2-15Cisco Media Gateway Controller Software Installation and Configuration Guide (Releases 9.1 through 9.6)
OL-1150-15

Chapter 2 Sun Solaris 8 Operating System InstallationLoading the Solaris 8 Operating System
> [ ] Middle East > [ ] Central America > [ ] South America > [ ] Northern Europe > [ ] Southern Europe > [ ] Central Europe > [/] North America > [ ] Australasia > [ ] Western Europe > [ ] Northern Africa
Move left, right, up, down using the arrow keys ------------------------------------------------------------------------------- F2_Continue F3_Go Back F5_Exit F6_Help
Step 3 Use the arrow keys to move the cursor to the geographic region of the target machine and press the spacebar to make your selection. Press F2 to continue.
Note The following two screens are not displayed when installing on newer platforms such as Sun Fire V120, Sun Fire V210, Netra 20, Netra 120, Netra 240, or Netra 440. Continue to Step 4.
A screen similar to the following may be displayed:
- Select 64 Bit ---------------------------------------------------------------
Select 64-bit if you want to install the Solaris 64-bit packages on this system.
[X] Select To Include Solaris 64-bit Support
------------------------------------------------------------------------------- F2_Continue F3_Go Back F5_Exit
2-16Cisco Media Gateway Controller Software Installation and Configuration Guide (Releases 9.1 through 9.6)
OL-1150-15

Chapter 2 Sun Solaris 8 Operating System InstallationLoading the Solaris 8 Operating System
Step 4 If the preceding screen is displayed, verify the that Select To Include Solaris 64-bit Support is selected and press F2 to continue.
A screen similar to the following is displayed:
- Select Software -------------------------------------------------------------
Select the Solaris software to install on the system.
NOTE: After selecting a software group, you can add or remove software by customizing it. However, this requires understanding of software dependencies and how Solaris software is packaged
[ ] Entire Distribution plus OEM support ....... 1224.00 MB [ ] Entire Distribution with 64 bit ............ 1197.00 MB [ ] Developer System Support with 64 bit support. 1148.00 MB (F4 to Customize)
[X] End User System Support..................... 856.00 MB [ ] Core System Support ........................ 279.00 MB
------------------------------------------------------------------------------- F2_Continue F3_Go Back F4_Customize F5_Exit F6_Help
Step 5 Use the arrow keys to move the cursor to Developer System Support with 64 bit support for the 10/01 and 2/02 releases, or Entire Distribution with 64 bit for the 2/04 release, and press the space bar to select. Then press F2 to continue.
A screen similar to the following is displayed:
- Select Disks ----------------------------------------------------------------
On this screen you must select the disks for installing Solaris software. Start by looking at the Suggested Minimum field; this value is the approximate space needed to install the software you've selected. Keep selecting disks until the Total Selected value exceeds the Suggested Minimum value.
Disk Device (Size) Available Space ============================================= [X] c0t0d0 (17269 MB) boot disk 17269 MB (F4 to edit) [ ] c0t1d0 (17269 MB) 17269 MB
Total Selected: 17269 MB Suggested Minimum: 845 MB
------------------------------------------------------------------------------- F2_Continue F3_Go Back F4_Edit F5_Exit F6_Help
Note For the device names for each platform type, refer to Table 2-2 on page 2-4 (Device Names on Supported Cisco MGC Software Platforms).
If the machine has a larger disk drive than the 18 GB disks shown here, the Size and Available Space fields will be different.
Netra 440 will display with four disks, but only two will be used.
2-17Cisco Media Gateway Controller Software Installation and Configuration Guide (Releases 9.1 through 9.6)
OL-1150-15
Chapter 2 Sun Solaris 8 Operating System InstallationLoading the Solaris 8 Operating System
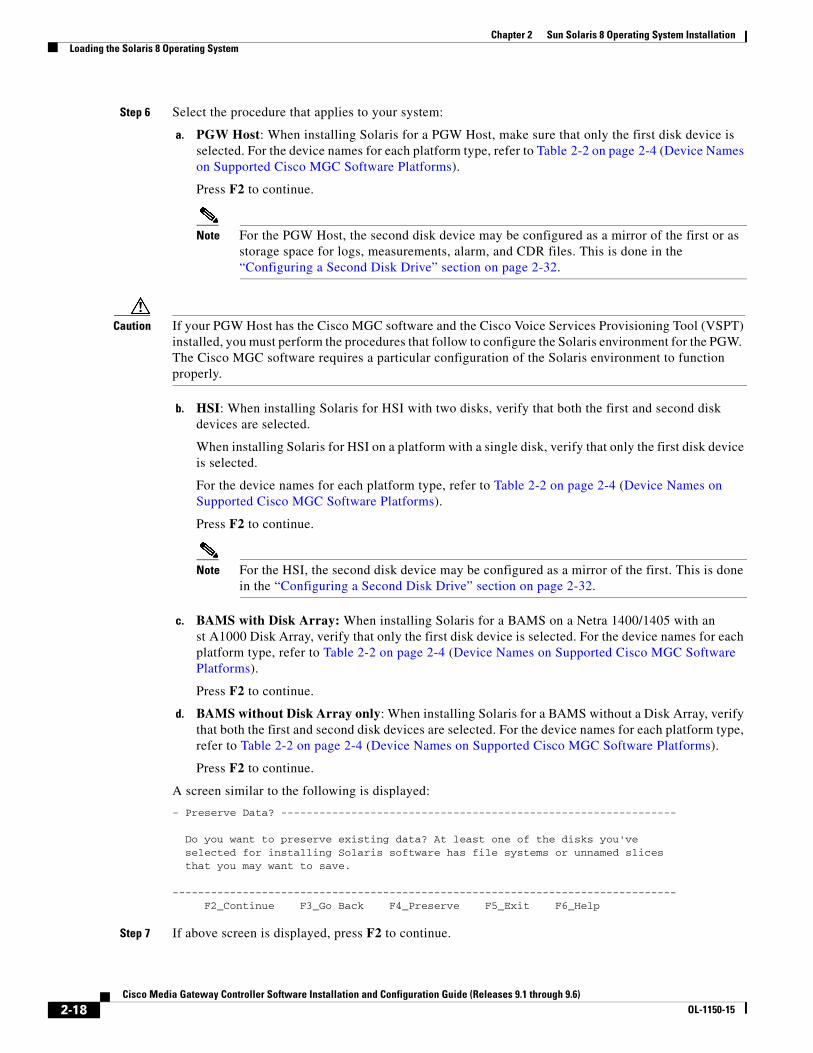
Step 6 Select the procedure that applies to your system:
a. PGW Host: When installing Solaris for a PGW Host, make sure that only the first disk device is selected. For the device names for each platform type, refer to Table 2-2 on page 2-4 (Device Names on Supported Cisco MGC Software Platforms).
Press F2 to continue.
Note For the PGW Host, the second disk device may be configured as a mirror of the first or as storage space for logs, measurements, alarm, and CDR files. This is done in the “Configuring a Second Disk Drive” section on page 2-32.
Caution If your PGW Host has the Cisco MGC software and the Cisco Voice Services Provisioning Tool (VSPT) installed, you must perform the procedures that follow to configure the Solaris environment for the PGW. The Cisco MGC software requires a particular configuration of the Solaris environment to function properly.
b. HSI: When installing Solaris for HSI with two disks, verify that both the first and second disk devices are selected.
When installing Solaris for HSI on a platform with a single disk, verify that only the first disk device is selected.
For the device names for each platform type, refer to Table 2-2 on page 2-4 (Device Names on Supported Cisco MGC Software Platforms).
Press F2 to continue.
Note For the HSI, the second disk device may be configured as a mirror of the first. This is done in the “Configuring a Second Disk Drive” section on page 2-32.
c. BAMS with Disk Array: When installing Solaris for a BAMS on a Netra 1400/1405 with an st A1000 Disk Array, verify that only the first disk device is selected. For the device names for each platform type, refer to Table 2-2 on page 2-4 (Device Names on Supported Cisco MGC Software Platforms).
Press F2 to continue.
d. BAMS without Disk Array only: When installing Solaris for a BAMS without a Disk Array, verify that both the first and second disk devices are selected. For the device names for each platform type, refer to Table 2-2 on page 2-4 (Device Names on Supported Cisco MGC Software Platforms).
Press F2 to continue.
A screen similar to the following is displayed:
- Preserve Data? --------------------------------------------------------------
Do you want to preserve existing data? At least one of the disks you've selected for installing Solaris software has file systems or unnamed slices that you may want to save.
------------------------------------------------------------------------------- F2_Continue F3_Go Back F4_Preserve F5_Exit F6_Help
Step 7 If above screen is displayed, press F2 to continue.
2-18Cisco Media Gateway Controller Software Installation and Configuration Guide (Releases 9.1 through 9.6)
OL-1150-15
Chapter 2 Sun Solaris 8 Operating System InstallationLoading the Solaris 8 Operating System
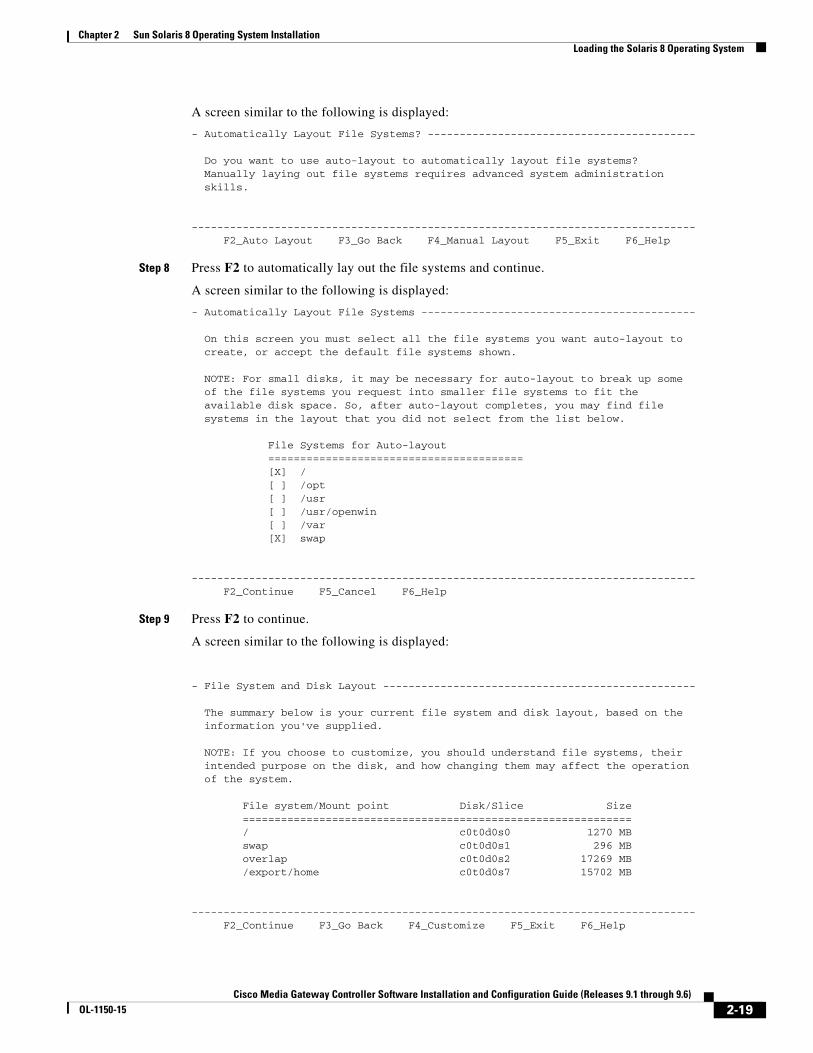
A screen similar to the following is displayed:
- Automatically Layout File Systems? ------------------------------------------
Do you want to use auto-layout to automatically layout file systems? Manually laying out file systems requires advanced system administration skills.
------------------------------------------------------------------------------- F2_Auto Layout F3_Go Back F4_Manual Layout F5_Exit F6_Help
Step 8 Press F2 to automatically lay out the file systems and continue.
A screen similar to the following is displayed:
- Automatically Layout File Systems -------------------------------------------
On this screen you must select all the file systems you want auto-layout to create, or accept the default file systems shown.
NOTE: For small disks, it may be necessary for auto-layout to break up some of the file systems you request into smaller file systems to fit the available disk space. So, after auto-layout completes, you may find file systems in the layout that you did not select from the list below.
File Systems for Auto-layout ======================================== [X] / [ ] /opt [ ] /usr [ ] /usr/openwin [ ] /var [X] swap
------------------------------------------------------------------------------- F2_Continue F5_Cancel F6_Help
Step 9 Press F2 to continue.
A screen similar to the following is displayed:
- File System and Disk Layout -------------------------------------------------
The summary below is your current file system and disk layout, based on the information you've supplied.
NOTE: If you choose to customize, you should understand file systems, their intended purpose on the disk, and how changing them may affect the operation of the system.
File system/Mount point Disk/Slice Size ============================================================= / c0t0d0s0 1270 MB swap c0t0d0s1 296 MB overlap c0t0d0s2 17269 MB /export/home c0t0d0s7 15702 MB
------------------------------------------------------------------------------- F2_Continue F3_Go Back F4_Customize F5_Exit F6_Help
2-19Cisco Media Gateway Controller Software Installation and Configuration Guide (Releases 9.1 through 9.6)
OL-1150-15
Chapter 2 Sun Solaris 8 Operating System InstallationLoading the Solaris 8 Operating System
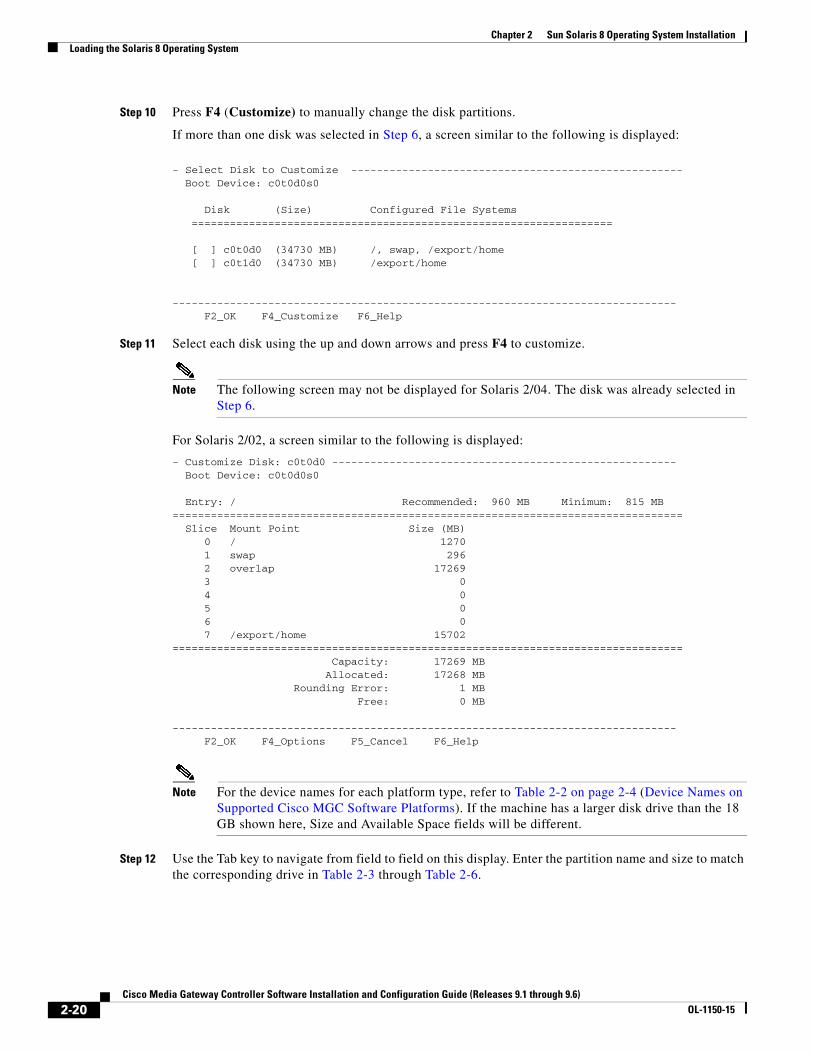
Step 10 Press F4 (Customize) to manually change the disk partitions.
If more than one disk was selected in Step 6, a screen similar to the following is displayed:
- Select Disk to Customize ---------------------------------------------------- Boot Device: c0t0d0s0
Disk (Size) Configured File Systems ==================================================================
[ ] c0t0d0 (34730 MB) /, swap, /export/home[ ] c0t1d0 (34730 MB) /export/home
------------------------------------------------------------------------------- F2_OK F4_Customize F6_Help
Step 11 Select each disk using the up and down arrows and press F4 to customize.
Note The following screen may not be displayed for Solaris 2/04. The disk was already selected in Step 6.
For Solaris 2/02, a screen similar to the following is displayed:
- Customize Disk: c0t0d0 ------------------------------------------------------ Boot Device: c0t0d0s0
Entry: / Recommended: 960 MB Minimum: 815 MB================================================================================ Slice Mount Point Size (MB) 0 / 1270 1 swap 296 2 overlap 17269 3 0 4 0 5 0 6 0 7 /export/home 15702================================================================================ Capacity: 17269 MB Allocated: 17268 MB Rounding Error: 1 MB Free: 0 MB
------------------------------------------------------------------------------- F2_OK F4_Options F5_Cancel F6_Help
Note For the device names for each platform type, refer to Table 2-2 on page 2-4 (Device Names on Supported Cisco MGC Software Platforms). If the machine has a larger disk drive than the 18 GB shown here, Size and Available Space fields will be different.
Step 12 Use the Tab key to navigate from field to field on this display. Enter the partition name and size to match the corresponding drive in Table 2-3 through Table 2-6.
2-20Cisco Media Gateway Controller Software Installation and Configuration Guide (Releases 9.1 through 9.6)
OL-1150-15

Chapter 2 Sun Solaris 8 Operating System InstallationLoading the Solaris 8 Operating System
Caution Make sure that you select the correct tables based on the disk drive being configured (Disk 0 or Disk 1), as well as the correct disk size. Select the column in the table that matches the software that will be installed on the platform later.
For BAMS, select the correct column based on whether the platform will have an external disk array attached.
Caution In the partition tables that follow, slice 2 is the overlap slice. It is configured by default to be the whole disk. This slice entry is only used for test and maintenance purposes—it is not mounted by the operating system. This slice entry should not be changed.
You must remove slice 7 before configuring the rest of the drive.
Due to rounding, the size of the slice shown after entry may be slightly larger than what was entered (for example, an entry of 1024 may be rounded up to 1025 or 1026).
Disks 2 and 3 are not currently used.
Caution For HSI: If you are upgrading from HSI 2.2 to HSI 4.1, make sure that your disks are correctly partitioned to support disk mirroring—partitioning requires the new disk layout.
If your disks are not correctly partitioned, you must re-partition your disks.
Note There may be an unnamed partition in some of the following tables that is created without a mount point (slice 7) for the PGW Host and HSI. The DiskSuite disk mirroring software uses this partition. If DiskSuite is not used, then the space is unused.
Note The third and fourth disks are not used.
2-21Cisco Media Gateway Controller Software Installation and Configuration Guide (Releases 9.1 through 9.6)
OL-1150-15

Chapter 2 Sun Solaris 8 Operating System InstallationLoading the Solaris 8 Operating System
Table 2-3 18-Gigabyte Disk 0 Partition Table
Slice No.
PGW Host BAMS without Disk ArrayBAMS with Disk
Array HSI
Slice Name
Slice Size (MB)
Slice Name Slice Size (MB)
Slice Name Slice Size (MB)
Slice Name Slice Size (MB)
0. / 512 / 1000 / 1024 / 512
1 swap 4096 swap 2040 swap 4096 swap 4096
2 overlap 17269 overlap 17269 overlap 17269 overlap 17269
3 0 0 0 /opt 6144
4 /opt 10590 /opt 1729 /opt 11110 /var 1024
5 /var 1024 /usr 1024 /usr 1024 /usr 1024
6 /usr 1024 /opt/CiscoBAMS/CDR/archive 11000 0 /export 4081
7 15 0 15 15
Table 2-4 18-Gigabyte Disk 1 Partition Table
Slice No.
PGW Host(See Configuring a Second Disk Drive,
page 2-32) BAMS without Disk ArrayBAMS with Disk
Array
HSI(See Configuring a Second
Disk Drive, page 2-32)
Slice Name
Slice Size (MB)
Slice Name Slice Size (MB)
Slice Name Slice Size (MB)
Slice Name Slice Size (MB)
0. 0 /opt/CiscoBAMS/data 17269 0 0
1 0 0 0 0
2 overlap 17269 overlap 17269 overlap 17269 overlap 17269
3 0 0 0 0
4 0 0 0 0
5 0 0 0 0
6 0 0 0 0
7 0 0 0 0
2-22Cisco Media Gateway Controller Software Installation and Configuration Guide (Releases 9.1 through 9.6)
OL-1150-15
Chapter 2 Sun Solaris 8 Operating System InstallationLoading the Solaris 8 Operating System
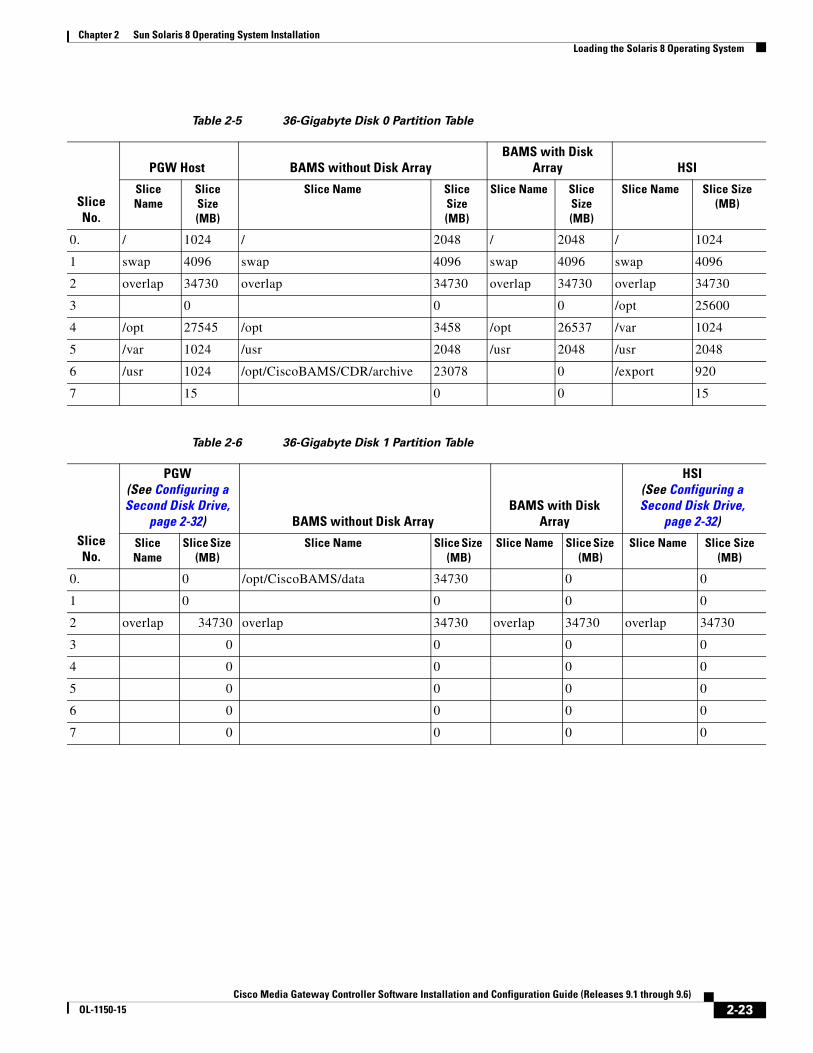
Table 2-5 36-Gigabyte Disk 0 Partition Table
SliceNo.
PGW Host BAMS without Disk ArrayBAMS with Disk
Array HSI
Slice Name
Slice Size (MB)
Slice Name Slice Size (MB)
Slice Name Slice Size (MB)
Slice Name Slice Size (MB)
0. / 1024 / 2048 / 2048 / 1024
1 swap 4096 swap 4096 swap 4096 swap 4096
2 overlap 34730 overlap 34730 overlap 34730 overlap 34730
3 0 0 0 /opt 25600
4 /opt 27545 /opt 3458 /opt 26537 /var 1024
5 /var 1024 /usr 2048 /usr 2048 /usr 2048
6 /usr 1024 /opt/CiscoBAMS/CDR/archive 23078 0 /export 920
7 15 0 0 15
Table 2-6 36-Gigabyte Disk 1 Partition Table
SliceNo.
PGW(See Configuring a Second Disk Drive,
page 2-32) BAMS without Disk ArrayBAMS with Disk
Array
HSI(See Configuring a Second Disk Drive,
page 2-32)
Slice Name
Slice Size (MB)
Slice Name Slice Size (MB)
Slice Name Slice Size (MB)
Slice Name Slice Size (MB)
0. 0 /opt/CiscoBAMS/data 34730 0 0
1 0 0 0 0
2 overlap 34730 overlap 34730 overlap 34730 overlap 34730
3 0 0 0 0
4 0 0 0 0
5 0 0 0 0
6 0 0 0 0
7 0 0 0 0
2-23Cisco Media Gateway Controller Software Installation and Configuration Guide (Releases 9.1 through 9.6)
OL-1150-15

Chapter 2 Sun Solaris 8 Operating System InstallationLoading the Solaris 8 Operating System
Table 2-7 73-Gigabyte Disk 0 Partition Table
SliceNo.
PGW Host BAMS without Disk Array BAMS with Disk Array HSI
Slice Name Slice Size (MB)
Slice Name Slice Size (MB)
Slice Name Slice Size (MB)
Slice Name
Slice Size (MB)
0. / 4099 / 4099 / 4099 / 1028
1 swap 4099 swap 4099 swap 4099 swap 4099
2 overlap 69994 overlap 69994 overlap 69994 overlap 69994
3 0 0 /opt 59341
4 /opt 53553 /opt 8193 /opt 57697 /var 1028
5 /var 4099 /usr 4099 /usr 4099 /usr 2052
6 /usr 4099 /opt/CiscoBAMS/CDR/archive 49503 /export 2399
7 44 44
Table 2-8 73-Gigabyte Disk 1 Partition Table
SliceNo.
PGW Host (See Configuring a Second
Disk Drive, page 2-32)
BAMS without Disk Array BAMS with Disk ArrayHSI
(See Configuring a Second Disk Drive,
page 2-32)
Slice Name Slice Size (MB)
Slice Name Slice Size (MB)
Slice Name Slice Size (MB)
Slice Name
Slice Size (MB)
0. /opt/CiscoBAMS/data 69994
1
2 overlap 69994 overlap 69994 overlap 69994 overlap 69994
3 0 0 0 0
4 0 0 0 0
5 0 0 0 0
6 0 0 0 0
7 0 0 0 0
2-24Cisco Media Gateway Controller Software Installation and Configuration Guide (Releases 9.1 through 9.6)
OL-1150-15
Chapter 2 Sun Solaris 8 Operating System InstallationLoading the Solaris 8 Operating System
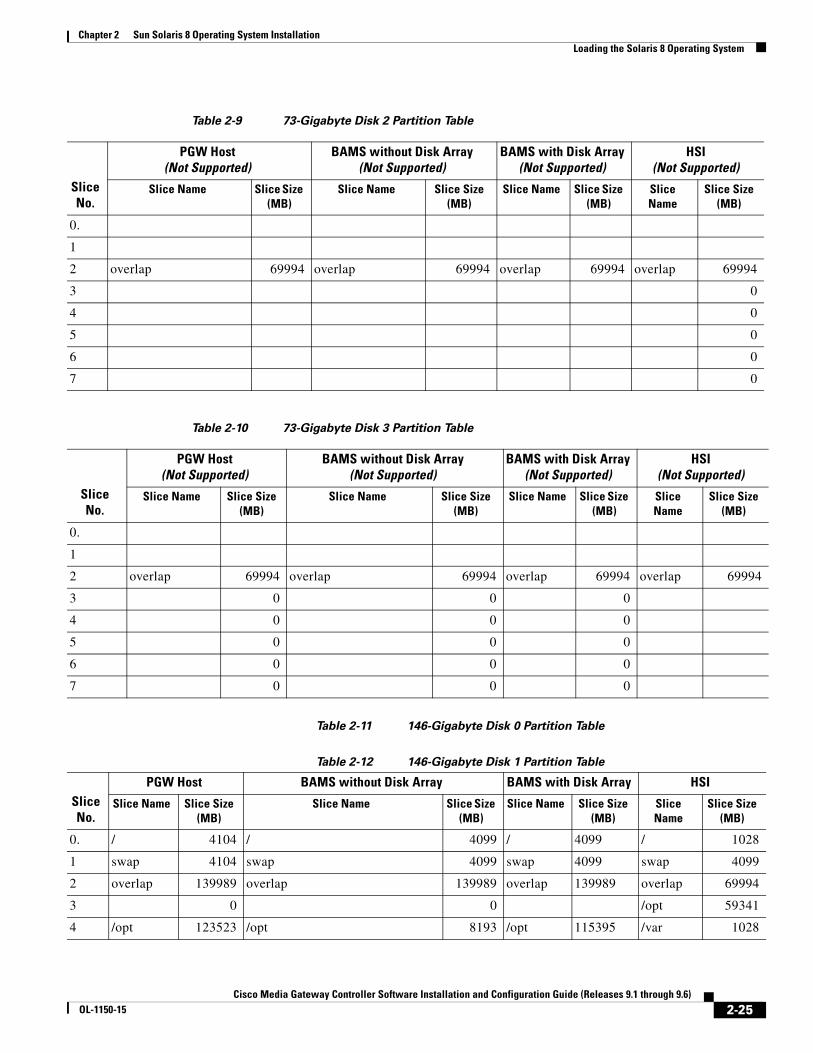
Table 2-11 146-Gigabyte Disk 0 Partition Table
Table 2-12 146-Gigabyte Disk 1 Partition Table
Table 2-9 73-Gigabyte Disk 2 Partition Table
SliceNo.
PGW Host(Not Supported)
BAMS without Disk Array(Not Supported)
BAMS with Disk Array(Not Supported)
HSI (Not Supported)
Slice Name Slice Size (MB)
Slice Name Slice Size (MB)
Slice Name Slice Size (MB)
Slice Name
Slice Size (MB)
0.
1
2 overlap 69994 overlap 69994 overlap 69994 overlap 69994
3 0
4 0
5 0
6 0
7 0
Table 2-10 73-Gigabyte Disk 3 Partition Table
SliceNo.
PGW Host(Not Supported)
BAMS without Disk Array(Not Supported)
BAMS with Disk Array(Not Supported)
HSI (Not Supported)
Slice Name Slice Size (MB)
Slice Name Slice Size (MB)
Slice Name Slice Size (MB)
Slice Name
Slice Size (MB)
0.
1
2 overlap 69994 overlap 69994 overlap 69994 overlap 69994
3 0 0 0
4 0 0 0
5 0 0 0
6 0 0 0
7 0 0 0
SliceNo.
PGW Host BAMS without Disk Array BAMS with Disk Array HSI
Slice Name Slice Size (MB)
Slice Name Slice Size (MB)
Slice Name Slice Size (MB)
Slice Name
Slice Size (MB)
0. / 4104 / 4099 / 4099 / 1028
1 swap 4104 swap 4099 swap 4099 swap 4099
2 overlap 139989 overlap 139989 overlap 139989 overlap 69994
3 0 0 /opt 59341
4 /opt 123523 /opt 8193 /opt 115395 /var 1028
2-25Cisco Media Gateway Controller Software Installation and Configuration Guide (Releases 9.1 through 9.6)
OL-1150-15
Chapter 2 Sun Solaris 8 Operating System InstallationLoading the Solaris 8 Operating System
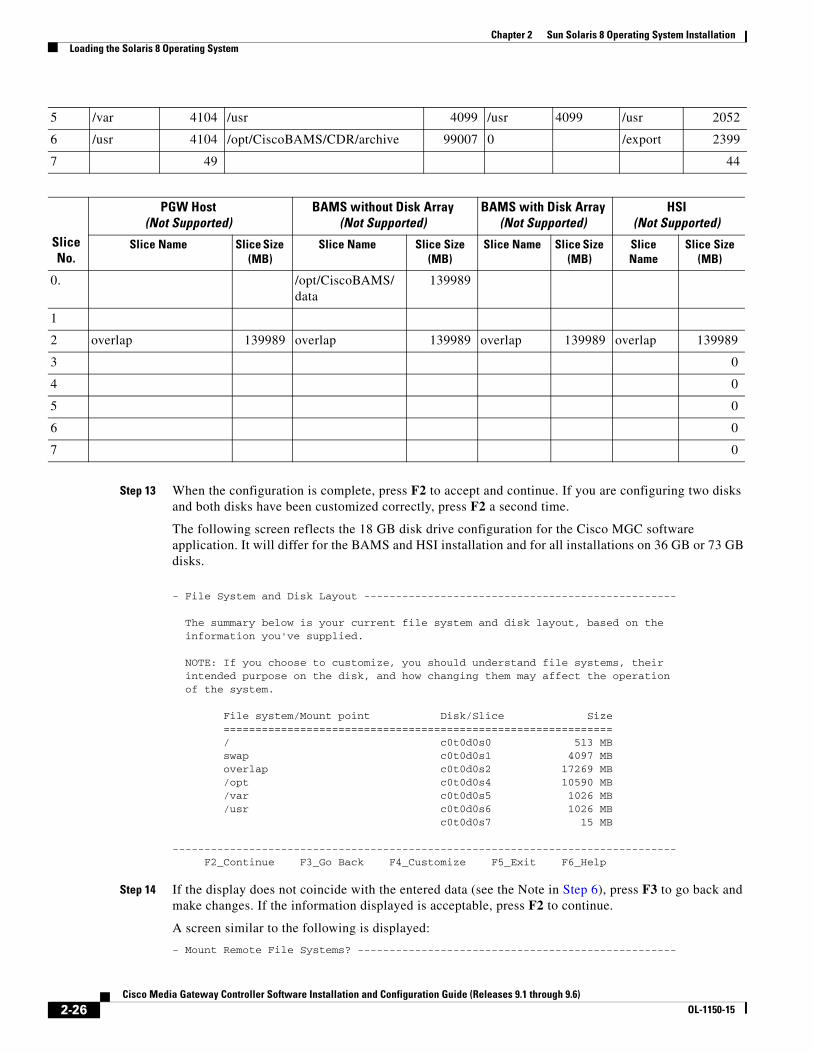
Step 13 When the configuration is complete, press F2 to accept and continue. If you are configuring two disks and both disks have been customized correctly, press F2 a second time.
The following screen reflects the 18 GB disk drive configuration for the Cisco MGC software application. It will differ for the BAMS and HSI installation and for all installations on 36 GB or 73 GB disks.
- File System and Disk Layout ------------------------------------------------- The summary below is your current file system and disk layout, based on the information you've supplied.
NOTE: If you choose to customize, you should understand file systems, their intended purpose on the disk, and how changing them may affect the operation of the system.
File system/Mount point Disk/Slice Size ============================================================= / c0t0d0s0 513 MB swap c0t0d0s1 4097 MB overlap c0t0d0s2 17269 MB /opt c0t0d0s4 10590 MB /var c0t0d0s5 1026 MB /usr c0t0d0s6 1026 MB c0t0d0s7 15 MB
------------------------------------------------------------------------------- F2_Continue F3_Go Back F4_Customize F5_Exit F6_Help
Step 14 If the display does not coincide with the entered data (see the Note in Step 6), press F3 to go back and make changes. If the information displayed is acceptable, press F2 to continue.
A screen similar to the following is displayed:
- Mount Remote File Systems? --------------------------------------------------
5 /var 4104 /usr 4099 /usr 4099 /usr 2052
6 /usr 4104 /opt/CiscoBAMS/CDR/archive 99007 0 /export 2399
7 49 44
SliceNo.
PGW Host(Not Supported)
BAMS without Disk Array(Not Supported)
BAMS with Disk Array(Not Supported)
HSI (Not Supported)
Slice Name Slice Size (MB)
Slice Name Slice Size (MB)
Slice Name Slice Size (MB)
Slice Name
Slice Size (MB)
0. /opt/CiscoBAMS/data
139989
1
2 overlap 139989 overlap 139989 overlap 139989 overlap 139989
3 0
4 0
5 0
6 0
7 0
2-26Cisco Media Gateway Controller Software Installation and Configuration Guide (Releases 9.1 through 9.6)
OL-1150-15

Chapter 2 Sun Solaris 8 Operating System InstallationLoading the Solaris 8 Operating System
Do you want to mount software from a remote file server? This may be necessary if you had to remove software because of disk space problems.
------------------------------------------------------------------------------- F2_Continue F3_Go Back F4_Remote Mounts F5_Exit F6_Help
Step 15 Press F2 to continue.
A screen similar to the following is displayed:
- Profile ---------------------------------------------------------------------
The information shown below is your profile for installing Solaris software. It reflects the choices you've made on previous screens.
============================================================================
- Installation Option: Initial | Boot Device: c0t0d0 | Client Services: None | | Locales: U.S.A. (en_US.ISO8859-1) | | Software: Solaris 8, Developer System Support 64-bit | | File System and Disk Layout: v------------------------------------------------------------------------------- F2_Continue F4_Change F5_Exit F6_Help
Step 16 If the display does not coincide with the data that is entered, press F4 to make changes. Otherwise, press F2 to accept the information displayed and continue.
A screen similar to the following is displayed:
- Warning ---------------------------------------------------------------------
The following disk configuration condition(s) have been detected. Errors must be fixed to ensure a successful installation. Warnings can be ignored without causing the installation to fail.
WARNING: Unused disk space (c0t0d0)
------------------------------------------------------------------------------- F2_OK F5_Cancel
Step 17 A small amount of disk space (required for DiskSuite installation) is left unused, causing the displayed warning. This will not effect the installation. Press F2 to continue.
A screen similar to the following is displayed:
- Reboot After Installation? --------------------------------------------------
After Solaris software is installed, the system must be rebooted. You can choose to have the system automatically reboot, or you can choose to manually reboot the system if you want to run scripts or do other customizations before the reboot. You can manually reboot a system by using the reboot(1M) command.
[X] Auto Reboot [ ] Manual Reboot
2-27Cisco Media Gateway Controller Software Installation and Configuration Guide (Releases 9.1 through 9.6)
OL-1150-15
Chapter 2 Sun Solaris 8 Operating System InstallationLoading the Solaris 8 Operating System
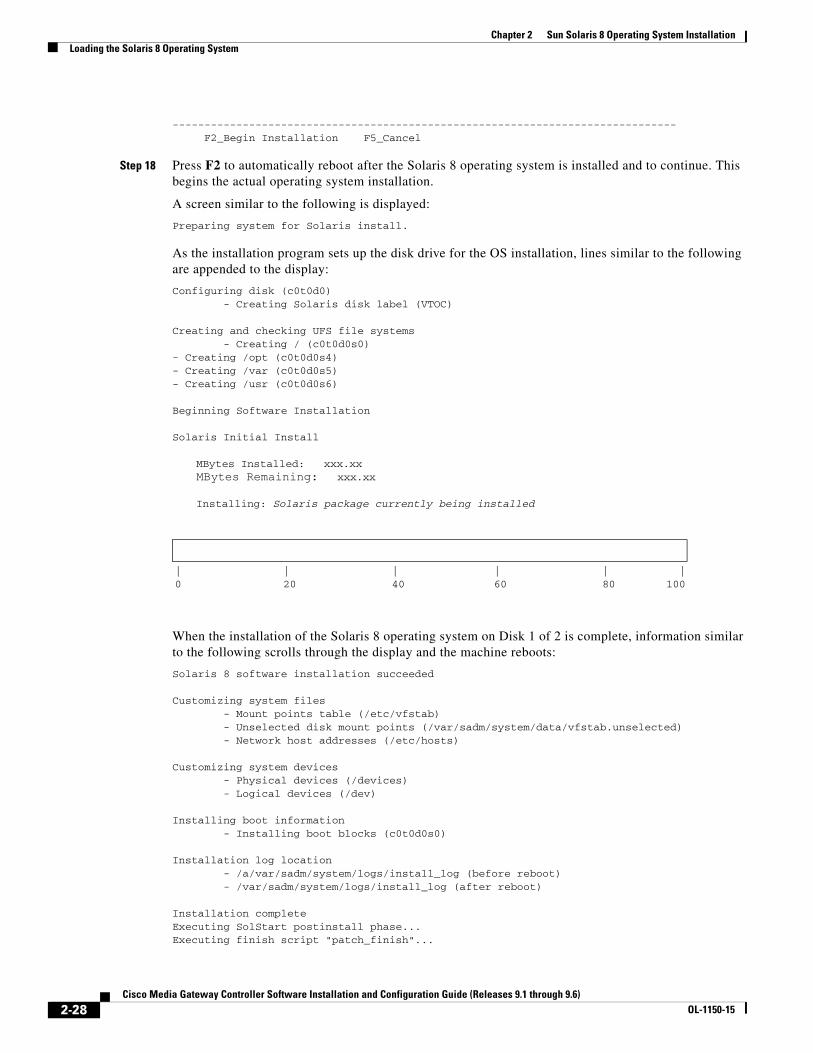
------------------------------------------------------------------------------- F2_Begin Installation F5_Cancel
Step 18 Press F2 to automatically reboot after the Solaris 8 operating system is installed and to continue. This begins the actual operating system installation.
A screen similar to the following is displayed:
Preparing system for Solaris install.
As the installation program sets up the disk drive for the OS installation, lines similar to the following are appended to the display:
Configuring disk (c0t0d0) - Creating Solaris disk label (VTOC)
Creating and checking UFS file systems - Creating / (c0t0d0s0)- Creating /opt (c0t0d0s4)- Creating /var (c0t0d0s5) - Creating /usr (c0t0d0s6)
Beginning Software Installation
Solaris Initial Install
MBytes Installed: xxx.xxMBytes Remaining: xxx.xx
Installing: Solaris package currently being installed
When the installation of the Solaris 8 operating system on Disk 1 of 2 is complete, information similar to the following scrolls through the display and the machine reboots:
Solaris 8 software installation succeeded
Customizing system files - Mount points table (/etc/vfstab) - Unselected disk mount points (/var/sadm/system/data/vfstab.unselected) - Network host addresses (/etc/hosts)
Customizing system devices - Physical devices (/devices) - Logical devices (/dev)
Installing boot information - Installing boot blocks (c0t0d0s0)
Installation log location - /a/var/sadm/system/logs/install_log (before reboot) - /var/sadm/system/logs/install_log (after reboot)
Installation completeExecuting SolStart postinstall phase...Executing finish script "patch_finish"...
| | | | | |0 20 40 60 80 100
2-28Cisco Media Gateway Controller Software Installation and Configuration Guide (Releases 9.1 through 9.6)
OL-1150-15

Chapter 2 Sun Solaris 8 Operating System InstallationLoading the Solaris 8 Operating System
Finish script patch_finish execution completed.Executing JumpStart postinstall phase...
The begin script log 'begin.log'is located in /var/sadm/system/logs after reboot.
The finish script log 'finish.log'is located in /var/sadm/system/logs after reboot.
syncing file systems... donerebooting...Resetting ...
When the reboot is complete, a screen similar to the following is displayed:
On this screen you can create a root password.
A root password can contain any number of characters, but only the first eightcharacters in the password are significant. (For example, if you create`a1b2c3d4e5f6' as your root password, you can use `a1b2c3d4' to gain rootaccess.)
You will be prompted to type the root password twice; for security, the passwordwill not be displayed on the screen as you type it.
> If you do not want a root password, press RETURN twice.
Root password:
Press Return to continue.
Step 19 Refer to Table 1-2 for the root password for this system and type it. Press Enter to continue. The following line is appended to the display and you will be prompted to confirm the root password.
Re-enter your root password.
Press Return to continue.
Step 20 Re-type the root password for this system, then press Enter.
A screen similar to the following is displayed:
System identification is completed.
Note The next two screens are not displayed when installing on newer systems such as Sun Fire V120, Sun Fire V210, Netra 120, Netra 20, Netra 240, or Netra 440 platforms.
================================================================This system is configured to conserve energy.================================================================
After 30 minutes of idle time on this system, your system state willautomatically be saved to disk, and the system will power-off. Later, when youwant to use the system again, and you turn the power back on, your system willbe restored to its previous state, including all the programs that you wererunning. Do you want this automatic power-saving shutdown? (If this system isused as a server, answer n) [y,n,?]
2-29Cisco Media Gateway Controller Software Installation and Configuration Guide (Releases 9.1 through 9.6)
OL-1150-15

Chapter 2 Sun Solaris 8 Operating System InstallationLoading the Solaris 8 Operating System
Step 21 Type n and press Enter to disable the power saving feature and continue. The following lines are appended to the display:
Autoshutdown has been disabled.
Do you want the system to ask about this again, when you next reboot? (Thisgives you the chance to try it before deciding whether to keep it.) [y,n,?]
Step 22 Type n and press Enter to permanently disable the power saving feature and continue. The installation continues and text similar to the following are displayed:
Starting Web Start Launcher in Command Line Mode.
Please specify the media from which you will be installing Solaris 8 (SPARC)Software 2.
Alternatively, choose the selection for "Skip" to skip this CD and go on to thenext one.
Media:
1. CD2. Network File System3. Skip
Media [1]: 1
Step 23 Type 1 Press Enter to continue. The following lines are appended to the display:
Please insert the CD for Solaris 8 (SPARC) Software 2.
Once the CD has been inserted, please press Enter.
Enter S to skip this CD and go on to the next one. To select a different media, enter B to go Back. []
Note For the Sun Fire V210 and Netra 240 and 440: The screen output is CD/DVD.
Step 24 Remove the Solaris 8 Software CD, Disk 1 of 2, load Solaris 8 Software CD, Disk 2 of 2, and press Enter to continue.
Lines similar to the following are appended to the display:
Reading Solaris 8 (SPARC) Software 2.... \
Launching installer for Solaris 8 (SPARC) Software 2. Please Wait...
Installing Solaris 8 Software 2|-1%--------------25%-----------------50%-----------------75%--------------100%|
Installation details:
Product Result More Info 1. Solaris 8 Software 2 Installed Available
2. Done
Enter the number corresponding to the desired selection for moreinformation, or enter 2 to continue [2]:
2-30Cisco Media Gateway Controller Software Installation and Configuration Guide (Releases 9.1 through 9.6)
OL-1150-15

Chapter 2 Sun Solaris 8 Operating System InstallationLoading the Solaris 8 Operating System
Step 25 Type 2 and press Enter to continue.
The following lines are appended to the display:
End of Solaris 8 Software 2 installation.
<Press ENTER to continue>
Step 26 Press Enter to continue.
The following line is appended to the display:
<Press Return to reboot the system>
Step 27 Press Enter to reboot.
Step 28 When the machine reboots, log in as root.
Step 29 Define the default router address and make it permanent by performing the following:
a. Create a file called /etc/defaultrouter.
b. Put the default gateway IP address on the first and only line of the file by entering the following command:
# echo default_router_IP_address > /etc/defaultrouter
This completes the installation of the Solaris 8 operating system. Proceed to the following section to verify Network Time Protocol (NTP) Packages.
Verifying Network Time Protocol (NTP) PackagesNTP synchronizes call detail record (CDR) timestamps on Cisco PGW 2200s and BAMS. Make sure that the correct NTP packages are installed by performing the following procedure:
Step 1 Enter the following command:
pkginfo | grep ntp
Text similar to the following is displayed:
system SUNWntpr NTP, (Root)system SUNWntpu NTP, (Usr)
Step 2 Echo the NTP server IP Address into the file /etc/inet/ntp.conf by entering the following command (the NTP server address is provided by your system administrator):
# echo "server NTP_server_IP_address" > /etc/inet/ntp.conf
Step 3 Cisco PGW 2200 requires the NTP daemon to always use slewing mechanism to synchronize the local clock with the NTP server reference time. To enable slewing, enter the following commands to add the lines in the /etc/inet/ntp.conf file (Note the use of the double arrows ">>"):
# echo "slewalways yes" >> /etc/inet/ntp.conf# echo "disable pll" >> /etc/inet/ntp.conf
Step 4 Reboot the machine with the following command to activate the default route:
# reboot -- -r
2-31Cisco Media Gateway Controller Software Installation and Configuration Guide (Releases 9.1 through 9.6)
OL-1150-15
Chapter 2 Sun Solaris 8 Operating System InstallationConfiguring a Second Disk Drive
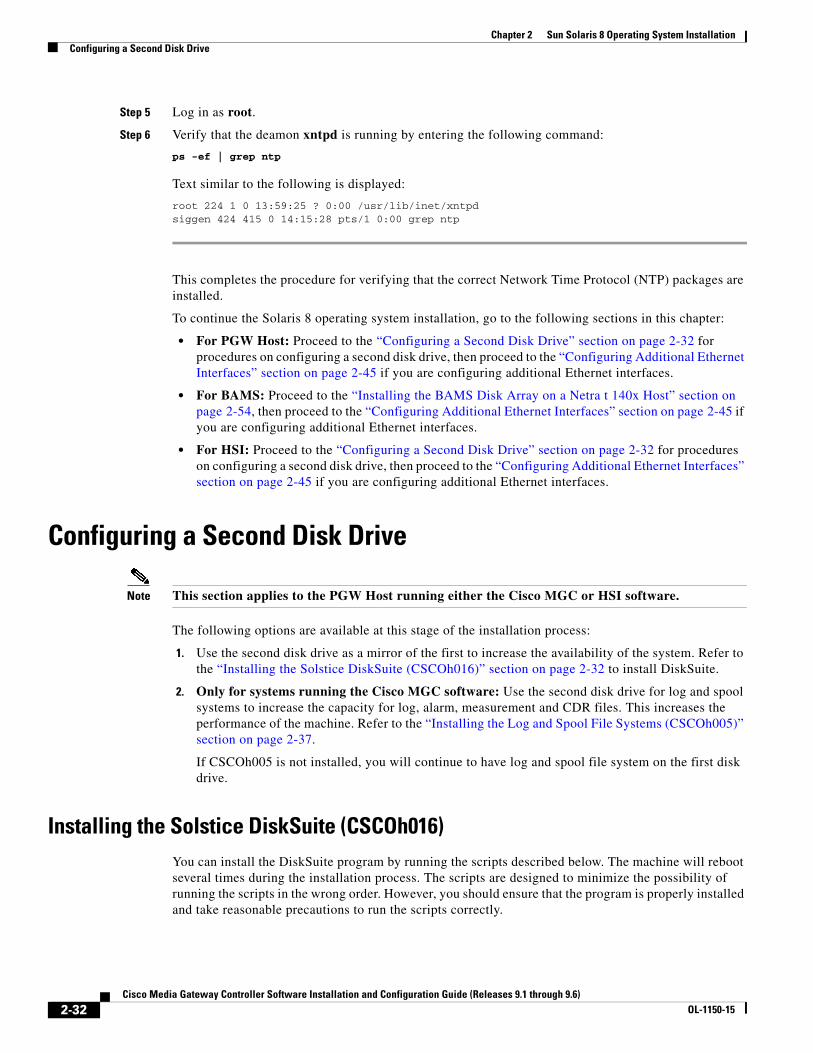
Step 5 Log in as root.
Step 6 Verify that the deamon xntpd is running by entering the following command:
ps -ef | grep ntp
Text similar to the following is displayed:
root 224 1 0 13:59:25 ? 0:00 /usr/lib/inet/xntpdsiggen 424 415 0 14:15:28 pts/1 0:00 grep ntp
This completes the procedure for verifying that the correct Network Time Protocol (NTP) packages are installed.
To continue the Solaris 8 operating system installation, go to the following sections in this chapter:
• For PGW Host: Proceed to the “Configuring a Second Disk Drive” section on page 2-32 for procedures on configuring a second disk drive, then proceed to the “Configuring Additional Ethernet Interfaces” section on page 2-45 if you are configuring additional Ethernet interfaces.
• For BAMS: Proceed to the “Installing the BAMS Disk Array on a Netra t 140x Host” section on page 2-54, then proceed to the “Configuring Additional Ethernet Interfaces” section on page 2-45 if you are configuring additional Ethernet interfaces.
• For HSI: Proceed to the “Configuring a Second Disk Drive” section on page 2-32 for procedures on configuring a second disk drive, then proceed to the “Configuring Additional Ethernet Interfaces” section on page 2-45 if you are configuring additional Ethernet interfaces.
Configuring a Second Disk Drive
Note This section applies to the PGW Host running either the Cisco MGC or HSI software.
The following options are available at this stage of the installation process:
1. Use the second disk drive as a mirror of the first to increase the availability of the system. Refer to the “Installing the Solstice DiskSuite (CSCOh016)” section on page 2-32 to install DiskSuite.
2. Only for systems running the Cisco MGC software: Use the second disk drive for log and spool systems to increase the capacity for log, alarm, measurement and CDR files. This increases the performance of the machine. Refer to the “Installing the Log and Spool File Systems (CSCOh005)” section on page 2-37.
If CSCOh005 is not installed, you will continue to have log and spool file system on the first disk drive.
Installing the Solstice DiskSuite (CSCOh016)You can install the DiskSuite program by running the scripts described below. The machine will reboot several times during the installation process. The scripts are designed to minimize the possibility of running the scripts in the wrong order. However, you should ensure that the program is properly installed and take reasonable precautions to run the scripts correctly.
2-32Cisco Media Gateway Controller Software Installation and Configuration Guide (Releases 9.1 through 9.6)
OL-1150-15
Chapter 2 Sun Solaris 8 Operating System InstallationConfiguring a Second Disk Drive
Caution The order in which packages are installed on the system is important. In particular, DiskSuite (located in the CSCOh016 package) must be installed before installing the Cisco PGW application (CiscoMGC software) and the Cisco Security package (CSCOh013).
If your system already has the CSCOh015 software package installed and you install CSCOh016, you must run the CSCOh015 installation script again to ensure compatibility between the two software packages (see Step 10, below).
When removing DiskSuite, you must remove CSCOh013 and the Cisco PGW application before removing DiskSuite. If the CSCOh013 package or the Cisco PGW application are already installed, the DiskSuite scripts will fail to run.
Note You must log in as root to run the following DiskSuite installation script.
Note If you have installed the Solaris 8 operating system on the platform with only one hard disk, shut down the server and insert a second disk. Turn on the server and log in as root. Run the UNIX command, /usr/sbin/shutdown -g0 -y -i0, to enter the OK mode. Then run the command, boot -rv, in OK mode to detect the newly inserted hard disk.
Step 1 Load the Cisco Solaris 8 Patches CD into the CD-ROM drive. Enter the following command to install the DiskSuite installation scripts:
pkgadd -d /cdrom/cdrom0/CSCOh016.pkg
This command copies the DiskSuite installation scripts into the directory /opt/sun_install/DiskSuite.
Step 2 Enter the following command to open the door of the CD-ROM drive:
eject
Remove the Cisco Solaris 8 Patches CD and re-install the Solaris CD (#2 of 2) in the CD-ROM drive.
Step 3 Change directories. Enter the following command:
cd /opt/sun_install/DiskSuite
Step 4 Run the first script. Enter the following command:
sh ./install_disksuite_1.sh
This script installs the DiskSuite packages from the Sun Solaris CD (disk #2). The machine reboots after installing the packages.
Step 5 Log in as root and enter the following command to open the door of the CD-ROM drive:
eject
Remove the Solaris CD (#2 of 2) from the CD-ROM drive.
Step 6 Change directories to /opt/sun_install/DiskSuite. Enter the following command:
cd /opt/sun_install/DiskSuite
Step 7 Run the second script. Enter the following command:
sh ./install_disksuite_2.sh
2-33Cisco Media Gateway Controller Software Installation and Configuration Guide (Releases 9.1 through 9.6)
OL-1150-15
Chapter 2 Sun Solaris 8 Operating System InstallationConfiguring a Second Disk Drive
This script formats the second disk drive with a partition table that is identical to the first drive on the system (where Solaris was installed). It creates the required DiskSuite disk partitions and databases. The machine reboots after creating the disk partitions and databases.
Step 8 Log in as root and go to the /opt/sun_install/DiskSuite directory. Enter the following command:
cd /opt/sun_install/DiskSuite
Step 9 Run the third script. Enter the following command:
sh ./install_disksuite_3.sh
This script attaches the meta-disks and starts the disk mirroring.
Caution DO NOT REBOOT until the disk is completely and correctly mirrored.
Step 10 Skip this step if the CSCOh015 software package is not installed in your system. However, if the CSCh015 software package is already installed, ensure that both CSCOh015 and CSCOh016 are compatible by entering the following commands:
# cd /opt/sun_install# ./installPatches8
The DiskSuite installation is now complete.
Rebooting from the Mirrored (Secondary) Disk
Caution Rebooting from the mirrored (secondary) disk is normally done only after a catastrophic failure of the primary disk.
Perform the following procedure to add an alias in the boot ROM so you can boot off of the secondary disk, if necessary.
Step 1 Get the information from the system on the second disk that you will boot from. Type the following command and press Enter:
# prtconf -vp | grep pci | grep disk1
Text similar to the following is displayed:
disk1: ‘/pci@1f,0/pc1@1/scsi@8/disk1,0’
Note Disk1 is a system-maintained standard for the system's second hard disk.
a. If the prtconf command returns the above information, you can use it to boot the second disk without any additional changes. Proceed to Step 3.
b. If you do not wish to use the above default information, create an alias name other than disk1 for the second boot disk in the NVRAM by using the information from the prtconf command (above). For example, to create an alias of "backup_root", enter the following command:.
2-34Cisco Media Gateway Controller Software Installation and Configuration Guide (Releases 9.1 through 9.6)
OL-1150-15

Chapter 2 Sun Solaris 8 Operating System InstallationConfiguring a Second Disk Drive
# eeprom nvramrc='devalias backup_root /pci@1f,0/pci@1/scsi@8/disk@1,0'
Step 2 Check the alias you created by typing the following commands and pressing Enter:
eeprom |grep nvramrc
Text similar to the following is displayed:
use-nvramrc?=truenvramrc=devalias backup_root /pci@1f,0/pci@1/scsi@8/disk@1,0
Note In the steps that follow, wherever you see "disk1" would be replaced with the alias you configured above.
Step 3 Before shutting down the system, check the progress of the mirroring to make sure that replication is complete. Type the following the command to check the progress of the mirroring. An Okay response means that disk mirroring is complete.
/usr/sbin/metastat
Warning DO NOT REBOOT until the replication is complete and the mirrors are in the Okay state.
Step 4 When the replication is complete, bring the machine down to the boot prompt. Type the following command and press Enter:
# /usr/sbin/shutdown -g0 -y -i0
Text similar to the following is displayed:
The system is coming down. Please wait.System services are now being stopped....The system is down....Program terminatedok
ok boot disk1ResLOM event: +0h5m53s host resetting...Executing last command: boot disk1Boot device: /pci@1f,0/pci@1/scsi@8/disk@1,0 File and args:SunOS Release 5.8 Version Generic_108528-13 64-bitCopyright 1983-2001 Sun Microsystems, Inc. All rights reserved.
The machine should reboot from the second disk.
Step 5 Verify that the following text is displayed in the boot output (see the output in Step 4, above). This ensures that the machine was working from the second drive:
Executing last command: boot disk1Boot device: /pci@1f,0/pci@1/scsi@8/disk@1,0 File and args:
2-35Cisco Media Gateway Controller Software Installation and Configuration Guide (Releases 9.1 through 9.6)
OL-1150-15

Chapter 2 Sun Solaris 8 Operating System InstallationConfiguring a Second Disk Drive
Note If you have installed the Solaris DiskSuite package (CSCOh016) on your system, the messages below are displayed during system boot-up. They are normal Solaris DiskSuite start-up messages and do not indicate any problem with your system.
WARNING force load of misc /md-trans failed
WARNING force load of misc /md-raid failed
WARNING force load of misc /md-hotspares failed
WARNING force load of misc /md-sp failed
This completes the procedures for rebooting from the mirrored (secondary) disk.
Removing the Solstice DiskSuite
Note This section applies to the PGW Host running either the Cisco MGC or HSI software. The following procedure only works from platforms that have been mirrored using the procedure provided in the “Installing the Solstice DiskSuite (CSCOh016)” section on page 2-32.
This procedure un-mirrors the disk partitions and removes the DiskSuite application from the platform. Use this procedure if a system has DiskSuite installed and you no longer wish to use CSCOh005 to configure the second disk for the log and spool directories.
If the platform is configured with customer-specific information, be sure to back up this information before the partitions are un-mirrored and DiskSuite is removed. Consult the appropriate document, depending on the software installed.
Step 1 Log in as root. Use the metastat command to verify that the state of all the mirrors is Okay.
Step 2 Type the following commands to run the script and press Enter:
cd /opt/sun_install/DiskSuitesh rm_disksuite_1.sh
The sh rm_disksuite_1.sh command detaches the mirrored disks and restores the original disk partition file in /etc/vfstab. The machine reboots after detaching the mirrored disks and restoring the original disk partition file.
Step 3 Log in as root and change directory to /opt/sun_install/DiskSuite. Enter the following command:
cd /opt/sun_install/DiskSuite
Step 4 Run the script sh ./rm_disksuite_2.sh:
sh ./rm_disksuite_2.sh
This script clears the disk mirrors and removes the DiskSuite software packages from the system.
This completes the DiskSuite removal.
2-36Cisco Media Gateway Controller Software Installation and Configuration Guide (Releases 9.1 through 9.6)
OL-1150-15

Chapter 2 Sun Solaris 8 Operating System InstallationInstalling the Log and Spool File Systems (CSCOh005)
Installing the Log and Spool File Systems (CSCOh005)
Note This section applies to the PGW Host running the Cisco MGC software.
Note If the DiskSuite software is installed and configured, you must first follow the procedure in the “Removing the Solstice DiskSuite” section on page 2-36 to remove the DiskSuite software before configuring the second disk to be used for the Log and Spool File Systems.
To determine whether DiskSuite is installed and configured, run the /usr/sbin/metastat command. If the command is found and it displays the status of mirrors, it indicates that DiskSuite is installed and configured.
Note For the device names for each platform type, refer to Table 2-2 on page 2-4 (Device Names on Supported Cisco MGC Software Platforms).
The following procedure configures the second disk of a PGW Host for use by the Cisco MGC software as storage for log, alarm, measurement, and CDR files. The second disk is defined into two partitions, as follows:
• The first partition is the log partition and uses 40% of the disk.
• The second partition is the spool partition that uses 60% of the disk.
Table 2-13 shows a sample partition table for the second disk of a Netra t 1400 with 36 GB disk drives.
Note If you have installed the Solaris 8 operating system on the platform with only one hard disk, shut down the server and insert a second disk. Turn on the server and log in as root. Run the UNIX command, /usr/sbin/shutdown -g0 -y -i0, to enter the OK mode. Then run the command, boot -rv, in OK mode to detect the newly inserted hard disk.
Table 2-13 36 GB Disk 1 Partition Table (PGW with Log and Spool Package)
Slice No.
PGW Host
Slice Name Slice Size (GB)
0. 0.00
1 0.00
2 overlap 33.92
3 /opt/CiscoMGC/var/log 13.57
4 /opt/CiscoMGC/var/spool 20.35
5 0.00
6 0.00
7 0.00
2-37Cisco Media Gateway Controller Software Installation and Configuration Guide (Releases 9.1 through 9.6)
OL-1150-15

Chapter 2 Sun Solaris 8 Operating System InstallationInstalling the Log and Spool File Systems (CSCOh005)
Step 1 Load the Cisco PGW Solaris 8 Patch CD into the CD-ROM drive. From the /var/tmp directory of the target Netra machine, install the Log And Spool Software by entering the following command:
# cd /var/tmp# pkgadd -d /cdrom/cdrom0/CSCOh005.pkg
A screen similar to the following is displayed:
The following packages are available: 1 CSCOh005 Virtual Switch Controller VSC log and spool package
(sparc) 2.0(3)
Type package(s) you wish to process (or 'all' to processall packages). (default: all) [?,??,q]
Step 2 Press Enter to accept the default answer all.
A screen similar to the following is displayed:
Processing package instance <CSCOh005 from </var/tmp/CSCOh005.pkg
Virtual Switch Controller VSC log and spool package(sparc) 2.0(3)Cisco System, Inc.Using </opt/sun_install as the package base directory.## Processing package information.## Processing system information. 1 package pathname is already properly installed.
## Verifying disk space requirements.## Checking for conflicts with packages already installed.## Checking for setuid/setgid programs.
This package contains scripts which will be executed with super-userpermission during the process of installing this package.
Do you want to continue with the installation of <CSCOh005> [y,n,?]
Step 3 Type y and press Enter to continue.
A screen similar to the following is displayed:
Installing Media Gateway Controller VSC log and spool package as <CSCOh005>
## Executing preinstall script.Platform is SUNW,Ultra-80This is a known platform
NOTICE: Architecture checks passed
## Installing part 1 of 1./opt/sun_install/format_log_spool_start.cmd/opt/sun_install/install_log_spool/opt/sun_install/query_2nd_disk.cmd[ verifying class <none> ]## Executing postinstall script.
!!!! You must now change directories to /opt/sun_install/Log_Spool and !! run the ./install_log_spool script as root.!!
Step 4 Change directory to /opt/sun_install/Log_Spool and run the install_log_spool script.
2-38Cisco Media Gateway Controller Software Installation and Configuration Guide (Releases 9.1 through 9.6)
OL-1150-15

Chapter 2 Sun Solaris 8 Operating System InstallationInstalling the Log and Spool File Systems (CSCOh005)
Note You must first shut down the Cisco MGC before running the install_log_spool script.
# cd /opt/sun_install/Log_Spool# ./install_log_spool
A screen similar to the following is displayed:
Platform is SUNW,Ultra-80Searching for disks...done
FORMAT MENU: disk - select a disk type - select (define) a disk type partition - select (define) a partition table current - describe the current disk format - format and analyze the disk repair - repair a defective sector label - write label to the disk analyze - surface analysis defect - defect list management backup - search for backup labels verify - read and display labels save - save new disk/partition definitions volname - set 8-character volume name !<cmd> - execute <cmd>, then return quitformat> disk
AVAILABLE DISK SELECTIONS: 0. c0t0d0 <SUN36G cyl 24620 alt 2 hd 27 sec 107> /pci@1f,4000/scsi@3/sd@0,0 1. c0t1d0 <SUN36G cyl 24620 alt 2 hd 27 sec 107> /pci@1f,4000/scsi@3/sd@1,0Specify disk (enter its number): 1selecting c0t1d0[disk formatted]format> currentCurrent Disk = c0t1d0<SUN36G cyl 24620 alt 2 hd 27 sec 107>/pci@1f,4000/scsi@3/sd@1,0
format> q2nd Disk device is: c0t1d0Disk type is: SUN36GNumber of Cylinders : 24620
Enter absolute path of the desired mount point for the log directory or press enter to accept the default [/opt/CiscoMGC/var/log]:
Step 5 If the PGW displays the following error message, you need to unmount the /opt/CiscoMGC/var/log and /opt/CiscoMGC/var/spool directories.
!!!!!!!!!!!!!!!!!!!!!!!!!!!!!!!!!!!!!!!!!!!!!!!!!!!!!!!!!!!If DiskSuite or StorEdge VM is running, it must be disabledThe second disk must not be mounted to run this script!!!!!!!!!!!!!!!!!!!!!!!!!!!!!!!!!!!!!!!!!!!!!!!!!!!!!!!!!!!
2-39Cisco Media Gateway Controller Software Installation and Configuration Guide (Releases 9.1 through 9.6)
OL-1150-15
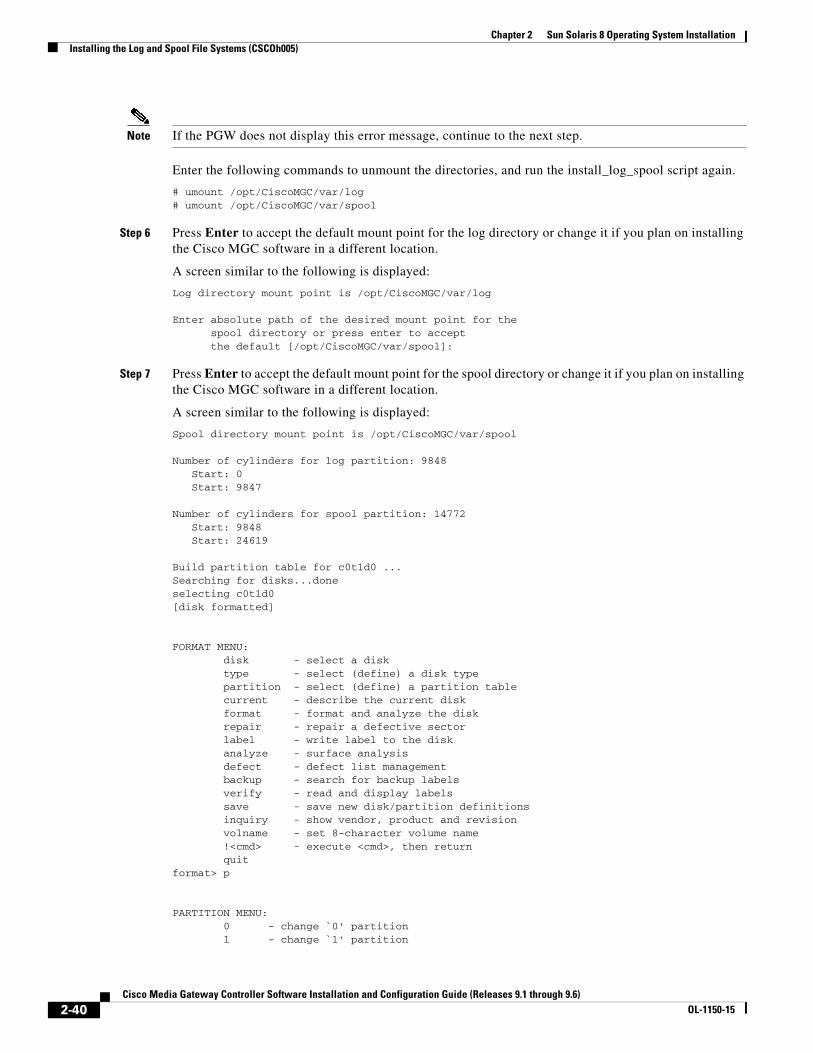
Chapter 2 Sun Solaris 8 Operating System InstallationInstalling the Log and Spool File Systems (CSCOh005)
Note If the PGW does not display this error message, continue to the next step.
Enter the following commands to unmount the directories, and run the install_log_spool script again.
# umount /opt/CiscoMGC/var/log# umount /opt/CiscoMGC/var/spool
Step 6 Press Enter to accept the default mount point for the log directory or change it if you plan on installing the Cisco MGC software in a different location.
A screen similar to the following is displayed:
Log directory mount point is /opt/CiscoMGC/var/log
Enter absolute path of the desired mount point for the spool directory or press enter to accept the default [/opt/CiscoMGC/var/spool]:
Step 7 Press Enter to accept the default mount point for the spool directory or change it if you plan on installing the Cisco MGC software in a different location.
A screen similar to the following is displayed:
Spool directory mount point is /opt/CiscoMGC/var/spool
Number of cylinders for log partition: 9848 Start: 0 Start: 9847
Number of cylinders for spool partition: 14772 Start: 9848 Start: 24619
Build partition table for c0t1d0 ...Searching for disks...doneselecting c0t1d0[disk formatted]
FORMAT MENU: disk - select a disk type - select (define) a disk type partition - select (define) a partition table current - describe the current disk format - format and analyze the disk repair - repair a defective sector label - write label to the disk analyze - surface analysis defect - defect list management backup - search for backup labels verify - read and display labels save - save new disk/partition definitions inquiry - show vendor, product and revision volname - set 8-character volume name !<cmd> - execute <cmd>, then return quitformat> p
PARTITION MENU: 0 - change `0' partition 1 - change `1' partition
2-40Cisco Media Gateway Controller Software Installation and Configuration Guide (Releases 9.1 through 9.6)
OL-1150-15
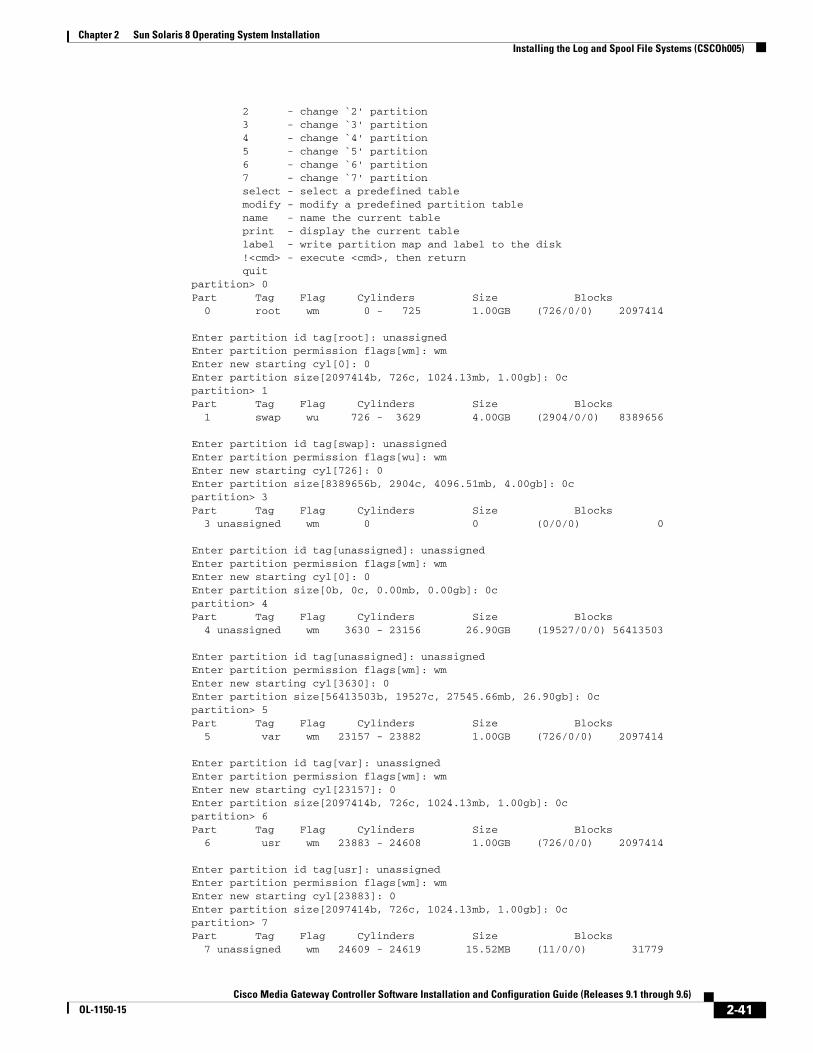
Chapter 2 Sun Solaris 8 Operating System InstallationInstalling the Log and Spool File Systems (CSCOh005)
2 - change `2' partition 3 - change `3' partition 4 - change `4' partition 5 - change `5' partition 6 - change `6' partition 7 - change `7' partition select - select a predefined table modify - modify a predefined partition table name - name the current table print - display the current table label - write partition map and label to the disk !<cmd> - execute <cmd>, then return quitpartition> 0Part Tag Flag Cylinders Size Blocks 0 root wm 0 - 725 1.00GB (726/0/0) 2097414
Enter partition id tag[root]: unassignedEnter partition permission flags[wm]: wmEnter new starting cyl[0]: 0Enter partition size[2097414b, 726c, 1024.13mb, 1.00gb]: 0cpartition> 1Part Tag Flag Cylinders Size Blocks 1 swap wu 726 - 3629 4.00GB (2904/0/0) 8389656
Enter partition id tag[swap]: unassignedEnter partition permission flags[wu]: wmEnter new starting cyl[726]: 0Enter partition size[8389656b, 2904c, 4096.51mb, 4.00gb]: 0cpartition> 3Part Tag Flag Cylinders Size Blocks 3 unassigned wm 0 0 (0/0/0) 0
Enter partition id tag[unassigned]: unassignedEnter partition permission flags[wm]: wmEnter new starting cyl[0]: 0Enter partition size[0b, 0c, 0.00mb, 0.00gb]: 0cpartition> 4Part Tag Flag Cylinders Size Blocks 4 unassigned wm 3630 - 23156 26.90GB (19527/0/0) 56413503
Enter partition id tag[unassigned]: unassignedEnter partition permission flags[wm]: wmEnter new starting cyl[3630]: 0Enter partition size[56413503b, 19527c, 27545.66mb, 26.90gb]: 0cpartition> 5Part Tag Flag Cylinders Size Blocks 5 var wm 23157 - 23882 1.00GB (726/0/0) 2097414
Enter partition id tag[var]: unassignedEnter partition permission flags[wm]: wmEnter new starting cyl[23157]: 0Enter partition size[2097414b, 726c, 1024.13mb, 1.00gb]: 0cpartition> 6Part Tag Flag Cylinders Size Blocks 6 usr wm 23883 - 24608 1.00GB (726/0/0) 2097414
Enter partition id tag[usr]: unassignedEnter partition permission flags[wm]: wmEnter new starting cyl[23883]: 0Enter partition size[2097414b, 726c, 1024.13mb, 1.00gb]: 0cpartition> 7Part Tag Flag Cylinders Size Blocks 7 unassigned wm 24609 - 24619 15.52MB (11/0/0) 31779
2-41Cisco Media Gateway Controller Software Installation and Configuration Guide (Releases 9.1 through 9.6)
OL-1150-15

Chapter 2 Sun Solaris 8 Operating System InstallationInstalling the Log and Spool File Systems (CSCOh005)
Enter partition id tag[unassigned]: unassignedEnter partition permission flags[wm]: wmEnter new starting cyl[24609]: 0Enter partition size[31779b, 11c, 15.52mb, 0.02gb]: 0cpartition> 2Part Tag Flag Cylinders Size Blocks 2 backup wm 0 - 24619 33.92GB (24620/0/0) 71127180
Enter partition id tag[backup]: unassignedEnter partition permission flags[wm]: wmEnter new starting cyl[0]: 0Enter partition size[71127180b, 24620c, 34730.07mb, 33.92gb]: 24620cpartition> 3Part Tag Flag Cylinders Size Blocks 3 unassigned wm 0 0 (0/0/0) 0
Enter partition id tag[unassigned]: unassignedEnter partition permission flags[wm]: wmEnter new starting cyl[0]: 0Enter partition size[0b, 0c, 0.00mb, 0.00gb]: 9848cpartition> 4Part Tag Flag Cylinders Size Blocks 4 unassigned wm 0 0 (0/0/0) 0
Enter partition id tag[unassigned]: unassignedEnter partition permission flags[wm]: wmEnter new starting cyl[0]: 9848Enter partition size[0b, 0c, 0.00mb, 0.00gb]: 14772cpartition> pCurrent partition table (unnamed):Total disk cylinders available: 24620 + 2 (reserved cylinders)
Part Tag Flag Cylinders Size Blocks 0 unassigned wm 0 0 (0/0/0) 0 1 unassigned wm 0 0 (0/0/0) 0 2 unassigned wm 0 - 24619 33.92GB (24620/0/0) 71127180 3 unassigned wm 0 - 9847 13.57GB (9848/0/0) 28450872 4 unassigned wm 9848 - 24619 20.35GB (14772/0/0) 42676308 5 unassigned wm 0 0 (0/0/0) 0 6 unassigned wm 0 0 (0/0/0) 0 7 unassigned wm 0 0 (0/0/0) 0
partition> l
partition> q
FORMAT MENU: disk - select a disk type - select (define) a disk type partition - select (define) a partition table current - describe the current disk format - format and analyze the disk repair - repair a defective sector label - write label to the disk analyze - surface analysis defect - defect list management backup - search for backup labels verify - read and display labels save - save new disk/partition definitions inquiry - show vendor, product and revision volname - set 8-character volume name !<cmd> - execute <cmd>, then return
2-42Cisco Media Gateway Controller Software Installation and Configuration Guide (Releases 9.1 through 9.6)
OL-1150-15

Chapter 2 Sun Solaris 8 Operating System InstallationInstalling the Log and Spool File Systems (CSCOh005)
quitformat> q
unknown disk type, assuming the speed is 10000 rpmBuild log filesystem at /dev/rdsk/c0t1d0s3 ...mkfs -F ufs /dev/rdsk/c0t1d0s3 28450872 107 27 8192 1024 251 1 166 8192 t 0 -1 8 107Cylinder groups must have a multiple of 16 cylinders with the given parametersRounded cgsize up to 256/dev/rdsk/c0t1d0s3: 28450872 sectors in 9848 cylinders of 27 tracks, 107 sectors 13892.0MB in 308 cyl groups (32 c/g, 45.14MB/g, 5632 i/g)super-block backups (for fsck -F ufs -o b=#) at: 32, 92592, 185152, 277712, 370272, 462832, 555392, 647952, 740512, 833072, . . .
Build spool filesystem at /dev/rdsk/c0t1d0s4 ...mkfs -F ufs /dev/rdsk/c0t1d0s4 42676308 107 27 8192 1024 251 1 166 8192 t 0 -1 8 107Cylinder groups must have a multiple of 16 cylinders with the given parametersRounded cgsize up to 256/dev/rdsk/c0t1d0s4: 42676308 sectors in 14772 cylinders of 27 tracks, 107 sectors 20838.0MB in 462 cyl groups (32 c/g, 45.14MB/g, 5632 i/g)super-block backups (for fsck -F ufs -o b=#) at: 32, 92592, 185152, 277712, 370272, 462832, 555392, 647952, 740512, 833072,. . .
Remove any existing entry in /etc/vfstab for c0t1d0s3 or c0t1d0s4
Adding entries to /etc/vfstab
Mounting /opt/CiscoMGC/var/log
Mounting /opt/CiscoMGC/var/spoolSuccess!!!
Note After the Log and Spool File system is successfully installed, you must install the Cisco Security Patch (CSCOh013) if it was removed before DiskSuite was removed. For installation procedures, see “Installing the Cisco Security Package (CSCOh013)” section on page 3-16.
This completes the installation of the Log and Spool File system.
Uninstalling the Log and Spool File SystemDo the following procedure if you need to remove the Log and Spool File system from the second disk. Contact Cisco TAC if you need assistance (see the “Obtaining Documentation, Obtaining Support, and Security Guidelines” section on page xvii).
Note You must be logged in as root to uninstall CSCOh005.
Step 1 Type the following command at the # prompt and press Enter:
2-43Cisco Media Gateway Controller Software Installation and Configuration Guide (Releases 9.1 through 9.6)
OL-1150-15

Chapter 2 Sun Solaris 8 Operating System InstallationInstalling the Log and Spool File Systems (CSCOh005)
cd /opt/sun_install/Log_Spool/./uninstall_log_spool
Text similar to the following is displayed:
You are running as root - Good...*** WARNING! LOG FILES WILL NOT BE SAVED ***Uninstalling this package typically means that the log &spool directories will be on the same disk as the rest ofthe software so there is less space available for thosefiles. We will not save any existing log or spool files.
*** WARNING! LOG FILES WILL NOT BE SAVED ***However, they are not being deleted - the log files willstill exist on the second (unmounted) disk driveIt is possible to manually mount that disk and recoverlog files if necessary.
If you want to save log files before running thisscript, then exit and do so nowDo you want to continue? (y/n) [N] y
Step 2 Type y and press Enter to remove CSCOh005. Text similar to the following is displayed:
Unmount /opt/CiscoMGC/var/logUnmount /opt/CiscoMGC/var/spoolUpdate /etc/vfstabRemove old files...The Log/Spool software has been removed from the systemNow you can remove the package with the command:pkgrm CSCOh005
Done!
Step 3 Type the following command and press Enter to continue the removal of CSCOh005.
pkgrm CSCOh005
Step 4 Reboot your machine with the -r option. Type the following command and press Enter:
# reboot -- –r
Note If you have installed the Solaris DiskSuite package (CSCOh016) on your system, the messages below are displayed during system boot-up. They are normal Solaris DiskSuite start-up messages and do not indicate any problem with your system.
WARNING force load of misc /md-trans failed
WARNING force load of misc /md-raid failed
WARNING force load of misc /md-hotspares failed
WARNING force load of misc /md-sp failed
This completes the removal of the Log and Spool File system from the second disk.
2-44Cisco Media Gateway Controller Software Installation and Configuration Guide (Releases 9.1 through 9.6)
OL-1150-15
Chapter 2 Sun Solaris 8 Operating System InstallationConfiguring Additional Ethernet Interfaces
Configuring Additional Ethernet InterfacesThe primary Ethernet interface is configured during the operating system installation. All additional Ethernet interfaces must be configured separately.
Note For Ethernet interface information for each platform type, refer to Table 2-2 on page 2-4 (Device Names on Supported Cisco MGC Software Platforms).
To configure additional Ethernet interfaces:
Step 1 Add the IP address and hostname of the additional Ethernet interfaces to the /etc/hosts file by typing the following command for each Ethernet port:
# echo IP_address hostname.deviceX >> /etc/hosts
Where:
• IP_address—IP address of an additional Ethernet interface, expressed in dotted decimal notation.
• hostname—Name of the host for the additional Ethernet interface.
• deviceX—A combination of the Ethernet device type and the interface instance, such as hme1.
For example, to add an IP address, 172.24.237.52, for an Ethernet port, hme1, on a host called Madison to the /etc/hosts file, you would enter the following command:
# echo 172.24.237.52 madison.hme1 >> /etc/hosts
Step 2 Create a new file to store the IP address or hostname for each additional Ethernet port by entering the command listed below. Refer to Table 1-2 on page 1-3 (Site-specific Information) if you made notes while preparing for the installation.
# echo IP_address > /etc/hostname.deviceX
Where:
• IP_address—IP address of an additional Ethernet interface, expressed in dotted decimal notation, or a hostname.
• deviceX—Must match the value used in Step 1.
For example, to enter an IP address of 172.24.237.52 for a second Ethernet interface of hme1, you would enter the following command:
# echo 172.24.237.52 > /etc/hostname.hme1
Step 3 Add a line to the /etc/netmasks file for each unique subnet of the interfaces being added by entering the command listed below. Multiple subnets of the same network address should have individual lines in the /etc/netmasks file.
# echo subnet_address subnet_mask >> /etc/netmasks
Where:
• subnet_address—IP address of a subnet, expressed in dotted decimal notation.
• subnet_mask—Subnet mask value, expressed in dotted decimal notation.
For example, to enter a subnet address of 172.24.237.0 with a subnet mask of 255.255.255.0, you would enter the following command:
2-45Cisco Media Gateway Controller Software Installation and Configuration Guide (Releases 9.1 through 9.6)
OL-1150-15
Chapter 2 Sun Solaris 8 Operating System InstallationInstalling the Alarm Software
# echo 172.24.237.0 255.255.255.0 >> /etc/netmasks
Step 4 The machine must now be rebooted with a -r option to complete the configuration. Enter the following command:
# reboot -- -r
Note If you have installed the Solaris DiskSuite package (CSCOh016) on your system, the messages below are displayed during system boot-up. They are normal Solaris DiskSuite start-up messages and do not indicate any problem with your system.
WARNING force load of misc /md-trans failed
WARNING force load of misc /md-raid failed
WARNING force load of misc /md-hotspares failed
WARNING force load of misc /md-sp failed
Step 5 When the machine finishes rebooting, log in as root and type the command ifconfig -a. Verify that the new Ethernet interfaces appear in the output.
# ifconfig -a
A screen similar to the following is displayed. IP addresses are for demonstration purposes only. Actual addresses will differ in each application.
lo0: flags=849<UP,LOOPBACK,RUNNING,MULTICAST> mtu 8232 inet 127.0.0.1 netmask ff000000 hme0: flags=863<UP,BROADCAST,NOTRAILERS,RUNNING,MULTICAST> mtu 1500 inet 172.24.235.53 netmask ffffff00 broadcast 172.24.235.255 ether 8:0:20:9a:76:6c hme1: flags=863<UP,BROADCAST,NOTRAILERS,RUNNING,MULTICAST> mtu 1500 inet 172.24.237.53 netmask ffffff00 broadcast 172.24.237.255 ether 8:0:20:9a:76:6c
The configuration of additional Ethernet interfaces is now complete. Proceed to “Installing the Alarm Software” section on page 2-46.
Installing the Alarm SoftwareThe driver for the alarm device is not part of the standard Solaris installation. It must be installed separately.
If you are installing Solaris 8 on a Netra t 1120/1125, use the procedure in the “Alarm Card Software Installation for Netra t 1120/1125” section on page 2-50 for alarm card software installation. For all other platforms, use the procedure in the following section, “Installing Lights Out Management Software”.
If you are installing Solaris 8 2/04 on a Sun Fire V210, Netra 240 or Netra 440 platform, there are no separate alarm software packages to install because the alarm software is installed automatically. The ALOM (Advance Lights Out Management) software for the Sun Fire V210, Netra 240, and Netra 440 is integrated within the Solaris 8 Operating System. Therefore, previous SUN lights-out alarm packages like "SUNWlomm" (on Sun Fire V120) and "SUNWtsalm" (on Netra 112X) do not exist on the Sun Fire V210, Netra 240 and Netra 440 platforms. For additional information regarding lights-out alarms on the
2-46Cisco Media Gateway Controller Software Installation and Configuration Guide (Releases 9.1 through 9.6)
OL-1150-15
Chapter 2 Sun Solaris 8 Operating System InstallationInstalling the Alarm Software
Sun Fire V210, Netra 240 and Netra 440, refer to the SUN ALOM Guide at http://www.sun.com/servers/alom.html. Proceed to the “Installing the Solaris 8 Patch Cluster (CSCOh015)” section on page 2-51.
Note If your system is using Sun Fire V210 platforms as PGW hosts, be aware that a log message indicating that the LOM package has not been installed is generated every time you start the Cisco MGC software. You can ignore this message. The message is similar to the following:
Tue Jan 31 12:10:44:936 2006 EST | AlarmManager (PID 4176) <Error>
MGMT_ERR_LOM_NOT_INSTALLED: The LOM package for NETRA not installed
For all other platforms, use the procedure in the following section, “Installing Lights Out Management Software”.
Installing Lights Out Management SoftwareTo install Lights Out Management software on the following platforms:
• Netra t 1400/1405
• Netra t 100/105
• Sun Fire V120
• Netra 120
• Netra 20
Step 1 Load the Software Supplement for the Solaris 8 Operating Environment 10/01 CD-ROM into the CD-ROM drive. Install the Lights out Management software by entering the following commands at the # prompt.
# cd /cdrom/cdrom0/Netra_Lights_Out_Management_2.0/Product# pkgadd -d .
A screen similar to the following is displayed along with copyright and trademark information:
The following packages are available: 1 SUNWlomm LOMlite manual pages (sparc) 2.0,REV=2000.08.22.14.14 2 SUNWlomr LOMlite driver (root) (sparc) 2.0,REV=2000.08.22.14.14 3 SUNWlomu LOMlite Utilities (usr) (sparc) 2.0,REV=2000.08.22.14.14
Select package(s) you wish to process (or 'all' to processall packages). (default: all) [?,??,q]:
Step 2 Press Enter to accept the default answer of all and install all the packages. A screen similar to the following is displayed:
Processing package instance <SUNWlomm> from </cdrom/solaris8_1000_suppcd/Netra_t_Lights_Out_Management_2.0/Product>
LOMlite manual pages(sparc) 2.0,REV=2000.08.22.14.14Copyright 2000 Sun Microsystems, Inc. All rights reserved.Using </> as the package base directory.
2-47Cisco Media Gateway Controller Software Installation and Configuration Guide (Releases 9.1 through 9.6)
OL-1150-15

Chapter 2 Sun Solaris 8 Operating System InstallationInstalling the Alarm Software
## Processing package information.## Processing system information. 4 package pathnames are already properly installed.## Verifying disk space requirements.## Checking for conflicts with packages already installed.## Checking for setuid/setgid programs.
Installing LOMlite manual pages as <SUNWlomm>
## Installing part 1 of 1.43 blocks
Installation of <SUNWlomm> was successful.
Processing package instance <SUNWlomr> from </cdrom/solaris8_1000_suppcd/Netra_t_Lights_Out_Management_2.0/Product>
LOMlite driver (root)(sparc) 2.0,REV=2000.08.22.14.14Copyright 2000 Sun Microsystems, Inc. All rights reserved.## Executing checkinstall script.Using </> as the package base directory.## Processing package information.## Processing system information. 9 package pathnames are already properly installed.## Verifying package dependencies.## Verifying disk space requirements.## Checking for conflicts with packages already installed.## Checking for setuid/setgid programs.
This package contains scripts which will be executed with super-userpermission during the process of installing this package.
Do you want to continue with the installation of <SUNWlomr> [y,n,?] y
Step 3 Type y and press Enter to continue the Netra t Lights Out Management installation. A screen similar to the following is displayed:
Installing LOMlite driver (root) as <SUNWlomr>
## Installing part 1 of 1.10 blocksi.drivers: INFO: Starting ...i.drivers: Adding /cdrom/solaris8_1000_suppcd/Netra_t_Lights_Out_Management_2.0/Product/SUNWlomr/reloc/platform/sun4u/kernel/drv/lomi.drivers: Adding /cdrom/solaris8_1000_suppcd/Netra_t_Lights_Out_Management_2.0/Product/SUNWlomr/reloc/platform/sun4u/kernel/drv/lompi.drivers: Adding /cdrom/solaris8_1000_suppcd/Netra_t_Lights_Out_Management_2.0/Product/SUNWlomr/reloc/platform/sun4u/kernel/drv/sparcv9/lomi.drivers: Adding /cdrom/solaris8_1000_suppcd/Netra_t_Lights_Out_Management_2.0/Product/SUNWlomr/reloc/platform/sun4u/kernel/drv/sparcv9/lompIdentified drivers: lom lomp lom lompi.drivers: Installing drivers ...Driver: lom ... devlinks ... add_drv(1M) ...Driver: lomp ... devlinks ... add_drv(1M) ...Driver: lom ... devlinks ... add_drv(1M) ...OK ... Driver: lomp ... devlinks ... add_drv(1M) ...OK ... i.drivers: Finished[ verifying class <drivers> ]
2-48Cisco Media Gateway Controller Software Installation and Configuration Guide (Releases 9.1 through 9.6)
OL-1150-15
Chapter 2 Sun Solaris 8 Operating System InstallationInstalling the Alarm Software
Installation of <SUNWlomr> was successful.
Processing package instance <SUNWlomu> from </cdrom/solaris8_1000_suppcd/Netra_t_Lights_Out_Management_2.0/Product>
LOMlite Utilities (usr)(sparc) 2.0,REV=2000.08.22.14.14Copyright 2000 Sun Microsystems, Inc. All rights reserved.Using </> as the package base directory.## Processing package information.## Processing system information. 4 package pathnames are already properly installed.## Verifying package dependencies.## Verifying disk space requirements.## Checking for conflicts with packages already installed.## Checking for setuid/setgid programs.
Installing LOMlite Utilities (usr) as <SUNWlomu>
## Installing part 1 of 1.337 blocks
Installation of <SUNWlomu> was successful.
The following packages are available: 1 SUNWlomm LOMlite manual pages (sparc) 2.0,REV=2000.08.22.14.14 2 SUNWlomr LOMlite driver (root) (sparc) 2.0,REV=2000.08.22.14.14 3 SUNWlomu LOMlite Utilities (usr) (sparc) 2.0,REV=2000.08.22.14.14
Select package(s) you wish to process (or 'all' to processall packages). (default: all) [?,??,q]: q
Step 4 Type q and press Enter when the Netra t Lights Out Management installation has completed.
Step 5 Eject the CD from the CD-ROM drive by entering the following commands:
# cd /# eject
Step 6 The machine must now be rebooted. Enter the following command:
# reboot
Note If you have installed the Solaris DiskSuite package (CSCOh016) on your system, the messages below are displayed during system boot-up. They are normal Solaris DiskSuite start-up messages and do not indicate any problem with your system.
WARNING force load of misc /md-trans failed
WARNING force load of misc /md-raid failed
WARNING force load of misc /md-hotspares failed
WARNING force load of misc /md-sp failed
Step 7 When the machine finishes rebooting, log in as root.
2-49Cisco Media Gateway Controller Software Installation and Configuration Guide (Releases 9.1 through 9.6)
OL-1150-15
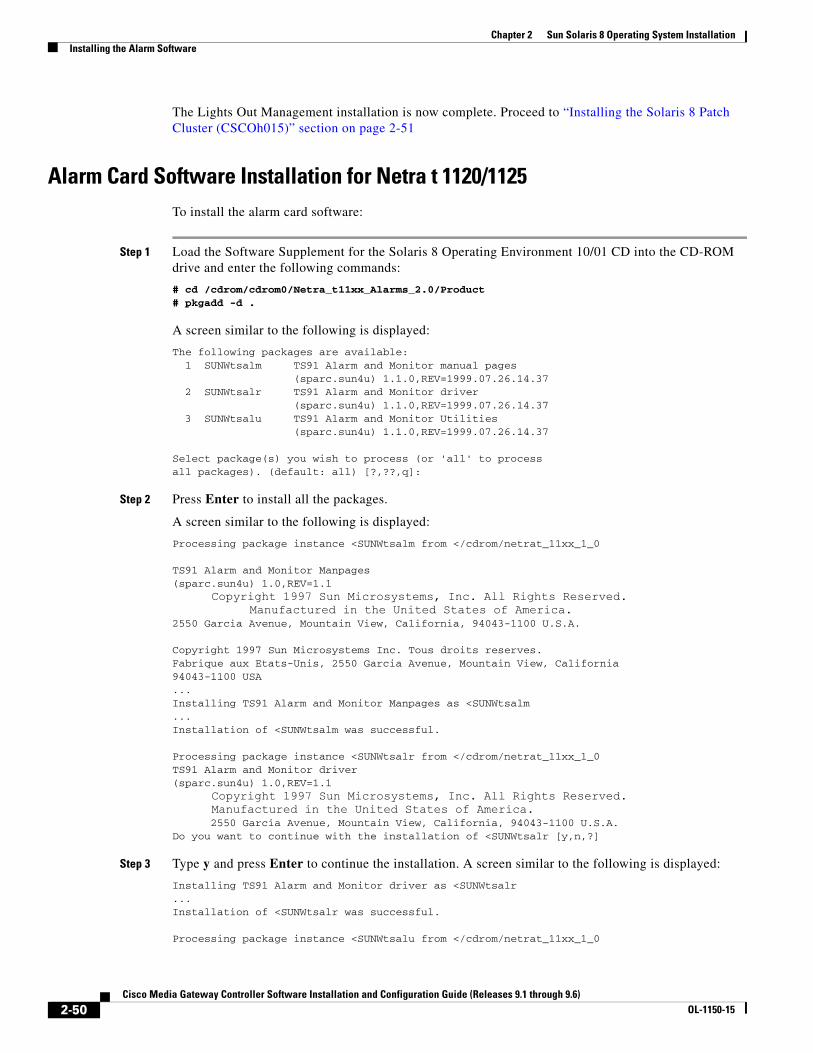
Chapter 2 Sun Solaris 8 Operating System InstallationInstalling the Alarm Software
The Lights Out Management installation is now complete. Proceed to “Installing the Solaris 8 Patch Cluster (CSCOh015)” section on page 2-51
Alarm Card Software Installation for Netra t 1120/1125To install the alarm card software:
Step 1 Load the Software Supplement for the Solaris 8 Operating Environment 10/01 CD into the CD-ROM drive and enter the following commands:
# cd /cdrom/cdrom0/Netra_t11xx_Alarms_2.0/Product# pkgadd -d .
A screen similar to the following is displayed:
The following packages are available: 1 SUNWtsalm TS91 Alarm and Monitor manual pages (sparc.sun4u) 1.1.0,REV=1999.07.26.14.37 2 SUNWtsalr TS91 Alarm and Monitor driver (sparc.sun4u) 1.1.0,REV=1999.07.26.14.37 3 SUNWtsalu TS91 Alarm and Monitor Utilities (sparc.sun4u) 1.1.0,REV=1999.07.26.14.37
Select package(s) you wish to process (or 'all' to processall packages). (default: all) [?,??,q]:
Step 2 Press Enter to install all the packages.
A screen similar to the following is displayed:
Processing package instance <SUNWtsalm from </cdrom/netrat_11xx_1_0
TS91 Alarm and Monitor Manpages(sparc.sun4u) 1.0,REV=1.1
Copyright 1997 Sun Microsystems, Inc. All Rights Reserved. Manufactured in the United States of America.
2550 Garcia Avenue, Mountain View, California, 94043-1100 U.S.A.
Copyright 1997 Sun Microsystems Inc. Tous droits reserves.Fabrique aux Etats-Unis, 2550 Garcia Avenue, Mountain View, California94043-1100 USA...Installing TS91 Alarm and Monitor Manpages as <SUNWtsalm...Installation of <SUNWtsalm was successful.
Processing package instance <SUNWtsalr from </cdrom/netrat_11xx_1_0TS91 Alarm and Monitor driver(sparc.sun4u) 1.0,REV=1.1
Copyright 1997 Sun Microsystems, Inc. All Rights Reserved. Manufactured in the United States of America.
2550 Garcia Avenue, Mountain View, California, 94043-1100 U.S.A.Do you want to continue with the installation of <SUNWtsalr [y,n,?]
Step 3 Type y and press Enter to continue the installation. A screen similar to the following is displayed:
Installing TS91 Alarm and Monitor driver as <SUNWtsalr...Installation of <SUNWtsalr was successful.
Processing package instance <SUNWtsalu from </cdrom/netrat_11xx_1_0
2-50Cisco Media Gateway Controller Software Installation and Configuration Guide (Releases 9.1 through 9.6)
OL-1150-15

Chapter 2 Sun Solaris 8 Operating System InstallationInstalling the Solaris 8 Patch Cluster (CSCOh015)
TS91 Alarm and Monitor Utilities(sparc.sun4u) 1.0,REV=1.1
Copyright 1997 Sun Microsystems, Inc. All Rights Reserved. Manufactured in the United States of America.
2550 Garcia Avenue, Mountain View, California, 94043-1100 U.S.A.
...Installation of <SUNWtsalu was successful.
The following packages are available: 1 SUNWtsalm TS91 Alarm and Monitor Manpages
(sparc.sun4u) 1.0,REV=1.1 2 SUNWtsalr TS91 Alarm and Monitor driver
(sparc.sun4u) 1.0,REV=1.1 3 SUNWtsalu TS91 Alarm and Monitor Utilities
(sparc.sun4u) 1.0,REV=1.1
Type package(s) you wish to process (or 'all' to processall packages). (default: all) [?,??,q]:
Step 4 Enter q to quit the installation when it has completed.
Step 5 Eject the CD from the CD-ROM drive.
# cd /# eject
Step 6 The machine must now be rebooted. Enter the following command:
# reboot
Note If you have installed the Solaris DiskSuite package (CSCOh016) on your system, the messages below are displayed during system boot-up. They are normal Solaris DiskSuite start-up messages and do not indicate any problem with your system.
WARNING force load of misc /md-trans failed
WARNING force load of misc /md-raid failed
WARNING force load of misc /md-hotspares failed
WARNING force load of misc /md-sp failed
Step 7 When the machine finishes rebooting, log in as root.
This completes the Alarm Card software installation. Proceed to “Installing the Solaris 8 Patch Cluster (CSCOh015)” section on page 2-51.
Installing the Solaris 8 Patch Cluster (CSCOh015)
Caution You must back up your system prior to installing the Solaris 8 Patch Cluster (CSCOh015). If you do not back up and your disk is too full when you install this software, the script may fail and corrupt your disk.
2-51Cisco Media Gateway Controller Software Installation and Configuration Guide (Releases 9.1 through 9.6)
OL-1150-15
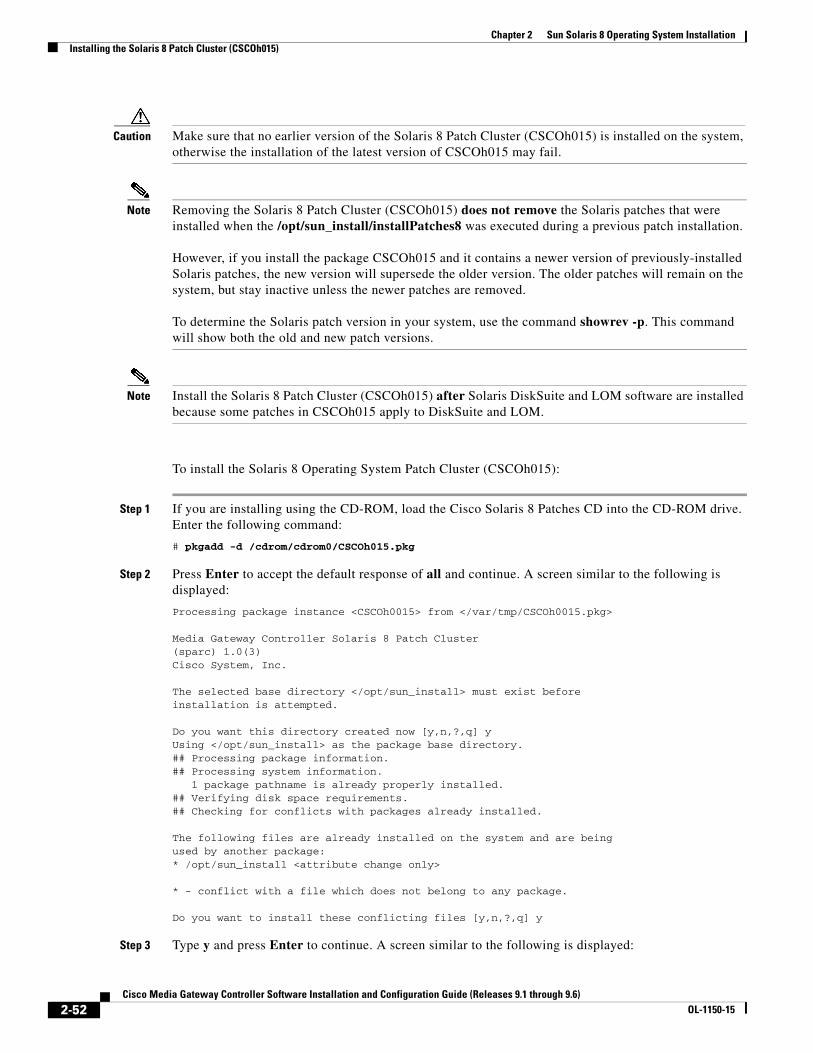
Chapter 2 Sun Solaris 8 Operating System InstallationInstalling the Solaris 8 Patch Cluster (CSCOh015)
Caution Make sure that no earlier version of the Solaris 8 Patch Cluster (CSCOh015) is installed on the system, otherwise the installation of the latest version of CSCOh015 may fail.
Note Removing the Solaris 8 Patch Cluster (CSCOh015) does not remove the Solaris patches that were installed when the /opt/sun_install/installPatches8 was executed during a previous patch installation.
However, if you install the package CSCOh015 and it contains a newer version of previously-installed Solaris patches, the new version will supersede the older version. The older patches will remain on the system, but stay inactive unless the newer patches are removed.
To determine the Solaris patch version in your system, use the command showrev -p. This command will show both the old and new patch versions.
Note Install the Solaris 8 Patch Cluster (CSCOh015) after Solaris DiskSuite and LOM software are installed because some patches in CSCOh015 apply to DiskSuite and LOM.
To install the Solaris 8 Operating System Patch Cluster (CSCOh015):
Step 1 If you are installing using the CD-ROM, load the Cisco Solaris 8 Patches CD into the CD-ROM drive. Enter the following command:
# pkgadd -d /cdrom/cdrom0/CSCOh015.pkg
Step 2 Press Enter to accept the default response of all and continue. A screen similar to the following is displayed:
Processing package instance <CSCOh0015> from </var/tmp/CSCOh0015.pkg>
Media Gateway Controller Solaris 8 Patch Cluster(sparc) 1.0(3)Cisco System, Inc.
The selected base directory </opt/sun_install> must exist beforeinstallation is attempted.
Do you want this directory created now [y,n,?,q] yUsing </opt/sun_install> as the package base directory.## Processing package information.## Processing system information. 1 package pathname is already properly installed.## Verifying disk space requirements.## Checking for conflicts with packages already installed.
The following files are already installed on the system and are beingused by another package:* /opt/sun_install <attribute change only>
* - conflict with a file which does not belong to any package.
Do you want to install these conflicting files [y,n,?,q] y
Step 3 Type y and press Enter to continue. A screen similar to the following is displayed:
2-52Cisco Media Gateway Controller Software Installation and Configuration Guide (Releases 9.1 through 9.6)
OL-1150-15
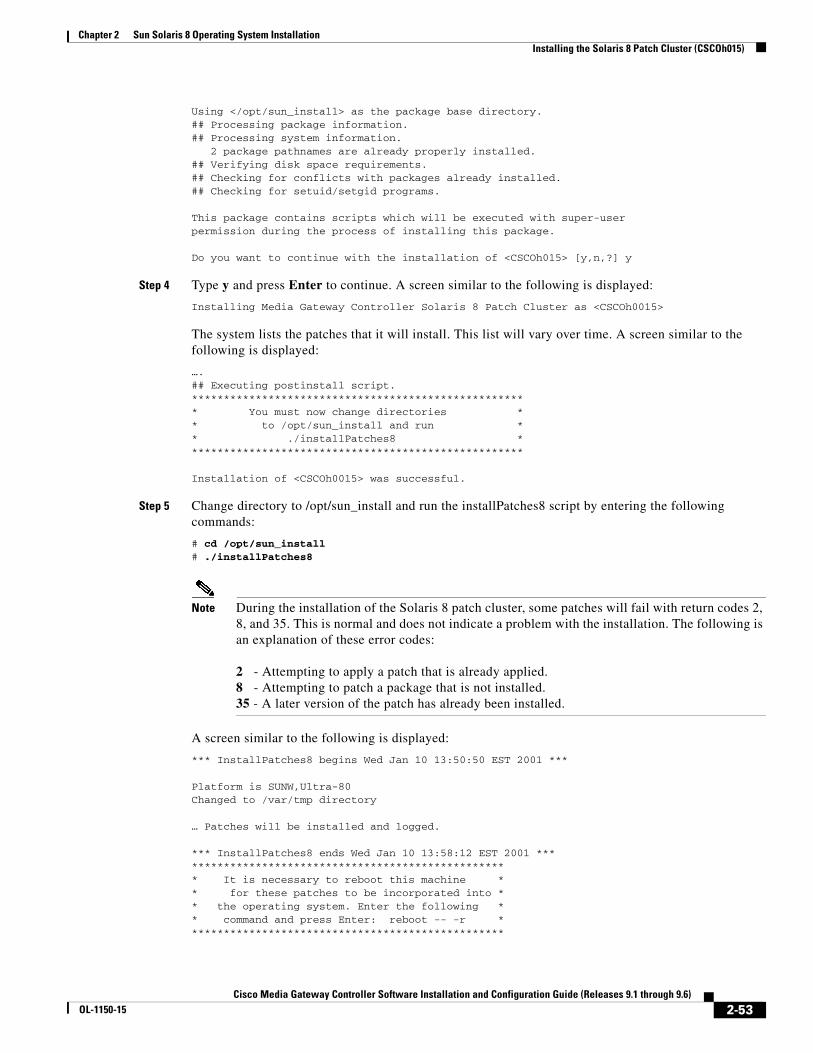
Chapter 2 Sun Solaris 8 Operating System InstallationInstalling the Solaris 8 Patch Cluster (CSCOh015)
Using </opt/sun_install> as the package base directory.## Processing package information.## Processing system information. 2 package pathnames are already properly installed.## Verifying disk space requirements.## Checking for conflicts with packages already installed.## Checking for setuid/setgid programs.
This package contains scripts which will be executed with super-userpermission during the process of installing this package.
Do you want to continue with the installation of <CSCOh015> [y,n,?] y
Step 4 Type y and press Enter to continue. A screen similar to the following is displayed:
Installing Media Gateway Controller Solaris 8 Patch Cluster as <CSCOh0015>
The system lists the patches that it will install. This list will vary over time. A screen similar to the following is displayed:
….## Executing postinstall script.***************************************************** You must now change directories ** to /opt/sun_install and run ** ./installPatches8 *****************************************************
Installation of <CSCOh0015> was successful.
Step 5 Change directory to /opt/sun_install and run the installPatches8 script by entering the following commands:
# cd /opt/sun_install# ./installPatches8
Note During the installation of the Solaris 8 patch cluster, some patches will fail with return codes 2, 8, and 35. This is normal and does not indicate a problem with the installation. The following is an explanation of these error codes:
2 - Attempting to apply a patch that is already applied.8 - Attempting to patch a package that is not installed.35 - A later version of the patch has already been installed.
A screen similar to the following is displayed:
*** InstallPatches8 begins Wed Jan 10 13:50:50 EST 2001 ***
Platform is SUNW,Ultra-80Changed to /var/tmp directory
… Patches will be installed and logged.
*** InstallPatches8 ends Wed Jan 10 13:58:12 EST 2001 ***************************************************** It is necessary to reboot this machine ** for these patches to be incorporated into ** the operating system. Enter the following ** command and press Enter: reboot -- -r **************************************************
2-53Cisco Media Gateway Controller Software Installation and Configuration Guide (Releases 9.1 through 9.6)
OL-1150-15
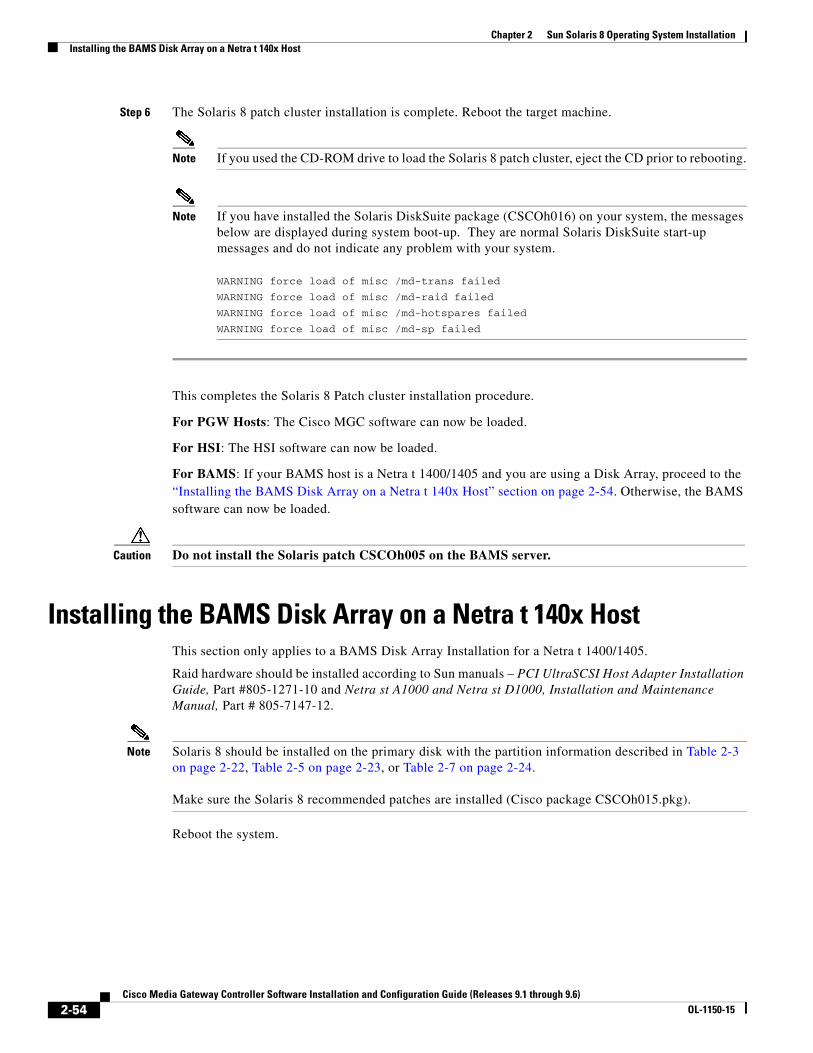
Chapter 2 Sun Solaris 8 Operating System InstallationInstalling the BAMS Disk Array on a Netra t 140x Host
Step 6 The Solaris 8 patch cluster installation is complete. Reboot the target machine.
Note If you used the CD-ROM drive to load the Solaris 8 patch cluster, eject the CD prior to rebooting.
Note If you have installed the Solaris DiskSuite package (CSCOh016) on your system, the messages below are displayed during system boot-up. They are normal Solaris DiskSuite start-up messages and do not indicate any problem with your system.
WARNING force load of misc /md-trans failed
WARNING force load of misc /md-raid failed
WARNING force load of misc /md-hotspares failed
WARNING force load of misc /md-sp failed
This completes the Solaris 8 Patch cluster installation procedure.
For PGW Hosts: The Cisco MGC software can now be loaded.
For HSI: The HSI software can now be loaded.
For BAMS: If your BAMS host is a Netra t 1400/1405 and you are using a Disk Array, proceed to the “Installing the BAMS Disk Array on a Netra t 140x Host” section on page 2-54. Otherwise, the BAMS software can now be loaded.
Caution Do not install the Solaris patch CSCOh005 on the BAMS server.
Installing the BAMS Disk Array on a Netra t 140x HostThis section only applies to a BAMS Disk Array Installation for a Netra t 1400/1405.
Raid hardware should be installed according to Sun manuals – PCI UltraSCSI Host Adapter Installation Guide, Part #805-1271-10 and Netra st A1000 and Netra st D1000, Installation and Maintenance Manual, Part # 805-7147-12.
Note Solaris 8 should be installed on the primary disk with the partition information described in Table 2-3 on page 2-22, Table 2-5 on page 2-23, or Table 2-7 on page 2-24.
Make sure the Solaris 8 recommended patches are installed (Cisco package CSCOh015.pkg).
Reboot the system.
2-54Cisco Media Gateway Controller Software Installation and Configuration Guide (Releases 9.1 through 9.6)
OL-1150-15
Chapter 2 Sun Solaris 8 Operating System InstallationInstalling the BAMS Disk Array on a Netra t 140x Host
Note If you have installed the Solaris DiskSuite package (CSCOh016) on your system, the messages below are displayed during system boot-up. They are normal Solaris DiskSuite start-up messages and do not indicate any problem with your system.
WARNING force load of misc /md-trans failed
WARNING force load of misc /md-raid failed
WARNING force load of misc /md-hotspares failed
WARNING force load of misc /md-sp failed
Installing the RAID Manager SoftwareSolaris 8 requires the Sun Raid Manager Software 6.22.1. If this is not the version shipped to you, then download rm6221-fsc-sparc-bin.zip from SunSolve at sun.sunsolve1.com. Newer units may have the proper version shipped with the RAID module.
Note Currently, all patches required for Raid Manager 6.22.1 are included in the Solaris 8 07/01 and later releases, as well as the Cisco Patch package CSCOh015.
After the Raid Manager is installed, you must reboot the system.
Note If you have installed the Solaris DiskSuite package (CSCOh016) on your system, the messages below are displayed during system boot-up. They are normal Solaris DiskSuite start-up messages and do not indicate any problem with your system.
WARNING force load of misc /md-trans failed
WARNING force load of misc /md-raid failed
WARNING force load of misc /md-hotspares failed
WARNING force load of misc /md-sp failed
Configuring the RAID ModuleUpdating firmware, configuring LUNs and monitoring the RAID module are done using the Raid Manager GUI software, Sun StorEdge RAID Manager 6.22.1, and Sun StorEdge 6.22 Installation and Support Guide for Solaris (Part # 805-756-10). The GUI for Raid Manager is started with the following command:
/usr/lib/osa/bin/rm6
Note There is no CLI available to configure the RAID module. To configure the RAID module remotely over the network, you must access the Sun box through a graphic adapter and a monitor.
2-55Cisco Media Gateway Controller Software Installation and Configuration Guide (Releases 9.1 through 9.6)
OL-1150-15
Chapter 2 Sun Solaris 8 Operating System InstallationInstalling the BAMS Disk Array on a Netra t 140x Host
Verifying/Upgrading Firmware
Check and update the RAID Module firmware as required. If the firmware is not at least version 3.0, it will need to be updated. Refer to the Installation and Support Manual, page 44, for installation instructions, and page 122 for the correct version information. Perform a RAID Module health check after the firmware is upgraded. Refer to the Installation and Support Manual, page 48, for health check procedures.
Configuring LUNs
The array should be configured with 2 LUNs. LUN0 should consist of three 36 GB drives and be configured with RAID 0 format. It will be used for /opt/CiscoBAMS/CDR/archive. LUN1 should be configured with five 36 GB drives and be configured with RAID 0. It will be used for /opt/CiscoBAMS/data.
You should first delete existing LUNs (refer to page 44 of the User Guide). Create new LUNs (refer to page 69 of the User Guide). The configuration should be set up as listed above.
Note Do not exit the configuration without creating at least LUN 0. If you exit without creating LUN 0, you will not be able to access the RAID module!
After LUNs have been created, perform a health check using the GUI Recovery Guru/Health Check Menu. This function should pass without any errors. For information, see page 48 of the Installation and Support Manual.
Verifying the RAID Module
When the RAID module is configured, verify that there are 2 LUNs and check the disk sizes.
Note For the device names for each platform type, refer to Table 2-2 on page 2-4 (Device Names on Supported Cisco MGC Software Platforms).
Step 1 Use the following command and verify that you have 2 LUNs and check the approximate disk sizes (shown in the text display):
/usr/lib/osa/bin/raidutil -c c1t5d0 -I
Text similar to the following is displayed:
LUNs found on c1t5d0 LUN 0 RAID 0 104077 MB LUN 1 RAID 0 173463 MB
Vendor ID SymbiosProductID StorEDGE A1000Product Revision 0205Boot Level 03.01.04.00Boot Level Date 04/05/01Firmware Level 03.01.04.68Firmware Date 06/22/01Raidutil succeeded!
2-56Cisco Media Gateway Controller Software Installation and Configuration Guide (Releases 9.1 through 9.6)
OL-1150-15
Chapter 2 Sun Solaris 8 Operating System InstallationTroubleshooting
Step 2 Make file systems on LUNs. Check the file systems and make mount points for disk volumes. Modify the /etc/vfstab file and mount new disk volumes.
Step 3 Make the file system for /opt/CiscoBAMS/CDR/archive. Enter the following command:
newfs /dev/rdsk/c1t5d0s6
Step 4 Make the file systems for /opt/CiscoBAMS/data. Enter the following command:
newfs /dev/rdsk/c1t5d1s6
Step 5 Check the file systems. Enter the following commands:
fsck -y /dev/rdsk/c1t5d0s6fsck -y /dev/rdsk/c1t5d1s6
Step 6 Make the mount points for the RAID volumes. Enter the following commands:
mkdir /opt/CiscoBAMS/datamkdir /opt/CiscoBAMS/CDR/archive
Step 7 Add entries to /etc/vfstab for new RAID volumes. Enter the following commands:
echo “/dev/dsk/c1t5d0s6 /dev/rdsk/c1t5d0s6 /opt/CiscoBAMS/CDR/archive ufs 2 yes - “ >> /etc/vfstabecho “/dev/dsk/c1t5d1s6 /dev/rdsk/c1t5d1s6 /opt/CiscoBAMS/data ufs 2 yes -“ >> /etc/vfstab
Step 8 Mount the RAID volumes. Enter the following command:
mount -a
This completes the RAID module configuration.
Troubleshooting
Netra t 10xSymptom:
Netra t 10x will not boot from the CD-ROM.
Solution:
At the ok prompt, type set-defaults to reset the OpenBoot PROM. Be sure to enter the environment variable settings shown in Installing the Solaris 8 Operating System, page 2-15, Step 28, at the end of the installation procedure.
Swap File Size Input Symptom:
Installation program does not accept swap file size input.
Solution:
2-57Cisco Media Gateway Controller Software Installation and Configuration Guide (Releases 9.1 through 9.6)
OL-1150-15

Chapter 2 Sun Solaris 8 Operating System InstallationTroubleshooting
If the target machine does boot to the hard disk drive, use the format command to delete the existing partitions.
If the target machine does not boot to the hard disk drive, boot from the CD-ROM by typing boot cdrom -s at the ok prompt. Follow the instructions to reformat the disk. This procedure takes approximately 1.5 hours.
2-58Cisco Media Gateway Controller Software Installation and Configuration Guide (Releases 9.1 through 9.6)
OL-1150-15