Sun Ethernet Fabric Operating System OSPFv3 … IPv6 Static Routes ... 6 Sun Ethernet Fabric...
92
Part No: E25212-03 July 2015 Sun Ethernet Fabric Operating System OSPFv3 Administration Guide
Transcript of Sun Ethernet Fabric Operating System OSPFv3 … IPv6 Static Routes ... 6 Sun Ethernet Fabric...

Part No: E25212-03July 2015
Sun Ethernet Fabric Operating SystemOSPFv3 Administration Guide


Part No: E25212-03
Copyright © 2010, 2015, Oracle and/or its affiliates. All rights reserved.
This software and related documentation are provided under a license agreement containing restrictions on use and disclosure and are protected by intellectual property laws. Exceptas expressly permitted in your license agreement or allowed by law, you may not use, copy, reproduce, translate, broadcast, modify, license, transmit, distribute, exhibit, perform,publish, or display any part, in any form, or by any means. Reverse engineering, disassembly, or decompilation of this software, unless required by law for interoperability, isprohibited.
The information contained herein is subject to change without notice and is not warranted to be error-free. If you find any errors, please report them to us in writing.
If this is software or related documentation that is delivered to the U.S. Government or anyone licensing it on behalf of the U.S. Government, then the following notice is applicable:
U.S. GOVERNMENT END USERS. Oracle programs, including any operating system, integrated software, any programs installed on the hardware, and/or documentation, deliveredto U.S. Government end users are "commercial computer software" pursuant to the applicable Federal Acquisition Regulation and agency-specific supplemental regulations. Assuch, use, duplication, disclosure, modification, and adaptation of the programs, including any operating system, integrated software, any programs installed on the hardware, and/ordocumentation, shall be subject to license terms and license restrictions applicable to the programs. No other rights are granted to the U.S. Government.
This software or hardware is developed for general use in a variety of information management applications. It is not developed or intended for use in any inherently dangerousapplications, including applications that may create a risk of personal injury. If you use this software or hardware in dangerous applications, then you shall be responsible to take allappropriate fail-safe, backup, redundancy, and other measures to ensure its safe use. Oracle Corporation and its affiliates disclaim any liability for any damages caused by use of thissoftware or hardware in dangerous applications.
Oracle and Java are registered trademarks of Oracle and/or its affiliates. Other names may be trademarks of their respective owners.
Intel and Intel Xeon are trademarks or registered trademarks of Intel Corporation. All SPARC trademarks are used under license and are trademarks or registered trademarks ofSPARC International, Inc. AMD, Opteron, the AMD logo, and the AMD Opteron logo are trademarks or registered trademarks of Advanced Micro Devices. UNIX is a registeredtrademark of The Open Group.
This software or hardware and documentation may provide access to or information about content, products, and services from third parties. Oracle Corporation and its affiliates arenot responsible for and expressly disclaim all warranties of any kind with respect to third-party content, products, and services unless otherwise set forth in an applicable agreementbetween you and Oracle. Oracle Corporation and its affiliates will not be responsible for any loss, costs, or damages incurred due to your access to or use of third-party content,products, or services, except as set forth in an applicable agreement between you and Oracle.
Documentation Accessibility
For information about Oracle's commitment to accessibility, visit the Oracle Accessibility Program website at http://www.oracle.com/pls/topic/lookup?ctx=acc&id=docacc.
Access to Oracle Support
Oracle customers that have purchased support have access to electronic support through My Oracle Support. For information, visit http://www.oracle.com/pls/topic/lookup?ctx=acc&id=info or visit http://www.oracle.com/pls/topic/lookup?ctx=acc&id=trs if you are hearing impaired.

Référence: E25212-03
Copyright © 2010, 2015, Oracle et/ou ses affiliés. Tous droits réservés.
Ce logiciel et la documentation qui l’accompagne sont protégés par les lois sur la propriété intellectuelle. Ils sont concédés sous licence et soumis à des restrictions d’utilisation etde divulgation. Sauf stipulation expresse de votre contrat de licence ou de la loi, vous ne pouvez pas copier, reproduire, traduire, diffuser, modifier, breveter, transmettre, distribuer,exposer, exécuter, publier ou afficher le logiciel, même partiellement, sous quelque forme et par quelque procédé que ce soit. Par ailleurs, il est interdit de procéder à toute ingénierieinverse du logiciel, de le désassembler ou de le décompiler, excepté à des fins d’interopérabilité avec des logiciels tiers ou tel que prescrit par la loi.
Les informations fournies dans ce document sont susceptibles de modification sans préavis. Par ailleurs, Oracle Corporation ne garantit pas qu’elles soient exemptes d’erreurs et vousinvite, le cas échéant, à lui en faire part par écrit.
Si ce logiciel, ou la documentation qui l’accompagne, est concédé sous licence au Gouvernement des Etats-Unis, ou à toute entité qui délivre la licence de ce logiciel ou l’utilise pourle compte du Gouvernement des Etats-Unis, la notice suivante s’applique:
U.S. GOVERNMENT END USERS. Oracle programs, including any operating system, integrated software, any programs installed on the hardware, and/or documentation, deliveredto U.S. Government end users are "commercial computer software" pursuant to the applicable Federal Acquisition Regulation and agency-specific supplemental regulations. Assuch, use, duplication, disclosure, modification, and adaptation of the programs, including any operating system, integrated software, any programs installed on the hardware, and/ordocumentation, shall be subject to license terms and license restrictions applicable to the programs. No other rights are granted to the U.S. Government.
Ce logiciel ou matériel a été développé pour un usage général dans le cadre d’applications de gestion des informations. Ce logiciel ou matériel n’est pas conçu ni n’est destinéà être utilisé dans des applications à risque, notamment dans des applications pouvant causer des dommages corporels. Si vous utilisez ce logiciel ou matériel dans le cadre d’applications dangereuses, il est de votre responsabilité de prendre toutes les mesures de secours, de sauvegarde, de redondance et autres mesures nécessaires à son utilisation dans desconditions optimales de sécurité. Oracle Corporation et ses affiliés déclinent toute responsabilité quant aux dommages causés par l’utilisation de ce logiciel ou matériel pour ce typed’applications.
Oracle et Java sont des marques déposées d’Oracle Corporation et/ou de ses affiliés. Tout autre nom mentionné peut correspondre à des marques appartenant à d’autres propriétairesqu’Oracle.
Intel et Intel Xeon sont des marques ou des marques déposées d’Intel Corporation. Toutes les marques SPARC sont utilisées sous licence et sont des marques ou des marquesdéposées de SPARC International, Inc. AMD, Opteron, le logo AMD et le logo AMD Opteron sont des marques ou des marques déposées d’Advanced Micro Devices. UNIX est unemarque déposée d’The Open Group.
Ce logiciel ou matériel et la documentation qui l’accompagne peuvent fournir des informations ou des liens donnant accès à des contenus, des produits et des services émanant detiers. Oracle Corporation et ses affiliés déclinent toute responsabilité ou garantie expresse quant aux contenus, produits ou services émanant de tiers, sauf mention contraire stipuléedans un contrat entre vous et Oracle. En aucun cas, Oracle Corporation et ses affiliés ne sauraient être tenus pour responsables des pertes subies, des coûts occasionnés ou desdommages causés par l’accès à des contenus, produits ou services tiers, ou à leur utilisation, sauf mention contraire stipulée dans un contrat entre vous et Oracle.
Accessibilité de la documentation
Pour plus d’informations sur l’engagement d’Oracle pour l’accessibilité à la documentation, visitez le site Web Oracle Accessibility Program, à l'adresse http://www.oracle.com/pls/topic/lookup?ctx=acc&id=docacc.
Accès au support électronique
Les clients Oracle qui ont souscrit un contrat de support ont accès au support électronique via My Oracle Support. Pour plus d'informations, visitez le site http://www.oracle.com/pls/topic/lookup?ctx=acc&id=info ou le site http://www.oracle.com/pls/topic/lookup?ctx=acc&id=trs si vous êtes malentendant.

5
Contents
Using This Documentation ................................................................................. 9Product Documentation Library ......................................................................... 9Acronyms and Abbreviations ............................................................................ 9CLI Command Modes .................................................................................... 10Feedback ...................................................................................................... 11
OSPFv3 Overview ............................................................................................. 13Protocol Description ...................................................................................... 13
OSPFv3 Topologies ........................................................................................... 15Configuration and Testing Topologies ............................................................... 15IPv6 Example Topology Interface and Host Addresses ......................................... 15
IPv6 Example Topology ......................................................................... 17Stub Area Topology ............................................................................... 17Route Redistribution Toplogy .................................................................. 18NSSA Type-7/-5 Conversion Topology ...................................................... 19Virtual Link and Route Summarization Topology ........................................ 20Host Topology ...................................................................................... 21
OSPFv3 Configurations ..................................................................................... 23Default Configuration Values ........................................................................... 23SNMP MIB Files .......................................................................................... 25Creating the Base Configuration ...................................................................... 25
▼ Access Global Configuration Mode ..................................................... 25▼ Access Interface Configuration Mode .................................................. 25
Enabling IPv6 Support and Assigning IPv6 Addresses ......................................... 26▼ Enable IPv6 .................................................................................... 26▼ Disable IPv6 ................................................................................... 27▼ Delete an IPv6 Address ..................................................................... 28
Configuring IPv6 Static Routes ........................................................................ 28

Contents
6 Sun Ethernet Fabric Operating System OSPFv3 Administration Guide • July 2015
▼ Configure Static Routes ..................................................................... 28▼ Delete a Static Route ........................................................................ 29
Creating the Base Configuration for Example Topologies ..................................... 29▼ Configure SEFOS1 ........................................................................... 30▼ Configure SEFOS2 ........................................................................... 30▼ Configure SEFOS3 ........................................................................... 31▼ Configure SEFOS4 ........................................................................... 31▼ Configure SEFOS5 ........................................................................... 32▼ Configure SEFOS6 ........................................................................... 32▼ Configure SEFOS7 ........................................................................... 33▼ Configure SEFOS8 ........................................................................... 33▼ Configure SEFOS9 ........................................................................... 33
Configuring OSPFv3 Features .......................................................................... 35OSPFv3 Features ........................................................................................... 35Configuring Basic OSPFv3 ............................................................................. 36
▼ Enable OSPFv3 ............................................................................... 36▼ Disable OSPFv3 .............................................................................. 36
Creating an OSPFv3 Interface ......................................................................... 37▼ Configure an OSPFv3 Interface .......................................................... 37
Configuring Neighbors ................................................................................... 39▼ Configure an OSPFv3 Neighbor ......................................................... 39
Configuring OSPFv3 Interface Parameters ......................................................... 40OSPFv3 Interface Parameters .................................................................. 41▼ Configure Interface Priority ............................................................... 41▼ Restore the Default Interface Priority ................................................... 42▼ Configure the Retransmission Interval .................................................. 42▼ Restore the Default Retransmission Value ............................................. 43▼ Configure Transmission Delay ............................................................ 43▼ Restore the Default Transmission Delay ............................................... 44▼ Configure the Hello Interval ............................................................... 44▼ Restore the Default Hello Interval ....................................................... 45▼ Configure the Dead Interval ............................................................... 45▼ Restore the Default Dead Interval ....................................................... 46▼ Configure the Network Type .............................................................. 46▼ Restore the Default OSPF Network Type .............................................. 47▼ Configure the Interface Cost .............................................................. 47▼ Restore the Default Interface Cost ....................................................... 48
Configuring a Demand Circuit ......................................................................... 48

Contents
7
▼ Enable a Demand Circuit ................................................................... 48▼ Remove the Demand Circuit Setting .................................................... 49▼ Enable Neighbor Probing on a Demand Circuit ...................................... 49▼ Remove Neighbor Probing on a Demand Circuit .................................... 50
Configuring Neighbor Probe Values .................................................................. 50▼ Configure the Neighbor Probe Retransmission Limit ............................... 50▼ Restore the Default Neighbor Probe Retransmission Limit ....................... 51▼ Configure the Neighbor Probe Interval ................................................. 51▼ Restore the Default Neighbor Probe Interval ......................................... 52
Configuring a Passive Interface ....................................................................... 52▼ Configure All Interfaces To Be Passive ................................................ 53▼ Configure Specified Interfaces To Be Passive ........................................ 53▼ Restore the Default Routing Updates ................................................... 54
Configuring Route Redistribution ..................................................................... 54▼ Configure an ASBR Router ............................................................... 55▼ Disable the ASBR Router .................................................................. 55▼ Configure Route Redistribution ........................................................... 56▼ Disable Route Redistribution .............................................................. 57▼ Configure the Stub Area, ASBR, and Route Distribution ......................... 57
Configuring Attributes for Redistributed Routes .................................................. 59▼ Configure Redistributed Route Attributes ............................................. 59▼ Delete Redistributed Route Attributes .................................................. 60
Configuring the Redistribution of Routes ........................................................... 60▼ Configure Route Redistribution ........................................................... 61▼ Restore the Default Redistribution Configuration ................................... 62
Configuring Area Route Summarization ............................................................ 62Area Route Overview ............................................................................. 63▼ Configure Address Range Aggregation ................................................. 63▼ Disable an Address Range ................................................................. 65▼ Configure an Internal Address Range ................................................... 65▼ Disable an Internal Address Range ...................................................... 66
Configuring a Stub Area ................................................................................. 68▼ Configure a Stub Area ...................................................................... 68▼ Convert a Stub Area to a Normal Area ................................................. 69▼ Configure a Default Summary Route for a Stub Area .............................. 69▼ Configure the Default Summary Route Cost for a Stub Area ..................... 70
Configuring an NSSA .................................................................................... 71▼ Configure the Stability Interval for NSSA ............................................. 72▼ Restore the Default Stability Interval ................................................... 73▼ Configure an NSSA Translation Role ................................................... 73

Contents
8 Sun Ethernet Fabric Operating System OSPFv3 Administration Guide • July 2015
▼ Restore the Default Translation Role .................................................... 74▼ Configure Default Summary Route for an NSSA .................................... 74▼ Configure the Metric Type for an NSSA ............................................... 75
Configuring the Capability in an NSSA Internal Border Router .............................. 76▼ Configure NSSA Type-7/-5 Conversion ................................................ 77
Configuring Virtual Links ............................................................................... 80▼ Configure a Virtual Link ................................................................... 80▼ Delete a Virtual Link ........................................................................ 81▼ Configure Virtual Link and Route Summarization .................................. 81
Configuring External Database Limit ................................................................ 84▼ Configure the External Database Limit ................................................. 85▼ Restore the Default External Database Limit ......................................... 86
Configuring the Overflow Exit Interval ............................................................. 86▼ Configure the Overflow Exit Interval ................................................... 87
Configuring a Demand Extension ..................................................................... 88▼ Disable a Demand Extension .............................................................. 88▼ Re-Enable Demand Extensions ........................................................... 89
Configuring the Host ..................................................................................... 89▼ Configure the Host ........................................................................... 90▼ Test the Host ................................................................................... 90
Configuring Route Calculation SPF Timers ........................................................ 91▼ Configure SPF Timers ....................................................................... 91▼ Restore the Default Delay Time .......................................................... 92

Using This Documentation 9
Using This Documentation
■ Overview – Describes the OSPFv3 module configuration on a switch running OracleSEFOS
■ Audience – Users implementing OSPFv3 protocol with other protocols in the router stack■ Required Knowledge – Basic knowledge of the OSPFv3 protocol
Product Documentation Library
Documentation and resources for this product and related products are available at:
■ http://www.oracle.com/goto/es2-72_es2-64/docs
■ http://www.oracle.com/goto/ES1-24/docs
■ http://www.oracle.com/goto/sn-10gbE-72p/docs
■ http://www.oracle.com/goto/sb6k-24p-10gbe/docs
Acronyms and Abbreviations
Acronym or Abbreviation Explanation
ABR Area border router
AH Authentication header
AS Autonomous system
ASBR Autonomous system border router
BGP Border Gateway Protocol
CLI Command-line interface
DDP Database description packet
DR Designated router
ESP Encapsulating security payload
IPsec IP Security Protocol
IPv6 Internet Protocol version 6
ISM Interface state machine

CLI Command Modes
10 Sun Ethernet Fabric Operating System OSPFv3 Administration Guide • July 2015
Acronym or Abbreviation Explanation
LAN Local area network
LSA Link state acknowledgment packet
LRQ Link state request packet
LS Link state
LSA Link state advertisement
LSDB Link state database
LSP Label-switched path
LSU Link state update
NBMA Non-broadcast multi-access
ND Neighbor discovery
NSSA Not-so-stubby-area
OSPFv3 Open Shortest Path First version 3
RIP Routing Information Protocol
RRD Route redistribution
RTM6 Route table manager for IP version 6
SEFOS Sun Ethernet Fabric Operating System
SPF Shortest Path First
VLAN Virtual LAN
VPN Virtual private network
VRF Virtual routing and forwarding
CLI Command Modes
The following table lists the configuration modes used in this document with their access andexit methods.
Command Mode Access Method Prompt Exit Method
User EXEC Access SEFOS from Oracle ILOM withread-only rights (privilege level 1).
SEFOS> Use the logout or exitcommand to return to theOracle ILOM prompt.
Privileged EXEC Access SEFOS from Oracle ILOM withfull administrative rights (privilege level15).
SEFOS# Use the logout or exitcommand to return to theOracle ILOM prompt.
GlobalConfiguration
From User EXEC mode, use the enablecommand.
SEFOS(config)# Use the end command to returnto Privileged EXEC mode.
InterfaceConfiguration
From Global Configuration mode,use the interface interface-typeinterface-id command.
SEFOS(config-if)# Use the exit command toreturn to Global Configurationmode, or use the end commandto return to Privileged EXECmode.

Feedback
Using This Documentation 11
Command Mode Access Method Prompt Exit Method
RouterConfiguration
Use the protocol-specific GlobalConfiguration mode router command(for example, router rip).
SEFOS(config-router)# Use the exit command toreturn to Global Configurationmode, or use the end commandto return to Privileged EXECmode.
VLANConfiguration
Use the Global Configuration modecommand vlan vlan no.
SEFOS(config-vlan)# Use the exit command toreturn to Global Configurationmode, or use the end commandto return to Privileged EXECmode.
Router MapConfiguration
Use the route map-specific GlobalConfiguration mode command (forexample, route-map aa permit 1).
SEFOS(config-rmap aa)# Use the exit command toreturn to Global Configurationmode, or use the end commandto return to Privileged EXECmode.
Feedback
Provide feedback on this documentation at:
http://www.oracle.com/goto/docfeedback

12 Sun Ethernet Fabric Operating System OSPFv3 Administration Guide • July 2015

OSPFv3 Overview 13
OSPFv3 Overview
This section describes the OSPFv3 protocol.
■ “Protocol Description” on page 13
Protocol Description
OSPFv3 adds support for IPv6 in the OSPF routing protocol, as described in RFC 2740. Mostconfigurations and operational commands function essentially the same in OSPFv3 as they doin OSPFv2. For example, OSPFv3 router IDs, area IDs, and LSA link state IDs are 32 bits, justas they are in OSPFv2 IPv4. In addition, all of the optional capabilities of OSPFv2 for IPv4, forexample, NSSA, are supported in OSPFv3 for IPv6.
However, there are also many significant changes in OSPFv3 for IPv6, including the following:
■ Router LSAs and network LSAs no longer carry prefix information. In OSPFv3, these LSAscarry only the topology information.
■ New and modified LSAs have been created to handle the flow of IPv6 addresses andprefixes in an OSPFv3 network.
■ OSPFv3 runs on a per-link basis, instead of a per-IP-subnet basis.■ IPv6 link-local addresses are used for OSPFv3 neighbor exchanges, except over virtual
links.■ The flooding scope for LSAs is generalized into three categories for OSPFv3:
■ Link-local scope. The OSPFv3 packet is flooded only to the members connected on alink.
■ Area scope. The OSPFv3 packet is flooded to all members of an OSPFv3 area.■ AS scope. The OSPFv3 packet is flooded to all members of an AS.
■ Authentication is removed from the OSPFv3 protocol. Instead, OSPFv3 relies on the AHand ESP portions of the IPSec for all authentication tasks in IPv6.
■ LSPs and traffic engineering are not supported in OSPFv3.
The 32-bit router ID in OSPFv3 always identifies neighboring routers.

14 Sun Ethernet Fabric Operating System OSPFv3 Administration Guide • July 2015

OSPFv3 Topologies 15
OSPFv3 Topologies
These sections provide sample topologies that you can use to configure and test the basicfeatures of OSPFv3.
■ “Configuration and Testing Topologies” on page 15■ “IPv6 Example Topology Interface and Host Addresses” on page 15
Configuration and Testing Topologies
The examples presented in this guide show various topology scenarios that can be used toconfigure and test OSPFv3.
The following components are used in the example topology, as shown in “IPv6 ExampleTopology Interface and Host Addresses” on page 15.
■ SEFOS1 through SEFOS9 are SEFOS switches.■ Host A includes host devices that are connected to switch SEFOS3.■ VLAN 1, VLAN 2, VLAN 3, VLAN 4, VLAN 5, VLAN 10, and VLAN 11 are VLAN interfaces.■ VL represents the virtual link between two areas.■ Each SEFOS switch has a router ID.
IPv6 Example Topology Interface and Host Addresses
This table lists detailed information about the routers used in the example topologies presentedin this guide.
Router/Host IPv4 Router ID Interface IPv6 Address/Prefix Length
VLAN 11 fec0::1111:0:3/96SEFOS1 10.0.0.1
VLAN 10 fec0::2856:0:1/96
SEFOS2 10.0.0.2 VLAN 11 fec0::1111:0:1/96

IPv6 Example Topology Interface and Host Addresses
16 Sun Ethernet Fabric Operating System OSPFv3 Administration Guide • July 2015
Router/Host IPv4 Router ID Interface IPv6 Address/Prefix Length
VLAN 2 fec0::2556:0:1/96
VLAN 11 fec0::1111:0:2/96SEFOS3 10.0.0.3
VLAN 2 fec0::3556:0:1/96
VLAN 11 fec0::1111:0:4/96
VLAN 3 fec0::3333:0:2/96
SEFOS4 10.0.0.4
VLAN 4 fec0::4444:0:1/96
VLAN 5 fec0::3003:0:1/96SEFOS5 10.0.0.5
VLAN 4 fec0::4444:0:2/96
VLAN 2 fec0::2001:0:1/96SEFOS6 10.0.0.6
VLAN 3 fec0::3333:0:2/96
SEFOS7 10.0.0.7 VLAN 5 fec0::3003:0:2/96
VLAN 1 fec0::2886:1:1/96SEFOS8 10.0.0.8
VLAN 10 fec0::2856:0:2/96
SEFOS9 10.0.0.9 VLAN 2 fec0::2556:1:1/96
Host A NA NA fec0::3556:1:1/96
The following figure illustrates this configuration:

IPv6 Example Topology Interface and Host Addresses
OSPFv3 Topologies 17
IPv6 Example Topology
Stub Area TopologyThis figure shows the components that are used to test and configure the stub area, ASBR, androute redistribution in the example topology.
See “IPv6 Example Topology Interface and Host Addresses” on page 15 for theconfiguration details of this topology.

IPv6 Example Topology Interface and Host Addresses
18 Sun Ethernet Fabric Operating System OSPFv3 Administration Guide • July 2015
Route Redistribution Toplogy
This figure shows the components that are used to test and configure route redistribution in theexample topology.
See “IPv6 Example Topology Interface and Host Addresses” on page 15 for theconfiguration details of this topology.
IPv6 Example Topology Interface and Host Addresses
OSPFv3 Topologies 19
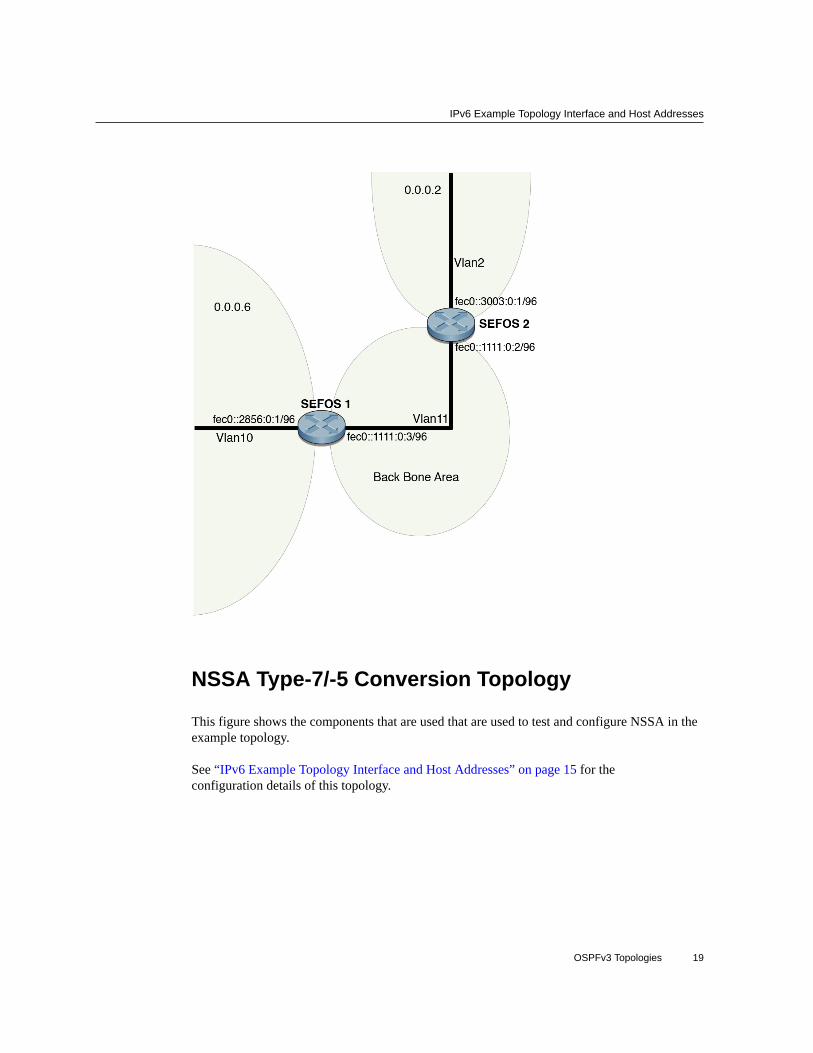
NSSA Type-7/-5 Conversion Topology
This figure shows the components that are used that are used to test and configure NSSA in theexample topology.
See “IPv6 Example Topology Interface and Host Addresses” on page 15 for theconfiguration details of this topology.

IPv6 Example Topology Interface and Host Addresses
20 Sun Ethernet Fabric Operating System OSPFv3 Administration Guide • July 2015
Virtual Link and Route Summarization Topology
This figure shows the components that are used to test and configure virtual link and routesummarization in the example topology.
See “IPv6 Example Topology Interface and Host Addresses” on page 15 for theconfiguration details of this topology.

IPv6 Example Topology Interface and Host Addresses
OSPFv3 Topologies 21
Host Topology
This figure shows the components that are used to test and configure the host in the exampletopology.
See “IPv6 Example Topology Interface and Host Addresses” on page 15 for theconfiguration details of this topology.

IPv6 Example Topology Interface and Host Addresses
22 Sun Ethernet Fabric Operating System OSPFv3 Administration Guide • July 2015

OSPFv3 Configurations 23
OSPFv3 Configurations
Configure the SEFOS implementation of OSPFv3 through the CLI interface. You can useSNMP to view the changes you make to the configuration.
These sections describe the preliminary configurations of Oracle OSPFv3 and describeonly IPv6-related configurations. For information about other configurations that you canuse to create interfaces and information about entering CLI configuration modes, see “CLICommand Modes” on page 10. For information on IPv6-related configurations, refer to the SunEthernet Fabric Operating System IPv6 Administration Guide. Refer to other feature-relatedadministration guides for detailed information about using specific features used in the exampleconfigurations in this guide.
■ “Default Configuration Values” on page 23■ “SNMP MIB Files” on page 25■ “Creating the Base Configuration” on page 25■ “Enabling IPv6 Support and Assigning IPv6 Addresses” on page 26■ “Configuring IPv6 Static Routes” on page 28■ “Creating the Base Configuration for Example Topologies” on page 29
Default Configuration ValuesBy default, OSPFv3 and IPv6 addressing are disabled on a switch running SEFOS. To configurean OSPFv3 router or to configure an interface with an IPv6 address, you must first enableOSPFv3 or IPv6 on the interfaces.
Parameter Default Configuration
ABR-type Standard
Area default-cost 10
Area metric value 1
Area type Transit
AS-external LSDB-limit -1 (no limit)
Dead-interval 40
Default network type Broadcast
Default OSPFv3 trace level Critical (If enabled)

Default Configuration Values
24 Sun Ethernet Fabric Operating System OSPFv3 Administration Guide • July 2015
Parameter Default Configuration
Default-information originate always metric 10
Default-information originate always metric-type 2
Demand circuit Enabled
Exit overflow interval 0
Hello-interval 10
IETF non-stop forwarding Disabled
IETF NSF helper strict LSA check Disabled
IETF NSF helper support unknown/s/w restart/s/wupgrade/ switch to redundant
Enabled
Interface metric From the reference bandwidth
IPv6 on the interface Disabled
Neighbor-probe retransmit - interval 120
Neighbor-probe retransmit-limit 10
nssa asbr-default-route translator Disabled
OSPFv3 module on the router Disabled
OSPFv3 traces Disabled
Passive interface Disabled
Poll-interval 120
Redist-config metric-type Type-2
Redist-config metric-value 10
Redist-config tag 0
Reference bandwidth 100000
Retransmit-interval 5
Route calculation staggering Enabled
Router priority 1
SPF hold time 10
SPF timer delay 5
Stability interval 40
Staggering interval 10
Summary-address Advertise
Translation Enabled
Translation-role Candidate
Transmit-delay 1

SNMP MIB Files
OSPFv3 Configurations 25
SNMP MIB Files
File Name MIB Name Description
ospf3.mib ospfv3MIB The MIB module to describe OSPFversion 3.
SUN-SEFOS-MISTDBRIDGE-MIB.mib SEFOS-MIStdBRIDGE-MIB The MIB module for standard bridgeMIB with multiple instance capability.
SUN-SEFOS-QBRIDGE-MIB.mib SEFOS-QBRIDGE-MIB The VLAN bridge MIB module formanaging virtual bridged LANs withmultiple instance capability.
SUN-SEFOS-RTM6-MIB.mib SEFOS-RTM6-MIB The MIB module for the SEFOSRTMv6 module.
SUN-SEFOS-IPVX-MIB.mib SEFOS-IPVX-MIB The MIB module for SEFOS IPVX.
SUN-SEFOS-CFA-MIB.mib SEFOS-CFA-MIB The MIB module for SEFOS CFA.
SUN-SEFOS-VCM-MIB.mib SEFOS-VCM-MIB The MIB module for the virtualcontext manager.
Creating the Base ConfigurationTo configure SEFOS OSPFv3 features, access Global Configuration mode or InterfaceConfiguration mode. See “CLI Command Modes” on page 10 for information about accessingand exiting these modes through the CLI.
See “IPv6 Example Topology Interface and Host Addresses” on page 15 for the topology usedfor the base configuration.
■ “Access Global Configuration Mode” on page 25■ “Access Interface Configuration Mode” on page 25
Access Global Configuration ModeType.
SEFOS#
SEFOS# configure terminalSEFOS(config)#
Access Interface Configuration ModeThis example creates interface VLAN 11.

Enabling IPv6 Support and Assigning IPv6 Addresses
26 Sun Ethernet Fabric Operating System OSPFv3 Administration Guide • July 2015
Access interface configuration mode and create an interface.
SEFOS#
SEFOS# configure terminalSEFOS(config)#
SEFOS# interface vlan 11SEFOS(config-if)#
Enabling IPv6 Support and Assigning IPv6 Addresses
IPv6 support is disabled by default, but you must enable it before configuring an interface withan IPv6 address.
■ “Enable IPv6” on page 26■ “Disable IPv6” on page 27■ “Delete an IPv6 Address” on page 28
Enable IPv6
This example enables IPv6 support in the VLAN 11 interface and assigns IPv6 addresses to VLAN11.
See “IPv6 Example Topology Interface and Host Addresses” on page 15 for the topology usedfor this sample configuration.
1. Enter Global Configuration mode and Interface Configuration mode in SEFOS1.
SEFOS# configure terminal
SEFOS# interface vlan 11
2. Enable IPv6 support in the VLAN 11 interface.The command used in this example automatically configures an IPv6 link-local address on theinterface and enables the interface for IPv6 processing.
SEFOS(config-if)# ipv6 enable
3. View the automatically configured link-local address and the operational statusof the interface in Privileged EXEC mode.

Disable IPv6
OSPFv3 Configurations 27
SEFOS# show ipv6 interface
vlan11 is up, line protocol is up
Link local address:
ffe80::214:4fff:fe6c:628f
Global unicast address(es):
Not Configured.
Joined group address(es):
ff02::1
ff02::2
ff02::1:ff00:3
ff02::1:ff6c:628f
MTU is 9216
ICMP redirects are enabled
ND DAD is enabled, Number of DAD attempts: 1
ND router advertisement is disabled
4. Configure the IPv6 address in the VLAN 11 interface.The type of address can be link-local, unicast, anycast, or eui64.
Type one of these:
SEFOS(config-if)# ipv6 address fec0::1111:0:1/96 unicast
SEFOS(config-if)# ipv6 address fec0::1111:0:1 96 unicast
5. View the automatically configured link-local address and the unicast addressconfigured in the previous step in SEFOS1.
SEFOS# show ipv6 interface
vlan11 is up, line protocol is up
Link local address:
ffe80::214:4fff:fe6c:628f
Global unicast address(es):
fec0::1111:0:1/96
Disable IPv6
This example disables IPv6 support in the active VLAN interface.
Disable IPv6 support.
SEFOS(config-if)# no ipv6 enable

Delete an IPv6 Address
28 Sun Ethernet Fabric Operating System OSPFv3 Administration Guide • July 2015
Delete an IPv6 Address
This example deletes the IPv6 address configured in “Enable IPv6” on page 26.
Delete an IPv6 address.
SEFOS(config-if)# no ipv6 address fec0::1111:0:1 96 unicast
Configuring IPv6 Static Routes
Routing defines the paths over which packets travel in the network. You can use manuallyconfigured static routes instead of dynamic routing protocols for smaller networks or forsections of a network that have only one path to an outside network.
See “IPv6 Example Topology Interface and Host Addresses” on page 15 for the topology usedfor this configuration.
■ “Configure Static Routes” on page 28■ “Delete a Static Route” on page 29
Configure Static Routes
Add static routes to the routing table.
1. Enter Global Configuration mode in SEFOS1.
SEFOS# configure terminal
2. Add the static route to 3333::/64 through VLAN 10 with next hop as fec0::2856:0:1in SEFOS8.
SEFOS(config)# ipv6 route 3333:: 64 fec0::2856:0:2
3. Ensure that static routes are properly configured in the SEFOS1 routing table.
SEFOS# show ipv6 route
IPv6 Routing Table - 3 entries
Codes : C - Connected, S - Static

Delete a Static Route
OSPFv3 Configurations 29
O - OSPF, R - RIP, B - BGP
S 3333::/64 [1/20]
via fec0::2856:0:2, vlan10
C fec0::1111:0:0/96 [1/1]
via ::, vlan11
C fec0::2856:0:0/96 [1/1]
via ::, vlan10
Delete a Static Route
This example deletes the static route for the SEFOS2 VLAN 2 interface in the SEFOS1 routingtable.
1. Delete the static route.
SEFOS# configure terminal
SEFOS(config)# no ipv6 route 3333:: 64 fec0::2856:0:2
2. Ensure that the static route was removed from the SEFOS1 routing table.
SEFOS# show ipv6 route
IPv6 Routing Table - 2 entries
Codes : C - Connected, S - Static
C fec0::1111:0:0/96 [1/1]
via ::, vlan11
C fec0::2856:0:0/96 [1/1]
via ::, vlan10
Creating the Base Configuration for Example Topologies
These sections show how to configure IPv6 interfaces in the switches used for the exampletopologies.
■ “Configure SEFOS1” on page 30■ “Configure SEFOS2” on page 30■ “Configure SEFOS3” on page 31■ “Configure SEFOS4” on page 31■ “Configure SEFOS5” on page 32■ “Configure SEFOS6” on page 32■ “Configure SEFOS7” on page 33■ “Configure SEFOS8” on page 33

Configure SEFOS1
30 Sun Ethernet Fabric Operating System OSPFv3 Administration Guide • July 2015
■ “Configure SEFOS9” on page 33
Configure SEFOS1
Use the following commands and values to configure the VLAN interfaces in SEFOS1 used inthe example topologies presented in this guide (VLAN 11 and VLAN 10).
Type.
SEFOS# configure terminal
SEFOS(config)# interface vlan 11
SEFOS(config-if)# shutdown
SEFOS(config-if)# ipv6 enable
SEFOS(config-if)# ipv6 address fec0::1111:0:3/96
SEFOS(config-if)# no shutdown
SEFOS(config-if)# exit
SEFOS(config)# interface vlan 10
SEFOS(config-if)# shutdown
SEFOS(config-if)# ipv6 enable
SEFOS(config-if)# ipv6 address fec0::2856:0:1/96
SEFOS(config-if)# no shutdown
SEFOS(config-if)# end
Configure SEFOS2
Use the following commands and values to configure the VLAN interfaces in SEFOS2 used inthe example topologies presented in this guide (VLAN 11 and VLAN 2).
Type.
SEFOS# configure terminal
SEFOS(config)# interface vlan 11
SEFOS(config-if)# shut
SEFOS(config-if)# ipv6 enable
SEFOS(config-if)# ipv6 address fec0::1111:0:1/96
SEFOS(config-if)# no shut
SEFOS(config-if)# exit
SEFOS(config)# interface vlan 2
SEFOS(config-if)# shut
SEFOS(config-if)# ipv6 enable
SEFOS(config-if)# ipv6 address fec0::2556:0:1/96
SEFOS(config-if)# no shut
SEFOS(config-if)# exit

Configure SEFOS3
OSPFv3 Configurations 31
Configure SEFOS3
Use the following commands and values to configure the VLAN interfaces in SEFOS3 used inthe example topologies presented in this guide (VLAN 11 and VLAN 2).
Type.
SEFOS# configure terminal
SEFOS(config)# interface vlan 11
SEFOS(config-if)# shut
SEFOS(config-if)# ipv6 enable
SEFOS(config-if)# ipv6 address fec0::1111:0:2/96
SEFOS(config-if)# no shut
SEFOS(config-if)# exit
SEFOS(config)# interface vlan 2
SEFOS(config-if)# shut
SEFOS(config-if)# ipv6 enable
SEFOS(config-if)# ipv6 address fec0::3556:0:1/96
SEFOS(config-if)# no shut
SEFOS(config-if)# exit
Configure SEFOS4
Use the following commands and values to configure the VLAN interfaces in SEFOS4 used inthe example topologies presented in this guide (VLAN 11, VLAN 3, and VLAN 4).
Type.
SEFOS# configure terminal
SEFOS(config)# interface vlan 11
SEFOS(config-if)# shut
SEFOS(config-if)# ipv6 enable
SEFOS(config-if)# ipv6 address fec0::1111:0:4/96
SEFOS(config-if)# no shut
SEFOS(config-if)# exit
SEFOS(config)# interface vlan 3
SEFOS(config-if)# shut
SEFOS(config-if)# ipv6 enable
SEFOS(config-if)# ipv6 address fec0::3333:0:1/96
SEFOS(config-if)# no shut
SEFOS(config-if)# exit
SEFOS(config)# interface vlan 4
SEFOS(config-if)# shut
SEFOS(config-if)# ipv6 enable
SEFOS(config-if)# ipv6 address fec0::4444:0:1/96
Configure SEFOS5
32 Sun Ethernet Fabric Operating System OSPFv3 Administration Guide • July 2015
SEFOS(config-if)# no shut
SEFOS(config-if)# exit
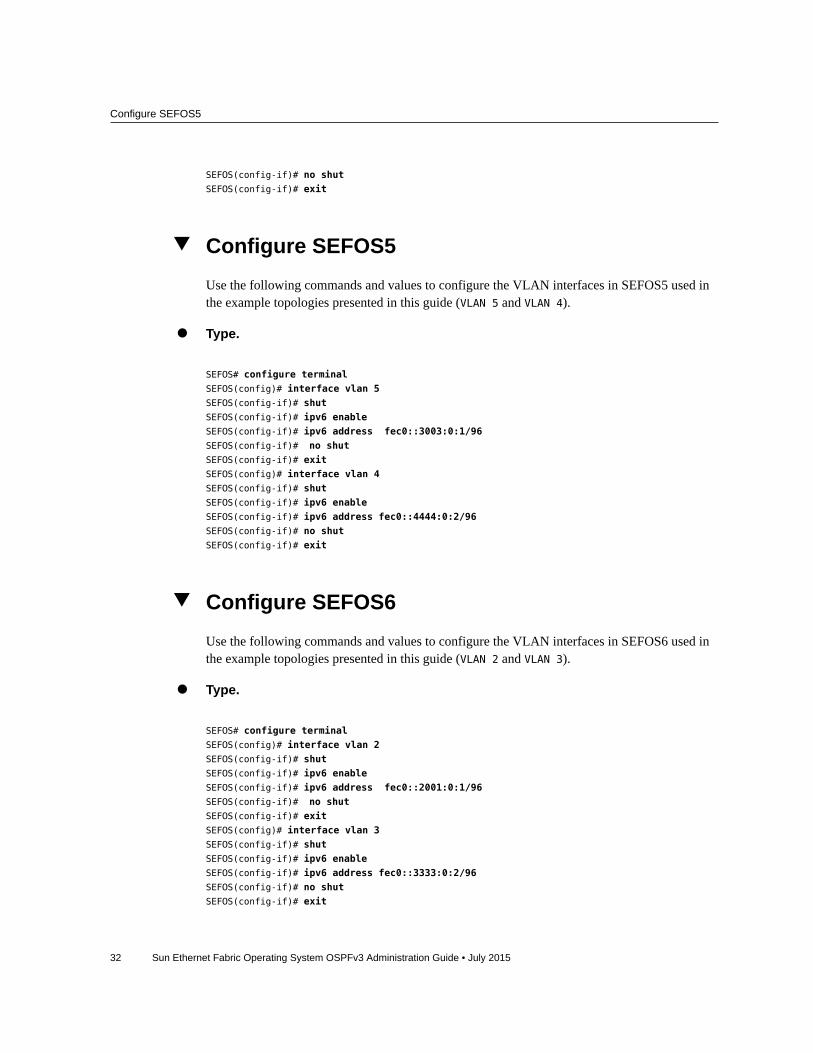
Configure SEFOS5Use the following commands and values to configure the VLAN interfaces in SEFOS5 used inthe example topologies presented in this guide (VLAN 5 and VLAN 4).
Type.
SEFOS# configure terminal
SEFOS(config)# interface vlan 5
SEFOS(config-if)# shut
SEFOS(config-if)# ipv6 enable
SEFOS(config-if)# ipv6 address fec0::3003:0:1/96
SEFOS(config-if)# no shut
SEFOS(config-if)# exit
SEFOS(config)# interface vlan 4
SEFOS(config-if)# shut
SEFOS(config-if)# ipv6 enable
SEFOS(config-if)# ipv6 address fec0::4444:0:2/96
SEFOS(config-if)# no shut
SEFOS(config-if)# exit
Configure SEFOS6Use the following commands and values to configure the VLAN interfaces in SEFOS6 used inthe example topologies presented in this guide (VLAN 2 and VLAN 3).
Type.
SEFOS# configure terminal
SEFOS(config)# interface vlan 2
SEFOS(config-if)# shut
SEFOS(config-if)# ipv6 enable
SEFOS(config-if)# ipv6 address fec0::2001:0:1/96
SEFOS(config-if)# no shut
SEFOS(config-if)# exit
SEFOS(config)# interface vlan 3
SEFOS(config-if)# shut
SEFOS(config-if)# ipv6 enable
SEFOS(config-if)# ipv6 address fec0::3333:0:2/96
SEFOS(config-if)# no shut
SEFOS(config-if)# exit

Configure SEFOS7
OSPFv3 Configurations 33
Configure SEFOS7
Use the following commands and values to configure the VLAN interfaces in SEFOS7 used inthe example topologies presented in this guide (VLAN 5).
Type.
SEFOS# configure terminal
SEFOS(config)# interface vlan 5
SEFOS(config-if)# shut
SEFOS(config-if)# ipv6 enable
SEFOS(config-if)# ipv6 address fec0::3003:0:2/96
SEFOS(config-if)# no shut
SEFOS(config-if)# exit
Configure SEFOS8
Use the following commands and values to configure the VLAN interfaces in SEFOS8 used inthe example topologies presented in this guide (VLAN 10 and VLAN 1).
Type.
SEFOS# configure terminal
SEFOS(config)# interface vlan 10
SEFOS(config-if)# shut
SEFOS(config-if)# ipv6 enable
SEFOS(config-if)# ipv6 address fec0::2856:0:2/96
SEFOS(config-if)# no shut
SEFOS(config-if)# exit
SEFOS(config)# interface vlan 1
SEFOS(config-if)# shut
SEFOS(config-if)# ipv6 enable
SEFOS(config-if)# ipv6 address fec0::2886:1:1/96
SEFOS(config-if)# no shut
SEFOS(config-if)# exit
Configure SEFOS9
Use the following commands and values to configure the VLAN interfaces in SEFOS9 used inthe example topologies presented in this guide (VLAN 2).
Type.

Configure SEFOS9
34 Sun Ethernet Fabric Operating System OSPFv3 Administration Guide • July 2015
SEFOS# configure terminal
SEFOS(config)# interface vlan 2
SEFOS(config-if)# shut
SEFOS(config-if)# ipv6 enable
SEFOS(config-if)# ipv6 address fec0::2556:1:1/96
SEFOS(config-if)# no shut
SEFOS(config-if)# exit

Configuring OSPFv3 Features 35
Configuring OSPFv3 Features
These sections show how to configure OSPFv3 features.
■ “OSPFv3 Features” on page 35■ “Configuring Basic OSPFv3” on page 36■ “Creating an OSPFv3 Interface” on page 37■ “Configuring Neighbors” on page 39■ “Configuring OSPFv3 Interface Parameters” on page 40■ “Configuring a Demand Circuit” on page 48■ “Configuring Neighbor Probe Values” on page 50■ “Configuring a Passive Interface” on page 52■ “Configuring Route Redistribution” on page 54■ “Configuring Attributes for Redistributed Routes” on page 59■ “Configuring the Redistribution of Routes” on page 60■ “Configuring Area Route Summarization” on page 62■ “Configuring a Stub Area ” on page 68■ “Configuring an NSSA” on page 71■ “Configuring the Capability in an NSSA Internal Border Router” on page 76■ “Configuring Virtual Links” on page 80■ “Configuring External Database Limit” on page 84■ “Configuring the Overflow Exit Interval” on page 86■ “Configuring a Demand Extension” on page 88■ “Configuring the Host” on page 89■ “Configuring Route Calculation SPF Timers” on page 91
OSPFv3 Features
■ Basic OPSFv3■ OSPFv3 interface■ Passive interface■ Redistribution and its attributes

Configuring Basic OSPFv3
36 Sun Ethernet Fabric Operating System OSPFv3 Administration Guide • July 2015
■ OSPFv4 area parameters■ Virtual link■ External database limit■ Demand extension■ Configuring host■ Graceful restart■ GR helper support■ Route calculation staggering■ Route calculation SPF timers■ Inboard filtering routes■ Administrative distance for OSPF routes in the routing table
Configuring Basic OSPFv3
The basic OSPFv3 operations include enabling OSPFv3, creating interfaces, and configuringneighbors.
■ “Enable OSPFv3” on page 36■ “Disable OSPFv3” on page 36
Enable OSPFv3
Enabling OSPFv3 takes you to Router Configuration mode, from which you can execute router-related commands. This procedure also enables all interfaces and enables self-originated LSAs.
1. Enter Global Configuration mode.
SEFOS# configure terminal
2. Enable OSPFv3 globally in SEFOS1, which will take you to Router Configurationmode.
SEFOS(config)# ipv6 router ospf
Disable OSPFv3
This example disables OSPFv3 globally in the SEFOS1 switch.

Creating an OSPFv3 Interface
Configuring OSPFv3 Features 37
Disable OSPFv3 in the switch.
SEFOS(config)# no ipv6 router ospf
Creating an OSPFv3 Interface
You can create an OSPFv3 interface by interfacing with IPv6. This process facilitates thetransmission and reception of protocol packets. OSPFv3 interacts with IPv6 before joining orleaving the multicast addresses for packet reception.
Before configuring the interface, you must configure the router ID. The router ID can be anarbitrary, but unique, IPv4 or IPv6 address.
IPv6 expects that the following information will be provided to OSPFv3:
■ Interface state change notifications■ Addition or deletion of IPv6 addresses on an interface
See “IPv6 Example Topology Interface and Host Addresses” on page 15 for the topology usedfor this configuration.
■ “Configure an OSPFv3 Interface” on page 37
Configure an OSPFv3 Interface
In this example, OSPFv3 is enabled on the SEFOS1 switch, and 10.0.0.1 is specified as therouter ID.
1. Enter Global Configuration mode.
SEFOS# configure terminal
2. Enable OSPFv3 globally in SEFOS1.
SEFOS(config)# ipv6 router ospf
3. Configure the OSPFv3 router ID.
SEFOS(config-router)# router-id 10.0.0.1

Configure an OSPFv3 Interface
38 Sun Ethernet Fabric Operating System OSPFv3 Administration Guide • July 2015
Note - The no form of this command is not supported. Therefore, you cannot remove the routerID, you can only change it to a different router ID IP.
4. Exit Router Configuration mode.
SEFOS(config-router)# end
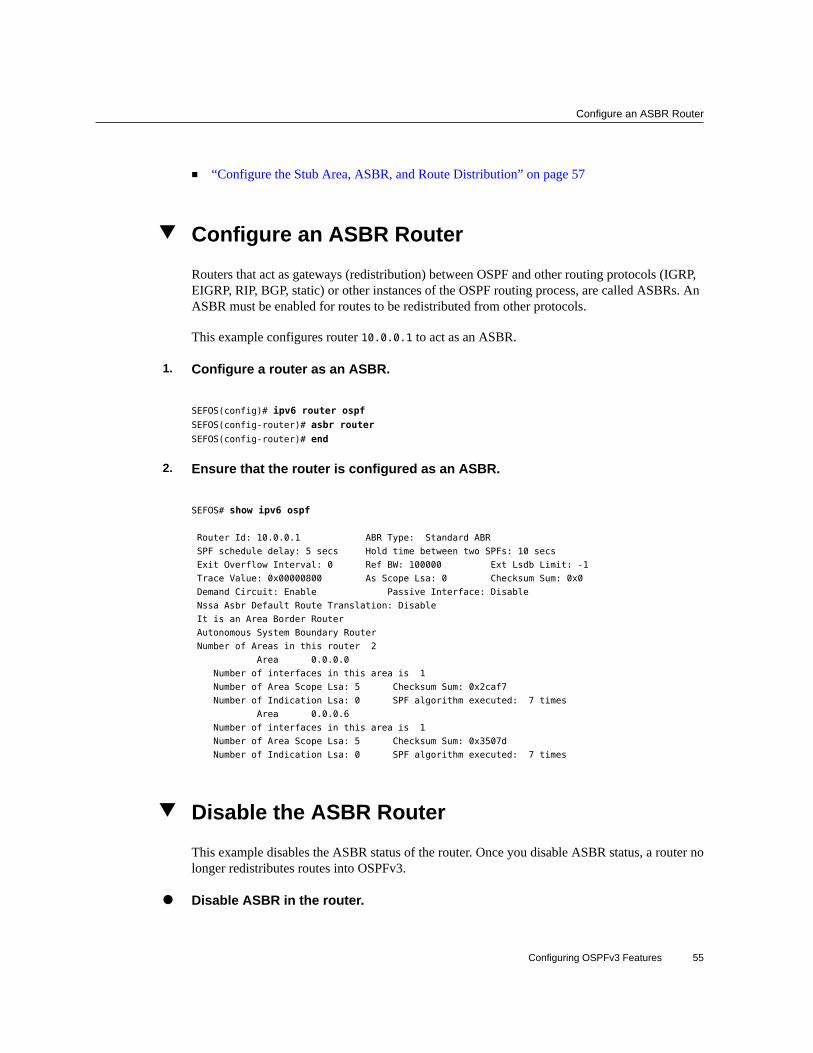
5. Ensure that the router ID value is correct.
SEFOS# show ipv6 ospf
Router Id: 10.0.0.1 ABR Type: Standard ABR
SPF schedule delay: 5 secs Hold time between two SPFs: 10 secs
Exit Overflow Interval: 0 Ref BW: 100000 Ext Lsdb Limit: -1
Trace Value: 0x00000800 As Scope Lsa: 0 Checksum Sum: 0x0
Demand Circuit: Enable Passive Interface: Disable
Nssa Asbr Default Route Translation: Disable
Number of Areas in this router 1
Area 0.0.0.0
Number of interfaces in this area is 0
Number of Area Scope Lsa: 0 Checksum Sum: 0x0
Number of Indication Lsa: 0 SPF algorithm executed: 0 times
6. Enter Global Configuration mode in SEFOS1.
SEFOS# configure terminal
7. Enable the OSPFv3 interface on the VLAN interfaces.This action defines the interfaces on which OSPFv3 runs and the area ID for those interfaces.
SEFOS(config)# interface vlan 11
SEFOS(config-if)# ipv6 ospf area 0.0.0.0
SEFOS(config-if)# exit
SEFOS(config)# interface vlan 10
SEFOS(config-if)# ipv6 ospf area 0.0.0.6
SEFOS(config-if)# end
8. Ensure that OSPFv3 is set to run the correct interfaces.
SEFOS# show ipv6 ospf interface
Interface Name: vlan11 Interface Id: 40 Area Id: 0.0.0.0
Local Address: fe80::214:4fff:fe6c:628f Router Id: 10.0.0.1
Network Type: BROADCAST Cost: 1 State: DR
Designated Router Id: 10.0.0.1 local address: fe80::214:4fff:fe6c:628f

Configuring Neighbors
Configuring OSPFv3 Features 39
Backup Designated Router Id: 0.0.0.0 local address: (null)
Transmit Delay: 1 sec Priority: 1 IfOptions: 0x0
Timer intervals configured:
Hello: 10, Dead: 40, Retransmit: 5, Poll: 120
Demand Circuit: Disable Neighbor Probing: Disable
Nbr Probe Retrans Limit: 10 Nbr Probe Interval: 120
Hello due in 8 sec
Neighbor Count is: 0
Interface Name: vlan10 Interface Id: 41 Area Id: 0.0.0.6
Local Address: fe80::214:4fff:fe6c:628f Router Id: 10.0.0.1
Network Type: BROADCAST Cost: 1 State: DR
Designated Router Id: 10.0.0.1 local address: fe80::214:4fff:fe6c:628f
Backup Designated Router Id: 0.0.0.0 local address: (null)
Transmit Delay: 1 sec Priority: 1 IfOptions: 0x0
Timer intervals configured:
Hello: 10, Dead: 40, Retransmit: 5, Poll: 120
Demand Circuit: Disable Neighbor Probing: Disable
Nbr Probe Retrans Limit: 10 Nbr Probe Interval: 120
Hello due in 9 sec
Neighbor Count is: 0
Configuring Neighbors
You can use the neighbor configuration information to create neighbors that allocate memoryfor the neighbor structure and initialize it with default values. This configuration is also used toactivate configured neighbors invoking the NSM with a start or down event. You can configureneighbors only in NBMA networks, but you can then point to multipoint networks.
See “IPv6 Example Topology Interface and Host Addresses” on page 15 for the topology usedfor this configuration.
■ “Configure an OSPFv3 Neighbor” on page 39
Configure an OSPFv3 Neighbor
In this example, SEFOS1 is the switch on which OSPFv3 is enabled, 10.0.0.1 is specified asthe router ID, and VLAN 10 is configured on the NBMA network with a neighbor priority of 10.
1. Enter Global Configuration mode in SEFOS1.
SEFOS# configure terminal
2. Enable OSPF globally in SEFOS1.

Configuring OSPFv3 Interface Parameters
40 Sun Ethernet Fabric Operating System OSPFv3 Administration Guide • July 2015
SEFOS(config)# ipv6 router ospf
3. Configure the OSPF router ID.
SEFOS(config-router)# router-id 10.0.0.1
4. Exit Router Configuration mode.
SEFOS(config-router)# exit
5. Enter Interface Configuration mode.
SEFOS(config)# interface vlan 10
6. Configure the network type as NBMA.
SEFOS(config-if)# ipv6 ospf network non-broadcast
7. Configure the neighbor with priority#10.
SEFOS(config-if)# ipv6 ospf neighbor fe80::214:4fff:fe6c:d04d priority 10
8. View the SEFOS1 configuration.
SEFOS# show ipv6 ospf neighbor
ID Pri State DeadTime Address
10.0.0.8 1 FULL/BACKUP 38 fe80::214:4fff:fe6c:d04d
Configuring OSPFv3 Interface Parameters
All of the OSPF interface sample configurations in this section are executed in SEFOS1. See“IPv6 Example Topology Interface and Host Addresses” on page 15 for the topology used forthe configuration of the parameters in this section.
■ “OSPFv3 Interface Parameters” on page 41■ “Configure Interface Priority” on page 41■ “Restore the Default Interface Priority” on page 42■ “Configure the Retransmission Interval” on page 42■ “Restore the Default Retransmission Value” on page 43
Configure Interface Priority
Configuring OSPFv3 Features 41
■ “Configure Transmission Delay” on page 43■ “Restore the Default Transmission Delay” on page 44■ “Configure the Hello Interval” on page 44■ “Restore the Default Hello Interval” on page 45■ “Configure the Dead Interval” on page 45■ “Restore the Default Dead Interval” on page 46■ “Configure the Network Type” on page 46■ “Restore the Default OSPF Network Type” on page 47■ “Configure the Interface Cost” on page 47■ “Restore the Default Interface Cost” on page 48
OSPFv3 Interface Parameters
There are a number of OSPFv3 interface parameters you can configure. This section explainshow to configure and disable the following features:
■ Interface priority■ Retransmission level■ Transmission delay■ Hello interval■ Dead interval■ Network type■ Interface cost
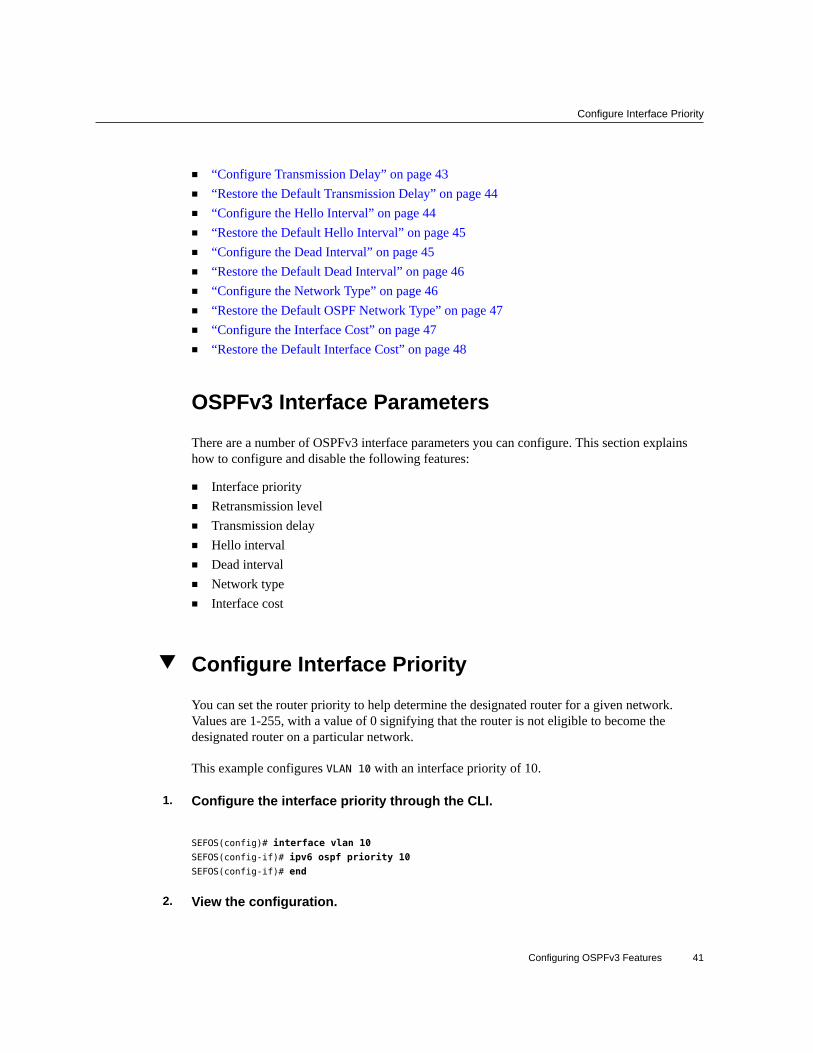
Configure Interface Priority
You can set the router priority to help determine the designated router for a given network.Values are 1-255, with a value of 0 signifying that the router is not eligible to become thedesignated router on a particular network.
This example configures VLAN 10 with an interface priority of 10.
1. Configure the interface priority through the CLI.
SEFOS(config)# interface vlan 10
SEFOS(config-if)# ipv6 ospf priority 10
SEFOS(config-if)# end
2. View the configuration.

Restore the Default Interface Priority
42 Sun Ethernet Fabric Operating System OSPFv3 Administration Guide • July 2015
SEFOS# show ipv6 ospf interface vlan 10
Ospfv3 Interface Information
Interface Name: vlan10 Interface Id: 41 Area Id: 0.0.0.6
Local Address: fe80::214:4fff:fe6c:628f Router Id: 10.0.0.1
Network Type: BROADCAST Cost: 1 State: BACKUP
Designated Router Id: 10.0.0.8 local address: fe80::214:4fff:fe6c:d04d
Backup Designated Router Id: 10.0.0.1 local address: fe80::214:4fff:fe6c:628f
Transmit Delay: 1 sec Priority: 10 IfOptions: 0x0
Timer intervals configured:
Hello: 10, Dead: 40, Retransmit: 5, Poll: 120
Demand Circuit: Disable Neighbor Probing: Disable
Nbr Probe Retrans Limit: 10 Nbr Probe Interval: 120
Hello due in 0 sec
Neighbor Count is: 1
Adjacent with neighbor 10.0.0.8
Restore the Default Interface Priority
This example restores the default OSPF interface priority to 1.
Restore the default value of the OSPF interface.
SEFOS(config-if)# no ipv6 ospf priority
Configure the Retransmission Interval
You can configure the LSA retransmission interval to specify the amount of time betweensuccessive LSA retransmissions. You can also use the retransmission interval value toretransmit database description and link-state request packets.
This example configures VLAN 10 with a retransmission interval of 10 seconds.
1. Configure the retransmission interval through the CLI.
SEFOS(config)# interface vlan 10
SEFOS(config-if)# ipv6 ospf retransmit-interval 10
SEFOS(config-if)# end
2. Ensure that the correct retransmission interval is set on the specified interface.

Restore the Default Retransmission Value
Configuring OSPFv3 Features 43
SEFOS# show ipv6 ospf interface vlan 10
Ospfv3 Interface Information
Interface Name: vlan10 Interface Id: 41 Area Id: 0.0.0.6
Local Address: fe80::214:4fff:fe6c:628f Router Id: 10.0.0.1
Network Type: BROADCAST Cost: 1 State: BACKUP
Designated Router Id: 10.0.0.8 local address: fe80::214:4fff:fe6c:d04d
Backup Designated Router Id: 10.0.0.1 local address: fe80::214:4fff:fe6c:628f
Transmit Delay: 1 sec Priority: 1 IfOptions: 0x0
Timer intervals configured:
Hello: 10, Dead: 40, Retransmit: 10, Poll: 120
Demand Circuit: Disable Neighbor Probing: Disable
Nbr Probe Retrans Limit: 10 Nbr Probe Interval: 120
Hello due in 7 sec
Neighbor Count is: 1
Adjacent with neighbor 10.0.0.8
Restore the Default Retransmission Value
This example restores the default retransmission value to five seconds.
Restore the default retransmission value.
SEFOS(config-if)# no ipv6 ospf retransmit-interval
Configure Transmission Delay
You can set the estimated time required to transmit a link-state update packet on the interfaceusing the configuration in this section. Values are 1-1800 seconds.
This example configures VLAN 10 with a transmission delay of 5 seconds.
1. Configure OSPFv3 transmission delay through the CLI.
SEFOS(config)# interface vlan 10
SEFOS(config-if)# ipv6 ospf transmit-delay 5
SEFOS(config-if)# end
2. Ensure that the correct transmission delay is set for the specified interface.
SEFOS# show ipv6 ospf interface vlan 10
Restore the Default Transmission Delay
44 Sun Ethernet Fabric Operating System OSPFv3 Administration Guide • July 2015
Ospfv3 Interface Information
Interface Name: vlan10 Interface Id: 41 Area Id: 0.0.0.6
Local Address: fe80::214:4fff:fe6c:628f Router Id: 10.0.0.1
Network Type: BROADCAST Cost: 1 State: DR
Designated Router Id: 10.0.0.1 local address: fe80::214:4fff:fe6c:628f
Backup Designated Router Id: 10.0.0.8 local address: fe80::214:4fff:fe6c:d04d
Transmit Delay: 5 sec Priority: 1 IfOptions: 0x0
Timer intervals configured:
Hello: 10, Dead: 40, Retransmit: 5, Poll: 120
Demand Circuit: Disable Neighbor Probing: Disable
Nbr Probe Retrans Limit: 10 Nbr Probe Interval: 120
Hello due in 3 sec
Neighbor Count is: 1
Adjacent with neighbor 10.0.0.8
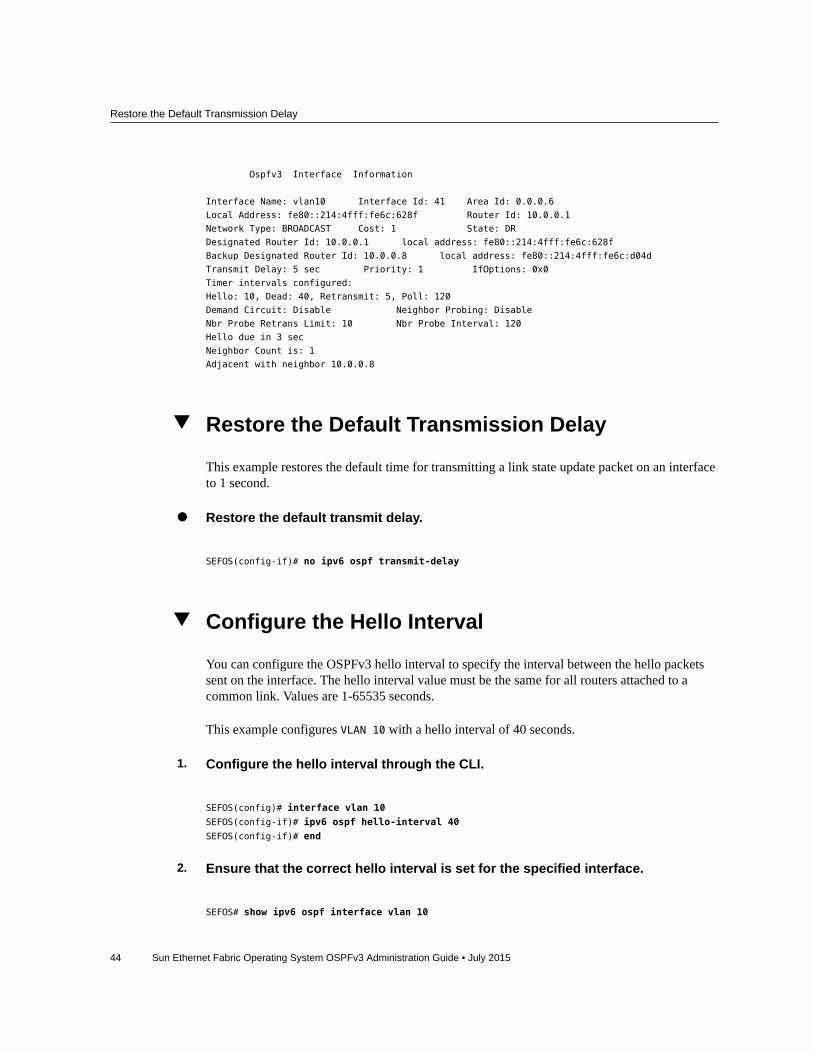
Restore the Default Transmission Delay
This example restores the default time for transmitting a link state update packet on an interfaceto 1 second.
Restore the default transmit delay.
SEFOS(config-if)# no ipv6 ospf transmit-delay
Configure the Hello Interval
You can configure the OSPFv3 hello interval to specify the interval between the hello packetssent on the interface. The hello interval value must be the same for all routers attached to acommon link. Values are 1-65535 seconds.
This example configures VLAN 10 with a hello interval of 40 seconds.
1. Configure the hello interval through the CLI.
SEFOS(config)# interface vlan 10
SEFOS(config-if)# ipv6 ospf hello-interval 40
SEFOS(config-if)# end
2. Ensure that the correct hello interval is set for the specified interface.
SEFOS# show ipv6 ospf interface vlan 10

Restore the Default Hello Interval
Configuring OSPFv3 Features 45
Ospfv3 Interface Information
Interface Name: vlan10 Interface Id: 41 Area Id: 0.0.0.6
Local Address: fe80::214:4fff:fe6c:628f Router Id: 10.0.0.1
Network Type: BROADCAST Cost: 1 State: DR
Designated Router Id: 10.0.0.1 local address: fe80::214:4fff:fe6c:628f
Backup Designated Router Id: 10.0.0.8 local address: fe80::214:4fff:fe6c:d04d
Transmit Delay: 1 sec Priority: 1 IfOptions: 0x0
Timer intervals configured:
Hello: 40, Dead: 40, Retransmit: 5, Poll: 120
Demand Circuit: Disable Neighbor Probing: Disable
Nbr Probe Retrans Limit: 10 Nbr Probe Interval: 120
Hello due in 33 sec
Neighbor Count is: 1
Adjacent with neighbor 10.0.0.8
Restore the Default Hello Interval
This example restores the default hello value to 10 seconds.
Restore the default hello interval.
SEFOS(config-if)# no ipv6 ospf hello-interval
Configure the Dead Interval
You can configure the dead interval to specify how long hello packets will not be received bythe router before neighbors declare that the router is down. This value must be a multiple of thehello interval value, and must be the same for all routers attached to the same link.
This example sets the dead interval for VLAN 10 to 120 seconds.
1. Configure the dead interval through the CLI.
SEFOS(config)# interface vlan 10
SEFOS(config-if)# ipv6 ospf dead-interval 120
SEFOS(config-if)# end
2. Ensure that the correct dead interval is set for the specified interface.
SEFOS# show ipv6 ospf interface vlan 10

Restore the Default Dead Interval
46 Sun Ethernet Fabric Operating System OSPFv3 Administration Guide • July 2015
Ospfv3 Interface Information
Interface Name: vlan10 Interface Id: 41 Area Id: 0.0.0.6
Local Address: fe80::214:4fff:fe6c:628f Router Id: 10.0.0.1
Network Type: BROADCAST Cost: 1 State: BACKUP
Designated Router Id: 10.0.0.8 local address: fe80::214:4fff:fe6c:d04d
Backup Designated Router Id: 10.0.0.1 local address: fe80::214:4fff:fe6c:628f
Transmit Delay: 1 sec Priority: 1 IfOptions: 0x0
Timer intervals configured:
Hello: 10, Dead: 120, Retransmit: 5, Poll: 120
Demand Circuit: Disable Neighbor Probing: Disable
Nbr Probe Retrans Limit: 10 Nbr Probe Interval: 120
Hello due in 4 sec
Neighbor Count is: 1
Adjacent with neighbor 10.0.0.8
Restore the Default Dead Interval
This example restores the default dead interval to 40 seconds.
Restore the default dead interval.
SEFOS(config-if)# no ipv6 ospf dead-interval
Configure the Network Type
You can specify the OSPF network type to be broadcast, non-broadcast, point-to-multipoint, orpoint-to-point. The default value is broadcast. The OSPF network type can be configured to atype other than the default for a given media.
This example configures the network type for VLAN 10 as point-to-point, meaning that it is anetwork that joins a single pair of routers.
1. Configure the network type through the CLI.
SEFOS(config)# interface vlan 10
SEFOS(config-if)# ipv6 ospf network point-to-point
SEFOS(config-if)# end
2. View the configuration.
SEFOS# show ipv6 ospf interface vlan 10

Restore the Default OSPF Network Type
Configuring OSPFv3 Features 47
Ospfv3 Interface Information
Interface Name: vlan10 Interface Id: 41 Area Id: 0.0.0.6
Local Address: fe80::214:4fff:fe6c:628f Router Id: 10.0.0.1
Network Type: PTOP Cost: 1 State: PTOP
Designated Router Id: 0.0.0.0 local address: (null)
Backup Designated Router Id: 0.0.0.0 local address: (null)
Transmit Delay: 1 sec Priority: 1 IfOptions: 0x0
Timer intervals configured:
Hello: 10, Dead: 40, Retransmit: 5, Poll: 120
Demand Circuit: Disable Neighbor Probing: Disable
Nbr Probe Retrans Limit: 10 Nbr Probe Interval: 120
Hello due in 4 sec
Neighbor Count is: 0
Restore the Default OSPF Network Type
This example restores the default OSPF network type to broadcast.
Restore the default network type.
SEFOS(config-if)# no ipv6 ospf network
Configure the Interface Cost
You can configure the interface cost explicitly to specify the cost of sending a packet on aninterface. Values are 1-65535.
This example configures the interface cost to be 20.
1. Configure the interface cost through the CLI.
SEFOS(config)# interface vlan 10
SEFOS(config-if)# ipv6 ospf metric 20
SEFOS(config-if)# end
2. Ensure that the correct interface cost is set.
SEFOS# show ipv6 ospf interface vlan 10
Ospfv3 Interface Information
Interface Name: vlan10 Interface Id: 41 Area Id: 0.0.0.6

Restore the Default Interface Cost
48 Sun Ethernet Fabric Operating System OSPFv3 Administration Guide • July 2015
Local Address: fe80::214:4fff:fe6c:628f Router Id: 10.0.0.1
Network Type: BROADCAST Cost: 20 State: BACKUP
Designated Router Id: 10.0.0.8 local address: fe80::214:4fff:fe6c:d04d
Backup Designated Router Id: 10.0.0.1 local address: fe80::214:4fff:fe6c:628f
Transmit Delay: 1 sec Priority: 1 IfOptions: 0x0
Timer intervals configured:
Hello: 10, Dead: 40, Retransmit: 5, Poll: 120
Demand Circuit: Enable Neighbor Probing: Enable
Nbr Probe Retrans Limit: 10 Nbr Probe Interval: 120
Hello due in 4 sec
Neighbor Count is: 1
Adjacent with neighbor 10.0.0.8
Restore the Default Interface Cost
This example restores the default OSPF metric to 1.
Restore the default OSPF metric.
SEFOS(config-if)# no ipv6 ospf metric
Configuring a Demand Circuit
Configuring an interface as a demand circuit allows OSPF to treat the specified interface asan OSPF demand circuit. This configuration is possible only when the demand extensions areenabled. See “Configuring a Demand Extension” on page 88 for details on configuringdemand extensions.
■ “Enable a Demand Circuit” on page 48■ “Remove the Demand Circuit Setting” on page 49■ “Enable Neighbor Probing on a Demand Circuit” on page 49■ “Remove Neighbor Probing on a Demand Circuit” on page 50
Enable a Demand Circuit
This example enables VLAN 10 to be used as an OSPF demand circuit.
1. Configure a demand circuit through the CLI.
Remove the Demand Circuit Setting
Configuring OSPFv3 Features 49
SEFOS(config)# interface vlan 10
SEFOS(config-if)# ipv6 ospf demand-circuit
SEFOS(config-if)# end
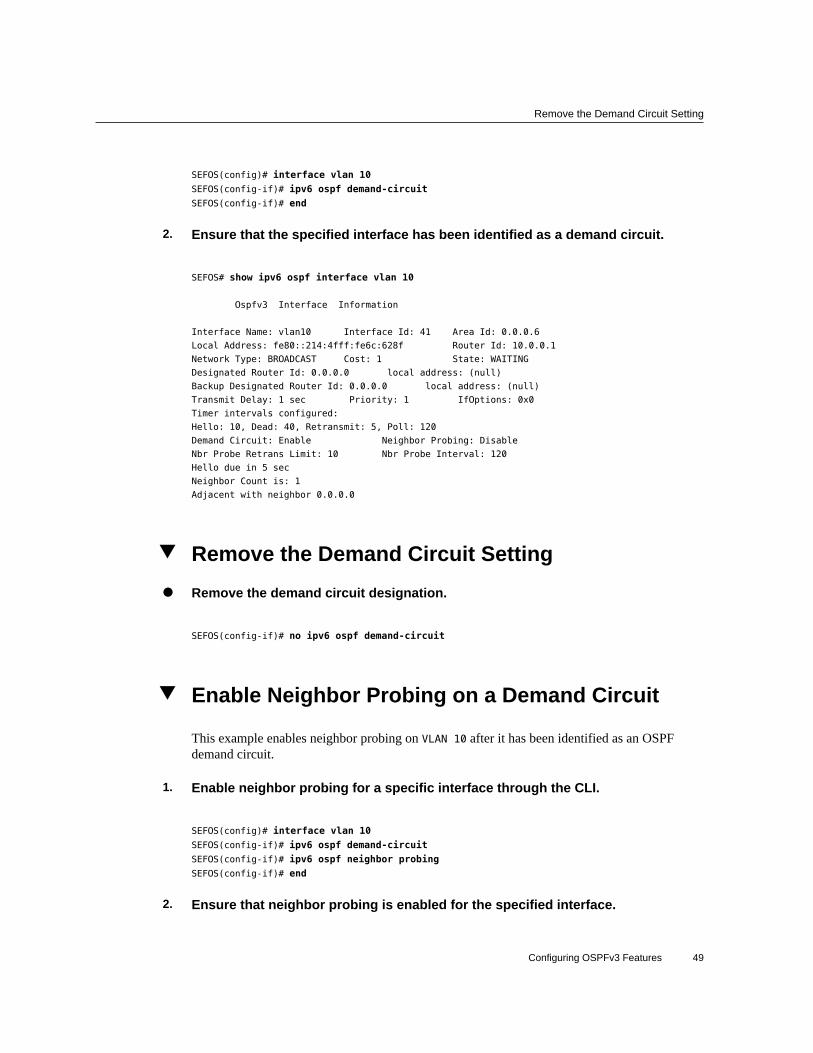
2. Ensure that the specified interface has been identified as a demand circuit.
SEFOS# show ipv6 ospf interface vlan 10
Ospfv3 Interface Information
Interface Name: vlan10 Interface Id: 41 Area Id: 0.0.0.6
Local Address: fe80::214:4fff:fe6c:628f Router Id: 10.0.0.1
Network Type: BROADCAST Cost: 1 State: WAITING
Designated Router Id: 0.0.0.0 local address: (null)
Backup Designated Router Id: 0.0.0.0 local address: (null)
Transmit Delay: 1 sec Priority: 1 IfOptions: 0x0
Timer intervals configured:
Hello: 10, Dead: 40, Retransmit: 5, Poll: 120
Demand Circuit: Enable Neighbor Probing: Disable
Nbr Probe Retrans Limit: 10 Nbr Probe Interval: 120
Hello due in 5 sec
Neighbor Count is: 1
Adjacent with neighbor 0.0.0.0
Remove the Demand Circuit SettingRemove the demand circuit designation.
SEFOS(config-if)# no ipv6 ospf demand-circuit
Enable Neighbor Probing on a Demand Circuit
This example enables neighbor probing on VLAN 10 after it has been identified as an OSPFdemand circuit.
1. Enable neighbor probing for a specific interface through the CLI.
SEFOS(config)# interface vlan 10
SEFOS(config-if)# ipv6 ospf demand-circuit
SEFOS(config-if)# ipv6 ospf neighbor probing
SEFOS(config-if)# end
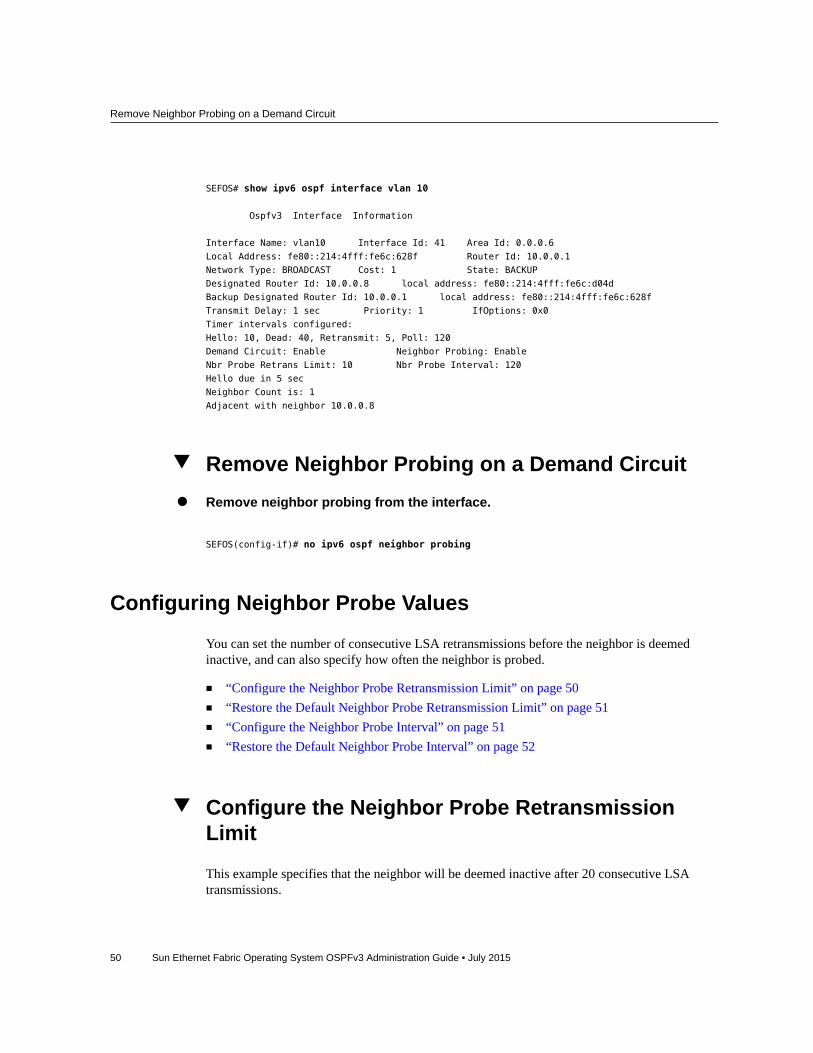
2. Ensure that neighbor probing is enabled for the specified interface.
Remove Neighbor Probing on a Demand Circuit
50 Sun Ethernet Fabric Operating System OSPFv3 Administration Guide • July 2015
SEFOS# show ipv6 ospf interface vlan 10
Ospfv3 Interface Information
Interface Name: vlan10 Interface Id: 41 Area Id: 0.0.0.6
Local Address: fe80::214:4fff:fe6c:628f Router Id: 10.0.0.1
Network Type: BROADCAST Cost: 1 State: BACKUP
Designated Router Id: 10.0.0.8 local address: fe80::214:4fff:fe6c:d04d
Backup Designated Router Id: 10.0.0.1 local address: fe80::214:4fff:fe6c:628f
Transmit Delay: 1 sec Priority: 1 IfOptions: 0x0
Timer intervals configured:
Hello: 10, Dead: 40, Retransmit: 5, Poll: 120
Demand Circuit: Enable Neighbor Probing: Enable
Nbr Probe Retrans Limit: 10 Nbr Probe Interval: 120
Hello due in 5 sec
Neighbor Count is: 1
Adjacent with neighbor 10.0.0.8
Remove Neighbor Probing on a Demand CircuitRemove neighbor probing from the interface.
SEFOS(config-if)# no ipv6 ospf neighbor probing
Configuring Neighbor Probe Values
You can set the number of consecutive LSA retransmissions before the neighbor is deemedinactive, and can also specify how often the neighbor is probed.
■ “Configure the Neighbor Probe Retransmission Limit” on page 50■ “Restore the Default Neighbor Probe Retransmission Limit” on page 51■ “Configure the Neighbor Probe Interval” on page 51■ “Restore the Default Neighbor Probe Interval” on page 52
Configure the Neighbor Probe RetransmissionLimit
This example specifies that the neighbor will be deemed inactive after 20 consecutive LSAtransmissions.

Restore the Default Neighbor Probe Retransmission Limit
Configuring OSPFv3 Features 51
1. Configure the number of consecutive LSA retransmissions before the neighboris deemed inactive.
SEFOS(config)# interface vlan 10
SEFOS(config-if)# ipv6 ospf demand-circuit
SEFOS(config-if)# ipv6 ospf neighbor-probe retransmit-limit 20
SEFOS(config-if)# end
2. Ensure that the correct retransmission limit was set.
SEFOS# show ipv6 ospf interface vlan 10
Ospfv3 Interface Information
Interface Name: vlan10 Interface Id: 41 Area Id: 0.0.0.6
Local Address: fe80::214:4fff:fe6c:628f Router Id: 10.0.0.1
Network Type: BROADCAST Cost: 1 State: BACKUP
Designated Router Id: 10.0.0.8 local address: fe80::214:4fff:fe6c:d04d
Backup Designated Router Id: 10.0.0.1 local address: fe80::214:4fff:fe6c:628f
Transmit Delay: 1 sec Priority: 1 IfOptions: 0x0
Timer intervals configured:
Hello: 10, Dead: 40, Retransmit: 5, Poll: 120
Demand Circuit: Enable Neighbor Probing: Enable
Nbr Probe Retrans Limit: 20 Nbr Probe Interval: 120
Hello due in 5 sec
Neighbor Count is: 1
Adjacent with neighbor 10.0.0.8
Restore the Default Neighbor ProbeRetransmission LimitThis example restores the default neighbor probe retransmission limit to 10 consecutive LSAtransmissions.
Restore the default neighbor probe retransmission limit.
SEFOS(config-if)# no ipv6 ospf neighbor-probe retransmit-limit
Configure the Neighbor Probe IntervalThis example specifies that the neighbor will be probed every 130 seconds.
1. Configure the neighbor probe interval for the specified interface.

Restore the Default Neighbor Probe Interval
52 Sun Ethernet Fabric Operating System OSPFv3 Administration Guide • July 2015
SEFOS(config)# interface vlan 10
SEFOS(config-if)# ipv6 ospf demand-circuit
SEFOS(config-if)# ipv6 ospf neighbor-probe interval 130
2. Ensure that the specified interface will be probed at the correct interval.
SEFOS# show ipv6 ospf interface vlan 10
Ospfv3 Interface Information
Interface Name: vlan10 Interface Id: 41 Area Id: 0.0.0.6
Local Address: fe80::214:4fff:fe6c:628f Router Id: 10.0.0.1
Network Type: BROADCAST Cost: 1 State: BACKUP
Designated Router Id: 10.0.0.8 local address: fe80::214:4fff:fe6c:d04d
Backup Designated Router Id: 10.0.0.1 local address: fe80::214:4fff:fe6c:628f
Transmit Delay: 1 sec Priority: 1 IfOptions: 0x0
Timer intervals configured:
Hello: 10, Dead: 40, Retransmit: 5, Poll: 120
Demand Circuit: Enable Neighbor Probing: Enable
Nbr Probe Retrans Limit: 10 Nbr Probe Interval: 130
Hello due in 2 sec
Neighbor Count is: 1
Adjacent with neighbor 10.0.0.8
Restore the Default Neighbor Probe Interval
This example restores the default neighbor probe interval as 120 seconds.
Restore the default neighbor probe interval.
SEFOS(config-if)# no ipv6 ospf neighbor-probe interval
Configuring a Passive Interface
You can configure a passive interface to suppress routing updates on all interfaces or specifiedinterfaces. If you configure a passive interface for all interfaces, all OSPF interfaces will bepassive. This situation is useful in ISP environments and for large enterprise networks, wheremany of the distribution routers have more than 200 interfaces.
■ “Configure All Interfaces To Be Passive” on page 53■ “Configure Specified Interfaces To Be Passive” on page 53

Configure All Interfaces To Be Passive
Configuring OSPFv3 Features 53
■ “Restore the Default Routing Updates” on page 54
Configure All Interfaces To Be Passive
If you want to configure all interfaces to be passive, you must do so before you create theinterfaces.
1. Enable OSPF globally in SEFOS1.
SEFOS(config)# ipv6 router ospf
2. Suppress routing updates.
SEFOS(config-router)# passive-interface
SEFOS(config-router)# end
3. Configure the interface, then view the modified configuration.
SEFOS# show ipv6 ospf interface vlan 10
Ospfv3 Interface Information
Interface Name: vlan10 Interface Id: 41 Area Id: 0.0.0.6
Local Address: fe80::214:4fff:fe6c:628f Router Id: 10.0.0.1
Network Type: BROADCAST Cost: 1 State: DR
Designated Router Id: 10.0.0.1 local address: fe80::214:4fff:fe6c:628f
Backup Designated Router Id: 0.0.0.0 local address: (null)
Transmit Delay: 1 sec Priority: 1 IfOptions: 0x0
Timer intervals configured:
Hello: 10, Dead: 40, Retransmit: 5, Poll: 120
Demand Circuit: Disable Neighbor Probing: Disable
Nbr Probe Retrans Limit: 10 Nbr Probe Interval: 120
No Hellos (Passive interface)
Neighbor Count is: 0
Configure Specified Interfaces To Be Passive
If you don't want to configure all interfaces to be passive, you can specify which interfacesshould be passive.
This example configures VLAN 10 as a passive interface.
1. Identify the interface that should be passive and suppress routing updates.
Restore the Default Routing Updates
54 Sun Ethernet Fabric Operating System OSPFv3 Administration Guide • July 2015
SEFOS(config)# interface vlan 10
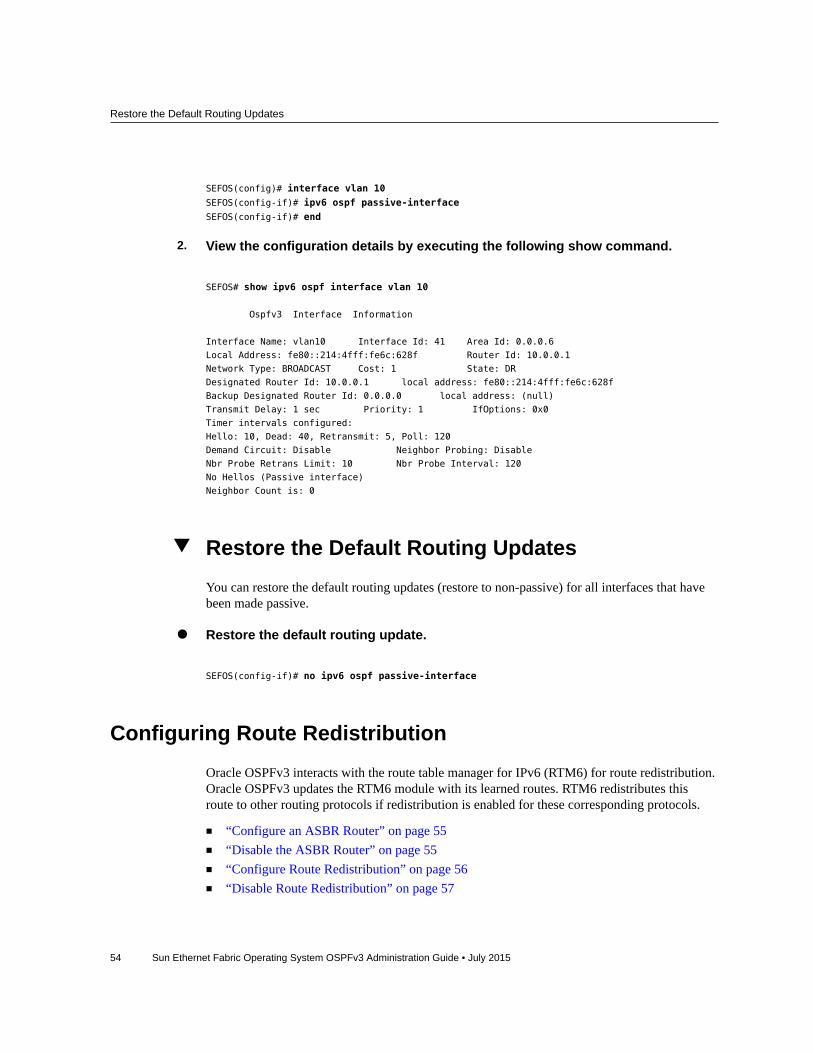
SEFOS(config-if)# ipv6 ospf passive-interface
SEFOS(config-if)# end
2. View the configuration details by executing the following show command.
SEFOS# show ipv6 ospf interface vlan 10
Ospfv3 Interface Information
Interface Name: vlan10 Interface Id: 41 Area Id: 0.0.0.6
Local Address: fe80::214:4fff:fe6c:628f Router Id: 10.0.0.1
Network Type: BROADCAST Cost: 1 State: DR
Designated Router Id: 10.0.0.1 local address: fe80::214:4fff:fe6c:628f
Backup Designated Router Id: 0.0.0.0 local address: (null)
Transmit Delay: 1 sec Priority: 1 IfOptions: 0x0
Timer intervals configured:
Hello: 10, Dead: 40, Retransmit: 5, Poll: 120
Demand Circuit: Disable Neighbor Probing: Disable
Nbr Probe Retrans Limit: 10 Nbr Probe Interval: 120
No Hellos (Passive interface)
Neighbor Count is: 0
Restore the Default Routing Updates
You can restore the default routing updates (restore to non-passive) for all interfaces that havebeen made passive.
Restore the default routing update.
SEFOS(config-if)# no ipv6 ospf passive-interface
Configuring Route Redistribution
Oracle OSPFv3 interacts with the route table manager for IPv6 (RTM6) for route redistribution.Oracle OSPFv3 updates the RTM6 module with its learned routes. RTM6 redistributes thisroute to other routing protocols if redistribution is enabled for these corresponding protocols.
■ “Configure an ASBR Router” on page 55■ “Disable the ASBR Router” on page 55■ “Configure Route Redistribution” on page 56■ “Disable Route Redistribution” on page 57
Configure an ASBR Router
Configuring OSPFv3 Features 55
■ “Configure the Stub Area, ASBR, and Route Distribution” on page 57
Configure an ASBR Router
Routers that act as gateways (redistribution) between OSPF and other routing protocols (IGRP,EIGRP, RIP, BGP, static) or other instances of the OSPF routing process, are called ASBRs. AnASBR must be enabled for routes to be redistributed from other protocols.
This example configures router 10.0.0.1 to act as an ASBR.
1. Configure a router as an ASBR.
SEFOS(config)# ipv6 router ospf
SEFOS(config-router)# asbr router
SEFOS(config-router)# end
2. Ensure that the router is configured as an ASBR.
SEFOS# show ipv6 ospf
Router Id: 10.0.0.1 ABR Type: Standard ABR
SPF schedule delay: 5 secs Hold time between two SPFs: 10 secs
Exit Overflow Interval: 0 Ref BW: 100000 Ext Lsdb Limit: -1
Trace Value: 0x00000800 As Scope Lsa: 0 Checksum Sum: 0x0
Demand Circuit: Enable Passive Interface: Disable
Nssa Asbr Default Route Translation: Disable
It is an Area Border Router
Autonomous System Boundary Router
Number of Areas in this router 2
Area 0.0.0.0
Number of interfaces in this area is 1
Number of Area Scope Lsa: 5 Checksum Sum: 0x2caf7
Number of Indication Lsa: 0 SPF algorithm executed: 7 times
Area 0.0.0.6
Number of interfaces in this area is 1
Number of Area Scope Lsa: 5 Checksum Sum: 0x3507d
Number of Indication Lsa: 0 SPF algorithm executed: 7 times
Disable the ASBR Router
This example disables the ASBR status of the router. Once you disable ASBR status, a router nolonger redistributes routes into OSPFv3.
Disable ASBR in the router.

Configure Route Redistribution
56 Sun Ethernet Fabric Operating System OSPFv3 Administration Guide • July 2015
SEFOS(config-if)# no asbr router
Configure Route Redistribution
All OSPFv3 routes are maintained in RTM6. The RTM redistributes the best route. The RTM6allows different routing protocols to exchange IPv6 routing information. This section describesthe CLI and SNMP modes of configuration for route redistribution (static or dynamic) torouting protocols registered with RTM6.
While configuring redistribution, the protocol with routes to be redistributed into OSPFv3 isalso configured.
This example enables route redistribution on SEFOS4 and specifies that static routes areredistributed.
1. Enter Global Configuration mode in SEFOS4.
SEFOS# configure terminal
2. Enable OSPF globally in SEFOS4.
SEFOS(config)# ipv6 router ospf
3. Configure the OSPF router ID.
SEFOS(config-router)# router-id 10.0.0.4
4. Configure the router as ASBR router.
SEFOS(config-router)# asbr router
5. Configure the redistribution of static routes.
SEFOS(config-router)# redistribute static
6. View the configuration.
SEFOS# show running-config ospf3
Building configuration...
ipv6 router ospf
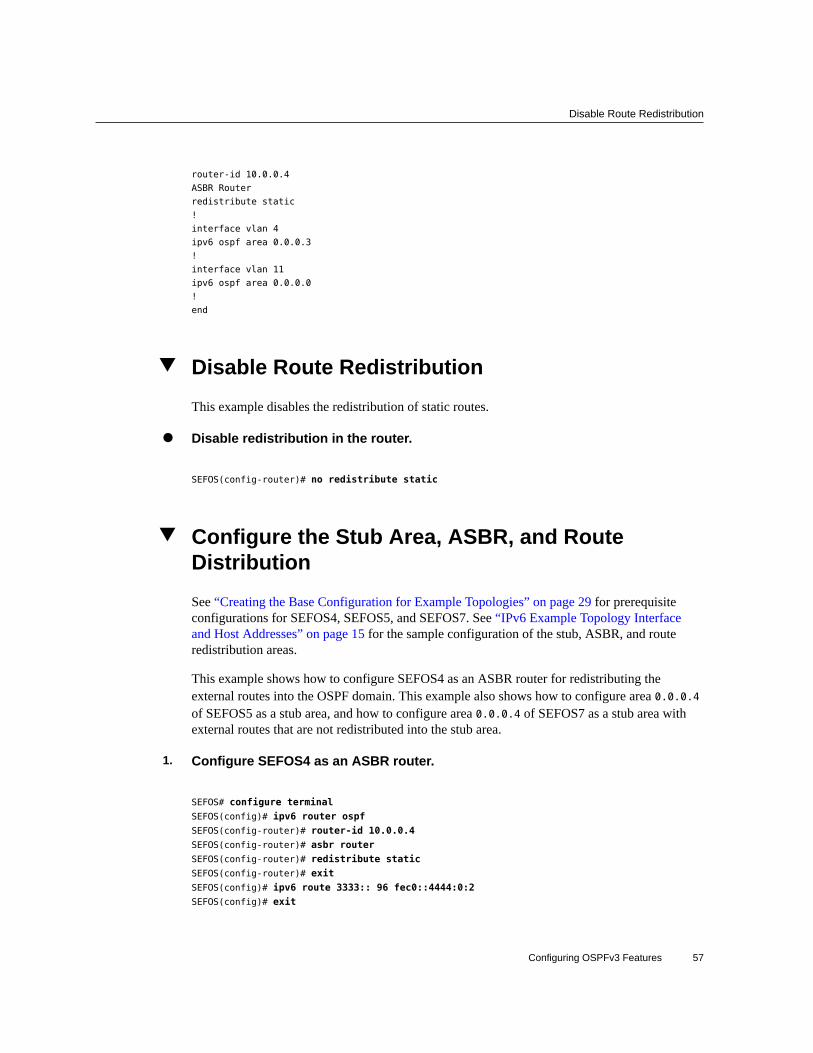
Disable Route Redistribution
Configuring OSPFv3 Features 57
router-id 10.0.0.4
ASBR Router
redistribute static
!
interface vlan 4
ipv6 ospf area 0.0.0.3
!
interface vlan 11
ipv6 ospf area 0.0.0.0
!
end
Disable Route Redistribution
This example disables the redistribution of static routes.
Disable redistribution in the router.
SEFOS(config-router)# no redistribute static
Configure the Stub Area, ASBR, and RouteDistribution
See “Creating the Base Configuration for Example Topologies” on page 29 for prerequisiteconfigurations for SEFOS4, SEFOS5, and SEFOS7. See “IPv6 Example Topology Interfaceand Host Addresses” on page 15 for the sample configuration of the stub, ASBR, and routeredistribution areas.
This example shows how to configure SEFOS4 as an ASBR router for redistributing theexternal routes into the OSPF domain. This example also shows how to configure area 0.0.0.4of SEFOS5 as a stub area, and how to configure area 0.0.0.4 of SEFOS7 as a stub area withexternal routes that are not redistributed into the stub area.
1. Configure SEFOS4 as an ASBR router.
SEFOS# configure terminal
SEFOS(config)# ipv6 router ospf
SEFOS(config-router)# router-id 10.0.0.4
SEFOS(config-router)# asbr router
SEFOS(config-router)# redistribute static
SEFOS(config-router)# exit
SEFOS(config)# ipv6 route 3333:: 96 fec0::4444:0:2
SEFOS(config)# exit

Configure the Stub Area, ASBR, and Route Distribution
58 Sun Ethernet Fabric Operating System OSPFv3 Administration Guide • July 2015
2. Configure a stub area in SEFOS5.
SEFOS# configure terminal
SEFOS(config)# ipv6 router ospf
SEFOS(config-router)# router-id 10.0.0.5
SEFOS(config-router)# area 0.0.0.4 stub
SEFOS(config-router)# exit
3. Configure a stub area in SEFOS7.
SEFOS# configure terminal
SEFOS(config)# ipv6 router ospf
SEFOS(config-router)# router-id 10.0.0.7
SEFOS(config-router)# area 0.0.0.4 stub
SEFOS(config-router)# exit
4. View the configuration details in SEFOS4.
SEFOS# show ipv6 ospf route
****************************************************
Dest/Prefix-Length NextHop/IfIndex Cost Rt.Type Area
fec0::3003:0:0/96 fe80::207:2ff:fe03:401/vlan4 2 interArea 0.0.0.0
fec0::4444:0:0/96 :: /vlan4 1 intraArea 0.0.0.0
SEFOS# show ipv6 ospf database as-external detail
Age: 0 Seconds LS Type: External Lsa
Link State Id: 0.0.0.2 Adv Rtr Id: 10.0.0.4
Sequence: 0x80000001 Checksum: 0x0bc4 Length: 56
Metric Type: Ext Type2 Metric: 0xa
Prefix Length: 96 Prefix Options: 0x00
Referenced LS Type: 0
Address Prefix: 3333::
Fw Address Prefix: 3333::fec0:0
External Route Tag: 0
5. Ensure that the external routes are redistributed in SEFOS5.
SEFOS# show ipv6 ospf route
OSPFV3 Process Routing Table
Dest/Prefix-Length NextHop/IfIndex Cost Rt.Type Area
3333::/96 fec0::4444:0:2/vlan4 10 type2Ext 0.0.0.0SEFOS# show ipv6 ospf database
as-external detailfec0::3003:0:0/96 ::/vlan5 1 intraArea 0.0.0.4
fec0::4444:0:0/96 ::/vlan4 1 intraArea 0.0.0.3Age: 63 Seconds LS
Type: External LsaLink State Id: 0.0.0.2 Adv Rtr Id: 10.0.0.4Sequence: 0x80000001
Checksum: 0x0bc4 Length: 56Metric Type: Ext Type2 Metric: 0xaPrefix Length: 96

Configuring Attributes for Redistributed Routes
Configuring OSPFv3 Features 59
Prefix Options: 0x00Referenced LS Type: 0Addres Prefix: 3333::Fw Addres Prefix: 3333::
fec0:0External Route Tag: 0
Configuring Attributes for Redistributed RoutesWhen you configure redistributed routes (using the redist-config command), the informationto be applied to routes learned from RTM is configured by default.
■ “Configure Redistributed Route Attributes” on page 59■ “Delete Redistributed Route Attributes” on page 60
Configure Redistributed Route AttributesThis example configures the IPv6 address prefix as 3333::, with a prefix length of 64. Themetric value of 100 is applied to the route before it is advertised to the OSPFv3 domain, with ametric type of as Exttype1 and a tag of 10.
1. Enter the Global Configuration mode in SEFOS1.
SEFOS# configure terminal
2. Enable OSPF globally in SEFOS1.
SEFOS(config)# ipv6 router ospf
3. Configure the OSPF router ID.
SEFOS(config-router)# router-id 10.0.0.1
4. Configure the ASBR router.
SEFOS(config-router)# asbr router
5. Configure the redistribution of static routes.
SEFOS(config-router)# redistribute static
6. Configure the redistribution configuration.

Delete Redistributed Route Attributes
60 Sun Ethernet Fabric Operating System OSPFv3 Administration Guide • July 2015
SEFOS(config-router)# redist-config 3333:: 64 metric-value 100 metric-type asExttype1 tag
10
7. View the effect of the configuration.
SEFOS# show running-config ospf3
Building configuration...
ipv6 router ospf
router-id 10.0.0.1
ASBR Router
passive-interface
redistribute static
redist-config 3333:: 64 metric-value 100 metric-type asExttype1 tag 10
!
interface vlan 11
ipv6 ospf area 0.0.0.0
ipv6 ospf passive-interface
!
interface vlan 10
ipv6 ospf area 0.0.0.6
ipv6 ospf passive-interface
!
end
Delete Redistributed Route AttributesYou can delete the information applied to the routes learned from RTM.
Delete redistributed route attributes.
SEFOS(config-router)# no redist-config 3333:: 64
Configuring the Redistribution of RoutesSee “IPv6 Example Topology Interface and Host Addresses” on page 15 for the topology usedto configure and test route redistribution. See “Creating the Base Configuration for ExampleTopologies” on page 29 for some basic configuration steps that you need to complete beforeconfiguring OSPFv3.
■ “Configure Route Redistribution” on page 61■ “Restore the Default Redistribution Configuration” on page 62

Configure Route Redistribution
Configuring OSPFv3 Features 61
Configure Route Redistribution
This example shows how to configure the information to be applied to routes learned fromRTM in SEFOS1. The IPv6 address prefix is 3333::1111:0:0, with a length of 96. A metricvalue of 100 is applied to the route before it is advertised to the OSPFv3 domain. A tag with thevalue 10 is applied to the sample route.
1. Test the redistribution configuration in SEFOS1.
SEFOS# configure terminal
SEFOS(config)# ipv6 router ospf
2. Configure redistribution of static route's redistribution configuration.
SEFOS(config-router)# redistribute static
3. Configure redistribution configuration.
SEFOS(config-router)# redist-config 3333::1111:0:0 96 metric-value 100 metric-type
asExttype1 tag 10
SEFOS(config-router)# exit
4. Add a static route for the network.
SEFOS(config)# ipv6 route 3333::1111:0:0 96 fec0::1111:0:2
SEFOS(config)# endSEFOS#
5. View the configuration details in SEFOS1.An external LSA is generated for 3333::1111:0:0 with metric as 100, metric type asasExtType1, and tag as 10.
SEFOS# show ipv6 ospf database as-external detail
Age: 0 Seconds LS Type: External Lsa
Link State Id: 0.0.0.1 Adv Rtr Id: 10.0.0.1
Sequence: 0x80000001 Checksum: 0x6151 Length: 60
Metric Type: Ext Type1 Metric: 0x64
Prefix Length: 96 Prefix Options: 0x00
Referenced LS Type: 0
Addres Prefix: 3333::1111:0:0
Fw Addres Prefix: 3333::1111:fec0:0
External Route Tag: 10
6. View the configuration details in SEFOS2.

Restore the Default Redistribution Configuration
62 Sun Ethernet Fabric Operating System OSPFv3 Administration Guide • July 2015
View the external route 3333::1111:0:0 with metric as 101.
SEFOS# show ipv6 ospf route
OSPFV3 Process Routing Table
Dest/Prefix-Length NextHop/IfIndex Cost Rt.Type Area
3333::1111:0:0/96 fec0::1111:0:2/vlan11 101 type1Ext 0.0.0.0
fec0::1111:0:0/96 ::/vlan11 1 intraArea 0.0.0.0
fec0::4444:0:0/96 ::/vlan4 1 intraArea 0.0.0.3
Restore the Default Redistribution Configuration
The following example deletes the external LSA generated for 3333::1111:0:0, and a newexternal LSA is generated with the default redistribution configuration.
1. Test no redist-config in SEFOS1.
SEFOS# configure terminal
SEFOS(config)# ipv6 router ospf
2. Restore the default redistribution configuration.
SEFOS(config-router)# no redist-config 3333::1111:0:0 96
SEFOS(config-router)# end
3. View the configuration details in SEFOS1.
SEFOS# show ipv6 ospf database as-external detail
Age: 0 Seconds LS Type: External Lsa
Link State Id: 0.0.0.1 Adv Rtr Id: 10.0.0.1
Sequence: 0x80000006 Checksum: 0x947e Length: 56
Metric Type: Ext Type2 Metric: 0xa
Prefix Length: 96 Prefix Options: 0x00
Referenced LS Type: 0
Addres Prefix: 3333::1111:0:0
Fw Addres Prefix: 3333::1111:fec0:0
External Route Tag: 0
Configuring Area Route Summarization
These sections show how to configure area route summarization.
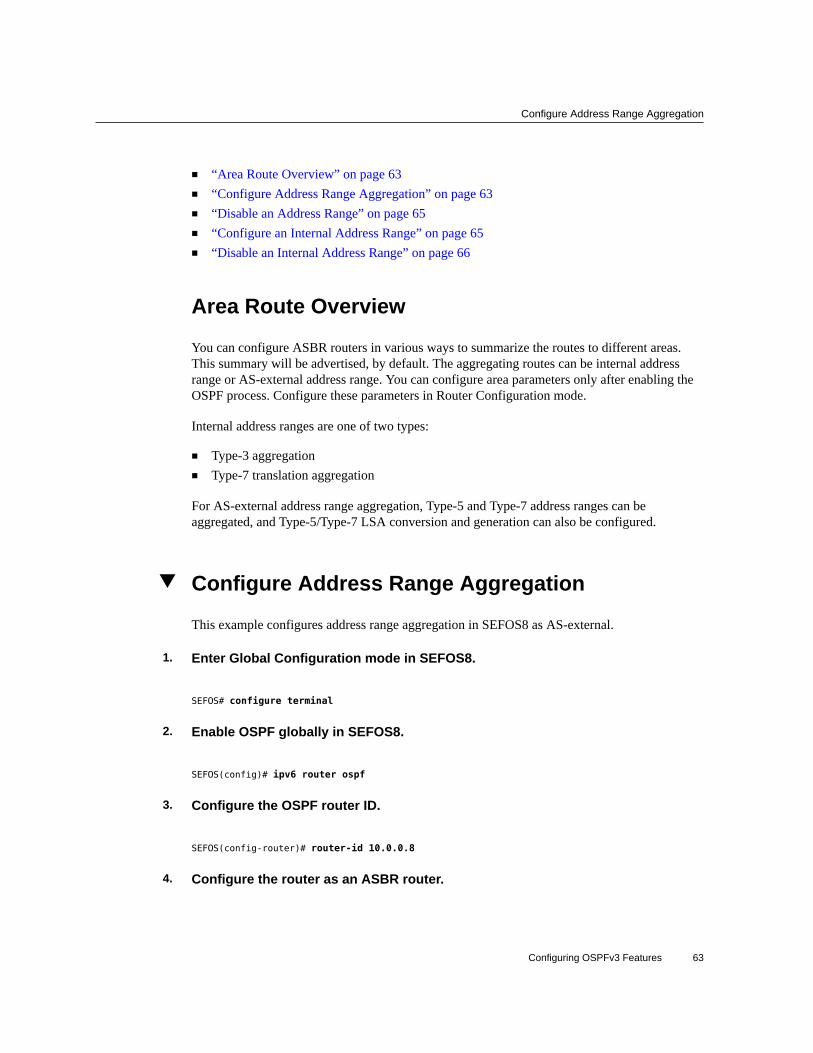
Configure Address Range Aggregation
Configuring OSPFv3 Features 63
■ “Area Route Overview” on page 63■ “Configure Address Range Aggregation” on page 63■ “Disable an Address Range” on page 65■ “Configure an Internal Address Range” on page 65■ “Disable an Internal Address Range” on page 66
Area Route Overview
You can configure ASBR routers in various ways to summarize the routes to different areas.This summary will be advertised, by default. The aggregating routes can be internal addressrange or AS-external address range. You can configure area parameters only after enabling theOSPF process. Configure these parameters in Router Configuration mode.
Internal address ranges are one of two types:
■ Type-3 aggregation■ Type-7 translation aggregation
For AS-external address range aggregation, Type-5 and Type-7 address ranges can beaggregated, and Type-5/Type-7 LSA conversion and generation can also be configured.
Configure Address Range Aggregation
This example configures address range aggregation in SEFOS8 as AS-external.
1. Enter Global Configuration mode in SEFOS8.
SEFOS# configure terminal
2. Enable OSPF globally in SEFOS8.
SEFOS(config)# ipv6 router ospf
3. Configure the OSPF router ID.
SEFOS(config-router)# router-id 10.0.0.8
4. Configure the router as an ASBR router.

Configure Address Range Aggregation
64 Sun Ethernet Fabric Operating System OSPFv3 Administration Guide • July 2015
SEFOS(config-router)# asbr router
SEFOS(config-router)# redistribute static
SEFOS(config-router)# exit
5. Add static routes.
SEFOS(config)# ipv6 route 3333::2222:0:0 96 fec0::2856:0:1
SEFOS(config)# ipv6 route 3333::4444:0:0 96 fec0::2886:0:10
6. View the database.
SEFOS# show ipv6 ospf database as-external detail
Age: 0 Seconds LS Type: External Lsa
Link State Id: 0.0.0.1 Adv Rtr Id: 10.0.0.8
Sequence: 0x80000001 Checksum: 0x593a Length: 56
Metric Type: Ext Type2 Metric: 0xa
Prefix Length: 96 Prefix Options: 0x00
Referenced LS Type: 0
Addres Prefix: 3333::2222:0:0
Fw Addres Prefix: 3333::2222:fec0:0
External Route Tag: 0
Age: 0 Seconds LS Type: External Lsa
Link State Id: 0.0.0.2 Adv Rtr Id: 10.0.0.8
Sequence: 0x80000001 Checksum: 0x1f80 Length: 40
Metric Type: Ext Type2 Metric: 0xa
Prefix Length: 96 Prefix Options: 0x00
Referenced LS Type: 0
Addres Prefix: 3333::4444:0:0
Fw Addres Prefix: 3333::4444:0:0
External Route Tag: 0
7. Configure the entire summary for this 3333:: address range.
SEFOS(config-router)# area 0.0.0.0 summary-prefix 3333:: 64 advertise
8. View the configuration results in SEFOS8.
SEFOS# show ipv6 ospf database as-external detail
Age: 3 Seconds LS Type: External Lsa
Link State Id: 0.0.0.3 Adv Rtr Id: 10.0.0.8
Sequence: 0x80000001 Checksum: 0xb496 Length: 36
Metric Type: Ext Type2 Metric: 0xa
Prefix Length: 64 Prefix Options: 0x00
Referenced LS Type: 0
Addres Prefix: 3333::
Fw Addres Prefix: 3333::

Disable an Address Range
Configuring OSPFv3 Features 65
External Route Tag: 0
Disable an Address RangeThis example disables the entire range that is not to be advertised.
1. Disable a previously specified range so that it is not advertised.
SEFOS(config-router)# area 0.0.0.0 summary-prefix 3333:: 64 not-advertise
2. Verify that the database entry has been removed.
SEFOS# show ipv6 ospf database as-external detail
Configure an Internal Address RangeThis example configures an internal address range in SEFOS1.
1. Enter Global Configuration mode in SEFOS1.
SEFOS# configure terminal
2. Enable OSPF globally in SEFOS1.
SEFOS(config)# ipv6 router ospf
3. Configure the OSPF router ID.
SEFOS(config-router)# router-id 10.0.0.1
4. Configure the entire summary for this fec0::1111:0:0 address range.
SEFOS(config-router)# area 0.0.0.6 range fec0::1111:0:0 96 advertise summary
5. View the results in SEFOS1.
SEFOS# show ipv6 ospf area 0.0.0.0 database detail
Age: 0 Seconds LS Type: Link Lsa
Link State Id: 0.0.0.41 Adv Rtr Id: 10.0.0.1

Disable an Internal Address Range
66 Sun Ethernet Fabric Operating System OSPFv3 Administration Guide • July 2015
Sequence: 0x8000001f Checksum: 0xc50c Length: 60
Router Priority: 1 Options: 0x33
Prefix: fe80::214:4fff:fe6c:628f
#Prefixes: 1
Prefix Length (Bytes): 12 Prefix Options: 0x00
Prefix: fec0::2856:0:0
Age: 3 Seconds LS Type: Link Lsa
Link State Id: 0.0.0.40 Adv Rtr Id: 10.0.0.8
Sequence: 0x8000001f Checksum: 0xda3b Length: 60
Router Priority: 1 Options: 0x33
Prefix: fe80::221:28ff:fe54:7069
#Prefixes: 1
Prefix Length (Bytes): 12 Prefix Options: 0x00
Prefix: fec0::2856:0:0
Age: 0 Seconds LS Type: Router Lsa
Link State Id: 0.0.0.0 Adv Rtr Id: 10.0.0.1
Sequence: 0x80000020 Checksum: 0x0e62 Length: 40
Router is an Area Border Router
Number of Links: 1 Options: 0x33
Link connected to : transit network
Metric: 0x1 Interface Id: 41
Nbr Interface Id: 40 Nbr Router Id: 10.0.0.8
Age: 3 Seconds LS Type: Router Lsa
Link State Id: 0.0.0.0 Adv Rtr Id: 10.0.0.8
Sequence: 0x80000020 Checksum: 0xd890 Length: 40
Router is an AS Boundary Router
Number of Links: 1 Options: 0x33
Link connected to : transit network
Metric: 0x1 Interface Id: 40
Nbr Interface Id: 40 Nbr Router Id: 10.0.0.8
Age: 3 Seconds LS Type: Network Lsa
Link State Id: 0.0.0.40 Adv Rtr Id: 10.0.0.8
Sequence: 0x8000001f Checksum: 0xabe7 Length: 32
Options: 0x33
Attached Router: 10.0.0.8
Attached Router: 10.0.0.1
Age: 3 Seconds LS Type: Intra Area Prefix Lsa
Link State Id: 0.0.0.0 Adv Rtr Id: 10.0.0.8
Sequence: 0x80000040 Checksum: 0xdff7 Length: 48
#Prefixes: 1 Referenced LS Type: Network Lsa
Ref Link State Id: 0.0.0.40 Ref Adv Router: 10.0.0.8
Prefix Length (Bytes): 12 Prefix Options: 0x00
Metric: 0x0
Prefix: fec0::2856:0:0
Disable an Internal Address Range
This example disables an internal range that is not to be advertised.

Disable an Internal Address Range
Configuring OSPFv3 Features 67
1. Ensure that the entire summary for this fec0::1111:0:0 address range is notadvertised.
SEFOS(config-router)# area 0.0.0.6 range fec0::1111:0:0 96 not-advertise summary
2. In SEFOS1, check whether the inter area prefix LSA advertised by 10.0.0.1 ismissing.
SEFOS# show ipv6 ospf area 0.0.0.0 database detail
Age: 0 Seconds LS Type: Link Lsa
Link State Id: 0.0.0.34 Adv Rtr Id: 10.0.0.1
Sequence: 0x80000003 Checksum: 0xb6f4 Length: 60
Router Priority: 1 Options: 0x33
Prefix: fe80::201:2ff:fe03:401
#Prefixes: 1
Prefix Length (Bytes): 12 Prefix Options: 0x00
Prefix: fec0::2856:0:0
Age: 3 Seconds LS Type: Link Lsa
Link State Id: 0.0.0.34 Adv Rtr Id: 10.0.0.8
Sequence: 0x80000002 Checksum: 0x9e06 Length: 60
Router Priority: 1 Options: 0x33
Prefix: fe80::202:2ff:fe03:401
#Prefixes: 1
Prefix Length (Bytes): 12 Prefix Options: 0x00
Prefix: fec0::2856:0:0
Age: 0 Seconds LS Type: Router Lsa
Link State Id: 0.0.0.0 Adv Rtr Id: 10.0.0.1
Sequence: 0x80000003 Checksum: 0x7921 Length: 40
Router is an Area Border Router
Number of Links: 1 Options: 0x33
Link connected to : transit network
Metric: 0x1 Interface Id: 34
Nbr Interface Id: 34 Nbr Router Id: 10.0.0.8
Age: 3 Seconds LS Type: Router Lsa
Link State Id: 0.0.0.0 Adv Rtr Id: 10.0.0.8
Sequence: 0x80000003 Checksum: 0x5240 Length: 40
Router is an AS Boundary Router
Number of Links: 1 Options: 0x33
Link connected to : transit network
Metric: 0x1 Interface Id: 34
Nbr Interface Id: 34 Nbr Router Id: 10.0.0.8
Age: 3 Seconds LS Type: Network Lsa
Link State Id: 0.0.0.34 Adv Rtr Id: 10.0.0.8
Sequence: 0x80000002 Checksum: 0x2294 Length: 32
Options: 0x33
Attached Router: 10.0.0.8
Attached Router: 10.0.0.1

Configuring a Stub Area
68 Sun Ethernet Fabric Operating System OSPFv3 Administration Guide • July 2015
Age: 3 Seconds LS Type: Intra Area Prefix Lsa
Link State Id: 0.0.0.0 Adv Rtr Id: 10.0.0.8
Sequence: 0x80000006 Checksum: 0x18ff Length: 48
#Prefixes: 1 Referenced LS Type: Network Lsa
Ref Link State Id: 0.0.0.34 Ref Adv Router: 10.0.0.8
Prefix Length (Bytes): 12 Prefix Options: 0x00
Metric: 0x0
Prefix: fec0::2856:0:0
Configuring a Stub AreaIf an area is configured as a stub area, you can inject summary routes into it. You can alsoconfigure other parameters related to that area.
In a stub area, the generation of summary LSAs is optional. If you specify the no-summaryoption, the router will not propagate summary LSAs. By default, the stub area sends summaryinformation.
You can configure area parameters only after enabling the OSPF process. Configure theseparameters in Router Configuration mode.
■ “Configure a Stub Area” on page 68■ “Convert a Stub Area to a Normal Area” on page 69■ “Configure a Default Summary Route for a Stub Area” on page 69■ “Configure the Default Summary Route Cost for a Stub Area” on page 70
Configure a Stub Area
This example configures the IP address 0.0.0.6 as a stub area in SEFOS1 (router ID10.0.0.1).
1. Enter Global Configuration mode in SEFOS1.
SEFOS# configure terminal
2. Enable OSPF globally in SEFOS1.
SEFOS(config)# ipv6 router ospf
3. Configure the OSPF router ID.

Convert a Stub Area to a Normal Area
Configuring OSPFv3 Features 69
SEFOS(config-router)# router-id 10.0.0.1
4. Configure the desired area associated with the OSPF address range as a stubarea.
SEFOS(config-router)# area 0.0.0.6 stub
SEFOS(config-router)# end
5. Ensure that the stub area is created.
SEFOS# show ipv6 ospf areas
OSPFV3 AREA CONFIGURATION INFORMATION
AreaId: 0.0.0.0 Area Type: NORMAL AREA
Spf Calculation: 4 (times) Area Bdr Rtr Count: 0
As Bdr Rtr Count: 0 Area Summary: Send Summary
AreaId: 0.0.0.6 Area Type: STUB AREA
Spf Calculation: 4 (times) Area Bdr Rtr Count: 0
As Bdr Rtr Count: 0 Area Summary: Send Summary
Stub Metric: 0x1 Stub Metric Type: 1
Convert a Stub Area to a Normal AreaYou can convert an area previously identified as a stub area to a normal area.
This example reconfigures area 0.0.0.6 as a normal area.
Return a stub area to a normal area.
SEFOS(config-router)# no area 0.0.0.6 stub
Configure a Default Summary Route for a StubArea
Configuring a stub area with the no-summary option specifies that the router will neitheroriginate nor propagate summary LSAs into the stub area, and will, instead, depend entirely onits default route. You can specify the no-summary option only in ABRs.
This example configures the IP address 0.0.0.6 as a stub area in SEFOS1 (router ID10.0.0.1), with no summary LSAs being originated or propagated by the router to the stubarea.

Configure the Default Summary Route Cost for a Stub Area
70 Sun Ethernet Fabric Operating System OSPFv3 Administration Guide • July 2015
1. Enter Global Configuration mode in SEFOS1.
SEFOS# configure terminal
2. Enable OSPF globally in SEFOS1.
SEFOS(config)# ipv6 router ospf
3. Configure the OSPF router ID.
SEFOS(config-router)# router-id 10.0.0.1
4. Configure the area 0.0.0.6 as a stub area.
SEFOS(config-router)# area 0.0.0.6 stub no-summary
SEFOS(config-router)# end
5. Ensure that the default summary route is set.
SEFOS# show ipv6 ospf areasOSPFV3 AREA CONFIGURATION INFORMATION
AreaId: 0.0.0.0 Area Type: NORMAL AREA
Spf Calculation: 10 (times) Area Bdr Rtr Count: 0
As Bdr Rtr Count: 0 Area Summary: Send Summary
AreaId: 0.0.0.6 Area Type: STUB AREA
Spf Calculation: 10 (times) Area Bdr Rtr Count: 0
As Bdr Rtr Count: 0 Area Summary: No Summary
Stub Metric: 0x1 Stub Metric Type: 1
Configure the Default Summary Route Cost for aStub Area
If default summary routes are selected, you can configure the cost for the default summary routethat is sent to a stub area.
1. Enter Global Configuration mode in SEFOS1.
SEFOS# configure terminal
2. Enable OSPF globally in SEFOS1.

Configuring an NSSA
Configuring OSPFv3 Features 71
SEFOS(config)# ipv6 router ospf
3. Configure the OSPF router ID.
SEFOS(config-router)# router-id 10.0.0.1
4. Configure the area 0.0.0.6 as a stub area.
SEFOS(config-router)# area 0.0.0.6 stub
5. Configure the cost as 20.
SEFOS(config-router)# area 0.0.0.6 default-metric 20
SEFOS(config-router)# end
6. Ensure that the correct cost is set.
SEFOS# show ipv6 ospf areas
OSPFV3 AREA CONFIGURATION INFORMATION
AreaId: 0.0.0.0 Area Type: NORMAL AREA
Spf Calculation: 11 (times) Area Bdr Rtr Count: 0
As Bdr Rtr Count: 0 Area Summary: Send Summary
AreaId: 0.0.0.6 Area Type: STUB AREA
Spf Calculation: 11 (times) Area Bdr Rtr Count: 0
As Bdr Rtr Count: 0 Area Summary: Send Summary
Stub Metric: 0x14 Stub Metric Type: 1
Configuring an NSSAThis section describes various options you can configure when configuring an NSSA.
You can configure area parameters only after enabling the OSPF process. Configure theseparameters in Router Configuration mode.
■ “Configure the Stability Interval for NSSA” on page 72■ “Restore the Default Stability Interval” on page 73■ “Configure an NSSA Translation Role” on page 73■ “Restore the Default Translation Role” on page 74■ “Configure Default Summary Route for an NSSA” on page 74■ “Configure the Metric Type for an NSSA” on page 75

Configure the Stability Interval for NSSA
72 Sun Ethernet Fabric Operating System OSPFv3 Administration Guide • July 2015
Configure the Stability Interval for NSSA
The stability interval is used when an elected translator determines that its services are nolonger required and the translator continues its translation duties for additional time.
This example configures area 0.0.0.6 to be an NSSA with the stability interval set to 120seconds.
1. Enter Global Configuration mode in SEFOS1.
SEFOS# configure terminal
2. Enable OSPF globally in SEFOS1.
SEFOS(config)# ipv6 router ospf
3. Configure the OSPF router ID.
SEFOS(config-router)# router-id 10.0.0.1
4. Configure the ASBR router status.
SEFOS(config-router)# asbr router
5. Configure an area as an NSSA.
SEFOS(config-router)# area 0.0.0.6 nssa
6. Configure the stability interval for the NSSA area.
SEFOS(config-router)# area 0.0.0.6 stability-interval 120
7. Ensure that the stability interval is correct.
SEFOS# show ipv6 ospf areas
OSPFV3 AREA CONFIGURATION INFORMATION
AreaId: 0.0.0.0 Area Type: NORMAL AREA
Spf Calculation: 12 (times) Area Bdr Rtr Count: 0
As Bdr Rtr Count: 0 Area Summary: Send Summary
AreaId: 0.0.0.6 Area Type: NSS AREA

Restore the Default Stability Interval
Configuring OSPFv3 Features 73
Spf Calculation: 12 (times) Area Bdr Rtr Count: 0
As Bdr Rtr Count: 0 Area Summary: Send Summary
Stub Metric: 0x1 Stub Metric Type: 2
Translator Role: Candidate Translator State: Elected/Enabled
Nssa Stability Interval: 120
Restore the Default Stability Interval
This example restores the stability interval for area 0.0.0.0 to the default of 40 seconds.
Restore the default stability interval for the NSSA.
SEFOS(config-router)# no area 0.0.0.6 stability-interval
Configure an NSSA Translation Role
You can configure the translation role for an NSSA to ensure that Type-7 LSAs are alwaystranslated into Type-5 LSAs. Alternatively, the default setting simply identifies an NSSA borderrouter as a candidate that can participate in the translator election process.
This example configures area 0.0.0.6 as an NSSA in SEFOS1 (router ID 10.0.0.1) andspecifies that the border router will always be able to translate Type-7 LSAs into Type-5 LSAs.
1. Enter Global Configuration mode in SEFOS1.
SEFOS# configure terminal
2. Enable OSPF globally in SEFOS1.
SEFOS(config)# ipv6 router ospf
3. Configure the OSPF router ID.
SEFOS(config-router)# router-id 10.0.0.1
4. Configure the ASBR router status.
SEFOS(config-router)# asbr router
5. Configure an area as an NSSA.

Restore the Default Translation Role
74 Sun Ethernet Fabric Operating System OSPFv3 Administration Guide • July 2015
SEFOS(config-router)# area 0.0.0.6 nssa
6. Configure the translator role.
SEFOS(config-router)# area 0.0.0.6 translation-role always
7. Ensure that the translation role is correct.
SEFOS# show ipv6 ospf areas
OSPFV3 AREA CONFIGURATION INFORMATION
AreaId: 0.0.0.0 Area Type: NORMAL AREA
Spf Calculation: 13 (times) Area Bdr Rtr Count: 0
As Bdr Rtr Count: 0 Area Summary: Send Summary
AreaId: 0.0.0.6 Area Type: NSS AREA
Spf Calculation: 13 (times) Area Bdr Rtr Count: 0
As Bdr Rtr Count: 0 Area Summary: Send Summary
Stub Metric: 0x1 Stub Metric Type: 2
Translator Role: Always Translator State: Elected/Enabled
Nssa Stability Interval: 40
Restore the Default Translation Role
This example restores the default translation role to candidate for area 0.0.0.6.
Restore the default translation role.
SEFOS(config-router)# no area 0.0.0.6 translation-role
Configure Default Summary Route for an NSSA
Configuring a NSSA with the no-summary option specifies that the router will neither originatenor propagate summary LSAs into the NSSA, and will, instead, depend entirely on its defaultroute. You can specify the no-summary option only in ABRs.
This example configures area 0.0.0.6 as an NSSA in SEFOS1 (router ID 10.0.0.1), with nosummary LSAs being originated or propagated by the router to the NSSA.
1. Enter Global Configuration mode in SEFOS1.
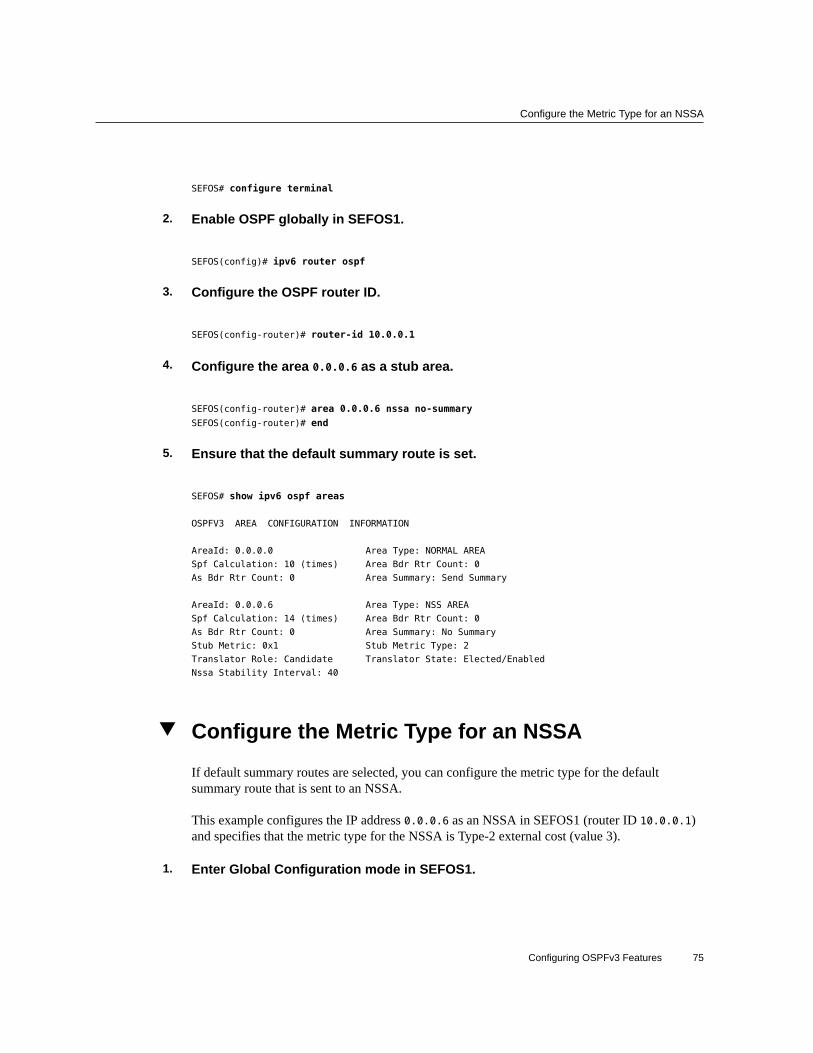
Configure the Metric Type for an NSSA
Configuring OSPFv3 Features 75
SEFOS# configure terminal
2. Enable OSPF globally in SEFOS1.
SEFOS(config)# ipv6 router ospf
3. Configure the OSPF router ID.
SEFOS(config-router)# router-id 10.0.0.1
4. Configure the area 0.0.0.6 as a stub area.
SEFOS(config-router)# area 0.0.0.6 nssa no-summary
SEFOS(config-router)# end
5. Ensure that the default summary route is set.
SEFOS# show ipv6 ospf areas
OSPFV3 AREA CONFIGURATION INFORMATION
AreaId: 0.0.0.0 Area Type: NORMAL AREA
Spf Calculation: 10 (times) Area Bdr Rtr Count: 0
As Bdr Rtr Count: 0 Area Summary: Send Summary
AreaId: 0.0.0.6 Area Type: NSS AREA
Spf Calculation: 14 (times) Area Bdr Rtr Count: 0
As Bdr Rtr Count: 0 Area Summary: No Summary
Stub Metric: 0x1 Stub Metric Type: 2
Translator Role: Candidate Translator State: Elected/Enabled
Nssa Stability Interval: 40
Configure the Metric Type for an NSSA
If default summary routes are selected, you can configure the metric type for the defaultsummary route that is sent to an NSSA.
This example configures the IP address 0.0.0.6 as an NSSA in SEFOS1 (router ID 10.0.0.1)and specifies that the metric type for the NSSA is Type-2 external cost (value 3).
1. Enter Global Configuration mode in SEFOS1.

Configuring the Capability in an NSSA Internal Border Router
76 Sun Ethernet Fabric Operating System OSPFv3 Administration Guide • July 2015
SEFOS# configure terminal
2. Enable OSPF globally in SEFOS1.
SEFOS(config)# ipv6 router ospf
3. Configure the OSPF router ID.
SEFOS(config-router)# router-id 10.0.0.1
4. Configure an area as an NSSA.
SEFOS(config-router)# area 0.0.0.6 nssa
5. Configure the metric type as Type-2 external cost (value 3).
SEFOS(config-router)# area 0.0.0.6 default-metric type 3
SEFOS(config-router)# exit
6. Ensure that the correct metric type is set.
SEFOS# show ipv6 ospf areas
OSPFV3 AREA CONFIGURATION INFORMATION
AreaId: 0.0.0.0 Area Type: NORMAL AREA
Spf Calculation: 14 (times) Area Bdr Rtr Count: 0
As Bdr Rtr Count: 0 Area Summary: Send Summary
AreaId: 0.0.0.6 Area Type: NSS AREA
Spf Calculation: 14 (times) Area Bdr Rtr Count: 0
As Bdr Rtr Count: 0 Area Summary: Send Summary
Stub Metric: 0x1 Stub Metric Type: 3
Translator Role: Candidate Translator State: Elected/Enabled
Nssa Stability Interval: 40
Configuring the Capability in an NSSA Internal BorderRouter
Configuring the p-bit in the Type-7 LSA allows the Type-7 LSA to get converted into a Type-5LSA by the NSSA ABR, or to not to convert it. Type-7 LSAs are generated from an AS-external border router that contains the routing information about the external AS link RIPng,BGP, and the like.

Configure NSSA Type-7/-5 Conversion
Configuring OSPFv3 Features 77
■ “Configure NSSA Type-7/-5 Conversion” on page 77
Configure NSSA Type-7/-5 ConversionSee “NSSA Type-7/-5 Conversion Topology” on page 19 for the NSSA Type-7/-5 conversiontopology created in this example.
1. Configure the interfaces with their corresponding IPv6 address.See “IPv6 Example Topology Interface and Host Addresses” on page 15.
2. Configure OSPFv3 by enabling OSPFv3 routing protocol in VLAN 2 (area 0.0.0.2)on SEFOS9 (router ID 10.0.0.9).
SEFOS(config)# ipv6 router ospf
SEFOS(config-router)# router-id 10.0.0.9
SEFOS(config-router)# ASBR Router
SEFOS(config-router)# redistribute static
SEFOS(config-router)# exit
SEFOS(config)# interface vlan 2
SEFOS(config-if)# ipv6 ospf area 0.0.0.2
SEFOS(config-if)# exit
3. Configure the area as an NSSA.
SEFOS(config)# ipv6 router ospf
SEFOS(config-router)# area 0.0.0.2 nssa
SEFOS(config-router)# end
4. Enable OSPFv3 routing protocol in VLAN 2 (area 0.0.0.2) on SEFOS2 (router ID10.0.0.2).
SEFOS(config)# ipv6 router ospf
SEFOS(config-router)# router-id 10.0.0.2
SEFOS(config-router)# exit
SEFOS(config)# interface vlan 2
SEFOS(config-if)# ipv6 ospf area 0.0.0.2
SEFOS(config-if)# exit
SEFOS(config)# interface vlan 11
SEFOS(config-if)# ipv6 ospf area 0.0.0.0
SEFOS(config-if)# exit
5. Configure area 0.0.0.2 as an NSSA.
SEFOS(config)# ipv6 router ospf

Configure NSSA Type-7/-5 Conversion
78 Sun Ethernet Fabric Operating System OSPFv3 Administration Guide • July 2015
SEFOS(config-router)# area 0.0.0.2 nssa
SEFOS(config-router)# exit
6. Enable OSPFv3 routing protocol on VLAN 11 (area 0.0.0.0) on SEFOS1 (router ID10.0.0.1).
SEFOS(config)# ipv6 router ospf
SEFOS(config-router)# router-id 10.0.0.1
SEFOS(config-router)# exit
SEFOS(config)# interface vlan 11
SEFOS(config-if)# ipv6 ospf area 0.0.0.0
SEFOS(config-if)# exit
SEFOS(config)# ipv6 router ospf
SEFOS(config-router)# end
7. Configure the static route.Add a static route to 4444::/96 through VLAN 1, where the IPv6 address for VLAN 1 onSEFOS9 is 3333::2222:0:1/96, with a next hop of 3333::2222:0:10/96.
SEFOS(config)# ipv6 route 4444:: 96 3333::2222:0:10
SEFOS(config)# exit
8. View the Type-7 and Type-5 LSA. By default the P-bit will be in clear state. Type-7LSAs will be converted into a Type-5 LSA.
■ In SEFOS9, type.
SEFOS# show ipv6 ospf database nssa detail
Age: 42 Seconds LS Type: Type-7 Lsa
Link State Id: 0.0.0.0 Adv Rtr Id: 10.0.0.2
Sequence: 0x80000002 Checksum: 0x0d20 Length: 28
Metric: 0x1
Metric Type: Ext Type1 Prefix Length: 0 Prefix Options: 0x00
Referenced LS Type: 0
Address Prefix: ::10:10f8:5830:300:e450
Fw Address Prefix: 3ddf:c7e8:3ddf:c738:ff4:324:3d50:10
External Route Tag: 0
Age: 0 Seconds LS Type: Type-7 Lsa
Link State Id: 0.0.0.1 Adv Rtr Id: 10.0.0.9
Sequence: 0x80000001 Checksum: 0xe6e5 Length: 56
Metric: 0xa
Metric Type: Ext Type2 Prefix Length: 96 Prefix Options: 0x08
Referenced LS Type: 0
Address Prefix: 4444::300:e450

Configure NSSA Type-7/-5 Conversion
Configuring OSPFv3 Features 79
■ In SEFOS2, type.
SEFOS# show ipv6 ospf database nssa detail
Age: 0 Seconds LS Type: Type-7 Lsa
Link State Id: 0.0.0.0 Adv Rtr Id: 10.0.0.2
Sequence: 0x80000002 Checksum: 0x0d20 Length: 28
Metric: 0x1
Metric Type: Ext Type1 Prefix Length: 0 Prefix Options: 0x00
Referenced LS Type: 0
Address Prefix: ::10:10f8:5920:300:2450
Fw Address Prefix: 3621:828:3621:778:ff4:324:fe4:2988
External Route Tag: 0
Age: 3 Seconds LS Type: Type-7 Lsa
Link State Id: 0.0.0.1 Adv Rtr Id: 10.0.0.9
Sequence: 0x80000001 Checksum: 0xe6e5 Length: 56
Metric: 0xa
Metric Type: Ext Type2 Prefix Length: 96 Prefix Options: 0x08
Referenced LS Type: 0
Address Prefix: 4444::300:2450
■ In SEFOS1, type.
SEFOS# show ipv6 ospf database as-external detail
Age: 3 Seconds LS Type: External Lsa
Link State Id: 0.0.0.1 Adv Rtr Id: 10.0.0.2
Sequence: 0x80000001 Checksum: 0x0bb2 Length: 56
Metric Type: Ext Type2 Metric: 0xa
Prefix Length: 96 Prefix Options: 0x00
Referenced LS Type: 0
Addres Prefix: 4444::
Fw Addres Prefix: 4444::fec0:0
External Route Tag: 0
9. In SEFOS9, set the P-bit in the default Type-7 LSA generated by an NSSA internalASBR.
SEFOS(config)# ipv6 router ospf
SEFOS(config-router)# no nssaAsbrDfRtTrans
10. Configure aggregation, if necessary.
SEFOS(config-router)# area 0.0.0.0 summary-prefix 4444::64 translation disabled

Configuring Virtual Links
80 Sun Ethernet Fabric Operating System OSPFv3 Administration Guide • July 2015
SEFOS(config-router)# exit
11. View the results in SEFOS1.
Note - No external LSA is sent to 10.0.0.1.
SEFOS# show ipv6 ospf database as-external detail
Configuring Virtual Links
You can configure a virtual link to define an OSPF virtual link and its related parameters.In OSPFv3, all areas must be connected to a backbone area. If there is a break in backbonecontinuity, or the backbone is purposefully partitioned, a virtual link can be established. Thetwo endpoints of a virtual link are ABRs. The virtual link must be configured in both routers.
The configuration information in each router consists of the other virtual endpoint (the otherABR) and the non-backbone area that the two routers have in common (called the transit area).
See “Virtual Link and Route Summarization Topology” on page 20 for the topology forconfiguring and testing virtual link and route summarization.
■ “Configure a Virtual Link” on page 80■ “Configure Virtual Link and Route Summarization” on page 81
Configure a Virtual Link
This example configures area 0.0.0.6 as a virtual link, with 20.0.0.1 as the virtual neighbor,and an interface index value of 100.
1. Enter Global Configuration mode in SEFOS1.
SEFOS# configure terminal
2. Enable OSPF globally in SEFOS1.
SEFOS(config)# ipv6 router ospf
3. Configure the OSPF router ID.
SEFOS(config-router)# router-id 10.0.0.1

Delete a Virtual Link
Configuring OSPFv3 Features 81
4. Configure the virtual link.
SEFOS(config-router)# area 0.0.0.6 virtual-link 20.0.0.1 100
5. View the configuration.
Note - The neighbor state will be down until other end of the virtual link becomes active.
SEFOS# show ipv6 ospf virtual-links
Interface State: DOWN, Neighbor State: DOWN
Transit Area: 0.0.0.6, Virtual Neighbor: 20.0.0.1
Intervals Configured for the Virtual Interface:
Hello: 10, Dead: 60, Transit: 1, Retransmit : 5
Delete a Virtual LinkType.
SEFOS(config-router)# no area 0.0.0.6 virtual-link 20.0.0.1 100
Configure Virtual Link and Route Summarization1. Enter Global Configuration mode in SEFOS1.
SEFOS# configure terminal
2. Enable OSPF globally in SEFOS1.
SEFOS(config)# ipv6 router ospf
3. Configure the OSPF router ID.
SEFOS(config-router)# router-id 10.0.0.1
4. Exit Router Configuration mode.
SEFOS(config-router)# end
5. Enter Global Configuration mode in SEFOS4.

Configure Virtual Link and Route Summarization
82 Sun Ethernet Fabric Operating System OSPFv3 Administration Guide • July 2015
SEFOS# configure terminal
6. Enable OSPF globally in SEFOS4.
SEFOS(config)# ipv6 router ospf
7. Configure the OSPF router ID.
SEFOS(config-router)# router-id 10.0.0.4
8. Configure the virtual link for backbone connectivity.
SEFOS(config-router)# area 0.0.0.3 virtual-link 10.0.0.6 100
SEFOS(config-router)# area 0.0.0.3 virtual-link 10.0.0.5 120
9. Exit Router Configuration mode.
SEFOS(config-router)# end
10. Enter Global Configuration mode in SEFOS5.
SEFOS# configure terminal
11. Enable OSPF globally in SEFOS5.
SEFOS(config)# ipv6 router ospf
12. Configure the OSPF router ID.
SEFOS(config-router)# router-id 10.0.0.5
13. Configure the virtual link for backbone connectivity.
SEFOS(config-router)# area 0.0.0.3 virtual-link 10.0.0.4 120
14. Exit Router Configuration mode.
SEFOS(config-router)# end
15. Enter Global Configuration mode in SEFOS6.
SEFOS# configure terminal

Configure Virtual Link and Route Summarization
Configuring OSPFv3 Features 83
16. Enable OSPF globally in SEFOS6.
SEFOS(config)# ipv6 router ospf
17. Configure the OSPF router ID.
SEFOS(config-router)# router-id 10.0.0.6
18. Configure the virtual link for backbone connectivity.
SEFOS(config-router)# area 0.0.0.3 virtual-link 10.0.0.4 100
19. Exit Router Configuration mode.
SEFOS(config-router)# end
20. Enter Global Configuration mode in SEFOS8.
SEFOS# configure terminal
21. Enable OSPF globally in SEFOS8.
SEFOS(config)# ipv6 router ospf
22. Configure the OSPF router ID.
SEFOS(config-router)# router-id 10.0.0.8
23. Exit configuration mode.
SEFOS(config-router)# end
24. View the route summarization information in SEFOS1.
SEFOS# show ipv6 ospf area-range
Ospfv3 Summary Address Configuration Information
Network PfxLength LSA Type Area Effect Tag
fec0::1111:0:0 96 Summary 0.0.0.0 advertise 0
fec0::2856:0:0 96 Summary 0.0.0.6 advertise 0
25. View the virtual link and the status of the link in SEFOS4.

Configuring External Database Limit
84 Sun Ethernet Fabric Operating System OSPFv3 Administration Guide • July 2015
SEFOS# show ipv6 ospf virtual-links
Interface State: PointToPoint, Neighbor State: FULL
Transit Area: 0.0.0.3, Virtual Neighbor: 10.0.0.5
Intervals Configured for the Virtual Interface:
Hello: 10, Dead: 60, Transit: 1, Retransmit : 5
Interface State: PointToPoint, Neighbor State: FULL
Transit Area: 0.0.0.3, Virtual Neighbor: 10.0.0.6
Intervals Configured for the Virtual Interface:
Hello: 10, Dead: 60, Transit: 1, Retransmit : 5
26. View the virtual link in SEFOS5.
SEFOS# show ipv6 ospf virtual-links
Interface State: PointToPoint, Neighbor State: FULL
Transit Area: 0.0.0.3, Virtual Neighbor: 10.0.0.4
Intervals Configured for the Virtual Interface:
Hello: 10, Dead: 60, Transit: 1, Retransmit : 5
27. View the virtual link in SEFOS6.
SEFOS# show ipv6 ospf virtual-links
Interface State: PointToPoint, Neighbor State: FULL
Transit Area: 0.0.0.3, Virtual Neighbor: 10.0.0.4
Intervals Configured for the Virtual Interface:
Hello: 10, Dead: 60, Transit: 1, Retransmit : 5
28. View the route available to reach ABR SEFOS1.
SEFOS# show ipv6 ospf border-routers
Ospfv3 Process Border Router Information
Destination Type NextHop Cost Rt Type Area Id
10.0.0.1 ABR ffff:ffff:ffff:ffff:ffff:ffff:ffff:ffff0 0.0.0.0
10.0.0.4 ABR fe80::207:2ff:fe03:401 1 intraArea 0.0.0.3
10.0.0.5 ABR fe80::207:2ff:fe03:401 2 intraArea 0.0.0.3
Configuring External Database Limit
Configuring the external database limit provides the upper limit for the number of non-defaultAS-external-LSAs in a router's link-state database. The router enters overflow state when itreaches the limit. The router does not hold more than the configured non-default AS-external-LSAs in its database.

Configure the External Database Limit
Configuring OSPFv3 Features 85
You must set the LSDB limit identically in all routers that are attached to the OSPFv3 backboneor any regular OSPFv3 area (for example, OSPFv3 stub areas and NSSAs are excluded).
■ “Configure the External Database Limit” on page 85■ “Restore the Default External Database Limit” on page 86
Configure the External Database Limit
This example configures the external database limit in SEFOS1 (router 10.0.0.1) to 20 entries.
1. Enter Global Configuration mode in SEFOS1.
SEFOS# configure terminal
2. Enable OSPF globally in the switch SEFOS1.
SEFOS(config)# ipv6 router ospf
3. Configure the OSPF router ID.
SEFOS(config-router)# router-id 10.0.0.1
4. Configure the external LSDB limit.
SEFOS(config-router)# as-external lsdb-limit 20
5. Exit Router Configuration mode.
SEFOS(config-router)# end
6. View the configuration details.
SEFOS# show ipv6 ospf
Router Id: 10.0.0.1 ABR Type: Standard ABR
SPF schedule delay: 5 secs Hold time between two SPFs: 10 secs
Exit Overflow Interval: 0 Ref BW: 100000 Ext Lsdb Limit: 20
Trace Value: 0x00000800 As Scope Lsa: 1 Checksum Sum: 0xf4c5
Demand Circuit: Enable Passive Interface: Disable
Nssa Asbr Default Route Translation: Disable
It is an Area Border Router
Number of Areas in this router 2
Area 0.0.0.0
Number of interfaces in this area is 1

Restore the Default External Database Limit
86 Sun Ethernet Fabric Operating System OSPFv3 Administration Guide • July 2015
Number of Area Scope Lsa: 7 Checksum Sum: 0x30ece
Number of Indication Lsa: 1 SPF algorithm executed: 22 times
Area 0.0.0.6
Number of interfaces in this area is 1
Number of Area Scope Lsa: 7 Checksum Sum: 0x4d7f3
Number of Indication Lsa: 0 SPF algorithm executed: 23 times
Restore the Default External Database LimitThis example restores the default external database limit to -1 (no limit) for SEFOS1 (router10.0.0.1).
Note - The exit overflow interval will be 0 until you configure it.
1. Enter Global Configuration mode in SEFOS1.
SEFOS# configure terminal
2. Enable OSPF globally in the switch SEFOS1.
SEFOS(config)# ipv6 router ospf
3. Configure the OSPF router ID.
SEFOS(config-router)# router-id 10.0.0.1
4. Configure the external LSDB limit.
SEFOS(config-router)# as-external lsdb-limit -1
5. Exit Router Configuration mode.
SEFOS(config-router)# end
Configuring the Overflow Exit IntervalConfiguring the overflow exit interval specifies how much time must pass (in seconds) before arouter will attempt to leave the overflow state. If you specify a value of 0, the router will remainin the overflow state.
■ “Configure the Overflow Exit Interval” on page 87

Configure the Overflow Exit Interval
Configuring OSPFv3 Features 87
Configure the Overflow Exit Interval
This example configures the external database limit in SEFOS1 (router 10.0.0.1) to 20 and theoverflow exit interval in SEFOS1 to 10 seconds.
1. Enter Global Configuration mode in SEFOS1.
SEFOS# configure terminal
2. Enable OSPF globally in the switch SEFOS1.
SEFOS(config)# ipv6 router ospf
3. Configure the OSPF router ID.
SEFOS(config-router)# router-id 10.0.0.1
4. Configure the as-external LSDB limit and overflow exit interval.
SEFOS(config-router)# as-external lsdb-limit 20
SEFOS(config-router)# exit-overflow-interval 10
5. Exit Router Configuration mode.
SEFOS(config-router)# end
6. View the configuration details.
SEFOS# show ipv6 ospf
Router Id: 10.0.0.1 ABR Type: Standard ABR
SPF schedule delay: 5 secs Hold time between two SPFs: 10 secs
Exit Overflow Interval: 10 Ref BW: 100000 Ext Lsdb Limit: 20
Trace Value: 0x00000800 As Scope Lsa: 1 Checksum Sum: 0xf4c5
Demand Circuit: Enable Passive Interface: Disable
Nssa Asbr Default Route Translation: Disable
It is an Area Border Router
Number of Areas in this router 2
Area 0.0.0.0
Number of interfaces in this area is 1
Number of Area Scope Lsa: 7 Checksum Sum: 0x30ece
Number of Indication Lsa: 1 SPF algorithm executed: 22 times
Area 0.0.0.6
Number of interfaces in this area is 1
Number of Area Scope Lsa: 7 Checksum Sum: 0x4d7f3
Number of Indication Lsa: 0 SPF algorithm executed: 23 times

Configuring a Demand Extension
88 Sun Ethernet Fabric Operating System OSPFv3 Administration Guide • July 2015
Configuring a Demand Extension
Demand extensions are configured by default to enable demand routing. To disable demandrouting on any router interface that is configured as a demand circuit, you must disable demandextensions on those interfaces.
■ “Disable a Demand Extension” on page 88■ “Re-Enable Demand Extensions” on page 89
Disable a Demand Extension
This example disables demand extensions on SEFOS1 (router 10.0.0.1).
1. Enter Global Configuration mode in SEFOS1.
SEFOS# configure terminal
2. Enable OSPF globally in the switch SEFOS1.
SEFOS(config)# ipv6 router ospf
3. Configure the OSPF router ID.
SEFOS(config-router)# router-id 10.0.0.1
4. Disable the demand-extension.
SEFOS(config-router)# no demand-extensions
5. Exit Router Configuration mode.
SEFOS(config-router)# end
6. View the result of the configuration.
SEFOS# show ipv6 ospf interface vlan 11
Ospfv3 Interface Information
Interface Name: vlan11 Interface Id: 41 Area Id: 0.0.0.0
Local Address: fe80::214:4fff:fe6c:628f Router Id: 10.0.0.1
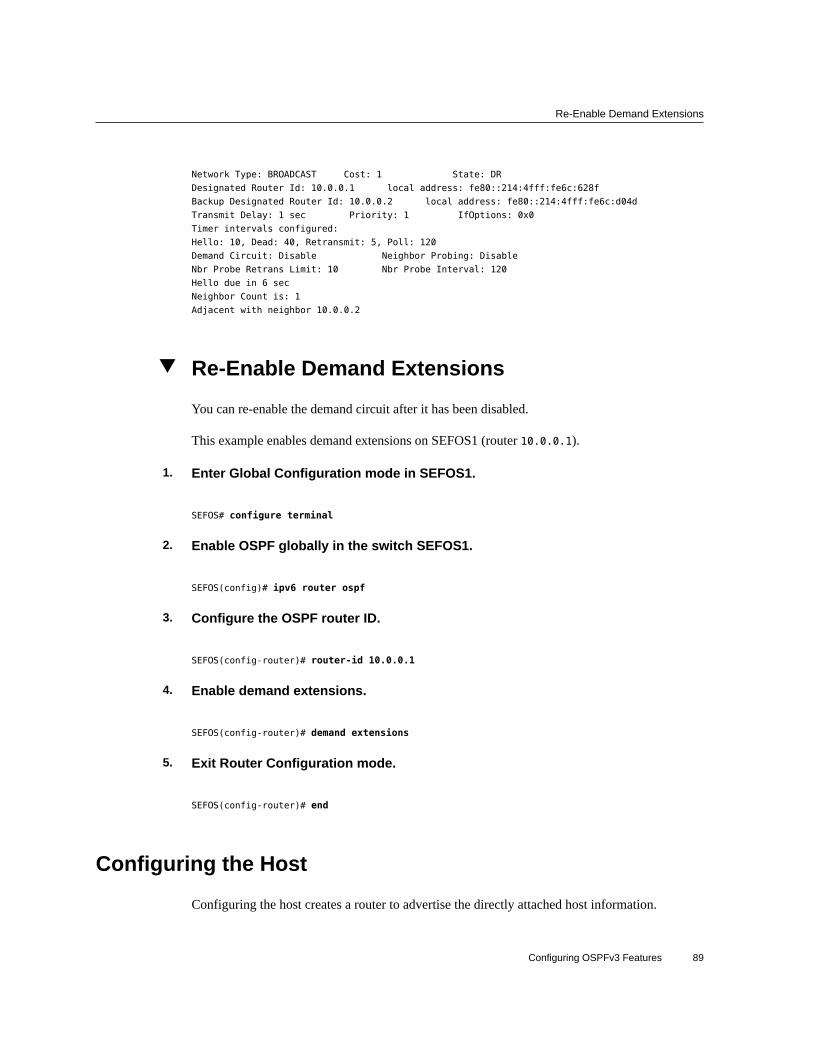
Re-Enable Demand Extensions
Configuring OSPFv3 Features 89
Network Type: BROADCAST Cost: 1 State: DR
Designated Router Id: 10.0.0.1 local address: fe80::214:4fff:fe6c:628f
Backup Designated Router Id: 10.0.0.2 local address: fe80::214:4fff:fe6c:d04d
Transmit Delay: 1 sec Priority: 1 IfOptions: 0x0
Timer intervals configured:
Hello: 10, Dead: 40, Retransmit: 5, Poll: 120
Demand Circuit: Disable Neighbor Probing: Disable
Nbr Probe Retrans Limit: 10 Nbr Probe Interval: 120
Hello due in 6 sec
Neighbor Count is: 1
Adjacent with neighbor 10.0.0.2
Re-Enable Demand Extensions
You can re-enable the demand circuit after it has been disabled.
This example enables demand extensions on SEFOS1 (router 10.0.0.1).
1. Enter Global Configuration mode in SEFOS1.
SEFOS# configure terminal
2. Enable OSPF globally in the switch SEFOS1.
SEFOS(config)# ipv6 router ospf
3. Configure the OSPF router ID.
SEFOS(config-router)# router-id 10.0.0.1
4. Enable demand extensions.
SEFOS(config-router)# demand extensions
5. Exit Router Configuration mode.
SEFOS(config-router)# end
Configuring the Host
Configuring the host creates a router to advertise the directly attached host information.
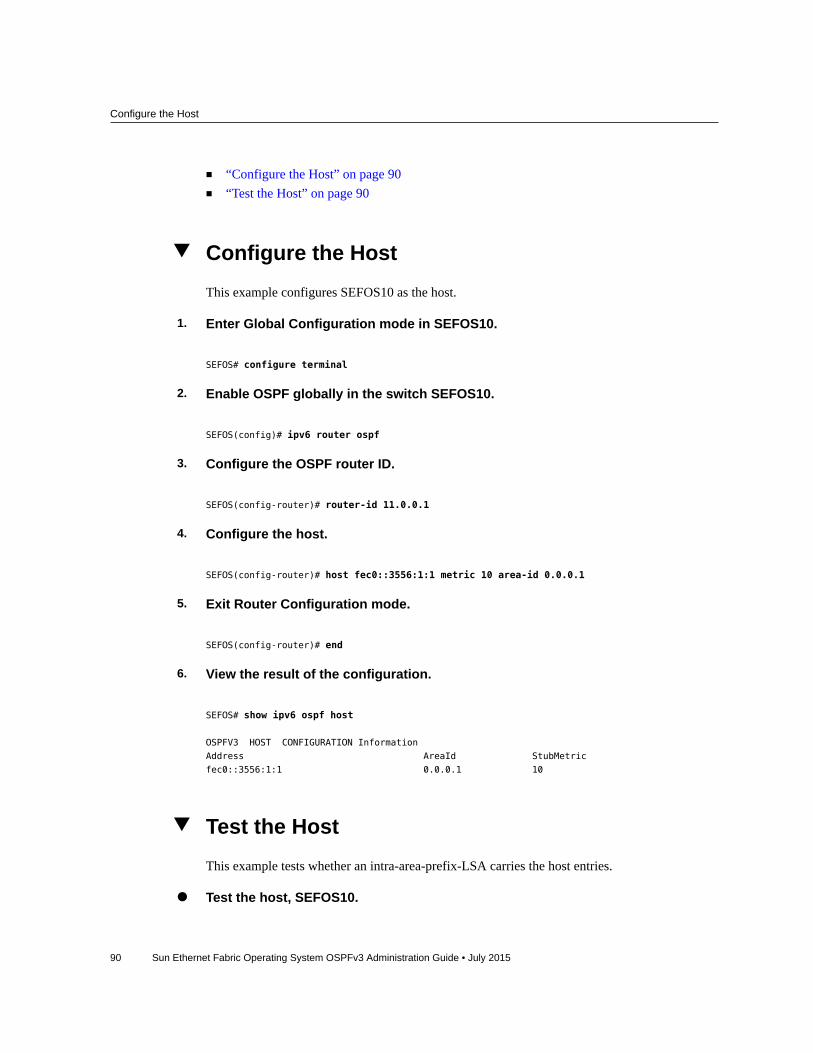
Configure the Host
90 Sun Ethernet Fabric Operating System OSPFv3 Administration Guide • July 2015
■ “Configure the Host” on page 90■ “Test the Host” on page 90
Configure the HostThis example configures SEFOS10 as the host.
1. Enter Global Configuration mode in SEFOS10.
SEFOS# configure terminal
2. Enable OSPF globally in the switch SEFOS10.
SEFOS(config)# ipv6 router ospf
3. Configure the OSPF router ID.
SEFOS(config-router)# router-id 11.0.0.1
4. Configure the host.
SEFOS(config-router)# host fec0::3556:1:1 metric 10 area-id 0.0.0.1
5. Exit Router Configuration mode.
SEFOS(config-router)# end
6. View the result of the configuration.
SEFOS# show ipv6 ospf host
OSPFV3 HOST CONFIGURATION Information
Address AreaId StubMetric
fec0::3556:1:1 0.0.0.1 10
Test the HostThis example tests whether an intra-area-prefix-LSA carries the host entries.
Test the host, SEFOS10.

Configuring Route Calculation SPF Timers
Configuring OSPFv3 Features 91
SEFOS# show ipv6 ospf database intra-prefix detail
Age: 0 Seconds LS Type: Intra Area Prefix Lsa
Link State Id: 0.0.0.0 Adv Rtr Id: 11.0.0.1
Sequence: 0x80000004 Checksum: 0xe526 Length: 52
#Prefixes: 1 Referenced LS Type: Router Lsa
Ref Link State Id: 0.0.0.0 Ref Adv Router: 11.0.0.1
Prefix Length (Bytes): 16 Prefix Options: 0x00
Metric: 0xa
Prefix: fec0::3556:1:1
Age: 0 Seconds LS Type: Intra Area Prefix Lsa
Link State Id: 0.0.0.1 Adv Rtr Id: 11.0.0.1
Sequence: 0x80000001 Checksum: 0x5cbe Length: 48
#Prefixes: 1 Referenced LS Type: Network Lsa
Ref Link State Id: 0.0.0.34 Ref Adv Router: 11.0.0.1
Prefix Length (Bytes): 12 Prefix Options: 0x00
Metric: 0x0
Prefix: fec0::3556:0:0
Configuring Route Calculation SPF Timers
You can configure an SPF timer to specify the delay time and hold time between twoconsecutive SPF calculations. Delay time is the time interval between when OSPFv3 receives atopology change and when it starts an SPF calculation. Hold time is the minimum time betweentwo consecutive SPF calculations.
■ “Configure SPF Timers” on page 91■ “Restore the Default Delay Time” on page 92
Configure SPF Timers
This example configures an SPF delay time of 10 seconds and a SPF hold time of 20 secondsfor SEFOS1 (router 10.0.0.1).
1. Enter Global Configuration mode in SEFOS1.
SEFOS# configure terminal
2. Enable OSPF globally in the switch SEFOS1.
SEFOS(config)# ipv6 router ospf

Restore the Default Delay Time
92 Sun Ethernet Fabric Operating System OSPFv3 Administration Guide • July 2015
3. Configure the OSPF router ID.
SEFOS(config-router)# router-id 11.0.0.1
4. Configure the SPF delay and hold times.
SEFOS(config-router)# timers spf 10 20
SEFOS(config-router)# end
5. View the configuration details.
SEFOS# show ipv6 ospf
Router Id: 10.0.0.1 ABR Type: Standard ABR
SPF schedule delay: 10 secs Hold time between two SPFs: 20 secs
Exit Overflow Interval: 0 Ref BW: 100000 Ext Lsdb Limit: -1
Trace Value: 0x00000800 As Scope Lsa: 1 Checksum Sum: 0xf0c7
Demand Circuit: Enable Passive Interface: Disable
Nssa Asbr Default Route Translation: Disable
It is an Area Border Router
Number of Areas in this router 2
Area 0.0.0.0
Number of interfaces in this area is 1
Number of Area Scope Lsa: 7 Checksum Sum: 0x2f2dc
Number of Indication Lsa: 1 SPF algorithm executed: 24 times
Area 0.0.0.6
Number of interfaces in this area is 1
Number of Area Scope Lsa: 7 Checksum Sum: 0x4c3fd
Number of Indication Lsa: 0 SPF algorithm executed: 25 times
Restore the Default Delay Time
This example restores the default delay time (5 seconds) and hold time (10 seconds).
Restore the default delay and hold times.
SEFOS(config-router)# no spf timer