Summer Camp Activity Curriculum
32
THE PENNSYLVANIA STATE UNIVERSITY Activity Curriculum Summer 2014 Carolina Santos & Christine Janiszewski 7/16/2014
-
Upload
christine-janiszewski -
Category
Documents
-
view
263 -
download
0
Transcript of Summer Camp Activity Curriculum

THE PENNSYLVANIA STATE UNIVERSITY
Activity Curriculum Summer 2014
Carolina Santos & Christine Janiszewski
7/16/2014
Table of Contents
INTRODUCTION TO SCIENCE IN COSMETICS ............................................................................................. 3
References .......................................................................................................................................... 4
Activity 1- Measuring Density and Viscosity ............................................................................................. 6
Introduction ........................................................................................................................................ 6
Activity description .............................................................................................................................. 7
Conclusion ........................................................................................................................................... 9
References .......................................................................................................................................... 9
Activity 2 - Lipstick and Lip Gloss Brand Testing Panel ............................................................................ 10
Introduction ...................................................................................................................................... 10
Activity 2.1 ........................................................................................................................................ 11
Activity 2.3 ........................................................................................................................................ 13
Conclusion ......................................................................................................................................... 13
References ........................................................................................................................................ 14
Activity 3- Ingredients in Nature ............................................................................................................ 15
Introduction ...................................................................................................................................... 15
Activity 3.1 ........................................................................................................................................ 15
Activity 3.2 ........................................................................................................................................ 16
Conclusion ......................................................................................................................................... 17
References ........................................................................................................................................ 17
Activity 4 - How to Make Mascara in Lab ............................................................................................... 18
Introduction ...................................................................................................................................... 18
Activity 4.1 ........................................................................................................................................ 19
Activity 4.2 ........................................................................................................................................ 20
Conclusion ......................................................................................................................................... 20
References ........................................................................................................................................ 21
Activity 5 - Making Foundation in Lab .................................................................................................... 22
Introduction ...................................................................................................................................... 22
Activity 5.1 ........................................................................................................................................ 23
Activity 5.2 ........................................................................................................................................ 24
Conclusion ......................................................................................................................................... 24
1

References ........................................................................................................................................ 25
Activity 6 – Eye Shadow/Makeover ........................................................................................................ 26
Introduction ...................................................................................................................................... 26
Activity 6.1 ........................................................................................................................................ 27
Activity 6.2 ........................................................................................................................................ 29
Conclusion ......................................................................................................................................... 30
References ........................................................................................................................................ 30
Suggestions For All Activities ................................................................................................................. 31
2

INTRODUCTION TO SCIENCE IN COSMETICS
Observing and experimenting are the key processes involved with studying physical and
chemical properties within a subject of interest. The core of the scientific domain is to understand aspects of the natural world through human creations. Children are drawn to science when it comes to performing tasks that transform apparently insignificant ingredients into an innovative product. This curriculum involving Science in Cosmetics will allow young girls to acquire a new dynamics towards cosmetics, if and when they decide to use makeup in the future. They will study basic ingredient properties and their importance in formulating products humans use on a daily basis.
In today’s world, cosmetics focus on enhancing appearances and defining what beauty looks like. Although cosmetic products have always played a very important role in human civilization, they did not always center on enhancing beauty. People utilized cosmetic products for religious, cultural, and personal protection purposes. Around 10,000 BCE, Egyptians used oils and creams as skin moisturizers and scent relievers. Oils and creams protected the people of Egypt against the harsh weather conditions, such as the sun, wind, and overall dryness of the desert1. Around the same time, ingredients such as almond oil, myrrh, and thyme became a part of religious rituals. Cosmetics also played crucial role in religious ceremonies, in which devotees would paint themselves as a way to mimic and honor their idolized gods. It was not until around 4000 BCE that Egyptian women began to embrace bright colors as a sign of beauty. Burnt nuts and fruit juices were forms of obtaining vibrant colors that humans would apply on their bodies.
As the years progressed, cosmetics lost part of its religious significance and became strongly attached to beauty and as a form of attracting attention. We humans are attracted to and inspired by colors. They exist in our everyday lives in the form of clothing, art, advertisements, cosmetics, and so much more. America has adopted a culture centered around using facial cosmetic products to enhance one’s appearance on a daily basis. The cosmetic industry plays a huge role in today’s world market by constantly expanding to different localities while developing its scientific domain. Scientists in the field spend a lot of time attempting to perfect cosmetic products by exploring the properties behind each ingredient.
In 2010, the industry encompassing soaps, cleaning products and cosmetics manufacturing employed a total of 120 thousand workers, from which 53% were women2. Although the scientific field behind cosmetics is broad, women only hold merely half of positions in an industry that originally targeted this particular gender. Additionally, a study reported by the U.S. Department of Commerce shows that women are still underrepresented in STEM (Science Technology Engineering Mathematics) fields in comparison to men, in which they compose 25% of the entire workforce. The engineering field, in particular, has a strong historical background of labor segregation. Males dominate the industrial as well as the higher office ranked positions. Currently, only one in about seven engineers is female3. Women showed no employment growth in STEM field jobs between 2000 and 2009.
Successful female STEM professionals recognize the country’s urging necessity of more scientists and engineers. The potential solution lies in encouraging groups of women and minority students to pursue such degrees by demonstrating that they could have very rewarding experiences in science and engineering related careers. Several programs are currently supporting college girls who aspire to become STEM professionals by providing them with unique job opportunities and exposing them to role models who have thrived in the field. These
3

initiatives, however, do not grasp onto the roots of the problem. The underrepresentation of women in STEM fields begins as early as elementary school4. Lack of support from parents, teachers and counselors lead young girls to lose any interest in STEM related courses. A study from the Journal of Science Communication indicated that children begin thinking in stereotypical patterns around eighth grade, which highly impacts their high school course selections5. These stereotypical thoughts include “social interaction” oriented careers being more suitable for women while physical science and engineering are culturally assigned to males. Additionally, the study proposes that “the time to convince underrepresented populations that STEM careers are open to them is before eighth grade”.
Exposing young girls to role models in STEM fields will reinforce the idea that females can and should participate in STEM fields as equals with men. The involvement of women in STEM careers will introduce a greater variety of innovators and scientists in the future. Encouraging young girls to get involved in sciences before eighth grade will affect their high school course selection by steering them towards more STEM related courses5. Playing with and applying makeup sparks the interest of women of all age groups. Through the activities in this curriculum, students, particularly young girls between the ages of 13 to 15, will have the opportunity to discover and to be involved with cosmetic science. Allowing young girls to discover a science that sparks their interest will encourage them to perceive STEM related fields as realistic career possibilities.
The goal of outreach programs such as Science in Cosmetics is to stimulate an early scientific interest in young females as well as to reassure them that women are indeed capable of pursuing challenging, yet gratifying STEM related careers. Multiple studies have shown that men and women perform equally in scientific and mathematical subjects6. Even though they may perform in STEM subjects as equals, young females are often discouraged and turn away from pursuing STEM fields because they are more self-conscious and constantly question their capabilities7. Science in Cosmetics will begin the process of giving women the confidence they need to continue their learning in STEM subjects. Along with confidence building, the project suggests a set of six hands-on activities which will significantly contribute to the understanding of scientific concepts. In order to continuously stimulate the student’s interest, these exciting activities were constructed with a strong emphasis on providing applicable knowledge. Through their own efforts, young girls will realize the possibility of creating fascinating products while maintaining an open mentality towards women in STEM. Girls will also discover that performing scientific experiments can be very enjoyable and this will instill a positive attitude towards the several benefits within such fields.
References 1. A History of Cosmetics from Ancient Times. Cosmetics Info,
http://www.cosmeticsinfo.org/ancient-history-cosmetics (accessed Jul 15, 2014).
2. Statistics, B. O. L. Women in the Labor Force: A Databook (2011 Edition). Women in the Labor Force: A Databook (2011 edition).
3. Beede, D. A. S.; Jullian, T.; Langdon, D.; McKittrick, G.; Khan, B.; Doms, M. Women in
STEM: A Gender Gap to Innovation. Economics and Statistics Administration. 2011.
4

4. Hughes, R. The Effects of a Single-Sex STEM Living and Learning Program on Female
Undergraduates' Persistence. International Journal of Gender, Sciene and Technology. 2014, 6, 25-54. http://genderandset.open.ac.uk/index.php/genderandset/article/view/287/557 (accessed July 15, 2014).
5. Cho, S. S., Goodman, M. M., Oppenheimer, B. B., Codling, J. J., & Robinson, T. T.
(2009). Images of women in STEM fields. JCOM: Journal Of Science Communication, 8(3), 1-5.
6. Progress, W. i. STEM Fields And The Gender Gap: Where Are The Women?. Forbes,
http://www.forbes.com/sites/work-in-progress/2012/06/20/stem-fields-and-the-gender-gap-where-are-the-women/ (accessed Jul 15, 2014).
7. Marrone, K. Why few women major in STEM fields, and what the UO is doing to change that. Daily Emerald, http://dailyemerald.com/2014/02/19/why-few-women-major-in-stem-fields-and-what-the-uo-is-doing-to-change-that/ (accessed Jul 15, 2014).
5

Activity 1- Measuring Density and Viscosity
Introduction The study of polymers composes a huge part of chemical industries. Polymers are macromolecules (large molecules) composed of many similar units that are bonded together, analogous to multiple beads connected into a necklace as can be seen in the figure below.
Figure 1. Bead necklace1. Polymers are present in our everyday lives whether we realize it or not. They are primary materials in the production of shoes, clothes, CDs and even soccer balls. Polymers are also the basis for the production of synthetic plastics which revolutionized the world in the 1900s. Today several hundred pounds of polymer materials are produced each year to satisfy the needs of each person in the United States2. When it comes to cosmetics, polymers are crucial substances that provide thickness and consistency to a product. For instance, as you will see in activity 6, GelMaker EMU (a polymer based material) is the viscous liquid that when added to the shimmer gel eyeshadow will give it a thick gel texture. Density: According to its formula, density is mass per unit of volume. In simpler words, density is the measure of how compact a substance is. In order to get a better idea of what density is, compare a marshmallow to a rock. A marshmallow is less compact and dense than a rock. If you had a rock and marshmallow that were the same size, the rock would clearly weigh more because it has a higher density. The rock would have a higher mass per unit of volume than the marshmallow. Today’s activity will give you a better understanding of what density is and how to measure it.
Figure 2. Material A is the most dense substance, followed by material B, and the least dense is material C.3
6

Viscosity: The easiest way to understand viscosity is by comparing honey to water. If you have a glass of each and you dump the cups over, water is going to come pouring out whereas the honey is going to slowly creep out of the glass cup. Both honey and water are liquids, so what make one so different from the other? The answer is viscosity. Viscosity is defined as the state of being thick, sticky, and semifluid in consistency due to internal friction between the molecules. With this definition in mind, honey has a much higher viscosity compared to water’s viscosity. Viscosity is a property analyzed in rheology, or the study of the flow of matter. In this activity, you will be able to measure viscosity as well as observe the relationship between viscosity and temperature.
Figure 3. Example of a very viscous fluid.4 Activity description: In this activity you will explore the properties of two different liquids: water and shampoo. You will be able to measure their viscosities through a technique called the “ball dropping technique”. In order to do so, however, you will first need to quantify the density of the metal ball used in the procedure. The procedures in this activity are based on Stokes’ Law, and his falling ball viscometer. Materials:
● Marble (glass sphere) ● 50 mL graduated cylinder ● Stopwatch ● Measuring tool (ruler) ● Polymers (shampoo) ● Hot plate ● Thermometer
Procedure for Measuring Density of Metal Sphere:
1. Fill a graduated cylinder to 20 mL with water. This is the first measurement of volume. 2. Weigh the metal ball and this gives you the mass of the object 3. Place the sphere in the already water-filled graduated cylinder 4. Find the new volume by carefully looking at the meniscus and write it down 5. Calculate the sphere’s volume by subtracting the original volume (20 mL) from the
second volume measurement. 6. Calculate the density by dividing the mass (in g) by the sphere’s volume (in mL)
7

Procedure for Measuring the Density of Fluids: 1. Measure the weight of an empty graduated cylinder using a scale. 2. Fill the graduated cylinder with the fluid and record the new weight. Also record the
volume mark of the fluid. 3. Subtract the final and initial weights to get the mass of your fluid. 4. Divide the mass of the fluid by the volume recorded in step two. And that will give you
the density of your fluid. Procedure for Measuring the Viscosity of Fluids:
1. Fill the graduated cylinder with the liquid to be measured. 2. With a marker make a mark at the top and bottom of the cylinder at 45 mL and 5mL
respectively. 3. With a ruler measure the distance between the two marks and record this value. 4. Drop the metal ball into the cylinder. Once it reaches the first mark at 45 mL start the
stopwatch, and stop it once the ball reaches the 5 mL mark. 5. Calculate the velocity of the glass ball by dividing the distance measured in step 3 by
the time recorded in step 4. 6. Plug the information obtained into the following formula:
where μ is the viscosity of the fluid, Δρ is the density of the sphere minus the density of the liquid, R is the radius of the sphere, g is the acceleration of gravity and v is the velocity of the sphere. Note: It is important to keep track of the units in which your measurements are being made. The ruler you are using will most likely give inches or centimeters. To make calculations easier use centimeters. Assume the acceleration of gravity (g) is 9.8m/s2. Now convert your distance value to meters knowing that 1m = 100cm. In this way, you will maintain your units consistent throughout the calculation. Viscosity vs Temperature: Temperature is indirectly proportional to viscosity. As the temperature rises, the fluid becomes less viscous. The higher the viscosity, the harder the liquid is to pour. When the temperature of a substance increases, the molecules get energized and begin to move around faster. Since the molecules move around faster, the liquid as a whole becomes easier to pour because the molecules have less friction between them. After heating the shampoo and repeating the viscosity experiment, you should observe a noticeable difference in how the ball moves through the liquid. The relationship between viscosity and temperature is portrayed in the form of a graph.
8

Figure 4. This graph demonstrates that as the temperature of crude oil is increased,the viscosity line decreases along the y-axis.5 Now that you have learned how viscosity relates to temperature, repeat the calculation of viscosity for shampoo after heating it to 40°C and for a third trial cool it to 10°C. Compare the three different viscosity values. Conclusion: after completing this viscosity experiment, the students will have a better idea of how cosmetic ingredients vary in their physical properties. They will learn important characteristics of viscosity through a simple experiment involving a polymer and a marble. Understanding how scientists obtain values for viscosity of polymers is important for learning what affects a polymer’s viscosity. An example of learning what affects viscosity is the idea of heating the polymer. Students had a chance to witness how viscosity decreases when the temperature rises.
References
1. All Natural Multi Color 9-95mm Freshwater Round Pearl Necklace in 14k Yellow Gold. Apples of Gold, http://applesofgold.com/pep7541.html (accessed Jul 15, 2014).
2. Hiemenz, P. C.; Lodge, T. Polymer Chemistry; CRC Press: Boca Raton, 2007.
3. Density and Lava Lamps. :::Yew Chung International School:::, http://ycis-
sir.weebly.com/density-and-lava-lamps.html (accessed Jul 15, 2014).
4. RGBstockcom. Free stock photos, http://www.rgbstock.com/photo/o09wi0i/viscosity (accessed Jul 15, 2014)
5. Training. Campbell Tip of the Month |, http://www.jmcampbell.com/tip-of-the-
month/page/7/ (accessed Jul 15, 2014)
9

Activity 2 - Lipstick and Lip Gloss Brand Testing Panel
Introduction Lipsticks are one of the most noticeable ways to change one’s appearance. In prehistoric times, the vibrant colors human beings would apply on their faces were obtained from fruits and plant juices such as pomegranate, and even from crushed gemstones.1
Figure 12. Brown agate gemstone powder. It was only in the 19th century that companies began manufacturing lipstick in wide scale production lines.3 Currently, lipstick is widely used all over the world by women from all social classes. The variety of colors offered in the market satisfy all different customer preferences, ranging from bright neon pink colors to very discrete beige tones. Besides having the privilege to pick from an extensive color range, women are also exposed to numerous marketing brands, including Estee Lauder, Maybelline, Covergirl and many others. Apart from pigmentation, the main properties of lipstick comprise viscosity, smoothness and adherence. As seen in activity 1, viscosity defines the thickness of the fluid consistency. The higher the viscosity of the lipstick, the more it will resemble a solid; contrary the lower the viscosity the more the lipstick will resemble a liquid. Polymer based ingredients determine the viscosity of the final product. In this activity you will use Polyisobutene-1200 to create a viscous lipstick. The smoothness of lipsticks is an important property that ensures surface regularity, free from lumps and unevenness. It also contributes to facilitating the application process onto the skin. Waxes are generally responsible for this effect. Candelilla Wax will be used as a plasticizer to your lipstick, in other words it will reduce its brittleness. Adhesiveness to the skin is another characteristic that many consumers demand upon when purchasing their lipstick. Many ingredients contribute to increasing the adhesiveness of lipsticks, such as the jojoba gel and oil. Different brands emphasize on distinct aspects of their lipstick to advertise to the public. Pigmentation is the primary aspect companies are concerned with. Intense vibrant colored lipsticks with moisturizing properties are desirable qualities in the product. A good lipstick
10

should meet the following requirements: easy application without bleeding into the lines around the mouth. It should feel moist, not dry, and give good color coverage, yet look natural. 4 In this activity, you will be making lipstick and modifying the quantity of some ingredients to achieve a more gloss like consistency. Lipstick: Lipsticks are basically mixtures of waxes, oils and pigments. Their proportions determine the characteristics of the final product. For example, a low wax and high oil content lipstick will apply more smoothly to the lips but will not last long. However, a low oil and high wax content will result in a long wearing lipstick with reduced smoothness.
Figure 2.5 Variety of lipsticks. Lip gloss: Like lipsticks, lip glosses are also mixtures of waxes, oils and pigments. The difference is that the wax to oil ratio is higher, with reduced pigmentation. This will create a product with gloss and transparent coverage.
Figure 36. Pot lip gloss. Activity 2.1: In groups of 3, you will be making lipsticks and pot lip glosses. Each person will be in charge of a different phase (A, B and C) that follow in the recipes. Alternate the phase you are responsible for when making a different product so that everyone can experience with all phases. In this activity you will be making three lipsticks and three pot lip glosses, one of each for every student.
11

Materials required : ● Ingredients to make lipstick and lip gloss. ● Lipstick molds ● Lipstick containers ● Lip balm containers (same as eyeshadow container) ● 100 mL beakers ● Thermometer ● Stirring rods ● 1-2 mL syringes (preferably plastic) ● Gloves ● Lab approved safety goggles
Procedure for making Lipstick (makes 3 lipsticks):
1. Make Phase A in a heat resistant glass beaker 2. Make Phase B (pigments) 3. Heat Phase A to 169 F/76 C and stir to help melt the waxes 4. Add Phase B to the Heated Phase A and stir A/B mixture until color is uniform. When
uniform, remove A/B mixture from heat 5. Make Phase C but because they are such small amounts, keep the ingredients in the
syringes until you add them to the overall mixture in order to prevent loss of substance 6. Add Phase C to A/B Mixture and stir 7. Grease the mold and close it tightly 8. Pour the hot lipstick mass (about 70 C/160 F) into the mold 9. Cool the mold in the refrigerator for 30 minutes 10. Open the mold carefully 11. Remove the lipsticks by pushing them gently out of the cavities bottom-first 12. Place the lipsticks carefully into the sleeves of the lipstick container
Phase A: Phase B: 5.0 g Jojoba Gel 0.75 mL D&C Red No. 7 Dispersion 6.6 mL Polyisobutene-1200 0.5 mL Titanium Dioxide Dispersion 1.25 g OM-Cinnamate 0.75 g Mica Bordeaux 1.0 g Shea Butter 1.0 g Mica Pearl White 2.25 g Candelilla Wax 0.5 g Mica Diamond Cluster 1.9 g Ozokerite Wax Phase C: 0.12 mL Vitamin E Acetate 0.25 mL Phenoxyethanol-SA 0.12 mL Vitamin A Palmitate Procedure for making Pot Lip Gloss (fills 3 pots):
1. Make Phase A in a heat resistant glass beaker
12

2. Make Phase B by keeping the D&C red and the titanium dioxide dispersion into separate syringes; keep the mica pigment in the weighing boat. They will be added directly to phase A in step 4.
3. Heat Phase A to 176 F/80 C and stir to help melt the waxes 4. Add Phase B to the Heated Phase A and stir A/B mixture until color is uniform. When
uniform, remove A/B mixture from heat 5. Make Phase C but because they are such small amounts, keep the ingredients in the
syringes until you add them to the overall mixture in order to prevent loss of substance 6. Add Phase C to A/B Mixture and stir 7. Pour the mixture while still hot and liquid into the lip balm pots.
Phase A: Phase B: 2.85 g Jojoba Gel 0.25 mL D&C Red No. 7 Dispersion 3.30 mL Polyisobutene-1200 0.12 mL Titanium Dioxide Dispersion 1.25 mL Jojoba Oil 0.50 g Mica Bordeaux 0.87 g Shea Butter 0.63 g Carnauba Wax 0.87 g Ozokerite Wax Phase C: 0.03 mL Vitamin E Tocopherol 0.12 mL Phenoxyethanol-SA Activity 2.2: Now that you have made both lipstick and lip gloss, form groups of three with two different people. In your groups discuss the following questions: 1. Compare the consistencies of your products. What can you say about viscosity, smoothness and adhesiveness of the two products you created? 2. Compare phase A of the two recipes. What ingredients are different? Based on the consistency properties you are studying, why do you think certain ingredients were added while others were eliminated? 3. You have learned about the key aspects of lip gloss. What ingredient(s) would you attribute the glossy, moisturizing aspect of the product to? Activity 2.3: Each group will be given a sample lipstick from a famous brand that is currently in the cosmetic market. In groups, you must pick one product to advertise to the class, either your “home-made” lipstick or the fabricated one. Your job is to compare their properties: consistency, smoothness and adherence to skin, and use these arguments to explain your preference to the class. Conclusion: this activity teaches students how to qualify lipsticks of different brands according to smoothness and adhesiveness. Students also explore ingredients and their functions for achieving different consistencies of the product. Finally, students learn the main differences with
13

making lipstick and lipgloss, in addition to modifying the recipe to achieve a more glossy substance. References
1. Lipstick History and Facts. History of Lipstick, http://www.lipstickhistory.com/ (accessed Jul 15, 2014).
2. Magic Miniatures - Tutorial on creating gemstone powder wings. Magic Miniatures -
Tutorial on creating gemstone powder wings, http://www.magicminiatures.com/tutorialwings.htm (accessed Jul 15, 2014).
3. Lipstick. Wikipedia, http://en.wikipedia.org/wiki/lipstick (accessed Jul 15, 2014).
4. Bombeli, K.; Bombeli, T. Recipes for Color Cosmetics; Somerset Cosmetic Co.: Renton,
WA, 2007.
5. K. What's Different About the New Benefit Full-Finish Lipsticks? - Makeup and Beauty Blog. Makeup and Beauty Blog: Makeup Reviews, Tips, Pictures and More, http://www.makeupandbeautyblog.com/product-reviews/whats-different-about-the-new-benefit-full-finish-lipsticks/ (accessed Jul 15, 2014).
6. Pot style Lip Gloss . Etsy, https://www.etsy.com/listing/103360348/pot-style-lip-gloss-
sangria-sheer-high (accessed Jul 15, 2014)
14

Activity 3- Ingredients in Nature
Introduction Before cosmetic ingredients were developed and produced in bulk in manufacturing companies, people found their cosmetic needs in nature. Egyptians, Native Americans, and Indians are just a few cultures that utilized ingredients found in nature. These natural ingredients included mostly oils for multiple uses and various colorants. Although developing synthetic ingredients has been an increasing interest for many scientists, there is a prosperous market for natural ingredients. The healing properties of natural ingredients, such as herbs, enriches the body and provides important nutrients. Cosmetic ingredients found in nature can be used for skin care, hair products, fragrance, and natural colorants. One of the more common ingredients found in nature is oil. Natural oil can be extracted from seeds, plants, leaves, fruits, vegetables, and nuts. Specific methods are involved when extracting natural oils from each of these ingredients. In this activity, you will be able to complete a simple extraction in order to obtain coconut oil. The usage of coconut oil for medicinal purposes dates back to 4000 years ago for its multiple health benefits. Besides its vast uses in medicine, coconut oil is also strongly tied to culinary and cosmetics. In cosmetics, this oil has very desirable moisturizing properties and is used in creams and soaps for dry skin treatments1. Benefits of Coconut Oil
1. Cognitive improvement in those with less severe cognitive dysfunction2 2. Ability to heal wounds3 3. Antifungal agent 4. Protects hair against damage 5. Moisturizes skin while functioning as a sunscreen
Figure 1. Cracked coconut and refined coconut oil4. Activity 3.1: In this activity, you will learn to extract coconut oil from a real coconut. You will also be expected to calculate the percent of oil yielded from the total amount of coconut used. In groups of three, carefully follow the instructions provided below.
15

Materials needed for extraction ● Fresh coconut ● Strainer ● Grater ● 100 mL glass beakers ● Blender ● Mortar and pestle ● Small plastic containers
Suggestions & Precautions Before Completing Activity- PLEASE READ
❖ Coconut flakes do not work as a replacement for fresh coconut because it is already too dried up
❖ For safety reasons, it is better for an adult to cut open the coconut and peel it for the kids ahead of time. Or just splitting the coconut shell open ahead of time is useful because then the students can spoon out the coconut meat out. There are many tutorials online that go through the process of cracking open a coconut.
❖ When it is time to burn off the water and milk to yield oil, be prepared to create a decent amount of smoke.
❖ Blending the coconut meat in a blender is the most efficient way to obtain the highest yield of coconut oil.
Procedure on How to Extract Coconut Oil5
1. Cut the coconut meat out of one half of a coconut 2. Weigh coconut meat and record the mass 3. Blend coconut chunks in a blender 4. Add equal parts of water in the blender to help produce coconut milk 5. Strain the liquid from the blended mixture. It may be useful to squeeze liquid out of
coconut paste with your hands. Keep the strained liquid in a separate beaker. 6. Allow coconut milk and water solution to cool in a refrigerator for approximately 2
hours. The solution will separate into two layers (coconut milk & water) 7. Carefully take off top layer (milk) and place in another beaker 8. Boil off milk using a hot plate. The milk will burn in the beaker and the coconut oil will
remain inside the beaker. 9. Measure the volume of coconut oil obtained 10. Collect the coconut oil in a small plastic container.
Activity 3.2: With the whole class, compare the different values of oil obtained. Answer the following questions. 1. Industrial extraction of coconut oil estimates a production of 70 liters of oil per 1000 coconuts. Calculate the amount of oil expected from a single coconut. Compare this value to the value you obtained. 2. What do you attribute this discrepancy to?
16
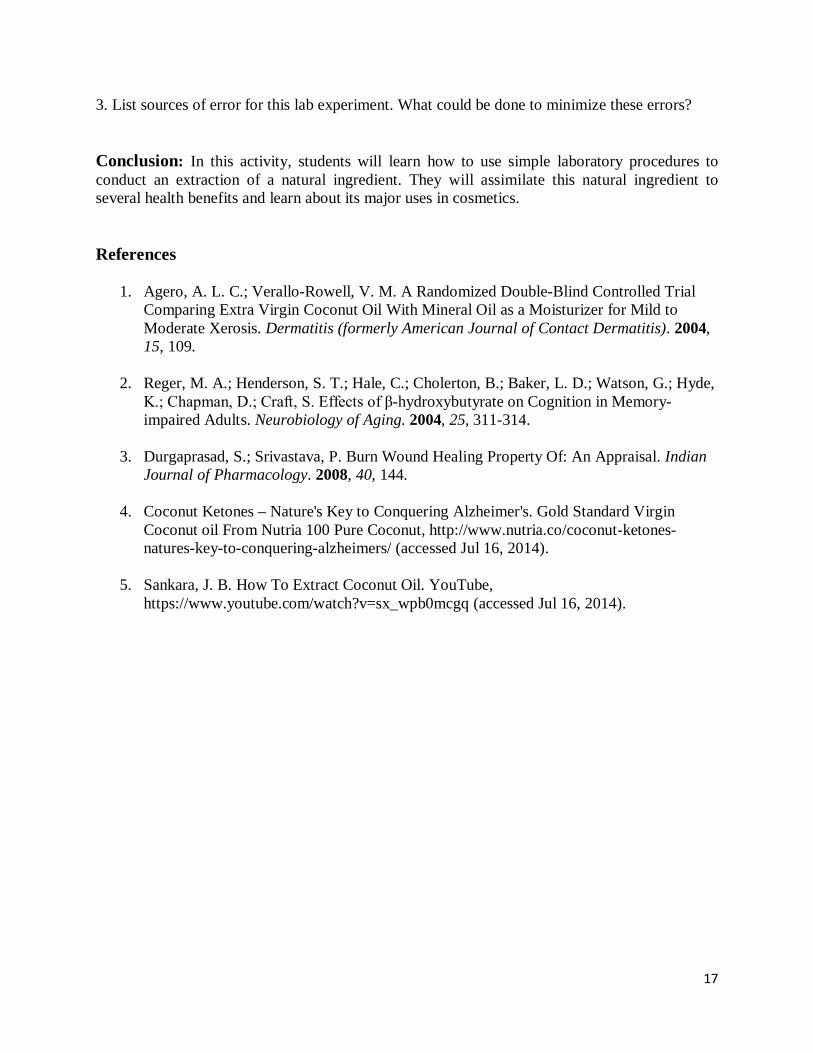
3. List sources of error for this lab experiment. What could be done to minimize these errors? Conclusion: In this activity, students will learn how to use simple laboratory procedures to conduct an extraction of a natural ingredient. They will assimilate this natural ingredient to several health benefits and learn about its major uses in cosmetics. References
1. Agero, A. L. C.; Verallo-Rowell, V. M. A Randomized Double-Blind Controlled Trial Comparing Extra Virgin Coconut Oil With Mineral Oil as a Moisturizer for Mild to Moderate Xerosis. Dermatitis (formerly American Journal of Contact Dermatitis). 2004, 15, 109.
2. Reger, M. A.; Henderson, S. T.; Hale, C.; Cholerton, B.; Baker, L. D.; Watson, G.; Hyde,
K.; Chapman, D.; Craft, S. Effects of β-hydroxybutyrate on Cognition in Memory-impaired Adults. Neurobiology of Aging. 2004, 25, 311-314.
3. Durgaprasad, S.; Srivastava, P. Burn Wound Healing Property Of: An Appraisal. Indian
Journal of Pharmacology. 2008, 40, 144.
4. Coconut Ketones – Nature's Key to Conquering Alzheimer's. Gold Standard Virgin Coconut oil From Nutria 100 Pure Coconut, http://www.nutria.co/coconut-ketones-natures-key-to-conquering-alzheimers/ (accessed Jul 16, 2014).
5. Sankara, J. B. How To Extract Coconut Oil. YouTube,
https://www.youtube.com/watch?v=sx_wpb0mcgq (accessed Jul 16, 2014).
17

Activity 4 - How to Make Mascara in Lab
Introduction As with many other cosmetic products, the origin of mascara traces back to the ancient egyptian civilization. The first eyelash related product that appeared was used by both men and women to protect the eyes against environmental harms, such as dust and microorganisms. The product was made by blending kohl (lead sulfide powder) with water, honey and crocodile excrements1. Mascara containers that are currently in the market only appeared in the 20th century when scientist Eugene Rimmel created the first packaged cosmetic mascara. Mascara may come in three different forms: liquid, cake or cream. It is used to thicken, volumize, lengthen and darken the lashes. The main ingredients found in modern mascara products are waxes, pigments, texturizers, emulsifiers and solvents. The thickness, consistency and waterproofing properties of the final product strongly relies on the amount of waxes used.3 Mascara containers Have you ever wondered what exists within a mascara container? The truth is a lot of engineering is involved in the process of making mascara containers. Their design is created to eliminate any excess mascara on the brush when removing it from the vessel. A sample design is depicted in the image below.
Figure 1.4 Engineered mascara container The liquid fills approximately half of the vessel while the remaining portion contains bristles that reduce the opening diameter from which the brush will exit. The reduced diameter forces the bristles of the brush to glide through the bristles of the container while they eliminate the excess product off the brush.
Figure 2a. Brush removed from a common container
18
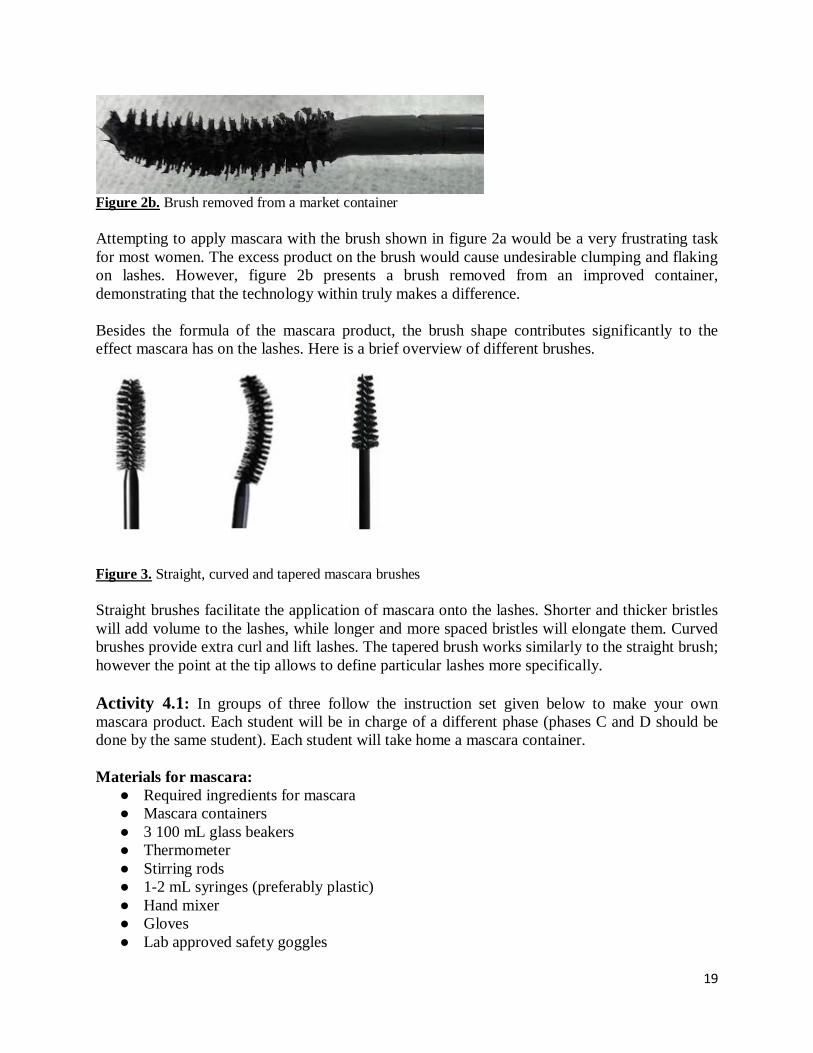
Figure 2b. Brush removed from a market container Attempting to apply mascara with the brush shown in figure 2a would be a very frustrating task for most women. The excess product on the brush would cause undesirable clumping and flaking on lashes. However, figure 2b presents a brush removed from an improved container, demonstrating that the technology within truly makes a difference. Besides the formula of the mascara product, the brush shape contributes significantly to the effect mascara has on the lashes. Here is a brief overview of different brushes.
Figure 3. Straight, curved and tapered mascara brushes Straight brushes facilitate the application of mascara onto the lashes. Shorter and thicker bristles will add volume to the lashes, while longer and more spaced bristles will elongate them. Curved brushes provide extra curl and lift lashes. The tapered brush works similarly to the straight brush; however the point at the tip allows to define particular lashes more specifically. Activity 4.1: In groups of three follow the instruction set given below to make your own mascara product. Each student will be in charge of a different phase (phases C and D should be done by the same student). Each student will take home a mascara container. Materials for mascara:
● Required ingredients for mascara ● Mascara containers ● 3 100 mL glass beakers ● Thermometer ● Stirring rods ● 1-2 mL syringes (preferably plastic) ● Hand mixer ● Gloves ● Lab approved safety goggles
19

● Pencil and paper Procedure for mascara (makes 3 containers)
1. Make Phase A in a heat resistant glass beaker 2. Make Phase B into another heat resistant beaker (sprinkle the gum arabic and the
xanthan gum into the water while mixing to avoid the formation of lumps) 3. Heat both beakers (phase A and B) to 185F/85C to melt the ingredients 4. Add Phase A to phase B and stir well with a hand mixer 5. Make Phase C into a weighing boat and add it to phase A/B. Stir for a few minutes until
the color is uniform, while keeping the temperature at 167F/75C 6. Make phase D, but because they are such small amounts, keep the ingredients in the
syringes until you add them to the overall mixture in order to prevent loss of substance 7. Add phase D to the overall mixture, stir well and remove from heat. If the mascara is
pasty and thick, add more water and stir well. 8. Using a syringe, pour the mixture while still hot into the mascara container
Phase A: Phase B: 2.5 g Stearic Acid 32.7 mL Distilled Water 0.3 mL Polyisobutene-1200 1.0 mL Glycerin 2.25 g Beeswax 0.5 g Gum Arabic 0.8 g Candelilla Wax 0.3 g Xanthan Gum 1.4 g Carnauba Wax 0.9 g Ceteareth-20 Phase C: Phase D: 5.0 g Iron Oxide Black 0.25 mL Provitamin B5 1.5 g Mica Powder 0.6 mL Phenoxyethanol-SA Activity 4.2: Now that you have learned how to make your own mascara, it is time to consider improving your mascara containers. In different groups of three, draw your innovative design for a new mascara container, the brush may also be part of your design. Use your creativity as well as your scientific knowledge to engineer a vessel that would satisfy customer preferences. Here are some questions to get you thinking about your design. 1. What are the main properties desired from a mascara product? 2. How can adaptations in the vessel affect these properties? 3. What effects may different brush shapes have when applying the product to your lashes? Each group will explain their design to the class and the most innovative idea will be selected by the instructor. Conclusion: In this activity students learn the lab techniques involved in making mascara in lab, as well as the engineering in the design behind mascara containers and how this affects the
20

application process. They also learn the importance of the brush shapes in producing different effects on the lashes. Finally, techniques on how to avoid clumping and flaking will be introduced to students. References
1. History of Mascara - Invention of the Mascara. Mascara History, http://www.historyofcosmetics.net/history-of-makeup/history-of-mascara/ (accessed Jul 15, 2014).
2. Michalak, J. History of Mascara. LoveToKnow,
http://makeup.lovetoknow.com/history_of_mascara (accessed Jul 15, 2014).
3. Bombeli, K.;Bombeli, T. Recipes for Color Cosmetics; Somerset Cosmetic Co.: Renton, WA, 2007.
4. Leone, E. D.; Brieva, H. Patent US6427700 - Mascara brush, container, and method.
Google Books, http://www.google.com/patents/us6427700 (accessed Jul 15, 2014).
21

Activity 5 - Making Foundation in Lab
Introduction Foundation dates back to the “face paint” used by greek and roman men and women to whiten their faces as a symbol of being part of the privileged mass. Their version of foundation consisted of white lead or chalk to create a pale skin tone. It was only in 1914 that Max Factor introduced the first commercial pancake foundation1. As the years progressed, multiple types of foundation were formulated to match a variety of skin tones and with healthier ingredients. Foundations are used by women of all ages to even out skin tone, impart color and hide imperfections2. With the advances in the scientific field however, properties such as sun protection, skin regeneration and anti-aging are also contained in some foundation formulas. Several factors should be considered for purchasing the correct foundation: Skin type: If the skin has many imperfections such as scars or pimples a higher coverage foundation is more desirable. If not, medium coverage is sufficient. Skin color: There are three basic skin colors: sallow (yellow-based), ruddy (red-based) and neutral. These tones can be mixed with different shades to achieve the exact tonality of your skin. Skin oiliness: If the skin is very oily it is important to get foundation that contains oil-absorbing agents such as corn starch. Dry skins, however, require more oils and butter (emollients) in the formulation. Different foundation consistencies are currently found in the market: liquid, cream, powder and mousse. In this activity you will be making cream foundation. Cream Foundation: creams based on oil-in-water or water-in-oil emulsions. Water-in-oil emulsions are generally prefered for water-proofing effects (remains on skin when swimming or sweating).
Figure 1.3 Cream foundation
22

Emulsions Emulsions are mixtures of two immiscible liquids (that do not mix naturally). Usually the two liquid phases are oil and water. If they don’t naturally mix, what then makes the emulsion possible? The key ingredient is the emulsifier. The emulsifier contains both hydrophobic (oil-loving) and hydrophilic (water-loving) parts. The hydrophobic part wraps around the oil droplets and stops them from combining with each other to form a separate layer again. The droplets then disperse throughout the water phase, this is called oil-in-water emulsion. Water-in-oil emulsion, however, consists of water droplets dispersed in oil.
Figure 2. Oil-in-water emulsion. After adding the emulsifier (red) to the mixture and agitating it, the oil phase which was primarily a separate layer, forms droplets and disperses through the water phase. The emulsifier surrounding the droplet prevents the oil from reuniting into a separate layer. Activity 5.1: In groups of three follow the instruction set given below to make your own foundation. Each student will be in charge of a different phase (phase D can be done by whoever finishes their phase first). Each student will take home a foundation container. There will be three different trials for the group to experiment with pigments to match your own skin tone. In each trial, you will make enough product to fill one container. Materials for Cream Foundation :
● Required ingredients for foundation ● Foundation containers ● 3 100 mL glass beakers ● Thermometer ● Stirring rods ● 1-2 mL syringes (preferably plastic) ● Gloves ● Lab approved safety goggles ● styrofoam ● Mortar and pestle
23

Procedure for Cream Foundation (makes 3 containers): 1. Make Phase C in a mortar and blend well with the pestle until the color is uniform.
Make this mixture by varying the quantity of the two pigments in order to match your unique skin tone. This mixture of pigments should add up to no more than 1.4 grams
2. Test your pigment mixture on a paper towel to verify that it matches your skin tone 3. Make Phase A in a heat resistant glass beaker 4. Make Phase B into another heat resistant beaker and stir 5. Heat both beakers (phase A and B) to 160F/71C to melt the ingredients 6. Add phase C to phase B and stir well 7. Add phase A to phase B/C and stir well to form the cream 8. Cool the mixture to 100F/40C and add phase D, stir well 9. Fill into dispenser bottle
Phase A: Phase B: 2.0 mL Triglyceride 20 mL Distilled Water 1.7 mL OM-Cinnamate 1.3 mL Glycerin 1.0 mL Isoeicosane 0.8 g HP Starch 1.0 g CreamMaker Blend 0.07 mL Polysorbate 80 0.7 g Shea Butter Phase C: Phase D: 1.67 g Titanium Dioxide 3.0 mL Tripeptide-5 0.67 g Pigment Blend Bare Beige 0.17 mL GelMaker EMU 0.67 g Pigment Blend Earth Brown 0.07 mL Vitamin E Tocopherol 0.5 mL Phenoxyethanol-SA Activity 5.2: Now that you have learned how to formulate foundation, it is time evaluate its properties. In different groups of three, apply your foundation to the styrofoam face. Focus on the areas where imperfections appear. Answer these questions regarding the quality of your product: 1. Comment on the coverage of your foundation (how well it hides the imperfections) 2. How does the foundation feel when in touch with the skin? (Soft, smooth, oily?) 3. When running water through the styrofoam, does the foundation run off or remain intact? What would you say about the waterproofness of your foundation? Share your thoughts with the rest of the class. Conclusion: In this activity, students will learn about the variety of foundations and what goes into giving them different properties. They will also learn how to mix multiple pigments to fit an individual’s skin tone. Additionally, emulsions between water and oil phases will be associated with water-proof properties.
24

References
1. A brief history of foundation. NewBeauty, http://www.newbeauty.com/blog/dailybeauty/2157-a-brief-history-of-foundation/ (accessed Jul 15, 2014).
2. Bombeli, K.; Bombeli, T. Recipes for Color Cosmetics; Somerset Cosmetic Co.: Renton,
WA, 2007.
3. Fricotes e Detalhes - Maquiagem MAC, MAC Pro, Illamasqua, Mufe, Moroccain Oil, Urban Decay, Chanel: Fevereiro 2013. Fricotes e Detalhes - Maquiagem MAC, MAC Pro, Illamasqua, Mufe, Moroccain Oil, Urban Decay, Chanel: Fevereiro 2013, http://fricotesedetalhes.blogspot.com/2013_02_01_archive.html (accessed Jul 15, 2014).
25

Activity 6 – Eye Shadow/Makeover
Introduction The first known appearance of the use of eyeshadow can be found in Egypt around twelve thousand years ago. Eye shadows were used as a way to mimic idolized gods in religious ceremonies and for medicinal purposes to cure infections and glares. During that period, the main ingredients included lead, copper, crushed antimony, burnt almonds, and ash. It is known today, however, that many of their ingredients are not safe when applied to human skin. Once the tradition of wearing eye makeup reached Rome and Greece, its religious significance died off and its sole purpose was to enhance beauty and to help others be noticed. The modern day eyeshadow was first formulated in the 1920s when scientists improved the formulation of the original recipe to enable easier removal and to stop skin irritations. Currently, eye shadow is used amongst all social classes as a symbol beauty due to the variety of shades resulting from the mixture of multiple pigments. Nowadays, eyeshadow comes in multiple forms, giving customers a wide variety and an ability to pick and choose what they like best. The three common forms of eyeshadow are powder, cream/gel, and liquid. The application process varies depending on the type of eyeshadow. In lab, you will be able to make your very own cream or gel eyeshadow. The process to making these types of eye shadow varies slightly, resulting in two very distinct consistencies of the product. You will get to experience the difference between them in lab. You will find that the cream eyeshadow is much thicker than the gel eyeshadow. Customers not only get to choose what type of eyeshadow they prefer, but also the shades that result from the abundant amount of colors to choose from as well. Today’s lab activity allows students to pick between cream or gel eyeshadow along with enabling them to explore experimenting and mixing colors. Cream Eye Shadow: Cream eye shadows contain pigments (coloring properties), emollients (moisturizing properties) and texturizers (gives the texture of the product) including waxes. The cream eye shadow you will formulate in this activity is made without water and therefore, the final product will look like a compressed powder cake, but creamy to apply on the skin. This is an example of what your final product should look like.
Figure 1. Cream Eye Shadow
26

Gel Eye Shadow: Gel eye shadows contain the same types of ingredients as cream eye shadows along with a gelling agent which is typically a polymer. In this activity, your gelling agent is called GelMaker EMU which will thicken the consistency of your product and enhance its moisturizing properties. An example of what your final product will look like can be seen below.
Figure 2. Gel Eye Shadow Activity 6.1: In groups of 3, choose what type of eye shadow you will want to make. The group will have two trials to experiment with both the type and the colors of eye shadows. After deciding on the type of eye shadow, each person will be in charge of a different phase (A, B and C) that follow in the recipes. When moving on to a different trial, alternate what phase you are in charge of so that everyone can experience with different phases. Each trial should fill up approximately three eye shadow containers, one per person. By the end of the activity, you will have one cream eyeshadow and one gel eyeshadow to take home! Materials for both Cream/Gel Eye shadow :
● Required ingredients for gel and cream eyeshadow ● Eyeshadow containers ● 3 100 mL glass beakers ● Thermometer ● Stirring rods ● 1-2 mL syringes (preferably plastic) ● Brushes/sponges for application ● Mirrors ● Gloves ● Lab approved safety goggles ● Makeup remover ● Cotton balls/ Q-tips
Procedure for Cream Eye Shadow (makes 3 pots):
9. Make Phase A in a heat resistant glass beaker 10. Make Phase B (pigments) 11. Make Phase C but because they are such small amounts, keep the ingredients in the
syringes until you add them to the overall mixture in order to prevent loss of substance
27
12. Heat Phase A to 169 F/76 C and stir to help melt the waxes 13. Add Phase B to the Heated Phase A and stir A/B mixture until color is uniform. When
uniform, remove A/B mixture from heat 14. Add Phase C to A/B Mixture and stir 15. Pour into Eye Shadow Pots while the final product is still a liquid 16. Allow Cream Eye Shadow to Cool at room temperature for about 10 minutes
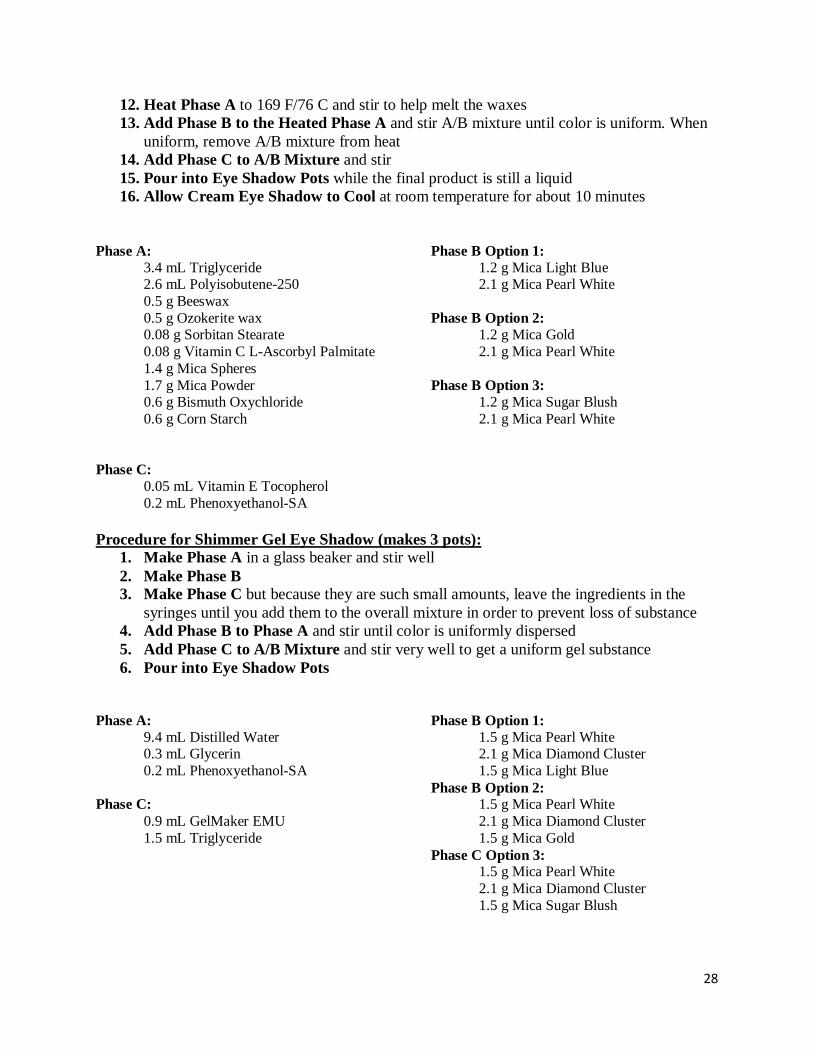
Phase A: Phase B Option 1: 3.4 mL Triglyceride 1.2 g Mica Light Blue 2.6 mL Polyisobutene-250 2.1 g Mica Pearl White 0.5 g Beeswax 0.5 g Ozokerite wax Phase B Option 2: 0.08 g Sorbitan Stearate 1.2 g Mica Gold 0.08 g Vitamin C L-Ascorbyl Palmitate 2.1 g Mica Pearl White 1.4 g Mica Spheres 1.7 g Mica Powder Phase B Option 3: 0.6 g Bismuth Oxychloride 1.2 g Mica Sugar Blush 0.6 g Corn Starch 2.1 g Mica Pearl White Phase C: 0.05 mL Vitamin E Tocopherol 0.2 mL Phenoxyethanol-SA Procedure for Shimmer Gel Eye Shadow (makes 3 pots):
1. Make Phase A in a glass beaker and stir well 2. Make Phase B 3. Make Phase C but because they are such small amounts, leave the ingredients in the
syringes until you add them to the overall mixture in order to prevent loss of substance 4. Add Phase B to Phase A and stir until color is uniformly dispersed 5. Add Phase C to A/B Mixture and stir very well to get a uniform gel substance 6. Pour into Eye Shadow Pots
Phase A: Phase B Option 1: 9.4 mL Distilled Water 1.5 g Mica Pearl White 0.3 mL Glycerin 2.1 g Mica Diamond Cluster 0.2 mL Phenoxyethanol-SA 1.5 g Mica Light Blue Phase B Option 2: Phase C: 1.5 g Mica Pearl White 0.9 mL GelMaker EMU 2.1 g Mica Diamond Cluster 1.5 mL Triglyceride 1.5 g Mica Gold Phase C Option 3: 1.5 g Mica Pearl White 2.1 g Mica Diamond Cluster 1.5 g Mica Sugar Blush
28

Activity 6.2: Congratulations girls! You have learned the science behind making cosmetic products! At this point you should have in hand four different materials: foundation, lipstick, eye shadow and mascara. Now you will learn how to safely apply these products onto your face through a quick tutorial below. With your mirror, cotton balls, q-tips and makeup remover, please read carefully through the application guidelines as you prepare to tryout the products. If you have any questions please contact your supervisor for clarification. Warning: Stop applying the products if you see any signs of skin irritation, itchiness or allergic reactions. Immediately contact your supervisor for assistance. Procedure for Applying Makeup Products: The products should be applied in the order listed below. Foundation:
1. Wash hands to prevent getting blemishes or pimples from touching your face with dirty hands. A sponge can be used to apply liquid foundation as long as it is not overused because bacteria collect on sponges.Sponges are often used to increase coverage. Another option is to use your fingers in order to get a more natural looking blend.
2. Clean face and apply moisturizer to protect skin and to help keep a natural look. 3. Apply concealer or the foundation under the eye by gently tapping the product from the
outside of the eye to the inside. Also cover other blemishes on your face in a similar fashion.
4. When it comes to foundation, less is more! Instead of globbing foundation on just the cheeks and trying to spread it around evenly, place multiple dots of foundation in areas that need the most coverage. This technique of dots helps to ensure you have an even coating of foundation. Do not apply foundation lower than the bottom of your jaw line (so do not apply to your neck).
5. Look closely in a mirror to make sure foundation is blended with no visible missed spots. It is also helpful to ask a friend if they see any spots you may have missed.
Eye Shadow:
1. Clean your hands from the last product. Again, you will be using your fingers to apply cream or gel eyeshadow. Using your fingers for these specific type of eyeshadows works best because the product is then naturally heated just enough to make the application process that much easier.
2. Dab your pinky in the product and place a small amount on your eyelid. Work the product from the inside of your eyelid towards the outside without going to close to your eyebrow.
3. A light cream or gel color can be applied as a highlighting effect right below the brow and on the upper cheekbones.
Mascara:
1. Before applying the mascara, it is important to not pump your mascara wand in and out of the container. Doing this will push air inside and make the mascara dry up even faster. Instead, twist the wand in a circular motion while it is still in the container.
29

2. Then scrape off excess mascara to avoid clumping your eyelashes together during the application process.
3. Look straight forward when applying mascara and split your eyelashes into 3 sections: left, middle, and right.
4. Starting from the base of the eyelash, move the brush in a single upwards motion to help create a curling effect. Coat each section of your eyelash once(left, middle, right) before starting a second coat on each section. This way the mascara will dry even and not clump together. 2-3 coats of mascara can be applied depending on desired look.
Lipstick:
1. Make sure your lips are soft and smooth. You may choose to apply a lip cream to soften and protect your lips.
2. With your lipstick in hand, start from the center of your top lip and move to one corner. Repeat on the other side of your top lip and then do the same on the bottom lip.
3. If you’d like a slightly deeper color, blot the lips with a tissue being careful not to smudge the lipstick and then apply a second coat of lipstick.
Conclusion: the significance of this lab activity extends beyond learning lab techniques, but teaches young girls that creativity is a big part of science; a developing field that can be both exciting and fun while using advanced physical/chemical concepts. It is also important for the students to see the growth and development of products in the world and understand that they can be part of that changing process. This firsthand experience will allow young females to discover the science involved in making cosmetic products and reinforces the idea that science can be fun and pertain to subjects that interest them.
References
1. Morgan, M. Do It Wrong Right: Applying Foundation With Your Fingers. http://www.xovain.com/makeup/do-it-wrong-right-applying-foundation-with-your-fingers#awesm=~ohzcwjsjmqffk7 (accessed Jul 15, 2014).
2. How to Apply Foundation and Concealer Correctly. wikiHow,
http://www.wikihow.com/apply-foundation-and-concealer-correctly (accessed Jul 15, 2014). foundation
3. Eye Shadow History - Invention of the Eye Shadow. History of Eye Shadow,
http://www.historyofcosmetics.net/history-of-makeup/eye-shadow-history/ (accessed Jul 15, 2014).
4. How To Apply Mascara Like a Pro. Makeup Geek How To Apply Mascara Like a Pro
Comments, http://www.makeupgeek.com/makeup-basics/how-to-apply-mascara-like-a-pro/ (accessed Jul 15, 2014).
30

Suggestions For All Activities
All of the ingredients were found on MakingCosmetics.com. The lab supplies can be
found using Amazon or a lab gear supplier, such as eNasco or Sigma Aldrich. The estimated price per person for each activity uses these websites to find the price of each item.
To make it simpler, there is a list that breaks down which activities go with each ingredient. This may make it easier when purchasing the ingredients because many of them overlap in other activities. Some of the amounts that are listed in the cost per student section are excessively more than needed to complete the activity. Please keep this in mind when purchasing the ingredients in order to save money and use the ingredients as efficiently as possible.
To minimize the cost of each activity, look for free or cheaper supplies than the ones listed in this curriculum. There is a section called ‘general materials’ which lists the lab gear needed in every activity.
31