Student Guide to myMount - Mount Saint Vincent University
38
Information Technology & Services Student Guide to myMount Page 1 of 38 Student Guide to Information Technology & Services August 16, 2016
Transcript of Student Guide to myMount - Mount Saint Vincent University

Information Technology & Services Student Guide to myMount
Page 1 of 38
Student Guide to
Information Technology & Services
August 16, 2016
Information Technology & Services Student Guide to myMount
Page 2 of 38
©2016 Mount Saint Vincent University
Introduction ................................................................................................................................................... 3
How to Login to myMount ............................................................................................................................. 3
Account Security ............................................................................................................................................ 4
Using the Registration Centre ........................................................................................................................ 5
Browse for Sections by Subject ................................................................................................................. 7
Filtering Results for Browse Display ...................................................................................................... 8
Search for Sections .................................................................................................................................. 12
Filtering Search Results ........................................................................................................................ 13
How to Build your Preferred Sections List ............................................................................................... 18
Section is Unavailable .......................................................................................................................... 19
How to Remove Preferred Sections..................................................................................................... 20
How to Register ....................................................................................................................................... 24
Registration Check list ......................................................................................................................... 24
Registering for Sections ....................................................................................................................... 24
My Information ............................................................................................................................................ 27
All Things Financial .................................................................................................................................. 27
My Class Schedule ................................................................................................................................... 32
My Calendar ............................................................................................................................................. 32
Accessing Moodle .................................................................................................................................... 34
Change my Password ............................................................................................................................... 35
Change my Address ................................................................................................................................. 35
Accessing Student Email .......................................................................................................................... 35
Important Dates for Students .................................................................................................................. 35
The Mount in the Media .......................................................................................................................... 36
Logging Off of myMount .............................................................................................................................. 37
Feedback Form ............................................................................................................................................ 38

Information Technology & Services Student Guide to myMount
Page 3 of 38
Introduction
myMount is the Mount’s student portal.
Use myMount to:
• Register for courses
• Access grades and transcripts
• View your class schedule
• Access Moodle class sites
• Access student email
• Pay tuition, get account statements, and tax forms
• See important dates and events
• Get campus announcements
How to Login to myMount
myMount can be accessed both from on and off campus by clicking on the myMount link at the top of the
Mount website (www.msvu.ca).
Use your Mount EMAIL address to login to myMount (this is new for 2016 Fall).
myMount works best on Windows using Firefox or Internet Explorer. On a Mac, it works best with
Firefox. myMount will work with Safari on a Mac or a PC, but the layout works best with the other
browsers.
To log into myMount:
1. Go to: www.msvu.ca and click on myMount at the top of the Mount website
2. Click the login button
3. Enter your Mount EMAIL address and password
4. Click Log On
If you cannot remember your username or password, please contact the Mount IT&S Helpdesk at (902)
457-6538 or at [email protected].

Information Technology & Services Student Guide to myMount
Page 4 of 38
On a successful login to myMount, you will be able to choose the “Menu” button located at the top left.
Account Security
Each person is responsible to maintain security on their account. Do not let others know your password,
and do not share your account. You can change your password by clicking on the “Change password” link
under “My Information” or by contacting the IT&S Helpdesk at (902) 457-6438 or emailing
You can go to the IT Services page on the Mount website for information on many Technology related
services, including how to change your password, with “Tips to creating a strong and secure password”
and How to Protect Your Account with examples of ‘phishing’ that may look legitimate but are attempts
to get your password from you.
http://www.msvu.ca/en/home/studentservices/itservices/default.aspx
Information Technology & Services Student Guide to myMount
Page 5 of 38
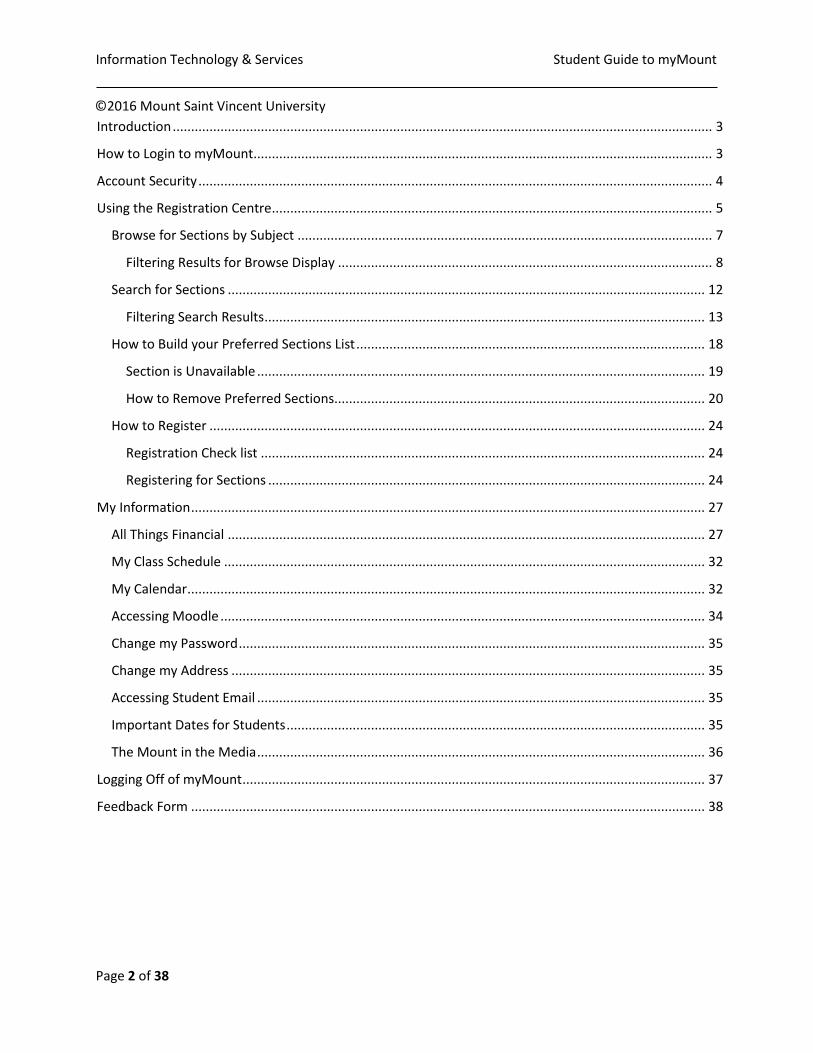
Using the Registration Centre
Use the Registration Centre to find the course sections you want to register for, add them to your
preferred list, and complete your registration.
Login to myMount from the Mount website, using your Mount EMAIL address
Select the “Menu” icon below the Mount logo, and select “REGISTRATION CENTRE”.
From the Registration Centre you can search for classes by subject, by course, or by course section.
You can find and register for courses in three easy steps.
Get quick how-to help on each of the three steps by clicking in the box to open the PDF guide for that
step.
NOTE: You may have to save the PDF on your PC before you can open it, depending on your internet browser.
You will need to have a PDF viewer like Adobe Acrobat installed to see these short how-to documents.
You will see the same information in the following pages.

Information Technology & Services Student Guide to myMount
Page 6 of 38
If you are just starting to look at what courses are offered at the Mount, or you just want to look at what
is available, start with “Browse for Sections by Subject”.
You can also click the Menu Icon from in the Registration Centre, and select “Browse Through Sections”.
This is the same feature.

Information Technology & Services Student Guide to myMount
Page 7 of 38
Browse for Sections by Subject
“Browse for Sections by Subject displays an alphabetical list of subjects.
Click on the word ‘Subject’ in front of a subject to expand that subject’s section offerings. Click on the
word ‘Subject’ again, to close the expanded subject.

Information Technology & Services Student Guide to myMount
Page 8 of 38
Filtering Results for Browse Display
You can sort and filter on the results using the fields in the header.
To look at all the course sections for a single term, you can “filter” by term.
To do this, hover over “Term” and click on the arrow to the right of “Term” and then select the
appropriate term from the drop down menu.
Look for the “filter” icon in the header, to see what filters are applied to the display.
Information Technology & Services Student Guide to myMount
Page 9 of 38
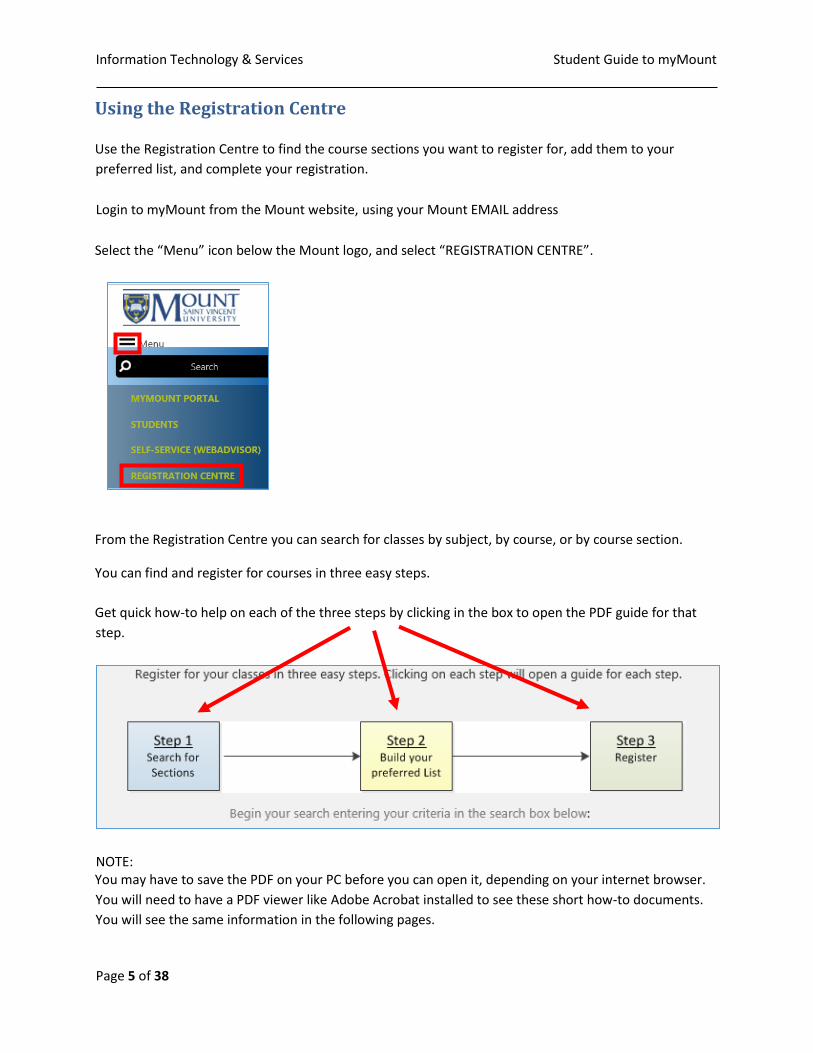
To clear a filter, choose the column and click on “Clear Filters from …”
To sort the results by a field, click on the field header and choose to sort in ascending or descending
order. The results within each subject will be sorted. You will see a down arrow showing what column the
results are sorted on.

Information Technology & Services Student Guide to myMount
Page 10 of 38
You might also choose to filter by Meeting Info if you are looking for a course to fill in your schedule in a
certain time slot.
If you wish to add a course to your preferred list, click on the title to expand the section, so you see just
that one section, then scroll to the bottom and choose “Add to Preferred List”.

Information Technology & Services Student Guide to myMount
Page 11 of 38
To continue searching or browsing, you will have to start a new search after each time you detail into a
course section where you have the option to add a section to your preferred list.
You can choose to add the section to your preferred list, or go to your preferred list to review it. Going to
your preferred list also allows you to remove any sections you do not want there.
Remember, you can choose “Browse Through Sections” from the Menu at the top left to start a new
browsing session at any time.

Information Technology & Services Student Guide to myMount
Page 12 of 38
Search for Sections
If you are interested in one subject, or a specific course, type this into the search box and press enter or
click the magnifying glass “Search” icon. You can use a key word or code to start your search.
Remember, you can start a new search at any time by clicking on the Menu button at the top left of the
screen and choosing “SEARCH AND REGISTER”.

Information Technology & Services Student Guide to myMount
Page 13 of 38
Results will display with the header “Sections Results.
Filtering Search Results
Search results are displayed with the filter (referred to as ‘refine’) criteria down the left side
The options are: Term, Subject, Academic Level, Meeting Info and Faculty.
You will probably want to start with selecting the Term you are interested in.

Information Technology & Services Student Guide to myMount
Page 14 of 38
The refine criteria are delivered expanded. When the criteria are expanded you can hover over the
criteria header and will see a blue arrow you can click to close the refine filter options. Click the Blue
arrow again to display the options.
You can choose a single term to see only sections for that term, and select All to again see All Terms
A maximum of five options will initially display for each of the 5 refining criteria, with “SHOW MORE”
when there are more options available. If you select “SHOW MORE” you will see all the available
options. You can select “SHOW FEWER” to go back to the original display.

Information Technology & Services Student Guide to myMount
Page 15 of 38
Expand a section by clicking on the section number

Information Technology & Services Student Guide to myMount
Page 16 of 38
Select “Add to Preferred List”, if you want to choose this section and add it to your preferred list.
Start a new Search by choosing a search option from the Start Menu at the top left.

Information Technology & Services Student Guide to myMount
Page 17 of 38

Information Technology & Services Student Guide to myMount
Page 18 of 38
How to Build your Preferred Sections List Step two of registration is to build a list of your preferred sections.
Not all students are allowed to register at the same time. When registration “opens” for you, you will be
able to build your preferred list.
The Preferred Sections list is similar to a shopping cart on a shopping website. Once you have found a
section you are interested in, you can add it to your Preferred Sections list by clicking on the “Add to
Preferred List” button.
When you add a section to your preferred list, you will see a box with “Successfully added to your
preferred list” on the screen, with a link titled “Go to your preferred list”. You can now start a new
search, to continue building you preferred list, or go to your preferred list, or choose any other feature in
myMount you wish to continue with.

Information Technology & Services Student Guide to myMount
Page 19 of 38
When you have added a preferred section and there is a required co-requisite, you will see a little yellow
triangle with an exclamation mark after the “Successfully Added!” If you hover over that triangle you will
see a message showing what other class has been added to your preferred sections list.
If you select a section already on your preferred list, you will see the message “This class is already in
your preferred sections list” and you will not be able to add it to your preferred list again.
After adding a section to your preferred list, start a new search.
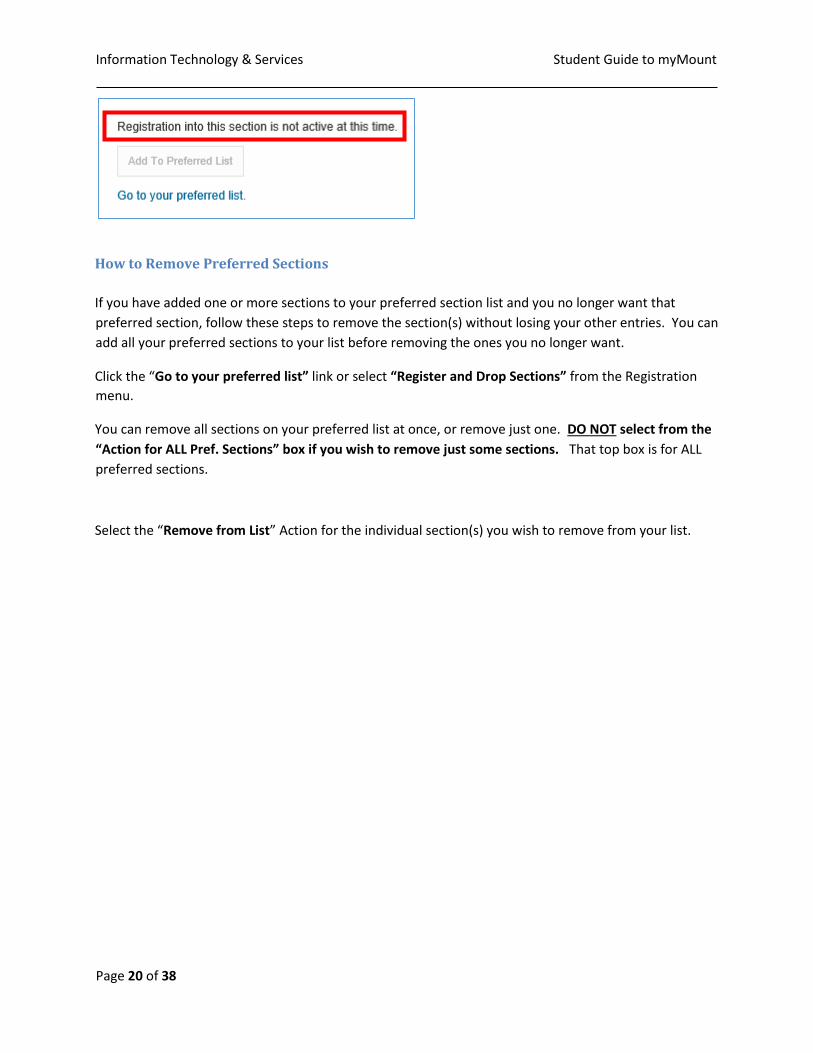
Section is Unavailable
When you see “Registration into this section is not active at this time” that section is not available to
you for registration. Make sure you are looking for the correct term. If this is happening for all courses in
the appropriate term that you want to register for, please contact the registrar’s office.
Information Technology & Services Student Guide to myMount
Page 20 of 38
How to Remove Preferred Sections
If you have added one or more sections to your preferred section list and you no longer want that
preferred section, follow these steps to remove the section(s) without losing your other entries. You can
add all your preferred sections to your list before removing the ones you no longer want.
Click the “Go to your preferred list” link or select “Register and Drop Sections” from the Registration
menu.
You can remove all sections on your preferred list at once, or remove just one. DO NOT select from the
“Action for ALL Pref. Sections” box if you wish to remove just some sections. That top box is for ALL
preferred sections.
Select the “Remove from List” Action for the individual section(s) you wish to remove from your list.

Information Technology & Services Student Guide to myMount
Page 21 of 38
This is the screen with no criteria selected. Remember, DO NOT use the top box to drop only some
courses! Choose the box next to individual sections o be dropped. Then click Submit at the bottom.

Information Technology & Services Student Guide to myMount
Page 22 of 38
To remove just the preferred section for “BUSI*2231*18” select “Remove from list” from the Action drop
down for that section, as shown below.
And now Click “Submit” at the bottom of the screen.
The “Registration Results” box will be displayed, showing that section has been removed from Preferred
Sections.
Click on “Register and Drop Sections” on the Registration Menu to re-display the Preferred List

Information Technology & Services Student Guide to myMount
Page 23 of 38
If you wish to go back to the Registration Centre to add more Preferred Sections, select the “Registration
Centre” button.

Information Technology & Services Student Guide to myMount
Page 24 of 38
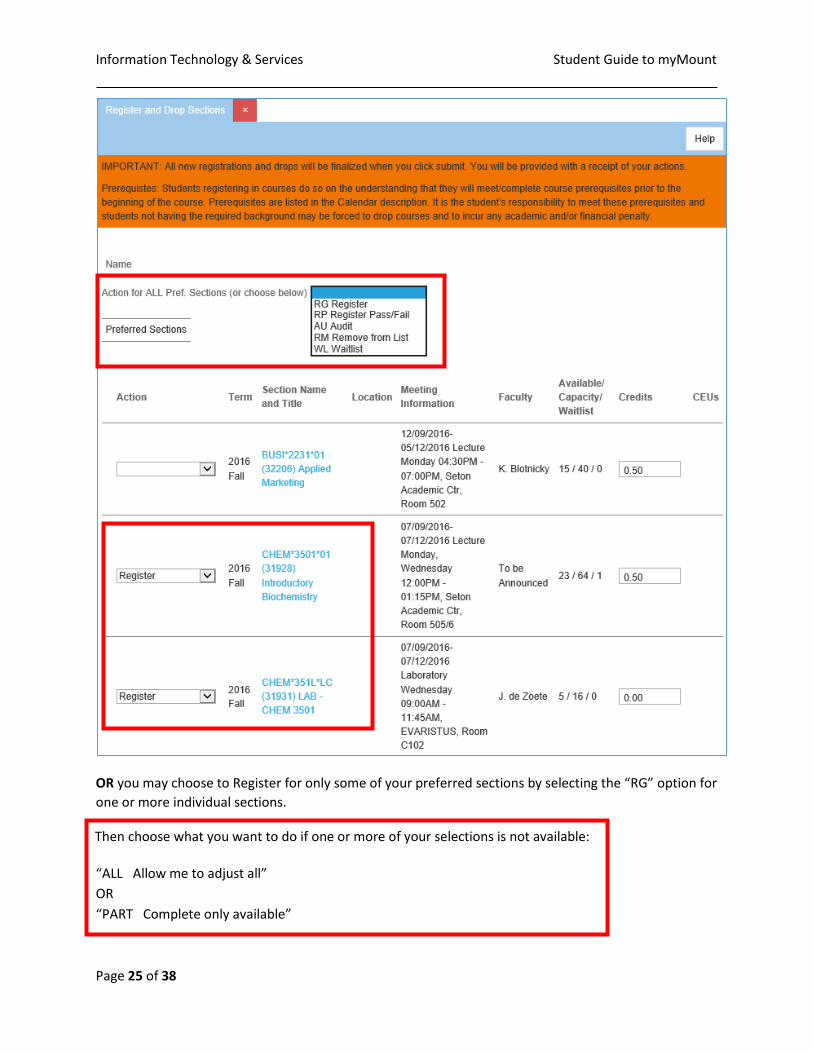
How to Register Once you have added all your preferred sections you are ready to register. You can proceed to
registration by either clicking the “View your preferred list” link from any section in the Registration
Centre, or by selecting “SELF-SERVICE (WEBADVISOR)” from the “Menu” at the top left, selecting
“WEBADVISOR FOR STUDENTS”, “Registration” and then selecting “Register and Drop Sections”.
“View your preferred list” will take you to the “Register and Drop Sections” page where you can register
for the sections on your list (or remove any you don’t want).
You can register for all sections on your preferred list at once, or one or a few at a time.
Registration Check list
Before proceeding to register for your courses you will want to have added all your choices to your
preferred list.
• Build preferred list
• Decide if registering for all courses on preferred list at once, or select actions by course
• Indicate what action to take if not all your choices are available when you click Submit
• Click Submit at bottom once all settings are chosen
Click “Help” button for help on the Register and Drop sections screen. This will explain exactly what to
expect, depending on how you fill in the form.
NOTES:
1) If you choose the option for partial processing, any successful transactions in your request are
processed and the Registration Results form is displayed with appropriate errors and warnings
for any unsuccessful transactions.
2) Your registration is not complete until the Registration Results form is displayed.
Registering for Sections
Once you have built your preferred section list, you can register for all sections at once by selecting
“RG Register” from the “Action for ALL Pref. Sections” prompt.
Information Technology & Services Student Guide to myMount
Page 25 of 38
OR you may choose to Register for only some of your preferred sections by selecting the “RG” option for
one or more individual sections.
Then choose what you want to do if one or more of your selections is not available:
“ALL Allow me to adjust all”
OR
“PART Complete only available”

Information Technology & Services Student Guide to myMount
Page 26 of 38
Click “SUBMIT” to Register for your sections.
Depending on how you answered the “ALL” or “PART” question and whether your preferred sections
were available, the “Registration Results” window will open, with or without error messages, or you will
be left in Register and Drop Sections with error messages displayed, if any of your selections was not
available.
If you do not see the “Registration Results” screen your registration was not completed.
Choose “REGISTER and DROP SECTIONS” again, and confirm that you can see you are registered for all
the registered courses you expect to see.

Information Technology & Services Student Guide to myMount
Page 27 of 38
My Information
All Things Financial
With the introduction of a new Student Account activity view/statement there are changes to how you
access your account information.
From the myMount homepage, under All Things Financial, select Student Account/Activity Statement. In
order to use the new functionality, it is advisable to use Internet Explorer, Firefox, or Safari for your
browser. There could be issues with using Google Chrome.
When you select Student Account Activity/Statement, you will initially see the following message:
Redirecting to Self Service, please wait...
The n the following screen will come up :
Information Technology & Services Student Guide to myMount
Page 28 of 38
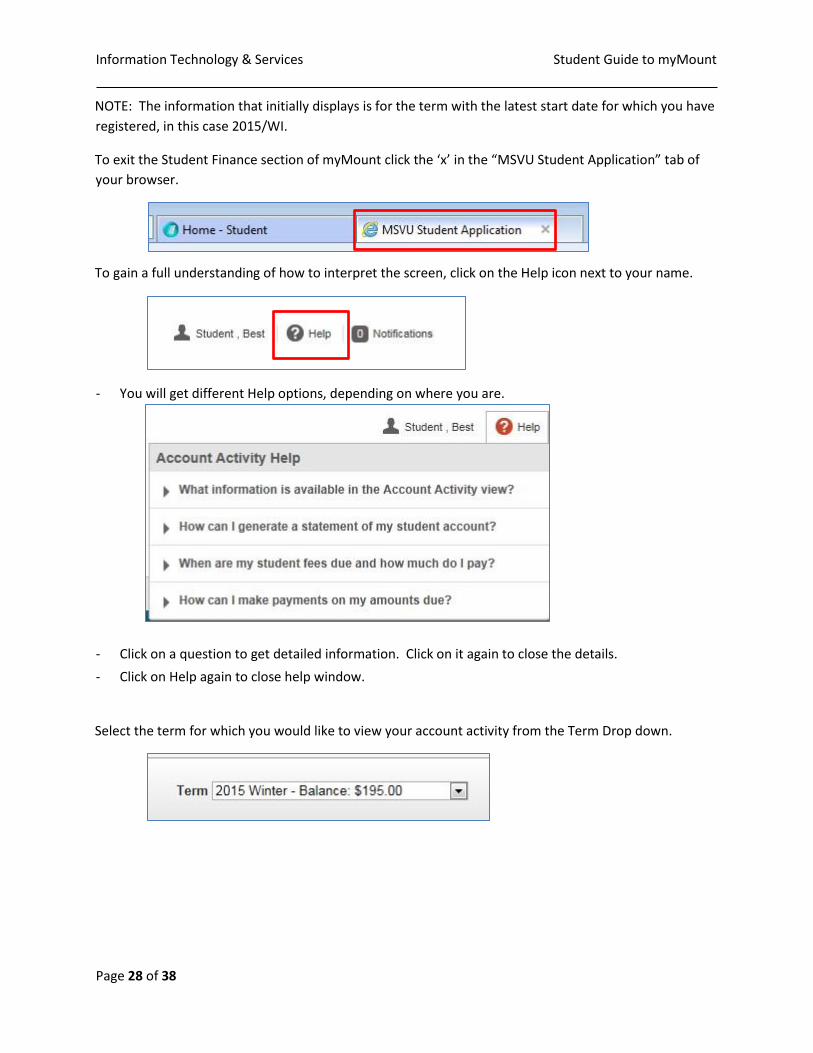
NOTE: The information that initially displays is for the term with the latest start date for which you have
registered, in this case 2015/WI.
To exit the Student Finance section of myMount click the ‘x’ in the “MSVU Student Application” tab of
your browser.
To gain a full understanding of how to interpret the screen, click on the Help icon next to your name.
- You will get different Help options, depending on where you are.
- Click on a question to get detailed information. Click on it again to close the details.
- Click on Help again to close help window.
Select the term for which you would like to view your account activity from the Term Drop down.

Information Technology & Services Student Guide to myMount
Page 29 of 38
To view charges for a different term, select another term from the Term drop-down.
To view all term details, click Expand All.
Click on a circle with a picture (before the = sign) to see term account details under that heading.
To see information under a heading with an arrow, click anywhere on the line to open more details; click
again to close that section.

Information Technology & Services Student Guide to myMount
Page 30 of 38
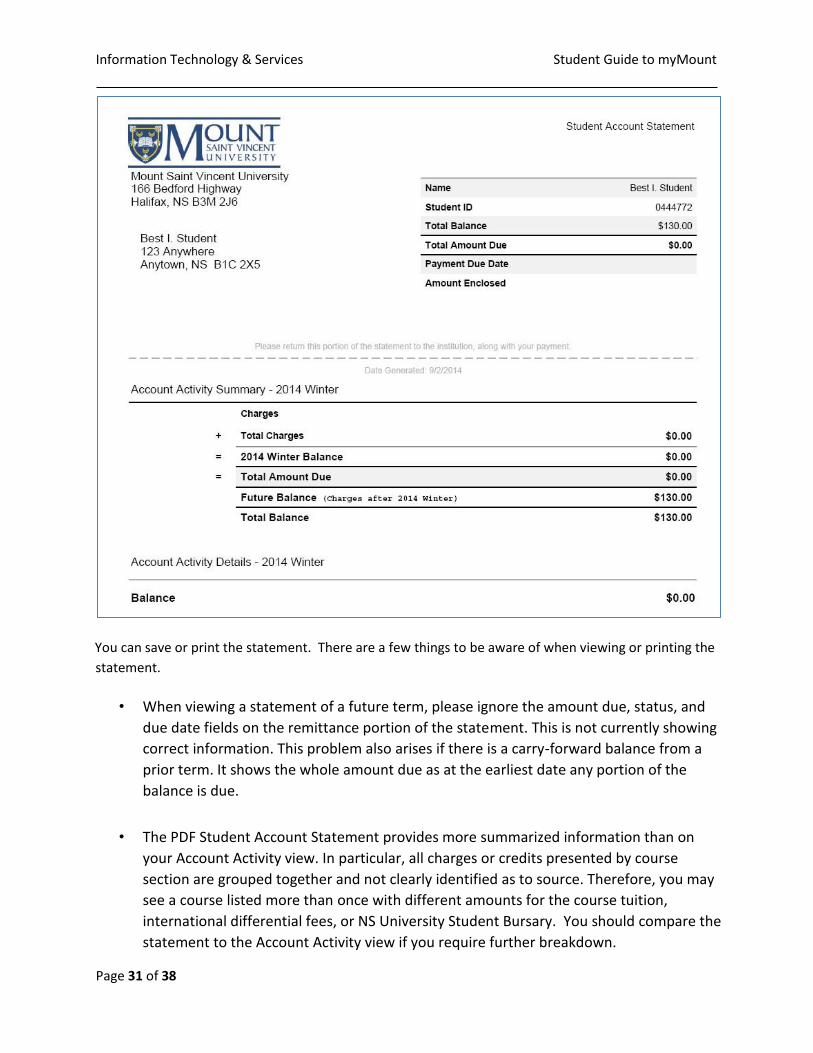
Click on “View Statement” to the right of the Term drop-down to view an account statement for that
term. The PDF will open in a separate tab. This may take a few minutes depending on the amount of
activity on your account.
A PDF statement you can save or print will open in a separate window.
Information Technology & Services Student Guide to myMount
Page 31 of 38
You can save or print the statement. There are a few things to be aware of when viewing or printing the
statement.
• When viewing a statement of a future term, please ignore the amount due, status, and
due date fields on the remittance portion of the statement. This is not currently showing
correct information. This problem also arises if there is a carry-forward balance from a
prior term. It shows the whole amount due as at the earliest date any portion of the
balance is due.
• The PDF Student Account Statement provides more summarized information than on
your Account Activity view. In particular, all charges or credits presented by course
section are grouped together and not clearly identified as to source. Therefore, you may
see a course listed more than once with different amounts for the course tuition,
international differential fees, or NS University Student Bursary. You should compare the
statement to the Account Activity view if you require further breakdown.
Information Technology & Services Student Guide to myMount
Page 32 of 38
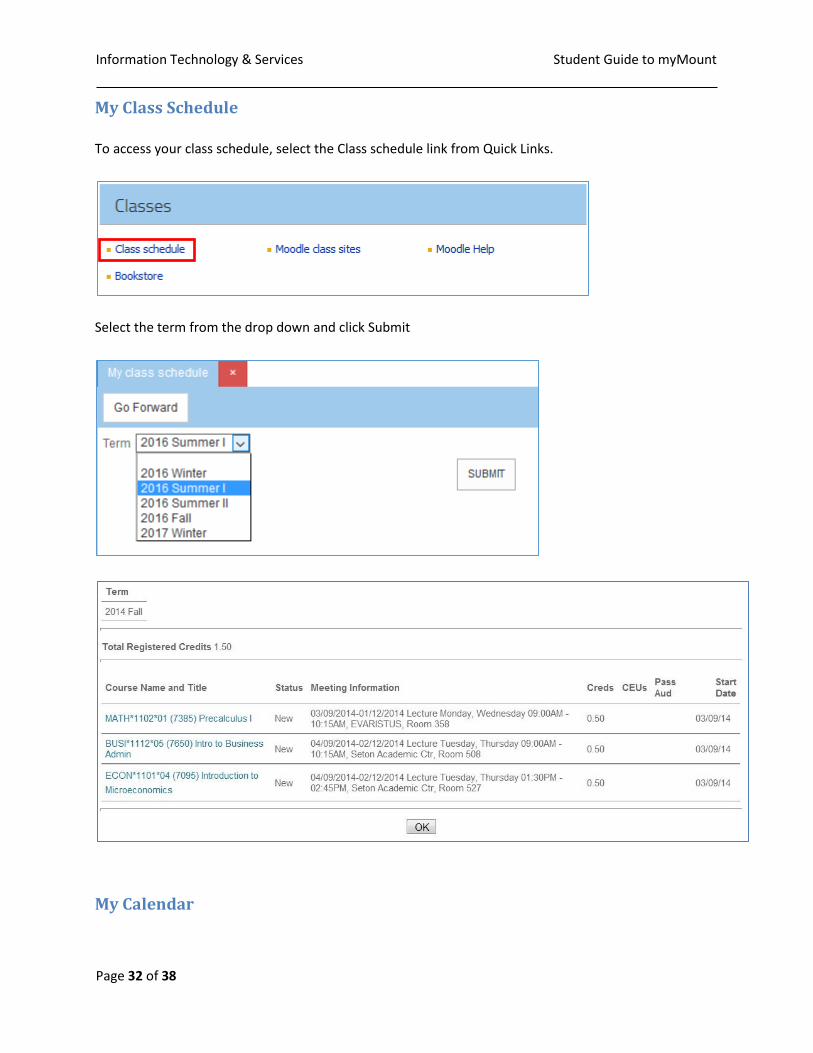
My Class Schedule
To access your class schedule, select the Class schedule link from Quick Links.
Select the term from the drop down and click Submit
My Calendar

Information Technology & Services Student Guide to myMount
Page 33 of 38
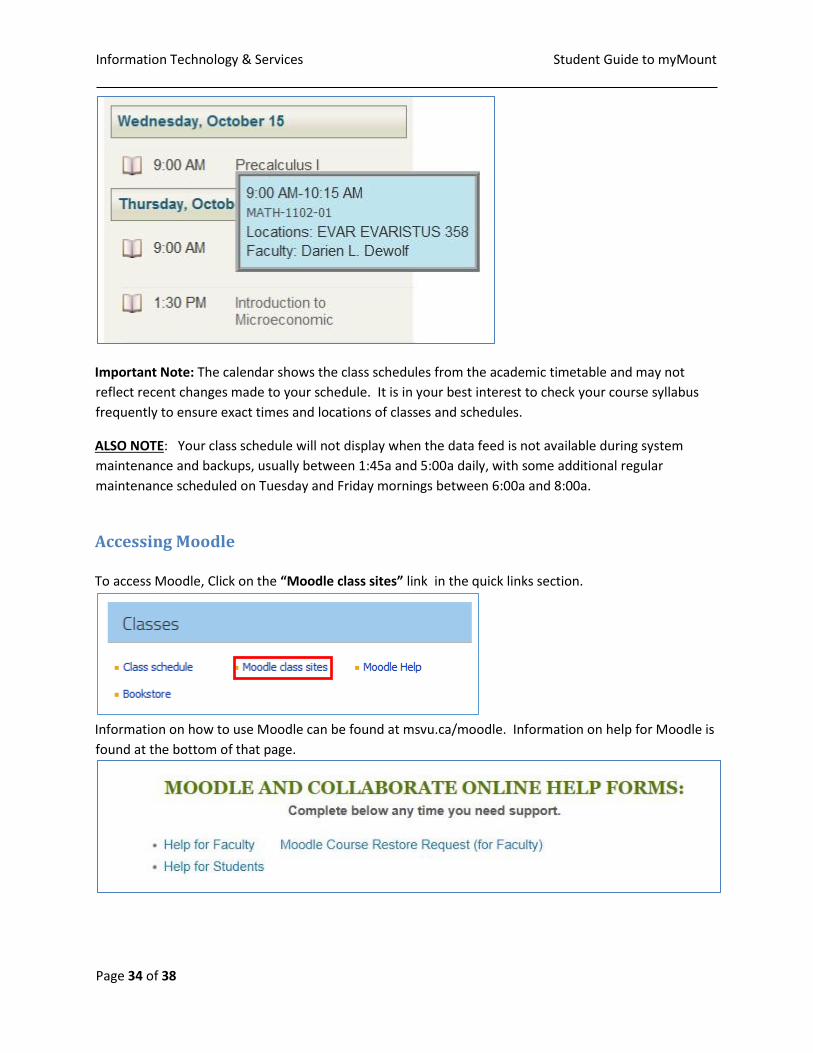
Your calendar shows your class schedule based on your class registrations.
It shows three days’ worth of information.
The calendar is interactive. You can change the date displayed by either clicking on the forward and
backward tabs, or by clicking on a date.
You can see more information by moving your mouse over a class title:
Information Technology & Services Student Guide to myMount
Page 34 of 38
Important Note: The calendar shows the class schedules from the academic timetable and may not
reflect recent changes made to your schedule. It is in your best interest to check your course syllabus
frequently to ensure exact times and locations of classes and schedules.
ALSO NOTE: Your class schedule will not display when the data feed is not available during system
maintenance and backups, usually between 1:45a and 5:00a daily, with some additional regular
maintenance scheduled on Tuesday and Friday mornings between 6:00a and 8:00a.
Accessing Moodle
To access Moodle, Click on the “Moodle class sites” link in the quick links section.
Information on how to use Moodle can be found at msvu.ca/moodle. Information on help for Moodle is
found at the bottom of that page.

Information Technology & Services Student Guide to myMount
Page 35 of 38
Change my Password
Select “Change Password” from Quick Links to change your password.
Change my Address
Select “Change Address” under quick links, and then choose the address you wish to change. Please
note that address changes will not be seen in myMount until reviewed by the registrar’s office.
Accessing Student Email
Click on the “Student Email” link to log in to your student email.
Information on how to use student email is found at:
http://www.msvu.ca/en/home/studentservices/itservices/myemailandmobile/default.aspx
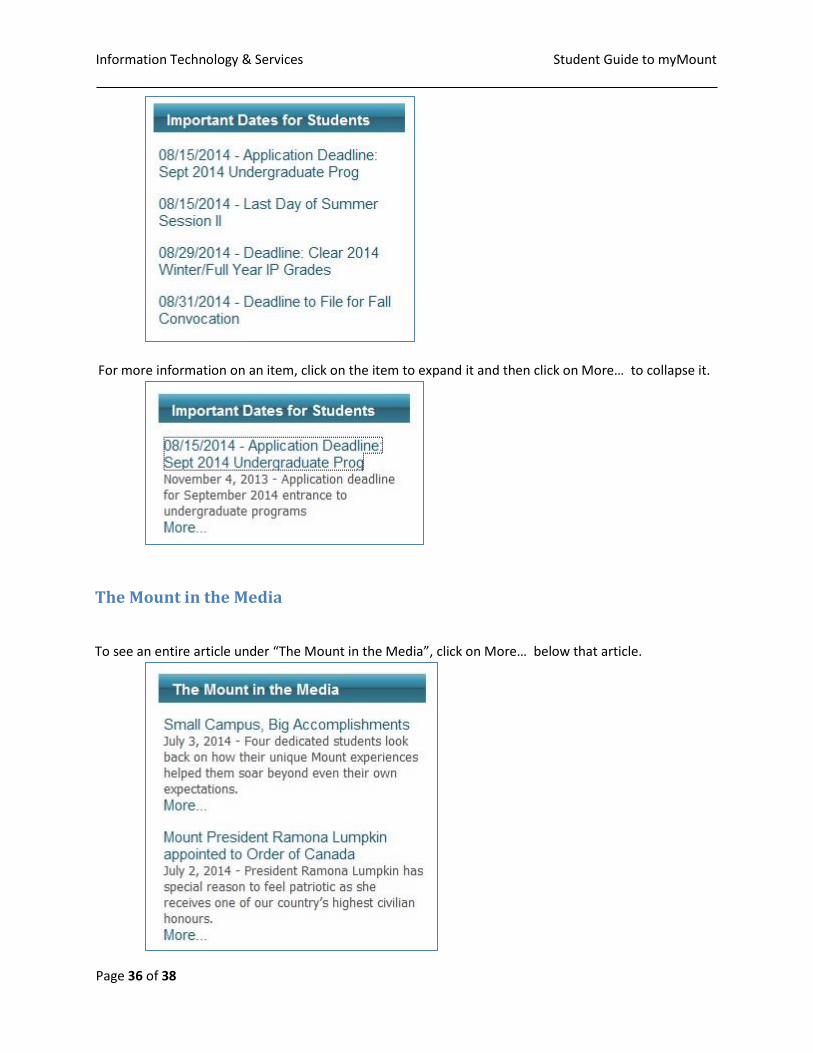
Important Dates for Students
This list is a direct feed of the Important Dates for Students events listed on the external web site. You
can see more dates by clicking on the see more… link which will take you to the list on the external
website.
Information Technology & Services Student Guide to myMount
Page 36 of 38
For more information on an item, click on the item to expand it and then click on More… to collapse it.
The Mount in the Media
To see an entire article under “The Mount in the Media”, click on More… below that article.

Information Technology & Services Student Guide to myMount
Page 37 of 38
Logging Off of myMount
To logout of myMount, click on your name in the top right corner of the page to get the drop down menu
and select Sign Out.
Then Click the “Close Window” button.
If you see the following window click the Yes button to finish closing your browser .

Information Technology & Services Student Guide to myMount
Page 38 of 38
Feedback Form Please click the Feedback Form link at the bottom of any myMount page to provide feedback.