Student Administration Query Intermediate 9.0 pt. 8 · Training Guide Student Administration Page 2...
67
Student Administration Query Intermediate 9.0 pt. 8.53 Version Date: January, 2016
Transcript of Student Administration Query Intermediate 9.0 pt. 8 · Training Guide Student Administration Page 2...
Student Administration
Query Intermediate 9.0 pt. 8.53
Version Date: January, 2016

Training Guide
Student Administration
Page ii
COPYRIGHT & TRADEMARKS
Copyright © 1998, 2011, Oracle and/or its affiliates. All rights reserved.
Oracle is a registered trademark of Oracle Corporation and/or its affiliates. Other names
may be trademarks of their respective owners.
This software and related documentation are provided under a license agreement
containing restrictions on use and disclosure and are protected by intellectual property
laws. Except as expressly permitted in your license agreement or allowed by law, you
may not use, copy, reproduce, translate, broadcast, modify, license, transmit, distribute,
exhibit, perform, publish or display any part, in any form, or by any means. Reverse
engineering, disassembly, or decompilation of this software, unless required by law for
interoperability, is prohibited.
The information contained herein is subject to change without notice and is not warranted
to be error-free. If you find any errors, please report them to us in writing.
If this software or related documentation is delivered to the U.S. Government or anyone
licensing it on behalf of the U.S. Government, the following notice is applicable:
U.S. GOVERNMENT RIGHTS
Programs, software, databases, and related documentation and technical data delivered to
U.S. Government customers are “commercial computer software” or “commercial
technical data” pursuant to the applicable Federal Acquisition Regulation and agency-
specific supplemental regulations. As such, the use, duplication, disclosure, modification,
and adaptation shall be subject to the restrictions and license terms set forth in the
applicable Government contract, and, to the extent applicable by the terms of the
Government contract, the additional rights set forth in FAR 52.227-19, Commercial
Computer Software License (December 2007). Oracle USA, Inc., 500 Oracle Parkway,
Redwood City, CA 94065.
This software is developed for general use in a variety of information management
applications. It is not developed or intended for use in any inherently dangerous
applications, including applications which may create a risk of personal injury. If you use
this software in dangerous applications, then you shall be responsible to take all
appropriate fail-safe, backup, redundancy and other measures to ensure the safe use of
this software. Oracle Corporation and its affiliates disclaim any liability for any damages
caused by use of this software in dangerous applications.
This software and documentation may provide access to or information on content,
products and services from third parties. Oracle Corporation and its affiliates are not
responsible for and expressly disclaim all warranties of any kind with respect to third
party content, products and services. Oracle Corporation and its affiliates will not be
responsible for any loss, costs, or damages incurred due to your access to or use of third
party content, products or services

Training Guide
Student Administration
Page iii
Table of Contents Student Administration Query Intermediate 9.0 pt. 8.53 ............................................. 1
Creating and Formatting a New Query ................................................................................... 1 Create a New Query ................................................................................................................................ 1 Format a Query ....................................................................................................................................... 9
Working with Criteria and Prompts ...................................................................................... 21 Add a Single Criteria ............................................................................................................................ 21 Add a Group of Criteria Using In List .................................................................................................. 27 Add Criteria using Between .................................................................................................................. 33 Add a Prompt ........................................................................................................................................ 39
Using Multiple Tables in a Query ........................................................................................... 49 Use Any Joins and Related Record Joins.............................................................................................. 50


Training Guide
Student Administration
Page 1
Student Administration Query Intermediate 9.0 pt. 8.53
Creating and Formatting a New Query
Create a New Query
Procedure
In this topic you will learn how to Create a New Query.
NOTE: In this example the query will display the student's name, ID, date of birth, gender,
marital status, and highest education level.
Step Action
1. Click the Main Menu button.
2. Click the Reporting Tools menu.
3. Click the Query menu.
4. Click the Query Manager menu.

Training Guide
Student Administration
Page 2
Step Action
5. Click the Create New Query link.
6. Adding Records
The Records page is the first page that you will see when you click the Create New
Query link on the Search page.
You will select the information for your query on the Records page.
7. The Records page displays the records (tables) available to query in alphabetical
order. The list of records available to the end-user is determined by his/her security
rights (Operator ID). Information for your query will be pulled from the selected
record, and will create the data rows on your spreadsheet.
The end-user may view existing records by selecting one of the following methods:
1. Click the Search button to view a list of records; or
2. Enter the appropriate search criteria (record name) into the Search by field. The
end-user may enter the full record name or partial information in CAPS or lower
case. Use the % (percent sign) to act as a wildcard when searching.
8. In this example you will use fields from one record -- the
ZZ_PER_QRY_SAVW_CLONE record.
Enter the desired information into the Description field. Enter "ZZ_PER".

Training Guide
Student Administration
Page 3
Step Action
9. Click the Search button.
10. Click the Add Record link.
11. Selecting Fields
The record and the fields in the record appear on the Query page. It is here that you
will select fields to build the query by clicking the checkbox in front of the field.
NOTE: You may click the checkbox to deselect a field or click the Uncheck All
Fields button to deselect all fields that are checked.
12. The Key symbol in front of the field indicates Key fields. Key fields are fields that
are common between records.
13. The Add Criteria symbol (funnel with a plus sign) allows you to add criteria from
the record itself. Adding criteria will be covered in the Working with Criteria and
Prompts section.
14. The A-Z button allows you to view fields in alphabetical order.

Training Guide
Student Administration
Page 4
Step Action
15. The fields selected will be the columns on your spreadsheet.
Click the EMPLID option.
16. Click the Name option.
17. Click the Gender option.
18. Click the Marital Status option.
19. Click the Birthdate option.
20. Click the Highest Education Level option.
21. Click the Fields tab.

Training Guide
Student Administration
Page 5
Step Action
22. Fields are displayed on the Fields tab in the order in which they were selected on the
Query tab.
Click the Run tab.

Training Guide
Student Administration
Page 6
Step Action
23. A total of 57,552 results display.
Click the Fields tab.

Training Guide
Student Administration
Page 7
Step Action
24. Click the Save As link.

Training Guide
Student Administration
Page 8
Step Action
25. Enter the desired information into the Query field. Enter "STDLIST".
26. Enter the desired information into the Description field. Enter "STUDENT LIST".
27. Enter the desired information into the Query Definition field. Enter "Current List
of Students".
28. Click the OK button.
29. This completes Create a New Query.
End of Procedure.

Training Guide
Student Administration
Page 9
Format a Query
Procedure
In this topic you will learn how to Format a Query.
Step Action
1. You can make formatting changes for the query on the Fields page. The following
are the format options available:
· Change the column heading text.
· Change the translate (XLAT) code when this option is available for a field
· Sort the output results by a particular field.
· Change the order of the columns (i.e. the order in which the fields appear in the
query results).
2. In this example the query results will be formatted as follows:
1. Change the heading text to reflect the long description for Highest Education
Level.
2. Display the long description of each person's Highest Education Level rather than
the default code.
3. Sort the data by Highest Education Level in descending order.
4. Change the order of the Highest Education Level field to display as the first
column.

Training Guide
Student Administration
Page 10
Step Action
3. Click the Edit button for the Highest Education Level field.
NOTE: Fields are formatted one at a time.
4. The Translate Value box will not appear on this page if a field does not have an
associated Translate Value.

Training Guide
Student Administration
Page 11
Step Action
5. Click the RFT Long option.
6. Click the OK button.

Training Guide
Student Administration
Page 12
Step Action
7. Click the Edit button for Highest Education Level.
8. The Translate Value box will not appear on this page if a field does not have an
associated Translate Value.
If a field has an associated Translate Value, the XLT column will contain one of the
following three values:
· N (None) option will display the default translate code (e.g. "G" for a Bachelor's
Degree) in the query results.
· S (Short) option will display a maximum of 10 characters (e.g. Bachelor's) in the
query results.
· L (Long) option will display a maximum of 30 characters (e.g. G-Bachelor's Level
Degree) in the query results.
Training Guide
Student Administration
Page 13
Step Action
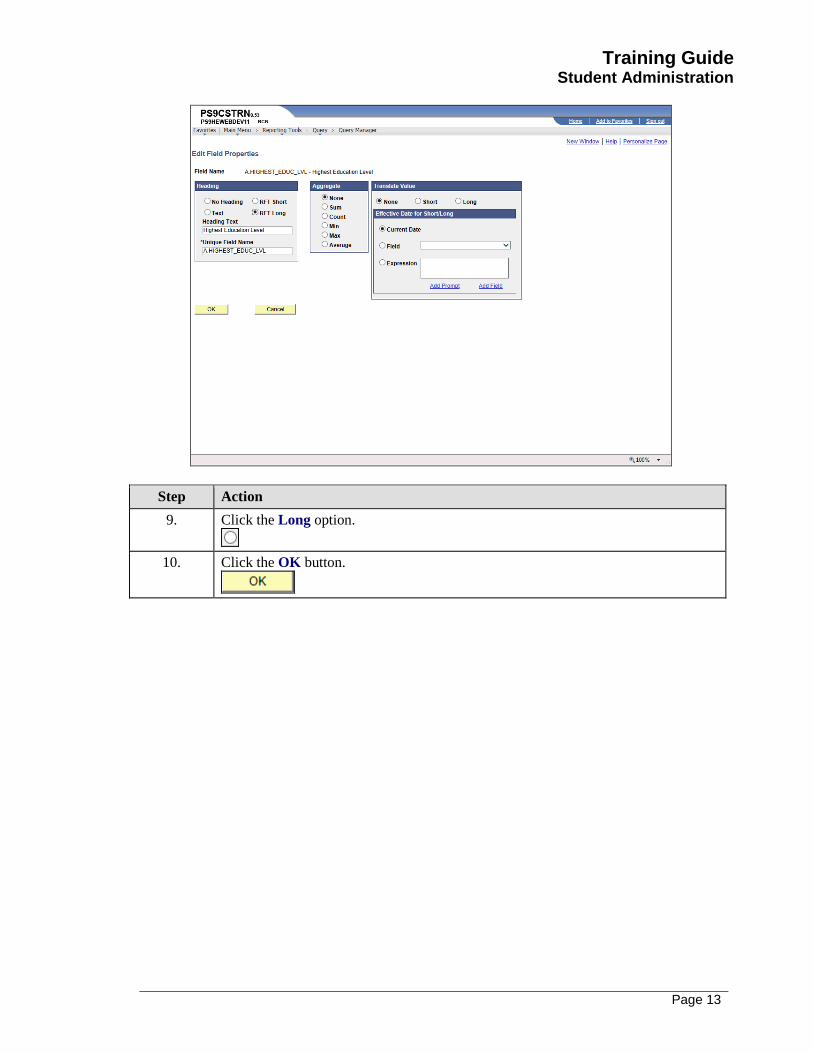
9. Click the Long option.
10. Click the OK button.

Training Guide
Student Administration
Page 14
Step Action
11. Click the Reorder / Sort button.
12. The Edit Field Ordering page allows you to view and change the Sort Order and
Output Order of the fields in a single page.
In this example, the query results will be changed as follows:
· The query results will be sorted by Highest Education Level.
· The fields (columns) will appear in the following order: ID, Name,
Birthdate, Gender, Marital Status, and Highest Education Level.

Training Guide
Student Administration
Page 15
Step Action
13. Click the Descending option for Highest Education Level.
This option allows the results to sort the Highest Education Level first.
14. Enter the desired information into the New Order By field. Enter "1".
15. Enter the desired information into the New Column field. Enter "3".
This field will now be the third column displayed in the query results.
16. Enter the desired information into the New Column field. Enter "4".
This field will now be the fourth column displayed in the query results.
17. Enter the desired information into the New Column field. Enter "5".
18. Click the OK button.
Training Guide
Student Administration
Page 16
Step Action
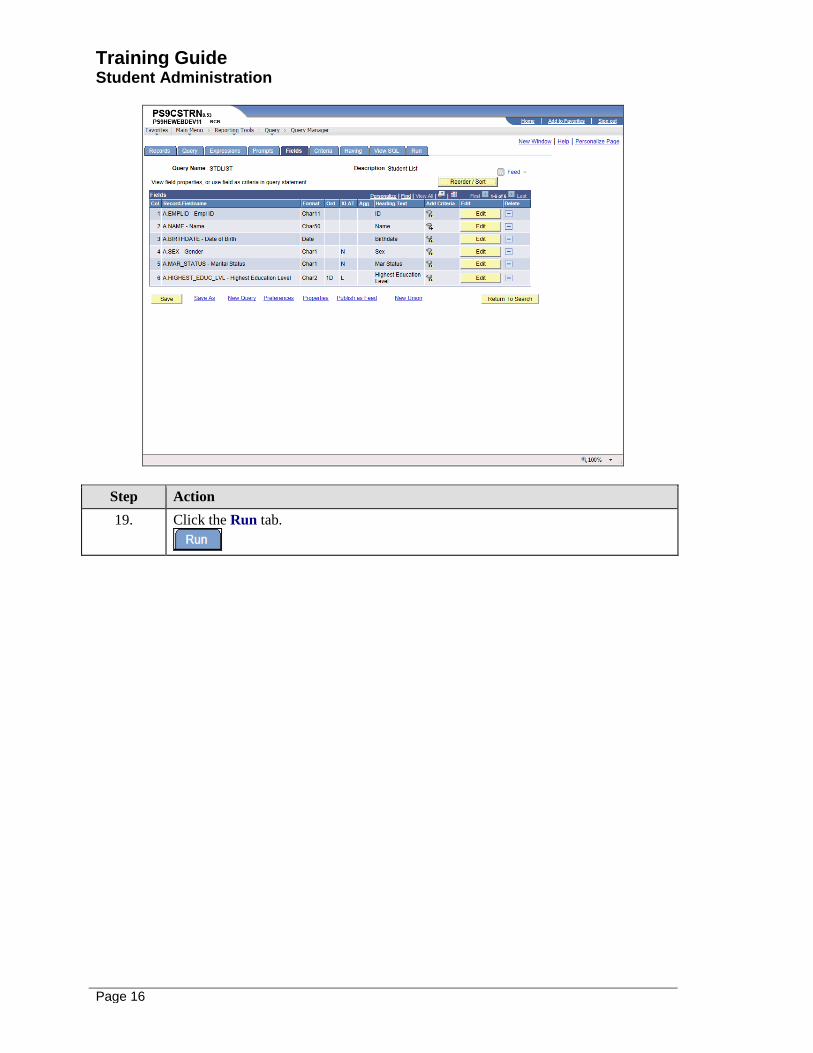
19. Click the Run tab.

Training Guide
Student Administration
Page 17
Step Action
20. Click the Fields tab.
21. Using the Distinct Option
When running a query, occasionally the same row of output may be listed more than
once when it meets multiple query requirements. Using the Distinct option removes
duplicate rows of data. However, the end-user should note that this option may
remove pertinent duplicate information, depending on the query. Therefore, if the
end-user is not sure if any pertinent data will be removed by selecting this option,
the safer alternative would be to run the query results to Excel and manipulate the
data in the spreadsheet.
If the end-user is confident that pertinent data will not be removed, the Distinct
option is located in the Properties page.

Training Guide
Student Administration
Page 18
Step Action
22. Click the Properties link.

Training Guide
Student Administration
Page 19
Step Action
23. Click the Distinct option.
NOTE: When you run the query again, any duplicate rows will be deleted.
24. Click the OK button.

Training Guide
Student Administration
Page 20
Step Action
25. Click the Save button.
26. This completes Format a Query.
End of Procedure.

Training Guide
Student Administration
Page 21
Working with Criteria and Prompts
Add a Single Criteria When you build a query you may wish to add certain criteria to limit the query results to a
particular condition (e.g. a specific value, a list of values or between two specified values).
Although, there are several conditions which you may select, the three most used Condition
Types will be covered in Query Intermediate (i.e. equal to, in list and between).
Procedure
In this topic you learn how to Add a Single Criteria to the query.
Step Action
1. Adding criteria allows you to limit the query results to a specified value.
In this example the query will display the employees whose highest education level
is Doctorate (Academic). To do this you will use the "equal to" Condition Type.
Step Action
2. Click the Add Criteria button for HIGHEST_EDUC_LVL.

Training Guide
Student Administration
Page 22
Step Action
3. The system defaults to the equal to Condition Type, so it does not need to be
selected from the drop-down list.
Step Action
4. Click the Select Constant From List button to access the list of education level
types and define the desired constant.

Training Guide
Student Administration
Page 23
Step Action
5. Click the Select Constant link for "J" Doctorate (Academic).

Training Guide
Student Administration
Page 24
Step Action
6. Click the OK button.

Training Guide
Student Administration
Page 25
Step Action
7. Click the Criteria tab.

Training Guide
Student Administration
Page 26
Step Action
8. The Criteria tab now indicates to display only those students whose Highest
Education Level is equal to 'J'.
Click the Run tab.
9. Your query results have been reduced from 57,552 to 120.
10. This completes Add a Single Criteria.
End of Procedure.

Training Guide
Student Administration
Page 27
Add a Group of Criteria Using In List
Procedure
In this topic you learn how to Add a Group of Criteria Using In List.
Step Action
1. A group of criteria can be added to the query in order to limit the query results to a
list of specified values.
In this example the query will display the students whose highest education levels
are Bachelor’s Degree, Doctorate, and Master Level Degree. To do this you will
use the "in list" Condition Type.
Step Action
2. Click the Edit button.

Training Guide
Student Administration
Page 28
Step Action
3. Click the drop-down arrow for *Condition Type and select the in list option.
NOTE: The "in list" Condition Type finds data having a value that matches any
one of the values in a specified list of values.
4. Click the in list list item.
5. Click the Select List Members button.
Training Guide
Student Administration
Page 29
Step Action
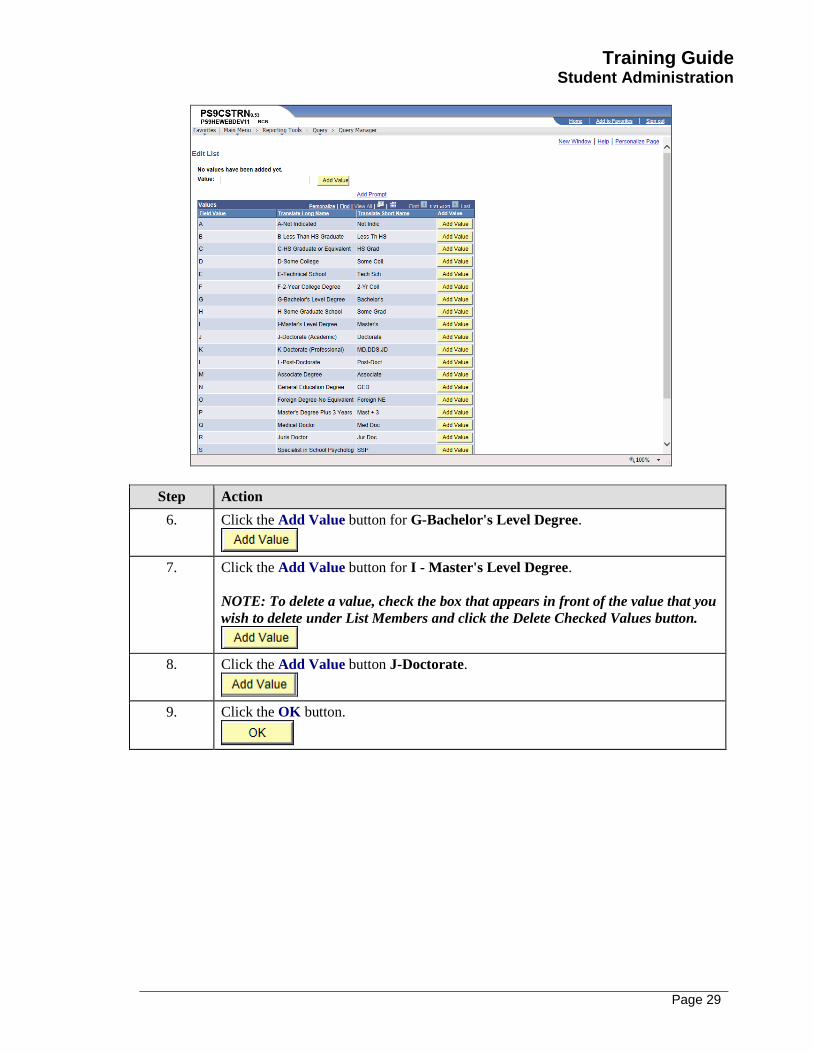
6. Click the Add Value button for G-Bachelor's Level Degree.
7. Click the Add Value button for I - Master's Level Degree.
NOTE: To delete a value, check the box that appears in front of the value that you
wish to delete under List Members and click the Delete Checked Values button.
8. Click the Add Value button J-Doctorate.
9. Click the OK button.

Training Guide
Student Administration
Page 30
Step Action
10. Click the OK button.

Training Guide
Student Administration
Page 31
Step Action
11. The Criteria tab now indicates to only display those students whose
HIGHEST_EDUC_LVL is G, I, or J.
Click the Run tab.
12. Your query results increased from 120 to 3,665.
13. This completes Add a Group of Criteria Using In List.
End of Procedure.

Training Guide
Student Administration
Page 32

Training Guide
Student Administration
Page 33
Add Criteria using Between
Procedure
In this topic you learn how to Add Criteria using Between.
Step Action
1. The "between" criteria allows you to limit the query results to data that falls
between two specified values.
In this example the query will display the students whose date of birth is between
January 1, 1982 and January 1, 1991. To do this you will use the "between"
Condition Type.
Step Action
2. Click the Fields tab.

Training Guide
Student Administration
Page 34
Step Action
3. Click the Add Criteria button.

Training Guide
Student Administration
Page 35
Step Action
4. Click the drop-down for *Condition Type and select the between option.
5. Click the between list item.
6. Enter the desired information into the Date field. Enter "010182".
7. Enter the desired information into the Date 2 field. Enter "010191".
8. Click the OK button.

Training Guide
Student Administration
Page 36
Step Action
9. Click the Criteria tab.

Training Guide
Student Administration
Page 37
Step Action
10. The Criteria tab now shows to display only students whose Highest Education Level
is equal to G, I or J, and whose date of birth is between 01/01/1982 and 01/01/1991.
Click the Run tab.
11. Your query results have now decreased from 3,665 to 170.
12. This completes Adding Criteria using Between.
End of Procedure.

Training Guide
Student Administration
Page 38

Training Guide
Student Administration
Page 39
Add a Prompt
Procedure
In this topic you learn how to Add a Prompt.
Step Action
1. Prompts allow you to select a desired value each time the query is run.
In this example, when you run the query you will be prompted to select the desired
highest education level. To do this you will use the "equal to" Condition Type and
create a "prompt" expression.
Step Action
2. Click the Edit button for HIGHEST_EDUC_LVL.

Training Guide
Student Administration
Page 40
Step Action
3. Click the Condition Type list.
NOTE: In order to use a prompt, the Condition Type should be set to "Equal to".

Training Guide
Student Administration
Page 41
Step Action
4. Click the equal to list item.

Training Guide
Student Administration
Page 42
Step Action
5. Click the Prompt option.
6. Click the New Prompt link.

Training Guide
Student Administration
Page 43
Step Action
7. Click the OK button.
NOTE: Most users will not make changes to the default values on this Edit
Prompt Properties page.

Training Guide
Student Administration
Page 44
Step Action
8. Click the OK button.

Training Guide
Student Administration
Page 45
Step Action
9. The Criteria tab now indicates that HIGHEST_EDUC_LVL has a prompt (:1), and
Birthdate must be between 01/01/1982 and 01/01/1991.
NOTE: Additional prompts will be denoted as :2, :3, etc.
Click the Run tab.

Training Guide
Student Administration
Page 46
Step Action
10. You are prompted to select the desired highest education level.
Click the button to the right of the Hi Educ Lv field.

Training Guide
Student Administration
Page 47
Step Action
11. Click the G-Bachelor's Level Degree list item.

Training Guide
Student Administration
Page 48
Step Action
12. Click the OK button.
13. The query results display those employees whose highest education level is
Bachelor Level Degree, and whose date of birth is between 01/01/1982 and
01/01/1991.
NOTE: You Save your changes before selecting another link from the menu (e.g.
Reporting Tools) by clicking the Save or Save As button. There is no Warning that
changes will be lost.
14. This completes Add a Prompt.
End of Procedure.

Training Guide
Student Administration
Page 49
Using Multiple Tables in a Query When creating a query, it may be necessary to retrieve data from more than one table (record) or
specify criteria in your query from a second table. In these cases, you need to link at least two
tables in one query. Query enables you to run a query that pulls information from multiple
tables. When you perform a join, the records involved are linked based on common fields.
Linking multiple tables, or joining, enables Query to retrieve data from more than one table, but
the query output will appear as if the data is retrieved from a single table. Working with multiple
tables is almost as easy as working with one.
The two joins that are covered in Query Intermediate are the following:
1. Related Record join
2. Any join
In this lesson you wish to retrieve a query that provides a list of student with their Student ID,
Name, Birthdate, Birth Country, Country Description, Academic Program, Degree,
Expected Grad Term . The ZZ_PER_QRY_SAVW - Clone of PER_QRY_SAVW record
contains the Student ID, Name, Birthdate, and Birth Country fields. The
ZZ_STD_PROG_VW record contains the Academic Program, Degree, and Expected Grad
Term fields, but not the Descr field. The Descr field is found in the COUNTRY_TBL table.
Therefore, it will be necessary to pull the fields from three different tables
(ZZ_PER_QRY_SAVW, ZZ_STD_PROG_VW and COUNTRY_TBL) to retrieve the desired
query results.

Training Guide
Student Administration
Page 50

Training Guide
Student Administration
Page 51
Use Any Joins and Related Record Joins
Procedure
In this topic you will learn how to Use Any Joins and Related Record Joins.
Step Action
1. Click the Main Menu button.
2. Click the Reporting Tools menu.
3. Click the Query menu.
4. Click the Query Manager menu.

Training Guide
Student Administration
Page 52
Step Action
5. Click the Create New Query link.
6. Joins allow you to create a query that combines fields from three tables/records
(ZZ_PER_QRY_SAVW, ZZ_STD_PROG_VW and COUNTRY_TBL) using a
Related Record join.
In Query, predefined joins can be generated as a Related Record join. Since these
types of joins are predefined, you will not have to add any criteria to manually link
the records.
Any Joins gives you the ability to join any record that you may access, to your
currently selected record. Records will be joined on their common high-level keys.
If you have an Any Join, it will automatically be added to your criteria, unless there
is only one row of data in the record to be joined.
7. Enter the desired information into the Description field. Enter "ZZ_PER".

Training Guide
Student Administration
Page 53
Step Action
8. Click the Search button.
9. Click the Add Record link.

Training Guide
Student Administration
Page 54
Step Action
10. Click the EMPLID option.
11. Click the Name option.
12. Click the Birthdate option.
13. Click the Birth Country option.
14. Click the Join COUNTRY_TBL - Countries link.
NOTE: This is a Related Record join.

Training Guide
Student Administration
Page 55
Step Action
15. Click the OK button.

Training Guide
Student Administration
Page 56
Step Action
16. Click the Description option.
17. Click the Records tab.
NOTE: This is an Any join.
18. Enter the desired information into the Description field. Enter "ZZ_STD".

Training Guide
Student Administration
Page 57
Step Action
19. Click the Search button.
20. Click Join Record for the ZZ_STD_PROG_VW.

Training Guide
Student Administration
Page 58
Step Action
21. Click the A = ZZ_PER_QRY_SAVW - Clone of PER_QRY_SAVW link.

Training Guide
Student Administration
Page 59
Step Action
22. NOTE: The Query tool has detected alike fields in both queries. Always select
Add Criteria on this screen.
Click the Add Criteria button.

Training Guide
Student Administration
Page 60
Step Action
23. Click the OK button.
24. Click the Academic Program option.
25. Click the Degree option.
26. Click the Expected Graduation Term option.
27. Click the Fields tab.

Training Guide
Student Administration
Page 61
Step Action
28. Click the Save As link.
29. Enter the desired information into the Query field. Enter "STUDENT_LIST".

Training Guide
Student Administration
Page 62
Step Action
30. Enter the desired information into the Description field. Enter "Birth Date and
Birth Country".
31. Click the OK button.

Training Guide
Student Administration
Page 63
Step Action
32. Click the Run tab.
33. You query results display.
34. This completes Using Any Joins and Related Record Joins.
End of Procedure.