STUCCO - The Building Consultant Kenney also wrote a piece in JLC (“Success with EIFS,” Nov/01),...
8
JLC / DECEMBER 2014 41 Photos: Mark Parlee I started out 38 years ago as a framing and siding contractor in Iowa and for the last 20 years, have worked as an exteriors contractor, doing complete exterior renovations and repairs. Over the years, the process of tearing off and replacing complete exteriors has revealed a multitude of poor details that have failed—experience that serves my consulting practice today. While I still keep a crew busy with exterior work, a big chunk of my business these days is providing forensic inspections and expert witness testimony for litigation throughout the Midwest. Right now we’re seeing a rash of failures with all types of cladding mate- rials, but especially with EIFS (exterior insulation finish systems) and DEFS (direct-applied exterior finish systems)—the predominant stucco assemblies used in this region—and with ACMV (adhered concrete masonry veneer) exteriors. I covered ACMV—which in essence is a variation on stucco—in JLC last year (see “Best Practices: Adhered Concrete Masonry Ve- neer,” Oct/13). And JLC has covered EIFS several times in the past, including breaking the story by Richard Piper and Russell Kenney about the earliest EIFS failures soon after the system migrated to the U.S. from Europe (“EIFS Performance Review,” Jun/92). Russell and Michael Kenney also wrote a piece in JLC (“Success with EIFS,” Nov/01), which details a lot of the best practices that are still used BY MARK PARLEE Synthetic Stucco Without Failures To avoid a lawsuit, build a drainable assembly BEST PRACTICES STUCCO
Transcript of STUCCO - The Building Consultant Kenney also wrote a piece in JLC (“Success with EIFS,” Nov/01),...
J LC / DE C E M B E R 2014 4 1
Pho
tos:
Mar
k P
arle
e
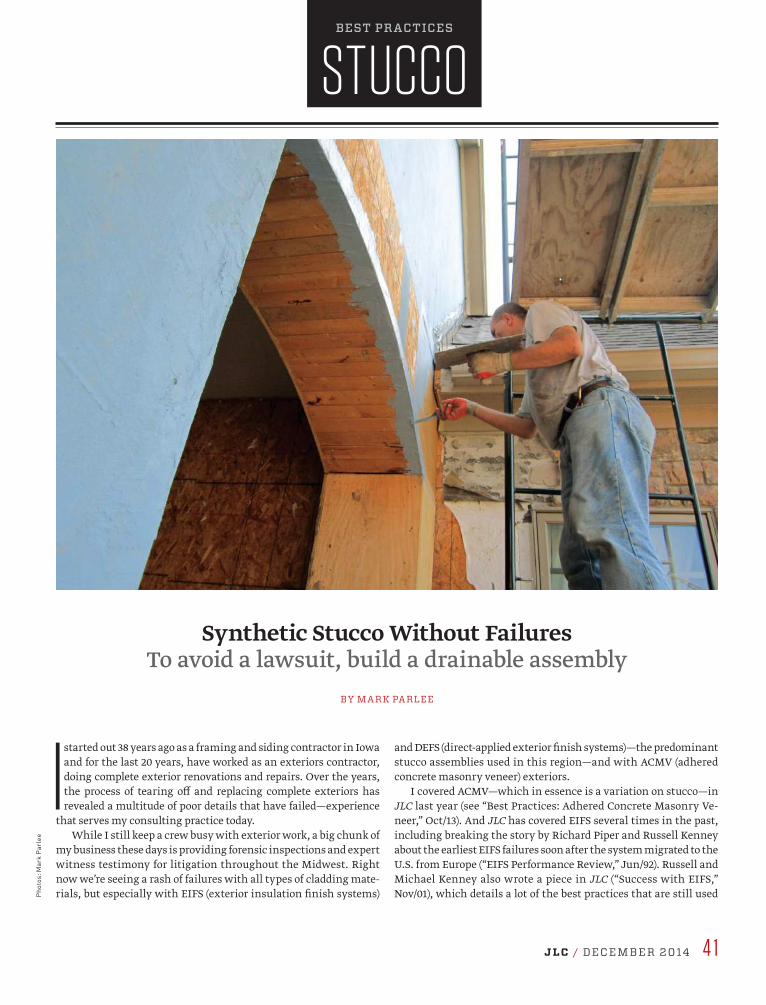
I started out 38 years ago as a framing and siding contractor in Iowa and for the last 20 years, have worked as an exteriors contractor, doing complete exterior renovations and repairs. Over the years, the process of tearing off and replacing complete exteriors has revealed a multitude of poor details that have failed—experience
that serves my consulting practice today. While I still keep a crew busy with exterior work, a big chunk of
my business these days is providing forensic inspections and expert witness testimony for litigation throughout the Midwest. Right now we’re seeing a rash of failures with all types of cladding mate-rials, but especially with EIFS (exterior insulation finish systems)
and DEFS (direct-applied exterior finish systems)—the predominant stucco assemblies used in this region—and with ACMV (adhered concrete masonry veneer) exteriors.
I covered ACMV—which in essence is a variation on stucco—in JLC last year (see “Best Practices: Adhered Concrete Masonry Ve-neer,” Oct/13). And JLC has covered EIFS several times in the past, including breaking the story by Richard Piper and Russell Kenney about the earliest EIFS failures soon after the system migrated to the U.S. from Europe (“EIFS Performance Review,” Jun/92). Russell and Michael Kenney also wrote a piece in JLC (“Success with EIFS,” Nov/01), which details a lot of the best practices that are still used
BY MARK PARLEE
Synthetic Stucco Without FailuresTo avoid a lawsuit, build a drainable assembly
BEST PRACTICES
STUCCO

4 2 DE C E M B E R 2014 / J LC
today. These days, however, we have more options for drainage-plane materials, which I’ll cover in this article. This time, I’m going to focus on DEFS, which are similar to EIFS, except that the two-part stucco finish is applied over a cementitious or special-OSB base in-stead of over EPS foam boards.
As with EIFS, success with DEFS comes by providing an effec-tive drainage assembly and taking care in detailing flashings and sealing joints. On nearly every job I look at that’s in litigation, moisture is getting past the stucco face at critical junctures and is rotting out the framed wall. The damage caused is often extensive. On one recent project, three missing kickout flashings led to some $30,000 in repairs. In another case against a builder, water that was leaking through a single wire penetration sparked an $85,000 lawsuit.
These are the kinds of numbers that you don’t want to risk. Spending a couple extra bucks per square foot to get the right mate-rials and exterior details can be viewed as a savings, not an added cost, when compared with being involved in litigation down the road. Don’t mess around with low bids unless you’re jonesing for a lawsuit or want to trash your reputation as a builder.
THE ESR TRUMPS CODEI’m confident that the details shown here will work for any DEFS installation. To avoid liability, you need to compare them to the manufacturer’s installation instructions and to the ICC-ES Eval-uation Report. All the major manufacturers of synthetic stucco systems and the accessory products that are part of the exterior finish assembly have gone through the evaluation service process to get an Evaluation Services Report (ESR). Typically, these reports include language that states that whenever the established build-ing code and the manufacturer’s installation instructions or the ESR differ, the installation instructions or the ESR prevails. ESRs are available from the manufacturer or from the ICC Evaluation Service (icc-es.org).
The main purpose of these documents is to assist code officials in determining what details are required to meet code, and some inspectors will require that you have copies of them, as well as cop-ies of the installation instructions, on hand at the time of inspec-tion. This doesn’t happen a lot, but it’s well within the building department’s domain to insist on it. Certainly it’s easy due-diligence to collect these reports and make them part of the job file. Take the
SYNTHETIC STUCCO WITHOUT FAILURES
5
3
4
21
6

J LC / DE C E M B E R 2014 4 3
time to familiarize yourself with ESRs (a guide to reading them can be found at icc-es.org/evaluation_reports/read.shtml). Knowing that you had them on file and that you checked your work against them will go a long way in a court of law if you’re ever sued.
OVER SHEATHING ONLYThe illustration above shows all the layers that make up an effec-tive DEFS assembly. This assembly is built over structural sheath-ing. In theory, there are “approved” applications that allow you to install the base panels over open-stud framing (provided, of course, that the wall meets the wind-bracing requirements with-out sheathing).
I don’t consider a “direct-to-stud” application best practice. While possible in some perfect world, it’s not likely to succeed in the real world. Between the time that the open framing gets cov-ered with a weather-resistive barrier (WRB) and the rest of the cladding system is installed, too much can happen (such as just having the wind blow) to compromise this key waterproofing layer. Without backing behind it, the exposed building wrap is extremely vulnerable. Direct-to-stud applications are put out there to make
the price of the finish system more attractive. After all, the base panel seems like sheathing and is certainly more substantial than EPS when compared with EIFS. But that doesn’t mean the final assembly will endure.
LIQUID-APPLIED WRBA more durable and fail-safe application is to use a liquid-applied waterproofing membrane over OSB or plywood sheathing. The first step to applying this membrane is to seal the panel joints with a “wet sandwich” of fiberglass mesh and the liquid mem-brane (1). We apply this around corners and all the way into the jambs of window and door openings, using a brush to work the liquid into tight corners and seams. Mesh and sealant should be applied to all inside and outside corners as well (2, 3).
The photos in this article show either StoGuard—a gold-colored liquid membrane—or Dryvit Backstop NT—a translucent blue mate-rial. Though not shown here, Parex produces WeatherTech WRB for its Armourwall stucco system, and BASF produces Senershield-R, the liquid WRB used with the Senergy finish system.
There are a number of other liquid-applied membranes that
Direct-Applied Exterior Finish System
Termination at Grade
Corner Detail
Liquid-applied WRB membrane
Liquid-applied WRB membrane
Drainage matrix
OSB or plywood sheathing, seams taped, coated with liquid-applied WRB Drainage matrix or
vertically grooved building wrap
8" min. to grade
Weep screed
Cementitious or special-OSB base panel
Corner bead
Apply mesh to seams on base layer and coat with stucco base coat
Stucco base coat
Stucco finish coat
Base panel
Base panel
Stucco base coat
Stucco base coat
Finish coat
Finish coat

4 4 DE C E M B E R 2014 / J LC
could work, but be advised that the warranty provided by the stucco manufacturer won’t apply unless you’re using all the com-ponents of one system. I’m not a big believer in manufacturer warranties, as there are too many “outs” a manufacturer can take, but I do generally try to stick to the components of one system as much as is feasible.
After the corners and seams have been sealed, the liquid mem-brane can be applied over the whole sheathing area by either rolling it or spraying it on. Spraying it on is a bit faster, but the over-spray can be messy. Rolling is much easier to control.
INTEGRATING FLASHINGSFlashings get integrated at the WRB layer. Generally, they are applied to the sheathing after the WRB is applied, and then the top edge gets another layer of mesh embedded in more liquid membrane.
Sidewall flashing. Roof-to-wall intersections typically see an enormous amount of water, making these critical areas to flash well. These must include step flashing that gets woven in with the roof shingles, and then a counterflashing to protect against water
getting behind the top edge of the step flashing (4). At the bottom edge of the roof, sidewall flashing must terminate with a kickout to deflect the water away from the sidewall and into a gutter.
For most builders this is not news, and we’re seeing step flashing and kickouts installed more and more. The big problem is that the kickout is usually undersized. The gush of water that comes racing down the roof hits the undersized kickout and simply spills over the edge, soaking the wall below and eventually finding its way into the cladding. To avoid this, we use large, preformed kickouts, like those made by DryFlekt, on steep roofs (5). Shallower roofs don’t require as big a kickout (6).
The top edge of the step flashing gets a layer of mesh and liquid WRB (7), as does the top edge of the counterflashing. The beauty of a liquid WRB is that each flashing layer can be made an integral part of the WRB.
Chimney flashing. Just like sidewalls, the roof-chimney inter-section sees a lot of water. The first step is to make sure that there’s a cricket formed into the plane of the roof to create positive drainage away from the chimney (8). We always use plenty of peel-and-stick on the cricket, lapping it onto the chimney, and (you guessed it)
SYNTHETIC STUCCO WITHOUT FAILURES
1210
9
11
87

J LC / DE C E M B E R 2014 4 5
sealing the top edge of this with mesh and liquid WRB. (Hopefully you’re seeing a theme emerging here.)
Siding transitions. Residential exteriors often combine stucco with another cladding. In our area we see a lot of transitions from stucco and synthetic stone, as well as from stucco to a horizontal siding, be it vinyl or fiber-cement. Any of these transitions needs through-wall flashing. We may use a W.R. Grace membrane, such as Perm-A-Barrier wall membrane (the green membrane at the base of the wall in photos 9 and 10). Again, the top edge of this through-flashing adheres to the wall and is sealed with mesh and liquid WRB.
Wall penetrations. Wiring conduit, plumbing, pipes, exhaust vents, AC linesets, and all other wall penetrations have to be flashed. Flashing panels, such as those made by Quickflash Weath-erproofing Products, are our go-to product for sealing these areas. And, like all the other flashing, these get sealed in with mesh tape and liquid WRB.
Windows and doors. These should be installed after the liquid WRB has been applied. As noted earlier, the entire rough opening gets treated first. After the unit goes in, the nail fins along the head
and side jambs get pasted over with mesh and liquid WRB. But the sills are left open (11, 12) so water that might leak through the win-dow or door has a way to drain out.
An L-flashing is required by code along the head. We typically use colored metal bent with a 4-inch back leg, and a 2-inch front leg with a 45-degree downturn along the front edge. This can be applied right over the top nail fin and pasted in with mesh and liquid WRB.
DRAINAGE PLANEThe layer that most often gets missed in a DEFS assembly is the drainage layer. I typically use a rainscreen material, such as Keene Building Products’ Driwall Rainscreen or Benjamin-Obdyke’s Home Slicker, the bright yellow matrix that’s shown in the photos in this article (13, 14). I’ve also used Masonry Technology’s Gravi-ty Cavity, which was developed for brick walls but works for stucco systems as well. You could even use a vertically grooved building wrap, such as Tyvek StuccoWrap.
The key is to use a material that creates a three-dimensional separation between the WRB and the base panels that will be
15
16 17
13 14
18

4 6 DE C E M B E R 2014 / J LC
installed over it. The liquid-applied WRBs are somewhat permeable, and if the base panel is pressed tight against them, any water that gets behind the base panel has the potential to wick through the WRB. The separation created by the drainage matrix allows the water to drain down the wall instead.
BASE PANELSOver the drainage matrix go the base panels (15). This is the key difference between EIFS and DEFS assemblies. The DEFS base pan-el replaces the insulation panel found in an EIFS assembly. The assembly loses its insulation value, but it gains in durability and impact resistance.
There are a number of options for stucco base panels that can be used. We typically use PermaBase, a cementitious panel made by National Gypsum. We also see a lot of James Hardie HardieBacker fiber-cement panels and LP SmartSide, an OSB product that’s treated with a zinc borate compound to discourage fungal growth.
Control joints. As with an EIFS assembly, the wall area needs to be segmented by placing a control joint every 10 to 12 feet, both vertically and horizontally. The purpose of these joints is to force
controlled cracks. If the wall area were larger, the stucco coating would pull itself apart due to thermal expansion and the wood framing’s swelling and shrinking due to changes in humidity. By installing a control joint, however, you limit the cumulative ex-pansion over the wall area, essentially breaking the wall into a neat matrix of rectangles.
The control joint is fashioned by spacing the base panels 1/2 inch apart (16) and applying a vinyl strip with an “M” profile that will accordion in and out as the wall swells and shrinks (17). Vinyl stuc-co accessories, including control joint strips and corner bead, are available from a number of sources; one common supplier is AMICO Building Products.
Vertical control joints should completely divide the wall section. We bring the joint right through any transition at the wall base (18). Horizontal control joints are typically placed between floors along the second- (and third-) floor band joists (19). Where the horizontal joint intersects a roofline or bump-out, we are careful to integrate the con-trol joint with edge treatments at the base of a wall (20).
J-track and corner bead. We typically use a vinyl J-track (some-times sold as “casing bead”) at the base of walls to finish out the
SYNTHETIC STUCCO WITHOUT FAILURES
22
2019
23 24
21

J LC / DE C E M B E R 2014 4 7
exposed bottom edges of the panels (21). True to its name, it has a J-profile to receive base panel, and it has weep holes that will allow any water that drains through the assembly to escape. It functions like a screed as well. When the stucco base coat is troweled on, the installer’s trowel will ride on the proud, outside edge, revealing a small slice of vinyl that will later be painted over by the finish coat.
Outside corners should get a corner bead to create a crisp edge to define architectural details in the facade (22).
The base panel should finish out at least 2 inches above a paved surface or above a sloped roof (23). Above exposed grade, most man-ufacturers will allow a minimum of 6 inches, which conforms with the 2009 IRC, but better is the old code standard of 8 inches, to keep the bottom of the stucco out of the splash zone at the dripline.
STUCCO BASE COATAn EIFS system would typically include an impact-resistant mesh over the entire surface of the foam boards. With DEFS, mesh is applied only at the joints, to help prevent the panel edges from telegraphing through the stucco. Like the mesh applied at the WRB layer, the mesh applied to the joints at the base panel lay-
er is embedded—only in this case the embedding material is the stucco base coat (24).
This base coat is a cementitious material. It’s not quite as hard as the scratch coat in a traditional three-coat system, and it doesn’t go on as thick. Each manufacturer provides specifications for the thick-ness, typically around 3/8 inch to 1/2 inch per coat. What’s critical is that the material be applied at a consistent thickness, so there are no sags or recesses. Much like with a plastered interior wall, imperfec-tions in the base coat will telegraph through the finish coat.
DETAILING WINDOWS & DOORS As mentioned earlier, the detailing of windows and doors starts at the WRB layer. After the base coat has cured, we apply a foam trim (25) and give that a base coat (26). The trim is held 3/8 inch away from the edge of the window or door, creating a channel that will later be sealed with backer rod and caulk, as shown in the illustration above.
For the trim, we use a pre-formed foam trim. This is sold either as pre-finished trim or as a starter strip for EIFS foam board with a “backwrapped” edge. This ensures that the edge and back are coated
DEFS Window DetailsHead Flashing
Jamb Flashing
Liquid-applied WRB membrane (blue)
Foam starter strip adhered to base layer, acts as casing
Factory-applied backwrapping(fiberglass mesh embedded in base coat material)
Metal head flashing
WRB material seals head flashing
Foam casing masked off with tape to provide 1/8" edge for sealant to adhere to (sealant adhered to factory-applied stucco base coat)WRB material seals nailing fin
Backer rod and sealant (finish coat applied before backer rod and sealant)
Drainage matrix
Sheathing
WRB (blue)
Base panel
Stucco base and finish coats
Nailing fin (red)
King and trimmer studs
Header
Base panel
Drainage matrix
26
25
4 8 DE C E M B E R 2014 / J LC
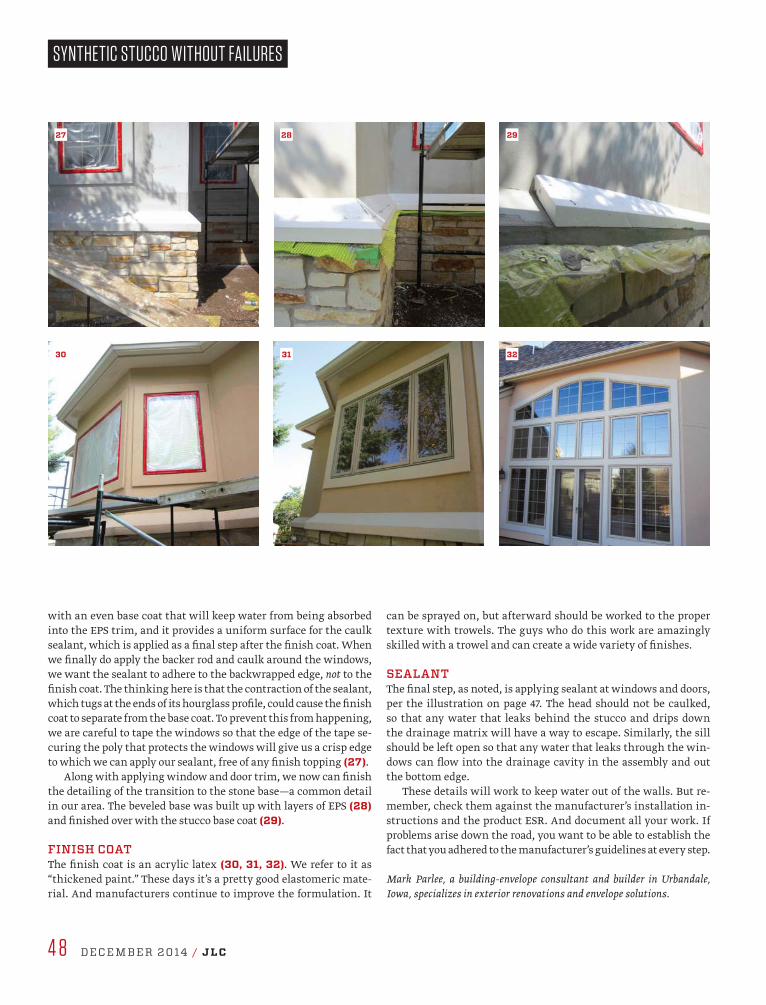
with an even base coat that will keep water from being absorbed into the EPS trim, and it provides a uniform surface for the caulk sealant, which is applied as a final step after the finish coat. When we finally do apply the backer rod and caulk around the windows, we want the sealant to adhere to the backwrapped edge, not to the finish coat. The thinking here is that the contraction of the sealant, which tugs at the ends of its hourglass profile, could cause the finish coat to separate from the base coat. To prevent this from happening, we are careful to tape the windows so that the edge of the tape se-curing the poly that protects the windows will give us a crisp edge to which we can apply our sealant, free of any finish topping (27).
Along with applying window and door trim, we now can finish the detailing of the transition to the stone base—a common detail in our area. The beveled base was built up with layers of EPS (28) and finished over with the stucco base coat (29).
FINISH COAT The finish coat is an acrylic latex (30, 31, 32). We refer to it as “thickened paint.” These days it’s a pretty good elastomeric mate-rial. And manufacturers continue to improve the formulation. It
can be sprayed on, but afterward should be worked to the proper texture with trowels. The guys who do this work are amazingly skilled with a trowel and can create a wide variety of finishes.
SEALANTThe final step, as noted, is applying sealant at windows and doors, per the illustration on page 47. The head should not be caulked, so that any water that leaks behind the stucco and drips down the drainage matrix will have a way to escape. Similarly, the sill should be left open so that any water that leaks through the win-dows can flow into the drainage cavity in the assembly and out the bottom edge.
These details will work to keep water out of the walls. But re-member, check them against the manufacturer’s installation in-structions and the product ESR. And document all your work. If problems arise down the road, you want to be able to establish the fact that you adhered to the manufacturer’s guidelines at every step.
Mark Parlee, a building-envelope consultant and builder in Urbandale, Iowa, specializes in exterior renovations and envelope solutions.
SYNTHETIC STUCCO WITHOUT FAILURES
27 28 29
323130