StruxureWareSCADAExpert VijeoCitect...
61
StruxureWare SCADA Expert Vijeo Citect 7.40 SP1 Installation and Configuration Guide February 2014
Transcript of StruxureWareSCADAExpert VijeoCitect...

StruxureWare SCADA ExpertVijeo Citect 7.40 SP1Installation and Configuration GuideFebruary 2014

Legal Information
DISCLAIMERSchneider Electric makes no representations or warranties with respect to this manual and, to the maximum extent permitted by law,expressly limits its liability for breach of any warranty that may be implied to the replacement of this manual with another. Further,Schneider Electric reserves the right to revise this publication at any time without incurring an obligation to notify any person of therevision.The Example Projects are provided to you for the purpose of illustrating how the SCADA software 7.40 SP1 could be used in anoperational environment ("the Purpose").Schneider Electric grants you a royalty free, non exclusive, non transferable license to use theexample projects installed with your SCADA software version 7.40 SP1 (“the Example Projects”) for the Purpose only.The Example Projects are provided by Schneider Electric as part of the SCADA software version 7.40 SP1 on an "as is" basis andSchneider Electric does not guarantee the reliability, serviceability or function of the Example Projects.Should you modify the Example Projects, you bear the risk of any use of such modified Example Projects.Schneider Electric gives no express warranties, guarantees or conditions and to the extent permitted under applicable laws, SchneiderElectric disclaims all implied warranties, including any implied warranties of merchantability, fitness for a particular purpose or non-infringement of third parties’ intellectual property rights.Schneider Electric shall not be liable for any direct, indirect or consequential damages or costs of any type arising out of any actiontaken by you or others related to the Example Projects.
COPYRIGHT© Copyright 2014 Schneider Electric All rights reserved.
TRADEMARKSSchneider Electric has made every effort to supply trademark information about company names, products and services mentioned inthis manual.Citect, CitectHMI, Vijeo Citect, Vijeo Citect Lite PowerSCADA Expert and CitectSCADA are either registered trademarks or trademarksof Schneider Electric.Pelco, Spectra, Sarix, Endura, are registered trademarks of Pelco, Inc.IBM, IBM PC and IBM PC AT are registered trademarks of International Business Machines Corporation.MS-DOS, Windows, Windows NT, Microsoft, and Excel are either registered trademarks or trademarks of Microsoft Corporation in theUnited States and/or other countries.DigiBoard, PC/Xi and Com/Xi are trademarks of Digi International Inc.Novell, Netware and Netware Lite are either registered trademarks or trademarks of Novell, Inc. in the United States and othercountries.dBASE is a trademark of dataBased Intelligence, Inc.All other brands and products referenced in this document are acknowledged to be the trademarks or registered trademarks of theirrespective holders.
GENERAL INFORMATIONSome product names used in this manual are used for identification purposes only and may be trademarks of their respectivecompanies.February 2014 edition for Vijeo Citect Version 7.40 SP1.Manual Revision Version 7.40 SP1.
PLEASE NOTEElectrical equipment should be installed, operated, serviced, and maintained only by qualified personnel. No responsibility is assumedby Schneider Electric for any consequences arising out of the use of this material. © 2014 Schneider Electric. All Rights Reserved.

Validity NoteThe present documentation is intended for qualified technical personnel responsible for the implementation, operation andmaintenance of the products described. It contains information necessary for the proper use of the products. However, those who wishto make a more "advanced" use of our products may find it necessary to consult our nearest distributor in order to obtain additionalinformation.The contents of this documentation are not contractual and in no way constitute an extension to, or restriction of, thecontractual warranty clauses.
Contact Schneider Electric today at www.schneider-electric.com

Contents
Legal Information 1
Contents 3
Safety Information 5
Chapter 1: Introduction 7About ThisGuide 7Purpose 7Maintaining SystemCurrency 7Audience 8
Chapter 2: Migration 9Changes in Functionality 9
Resolving cluster context with unique tag names 9NetworkSupport 9
New Features 10Introduced in 7.40SP1 11Introduced in 7.40 12Introduced in 7.30 13Introduced in v7.20 17Introduced in v7.10 21Introduced in v7.0 25Cicode Functions 28
TheMigration Process 28Low Impact Changes 28Changes ImpactingMigration 29
Migration Aids 31Upgrading aRuntime-only Installation 31
Chapter 3: Installation Description 333

TaskSelectionDialogs 33Installation Profiles 33Documentation Installation 35Add-ons Installation 35CommunicationDrivers 36
Chapter 4: Installation Requirements 37AllCoreComponents 37
SystemHardware 37SystemSoftware 38
Microsoft IISCompatibility 39SystemSoftware 40Software Licensing 41
Updating Your Hardware Key 41VijeoCitect LicensePoint Count 42DemoMode 42
Chapter 5: Installation 45The Installation Process 45
Chapter 6: Configuration 47LocalAreaNetworkConfiguration 47
NetworkCommunicationsOverview 48ConfiguringCommunicationsOver aWAN 49
WebServer Configuration 49The IISVirtualDirectory 50SettingUpSecurity 51WebClient user account types 51Configuring SecurityUsing IIS 52Testing theWebServer SecuritySettings 55Logging on to theWebServer 56
Index 59
Contents
4

Safety InformationHazard categories and special symbols
The following symbols and special messages may appear in this manual or on theproduct to warn of potential hazards or to call attention to information that clarifies orsimplifies a procedure.
Symbol Description
or
The addition of either symbol to a “Danger” or “Warning” safetylabel indicates that an electrical hazard exists which will result inpersonal injury if the instructions are not followed.
This is the safety alert symbol. It is used to alert you to personalinjury hazards. Obey all safety messages that follow this symbol toavoid possible injury or death.
DANGER indicates an imminently hazardous situation, which, if not avoided, will result indeath or serious injury.
WARNING indicates a potentially hazardous situation, which, if not avoided, can result indeath or serious injury.
CAUTION indicates a potentially hazardous situation which, if not avoided, can result inminor or moderate injury.
NOTICE
NOTICE used without a safety alert symbol, indicates a potentially hazardous situationwhich, if not avoided, can result in property or equipment damage.
Please Note
5

Electrical equipment should be installed, operated, serviced, and maintained only byqualified personnel. No responsibility is assumed by Schneider Electric for any con-sequences arising out of the use of this material.
Before You Begin
Vijeo Citect is a Supervisory Control and Data Acquisition (SCADA) solution. It facil-itates the creation of software to manage and monitor industrial systems and processes.Due to Vijeo Citect's central role in controlling systems and processes, you must appro-priately design, commission, and test your Vijeo Citect project before implementing it inan operational setting. Observe the following:
UNINTENDED EQUIPMENT OPERATION
Do not use Vijeo Citect or other SCADA software as a replacement for PLC-based control pro-grams. SCADA software is not designed for direct, high-speed system control.
Failure to follow these instructions can result in death, serious injury, or equip-ment damage.
LOSS OF CONTROL
l The designer of any control schememust consider the potential failure modes of con-trol paths and, for certain critical control functions, provide a means to achieve a safestate during and after a path failure. Examples of critical control functions are emer-gency stop and overtravel stop, power outage and restart.
l Separate or redundant control paths must be provided for critical control functions.l System control paths may include communication links. Consideration must be givento the implications of unanticipated transmission delays or failures of the link.
l Observe all accident prevention regulations and local safety guidelines. 1l Each implementation of a control system created using Vijeo Citect must be indi-vidually and thoroughly tested for proper operation before being placed into service.
Failure to follow these instructions can result in death, serious injury, or equip-ment damage.
1. For additional information, refer to NEMA ICS 1.1 (latest edition) "Safety Guidelinesfor the Application, Installation, and Maintenance of Solid State Control", and to NEMAICS 7.1 (latest edition) "Safety Standards for Construction and Guide for Selection, Install-ation and Operation of Adjustable-Speed Drive Systems" or their equivalent governingyour particular location.
Safety Information
6

Chapter 1: Introduction
About This Guide
Purpose
This document is a guide for installing StruxureWare SCADA Expert Vijeo Citect. Itdescribes the installation process and optional components which can be installed ineach environment.
The configuration section provides an overview of using StruxureWare SCADA ExpertVijeo Citect in a Local Area Network (LAN), a Wide Area Network (WAN), and as a WebServer.
It includes information on the following aspects of installing StruxureWare SCADAExpert Vijeo Citect:
l "Migration"
l "Installation Description"
l "Installation Requirements"
l "Installation"
l "Configuration "
Maintaining System Currency
After you have completed the installation and configuration of StruxureWare SCADAExpert Vijeo Citect and deployed it as your production system, it is very important thatyou keep your software up to date. Schneider Electric will periodically publish updatesin the form of Service Packs, Hot Fixes or Advisories relating to safety, security andfunctionality of StruxureWare SCADA Expert Vijeo Citect. These updates are availablefrom the Knowledge Base page of the “MyCitect” web site orhttp://www.citect.schneider-electric.com/servicepacks. We especially recommend that younominate a person in your organization to refer, and subscribe, to the RSS feeds forSafety and Security, as well as the latest articles on the web site.
7
Audience
This document is primarily for those who install StruxureWare SCADA Expert VijeoCitect, either on a single workstation or on a network. It is also useful for systemadministrators and new users of StruxureWare SCADA Expert Vijeo Citect.
Note: Throughout the documentation, StruxureWare SCADA Expert Vijeo Citect isreferred to as Vijeo Citect.
Chapter 1: Introduction
8

Chapter 2: Migration
This chapter describes changes in functionality and new features introduced in VijeoCitect 7.0, 7.10, 7.20, 7.30, 7.40 and 7.40 SP1 and how it may effect your installation andmigration from a previous version. Migration information in this chapter covers onlymigration from Vijeo Citect 6.x to 7.40 SP1. If you are running a version earlier than 6.10it is recommended that you upgrade to v 7.x before migrating to v7.40 SP1.
Changes in Functionality
Resolving cluster context with unique tag names
With the release of version 7.30, Vijeo Citect will allow tags that do not have a clustercontext specified to be automatically resolved if every tag name in the project is unique.This means customers who have used a unique tag naming convention will be able tomigrate a project to a multi-clustered system without having to specify cluster context.
As further development of a project takes place, ambiguous tag resolution will continuesuccessfully as long as unique tag names are maintained. Vijeo Citect's existing behaviorwill apply for any tags that are not unique across all clusters, which means by default#COM will be displayed for a tag if cluster context can not be determined.
Note: This capability is controlled via the parameter [General]TagDB which isenabled by default.
Network Support
In order to incorporate the many benefits provided with the introduction of the NewCommunications Architecture in Vijeo Citect 7.0, it was necessary to remove the supportfor NetBIOS network communications. Vijeo Citect 7.10 and later only supports TCP/IPnetworking.
If you are currently using TCP/IP as your network protocol you may ignore this section.However, if you currently implement NetBIOS, change your network communicationover in your current version of Vijeo Citect to TCP/IP before installing Vijeo Citect 7.40SP1.
Converting from NetBIOS to TCP/IP
9

This conversion is a two part operation. The first part is to convert each of your servers(Alarms, Reports, Trends). For the transition time that you are performing the conversionof your entire system you need to maintain network communication between yourservers and your clients, this requires that your servers support both NetBIOS andTCP/IP for a brief period. Do this by directly editing the appropriate parameter in theLAN section of the Citect.ini file on each server. This can be done by using the ComputerSetup Editor.
In order to support both NetBIOS and TCP/IP set the TCP/IP parameter to 1 in theCitect.ini file as shown below.
[LAN]NetBIOS =1TCPIP =1
Also set the server parameters in the DNS section as described in the v6.0 online helpunder the topic "Using TCP/IP for network communications " under the topic "UsingVijeo Citect on a Network".
Once you have configured your servers to use TCP/IP (and maintain NetBIOS) edit theCitect.ini file on each of your client machines, set TCPIP=1 and NetBIOS=0 for each ofthose clients. You do not need to maintain NetBIOS on the clients as they are nowcommunicating with the servers using TCP/IP.
It is essential to set up your servers to use TCP/IP before you set up your clientmachines. Once you have finished the conversion on all client machines, return to theCitect.ini file of each server and set the NetBIOS parameter to 0, so disabling NetBIOS oneach server as this is now redundant.
On completion of the conversion described above to your existing system to use TCP/IP,you can then continue with the remainder of the "The Migration Process" andinstallation procedure to 7.40 SP1.
New Features
Vijeo Citect 7.40 SP1 includes the following new features or changes in functionality. Inmany cases these new features will not impact the installation or initial configuration.However, some of them may impact your project configuration and functionality. Onceyou have installed this version, refer to the online help for information on how toreconfigure your projects to take advantage of the new features and improvedfunctionality.
Chapter 2: Migration
10
Introduced in 7.40 SP1
The following list of new features introduced in this release is only a brief description.For more details, and links to using the features in your projects, refer to the "What'sNew in Vijeo Citect 7.40 SP1" page in the main Vijeo Citect help.
Alarm Performance Improvement
In Vijeo Citect v7.30 and v7.40, the display client was slow to display alarms for the firsttime after the login of a new user, or after restarting the client. The time taken to obtainalarms has been reduced in 7.40 SP1.
Equipment Editor Enhancements
In 7.40 SP1 numerous GUI enhancements have been made to the Equipment Editor.These enhancements include new buttons for accumulators, new tabs for States, andCustom Parameters. Also included is enhanced naming of equipment whereby you canquickly and easily create a tree-view of equipment using empty nodes.
See Example - Using the Equipment Editor in the main help for a basic introduction ofthe look and functionality of the new enhancements.
EcoStruxure Web Services Client
The EcoStruxure Web Services Client enables Vijeo Citect to communicate with anEcoStruxure Web Services Server.
Library_Equipment Include Project
The Library_Equipment include project includes a series of genies and pop up pagetemplates.
Pop up page templates include:
l Equip_Control@User - pre-defined for equipment control
l Equip_Alarm@User - pre-defined for alarmd display
l Equip_PA@User - pre-defined for process analyst (trends)
l Equip_Tagl@User - pre-defined for variable tags
l Equip_Normal@User - generic pop-up
l Equip_Extended@User - generic pop-up of extended size
It also includes
l Diagnostic and status information popup pages for Schneider Electric M580, M340,Premium and Quantum PAC range.
Chapter 2: Migration
11

l Popup pages with adaptable links to FactoryCast Module statistics and summarypages for M580, M340, Premium and Quantum PAC range
Introduced in 7.40
The following list of new features introduced in this release is only a brief description.For more details, and links to using the features in your projects, refer to the "What'sNew in Vijeo Citect 7.40" page in the main Vijeo Citect help.
Referencing a variable tag using Equipment.Item
In 7.40 you can now reference a variable tag using associated equipment and item(equipment.item syntax). This means you can:
l Use equipment.item in place of variable tags in all expression fields in graphic pages.
l Use equipment.item to reference variable tags in Genie and Super Geniesubstitutions.
l Used equipment.item in the value field to represent a variable tag when associatingsuper genie substitutions via Metadata.
l Pass equipment.item to Cicode functions in which the variable tag name is anargument.
l Pass equipment.item to CTAPI functions in which the variable tag name is anargument.
Note: Only variable tags (and not Alarm or trend tags) can be referenced usingEquipment.Item syntax.
New Cicode functions to maintain a list of unique Pages "opened"
In 7.40, in addition to page history, a new type of page tracking, called page list, hasbeen introduced to keep track of unique list of pages that have been visited in a window.When a page is displayed, either via normal display, super genie display or CicodePageTask(), it will be checked against pages that are visited on this window. If the pagehas not been visited, the parameters to display this page will be added to the list. Once apage is in the list, it can be recalled.
The new Cicode functions have been added so you can:
l Iterate pages stored in the list.
l Retrieve information of page stored in the list
l Remove page from the list
l Recall a page stored in the list
Chapter 2: Migration
12
Equipment Editor Interface
In 7.40 you can add equipment types, create instances of equipment based on equipmenttypes, and edit and delete equipment in the equipment hierarchy in your projects usingthe new equipment editor interface. With the equipment editor you no longer need towrite XML. Changes made are saved directly to the XML template. Equipment Instancesthat are created are saved to the EQUIP.DBF.
New StruxureWare Templates
New StruxureWare templates have been included for use in StruxureWare designedsystems. Wide screen only, the new look and feel is consistent with other StruxureWareproducts, assisting the operator when moving between applications.
Note:These templates are not designed for direct upgrade from existing tab styletemplates
OPC Factory Server (OFS) Security Update
To fix known OFS xml security issues you will need to manually copy and paste certainfiles depending on what is installed.
l The OFS 3.40 Server and Configuration tool should be installed. (Optional OPC-UAwrapper)
l If OFS3.40 LARGE is installed, the LARGE\Server folder content should be copied tothe x:\Program Files\Schneider Electric\OFS\Server folder .
l The OFSConf folder content should be copied to the x:\Program Files\SchneiderElectric\OFS\OFSConf folder. Archive the current OFS Configuration before copyingthe OFSConf folder.
l If UNITY PRO is not installed or if UNITY PRO with version < 6.0 is installed, theSRCSDK51 folder content should be copied to C:\Program Files\CommonFiles\Schneider Electric Shared\SRCSDK folder.
l If UNITY PRO with version >= 6.0 is installed, the SRCSDK60 folder content shouldbe copied to the C:\Program Files\Common Files\Schneider ElectricShared\SRCSDK folder.
l If OPC-UA wrapper is installed, OPCUA folder content should be copied to thex:\Program Files\Schneider Electric\OFS\OPCUA folder.
Introduced in 7.30
Chapter 2: Migration
13

NOTICE
The minimum and recommended hardware requirements have changed in this release.Upgrading customers should load test their system as part of their upgrade procedure toensure that the hardware in use is adequate for the needs of their system.
The following list of new features introduced in this release is only a brief description.For more details, and links to using the features in your projects, refer to the "What'sNew in Vijeo Citect 7.30" page in the main Vijeo Citect help.
ActiveX Data Objects(ADO)
Vijeo Citect v7.30 features a new interface between SCADA and your SQL databaseusing ADO.NET. If your project currently uses SQL Cicode commands, then the existingbehavior will remain unchanged. A number of new Cicode commands have beenintroduced in the following categories:
l Creation/connection - functions that separate the creation of DB connection objectsfrom connection initialization, and the ability to work with connected anddisconnected recordsets
l Multiple recordsets per connection - functions that enable users to obtain and usehandles to recordsets
l Parameterization - functions that provide a more secure way of building SQL queries
l Multiple queries per connection - functions that enable users to obtain and usehandles to queries
Alarm Enhancements
There have been numerous improvements made to alarms in Vijeo Citect.
Improvements include:
l Active alarm and historical alarm events synchronization
l Handling of event information with the introduction of a new sequence of eventspage
l Ability to insert a user event into the event journal
l Named filter
l Sorting of alarms and events
l Dynamic alarm count at runtime
l User comments on events
l Can configure more than 65535 alarms for each type of alarm
l New alarm template with equipment tree view
Chapter 2: Migration
14
Refer to the topics Alarm Server Upgrade and Migrating Alarm Event History forinformation you need to know before upgrading.
Equipment Hierarchy
The concept of "equipment" was introduced in 7.20 as a means of applying anhierarchical structure to SCADA objects specified in your system. In the 7.30 release, ithas been expanded to form logical groups of SCADA objects by linking equipment totags.
Each item in the equipment database can be assigned a place in a hierarchy ofequipment. The hierarchy is based on the equipment name, and each item of equipmentis specifically identified to signify it's level in the hierarchy.
This provides the opportunity to browse, find, identify and quantify the values of tagsand other objects assigned to a piece of equipment using a number of new or modifiedCtAPI and Cicode functions.
Importing Equipment
The concept of equipment has been introduced in 7.30 to provide a way of browsing,finding, identifying and quantifying the values of tags and other objects assigned to apiece of equipment.
In addition, equipment can be created by importing them in much the same way as tagscan be imported using TagGen. An XML template is used to specify the fields of inputand output databases, and define filters and transformation rules that create equipmentand associated alarm, trend, report or variable tags from existing database fields.
New Licensing Protection Method
Vijeo Citect now supports two different software licensing protection models to helpmaintain license conformance:
l Sentinel Licensing products which are the existing methods used by the product.o Using a SafeNet hardware dongle
l A new licensing mechanism which is introduced with 7.30 as part of the SchneiderElectric offering.
o Using a FLEXERA softkey
In both cases the hardware dongle is a physical key that plugs into either the parallelport or USB port of your computer, and contains details of your user license, such astype and I/O point count.
You may choose to use either the Sentinel licensing method, or the new FLEXERAmethod.
To install the new licensing manager, select it from the Vijeo Citect Core Componentsdialog at the beginning of your installation.
Chapter 2: Migration
15

OPC DA Server
OPC (OLE for Process Control) is a set of communication standards maintained by theOPC Foundation for the industrial automation industry. OPC provides a commonplatform for applications to share data from typically disparate sources, such as PLCsand databases, without the need to comprehend native protocols.
The OPC Data Access solution (OPC DA) provides specifications for client and serverapplications that are focused on the continuous communication of real-time data. To thisend, Vijeo Citect supports a runtime OPC DA server that implements mandatory OPCDA v2.05 and OPC DA v3 interface specifications.
This allows Vijeo Citect to provide real-time data to any compliant OPC DA clients,including applications such as AMPLA, OSI-PI and Historian.
Schneider Electric Software Update
Schneider Electric Software Update is a software tool that has been designed to providethe latest news and updates of Schneider Electric software.
You can adapt it to your individual requirements by:
l Configuring it to check for only those Schneider Electric software updates that youare really interested in, even from PCs other than where any of your SchneiderElectric software products are installed.
l Scheduling the intervals it checks for updates according to your needs.
To install the Software Update select it from the Vijeo Citect Core Components dialog atthe beginning of your installation.
Supportability Enhancements
Further Supportability Enhancements have been added to Vijeo Citect to harmonizelogging features of the product. Although the enhancements were primarily introducedto assist Technical Support personnel with system analysis, they have resulted in manybenefits to the end user.
Scheduler
The Scheduler was first released in Vijeo Citect 7.20 SP3. It is a calendar basedprogramming tool that allows you to manipulate equipment within a Vijeo Citectproject. It can be used to create a sequence of automatically executed commands,delivering a valuable scheduling tool for applications.
Tag Browsing
You can now browse a list of variable tags at runtime. You can also browse selectedruntime and configuration fields of the tag via Cicode and CtApi, and while browsingyou can apply a filter using a set of predefined field names using regular expressions.
Chapter 2: Migration
16

Introduced in v7.20
Improved Installation process
The installation process of Vijeo Citect has been improved to simplify the operation andguide the user through the installation by use of Installation Profiles and the creation ofdefault component selections. Whilst still allowing for complete flexibility for theexperienced user, the complexity and multiple installation paths and options have beengreatly reduced. The installer has been enhanced to allow the installation of a runtime-only version of the product. This allows the runtime environment to be installed withoutthe project tools of the Vijeo Citect Integrated Environment. The Runtime Onlyinstallation provides not only a smaller installation footprint but also the ability to setup workstations which do not allow project configuration. This automatically improvesthe security of the system configuration.
Control SCADA Client Connections
Two Citect.ini parameters determine how a client will behave if it is unable to maintaina connection with a primary Alarms, Reports or Trends server. Each server type hasaccess to these parameters:
[Type.<ClusterName>.<ServerName>]Priorityand[Type.<ClusterName>.<ServerName>]DisableConnection
where Type is the relevant server type (Report, Trend or Alarm).
Dynamically Optimized Writes
Following the move to the new Publish-Subscribe infrastructure with v7.0, a number ofcustomers were adversely affected by a change in the way the product behaves inrespect to combining multiple writes together. This change is generic across ALL driversand specific issues have been raised with in regard to HITACHI, MODBUS and OPC.
In v7.20 changes have been made to the way that writes are performed at the I/O Serverin order to restore the pre-v7.0 behavior.
These changes result in a similar level of blocking as occurred in previous versions. Itdoes not guarantee that writes will be blocked, but it is more than likely that they will beif they are initiated close enough together.
This will also allow use of the re-instated Citect.ini parameter [IOServer]BlockWrites inorder to choose whether to use the Block Writes functionality.
Graphics Enhancements
Chapter 2: Migration
17
Enhancements have been made to how you can configure graphic pages and the objectsyou place on the page. These enhancements can be used in the creation andimplementation of Genies and Super Genies.
Improved Security
Security enhancements have been implemented in this release to address known securityissues from previous versions and to reduce the potential risk of malicious attack. Thesesecurity enhancements include, improved inter-operability through the introduction ofnew INI parameters, trusted network authentication, and the addition of assigning rolesto runtime users, as you currently do for Windows users.
New Example Project
The Example Project has been updated to demonstrate the new tab menu templates thatare available with v7.20.
The project includes a "What's New?" menu to introduce some of the new featuresoffered. This menu links to pages that demonstrate:
l the use of tag extensions and tag properties on graphics pages
l server monitoring and the ability to implement online changes for alarm and trendservers
l multi-monitor support
l Instant Trending using the Process Analyst
The new content complements pages drawn in from the existing Example Project andCSV_Example Project, which are now superseded.
To view the new Example Project, select and run it from Citect Explorer. For moreinformation, use the help button included in the project on the main navigation panel.
OFSOPC Driver
The release of Vijeo Citect coincides with the availability of the OFSOPC Driver forSchneider Electric's OPC Factory Server (OFS).
OFS is a foundation component for communication with certain Schneider Electric PLCs.The OFSOPC Driver allows Vijeo Citect to tightly integrate with OFS, minimizing theamount of configuration required for an end-to-end Schneider Electric system.
You can install the OFSOPC Driver and its supporting documentation via the DriverSelection page of the Vijeo Citect installer.
Pelco Camera Support
Chapter 2: Migration
18

This feature adds two buttons to the Graphics Builder toolbox, which will allow two ofthe Pelco Camera ActiveX controls to be easily added to a graphics page. This controlprovides an ActiveX component that will connect to Pelco IP cameras with configurablebandwidth usage for slow network connections and auto-resizes video to fit the ActiveXcontrol size.
The two ActiveX controls supported are:
Video Streaming - Fully Resizable, multiple bandwidth levels, MPEG4 Video, returnsthe camera name and model.
Camera Control PTZ (Pan, Tilt and Zoom) - Communicates with DVRs and IP cameras.Featuring pan zoom and tilt, iris, focus, presets, patterns and adjustable speed.
Performance Improvements
The architecture of v7.20 includes a new threading model that offers significantperformance improvements. The new Platform Task Framework (PTF) defines an explicitthreading environment for each subsystem, providing a standard protocol for work to becreated and passed between them.
The performance improvements have been implemented in a way that retains allexisting functionality.There is no changes to the configuration or operation of a system,just performance benefits and improved stability.
Persisted I/O Memory Mode
Many customers use DiskPLC I/O devices to provide system-wide global variable tagsthat are managed by I/O Servers and are persisted to disk to maintain their latest values.DiskPLC I/O devices take advantage of the standard I/O system redundancy features,such that, if one I/O server is unavailable, another can provide client(s) with tag values.They also perform a level of synchronization by using features such as standby writeand by providing redundant paths to the persisted binary data files, so that, at startup ofan I/O server, the latest value can be read into the system from the most recentlymodified data file.
However, there is no synchronization when network connections are inoperative andregained, resulting in several scenarios in which redundant DiskPLC I/O devices canend up with different values for the same tag.
With v7.20, the new feature of persistence when applied to I/O Devices in memorymode, provides an improved alternative to a DiskPLC device, as there is fullsynchronization in scenarios involving one of the servers becoming unavailable for aperiod of time. Persistence is enabled using the Persist field in the extended section of theI/O Devices Properties dialog.
Post Compile Commands
Chapter 2: Migration
19

After a project has compiled successfully you can execute an optional command, scriptor batch file. This offers useful functionality if you have tasks that could be automatedafter a successful compile. This provides an expansion point for you to add your ownscript or command to perform additional tasks. You can also launch an optionalcommand, script or batch file to execute after an unsuccessful compile.
Server Side Online Changes
To improve the ability to change configurations on a live system without having torestart the servers, Vijeo Citect now provides the facility to reload server configurationsduring runtime either programmatically or using the Runtime Manager.
Microsoft® Windows 7 Support
Vijeo Citect also supports the Microsoft Windows 7 and Microsoft Windows Server®2008 R2 operating systems. The changes to Vijeo Citect undertaken in the v7.10 releaseto support Windows Vista significantly reduced the changes that were required tosupport Windows 7 and Server 2008 R2. Previous Vista users will experience nofunctional differences when migrating to Windows 7. However if you migrate toWindows 7 from Widows XP there are functional differences with Vijeo Citect betweenXP and Vista, as described in “New Locations for Configuration and Project Files” in theVijeo Citect online help.
Supportability Enhancements
Supportability Enhancements have been added to provide easier access to thediagnostics functionality of the product. Although the enhancements were primarilyintroduced to assist Technical Support personnel with system analysis, they haveresulted in many benefits to the end user. These include:
l Timestamp harmonization across all log files.
l Additional [Debug] parameters to support category and severity filtering (seeCitect.ini Parameters in v7.20).
l Support for online logging adjustments using the new SetLogging() and GetLogging()Cicode functions.
l A set of parameters that can be modified while online due to periodic or an on-demand read of the citect.ini file during runtime.
Additionally, the home page of the Computer Setup Editor now includes a link to theLogging Parameters page, which provides comprehensive instructions for theconfiguration of logging.
New Tab Menu Templates
Chapter 2: Migration
20

To improve the user interface of projects and integrate the look and feel with the latestWindows® systems, Vijeo Citect now features new templates with a tab style menusystem. Main menu items can be represented as tabs along a menu bar, below whichsubsidiary items are displayed in a ribbon. New projects have the new Tab_Style_Include templates already available to them.
Tag Extensions
With the addition of Tag Extensions in v7.20, the variable tag can now represent data asa collection of elements, and each of these elements can contain a collection of items. Forexample, the tag variable data received from the PLC can be represented as the “Field”or"Valid" element, which contains the following items within the "VQT Tag Element":
v- the value of the tag.
vt- the timestamp of when the value last changed.
q- the quality of the value , GOOD, UNCERTAIN or BAD. The Quality variablecan be further identified using Cicode QUALITY functions.
qt- the timestamp of when the quality last changed.
t- the timestamp of when the element was last updated.
Introduced in v7.10
Vijeo Citect 7.10 incorporates the following new features
New Location for Configuration and User Files
To improve the security of your SCADA system and provide compatibility withWindows Vista, Vijeo Citect 7.10 can now be run under a standard user account (i.e. onewithout administrator privileges). To achieve this, some modifications to the location offiles installed by Vijeo Citect have been made. These changes apply to all supportedoperating systems. Specifically, it is no longer possible for standard users to write to theProgram Files or System directories, which means the citect.ini file cannot live in the Binor Windows directory, and the User folder cannot live under Program Files. It isadvisable that you accept the default installation path when installing , or that yourchosen User/Data folder is writable by standard users.
File type Platform Install Path
Configuration files such as thecitect.ini file
Pre-Vista
Documents and Settings/AllUsers/Application Data/SchneiderElectric/Vijeo Citect 710/Config
Vista ProgramData/Schneider Electric/VijeoCitect 7.40 SP1/Config
Chapter 2: Migration
21

File type Platform Install Path
User directory Pre-Vista
Documents and Settings/AllUsers/Application Data/SchneiderElectric/Vijeo Citect 7.10/User
Vista ProgramData/Schneider Electric/VijeoCitect 7.10/User
Data directory Pre-Vista
Documents and Settings/AllUsers/Application Data/SchneiderElectric/Vijeo Citect 7.10/Data
Vista ProgramData/Schneider Electric/VijeoCitect 7.10/Data
Log files. All log files produced bydrivers are written to a sub-foldercalled ‘Drivers’.
Pre-Vista
Documents and Settings/AllUsers/Application Data/SchneiderElectric/Vijeo Citect 7.10/Logs
Vista ProgramData/Schneider Electric/VijeoCitect 7.10/Logs
Windows® Integrated Security
In Vijeo Citect 7.10 you have the ability to incorporate Vijeo Citect users and securityoptions with the standard Windows security system. Of course you can still use theVijeo Citect native security if you prefer to define users in the project and logon to VijeoCitect runtime.
Using the integrated Windows security feature, the Windows user can logon to VijeoCitect runtime with runtime privileges configured within the project.
Multi-Signature Support
Vijeo Citect 7.10 provides the facility for up to four users to approve an action or tagwrite operation using the new Cicode functions MultiSignatureForm andMultiSignatureTagWrite.
Two further Cicode functions, VerifyPrivilegeForm and VerifyPrivilegeTagWrite, enableyou to restrict access to a specific action or tag write for a user with a specific set ofprivileges.
Edit .dbf Files in Microsoft Excel
Vijeo Citect allows you to edit and save .dbf files (tables) used inVijeo Citect by openingthem in Microsoft® Office Excel®.
Chapter 2: Migration
22
Microsoft Office Excel 2007 and later does not allow you to save files in .dbf formatthough you may open and edit them using the File > Open command. In order toovercome this limitation Vijeo Citect now includes an Add-In for Microsoft Excel calledProjectDBFAddIn. When this Add-In is loaded into Excel, it allows you to browse, open,edit and save .dbf files in the correct format.
Enhanced Driver Installation
The installation of Vijeo Citect prior to v7.10 installed all the available communicationdrivers automatically with the installation of the product. From v7.10 the installation ofthese drivers is performed at the final stage of the product installation using a separateinstallation process. This installation process allows you to select individual drivers thatyou want to install, specific to your system and its I/O Devices.
Note: There are certain drivers that the product installation will install that arenecessary for Vijeo Citect to function correctly. These will be installed automaticallyas in previous releases.
New Font Selection for Graphics Button
In previous releases of Vijeo Citect, you were not able to change the properties of textsuch as font, size, style on buttons in the Graphics Editor. This inability to configure thebutton text properties led to graphics with text from different source objects havingdifferent font settings on the same page, which appears aesthetically untidy andinconsistent on the runtime displays.
From v7.10 the text displayed on a button object can be configured in the same manneras other Vijeo Citect text objects within the Graphics Editor and the automation interface.This will allow you to present a more polished and consistent user interface to meetindividual project runtime presentation requirements.
When migrating from a previous release, button object text properties are preserved andconverted to the new button object text properties with the appropriate default propertyvalues automatically placed in the new configuration such as Font=Arial, Size=12,Alignment=centre, style=regular, etc.
Microsoft® Windows Vista® Support
Vijeo Citect 7.10 and later has achieved the Microsoft "Works with Windows Vista"certification. However, merely meeting the requirements of this certification was notsufficient to make Vijeo Citect functional on Vista. A number of other changes wererequired to achieve satisfactory functionality on the Vista operating system.
Chapter 2: Migration
23

v7.10 satisfies many of the requirements of the "Certified for Windows Vista"certification, and by having this level of qualification we are confident that you will findminimal differences when running the product on the Vista operating system comparedto previous operating systems.
New Alarm Field Enhancements
There are four enhancements to alarm fields:
l Runtime writes to custom alarm fields
l Alarm summary field changes
l Alarm display field changes
l Alarm paging
Runtime Writes to Custom Alarm Fields
It is now possible to write to the eight custom alarm fields during runtime. In previousreleases these fields could really only be used for alarm filtering.
Alarm Summary Field Changes
Alarm Summary Fields can now be used to format an alarm display or alarm logdevice. In addition any Alarm Display Field can be used in your alarm summary, apartfrom State.
New Alarm Summary Fields
Field Name Description
{SumType,n} Type of alarm summary (similar to alarm display "Type").
Alarm Display Field Changes
Now any alarm display field can be used for any type of alarm. Where not applicable fora particular alarm type, zero or an empty string will be displayed.
Alarm Paging
The Vijeo Citect alarm facility constantly monitors equipment data and alerts operatorsof any equipment errors (sometimes called "faults"), or alarm condition. When an alarmis triggered it is displayed on the standard alarm display page. The operator has to becontinuously sitting in front of an HMI monitoring the system. Vijeo Citect 7.10 providesthe facility to link alarms with a remote paging system for operators.
Two Alarm Properties have been added to enable Vijeo Citect to interface with any third-party paging system. The Paging property is a flag to indicate that the alarm is going tobe paged, the PagingGroup property is a freeform text field indicating the sequence ofpeople to notify in the event the alarm occurred.
Chapter 2: Migration
24

See your third-party paging system documentation for information on how to interfacewith Vijeo Citect.
New Time Synchronization Service
In order to maintain time synchronization Vijeo Citect 7.10 installs a Windows servicecalled TimeSyncService, which runs under the built-in LocalSystem account. Thisreplaces the existing time synchronization server which is not compatible withWindows Vista. This purpose of this service is to maintain the time on the localcomputer against one or more time sources.
A Time synchronization utility is provided by Vijeo Citect to assist you to configure timesynchronization, and control the service as part of your administration environment.This utility requires administrator rights as it configures and controls a windowsservice. When run on Windows Vista with User Access Control (UAC) on, you will beprompted to elevate to an administrator. When run on earlier operating systems, theutility will exit after displaying a message if the current user is not an administrator onthe local machine.
Introduced in v7.0
Vijeo Citect 7.0 incorporates the following new features
Improved Support for Clustering
The concept of "clustering" was introduced in an earlier version of Vijeo Citect. Theoriginal concept allowed the "grouping" of duplicated elements, and gave you the abilityto cluster Alarms, Reports and Trends servers. However, there were limitations.
The concept of clustering has since evolved and has the advantage of greater flexibilityand improved performance. Each of the servers (IO, Alarm, Trend and Report) has aunique name and is part of a Cluster. Each Cluster has a unique name and clients canrefer to clusters by it.
A Vijeo Citect project can now include separate clusters allowing for geographical orlogical divisions to be implemented in a single project.
Configure Vijeo Citect's clustering as a direct reflection of the system that is to bedeployed, and in particular:
l The requirements for the system
l The physical layout of the facility
l The strategy for maintenance and deployment of the system
Online Changes for Clients
Chapter 2: Migration
25

Server decoupling allows changes to be implemented at runtime on clients without ashutdown of the client being required. Regardless of whether a server requires a restartfor an online change, the client does not require a restart.
Clients currently contain a copy of Trend, Alarm and Variable Tags which has to matchthe server copy. In v7.0, the need for the variable tag configuration to be loaded by theclients has been removed. The client retrieves the configuration from the server whenrequired and is notified by the server when changes occur.
The following list describes the online changes that can be made without the clientmachine having to be restarted:
l Adding Trends, Alarms, Alarm categories and Address based Variable Tags
l Modifying a subset of properties of Trends, Alarms and Alarm categories
l Modifying Address based Variable Tag properties
l Deleting Address based Variable Tags
l Adding and deleting pages and PAV files (except the current one)
l Modifying pages and PAV files (except the current one)
l Adding, deleting or modifying user profiles
New Communications Architecture
A new publish-subscribe architecture removes much of the need for polling. It is anenabling technology and a step towards improved performance, project deployment,server side online changes, and discovery services.
Local Variables
Memory I/O devices have been removed from Vijeo Citect 7.0 and a new tag has beenintroduced called Local Variable to replace the “Memory PLC” based variable tag. ALocal Variables allows you to store data in memory when you start your runtimesystem. Local variables are created each time your runtime system starts, and thereforedo not retain their values when you shut down your system. They can be of any datatype supported by Vijeo Citect.
Each process has its own copy of each local variable configured in the project, the valuesin a local variable are available only to the process that wrote them.
Publish Alarm Property
Alarm devices were defined as devices with their Protocol field set to "Alarm". Thefunction of these devices are now configured on an Alarm Server by setting the “PublishAlarm Properties” property to True.
Memory Mode for Devices
Chapter 2: Migration
26

Devices can now be run in simulation mode. When configuring an I/O device, you havethe option to set memory mode. This means that the I/O device will be created inmemory and its values stored in memory at runtime.
This is useful when you are configuring a system for the first time, as you can designand test your system before using a physical I/O device in the system.
As with local variables, the values of an I/O device in memory mode are not retainedwhen you shut down.
Persist Mode for Devices
When configuring an I/O device, you have the option to set persist mode. This meansthat the value of each variable in the I/O device is stored on the computer’s hard disk.Since the values are saved to disk, when you restart your system after a system becomesinoperative or a shutdown, the latest values are immediately available.
Persist mode is useful for status information or predefined data that is required as soonas the system restarts.
Improved Hardware Alarms
The limitation in previous releases of Vijeo Citect of only a single alarm from multiplealarm situations being displayed has been lifted. All and any alarms are now displayedsimultaneously, allowing for immediate response to multiple situations.
Event Driven Cicode
Cicode can now be triggered by the change of a specific tag. This improves the efficiencyof the Vijeo Citect system by removing the need to poll for changing tag values.
Publisher-Subscriber Model
Vijeo Citect now uses a Publisher-Subscriber data acquisition model. Client computerssubscribe to configured tags and receive notification when the tag values change. Cicodefunctions can also be triggered by the change of a tag, removing the need to poll, andimproving the efficiency of the system.
Dual Network Support
Previous Vijeo Citect versions have been able to support redundant networks viaNetBIOS. From v7.0, users can specify multiple IP addresses for each server using onlyTCP/IP, providing native support for network redundancy.
Project-Based Network Configuration
From v7.0, the project topology is embedded in the project, and network configurationcan be performed from within the Project Editor. Servers and their IP addresses are setup in the Network Addresses dialog in the Project Editor.
Chapter 2: Migration
27

This means that physical computers in the system can easily be changed. As long as theIP address or computer name of the new machine is the same as the one being replaced,the new computer will be able to immediately take the same role.
Cicode Functions
Changes have been made to Cicode functions from Vijeo Citect 7.0 onwards. Thesechanges incorporated functions that have been added, modified or made redundant. Fora detailed explanation of these changes refer to the “What's New in Vijeo Citect” topic ofthe Vijeo Citect online help.
The Migration Process
UPGRADE ALTERS COMMUNICATIONS CONFIGURATIONS
After upgrading, confirm and adjust the configuration of all I/O devices in your project.
Failure to follow these instructions can result in death, serious injury, orequipment damage.
There are a number of considerations that you need to make before migrating yourprojects to Vijeo Citect 7.40 SP1 from v 6.x. These considerations relate primarily to theintroduction of new features, or changes to existing functionality, as described earlier.
Low Impact Changes
The following list identifies the changes which will have low impact on your existingVijeo Citect 6.x projects when they are migrated to this version. These changes canoptionally be incorporated into your existing projects during later development, or maybe ignored if they are of no benefit to the way that Vijeo Citect is used in yourorganization.
l Improved Support for Clustering
l Online Changes for Clients
l New Communications Architecture
l Memory Mode for Devices
l Persist Mode for Devices
Chapter 2: Migration
28

l Improved Hardware Alarms
l Event Driven Cicode
l Windows® Integrated Security
l Multi-Signature Support
l Edit .dbf Files in Microsoft® Excel
l New Font Selection for Graphics Button
l New Alarm Field Enhancements
l Runtime Writes to Custom AlarmFields
l Alarm Summary Field Changes
l Alarm Display Field Changes
l New Time Synchronization Service
l Improved Installation process
l Control SCADA Client Connections
l Dynamically Optimized Writes
l Graphics Enhancements
l New Example Project
l OPC Factory Server (OFSOPC) Driver
l Pelco Camera Support
l Performance Improvements
l Persisted I/O Memory Mode
l Post Compile Commands
l Server Side Online Changes
l Supportability Enhancements
l StruxureWre Templates
Note: It is optional for you to utilize the extensive capability of clustering, however,after you have installed Vijeo Citect 7.40 SP1 you need to create a minimum of onecluster. For details on creating a cluster refer to the “Upgrading Procedure” topic inthe Vijeo Citect online help after you have installed the product.
Changes Impacting Migration
The following list identifies functionality changes that may impact migration of yourexisting projects to Vijeo Citect 7.40 SP1.
Chapter 2: Migration
29
l Network Support
l Local Variables
l Publish Alarm Property
l Dual Network Support
l Project-Based Network Configuration
l Parameters and Cicode Functions
l New Location for Configuration and User Files
l Enhanced Driver Installation
l Microsoft® Windows 7 Support
l Microsoft® Windows 8 Support
l Improved Security
In order to understand any implication these changes in functionality may have on yourexisting projects, refer to the “Upgrading to Vijeo Citect 7.40 SP1” topic in the VijeoCitect online help after you have installed the product.
Alarm Server Upgrade
When upgrading to Vijeo Citect 7.30, be aware legacy alarm servers and clients (thoseprior to 7.30) will be unable to communicate with the new alarm server.
Only v7.30 alarm client and servers will be able to communicate.
See AlsoMigrating Alarm Event History
Migrating Alarm Event History
Migration of alarm event history from any 7.x versions is supported.
Alarm event history migration is triggered automatically at runtime if :
1. A valid alarm history file exists (defined using the parameters [Alarm]SavePrimaryor [Alarm]SaveSecondary). If two save files exist, one from the primary alarm Serverand one from the standby Alarm Server, the system uses the save file with the latestdate.
2. The Alarm database does not exist in the system. This implies that runtime islaunched initially or the database has been manually deleted. The alarm databasewill be created when runtime is launched for the first time.
To undo the migration of the alarm event history manually delete the database. Thealarm history file should be valid.
Chapter 2: Migration
30

Note: Deleting the alarm database will cause the entire 7.40 SP1 alarm history to be lost.The database can be deleted by deleting the directory located in the Vijeo Citect datadirectory and has the same name as the project. The Vijeo Citect data directory is definedin INI parameter [CtEdit]Data.
For example, if the data directory defined in the INI parameter is:
[CtEdit]Data=C:\ProgramData\Schneider Electric\Vijeo Citect 7.30\Data, then the alarmdatabase directory would be C:\ProgramData\Schneider Electric\Vijeo Citect7.30\Data\Example.
See AlsoAlarm Server Upgrade
Migration Aids
In order to assist in the migration of your existing projects Vijeo Citect provides twomigration aids. One aid is an automatic update of the project database, the other is amanually invoked Migration Tool.
Automatic Update
The automatic update is carried out when you initially launch Vijeo Citect 7.40 SP1. Thisupdate is a passive action which typically updates the database field definition for anydatabase that has been changed between the two versions and copies new files that arerequired in v7.40 SP1. Prior to the automatic upgrade proceeding you are given theoption of canceling the upgrade. The upgrade can be invoked at a later time by adjustingthe Update parameter in the Citect.ini file.
Migration Tool
The Migration Tool is a separate application which needs to be manually run after theautomatic upgrade has been executed, and initiated by you after you have prepared theproject for final migration. This tool will accommodate many of the changes in projectfunctionality which are incorporated in v7.40 SP1.
It is important you prepare your existing projects for a successful upgrade using thistool. For details on the Migration Tool, and the preparatory steps that you need to makeprior to its use, refer to the “Migration Tool” topic in the Vijeo Citect online help afteryou have installed the application.
Upgrading a Runtime-only Installation
You can upgrade a runtime-only installation of Vijeo Citect to a complete installationthat incorporates the configuration environment by simply running the installer againand selecting the All Core Components option from the Installation Profiles page.
Chapter 2: Migration
31

However, if a project has been restored and operated under the runtime-onlyenvironment, it will not automatically appear in Citect Explorer following the upgrade toa complete installation.
If you would like to add a missing project to Citect Explorer, you can use the AddProject Link feature, accessible via the File menu. You can select the project from theAdd Project Directory dialog when it appears.
Chapter 2: Migration
32

Chapter 3: Installation Description
Before you begin the installation of Vijeo Citect, you need to first decide whichcomponents you want to install. This is determined by the functionality you want theinstallation to support.
After you have decided on the Vijeo Citect environment, and any additional stand alonecomponents that you want to install, refer to Chapter 4 "Installation Requirements" sothat your hardware and system software meet the requirements for your selectedinstallation.
Once you have progressed through the preliminary dialogs of the installation interface,you will be requested to begin selecting the components that you want to install. Theoptions that the installation interface will present to you are described below.
Task Selection Dialogs
Installation Profiles
The installer provides a set of profiles to help you select the appropriate components forinstallation. Depending on the profile that you choose, the next dialog will have defaultselections recommended for installation. You may accept the default components, orselect the ones of your choice on the components selection screen which is displayedafter you click Next on the Installation Profiles dialog.
The options are:
l All Core Components
l Runtime Only Server
l Runtime Only Client
l Custom
The All Core Components option will select the .Net Framework 4 (if not installed),Configuration Environment, Runtime, Drivers and Sentinel Driver for installation. It is a“Complete” installation which will install a fully functional Vijeo Citect developmentand server/client system. Such an installation will include the Vijeo Citect developmentenvironment, runtime infrastructure files, Client, I/O Server, Alarm Server, Trend Serverand Reports Server. Select this option if this is an initial installation of Vijeo Citect
33

which will run as a single system, or act as a server to service a number of clientinstallations.
If the .NET Framework 4.0 installation does not complete, you can install it manuallyfrom the installation file in the Extras folder of the Vijeo Citect installation disk, theninstall Vijeo Citect. Note that .NET Framework 4.0 requires Windows ImagingComponent (available on the Windows Download Center web site) to be installed first.
The Runtime Only Server option will select Runtime, Sentinel Driver andCommunications Drivers for installation. It is an installation which will install theruntime components for both a Server and Client. Such an installation will includeruntime infrastructure files, Client and I/O Server, Alarm Server, Trend Server andReports Server.
Select this option if this is an installation of Vijeo Citect which will act as a server toservice a number of client installations.
The Runtime Only Client option will only select the Runtime system for installation. Itis an installation which will install the runtime components and a Client. Such aninstallation will include runtime infrastructure files, but will exclude drivers.
Select this option if this is an installation of Vijeo Citect which will be used as a client.
If you wish to upgrade either of the Runtime installations to a full installation, includingthe Development and Configuration environment, insert the original installation mediaand select "All Core Components" or "Custom" from the Installation Profiles dialog.
Note:You can also install the Vijeo Citect Runtime Only Client from a singleinstallation file. This file is named Vijeo Citect 7.40.exe and located in the<discmedia>\Vijeo Citect 7.40\Extras\Runtime Installer folder of the installationDVD. This allows installation of the software to computers which only require theruntime. The file can be copied to a network location for remote installation
The single-file installation does not include Communication Drivers, the Sentinel Driver,or the Microsoft® .NET Framework which is a prerequisite of the runtime. If the .NETFramework is not already installed on the target computer, you cannot use the single-fileinstallation. In this case, you may use the full package installer to automatically installthe .NET Framework during the installation of Vijeo Citect. Alternatively you can install.NET Framework from another source, then carry out the single file runtime installation.
The Custom option will not select any components for installation; it will allow you toselect the core components that you specifically need, or allow you to install Add-ons ordocumentation only.
Chapter 3: Installation Description
34
Documentation Installation
The Product Documentation option will install a comprehensive library of user guidesand references in Adobe Portable Document Format (PDF). These can be accessed from amaster contents HTML page.
It is highly recommended that you install the product documentation for futurereference.
Add-ons Installation
Once you have selected the components that you want to install, the next dialog allowsyou to select any Add-ons that you wish to use in your installed system..
The options are:
l Project DBF Add-in for Excel™
l Web Server for IIS
The Project DBF Add-in for Excel option will install an Add-In for Microsoft™ Excel.When this Add-In is loaded into Excel, it allows you to browse, open, edit and saveVijeo Citect .dbf files in the correct format. This is only available for selection if MicrosoftExcel 2007 or above is installed on the computer. Otherwise, it is visible but is deselectedand disabled.
TheWeb Server option will install a Web Server running on Microsoft InternetInformation Service (IIS). The Web Server performs the server-side functionality of a WebService to the Web Client. As well as facilitating communication, it directs a client to thegraphical and functional content of a Vijeo Citect project and the location of the runtimeservers. This information is stored on the Web Server when a Vijeo Citect project isdeployed. A Web Server can contain multiple deployments.
Note: If the Web Server and Vijeo Citect runtime server are set up on differentmachines, and it is not possible to establish a trust relationship between them, thetwo machines need to be on the same domain so that the Web server can access thedirectory on the Vijeo Citect server that's hosting the web deployment files. If,conversely, a trust relationship can be established between the Web Server and theVijeo Citect server, they can be on different domains as long as the Web server hasread access to the project folder on the Vijeo Citect server.
Chapter 3: Installation Description
35

Communication Drivers
Vijeo Citect communicates with control or monitoring I/O Devices that have acommunication port or data highway - including PLCs (Programmable LogicControllers), loop controllers, bar code readers, scientific analyzers, remote terminal units(RTUs), and distributed control systems (DCS). This communication takes place witheach device through the implementation of a communications driver. It is important thatthese drivers are the latest version.
The installation of Vijeo Citect prior to v7.10 installed all the available communicationdrivers automatically with the installation of the product. From v7.10 the installation ofthese drivers is performed at the final stage of the product installation using a separateinstallation process. This installation process allows you to select individual drivers thatyou want to install, specific to your system and its I/O devices. There are certain driversthat the product installation will install that are necessary for Vijeo Citect to functioncorrectly. These will be installed automatically as in previous releases.
Only install drivers which are identified as being compatible with the computersoperating system. If you select any driver that is not yet identified as being compatible,or is specifically identified as not compatible, the installation process will provide analert to that effect, and will allow you to deselect the driver prior to continuing with theinstallation.
INCOMPATIBLE DRIVERS
Do not ignore alerts during driver installation. If you choose to ignore such alerts, thedriver will be installed but may operate incorrectly.
Failure to follow these instructions can result in death, serious injury, orequipment damage.
The communication driver installation can also be invoked individually at any timeafter the product installation to install additional drivers.
Chapter 3: Installation Description
36

Chapter 4: Installation Requirements
This chapter describes the requirements for hardware, operating system software andsystem configuration prior to installing Vijeo Citect and any of its components.
These requirements will vary subject to the components of Vijeo Citect that you intend toinstall on any computer. Refer to chapter 3"Installation Description" to determine thecomponents that you want to install. This chapter identifies the basic hardware andsystem software requirements, as well as requirements specific to each particularcomponent.
Before you begin to install Vijeo Citect it is important that you install the latest updatesfrom Microsoft® for your operating system and system software.
All Core Components
System Hardware
NOTICE
The minimum and recommended hardware requirements have changed in this release.Upgrading customers should load test their system as part of their upgrade procedure toensure that the hardware in use is adequate for the needs of their system.
The following tables indicate the computer hardware requirements for the Vijeo Citect“All Core Components” installation and all optional components.
Description Minimum Specification
Processor Speed 2 GHz
Random Access Memory(RAM)
2GB if SCADA client
or
4GB if SCADA server
Available Disk Space 160GB
Graphics Adapter (seenote below) With 64MB of VRAM
37
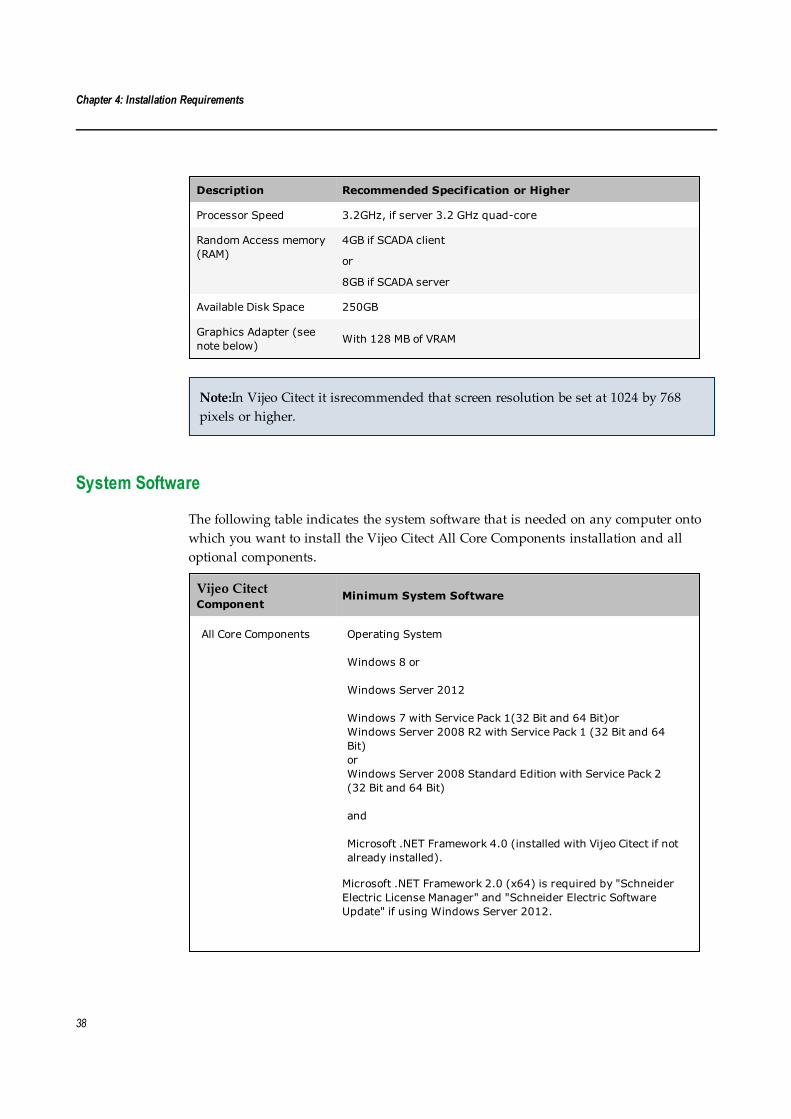
Description Recommended Specification or Higher
Processor Speed 3.2GHz, if server 3.2 GHz quad-core
Random Access memory(RAM)
4GB if SCADA client
or
8GB if SCADA server
Available Disk Space 250GB
Graphics Adapter (seenote below) With 128 MB of VRAM
Note:In Vijeo Citect it isrecommended that screen resolution be set at 1024 by 768pixels or higher.
System Software
The following table indicates the system software that is needed on any computer ontowhich you want to install the Vijeo Citect All Core Components installation and alloptional components.
Vijeo CitectComponent
Minimum System Software
All Core Components Operating System
Windows 8 or
Windows Server 2012
Windows 7 with Service Pack 1(32 Bit and 64 Bit)orWindows Server 2008 R2 with Service Pack 1 (32 Bit and 64Bit)orWindows Server 2008 Standard Edition with Service Pack 2(32 Bit and 64 Bit)
and
Microsoft .NET Framework 4.0 (installed with Vijeo Citect if notalready installed).
Microsoft .NET Framework 2.0 (x64) is required by "SchneiderElectric License Manager" and "Schneider Electric SoftwareUpdate" if using Windows Server 2012.
Chapter 4: Installation Requirements
38

Vijeo CitectComponent
Minimum System Software
Internet Explorer Version 6.0 or greater.
A Local Area Network (LAN) if you want to have multiple clientsaccess a remote server.
If running under virtualization with VMWare, the minimumsystem requirement is VMWorkstation 6.03 and later.
Schneider ElectricLicense Manager
Java Runtime Environment (JRE)
Vijeo CitectWebServer
As for Vijeo Citect all Core Components with the addition of:
A LAN running TCP/IP
and
Microsoft Internet Information Services (IIS) See Microsoft IISCompatibility for information.
ProductDocumentation
As for All Core Components.
Project DBF Add-in forExcel
As for All Core Components, and Microsoft Excel 2007or later.Microsoft Excel 2013 (32 bit only)
Note: Use an NTFS file system on the target drive for the Web Server software,otherwise you won't have effective access to the necessary Windows security settings(that is, the Folder Properties dialog will not have a Security tab). If you are currentlyusing a FAT/FAT32 system, convert the drive to NTFS before installing the WebServer software.
Microsoft IIS Compatibility
For correct operation of the WebServer, install the appropriate Microsoft InternetInformation Services (IIS) feature for your operating system:
l For Windows Server 2003 or 2008 install IIS v6.0
l For Windows Vista and Windows 7 install IIS v7.0 and follow the Microsoftdocumentation for IIS7 to install the following components:
Chapter 4: Installation Requirements
39

Component Install?
- FTP Publishing services no to all
- Web Management Tools- IIS6 Management Compatibility- IIS6 management console- IIS6 Scripting tools- IIS6 WMI Compatibility- IIS6 Metabase and IIS6 Configuration compatibility- IIS Management Console- IIS Management scripts and tools- IIS Management Service
yesyesnononoyesyesnoyes
- World Wide Web services- Application Development Features- .NET Extensibility- ASP- ASP.NET- CGI- ISAPI Extensions- ISAPI Filters- Server-Side Includes- Common Http features- Health and Diagnostics- Performance features- Security- Basic Authentication- Client Certificate Mapping authentication- Digest Authentication- IIS Client Certificate Mapping authentication- IP Security- Request filtering- URL Authorization- Windows Authentication
yesyesyesyesyesnoyesyesnoyes to allno to allno to allyesnononononoyesnoyes
Note: In the above table, 'yes' means the feature is essential or recommended for theWebServer installation and 'no' means the feature is optional or not relevant to theWebServer.
System Software
The hardware and system software that is needed on any computer onto which youwant to install the Vijeo Citect Runtime Only Server or Client has the same requirementsas the Core.
Chapter 4: Installation Requirements
40

Software Licensing
Vijeo Citect uses a hardware key to help manage the software licensing. The hardwarekey is a physical key that plugs into either the parallel port or USB port of yourcomputer. The hardware key contains details of your user license, such as type and I/Opoint limit. There is also the new licensing mechanism introduce with 7.30. Refer to"New Licensing Method" in the section Introduced in 7.30.
Updating Your Hardware Key
When you upgrade to a new version of Vijeo Citect, you might need to update yourhardware key to enable the system to run. See the Vijeo Citect Readme file to confirmwhether you need to perform an update.
Updating the hardware key involves running the Vijeo Citect Key Update command,which is found in the Help menu of Citect Explorer.
Note: If you have CitectSCADA 5.21 or 5.20, run ciusafe.exe from the Citect bindirectory. You can also download the latest version of the upgrade program from theAuthCode Generator section of the Vijeo Citect website athttp://www.citect.schneider-electric.com/.
To update the hardware key:
1. In Citect Explorer choose Help | Sentinel Key Update. A Key ID is displayed. Thehardware key's serial number might also appear. If not, read the serial number fromthe label on the key.
2. Visit http://www.citect.schneider-electric.com/authcode/ and enter the serial numberas prompted. You might also be asked for the Key ID and your web login name andpassword.
3. The authorization code is displayed. Type the code (or copy and paste it from theweb site) into the Authorization Code field in CiUSAFE. Do not use any spaces whenentering the characters.
4. Click Update.
The Return Code field indicates whether the hardware key was updated successfully.Fora detailed explanation of the fields in the CiUSAFE dialog, click the Help button on thedialog.
Chapter 4: Installation Requirements
41
Note: Each time you run the Sentinel Key Update, a different Key ID is generatedwhich is normal. However, if you obtain an authorization code but do notimmediately update the hardware key, you can enter the same authorization codethe next time you run the update.
Vijeo Citect License Point Count
The point limit is the maximum number of I/O device addresses (variable tags) that canbe read, and is specified by your Vijeo Citect license. Vijeo Citect counts all I/O deviceaddresses dynamically at runtime.
This includes all tags used by alarms, trends, reports, events, pages, in Super Genies, useof the TagRead() and TagWrite() Cicode functions, or internal values written using DDE,ODBC, or the CTAPI.
It does not count any points statically at compile time.
l Dynamic points are counted only once, regardless of how many times they are used.
l At runtime, the dynamic point counts are available through the Kernel and theCitectInfo() Cicode function.
l Existing MEMORY_PLC tags from before v7.0 are converted to the new "localvariables" during migration. Local variables are stored on the client and resolved onthe client and they are not included in the point count.
l When you plan your system be aware of your point count so that you do not exceedyour point limit. This is particularly important, as at runtime, you can incrementallyadd to your point count by using tags that have not yet been included in the totalcount.
When you run Vijeo Citect at runtime, the dynamic point count is continuously checkedagainst your hardware key. When the total number of dynamic points (at runtime)pushes the total point count above the point license limit, Vijeo Citect will refuse to getvalues for the additional points.
Vijeo Citect has two preconfigured 'watermark' messages that will display to the userwhen the dynamic point count reaches 95% and 98% of their point license limit. Youcan configure these percentages in the Citect.ini file.
Demo Mode
You can run Vijeo Citect without the hardware key in demonstration (Demo) mode.Demonstration mode lets you use all Vijeo Citect features normally, but with restrictedruntime and I/O.
Chapter 4: Installation Requirements
42

The following demonstration modes are available:
l 15 minutes with a maximum of 50,000 real I/O.
l 10 hours with a maximum of 1 dynamic real I/O. This is useful for demonstrationsusing memory and disk I/O. Vijeo Citect starts in this mode if no hardware key isavailable. If the system detects that you are using more than 1 real I/O point atruntime then it will swap to the 15 minutes demo mode.
Note: Writing to any tag through DDE, CTAPI, or ODBC will cause that tag tocontribute to the dynamic point count even if it is a memory or disk I/O point. So ifyou write to more than 1 point through these interfaces it will swap to the 15 minutedemo mode.
l 8 hours with a maximum of 42,000 real I/O. This is only available through specialVijeo Citect Integration Partners (CIP) keys.
Chapter 4: Installation Requirements
43

Chapter 4: Installation Requirements
44

Chapter 5: Installation
The Installation Process
Please refer to the PowerSCADA Expert Installation Supplement for installationinstructions specific to PowerSCADA Expert.
Note: Backup your existing projects then uninstall prior versions before installing7.40 SP1, as Vijeo Citect does not support different versions running side-by-side.
45

Chapter 5: Installation
46
Chapter 6: Configuration
In all but the smallest system, Vijeo Citect will need to operate over a Local AreaNetwork (LAN) or a Wide Area Network (WAN).
You can use TCP/IP with Vijeo Citect. Vijeo Citect supports scalable architecture, whichlets you initially implement Vijeo Citect on a single computer, or over a small network,and then expand the system later without changing your existing hardware, software, orsystem configuration.
Using Vijeo Citect on a LAN adds more flexibility to the system, and coordinationwithin large plants can be more easily achieved. You can control and monitorautonomous areas within the plant separately, and interrogate the whole plant usingany Vijeo Citect computer on the network if you want.
In any of these scenarios there are basic configurations that you have to make for thesuccessful operation of your Vijeo Citect system. The configuration steps are described inthis chapter.
Local Area Network Configuration
To set up a local area network (LAN) for Vijeo Citect, you need to have successfullyinstalled network hardware and software in strict accordance with the instructionsprovided by the manufacturer, and also be familiar with the basic operation of thenetwork.
Install the Vijeo Citect software on every PC you want to use as a Vijeo Citect design-time development machine, Vijeo Citect Runtime Only Client, Vijeo Citect I/O server,Vijeo Citect Alarm, Report, or Trend server.
Also, set up Vijeo Citect for your network, using the Computer Setup Wizard on everyone of the machines. To access the Computer Setup Wizard, Open Citect Explorer. In theproject list area, select My Projects and double-click the Computer Setup Wizard icon, orchoose Tools, Computer Setup.
Note: You need a compiled project to select in order to run the Computer SetupWizard.
For a detailed explanation on the Computer Setup Wizard, and its options refer to“Running the Computer Setup Wizard” in the online help.
47

Network Communications Overview
Networking and Microsoft Windows 7
Microsoft Windows 7 distinguishes between Public, Home and Work networks. Eachnetwork has its own firewall profile, which allows you to configure different firewallrules depending on the security requirements of your location. The Vijeo Citect installersautomatically modify the windows firewall settings for the current active network profileduring installation. If you later change network settings, you will need to manuallymodify the firewall settings within Windows.
Note:Vijeo Citect networking and redundancy needs the options "Vijeo Citect FTPserver" and "Vijeo Citect Runtime" to communicate through a Windows firewall. Youwill need to manually add an application to the Windows 7 firewall exception listfor a particular network profile.
Using TCP/IP for network communications
Vijeo Citect uses TCP/IP to facilitate communications across a network.
To set your system to TCP/IP-based communications, a number of parameters need to beset in the citect.ini file. These parameters will be set automatically when you run theComputer Setup Wizard and select TCP/IP, after you have completed the installation ofVijeo Citect. For details of these parameters, and others, refer to “Citect.ini FileParameters” in the online help.
The Computer Setup Wizard will recognize the computers IP address and match it to theIP address configured in the project for the various servers in the Networking Addressesdialog under the Servers menu in the Vijeo Citect Project Editor.
For example, if you had the following servers in your system:
Citect_IO_1
Citect_IO_2
Citect.PrimaryAlarm
Citect.StandbyAlarm
Citect.PrimaryTrend
Citect.StandbyTrend
Citect.PrimaryReport
Citect.StandbyReport
Chapter 6: Configuration
48

If the role you need for your PC is not available, you will also have to determine the IPaddress and update the project accordingly. You can use the DOS command “ipconfig”to obtain this information. Alternatively, you can change the PCs IP address to matchthat defined in the project.
Configuring Communications Over a WAN
You can configure your system for use with wide area networks (WANs).
Using a Wide Area Network (WAN) is configured in much the same way as using aLAN, with several additional considerations:
1. That the PCs on the WAN can see each other.
2. That appropriate security precautions (eg: VPN) are used when connecting networksover a potentially public link (eg: the Internet).
3. Performance of the connections is appropriate to the data being transferred.
4. Reliability of the connection is appropriate to the requirement for access.
Web Server Configuration
To display a live Vijeo Citect project in an Internet browser, you need to publish thecontent of the project pages and the current data these pages present using standard,Web-based communication protocols.
For the web server to function you need to create an exception in the Windows firewallor any other third party firewall to allow TCP traffic to flow on port 80. Specifically, ifthe machine hosting the web server is running the Windows Vista or Windows 7operating system, enable the World Wide Web Services (HTTP) option in the WindowsVista inbound firewall.
To understand the communication architecture for the Vijeo Citect Web Client, it's easiestto consider the role each of the following components play in achieving this outcome:
l Vijeo Citect Web Server - Performs the server-side functionality of the system. As wellas providing communication, it directs a client to the graphical and functionalcontent of a Vijeo Citect project and the location of the runtime servers. Thisinformation is stored on the Web Server when a Vijeo Citect project is configured as a“deployment”. A Vijeo Citect Web Server can contain multiple deployments.
l Vijeo Citect Runtime Servers (including the I/O Server, Alarms Server, Trends Serverand Report Server) - Monitor the physical production facility and contain the livevariable tag data, alarms and trends that the Web Client will display.
Chapter 6: Configuration
49

l Web Client - provides the platform to merge a deployed project's pages and contentwith the raw data drawn from the runtime servers. Again, standard Webtechnologies are needed, so the client uses Microsoft Internet Explorer.
Once you've installed Vijeo Citect Web Server for IIS, you will find the followingdirectories under the \Inetpub\wwwroot\Citect folder.
l The base directory primarily hosts the administrative pages that are displayed by aWeb Server.
l The cgi-bin and images directories contain the content necessary to display thesepages.
l The client folder contains the client components (.cab files) that are delivered to aremote computer to run a deployment. Any subdirectories includes the componentsassociated with a particular release (in this case, v7.40 SP1).
l The deploy folder includes the files associated with any deployments (Vijeo Citectprojects) configured on the Web Server.
l The #displayclientfolder (located in the Deploy folder) plays a key role in the WebServer security, as the permissions defined for this folder determine the access rightsfor each user.
l The locales folder contains the files necessary to support different languages for theclient interface. See “Implementing Multiple Language Support” in the Web Clienttopic of the Vijeo Citect online help.
The IIS Virtual Directory
The installation process also adds a virtual directory called Citect to Windows IIS(Internet Information Services). This virtual directory establishes the Web Server as avalid destination for client applications. However, it also plays an important role inmanaging which users have access to the site.
You can view evidence of this virtual directory in the IIS management console, which islaunched by selecting Internet Information Services from Windows' AdministrationTools menu. The Vijeo Citect virtual directory is shown under the list of default websites.
You can view the properties for the directory by selecting Properties from the right-clickmenu.
The Virtual Directory inherits all security settings from the computer's default web site,with the following exceptions:
l Directory Browsing is enabled
l Script Source Access is disabled
l The default document is set to default.htm only
Chapter 6: Configuration
50

l Anonymous access is disabled
l Integrated Authentication is disabled
l Basic Authentication is enabled
These security settings, including integrated authentication, anonymous access and SSLEncryption, can be customized by the local administrator. However, properconfiguration needs experience with IIS and an understanding of the implications ofadjusting its settings.
Setting Up Security
If you want to use a Web Server/Client for communications in your Vijeo Citect systemthere are configuration requirements for both the server and the client. The majorconfiguration needed is that of security on the server.
Security on the Web Server is based on the implementation of user accounts. In the caseof an IIS-based Web server, security is tightly integrated with Windows userauthentication. For information on setting security on each of these, refer to ConfiguringSecurity Using IIS.
Web Client user account types
Both systems support the same three user account types on a Web Client.
Client type Description
Administrator User is permitted to remotely view, add, update and deletedeployments.
Control Client User can view project pages and make adjustments to writablevalues.
View-only Client User can only view the project pages.
The Web Server tests the access rights for each user when they log in and then displaysor hides the appropriate buttons on the home page accordingly.
Note: Although the Web Client security architecture controls access to your projectson the Web Server, the Vijeo Citect system security (privilege/area settings) stillmanages the control system, maintaining a primary level of security.
Chapter 6: Configuration
51

Configuring Security Using IIS
Setting up security on an IIS-based Web Server primarily involves creating threeWindows user groups, each representing one of the Web Client user account types.Individual users can then be assigned to the relevant user group, and automaticallyinherit appropriate access rights based on the Windows security settings defined for thegroup.
Note: To avoid security access issues for operating systems Windows Vista® andabove, creation of these Windows user groups is mandatory.
Client Type Access Rights
The following table defines the access rights that each type of user has to the WebServer's installed directories, as defined by the properties for each.
In the table, read means Read & Execute, List Folder Contents and Read userpermissions are allowed; read and write means Full Control is allowed, and accessdenied means Full Control is denied.
Installed directory ADMINISTRATOR CONTROL VIEW-ONLY
Citect read read read
Citect \ cgi-bin read read read
Citect \ client read read read
Citect \ deploy read and write read read
Citect \ deploy \ #displayclient read read access denied
Citect \ images read read read
For example, an administrator client needs to be able to read all the installed folders tofully access the components of the home page. Additionally, they need write access tothe Deploy subdirectory to create new deployments.
By comparison, a View-only Client needs to be denied access to the #displayclient folderto deny the ability to write back to a Vijeo Citect project.
Therefore, when setting up security on the Web Server, your user accounts need to alignappropriately with the permissions outlined in the table above.
To implement the Web Server’s security strategy successfully, follow the procedurebelow to configure your system, and simplify managing client accounts.
The ongoing management of your Web Server security then involves adding andremoving individual accounts as needed.
Chapter 6: Configuration
52
Note:
l The installation and initial configuration of the Web Server needs to be performed bya Windows user with local administrator permissions; that is, they need to be able toadd and edit Windows User accounts, and modify files and folders. This capability isneeded to set up Web Client user accounts and manage security settings.
l It is important to understand the distinction between the role of the Windows LocalAdministrator, and the Web Client’s Administrator users:
l Windows Administrator - configures security on the Web Server and sets upclient accounts.l Web Client Administrator - an end user capable of modifying and managingprojects deployed on the Web Server.
The two roles parallel a Vijeo Citect configuration engineer and a runtime operator
To create the client account user groups:
1. From the Computer Management tool, locate Local Users and Groups in the directorytree. This is where the users and groups for the local machine are configured andmanaged.
2. Right-click the Groups folder and select New Group. This displays the New Groupdialog.
3. In the Group Name, type Web Client Administrator (or something appropriate), anddescribe the group's purpose.
4. Click Create.
The group you have just created will appear in the list of groups presented in theComputer Management console.
Repeat the steps above to create Control Client and View-only Client user groups.
To test your security settings, add at least one user to each group.
Preparing the Citect folder
You need to set the security settings for the Citect folder and its sub-directories, as thiswill determine the access granted to each type of client account.
To prepare the Citect folder:
1. Log on to the Web Server computer as a Windows Administrator.
2. Launch Windows Explorer and browse to the Citect folder. The Citect folder islocated in the installation directory. By default, this is Inetpub\wwwroot\Citect onthe web server computer.
3. Right-click the Citect folder and select Properties.
4. From the Properties dialog, select the Security tab to display the users currentlyconfigured for the folder.
Chapter 6: Configuration
53

There will probably be several groups already defined in this folder. The two you need topay attention to are the Administrators group and the Everyone group.
l The Administrators group represents all the Windows users recognized by theWeb Server computer with Local Administrator rights. This group has FullControl permissions on the folder, facilitating the ability to adjust the Web Serversecurity settings. If this is the case, there should be no reason to modify thisgroup.l The Everyone group represents all other users recognized by the local machine.Give this group the following access to the Citect folder; allow Read & Execute,List Folders Contents, and Read permissions. This provides local users on theWeb Server machine with the equivalent of Control Client permissions.
5. Add the three groups that you created in Configuring Client Account User Groups tothe Citect folder.
6. Confirm the security settings for the three newly created groups. Each has to have thesame access as the Everyone group: Read & Execute, List Folders Contents, andRead permissions
7. All the subdirectories have to inherit the permissions set for the Citect folder. To dothis click the Advanced button on the Security tab of the properties dialog, and selectReplace permission entries on all child objects, then click OK.
This provides consistent security settings across all the installed directories. A Securitydialog might appear to alert you that this will “remove or reset explicitly definedpermissions on child objects”. Click Yes to continue.
Setting Access Rights for Client Accounts
The three client account types supported by the Web Client are defined by the securitysettings for each within the installed directories on the Web Server machine.
The differences, outlined in the table in Client Type Access Rights, need specific securitysettings for the Administrator Client and View-only Client types. An Administratorneeds write access to the Deploy subdirectory, and the View-only Client needs to bedenied access to the #displayclient subdirectory.
To configure security setting for the Administrator Client group:
The Administrator Client needs full access to the Deploy subdirectory to enable thecreation and modification of deployments.
1. Locate the Deploy subdirectory in the Citect folder. By default, this isInetPub\wwwroot\Citect\Deploy.
2. Right-click the folder and select Properties to display the Deploy folder properties.
3. Click the Security tab and locate the Web Client Administrator group you created in
Chapter 6: Configuration
54

the list of users and groups.
4. Edit the permissions set for the group to Allow Full Control.
To configure the security settings for the View-only Client group:
The View-only Client needs to be denied access to the #displayclient subdirectory todeny write changes being made to a deployed Vijeo Citect project.
1. Locate the #displayclient subdirectory in the Citect folder. By default, this isInetpub\wwwroot\Citect\Deploy\#displayclient.
2. Right-click the folder and select Properties to display the folder properties.
3. Click the Security tab and locate the View-only Client group you created in the list ofusers and groups.
4. Edit the permissions set for the group, and change to Deny Full Control
5. A Security dialog appears “Deny entries take priority over all Allow entries”. ClickYes to continue.
Note: The Control Client group needs no additional configuration, as it uses thesettings outlined in Preparing the Citect folder.
Set security permissions accurately in order for the web server to operate correctly. If youexperience any problem with communicating from the web client check that the securitysettings are correct for your installation.
Deleting a User Account
You can deny a user access to the Web Server by removing them from the groups thathave permissions set for the Citect folder.
However, if security is a concern, deny the user access to the Citect folder before youdelete the user. This avoids a situation where the operating system doesn't immediatelyacknowledge that a user account has been deleted, creating a short period where adeleted user can still log on.
To absolutely delete a user account:
1. Add the user as an individual to the Citect folder.
2. Set their access rights to Deny Full Control.
3. Remove the user from the groups that have permissions set for the Citect folder.
With all access denied, they cannot do anything even if they gain access.
Testing the Web Server Security Settings
To test the security settings for your Web Server client groups:
Chapter 6: Configuration
55

1. Launch Internet Explorer on the Web Server machine.
2. Call up the Web Client home page by typing in the following address:
http://localhost/Citect
3. Log in to the home page using a user name and password that's been added to theAdministrator Client group.
If successful, the System Messages dialog will read “LOGINADMIN Admin(UserName) logged in”.
If the message starts with LOGINDC (for Control Client) or LOGINMC (for View-only Client), there is a problem with your configuration. Confirm that you areusing the correct user name for the group you are testing. If the problem stilloccurs, revisit the process in Setting up security using IIS to check that an errorhasn't been made.
4. Repeat this process with a Control Client and View-only Client user.
Once you have confirmed that security is correctly set up on the Web Server, you cannow prepare your Vijeo Citect project for deployment. For more information seeConfiguring a deployment in the online help.
Logging on to the Web Server
After setting up your client accounts, you need to provide the following details to eachend user so they can log on to the Web Server:
l Address of the Web Server
This is the address users have to type into their Web browser to gain access to theVijeo Citect Web Server. If they are doing this remotely, the address is:
http://<machine name>/Citect
or
http://<machine IP address>/Citect
If they are logging on to the Web Server computer, the address is:
http://localhost/Citect
l User name and password
Once the browser has arrived at the Web Server, the end user is asked to provide auser name and password. Typically, you just need to tell them that their Windowsuser name and password will provide appropriate access. If you had to create anew user profile for someone, provide them with the details.
Chapter 6: Configuration
56
Note: In some operating systems users may be logged in automatically. To modifythis behavior so the user is prompted to login, go to User Authentication in InternetExplorer|Tools|Internet Options|Security Settings.
Once you have finalized the security setup on the Web Server, you are ready to prepareyour Vijeo Citect projects for deployment.
Chapter 6: Configuration
57

Chapter 6: Configuration
58

Index
Aarchitecture 26
CCitect license point count 42clustering 25
resolving context with unique tag names 9Computer Setup Wizard configuration 47configuration 47
Ddemo mode 42description
Integrated Environment 33
EEcoStruxureWebServicesClient 11equipment
editor 11item 12
Hhardware alarms 27hardware key 41
IIIS components 39Installation Requirements 37IPX/SPX 47
LLAN 47Library_Equipment
Include Project 11license points
dynamic 42static 42

local variable 27, 30
Mmemory mode 26migration 9
multi-cluster system 9
NNetBEUI 47Network Support 9Networking and Microsoft Windows 7 48new features 9new functionality 9
Oonline changes 25
PPages
Open 12persist mode 27-28
RRequirements
hardware 38IIS 39LAN 39operating system 38RAM 37System Software 38
TTCP/IP 9, 47TCP/IP setup 48
Uunique tag names 9
WWAN 47