
Structuring your essays, theses and reports using Word Documents/Word Long... · Structuring your...
29
This document and other Information Services documents are held online on our website: https://staff.brighton.ac.uk/is/training Structuring your essays, theses and reports using Word A guide to tools in Word that will assist in the structuring of an essay, thesis or report This workbook is aimed at those who use Word to prepare their essays, theses and reports and looks at : efficient formatting using styles and heading styles adding a table of contents automatically inserting headers and footers managing page numbers. A must for anyone writing a thesis, this document will also help anyone who uses word save time when creating or editing documents. Last updated Faye Brockwell On 30 July 2015
-
Upload
nguyenlien -
Category
Documents
-
view
220 -
download
6
Transcript of Structuring your essays, theses and reports using Word Documents/Word Long... · Structuring your...

This document and other Information Services documents are held online on our
website: https://staff.brighton.ac.uk/is/training
Structuring your essays,
theses and reports using
Word
A guide to tools in Word that will assist in the structuring of an
essay, thesis or report
This workbook is aimed at those who use Word to prepare
their essays, theses and reports and looks at :
efficient formatting using styles and heading styles
adding a table of contents automatically
inserting headers and footers
managing page numbers.
A must for anyone
writing a thesis, this
document will also
help anyone who
uses word save time
when creating or
editing documents.
Last updated
Faye Brockwell
On 30 July 2015

University of Brighton Information Services
Page | 2 last update 30 July 2015
Contents
Workshop requirements .................................................................................... 3
Files required for this workshop.................................................................. 3
System and software .................................................................................. 3
Working with Styles ........................................................................................... 4
Style Types ................................................................................................ 4
2.1.1 Paragraph Styles ................................................................................ 4
2.1.2 Heading Styles .................................................................................... 6
2.1.3 Numbering Headings or Chapters ....................................................... 8
2.1.4 Character Styles ................................................................................. 8
Table of Contents ............................................................................................ 10
Updating a Table of Contents ................................................................... 10
Formatting the table of contents ............................................................... 10
Templates ....................................................................................................... 11
Changing a template ................................................................................ 14
Page vs Section Breaks .................................................................................. 16
Inserting a Page Break ............................................................................. 16
Inserting a Section Break ......................................................................... 16
Turn on show/hide when using section breaks or page breaks ................ 17
Deleting a Section/Page Break................................................................. 17
Headers, Footers and Page Numbering ................................................... 18
Working with page numbers ..................................................................... 19
Working with different headers/footers on different pages ........................ 19
5.7.1 Starting the page numbering at a different number ........................... 21
Working with your document outline ................................................................ 22
Outlining tools .......................................................................................... 22
Working with the Navigation Pane (2010/2013 only) ...................................... 24
Inserting a Cover Page.................................................................................... 26
Inserting and Formatting a Picture.................................................................. 27
Resizing your Picture ............................................................................... 27
Using the Picture Tools Format tab to format your picture ........................ 27

University of Brighton Information Services
To position your picture with text flowing around the image ...................... 28
Adding a table of figures and/or index of tables ........................................... 28
Adding a caption to your picture/table ...................................................... 28
Create a table of figures or index of tables ............................................... 29
Updating the table of figures or index of tables ......................................... 29
Referencing in Word .................................................................................... 29
Other Help ................................................................................................... 29
Workshop requirements
Files required for this workshop
You can access this document and the demo files from
https://staff.brighton.ac.uk/is/training/Pages/Word/Word.aspx
System and software
Windows7 or Windows XP and
Word 2007, Word 2010 or Word 2013*
*All these versions of Word are very similar. Word 2013 is installed on all Windows
computers in student pool rooms and teaching rooms at the University of Brighton.
Where there are differences between 2007 and 2010 or 2013, these are clearly
marked.

University of Brighton Information Services
Page | 4 last update 30 July 2015
Working with Styles
Working with styles in Word will improve the consistency of your formatting as well
as speeding up the process of formatting a document. Word was designed to be
used with styles and a number of key functions are dependent on the correct use of
styles. So let’s take a look at formatting a document using styles!
Style Types
Paragraph styles - these control the formatting of the entire paragraphs (including
tab settings, fonts, and indents as well as character formatting). Paragraph styles
affect the whole of the paragraph they are applied to,
Character styles - these affect selected text within a paragraph like the font and
size of text, and bold and italic formats. Character styles can be applied to part of a
paragraph without affecting the rest of the paragraph.
List styles - used for formatting both numbered and bulleted lists.
Table styles - these are used to format all aspects of a table.
Word provides numerous default Styles. You can use these Styles as they are,
modify them, or create your own Styles.
2.1.1 Paragraph Styles
As the majority of a document is formatted using Paragraph Styles let’s look at
those first.
As mentioned Paragraph Styles are used to control the formatting of an entire
paragraph, including: character formatting, line height, tab spacing, alignment
and borders.
When opening a new blank document you will have opened a page based on a
template. This template contains a default paragraph style called ‘Normal’ which is
set to Arial size 11 with 1.0 line height and left aligned. A number of other styles are
dependent on this style so the easiest option for creating your main paragraph style
is to modify the style called ‘Normal’. So let’s have a go.
Exercise A Modifying the ‘Normal’ Style
1 Open the document called Effective Writing.doc.
This document has had its formatting stripped from the document, so contains text
using the default Style Normal.
2 Go to the Home tab and locate the Normal
style in the Styles group. If you don’t see a
selection of styles displayed, try maximising
your document window
3 Right click on the Normal style and select
Modify… from the options available.

Structuring your essays, theses and reports using Word
Printed Monday, 12 October 2015 Page | 5
This will open up the Modify Style
dialogue box, in which you can change
the format of the main paragraph style.
4 Change the font to
Arial, size 10, 1½ line
spacing and an extra
6pts of space before
and after each
paragraph.
5 Now click OK. You
should notice the
format of the whole
document has
changed.
6 If you want this change
to apply to all of your
future documents, click to select
New Documents based on this
template. Don’t do this in the staff
computer
Keep this document open as we will be using it throughout the workshop.
Exercise B Creating a new Paragraph Style
Let’s say that you want to emphasize one or more paragraphs of text in your
document. The most consistent way of doing this is to create a new style that you
can apply to multiple paragraphs.
1 Before creating a new style you need to
launch the Styles dialogue box. To do this,
locate the small arrow icon at the bottom
right of the Styles group and click on it.
2 There are three buttons at the bottom of the
Styles dialogue box, click on the one on the
left, this will launch
the New Style
dialogue box.
3 Give your new style the name highlight.
4 Select Style Type Paragraph.
5 Style should be based on Normal.
6 Style for Following Paragraph should be Normal.
7 Click on the Italic button.
Change
font
style
here
Change
font
style
here Click here for
1½ line
spacing
Click here to add 6pts
of paragraph space
(each click adds 6pts)
University of Brighton Information Services
Page | 6 last update 30 July 2015
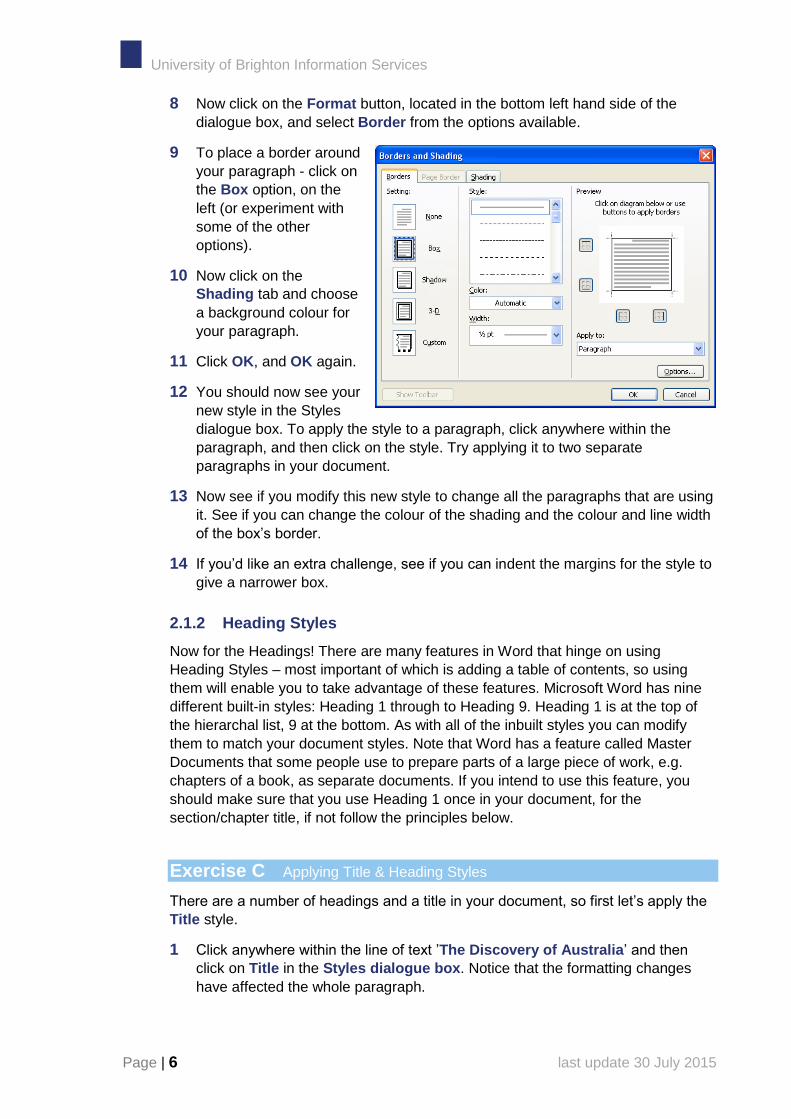
8 Now click on the Format button, located in the bottom left hand side of the
dialogue box, and select Border from the options available.
9 To place a border around
your paragraph - click on
the Box option, on the
left (or experiment with
some of the other
options).
10 Now click on the
Shading tab and choose
a background colour for
your paragraph.
11 Click OK, and OK again.
12 You should now see your
new style in the Styles
dialogue box. To apply the style to a paragraph, click anywhere within the
paragraph, and then click on the style. Try applying it to two separate
paragraphs in your document.
13 Now see if you modify this new style to change all the paragraphs that are using
it. See if you can change the colour of the shading and the colour and line width
of the box’s border.
14 If you’d like an extra challenge, see if you can indent the margins for the style to
give a narrower box.
2.1.2 Heading Styles
Now for the Headings! There are many features in Word that hinge on using
Heading Styles – most important of which is adding a table of contents, so using
them will enable you to take advantage of these features. Microsoft Word has nine
different built-in styles: Heading 1 through to Heading 9. Heading 1 is at the top of
the hierarchal list, 9 at the bottom. As with all of the inbuilt styles you can modify
them to match your document styles. Note that Word has a feature called Master
Documents that some people use to prepare parts of a large piece of work, e.g.
chapters of a book, as separate documents. If you intend to use this feature, you
should make sure that you use Heading 1 once in your document, for the
section/chapter title, if not follow the principles below.
Exercise C Applying Title & Heading Styles
There are a number of headings and a title in your document, so first let’s apply the
Title style.
1 Click anywhere within the line of text ’The Discovery of Australia’ and then
click on Title in the Styles dialogue box. Notice that the formatting changes
have affected the whole paragraph.

Structuring your essays, theses and reports using Word
Printed Monday, 12 October 2015 Page | 7
If the Title style is not showing in the Styles dialogue box for your document:
click on Options at the bottom of the Styles dialogue box
then choose All Styles from the Select styles to
show drop-down list
and then choose Alphabetical from the Select
how list is sorted drop down list.
2 If you are using Word 2010 or 2013, you can
make it easier to find the headings in this
exercise if you display the Navigation Pane. The
navigation Pane includes a Search Box. To display it, go to View menu and
check the Navigation Pane Show box. See a later exercise for more
information on the Navigation Pane,
3 Click anywhere within the line of text
’Introduction’ and then click on Heading1 in
the Task Pane.
4 Click anywhere within the line of text
‘Indigenous Australians’ and then click on
Heading2 in the Task Pane.
5 Repeat this for the line of text Europeans in
Australia.
Now let’s apply Heading3 to the remaining
headings.
6 As above, click within the following lines of text and apply Heading 3 -
The Buginese
Captain James Cook
Note: to select multiple lines of text, click once in the left margin to select the first
line of text, scroll to the next line of text to be selected, hold down the CTRL key and
then click in the left margin next to the line of text.
What if you don’t like the appearance of the Heading Styles? Let’s modify a Heading
Style.
7 Look in the Styles (and Formatting) task pane for the style called ‘Heading1’.
Hover over the style name until the small downwards arrow appear to the
right . Click on this and select ‘Modify…’ from the options available.
8 Choose a new font from the ‘Modify Style’ dialog box, then click OK.
9 Are you happy with your new look document? If not, go ahead and make some
more changes.
University of Brighton Information Services
Page | 8 last update 30 July 2015
The great thing about using styles is that it will now only take seconds to transform
your whole document. You’ll also be able to keep it looking consistent throughout.
Even better news is that you can use the document layouts you create with all your
other documents.
2.1.3 Numbering Headings or Chapters
If you need to number your headings
or chapters Word has a tool to
automate this process. As it can
sometimes be temperamental, we
recommend that you leave this step towards the end of
creating your document, when you are happy with its
structure:
1 On the Home tab in the Paragraph group locate the
multilevel list button
2 Click on the small downwards arrow to the right of the tool and select the option
show on the left.
You should notice that any headings in your document should now have the
correct numerical sequence
2.1.4 Character Styles
Character Styles are used to format characters within paragraphs. Let’s say you
need to highlight a word or words within a paragraph by making it bold, or maybe
italic and you also want to use a different colour. This is best done by creating a
Character Style.
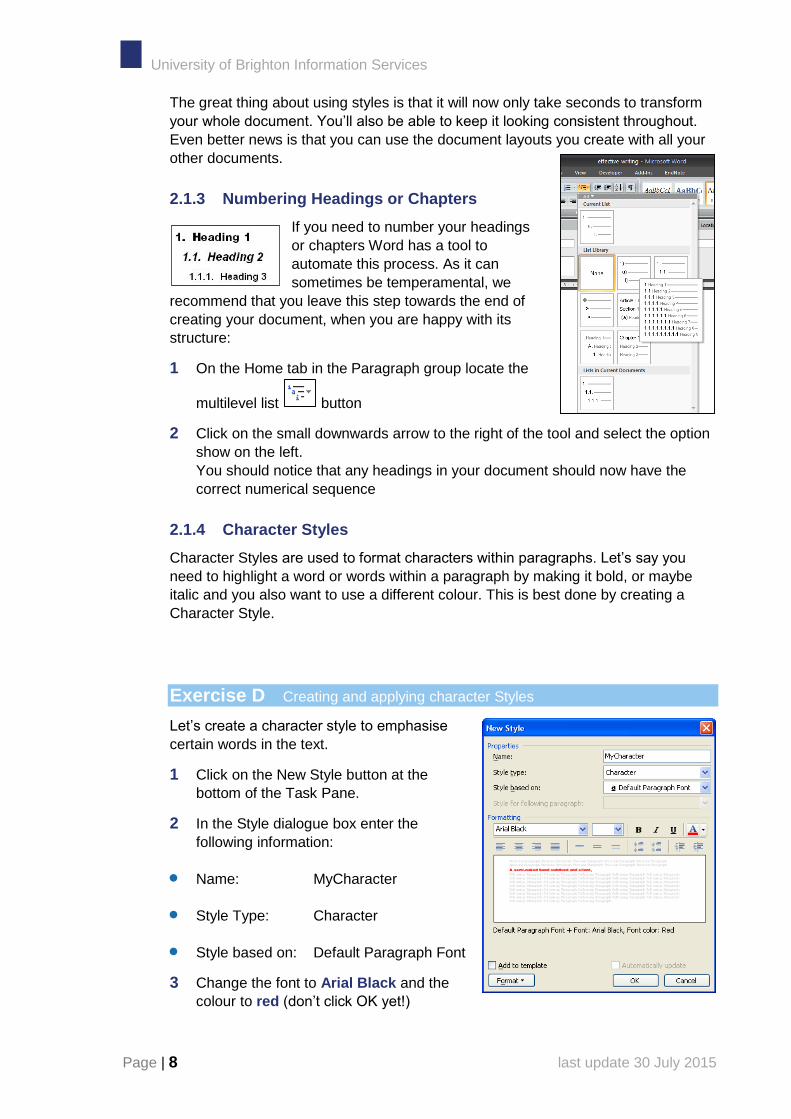
Exercise D Creating and applying character Styles
Let’s create a character style to emphasise
certain words in the text.
1 Click on the New Style button at the
bottom of the Task Pane.
2 In the Style dialogue box enter the
following information:
Name: MyCharacter
Style Type: Character
Style based on: Default Paragraph Font
3 Change the font to Arial Black and the
colour to red (don’t click OK yet!)

Structuring your essays, theses and reports using Word
Printed Monday, 12 October 2015 Page | 9
Applying a character style is made much easier if you can use shortcut keys, so let’s
specify a shortcut key for this style.
4 Click on the Format button at the bottom of
the dialogue box and select ‘Shortcut Key’.
5 Now hold down the keys you want to use, in
this case the Ctrl key and the B key (hold
down at the same time). You will notice
these key appearing in the dialogue box in
the section labelled ‘Press new shortcut
key’
6 In the Save Changes In box, change this
from the Normal template to your current
document (effective-writing.doc). If you
leave it as Normal, this change will affect all
the new documents you create
7 Click the Assign button, followed by the Close button, followed by the OK
button.
Now you can apply this new style my using your keyboard.
8 Click anywhere within a word and then hold down the keys – Ctrl+B. Try this out
in several places in your document.
Keystroke Action
CTRL+SHIFT+S Access the Style box on the Formatting toolbar.
CTRL+SHIFT+N Apply Normal paragraph style.
CTRL+Q Strip paragraph formatting that's not contained in the
applied paragraph style.
CTRL+SPACEBAR Strip character formatting that's not contained in the
applied paragraph style.
CTRL+ALT+1 or 2 or 3 Apply built-in paragraph styles Heading 1, Heading 2,
or Heading 3, respectively.

University of Brighton Information Services
Page | 10 last update 30 July 2015
Table of Contents
Having applied Heading Styles to our documents we can now easily compile a Table
of Contents based on those headings.
Exercise E Inserting a Table of Contents
1 Place your cursor on the new page that’s just been inserted (Ctrl+Home).
2 On the References tab click on Table of Contents.
3 A drop down list will appear with a variety of available styles for your ToC, select
the first or second option.
It’s that easy! Just remember that if you move or add information to your document
you will need to update your Table of Contents.
Updating a Table of Contents
Right click on the Table of
Contents in your document
Select ‘Update Field’
Check the section ‘Update entire
table’
Click OK
Formatting the table of contents
The table of contents uses styles names TOC1 through to TOC9. To change to look
and feel of the table of contents, simply modify these styles as you would edit your
heading styles or normal style (as shown on page 3 of this workbook.

Structuring your essays, theses and reports using Word
Printed Monday, 12 October 2015 Page | 11
Templates
We have looked at how you can change the look and feel of your document by
applying and modifying styles to change font type, size and colour as well as other
characteristics like paragraph and line spacing.
What if you would like to use these modified styles again, so that all of your
documents look similar? Rather than modify the styles each time you start a new
document, you can save time by creating a template. A template stores your style
and page layout settings and is easily accessible when creating a new document in
Word. It’s a bit like overtyping an existing document without the need to delete the
content.
Each time you start a new document in Word, you are already using a template –
the Normal template. This is how Word knows which styles to apply to new
documents.
Exercise F Creating a template
We are going to create a basic template to remember the modifications we make to
styles.
To do this, we will modify a simple document just so that we can save our settings.
1 Open the exercise file Essay template example. This is a simple document
containing examples of the basic styles I want to use in my essay document.
2 First, we need to save the document as a template. To save the template:
Word 2007 Word 2010 Word 2013
Click on the Office
button
Click on the File tab and
choose Save As
Click on the File tab
and choose Save As
Choose Save
As>>Word
Template
In the Save as type box,
click on the arrow to
choose Word Template
(*.dotx) from the list
Choose where you
want to save your
file.*
Choose where to
save your
template*
Choose where to save
your template*
In the Save as type
box, click on the arrow
to choose Word
Template (*.dotx) from
the list

University of Brighton Information Services
Page | 12 last update 30 July 2015
If you are working on a student PC, you will need to save the template to your
network drive or a memory stick. If you are a member of staff and you always work
on the same computer, you can save your template in the default templates folder. If
you are using 2010 and can’t find the Templates folder, click on the Trusted
Templates button on the left of the Save As box. This will add the templates to My
Templates.
3 The template will be saved as a Word template ending in .dotx
4 Next we will modify the styles in the document.
5 Modify the Title style so that the text is Arial size 26 black and aligned in the
centre of the page. Before clicking OK, click to select New documents based
on this template.This will ensure that the style applies to any new documents
created using our template.
6 Modify the other styles in the document as follows, remember to always click to
select New documents based on this template before clicking OK to close the
Modify Style dialogue box.
Heading 1 Arial size 16 bold and black
Heading 2 Arial size 16 bold, italics and
black
Heading 3 Arial size 12 bold and black
Heading 4 Arial size 12 bold, italics and
black
Normal Arial size 12 double line
spacing.
This has modified all of the styles so that our text will appear as we need it to.
7 When we start a new document, we want to start with a blank page. So delete
all of the text on the page. The changes you made to the styles will still be there
in the background. (If you want to prove it, type your name, press ENTER and
then type your address: the lines will be double-spaced. Delete all of the text
before continuing to step 6 if you do!)
8 Close the template in Word so that we can practise creating a new document
using that template.

Structuring your essays, theses and reports using Word
Printed Monday, 12 October 2015 Page | 13
9 To use the template:
Word 2013:
Click on the File tab and choose New.
In the New screen, click on PERSONAL (if you saved it
to the default templates location - not available on
student machines) and choose your template from the
list shown.
If you are using a template from a memory stick or similar location, do not open
the template from within Word. Rather open the folder containing the Word
template and simply double-click to open it.
Word 2010:
Click on the File tab and choose
New.
In the Available Templates, choose
New from existing (if you chose a location to save your template) or My
Templates (if you saved it to the default templates location - not available on
student machines)
Word 2007:
Click on the Office button and choose New.
In the dialogue box that appears, from the templates
options on the left choose New from existing (if you
chose a location to save your template) or My
Templates (if you saved it to the default templates location)
10 This will start a new document based on your template. Any changes you make
to the document will not overtype the template. Try typing some text and
applying some heading styles. You will see that the formatting matches the
changes you made at the beginning of this exercise. Compare this with what
happens if you simply choose to create a new blank document without using a
template.
Styles are not the only things you can include in your template. Later in this
document we will look at setting up headers and footers, adding page numbering,
tables of contents and cover pages. All of these can be included in your template if
you need a standard look and feel for these elements of your document.

University of Brighton Information Services
Page | 14 last update 30 July 2015
Changing a template
If you need to edit your template:
Word 2010 and 2013:
Click on the File tab and choose Open.
Locate your template where you saved it. If you can’t see it, you may need to tell
Word to look for All Word Document File types and not just plain documents
Make the necessary changes to your template and click on Save.
Word 2007:
Click on the Office button and choose Open.
Locate your template where you saved it.
Make the necessary changes to your template and click on Save.
Exercise G Applying a template to an existing document
If you create a template, but then want to apply that template to another document:
1 Open the document that you want to apply the template to.
2 Display the Developer tab on the ribbon as described below (you will only need
to do this once, as these steps are to make the
developer table visible.
Word 2010 and 2013:
Click on the File tab and then on Options.
In the Word Options window, click on Customize
Ribbon.
In the Main Tabs box on the right, ensure that the
checkbox next to Developer is ticked.
Click OK
Structuring your essays, theses and reports using Word
Printed Monday, 12 October 2015 Page | 15
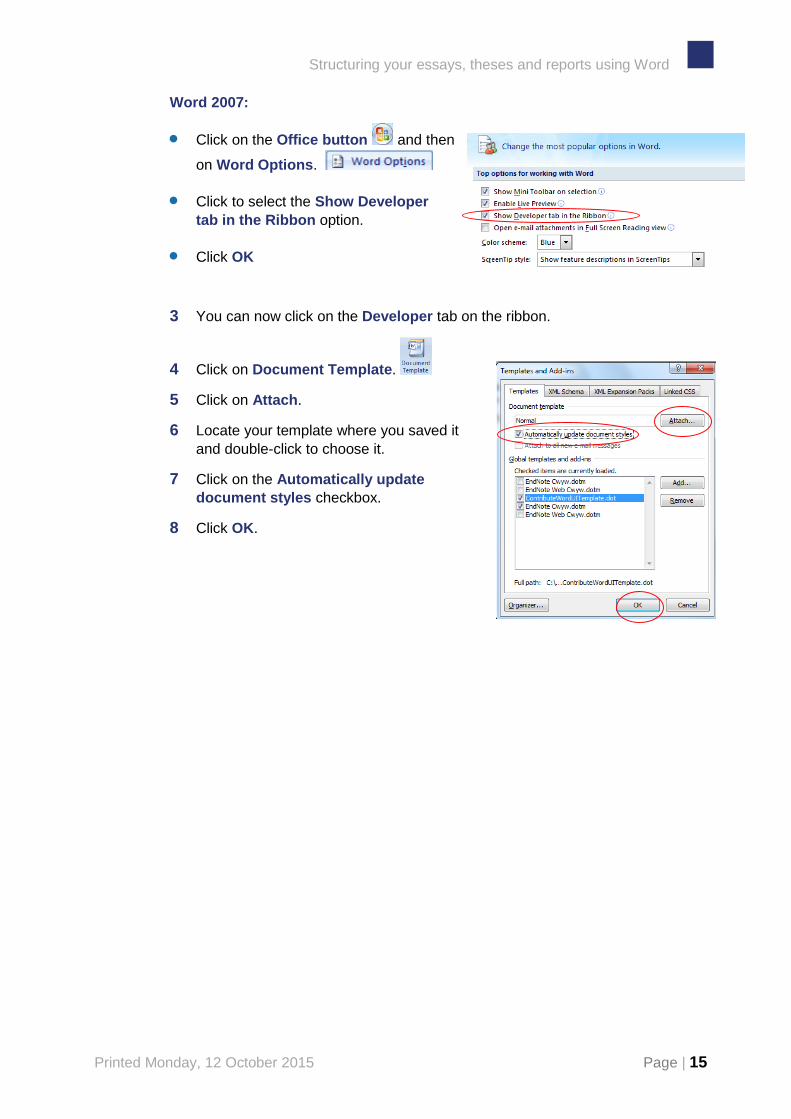
Word 2007:
Click on the Office button and then
on Word Options.
Click to select the Show Developer
tab in the Ribbon option.
Click OK
3 You can now click on the Developer tab on the ribbon.
4 Click on Document Template.
5 Click on Attach.
6 Locate your template where you saved it
and double-click to choose it.
7 Click on the Automatically update
document styles checkbox.
8 Click OK.

University of Brighton Information Services
Page | 16 last update 30 July 2015
Page vs Section Breaks
When you have filled a page with text and graphics Word automatically inserts a
new page for you, but what happens if you want to start a new page when only part
way through the current page? Some people would keep pressing their return key
until they get to the next page. This can cause content in your document to shift
when adding and editing your document.
The preferred method is to insert either a Page Break or a Section Break. Inserting
a Page Break will do exactly that, break to the next page. Inserting a Section
Break, will place identifiable sections into your document and enable you to vary the
following features in each section inserted:
Margins
Paper size
Paper orientation (landscape or
portrait)
Contents and position of headers
and footers
Format, position and sequence of
page numbers
Number of columns
Location where footnotes print
Line numbers
Inserting a Page Break
To insert a Page Break do the following:
Place your cursor where you want the page break to occur.
On the Insert tab in the Pages group choose Page Break
Inserting a Section Break
When inserting Section breaks you can choose to
start a new section on the next page, on an even
numbered page, an odd numbered page, or on the
current page i.e. Continuous, this can be used to
break columns.
To insert a Section Break do the following:
Place your cursor where you want the section
break to occur.
On the Page Layout tab in the Page Setup group choose Breaks and then
select the type of break you want to use.

Structuring your essays, theses and reports using Word
Printed Monday, 12 October 2015 Page | 17
Turn on show/hide when using section breaks or page breaks
When you start using breaks in a document, it can be difficult to keep track of where
you put them. To make life easier click on the Show/Hide icon on the Home
tab. This will show paragraph marks, section breaks and other hidden formatting
symbols. These will not print. To turn them off again, simply click on Show/Hide
again.
Deleting a Section/Page Break
Ensure that you have clicked Show/Hide icon on the Home tab (see above).
Now select the Break you want to remove by clicking and dragging across it and
simply press the Delete key.
Exercise H Insert a Section Break
We’re going to add a ‘Next Page’ Section Break at the beginning of your document.
This will insert a new page at the start of the document on which we will insert our
Table of Contents.
1 Return to your document Effective Writing.doc
2 Ensure that you have clicked Show/Hide icon on the Home tab (see
above).
3 Go to the start of your document and place your cursor at the beginning of the
first line of text. (CTRL+Home)
4 On the Page Layout tab select Breaks > Next Page.
You should now have a new blank page at the beginning of your document on which
we can insert your Table of Contents.

University of Brighton Information Services
Page | 18 last update 30 July 2015
Headers, Footers and Page Numbering
Headers and Footers appear at the top and bottom of every page, and can be a
useful way of including additional information, like Essay Title, Name, Date and
Page Numbers, in your document.
Exercise I Adding information into the Header and Footer
1 Scroll to the top of your document ,
click on the Insert tab and then, in the
Header & Footer group, click on the
Header button.
2 A drop down will appear giving you a
range of available headers.
3 Scroll through the list and select the
one called Grid
4 This puts in a Header with 2 place
holders for text.
5 Click inside the first one and type –
The Discovery of Australia.
6 Click inside the second text area (this
is designed for a date). Now click on
the arrow to the right of the text area
and a calendar opens enabling you to
pick a date. Click on today’s date.
Now for the Footer and page numbering!
7 The Header & Footer tools tab should still be available, if not simply return to
the Insert tab. Click on the Footer button and scroll through the available footer
designs; you’ll notice that some of them already carry page number so let’s pick
one of those options, Banded, for instance.
8 Double click on the left-hand placeholder in the footer and type your name.
9 Click Close Header and Footer on the ribbon to exit Headers and Footers and
return to your document.
Structuring your essays, theses and reports using Word
Printed Monday, 12 October 2015 Page | 19
Working with page numbers
To add a page number to your document, you can either:
Choose a pre-defined footer that inserts a page number (as in the previous
exercise)
Insert a page number into your footer manually (see below).
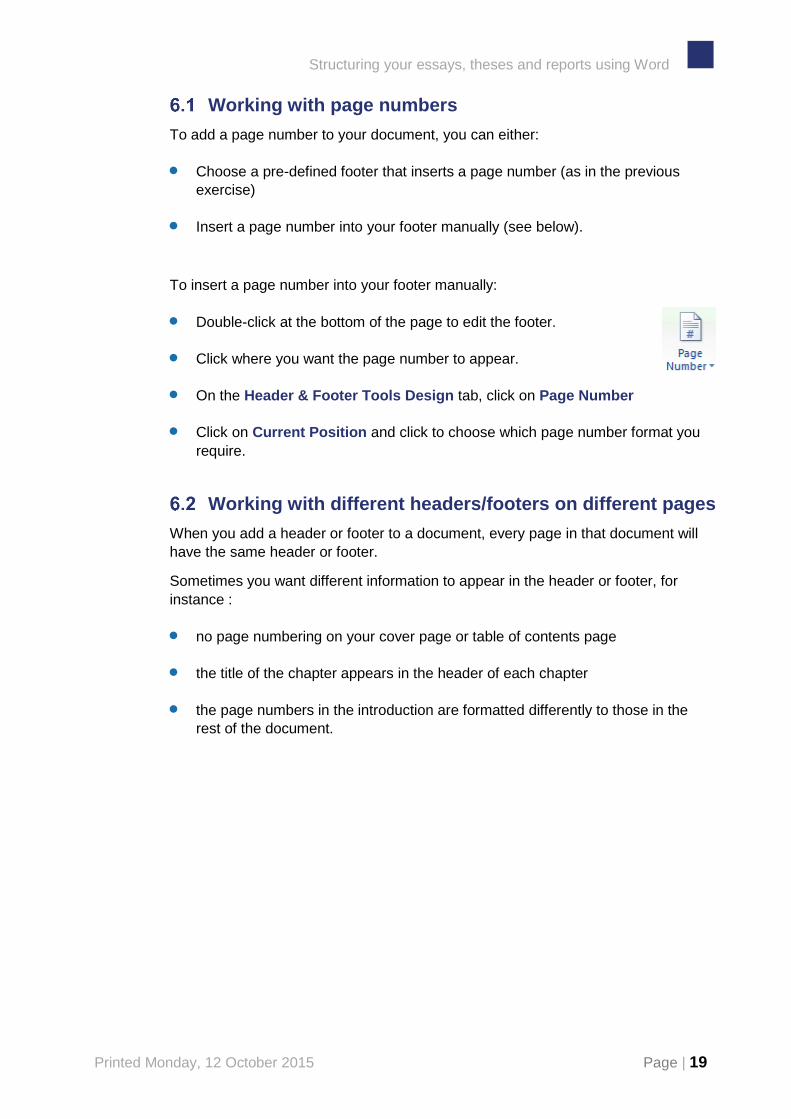
To insert a page number into your footer manually:
Double-click at the bottom of the page to edit the footer.
Click where you want the page number to appear.
On the Header & Footer Tools Design tab, click on Page Number
Click on Current Position and click to choose which page number format you
require.
Working with different headers/footers on different pages
When you add a header or footer to a document, every page in that document will
have the same header or footer.
Sometimes you want different information to appear in the header or footer, for
instance :
no page numbering on your cover page or table of contents page
the title of the chapter appears in the header of each chapter
the page numbers in the introduction are formatted differently to those in the
rest of the document.

University of Brighton Information Services
Page | 20 last update 30 July 2015
To do this, you must:
1 Split your document into sections (e.g.
chapters)
To do this insert a Section Break at the bottom of
last page of each section.
Note that each section does not need to be a
chapter. Your cover page and contents page can
also be treated as individual sections for page
numbering.
2 Break the link between the sections
When you insert a section break, Word still maintains
the continuity of the header and footer from one
section to another. If you want to control the content
of the header and footer of each section
independently, you must break the link between the
different sections.
To do this click in the header of the second of two sections and click on Link to
Previous on the Header & Footer Tools Design tab. You can
only break the link to a preceding section. I.e. if you have two chapters and each
chapter is a section identified with a section break, you must click on the header of
the second chapter to break the link between the two.
Exercise J Using section breaks to manage page numbering
Let’s practise the technique above. We will update our document so that page
numbers do not appear on the contents page of our document.
1 On the first page of your document, double click on the footer.
2 Note that the first page says section 1.
3 Scroll to the footer on page 2. Note that this is labelled section 2. This is
because of the section break at the end of page 1.
Also note that on the right-hand side of the footer it states that the section 2
footer is the same as previous. Meaning that it is linked to the footer of the
previous section.
4 Scroll back up to section 1 (page 1). Delete the page number from the footer
(including the word Page).
5 Scroll down to section 2 (page 2). Deleting the page number from section 1 has
also deleted the page number from section 2. This is because the footer in
section 1 and section 2 are still linked. So whatever you do to section 1 will
apply to section 2.
Structuring your essays, theses and reports using Word
Printed Monday, 12 October 2015 Page | 21
6 Click on Undo so that the page numbering reappears.
7 Click in the footer in section 2 (page 2) and click on Link to Previous
on the Header & Footer Tools Design tab. This breaks the link to the footer in
the previous section.
8 Scroll back up to section 1 (page 1). Delete the page number from the footer
(including the word Page).
9 Scroll down to section 2 (page 2). Now that the footers are not linked, deleting
the page numbering from section 1 has not affected the page numbering in
section 2.
6.2.1 Starting the page numbering at a different number
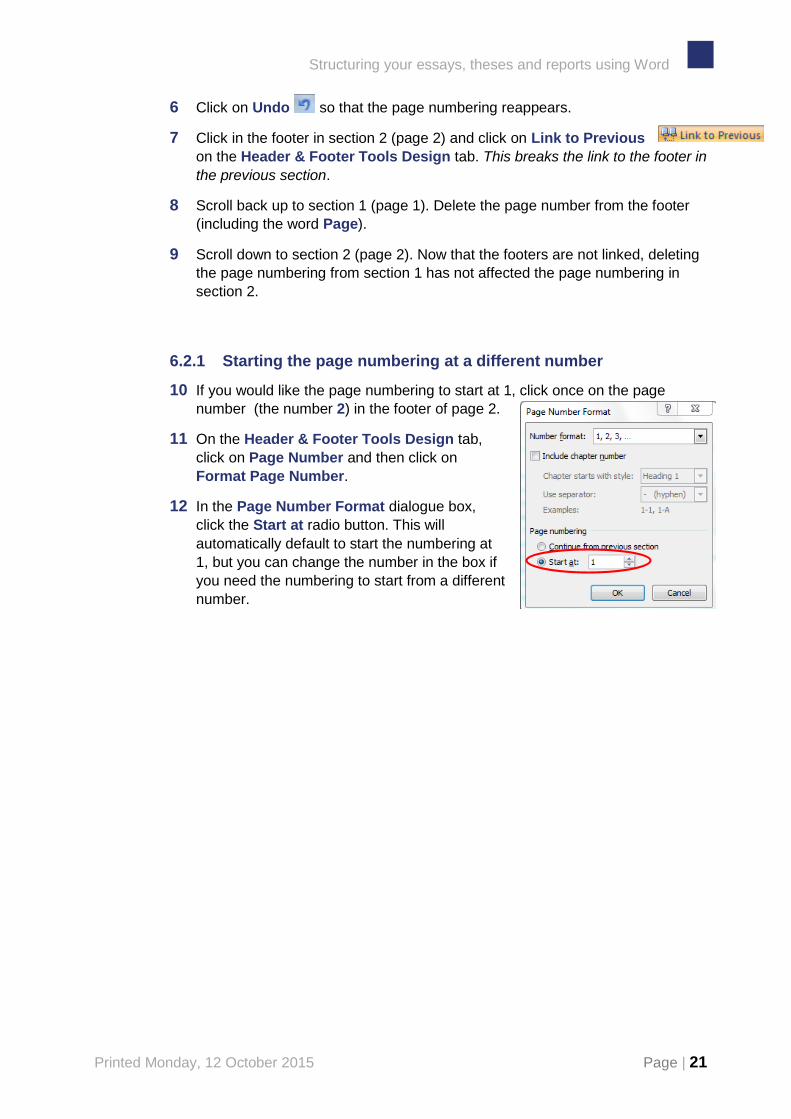
10 If you would like the page numbering to start at 1, click once on the page
number (the number 2) in the footer of page 2.
11 On the Header & Footer Tools Design tab,
click on Page Number and then click on
Format Page Number.
12 In the Page Number Format dialogue box,
click the Start at radio button. This will
automatically default to start the numbering at
1, but you can change the number in the box if
you need the numbering to start from a different
number.

University of Brighton Information Services
Page | 22 last update 30 July 2015
Working with your document outline
Earlier in this workshop we put headings into our document. Headings are vital for
both the author and the reader of a document. They help to build a structure round a
document; act as brief summaries, and aid navigation through the text.
Word has an Outline View which lets you look at the structure of your document and
to move, copy and reorganize text in it by dragging headings around. In Outline
view, you can collapse a document to see only the main headings, or you can
expand it to see all headings and even body text.
Outline view also makes it easy to work with master documents.
Outlining tools
When you select Outline from the View tab Word reveals a new tool bar. Place your
cursor over each tool to find out more.
Exercise K Exploring Outline View
The next exercise provides practice in working with a document in outline view.
1 Open the document called Effective Writing (if not already open).
2 Turn on Outline view – View tab - Outline, this will reveal the Outlining
toolbar (see above)
3 Use the Show Level tool and select show level 2, this will
collapse the outline so that only the main headings (heading1 and heading2) are
visible. Word displays a wavy line beneath each heading to denote that there is
hidden subtext.
4 Expand the outline again by selecting Show All
5 Check the “show first line only” option; this will hide body text except for the
first line in each paragraph.
6 Use the Show Level tool and select show level 2
Now we will add a new heading at the end of the document.
7 Click at the end of the heading Europeans in Australia and press Enter.
8 Type the new heading Australians in Europe and press Enter

Structuring your essays, theses and reports using Word
Printed Monday, 12 October 2015 Page | 23
9 Notice that you are expected to type in another new level 2 heading. You don’t
want to do this! Click the Demote button and type in the names of a few
famous Australian exports you know, pressing Enter after each one.
10 Got a few names? Good, let’s start jotting down a few notes about them. Click
after the names of one of your Australians and press Enter
11 Word thinks you’re about to type in another heading, but you’re not. Look in the
Outline toolbar for the demote to body text button and click on it.
12 Now start typing a very brief paragraph of information about your famous
Australian.
13 Try adding some brief details to another Australian in the same way.
14 We will now reorganize the document by moving the headings in outline view.
First make sure you are showing all your headings, from the Outline toolbar,
choose Show Level 3
15 Do one of the following:
Click on the Outline symbol to the left of the first heading The discovery of
Australia. Drag it to the bottom of the list of headings – note that Word
provides a guide line to assist with positioning or ....
Click on the Outline symbol adjacent to the heading which is now at the top
of the list and nudge it down with Move Down
16 Use the Show headings button to select Show All and notice that the whole
document has been reorganized, not just the headings. Hmm, we didn’t want to
do that. See if you can put things back how they were. If all else fails, use the
Undo button, until it looks right.
17 Click Close Outline View to return to the normal view.
Outline View is just one of the many ways you can look at and work on your
document. As you can see, changes you make in Outline View are reflected in Page
Layout View and all other views.
Hopefully you have seen how the Outline View can be a great help for rearranging
and reordering your document. It is also very useful when you first start planning a
new essay or report. Using Outline view, just type in a few headings for topics you
think you might want to cover, add a few sub-headings if you can and finally start
adding some paragraphs. The example below shows a typical outline structure of a
scientific report. Before starting work on this type of report, you could use Outline
View to enter these headings and then start filling in the text. You could even save
the outline as a template that you could reuse for other reports.

University of Brighton Information Services
Page | 24 last update 30 July 2015
1. Title 2. Abstract 3. Introduction 4. Method
4.1. Participants 4.2. Design 4.3. Apparatus/Materials – 4.4. Procedure
5. Results 6. Discussion
6.1. summary of the main results 6.2. interpretation 6.3. implications. 6.4. limitations 6.5. further research
7. conclusion
8. References
9. Appendices
Typical outline of a scientific report.
Working with the Navigation Pane (2010/2013
only)
The navigation pane available in Word 2010 and
2013 provides a useful overview of your
document.
You can click on a heading to jump to that
section of your document quickly.
You can use the search box to find text within
your document.
You can also manipulate the structure of the document by dragging and dropping
headings to move entire sections – just like in the Outline View.
Exercise L Exploring the Navigation Pane
Let’s have a go at using the Navigation Pane.
1 If the navigation pane is not visible, click on the View tab and then click to select
Navigation Pane.
2 Click on The Buginese heading in the navigation pane. Note that the document
jumps to this part of the document and The Buginese is highlighted in yellow in
the navigation pane to show you where you are in the document.
An essay outline

Structuring your essays, theses and reports using Word
Printed Monday, 12 October 2015 Page | 25
3 Right click anywhere on the headings shown in
the navigation pane. In the pop-up menu
choose Show Heading Levels >> Show
Heading 2. This will collapse the pane so that
only the main headings (heading1 and heading
2) are visible). This makes it easy to see an
overview of the structure of your document.
4 Expand the navigation pane again by right
clicking anywhere on the headings shown in
the navigation pane. In the pop-up menu
choose Show Heading Levels >> All.
Now we will add a new heading at the end of the
document.
5 Right-click on the last heading in your navigation pane and click on New
Heading After.
6 Type the new heading Australian Icons and press Enter.
7 We want that heading to be Heading 2 level. Right click on the Australian
Icons heading in the navigation pane and click on Promote.
8 Let’s add some Australian icons. Right click on the Australian Icons heading in
the navigation pane and click on New Subheading. Type Kangaroo and press
Enter.
9 Repeat step 7 to add a few more Australian icon headings.
10 We will now reorganise the document by moving the headings in the navigation
pane. First make sure that you are showing all your headings: right click
anywhere on the headings shown in the navigation pane. In the pop-up menu
choose Expand All.
11 Drag and drop Indigenous Australians to the bottom of the list of headings in
the navigation pane. Note that the subheadings move too in the navigation pane
and that any paragraphs of text in the document have moved too.
12 Drag Indigenous Autralians back up under the Introduction heading in the
navigation pane.
13 In the search box at the top of the navigation pane, type Cook and press Enter.
In the navigation pane, headings are highlighted in yellow where Cook appears
in that section of the document. In the main document, any instances of the
word Cook are also highlighted in yellow.
14 In the navigation pane, click on the right-hand (Results)
tab. This shows you more detail for each instance of the
word Cook, allowing you to pinpoint the section of text you
are looking for more easily. This is especially useful when working with a very
large document as it removes the need to scroll through the document checking
each instance highlighted in yellow.

University of Brighton Information Services
Page | 26 last update 30 July 2015
15 In the navigation pane, click on the search result “In 1770, Cook did what no
other European had done officially - he placed the British flag on”. Note that the
document jumps to the paragraph of text containing this search result and the
work Cook is highlighted in green.
16 In the navigation pane, click on the left-hand tab to return
to the list of headings in the document.
The Navigation Pane, like the Outline View is just one of the many ways you can
look at and work on your document.
Inserting a Cover Page
One of the features of Word is the built in tool for creating cover pages. So let’s have
a look at how it works.
Exercise M Inserting a Cover Page
1 Make sure you are in Page Layout View and not
Outline view.
2 Go to the Insert tab and in the Pages group click on
Cover Page to reveal the
various design options for
your cover page.
3 Scroll through a select one of
the options by clicking on it.
4 You’ll notice Word inserts a
Cover page that has a
number of preset text boxes.
Simply click on a text box
and type to enter your text.

Structuring your essays, theses and reports using Word
Printed Monday, 12 October 2015 Page | 27
Inserting and Formatting a Picture
Word provides you with a number of options when
adding illustrations to your document (see right).
We’re going to focus on inserting an image from
file but the same principles would apply for each of
the options.
Exercise N Insert a picture from your computer
1 Go to the end of your document – Ctrl+End and then press your Return key to
place your cursor on a new line.
2 Go to the Insert tab and in the Illustrations group select Pictures.
3 Navigate to a picture file (eg in your Pictures library).
4 Double-click on a picture to insert it into your document.
Exercise O Formatting your Picture
Having inserted your picture you may now need to change the size and formatting of
it. Here’s how…
Resizing your Picture
1 Single click on the picture you have just inserted to
select it.
You will notice that when selected the picture has small
squares (Handles) on each corner and in the middle of
each straight edge. These handles enable you to resize
your picture.
2 Click, hold and drag on the bottom right hand picture
handle. This will make the picture larger. Try doing this
in reverse, to make the picture smaller.
Using the Picture Tools Format tab to format your picture
So, what else can you do with an illustration?
3 Click on the picture you have inserted.
The Picture Tools Format tab should now be available. Hover over each of the tools
to reveal the function of each tool.
4 Have a go at using some of these tools.

University of Brighton Information Services
Page | 28 last update 30 July 2015
To position your picture with text flowing around the image
5 Try out the Text Wrapping options in the Arrange group. The Square
option allows you more control over the position of the picture on the
page.
Adding a table of figures and/or index of tables
Word can automatically create a table of figures for all of the images in your
document. It can also create an index of tables for all the tables in your document.
These indexes act like a table of contents. To create these:
Add a caption to each image or table
Insert your table of figures/index of tables
Adding a caption to your picture/table
1 Click to select the picture/diagram/table.
2 On the References tab click on Insert Caption
3 The Caption dialogue box will appear. The words
‘figure’ or ‘table’ and then a number will be there
already. If it’s not the type of label you want, click
on the Label drop-down to choose a different
one.
Word will keep track of how many captions you have and renumber them as you
add more
4 Click in the caption box after the number, type a space and type the text to
accompany the image or table.
5 To include the chapter number in your caption, click on Numbering and click to
select the Include Chapter Number checkbox
This will only work if:
You have applied Heading 1 style to your chapter headings in your document
You have applied Multi-level list numbering to your document (see Numbering
Chapters section).

Structuring your essays, theses and reports using Word
Printed Monday, 12 October 2015 Page | 29
Create a table of figures or index of tables
1 On the References tab click on Insert Table
of Figures
2 On the Table of Figures tab, in the caption
drop-down box choose
Figure to create a table of figures
Table to create an index of tables.
3 Check the other options and then click OK.
Updating the table of figures or index of tables
These work like your table of contents. You must update the table to reflect any
changes in your document.
1 Right click on the table of figures or index of tables in your document
2 Select Update Field
3 Check the section Update entire table
4 Click OK
Referencing in Word
There are a number of ways of building a bibliography from using word to using
software designed for referencing.
In the university we have a site license for EndNote, which is a specialised tool to
store and organise references and bibliographies. Don’t confuse this with Word’s
built in Footnote/Endnote feature. Word’s own Endnotes are just footnotes that
appear at the end of the section or document, whereas Footnotes appear at the
bottom of the page they are referenced in.
For more information about referencing see
http://about.brighton.ac.uk/ask/undergraduates/reading-and-research/
For information on using EndNote software, visit
http://libguides.brighton.ac.uk/endnote
Other Help
Information Services provides a number of online guides and tutorials that could
help with your use of computers and Information Skills.
Visit https://staff.brighton.ac.uk/is/training to find out more.