Structure extension jun
41
Yap Zhi Jun 0310738 Extension Proposal Architectural Plan 1:150 1. Ground Floor Plan Maid’s room Toilet Music room Storage Painting room
Transcript of Structure extension jun

Yap Zhi Jun 0310738
Extension Proposal
Architectural Plan 1:150
1. Ground Floor Plan
Maid’s room Toilet
Music room
Storage
Painting room

Yap Zhi Jun 0310738
2. First Floor Plan 1 : 150
Toilet
Study room
Storage
Library
Studio

Yap Zhi Jun 0310738
Extension Proposal
Structural Plan
1. Foundation Structural Plan 1 : 150

Yap Zhi Jun 0310738
2. Ground Floor Structural Plan 1 : 150
3. First Floor Structural Plan 1 : 150
3000 2000
1200
3000
4570
3700
1500
3000 2000
1200
3000
4570
3700
1500

Yap Zhi Jun 0310738
4. Roof Structural Plan 1 : 150

Yap Zhi Jun 0310738
5. 3D Structural Perspective View

Yap Zhi Jun 0310738
Quantity Dead Loads Acting On Structure
Beam Self-weight
(Assume that initial beam size 150mm x 300mm)
= Beam Size x Concrete Density
= 0.15m x 0.3m x 24kN/m3
= 1.08kN/m
Ground Floor Slab Self –weight
Maid’s room:
Slab thickness = 150mm
Slab self-weight = 0.15m x 24kN/m3
= 3.6kN/m3
Painting room:
Slab thickness = 150mm
Slab self-weight = 0.15m x 24kN/m3
= 3.6kN/m3
Music room:
Slab thickness = 150mm
Slab self-weight = 0.15m x 24kN/m3
= 3.6kN/m3
Storage:
Slab thickness = 150mm
Slab self-weight = 0.15m x 24kN/m3
= 3.6kN/m3
Toilet:
Slab thickness = 100mm
Slab self-weight = 0.1m x 24kN/m3
= 2.4kN/m3
First Floor Slab Self-weight
Storage:
Slab thickness = 150mm
Slab self-weight = 0.15m x 24kN/m3
= 3.6kN/m3
Studio:
Slab thickness = 150mm
Slab self-weight = 0.15m x 24kN/m3
= 3.6kN/m3
Library:
Slab thickness = 150mm
Slab self-weight = 0.15m x 24kN/m3
= 3.6kN/m3
Study room:
Slab thickness = 150mm
Slab self-weight = 0.15m x 24kN/m3
= 3.6kN/m3
Toilet:
Slab thickness = 100mm
Slab self-weight = 0.1m x 24kN/m3
= 2.4kN/m3

Yap Zhi Jun 0310738
Brick Wall self-weight
Ground floor brick wall
= Wall height x Thickness x Density
= 3.05m x 0.15m x 19kN/m3
= 8.69kN/m
Quantity Live loads Acting on Structure
(According to 4th schedule of UBBL for live load according to the function of the space)
Ground Floor
Maid’s room : 2.0kN/m3
Painting room : 2.5kN/m3
Music room : 2.5kN/m3
Storage : 2.5kN/m3
Toilet : 2.0kN/m3
Extension Floor plan
First floor brick wall
= Wall height x Thickness x Density
= 3.02m x 0.15m x 19kN/m3
= 8.61kN/m
First Floor
Storage : 2.5kN/m3
Studio : 2.5kN/m3
Library : 2.5kN/m3
Study room : 2.5kN/m3
Toilet : 2.0kN/m3
Ground Floor Plan 1 : 150 First Floor Plan 1 : 150
3000 2000 3000 2000
1200
3000
4570
3700
1500
Maid’s room Toilet Toilet
Music room
Storage Study room
Storage
Library
Painting room
Studio

Yap Zhi Jun 0310738
Identify One Way or Two Way Slab
Indicating the Distribution of load from Slab to Beam
Ly = Longer side of slab When Ly/Lx > 2, it is a one way slab
Lx = Shorter side of slab When Ly/Lx < 2 or = 2, it is a two way slab
Ground Floor
Maid’s room
= 4200mm / 3000mm
= 1.4 < 2 (two way slab)
Toilet
= 3000mm / 2000mm
= 1.5 < 2 (two way slab)
Painting room
= 5000mm / 4570mm
= 1.09 < 2 (two way slab)
Music room
= 5200mm / 3000mm
= 1.73 < 2 (two way slab)
Storage
= 3700mm / 2000mm
= 1.85 < 2 (two way slab)
First Floor
Storage
= 4200mm / 3000mm
= 1.4 < 2 (two way slab)
Toilet
= 3000mm / 2000mm
= 1.5 < 2 (two way slab)
Studio
= 5000mm / 4570mm
= 1.09 < 2 (two way slab)
Library
= 5200mm / 3000mm
= 1.73 < 2 (two way slab)
Study Room
= 3700mm / 2000mm
= 1.85 < 2 (two way slab)

Yap Zhi Jun 0310738
Load distribution diagram
To identify how much load would be transferred from the slab to each adjacent beam
Ground Floor Plan 1 : 100 First Floor Plan 1 : 100
1200
3000
4570
3700
1500
3000 2000 A B C
1
2
3
4
5
6
A C 3000 2000 B

Yap Zhi Jun 0310738
Beam Analysis Calculation (First Beam)
Ground Floor Beam, BC/5
List of loads on BC/5:
1) Beam self-weight (Dead Load) - UDL 2) Brick Wall Weight (Dead Load) - UDL 3) Slab BC/4-5 (Dead Load) - UDL 4) Slab BC/4-5 (Live Load) - UDL
1) Beam self-weight = 0.15m x 0.3m x 24kN/m3
= 1.08kN/m
2) Brick Wall Weight = 3.05m x 0.15m x 19kN/m3 = 8.69kN/m
3) Dead load on slab BC/4-5 (two way slab) Load is transferred to beam BC/5 in a UDL triangular form Dead load from slab BC/4-5 = Dead load on slab x (Lx/2) = 3.6kN/m2 x (2.0m/2) = 3.6kN/m Convert triangular load to UDL by applying a factor of 2/3 Dead load from slab BC/4-5 = (2/3) x 3.6kN/m = 2.4kN/m Total Dead load diagram on Beam BC/5
B C
B C
B C
B C
Beam self-weight
Brick Wall Weight
Slab BC/4-5
Total dead load
1.08kN/m
8.69kN/m
2.4kN/m
12.17kN/m
2.0m

Yap Zhi Jun 0310738
4) Live load on slab BC/4-5 (two way slab) Load is transferred to beam BC/5 in a UDL triangular form Live load from slab BC/4-5 = Live load on slab x (Lx/2) = 2.5kN/m2 x (2.0m/2) = 2.5kN/m Convert triangular load to UDL by applying a factor of 2/3 Live load from slab BC/4-5 = (2/3) x 2.5kN/m = 1.67kN/m Total Live load diagram on Beam BC/5
Ultimate load
Apply factor 1.4 and 1.6 to dead load and live load respectively
Dead load BC = 12.17kN/m x 1.4
= 17.04kN/m
Live Load BC = 1.67kN/m x 1.6
= 2.67kN/m
Total ultimate load = 17.04kN/m + 2.67kN/m
= 19.71kN/m
Total Ultimate load diagram on Beam BC/5
B C
B C
Slab BC/4-5
Total live load
1.67kN/m
1.67kN/m
B C Total ultimate load
19.71kN/m
2.0m
2.0m

Yap Zhi Jun 0310738
Reactions
∑MC = 0
= RB (2.0) – 19.71 (2.0) (2.0/2)
= 2.0 RB – 39.42
RB = 19.71KN
∑Fy = 0
= RB + RC – 19.71 (2.0)
= 19.71 + RC – 3.42
Rc = 19.71KN
Load Diagram Beam BC/5
Shear Force Diagram Beam BC/5
Bending Moment Diagram Beam BC/5
B C
9.86kNm
B C
19.71kN
1.0m
B C
19.71kN/m
2.0m
-19.71kN
1.0m
1.0m 1.0m
19.71kN 19.71kN

Yap Zhi Jun 0310738
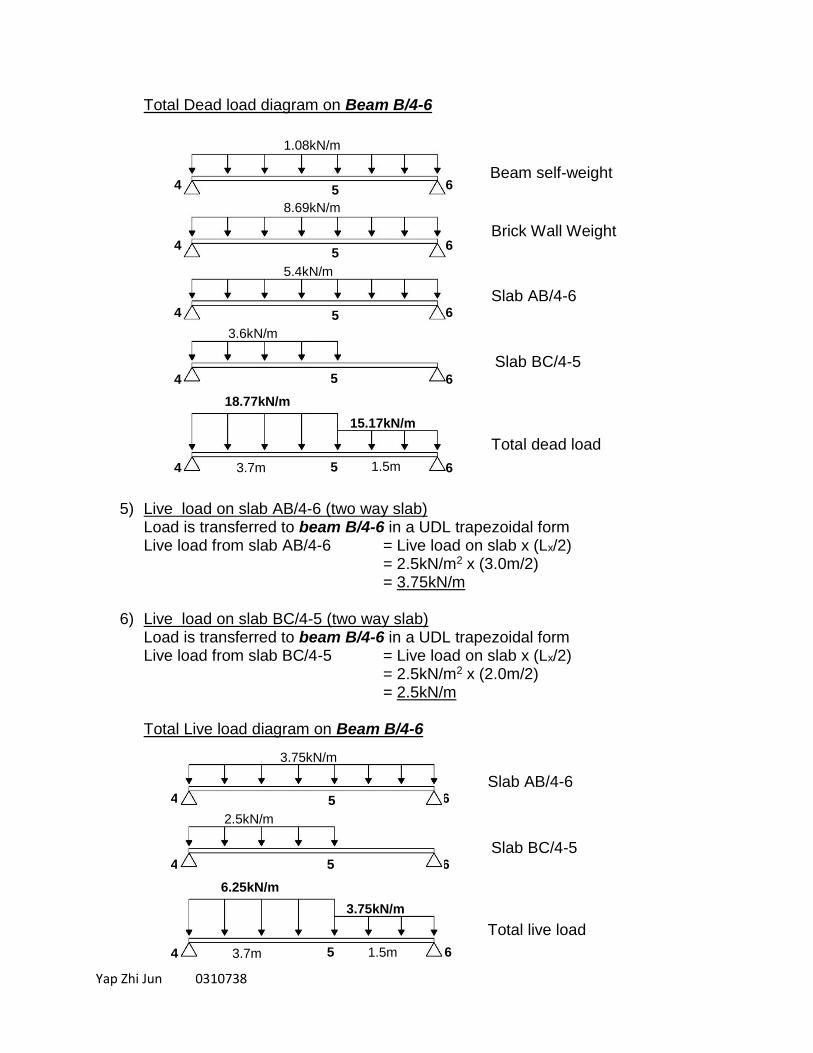
Beam Analysis Calculation (Second Beam)
Ground Floor Beam, B/4-6
List of loads on B/4-6:
1) Beam self-weight (Dead Load) - UDL 2) Brick Wall Weight (Dead Load) - UDL 3) Slab AB/4-6 (Dead Load) - UDL 4) Slab BC/4-5 (Dead Load) - UDL 5) Slab AB/4-6 (Live Load) - UDL 6) Slab BC/4-5 (Live Load) - UDL 7) Beam BC-5 (Dead Load) - PL
1) Beam self-weight = 0.15m x 0.3m x 24kN/m3
= 1.08kN/m
2) Brick Wall Weight = 3.05m x 0.15m x 19kN/m3 = 8.69kN/m
3) Dead load on slab AB/4-6 (two way slab) Load is transferred to beam B/4-6 in a UDL trapezoidal form Dead load from slab AB/4-6 = Dead load on slab x (Lx/2) = 3.6kN/m2 x (3.0m/2) = 5.4kN/m
4) Dead load on slab BC/4-5 (two way slab) Load is transferred to beam B/4-6 in a UDL trapezoidal form Dead load from slab BC/4-5 = Dead load on slab x (Lx/2) = 3.6kN/m2 x (2.0m/2) = 3.6kN/m
Yap Zhi Jun 0310738
Total Dead load diagram on Beam B/4-6
5) Live load on slab AB/4-6 (two way slab) Load is transferred to beam B/4-6 in a UDL trapezoidal form Live load from slab AB/4-6 = Live load on slab x (Lx/2) = 2.5kN/m2 x (3.0m/2) = 3.75kN/m
6) Live load on slab BC/4-5 (two way slab) Load is transferred to beam B/4-6 in a UDL trapezoidal form Live load from slab BC/4-5 = Live load on slab x (Lx/2) = 2.5kN/m2 x (2.0m/2) = 2.5kN/m Total Live load diagram on Beam B/4-6
4 6
4 6
4 6
4 6
Beam self-weight
Brick Wall Weight
Slab AB/4-6
Total dead load
1.08kN/m
8.69kN/m
5.4kN/m
18.77kN/m
3.7m
5
5
5
5
3.6kN/m
4 6 5 1.5m
15.17kN/m
Slab BC/4-5
4 6
4 6
Slab AB/4-6
Total live load
5
5
2.5kN/m
4 5 1.5m 3.7m
3.75kN/m
3.75kN/m
6.25kN/m
Slab BC/4-5
6

Yap Zhi Jun 0310738
7) Dead load from Beam BC/5 = 19.71KN
Ultimate load
Apply factor 1.4 and 1.6 to dead load and live load respectively
Dead load 45 = 18.77kN/m x 1.4
= 26.28kN/m
Dead load 56 = 15.17kN/m x 1.4
= 21.24kN/m
Live Load 45 = 6.25kN/m x 1.6
= 10.0kN/m
Live Load 56 = 3.75kN/m x 1.6
= 6.0kN/m
Ultimate load 45 = 26.28kN/m + 10.0kN/m
= 36.28kN/m
Ultimate load 56 = 21.24kN/m + 6.0kN/m
= 27.24kN/m
Total Ultimate load diagram on Beam B/4-6
4 5 1.5m 3.7m
27.24kN/m
36.28kN/m
6

Yap Zhi Jun 0310738
Reactions
∑M4 = 0
= R6 (5.2) – 36.28 (3.7) (3.7/2) – 27.24 (1.5) (1.5/2 + 3.7) – 19.7 (3.7)
= 5.2 R6 – 248.34 – 181.83 – 72.93
R6 = 96.75KN
∑Fy = 0
= R4 + R6 – 36.28 (3.7) – 27.24 (1.5) – 19.71
= 96.75 – 134.24 – 40.86 – 19.71
R4 = 98.06KN
Load Diagram Beam B/4-6
Shear Force Diagram Beam B/4-6
Bending Moment Diagram Beam B/4-6
B C
9.86kNm
4 6
19.71kN
3.7m
1.5m
1.0m 1.0m
98.06kN 96.76kN
5 1.5m
36.28kN/m
27.24kN/m
98.06kN
-96.76kN -55.89kN
-36.18kN
2.7m 1.0m 4 6
5
4 6 5
132.38kNm
114.29kNm

Yap Zhi Jun 0310738
Beam Analysis Calculation (Third Beam)
Ground Floor Beam, AC/4
List of loads on AC/4:
1) Beam self-weight (Dead Load) - UDL 2) Brick Wall Weight (Dead Load) - UDL 3) Slab AB/4-6 (Dead Load) - UDL 4) Slab BC/4-5 (Dead Load) – UDL 5) Slab AC/3-4 (Dead Load) – UDL 6) Slab AB/4-6 (Live Load) - UDL 7) Slab BC/4-5 (Live Load) – UDL 8) Slab AB/4-6 (Live Load) – UDL 9) Beam B/4-6 (Dead Load) - PL
1) Beam self-weight = 0.15m x 0.3m x 24kN/m3
= 1.08kN/m
2) Brick Wall Weight = 3.05m x 0.15m x 19kN/m3 = 8.69kN/m
3) Dead load on slab AB/4-6 (two way slab) Load is transferred to beam AC/4 in a UDL triangular form Dead load from slab AB/4-6 = Dead load on slab x (Lx/2) = 3.6kN/m2 x (3.0m/2) = 5.4kN/m Convert triangular load to UDL by applying a factor of 2/3 Dead load from slab AB/4-6 = (2/3) x 5.4kN/m = 3.6kN/m
4) Dead load on slab BC/4-5 (two way slab) Load is transferred to beam AC/4 in a UDL triangular form Dead load from slab BC/4-5 = Dead load on slab x (Lx/2) = 3.6kN/m2 x (2.0m/2) = 3.6kN/m Convert triangular load to UDL by applying a factor of 2/3 Dead load from slab BC/4-5 = (2/3) x 3.6kN/m = 2.4kN/m

Yap Zhi Jun 0310738
5) Dead load on slab AC/3-4 (two way slab) Load is transferred to beam AC/4 in a UDL triangular form Dead load from slab AB/4-6 = Dead load on slab x (Lx/2) = 3.6kN/m2 x (4.57m/2) = 8.23kN/m Total Dead load diagram on Beam AC/4
6) Live load on slab AB/4-6 (two way slab) Load is transferred to beam AC/4 in a UDL trapezoidal form Live load from slab AB/4-6 = Live load on slab x (Lx/2) = 2.5kN/m2 x (3.0m/2) = 3.75kN/m Convert triangular load to UDL by applying a factor of 2/3 Live load from slab AB/4-6 = (2/3) x 3.75kN/m = 2.5kN/m
A C
A C
A C
A C
Beam self-weight
Brick Wall Weight
Slab AB/4-6
Total dead load
1.08kN/m
8.69kN/m
3.6kN/m
21.6kN/m
3.0m
B
B
B
B
2.4kN/m
A C B 2.0m
20.7kN/m
Slab BC/4-5
Slab AC/3-4 A C B
8.23kN/m

Yap Zhi Jun 0310738
7) Live load on slab BC/4-5 (two way slab) Load is transferred to beam AC/4 in a UDL triangular form Live load from slab BC/4-5 = Live load on slab x (Lx/2) = 2.5kN/m2 x (2.0m/2) = 2.5kN/m Convert triangular load to UDL by applying a factor of 2/3 Live load from slab BC/4-5 = (2/3) x 2.5kN/m = 1.67kN/m
8) Live load on slab AC/3-4 (two way slab) Load is transferred to beam AC/4 in a UDL trapezoidal form Live load from slab AC/3-4 = Live load on slab x (Lx/2) = 2.5kN/m2 x (4.57m/2) = 5.71kN/m Total Live load diagram on Beam AC/4
9) Dead load from Beam B/4-6 = 98.06KN
A C
A C
Slab AB/4-6
Total live load
B
B
1.67kN/m
A B
2.0m 3.0m
2.5kN/m
7.38kN/m
8.21kN/m
Slab BC/4-5
C Slab AC/3-4
A B C
5.71kN/m

Yap Zhi Jun 0310738
Ultimate load
Apply factor 1.4 and 1.6 to dead load and live load respectively
Dead load AB = 21.6kN/m x 1.4
= 30.24kN/m
Dead load BC = 20.4kN/m x 1.4
= 28.56kN/m
Live Load AB = 8.21kN/m x 1.6
= 13.14kN/m
Live Load BC = 7.38kN/m x 1.6
= 11.81kN/m
Ultimate load AB = 30.24kN/m + 13.14kN/m
= 43.38kN/m
Ultimate load BC = 28.56kN/m + 11.81kN/m
= 40.37kN/m
Total Ultimate load diagram on Beam AC/4
A B 2.0m 3.0m
40.37kN/m
43.38kN/m
C

Yap Zhi Jun 0310738
Reactions
∑MA = 0
= RC (5.0) – 43.38 (3.0) (3.0/2) – 40.37 (2.0) (2.0/2 + 3.0) – 98.06 (3.0)
= 5.0 RC – 195.21 – 322.96 – 294.18
RC = 162.47KN
∑Fy = 0
= RA + RC – 43.38 (3.0) – 40.37 (2.0) – 98.06
RA = 162.47 – 130.14 – 80.74 – 98.06
= 146.47KN
Load Diagram Beam AC/4
Shear Force Diagram Beam AC/4
Bending Moment Diagram Beam AC/4
C
244.2kNm
A C
98.06kN
3.0m
2.0m
3.0m 2.0m
146.47kN 162.47kN
B 2.0m
43.38kN/m
40.37kN/m
-81.73kN
3.0m C C
B
A
B
146.47kN
-162.47kN
Yap Zhi Jun 0310738
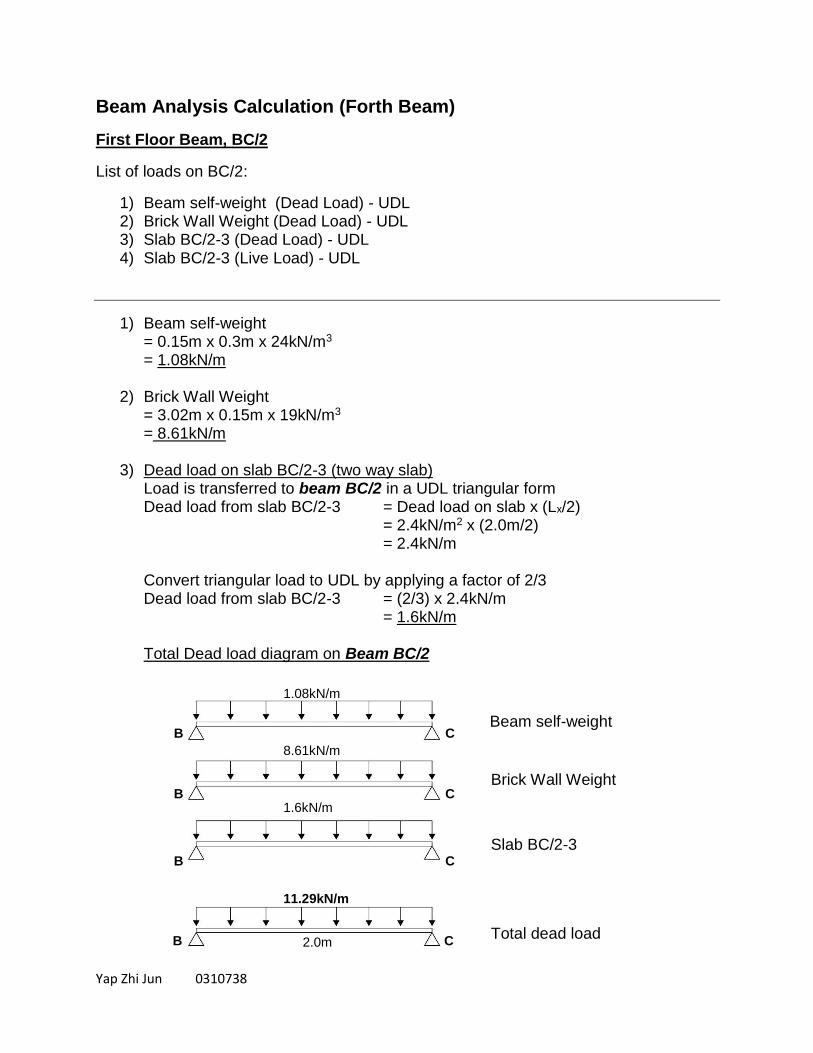
Beam Analysis Calculation (Forth Beam)
First Floor Beam, BC/2
List of loads on BC/2:
1) Beam self-weight (Dead Load) - UDL 2) Brick Wall Weight (Dead Load) - UDL 3) Slab BC/2-3 (Dead Load) - UDL 4) Slab BC/2-3 (Live Load) - UDL
1) Beam self-weight = 0.15m x 0.3m x 24kN/m3
= 1.08kN/m
2) Brick Wall Weight = 3.02m x 0.15m x 19kN/m3 = 8.61kN/m
3) Dead load on slab BC/2-3 (two way slab) Load is transferred to beam BC/2 in a UDL triangular form Dead load from slab BC/2-3 = Dead load on slab x (Lx/2) = 2.4kN/m2 x (2.0m/2) = 2.4kN/m Convert triangular load to UDL by applying a factor of 2/3 Dead load from slab BC/2-3 = (2/3) x 2.4kN/m = 1.6kN/m Total Dead load diagram on Beam BC/2
B C
B C
B C
B C
Beam self-weight
Brick Wall Weight
Slab BC/2-3
Total dead load
1.08kN/m
8.61kN/m
1.6kN/m
11.29kN/m
2.0m

Yap Zhi Jun 0310738
4) Live load on slab BC/2-3 (two way slab) Load is transferred to beam BC/2 in a UDL triangular form Live load from slab BC/2-3 = Live load on slab x (Lx/2) = 2.0kN/m2 x (2.0m/2) = 2.0kN/m Convert triangular load to UDL by applying a factor of 2/3 Live load from slab BC/2-3 = (2/3) x 2.0kN/m = 1.33kN/m Total Live load diagram on Beam BC/2
Ultimate load
Apply factor 1.4 and 1.6 to dead load and live load respectively
Dead load BC = 11.29kN/m x 1.4
= 15.81kN/m
Live Load BC = 1.33kN/m x 1.6
= 2.13kN/m
Total ultimate load = 15.81kN/m + 2.13kN/m
= 17.94kN/m
Total Ultimate load diagram on Beam BC/2
B C
B C
Slab BC/2-3
Total live load
1.33kN/m
1.33kN/m
B C Total ultimate load
17.94kN/m
2.0m
2.0m

Yap Zhi Jun 0310738
Reactions
∑MC = 0
= RB (2.0) – 17.94 (2.0) (2.0/2)
RB = 17.94KN
∑Fy = 0
= RB + RC – 19.71 (2.0)
= 17.94 + RC – 35.87
Rc = 17.94KN
Load Diagram Beam BC/2
Shear Force Diagram Beam BC/2
Bending Moment Diagram Beam BC/2
B C
8.97kNm
B C
17.94kN
1.0m
B C
17.94kN/m
2.0m
-17.94kN
1.0m
1.0m 1.0m
17.94kN 17.94kN

Yap Zhi Jun 0310738
Beam Analysis Calculation (Forth Beam)
First Floor Beam, B/1-3
List of loads on B/1-3:
1) Beam self-weight (Dead Load) - UDL 2) Brick Wall Weight (Dead Load) - UDL 3) Slab AB/1-3 (Dead Load) - UDL 4) Slab BC/2-3 (Dead Load) - UDL 5) Slab AB/1-3 (Live Load) - UDL 6) Slab BC/2-3 (Live Load) - UDL 7) Beam BC-2 (Dead Load) - PL
1) Beam self-weight = 0.15m x 0.3m x 24kN/m3
= 1.08kN/m
2) Brick Wall Weight = 3.02m x 0.15m x 19kN/m3 = 8.61kN/m
3) Dead load on slab AB/1-3 (two way slab) Load is transferred to beam B/1-3 in a UDL trapezoidal form Dead load from slab AB/1-3 = Dead load on slab x (Lx/2) = 3.6kN/m2 x (3.0m/2) = 5.4kN/m
4) Dead load on slab BC/2-3 (two way slab) Load is transferred to beam B/1-3 in a UDL trapezoidal form Dead load from slab BC/2-3 = Dead load on slab x (Lx/2) = 2.4kN/m2 x (2.0m/2) = 2.4kN/m

Yap Zhi Jun 0310738
Total Dead load diagram on Beam B/1-3
5) Live load on slab AB/1-3 (two way slab) Load is transferred to beam B/1-3 in a UDL trapezoidal form Live load from slab AB/1-3 = Live load on slab x (Lx/2) = 2.5kN/m2 x (3.0m/2) = 3.75kN/m
6) Live load on slab BC/2-3 (two way slab) Load is transferred to beam B/1-3 in a UDL trapezoidal form Live load from slab BC/2-3 = Live load on slab x (Lx/2) = 2.0kN/m2 x (2.0m/2) = 2.0kN/m Total Live load diagram on Beam B/1-3
3 1
3 1
3 1
3 1
Beam self-weight
Brick Wall Weight
Slab AB/1-3
Total dead load
1.08kN/m
8.61kN/m
5.4kN/m
17.49kN/m
3.0m
2
2
2
2
2.4kN/m
3 1 2 1.2m
15.09kN/m
Slab BC/2-3
3 1
3 1
Slab AB/1-3
Total live load
2
2
2.0kN/m
3 2 1.2m 3.0m
3.75kN/m
3.75kN/m
5.75kN/m
Slab BC/2-3
1

Yap Zhi Jun 0310738
7) Dead load from Beam BC/2 = 17.94KN
Ultimate load
Apply factor 1.4 and 1.6 to dead load and live load respectively
Dead load 12 = 15.09kN/m x 1.4
= 21.13kN/m
Dead load 23 = 17.49kN/m x 1.4
= 24.49kN/m
Live Load 12 = 3.75kN/m x 1.6
= 6.0kN/m
Live Load 23 = 5.75kN/m x 1.6
= 9.2kN/m
Ultimate load 12 = 21.13kN/m + 6.0kN/m
= 27.13kN/m
Ultimate load 23 = 24.49kN/m + 9.2kN/m
= 33.69kN/m
Total Ultimate load diagram on Beam B/1-3
3 2 1.2m 3.0m
27.13kN/m
33.69kN/m
1

Yap Zhi Jun 0310738
Reactions
∑M1 = 0
= R3 (4.2) – 27.13 (1.2) (1.2/2) – 33.69 (3) (3/2 + 1.2) – 17.94 (1.2)
= 4.2 R3 – 19.53 – 272.89 – 21.53
R3 = 74.75KN
∑Fy = 0
= R1 + R3 – 27.13 (1.2) – 33.69 (3.0) – 17.94
R1 = 74.75 – 32.56 – 101.07 – 17.94
= 76.8KN
Load Diagram Beam B/1-3
Shear Force Diagram Beam B/1-3
Bending Moment Diagram Beam B/1-3
B C
9.86kNm
3 1
17.94kN
3.0m
1.2m
1.0m 1.0m
74.75kN 76.82kN
2 1.2m
33.69kN/m
27.13kN/m
74.75kN
-76.82kN
-44.26kN -26.32kN
2.22m 0.78m 3 1
2
3 1 2
82.97kNm
72.71kNm

Yap Zhi Jun 0310738
Beam Analysis Calculation (Sixth Beam)
First Floor Beam, AC/3
List of loads on AC/3:
1) Beam self-weight (Dead Load) - UDL 2) Brick Wall Weight (Dead Load) - UDL 3) Slab AB/1-3 (Dead Load) - UDL 4) Slab BC/2-3 (Dead Load) – UDL 5) Slab AC/3-4 (Dead Load) – UDL 6) Slab AB/1-3 (Live Load) - UDL 7) Slab BC/2-3 (Live Load) – UDL 8) Slab AB/3-4 (Live Load) – UDL 9) Beam B/1-3 (Dead Load) - PL
1) Beam self-weight = 0.15m x 0.3m x 24kN/m3
= 1.08kN/m
2) Brick Wall Weight = 3.02m x 0.15m x 19kN/m3 = 8.61kN/m
3) Dead load on slab AB/1-3 (two way slab) Load is transferred to beam AC/3 in a UDL triangular form Dead load from slab AB/1-3 = Dead load on slab x (Lx/2) = 3.6kN/m2 x (3.0m/2) = 5.4kN/m Convert triangular load to UDL by applying a factor of 2/3 Dead load from slab AB/1-3 = (2/3) x 5.4kN/m = 3.6kN/m
4) Dead load on slab BC/2-3 (two way slab) Load is transferred to beam AC/3 in a UDL triangular form Dead load from slab BC/2-3 = Dead load on slab x (Lx/2) = 2.4kN/m2 x (2.0m/2) = 2.4kN/m Convert triangular load to UDL by applying a factor of 2/3 Dead load from slab BC/2-3 = (2/3) x 2.4kN/m = 1.6kN/m

Yap Zhi Jun 0310738
5) Dead load on slab AC/3-4 (two way slab) Load is transferred to beam AC/3 in a UDL triangular form Dead load from slab AC/3-4 = Dead load on slab x (Lx/2) = 3.6kN/m2 x (4.57m/2) = 8.23kN/m Total Dead load diagram on Beam AC/3
6) Live load on slab AB/1-3 (two way slab) Load is transferred to beam AC/3 in a UDL trapezoidal form Live load from slab AB/1-3 = Live load on slab x (Lx/2) = 2.5kN/m2 x (3.0m/2) = 3.75kN/m Convert triangular load to UDL by applying a factor of 2/3 Live load from slab AB/1-3 = (2/3) x 3.75kN/m = 2.5kN/m
A C
A C
A C
A C
Beam self-weight
Brick Wall Weight
Slab AB/1-3
Total dead load
1.08kN/m
8.61kN/m
3.6kN/m
21.52kN/m
3.0m
B
B
B
B
1.6kN/m
A C B 2.0m
19.52kN/m
Slab BC/2-3
Slab AC/3-4 A C B
8.23kN/m

Yap Zhi Jun 0310738
7) Live load on slab BC/2-3 (two way slab) Load is transferred to beam AC/3 in a UDL triangular form Live load from slab BC/2-3 = Live load on slab x (Lx/2) = 2.0kN/m2 x (2.0m/2) = 2.0kN/m Convert triangular load to UDL by applying a factor of 2/3 Live load from slab BC/2-3 = (2/3) x 2.0kN/m = 1.33kN/m
8) Live load on slab AC/3-4 (two way slab) Load is transferred to beam AC/3 in a UDL trapezoidal form Live load from slab AC/3-4 = Live load on slab x (Lx/2) = 2.5kN/m2 x (4.57m/2) = 5.71kN/m Total Live load diagram on Beam AC/3
9) Dead load from Beam B/1-3 = 74.75KN
A C
A C
Slab AB/1-3
Total live load
B
B
1.33kN/m
A B
2.0m 3.0m
2.5kN/m
7.04kN/m
8.21kN/m
Slab BC/2-3
C Slab AC/3-4
A B C
5.71kN/m

Yap Zhi Jun 0310738
Ultimate load
Apply factor 1.4 and 1.6 to dead load and live load respectively
Dead load AB = 21.52kN/m x 1.4
= 30.13kN/m
Dead load BC = 19.52kN/m x 1.4
= 27.33kN/m
Live Load AB = 8.21kN/m x 1.6
= 13.14kN/m
Live Load BC = 7.04kN/m x 1.6
= 11.26kN/m
Ultimate load AB = 30.13kN/m + 13.14kN/m
= 43.27kN/m
Ultimate load BC = 27.33kN/m + 11.26kN/m
= 38.59kN/m
Total Ultimate load diagram on Beam AC/3
A B 2.0m 3.0m
38.59kN/m
43.27kN/m
C
Yap Zhi Jun 0310738
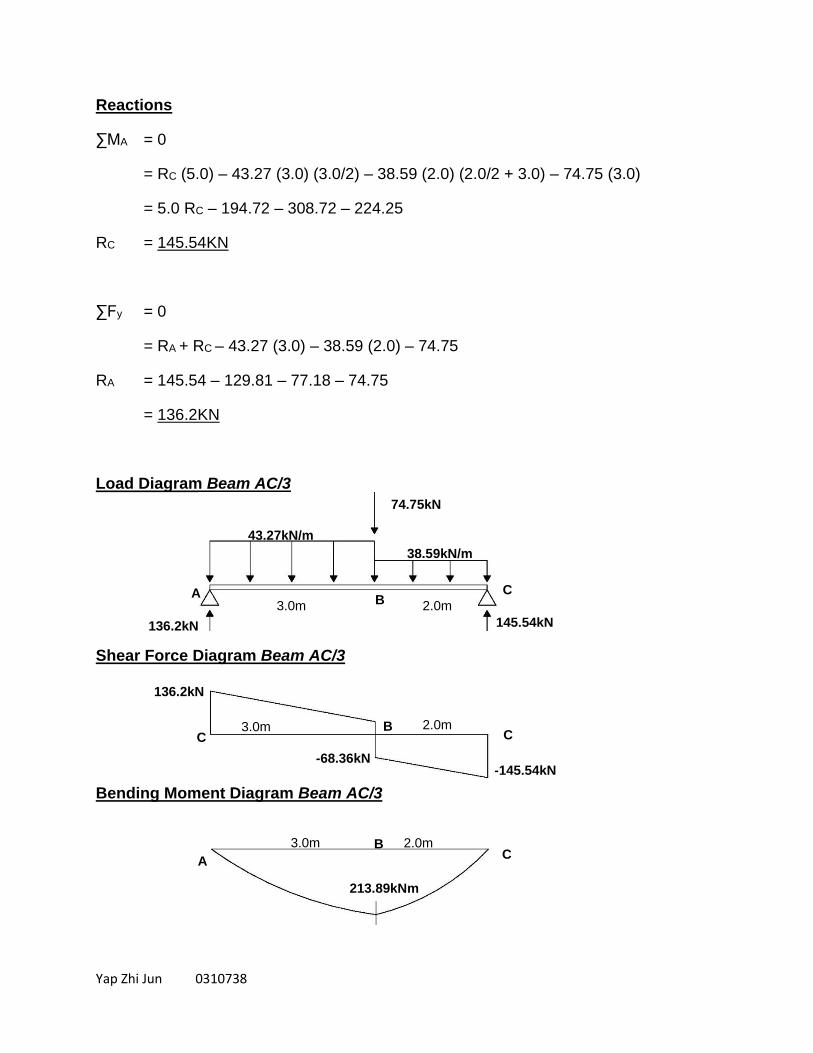
Reactions
∑MA = 0
= RC (5.0) – 43.27 (3.0) (3.0/2) – 38.59 (2.0) (2.0/2 + 3.0) – 74.75 (3.0)
= 5.0 RC – 194.72 – 308.72 – 224.25
RC = 145.54KN
∑Fy = 0
= RA + RC – 43.27 (3.0) – 38.59 (2.0) – 74.75
RA = 145.54 – 129.81 – 77.18 – 74.75
= 136.2KN
Load Diagram Beam AC/3
Shear Force Diagram Beam AC/3
Bending Moment Diagram Beam AC/3
C
213.89kNm
A C
74.75kN
3.0m
2.0m
3.0m 2.0m
136.2kN 145.54kN
B 2.0m
43.27kN/m
38.59kN/m
-68.36kN
3.0m C C
B
A
B
136.2kN
-145.54kN

Yap Zhi Jun 0310738
Load Distribution Diagram
To identify distribution of load from Slab to column by using the tributary area method
3000
3000
4570
3700
A B C
1
2
3
4
5
6
2000
1200
1500
A B C 2000 3000
Column B/1 Column C/2 Column C/3
B C
C
1 3 2
1500
600
600
1500 2000 500
2285
1500
2000 500
Ground Floor Plan 1 : 150 First Floor Plan 1 : 150

Yap Zhi Jun 0310738
Column Analysis Calculation (Tributary Area Method)
To identify how much load would be transferred from slab to column
Column B/1
List of loads:
Dead load Live Load
1) Roof 1) Roof
2) First Floor 2) First Floor
3) Ground Floor 3) Ground Floor
Dead Load
1) Roof
a) Flat roof slab
Assume slab self-weight 1.0kN/m2
Area = 1.5m x 0.6m
= 0.9m2
Dead Load of Flat Roof Slab
= 1.0kN/m2 x 0.9m2
= 0.9kN
b) Beam Self-weight
= 1.08kN/m x (1.5m + 0.6m)
= 2.27kN
Total Dead Load of Roof = 0.9kN + 2.27kN = 3.17kN
2) First Floor a) Slab (Storage)
= 3.6kN/m2 x (1.5m x 0.6m) = 3.24kN
b) Beam Self-weight =1.08kN/m x (1.5m + 0.6m) = 0.97kN
c) Brick Wall = 8.61kN/m x (1.5m + 0.6m) = 18.08kN Total Dead Load of first Floor = 3.24kN + 0.97kN + 18.08kN = 22.29kN

Yap Zhi Jun 0310738
3) Ground Floor a) Slab (Maid’s Room)
= 3.6kN/m2 x (1.5m x 0.6m) = 3.24kN
b) Beam Self-weight =1.08kN/m x (1.5m + 0.6m) = 0.97kN
c) Brick Wall = 8.69kN/m x (1.5m + 0.6m) = 18.25kN Total Dead Load of Ground Floor = 3.24kN + 0.97kN + 18.25kN = 22.46kN
Total Dead Load from Roof to Foundation on Column B/1
= 3.17kN + 22.29kN + 22.46kN
= 47.92kN
Live Load
1) Roof
Live Load of Flat Roof Slab
= 0.5kN/m2 x (1.5m x 0.6m)
= 0.45kN
2) First Floor Slab (Storage) = 2.5kN/m2 x (1.5m x 0.6m) = 2.25kN
3) Ground Floor Slab (Maid’s Room) = 2.0kN/m2 x (1.5m x 0.6m) = 1.8kN
Total Live Load from Roof to Foundation on Column B/1
= 0.45kN + 2.25kN + 1.8kN
= 4.5kN
Ultimate Load
47.92kN (1.4) + 4.5kN (1.6) = 74.29kN

Yap Zhi Jun 0310738
Column C/2
List of loads:
Dead load Live Load
1) Roof 1) Roof
2) First Floor 2) First Floor
3) Ground Floor 3) Ground Floor
Dead Load
1) Roof
a) Flat roof slab
Assume slab self-weight 1.0kN/m2
Area = (0.5m x 2.1m) + (2.0m x 1.5m)
= 4.05m2
Dead Load of Flat Roof Slab
= 1.0kN/m2 x 4.05m2
= 4.05kN
b) Beam Self-weight
= 1.08kN/m x (2.1m + 2.0m + 1.5m)
= 6.05kN
Total Dead Load of Roof = 4.05kN + 6.05kN = 10.1kN
2) First Floor a) Slab (Storage + toilet)
= (3.6kN/m2 x (0.5m x 2.1m)) + (2.4kN/m2 x (2.0m x 1.5m)) = 3.78kN + 7.2kN = 10.98kN
b) Beam Self-weight = 1.08kN/m x (2.1m + 2.0m + 1.5m)
= 6.05kN
c) Brick Wall = 8.61kN/m x (2.1m + 2.0m + 1.5m) = 48.22kN Total Dead Load of first Floor = 10.98kN + 6.05kN + 48.22kN = 65.25kN

Yap Zhi Jun 0310738
3) Ground Floor a) Slab (Maid’s Room + toilet)
= (3.6kN/m2 x (0.5m x 2.1m)) + (2.4kN/m2 x (2.0m x 1.5m)) = 3.78kN + 7.2kN = 10.98kN
b) Beam Self-weight = 1.08kN/m x (2.1m + 2.0m + 1.5m)
= 6.05kN
c) Brick Wall = 8.69kN/m x (2.1m + 2.0m + 1.5m) = 48.66kN Total Dead Load of Ground Floor = 10.98kN + 6.05kN + 48.66kN = 65.69kN
Total Dead Load from Roof to Foundation on Column C/2
= 10.1kN + 65.25kN + 65.69kN
= 141.04kN
Live Load
a) Roof
Live Load of Flat Roof Slab
= 0.5kN/m2 x 4.05m2
= 2.03kN
b) First Floor Slab (Storage + toilet) = (2.5kN/m2 x 1.05m2) + (2.0kN/m2 x 3.0m2) = 8.63kN c) Ground Floor Slab (Maid’s Room + toilet) = 2.0kN/m2 x 4.05m2 = 8.1kN
Total Live Load from Roof to Foundation on Column C/2
= 2.03kN + 8.63kN + 8.1kN
= 18.76kN
Ultimate Load
141.04kN (1.4) + 18.76kN (1.6) = 227.47kN

Yap Zhi Jun 0310738
Column C/3
List of loads:
Dead load Live Load
1) Roof 1) Roof
2) First Floor 2) First Floor
3) Ground Floor 3) Ground Floor
Dead Load
1) Roof
a) Flat roof slab
Assume slab self-weight 1.0kN/m2
Area = (0.5m x 1.5m) + (2.0m x 1.5m) + (2.5m x 2.29m)
= 9.48m2
Dead Load of Flat Roof Slab
= 1.0kN/m2 x 9.48m2
= 9.48kN
b) Beam Self-weight
= 1.08kN/m x (1.5m + 3.79m + 2.5m)
= 8.41kN
Total Dead Load of Roof = 9.48kN + 8.41kN = 17.89kN
2) First Floor a) Slab (Storage + toilet + studio)
= (3.6kN/m2 x (0.5m x 1.5m)) + (2.4kN/m2 x (2.0m x 1.5m)) + (3.6kN/m2 x (2.29m x 2.5m)) = 2.7kN + 7.2kN + 20.61kN = 30.51kN
b) Beam Self-weight = 1.08kN/m x (1.5m + 3.79m + 2.5m)
= 8.41kN
c) Brick Wall = 8.61kN/m x (1.5m + 3.79m + 2.5m) = 67.07kN Total Dead Load of first Floor = 30.51kN + 8.41kN + 67.07kN = 105.99kN

Yap Zhi Jun 0310738
3) Ground Floor a) Slab (Maid’s Room + toilet + Painting Room)
= (3.6kN/m2 x (0.5m x 1.5m)) + (2.4kN/m2 x (2.0m x 1.5m)) + (3.6kN/m2 x (2.29m x 2.5m)) = 2.7kN + 7.2kN + 20.61kN = 30.51kN
b) Beam Self-weight = 1.08kN/m x (1.5m + 3.79m + 2.5m)
= 8.41kN
c) Brick Wall = 8.69kN/m x (1.5m + 3.79m + 2.5m) = 67.7kN Total Dead Load of Ground Floor = 30.51kN + 8.41kN + 67.7kN = 106.62kN
Total Dead Load from Roof to Foundation on Column C/3
= 17.89kN + 105.99kN + 106.62kN = 230.5kN
Live Load
1) Roof
Live Load of Flat Roof Slab
= 0.5kN/m2 x 9.48m2
= 2.03kN
2) First Floor Slab (Storage + toilet + studio) = (2.5kN/m2 x 6.48m2) + (2.0kN/m2 x 3m2) = 22.2kN
3) Ground Floor Slab (Maid’s Room + toilet + Painting room) = (2.0kN/m2 x 3.75m2) + (2.5kN/m2 x 5.73m2) = 21.83kN
Total Live Load from Roof to Foundation on Column C/3
= 2.03kN + 22.2kN + 21.83kN = 46.06kN
Ultimate Load
230.5kN (1.4) + 46.06kN (1.6) = 396.4kN


![arXiv:cs/0306043v1 [cs.DS] 10 Jun 2003arXiv:cs/0306043v1 [cs.DS] 10 Jun 2003 Skip Graphs James Aspnes∗ Gauri Shah† Abstract Skip graphs are a novel distributed data structure,](https://static.fdocuments.us/doc/165x107/5e855d699f7558260d59ac44/arxivcs0306043v1-csds-10-jun-2003-arxivcs0306043v1-csds-10-jun-2003-skip.jpg)