Street Furniture Maintenance Guide - media.marshalls.co.uk · Nero Porfido Sales Office: 0870 600...
24
Street Furniture Maintenance Guide www.marshalls.co.uk/commercial
Transcript of Street Furniture Maintenance Guide - media.marshalls.co.uk · Nero Porfido Sales Office: 0870 600...

Street Furniture Maintenance Guide
www.marshalls.co.uk/commercial

Introduction
This manual is designed to give a generic overview of the cleaning regimes,
solutions, methods and techniques to keep your Marshalls Street Furniture, signage
and traffic calming products aesthetically flawless.
The manual also discusses minor repairs of common materials and finishes used in
the manufacture of Marshalls Street Furniture.
It is recommended that a trial repair be carried out on an unimportant surface
first. No corrosive cleaners or other abrasives should be used. Any contamination
to stainless steel or aluminium items, particularly carbon steel scuffs from vehicles,
should be quickly removed to avoid corrosion or the appearance of such caused by
cross-contamination.
Large dents in metal surfaces cannot be easily repaired and might compromise
structural integrity (usually caused by vehicular impact). Insuch cases the product
should be immediately isolated to ensure safety of the general public.
In the event of serious damage to any main component, replacements can be
ordered from our dedicated Marshalls Street Furniture team.
In the event of major damage or any need to disassemble the structure, please
contact Marshalls Street Furniture directly for detailed technical advice.
This document is not designed to be exhaustive and extensive in the exacting
requirements of every case. If you consider your cleaning or repair circumstance to
be outside of the scope of this document, then please do not hesitate to contact our
office and we will be happy to help you keep our products looking as new.
Marshalls New Street Furniture Product Selector is now available!
Featuring enhanced brand offerings for creating better landscapes, including a quick find index section.
To request a printed copy, please call 0870 241 2463
Sales Office: 0870 600 2425
www.marshalls.co.uk/commercial
UniclassL811
EPICQ12
CI/SfB
(90.7) X
June 2013
Street Furniture Product Selector 2013/2014
www.marshalls.co.uk/commercial
Materials SpecificationConcrete Material Specification, Colourways and Maintenance Recommendations
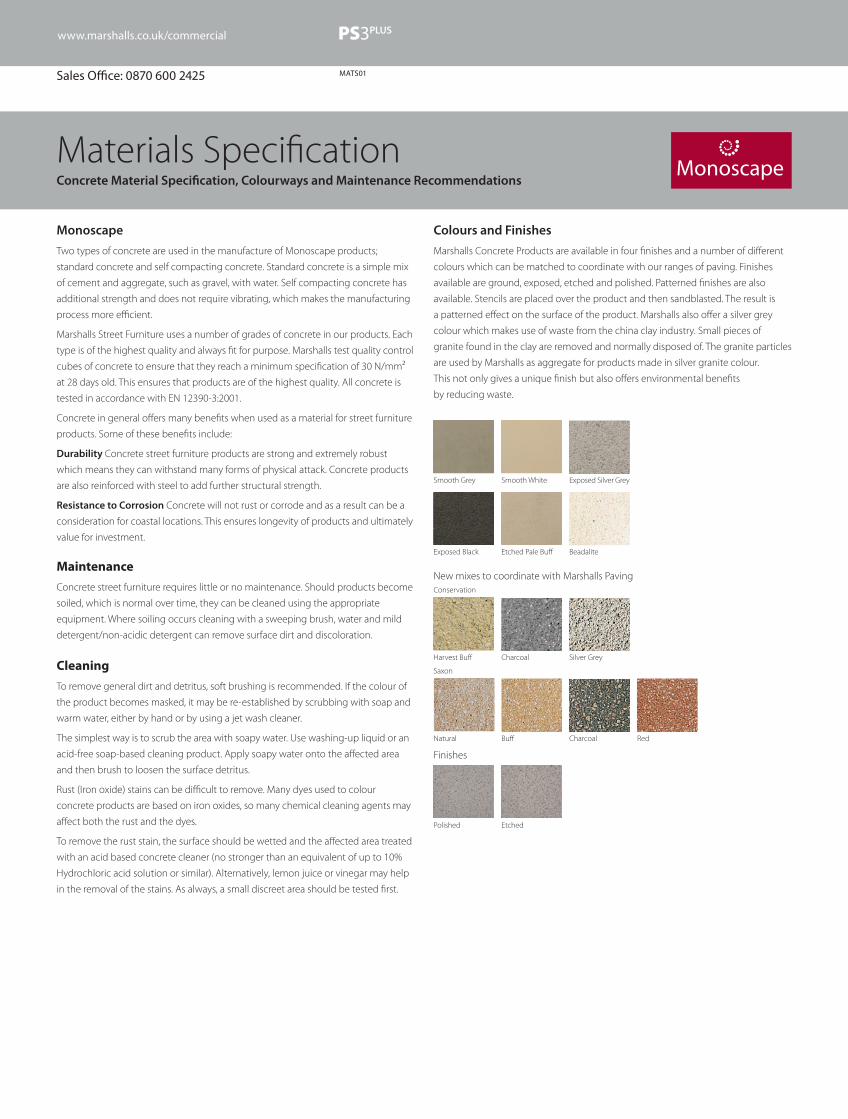
Colours and Finishes
Marshalls Concrete Products are available in four finishes and a number of different
colours which can be matched to coordinate with our ranges of paving. Finishes
available are ground, exposed, etched and polished. Patterned finishes are also
available. Stencils are placed over the product and then sandblasted. The result is
a patterned effect on the surface of the product. Marshalls also offer a silver grey
colour which makes use of waste from the china clay industry. Small pieces of
granite found in the clay are removed and normally disposed of. The granite particles
are used by Marshalls as aggregate for products made in silver granite colour.
This not only gives a unique finish but also offers environmental benefits
by reducing waste.
Monoscape
Two types of concrete are used in the manufacture of Monoscape products;
standard concrete and self compacting concrete. Standard concrete is a simple mix
of cement and aggregate, such as gravel, with water. Self compacting concrete has
additional strength and does not require vibrating, which makes the manufacturing
process more efficient.
Marshalls Street Furniture uses a number of grades of concrete in our products. Each
type is of the highest quality and always fit for purpose. Marshalls test quality control
cubes of concrete to ensure that they reach a minimum specification of 30 N/mm²
at 28 days old. This ensures that products are of the highest quality. All concrete is
tested in accordance with EN 12390-3:2001.
Concrete in general offers many benefits when used as a material for street furniture
products. Some of these benefits include:
Durability Concrete street furniture products are strong and extremely robust
which means they can withstand many forms of physical attack. Concrete products
are also reinforced with steel to add further structural strength.
Resistance to Corrosion Concrete will not rust or corrode and as a result can be a
consideration for coastal locations. This ensures longevity of products and ultimately
value for investment.
Smooth Grey
Conservation
Smooth White Exposed Silver Grey
Harvest Buff Charcoal
New mixes to coordinate with Marshalls Paving
Exposed Black Etched Pale Buff Beadalite
Silver Grey
Saxon
Natural Buff Charcoal Red
Polished
Finishes
Etched
Maintenance
Concrete street furniture requires little or no maintenance. Should products become
soiled, which is normal over time, they can be cleaned using the appropriate
equipment. Where soiling occurs cleaning with a sweeping brush, water and mild
detergent/non-acidic detergent can remove surface dirt and discoloration.
Cleaning
To remove general dirt and detritus, soft brushing is recommended. If the colour of
the product becomes masked, it may be re-established by scrubbing with soap and
warm water, either by hand or by using a jet wash cleaner.
The simplest way is to scrub the area with soapy water. Use washing-up liquid or an
acid-free soap-based cleaning product. Apply soapy water onto the affected area
and then brush to loosen the surface detritus.
Rust (Iron oxide) stains can be difficult to remove. Many dyes used to colour
concrete products are based on iron oxides, so many chemical cleaning agents may
affect both the rust and the dyes.
To remove the rust stain, the surface should be wetted and the affected area treated
with an acid based concrete cleaner (no stronger than an equivalent of up to 10%
Hydrochloric acid solution or similar). Alternatively, lemon juice or vinegar may help
in the removal of the stains. As always, a small discreet area should be tested first.
MATS01Sales Office: 0870 600 2425
www.marshalls.co.uk/commercial

Materials SpecificationConcrete Material Specification, Colourways and Maintenance Recommendations
Precious Stone
Bellitalia also offer a range of polished products in which pieces of marble aggregate
are added to the pozzolanic mix to create a unique aesthetic. This is then put
through a unique polishing process before being coated in a clear varnish to give a
fine, lustrous, polished finish.
Colours
Precious Stone products are available in seven different colours.
Bellitalia Concrete Products
Bellitalia Concrete Products are manufactured using Pozzolanic concrete. Pozzolanic
concrete contains pozzolans which are siliceous and aluminous materials with
little or no cementing properties. When added to cement, pozzolans will, in the
presence of moisture, react with calcium hydroxide at normal temperatures to form
a compound with cementitious properties. Commonly used pozzolans are fly ash
and volcanic ash.
Pozzolanic concrete offers the following benefits when used in street furniture
applications:
Increased Strength As concrete cures free lime is formed, with pozzolanic filler
in the concrete the resultant reaction, when water is present, will fill the voids in the
concrete. The pozzolanic reaction will occur whilst the concrete is still plastic thus
preventing any expansive failure. The benefit of this is a more durable and stronger
concrete.
Increased Durability The reduced volume of pores in pozzolanic concrete help to
prevent the ingress of waterborne chemicals such as sulphates and chlorides. This
reduces the risk of failure from ground sulphates, acids and sea water, making these
products suitable for use in all environments.
Colours
Concrete products are available in two colours, silver grey and dark grey as standard.
Black is available as a special order.
Rosso Bianco Giallo Veneziano Verde
Nero Porfido
MATS01Sales Office: 0870 600 2425
www.marshalls.co.uk/commercial
Maintenance
Concrete street furniture requires little or no maintenance. Should products become
soiled, which is normal over time, they can be cleaned using the appropriate
equipment. Where soiling occurs cleaning with a sweeping brush, water and mild
detergent/non-acidic detergent can remove surface dirt and discoloration.
Materials SpecificationNatural Stone Material Specification, Colourways and Maintenance Recommendations
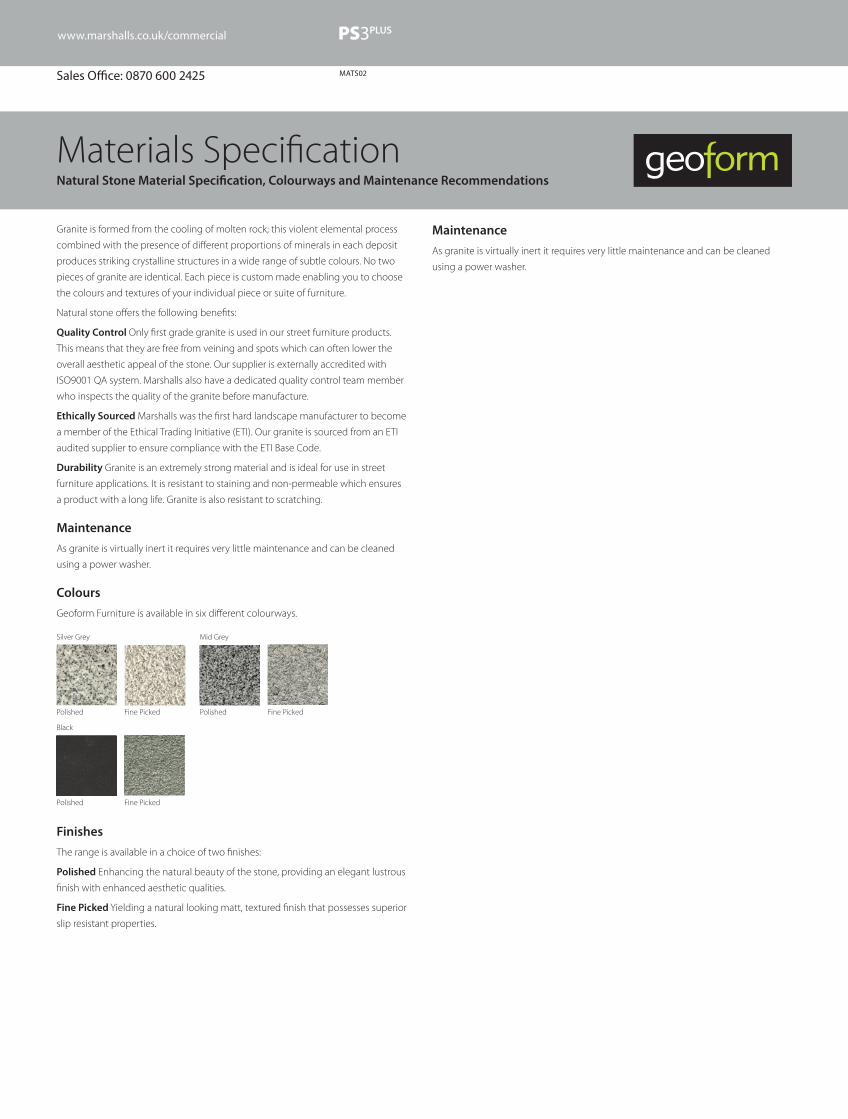
Finishes
The range is available in a choice of two finishes:
Polished Enhancing the natural beauty of the stone, providing an elegant lustrous
finish with enhanced aesthetic qualities.
Fine Picked Yielding a natural looking matt, textured finish that possesses superior
slip resistant properties.
Granite is formed from the cooling of molten rock; this violent elemental process
combined with the presence of different proportions of minerals in each deposit
produces striking crystalline structures in a wide range of subtle colours. No two
pieces of granite are identical. Each piece is custom made enabling you to choose
the colours and textures of your individual piece or suite of furniture.
Natural stone offers the following benefits:
Quality Control Only first grade granite is used in our street furniture products.
This means that they are free from veining and spots which can often lower the
overall aesthetic appeal of the stone. Our supplier is externally accredited with
ISO9001 QA system. Marshalls also have a dedicated quality control team member
who inspects the quality of the granite before manufacture.
Ethically Sourced Marshalls was the first hard landscape manufacturer to become
a member of the Ethical Trading Initiative (ETI). Our granite is sourced from an ETI
audited supplier to ensure compliance with the ETI Base Code.
Durability Granite is an extremely strong material and is ideal for use in street
furniture applications. It is resistant to staining and non-permeable which ensures
a product with a long life. Granite is also resistant to scratching.
Maintenance
As granite is virtually inert it requires very little maintenance and can be cleaned
using a power washer.
Colours
Geoform Furniture is available in six different colourways.
Polished
Silver Grey Mid Grey
Black
Fine Picked Polished Fine Picked
Polished Fine Picked
MATS02Sales Office: 0870 600 2425
www.marshalls.co.uk/commercial
Maintenance
As granite is virtually inert it requires very little maintenance and can be cleaned
using a power washer.
Materials SpecificationCast Iron and Aluminium Material Specifications, Colourways and Maintenance Recommendations
The two most common forms of iron used today are grey iron, commonly known
as cast iron, and ductile iron. Marshalls Street Furniture uses only ductile iron in
its cast iron products. The main difference between the two types of iron is their
chemical make-up. Grey iron is made up of elongated flakes of graphite whereas
ductile iron has spherical graphite particles. During the manufacturing process of
ductile iron graphite is formed, this solidifies and causes an internal expansion.
This eliminates defects caused by shrinkage that other cast iron types are prone to,
and gives ductile iron an increased strength to weight ratio when compared with
grey iron. Ductile iron is therefore less prone to fracturing in usage. Ductile iron also
uses less energy and resources in its manufacture; it may be cast either without the
use of additional feeders or with a smaller quantity than those used for other types
of iron. This reduced requirement for feed metal increases the productivity of ductile
iron and reduces its material and energy requirements. All Marshalls Street Furniture
cast iron products are manufactured to BS EN 1563:1997.
The main benefits of using ductile iron are as follows:
Durability Cracking is eliminated due to the spherical formation of the graphite
particles, increasing the ductility of the iron, and making it less brittle.
Greater Impact Resistance Due to the extra strength and ductility of cast iron,
when compared to grey iron, it has a higher resistance to impact. This makes ductile
cast iron an ideal material for bollards as they will not fracture on impact.
Corrosion Resistance Ductile iron offers greater corrosion resistance when
compared with grey iron. Also, each piece of street furniture is protected against
rust with a rust inhibited primer before being painted with a gloss paint finish.
This ensures longevity of the product.
Aluminium
Marshalls Street Furniture also use cast aluminium in some of its products. Cast
aluminium has similar properties to cast iron such as durability and high impact
resistance. However it is much lighter, this is particularly useful for demountable
bollards. Cast aluminium will not rust and as a result requires less maintenance
when compared with cast iron.
Anodised Aluminium Cleaning
For general cleaning of anodised aluminium, warm water with a mild soap solution
should be used. The solution should be free from fluorides, chlorides and sulphates.
It should also be non-toxic and should have a pH within 5-8.
More difficult grime deposits may require the use of a mild abrasive such as pumice
powder and water. Where greasy deposits are concerned, cleaning may require a
soft cloth dipped in white spirits. A Sandflex 240 grit rubbing block can also be used
in movements along the grain for ground in dirt.
It is necessary to thoroughly rinse with water after cleaning especially where crevices
are present to ensure removal of all residues.
Painted Aluminium Cleaning
Use a clean, damp cloth with warm soapy water only. Scourers and abrasive cleaners
are not suitable for this type of finish and will damage the paint.
Before using cleaning agents to remove graffiti, consult Woodhouse for detailed
information. Try only a small or inconspicuous area first to avoid causing more
unsightly damage.
Anodised Aluminium Repairing
Analok anodised surfaces are harder than a painted surface. In the event that the
product becomes damaged (e.g. scratched), the anodising cannot be repaired but
the scratch will eventually oxidise, mostly blending in with the surrounding finish.
Light scratches on Analok and standard anodised surfaces can be removed using
Sandflex rubbing blocks, though this may brighten the finish locally – as with all
attempted repairs, we advise that repairs are trialed on an inconspicuous area first.
Painted Aluminium Repairing
Paint application to follow approved methods as detailed by paint supplier. For
handling and storage instructions, please refer to paint manufacturer or supplier.
Detail specifications may change over a period of time and is therefore advisable to
consult the relevant paint supplier before commencing any work. Please note that
it is advisable to use professional painters to achieve the best results when touching
up large areas.
1. Abrade area of damage using 240 Brush Grit grade sandpaper ensuring even
abrasion around the edges of the damaged areas.
2. Apply brush on primer available from local wholesaler. Allow primer to dry
thoroughly before applying topcoat.
3. Apply aerosol topcoat while following manufacturers instructions for even
application.
For areas of large damage or dents, fill the area with suitable polyester filler such as
Supatex (or similar), abrade to a level equivalent to the surrounding area and follow
the method statement
MATS03Sales Office: 0870 600 2425
www.marshalls.co.uk/commercial
Materials SpecificationStainless Steel Material Specification and Maintenance Recommendations
www.marshalls.co.uk/commercial
Cleaning and Maintenance
Stainless steel requires relatively low maintenance. However its corrosion resistant
and aesthetic properties can be compromised if its surface is not kept clean. Regular
cleaning schedules will enhance the performance of the product and result in a
long service life.
Surface contamination is the main cause of staining. This can be down to minute
particles of detritus or iron settling on the surface of the steel during installation.
Common problems occur when iron particles from the surrounding environment,
for example stone cutting equipment, gather on the surface of the metal. These
particles then rust and give the appearance of staining. In addition, naturally
occurring atmospheric conditions can produce deposits which may be corrosive,
e.g. salt deposits from marine atmospheres, or highway gritting in winter.
The cleaning frequency is dependent on the application, however cleaning is
recommended when the metal is soiled. In doing so, the original appearance can
be restored.
Stainless steel is very easy to clean. Washing with soap or mild detergent and warm
water followed by a clear water rinse is usually adequate. Where stainless steel has
become extremely dirty alternative methods of cleaning can be used, as shown in
the table.
Marshalls Street Furniture offer a stainless steel cleaning pack, for further information
contact our Sales Order Office.
Grades of Stainless Steel
Stainless steel from the Austenitic range are selected for use in street furniture
fabrication. There are two main grades of Austenitic stainless steel used in our street
furniture; grades 304 (1.4301 EN classification) and 316 (1.4401 EN classification).
Each grade of stainless steel is suited to different locations. Grade 316 (1.4401) is
suited to all areas, especially marine locations where high sodium chloride levels in
the air can degrade other types of stainless steel. Grade 304 (1.4301) is more suited
to urban locations where there is less risk of sodium chlorides contaminating the
surface of the steel. Our products are of the highest quality and will perform their
purpose whilst remaining aesthetically pleasing throughout their lifetime provided
the correct grade of stainless steel is specified and maintenance is carried out when
necessary.
The main differences between the two grades are as follows:
• Grade316(1.4401)hasagreaterchromiumandnickelcontentandincludes
molybdenum. This increases its corrosion resistant properties and makes it
less susceptible, when compared to grade 304 (1.4301), to surface pitting and
staining.
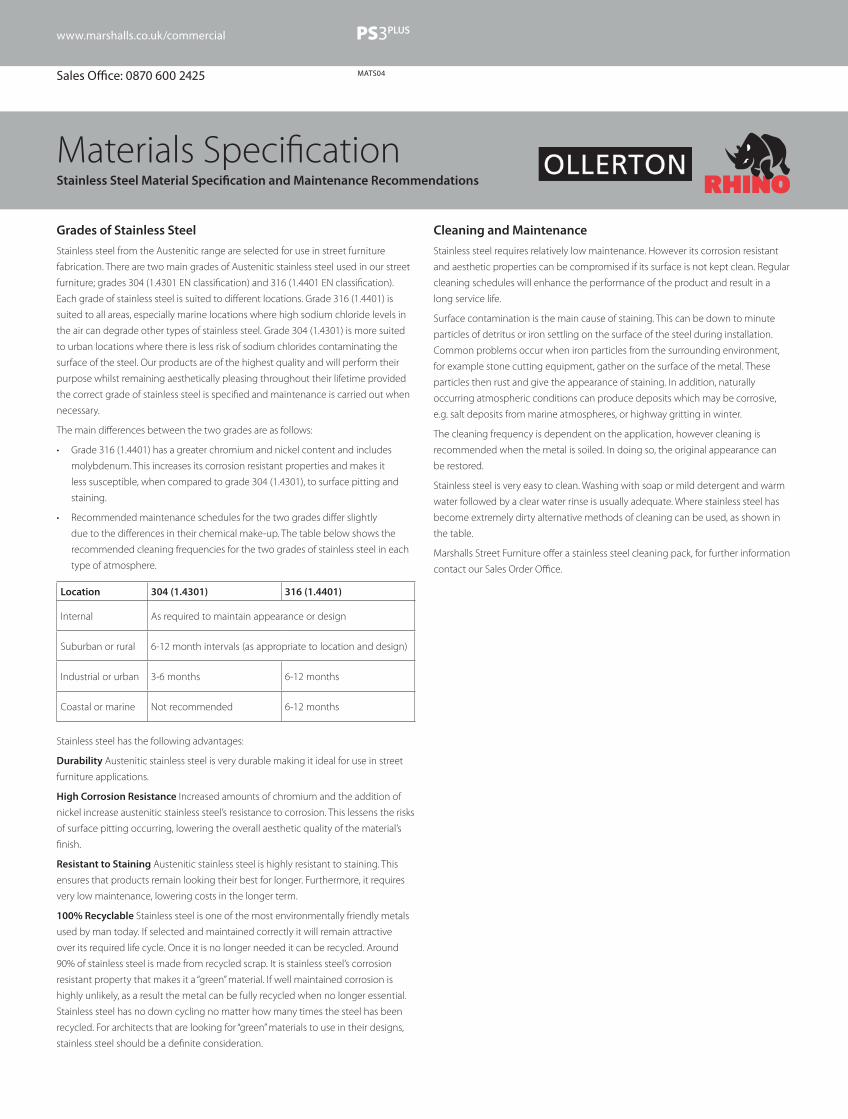
• Recommendedmaintenanceschedulesforthetwogradesdifferslightly
due to the differences in their chemical make-up. The table below shows the
recommended cleaning frequencies for the two grades of stainless steel in each
type of atmosphere.
Location 304 (1.4301) 316 (1.4401)
Internal As required to maintain appearance or design
Suburban or rural 6-12 month intervals (as appropriate to location and design)
Industrial or urban 3-6 months 6-12 months
Coastal or marine Not recommended 6-12 months
Stainless steel has the following advantages:
Durability Austenitic stainless steel is very durable making it ideal for use in street
furniture applications.
High Corrosion Resistance Increased amounts of chromium and the addition of
nickel increase austenitic stainless steel’s resistance to corrosion. This lessens the risks
of surface pitting occurring, lowering the overall aesthetic quality of the material’s
finish.
Resistant to Staining Austenitic stainless steel is highly resistant to staining. This
ensures that products remain looking their best for longer. Furthermore, it requires
very low maintenance, lowering costs in the longer term.
100% Recyclable Stainless steel is one of the most environmentally friendly metals
used by man today. If selected and maintained correctly it will remain attractive
over its required life cycle. Once it is no longer needed it can be recycled. Around
90% of stainless steel is made from recycled scrap. It is stainless steel’s corrosion
resistant property that makes it a “green” material. If well maintained corrosion is
highly unlikely, as a result the metal can be fully recycled when no longer essential.
Stainless steel has no down cycling no matter how many times the steel has been
recycled. For architects that are looking for “green” materials to use in their designs,
stainless steel should be a definite consideration.
MATS04Sales Office: 0870 600 2425
Materials SpecificationStainless Steel Material Specification and Maintenance Recommendations
www.marshalls.co.uk/commercial
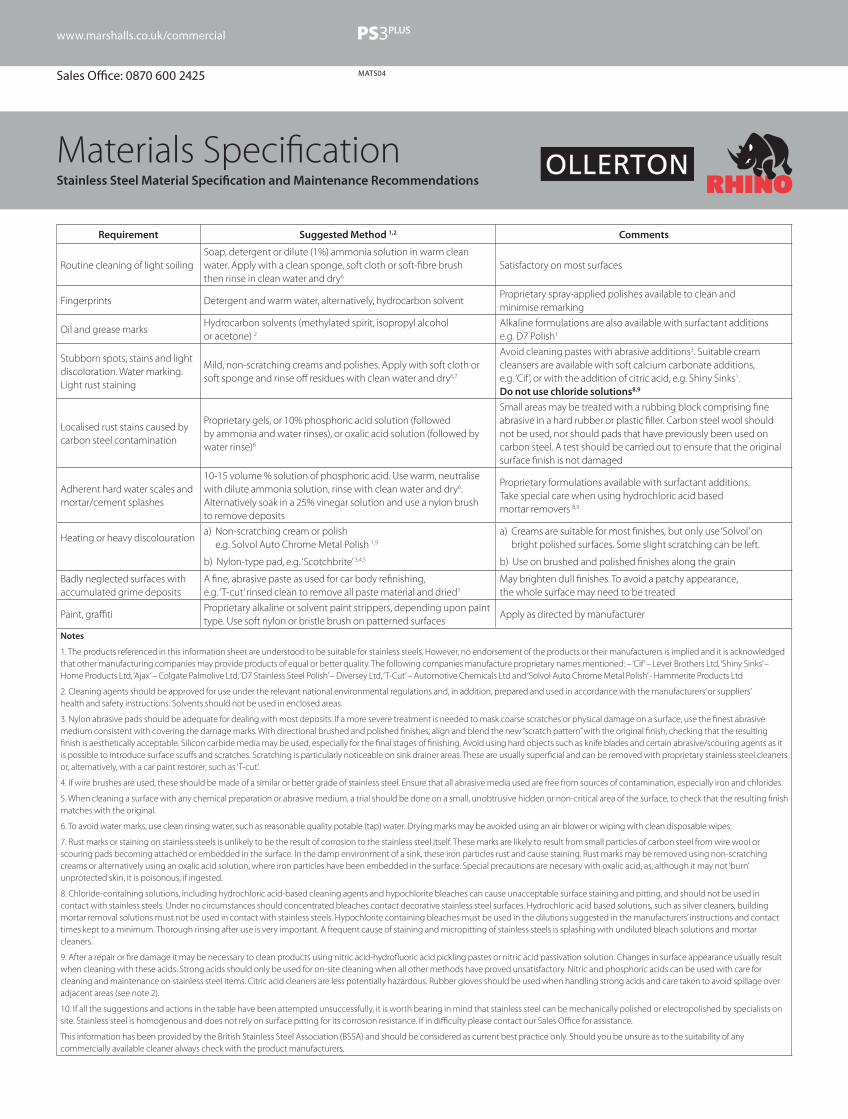
Requirement Suggested Method 1,2 Comments
Routine cleaning of light soilingSoap, detergent or dilute (1%) ammonia solution in warm clean water. Apply with a clean sponge, soft cloth or soft-fibre brush then rinse in clean water and dry6
Satisfactory on most surfaces
Fingerprints Detergent and warm water, alternatively, hydrocarbon solventProprietary spray-applied polishes available to clean and minimise remarking
Oil and grease marksHydrocarbon solvents (methylated spirit, isopropyl alcohol or acetone) 2
Alkaline formulations are also available with surfactant additions e.g. D7 Polish1
Stubborn spots, stains and light discoloration. Water marking. Light rust staining
Mild, non-scratching creams and polishes. Apply with soft cloth or soft sponge and rinse off residues with clean water and dry6,7
Avoid cleaning pastes with abrasive additions3. Suitable cream cleansers are available with soft calcium carbonate additions, e.g. ‘Cif’, or with the addition of citric acid, e.g. Shiny Sinks1. Do not use chloride solutions8,9
Localised rust stains caused by carbon steel contamination
Proprietary gels, or 10% phosphoric acid solution (followed by ammonia and water rinses), or oxalic acid solution (followed by water rinse)6
Small areas may be treated with a rubbing block comprising fine abrasive in a hard rubber or plastic filler. Carbon steel wool should not be used, nor should pads that have previously been used on carbon steel. A test should be carried out to ensure that the original surface finish is not damaged
Adherent hard water scales and mortar/cement splashes
10-15 volume % solution of phosphoric acid. Use warm, neutralise with dilute ammonia solution, rinse with clean water and dry6. Alternatively soak in a 25% vinegar solution and use a nylon brush to remove deposits
Proprietary formulations available with surfactant additions. Take special care when using hydrochloric acid based mortar removers 8,9
Heating or heavy discolourationa) Non-scratching cream or polish
e.g. Solvol Auto Chrome Metal Polish 1,9
a) Creams are suitable for most finishes, but only use ‘Solvol’ on bright polished surfaces. Some slight scratching can be left.
b) Nylon-type pad, e.g. ‘Scotchbrite’ 3,4,5 b) Use on brushed and polished finishes along the grain
Badly neglected surfaces with accumulated grime deposits
A fine, abrasive paste as used for car body refinishing, e.g. ‘T-cut’ rinsed clean to remove all paste material and dried1
May brighten dull finishes. To avoid a patchy appearance, the whole surface may need to be treated
Paint, graffitiProprietary alkaline or solvent paint strippers, depending upon paint type. Use soft nylon or bristle brush on patterned surfaces
Apply as directed by manufacturer
Notes
1. The products referenced in this information sheet are understood to be suitable for stainless steels. However, no endorsement of the products or their manufacturers is implied and it is acknowledged that other manufacturing companies may provide products of equal or better quality. The following companies manufacture proprietary names mentioned: – ‘Cif’ – Lever Brothers Ltd, ‘Shiny Sinks’ – Home Products Ltd, ‘Ajax’ – Colgate Palmolive Ltd, ‘D7 Stainless Steel Polish’ – Diversey Ltd, ‘T-Cut’ – Automotive Chemicals Ltd and ‘Solvol Auto Chrome Metal Polish’ - Hammerite Products Ltd
2. Cleaning agents should be approved for use under the relevant national environmental regulations and, in addition, prepared and used in accordance with the manufacturers’ or suppliers’ health and safety instructions. Solvents should not be used in enclosed areas.
3. Nylon abrasive pads should be adequate for dealing with most deposits. If a more severe treatment is needed to mask coarse scratches or physical damage on a surface, use the finest abrasive medium consistent with covering the damage marks. With directional brushed and polished finishes, align and blend the new “scratch pattern” with the original finish, checking that the resulting finish is aesthetically acceptable. Silicon carbide media may be used, especially for the final stages of finishing. Avoid using hard objects such as knife blades and certain abrasive/scouring agents as it is possible to introduce surface scuffs and scratches. Scratching is particularly noticeable on sink drainer areas. These are usually superficial and can be removed with proprietary stainless steel cleaners or, alternatively, with a car paint restorer, such as ‘T-cut’.
4. If wire brushes are used, these should be made of a similar or better grade of stainless steel. Ensure that all abrasive media used are free from sources of contamination, especially iron and chlorides.
5. When cleaning a surface with any chemical preparation or abrasive medium, a trial should be done on a small, unobtrusive hidden or non-critical area of the surface, to check that the resulting finish matches with the original.
6. To avoid water marks, use clean rinsing water, such as reasonable quality potable (tap) water. Drying marks may be avoided using an air blower or wiping with clean disposable wipes.
7. Rust marks or staining on stainless steels is unlikely to be the result of corrosion to the stainless steel itself. These marks are likely to result from small particles of carbon steel from wire wool or scouring pads becoming attached or embedded in the surface. In the damp environment of a sink, these iron particles rust and cause staining. Rust marks may be removed using non-scratching creams or alternatively using an oxalic acid solution, where iron particles have been embedded in the surface. Special precautions are necesary with oxalic acid, as, although it may not ‘burn’ unprotected skin, it is poisonous, if ingested.
8. Chloride-containing solutions, including hydrochloric acid-based cleaning agents and hypochlorite bleaches can cause unacceptable surface staining and pitting, and should not be used in contact with stainless steels. Under no circumstances should concentrated bleaches contact decorative stainless steel surfaces. Hydrochloric acid based solutions, such as silver cleaners, building mortar removal solutions must not be used in contact with stainless steels. Hypochlorite containing bleaches must be used in the dilutions suggested in the manufacturers’ instructions and contact times kept to a minimum. Thorough rinsing after use is very important. A frequent cause of staining and micropitting of stainless steels is splashing with undiluted bleach solutions and mortar cleaners.
9. After a repair or fire damage it may be necessary to clean products using nitric acid-hydrofluoric acid pickling pastes or nitric acid passivation solution. Changes in surface appearance usually result when cleaning with these acids. Strong acids should only be used for on-site cleaning when all other methods have proved unsatisfactory. Nitric and phosphoric acids can be used with care for cleaning and maintenance on stainless steel items. Citric acid cleaners are less potentially hazardous. Rubber gloves should be used when handling strong acids and care taken to avoid spillage over adjacent areas (see note 2).
10. If all the suggestions and actions in the table have been attempted unsuccessfully, it is worth bearing in mind that stainless steel can be mechanically polished or electropolished by specialists on site. Stainless steel is homogenous and does not rely on surface pitting for its corrosion resistance. If in difficulty please contact our Sales Office for assistance.
This information has been provided by the British Stainless Steel Association (BSSA) and should be considered as current best practice only. Should you be unsure as to the suitability of any commercially available cleaner always check with the product manufacturers.
MATS04Sales Office: 0870 600 2425
Materials SpecificationSteel Material Specification, Colourways and Maintenance Recommendations
• AjaxCream
• LiquidGumption
• Flashinwater
• AjaxLiquidinwaterWhiletestsshowthatproductsofthistypemaybeusedto
successfully remove heavy surface deposits, extra care must be taken to avoid
any scuffing of the powder coating film.
It is recommended that in all cases, such products are reserved for heavy soiled
coatings only. Cleaning products should be tested on a small area first to assess their
efficiency. After application all detergents and cleaners must be thoroughly rinsed
away with clean water, ensuring there is no risk of pollution to the surrounding area.
The information contained should be considered as best practice only. Should you
be unsure as to the suitability of any commercially available cleaner always check
Carbon steel or mild steel as it is more commonly known is a highly functional
material when used in street furniture applications. It can withstand high impacts
which is particularly useful when used as a bollard material. The main features and
benefits of steel are as follows:
Durability Steel is an exceptionally strong material and has a high strength to
weight ratio. This makes it an ideal material for use in street furniture applications as
it can withstand high impact without becoming severely damaged.
Resistance to Corrosion All our steel products are hot dip galvanised to coat
them in a 40-60 micron zinc covering. Hot dipping is a process whereby the steel is
submerged in a bath of molten zinc for around 4-5 minutes. This forms a thin layer
of zinc which helps protect the steel from corrosion. The process complies with the
BS EN ISO 1461 standard for hot dip galvanised coatings on fabricated iron and steel.
In addition to galvanising, polyester powder coating increases steel’s weathering
characteristics making it even more resistant to corrosion.
Resistant to Chips and Abrasions In addition to the galvanising process, some
steel products have a polyester powder coating. Polyester powder has excellent
colour and gloss retention in outdoor exposure. It also has good wear resistant
properties which gives our products more resistance to chips and abrasions.
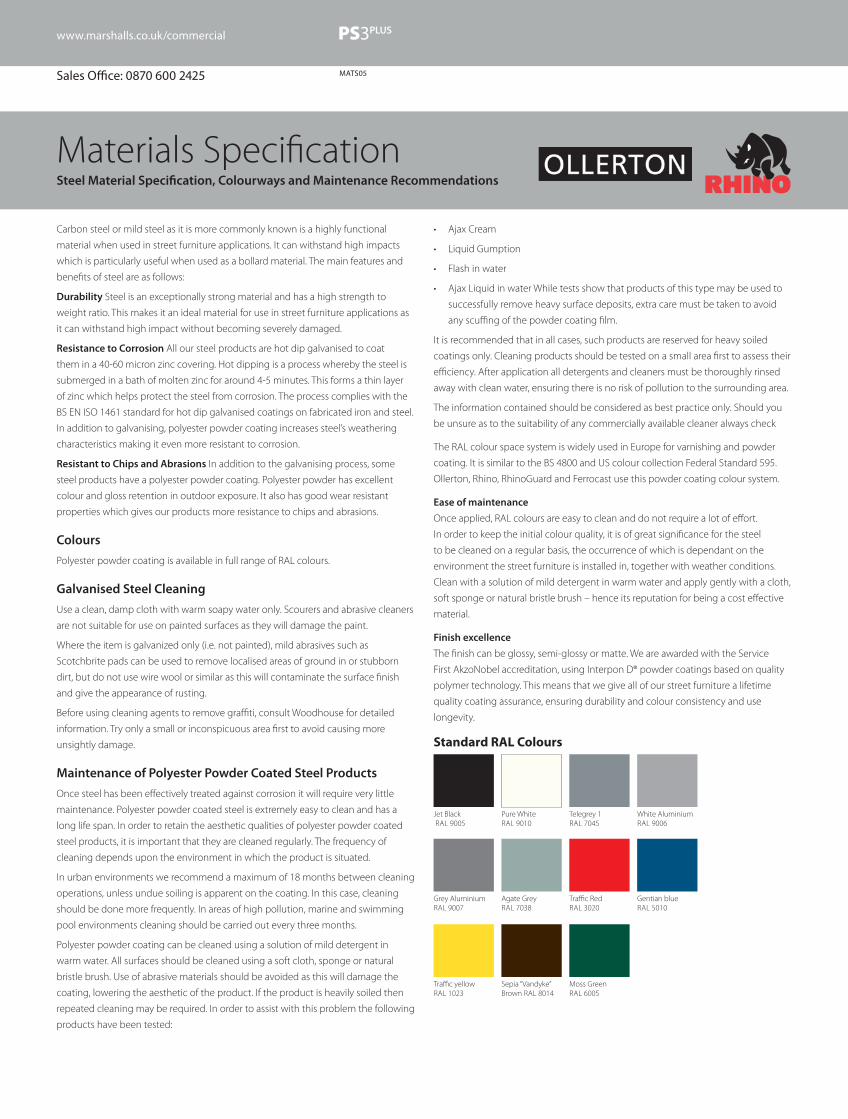
Colours
Polyester powder coating is available in full range of RAL colours.
Galvanised Steel Cleaning
Use a clean, damp cloth with warm soapy water only. Scourers and abrasive cleaners
are not suitable for use on painted surfaces as they will damage the paint.
Where the item is galvanized only (i.e. not painted), mild abrasives such as
Scotchbrite pads can be used to remove localised areas of ground in or stubborn
dirt, but do not use wire wool or similar as this will contaminate the surface finish
and give the appearance of rusting.
Before using cleaning agents to remove graffiti, consult Woodhouse for detailed
information. Try only a small or inconspicuous area first to avoid causing more
unsightly damage.
Maintenance of Polyester Powder Coated Steel Products
Once steel has been effectively treated against corrosion it will require very little
maintenance. Polyester powder coated steel is extremely easy to clean and has a
long life span. In order to retain the aesthetic qualities of polyester powder coated
steel products, it is important that they are cleaned regularly. The frequency of
cleaning depends upon the environment in which the product is situated.
In urban environments we recommend a maximum of 18 months between cleaning
operations, unless undue soiling is apparent on the coating. In this case, cleaning
should be done more frequently. In areas of high pollution, marine and swimming
pool environments cleaning should be carried out every three months.
Polyester powder coating can be cleaned using a solution of mild detergent in
warm water. All surfaces should be cleaned using a soft cloth, sponge or natural
bristle brush. Use of abrasive materials should be avoided as this will damage the
coating, lowering the aesthetic of the product. If the product is heavily soiled then
repeated cleaning may be required. In order to assist with this problem the following
products have been tested:
MATS05
Jet Black RAL 9005
Pure WhiteRAL 9010
Standard RAL Colours
Telegrey 1RAL 7045
White AluminiumRAL 9006
Grey AluminiumRAL 9007
Agate GreyRAL 7038
Traffic RedRAL 3020
Gentian blue RAL 5010
Traffic yellow RAL 1023
Sepia “Vandyke” Brown RAL 8014
Moss GreenRAL 6005
The RAL colour space system is widely used in Europe for varnishing and powder
coating. It is similar to the BS 4800 and US colour collection Federal Standard 595.
Ollerton, Rhino, RhinoGuard and Ferrocast use this powder coating colour system.
Ease of maintenance
Once applied, RAL colours are easy to clean and do not require a lot of effort.
In order to keep the initial colour quality, it is of great significance for the steel
to be cleaned on a regular basis, the occurrence of which is dependant on the
environment the street furniture is installed in, together with weather conditions.
Clean with a solution of mild detergent in warm water and apply gently with a cloth,
soft sponge or natural bristle brush – hence its reputation for being a cost effective
material.
Finish excellence
The finish can be glossy, semi-glossy or matte. We are awarded with the Service
First AkzoNobel accreditation, using Interpon D® powder coatings based on quality
polymer technology. This means that we give all of our street furniture a lifetime
quality coating assurance, ensuring durability and colour consistency and use
longevity.
www.marshalls.co.uk/commercial
Sales Office: 0870 600 2425

Jet Black RAL 9005
Pure WhiteRAL 9010
Standard RAL Colours
Telegrey 1RAL 7045
White AluminiumRAL 9006
Grey AluminiumRAL 9007
Agate GreyRAL 7038
Traffic RedRAL 3020
Gentian blue RAL 5010
Traffic yellow RAL 1023
Sepia “Vandyke” Brown RAL 8014
Moss GreenRAL 6005
Materials SpecificationPolyurethane Materials Specification, Colourways and Maintenance Recommendations
Ferrocast® is created from a polyurethane compound which comprises two
components. When both parts are mixed together they create a thermal reaction,
known as polymerisation, which hardens the compound, creating a thermo set
material. The Ferrocast polyurethane compound can be cast into very complex
shapes, making Ferrocast extremely versatile. To increase the strength of some
Ferrocast products, they are set around a steel core.
The main benefits of Ferrocast are as follows:
Resistance to Corrosion As Ferrocast is a non-ferrous material it is completely
resistant to rust and corrosion. This makes Ferrocast an ideal material for use
in coastal areas where high saline content in the atmosphere can cause other
materials, such as cast iron, to corrode. Ferrocast is a highly suitable replacement for
degraded cast iron which is often used in post and rail systems in harbours.
High Abrasion and Chip Resistance The polyurethane cast product is coated with
a two part polymer paint which chemically bonds itself to the surface. This increases
resistance to chips and abrasions. Furthermore, the Ferrocast polyurethane is
pigmented to the same RAL colour as the polymer paint finish. This ensures that the
aesthetic of the product is not compromised should any damage occur to the paint.
Durability Ferrocast was developed for use in mining, quarrying and North Sea oil
industries. This means it can perform in the toughest of environments.
Non-Freezing Ferrocast will not freeze which makes it a suitable material with
which to coat rails with as it will not be cold to the touch. This contributes towards
some of the requirements for D.D.A. compliance for Post and Rail systems.
Versatility Ferrocast can be shaped into almost any style. A simple moulding
process is all that is required to create a finished product. Standard or bespoke
products can be easily made giving the designer absolute freedom in creating
whatever piece of street furniture they require. Fully coordinating ranges of bespoke
street furniture can also be created.
Reproductions Original cast iron street furniture which has become degraded can
be replicated easily, ensuring the landscape’s aesthetics are not affected.
Low Cost Tooling Tooling costs for bespoke items of street furniture can be
expensive. When compared with other processes, Ferrocast has low tooling costs
offering solutions for all budgets.
Colours
Ferrocast products can be supplied in most RAL colours and come with a range
of options including gold banding and ballotini rings.
MATS06
Maintenance
Due to its non-ferrous and high chip and abrasion resistant properties, Ferrocast
requires only minimal maintenance which means that life time costs of the product
are low. Generally, cleaning regimens can be infrequent if dirt and grime build up is
minimal. Products can be cleaned using a mild detergent, water and a soft cloth.
www.marshalls.co.uk/commercial
Sales Office: 0870 600 2425

Hardwood and Softwood used in Sineu Graff products is sourced exclusively from
sustainable plantation forests, some of which are certified by the FSC. Each type of
timber is rigorously checked at each stage of their transformation as they are put
through a process of drying, planing and machining before being treated prior to
final assembly.
Hardwood
Hardwood is Garapa timber from sustainable plantation forests, some of which is
processed and then treated with solvent free, natural coloured emulsion which
protects against ingress of water, fungus and insects. This is applied in two stages.
The first stage is a flow-coat application to 20 microns. The wood is then coated
using a fully automated electrostatic process to 100 microns. This not only protects
the hardwood but also gives a high quality finish. Various colours are available
depending on product type. Please refer to individual product pages for details.
Softwood
Softwood is a specially selected high quality timber from sustainable local sources
which are closely situated to Sineu Graff in the Alsace region of France. Softwood
is pressure treated and sealed with a ‘green tint’ protective stain which is free from
arsenic and chrome. Timber is immersed in a liquid preservative and placed in an
autoclave forcing the chemical deep into the wood fibres. This approach ensures
that the chemical makes it to the core of each piece of wood making it much more
effective than simply soaking the wood in a treatment chemical.
Cleaning
Slats should be cleaned with a stiff brush once per year, especially in more exposed
locations, in order to prevent a verdigris type build up on the timber surface. Ideally,
this should be completed in early spring following the winter months.
At the cleaning stage, all slats should be checked for splits and splinters. Any
splinters should be removed and the surface sanded with 100 grit sandpaper in
order to remove any uneven/sharp edges or surfaces.
After cleaning and removal of splinters as described above, if the slats have been
protected then they should be re-coated as required
Repairs
For light damage, please see section on general maintenance above.
In instances of heavy damage, the timber slat should be replaced. Please order
against the part number reference provided with this manual. A method statement
for this operation can be provided on request.
Sineu Graff uses mostly colours from the Metallic RAL colour space system with the
same properties as the classic ones.
The standard range of colours offered without any extra cost for each of the above
brands can be found below. It is recommended that colours are judged from actal
materials rather than photographic representations.
Marshalls offers all RAL and BS colours upon request with an additional charge
incurring.
We also offer a range of personalisation options, including corporate colouring and
branding.
For more information on the additional colour range and personalisation options
available, please contact the sales team office.
GREY 900 SABLE
GREEN 500SABLE
Sineu Graff Colours
BLUE 700 SABLE
BLACK 100 SABLE
Materials SpecificationSineu Graff Timber Material Specification
www.marshalls.co.uk/commercial
MATS07Sales Office: 0870 600 2425
Materials SpecificationMoulded Polyethylene Material Specification, Colourways and Maintenance Recommendations
www.marshalls.co.uk/commercial
MATS08
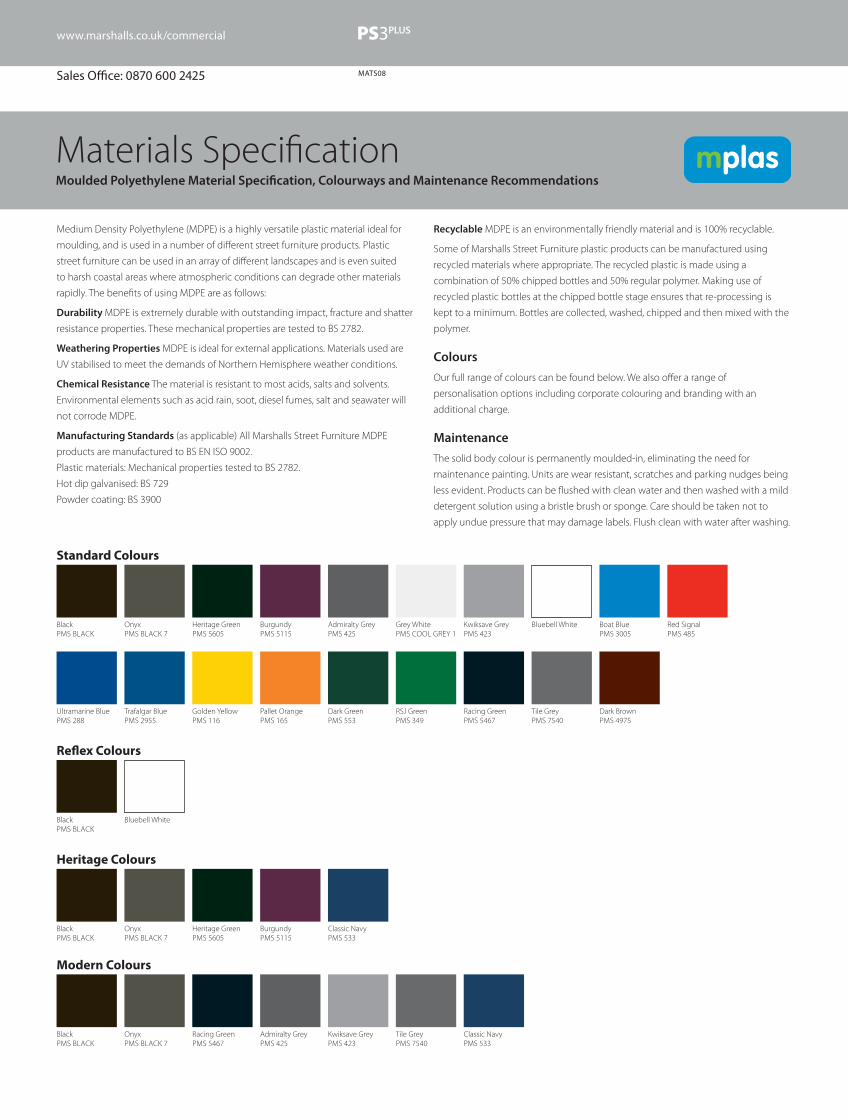
Medium Density Polyethylene (MDPE) is a highly versatile plastic material ideal for
moulding, and is used in a number of different street furniture products. Plastic
street furniture can be used in an array of different landscapes and is even suited
to harsh coastal areas where atmospheric conditions can degrade other materials
rapidly. The benefits of using MDPE are as follows:
Durability MDPE is extremely durable with outstanding impact, fracture and shatter
resistance properties. These mechanical properties are tested to BS 2782.
Weathering Properties MDPE is ideal for external applications. Materials used are
UV stabilised to meet the demands of Northern Hemisphere weather conditions.
Chemical Resistance The material is resistant to most acids, salts and solvents.
Environmental elements such as acid rain, soot, diesel fumes, salt and seawater will
not corrode MDPE.
Manufacturing Standards (as applicable) All Marshalls Street Furniture MDPE
products are manufactured to BS EN ISO 9002.
Plastic materials: Mechanical properties tested to BS 2782.
Hot dip galvanised: BS 729
Powder coating: BS 3900
Recyclable MDPE is an environmentally friendly material and is 100% recyclable.
Some of Marshalls Street Furniture plastic products can be manufactured using
recycled materials where appropriate. The recycled plastic is made using a
combination of 50% chipped bottles and 50% regular polymer. Making use of
recycled plastic bottles at the chipped bottle stage ensures that re-processing is
kept to a minimum. Bottles are collected, washed, chipped and then mixed with the
polymer.
Colours
Our full range of colours can be found below. We also offer a range of
personalisation options including corporate colouring and branding with an
additional charge.
Maintenance
The solid body colour is permanently moulded-in, eliminating the need for
maintenance painting. Units are wear resistant, scratches and parking nudges being
less evident. Products can be flushed with clean water and then washed with a mild
detergent solution using a bristle brush or sponge. Care should be taken not to
apply undue pressure that may damage labels. Flush clean with water after washing.
BlackPMS BLACK
OnyxPMS BLACK 7
Standard Colours
Heritage GreenPMS 5605
BurgundyPMS 5115
Admiralty GreyPMS 425
Grey WhitePMS COOL GREY 1
Kwiksave GreyPMS 423
Bluebell White
Boat BluePMS 3005
Red SignalPMS 485
Ultramarine BluePMS 288
Trafalgar BluePMS 2955
Golden YellowPMS 116
Pallet OrangePMS 165
Dark GreenPMS 553
RSJ GreenPMS 349
Racing GreenPMS 5467
Tile GreyPMS 7540
BlackPMS BLACK
Bluebell White
Reflex Colours
Dark BrownPMS 4975
BlackPMS BLACK
OnyxPMS BLACK 7
Heritage Colours
Heritage GreenPMS 5605
BurgundyPMS 5115
Classic NavyPMS 533
BlackPMS BLACK
OnyxPMS BLACK 7
Modern Colours
Racing GreenPMS 5467
Admiralty GreyPMS 425
Kwiksave GreyPMS 423
Tile GreyPMS 7540
Classic NavyPMS 533
Sales Office: 0870 600 2425

Materials SpecificationRecycled Plastic Composite Material Specification and Maintenance Recommendations
www.marshalls.co.uk/commercial
MATS09
Long Lifespan RP is impervious to water, insect and fungal ingress and as a result
will not rot. This ensures that the product has a long life and means that repair and
replacement costs can be kept to a minimum. Whole life costs of the RP products
can be up to a third of the costs of a traditional solution.
Consistent Quality As an extruded product, every piece of recycled plastic has
consistent characteristics unlike timber.
Environmentally Friendly Using RP in street furniture not only offers the customer
a low cost product but also helps to reduce the amount of plastic waste which goes
to landfill or incineration. Recycling a plastic bottle can conserve enough energy to
light a 60W bulb for up to 6 hours. As RP is used as replacement for timber, it also
reduces the amount of trees that need to be felled. Official figures state that for
every ton of recycled plastic used, 1.66 tons of CO2 output is saved.
100% Recyclable Each piece of RP street furniture can be completely recycled at
the end of its useful life.
Maintenance
No painting or treatment of the material is required, which not only minimises
general maintenance but also lowers costs and environmental impact. The surface
of the product can be wiped clean easily. Paint or marker pen can be easily removed
with thinners without damaging the product.
Mplas recycled plastic products are manufactured from waste material and are
therefore made from 100% recycled plastic. No paint, preservation or surface
treatments are added to the mix.
The manufacturing process starts with the arrival of plastic waste which comes in an
array of sizes and formats. Intruplas clean and granulate waste on site to make it easier
to handle. Different types of plastic are blended together to ensure the correct mix
is achieved. The mix is melted and this process, combined with the special blend of
plastics, creates a new material which has a high tensile strength making it ideal for
use in street furniture applications. The material is then extruded into profiles, each
one of which is hand-finished and assembled as required.
The main benefits of using RP in street furniture applications are as follows:
Durability RP is extremely strong meaning it can perform its purpose even in
the toughest of urban environments. Due to the robustness of the material it has
increased resistance to physical attack. Each piece of RP street furniture is free from
cracking and splintering and will not chip. This offers improved safety in public areas.
Sales Office: 0870 600 2425

Materials SpecificationFramework and Fixing
TECH01
Mild SteelWhen it comes to the framework, it is always important to use the right grade of raw
steel and specify the most appropriate treatment and finish in order to ensure the
strength, safety, functionality and also aesthetics of the canopy or walkway.
Carbon steel or mild steel as it is commonly known is a highly functional material
when used in street furniture and structure applications. It comes in many grades,
however Marshalls Urban Structures use a structural grade for external canopy
steelwork.
The benefits of using structural grade mild steel are:
Greater strength Structural mild steel is stronger than alternative grades of
mild steel.
Resistance to weld cracking Extreme changes in temperature, e.g. freezing to
warm, can cause cracks in welding making structures unsafe. Structural grade mild
steel has much higher resistance to weld cracking.
Resistance to embrittlement Extreme temperatures cause steel to become brittle.
Other grades are at more risk of this occurring due to their recycled steel content.
FinishingHot dip galvanising
Hot dip galvanizing by itself is a long lasting and cost effective means of protecting
steel from corrosion. When organic coatings such as paint or powder coatings
are applied over hot dip galvanised steel, the resulting combination is known as a
duplex coating. These coatings are used to add colour for aesthetic, camouflage,
or safety purposes, increase the economic life of a structure and provide additional
protection in aggressive environments. All products which are hot dip galvanised
conform to BS EN ISO 1461, standard for hot dip galvanised coatings on fabricated
iron and steel.
Zinc-rich primer
An alternative to galvanising is a zinc-based primer coating. This involves painting
the raw steel with a zinc-rich paint primer. The process cuts down on the cost of
galvanising whilst still providing adequate protection for the steel from corrosion.
Products are then powder coated in a colour of your choice.
Polyester Powder Coating
Once a product has been galvanised or zinc-rich primed it can be powder coated
to increase its aesthetic qualities. This involves spraying fine particles of coloured
polyester powder onto the galvanised/primed product. The powder is then heated
so that the particles melt and fuse together creating an even coat. Colour swatches
of all available colours can be found below.
Ten year warranty
Our ten year warranty covers products which have a zinc-rich primer and polyester
powder coated finish against rust and corrosion. In the event of a product rusting or
corroding within ten years from purchase, Marshalls Urban Structures will repair the
product coating on site, providing the following terms of the warranty are upheld, at
no cost to the customer.
1. Marshalls Urban Structures shall not incur any liability for the repair of the
product if damage to the coating system has arisen from causes beyond our
control such as but not limited to accidental damage, mechanical damage,
fire damage, malicious damage, pollution and abnormal weather conditions.
2. Product surfaces should be regularly maintained in accordance with Marshalls
recommended maintenance guidelines.
3. The warranty will only apply to products which are installed in the United
Kingdom and Eire.
4. All claims against this warranty must be submitted in writing and deemed
duly served three days after it has been sent by First Class registered post,
or immediately upon receipt if delivered by hand or properly sent by
facsimile transmission.
The warranty is granted to the customer alone and is non-transferable and
non-assignable in whole or in part.
Fixing DetailsMarshalls offer three types of fixing on our structures. Details of each type can be
found below.
Surface Fixed – Products are attached
directly to the surface of a suitable substrate,
for example concrete, with a positive bolting
system.
Base Plate Fixed – Similar to surface
mounting, however the base plate is attached
to concrete foundations up to 200mm below
final floor level. This allows surfacing materials,
such as paving, to be laid over the base plate,
creating a clean and tidy finish.
Root Fixed – The bases of the structure are
situated directly into an appropriate grade
concrete mix. Root depths vary depending
on which product is specified.
www.marshalls.co.uk/commercial
Sales Office: 0870 600 2425
Materials SpecificationCladding
www.marshalls.co.uk/commercial
TECH02
Polyethylene Terephthalate (PET)For non-industrial projects, the scope and potential of structural steel canopies
is being revolutionised by the introduction of a new derivative material called
Polyethylene Terephthalate – commonly known as PET. PET is a thermoplastic
polymer resin, which can be manufactured as a solid plastic sheet in transparent,
translucent or coloured form.
Marshalls offer PET in Clear, Opal or Smoked Grey colours.
It offers outstanding elasticity and thermoforming properties. It can be formed,
in warm and cold bending processes, without losing transparency or breaking –
making it ideal for architectural curved glazing structures.
Performance Benefits
Impact, fracture and shatter resistant – Unlike traditional Acrylic, PET sheets are
outstanding for their high resistance to shattering and stress cracking.
Scratch Resistance – The material also offers very good resistance to abrasions
and is suitable for bus and cycle shelters in inner cities where vandalism can be
prevalent.
Fire resistance – PET has a Y1 fire rating under BS 476: Part 7, any shelter made from
PET would resist accidental fire damage or attempted arson.
Corrosion and weathering – PET is ideal for canopies and walkways in coastal areas
and inner cities, due to its outstanding resistance to corrosion caused by atmospheric
pollution, acid rain, soot and diesel fumes, as well as salt air or sea water.
Easy to clean – Graffiti can be removed from shelters made from PET, using
acetone-free and benzene-free solvent cleaners or diluting agents. This does not
affect its performance or aesthetic properties.
Environmentally friendly – PET is the most environmentally friendly canopy material
as it does not contribute to the depletion of the ozone layer, but simply returns carbon
dioxide and water back into the atmosphere. It is also 100% recyclable.
Resistance to UV light – PET demonstrates high resistance to UV light, offering
protection from the effects of the sun.
Longevity and guarantees – PET comes with 5 or 10 year guarantees.
Cost effective – As PET is a derivative rather than an entirely new material, it is also a
highly cost-effective option for most architectural projects.
Toughened GlassToughened glass is made from annealed glass via a thermal tempering process. The
glass is placed onto a roller table, taking it through a furnace that heats it to above
its annealing point of about 600 °C. The glass is then rapidly cooled with forced
drafts of air while the inner portion of the glass remains free to flow for a short time.
Toughened glass is an extremely high quality product and has excellent aesthetic
qualities.
Polycarbonate
Polycarbonate can be easily worked, moulded, and thermoformed; as such, it is a
common choice for use as a glazing and cladding material. Polycarbonate has high
temperature resistant properties and a high resistance to impact. It also has better
light transmission characteristics than many kinds of glass which make it ideal for
use in glazing applications.
PlastisolPlastisol comprises steel coated with an alloy comprising of zinc and aluminium.
Plastisol roofing and cladding sheets are a highly durable option. It is mainly used
in industrial, agricultural and warehouse applications, where the emphasis is on
function and performance rather than aesthetic quality.
It is very strong and has a high resistance to damage. Both sides of the steel sheet
are coated which further enhances the product’s life. The steel sheet is flexible
allowing it to be formed around curved structures. The zinc and aluminium coating
increases Plastisol’s resistance to corrosion and ensures a guaranteed life of 15 years.
Sales Office: 0870 600 2425
www.marshalls.co.uk/commercial
Lift Out and Lockable Bollard Installation
1. Determine where the bollard is to be situated.
2. Check utilities/services drawings and perform a visual inspection to ensure there
are none in the area. This may also require scanning the location for live cabling.
3. Excavate a cube in the substrate according to the bollard’s specification.
For example, Lift Out and Lockable bollards require a cube no less than 400mm x
400mm, fixed on the post centre, by 400mm deep.
4. Where applicable, ensure the root cross bar is inserted through the core of
the socket.
5. Locate the socket centrally in the hole and fill with grade C30 concrete, medium
slump, including a rapid hardening agent if required.
6. Ensure the socket is vertical in all planes.
7. Reinstate any surface finishes disturbed by the bollard. Where necessary, rinse off
any residue concrete from base of bollard with a soft cloth and water, taking care
not to scratch the surface of the bollard.
8. Finish off top surface of in situ concrete to give a tight surface finish. Concrete
should be protected by polythene during the first 24-hours following installation.
This is particularly important during inclement and/or cold weather. Units should
not be used until the concrete has cured.
Base Plate Bollard Installation
Fix the post to a suitable homogeneous substrate using a suitable bolting system
used in accordance with the manufacturer’s instructions. If the base material is
concrete then a chemical or drop in type anchor may be suitable. Anchors such
as these are available through the local builder’s merchants or direct from the
manufacturer. Marshalls Street Furniture would be happy to assist in suitable bolt
selection if required.
Standard Ground (Root) Fixing Bollard Installation
Root depth varies across our range of static bollards from 200mm-500mm depending
on model. For details on root depths please refer to individual product pages.
1. Determine where the bollard is to be situated.
2. Check utilities/services drawings and perform a visual inspection to ensure there
are none in the area. This may also require scanning the location for live cabling.
3. Excavate a cube in the substrate according to the bollard’s specification. For
example, a bollard with a 300mm root depth will require a cube to be excavated
measuring 300mm x 300mm, fixed on the post centre, by 300mm deep.
4. Locate the bollard centrally into the hole and fill with grade C30 concrete,
medium slump, including a rapid hardening agent if required.
5. Ensure the bollard is vertical in all planes.
6. Reinstate any surface finishes disturbed by the bollard. Where necessary, rinse
off any concrete residue from the base of the bollard with a soft cloth and water,
taking care not to scratch the surface of the bollard.
7. Finish off top surface of in situ concrete to give a tight surface finish. Concrete
should be protected by polythene during the first 24-hours following installation.
This is particularly important during inclement and/or cold weather. Units should
not be used until the concrete has cured.
Anti-Ram Bollard Installation
1. Determine where the bollard is to be situated.
2. Check utilities/services drawings and perform a visual inspection to ensure there
are none in the area. This may also require scanning the location for live cabling.
3. Excavate a cube in the substrate according to the bollard’s specification.
For example, anti-ram bollards require a cube no less than 500mm x 500mm
fixed on the post centre, by 600mm deep.
4. Where applicable, ensure the root cross bar is inserted through the core.
5. Locate the bollard centrally into the hole and fill with grade C30 concrete,
medium slump, including a rapid hardening agent if required.
6. Ensure the bollard is vertical in all planes.
7. Where applicable, infill bollard with concrete and attach top T cap.*
8. Reinstate any surface finishes disturbed by the bollard. Where necessary, rinse
off any concrete residue from the base of the bollard with a soft cloth and water,
taking care not to scratch the surface of the bollard.
9. Finish off top surface of in situ concrete to give a tight surface finish. Concrete
should be protected by polythene during the first 24-hours following installation.
This is particularly important during inclement and/or cold weather. Units should
not be used until the concrete has cured.
* Only applicable for Reinforced Steel Bollards.
INST01
Installation DetailsBollards
Sales Office: 0870 600 2425
Rhino Telescopic Bollard Installation
1. Determine where the bollard is to be situated.
2. Check utilities/services drawings and perform a visual inspection to ensure there
are none in the area. This may also require scanning the location for live cabling.
3. Excavate a cube in the substrate approximately 300mm x 300mm and 200mm
deeper than the ground socket to be installed.
4. Put approximately 200mm of minimum 15mm clean loose stone into the hole
for drainage purposes.
5. Lower the ground socket into the hole and check the top of ground socket is
approximately 5mm above ground level.
6. Locate the ground socket centrally in the hole and ensure socket is vertical in
all planes.
7. Add approximately 200mm of clean loose stone.
8. Back fill the hole, tamping down until approximately 300mm from the surface.
9. Raise telescopic bollard and check for alignment (if more than one post is to
be installed).
10. Then fill the hole with grade C30 concrete, including a rapid hardening agent
and sulphate resisting cement as required, medium slump and smooth off the
area around the lid to allow fall away.
11. Lower the telescopic bollard into the ground socket. Please ensure the bollard
and lid are kept clear of debris during installation.
12. Finish off top surface of in situ concrete to give a tight surface finish. Concrete
should be protected by polythene during the first 24-hours following installation.
This is particularly important during inclement and/or cold weather. Units should
not be used until the concrete has cured.
Rhino Telescopic Bollard Operating Instructions
To Lock
1. Lift lid, draw up inner post to full extension. Rotate handle clockwise a quarter
turn. Press down push button lock.
To Unlock
1. Release push button lock with key.
2. Return key to original position by depressing slightly and remove key. Rotate
handle a quarter turn clockwise.
3. Lower the post slowly and in a controlled manner. Do not allow it to free-fall into
base.
4. To lock repeat step 1 from ‘To Lock’ instructions above.
Weekly Maintenance
1. Ensure sliding post is kept clean and free from debris.
2. Clean and lubricate lock using a lubricant similar to WD40.
3. Installations with high water tables or adverse conditions should be checked daily.
4. Always ensure that the cover plate is closed when bollard is not in use.
5. Clear any debris from around hinge and cover plate.
INST01
Installation DetailsBollards
www.marshalls.co.uk/commercial
Sales Office: 0870 600 2425
Installation DetailsSineu Graff Bollards
INST01
Sineu Graff Timber Bollards with Ground Anchor Fixing
1. Determine where the bollard is to be situated.
2. Check utilities/services drawings and perform a visual inspection to ensure there
are none in the area. This may also require scanning the location for live cabling.
3. Excavate a cube in the substrate measuring 350mm x 350mm, fixed on the post
centre, by 350mm deep.
4. Locate the ground anchor centrally in to the hole and fill with grade C30
concrete, medium slump, including a rapid hardening agent if required.
5. Ensure the post is vertical in all planes.
6. Reinstate any surface finishes disturbed by the bollard. Where necessary, rinse
off any concrete residue from the base of the bollard with a soft cloth and water,
taking care not to scratch the surface of the bollard.
7. Finish off top surface of in situ concrete to give a tight surface finish. Concrete
should be protected by polythene during the first 24-hours following installation.
This is particularly important during inclement and/or cold weather. Units should
not be used until the concrete has cured.
8. Attach the bollard to the ground anchor using two fixing bolts.
All necessary protective equipment is to be used during the installation process.
Care should be taken to avoid damage to surrounding areas.
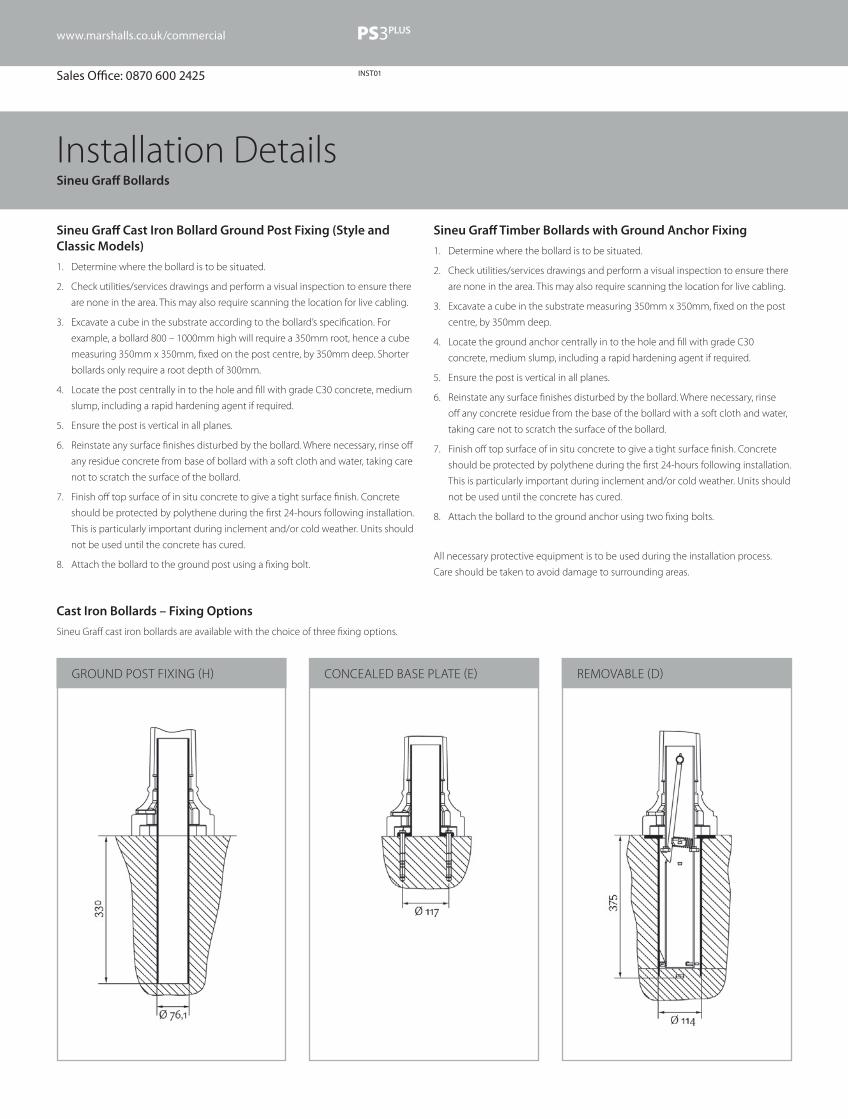
Sineu Graff Cast Iron Bollard Ground Post Fixing (Style and Classic Models)
1. Determine where the bollard is to be situated.
2. Check utilities/services drawings and perform a visual inspection to ensure there
are none in the area. This may also require scanning the location for live cabling.
3. Excavate a cube in the substrate according to the bollard’s specification. For
example, a bollard 800 – 1000mm high will require a 350mm root, hence a cube
measuring 350mm x 350mm, fixed on the post centre, by 350mm deep. Shorter
bollards only require a root depth of 300mm.
4. Locate the post centrally in to the hole and fill with grade C30 concrete, medium
slump, including a rapid hardening agent if required.
5. Ensure the post is vertical in all planes.
6. Reinstate any surface finishes disturbed by the bollard. Where necessary, rinse off
any residue concrete from base of bollard with a soft cloth and water, taking care
not to scratch the surface of the bollard.
7. Finish off top surface of in situ concrete to give a tight surface finish. Concrete
should be protected by polythene during the first 24-hours following installation.
This is particularly important during inclement and/or cold weather. Units should
not be used until the concrete has cured.
8. Attach the bollard to the ground post using a fixing bolt.
Cast Iron Bollards – Fixing Options
Sineu Graff cast iron bollards are available with the choice of three fixing options.
GROUND POST FIXING (H) CONCEALED BASE PLATE (E) REMOVABLE (D)
www.marshalls.co.uk/commercial
Sales Office: 0870 600 2425
Installation DetailsPlastic Bollards
www.marshalls.co.uk/commercial
INST01
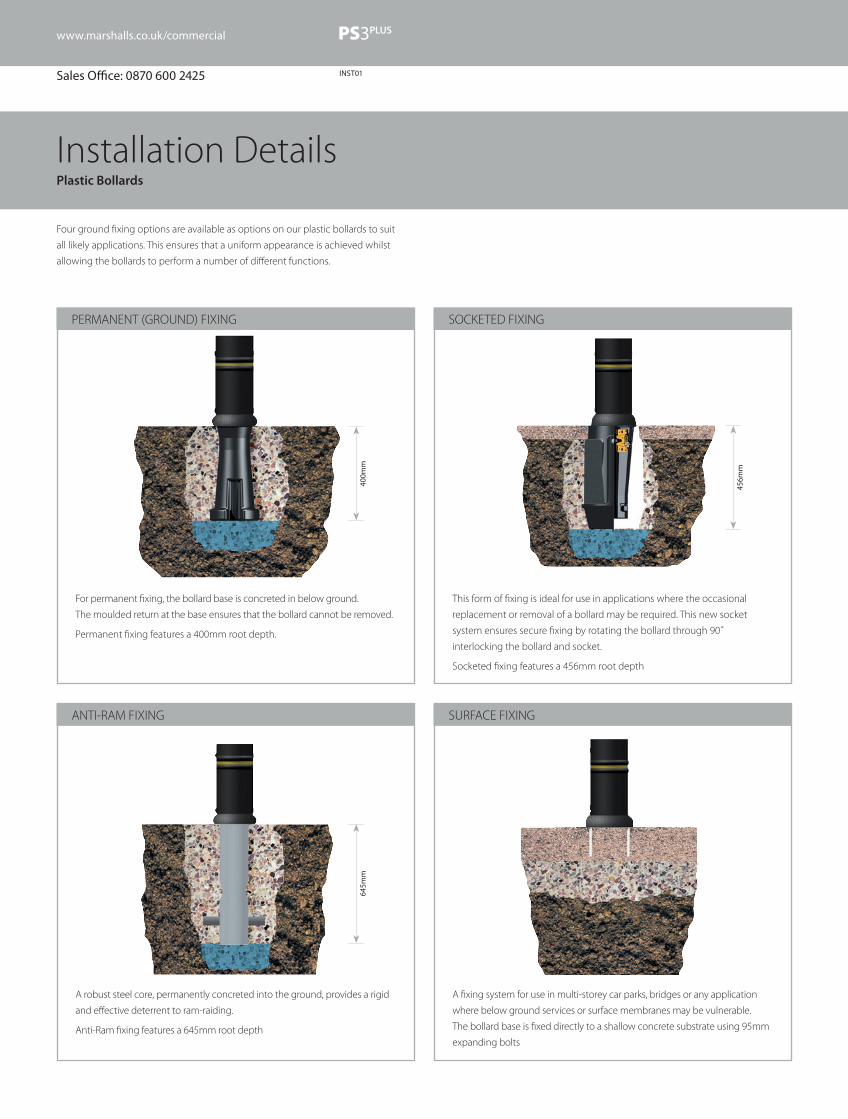
PERMANENT (GROUND) FIXING
Four ground fixing options are available as options on our plastic bollards to suit
all likely applications. This ensures that a uniform appearance is achieved whilst
allowing the bollards to perform a number of different functions.
400m
m
For permanent fixing, the bollard base is concreted in below ground.
The moulded return at the base ensures that the bollard cannot be removed.
Permanent fixing features a 400mm root depth.
ANTI-RAM FIXING
645m
m
A robust steel core, permanently concreted into the ground, provides a rigid
and effective deterrent to ram-raiding.
Anti-Ram fixing features a 645mm root depth
SURFACE FIXING
A fixing system for use in multi-storey car parks, bridges or any application
where below ground services or surface membranes may be vulnerable.
The bollard base is fixed directly to a shallow concrete substrate using 95mm
expanding bolts
SOCKETED FIXING
456m
m
This form of fixing is ideal for use in applications where the occasional
replacement or removal of a bollard may be required. This new socket
system ensures secure fixing by rotating the bollard through 90˚
interlocking the bollard and socket.
Socketed fixing features a 456mm root depth
Sales Office: 0870 600 2425

Installation DetailsSineu Graff Fixing Details
INST02
Litter Bin Fixing Details
Free standing
Generally the weight of the litter bin will deter unauthorised movement, for example
Bellitalia concrete litter bins. Additionally some products are available with a
weighted self stabilising base plate which provides additional security.
Plastic litter bins may also be specified with integral ballast cartridge which also
provides additional security.
Ground Fixed
Part of the litter bin body or supporting post is permanently set into a C30, medium
slump grade concrete mix. Some Sineu Graff models are supplied with a concrete
mounting block. The bin can be fixed to the block once it has been situated at the
correct level in an in situ mix. This allows the litter bin to be permanently installed.
Please refer to individual product pages for details on which Sineu Graff litter bins are
available with this type of fixing.
Base Plate/Surface Mounted
Base plate is secured to suitable substrate, for example concrete, using rag bolts via a
base plate or fitting/drainage holes at the base of the bin. Some models have holes
for the rag bolts incorporated in their feet avoiding the need for base plates.
Seating Fixing Details
Free standing
Free standing seats can be situated directly into place on site using the correct lifting
equipment. The large weight of the products means that fixing to the ground is
unnecessary.
Ground (Root) Fixed
The seat legs are designed to be situated directly into a concrete mix. Root depths
vary depending on product.
Base Plate/Surface Mounting
A positive bolting system should be selected by the installer based on the type and
condition of the substrate taking into account any applicable close edges
and thicknesses.
Sub-Surface
This is similar to surface mounting, however seat legs are bolted to a concrete
substrate and then a surface material, such as paving, is laid on top. The seat legs are
extended to ensure the same seat height above ground as surface mounting.
Sineu Graff Seating Fixing Types and Installation Details
Sineu Graff seating is available with various types of fixing. Fixing methods are
dependent on model. Please refer to individual product pages for specific details on
which types of fixing are available for each model.
Type T – Bolt Fixing. Seat is bolted into the in situ concrete.
Type P – Anchor fixing. This type of fixing is designed for seats with either hardwood
or softwood feet.
Type DT – Bolt fixing through mounting block which is supplied as an
additional item.
Type DE – Bolt fixing through mounting block supplied which is supplied as an
additional item. An additional angle bracket is also supplied.
Type DT and DE fixing methods provide additional anchorage where ground
conditions are less stable.
Fixing Methods for Sineu Graff Seats
In situ concrete
250
Type T – Bolt fixing
In situ concrete
200
Type P – Anchor fixing
(seats with either hardwood or
softwood feet).
250
180
180
Type DE – Bolt fixing through
mounting block supplied as
additional item. Additional angle
bracket also supplied.
250
180
180
Type DT – Bolt fixing
through mounting block
supplied as additional item.
Type DT and DE provide addition anchorage where ground conditions are less stable.
www.marshalls.co.uk/commercial
Sales Office: 0870 600 2425

Installation DetailsBellitalia Fixing Details
INST03
4%
1. Place base elements and adjust level.
2. Secure level and place top elements in position.
3. Completed Planter ready for planting.
Generally, planters can be installed by lifting them into position using appropriate lifting
equipment. Certain models of planters can be specified with sub-channels, which allow
for movement by fork lift truck. Additionally, steel lifting hooks may be specified which
can be used to move planters even when they have been fully planted.
Planters, Litter Bins with Self-levelling System
1. Place base elements and adjust level. ‘Lock’ adjustment bolts in the level position.
2. Manoeuvre top elements into position.
3. Completed planter is now ready for planting. (The planter is equipped with hot-
galvanised steel eyes to make it easier to lift and move even when fully planted)
Classica Planters, Ginevra Planters, Litter Bins with Self Levelling System
Bellitalia Self Levelling Litter Bins
Bellitalia Litter bins are supplied as standard with a patented self levelling system
which allows litter bins to be installed level on slopes of up to 5% - 6.5% from
horizontal (depending on model).
1. Ensure area is totally clean.
2. Place base element and lift main body into position using appropriate
lifting equipment.
3. Level main body and ‘lock’ adjustment bolts level in position.
4. Litter bin is now level and ready to use.
Demetra Bench Installation overview
Bellitalia Demetra seating system is supplies as standard with a patented self
levelling system which allows the benches to be installed on slopes of up to 6%. The
Artemide planter is also installed in the same manner as the Demetra bench.
•Pleaseuserelevantliftingpointstohandleandposition.Theliftingpointscanbe
found where the Bellitalia logo is located and they are supplied by Bellitalia.
•Pleaseunscrewthelogoandscrewintheliftingeyes,whichcanbeordered
separately from Marshalls via our sales team on 0870 600 2425. It is advisable to
ensure that the plane of the lifting eye is parallel to the vertical face of the side of
the product prior to lifting taking place. Then, lift product to its correct location.
•Theproductconstitutesoftwoelements:thebase(innerpart)andtheseat(upper
part). Please move the upper part initially and the inner part to follow. Do not move
the two elements together, as the seat will get damaged.
•Thefurnitureweightissufficienttoensurethat,onceplacedontheground,the
products cannot be moved.
•Itissuggestedtolaytheproductslowlyonthegroundforgreaterbalance
handling.
•Tominimiseanydamageormarkingsontheproductfromtheslings,itis
recommended to cover the sides with protective material.
•MarshallsuseHiabcranesandstrongstraps/metalchainstotransfertheproductto
the ground; it is advisable not to use the Hiab grabber onto the product directly, as
the machinery is very powerful and will damage the product.
•Iftheproductistobetransferredfromtheinitialgroundlayingpositiontoanother
ground point, it is suggested to put the product on a pallet prior to moving.
In order to clean and maintain all Bellitalia products, please refer to the Maintenance
section of the brand on page 4
www.marshalls.co.uk/commercial
Sales Office: 0870 600 2425

Installation DetailsFerrocast® and Ollerton Notice Boards and Fingerposts
INST04
Ferrocast Fingerpost Ground (Root) Fixing Installation
Root depth varies across our range of Fingerposts from 150mm-500mm
depending on model. Please refer to individual product pages for details or contact
our Sales Office.
1. Determine where the fingerpost is to be situated.
2. Check utilities/services drawings and perform a visual inspection to ensure there
are none in the area. This may also require scanning the location for live cabling.
3. Excavate a cube in the substrate according to the fingerpost’s specification.
For example, a fingerpost with a 400mm root depth will require a cube to be
excavated measuring 400mm x 400mm, fixed on the post centre, by 450mm deep.
4. Locate the fingerpost centrally in the hole and fill with grade C30 concrete,
medium slump, including a rapid hardening agent if required.
5. Ensure the fingerpost is vertical in all planes.
6. Reinstate any surface finishes disturbed by the fingerpost. Where necessary, rinse
off any concrete residue from the base of the fingerpost with a soft cloth and
water, taking care not to scratch the surface of the product.
7. Finish off top surface of in situ concrete to give a tight surface finish. Concrete
should be protected by polythene during the first 24-hours following installation.
This is particularly important during inclement and/or cold weather. Units should
not be used until the concrete has cured.
8. Once the concrete has cured add the fingers to the post in the correct positions.
Ferrocast Notice Board Ground (Root) Fixed Installation
Root depth varies across our range of notice boards from 150mm-400mm
depending on model. Please refer to individual product pages for details or contact
our Sales Office.
1. Determine where the notice board is to be situated.
2. Check utilities/services drawings and perform a visual inspection to ensure there
are none in the area. This may also require scanning the location for live cabling.
3. Excavate either one or two cubes in the substrate; the number depends on how
many posts the notice board has. When two cubes are required, the distance
between them will be determined by the width of the notice board. For example,
a single post notice board with a 150mm root depth will require a cube to be
excavated measuring 150mm x 150mm, fixed on the post centre, by 200mm deep.
4. Locate the notice board centrally in the hole and fill with grade C30 concrete,
medium slump, including a rapid hardening agent if required.
5. Ensure the notice board is vertical in all planes.
6. Reinstate any surface finishes disturbed by the notice board. Where necessary,
rinse off any concrete residue from the base of the notice board with a soft cloth
and water, taking care not to scratch the surface of the product.
7. Finish off top surface of in situ concrete to give a tight surface finish. Concrete
should be protected by polythene during the first 24-hours following installation.
This is particularly important during inclement and/or cold weather. Units should
not be used until the concrete has cured.
Ollerton and Imperial Fingerpost and Notice Board Installation
Posts are bolted to a concrete substrate and then a surface material, such as paving is
laid on top.
www.marshalls.co.uk/commercial
Sales Office: 0870 600 2425
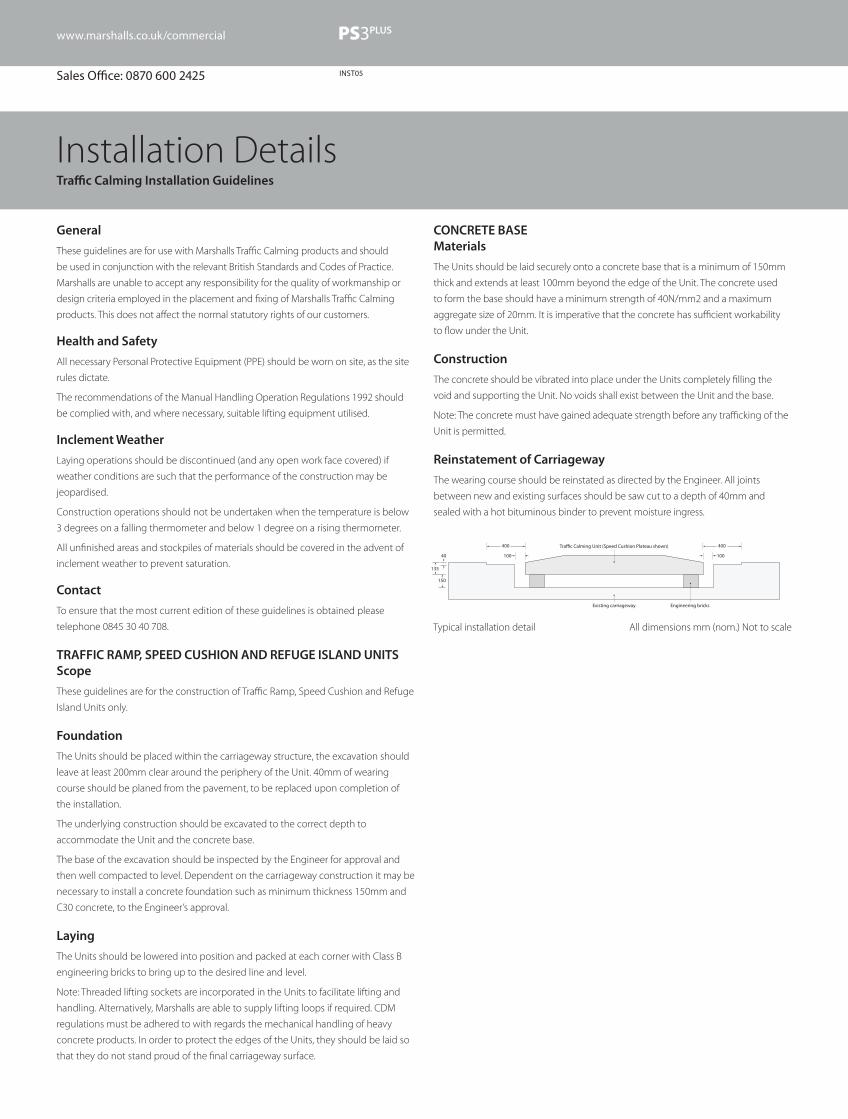
Installation DetailsTraffic Calming Installation Guidelines
www.marshalls.co.uk/commercial
INST05
CONCRETE BASE Materials
The Units should be laid securely onto a concrete base that is a minimum of 150mm
thick and extends at least 100mm beyond the edge of the Unit. The concrete used
to form the base should have a minimum strength of 40N/mm2 and a maximum
aggregate size of 20mm. It is imperative that the concrete has sufficient workability
to flow under the Unit.
Construction
The concrete should be vibrated into place under the Units completely filling the
void and supporting the Unit. No voids shall exist between the Unit and the base.
Note: The concrete must have gained adequate strength before any trafficking of the
Unit is permitted.
Reinstatement of Carriageway
The wearing course should be reinstated as directed by the Engineer. All joints
between new and existing surfaces should be saw cut to a depth of 40mm and
sealed with a hot bituminous binder to prevent moisture ingress.
General
These guidelines are for use with Marshalls Traffic Calming products and should
be used in conjunction with the relevant British Standards and Codes of Practice.
Marshalls are unable to accept any responsibility for the quality of workmanship or
design criteria employed in the placement and fixing of Marshalls Traffic Calming
products. This does not affect the normal statutory rights of our customers.
Health and Safety
All necessary Personal Protective Equipment (PPE) should be worn on site, as the site
rules dictate.
The recommendations of the Manual Handling Operation Regulations 1992 should
be complied with, and where necessary, suitable lifting equipment utilised.
Inclement Weather
Laying operations should be discontinued (and any open work face covered) if
weather conditions are such that the performance of the construction may be
jeopardised.
Construction operations should not be undertaken when the temperature is below
3 degrees on a falling thermometer and below 1 degree on a rising thermometer.
All unfinished areas and stockpiles of materials should be covered in the advent of
inclement weather to prevent saturation.
Contact
To ensure that the most current edition of these guidelines is obtained please
telephone 0845 30 40 708.
TRAFFIC RAMP, SPEED CUSHION AND REFUGE ISLAND UNITS Scope
These guidelines are for the construction of Traffic Ramp, Speed Cushion and Refuge
Island Units only.
Foundation
The Units should be placed within the carriageway structure, the excavation should
leave at least 200mm clear around the periphery of the Unit. 40mm of wearing
course should be planed from the pavement, to be replaced upon completion of
the installation.
The underlying construction should be excavated to the correct depth to
accommodate the Unit and the concrete base.
The base of the excavation should be inspected by the Engineer for approval and
then well compacted to level. Dependent on the carriageway construction it may be
necessary to install a concrete foundation such as minimum thickness 150mm and
C30 concrete, to the Engineer’s approval.
Laying
The Units should be lowered into position and packed at each corner with Class B
engineering bricks to bring up to the desired line and level.
Note: Threaded lifting sockets are incorporated in the Units to facilitate lifting and
handling. Alternatively, Marshalls are able to supply lifting loops if required. CDM
regulations must be adhered to with regards the mechanical handling of heavy
concrete products. In order to protect the edges of the Units, they should be laid so
that they do not stand proud of the final carriageway surface.
400
100
400
100
Engineering bricksExisting carriageway
Typical installation detail All dimensions mm (nom.) Not to scale
Tra�c Calming Unit (Speed Cushion Plateau shown)
40
150
135
Typical installation detail All dimensions mm (nom.) Not to scale
Sales Office: 0870 600 2425

Landscape House, Premier Way, Lowfields Business Park, Elland HX5 9HT
Telephone: 0870 600 2425 Fax: 0870 600 2426 Email: [email protected] www.marshalls.co.uk/commercial
A Subsidiary of Marshalls plc
Registered Office Marshalls plc, Birkby Grange, Birkby Hall Road,
Birkby, Huddersfield, HD2 2XB
© MARSHALLS 2013
DM
D_3
3586