Stop Motion Pro 7 help · 2 Stop Motion Pro 7 help Table of Contents Foreword 0 Part IWelcome to...
172
All text and images copyright Stop Motion Pro Pty Ltd Stop Motion Pro 7 help Monday, 30 August 2010
Transcript of Stop Motion Pro 7 help · 2 Stop Motion Pro 7 help Table of Contents Foreword 0 Part IWelcome to...

All text and images copyright Stop Motion Pro Pty Ltd
Stop Motion Pro 7 help
Monday, 30 August 2010

Stop Motion Pro 7 help2
Table of Contents
Foreword 0
Part I Welcome to Stop Motion Pro v7 6
................................................................................................................................... 61 Introduction
Part II Installation, registering and unlocking 8
................................................................................................................................... 81 Installation
................................................................................................................................... 82 Hardware requirements
................................................................................................................................... 93 Registration and unlocking
................................................................................................................................... 114 Save options
Part III Configuring Windows 13
................................................................................................................................... 131 Windows Vista color scheme
................................................................................................................................... 132 Windows security
................................................................................................................................... 143 Windows security XP
................................................................................................................................... 164 Windows 64 bit
................................................................................................................................... 175 Windows security Vista, Windows 7
................................................................................................................................... 226 Audio recording on Vista, Windows 7
Part IV Camera compatibility 27
................................................................................................................................... 271 Camera compatibility
................................................................................................................................... 272 Using HDV
Part V Toolbar 36
................................................................................................................................... 361 Introduction
................................................................................................................................... 372 Live mode
................................................................................................................................... 383 Stored mode
................................................................................................................................... 394 Frame indicator /slider
Part VI Sidebar 42
................................................................................................................................... 421 Sidebar introduction
Part VII Menus 44
................................................................................................................................... 441 File menu
................................................................................................................................... 452 View menu
................................................................................................................................... 473 Settings menu
................................................................................................................................... 474 Tools menu
................................................................................................................................... 485 Help menu
Part VIII Advanced settings 51
................................................................................................................................... 511 Advanced settings overview
................................................................................................................................... 522 Loop
3Contents
3
................................................................................................................................... 543 Play
................................................................................................................................... 554 Capture
................................................................................................................................... 575 Overlay
................................................................................................................................... 596 Shortcut keys
................................................................................................................................... 617 Remote control
Part IX Capture Settings 65
................................................................................................................................... 651 Capture settings overview
................................................................................................................................... 672 No capture type set
................................................................................................................................... 683 Directory scan
................................................................................................................................... 694 Video / webcam
................................................................................................................................... 715 Canon digital compact camera
................................................................................................................................... 736 Canon DSLR
................................................................................................................................... 757 Canon advanced
................................................................................................................................... 768 Nikon DSLR
................................................................................................................................... 779 Nikon advanced
................................................................................................................................... 7910 Video assist
................................................................................................................................... 7911 Averaging
................................................................................................................................... 8012 Multiple exposure
................................................................................................................................... 8213 Multiple Exposure Mark Roberts Stepper
Part X Importing into Stop Motion Pro 86
................................................................................................................................... 861 Import individual files
................................................................................................................................... 862 Import individual files - multiple exposure
................................................................................................................................... 873 Reorder Import Files
................................................................................................................................... 884 Import AVI file
Part XI Exporting from Stop Motion Pro 91
................................................................................................................................... 911 Make movie
................................................................................................................................... 922 Export as individual frames
................................................................................................................................... 943 Export as flipbook
................................................................................................................................... 964 Export to Youtube
................................................................................................................................... 985 Export frame list
................................................................................................................................... 986 Export RAW
................................................................................................................................... 997 Export Multiple exposure
Part XII Editor 103
................................................................................................................................... 1031 Editor overview
................................................................................................................................... 1062 Actions tab
Part XIII Markers 110
................................................................................................................................... 1101 Markers
Part XIV System settings 113

Stop Motion Pro 7 help4
................................................................................................................................... 1131 System settings overview
................................................................................................................................... 1142 System
................................................................................................................................... 1153 Home directory
................................................................................................................................... 1164 Login and Users
................................................................................................................................... 1185 Youtube
................................................................................................................................... 1196 Slate
................................................................................................................................... 1217 Workflow
Part XV Tools 124
................................................................................................................................... 1241 Audio sync
................................................................................................................................... 1262 Audio record
................................................................................................................................... 1273 Chromakey
................................................................................................................................... 1304 Rotoscope
................................................................................................................................... 1325 DOP Control
................................................................................................................................... 1396 Frame painter
................................................................................................................................... 1427 Rig removal
................................................................................................................................... 1448 Time lapse
................................................................................................................................... 1479 Preview player
................................................................................................................................... 14810 Preview player stereoscopic
................................................................................................................................... 15011 Video player
................................................................................................................................... 15112 Slate
................................................................................................................................... 15313 Notes
................................................................................................................................... 15314 Timeline
................................................................................................................................... 15615 Worktime
Part XVI Dialog boxes 158
................................................................................................................................... 1581 Welcome to Stop Motion Pro
................................................................................................................................... 1582 New Production/Shot
................................................................................................................................... 1593 New Production/Episode/Shot/Type/Take
................................................................................................................................... 1614 Open Production/Shot
................................................................................................................................... 1635 Open Production/Episode/Shot/Type/Take
................................................................................................................................... 1656 Full resolution viewer
................................................................................................................................... 1697 Colour select
................................................................................................................................... 1708 Login
................................................................................................................................... 1709 Overlay parameters
................................................................................................................................... 17110 Password

Part
I

Stop Motion Pro 7 help6
1 Welcome to Stop Motion Pro v7
1.1 Introduction
Stop Motion Pro has brought stop motion animation into the digital era.
Creative freedomTaking full advantage of computer technology, animators will experience new heights of control andcreative freedom. Using a computer, video capture card and a video camera, Stop Motion Pro will transform the way youwork and the results you can achieve. Both professionals and students of animation will work fasterand produce superior results than ever before.
Trial editionThe Stop Motion Pro trial edition can be used for 20 times for three hours. Once you have tried theStop Motion Pro trial edition, and would like a fully functioning, unlimited edition you need to purchasea copy.
You can purchase from a reseller or directly from our secure online shop. The price and orderingdetails are available on our website, www.stopmotionpro.com
InstallationFor information on how to install Stop Motion Pro click here.
Camera compatibilityTo get the maximum benefit of using Stop Motion Pro, you will need a camera. Information on how toconnect your camera is here.
RegistrationOnce you have purchased the product you will still need to register it so you can unlock the software.Click here for more information on registering.
Quick start guideTo get up and running quickly use the Quick start guide that is located under the Stop Motion Proinstallation directory. It shows how to perform the most used tasks. A link to the Quick start guide is onthe Help menu.
Information in this HelpEach edition of Stop Motion Pro has a specially selected range of features designed for animators withdifferent skill levels and requirements.
Therefore some of the items described in this help file may not be applicable to the version you havepurchased. Check our website for more details on what is included in each version.

Part
II

Stop Motion Pro 7 help8
2 Installation, registering and unlocking
2.1 Installation
Stop Motion Pro can be delivered via Internet download or CDROM.
Uninstall any existing versions of Stop Motion Pro, including the trial edition before installing apurchased edition.
Internet download You will have received a Stop Motion Pro serial number via email or from your reseller. Use the serialnumber to download your edition from www.stopmotionpro.com.
CDROM Insert the Stop Motion Pro CDROM into your CDROM drive and the Stop Motion Pro installation selectwindow will be displayed.
Identify the edition you have purchased and click the appropriate button. The setup wizard for theselected edition will then be displayed.
If the installation select window is not displayed, run the application setup_stopmotionpro.exe on theCDROM.
2.2 Hardware requirements
You will need the following to install and run Stop Motion Pro:

Installation, registering and unlocking 9
· Windows XP, Vista 32 bit, Vista 64 bit, Windows 7 32 bit, Windows 7 64 bit· Either a firewire or analogue video capture card, webcam or digital still camera (see Video
compatibility).· Pentium 2.8+ Ghz (recommended)· 512+ meg RAM (recommended)· DirectX 9 or later version. More information about DirectX is available from Microsoft.
www.microsoft.com/directx
You can also run Stop Motion Pro
2.3 Registration and unlocking
After installation you need to register Stop Motion Pro
The registration process occurs the first time you run Stop Motion Pro.
· Each copy of Stop Motion Pro comes with a Serial number. This is attached to the CDROM ifpurchased via a reseller, or sent by email if purchased on line.
· A Computer ID is generated by Stop Motion Pro.
· Using the Serial number and the Computer ID, an unlock code is obtained from our website, www.stopmotionpro.com
· Stop Motion Pro needs to be registered on each machine for ongoing use.
Running the software the first timeOnce you have downloaded your copy of Stop Motion Pro, install it on the computer you want to runStop Motion Pro.
Run Stop Motion Pro and the following dialog box will be displayed.
Select your language then click OK. The following dialog box will be displayed.

Stop Motion Pro 7 help10
Your unique Computer ID number will be shown.
Every computer will have a unique Computer ID, you must follow these steps when installingStop Motion Pro on different computers.
Unlocking Stop Motion ProNow you have your Computer ID, the next step is to create an unlock code which will unlock yourcopy of Stop Motion Pro.
Enter your serial number, name and email.
If your machine is connected to the Internet, click Register Direct Online and the unlock code will beautomatically calculated.
You can obtain your unlock code manually from the Unlock section of www.stopmotionpro.com. Youwill be emailed your unlock code. It is recommended that you use copy + paste to enter the variouscodes.
Enter all the registration information fields, then click OK. The Save options dialog box will bedisplayed.
A registration text file can be used to save and reapply your registration information. It has thefollowing format:[SMP REGISTER]name=email=

Installation, registering and unlocking 11
serial=unlock=
To open a registration text file, click Open Unlock file.
To Save your registration information in a text file, click Save Unlock file.
2.4 Save options
This dialog box sets the initial Stop Motion Pro home directory. All created Productions will be listedbelow the home directory in sperate sub directories.
Select the option then click OK. The Welcome dialog box will be displayed.
The default directory for specific Windows login option is your default documents directory\SMP_v7_projects.
The default directory for all Windows users option is c:\My documents\SMP_v7_projects.
If the all Windows users option is selected, click here for information on how to set Windows security.

Part
III

Configuring Windows 13
3 Configuring Windows
3.1 Windows Vista color scheme
When using Stop Motion Pro on Windows Vista or Windows 7, a number of the display parametersneed to be changed to enable high speed operation when playing the stored frames.
Stop Motion Pro changes these parameters automatically, and reset to them to their previous valuewhen closing.
When Stop Motion Pro starts, the following balloon message is displayed by VISTA.
Click the balloon and the following message is displayed:
Tick Don't show me this again then click OK.
3.2 Windows security
Every Window’s user of Stop Motion Pro must have read/write/delete permissions for the Stop MotionPro home directory and Production/Shot subdirectories.

Stop Motion Pro 7 help14
The security settings for these directories may have to be changed on your machine to allow all usersto have full control over the contents of the directory and subdirectories.
The process for setting permissions on XP click here.
The process for setting permissions on Vista and Windows 7 click here.
3.3 Windows security XP
Use the following process to check the permissions.
Start Windows Explorer.
Select menu Tools|Folder options
Scroll down the list and ensure Use simple file sharing is NOT ticked
Click OK.
Right click on the Stop Motion Pro Production/Shot home directory and select Properties from popupmenu

Configuring Windows 15
The following dialog box is displayed.

Stop Motion Pro 7 help16
Select Users from the Group or User name list then tick Full control in the Allow column
Click OK
To ensure the permissions are set correctly, run Stop Motion Pro with a Windows Administrator login,then repeat for a Windows User login. Perform the following tasks:1. Create a new Production/Shot2. Capture some frames3. Close the Production/Shot4. Reopen the Production/Shot and Click Play5. Close Stop Motion Pro
3.4 Windows 64 bit
Stop Motion Pro v7 can appear to run sluggish under some installations of Windows 64 bit.
The solution to this problem is described below:Install Stop Motion Pro in the standard way.
Register Stop Motion Pro and obtain the unlock code
Close Stop Motion Pro
After registration, right click on the Stop Motion Pro desktop icon. The following is displayed:
Select Properties and the following dialog box is displayed:

Configuring Windows 17
· Select the Compatibility Tab· Tick Run this program in compatibility for · Select Windows XP from the drop down list.
Then click OK and start Stop Motion Pro v7 by double clicking the desktop icon.
3.5 Windows security Vista, Windows 7
Use the following process to check the permissions.
Right click on the Stop Motion Pro Production/Shot home directory and select Properties from popupmenu
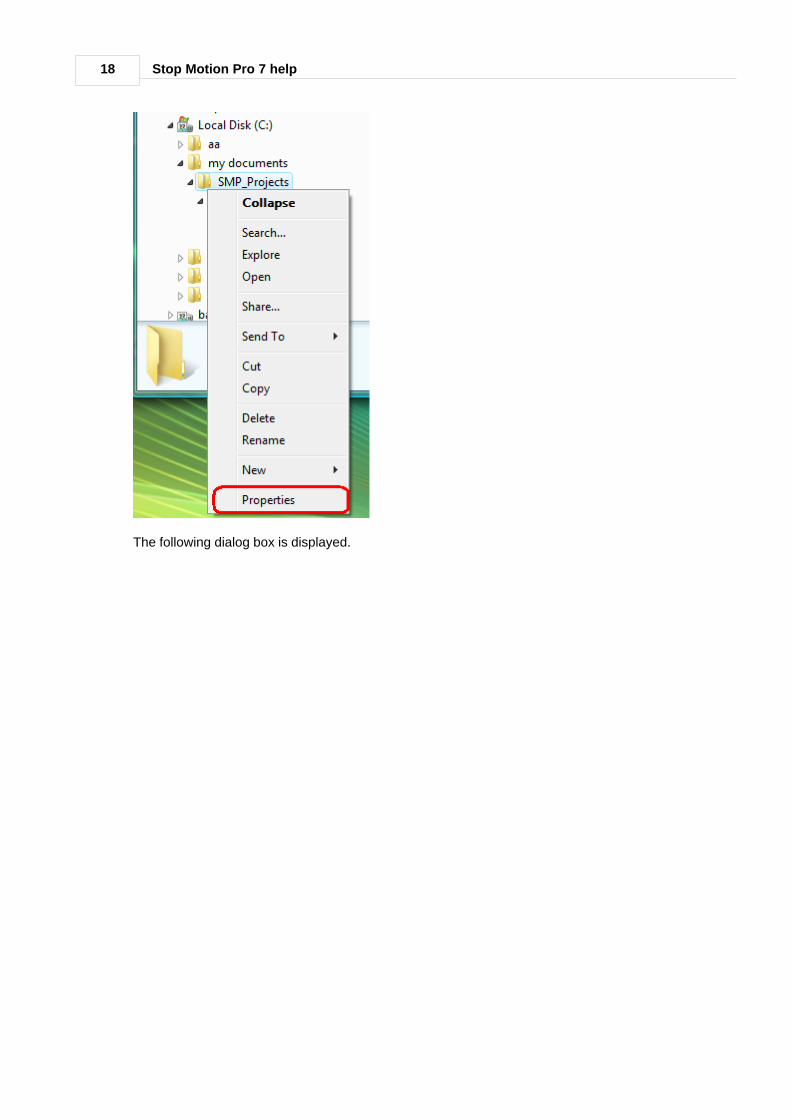
Stop Motion Pro 7 help18
The following dialog box is displayed.

Configuring Windows 19
Select the Sharing tab.

Stop Motion Pro 7 help20
Click Advanced Sharing and the following dialog box is displayed.

Configuring Windows 21
Tick Share this folder, then click Permissions.
The following dialog box is displayed.
Stop Motion Pro 7 help22
Select the Group or User name
Tick Full control in the Allow column
Click OK
To ensure the permissions are set correctly, run Stop Motion Pro with a Windows Administrator loginand a Windows User login. Perform the following tasks:1. Create a new Production/Shot2. Capture some frames3. Close the Production/Shot4. Reopen the Production/Shot and Click Play
3.6 Audio recording on Vista, Windows 7
A typical problem with sound recording in Windows Vista is that the required mixer devices are disabled by default. Normally Vista only allows you to select between Microphone and Line In inputs,neither of them being very good ways to get your in-game audio recorded to videos. This typicalsituation causes the Stop Motion Pro Audio recorder to not display the full set of inputs.
However, most sound hardware drivers actually allow you to enable mixer devices that can be used todirectly record the sound you hear from your speakers, i.e. your game sounds. To be able to use thesein Stop Motion Pro you need to first enable them.
Step 1: Access Control Panel from the Windows Start menu.
Step 2: Switch to Classic View and double click on the Sound icon.
Step 3: Select the Recording tab and right click anywhere in the blank white area of the window todisplay the Show Disabled Devices context menu and select Show Disabled Devices from the popupmenu.

Configuring Windows 23
Step 4: You should now see all the sound devices the system can provide. Right click on the disableddevice you want to enable and choose Enable from the popup menu.

Stop Motion Pro 7 help24
To minimize problems with Stop Motion Pro, try setting the selected device to be the default mixer byclicking on it and then selecting Set as Default device from the popup menu.

Configuring Windows 25
Click OK to save the settings.
You need to close and re-open the Stop Motion Pro Audio recorder to show the changes made inControl Panel.

Part
IV

Camera compatibility 27
4 Camera compatibility
4.1 Camera compatibility
To get the maximum advantage using Stop Motion Pro, a camera should be used and connect at alltimes. A range of cameras can be used.
DV (Digital Video, using IEEE 1394, Firewire or iLink)If you have a digital video (DV) camera, you'll need either a FireWire card (also known as IEEE 1394).FireWire is recommended for the best quality results. Many new PC's come with a FireWire cardalready installed. If not, there are a number of manufacturers that make a card that will work with yourPC, any generic Firewire card will work with Stop Motion Pro.DV cameras should not have video tapes in them to avoid going into standby mode. Somecameras come from the factory with demo mode set. This must be turned off.
HDV (Digital Video, using IEEE 1394, Firewire or iLink)If you have a digital video (HDV) camera, you'll need either a FireWire card (also known as IEEE 1394)capture card. HDV cameras should not have video tapes in them to avoid going into standby mode. Somecameras come from the factory with demo mode set. This must be turned off.When using a HDV camera with Stop Motion Pro, an MPEG decoder must be installed.
Analogue video devicesIf you have an analog camcorder, or a VCR, you will need an analog video capture device thatconverts the video signal into USB. The cards we recommend are the Osprey series from Viewcast Ifyou have a different analogue capture card then we suggest you test your capture card with the freetrial of Stop Motion Pro before purchase.
WebcamsStop Motion pro should work with most webcams.
Canon compact camerasSome Canon compact camera will provide a live video feed from the USB connector on the camera. If your camera comes with Canon remote shooting software, it will probably work with Stop Motion Pro.We suggest you test your webcam with the free trial of Stop Motion Pro before purchase.
Canon DSLR camerasSome Canon DSLRs will provide a live video feed from the USB connector on the camera. Othermodels can be used with a video assist.
Nikon DSLR camerasSome Nikon DSLRs will provide a live video feed from the USB connector on the camera. Othermodels can be used with a video assist.
HD Blackmagic capture cardsStop Motion Pro works with the Blackmagic capture cards to capture in uncompressed HD.However we suggest you test your Blackmagic capture card with the free trial of Stop Motion Probefore purchase.
Other digital still cameras.Nikon, Olympus and Leica cameras that support "remote capture" via a PC connection and softwarecan be used with Stop Motion Pro in directory scan mode
4.2 Using HDV
We have found using HDV directly into the PC can be quite problematic with various artifactsembedded in the video signal. This varies from PC to PC and unfortunately it is out of our control to fix.
Stop Motion Pro 7 help28
We recommend using a Blackmagic Intensity card available from http://www.blackmagic-design.com/products/intensity/ and connecting to your camera using theComponent connection from the camera.
With HDV there is a delay for the image to refresh in Stop Motion Pro after your model has beenmoved. This is normal and is a result of the HDV codec in the camera.
If you want to use a HDV camera directly with Stop Motion Pro, an MPEG decoder must be installed.
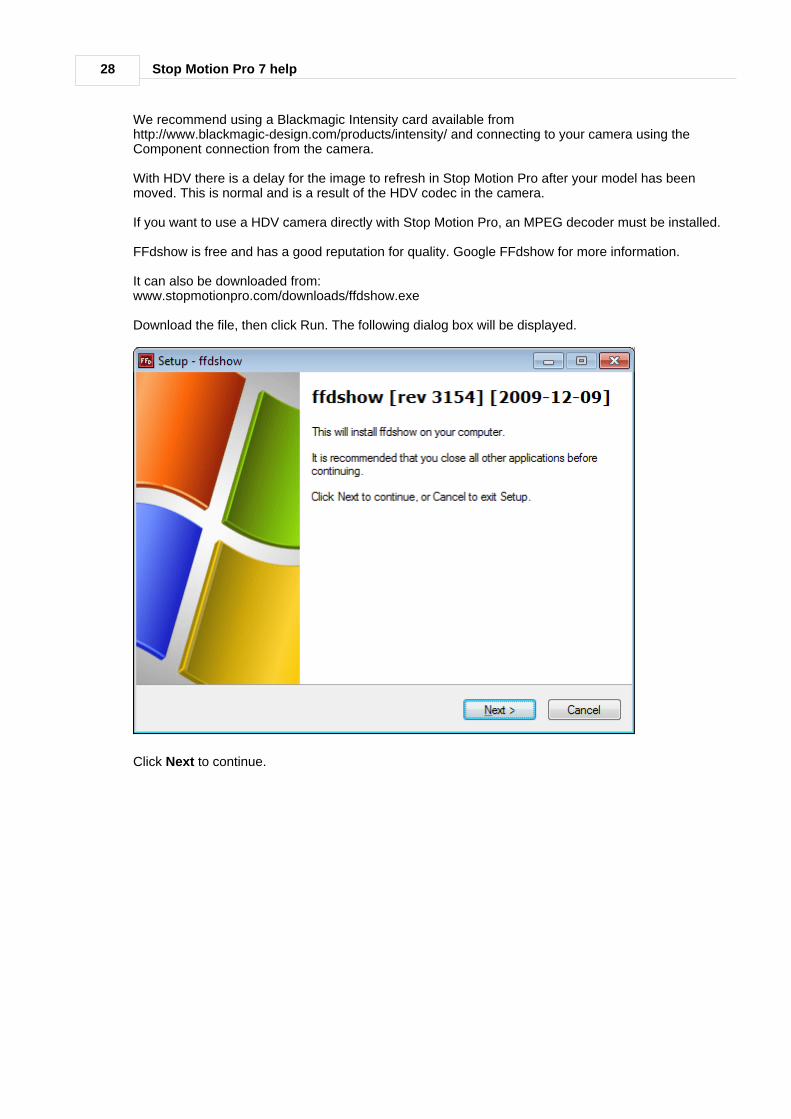
FFdshow is free and has a good reputation for quality. Google FFdshow for more information.
It can also be downloaded from:www.stopmotionpro.com/downloads/ffdshow.exe
Download the file, then click Run. The following dialog box will be displayed.
Click Next to continue.

Camera compatibility 29
Click Next to continue.
Click Next to continue.

Stop Motion Pro 7 help30
Click Next to continue.
Scroll down the list until MPEG-2 is displayed. Tick MPEG-2 and select libmpeg2

Camera compatibility 31
Click Next to continue.
Click Next to continue.

Stop Motion Pro 7 help32
Click Install.
Windows 7 additional stepsWindows 7 uses its own codecs for decoding several audio and video formats. Using third partyDirectShow filters instead of the native filters is not possible without making difficult changes to theWindows Registry.
The Win7DSFilterTweaker tool allows you to configure your preferred DirectShow decoders with just afew mouse clicks. It is quick, easy, and changes can always be undone.
Download the tool from here: www.codecguide.com/windows7_preferred_filter_tweaker.htm
Download the file, then click Run. The following dialog box will be displayed.

Camera compatibility 33
Scroll the 32 bit decoders to MPEG2 and change from Microsoft to ffdshow.
Now you have installed a MPEG decoder so you can film animation using HDV with Stop Motion Pro.
· Connect your HDV camera to the computer using a Firewire (iLink) lead

Stop Motion Pro 7 help34
· Turn the camera on so you have a live view in the camera viewfinder· Start Stop Motion Pro· Create a new Production/Shot· On the Capture Settings dialog select Video/Webcam from the Capture type drop down list· Select HDV camera. from the Device drop down list

Part
V

Stop Motion Pro 7 help36
5 Toolbar
5.1 Introduction
The Stop Motion Pro main toolbar is the control center for operating the program.
Stop Motion Pro operates in 3 main modes:· Live/Capture· Stored Play and Loop· Editor
In addition you can change many of the Advanced settings.
LiveWhen a live video source is available, Stop Motion Pro will enable live video mode and the live buttonon the toolbar will become enabled. A frame is captured from the live video by clicking the capture button. More information can be found here.
StoredThese are your captured frames, or frames that you have added to your film sequence. This buttonbecomes enabled after a frame has been captured. Stored frames can be stepped thru, played or looped.More information can be found here.
EditorThe Editor mode is available anytime you are using Stop Motion Pro. More information can be found here.
Frame counterDisplays the current stored frame number and the total number of frames. The display can beswitched between sequential numbers and timecode in the Advanced Setup dialog box.
Frames per secondThe play rate (how fast or slow the animation plays back) is visible in the fps (frames per second)window. The higher the number, the faster the animation plays back.
Advanced setupTo modify the various functions of the toolbar (eg, frames per second playback, number of frames percapture, onionskin parameters, looping etc) click the Advanced Setup icon.

Toolbar 37
5.2 Live mode
When a live video source is available, The live and capture button and onionskin transparencyslider on the toolbar will become enabled. A live video source can be from a wide range of sources.
Live video is used as a guide for positioning figures, cameras etc. It is also required for advancedfeatures of Stop Motion Pro including onionskinning, rotoscoping and the Chroma key tools.
To capture a frame from a video camera, click Capture on the main toolbar.
After a frame is captured, the frame counter will increment.
You can see the difference between the previous captured frames and the current live video by usingthe Onionskin function. Move the Onionskin slider to the left to increase the visibility of the previous frame.
You can quickly toggle between live and Stored mode by clicking Stored and Live, or using theLive/Stored toggle shortcut key. (Default is the space bar).
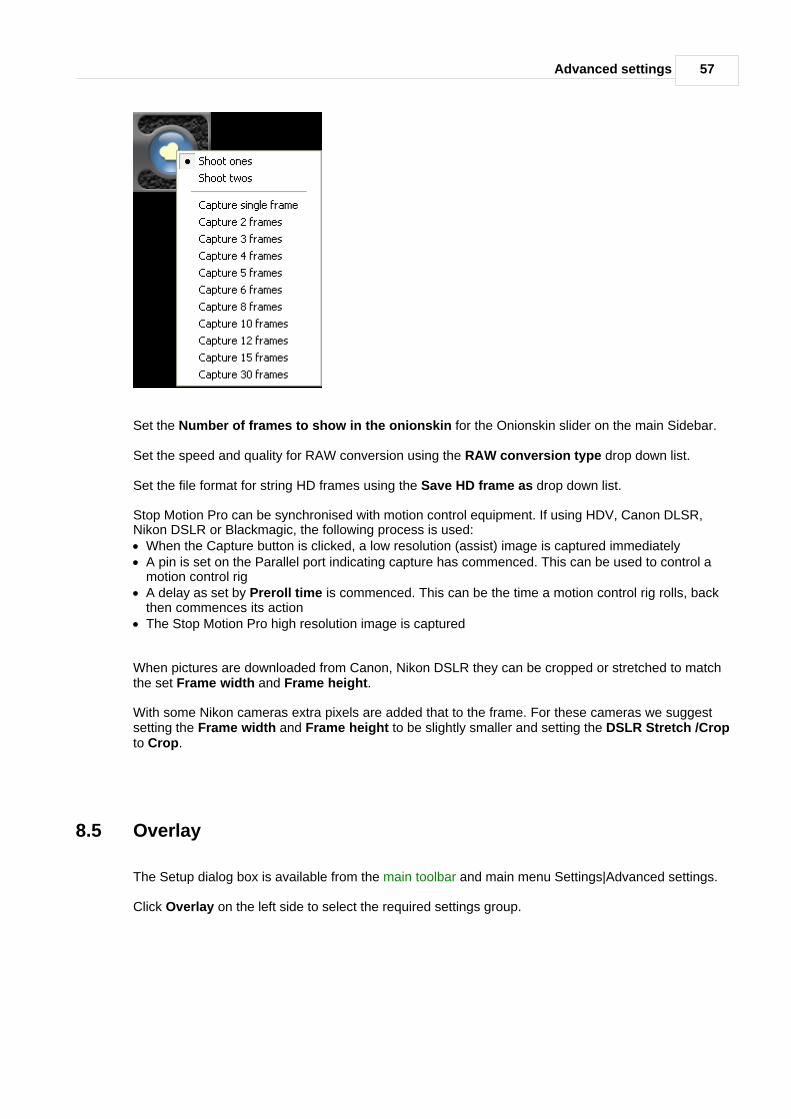
Right clicking on the capture button lets you capture a number of multiple frames (saving multipleclicks).
Select Shoot ones or Shoot twos to set the default number of frames captured when you clickcapture.
Select any of the Capture options to capture that number of frames once.
Changes to capture settings can be made on the Capture settings dialog box or the Advanced settingsdialog box.

Stop Motion Pro 7 help38
5.3 Stored mode
These are your captured frames, or frames that you have added to your film sequence.
The stored button becomes enabled after a frame has been captured from the live video by pressingthe capture button. You can quickly toggle between live and Stored mode by clicking Stored and Live, or using the Live/Stored toggle shortcut key. (Default is the space bar).
Play buttonClick Play to play your animation.This button toggles between play and pause. When your animation is paused, the button becomes a play button. When your animation is playing, the button becomes a pause button.
The play rate for the animation is visible in the fps window. Right click on the fps window and a list offps options is displayed. Select the required fps from the menu. The fps can also be set on theAdvanced settings dialog
Frame indicator / sliderUse the frame indicator / slider to move quickly to any frame within your animation. More informationis here.
Back one frameClicking this button moves the currently displayed frame of your animation back one frame.Right clicking on this button displays the following menu.

Toolbar 39
Forward one frameClicking this button moves the currently displayed frame of your animation forward one frame.Right clicking on this button displays the following menu.
LoopingWhen a loop is specified in the frame / loop indicator (see below) pressing the loop button makes theloop play continuously. The zoom start and end is shown as light grey frames.
When your animation is paused, the button becomes a loop button. When your animation is looping, the button becomes a pause button.
Right clicking on this button displays the following menu.
Changes to Stored and loop settings can be made on the Advanced settings dialog box.
5.4 Frame indicator /slider
The frame indicator / slider tool lets you zoom in, out and navigate through your frames. This is usefulfor navigating (and setting loops) in long sequences of frames. It adapts to any number of storedframes.
Zooming into a specific range of framesMove the Resize handles to zoom in on a range of frames.

Stop Motion Pro 7 help40
Right clicking on the frame indications on the frame indicator / slider tool will display a popup menu.
It is possible to set the start and end points of the looping sequence using this feature. The loop canalso be removed. The looping frames are indicated by light grey.
Moving the mouse over this area displays the frame number on the frame indicator panel.
Holding the mouse left button down and moving the mouse left and right quickly moves through thestored frames. If the Audio sync tool is being used and Audio scrub is ticked, the audio will be playedfor each frame.

Part
VI

Stop Motion Pro 7 help42
6 Sidebar
6.1 Sidebar introduction
The Sidebar gives quick access to the main actions and settings in Stop Motion Pro.
Showing / Hiding the sidebarThe sidebar can be shown or hidden by clicking the thumb.
To open or close a tab click the Caption for that tab.
Click Advance settings to display the Advanced settings dialog box.

Part
VII

Stop Motion Pro 7 help44
7 Menus
7.1 File menu
New Production/Shot Create a new Production/Shot.Displays the New Production/Shot dialog box or the New Production/Episode/Shot/Type/Take dialogbox .
Open Production/Shot Opens, copy, rename or delete an existing Production/Shot.Displays the Open Production/Shot dialog box or the Open Production/Episode/Shot/Type/Take dialogbox .
Close Production/ShotSave the setup parameters and close the current Production/Shot.All your frames and edits are saved as you work in Stop Motion Pro.
Save Production/ShotSave the setup parameters for the current Production/Shot. This happens automatically when aProduction/Shot is closed
Import individual imageImport individual image files and add to the end of your animation.Displays the Import Individual files dialog box.
Import an AVIImport an AVI file and add to the end of your animation.Displays the Import AVI file dialog box.
Make movieCreates an AVI, MOV or WMV file of you animation.Displays the Make movie dialog box.

Menus 45
Export as individual frames Creates individual files for each frame of you animation.Displays the Export files dialog box.
Export as flipbookPrints a flipbook of your animation.Displays the Export flipbook dialog box.
Export as YoutubeSends your animation directly to Youtube.Displays the Export Youtube dialog box.
Export frame list Creates a list of the frame number in the play order and the filename. The filenames may be differentthan the play order if the Editor was used to move frames around or hide frames. Displays the Export frames list dialog box.
Export RAW frames If RAW files were captured in Canon or Nikon DSLR mode, creates a copy of the RAW files ignoringany hidden frames.Displays the Export RAW frames dialog box.
Export multiple exposure If multiple exposure was set in Capture settings, provides options to export to post production softwareignoring any hidden frames.Displays the Export Multiple Exposure dialog box.
ExitClose Stop Motion Pro. Everything is saved as you work in Stop Motion Pro, there is no need to Save your Production/Shot.
7.2 View menu

Stop Motion Pro 7 help46
Captured frames "Captured frames" (also referred to as "Stored frames") are the high quality frames that make up theanimation. This is the default viewing mode when using Stop Motion Pro.
Video assistIn some Capture type modes (with the term assist in them) video assist frames are captured at thesame time as when frames are added to the Stop Motion Pro Production/Shot. By toggling between"Captured frames" and "Video assist", it is possible to use the video assist live video image as areference for onionskinning, rotoscoping and the chroma key tool.
Video assist and captured frames are always linked together, changes to the captured frames in theeditor are reflected in the video assist frame sequence.
This menu option is only available when a capture type mode with assist is being used.
Full resolution viewerStop Motion Pro allows viewing of captured frames at their full resolution. This is important if a 1:1pixel view of the captured frames is required. Displays the Full resolution viewer window with the frame visible.
Output to second monitor Stop Motion Pro can display the captured frames and live view on a second monitor. A dual head card is required to do this.
Video 100% size Used in stored mode and live mode to set the resizable display window equal to the dimensions of theactual live video source.
16:9 format Used in stored mode and live mode to set the resizable display window to a ratio of 16:9.
Mask to Safe zone aspect ratioMask the display to match the current Safe zone settings. The Safe zone is set on the Advancedsettings dialog box or main Sidebar
Black screen during captureDuring capture all Tool windows and the main display window are hidden to stop light spill from thecomputer monitor onto the animation set.
Reset main toolbarPlaces the toolbar in the middle of the screen.
Show MarkersToggle the display of markers on and off. For information on markers click here
Show Safe zoneToggle the display of a safe zone on and off. Setup parameters are made on the setup overlay.
Show frame counterDisplays a frame counter over the video image on the stage. This is for reference only, and is notrecorded on your actual animation. Setup parameters are from the setup overlay.
Show Stored live indicatorDisplays a red light when you are in Live mode. This is for reference only, and is not recorded on youractual animation. Setup parameters are from the setup overlay.
Show crosshairPlace a cross in the middle of the frame.

Menus 47
Show rule of thirdsThe rule of thirds is a compositional rule of thumb in photography. The rule states that an imageshould be imagined as divided into nine equal parts by two equally-spaced horizontal lines and twoequally-spaced vertical lines, and that important compositional elements should be placed along theselines or their intersections.
This option is only available if Show Safe zone is enabled.
7.3 Settings menu
Capture settingsChange settings for frame capture (DV, Canon compact camera, DSLR, Directory scan and Nocapture card).Displays the Capture settings dialog box.
Advanced settingsDisplays the Advanced settings dialog box.
System settingsControl of multiple users, modify the directory that Stop Motion Pro stores Production/Shots and othersystem parametersDisplays the System settings dialog box.
7.4 Tools menu
Stop Motion Pro 7 help48
Audio syncDisplays the audio sync tool.
Audio recordDisplays the audio record tool.
Chroma keyDisplays the chroma key tool.
RotoscopeDisplays the rotoscope tool.
DOP controlDisplays the DOP control tool
Frame painterDisplays the Frame painter tool
Rig removalDisplays the Rig removal tool
Time lapseDisplays the timelapse tool.
Preview playerDisplays the Preview player tool.
Video playerDisplays the Video player tool.
SlateDisplays the Slate tool.
NotesDisplays the Notes tool.
TimelineDisplays the Timeline tool.
WorktimeDisplays the worktime tool.
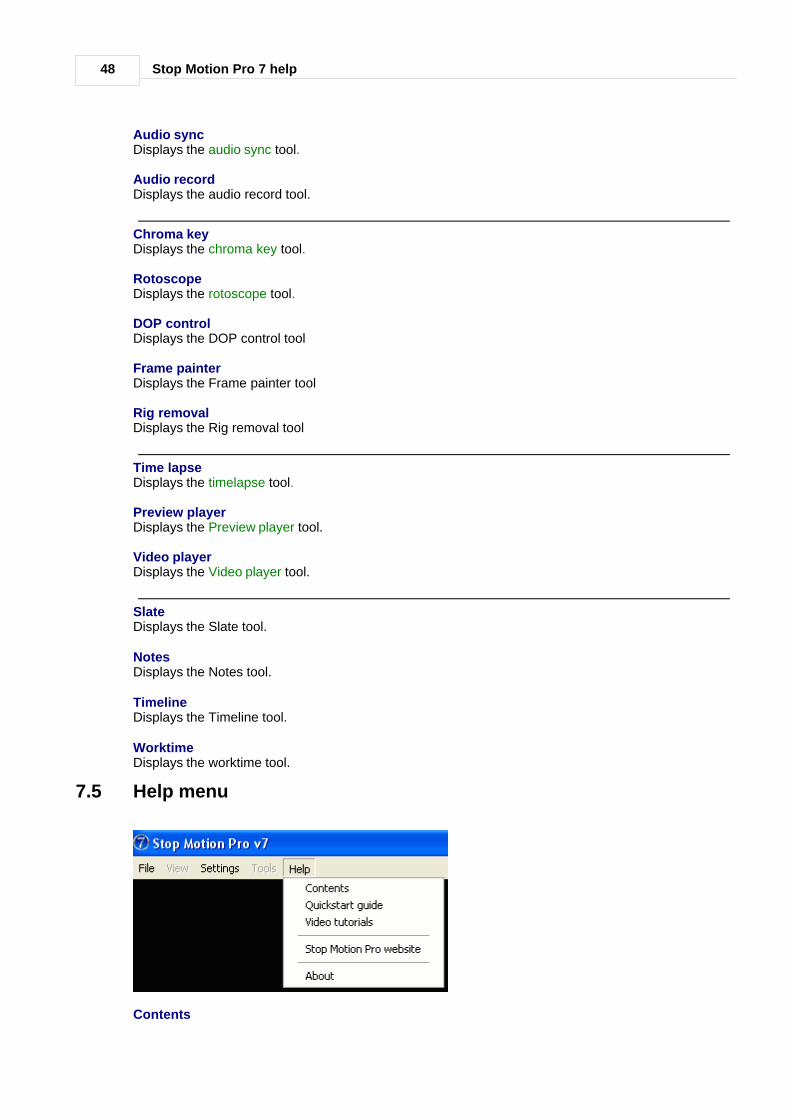
7.5 Help menu
Contents

Menus 49
Opens this help file.
Quickstart guideOpen the Stop Motion Pro Quickstart guide pdf.
Stop Motion Pro online tutorials A link to the Stop Motion Pro website online tutorials.
Stop Motion Pro website A link to the Stop Motion Pro website
About Opens a window with the current version build information and registered owner name.

Part
VIII

Advanced settings 51
8 Advanced settings
8.1 Advanced settings overview
The Setup dialog box is available from the main toolbar and main menu Settings|Advanced settings.
Click the button on the left side to select the required settings group.
After making the appropriate changes click Apply or OK.
If you click Apply the dialog box remains displayed.

Stop Motion Pro 7 help52
If you click OK the dialog box is closed.
8.2 Loop
The Setup dialog box is available from the main toolbar and main menu Settings|Advanced settings.
Click Loop on the left side to select the required settings group.
There are three modes for looping.
The loop start and end frame are displayed in light grey on the main toolbar.

Advanced settings 53
The looping mode can be selected by:· clicking the option at the top left corner of the required looping mode· using a pop up menu on the Loop button on the main toolbar· assigning a shortcut key
To trigger a loop sequence use the loop button on the main toolbar. Stop the loop playback by clickingthe pause button or loop button.
Loop specific framesThis option will set a loop of specific frames using this option. Any start frame or any end frame can beset.
Set the frame to start looping in the From spinedit.
Set the frame to end looping in the To spinedit. If Last frame is ticked the end looping frame willincrease as frames are captured.
If Play once is ticked the looping will only occur once.
When there is a live video source, Include live mode is enabled. If this is ticked, the live video sourceimage will be displayed at the end of the stored frames, for the mount of time set the Pause on livespinedit.
Loop from last frameThis option will set a loop of a set number of frames from the last frame. As frames are captured thestart frame of the loop will increase.
Set the number of frames to loop in the Number of frames to loop spinedit.
If Play once is ticked the looping will only occur once.
When there is a live video source, Include live mode is enabled. If this is ticked, the live video sourceimage will be displayed at the end of the stored frames, for the mount of time set the Pause on livespinedit.
Loop from the Last/Current frame with fade to liveThis option will set continuous loop from the current or last stored frame to live video, with an option ofa dissolve between.
Select Use current frame to loop the current frame and live.
Select Use last frame to loop the last frame and live. As frames are captured the frame of the loopwill increase.

Stop Motion Pro 7 help54
Set the time the stored frame will be displayed in Stored frame hold time spinedit.
If a instant toggle is required between the stored frame and the live, deselect Auto blend.
If a dissolve is required between the stored frame and the live, select Auto blend.
Set the time the live view will be displayed in Live hold time spinedit.
8.3 Play
The Setup dialog box is available from the main toolbar and main menu Settings|Advanced settings.
Click Play on the left side to select the required settings group.

Advanced settings 55
Stored frames play rateRefers to the speed (frames per second) that Stop Motion Pro plays back your animation. If you aregoing to output onto DVD or tape remember that NTSC is 30 frames per second, PAL is 25.
If you are experiencing choppy playback of your animation, you can experiment setting the play rate to Play all frames or Optimize play for accurate fps. Optimizing for accurate fps will mean frames aredropped if your system cannot keep up with playing back the animation, however you will get anaccurate idea of timing. The Preview player can also be used to give an accurate idea of theanimation at an exact fps rate.
If you have a high performance computer and graphic display card, tick High performance machine.This will display the frames in playback and looping with higher resolution.
To determine what settings to use, select Play all frames and tick High performance machine. Usea stop watch to evaluate the playback rate over a 20 second animation sequence to determine if yoursystem can playback in this high quality realtime playback mode.
Second monitor width sets the width of the live and stored frames. The height is calculated to keepthe same aspect ratio as the Capture settings frame width and frame height.
Maximum Proxy size sets the width of the proxy frame used for Stop Motion Pro display. The heightis calculated to keep the same aspect ratio as the Capture settings frame width and frame height. Werecommend leaving this at 800 pixels, unless an advanced PC is used. This must be set before anyframes are captured.
Frame CounterThis switches the display of Timecode or simple sequential frame numbering. Changes here arereflected in both the toolbar and the editor
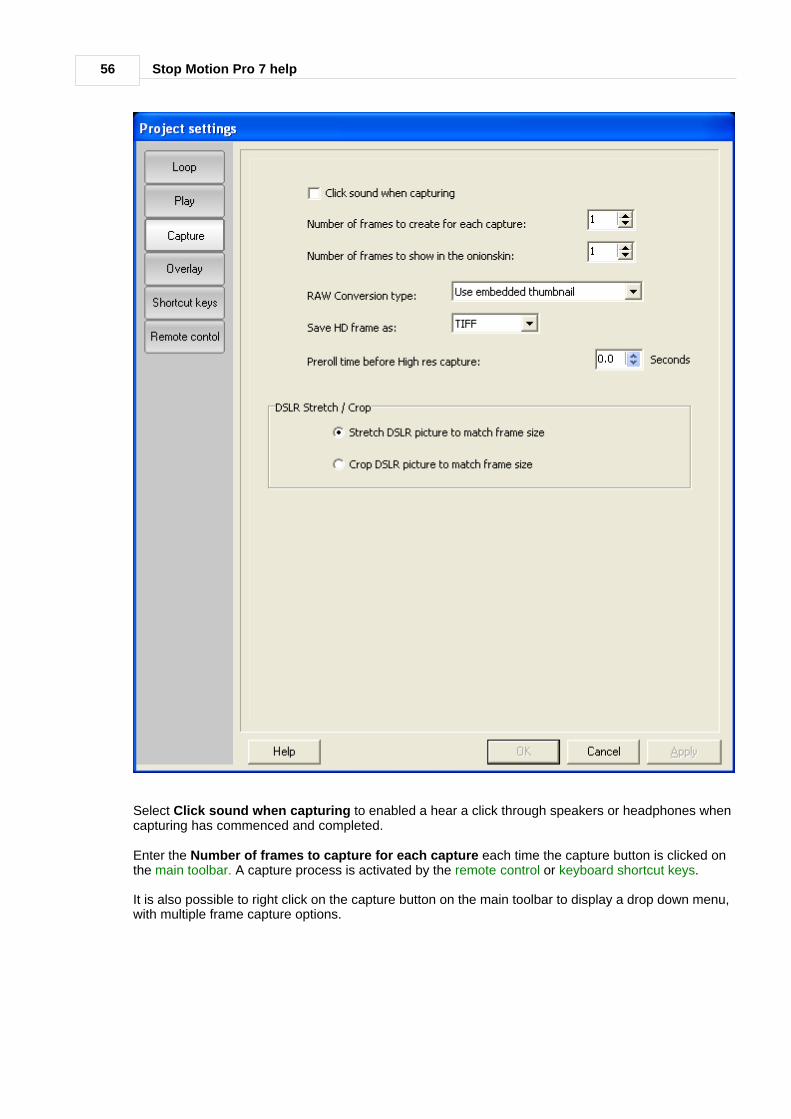
8.4 Capture
The Setup dialog box is available from the main toolbar and main menu Settings|Advanced settings.
Click Capture on the left side to select the required settings group.
Stop Motion Pro 7 help56
Select Click sound when capturing to enabled a hear a click through speakers or headphones whencapturing has commenced and completed.
Enter the Number of frames to capture for each capture each time the capture button is clicked onthe main toolbar. A capture process is activated by the remote control or keyboard shortcut keys.
It is also possible to right click on the capture button on the main toolbar to display a drop down menu,with multiple frame capture options.
Advanced settings 57
Set the Number of frames to show in the onionskin for the Onionskin slider on the main Sidebar.
Set the speed and quality for RAW conversion using the RAW conversion type drop down list.
Set the file format for string HD frames using the Save HD frame as drop down list.
Stop Motion Pro can be synchronised with motion control equipment. If using HDV, Canon DLSR,Nikon DSLR or Blackmagic, the following process is used:· When the Capture button is clicked, a low resolution (assist) image is captured immediately· A pin is set on the Parallel port indicating capture has commenced. This can be used to control a
motion control rig· A delay as set by Preroll time is commenced. This can be the time a motion control rig rolls, back
then commences its action· The Stop Motion Pro high resolution image is captured
When pictures are downloaded from Canon, Nikon DSLR they can be cropped or stretched to matchthe set Frame width and Frame height.
With some Nikon cameras extra pixels are added that to the frame. For these cameras we suggestsetting the Frame width and Frame height to be slightly smaller and setting the DSLR Stretch /Cropto Crop.
8.5 Overlay
The Setup dialog box is available from the main toolbar and main menu Settings|Advanced settings.
Click Overlay on the left side to select the required settings group.

Stop Motion Pro 7 help58
The overlay settings in Stop Motion Pro do not appear in the final Make movie or exported files.
Frame counterA frame counter can be shown over the top of your animation to assist in navigation through frames.
Set the size of the frame counter text using the Size spinedit.
Set the position of the frame counter using the Position Top and Position Left spinedit. The StoredLive indicator is also placed at this location.
Set the text color and background color of the frame counter text by clicking Text color andBackground color. Setting background color to Black (RGB 0,0,0) displays as a transparentbackground..

Advanced settings 59
Safe zoneA Safe zone can also be shown over the top of your animation to assist knowing what are theboundaries are of your animation.
In some cases the aspect ratio of the capturing device may not match the required output size. Presetsrepresenting different output formats and aspect ratios are included, making it possible to frame shotsappropriately. For example a DSLR format is 4:3, but the result may be used for a feature film wherethe requirements are 1.85:1.
Select the required aspect ration from the Aspect ratio drop down list.
The percentage of the frame size can be set using Action safe spinedit and Title safe spinedit.
The opacity of the area outside the Action safe area can changed using the Mask Opacity spinedit.The color of the mask can be set by clicking Mask color.
Markers and guides can also be overlayed.
8.6 Shortcut keys
The Setup dialog box is available from the main toolbar and main menu Settings|Advanced settings.
Click Shortcut keys on the left side to select the required settings group.

Stop Motion Pro 7 help60
More efficient animation can be achieved by using shortcut keys, rather than the mouse.
You can allocate a wide range of Stop Motion pro actions to specific keyboard keys.
Default shortcut keys have been set up for Stop Motion Pro, however these can be easily changed.
Select the required function listed in the Function column, then click in the Short key cell for that row.A list of keys is displayed on a drop down list.
Only one Function can be allocated to a specific key. If multiple functions are allocated to the samekey, a warning will be show when OK, or Apply is clicked. The duplicate allocation is shown with a redback ground color.
The speed of key repeat can be set by Maximum key repeat speed.

Advanced settings 61
Key testingIf you need to match a key with a key function, use the Key tester. Select the Check key beingpressed tick box, then press your key to test. The key title will appear to the right of this area. You canthen assign that shortcut key to a function as described above.
Click Print list to print a list of the functions and key allocation.
To transfer standard shortcut settings to another machine, click Save list to save a copy of the list asa text file.
To import standard shortcut settings from another machine, click Open list to open a text file.
Stop Motion Pro is compatible with Numeric only keypads . Simply plug in the keypad and set up theshortcut keys as you wish to work. This is a great way to animate and highly recommended.
8.7 Remote control
The Setup dialog box is available from the main toolbar and main menu Settings|Advanced settings.
Click Remote control on the left side to select the required settings group.

Stop Motion Pro 7 help62
Stop Motion Pro can be controlled by external hardware using the parallel port. This can be used formotion device controllers or a simple four button remote.
Type

Advanced settings 63
Set the parallel printer port of remote control.
Input 1 .. 4Up to four inputs can be allocated to perform Stop Motion Pro tasks.
Use the drop down lists to select the required function for each input.
Refer to our website for more information on the hardware interface specifications.

Part
IX

Capture Settings 65
9 Capture Settings
9.1 Capture settings overview
The capture settings dialog box allows you to select the relevant capture method for a Production/Shot.
The capture settings dialog box is displayed when you create a new Production/Shot or open anexisting Production/Shot, or select main menu Settings|Capture.
One of the major benefits of using Stop Motion Pro is being able to immediately see any changes froma live view of your animation compared to the last frames captured.
A live video source can be in the form of a Canon compact digital still camera, Canon DSLR, NikonDSLR, DV camera, webcam or analogue video adapter. Please read our compatibility guide here.
If you have a live video source, plug it into your computer and ensure it is turned on before startingStop Motion Pro.
DV cameras should not have video tapes in them to avoid going into standby mode. Somecameras come from the factory with demo mode set. This must be turned off.
Depending on what devices you have connected to your computer and which version of Stop MotionPro you have, you will see a list of options on the Capture type drop down list.

Stop Motion Pro 7 help66
Select the option that best suits how you are working.
No capture type No live videoMore details can be found at No capture type.
Video / webcam Use for webcams, DV cameras, analogue capture adapters, Blackmagic Design interface cards for HDvideo capture or HDV cameras.More details can be found at Analogue capture or webcam .
Directory scanUse for DSLRs, scanners etc.The capture button on the main toolbar is not active in this mode.More details can be found at Directory scan.
Directory scan Video assistDirectory scan can also be used with DV and analogue assist. See the individual entries for Video /webcam capture for information on setting up the specific assist processes.More details can be found at Directory scan.
When a frame is added to the directory that is being scanned, Stop Motion Pro captures a frame fromthe live video source. It is possible to toggle between the directory frame and the assist frame footageusing the View menu
Capture Settings 67
Canon digital compact cameraSome Canon compact cameras will provide a live video feed from the USB connector on the camera.If your camera comes with Canon remote shooting software, it will probably work with Stop Motion Pro.More details can be found at Canon digital compact camera.
Canon DSLR No assistUse for Canon DSLR cameras.More details can be found at Canon DSLR.
Canon DSLR assistUse for Canon DSLR cameras.Canon DSLR can also be used with DV and analogue assist. See the individual entries for Video /webcam capture for information on setting up the specific capture processes. More details can be found at Canon DSLR.
When a frame is captured, Stop Motion Pro captures a frame from DSLR and the live video source. Itis possible to toggle between the DSLR frame and the assist frame using the View menu option
Canon DSLR EVF assistUse for Canon DSLR cameras that are enabled with Canon live view .More details can be found at Canon DSLR.
When a frame is captured, Stop Motion Pro captures a frame and assist from the DSLR. It is possibleto toggle between the DSLR frame and the assist frame using the View menu option
Nikon DSLR No assistUse for Canon DSLR cameras.More details can be found at Nikon DSLR
Nikon DSLR assistUse for Canon DSLR cameras.Canon DSLR can also be used with DV and analogue assist. See the individual entries for Video /webcam capture for information on setting up the specific capture processes. More details can be found at Nikon DSLR
When a frame is captured, Stop Motion Pro captures a frame from DSLR and the live video source. Itis possible to toggle between the DSLR frame and the assist frame using the View menu option
Nikon DSLR EVF assistUse for Nikon DSLR cameras that are enabled with Nikon live view .More details can be found at Nikon DSLR
When a frame is captured, Stop Motion Pro captures a frame and assist from the DSLR. It is possibleto toggle between the DSLR frame and the assist frame using the View menu option
After making the appropriate changes click Apply or OK.
If you click Apply the dialog box remains displayed.
If you click OK the dialog box is closed.
9.2 No capture type set
A tab available on the Capture settings dialog box.

Stop Motion Pro 7 help68
Frame resolution width and height Set as required
This can be used when importing files into a Production/Shot. See Import individual frames and ImportAVI files.
9.3 Directory scan
A tab available on the Capture settings dialog box.
Directory scanIf you do not have a live video source, then you can continuously scan a directory (folder) looking fornew files. For example, using a scanner or Digital still camera capturing to your computer directly.
This is useful if you have a non Canon DSLR (or a scanner) and wish to automatically add newlycaptured frames to a Stop Motion Pro Production/Shot for preview and editing.
Most DSLRs and many digital compact cameras include capture software that allows remote capturedirectly onto a computers hard drive. Use this software to specify a location on your computer.
The capture button on the main toolbar is not active in this mode.
Click Browse to locate this folder where the source files will be placed by the camera software.

Capture Settings 69
Frame resolution width and height Set as required
Flip imagesIt is possible to flip the image vertical, horizontal (or both)
File size MinIf you are finding thumbnails appearing in your Production/Shot, set the File size min to avoid these(Note the Kb size of these thumbnail files by looking at their properties in a Windows Explorer window,and set Kb size to a greater number).
File suffixSelect the file type to search for from the File suffix drop down list.
Assist modeDirectory scan can also be used with DV and analogue assist. See Video / webcam capture forinformation on setting up the specific capture processes.
When a frame is added to the directory that is being scanned, Stop Motion Pro captures a frame fromthe live video source. It is possible to toggle between the directory footage and the Assist framesusing the View menu option
The capture button on the main toolbar is not active in this mode.
9.4 Video / webcam
A tab available on the Capture settings dialog box.

Stop Motion Pro 7 help70
The appearance of this tab will vary depending on your actual hardware. There should be some basicsettings common to all hardware.
DeviceDisplays a list of compatible video devices.
These can be DV, HDV, analogue capture adapters, Blackmagic Devices capture card or webcam.
Blackmagic devices are used to capture SD (standard definition) and HD (high definition) video. Blackmagic devices such as the Decklink series are compatible with Stop Motion Pro. Using aBlackmagic capture device it is possible to capture at resolutions of 1920 x 1080 via component video(RGB).
The type of camera output will determine which resolution you need to set.
SizeSet the resolution of the captured frames and live video source. These options are provided by thecapture device.
InputDepending on your hardware and how you have connected your camera, it is possible to set how thecamera is connected (S-Video or composite RCA connector or component multiple connections). Ananalogue capture card may also require setting for NTSC or PAL source video, this will depend on

Capture Settings 71
your camera, please refer to the documentation.
The Format button also has options that are specific to your hardware, and you should experimentwith settings as appropriate.
Flip imageTicks in these boxes will flip the image vertically, horizontally or both.
Screen Refresh rateHow often the video image is refreshed on the stage. Lower figures are recommended for oldersystems.The Dropped samples indicates if your refresh rate is too high after OK or Apply is clicked.
Frame averagingReduce CCD chip noise and other artefacts using the frame averaging tool. Stop Motion Pro willsample the number of frames you specify and average each pixel to remove noise. Effects such asmotion blur can be created with this tool. Click here for more details.
Click Apply to reflect the changes on the Stop Motion Pro display. This is useful when settingexposure and focus.
9.5 Canon digital compact camera
A tab available on the Capture settings dialog box.
Some Canon compact camera will provide a live video feed from the USB connector on the camera. Ifyour camera comes with Canon remote shooting software, it will probably work with Stop Motion Pro.
Two tabs are displayed, Canon and Canon advanced

Stop Motion Pro 7 help72
Frame sizeBecause Canon cameras are locked to a 4:3 ratio, it is possible to set the width, with the heightautomatically added. Stop Motion Pro will automatically resize images if the actual images are notidentical.
Flip imageTicks in these boxes will flip the image vertically, horizontally or both.
Exposure mode"Program" usually refers to an automatic exposure. This is not ideal for stop motion animation (theresult is flicker), a manual setting is better, we recommend experimenting with TV, AV or manual ifavailable.
TVThe camera shutter speed.
AV The camera aperture value.
AF distanceMacro or normal zoom ranges can be specified here.
Focus lockWhen ticked, the focus is locked. To unlock focus remove the tick.

Capture Settings 73
Tip: If you frame an image with your subject not in the center of the image, it may not focus correctly. To fix this, unlock the focus and reframe your image with the subject you wish to be in focus in thecenter of the image. Wait for the camera to focus, then lock the focus. Reframe your subject and itwill remain focused correctly.
ZoomThis slider allows control of the optical zoom capabilities of your camera.
If you are experiencing issues connecting to your Canon camera that worked in the past, ensure youhave deleted the old camera configuration information
Ensure you camera is connected to mains power. If you camera is not visible to Stop Motion Pro thenremove the USB connection and then reconnect. The settings on the tab itself are set by your specificcamera.
9.6 Canon DSLR
A tab available on the Capture settings dialog box.
Two tabs are displayed, Canon and Canon advanced.

Stop Motion Pro 7 help74
Frame sizeSpecify the frame height and width as appropriate.
After a frame has been captured in this session, the actual size of the frame created by the camera isdisplayed. The Camera setting height and width should usually equal the set Frame height andFrame width.
Screen Refresh rateHow often the video image is refreshed on the stage. Lower figures are recommended for oldersystems.
Flip imageTicks in these boxes will flip the image vertically, horizontally or both. Flipped images remain flipped.
Exposure mode"Program" usually refers to an automatic exposure. This is not ideal for stop motion animation (theresult is flicker), a manual setting is better, we recommend experimenting with TV, AV or manual ifavailable.
TVThe camera shutter speed.
AV The camera aperture value.
Live view exposure offset (Canon, EVF Assist)This can be used to increase the brightness of the live view image when non Canon manual iris lensesare used.On some Canon DSLR cameras there is a Camera settings option to control the live view brightness.(refer to your camera manual).However on other cameras (usually the more economical ones in the range) the live view brightnessgets 'confused' when the manual iris lenses are used. In this situation the live view image is muchdarker than the actual captured frame.Increase the value of Live view exposure offset to increase the brightness of live view to match thecaptured frame exposure.
Canon, AssistIt is possible to use a Canon DSLR with video assist. Using this mode Stop Motion Pro can bothcontrol the connection to the cameras and the capturing of frames from the DSLR and the assist.
When a frame is captured using the Stop Motion Pro capture button on the main toolbar, Stop MotionPro captures a frame from the DV live video source and the Canon DSLR. It is possible to togglebetween the Canon DSLR stored frames and the Assist frames using the View menu option.
Canon, EVF AssistUse for Canon DSLR cameras that are enabled with Canon live view. The assist is received using theUSB lead.
When a frame is captured using the Stop Motion Pro capture button on the main toolbar, Stop MotionPro captures a frame from the DV live video source and the Canon DSLR. It is possible to togglebetween the Canon DSLR stored frames and the Assist frames using the View menu option.
Ensure you camera is connected to mains power. If you camera is not visible to Stop Motion Pro thenremove the USB connection and then reconnect. The settings on the tab itself are set by your specificcamera.

Capture Settings 75
9.7 Canon advanced
A tab available on the Capture settings dialog box.
Displayed when Canon digital compact camera or Canon DSLR is chosen as the capture source.
The exact settings will vary for your particular camera. The Canon advanced tab is always presentedin conjunction with either the Canon digital compact camera tab or the Canon DSLR tab
ISO The speed of the camera sensor. Higher values allow filming in lower light levels with the payoff beinga noisier image.
White balanceAuto is not recommended because it may change during shot. Choose an option from the drop downlist.If your camera has a Kelvin option, and it is selected, a Kelvin temperature white balance can be set.
Size, QualityDepends on camera, refer to camera documentation. Set to your requirements. Stop Motion Pro iscompatible with the JPEG and some RAW images.
With some cameras the Size and Quality settings maybe combined into a single drop down list.

Stop Motion Pro 7 help76
Ensure you camera is connected to mains power. If you camera is not visible to Stop Motion Pro thenremove the USB connection and then reconnect. The settings on the tab itself are set by your specificcamera.
9.8 Nikon DSLR
A tab available on the Capture settings dialog box.
Two tabs are displayed, Nikon and Nikon advanced.
Frame sizeSpecify the frame height and width as appropriate.
After a frame has been captured in this session, the actual size of the frame created by the camera isdisplayed. The Camera setting height and width should usually equal the set Frame height and Framewidth.
However with some Nikon cameras extra pixels are added that to the frame. For these cameras wesuggest setting the Frame width and Frame height to be slightly smaller and setting the DSLRStretch /Crop on the Settings dialog to Crop.

Capture Settings 77
Flip imageTicks in these boxes will flip the image vertically, horizontally or both. Flipped images remain flipped.
Exposure mode"Program" usually refers to an automatic exposure. This is not ideal for stop motion animation (theresult is flicker), a manual setting is better, we recommend experimenting with TV, AV or manual ifavailable.
TVThe camera shutter speed.
AV The camera aperture value.
Nikon, AssistIt is possible to use a Nikon DSLR with video assist. Using this mode Stop Motion Pro can bothcontrol the connection to the cameras and the capturing of frames from the DSLR and the assist.
When a frame is captured using the Stop Motion Pro capture button on the main toolbar, Stop MotionPro captures a frame from the DV live video source and the Nikon DSLR. It is possible to togglebetween the Nikon DSLR stored frames and the Assist frames using the View menu option.
Nikon, EVF AssistUse for Nikon DSLR cameras that are enabled with Canon live view. The assist is received using theUSB lead.
When a frame is captured using the Stop Motion Pro capture button on the main toolbar, Stop MotionPro captures a frame from the DV live video source and the Nikon DSLR. It is possible to togglebetween the Nikon DSLR stored frames and the Assist frames using the View menu option.
Ensure you camera is connected to mains power. If you camera is not visible to Stop Motion Pro thenremove the USB connection and then reconnect. The settings on the tab itself are set by your specificcamera.
9.9 Nikon advanced
A tab available on the Capture settings dialog box.
Displayed when Nikon DSLR is chosen as the capture source.

Stop Motion Pro 7 help78
ISO The speed of the camera sensor. Higher values allow filming in lower light levels with the payoff beinga noisier image.
White balanceAuto is not recommended because it may change during shot. Choose an option from the drop downlist.
Size, QualityDepends on camera, refer to camera documentation. Set to your requirements. Stop Motion Pro iscompatible with the JPEG and some RAW images.
EVF timeoutWith some Nikon camera, they can overheat if the EVF is left on for too long. Change this setting toget the required EVF time.
Ensure you camera is connected to mains power. If you camera is not visible to Stop Motion Pro thenremove the USB connection and then reconnect. The settings on the tab itself are set by your specificcamera.

Capture Settings 79
9.10 Video assist
Video assist is a method of checking positioning, framing and lighting while filming with a device thatdoes not have video out.
Stop Motion Pro allows the connection of high quality Digital Still Reflex Lens (DSLR) cameras and avideo camera (DV, HDV, Blackmagic or analogue) at the same time. The live Assist image is not usedin the final animation, rather it is used during filming as a guide for onionskinning, rotoscoping andother tools.
Effectively using a video assist you get the best of both worlds, the high quality of a DSLR for your finaloutput, with the live video feedback giving the animators control while filming.
Information on Video assist and associated advanced capture techniques in the tutorial section of our website.
An additional option on the Video / webcam tab allows control over the aspect ratio the video assistfootage is viewed at.
Selecting Assist height = full res height means the DV footage is not stretched to compensate forthe differing aspect ratios between digital still cameras and video cameras. Black bars will appear onthe right and left of the video footage. This is normal.
The Pixel ratio of the assist source can be set. The following a standard values:1 Square0.9091 NTSC DV1.2121 NTSC DV Widescreen1.0926 (PAL DV)1.4568 (PAL DV Widescreen)1.3333 (HDV 1080)
9.11 Averaging
Frame averaging can significantly improve image quality especially with low light conditions andwebcams.
A setting of 5 or above will greatly contribute to removing video noise, while smoothing gradients.

Stop Motion Pro 7 help80
9.12 Multiple exposure
A tab available on the Capture settings dialog box.
Multiple exposure mode is used to capture multiple frames for the same frame number. This can beused for Checkerboard, High Dynamic Range, Motion control, stereoscopic or special effects shots.
For example:Exposure 1 is a worklightExposure 2 is foreground exposed correctlyExposure 3 is foreground exposed to be used as a special effect mask

Capture Settings 81
To use Multiple exposure tick Use Multiple exposure.

Stop Motion Pro 7 help82
Set the Number of exposure to be taken each frame.
Select either Manual or Automatic Multiple exposures.If Manual is selected, a dialog box with a capture button is displayed between each exposure. Clickthe Capture button to capture the exposure.
If Automatic is selected, each exposure will be taken with a delay between exposure set by Delay.
Each exposure is given a Description and the exposure time is set by the TV value.
When using Multiple exposure TV values on the camera tab are ignored.
Each multiple exposure can be considered a completely sperate set of frames. Each exposure can beplayed. To select the multiple exposure to be played select the View menu.
To export multiple exposure, select the Export multiple dialog box.
Stop Motion Pro can also control the Mark Roberts S3 Stereoscopic Stepper. More information is here.
9.13 Multiple Exposure Mark Roberts Stepper
The easiest way to create a 3D stop motion film is to use a single camera and lens and move the

Capture Settings 83
camera between the 'left' and 'right' eye position.
This method has the following advantages:· makes the camera package smaller by needing only one camera and lens· eliminates differences in the image due to two lenses having different lens distortions· allows the inter-ocular distance to be as small as needed without problems due to camera and lens
sizes
The Mark Roberts S3 Stereoscopic Stepper module is an intelligent, low-cost, portable unit that canaccurately control the position of the camera. It is designed to carry a variety of DSLR and filmingcameras.
Follow the instructions from Mark Roberts on installing the driver software and note the communicationport name displayed in Windows Control Panel.
You must use Stepper firmware version 2.6 and above.
To control the position of the stepper, use the Multiple exposure tab on the Capture settings dialogbox.
Tick Use MR stepper, and a list of communication ports will be displayed in the Port drop down list.Select the port noted from the Windows Control Panel.
Click the Zero set button next to the Port drop down list to reset the stepper zero point.
Stop Motion Pro 7 help84
Enter the appropriate stepper distances for each exposure in the Step dist column.
Stop Motion Pro will wait for the Stepper to reach the correct distance before allowing the nextexposure to be taken.

Part
X

Stop Motion Pro 7 help86
10 Importing into Stop Motion Pro
10.1 Import individual files
This option lets you import still image files into Stop Motion Pro. You are able to reorder the images asappropriate during the import process. Note that frames will automatically be resized to the frame size(resolution) that you have specified for your Production/Shot.
Select main menu File|Import individual files (BMP, JPG, TGA, TIF).
A Windows file browser window will appear.
Locate the directory where the still images are that you wish to import. Stop Motion Pro can alsoimport CRW and NEF formatted image files.
If you select a single frame, the frame is brought into Stop Motion Pro as a stored frame.
If you have selected multiple images to import (by using Shift+click and /or Ctrl+click to select multipleimages) the Reorder Import Files dialog will be displayed.
Click Open to import the files.
10.2 Import individual files - multiple exposure
This option lets you import still image files into Stop Motion Pro if Multiple exposures are set. You areable to reorder the images as appropriate during the import process. Note that frames will

Importing into Stop Motion Pro 87
automatically be resized to the frame size (resolution) that you have specified for your Production/Shot.
Select main menu File|Import individual files (BMP, JPG, TGA, TIF) and the following dialog isdisplayed.
Select the required exposure from the Exposure drop down list.
Click Open and a Windows file browser window will appear.
Locate the directory where the still images are that you wish to import. Stop Motion Pro can alsoimport CRW and NEF formatted image files. Select multiple images by using Shift+click and /orCtrl+click.
The files will be displayed in alphabetical order. Select a file, then click Move up and Move Down tochange the import order.
Click Delete to remove a file from the import list. This does not delete the file off the hard drive.
The number of files for each Exposure must be the same.
Click OK to import the files.
10.3 Reorder Import Files
This dialog lets you reorder the way individual image files are brought into Stop Motion Pro.

Stop Motion Pro 7 help88
It is displayed when multiple images have been selected to import with File|Import individual files.
The imported frame file names are displayed as a list on the left hand side. The frame at the top of thelist will be the first frame imported into the Production/Shot, the file name in the list below the first filename will be the next frame and so on.
While you can reorder frames in the Stop Motion Pro editor, it may be desirable to reorder the frameshere.
Simply select the file name you wish to move up or down. When a file name is selected the Move upand Move down buttons become enabled. Use these buttons to reorder your frames as appropriate.
To import the files, click OK.
10.4 Import AVI file
This option imports AVI video files into Stop Motion Pro as individual frames.
Select main menu File|Import AVI file.

Importing into Stop Motion Pro 89
AVI files will automatically be resized to the frame size that you have specified for your Production/Shot.
Ideally, Stop Motion Pro should be used to import uncompressed AVI files, most video editing softwareallows exporting with this option.
If you have difficulties importing AVI files into Stop Motion Pro, consider using another application toconvert them to uncompressed AVI files.
Click Open to import the file.

Part
XI

Exporting from Stop Motion Pro 91
11 Exporting from Stop Motion Pro
11.1 Make movie
Make movie is an option to output your animation from Stop Motion Pro.
Select main menu File|Make movie. The following dialog box will be displayed.
Select the frames to be exported using the Make movie using drop down list.
If Multiple exposure is set, select the Exposure from the drop down list

Stop Motion Pro 7 help92
The whole animation, or a selection of frames can be exported.· To export all frames, select All frames· To export a range of frames, select Frame range. A range of frames can be entered in the text box.
The format is first frame - last frame. eg 1-50 will export frame 1 to frame 50.
Set the aspect ratio of the movie by selecting from the drop down list.
Tick Include slate frame to insert a Slate as the first frame. Click Slate to view or edit the Slateinformation.
The exported frame size can be changed, by entering a new width and height.
If the height and width are different from the captured size, the exported movie can be stretched to fitthe new size or cropped. The captured images are not altered.
Set the frame rate of the movie file using the Frame rate spinedit.
To use the audio file in the Audio sync tool, tick Include Audio Sync file.
Select the required video format, AVI uncompressed, AVI lossless compression, MOV or WMV thenclick OK and select the destination directory.
Always use MOV or AVI Uncompressed export for editing on a MAC.
Export as AVI Use AVI Uncompressed if you wish to use your animation for importing into a video editing program.Uncompressed is the highest possible quality, but it creates very large files.
Use AVI lossless compression if you wish to use your animation for importing into a video editingprogram. Stop Motion Pro uses the Lagarith compressor for the highest possible quality, but withmuch smaller files than uncompressed. If you want to edit the exported AVI an another PC, you mustinstall the Lagarith compressor on that PC.
Export as WMVUse WMV for computer playback or sharing your animations on CD.
If WMV is selected the following parameters can be set:Video codecVideo qualityAudio codecAudio quality
We suggest Video codec Windows media V9, HD quality.For audio select 192kb
Export as MOVUse MOV if you wish to use your animation for importing into a video editing program on Apple MAC.
If MOV is selected the following parameters can be set:Video codecVideo quality
Some of the MOV export codecs such as Animation, BMP and Jpeg are only viewable on thedestination MAC if Quicktime Pro is installed on the MAC.
11.2 Export as individual frames
Exporting individual frames is an option to output your animation from Stop Motion Pro.

Exporting from Stop Motion Pro 93
If multiple exposure is set use the Export Multiple exposure dialog box.
Select main menu File|Export individual frames. The following dialog box will be displayed.
The whole animation, or a selection of frames can be exported.· To export all frames, select All frames· To export the current frame only, select Current frame· To export a range of frames, select Frame range. A range of frames can be entered in the text box.
The format is first frame - last frame. eg 1-50 will export frame 1 to frame 50.
Tick Include slate frame to insert a Slate as the first frame. Click Slate to view or edit the Slateinformation.
The exported frame size of the individual bitmaps can be changed, by entering the new width andheight. The captured aspect ratio is kept if Keep aspect ratio is ticked. The captured images are notaltered. Stop Motion Pro will automatically sequence the bitmaps by adding a 4 digit number to the file name.You can add a prefix to each filename. Enter the required prefix in the File name prefix text box.e.g. if you enter rg_1.bmp as the file name prefix in the file dialog, the actual files created will berg_10001.bmp, rg_10002.bmp etc.
If the Current frame is exported, the frame number will be automatically added. e.g. if you enterrg1.bmp as the filename in the file dialog, and the current frame is 18, the actual file created will berg1_0018.bmp.
The animation can be exported as a sequence of individual images. Either BMP, TIF, TGA or JPEGformat can be saved. JPEG images are compressed, and will take up less storage space, howeverthere is a loss of quality.
If JPG or Jpeg2000 is selected as the file type, the Quality of the images can be set using the Quality

Stop Motion Pro 7 help94
spinedit.
Click OK and select the destination directory.
11.3 Export as flipbook
Export as flipbook is an option to output your animation from Stop Motion Pro.
This allow you to create a printed form of your animation. A flip book is a book with a series of picturesthat vary gradually from one page to the next, so that when the pages are turned rapidly, the picturesappear to animate by simulating motion or some other change.
Rather than "reading" left to right, a viewer simply stares at the same location of the pictures in the flipbook as the pages turn. The book must also be flipped with enough speed for the illusion to work, sothe standard way to "read" a flip book is to hold the book with one hand and flip through its pages withthe thumb of the other hand.
You can print onto normal paper, however you will get a much better flipping by using thicker paper.
We recommend using precut business cards such as these. They have a number of advantagesincluding:· easily obtainable· standard sizes without requiring scissors to cut the paper· suitable thickness for flipping
Select main menu File|Export as flipbook. The following dialog box will be displayed.

Exporting from Stop Motion Pro 95
The whole animation, or a selection of frames can be exported.· To export all frames, select All frames· To export the current frame only, select Current frame· To export a range of frames, select Frame range. A range of frames can be entered in the text box.
The format is first frame - last frame. eg 1-50 will export frame 1 to frame 50.
A range of parameters can be set for printing. A sample of the printout is shown so you can see theresult of the settings.
Select your preferred measurement Units from the drop down list. Set the appropriate dimensionsusing the spinedit controls.

Stop Motion Pro 7 help96
Tick Draw label outlines to include lines showing the position of each label to enable easier cuttingout of the frames.
Tick Draw frame number to include the frame number in the top left of the label to ensure the correctsequence.
Select the Aspect ratio of the frame.
To reduce the size of the frame on the label, increase the Gutter size.
Click OK to print the flipbook.
11.4 Export to Youtube
Export to Youtube is an option to output your animation from Stop Motion Pro.
You can publish directly to the Youtube website using your existing Youtube account.
Select main menu File|Export to Youtube. The following dialog box will be displayed.

Exporting from Stop Motion Pro 97
The whole animation, or a selection of frames can be exported.· To export all frames, select All frames· To export a range of frames, select Frame range. A range of frames can be entered in the text box.
The format is first frame - last frame. eg 1-50 will export frame 1 to frame 50.
Set the frame rate of the movie file using the Frame rate spinedit.
To use the audio file in the Audio sync tool, tick Include Audio Sync file.
Select the audio parameters. We recommend Audio codec = Windows media V9, Audio quality =192kb.
Enter your existing Youtube account details, then click Verify to check the connection. Stop Motion Procan remember you login details if you tick Remember password. You can also set the Youtube logindetails on the System settings dialog box.
You must include a Youtube Title, Description and Keywords. The keywords are used by otherYoutube users to find your animation.
Select Private or Public Youtube access.

Stop Motion Pro 7 help98
11.5 Export frame list
This option creates a list of the frame number in the sequence and the filename in the Production\Shot\frame and Production\Shot\frame_HD directory. The filenames may be different thanthe frame order if the Editor was used to move frames around or hide frames.
Select main menu File|Export Frame list The following dialog box will be displayed.
This feature is especially useful for line testing.
Click Print to print the list
Click Save to save as CSV (Comma Delimited, CSV text file format) or as XLS (Microsoft Excel)format.
11.6 Export RAW
Export RAW is an option to output your animation from Stop Motion Pro.
It is only available if RAW files were captured in Canon or Nikon DSLR mode. This option creates acopy of the RAW files ignoring any hidden frames.
If multiple exposure is set use the Export Multiple exposure dialog box.
Select main menu File|Export RAW frames. The following dialog box will be displayed.

Exporting from Stop Motion Pro 99
The whole animation, or a selection of frames can be exported.· To export all frames, select All frames· To export a range of frames, select Frame range. A range of frames can be entered in the text box.
The format is first frame - last frame. eg 1-50 will export frame 1 to frame 50.
Tick Include slate frame to insert a Slate as the first frame. Click Slate to view or edit the Slateinformation.
A prefix can be added to each of the RAW files when they are copied using the Frame prefix textbox..This could include shot information.
A notes file is also created in the destination directory. This is a standard Windows text file and anyrelevant information can be included.
Click OK to copy the RAW files.
11.7 Export Multiple exposure
Export Multiple exposure is an option to output your animation from Stop Motion Pro.

Stop Motion Pro 7 help100
It is only available if Multiple Exposure was set in Canon or Nikon DSLR mode.
This option creates a copy of the TIF, JPG and RAW files in the frame_hd directories ignoring anyhidden frames.
Select main menu File|Export Export multiple Exposure. The following dialog box will be displayed.
The whole animation, or a selection of frames can be exported.· To export all frames, select All frames· To export a range of frames, select Frame range. A range of frames can be entered in the text box.
The format is first frame - last frame. eg 1-50 will export frame 1 to frame 50.
Tick Include slate frame to insert a Slate as the first frame. Click Slate to view or edit the Slate
Exporting from Stop Motion Pro 101
information.
A prefix can be added to each of the Multiple Exposure files when they are copied using the Frameprefix textbox.. This could include shot information.
The order the exposures are exported can be set by selecting a row then click Move up or Movedown. The order selected is influenced by the requirements of the application use to apply postprocessing to the frames.
There may be a situation where an exposure is not to be included in export. All rows with a tick in the Export column will be exported.
The exposures can be exported in one of the following formats:Separate directory per frameThis format is compatible with Adobe After Effects.Each filename is renamed and a suffix automatically added depending on the row. The exposure in thetop row of the grid has suffix a, second row suffix b etc.eg 00001a.tif would be the left eye frame, 00001b.tif would be the right eye frame.
Separate directory per exposureA directory will be created for each exposure and all the frames for the exposure be placed in thatdirectory. Stop Motion Pro will automatically sequence the frames by adding a 4 digit number to the filename.
RAW files will follow the same format, but a separate directory will be created.
A notes file is also created in the destination directory. This is a standard Windows text file and anyrelevant information can be included.
Click OK to copy the Multiple Exposure files.

Part
XII

Editor 103
12 Editor
12.1 Editor overview
The editor provides editing functionality especially designed for stop motion animation. Editing isperformed using thumbnail images representing each frame of the animation, and the Action options.The editor is available when a Production/Shot has stored frames.
To display the editor, click editor on the main toolbar.
Selecting framesLeft click on a frame to select it. Selected frames are indicated by a red border and are displayed in theSidebar - Preview tool.
Select multiple frames by holding down the Ctrl key and clicking on the individual frames, or click onthe first frame you wish to select, hold down the Shift key and click on the last frame of the sequence.
If you double click a frame Stop Motion Pro closes the Editor window, with that particular frameselected on the main screen.
Frame informationThe following information is displayed for each frame:

Stop Motion Pro 7 help104
Frame number: the order they shown in your animation ID: the order the frames were added to the animation This cannot be changed. Description: description can be added to each frame.
These options can be changed on the Settings Sidebar tool.
Editing framesThe actual editing of frames is performed on the Action Sidebar tab.
You can also right click on the selected frames and the following popup is displayed:
Sidebar tab - DisplayUse this tab to set which frames are displayed in the editor.
Select the required frame display from the drop down lists.
Any editing actions will apply to all Exposures and frame types.
Sidebar tab - PreviewUse this tab to play the frames displayed in the editor.

Editor 105
Click Play the animation.
Tick Output to second monitor if the Preview is to be displayed on a second monitor.
Sidebar tab - Group hideUse this tab to add a description to an individual frame. Frames with the same Description can beHidden/Unhidden as a group.
A color bar is placed under all the frames of the same description.
· Enter the required text in the Description text box· Click the Identification color box to select the required color to identify the Description group.· Click Apply.
The Description and Identification color are shown in the list. Tick the checkbox to Hide all the frameswith the Description.
Sidebar tab - SettingsUse this tab to set the options for the Editor.

Stop Motion Pro 7 help106
To display the frame descriptions, tick Show Frame description.
Set the number of lines in frame description in the Number of description lines spinedit.
To display the frame ID, tick Show Frame ID.
To display the hidden frames, tick Show hidden frames.
Set the thumbnail display size using the Display size drop down list.
12.2 Actions tab
Once the thumbnails are selected a range of editor actions can be performed.
Hiding, UnhidingHiding frames is like an unlimited Undo. The benefit of this is that you can change your mind about

Editor 107
work you have hidden in a non-linear way.
Hidden frames are indicated by a diagonal yellow line.
Hidden frames do not appear when you play or loop your animation and are not exported.
To Hide selected frames click Hide, or select Hide selected frames from the Actions drop down listthen click Apply.
To Unhide selected frames click Unhide, or select Unhide selected frames from the Actions dropdown list then click Apply.
If you find the Hidden frames distracting, the Editor can be set so they are not displayed.
It is possible to hide a frame without being in the Editor. Right click on the stored frame and select Hide frame.
Cut, Copy, PasteLike a word processor, you can select individual or multiple frames for cut, copy and paste.
When you copy a frame or frames a reference is placed the clipboard. Frames can be pasted byselecting another frame and selecting Action Paste before current frame or Paste after currentframe.
To copy selected frames click Copy. To Paste after the selected frames click Paste after.
Cut, Copy and Paste options can be selected from the Actions drop down list then click Apply.
Copy frame as bitmap, Replace frame with bitmapA single frame can be copied to an external image editing application using action Copy frame asbitmap then click Apply.
After external image editing, the frame is replaced using action Replace frame with bitmap then clickApply.
Delete selected hidden framesYou can delete hidden frames. This will delete the files off the hard drive and they cannot berecovered.
Select Delete selected hidden frames from the Actions drop down list then click Apply.
Insert blank framesUsing this tool it is possible to pad out your animation with blank frames.
Select Insert blank frames from the Actions drop down list, enter the number of frames in the Countspinedit then click Apply. Reverse order of selected framesThe display order of selected frames can be reversed.
If you select 1,2,3,4,5,6,7,8 becomes 8,7,6,5,4,3,2,1.
Select Reverse order of selected frames from the Actions drop down list then click Apply.
Repeat selected framesRepeats the selected frame the number of times you specify. This feature is useful for extending singleframe captures to double frames.
If you select frame 4 and Count=2: 1,2,3,4,5,6,7,8,9,10 becomes 1,2,3,4,4,4,4,5,6,7,8,9,10
If you select 2,3,4,5 and Count=1: 1,2,3,4,5,6,7,8,9,10 becomes 1,2,2,3,3,4,4,5,5,6,7,8,9,10

Stop Motion Pro 7 help108
Select Repeat selected frames from the Actions drop down list, enter the number of frames in theCount spinedit then click Apply.
Repeat selected sequenceRepeats the selected sequence the number of times you specify.
If you select 2,3,4,5 and Count=2: 1,2,3,4,5,6,7,8,9,10 becomes 1,2,3,4,5,6,7,8,9,10,2,3,4,5,2,3,4,5
Select Repeat selected sequence from the Actions drop down list, enter the number of frames inthe Count spinedit then click Apply.
Part
XIII

Stop Motion Pro 7 help110
13 Markers
13.1 Markers
Markers and guides are useful reference tools for action, timing and positioning. For example, an arcfor a hand to follow, with slow in and out points.
Tick main menu View|Show markers and lines to add markers, poly lines, vertical lines andhorizontal lines to use as guides over live and stored frames select This must be ticked for markersto be visible.
Markers are not exported with the stored frames or made into a movie.
Right clicking on the stored frame or live view will display a popup menu.
The current option is signified by a black dot to the left. In the example above, Select object is thecurrent function.
Add Crosshair, Add Point, Add StarAdds individual square marker points over the image. It is possible to add as many points as requiredby clicking the left mouse button. Add PolylineDraw of a line of any shape by clicking the mouse left button and moving the mouse. To end drawingdouble click the left mouse button.
Add Straight lineDraw of a straight line by clicking the mouse left button and moving the mouse
Select objectWhen a line is selected it is possible to resize and scale the polyline.When a point is selected it is possible to resize and move the point.The Color and size selected objects and Delete selected object menu options are enabled.Multiple objects can be selected by holding the Ctrl key and clicking with the mouse
Color and size selected objectsWhen an item is selected it is possible to adjust the color and size of the selected line or point. Moreinformation can be found here.
Delete selected objectsDelete the selected line or point.

Markers 111
Delete all objectsDelete all lines and points.
Hide frameSelecting this option to hide the current stored frame. The frame appears in the editor with a yellowdiagonal line through it.
Duplicate frameSelecting this option to Duplicated the current stored frame.
Part
XIV
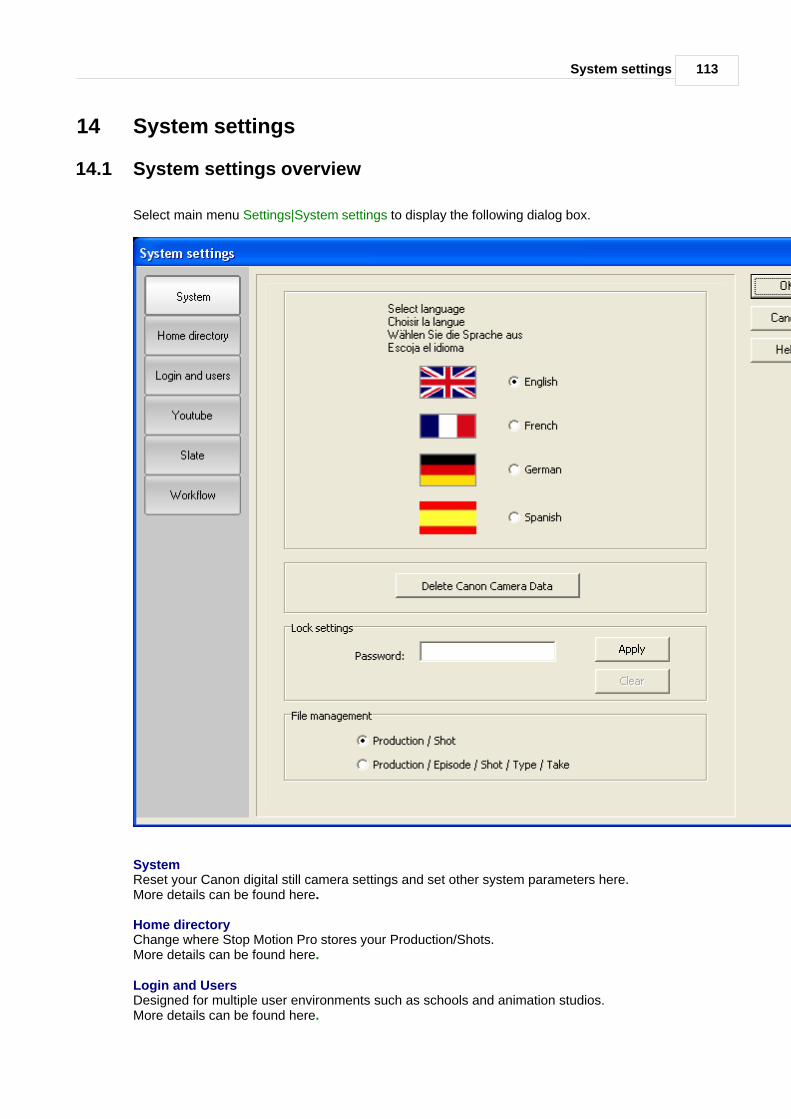
System settings 113
14 System settings
14.1 System settings overview
Select main menu Settings|System settings to display the following dialog box.
SystemReset your Canon digital still camera settings and set other system parameters here.More details can be found here.
Home directory Change where Stop Motion Pro stores your Production/Shots. More details can be found here.
Login and Users Designed for multiple user environments such as schools and animation studios.More details can be found here.

Stop Motion Pro 7 help114
YoutubeSet Youtube login parameters for all users.More details can be found here.
SlateSet Slate parameters.More details can be found here.
WorkflowSet Workflow parameters.More details can be found here.
14.2 System
Select main menu Settings|System settings to display the following dialog box.
Click System on the left side to select the required settings group.

System settings 115
Stop Motion Pro can display the dialog boxes, menus and warning messages in a range of languages.
Click Delete Canon Camera Data to clear any information Stop Motion Pro has regarding your Canondigital still camera.
All System settings so only authorized users can make changes. · To create a password, enter a Password then click Apply. · To clear a password, enter the existing Password then click Apply. Click Clear to reset the current
password.· To edit a Password, enter the existing Password then click Apply, Click Clear to reset the current
password. Then enter the new Password and click Apply.
Stop Motion Pro can display different levels of information for each Production/Shot.Option 1
Option 2
Click OK to save the settings.
14.3 Home directory
Select main menu Settings|System settings to display the following dialog box.
Click Home directory on the left side to select the required settings group.
The following rules apply to how Stop Motion Pro manages your Production/Shots:· All Production/Shots are stored under the Stop Motion Pro home directory.· All assets for a Production/Shot are copied into the Production/Shot directory. This includes files
used for Rotoscope, Audio sync and Chroma key.

Stop Motion Pro 7 help116
· All frames are stored under the Production/Shot directory
Store Production/Shots using Windows User My Documents settings allows the home directoryfor each Windows login to be specified in each Windows Users's profile.
Store Production/Shots on this machine allows any home directory to be set.
If Store Production/Shots on a server option is selected the following process occurs:· When a Production/Shot is opened, all Production/Shot files are copied from the server to the local
machine.· When a Production/Shot is closed, all Production/Shot files are copied from the local machine back
to the server.
This results in the advantages of centralized storage of Production/Shots, with no network interactionduring the animation process.
Click Set new directory to display the directory selection dialog box.
Click OK to save the settings.
14.4 Login and Users
Select main menu Settings|System settings to display the following dialog box.
Click Login and users on the left side to select the required settings group.
If you are using Stop Motion Pro in an environment with multiple users (a school or studio for instance)you may like to take advantage of the user management tool in Stop Motion Pro. This protects userswork and ensures only the owner of Production/Shots can modify their Production/Shots.
Each user needs to login with their own password.
There are two types of users, those who can manage users (administrators) and those who can't.Those who can manage users are able to view and delete other users Production/Shots, create usersand reset passwords. Those users who do not have manage users rights can only create, edit anddelete their own Production/Shots.
If the manage users password is lost or forgotten, use Windows explorer and delete smp_admin.abs

System settings 117
in the home directory. This will delete ALL user data. The Production/Shots will remain.
How to use the user management toolTo enable user management, tick Individual user login.
Create a groupThe user management tool requires at least one group to be created.
Adding , deleting and editing groupsClick Add in the Group section. Enter the group name, then click OK.
The new group name will be added to the tree display.
To add, delete or edit a group firstly select a group, it will be highlighted. The Edit and Delete buttonswill become enabled (see below).
Add users to a groupSelect a group

Stop Motion Pro 7 help118
Click Add in the User section and enter the name of the individual.
It is possible to allow any user to have rights to manage other users.
If a user forgets their password, click Reset password.
To edit Users information, select that particular user then click Edit.
To delete a User, select that particular user then click Delete.
Click OK to save the settings.
14.5 Youtube
Select main menu Settings|System settings to display the following dialog box.

System settings 119
Click Youtube on the left side to select the required settings group.
Select No Youtube allowed to disable main menu File|Export to Youtube.
Select Use individual Youtube login to disable main menu File|Export to Youtube. Each user willenter their Youtube logins on the Export to Youtubedialog box.
Select Use system Youtube login to enable all users on this machine to use the same Youtube logindetails
Enter your existing Youtube account details, then click Verify to check the connection.
Select Private or Public Youtube access.
Click OK to save the settings.
14.6 Slate
Select main menu Settings|System settings to display the following dialog box.
Click Slate on the left side to select the required settings group.
The Slate tool enables you to create a frame at the start of the animation containing the metadataabout the Production/Shot. To enable consistent information that can be used in a contentmanagement system, the user selects from a number of drop down lists. The content of the lists is sethere.

Stop Motion Pro 7 help120
Select the required category from the Data drop down list.
Any existing information for that category will be displayed.To add extra data, click Add and enter the data.To edit existing data, select the row, then click Edit and enter the data.To delete existing data, select the row, then click Delete.To move data, select the row, then click Move Up or Move Down.
A graphic/logo can be added to the top right of the Slate tool screen. Click Browse and select thegraphic.
The Slate tool can be displayed at any time while the Production/Shot is open using:· the main menu Tools|Slate· button on the main Sidebar· button on the various Export dialog boxes
Tick Show Slate at Production/Shot close to display the Slate tool when the Production/Shot isclosed.

System settings 121
To force the user to enter all Slate options tick No blank data.
Click OK to save the settings.
14.7 Workflow
Select main menu Settings|System settings to display the following dialog box.
Click Workflow on the left side to select the required settings group.
Stop Motion Pro can integrate with your workflow processes and software to ensure a totally integratedcontent management system. A document specifying all of the Stop Motion Pro protocols can be foundat www.stopmotionpro.com in the Download section.
To create a status file after each capture or edit, tick Save status file after each Capture or Edit.The files stores a list of the filenames in the Production\Shot\frame and Production\Shot\frame_HDdirectory in the frame order. The filenames may be different than the frame order if the Editor wasused to move frames around or hide frames. The filename of the text file is Production/Shot name_create date_create time.txt. It is stored in the

Stop Motion Pro 7 help122
Production/Shot directory.More information on the file format can be found in the Stop Motion Pro Workflow specification whichcan be obtained from our website in the Download section.
A metadata text file can be created when the Production\Shot is closed. This contains all of the Slatetool information. To create the metadata file, tick Save metadata file at close. More information onthe file format can be found in the Stop Motion Pro Workflow specification which can be obtained fromour website in the Download section.
A message can be displayed when the Production\Shot is closed prompting the user to confirm if theProduction\Shot is completed. If Completed is selected, whenever the Production\Shot is reopened awarning is given. To set the prompt, tick Show Production\Shot completed message.
You can configure Stop Motion Pro that only a content management systems can create newProduction\Shots. Tick User cannot create Production\Shots so that a Production\Shot cannot becreated outside of the content management system. This disables the main menu NewProduction/Shot, Welcome dialog box New Production/Shot and on the Open Production/Shot dialogCopy and Rename.
Stop Motion Pro exports data to be compatible with content management systems. Select your systemfrom the CMS format drop down list.
Set Pad new Production\Shot numbers to preset the Episode/Sequence, Shot, Take data on theNew Production\Shot Advanced dialog box.
The Notes tool enables information about the Production\Shot to be sent to the animator or other staffto alert them to items with respect to the shot. Any changes to the notes are stored separately. · To add an extra Notes type, click Add and enter the data.· To edit existing Notes type, select the row, then click Edit and enter the data.· To delete existing Notes type, select the row, then click Delete.·A range of color curves can be used in the DOP tool. These can be standardized across a totalproduction an imported onto each workstation. To import a Color curve file, click Import. To exportColor curves click Export.
Click OK to save the settings.
Stop Motion Pro can be configured by a standardized system setting text file that can be rolled out onall workstations on a shoot. More information on the file format can be found in the Stop Motion ProWorkflow specification which can be obtained from our website in the Download section.

Part
XV

Stop Motion Pro 7 help124
15 Tools
15.1 Audio sync
The audio sync tool allows the you to synchronies a single audio track to any stored frame. It is usefulfor lipsync and matching animated effects with audio.
WAV, MP3, AVI or MOV files can be used.
Select main menu Tools|Audio sync. The following dialog is displayed.
Select the required file then click Open. The following dialog is displayed with the audio file shown as agreen waveform.

Tools 125
Playing the audioClick Play to play the audio.
On the audio waveform hold the left mouse down and move the mouse to play the audio for a specificframe. This is called scrubbing.
Use the audio sync zoom slider you can get close up views at a frame level of your audio waveform.
If Scrub Audio is ticked, hold the left mouse down on the main toolbar Frame indicator/slider andmove the mouse to play the audio for a specific frame.
Tick Mute to play the audio file, but not hear the sound.
You can set a portion of the audio waveform to loop continuously.· Right click on the audio waveform where the loop is to start and select Start Loop.· Right click on the audio waveform where the loop is to end and select End Loop.· The background of the loop area will change color· Click Loop to start playing the loop section
Synchronize to the stored framesFor the audio sync functions to become active you must synchronies the audio sync file to a storedframe. · on the main toolbar, select the stored frame where you want the audio sync file to be synchronized· on the audio file waveform, click where you want the audio sync to be synchronized· then click sync
When synchronised, the locked stored frame number and the corresponding audio sync frame numberare displayed.
Click sync to unsync.
Accurate setting and nudging of the Sync point can be done using the spinedit controls.

Stop Motion Pro 7 help126
Once the audio sync and stored frames are synchronized, the stored frames are represented in theaudio sync window, with a white highlight showing the current stored frame.
Rolling the mouse over the stored frames area displays the stored frame number in a yellow popup.
Setting the audio out pointYou can set the point where the audio stops playing.
Right click on the audio waveform and select Set Audio end point. Accurate setting and nudging ofthe Audio out point can be done using the spinedit control.
To remove the Audio out point, right click on the audio waveform and select Clear Audio end point.
Opening a new fileOn the audio sync window, click Open file to locate the new file.
15.2 Audio record
The audio record tool allows you to record an audio file while playing your animation.
Select main menu Tools|Audio record. The following dialog is displayed.
Select the audio capture device, required input and recording format from the drop down lists. Werecommend a Format of 44Khz, 16bit, Stereo. More information on configuring Vista and Windows 7for audio recording can be found here.

Tools 127
The record level VU meter will show the current audio level for the selected input. The volume can bechanged by the Record level slider.
To start and stop recording click Recording Start / Stop.
To playback your recording, stop recording, then click Play Start / Stop.
To play your animation while recording or playing, tick Play Stored frames while recording andplaying. The start frame in your animation can be set using the Start playing at frame spinedit.
When recording is completed, click Save and save the audio file to your hard drive.
An option to import the audio file into the audio sync tool is displayed.
Not all sound cards are compatible with the audio recorder. We have found the Soundblaster X-FiXtreme Audio card compatible on XP, Vista and Windows 7.
15.3 Chromakey
The chroma key tool provides synchronized (locked together) still images or video through a colorspecific transparency. The reference material could be in the form of a live action set or character, forinstance. The chroma key tool could be used to get eye lines between characters correct, or sizes andperspective in proportion.
The Stop Motion Pro Chroma key tool is designed as a reference during filming. Export youranimation and use a tool such as Adobe After Effects to remove colors and composite sourcestogether.
The image below shows the Chroma key tool in action, the background blue around "duckman" (top)has been made transparent allowing the sunset chroma key footage to be visible (bottom). TIF, JPG,BMP,TGA, CR2, NEF, AVI or MOV files can be used.

Stop Motion Pro 7 help128
Select main menu Tools|Chroma key. The following dialog is displayed.
Select the required file then click Open. The following dialog is displayed with the image shown.

Tools 129
AVI and MOV filesClick Play to play the video.
The frame indicator and zoom handles become active. This operates in exactly the same way as in themain toolbar.
Step through the frames by clicking Next frame and Previous frame.
Synchronize to the stored framesFor the Chroma key functions to become active you must synchronies the Chroma key file to a storedframe. · on the main toolbar, select the stored frame where you want the Chroma key file to be synchronized· on the frame indicator and zoom, click where you want the Chroma key to be synchronized (AVI or
MOV)· then click sync
When synchronised, the locked stored frame number and the corresponding Chroma key framenumber are displayed.
Click sync to unsync.
Accurate setting and nudging of the Sync point can be done using the spinedit controls.
Setting the Chroma key color and toleranceUse the color picker and tolerance slider to blend the chroma key footage with the main live image.· Set live mode on the main toolbar· Click the chroma key color picker tool on the chroma key window· On the main animation window, select the color you wish to make transparent· Use the tolerance slider to increase or decrease the sensitivity of the tool
Tick Show to turn the chroma key effect on and off.

Stop Motion Pro 7 help130
The Stop Motion Pro Chroma key tool is designed as a reference during filming. Export youranimation and use a tool such as Adobe After Effects to remove colors and composite sourcestogether.
Opening a new fileOn the chroma key window, click Open file to locate the new file.
15.4 Rotoscope
The rotoscope is designed to provide synchronized (locked together) reference material whenanimating. This material could be in the form of still image or live action footage of an actor talking,for instance. Animators can use this material as a guide while animating.
TIF, JPG, BMP,TGA, CR2, NEF, AVI or MOV files can be used.
Select main menu Tools|Rotoscope. The following dialog is displayed.
Select the required file then click Open. The following dialog is displayed with the image shown.

Tools 131
AVI and MOV filesClick Play to play the video.
The frame indicator and zoom handles become active. This operates in exactly the same way as in themain toolbar.
Step through the frames by clicking Next frame and Previous frame.
Synchronize to the stored framesFor the rotoscope functions to become active you must synchronies the rotoscope file to a storedframe. · on the main toolbar, select the stored frame where you want the rotoscope file to be synchronized· on the frame indicator and zoom, click where you want the rotoscope to be synchronized (AVI or
MOV)· then click sync
When synchronised, the locked stored frame number and the corresponding rotoscope frame numberare displayed.
Click sync to unsync.
Accurate setting and nudging of the Sync point can be done using the spinedit controls.
Use the rotoscope opacity slider to blend the rotoscope footage with live or stored frames.
Opening a new fileOn the rotoscope window, click Open file to locate the new file.
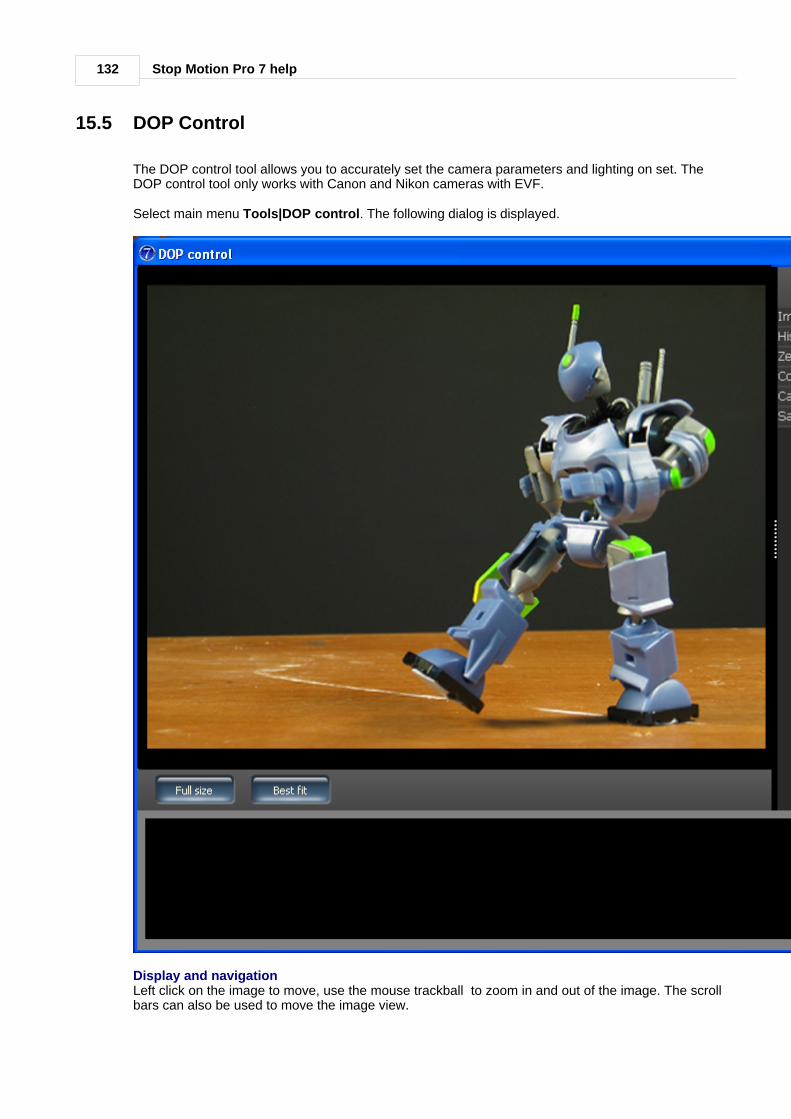
Stop Motion Pro 7 help132
15.5 DOP Control
The DOP control tool allows you to accurately set the camera parameters and lighting on set. TheDOP control tool only works with Canon and Nikon cameras with EVF.
Select main menu Tools|DOP control. The following dialog is displayed.
Display and navigationLeft click on the image to move, use the mouse trackball to zoom in and out of the image. The scrollbars can also be used to move the image view.

Tools 133
To show the image at a 1:1 pixel match, click Full Size.
To show the image so it fits the viewer window area, click Best Fit.
Test framesThe DOP allows test frames to be taken and analysed for lighting and camera settings. These testframes are kept sperate from the animation sequence frames.
Click Capture to take a test frame. The new frame is added to the test frame viewer.
Click Live to view the live image from the camera.
Left click to select a test frame to display in the main DOP control tool window.
You can delete the currently selected test frame using the Delete key.
Sidebar tool - Image settingsUse this tool to view the camera setting of the test frame.
You can also add notes to each test frame. Any notes in the text field are saved automatically.
To use the camera settings of the selected test frame in your animation, click Update CaptureSettings.
Sidebar tool - HistogramUse this tool to view a histogram of the frame.

Stop Motion Pro 7 help134
The required color channel can be selected from the drop down list.
Sidebar tool - Zebra and MagnifyUse this tool to highlight under or over exposure. You can also enlarge a specific part of the frame.
Select the required Zebra value in the spinedit controls. Any overexposed areas will be show as red.Any underexposed areas will be shown as blue.
Tick Display Zebra to show the Zebra settings.

Tools 135
Tick Display Magnifier To enlarge a specific part of the frame.
Select the magnify box with a left click and it can be moved around the frame.
Change the Zoom factor and Size of the magnify box using the sliders.
Sidebar tool - Color and brightnessUse this tool to adjust the color and brightness of the frame.
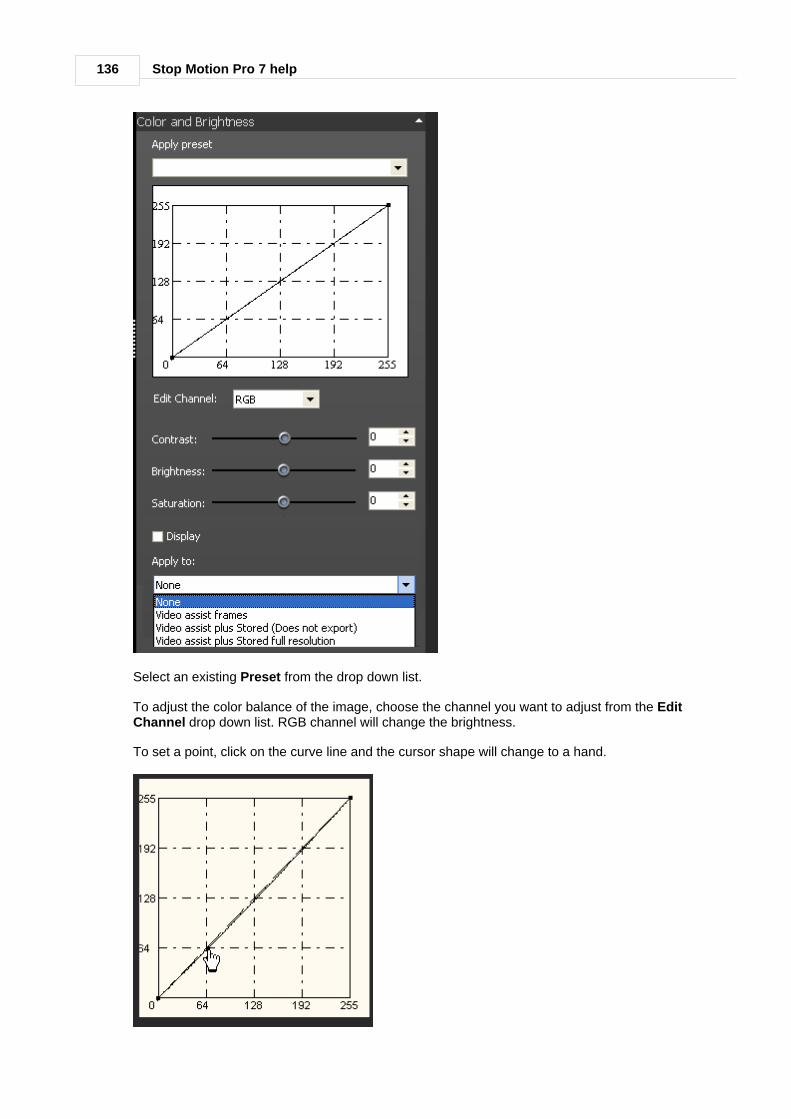
Stop Motion Pro 7 help136
Select an existing Preset from the drop down list.
To adjust the color balance of the image, choose the channel you want to adjust from the EditChannel drop down list. RGB channel will change the brightness.
To set a point, click on the curve line and the cursor shape will change to a hand.
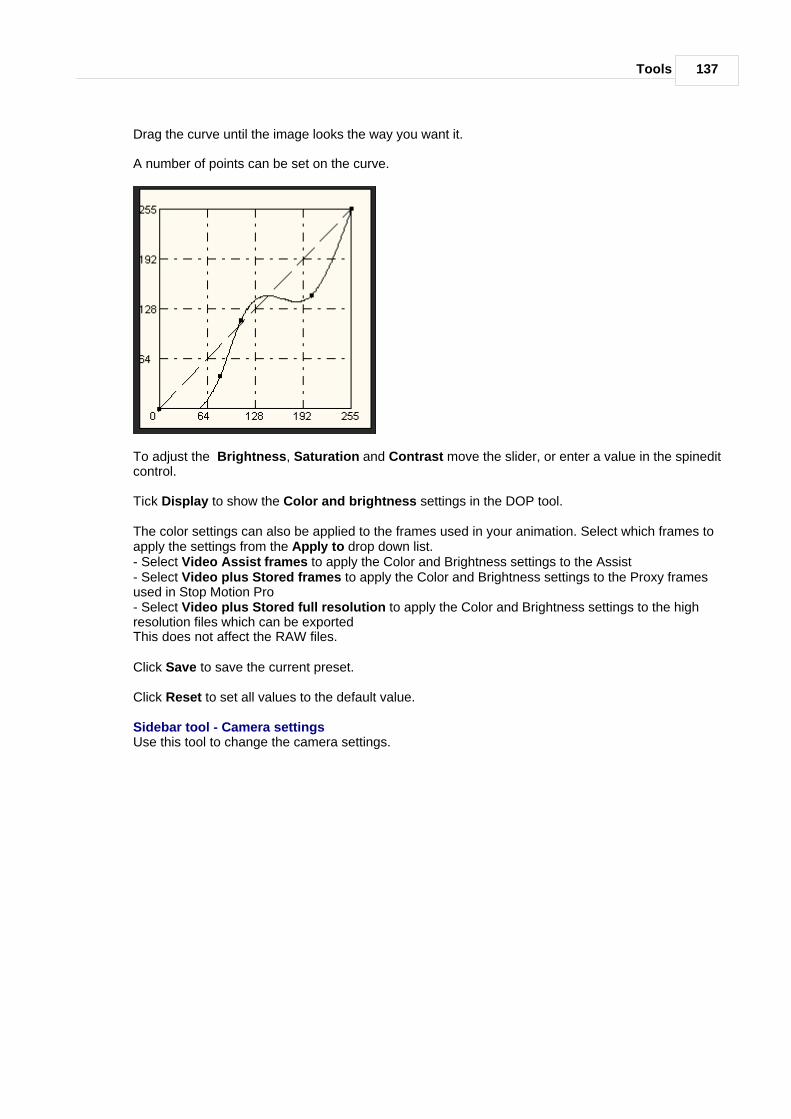
Tools 137
Drag the curve until the image looks the way you want it.
A number of points can be set on the curve.
To adjust the Brightness, Saturation and Contrast move the slider, or enter a value in the spineditcontrol.
Tick Display to show the Color and brightness settings in the DOP tool.
The color settings can also be applied to the frames used in your animation. Select which frames toapply the settings from the Apply to drop down list.- Select Video Assist frames to apply the Color and Brightness settings to the Assist - Select Video plus Stored frames to apply the Color and Brightness settings to the Proxy framesused in Stop Motion Pro- Select Video plus Stored full resolution to apply the Color and Brightness settings to the highresolution files which can be exported This does not affect the RAW files.
Click Save to save the current preset.
Click Reset to set all values to the default value.
Sidebar tool - Camera settingsUse this tool to change the camera settings.

Stop Motion Pro 7 help138
TVThe camera shutter speed.
AV The camera aperture value.
Live view exposure offset This can be used to increase the brightness of the live view image when a manual iris lenses are used.On some Canon DSLR cameras there is a Camera settings option to control the live view brightness.(refer to your camera manual).However on other cameras (usually the more economical ones in the range) the live view brightnessgets 'confused' when the manual iris lenses are used. In this situation the live view image is muchdarker than the actual captured frame.Increase the value of Live view exposure offset to increase the brightness of live view to match thecaptured frame exposure.
Camera zoomSelect the in camera zoom factor for magnification.
To use the camera settings of the selected test frame in your animation, click Update CaptureSettings.
Sidebar tool - SafezoneUse this tool to overlay the Safezone over the frame.
Select the required aspect ration from the Aspect ratio drop down list.
The percentage of the frame size can be set using Action safe spinedit and Title safe spinedit.

Tools 139
Tick Display to show the Safe zone settings.
Tick Mask to set the area outside the Action safe area to black.
Tick Crosshair to show a crosshair marker in the middle of the frame.
Tick Show rule of thirds to show the Rule of thirds markers.
15.6 Frame painter
The Frame painter tool allows you to add any shape or text to your frames. It is a bitmap painter, justlike Adobe Photoshop, so you can draw anything you like.
Select main menu Tools|Frame painter. The following dialog is displayed.
Display and navigationLeft click on the image to move, use the mouse trackball to zoom in and out of the image. The scrollbars can also be used to move the image view.
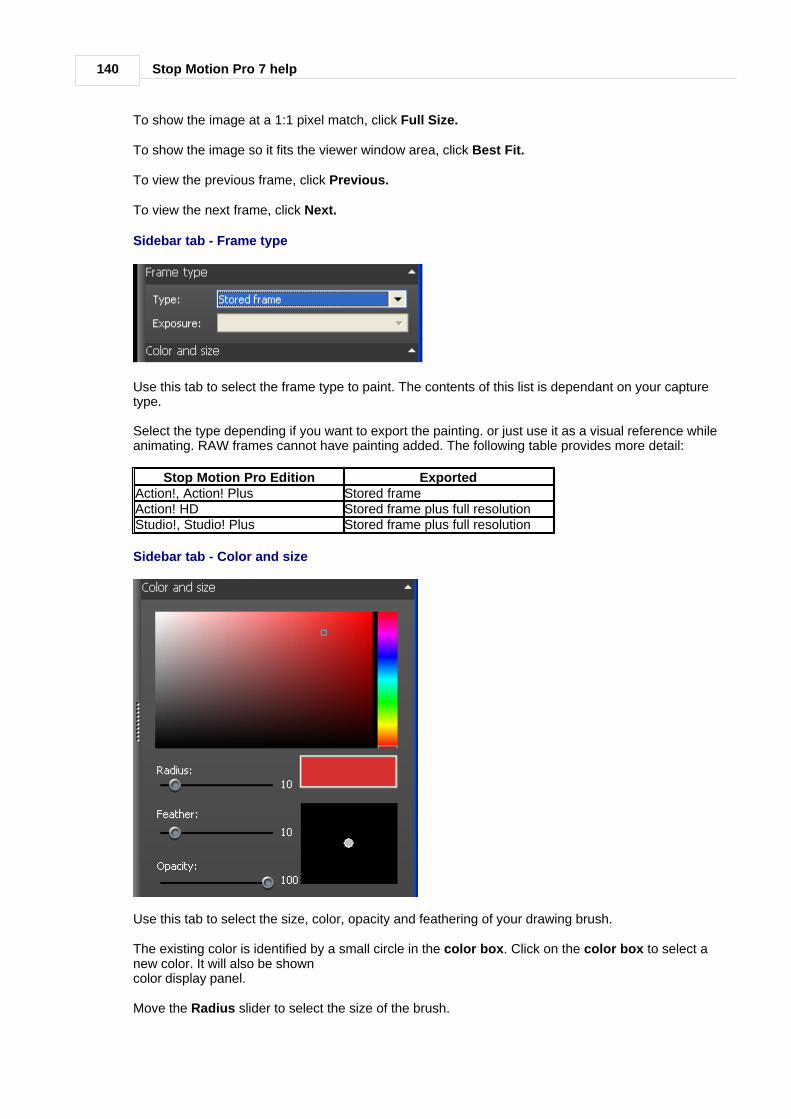
Stop Motion Pro 7 help140
To show the image at a 1:1 pixel match, click Full Size.
To show the image so it fits the viewer window area, click Best Fit.
To view the previous frame, click Previous.
To view the next frame, click Next.
Sidebar tab - Frame type
Use this tab to select the frame type to paint. The contents of this list is dependant on your capturetype.
Select the type depending if you want to export the painting. or just use it as a visual reference whileanimating. RAW frames cannot have painting added. The following table provides more detail:
Stop Motion Pro Edition ExportedAction!, Action! Plus Stored frameAction! HD Stored frame plus full resolutionStudio!, Studio! Plus Stored frame plus full resolution
Sidebar tab - Color and size
Use this tab to select the size, color, opacity and feathering of your drawing brush.
The existing color is identified by a small circle in the color box. Click on the color box to select anew color. It will also be showncolor display panel.
Move the Radius slider to select the size of the brush.

Tools 141
Move the Feather slider to select the sharpness of the edges of the brush so it will blend into thebackground.
Select the Opacity slider to select the sharpness of the edges of the brush. Opacity is the amount oftransparency that exists in an image. If an image has 100% opacity it is not transparent at all. As youdecrease the amount of opacity it becomes more transparent.
Sidebar tab - Actions
Select the Action to be performed on the frame:Draw using the currently selected drawing brush.Erase any of the drawing you have doneSelect a color from the frame and set the color box on the Sidebar tab- Color and sizePaste previous Frame painter actions onto this frameMove the part of the frame being viewed. This only applies if you havezoomed into the frameCreate an edit masking area. Only parts within the mask will beaffected by the paintingDelete the edit masking areaUndo any paining you have doneRedo any Undo
To compare the current selected frame with the previous frame, morethe Onionskin slider. This enables you to see the previous location ofyour painting.
To view the previous frame, click Previous. To view the next frame,click Next. A warning message will be displayed.
Click Yes to keep the changesClick No to lose the changesClick Cancel to continue painting on the current frame Any painted frame will be set to Hidden in the Editor, so that the painting operation can be removed ifrequired.
Painting the frame processTo paint on a frame, use this process:1. Select the Frame type

Stop Motion Pro 7 help142
2. Select the brush size and color3. Select the Draw action4. Place the mouse over the frame where you want to commence painting5. Click the left mouse button to commence drawing and move the mouse6. Release the left mouse button to stop drawing
15.7 Rig removal
The Rig removal tool allows you to remove any rigging or supports from your frames.
It does this by using a Background plate as a reference point, ie a captured frame or frames with no rigin shot.
Select main menu Tools|Rig removal. The following dialog is displayed.
Display and navigationLeft click on the image to move, use the mouse trackball to zoom in and out of the image. The scrollbars can also be used to move the image view.
To show the image at a 1:1 pixel match, click Full Size.
To show the image so it fits the viewer window area, click Best Fit.
To view the previous frame, click Previous.
To view the next frame, click Next.

Tools 143
Sidebar tab - Background Plate
Use this tab to select the frame type to paint. The contents of this list is dependant on your capturetype.
Select the type depending if you want to export the Rig removal changes. or just use it as a visualreference while animating. RAW frames cannot have Rig removal. The following table provides moredetail:
Stop Motion Pro Edition ExportedAction! Plus Stored frameAction! HD Stored frame plus full resolutionStudio!, Studio! Plus Stored frame plus full resolution
Move the slider to locate the frame you wish to reveal when you erase the rig.
Sidebar tab - Brush size
Use this tab to select the size, and feathering of your Rig removal brush.
Move the Radius slider to select the size of the brush.
Move the Feather slider to select the sharpness of the edges of the brush so it will blend into thebackground.
Sidebar tab - Actions

Stop Motion Pro 7 help144
Select the Action to be performed on the frame:Erase any of the drawing using the currently selected drawing brushMove the part of the frame being viewed. This only applies if you have zoomed into the frameCreate an edit masking area. Only parts within the mask will be affected by the Rig removal brushDelete the edit masking areaUndo any paining you have doneRedo any Undo
To view the previous frame, click Previous. To view the next frame, click Next. A warning messagewill be displayed.
Click Yes to keep the changesClick No to lose the changesClick Cancel to continue painting on the current frame Any painted frame will be set to Hidden in the Editor, so that the painting operation can be removed ifrequired.
Rig removal processTo use the Rig removal on a frame, use this process:1. Select the Background plate frame2. Select the brush size and feather3. Select the Erase action4. Place the mouse over the frame where you want to commence the Rig removal5. Click the left mouse button to commence the Rig removal and move the mouse6. Release the left mouse button to stop Rig removal
15.8 Time lapse
Stop Motion Pro can automatically capture video images at predefined intervals. This can be used tocreate time lapse sequences such as growing plants.
Select main menu Tools|Time lapse. The following dialog is displayed.

Tools 145
Click the Start button to commence the time lapse.
Click the Stop button to end the time lapse at any time.
The status window shows:· the time and date of the first capture· the latest capture· time lapse status
The time between frame capture is set by Capture interval.
To set the start time of the time lapse sequence:Select Immediately to start the capture immediately the Start button is clickedSelect Start at a specified date and time to set when the time lapse is to commence. The start timeis set by the drop down list for the date and the drop down list for the time.

Stop Motion Pro 7 help146
To set the end time of the time lapse sequence:Select Capture continuously to capture until the Stop button is clickedSelect Stop at a specified date and time to set when the time lapse is to end. The end time is set bythe drop down list for the date and the drop down list for the time.
To pause the capture:Click Pause capture and set the Begin pause at time and End pause at time.
Click Show label to show the capture time and date in the captured frame. The following parameterscan be set for the label:The color of the label text by clicking the Text color color box to display the Color select dialog.The color of the label background by clicking the Background color color box to display the Colorselect dialog.The label size by the Size spinedit.The label location can be set by the Location drop down list.The format of the label is set in the Text entry. Format specifiers may be written in upper case as wellas in lower case letters produce the same result. The following specifiers can be used:
Tools 147
15.9 Preview player
Once you have a 40+ frame sequence you can use the Preview player to generate a preview of youranimation. The preview player is a good way to test back animation at an accurate speed on slowersystems. Use Make movie to output finished animation.
Select main menu Tools|Preview player. The following dialog is displayed.

Stop Motion Pro 7 help148
Playing the audioClick Play to play the audio.
Use the slider to move to any portion of the preview file.
Select which frames to play from the Preview drop down list.
Tick Mask to Safe zone aspect ratio to view the preview at the Safe zone aspect ratio.
To export the Preview file click Save.
15.10 Preview player stereoscopic
Use the Preview player stereoscopic tool to generate a preview of your animation with both left eyeand right eye frames displayed together. Using 3D glasses, an accurate 3D view is created.Recommendations for 3D glasses can be found at www.stopmotionpro.com
Multiple exposure on the Capture settings dialog box must be set to use the Preview playerstereoscopic tool.
Select main menu Tools|Preview player stereoscopic. The following dialog is displayed.

Tools 149
One exposure is displayed on the left side and a second exposure on the right side. Using 3D glasses,the 3D effect is revealed.
The toolbar is duplicated so it is easily visible when wearing 3D glasses.
Click Play to play your animation.This button toggles between play and pause. When your animation is paused, the button becomes a play button. When your animation is playing, the button becomes a pause button.
Use the frame indicator / slider to move quickly to any frame within your animation. The frameindicator / slider tool lets you zoom in, out and navigate through your frames. This is useful fornavigating (and setting loops) in long sequences of frames. It adapts to any number of stored frames.
Moving the mouse over this area displays the frame number on the frame indicator panel. Holding themouse left button down and moving the mouse left and right quickly moves through the stored frames.

Stop Motion Pro 7 help150
Click the Previous button to move the currently displayed frame of your animation back one frame.
Click the Next button to move the currently displayed frame of your animation forward one frame.
The Play from frame and To spinners set the start frame and end frame when Play is clicked. TickLast frame if the last frame in the animation is the end of the play.
Tick Mask to Safe zone aspect ratio to view the preview at the Safe zone aspect ratio.
Tick Output to second monitor if the Preview is to be displayed on a second monitor.
Select the exposure that is to be displayed on the left side of the screen from the Left exposure dropdown list. Select the exposure that is to be displayed on the right side of the screen from the Rightexposure drop down list.
15.11 Video player
AVI and MOV files can be opened using the Video player tool. These can be used as referencematerial while animating. The video file is not synched with the stored frames and is not stored with theproject data.
Select main menu Tools|Video player. The following dialog is displayed.
Select the required file then click Open. The following dialog is displayed with the image shown.

Tools 151
Playing the audioClick Play to play the audio.
Use the slider to move to any portion of the video file.
15.12 Slate
The Slate tool enables you to create a frame at the start of the animation containing the metadataabout the Production/Shot. To enable consistent information that can be used in a contentmanagement system, the user selects from a number of drop down lists. The content of the lists is seton the System settings dialog.
Select main menu Tools|Slate. The following dialog is displayed.

Stop Motion Pro 7 help152
Select the appropriate data from the drop down lists.
Click Print to print the Slate.
Click Use last slate to set the drop down lists and other data to the same used on the last slate.

Tools 153
15.13 Notes
The Notes tool enables information about the Production\Shot to be sent to the animator or other staffto alert them to items with respect to the shot. Any changes to the notes are stored separately. Set upthe Notes categories on the System Settings dialog.
Select main menu Tools|Notes. The following dialog is displayed.
Select the Note to view from the drop down list.
After editing the note, click Update to save the changes.
Click Print to print the Note.
15.14 Timeline
The Timeline tool allows the you to synchronies capture your frames and see them in context with theprevious and next shots in the production . This is useful when shots flow from one to anothersmoothly or for getting eyelines correct if the animation is a dialog between 2 characters.
A reference file is imported into the timeline tool. The reference file is created in your video editing

Stop Motion Pro 7 help154
software and has the following format:
As frames are capture in Stop Motion Pro, the Current shot part of the reference is replaced by thecaptured frames.
The content of Previous shot, Current shot and Next shot can be the actual frames of the previousshot, if it has been take, animatic or storyboard.
AVI or MOV files can be used.
Select main menu Tools|Timeline. The following dialog is displayed.
Select the required file then click Open. The following dialog is displayed with the image shown.

Tools 155
Playing the Timeline fileClick Play to play the video.
The frame indicator and zoom handles become active. This operates in exactly the same way as in themain toolbar.
Step through the frames by clicking Next frame and Previous frame.
Synchronize to the stored framesFor the Timeline functions to become active you must synchronies the Timeline file to a stored frame. · on the main toolbar, select the stored frame where you want the Timeline file to be synchronized· on the frame indicator and zoom, click where you want the Timeline to be synchronized· then click sync
When synchronised, the locked Stored In frame number and the corresponding Timeline framenumber are displayed.
Set the Stored out frame where you want the Timeline file to be redisplayed.
Click sync to unsync.
Accurate setting and nudging of the Sync point can be done using the spinedit controls.
Use the rotoscope opacity slider to blend the rotoscope footage with live or stored frames.
Opening a new fileOn the Timeline window, click Open file to locate the new file.

Stop Motion Pro 7 help156
15.15 Worktime
This features shows the times and dates a Production/Shot was opened and closed.
Select main menu Tools|Worktime. The following dialog is displayed.
To save the data as a CSV (Comma Delimited, CSV text file format) or as XLS (Microsoft Excel)format, click Save.
The data can then be used in a spreadsheet or database.

Part
XVI

Stop Motion Pro 7 help158
16 Dialog boxes
16.1 Welcome to Stop Motion Pro
This dialog box allows you to quickly select a start up option.
Create a new Production/ShotCreate a new Production/Shot. This is the same as menu File|New Production/Shot.
Open an existing Production/ShotOpens the open Production/Shot dialog box. This is the same as menu File|Open Production/Shot.
Open your last Production/ShotOpens the last Production/Shot you were working on. The name of the last Production/Shot isdisplayed.
16.2 New Production/Shot
Use this dialog to set the Production/Shot name.
Click main menu File|New Production/Shot or click New Production/Shot on the Welcome dialog.
Stop Motion Pro store projects in a directory hierarchy.

Dialog boxes 159
Select an existing Production from the drop down list or enter a Production name.
Enter a Shot name, then click OK.
The Production and Shot names can only consist of letters and numbers.
The Production/Shot name creates a directory under the Stop Motion Pro home directory.
16.3 New Production/Episode/Shot/Type/Take
Use this dialog to set the Production/Shot name. The File management option on the System settingsdialog box must be set.
Click main menu File|New Production/Shot or click New Production/Shot on the Welcome dialog.
Stop Motion Pro store projects in a directory hierarchy.

Stop Motion Pro 7 help160
For each column, select any option in the list or enter the data directly in the text box at the top of thecolumn.
Stop Motion Pro will automatically calculate the next Episode, Shot or Take.
Slate data entered in the System settings dialog box will be loaded into the drop down lists. If NoBlank data is ticked, the first item of each of the Slates lists will be displayed.
Click Use last slate to set the drop down lists and other data to the same used on the last slate.
Video, audio assets and Notes can be copied to the Take directory.

Dialog boxes 161
Click Add to add a file to the list to be copied.
Click Delete to remove a file from the list to be copied.
Click Open to open a file in the list.
Click OK to create the Product/Shot.
16.4 Open Production/Shot
Use this dialog to open a Production/Shot.
Click main menu File|Open Production/Shot or click Open Production/Shot on the Welcome dialog.
The display order of the projects can be the following:· Production/Shot name· Latest Production/Shot that has been modified at the top· Earliest Production/Shot that has been modified at the top

Stop Motion Pro 7 help162
Select the display order using the Display order drop down list box. Tick Show last frame if the Lastframe of the animation is to be displayed in the thumbnail.
Filter the Shots displayed using the Production drop down list.
Select the Production/Shot using the left mouse button. This is highlighted by the red outline and thefirst frame is shown in the sample window. If there are more that one frame, it can be played.
Production/Shot ManagementTo copy an existing Production/Shot, click Copy and enter a new Production/Shot name.
To rename an existing Production/Shot, click Rename and enter a new Production/Shot name.
To delete an existing Production/Shot, select Delete. When you delete a Production/Shot it cannotbe recovered.
Stop Motion Pro locks a project if it is opened by one user so it cannot be changed by another. If theProduction/Shot was not closed correctly, the lock flag may not be reset. Click Unlock All to reset thelock flags.
To open the Production/Shot click Open.
Multi userIf Individual login is set on the System settings dialog box, you are Allowed to manage users aextra tab is displayed.

Dialog boxes 163
Select the required user within a group and then click the Projects tab. All the projects for that user willbe displayed.
16.5 Open Production/Episode/Shot/Type/Take
Use this dialog to open a Production/Shot. The File management option on the System settings dialogbox must be set.
Click main menu File|Open Production/Shot or click Open Production/Shot on the Welcome dialog.
For each column, select any option in the list.
Tick Show last frame if the Last frame of the animation is to be displayed in Sample.
Tick Output to second monitor if the Sample is to be displayed on a second monitor.
To open the Production/Shot click Open. Tick Fast open to not display the Capture settings dialog

Stop Motion Pro 7 help164
box.
SlateSlate data entered in the System settings dialog box will be loaded into the drop down lists. If NoBlank data is ticked, the first item of each of the Slates lists will be displayed.
Click Update to save and Slate data changes.
Copying filesVideo, audio assets and Notes can be copied to the Take directory.
Click Add to add a file to the list to be copied.
Click Delete to remove a file from the list to be copied.
Click Open to open a file in the list.
NotesView or edit any notes in the Take directory.
Click Update to save any Notes changes.
Production/Shot ManagementTo copy an existing Production/Shot, click Copy and enter a new Production/Shot name.
To rename an existing Production/Shot, click Rename and enter a new Production/Shot name.
To delete an existing Production/Shot, select Delete. When you delete a Production/Shot it cannotbe recovered.
Stop Motion Pro locks a project if it is opened by one user so it cannot be changed by another. If theProduction/Shot was not closed correctly, the lock flag may not be reset. Click Unlock All to reset thelock flags.
Multi userIf Individual login is set on the System settings dialog box, you are Allowed to manage users a
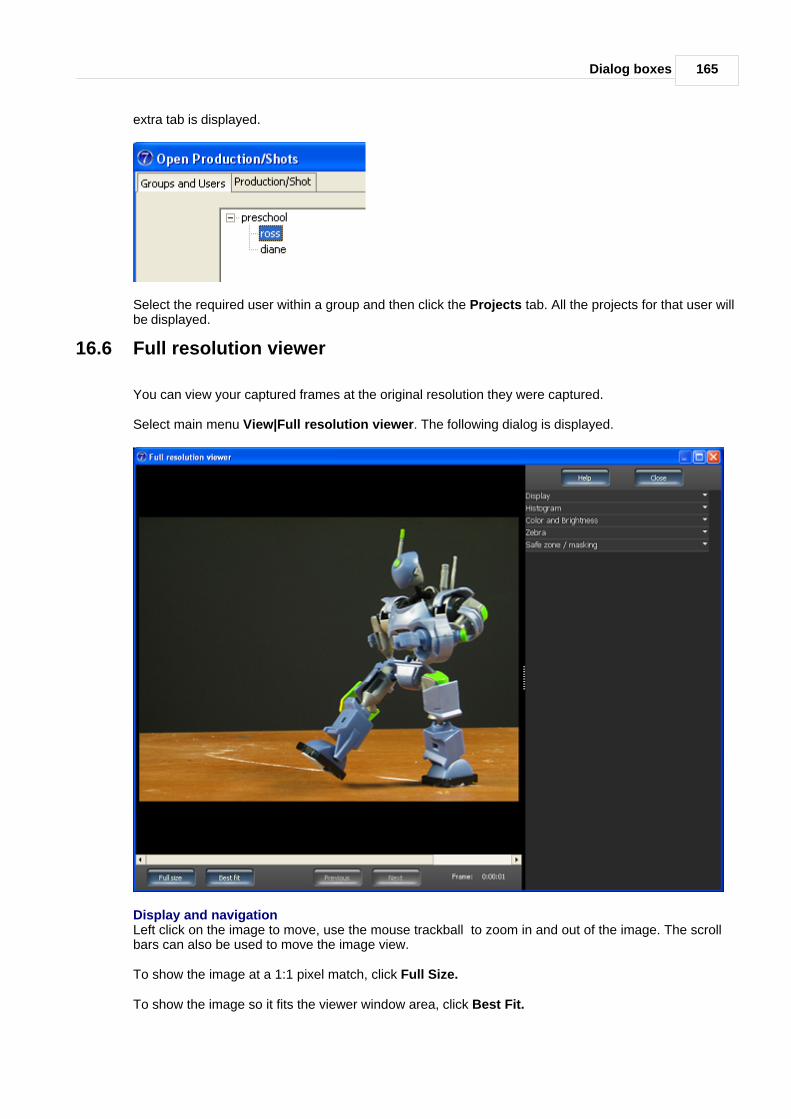
Dialog boxes 165
extra tab is displayed.
Select the required user within a group and then click the Projects tab. All the projects for that user willbe displayed.
16.6 Full resolution viewer
You can view your captured frames at the original resolution they were captured.
Select main menu View|Full resolution viewer. The following dialog is displayed.
Display and navigationLeft click on the image to move, use the mouse trackball to zoom in and out of the image. The scrollbars can also be used to move the image view.
To show the image at a 1:1 pixel match, click Full Size.
To show the image so it fits the viewer window area, click Best Fit.
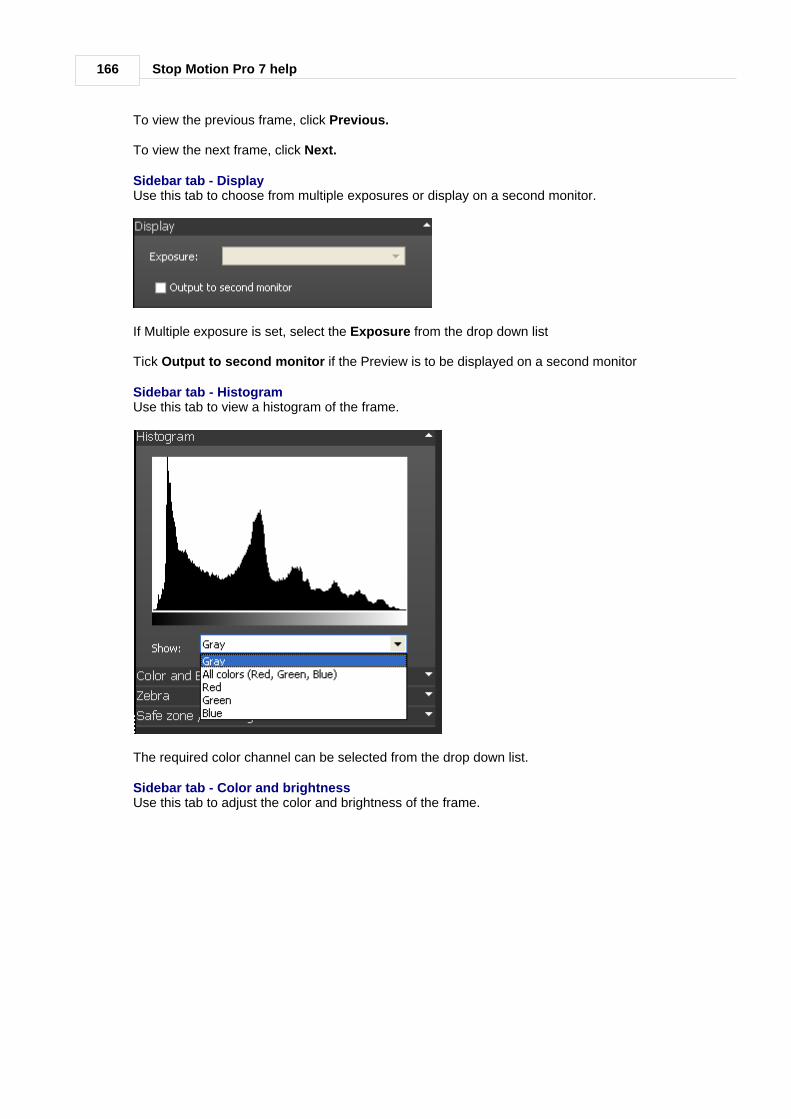
Stop Motion Pro 7 help166
To view the previous frame, click Previous.
To view the next frame, click Next.
Sidebar tab - DisplayUse this tab to choose from multiple exposures or display on a second monitor.
If Multiple exposure is set, select the Exposure from the drop down list
Tick Output to second monitor if the Preview is to be displayed on a second monitor
Sidebar tab - HistogramUse this tab to view a histogram of the frame.
The required color channel can be selected from the drop down list.
Sidebar tab - Color and brightnessUse this tab to adjust the color and brightness of the frame.

Dialog boxes 167
Select an existing Preset from the drop down list.
To adjust the color balance of the image, choose the channel you want to adjust from the EditChannel drop down list. RGB channel will change the brightness.
To set a point, click on the curve line and the cursor shape will change to a hand.

Stop Motion Pro 7 help168
Drag the curve until the image looks the way you want it.
A number of points can be set on the curve.
To adjust the Brightness, Saturation and Contrast move the slider, or enter a value in the spineditcontrol.
Tick Display to show the Color and brightness settings.
Click Save to save the current preset.
Click Reset to set all values to the default value.
Sidebar tab - ZebraUse this tab to highlight under or over exposure.
Select the required value in the spinedit controls. Any overexposed areas will be show as red. Anyunderexposed areas will be shown as blue.
Tick Display to show the Zebra settings.
Sidebar tab - SafezoneUse this tab to overlay the Safezone over the frame.

Dialog boxes 169
Select the required aspect ration from the Aspect ratio drop down list.
The percentage of the frame size can be set using Action safe spinedit and Title safe spinedit.
Tick Display to show the Safe zone settings.
Tick Mask to set the area outside the Action safe area to black.
Tick Crosshair to show a crosshair marker in the middle of the frame.
Tick Show rule of thirds to show the Rule of thirds markers.
16.7 Colour select
This dialog sets the colors for the Overlay settings on the Setup dialog box.
The existing color is identified by a small circle in the color box. The Red, Green and Blue values arelisted.
Click on the color box or change the Red, Green and Blue values to the required color.

Stop Motion Pro 7 help170
For reference the Web color is also shown.
Enter the required data then click OK.
16.8 Login
If Individual user login has been ticked, each user will need to login. Individual login is set on theSystem settings dialog box.
The Login dialog box is displayed.
Enter your Login name and Password then click OK.
You will be notified of your Login name by the system administrator.
If you are logging in to Stop Motion pro for the first time, leave Password blank then click OK. TheNew Password dialog box will be displayed.
16.9 Overlay parameters
This dialog sets the colors and sizes for the Overlay settings.

Dialog boxes 171
The existing color is identified by a small circle in the color box. The Red, Green and Blue values arelisted.
Click on the color box or change the Red, Green and Blue values to the required color.
If a line is selected adjust the line width using the Line width spinedit.
If a point is selected adjust the size using the Size spinedit.
Enter the required data then click OK.
16.10 Password
If Individual user login has been ticked, each user will need to login. Information on setting up useraccounts can be found here.
The password dialog box is displayed if no password has been set, or has been reset.
Enter the new password in the Password field.

Stop Motion Pro 7 help172
Repeat the password in the Repeat new password field then click OK.
This new password will apply the next time Stop Motion Pro is started.