STD 4th COMPUTER Chapter 5: Presentation Software An ...
21
STD – 4th COMPUTER Chapter 5: Presentation Software – An Introduction Learning objectives: • MS PowerPoint • Starting MS PowerPoint • Components of MS PowerPoint Screen • Creating a Presentation • Slide Show • Exiting MS PowerPoint TOPIC-1 MS POWERPOINT MS PowerPoint is one of the applications in Microsoft Office suite that enables to present ideas and views effectively through audio- visual aids. It is, therefore, aPresentation Graphics Software in which you can create presentations using text, pictures, and drawings and sound. Click the link below to have a better understanding to the introduction of the topic. https://youtu.be/E8wSFojwGII https://youtu.be/sbeyPahs- ng PRESENTATION When we explain a new idea or concept to a person with the help of certain tools such as charts, diagrams, pictures and sounds, it is called a presentation. The purpose of the presentation is to make the person understand, in an effective manner, what one wishes to convey.
Transcript of STD 4th COMPUTER Chapter 5: Presentation Software An ...

STD – 4th COMPUTER
Chapter 5: Presentation Software – An Introduction
Learning objectives:
• MS PowerPoint
• Starting MS PowerPoint
• Components of MS PowerPoint Screen
• Creating a Presentation
• Slide Show
• Exiting MS PowerPoint
TOPIC-1 MS POWERPOINT
MS PowerPoint is one of the applications in Microsoft Office suite that
enables to present ideas and views effectively through audio- visual
aids.
It is, therefore, aPresentation Graphics Software in which you can create presentations using text, pictures, and drawings and sound.
Click the link below to have a better understanding to the introduction of the topic.
https://youtu.be/E8wSFojwGII https://youtu.be/sbeyPahs-
ng
PRESENTATION
When we explain a new idea or concept to a person with the help of certain tools such as charts, diagrams, pictures and sounds, it is called a presentation. The purpose of the presentation is to make the person understand, in an effective manner, what one wishes to convey.

SLIDES AND SLIDE SHOW
• When we create a presentation, we divide the entire information into various parts that need to be conveyed one by one.
• The matter for each of these parts is presented in a unique manner and kept on a separate page.
• Each of these pages is called a slide.
• When all these slides are integrated together and shown in a particular order, it is called a slide show.
TOPIC-2 STARTING MS POWERPOINT
The steps to start MS PowerPoint are as follows:
Step 1: Click on Start button.
Step 2: Click on All Programs.
Step 3: Click on Microsoft Office.
Step 4: Click on MS PowerPoint 2010
FACT BYTE
The initial edition of MS PowerPoint was called Presenter in 1987.

Start Button > All Programs > Microsoft office > Microsoft PowerPoint
2010
TOPIC-3 COMPONENTS OF MS POWERPOINT SCREEN
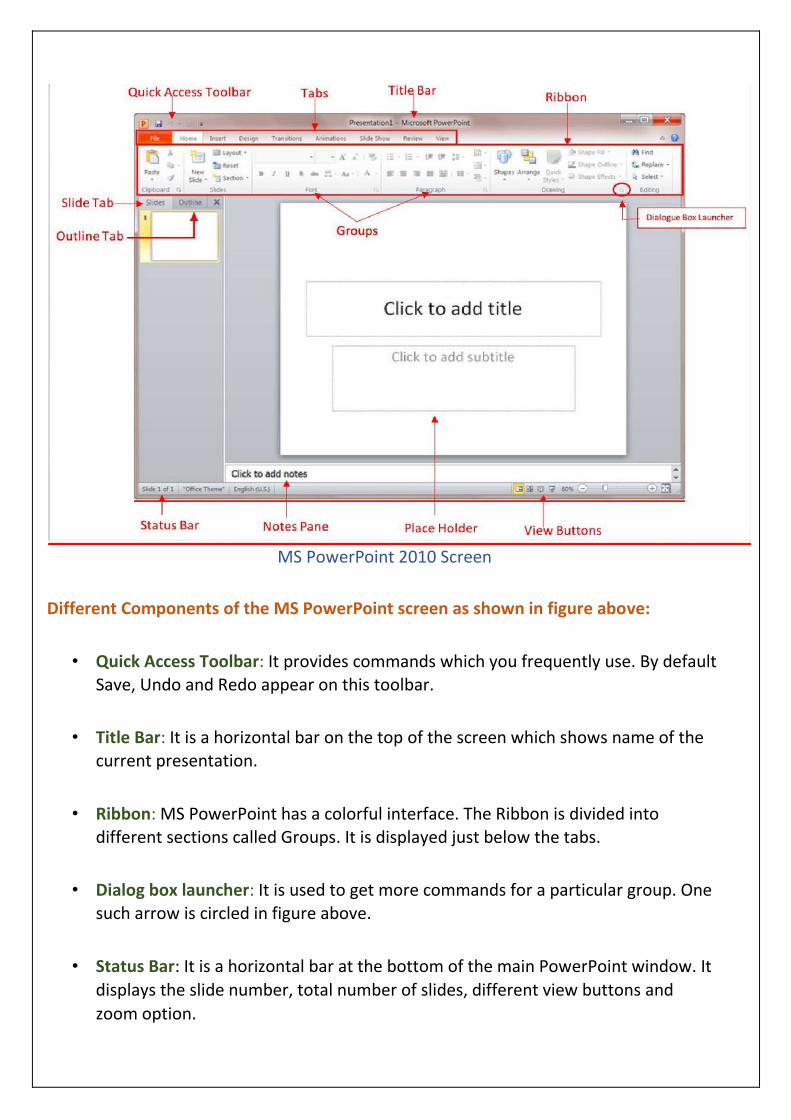
MS PowerPoint 2010 Screen
Different Components of the MS PowerPoint screen as shown in figure above:
• Quick Access Toolbar: It provides commands which you frequently use. By default Save, Undo and Redo appear on this toolbar.
• Title Bar: It is a horizontal bar on the top of the screen which shows name of the current presentation.
• Ribbon: MS PowerPoint has a colorful interface. The Ribbon is divided into different sections called Groups. It is displayed just below the tabs.
• Dialog box launcher: It is used to get more commands for a particular group. One such arrow is circled in figure above.
• Status Bar: It is a horizontal bar at the bottom of the main PowerPoint window. It
displays the slide number, total number of slides, different view buttons and
zoom option.

• Ruler: The horizontal and vertical rulers measure width and height, respectively, of the slide.
• Outline Tab: It displays the text in the presentation.
• Slides Tab: It displays the thumbnail (very small images) versions of slides in your presentation.
• Notes Pane: It lets you type speaker notes for each slide. It is located beneath the
Slide pane.
• Placeholder: It is the container in the layout that holds content such as text, tables, charts, graphics, movies, sounds and pictures.
• View Buttons: The view buttons at the bottom of the presentation window can be used to switch between Normal view, Slide Sorter view, Reading view and Slide Show view.
TOPIC-4 CREATING A PRESENTATION
A Blank presentation is a simple and good template to use when you first start to work
with MS PowerPoint. When you open PowerPoint, the program takes you by default to
a new slide screen.

Creating New Presentation
To create a new presentation, the steps are as follows:
Step 1: Click on File tab.
Step2: Click on New option, and under the Available Templates and Themes, select Blank presentation.
Step 3: Click on Create button. A new presentation slide opens.
Now you can start inserting your text, picture or clipart.
Inserting Text to Slide/Placeholder
Placeholders are the containers in layouts that hold content such as text (including body text, bulleted lists and titles), tables, charts, graphics, movies, sounds and pictures.

To add text to a placeholder on a slide, click inside the placeholder and then type or paste text as shown in figure above.
Inserting Picture and Clip Art
You can insert or copy Picture and Clip Art into a PowerPoint presentation. You can also use Picture and Clip Art as background for your slides in PowerPoint.
Steps to insert picture in MS PowerPoint:
Step 1: Click on the slide where want to add the picture.
Step 2: Click on Insert tab and then in the images group, click on the picture button as shown in figure below.
Inserting Text to Slide/Placeholder

Step 3: The Insert Picture dialog box will appear as shown in figure below.
Insert Picture Dialog Box
Step 4: Select the Picture that you want to insert and click on Insert button. Thus, selected picture will get copied on the slide.
Inserting Clip Art
Clip Art is a gallery of ready-made graphics in MS PowerPoint.
Steps to insert Clip Art in MS PowerPoint are as follows:
Step 1: Click on the slide where you want to add the Clip Art.

Step 2: Click on the insert tab and then click on Clip Art of the images group as shown in figure below.
Step 3: In the Clip Art task pane, in the Search for text box, type a word that describes the Clip Art that you want as shown in figure below.
Clip Art Task Pane
Step 4: Click on the Go button.

Step 5: In the list of results, click the Clip Art to insert it.
Inserting a New Slide
Steps to insert a new slide in MS PowerPoint are as follows:
Step 1: Click on the Home tab, and then, on the Slides group you will find New Slide button as shown in figure.
Step 2: Click on the arrow below New Slide.
A gallery of slide layout appears, outlining your various slide content options to choose from.
Step 3: Click on the slide layout that you want to use.
OR
If you want your new slide to have the same layout that the slide before it has, you can just click New Slide instead of clicking the arrow below it.
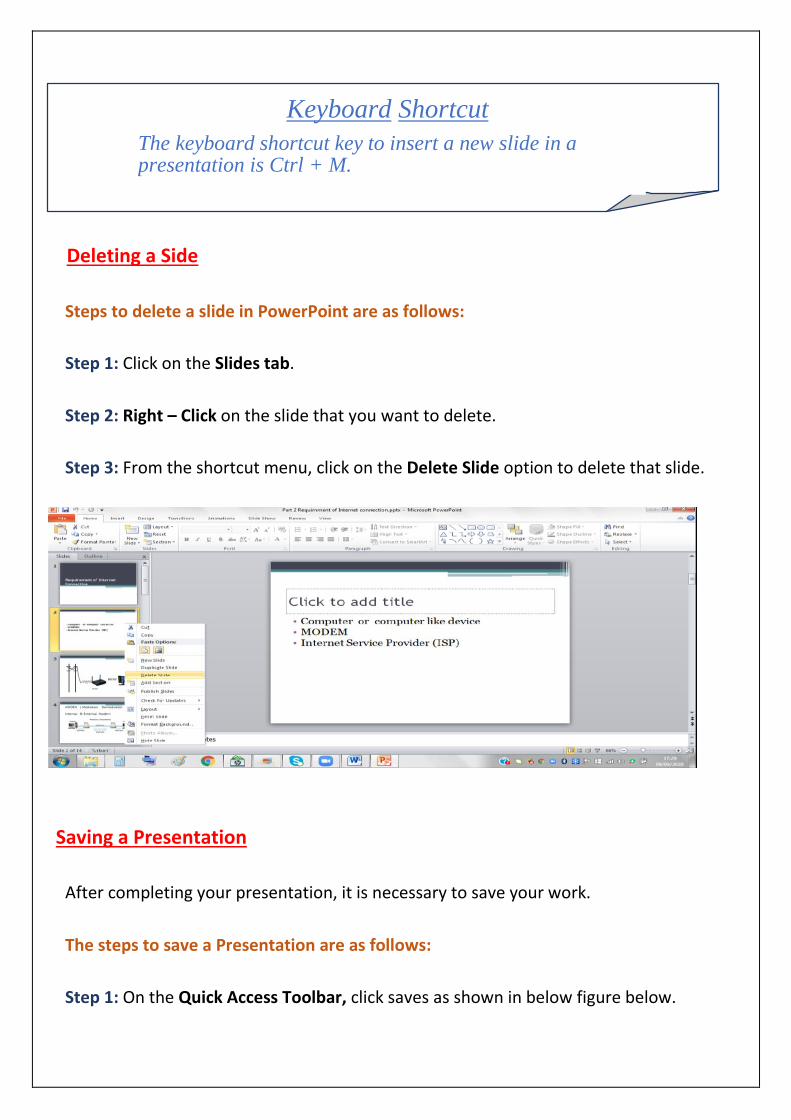
Deleting a Side
Steps to delete a slide in PowerPoint are as follows:
Step 1: Click on the Slides tab.
Step 2: Right – Click on the slide that you want to delete.
Step 3: From the shortcut menu, click on the Delete Slide option to delete that slide.
Saving a Presentation
After completing your presentation, it is necessary to save your work.
The steps to save a Presentation are as follows:
Step 1: On the Quick Access Toolbar, click saves as shown in below figure below.
Keyboard Shortcut
The keyboard shortcut key to insert a new slide in a presentation is Ctrl + M.

OR
Click on the File tab. Click on Save As or Save option. The Save As dialog box will appear.
Step 2: Select the drive/folder where you want to save the presentation.
Step 3: Type the name of the presentation, and then, click o Save. The File is saved with the .pptx extension.
Smart Byte
When you save a presentation for the first time using the Save or Save as option, the Save As dialogue box appears. Whereas, when you save an existing presentation, the save option does not display any dialogue box.

Closing a Presentation
After saving a Presentation, the steps to close the Presentation are as follows:
Step 1: Click on the File Tab
Step 2: Click on the Close option
OR
You can also close a Presentation by pressing CTRL + W.
Keyboard Shortcut
The keyboard shortcut key to save a presentation is Ctrl + S.

Opening a Presentation
Steps to open an existing presentation are as follows:
Step 1: Click on the File Tab
Step 2: Click on the Open option. The open dialog box will appear.
Step 3: Search for your file in the drive/folder. And select the file that you want to open.
Step 4: Click on the Open button.
Navigating between the slides
You can navigate between the slides in the PowerPoint 2010 window in many ways.
• Press PageDown and PageUp keys on the Keyboard to move onto the next or
previous slide, respectively.
• Press Down and Up arrows key on the keyboard to move onto the next or
previous slide, respectively.

• Select the required slide directly in the Slide/Outline Pane of the PowerPoint window.
• You can also use the Scroll bar or the Previous Slide and Next Slide arrow buttons
to navigate between the slides in the Slide Pane.
TOPIC 5: SLIDESHOW
• The Slide Show is a sequential display of slides in the full screen mode.
• Once, all the slides are complete, you have to run them together on the screen as
a slide show to see the effect of the entire presentation comprehensively.
• It is important to run a preview of the slide show, so that any required changes can be made before it is finally shown to the audience that it is meant for.
Steps to view a presentation in the Slide Show are as follows:
Step 1: Click on the Slide Show tab. In the Start Slide Show group, click on From Beginning to view the entire Presentation or From Current Slide to view from the Current Slide onwards.
Step 2: Click on the left mouse button or arrow Key to advance from slide to slide. At the end of your Presentation, a black screen appears with the message: End of Slide Show, click to exit.
Step 3: Click to exit the Slide Show.
Keyboard Shortcut
Press F5 from the keyboard to run the Slide Show from beginning.
EXITING MS POWERPOINT
Once you have finished your work, you need to exit the MS PowerPoint application. If you have not saved your work before exiting or closing MS PowerPoint, it prompts you to save it.

Steps to exit MS PowerPoint are as follows:
Step 1: Click on the File tab.
Step 2: Click on the Exit option.
OR
You can also exit MS PowerPoint by clicking on the Close button on the Title bar or by pressing Alt + F4.
Worksheet 1(Textbook exercise)
Q 1. Choose the Correct Answer
1. The shortcut key to add a new slide is
a. Ctrl + A b.Ctrl + S c. Ctrl + M d. Ctrl + N
2. MS PowerPoint 2010 saves file with an extension
a. .pptx b. .png c.ppt d. .pps
3. To close a PowerPoint presentation, click on
a. File tab -> Save as
b. Start button -> Log off
c. File tab -> Close

d. Close button
4. Which tab displays the thumbnail versions of the slides in your presentation?
a.Outline tab b. File tab c.Slides tab d. Insert tab
5. Pressing the key displays your presentation from the beginning.
a. F5 b.F6 c. F4 d. F1
Q 2. Fill in the blanks
1) The is on the top of the MS PowerPoint screen.
2) A presentation is a collection of .
3.Omit
4.Omit
5) tab displays the text in the presentation.
Worksheet 1 (Textbook exercise)
(Solution)
Q 1. Choose the correct option
1. Ctrl + M
2. .pptx
3. File tab - > Close
4. Slides Tab
5. F5
Q 2. Fill in the blanks
1. Title

2. Slides
3. Omit
4. Omit
5. Outline
Worksheet 2(Notebook Exercise)
Q 1. Answer in one word
1. What is a sequential display of slide in full screen mode called?
2. Which component is divided into different section called group?
3. Which component provides save, undo, redo command?
4. Which short cut key is used to save a presentation?
5. In which gallery ready-made graphics are available?
6. Which software is used for creating slideshow?
7. Which component of PowerPoint window is used to measureWidth and height of the slide?
8. Which key is used to move on to the next slide in the normal view?
9. Which shortcut key is used to close a presentation?
10. In which view one can write and design presentations?

Q 2. Fill in the blanks:
1) displays name of the current presentation.
2) An individual page of power point presentation is called
3) is used to get more command for a particular group.
4) In MS PowerPoint, is the container in the layout that holds the
content.
5) MS PowerPoint is a part of .
Worksheet 2 (Notebook Exercise)
Solution
Q 1. Answer in one word
1. Slide Show
2. Ribbon
3. Quick Access toolbar
4. Ctrl+S
5.ClipArt
6. MS Power point
7.Ruler
8. Down arrow key
9. Ctrl + W
10.Normal View
Q 2. Fill in the blanks:
1. Title bar
2. Slide

3. Dialog box launcher
4. Placeholder
5. MS office
Worksheet 3 (Notebook Exercise) Answer the following
1. What is presentation? 2. Enlist the Components of MS PowerPoint screen. 3. Write the steps to insert a clipart in Ms PowerPoint. 4. Write the steps to save a presentation in Ms PowerPoint.
Worksheet 3 (Notebook Exercise)
Solution
Answer the following:
Ans 1)
• Explanation done with the help of tools such as charts, diagrams, pictures and sounds is called presentation.
• The purpose of the presentation is to make the person understand in an effective manner.
Ans 2) The Components of MS PowerPoint screen are:
1. Quick Access Toolbar 7. Outline Tab
2. Title bar 8. Ruler
3. Tabs 9.Place Holder
4. Ribbon 10.Notes pane
5. Dialog Box Launcher 11. View Buttons
6. Slides Tab 12.Status Bar
Ans 3) Steps to insert Clip Art in MS PowerPoint are as follows:

Step 1: Click on the slide where you want to add the Clip Art.
Step 2: Click on the insert tab and then click on Clip Art of the images group. (Clipart taskpane will appear).
Step 3: In the Clip Art task pane, in the Search box, type a word that describes your Clip Art.
Step 4: Click on the Go button.
Step 5: In the list of results, click the Clipart to insert it.
Ans 4) Steps to save a presentation in MS PowerPoint are as follows:
Step 1: Click on the File tab. Click on Save As or Save option. The Save As dialog box will appear.
Step 2: Select the drive/folder where you want to save the presentation.
Step 3: Type the name of the presentation, and then, click on Save.


![Mental Maths Competition Std 8 · Mental Maths Competition® 2013 Std 8 ... from each std will be felicitated with ... [Rank 4th to Rank 10th] will](https://static.fdocuments.us/doc/165x107/5b5d97547f8b9ad2198eb9b2/mental-maths-competition-std-8-mental-maths-competition-2013-std-8-from.jpg)