
Start-up Guide for the K computer - High … BY AN SSH COMMAND FROM A LINUX TERMINAL..... 29 5.2. L...
48
Start-up Guide for the K computer Version 1.19 Jan, 2019 RIKEN Center for Computational Science
Transcript of Start-up Guide for the K computer - High … BY AN SSH COMMAND FROM A LINUX TERMINAL..... 29 5.2. L...

Start-up Guide for the K computer
Version 1.19
Jan, 2019
RIKEN Center for Computational Science

Start-up Guide for the K computer (Ver. 1.19)
i
Contents
1. STARTING TO USE THE K COMPUTER ...................................................................................... 1
1.1. OPERATING PROCEDURE BEFORE STARTING (OVERVIEW) .................................................................... 2
2. INSTALLING YOUR CLIENT CERTIFICATE .................................................................................. 3
2.1. PRIOR PREPARATIONS .............................................................................................................. 3
2.2. INSTALLING YOUR CLIENT CERTIFICATE INTO YOUR WINDOWS PC .......................................................... 4
2.3. INSTALLING YOUR CLIENT CERTIFICATE INTO YOUR MACINTOSH PC ...................................................... 10
2.4. INSTALLING YOUR CLIENT CERTIFICATE INTO FIREFOX WEB BROWSER .................................................... 14
3. HOW TO ACCESS THE K COMPUTER PORTAL SITE .................................................................. 20
4. GENERATING AND REGISTERING A SSH PUBLIC KEY ............................................................... 24
4.1. GENERATING PRIVATE AND PUBLIC KEYS ...................................................................................... 24
4.2. REGISTERING A PUBLIC KEY ONTO A LOGIN NODE OF THE K COMPUTER .................................................. 28
5. LOGGING IN TO THE K COMPUTER BY OPENSSH .................................................................... 29
5.1. LOGGING BY AN SSH COMMAND FROM A LINUX TERMINAL ................................................................ 29
5.2. LOGGING BY PUTTY TERMINAL EMULATOR ON WINDOWS PC ........................................................... 31
6. INTRODUCING IDE CLIENTS AND ITS LOGIN PROCEDURE ........................................................ 35
6.1. OBTAINING AN IDE CLIENT INSTALLER ........................................................................................ 35
6.2. INSTALLATION PROCEDURE ...................................................................................................... 36
6.3. CLIENT LOGIN PROCEDURE ...................................................................................................... 38
7. HOW TO LOG INTO THE K COMPUTER BY SINGLE SIGN-ON ..................................................... 40
7.1. PRIOR PREPARATIONS ............................................................................................................ 40
7.2. ACCESSING THE K COMPUTER .................................................................................................. 41
7.3. SWITCHING BETWEEN LOCAL ACCOUNTS. ..................................................................................... 41

Start-up Guide for the K computer (Ver. 1.19)
ii
Version history
Version Revision date Content
1.04 Sep. 2, 2013 Translated version of Japanese guide ver.1.04
1.05 Nov. 8, 2013 Add “Section 2.5 Java installation” Update a few screenshots of portal site ”Chapter3, Section 4.2, Section 6.1”
1.06 Nov. 27, 2013 Correct typographic error in the section 4.2 Main tab ⇒ Status/Configuration tab
1.07 Jul. 8, 2014
Remove description for Windows XP Update all screenshots of the portal site and Windows Update ”Section 4.1 Generating private and public keys ”
1.08 Mar. 27, 2015
Due to prohibition of SSL connection, add how to use of TLS connection into the Chapter 3. Update how to download the latest IDE installer in the section 6.1.
1.09 Jun. 18, 2015
Update the description of ⅲ due to the change of client OS (Add Windows8 and MacOS10.8 / Remove Windows Vista ) Update a few procedures and screenshots of Chapter 2, Section 2.2, Section 2.3, Section 2.5 and Chapter 3 due to the start of the support for IE11,JRE1.08 ( and end of the support for IE9,JRE1.07 )
1.10 Jan. 13, 2016 Remove description for Internet Explorer 10
1.11 Apr. 4, 2016
Update the description and screenshot due to the change of the certification authority (CA) of the client certificate in the section 2.2, 2.3, 2.4, 2.5 and the chapter 3.
1.12 Apr. 5, 2016 Update description in the section 4.1.2
1.13 Apr. 6, 2017 Correct typographic error in the header
1.14 Apr. 21, 2017
Update the description of MacOS’s version in page iv Remove the description of the login service with GSI-SSH login node due to the end of service
1.15 Oct. 25, 2017
Update the description of ⅲ due to the change of client OS (Add Windows10)
Update a few procedures and Chapter 3 due to the start of the support for Microsoft Edge, TLS1.2( and end of the support for TLS1.0,TLS1.1 )
1.16 Apr. 1, 2018 Change the organization name

Start-up Guide for the K computer (Ver. 1.19)
iii
Update new domain information Update almost all screenshots
1.17 Apr. 16, 2018 Change new domain Update a few screenshots of Section2.3, Section2.5, Chaper3, Section5.2 and Section6.3.
1.18 Aug. 8, 2018
Add ssh login method to specify 10G port on klogin(k-10g.r-ccs.riken.jp). Update description in the section 5.1 and related points. Correct the broken link in the chapter 7.
1.19 Jan. 23, 2019 Delete Section 2.5 Delete old domain information
Aim of this start-up guide
This start-up guide describes the procedures for users to start using the K computer. Please refer to the K computer portal manual for specific procedures such as job execution on the K computer. Note:
• For command execution given in this guide book, the user terminal in operation
and the login node are expressed by prompts.
Prompt Terminal
terminal Signifies that command is executed on the user’s terminal.
klogin Signifies that command is executed on the K computer.
• Bold lettering in a command input signifies input by the user. • Bold lettering (italics) in a command input signifies that the user can input any
character string. • An ‘’¥’’ sign at the end of a command input signifies a continuing line. • The operating systems (OSs), on which clients are executed, dealt with in this
guide are Microsoft Windows 7/8 /10(hereafter referred to as Windows) and MacOS X (hereafter referred to as Macintosh).

Start-up Guide for the K computer (Ver. 1.19)
iv
Trademarks
Some company names and product names in the text are trademarks or registered trademarks of those companies. Other trademarks or registered trademarks mentioned are generally company trademarks or registered trademarks. Please note that system or product names in the text do not always display the ™, ® marks.
© 2018 RIKEN Center for Computational Science. Unauthorized reproduction or copying of the contents of this manual is forbidden.

Start-up Guide for the K computer (Ver. 1.19)
1
1. STARTING TO USE THE K COMPUTER
Before starting to use the K computer, a number of settings need to be configured in advance. This start-up guide describes the procedures starting with acquiring a K computer local account, a client certificate to access the K computer user portal site, and a passphrase to register the client certificate on the user’s own PC, and ending with logging in to the K computer. It also describes the procedure for using single sign-on (SSO) with a HPCI account when logging in to the K computer. Note: - The passphrase to register a K computer local account and a client certificate is
sent on a postcard by the Registered Institution for Facilities Use Promotion. - The client certificate for the access of the user portal site is sent to individual users
by e-mail. By following the start-up guide to configure the settings for the connection authentication to the K computer user portal on the user’s own PC, the user can access the user portal. In the user portal, the user can register an SSH public key on the K computer front-end sever and obtain a programming support tool (IDE). Below is an outline of the user portal, etc.
Name Outline Authentication method User portal Information about operations of
the K computer, disclosure of documentation such as manuals, registration of SSH public keys, etc.
Client certificate (access through browser)
SSH connection Connecting to a K computer login node
SSH public key
Programming support tool (IDE)
Tool for profiler visualization, etc. Client certificate (access through dedicated client)

Start-up Guide for the K computer (Ver. 1.19)
2
1.1. Operating procedure before starting (overview)
In order to start using the K computer, please set up the environment according to the
following procedure.

Start-up Guide for the K computer (Ver. 1.19)
3
2. INSTALLING YOUR CLIENT CERTIFICATE
Here we explain the procedure to register your client certificate on the PC you use. Of the
following, please refer to the appropriate procedure for the PC you use.
Operating system Clients Section to be referred Remarks
Windows K computer portal Go to section 2.2 Internet Explorer or Microsoft Edge
are assumed to use.
IDE tool for Windows
Macintosh K computer portal Go to section 2.4
Firefox is assumed to use.
IDE tool for Mac Go to section 2.3
Linux K computer portal Go to section 2.4
Firefox is assumed to use.
Note: The use of Internet Explorer is assumed for Windows. If other browsers are used, please
confirm for yourself how certificates are managed in that particular browser before installing
the certificate.
2.1. Prior preparations
Before starting the installation of your client certificate, please confirm you have the
followings.
• Your client certificate This can be found in the file named ‘’LOCAL_ACCOUNT.p12’’, attached to the email. Please save the file ‘’LOCAL_ACCOUNT.p12’’ on the PC on which you will install the client certificate. *After installing the certificate, the file ‘’LOCAL_ACCOUNT.p12’’ may be deleted from the PC.
• Client certificate passphrase
This can be found on the postcard from the Registered Institution for Facilities Use Promotion.

Start-up Guide for the K computer (Ver. 1.19)
4
2.2. Installing your client certificate into your Windows PC
(1) Double-click the file “LOCAL_ACCOUNT.p12” saved on your PC to run an installation
procedure, then a wizard for importing your client certificate starts. Select “Current
User” in the “Store Location” field, and the Click the [Next] button.
When there is no “Store Location” field on the window, just click the [Next] button.

Start-up Guide for the K computer (Ver. 1.19)
5
(2) Make sure the file name of your certificate displayed in the filename field again,
then click the [Next] button.
(3) Enter the passphrase of your client certificate, which was written on the postcard
sent separately, into the password field, and check the "Enable strong private
key protection" box, and then click the [Next] button.
Start-up Guide for the K computer (Ver. 1.19)
6
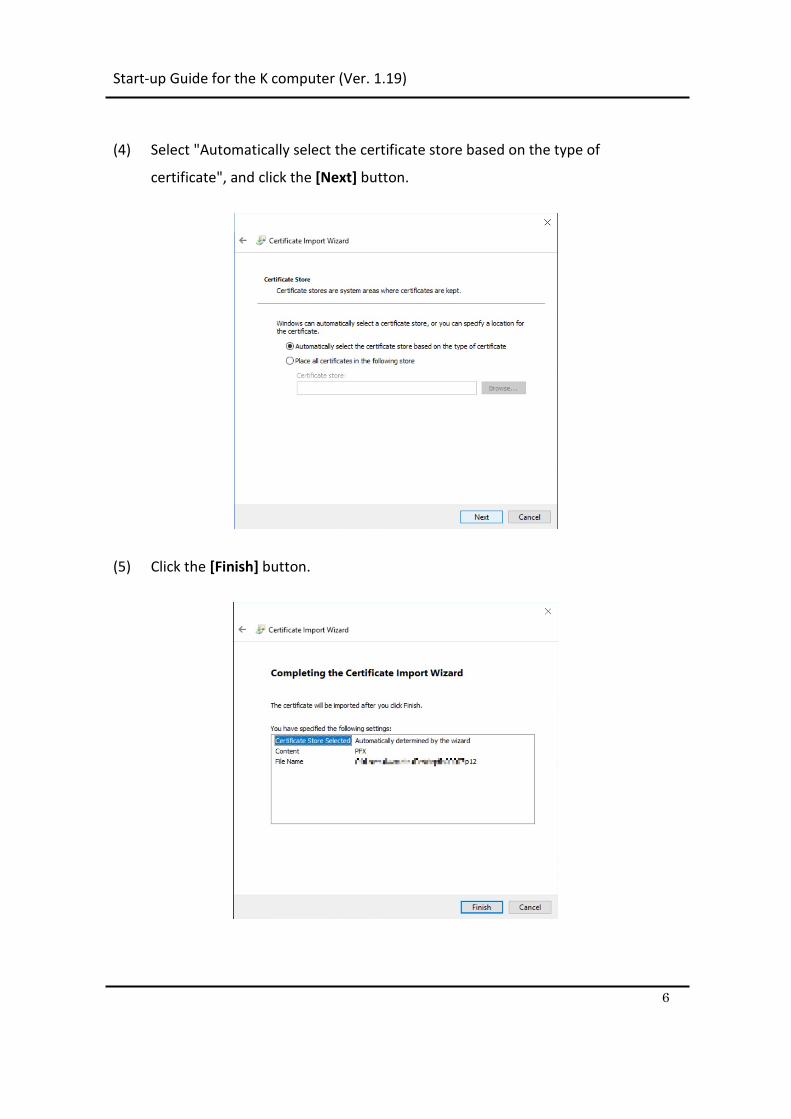
(4) Select "Automatically select the certificate store based on the type of
certificate", and click the [Next] button.
(5) Click the [Finish] button.
Start-up Guide for the K computer (Ver. 1.19)
7
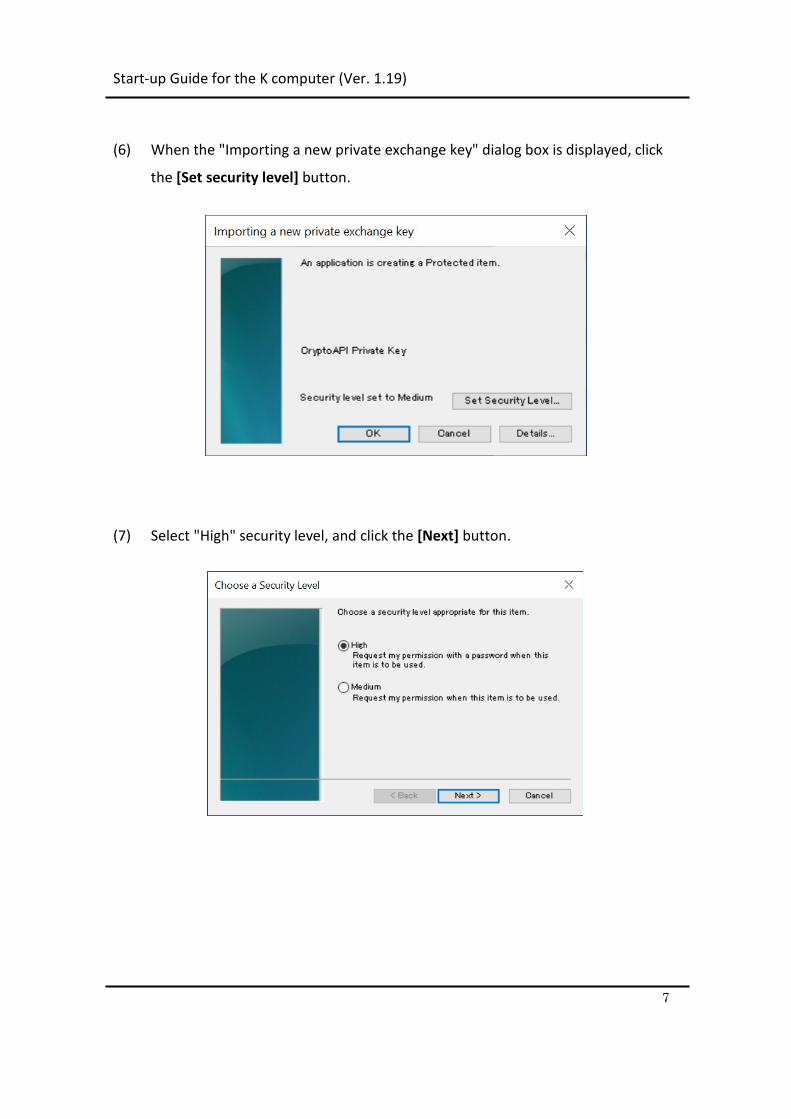
(6) When the "Importing a new private exchange key" dialog box is displayed, click
the [Set security level] button.
(7) Select "High" security level, and click the [Next] button.

Start-up Guide for the K computer (Ver. 1.19)
8
(8) Set any password that is required when using a client certificate, and then click
[Finish] button.
(9) Make sure that security level is set to "High", and click the [OK] button.
Start-up Guide for the K computer (Ver. 1.19)
9
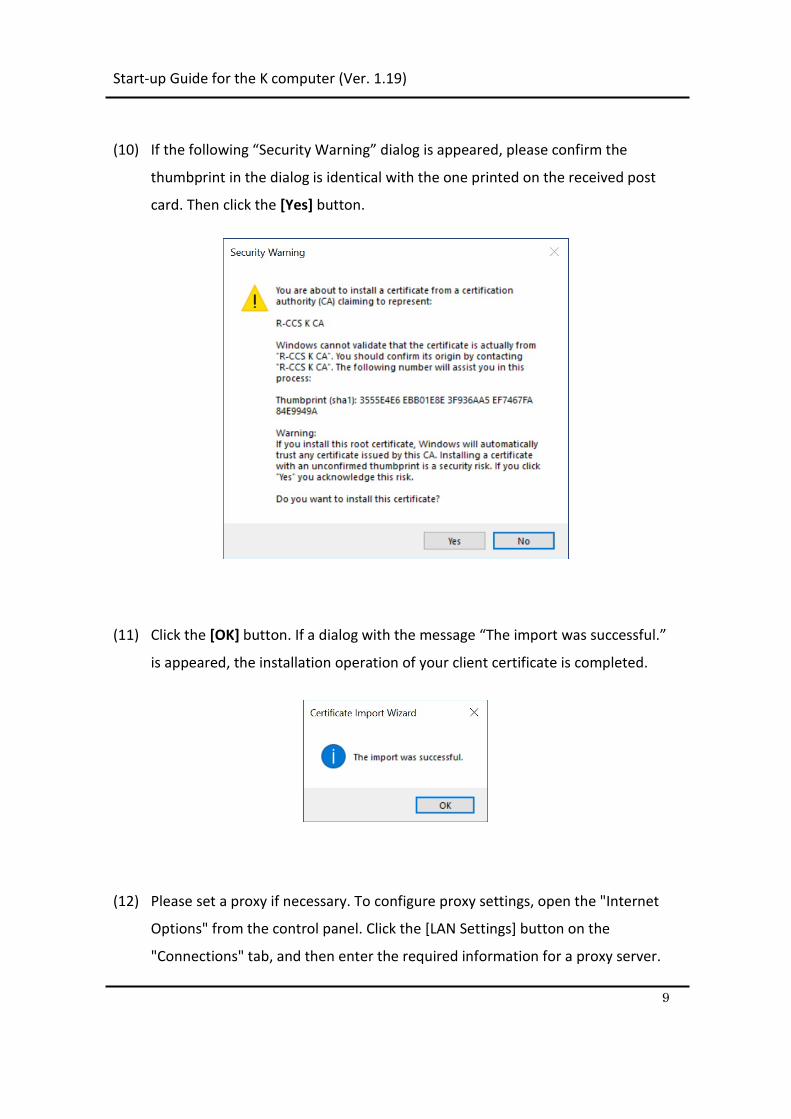
(10) If the following “Security Warning” dialog is appeared, please confirm the
thumbprint in the dialog is identical with the one printed on the received post
card. Then click the [Yes] button.
(11) Click the [OK] button. If a dialog with the message “The import was successful.”
is appeared, the installation operation of your client certificate is completed.
(12) Please set a proxy if necessary. To configure proxy settings, open the "Internet
Options" from the control panel. Click the [LAN Settings] button on the
"Connections" tab, and then enter the required information for a proxy server.

Start-up Guide for the K computer (Ver. 1.19)
10
2.3. Installing your client certificate into your Macintosh PC
(1) Double-click the file “LOCAL_ACCOUNT.p12” saved on your Mac to run an
installation procedure. Then enter your client certificate in the “Password” field of
the appeared dialog window, and click the [OK] button.
(2) Open the “Keychain Access" window, and double-click the root certificate
authority “R-CCS K CA” from which your client certificate was issued. Then an
information window of the client certificate is appeared.

Start-up Guide for the K computer (Ver. 1.19)
11
(3) After "Trust" window is appeared, select "Always Trust" in the "When using this
certificate:" field, then close this window.
(4) In order to reflect the change to the certificate trust settings, administrator’s user
name and password of your Mac are requested to enter. Enter them and click
[Update Settings] button.
Start-up Guide for the K computer (Ver. 1.19)
12
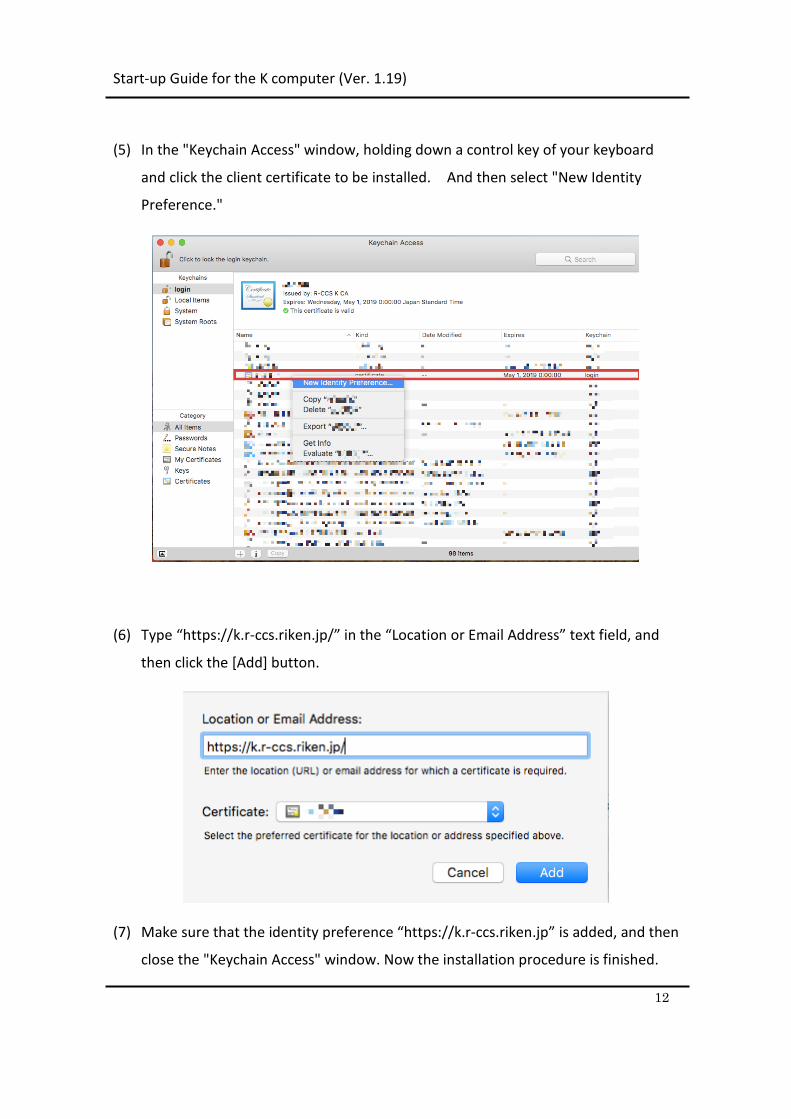
(5) In the "Keychain Access" window, holding down a control key of your keyboard
and click the client certificate to be installed. And then select "New Identity
Preference."
(6) Type “https://k.r-ccs.riken.jp/” in the “Location or Email Address” text field, and
then click the [Add] button.
(7) Make sure that the identity preference “https://k.r-ccs.riken.jp” is added, and then
close the "Keychain Access" window. Now the installation procedure is finished.

Start-up Guide for the K computer (Ver. 1.19)
13
(8) Please set a proxy if necessary. To configure proxy settings, open the "Network"
from the “System Preferences”. Select the device in the network connection, click
the “Advanced” button, and then enter the required information for a proxy
server.

Start-up Guide for the K computer (Ver. 1.19)
14
2.4. Installing your client certificate into Firefox web browser
(1) Start Firefox and choose [Preferences..] in the Firefox menu.
(2) Select [Privacy&Security] category. Then click [View Certificates] button.

Start-up Guide for the K computer (Ver. 1.19)
15
(3) A Window “Certificate Manager” will appear on the screen. Select [Your
Certificates] and click [Import...] button.
(4) Choose your client certificate file saved on your PC, then click [Open] button.

Start-up Guide for the K computer (Ver. 1.19)
16
(5) Enter the passphrase of your client certificate, which was written on the postcard
sent separately, into the password field, then click the [OK] button.
(6) Click the [OK] button on the alert dialog.

Start-up Guide for the K computer (Ver. 1.19)
17
(7) Check that your client certificate is imported correctly in the “Certificate Manger”
window, then click [OK] button to close the window. The installation operation is
over.
(8) Next, set a password to be typed when you start to use the certificate. This
operation increases the security. Click [Security Device...] button in the window
“Privacy & Security”.

Start-up Guide for the K computer (Ver. 1.19)
18
(9) After the “Device Manager” window is displayed, choose [Software Security
Device] and click [Change Password] button.
(10) Set any password in the “New password” fields, then click the [OK] button.

Start-up Guide for the K computer (Ver. 1.19)
19
(11) Click the [OK] button on the alert dialog.
(12) Click [OK] button to close the Device Manager. The password registration
operation is over.

Start-up Guide for the K computer (Ver. 1.19)
20
3. HOW TO ACCESS THE K COMPUTER PORTAL SITE
1) Access the K computer portal (URL: https://k.r-ccs.riken.jp) by using any web
browser.
Note: The following web browsers are recommended to use in the guide.
Microsoft Windows Internet Explorer 11 (Windows 7 or latter)
Microsoft Edge (Windows 10)
Macintosh Firefox version 12 or latter
Linux Firefox version 12 or latter
Warning)
To avoid the vulnerability of SSL, we prohibit SSL connection for the K computer portal
site. You may not be able to connect to the portal site by TLS connection due to your
browser setting. If you can’t connect to the portal site, please make sure that TLS
connection be used in your browser setting.
For the Internet Explorer
1. Open the “Internet Options” from “Tools” menu or button.
2. Open “Advanced” tab.
3. Check “Use TLS 1.2”.
4. Click “OK”.
For the Firefox
1. Input “about:config” into the location-bar and press enter
2. Search by “tls”
3. Double-click “security.tls.version.max” or click the right mouse button and select
“Modify”, and then change this value into 3 if this was not 3.

Start-up Guide for the K computer (Ver. 1.19)
21
4. Close “about:config” tab
2) After a certificate selection dialog is displayed, select a client certificate
corresponding to the local account of the K computer you want to use.
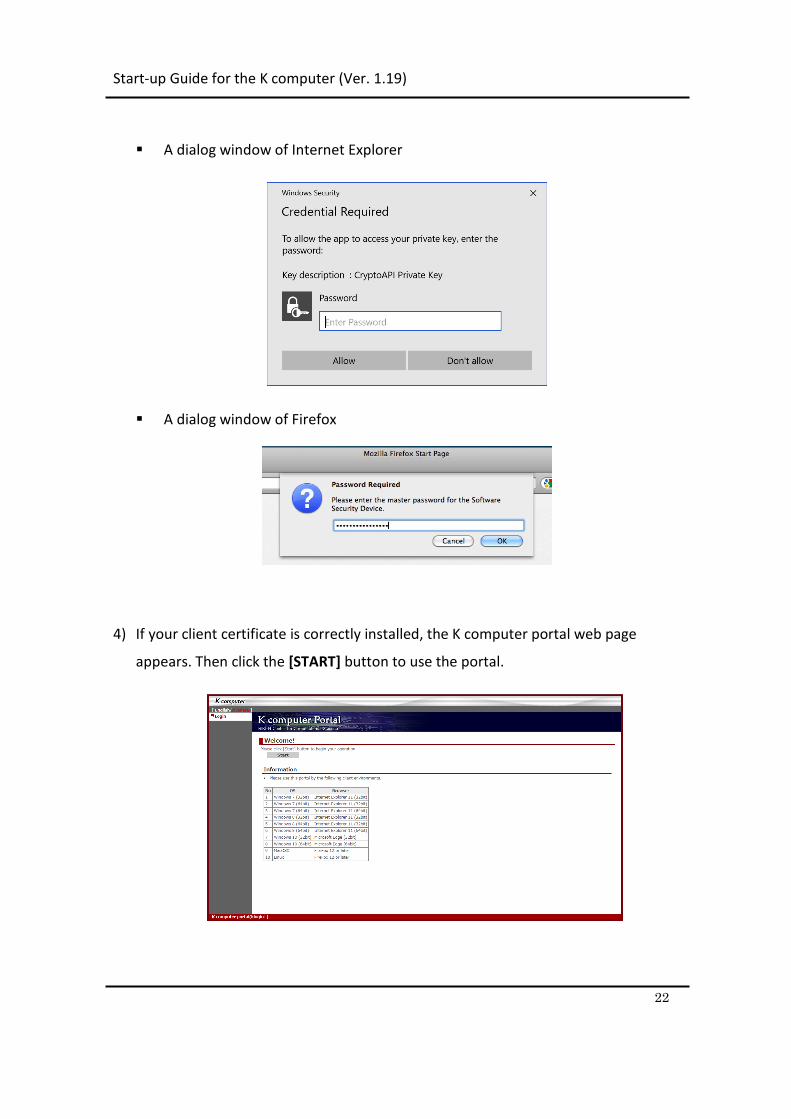
A dialog window of Internet Explorer
A dialog window of Firefox
3) Enter the password which was registered at the client certificate installation
process, into the password dialog window.
Start-up Guide for the K computer (Ver. 1.19)
22
A dialog window of Internet Explorer
A dialog window of Firefox
4) If your client certificate is correctly installed, the K computer portal web page
appears. Then click the [START] button to use the portal.

Start-up Guide for the K computer (Ver. 1.19)
23
5) To terminate the K computer portal, click the [Exit] button on the upper-right
corner of the web page. Then, click [OK] button in the confirmation dialog and
close the browser.

Start-up Guide for the K computer (Ver. 1.19)
24
4. GENERATING AND REGISTERING A SSH PUBLIC KEY
This chapter explains how to generate an SSH private and public key pair, necessary to
log into the K computer by a Secure Shell (SSH) protocol, and how to register a SSH
public key into a login node of the K computer thorough the K computer portal web
site.
4.1. Generating private and public keys
This section describes the procedure for generating a public and private key pair for an
SSH connectivity tool OpenSSH used on UNIX/Linux servers and a terminal emulator
software PuTTY with SSH functions used on Windows systems.
4.1.1 HOW TO USE AN SSH-KEYGEN COMMAND ON UNIX/LINUX SERVERS
To generate a private and public key pair, an ssh-keygen command in the OpenSSH
suite is used.
(1) Launch a terminal emulator at your server and execute the ssh-keygen
command. A passphrase for the SSH connection is required to enter twice in
the prompt. If you use Mac, launch the Terminal and execute the ssh-keygen
command.
Note: Please specify the 2048bit the length of the key.
Note: As with passwords, please choose a character string that is difficult for third parties to guess.
terminal$ ssh-keygen –b 2048 Generating public/private rsa key pair. Enter file in which to save the key (/home/user_name/.ssh/id_rsa): Enter passphrase (empty for no passphrase): ←Enter passphrase Enter same passphrase again: ←Enter same passphrase again Your identification has been saved in /home/user_name/.ssh/id_rsa. Your public key has been saved in /home/user_name/.ssh/id_rsa.pub. The key fingerprint is: f9:81:b6:c7:8f:b9:aa:3e:0e:c6:bd:35:19:a1:1e:06 username@terminal
Start-up Guide for the K computer (Ver. 1.19)
25
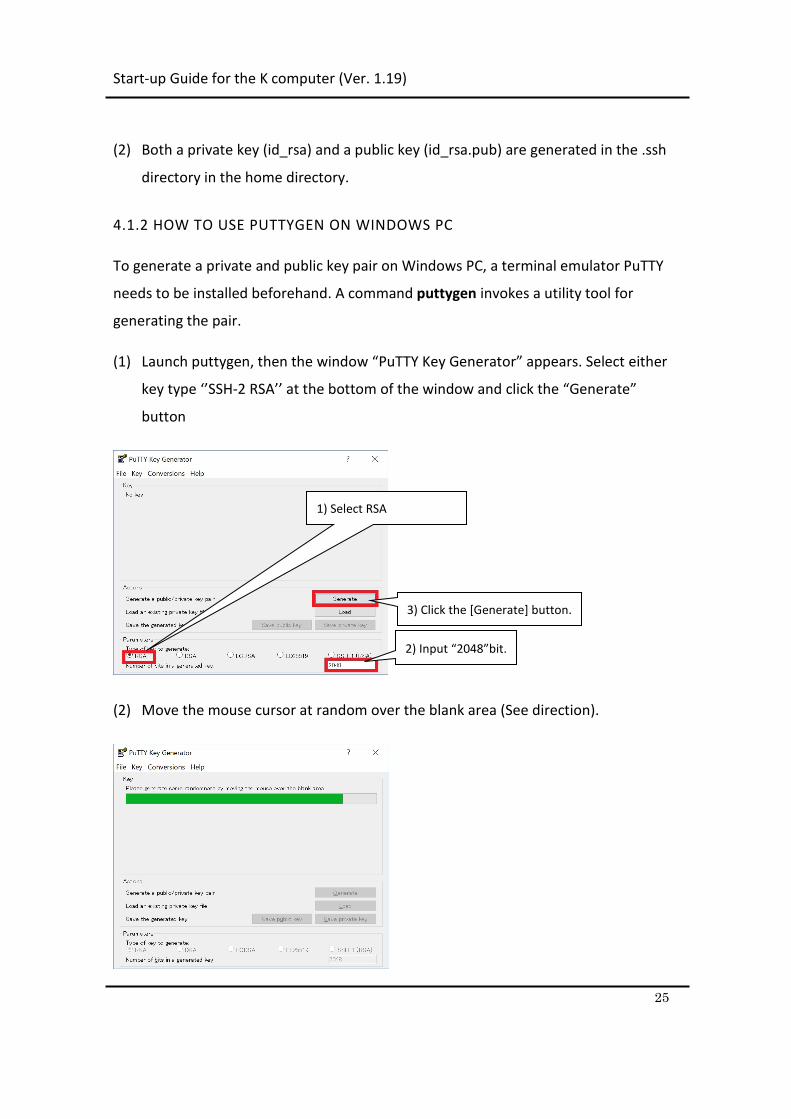
(2) Both a private key (id_rsa) and a public key (id_rsa.pub) are generated in the .ssh
directory in the home directory.
4.1.2 HOW TO USE PUTTYGEN ON WINDOWS PC
To generate a private and public key pair on Windows PC, a terminal emulator PuTTY
needs to be installed beforehand. A command puttygen invokes a utility tool for
generating the pair.
(1) Launch puttygen, then the window “PuTTY Key Generator” appears. Select either
key type ‘’SSH-2 RSA’’ at the bottom of the window and click the “Generate”
button
(2) Move the mouse cursor at random over the blank area (See direction).
1) Select RSA
3) Click the [Generate] button.
2) Input “2048”bit.
Start-up Guide for the K computer (Ver. 1.19)
26
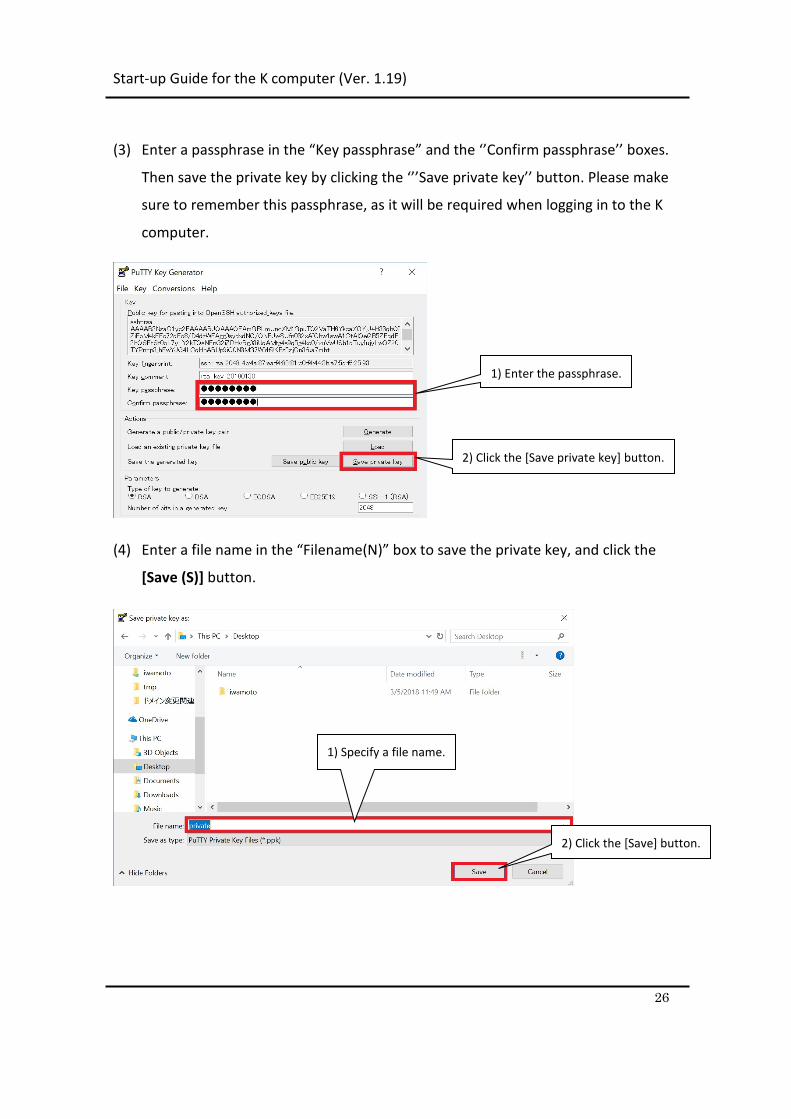
(3) Enter a passphrase in the “Key passphrase” and the ‘’Confirm passphrase’’ boxes.
Then save the private key by clicking the ‘’’Save private key’’ button. Please make
sure to remember this passphrase, as it will be required when logging in to the K
computer.
(4) Enter a file name in the “Filename(N)” box to save the private key, and click the
[Save (S)] button.
1) Enter the passphrase.
2) Click the [Save private key] button.
1) Specify a file name.
2) Click the [Save] button.

Start-up Guide for the K computer (Ver. 1.19)
27
(5) To save the public key, click the “Save public key” button and enter a filename in
the same way as with the private key saving. Then click the [Save(S)] button. At
the same time, by copying the content of the“Public key for pasting in to OpenSSH
authorized keys file:” box in the window onto the clipboard of Windows or pasting
it Notepad for instance, subsequent tasks will be easy.
Copy the displayed contents
to the Clipboard.
Start-up Guide for the K computer (Ver. 1.19)
28
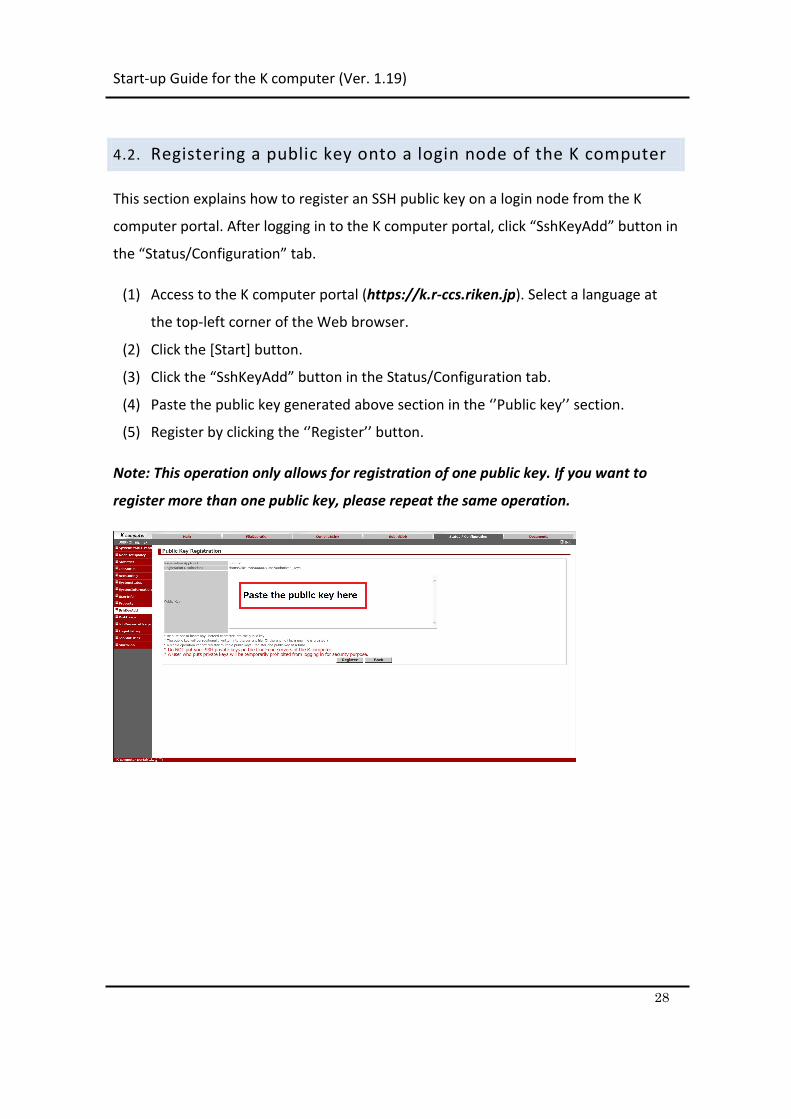
4.2. Registering a public key onto a login node of the K computer
This section explains how to register an SSH public key on a login node from the K
computer portal. After logging in to the K computer portal, click “SshKeyAdd” button in
the “Status/Configuration” tab.
(1) Access to the K computer portal (https://k.r-ccs.riken.jp). Select a language at
the top-left corner of the Web browser.
(2) Click the [Start] button.
(3) Click the “SshKeyAdd” button in the Status/Configuration tab.
(4) Paste the public key generated above section in the ‘’Public key’’ section.
(5) Register by clicking the ‘’Register’’ button.
Note: This operation only allows for registration of one public key. If you want to
register more than one public key, please repeat the same operation.
Start-up Guide for the K computer (Ver. 1.19)
29
5. LOGGING IN TO THE K COMPUTER BY OPENSSH
This chapter explains the procedure for logging in to the K computer.
5.1. Logging by an ssh command from a Linux terminal
Logging in to the K computer is only possible using SSH public key authentication.
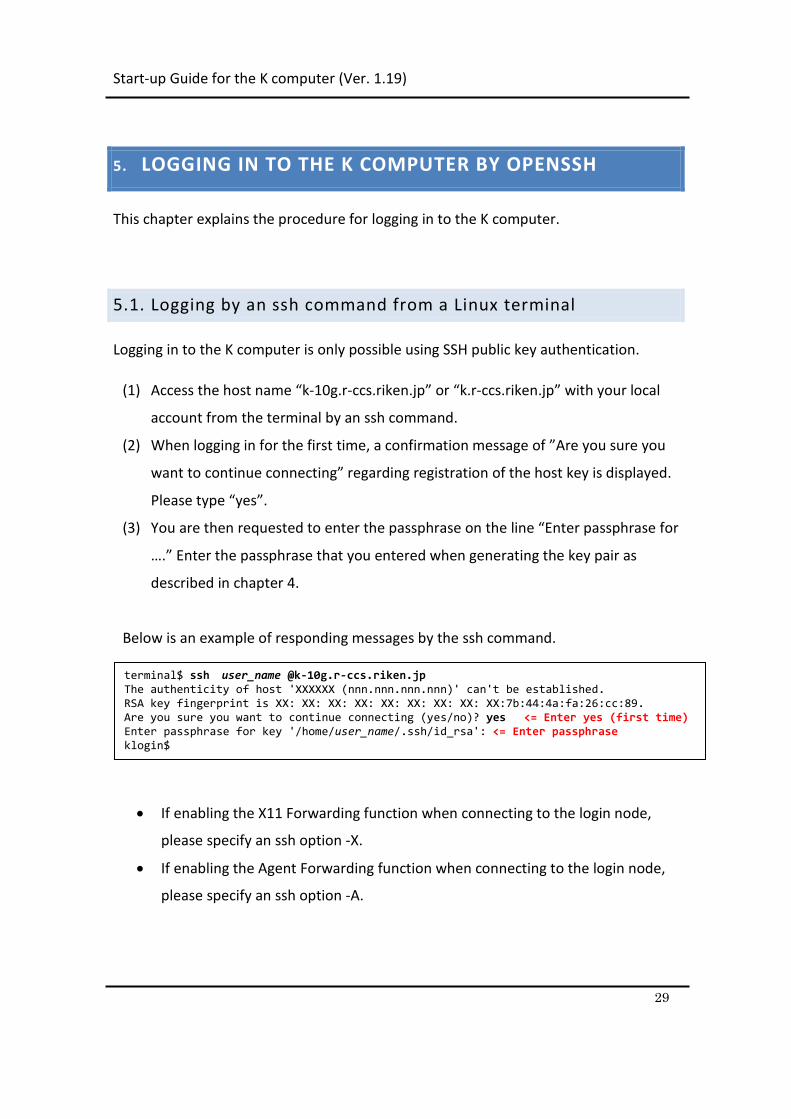
(1) Access the host name “k-10g.r-ccs.riken.jp” or “k.r-ccs.riken.jp” with your local
account from the terminal by an ssh command.
(2) When logging in for the first time, a confirmation message of ”Are you sure you
want to continue connecting” regarding registration of the host key is displayed.
Please type “yes”.
(3) You are then requested to enter the passphrase on the line “Enter passphrase for
….” Enter the passphrase that you entered when generating the key pair as
described in chapter 4.
Below is an example of responding messages by the ssh command.
• If enabling the X11 Forwarding function when connecting to the login node,
please specify an ssh option -X.
• If enabling the Agent Forwarding function when connecting to the login node,
please specify an ssh option -A.
terminal$ ssh user_name @k-10g.r-ccs.riken.jp The authenticity of host 'XXXXXX (nnn.nnn.nnn.nnn)' can't be established. RSA key fingerprint is XX: XX: XX: XX: XX: XX: XX: XX: XX:7b:44:4a:fa:26:cc:89. Are you sure you want to continue connecting (yes/no)? yes <= Enter yes (first time) Enter passphrase for key '/home/user_name/.ssh/id_rsa': <= Enter passphrase klogin$

Start-up Guide for the K computer (Ver. 1.19)
30
• There are 10 login nodes in total, and one of those will be selected
automatically. All login nodes share the same home directory (/home) and data
directory (/data). • You can select login node individually, when you access to 10G port on klogin.
To login a specific klogin, select the following host name.
klogin2 : k-10g2.r-ccs.riken.jp
klogin3 : k-10g3.r-ccs.riken.jp
klogin4 : k-10g4.r-ccs.riken.jp
klogin5 : k-10g5.r-ccs.riken.jp
klogin6 : k-10g6.r-ccs.riken.jp
klogin7 : k-10g7.r-ccs.riken.jp
klogin8 : k-10g8.r-ccs.riken.jp
klogin9 : k-10g9.r-ccs.riken.jp
• If there is a login node separated from the operation due to system
maintenance work, connection may not be possible with normal host name
(k.r-ccs.riken.jp) or (k- 10g.r-ccs.riken.jp). In that case, check the available login
nodes from [Main] - [Notification] - [System operation status] of the K
computer portal (https://k.r-ccs.riken.jp) and enter the host name.

Start-up Guide for the K computer (Ver. 1.19)
31
5.2. Logging by PuTTY terminal emulator on Windows PC
(1) Launch PuTTY application on you Windows PC. First setting the private key saved
on your PC is required. Select “Connection”→ “SSH” → “Auth” in the left-side
window and click the “Browse” button.
(2) Select the file saved your private key which was generated by the puttygen tool
and the click the [Open] button.
(1) Select private
key file (2) Click the “Open(O)”
(1) Select [Connection] -
[SSH] - [Auth].
(2) Click the [Browse]
button.

Start-up Guide for the K computer (Ver. 1.19)
32
(3) Select ‘’Session’’ in the left-side window and enter a host name of the login node
in to the ‘’Host Name (or IP Address)’’ box. In order to save the setting, enter an
appropriate name, for example “K computer,” in the ‘’Saved Sessions’’ box and
click the ‘’Save’’ button. From the second login onwards, select the name you
specified and click the ‘’Load’’ button.
(4) If enabling the X11 Forwarding function when connecting to the login node,
please open “Connection” → “SSH” → “X11” and tick the “Enable X11
forwarding” box before clicking the “Open” button.
(3) Enter a name to save
(4) Click Save
(5) Click Open
Tick this box.
(1) Select Session.
(2) Enter k-10g.r-ccs.riken.jp or k.r-ccs.riken.jp

Start-up Guide for the K computer (Ver. 1.19)
33
(5) If enabling the Agent Forwarding function when connecting to the login node,
please open “Connection” → “SSH” → “Auth” and tick the “Allow agent
forwarding” box before clicking the “Open” button.
(6) Click the ‘’Open’’ button, then a connection to the login node of the K computer
is opened.
(7) When logging in for the first time, a confirmation window is displayed with
regards to registering the host key, then click the “Yes” button.
Click the [Yes (Y)] button.
Tick this box.
Start-up Guide for the K computer (Ver. 1.19)
34
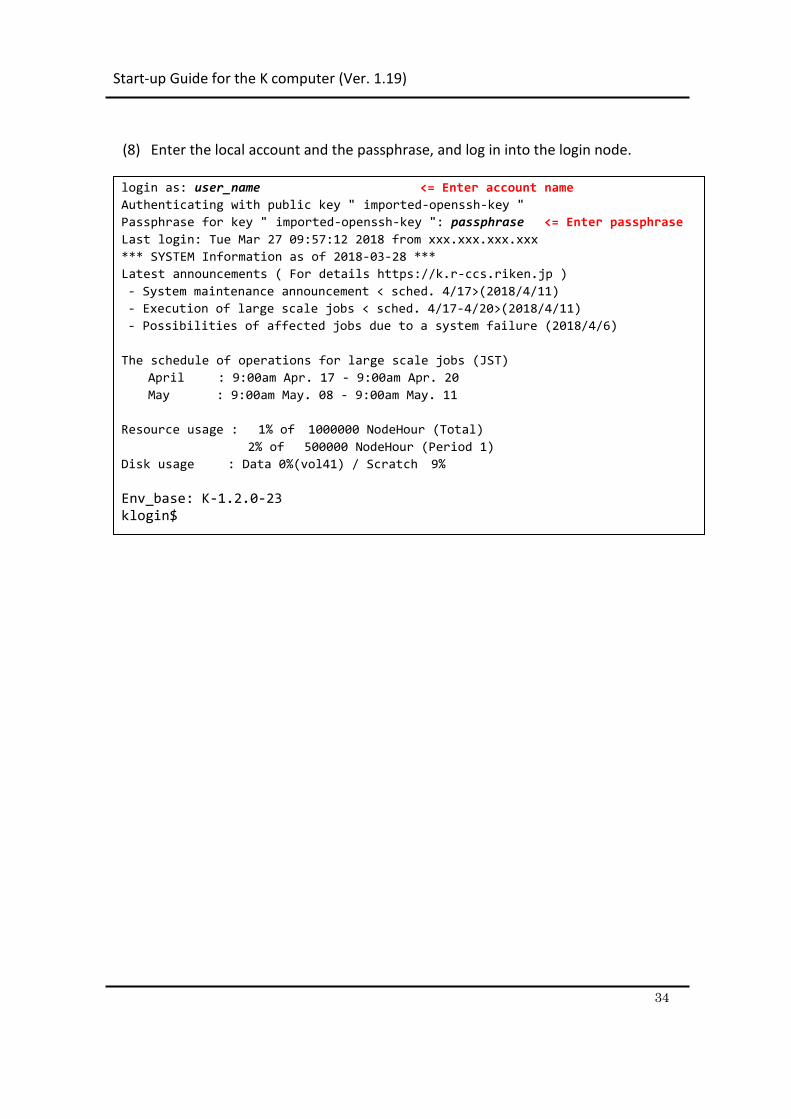
(8) Enter the local account and the passphrase, and log in into the login node.
login as: user_name <= Enter account name Authenticating with public key " imported-openssh-key " Passphrase for key " imported-openssh-key ": passphrase <= Enter passphrase Last login: Tue Mar 27 09:57:12 2018 from xxx.xxx.xxx.xxx *** SYSTEM Information as of 2018-03-28 *** Latest announcements ( For details https://k.r-ccs.riken.jp ) - System maintenance announcement < sched. 4/17>(2018/4/11) - Execution of large scale jobs < sched. 4/17-4/20>(2018/4/11) - Possibilities of affected jobs due to a system failure (2018/4/6) The schedule of operations for large scale jobs (JST) April : 9:00am Apr. 17 - 9:00am Apr. 20 May : 9:00am May. 08 - 9:00am May. 11 Resource usage : 1% of 1000000 NodeHour (Total) 2% of 500000 NodeHour (Period 1) Disk usage : Data 0%(vol41) / Scratch 9% Env_base: K-1.2.0-23 klogin$
Start-up Guide for the K computer (Ver. 1.19)
35
6. INTRODUCING IDE CLIENTS AND ITS LOGIN PROCEDURE
Here we explain the introduction of tools, for instance the visualization of performance
information obtained through a profiler, and the procedure to use this from the client.
6.1. Obtaining an IDE client installer
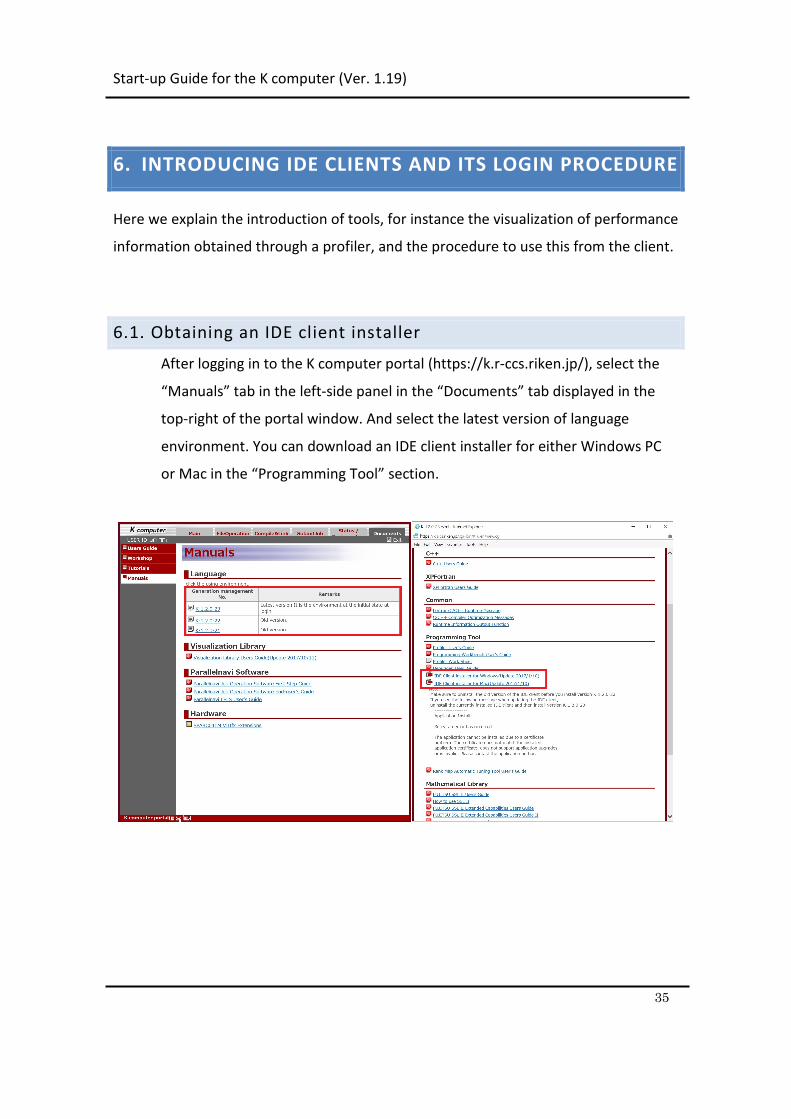
After logging in to the K computer portal (https://k.r-ccs.riken.jp/), select the
“Manuals” tab in the left-side panel in the “Documents” tab displayed in the
top-right of the portal window. And select the latest version of language
environment. You can download an IDE client installer for either Windows PC
or Mac in the “Programming Tool” section.

Start-up Guide for the K computer (Ver. 1.19)
36
6.2. Installation procedure
6.2.1 WINDOWS CLIENT INSTALLATION
(1) Run the downloaded installer for Windows PC.
(2) The installer window is displayed. Change the content as needed, and click the
[continue] button.
(3) If Adobe®AIR® is not installed on your PC, a window containing the Adobe®AIR®
license agreement is displayed. After confirming the content, click the [Agree]
button.
(4) Run the programming support tool when installation has completed.
6.2.2 MAC CLIENT INSTALLATION
(1) Run the downloaded installer for Mac. Depending on the browser settings, the
downloaded file may have been archived. If that is the case, please extract the
archived file and run the installer.
(2) The installer window is displayed. Click the [Install] button.

Start-up Guide for the K computer (Ver. 1.19)
37
(3) The installer settings window is displayed. Change the content as needed, and
click the [Continue] button.
(4) Run the programming support tool when installation has completed.

Start-up Guide for the K computer (Ver. 1.19)
38
6.3. Client login procedure
(1) Run the “Fujitsu Software Development Tools” on your PC. The login window is
displayed.
Enter “k.r-ccs.riken.jp” in the ‘’Server’’ box in the login window, and click the
‘’OK’’ button.
(2) In Windows, the digital certificate selection window will be displayed. Select
the user and click the ‘’OK’’ button.
(3) When authentication is successful, the main window is displayed.
Login window
Digital certificate selection window

Start-up Guide for the K computer (Ver. 1.19)
39
Main window

Start-up Guide for the K computer (Ver. 1.19)
40
7. HOW TO LOG INTO THE K COMPUTER BY SINGLE SIGN-
ON
In order to use single sign-on for the K computer through an HPCI account, prior
preparations as outlined in the HPCI Quick Start Guide (published by the HPCI
Secretariat) are necessary. The HPCI Quick Start Guide can be obtained from
http://www.hpci-office.jp/pages/hpci_info_manuals.
7.1. Prior preparations
(1) Confirm that an HPCI account has been obtained.
(2) Access the URL given in the HPCI account notification email and change the
initial password.
(3) Following the HPCI Quick Start Guide, install the tools necessary for single sign-
on, e.g., GSI-SSH TERM.
(4) Access the HPCI certificate issuance system and obtain a substitution
certificate.
(5) Configure the environment on your own PC.

Start-up Guide for the K computer (Ver. 1.19)
41
7.2. Accessing the K computer
You can log into the K computer by using a substitution certificate. It is also possible to
log into the K computer.
7.2.1 LOGGING IN INTO THE K COMPUTER
(1) Please log into the login node “k-10g.r-ccs.riken.jp”or”k.r-ccs.riken.jp” with a
local account using a command such as gsissh.
(2) As local accounts are issued per a project, multiple local accounts are issued for
different multiple projects. The user therefore needs to switch between local
accounts. This process is explained in ‘’7.3 Switching between local accounts.’’
7.3. Switching between local accounts.
It is only possible to switch between local accounts at the point of logging in. The
process to switch between local accounts varies depending on the client used.
*Please note that switching is not possible after login.
7.3.1 SWITCHING WITH GSI-SSH TERM
(1) Launch GSI-SSH TERM.

Start-up Guide for the K computer (Ver. 1.19)
42
(2) Click the ‘’Advanced’’ button.
(3) The settings window is displayed. Enter the local account name in the ‘’Username’’
box of the ‘’Host’’ menu tab.
Enter, for example, local account name ‘’hm001122’’.

Start-up Guide for the K computer (Ver. 1.19)
43
(4) Log in is possible as local account ‘’hm001122’’.
7.3.2 SWITCHING WITH GLOBUS SSH
(1) Launch the terminal and execute specifying the gsissh command option as ‘’ –l
local_account_name’’. Login is then possible with this account name.