
Star Defense XNA Game Tutorial Series – Part One – Design · Star Defense XNA Game Tutorial...
55
Star Defense XNA Game Tutorial Series – Part One – Design Welcome to the first installment of the XNAResources.com Star Defense game tutorial! Through this series of articles, we will build, from the ground up, a simple, fully functional arcade game. This first segement doesn't contain actual code (But I'm posting parts 1 and 2 at the same time, so there is no need to wait!) In all but the simplest software projects, there is a lot of work to do before the actual coding begins. While Star Defense isn’t exactly a complex game, we still need to decide a few things before we leap into Visual Studio. Overall Game Play Theme For our purposes in this tutorial series, our basic game design is fairly straightforward. Star Defense is inspired by the old arcade games Defender and Stargate . Basically these games allowed the player to control a space fighter in a star field that was essentially mapped onto the inside of a cylinder, meaning that the player could fly endlessly either left or right and the “map” would loop back on itself. The top and bottom of the screen were the vertical movement limits. For the purposes of this tutorial series, I have made the following design choices: The “game world” will be a 1920 pixel wide background image which will wrap around when the player reaches the edge. The display “portal” onto this world will be the screen in 1280x720 resolution, so the game world background should be 1920x720 pixels in size. We will also support a “parallax” layer of stars that scroll at a different rate above the background layer. This image will be 1620x720 pixels, and just consists of a few stars sprinkled over a mostly-transparent image. Our player’s star fighter will move freely vertically, but moving left or right will scroll the map (as opposed to moving the star fighter), so the player’s ship will always remain centered horizontally on the screen. Actual game play will consist of waves of enemies. Each wave will add an additional enemy, up to a maximum of 30 enemies on the map at a time. Our enemies will use a very simple (random) “AI”. We will support randomly spawning powerups at set time intervals. Each powerup will be identified by a differently colored, animated sprite. The powerups will be: Extra Life Extra Super Bomb Faster Weapon Shots Dual Cannons Better Ship Handling Obviously, in order to support the powerups above we will have: Super Bombs that destroy all visible enemies on the screen. Ship handling characteristics that determine how fast we can change directions Our game will be playable with either the keyboard or an Xbox 360 GamePad We will have a “title screen” and a “game screen”, and our game can be in one of the two modes at a time. Of course, all of these decisions are specific to the game that this tutorial will produce. You are free to change anything you like during the course of the series, naturally. Design Sketch Here is a quick sketch screenshot of what our game will look like in the end (the sketch I had was way, way too silly to put up on the internet): XNA Resources - XNA Tutorials, GSE Tutorials, XNA News... http://www.xnaresources.com/pages.asp?pageid=31 1 de 3 23/5/09 11:05
Transcript of Star Defense XNA Game Tutorial Series – Part One – Design · Star Defense XNA Game Tutorial...
Star Defense XNA Game Tutorial Series – Part One – Design
Welcome to the first installment of the XNAResources.com Star Defense game tutorial! Through this series of articles, we will build, from the ground
up, a simple, fully functional arcade game.
This first segement doesn't contain actual code (But I'm posting parts 1 and 2 at the same time, so there is no need to wait!) In all but the simplest
software projects, there is a lot of work to do before the actual coding begins. While Star Defense isn’t exactly a complex game, we still need to
decide a few things before we leap into Visual Studio.
Overall Game Play Theme
For our purposes in this tutorial series, our basic game design is fairly straightforward. Star Defense is inspired by the old arcade games Defender
and Stargate. Basically these games allowed the player to control a space fighter in a star field that was essentially mapped onto the inside of a
cylinder, meaning that the player could fly endlessly either left or right and the “map” would loop back on itself. The top and bottom of the screen
were the vertical movement limits.
For the purposes of this tutorial series, I have made the following design choices:
The “game world” will be a 1920 pixel wide background image which will wrap around when the player reaches the edge. The display “portal”
onto this world will be the screen in 1280x720 resolution, so the game world background should be 1920x720 pixels in size.
We will also support a “parallax” layer of stars that scroll at a different rate above the background layer. This image will be 1620x720 pixels,
and just consists of a few stars sprinkled over a mostly-transparent image.
Our player’s star fighter will move freely vertically, but moving left or right will scroll the map (as opposed to moving the star fighter), so the
player’s ship will always remain centered horizontally on the screen.
Actual game play will consist of waves of enemies. Each wave will add an additional enemy, up to a maximum of 30 enemies on the map at a
time. Our enemies will use a very simple (random) “AI”.
We will support randomly spawning powerups at set time intervals. Each powerup will be identified by a differently colored, animated sprite.
The powerups will be:
Extra Life
Extra Super Bomb
Faster Weapon Shots
Dual Cannons
Better Ship Handling
Obviously, in order to support the powerups above we will have:
Super Bombs that destroy all visible enemies on the screen.
Ship handling characteristics that determine how fast we can change directions
Our game will be playable with either the keyboard or an Xbox 360 GamePad
We will have a “title screen” and a “game screen”, and our game can be in one of the two modes at a time.
Of course, all of these decisions are specific to the game that this tutorial will produce. You are free to change anything you like during the course of
the series, naturally.
Design Sketch
Here is a quick sketch screenshot of what our game will look like in the end (the sketch I had was way, way too silly to put up on the internet):
XNA Resources - XNA Tutorials, GSE Tutorials, XNA News... http://www.xnaresources.com/pages.asp?pageid=31
1 de 3 23/5/09 11:05

Coding Design
Let me start by saying that many OOP (Object Oriented Programming) purists will definitely cringe at what they are about to see :). When I
originally started putting this game together I did the whole thing as one program, all in the game1.cs file.
In reconstituting the game for XNA 2.0 (and upgrading it to 3.0) and this tutorial series, I have gone back and refactored much of the code into
more manageable classes. Even this refactoring, though, isn’t a strict OOP approach, because there were some things I felt would be more efficient
to just handle inline.
There are also a few choices I made based on speed concerns and garbage collection issues. As an example, let me discuss the way I handle
enemies (and bullets and explosions for that matter). At first I considered using the “List” class to handle these. It seems simple enough to create a
list:
List<Enemy> listEnemies = new List<Enemy>;
And, whenever I need to add a new enemy, just insert a new object into the list. When an enemy is destroyed, I just remove them from the list.
Unfortunately, while this has some definite coding advantages, the approach has a couple of problems for me:
That is a WHOLE LOT of object creation and removal. As you progress in the game, we have a max of 30 enemies in each wave. Add to that
similar lists for each bullet the player fires and any explosions that take place as a result, and we are talking about generating a lot of object
traffic.
You can’t remove more than one item from a list in a foreach loop. I actually didn’t know this until I tried this approach. I had the listEnemies
implemented as above, and while updating my routine to check if a bullet impacts an enemy (and then destroy the enemy) I got a runtime
error that the list had been changed and the enumeration could not continue.
So, when we get to implementing them, you will see that our Enemies, Explosions, and Bullets are all stored in arrays as persistent objects. They
have fields that determine if they are active or not. Non-active entities are simply ignored during the Update and Draw routines.
As far as classes, we will do a bit of encapsulation here, and create classes for the following:
AnimatedSprite.cs – This is a “generic” class that supports having a texture which contains a number of animations. The class will support
frame rates for those animations as well as automatically looping them, etc. We will actually use the same class for Non-Animated sprites,
which will simply be AnimatedSprites with a single frame of animation.
Background.cs – This class will handle our scrolling background. It will also (optionally) have a “parallax” layer associated with the
background that scrolls at a different rate than the full background.
Player.cs – Contains the information about the player’s star fighter, it’s position on the screen, it’s current display state, and it’s “upgrade
status” based on powerups that have been collected.
Bullet.cs - The player's star fighter has cannons that can fire bullets... This class will handle those bullets
Enemy.cs – Handles what we need to know about enemies. Each enemy has an AnimatedSprite associated with it, as well as positional and
movement information. The class can also provide information about the position of the enemy for collision purposes. Finally we have a
simple AI routine to direct our enemy’s movements.
Explosion.cs – Whenever an enemy (or the player) is destroyed, an Explosion object will be activated. This explosion has an AnimatedSprite
associated with it which consists of a 16-frame explosion animation. Explosions also have positional information (of course) and will have
movement information as well, since we will transfer a portion of the enemy’s momentum to the explosion to create a drift effect.
Required Assets
XNA Resources - XNA Tutorials, GSE Tutorials, XNA News... http://www.xnaresources.com/pages.asp?pageid=31
2 de 3 23/5/09 11:05
Taking our game design into account, it is plain that we are going to need quite a number of art assets for our game. Personally, I can’t do graphics.
At all. I can’t draw a sick figure that isn’t crooked, so I farm all of this stuff out to Jason.
That brings up another point about assets. If you are just learning, it probably isn’t a big deal to grab graphics off the net from anywhere you can
find them to play around with, but we will, in most cases, be using original assets to avoid copyright and licensing issues. If you are planning to
release your game, you will want to do the same thing.
The exception, of course, is if you can locate assets that are public domain and royalty free. This is the approach we took with our sound effects,
since we don’t have enough to warrant trying to go out and record our own.
Based on our requirements, we are going to need:
A Title Screen (1280x720)
A “Game Board” background image (1920x720)
A “Parallax” background image (1680x720)
A Game Interface Overlay (1280x720)
A multi-frame Star Fighter (72x16, facing left and right, with and without engine thrust)
An animated enemy ship image (32x32), XX frames
A Power Up animation (736x32 = 23 frames of 32x32 spinning Power Up barrel)
A bullet/laser thing
A few animated explosions. I used a program called the Explosion Generator (http://www.geocities.com/starlinesinc/) to generate 8 of these,
then repositioned them in to sprite strips so my final animation file is 1024x512 (8 different 64x64 explosion sequences of 16 frames each)
Finally, we are going to need a few sounds:
The player’s weapon firing
An enemy blowing up
The player blowing up
Picking up a Power Up
That should give us a good starting point for our work, and some idea what to expect as we work our way through the series. We'll get into more
details as we begin implementing the various portions of our code.
!
Site Contents Copyright © 2006 Full Revolution, Inc. All rights reserved.
This site is in no way affiliated with Microsoft or any other company.
All logos and trademarks are copyright their respective companies.
RSS FEED
XNA Resources - XNA Tutorials, GSE Tutorials, XNA News... http://www.xnaresources.com/pages.asp?pageid=31
3 de 3 23/5/09 11:05

Star Defense XNA Game Tutorial Series – Part Two – Foundations
Welcome back to the XNAResources.com Star Defense tutorial series. In this portion of the series, we are going to look at getting our project set up
and putting together some of the basics we will need later on. By the end of this segment we will have put together a simple class to do sprite
animations and shown that we can display them easily.
Before You Begin… Installing XNA Fonts
Visual Studio doesn’t recognize any fonts you add after it is up and running. In keeping with our intent to use only self-generated or freely
redistributable content, we are going to need to install the XNA Redistributable Font Package from:
http://go.microsoft.com/fwlink/?LinkId=104778&clcid=0x409
This pack contains a few fonts licensed by Microsoft to be freely redistributable by XNA developers. This is an often overlooked issue, but even the
fonts that come with Windows aren’t free to redistribute. There are a number of freely available fonts on the web, but even that doesn’t mean you
can convert them to .spritefont files and repackage them with your game. Check the license for the fonts you intend to use beforehand!
Instructions are included with the package above for installing the fonts. If you have Visual Studio open when you install them, you must close it
and reopen it or your builds will fail saying it can’t find the font file.
Creating the Project
As with any XNA project, launch Visual Studio and select New Project… For the project type, select either “Windows Game (2.0)” or “Xbox 360 Game
(2.0)”. For the purposes of this tutorial series I’ll be doing everything as a Windows Game, however the Xbox game project should work without
changing any of the code.
Adding our Content
Let’s begin by updating the Content folder in our project to keep things organized. Click on the + symbol next to Content to expand it. You should
see a References node. We will leave that alone for now.
Right click on the text of the word Content and click Add -> New Folder from the popup menu. Name the folder “Fonts”. Create another new folder
at the Content level called “Textures”.
Right click on the “Fonts” folder and click Add -> New Item from the popup menu. Under “Visual Studio Installed Templates” select the “SpriteFont”
template. In the Name box at the bottom, enter “Pericles.spritefont”. (Pericles is one of the freely redistributable fonts provided by Microsoft for XNA
Developers that we installed above.)
This will generate the SpriteFont resource for you and add it to your project. The .spritefont file itself should pop open in Visual Studio and you can
browse the parameters of the font here. We will make use of the .spritefont later when we display things such as the current wave number, the
player’s score, and the like.
The way we handle Texture resources has changed drastically since the early days of XNA. Back before the Content Pipeline we used to convert all
of our images to .DDS files and use the FromFile() method of the Texture2D class to load them directly from disk. Now, we can supply our images in
a number of convenient (for us) formats and the Content Pipeline will convert them to XNA's internal format which we will load using the Load()
method of the Content Manager class.
Throughout this tutorial series, we will be adding content to our project as we need it for the classes we are working on. Since we want to be able
to see at least SOMETHING at the end of this second segment, we will add the explosions texture we will use when enemies and the player ship
explodes.
Save the image below (Explosions.png) in the Content\Textures folder inside your project (The image is 1024x512, but I've reduced it to half size via
HTML in order to display it properly on the page. It should save at full size.)
XNA Resources - XNA Tutorials, GSE Tutorials, XNA News... http://www.xnaresources.com/pages.asp?pageid=33
1 de 7 23/5/09 11:05

This won’t make the texture show up in Visual Studio, however, so one more step is necessary. In the Solution Explorer window, click on the little
button in the toolbar called “Show All Files”. Now click on the “+” next to the Textures folder and the Explosions.png file should appear. Right click
on it and select “Include in Project”.
We will add additional content to our Textures folder throughout the development of our tutorial series, but this texture is enough to illustrate our
AnimatedSprite class.
AnimatedSprite.cs
The first bit of code we are going to tackle is to allow us to create animated sprites. A "sprite" is a term that goes back, as far as I know, to the
Commodore 64 and just means a 2D image that we will render more or less directly to the screen (as opposed to a Texture, which would normally
be mapped onto a 3D object). We are calling all of our images Textures as that has become a common term for any type of image handled by the
video card, but you may also see what we are working with called "Sprite Sheets", which are single images that contain multiple frames of
pixel-based graphics.
Since we are making a 2D space shooter we will need AnimatedSprites all over our game, so this will be our first real building block of code.
We want our AnimatedSprite class to do a few things:
Store a Texture associated with the sprite
Automatically handle sprite animation based on a Frame Rate
Draw itself to the screen when requested
Lets begin by right-clicking on the Star Defense project in Solution Explorer (Should be the second item, as the topmost item is the solution itself)
and select Add -> Class… from the popup menu. This brings up the “Add New Item” window with Class as the selected type. Name the class file
“AnimatedSprite.cs”.
Visual Studio will now create the AnimatedSprite.cs file with the shell of the class opening in the right-hand pane of the window. The first thing we
will need to do is add a few “Using” statements to the top of the file:
using Microsoft.Xna.Framework;
using Microsoft.Xna.Framework.Graphics;
This will allow our class to access classes from the XNA Framework, which we will need in order to draw to the screen.
Next, lets add the member variables that our AnimatedSprite class will use. These can go right after the “class AnimatedSprite” line (but inside the
curly brace!):
Texture2D t2dTexture;
float fFrameRate = 0.02f;
float fElapsed = 0.0f;
int iFrameOffsetX = 0;
int iFrameOffsetY = 0;
int iFrameWidth = 32;
int iFrameHeight = 32;
int iFrameCount = 1;
int iCurrentFrame = 0;
int iScreenX = 0;
int iScreenY = 0;
bool bAnimating = true;
Lets go through each of these and take a look at what they will be used for:
t2dTexture: The graphics for our sprites are stored on "sprite sheets", which are just images we have imported into XNA. The way we are going to
set up our AnimatedSprite class, each frame of any individual sprite's animation must be contained on a single "line" in our sprite sheet image. You
can see in the explosions image above how each explosion is contained on a single "row" of same sized sub images. Additionally, all frames must be
the same size.
XNA Resources - XNA Tutorials, GSE Tutorials, XNA News... http://www.xnaresources.com/pages.asp?pageid=33
2 de 7 23/5/09 11:05

fFrameRate and fElapsed: These two values are used to control how fast the frames of animation play. The fFrameRate value is the time (in
seconds) that each frame is displayed. fElapsed accumulates the elapsed time since the frame was last advanced. When fElapsed becomes greater
than fFrameRate, we advance the frame and set fElapsed back to 0.
iFrameOffsetX and iFrameOffsetY: These values identify the upperleft corner of the first frame of the sprite. This allows us to have multiple
sprites on the same sprite sheet by starting them in different locations. Our explosion texture above uses this feature (we have 8 animated
explosions on the texture, each one at an increment of 64 pixels from the top of the image.
iFrameWidth and iFrameHeight: These two integers specify the width and height of each animation frame. All frames of the animation are the
same size.
iFrameCount: The total number of frames in the animation.
iCurrentFrame: The frame of animation that is currently being displayed.
iScreenX and iScreenY: The on-screen coordinates the sprite occupies. I should note that these are here to make our sprite independant of what
other code is using it, but we will generally be setting these to 0,0 and using an offset in our draw routine equal to the X and Y position of the
object that represents what is being drawn by our sprite. (This sentance will make more sense later... essentially, our sprite is capable of functioning
on it's own but since we will be using them as members of other classes that have other uses for the X and Y location, we will not use these values
directly in many cases.)
bAnimating: If this value is set to false, the frames in the sprite won’t be automatically updated.
So far everything we have declared are “private” declarations. That means that they will not be accessable by any code outside the AnimatedSprite
class itself. We will need to add a few properties to our class to allow other code to interact with it. Right below our declarations, lets add the
following properties:
public int X
{
get { return iScreenX; }
set { iScreenX = value; }
}
public int Y
{
get { return iScreenY; }
set { iScreenY = value; }
}
public int Frame
{
get { return iCurrentFrame; }
set { iCurrentFrame = (int)MathHelper.Clamp(value, 0, iFrameCount); }
}
public float FrameLength
{
get { return fFrameRate; }
set { fFrameRate = (float)Math.Max(fFrameRate, 0f); }
}
public bool IsAnimating
{
get { return bAnimating; }
set { bAnimating = value; }
}
By declaring these properties as “public”, any class using our AnimatedSprite class will have access to these values. While it is true that we could
have made the member variables above public to allow outside code to access them, using properties has a couple of advantages:
Properties can be “read only”. For example, if we remove the “set { iScreenX = value;}” from the X property, outside code could read, but not
alter the iScreenX value.
Properties can implement other code. While you probably won’t use this very often in “get” statements, in “sets” it is very handy. In the
“Frame” property above, I utilize this feature to limit the value of iCurrentFrame to a frame that is actually defined in the animation.
The only "special" things we do with these properties are in the Frame property where, as mentioned above, we use MathHelper.Clamp to limit the
Frame value to a number between 0 and iFrameCount. Also, in the FrameRate property set we use Math.Max to ensure that fFrameRate doesn't end
up being a negative number (Not that a negative number would cause any problems with our code, but it doesn't really make any sense so we'll rule
it out.)
Next we will put together our constructor. A constructor is a function with the same name as the class itself (in our case, AnimatedSprite). This is
the function that is called whenever you use “new” to create a new instance of a class. (ie, AnimatedSprite MySprite = new AnimatedSprite();)
public AnimatedSprite(
Texture2D texture,
int FrameOffsetX,
int FrameOffsetY,
int FrameWidth,
XNA Resources - XNA Tutorials, GSE Tutorials, XNA News... http://www.xnaresources.com/pages.asp?pageid=33
3 de 7 23/5/09 11:05
int FrameHeight,
int FrameCount)
{
t2dTexture = texture;
iFrameOffsetX = FrameOffsetX;
iFrameOffsetY = FrameOffsetY;
iFrameWidth = FrameWidth;
iFrameHeight = FrameHeight;
iFrameCount = FrameCount;
}
Our constructor here is very straightforward. We pass in the basic parameters for creating our AnimatedSprite and simply set the member variables
of our instance to those values.
All that is left at this point is to write our Update and Draw routines (well, almost all anyway). Before we do that, I want to include a quick helper
function that we will use later:
public Rectangle GetSourceRect()
{
return new Rectangle(
iFrameOffsetX + (iFrameWidth *iCurrentFrame),
iFrameOffsetY,
iFrameWidth,
iFrameHeight);
}
This function will be used in our Draw method to determine where on the sprite sheet (based on iCurrentFrame) we will pull from when drawing our
sprite. Recall that iFrameOffsetX is the left point for our first frame. To this, we add the iFrameWidth multiplied by iCurrentFrame to get the X
position of the frame we desire.
Because we have predetermined that all frames of an animation must appear on the same “line” in the sprite sheet and be the same size, iScreenY,
iFrameWidth, and iFrameHeight never need to be changed.
Updating our sprite’s animation is also a relatively painless process:
public void Update(GameTime gametime)
{
if (bAnimating)
{
// Accumulate elapsed time...
fElapsed += (float)gametime.ElapsedGameTime.TotalSeconds;
// Until it passes our frame length
if (fElapsed > fFrameRate)
{
// Increment the current frame, wrapping back to 0 at iFrameCount
iCurrentFrame = (iCurrentFrame + 1) % iFrameCount;
// Reset the elapsed frame time.
fElapsed = 0.0f;
}
}
}
The Update method is passed our game’s current GameTime value. If we are animating (bAnimating==true), the elapsed game time is added to
fElapsed. If more time has passed than our desired frame length, we will move to the next frame and reset fElapsed to 0.
The reason for all this mucking about with elapsed time is the structure of an XNA game itself. You can think of an XNA game as a giant loop. After
the game does all of the initial setup (things like setting up the display, running the LoadContent method,etc) it basically starts calling the Game
class' Update and Draw routines over and over and over again until the game exist.
While there are targets you can set for how fast you want these to run, you can't guarentee that you will get any particular framerate while your
game is running. This means you can't rely on the number of calls to Update/Draw as an accurate timing method as this may differ depending on
what is going on both in the game and on the system.
So instead, we track elapsed time and base all of our timed events off of this elapsed time. You will see this come up again when we want to keep
things from happening too fast. When we add player bullets to the game, if we didn't set a real-time delay before the player could fire a second
bullet, we would be spitting them out so fast they would be a constant stream on the screen.
The method used to increment the frame also deserves a bit of explanation here. The line is:
iCurrentFrame = (iCurrentFrame + 1) % iFrameCount;
You might expect to see something more along the lines of:
iCurrentFrame++;
if (iCurrentFrame >= iFrameCount)
{
iFrameCount=0;
}
XNA Resources - XNA Tutorials, GSE Tutorials, XNA News... http://www.xnaresources.com/pages.asp?pageid=33
4 de 7 23/5/09 11:05
And indeed this would work just fine. The shorthand version above uses the Modulo operator (%) which returns the remainder of an integer
division. So, for example if we have a 16 frame animation and we are on frame 0, iCurrentFrame+1 will be 1, divided by 16 is zero with a remainder
of 1, so frame 1.
The magic happens when we reach frame 15 (which is actually the 16th frame, since we start counting from zero). iCurrentFrame+1 will now be 16,
divided by 16 (iFrameCount) is 1 with a remainder of 0. Since we are never using the actual division product and just the remainder, the result is
that iCurrentFame gets set back to 0 without ever having to do an “if” test on the value.
Ok! So let’s draw something already! Here are two “Draw” methods. I’ll explain why we have two in a moment:
public void Draw(
SpriteBatch spriteBatch,
int XOffset,
int YOffset,
bool NeedBeginEnd)
{
if (NeedBeginEnd)
spriteBatch.Begin(SpriteBlendMode.AlphaBlend);
spriteBatch.Draw(
t2dTexture,
new Rectangle(
iScreenX + XOffset,
iScreenY + YOffset,
iFrameWidth,
iFrameHeight),
GetSourceRect(),
Color.White);
if (NeedBeginEnd)
spriteBatch.End();
}
public void Draw(SpriteBatch spriteBatch, int XOffset, int YOffset)
{
Draw(spriteBatch, XOffset, YOffset, true);
}
This demonstrates a concept called Method Overloading. Basically that means you can have any number of methods with the same name, as long
as they all have different parameters (the method name along with it’s parameters forms the “Method Signature” which is what needs to be unique).
Note that it isn’t the parameter names that must be different, but the types or number of parameters.
In the first Draw method above (which is actually the one we will be using most of the time) we pass in a SpriteBatch object, an offset to the
coordinates that the sprite thinks it is in, and a boolean value that determines if the AnimatedSprite should call it’s own SpriteBatch.Begin and .End
methods.
The method itself simply uses the GetSourceRect() method we wrote above to draw the needed portion of the texture onto the screen, optionally
wrapping that with the .Begin and .End code.
The second Draw method leaves out the last parameter (NeedBeginEnd). All it does is pass the parameters along to the first draw method along
with a “true” for the final parameter.
In theory, this makes the AnimatedSprite class more flexible, as we don’t have to be inside a SpriteBatch sequence to draw. In practice though if we
are drawing a lot of sprites we don’t want to Begin and End batches for each one, as that will cut into our sprite drawing performance.
That’s it! We now have an AnimatedSprite class that we can use to define and draw sprites!
What’s that you say? We haven’t actually drawn anything?
Ok, that’s true. Since it is nice to see our work pay off a bit, lets head over to the “game1.cs” file and add a few lines to show off our sprite class.
(I’ll go into full detail about the things we are doing here in our next segment when we really start working with our textures and content… for now,
I'll give a more brief overview of what we are doing.)
Right under the lines that say:
GraphicsDeviceManager graphics;
SpriteBatch spriteBatch;
Add:
AnimatedSprite Explosion;
This adds an instance of the AnimatedSprite class, called Explosion, to our game.
Now scroll down to “LoadContent” and update it to look like this:
protected override void LoadContent()
{
// Create a new SpriteBatch, which can be used to draw textures.
spriteBatch = new SpriteBatch(GraphicsDevice);
XNA Resources - XNA Tutorials, GSE Tutorials, XNA News... http://www.xnaresources.com/pages.asp?pageid=33
5 de 7 23/5/09 11:05
Explosion = new AnimatedSprite(
Content.Load<Texture2D>(@"Textures\Explosions"),
0, 0, 64, 64, 16);
Explosion.X = 0;
Explosion.Y = 0;
// TODO: use this.Content to load your game content here
}
The LoadContent method is called automatically by XNA as the game starts up. This method is used to load all of our textures and objects. In the
code above, we are calling the constructor of our AnimatedSprite class and using the Content object (which is an instance of the XNA Content
Manager class) to load the Explosions texture. We pass the constructor the location (0,0), size (64x64 pixels) and number of frames (16) in our
sprite. The class constructor will copy all of these to it's internal variables. Finally, we access the X and Y properties of our sprite to place it at 0,0 on
the screen.
Add the following line to the “Update” method, right above the “base.Update(gameTime);” line:
Explosion.Update(gameTime);
This calls our AnimatedSprite's Update method, which will accumulate elapsed time and increment the iCurrentFrame variable as necessary.
Finally, add the following three lines to the Draw method, right above the “base.Draw(gameTime);” line:
spriteBatch.Begin();
Explosion.Draw(spriteBatch,0,0,false);
spriteBatch.End();
Here we start off a SpriteBatch.Begin and ask our AnimatedSprite to draw itself with an offset of 0,0, setting NeedBeginEnd to false since we are
doing that ourself. For this little test, we could have left out the SpriteBatch.Begin and .End calls and simply set the last parameter in our Draw call
to true (or left it off thanks to our overloaded Draw method) and it would have done that for us.
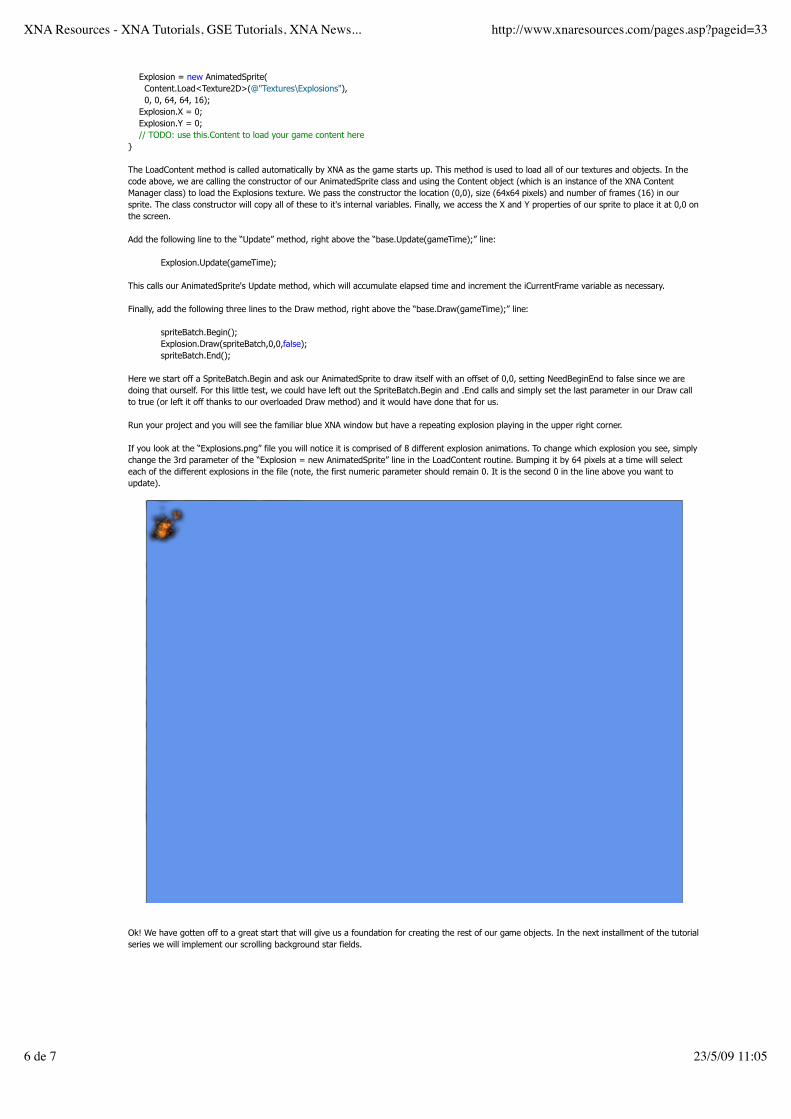
Run your project and you will see the familiar blue XNA window but have a repeating explosion playing in the upper right corner.
If you look at the “Explosions.png” file you will notice it is comprised of 8 different explosion animations. To change which explosion you see, simply
change the 3rd parameter of the “Explosion = new AnimatedSprite” line in the LoadContent routine. Bumping it by 64 pixels at a time will select
each of the different explosions in the file (note, the first numeric parameter should remain 0. It is the second 0 in the line above you want to
update).
Ok! We have gotten off to a great start that will give us a foundation for creating the rest of our game objects. In the next installment of the tutorial
series we will implement our scrolling background star fields.
XNA Resources - XNA Tutorials, GSE Tutorials, XNA News... http://www.xnaresources.com/pages.asp?pageid=33
6 de 7 23/5/09 11:05

Star Defense XNA Game Tutorial Series – Part Three – Scrolling
Background
As we have discussed, our game will play out on a multi-level scrolling star field background. In order to accomplish the parallax effect we are
looking for we will use two different star field backgrounds, scrolled at different rates.
We will start by creating our two images. I got Jason to put these together for me. The first is a star field with a solid background. It is 1920x720
pixels.
Save this PNG file into your Content/Textures folder for your project and use the Solution Explorer to include it in the project.
Our second star field is a mostly transparent image with a few white stars scattered about it. This image is 1620x480, which means we will be
stretching the image when drawing it to fill our 720-pixel high screen, but it will look fine when we do.
Again, save this image to your Content/Textures folder and add it to your solution.
The Background.cs class
We will create a new class to handle our scrolling background just to keep things neat. Right click on your project in Solution Explorer and add a
new class called “Background.cs”.
We will need this class to have access to a few of the XNA Framework namespaces, so add the following “using” statements to the top of the class
file:
using Microsoft.Xna.Framework;
using Microsoft.Xna.Framework.Graphics;
using Microsoft.Xna.Framework.Content;
Next, we will declare the variables we will be using in this class. Inside the class itself, add:
// Textures to hold the two background images
Texture2D t2dBackground, t2dParallax;
We will use these two Texture2D objects to hold the background images for our scrolling background.
Next, add the following:
XNA Resources - XNA Tutorials, GSE Tutorials, XNA News... http://www.xnaresources.com/pages.asp?pageid=34
1 de 7 23/5/09 11:05

int iViewportWidth = 1280;
int iViewportHeight = 720;
int iBackgroundWidth = 1920;
int iBackgroundHeight = 720;
int iParallaxWidth = 1680;
int iParallaxHeight = 480;
The iViewportWidth and iViewportHeight determine how large our background image will be displayed when rendered to the screen. Here we are
targeting a 720i/720p display of 1280x720.
The next four integers hold the width and height of our background images. The actual values here happen to match our images, but they are really
just placeholders since we will set to match whatever images we load in our constructor.
Next we will need a couple of values to determine how far along we should start drawing the background images.
Essentially, these hold the leftmost position in the texture to start drawing at. Another way to think of this would be that we are starting to draw our
background image “iBackgroundOffset” pixels BEFORE the screen begins (ie, off the left edge of the display).
In addition to the variables themselves, I have included a couple of properties to set them from outside the class:
int iBackgroundOffset;
int iParallaxOffset;
public int BackgroundOffset
{
get { return iBackgroundOffset; }
set
{
iBackgroundOffset = value;
if (iBackgroundOffset < 0)
{
iBackgroundOffset += iBackgroundWidth;
}
if (iBackgroundOffset > iBackgroundWidth)
{
iBackgroundOffset -= iBackgroundWidth;
}
}
}
public int ParallaxOffset
{
get { return iParallaxOffset; }
set
{
iParallaxOffset = value;
if (iParallaxOffset < 0)
{
iParallaxOffset += iParallaxWidth;
}
if (iParallaxOffset > iParallaxWidth)
{
iParallaxOffset -= iParallaxWidth;
}
}
}
You will notice that the two properties above check to see if we have gone off of either end of each texture and wrap around if necessary. If we
don’t do this, we can scroll right off the end of the background image.
Finally, though we won’t have a need to use it in our case, I’ve added a toggle to turn the star field overlay on or off:
// Determines if we will draw the Parallax overlay.
XNA Resources - XNA Tutorials, GSE Tutorials, XNA News... http://www.xnaresources.com/pages.asp?pageid=34
2 de 7 23/5/09 11:05

bool drawParallax = true;
public bool DrawParallax
{
get { return drawParallax; }
set { drawParallax = value; }
}
In our draw code we will simply check this bool value and not draw the mostly transparent star overlay if it is set to false.
Now we are ready to write a constructor for our class:
// Constructor when passed a Content Manager and two strings
public Background(ContentManager content,
string sBackground,
string sParallax)
{
t2dBackground = content.Load<Texture2D>(sBackground);
iBackgroundWidth = t2dBackground.Width;
iBackgroundHeight = t2dBackground.Height;
t2dParallax = content.Load<Texture2D>(sParallax);
iParallaxWidth = t2dParallax.Width;
iParallaxHeight = t2dParallax.Height;
}
You will remember that in our AnimatedSprite class we passed the textures we would be using directly into the animated sprite (we used Content
Manager outside the AnimatedSprite to get them into our game.) We are taking a slightly different approach here and will be passing in a Content
Manager instance and using it to load images from our class. This is purely to illustrate that it can be done this way as well, as it would be just fine
to use the same texture passing method we used in AnimatedSprite here too.
When we use this constructor to create an instance of our Background class, we will pass in a content manager and use it to load the two textures
passed to the function. Our constructor will set iBackgroundWidth, iBackgroundHeight, iParallaxWidth, and iParallaxHeight to the appropriate values
from the textures we loaded.
I’ve also got a second constructor set up for the Background.cs class. We won’t actually be using this constructor in our tutorial series, but it could
be used in the instance that you simply wanted a scrolling background without the parallax overlay:
// Constructor when passed a content manager and a single string
public Background(ContentManager content, string sBackground)
{
t2dBackground = content.Load<Texture2D>(sBackground);
iBackgroundWidth = t2dBackground.Width;
iBackgroundHeight = t2dBackground.Height;
t2dParallax = t2dBackground;
iParallaxWidth = t2dParallax.Width;
iParallaxHeight = t2dParallax.Height;
drawParallax = false;
}
This simply eliminates the overlay and disables it from drawing (drawParallax=false;)
All that is left now is to actually draw our background images. Lets add the following Draw method, which I will explain afterwards:
public void Draw(SpriteBatch spriteBatch)
{
// Draw the background panel, offset by the player's location
spriteBatch.Draw(
t2dBackground,
new Rectangle(-1 * iBackgroundOffset,
0, iBackgroundWidth,
iViewportHeight),
Color.White);
// If the right edge of the background panel will end
// within the bounds of the display, draw a second copy
// of the background at that location.
if (iBackgroundOffset > iBackgroundWidth-iViewportWidth) {
spriteBatch.Draw(
t2dBackground,
new Rectangle(
(-1 * iBackgroundOffset) + iBackgroundWidth,
0,
iBackgroundWidth,
iViewportHeight),
Color.White); }
if (drawParallax)
{
// Draw the parallax star field
XNA Resources - XNA Tutorials, GSE Tutorials, XNA News... http://www.xnaresources.com/pages.asp?pageid=34
3 de 7 23/5/09 11:05

spriteBatch.Draw(
t2dParallax,
new Rectangle(-1 * iParallaxOffset,
0, iParallaxWidth,
iViewportHeight),
Color.SlateGray);
// if the player is past the point where the star
// field will end on the active screen we need
// to draw a second copy of it to cover the
// remaining screen area.
if (iParallaxOffset > iParallaxWidth-iViewportWidth) {
spriteBatch.Draw(
t2dParallax,
new Rectangle(
(-1 * iParallaxOffset) + iParallaxWidth,
0,
iParallaxWidth,
iViewportHeight),
Color.SlateGray); }
}
}
Our Draw method is passed a SpriteBatch to use, and we will assume that we are within a SpriteBatch.Begin and SpriteBatch.End call set.
Our first statement draws the background image, offset by the background offset:
spriteBatch.Draw(
t2dBackground,
new Rectangle(-1 * iBackgroundOffset,
0, iBackgroundWidth, iViewportHeight),
Color.White);
When we create the destination rectangle, we set the left position to “-1 * iBackgroundOffset”, which results in shifting our image to the left by a
number of pixels equal to iBackgroundOffset.
This works great except when we get to the point where drawing the offset image doesn’t fill our entire display. If we don’t account for that, we will
end up with a partially filled background and then the XNA Blue Window. This is where the next statement comes in:
// If the right edge of the background panel will end within the bounds of
// the display, draw a second copy of the background at that location.
if (iBackgroundOffset > iBackgroundWidth-iViewportWidth) {
spriteBatch.Draw(
t2dBackground,
new Rectangle(
(-1 * iBackgroundOffset) + iBackgroundWidth,
0,
iBackgroundWidth,
iViewportHeight),
Color.White); }
First we check to see if we need to draw a second copy of the image. If so, we repeat the above draw call except that we modifiy the position of the
second destination rectangle by adding the width of the background image to the call. This will line the second copy of the image up to start at
exactly the point where the first copy ended.
We will never need to draw more than two of these images to fill the screen, since the width of the background image is greater than the width of
the screen.
The rest of our draw function does exactly the same process with the parallax star overlay after checking to see if we should be drawing it. It uses
the same offsetting and second copy drawing logic as the background.
Adding the Background to our Game
Now that we have our background class, lets make it do something. Currently our “Game1” code is loading and explosion and animating it. We can
leave this code here for now, and add our Background object to the game.
Lets begin by setting our window/display resolution. In the Initialize method for your game, add the following code (right before the
“base.initialize();” line:
graphics.PreferredBackBufferHeight = 720;
graphics.PreferredBackBufferWidth = 1280;
graphics.ApplyChanges();
All we are doing here is letting the grpahics device know that we want a 1280x720 screen size. On the Xbox 360 this will be automatically scaled by
the system to fit the display, adding letterboxing as needed if the user is on a standard definition television. On Windows, this will result in a
1280x720 window being created when we run the game.
In you declaration section, right after the SpriteBatch declaration, add the following:
XNA Resources - XNA Tutorials, GSE Tutorials, XNA News... http://www.xnaresources.com/pages.asp?pageid=34
4 de 7 23/5/09 11:05

Background background;
This will add a new (but still uninitialized) background object to our game. Next, we’ll need to actually initialize the background by running it’s
constructor. In the LoadContent method of our game, lets add the following code:
background = new Background(
Content,
@"Textures\PrimaryBackground",
@"Textures\ParallaxStars");
Here, we call the Background object’s constructor and pass it our Content Manager object, along with the asset names of the two textures we will
be using.
That handles the setup, so all that is left is to draw our background. Scroll down to the Draw method and add the following line BEFORE the draw
code for the explosion, but inside the spriteBatch.Begin and spriteBatch.End block:
background.Draw(spriteBatch);
That’s all we need to draw our background to the screen. Of course, we will want to be able to scroll it, so lets add a couple of lines to the game’s
Update method:
if (Keyboard.GetState().IsKeyDown(Keys.Left))
{
background.BackgroundOffset -= 1;
background.ParallaxOffset -= 2;
}
if (Keyboard.GetState().IsKeyDown(Keys.Right))
{
background.BackgroundOffset += 1;
background.ParallaxOffset += 2;
}
(Note that for this simple test code, I'm using a Windows based project, and thus using the keyboard. If you have set up an XBox 360 project and
want to use the GamePad, replace "Keyboard.GetState().IsKeyDown(Keys.Left)" with "GamePad.GetState(PlayerIndex.One).ThumbSticks.Left.X<0"
and the right key with >0. In part 4 when we add the player's space ship, we will add input handling routines to check for both keyboard and
gamepad input.
If you run your project now, you should be able to scroll your background left and right with the arrow keys. We have set the scroll rate to 1 and 2
pixels here, but you can make the background change faster by upping these values. We will actually use a range of values to allow our player to
move at different speeds.
In our next installment, we will draw the player’s ship onto the screen and start setting up the variables we will need to handle gameplay.
XNA Resources - XNA Tutorials, GSE Tutorials, XNA News... http://www.xnaresources.com/pages.asp?pageid=34
5 de 7 23/5/09 11:05

Star Defense XNA Game Tutorial Series – Part Four – Player Ship
In this installment we will add the player’s star fighter to our game. For our purposes, we will use a ship that is 72x16 pixels. We will create a
four-frame sprite sheet for our player’s ship. We’ll use two frames to show the ship facing left and right, and in the other two frames we will add a
“thrust” image to the ship’s engines to show that the player is actively moving in a direction.
Save this image to your Content/Textures folder and add it to your project.
As before, we will create a new class for our player to keep things together and organized. Add a new class to your project via Solution Explorer
called Player.cs. We will need to add a couple of references at the top of our class file:
using Microsoft.Xna.Framework;
using Microsoft.Xna.Framework.Graphics;
As for declarations, we are going to start out simple. We’ll expand on this later when we add more features to our game in later installments but for
now, we will need the following:
AnimatedSprite asSprite;
int iX = 604;
int iY = 260;
int iFacing = 0;
bool bThrusting = false;
int iScrollRate = 0;
int iShipAccelerationRate = 1;
int iShipVerticalMoveRate = 3;
float fSpeedChangeCount = 0.0f;
float fSpeedChangeDelay = 0.1f;
float fVerticalChangeCount = 0.0f;
float fVerticalChangeDelay = 0.01f;
The AnimatedSprite will, of course, be used to house the image above. We will be using the bAnimating feature of our animated sprite class to
prevent it from animating automatically so that we can control which frame of the ship “animation” is displayed.
iX and iY determine the location of the ship on the screen. In the game we will be producing for this tutorial series, the ship will never leave the
center of the screen (horizontally) but will move freely vertically.
iFacing determines which direction the player is currently facing. 0=Right, 1=Left.
bThrusting is set to true when the player is actively moving in a direction (as opposed to coasting in that direction).
The next few variables are all related to how our ship/screen moves. We’ll get into more detail below when we add the ship to the screen and
handle movement.
iScrollRate determines the speed and direction that the ship is actually moving (this is not related to the Facing, as it is possible to be moving one
direction while facing the other). Positive values indicate rightward movement, negative values leftwards. The magnitude of the number determines
the number of pixels per update frame that the screen will scroll.
iShipAccelerationRate sets how fast iScrollRate can change. A value of 1 means that every time the speed changes it changes by 1.
iShipVerticalMovementRate is the number of pixels the ship moves vertically when the player presses up or down on the gamepad/keyboard.
fSpeedChangeCount and fSpeedChangeDelay determine how rapidly iShipAccelerationRate can be applied. fSpeedChangeCount accumulates the
time since the last speed change. When it is greater than fSpeedChangeDelay, the speed is allowed to change and will be reset to 0 if it does.
fVerticalChangeCount and fVerticalChangeDelay work in the same way that fSpeedChangeCounnt/Delay work except that they serve to limit how
quickly the player can move vertically. The value we have set here (0.01 seconds) is very, very low so we are basically just using this to keep the
ship moving at a consistant speed on fast computers.
Lets include a few properties so we can access these variables from outside the class:
XNA Resources - XNA Tutorials, GSE Tutorials, XNA News... http://www.xnaresources.com/pages.asp?pageid=36
1 de 6 23/5/09 11:11

public Player(Texture2D texture)
{
asSprite = new AnimatedSprite(texture, 0, 0, 72, 16, 4);
asSprite.IsAnimating = false;
}
In this case, all we are doing is passing the texture along to create our AnimatedSprite. We set the frame size to 72x16 and tell the AnimatedSprite
that it has 4 frames. Then we set IsAnimating to false, which will prevent the sprite from updating frames on its own.
Our Draw code will be even simpler:
public void Draw(SpriteBatch sb)
{
asSprite.Draw(sb, iX, iY, false);
}
Here we just pass the SpriteBatch object on to the AnimatedSprite’s Draw method. We include the X and Y position of the sprite. The final
parameter (false) tells the AnimatedSprite not to add SpriteBatch.Begin and SpriteBatch.End calls of it’s own.
Finally, we will need to update animation frames based on the values of iFacing and bThrusting. Lets create an Update method:
public void Update(GameTime gametime)
{
if (iFacing==0)
{
if (bThrusting)
asSprite.Frame=1;
else
asSprite.Frame=0;
} else {
if (bThrusting)
asSprite.Frame=3;
else
asSprite.Frame=2;
}
}
By checking the combination of iFacing and bThrusting we determine what to set the sprite’s Frame value to (0=Right, 1=Right with Thrust, 2=Left,
3=Left with Thrust).
In order to add our ship to the game, we will need to start thinking about how our ship will move in the game. The simple way would be to have a
pixel speed that is added or subtracted to the ship’s position whenever a movement key is pressed, however we want a more “complex” movement
system, so we will do something a bit different.
First, we will need to add a few declarations to the top of our game1.cs class:
Player player;
public int iPlayAreaTop = 30;
public int iPlayAreaBottom = 630;
int iMaxHorizontalSpeed = 8;
float fBoardUpdateDelay = 0f;
float fBoardUpdateInterval = 0.01f;
The “player” object houses our instance of the Player class. The two public ints (iPlayAreaTop and iPlayAreaBottom) are public because we will be
using them in our Enemy class later.
fBoardUpdateDelay and fBoardUpdateInterval will be used to control how fast the screen can scroll overall (if we rely simply on calls to Update we
can potentially get inconsistant speeds).
We need to initialize our Player object, so in the game’s LoadContent method, add the following:
player = new Player(Content.Load<Texture2D>(@"Textures\PlayerShip"));
Next, lets add the code to draw our player sprite to our Draw method. Add the following right after the call to draw our background:
player.Draw(spriteBatch);
Now we should see our ship sprite on the screen if we run our project, but we can’t move it.
We will add two functions to check for movement. We are using two because vertical movement is handled differently from horizontal movement.
The player can move vertically with “immediate response”, meaning if you are holding down the “up” movement control when the update routine
runs, your ship moves 3 pixels up (iShipVerticalMovementRate).
Horizontal movemnt works differently in that we have a current speed that the ship is moving. We can modify this speed by holding down a
directional control. When we let up on the directional control, we continue to move in the direction we were last moving in until we alter the speed
and direction again.
Here is our routine for horizontal movement:
protected void CheckHorizontalMovementKeys(KeyboardState ksKeys,
XNA Resources - XNA Tutorials, GSE Tutorials, XNA News... http://www.xnaresources.com/pages.asp?pageid=36
3 de 6 23/5/09 11:11
GamePadState gsPad)
{
bool bResetTimer = false;
player.Thrusting = false;
if ((ksKeys.IsKeyDown(Keys.Right)) ||
(gsPad.ThumbSticks.Left.X > 0))
{
if (player.ScrollRate < iMaxHorizontalSpeed)
{
player.ScrollRate += player.AccelerationRate;
if (player.ScrollRate > iMaxHorizontalSpeed)
player.ScrollRate = iMaxHorizontalSpeed;
bResetTimer = true;
}
player.Thrusting = true;
player.Facing = 0;
}
if ((ksKeys.IsKeyDown(Keys.Left)) ||
(gsPad.ThumbSticks.Left.X < 0))
{
if (player.ScrollRate > -iMaxHorizontalSpeed)
{
player.ScrollRate -= player.AccelerationRate;
if (player.ScrollRate < -iMaxHorizontalSpeed)
player.ScrollRate = -iMaxHorizontalSpeed;
bResetTimer = true;
}
player.Thrusting = true;
player.Facing = 1;
}
if (bResetTimer)
player.SpeedChangeCount = 0.0f;
}
We will pass this routine both a KeyboardState and a GamePadState, so at this point our “game” is playable with either controller. We are treating
the Gamepad’s left thumbstick as a simple digital control here instead of using it’s analog (0.0 to 1.0) value. The player is either pressing in a
direction or not pressing in a direction. For our purposes how far the stick is moved isn’t important.
When we detect horizontal movement, we alter the player.ScrollRate value by the playerAccelerationRate, limiting it to a magnitude of 8
(iMaxHorizontalSpeed)in either direction (so player.ScrollRate can range from -8 to +8)
Additionally, if either the left or right movement control is active, we set the “Facing” value for our player’s ship, and turn on the “Thrusting”
boolean.
Finally, if we do alter player.ScrollRate, we reset player.SpeedChangeCount to restart the delay timer before player.ScrollRate can be changed again.
As for vertical movement, it is much more straightforward:
protected void CheckVerticalMovementKeys(KeyboardState ksKeys,
GamePadState gsPad)
{
bool bResetTimer = false;
if ((ksKeys.IsKeyDown(Keys.Up)) ||
(gsPad.ThumbSticks.Left.Y > 0))
{
if (player.Y > iPlayAreaTop)
{
player.Y -= player.VerticalMovementRate;
bResetTimer = true;
}
}
if ((ksKeys.IsKeyDown(Keys.Down)) ||
(gsPad.ThumbSticks.Left.Y < 0))
{
if (player.Y < iPlayAreaBottom)
{
player.Y += player.VerticalMovementRate;
bResetTimer = true;
}
}
if (bResetTimer)
player.VerticalChangeCount = 0f;
}
Just like our horizontal movement checks, we determine if a vertical movement key has been pressed and reset the player.VerticalChangeCount
XNA Resources - XNA Tutorials, GSE Tutorials, XNA News... http://www.xnaresources.com/pages.asp?pageid=36
4 de 6 23/5/09 11:11

public int X
{
get { return iX; }
set { iX = value; }
}
public int Y
{
get { return iY; }
set { iY = value; }
}
public int Facing
{
get { return iFacing; }
set { iFacing = value; }
}
public bool Thrusting
{
get { return bThrusting; }
set { bThrusting = value; }
}
public int ScrollRate
{
get { return iScrollRate; }
set { iScrollRate = value; }
}
public int AccelerationRate
{
get { return iShipAccelerationRate; }
set { iShipAccelerationRate = value; }
}
public int VerticalMovementRate
{
get { return iShipVerticalMoveRate; }
set { iShipVerticalMoveRate = value; }
}
public float SpeedChangeCount
{
get { return fSpeedChangeCount; }
set { fSpeedChangeCount = value; }
}
public float SpeedChangeDelay
{
get { return fSpeedChangeDelay; }
set { fSpeedChangeDelay = value; }
}
public float VerticalChangeCount
{
get { return fVerticalChangeCount; }
set { fVerticalChangeCount = value; }
}
public float VerticalChangeDelay
{
get { return fVerticalChangeDelay; }
set { fVerticalChangeDelay = value; }
}
This is a big chunk of code, but there is nothing out of the ordinary here, as these are all simple get/set property pairs for the variables we declared
above.
Now lets add one last property that will be used later when we start detecting collissions between objects in our game:
public Rectangle BoundingBox
{
get { return new Rectangle(iX, iY, 72, 16); }
}
The BoundingBox property simply returns a new rectangle based on the position and size of our ship. We will be adding similar properties to other
objects in our game, some of them more complex than this to account for objects position within the “world map”.
As for our constructor, it is similarly simple:
XNA Resources - XNA Tutorials, GSE Tutorials, XNA News... http://www.xnaresources.com/pages.asp?pageid=36
2 de 6 23/5/09 11:11

variable if appropriate. We add (or subtract) player.VerticalMovementRate to the player.Y position.
We will add another new function that we will expand upon later to update the “game board” during each update cycle:
public void UpdateBoard()
{
background.BackgroundOffset += player.ScrollRate;
background.ParallaxOffset += player.ScrollRate * 2;
}
Since our background class takes care of looping around on it’s own, that’s all we need to do right now to update our game board.
Finally, we need to modify our existing Update method to take our new input functions into account. First we need to remove the code we added
when putting the Background object in (that checks for the Left and Right keys being pressed). For clarity, here is the entire update method as it
should look now:
protected override void Update(GameTime gameTime)
{
// Allows the game to exit
if (GamePad.GetState(PlayerIndex.One).Buttons.Back == ButtonState.Pressed)
this.Exit();
player.SpeedChangeCount += (float)gameTime.ElapsedGameTime.TotalSeconds;
if (player.SpeedChangeCount > player.SpeedChangeDelay)
{
CheckHorizontalMovementKeys(Keyboard.GetState(),
GamePad.GetState(PlayerIndex.One));
}
player.VerticalChangeCount += (float)gameTime.ElapsedGameTime.TotalSeconds;
if (player.VerticalChangeCount > player.VerticalChangeDelay)
{
CheckVerticalMovementKeys(Keyboard.GetState(),
GamePad.GetState(PlayerIndex.One));
}
player.Update(gameTime);
fBoardUpdateDelay += (float)gameTime.ElapsedGameTime.TotalSeconds;
if (fBoardUpdateDelay > fBoardUpdateInterval)
{
fBoardUpdateDelay = 0f;
UpdateBoard();
}
// TODO: Add your update logic here
Explosion.Update(gameTime);
base.Update(gameTime);
}
After checking all of our movement keys, we update the player object, and then check our elapsed time to determine if enough game time has
passed to update the playfield. If so, we update the board and reset fBoardUpdateDelay back to 0.
If you run your game now, you should be able to use either the keyboard or the game pad to move your player ship around the game map. You will
notice a few things:
Whenever a horizontal movement control is depressed, the ship displays a fiery thrust graphic.
The ship does not stop moving horizontally when you release the movement control.
If you accelerate to full speed in one direction and then reverse directions briefly, the ship will turn around while your momentum continues
to carry you in the original direction.
Vertical movement does not exhibit the same acceleration characteristics. You can freely move up and down without “coasting”.
Thanks to iPlayAreaTop and iPlayAreaBottom, the player’s ship can’t move off the top or bottom of the screen.
Try experimenting with the fSpeedChangeDelay variable to alter the handling characteristics of the ship. In a future installment when we add Power
Ups, we will include one that reduces this value to make the ship more responsive when changing directions and speed.
That’s it for this installment. We are well on our way to having a functional game! In the next installment we will look at giving the player the ability
to fire bullets.
XNA Resources - XNA Tutorials, GSE Tutorials, XNA News... http://www.xnaresources.com/pages.asp?pageid=36
5 de 6 23/5/09 11:11

Star Defense XNA Game Tutorial Series – Part Five – Lock and Load
So we have our star fighter flying merrily through our virtual space sector. Time to bring on the cannons!
This is one of those cases where I break away from the pure object oriented system and use a static array of objects to handle the player’s “bullets.”
The player will be able to fire A LOT of bullets. If we were creating an destroying objects (with associated textures, etc) every time a bullet was
fired, left the screen, or impacted an enemy, we would be adding quite a bit of unneeded overhead to our code.
We have a very small image for our bullet, composed of two frames. In the first frame the bullet is firing to the right, in the second the bullet is
firing to the left. Recall that in previous objects we have used the values of 0 and 1 to represent a “facing” of right and left respectively. We will stick
to that system here.
Our bullet sprite will be 16 pixels wide by 1 pixel high, so the overall image is 32x1 pixels:
Save the “bullet” graphic to your Content/Textures folder and include it in your project as normal.
As with the rest of our game, we will encapsulate most of the code to handle bullets into a class, so right click on your project and add a new class
file called “Bullet.cs”.
Also as with the rest of our classes, we will need access to the XNA framework and graphics classes, so add the standard using statements to the
top of the file:
using Microsoft.Xna.Framework.Graphics;
using Microsoft.Xna.Framework;
On with the declarations! We are going to handle our AnimatedSprite a little differently this time around. Bullets always have the same graphic, and
nothing in our AnimatedSprite class prevents the sprite from being drawn multiple times, especially since we provide drawing offsets (and haven’t
been using the AnimatedSprite’s internal X and Y coordinates anyway). We will add two animated sprites to our class, both of them static:
static AnimatedSprite asLeft;
static AnimatedSprite asRight;
The “static” qualifier indicates that the same “asLeft” and “asRight” objects will be shared across ALL instances of the Bullet class. All of our previous
declarations have become their own instances for each instance of the class (for example, the Player object has the integers iX and iY. If we created
100 Player objects, each iX and iY would be different integer instances. When we define an object as static, there is only one copy, no matter how
many instances of the parent object we create, and all instances share it).
Because we are declaring the Bullet’s sprites static, we can’t use a single AnimatedSprite with two frames (one for each facing) because updating
the frame on one bullet would update the frame on all bullets in the game, making them flop back and forth. Hence we will have two animated
sprites, each pointing to a single frame of our bullet texture.
Next we will need a fairly standard set of variables:
int iX;
int iY;
bool bActive;
int iFacing = 0;
float fElapsed = 0f;
float fUpdateInterval = 0.015f;
public int iSpeed = 12;
As normal, iX and iY will track the location of our bullet. Some may ask why I’m not using a Vector2 object instead of two integers, and there isn’t
much of a reason beyond old habits and a vague opinion that the floating point path associated with Vector2’s is less efficient than integer math.
You could very easily change iX and iY to a single Vector2 and reference the X and Y components.
The bActive variable is set to true when the bullet is fired and remains true while it is on the screen. It will be disabled when the bullet leaves the
screen or when it impacts an enemy.
iFacing is our standard directional variable. Bullets fired to the right have a facing of 0, while bullets fired to the left have a facing of 1.
fElapsed and fUpdateInterval will handle our timing values much like we did with acceleration with our ship. fElapsed will accumulate game time
XNA Resources - XNA Tutorials, GSE Tutorials, XNA News... http://www.xnaresources.com/pages.asp?pageid=37
1 de 6 23/5/09 11:11
until it is greater than fUpdateInterval, at which time the bullet’s position will be updated and fElapsed will be reset to zero.
Finally iSpeed determines the pixels per frame that the bullet will move.
Speaking of pixels, I should note that we don’t track “world position” of our bullets but only “screen position”. This is for a couple of reasons:
By tracking and updating screen position, bullets will always visually move at the same speed no matter which direction and at what speed
the player is scrolling the background. This means we won’t have situations where bullets “bunch up” while the player accelerates.
Since we are only going to test for collisions on the screen, there is no need to worry about where the bullet is in “world space”. While we will
be tracking our enemies in world space, we will translate that position to screen space when we test for bullet-to-enemy collisions.
As always, we will need some public properties to access these variables:
public int X
{
get { return iX; }
set { iX = value; }
}
public int Y
{
get { return iY; }
set { iY = value; }
}
public bool IsActive
{
get { return bActive; }
set { bActive = value; }
}
public int Facing
{
get { return iFacing; }
set { iFacing = value; }
}
public int Speed
{
get { return iSpeed; }
set { iSpeed = value; }
}
public Rectangle BoundingBox
{
get { return new Rectangle(iX, iY, 16, 1); }
}
Nothing too out of the ordinary here. As with the player ship, we have a BoundingBox property which we will use when detecting collisions later. The
BoundinbBox property returns a rectangle that represents the screen position of the bullet (a 16x1 rectangle at iX, iY).
Also, we don’t expose fElapsed and fUpdateInterval as properties since all of the timing code will be handled within the class itself. This is a change
from the way we handled the Player class, as user input has a more direct impact on what happens to the ship. After a bullet is fired, the player has
no control over what happens to it.
Now it’s constructor time. We are going to have two constructors for our Bullet class, and here they are:
public Bullet(Texture2D texture)
{
asRight = new AnimatedSprite(texture, 0, 0, 16, 1, 1);
asRight.IsAnimating = false;
asLeft = new AnimatedSprite(texture, 16, 0, 16, 1, 1);
asRight.IsAnimating = false;
iFacing = 0;
iX = 0;
iY = 0;
bActive = false;
}
public Bullet()
{
iFacing = 0;
iX = 0;
iY = 0;
bActive = false;
}
The first (full) constructor will be called only once by our game (It could be used every time, and won’t hurt anything if it is, but there is really no
need to do so). This will take the image we are passing into it and set up our two static AnimatedSprites as single frames.
XNA Resources - XNA Tutorials, GSE Tutorials, XNA News... http://www.xnaresources.com/pages.asp?pageid=37
2 de 6 23/5/09 11:11

After the sprite setup, both constructors do the same thing. They set defaults (zeros) for the iFacing, iX, and iY variables, and set the bullet to
inactive.
Since we will be using a static array of Bullets in our game, we will set them all up during our LoadContent phase and just activate them when we
need them.
Next, we will include a public function to “fire” a bullet:
public void Fire(int X, int Y, int Facing)
{
iX = X;
iY = Y;
iFacing = Facing;
bActive = true;
}
When called, the position of the bullet will be set, along with it’s facing. It is then made active. We’ll call this function when the player presses the
fire button, passing it the location of the player’s ship (with a few offsets) to start the bullet off at the players cannon.
In order to make our bullets as self-contained as possible, we’ll include the following Update routine:
public void Update(GameTime gameTime)
{
if (bActive)
{
fElapsed += (float)gameTime.ElapsedGameTime.TotalSeconds;
if (fElapsed > fUpdateInterval)
{
fElapsed = 0f;
if (iFacing == 0)
{
iX += iSpeed;
}
else
{
iX -= iSpeed;
}
// If the bullet has moved off of the screen,
// set it to inactive
if ((iX > 1280) || (iX < 0))
{
bActive = false;
}
}
}
}
After making sure we are working with an “active” bullet, we accumulate elapsed time, checking to see if we have passed the fUpdateInterval value.
If so, we reset the fElapsed time and check the facing of the bullet and then either add or subtract the iSpeed value to the horizontal position.
Lastly, we check to see if the bullet has moved off of the screen as a result of this movement. If it has, we set it to inactive.
Drawing our bullet is very simple. We will simply pass a SpriteBatch object along to the underlying AnimatedSprite depending on the bullet’s facing:
public void Draw(SpriteBatch sb)
{
if (bActive)
{
if (iFacing == 0)
{
asRight.Draw(sb, iX, iY, false);
}
else
{
asLeft.Draw(sb, iX, iY, false);
}
}
}
Once again, we determine if the bullet is active first (and if not, do nothing). Then we simply draw the AnimatedSprite associated with the iFacing
value for the bullet.
Adding Bullets to our Game
We are now finished with our Bullet class and ready to add them into our game and allow the player to fire them. To begin with, we’ll add a few
declarations to our Game1.cs declarations area:
XNA Resources - XNA Tutorials, GSE Tutorials, XNA News... http://www.xnaresources.com/pages.asp?pageid=37
3 de 6 23/5/09 11:11
int iBulletVerticalOffset = 12;
int[] iBulletFacingOffsets = new int[2] { 70, 0 };
static int iMaxBullets = 40;
Bullet[] bullets = new Bullet[iMaxBullets];
float fBulletDelayTimer = 0.0f;
float fFireDelay = 0.15f;
iBulletVerticalOffset will be added to our bullet's initial position in order to make it look like the bullet is coming from the star fighter's cannon
(moving 12 pixels down from the upper edge of the ship sprite).
iBulletFacingOffsets is similar in that we use it to make the bullet appear to be coming from the ship's cannon, but this time in the horizontal
direction. When the ship is facing left (player.Facing==1) a 0 offset is fine, but when facing right we want to add 70 pixels to the bullet's starting
location so it doesn't end up coming from the back end of the ship. A simple two element array will let us index it by the facing to get the
appropriate offset.
Next we have iMaxBullets which is a static int that determines the maximum number of bullet objects we will be able to have on the screen at any
one time. We use a static int so that we can use that value as the array size for the bullets array (you can’t use non-static values to declare the size,
so would have to have “new Bullet[40]” here if iMaxBullets wasn’t static.
The bullets array, of course, holds our actual bullet objects.
fBulletDelayTimer and fFireDelay control how fast bullets can be fired by the player. As normal, we will accumulate time in fBulletDelayTimer
and check it against fFireDelay to determine when a bullet can be fired.
After we have our declarations, we need to initialize the bullet objects, so in our LoadContent method lets add the following (It doesn’t really matter
where, but I have it after the “player” initialization):
bullets[0] = new Bullet(Content.Load<Texture2D>(@"Textures\PlayerBullet"));
for (int x = 1; x < iMaxBullets; x++)
bullets[x] = new Bullet();
Next, lets add a few helper functions we will use to manage our Bullet array. The first we will call from our game’s update routine to handle updating
all of our bullets:
protected void UpdateBullets(GameTime gameTime)
{
// Updates the location of all of thell active player bullets.
for (int x = 0; x < iMaxBullets; x++)
{
if (bullets[x].IsActive)
bullets[x].Update(gameTime);
}
}
This function simply loops through all of the bullets in our array and calls the Update method for each active bullet, passing it the current
GameTime. We could have inlined this into our Update code, but the Update method is going to get complex enough as we add more things to the
game, so I chose to break it out into a separate function.
We’ll add another helper function that will be called whenever the player presses the fire button:
protected void FireBullet(int iVerticalOffset)
{
// Find and fire a free bullet
for (int x = 0; x < iMaxBullets; x++)
{
if (!bullets[x].IsActive)
{
bullets[x].Fire(player.X + iBulletFacingOffsets[player.Facing],
player.Y + iBulletVerticalOffset + iVerticalOffset,
player.Facing);
break;
}
}
}
Since we are using an array of bullet objects, we need to find a “free” bullet to fire. This is a bullet object that isn’t currently active, so a simple loop
finds the first non-active bullet execute's it's Fire() method using the player's position and the offsets we discussed above to establish its initial
position. (As soon as we have found one, we can exit the loop, so we “break;” out of it to prevent the method from firing all the available bullets
with each button press.)
You will notice that we add a second vertical offset here that is passed into our helper function. We will use this when we add powerups, as one of
the powerups will be “dual cannons” which will fire a second bullet that is 4 pixels above the normal bullet.
If we didn’t find a free bullet nothing will happen, but that would mean that every bullet is currently on the screen! With 40 bullets and a delay
between firing, this should never happen.
One more helper function, this time to check for the player pressing the fire button:
protected void CheckOtherKeys(KeyboardState ksKeys, GamePadState gsPad)
XNA Resources - XNA Tutorials, GSE Tutorials, XNA News... http://www.xnaresources.com/pages.asp?pageid=37
4 de 6 23/5/09 11:11
{
// Space Bar or Game Pad A button fire the
// player's weapon. The weapon has it's
// own regulating delay (fBulletDelayTimer)
// to pace the firing of the player's weapon.
if ((ksKeys.IsKeyDown(Keys.Space)) ||
(gsPad.Buttons.A == ButtonState.Pressed))
{
if (fBulletDelayTimer >= fFireDelay)
{
FireBullet(0);
fBulletDelayTimer = 0.0f;
}
}
}
We will call this routine from our Update method (we’ll expand it later to account for SuperBombs and other Power Ups). Either the space bar or the
“A” button on the gamepad will fire the player’s weapon. We use our standard timing method to determine if a bullet can be fired. If it can, we call
FireBullet with a vertical offset of 0.
At the top of our Update method (Right after the check to see if the user has pressed the Back button on the game pad to exit), add the following
line:
fBulletDelayTimer += (float)gameTime.ElapsedGameTime.TotalSeconds;
This will handle controlling how fast bullets can be fired by the player.
Add the following to your Game1.cs file’s Update method, right after the Explosion.Update(gameTime) call:
UpdateBullets(gameTime);
Which will call our helper function to update any active bullets. Next, add the following right after the call to CheckVerticalMovementKeys (but
outside the if statement about vertical movement timing):
CheckOtherKeys(Keyboard.GetState(), GamePad.GetState(PlayerIndex.One));
Which will allow the player to actually fire a bullet by pressing the fire button/key.
Finally, we need to actually draw our bullets. In your draw method, after the call to draw the player’s ship, add the following:
// Draw any active player bullets on the screen
for (int i = 0; i < iMaxBullets; i++)
{
// A bullet with a Y value of -100 is inactive
if (bullets[i].IsActive)
{
bullets[i].Draw(spriteBatch);
}
}
Here we simply loop through our bullet array and draw any active bullets.
Fire up your game! You should be able to fly around with either the Game Pad or the keyboard and fire bullets!
In our next installment, we will revise our Game proejct to allow for a Title Screen phase and a Gameplay phase, as well as put in our framework for
starting new games and new game waves.
XNA Resources - XNA Tutorials, GSE Tutorials, XNA News... http://www.xnaresources.com/pages.asp?pageid=37
5 de 6 23/5/09 11:11
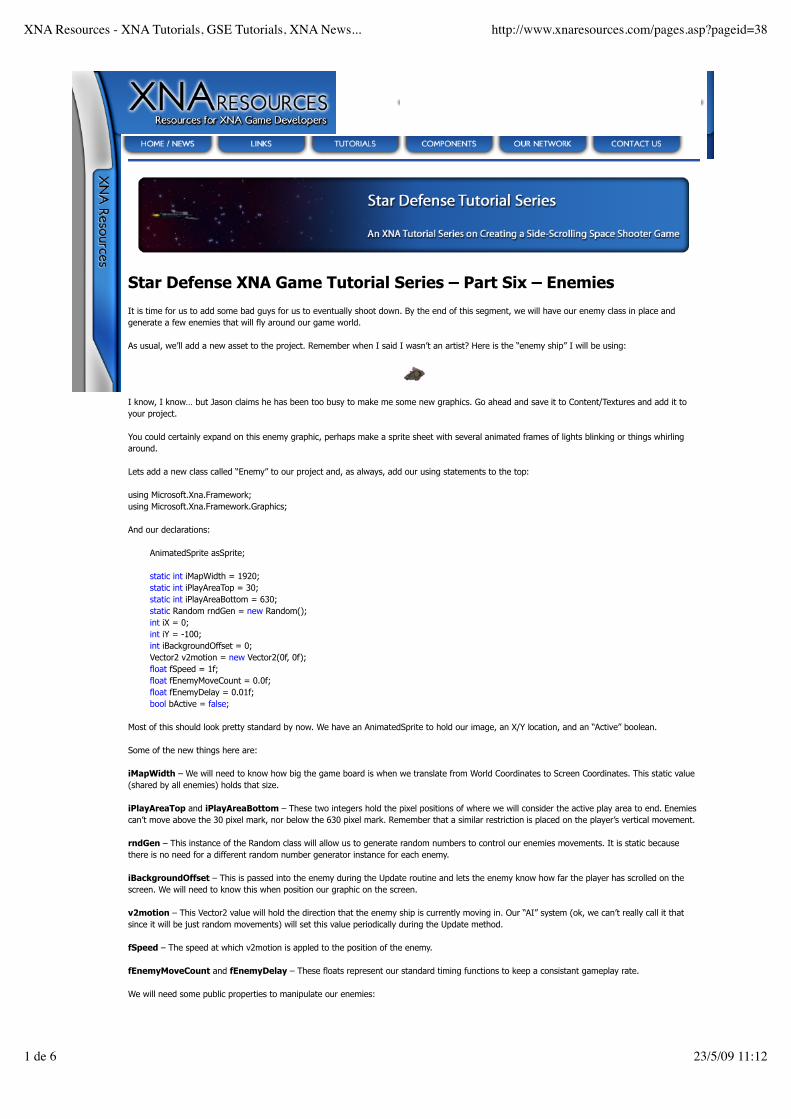
Star Defense XNA Game Tutorial Series – Part Six – Enemies
It is time for us to add some bad guys for us to eventually shoot down. By the end of this segment, we will have our enemy class in place and
generate a few enemies that will fly around our game world.
As usual, we’ll add a new asset to the project. Remember when I said I wasn’t an artist? Here is the “enemy ship” I will be using:
I know, I know… but Jason claims he has been too busy to make me some new graphics. Go ahead and save it to Content/Textures and add it to
your project.
You could certainly expand on this enemy graphic, perhaps make a sprite sheet with several animated frames of lights blinking or things whirling
around.
Lets add a new class called “Enemy” to our project and, as always, add our using statements to the top:
using Microsoft.Xna.Framework;
using Microsoft.Xna.Framework.Graphics;
And our declarations:
AnimatedSprite asSprite;
static int iMapWidth = 1920;
static int iPlayAreaTop = 30;
static int iPlayAreaBottom = 630;
static Random rndGen = new Random();
int iX = 0;
int iY = -100;
int iBackgroundOffset = 0;
Vector2 v2motion = new Vector2(0f, 0f);
float fSpeed = 1f;
float fEnemyMoveCount = 0.0f;
float fEnemyDelay = 0.01f;
bool bActive = false;
Most of this should look pretty standard by now. We have an AnimatedSprite to hold our image, an X/Y location, and an “Active” boolean.
Some of the new things here are:
iMapWidth – We will need to know how big the game board is when we translate from World Coordinates to Screen Coordinates. This static value
(shared by all enemies) holds that size.
iPlayAreaTop and iPlayAreaBottom – These two integers hold the pixel positions of where we will consider the active play area to end. Enemies
can’t move above the 30 pixel mark, nor below the 630 pixel mark. Remember that a similar restriction is placed on the player’s vertical movement.
rndGen – This instance of the Random class will allow us to generate random numbers to control our enemies movements. It is static because
there is no need for a different random number generator instance for each enemy.
iBackgroundOffset – This is passed into the enemy during the Update routine and lets the enemy know how far the player has scrolled on the
screen. We will need to know this when position our graphic on the screen.
v2motion – This Vector2 value will hold the direction that the enemy ship is currently moving in. Our “AI” system (ok, we can’t really call it that
since it will be just random movements) will set this value periodically during the Update method.
fSpeed – The speed at which v2motion is appled to the position of the enemy.
fEnemyMoveCount and fEnemyDelay – These floats represent our standard timing functions to keep a consistant gameplay rate.
We will need some public properties to manipulate our enemies:
XNA Resources - XNA Tutorials, GSE Tutorials, XNA News... http://www.xnaresources.com/pages.asp?pageid=38
1 de 6 23/5/09 11:12

public int X
{
get { return iX; }
set { iX = value; }
}
public int Y
{
get { return iY; }
set { iY = value; }
}
public bool IsActive
{
get { return bActive; }
}
public Rectangle BoundingBox
{
get {
int X = iX - iBackgroundOffset;
if (X > iMapWidth)
X -= iMapWidth;
if (X < 0)
X += iMapWidth;
return new Rectangle(X, iY, 32, 32);
}
}
public int Offset
{
get { return iBackgroundOffset; }
set { iBackgroundOffset = value; }
}
public float Speed
{
get { return fSpeed; }
}
public Vector2 Motion
{
get { return v2motion; }
set { v2motion = value; }
}
We use the background offset to determine the on-screen location of our enemy, accounting for crossing the “zero line”. (See the GetDrawX()
method below)
As with our explosions, our constructor for the Enemy class is very simple:
public Enemy(Texture2D texture,
int X, int Y, int W, int H, int Frames)
{
asSprite = new AnimatedSprite(texture, X, Y, W, H, Frames);
}
Again we are simply passing the parameters along to the AnimatedSprite class. We will handle all of the parameters for the enemy when they are
generated by the Generate() method (coming up shortly).
First, a couple of helper functions:
public void Deactivate()
{
bActive = false;
}
private int GetDrawX()
{
int X = iX - iBackgroundOffset;
if (X > iMapWidth)
X -= iMapWidth;
if (X < 0)
X += iMapWidth;
return X;
}
As it’s name implies, Deactivate simply deactivates and enemy. Non-active enemies won’t update or draw.
The GetDrawX() method translates the enemy’s “world position” X coordinate to a screen position by subtracting the value of iBackgroundOffset
XNA Resources - XNA Tutorials, GSE Tutorials, XNA News... http://www.xnaresources.com/pages.asp?pageid=38
2 de 6 23/5/09 11:12

from the world-X position. It then accounts for wrapping off of either end of the map by adding or subtracting the width of the map.
So, for example, if the enemy is located at world-position 500 and we are it our starting position of 0 iBackgroundOffset, the enemy will be drawn
starting at pixel 500. If we are scrolled right to postion 250, the enemy needs to be drawn at postion 250 (500-250).
Where it gets tricky is, as you can imagine, surrounding the “zero-line”. Lets say our enemy is locasted at world position 100, but we are scrolled so
that our current background offset is 1800 pixels. If we simply subtract the iBackgroundOffset from iX, we get -1700 pixels, which won’t draw
anything to the screen at all. But if we add the iMapWidth to the -1700, we get 220 pixels, which is the correct draw location for our enemy.
Our last helper function will generate a random direction and speed for our enemy ship:
public void RandomizeMovement()
{
v2motion.X = rndGen.Next(-50, 50);
v2motion.Y = rndGen.Next(-50, 50);
v2motion.Normalize();
fSpeed = (float)(rndGen.Next(3,6));
}
We use our rndGen Random object to generate X and Y values for our vector between -50 and +50 using the Random class’ Next method. This way
of calling the method generates a random integer between the two passed values.
We then use the Vector2’s “Normalize” method to turn the v2motion vector into a “unit vector” which a a vector with a length of 1. This means that
our vector now contains directional information but not speed information. This means we can multiple the vector by a scalar (fSpeed in our case) in
order to apply a speed when the vector is added to our object’s location.
Speaking of fSpeed, the last thing our RandomizeMovement() method does is generate a speed between 3 and 6. This value will be multiple into the
v2motion vector when it is added to the enemy position during Update().
Next, lets add a helper function to our class:
public void Generate(int iLocation, int iShipX)
{
// Generate a random X location that is NOT
// within 200 pixels of the player's ship.
do
{
iX = rndGen.Next(iMapWidth);
} while (Math.Abs(GetDrawX() - iShipX) < 200);
// Generate a random Y location between iPlayAreaTop
// and iPlayAreaBottom (the area of our game screen)
iY = rndGen.Next(iPlayAreaTop,iPlayAreaBottom);
RandomizeMovement();
bActive = true;
}
We will call Generate() from our game whenever we need to set up a new enemy. The Generate() method will randomize the location of the enemy
ship, using Math.Abs (absolute value) to make sure that it doesn’t end up within 200 pixels of the player’s ship horizontally. This way we can start a
new game wave and not worry about clobbering the player unfairly.
The vertical location of the ship is generated beteween the bounds of the Play Area, and our RandomizeMovement() method is called to establish an
initial direction and speed for our enemy. Finally, the enemy is made active by setting bActive to true.
I’m goingto go ahead and add the Draw method here since it is very simple. We’ll handle update last because it will take some discussion:
public void Draw(SpriteBatch sb, int iLocation)
{
if (bActive)
asSprite.Draw(sb, GetDrawX(), iY, false);
}
Nothing surprising here… if the enemy is active, we ask the AnimatedSprite to draw itself. As with our explosions, we use GetDrawX() to map the
World Coordinates to Screen Coordinates.
Finally, we need our Update() method:
public void Update(GameTime gametime, int iOffset)
{
iBackgroundOffset = iOffset;
fEnemyMoveCount += (float)gametime.ElapsedGameTime.TotalSeconds;
if (fEnemyMoveCount > fEnemyDelay)
{
iX += (int)((float)v2motion.X * fSpeed);
iY += (int)((float)v2motion.Y * fSpeed);
if (rndGen.Next(200) == 1)
{
RandomizeMovement();
XNA Resources - XNA Tutorials, GSE Tutorials, XNA News... http://www.xnaresources.com/pages.asp?pageid=38
3 de 6 23/5/09 11:12

}
if (iY < iPlayAreaTop)
{
iY = iPlayAreaTop;
RandomizeMovement();
}
if (iY > iPlayAreaBottom)
{
iY = iPlayAreaBottom;
RandomizeMovement();
}
if (iX < 0)
iX += iMapWidth;
if (iX > iMapWidth)
iX -= iMapWidth;
fEnemyMoveCount = 0f;
}
asSprite.Update(gametime);
}
As with our Explosion class, we update the passed in background offset for our enemy, after which we check to see if enough time has passed to
allow us to do something again.
If so, we have a lot of things to do. First off, we update the enemy position based on the v2motion vector and fSpeed by simply multiplying the
magnitude of the X and Y components of the vector by the fSpeed variable and adding them to the position.
Next ,we generate a random number between 0 and 199. If the result is a 1 (so 0.5% chance) we will generate a new random movement for our
enemy.
The next couple checks determine if we have moved off of the top or bottom of the play area. If we have, we clamp back to the play area and
generate a new random movement. It is entirely possible that this new movement will take us off of the screen on the next Update cycle, but we
will hit the same “if” condition again and try again if that happens.
If our X position moves off of either side of the game map (ie, becomes less than 0 or greater than the map width) we add or subtract the map
width as appropriate to wrap it around.
We then reset our delay timer.
Finally, we allow the sprite to update it’s animate frames (since it keeps track of it’s own framerate we don’t need to control it with our timing values
here).
Adding Enemies to Our Game
That handles our enemy class, but of course we still can’t see them. Lets add some to the game. In the declarations area of your Game1.cs file, lets
add the values we will need to support our enemies:
int iMaxEnemies = 9;
int iActiveEnemies = 9;
static int iTotalMaxEnemies = 30;
Enemy[] Enemies = new Enemy[iTotalMaxEnemies];
Texture2D t2dEnemyShip;
Here, iTotalMaxEnemies represents to overall maximum number of enemies we can ever have on a level. We are setting this to 30 (and recall it
needs to be static for us to use it as the size of our array).
iMaxEnemies will control how many enemies are in the “current wave”. We will expand on this when we actually add collisions and waves.
iActiveEnemies represents how many undestroyed enemies remain on the current level.
In our LoadContent, lets add the following to set up our enemies:
t2dEnemyShip = Content.Load<Texture2D>(@"Textures\enemy");
for (int i = 0; i < iTotalMaxEnemies; i++)
{
Enemies[i] = new Enemy(t2dEnemyShip, 0, 0, 32, 32, 1);
}
Here we simply load the texture and execute all of the constructors for our enemies.
Now lets add a helper function for our game:
protected void GenerateEnemies()
{
if (iMaxEnemies < iTotalMaxEnemies)
iMaxEnemies++;
XNA Resources - XNA Tutorials, GSE Tutorials, XNA News... http://www.xnaresources.com/pages.asp?pageid=38
4 de 6 23/5/09 11:12

iActiveEnemies = 0;
for (int x = 0; x < iMaxEnemies; x++)
{
Enemies[x].Generate(background.BackgroundOffset,
player.X);
iActiveEnemies += 1;
}
}
This helper function checks to see if iMaxEnemies is less than iTotalMaxEnemies and, if it is, adds one to iMaxEnemies. Whenever this routine is
called, a new wave of enemies, one enemy larger than the last, will be generated. Note that existing enemies will simply be “regenerated” if they
have been destroyed. We update our iActiveEnemies count for each enemy we create.
Lets add one more helper function that will be expaneded later:
protected void StartNewWave()
{
GenerateEnemies();
}
At the moment we are simply calling GenerateEnemies, but down the road we will expand this to have other impacts on our game state. Since we
don’t currently have anything in place to handle our game state, we need to temporarially put a call to StartNewWave() somewhere that it won’t get
run over and over and over again. The easiest place to do this for now is at the very end of the LoadContent method, so add this line there:
StartNewWave();
Next we will need to handle updating our enemies during our Update method. This is as simple as looping through the active enemies and calling
their Update method. Add the following to your Update method after the call to CheckOtherKeys:
for (int i = 0; i < iTotalMaxEnemies; i++)
{
if (Enemies[i].IsActive)
Enemies[i].Update(gameTime,
background.BackgroundOffset);
}
Finally we need to draw our enemies to the screen. Update your Draw code by adding the following right after all of the bullets are drawn:
for (int i = 0; i < iMaxEnemies; i++)
{
if (Enemies[i].IsActive)
Enemies[i].Draw(spriteBatch,
background.BackgroundOffset);
}
Go ahead and run your game! It should generate 10 enemies that fly randomly around on your game board.
At the moment, you can fly right through them and they are maddeningly immune to your ship’s cannons, but not for long!
XNA Resources - XNA Tutorials, GSE Tutorials, XNA News... http://www.xnaresources.com/pages.asp?pageid=38
5 de 6 23/5/09 11:12

Star Defense XNA Game Tutorial Series – Part Seven – Collision Detection
It’s finally time! By the end of the installment, you will have something that actually plays a bit like a game (at least until you kill off all of the
enemies on the level).
We’re going to talk about collision detection, and we will be using a very simply bounding box method to determine when our bullets hit our
enemies, or when our enemies hit us.
Since we are using bounding boxes, we need to take a look at our sprites for our enemies and think about how accurately a bounding box will
represent them.
Here is a “close up” view of our enemy sprite (I’ve added a grid that represents individual pixels here as well):
As you can see, we have a bit of space at the top and bottom of our enemy sprite. If we use simply bounding box collision here, we are likely to get
bullets that pass under or over the enemy ship, but trigger a hit anyway. Similarly, an ememy may approache the player and the player might collide
with the enemie’s bounding box before the enemy visually reaches the player. Consider the following image, however:
If we trim two pixels off of all sides of our bounding box, we get a pretty good representation of the area actually occupied by our enemy sprite.
In order to do this in code, lets open up our Enemy class and add a new property. It will be very similar to the BoundingBox property we already
have:
!!!!!!!!"#$%&'!()'*+,-%)!./%%&0&/,1/2
!!!!!!!!3
!!!!!!!!!!!!-)*
!!!!!!!!!!!!3
!!!!!!!!!!!!!!!!&,*!4!5!&4!6!&1+'7-8/#,9:;;0)*<
!!!!!!!!!!!!!!!!&;!=4!>!&?+"@&9*AB
!!!!!!!!!!!!!!!!!!!!4!65!&?+"@&9*A<
!!!!!!!!!!!!!!!!&;!=4!C!DB
!!!!!!!!!!!!!!!!!!!!4!E5!&?+"@&9*A<
!!!!!!!!!!!!!!!!8)*#8,!,)F!()'*+,-%)=4EGH!&IEGH!GJH!GJB<
XNA Resources - XNA Tutorials, GSE Tutorials, XNA News... http://www.xnaresources.com/pages.asp?pageid=39
1 de 4 23/5/09 11:12
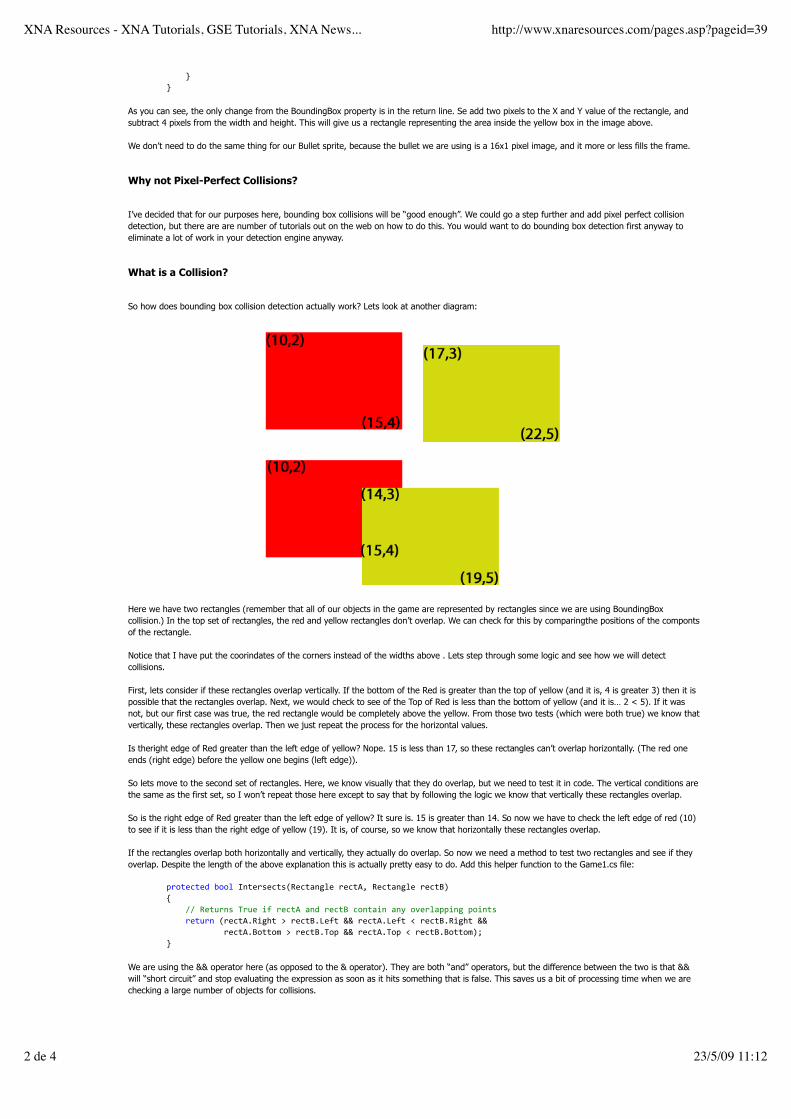
!!!!!!!!!!!!"
!!!!!!!!"
As you can see, the only change from the BoundingBox property is in the return line. Se add two pixels to the X and Y value of the rectangle, and
subtract 4 pixels from the width and height. This will give us a rectangle representing the area inside the yellow box in the image above.
We don’t need to do the same thing for our Bullet sprite, because the bullet we are using is a 16x1 pixel image, and it more or less fills the frame.
Why not Pixel-Perfect Collisions?
I’ve decided that for our purposes here, bounding box collisions will be “good enough”. We could go a step further and add pixel perfect collision
detection, but there are are number of tutorials out on the web on how to do this. You would want to do bounding box detection first anyway to
eliminate a lot of work in your detection engine anyway.
What is a Collision?
So how does bounding box collision detection actually work? Lets look at another diagram:
Here we have two rectangles (remember that all of our objects in the game are represented by rectangles since we are using BoundingBox
collision.) In the top set of rectangles, the red and yellow rectangles don’t overlap. We can check for this by comparingthe positions of the componts
of the rectangle.
Notice that I have put the coorindates of the corners instead of the widths above . Lets step through some logic and see how we will detect
collisions.
First, lets consider if these rectangles overlap vertically. If the bottom of the Red is greater than the top of yellow (and it is, 4 is greater 3) then it is
possible that the rectangles overlap. Next, we would check to see of the Top of Red is less than the bottom of yellow (and it is… 2 < 5). If it was
not, but our first case was true, the red rectangle would be completely above the yellow. From those two tests (which were both true) we know that
vertically, these rectangles overlap. Then we just repeat the process for the horizontal values.
Is theright edge of Red greater than the left edge of yellow? Nope. 15 is less than 17, so these rectangles can’t overlap horizontally. (The red one
ends (right edge) before the yellow one begins (left edge)).
So lets move to the second set of rectangles. Here, we know visually that they do overlap, but we need to test it in code. The vertical conditions are
the same as the first set, so I won’t repeat those here except to say that by following the logic we know that vertically these rectangles overlap.
So is the right edge of Red greater than the left edge of yellow? It sure is. 15 is greater than 14. So now we have to check the left edge of red (10)
to see if it is less than the right edge of yellow (19). It is, of course, so we know that horizontally these rectangles overlap.
If the rectangles overlap both horizontally and vertically, they actually do overlap. So now we need a method to test two rectangles and see if they
overlap. Despite the length of the above explanation this is actually pretty easy to do. Add this helper function to the Game1.cs file:
!!!!!!!!#$%&'(&')!*%%+!,-&'$.'(&./0'(&1-2+'!$'(&34!0'(&1-2+'!$'(&56
!!!!!!!!7
!!!!!!!!!!!!88!0'&9$-.!:$9'!;<!$'(&3!1-)!$'(&5!(%-&1;-!1-=!%>'$+1##;-2!#%;-&.
!!!!!!!!!!!!$'&9$-!/$'(&3?0;2@&!A!$'(&5?B'<&!CC!$'(&3?B'<&!D!$'(&5?0;2@&!CC
!!!!!!!!!!!!!!!!!!!!$'(&3?5%&&%E!A!$'(&5?:%#!CC!$'(&3?:%#!D!$'(&5?5%&&%E6F
!!!!!!!!"
We are using the && operator here (as opposed to the & operator). They are both “and” operators, but the difference between the two is that &&
will “short circuit” and stop evaluating the expression as soon as it hits something that is false. This saves us a bit of processing time when we are
checking a large number of objects for collisions.
XNA Resources - XNA Tutorials, GSE Tutorials, XNA News... http://www.xnaresources.com/pages.asp?pageid=39
2 de 4 23/5/09 11:12
We can pass Intersects any two rectangles and it will return “true” if they overlap, and “false” if not.
Setup Stuff
Lets add a couple more helpers to our Game1.cs file to handle the results of oru collisions (we’ll expand on these later):
!!!!!!!!"#$%&'%&(!)$*(!+&,%#$-./&0-1*/%!*./&0-2
!!!!!!!!3
!!!!!!!!!!!!./&0*&,4*./&0-56+&7'%*)7%&128
!!!!!!!!9
!!!!!!!!"#$%&'%&(!)$*(!:&0$)&;<==&%1*/%!*;<==&%2
!!!!!!!!3
!!!!!!!!!!!!><==&%,4*;<==&%56?,@'%*)&!A!B7=,&8
!!!!!!!!9
Right now, all these functions do is deactivate the Enemy or Bullet specified. We will be adding to the DestroyEnemy function later to add explosions
when an enemy is destroyed.
With these in place, lets add our primary function to test bullet-to-enemy collisions:
!!!!!!!!"#$%&'%&(!)$*(!CD&'E;<==&%F*%,12
!!!!!!!!3
!!!!!!!!!!!!GG!CD&'E!%$!,&&!$B!7/-!$B!%D&!"=7-&#,!><==&%,!D7)&!
!!!!!!!!!!!!GG!*0"7'%&(!7/-!$B!%D&!&/&0*&,6
!!!!!!!!!!!!B$#!1*/%!*!A!H8!*!I!*J7K;<==&%,8!*LL2
!!!!!!!!!!!!3
!!!!!!!!!!!!!!!!*B!1><==&%,4*56?,@'%*)&2
!!!!!!!!!!!!!!!!!!!!B$#!1*/%!K!A!H8!K!I!*M$%7=J7K./&0*&,8!KLL2
!!!!!!!!!!!!!!!!!!!!!!!!*B!1./&0*&,4K56?,@'%*)&2
!!!!!!!!!!!!!!!!!!!!!!!!!!!!*B!1?/%&#,&'%,1><==&%,4*56;$</(*/N;$KO
!!!!!!!!!!!!!!!!!!!!!!!!!!!!!!!!!!!!!!!!!!!./&0*&,4K56C$==*,*$/;$K22
!!!!!!!!!!!!!!!!!!!!!!!!!!!!3
!!!!!!!!!!!!!!!!!!!!!!!!!!!!!!!!+&,%#$-./&0-1K28
!!!!!!!!!!!!!!!!!!!!!!!!!!!!!!!!:&0$)&;<==&%1K28
!!!!!!!!!!!!!!!!!!!!!!!!!!!!9
!!!!!!!!!!!!9
!!!!!!!!9
We simply loop through our bullet array and, for any active bullet, we check against every active enemy and see if Intersects() returns true for the
bullets BoundingBox vs the enemy’s CollisionBox rectangles. If so, we call both of your removal helpers.
Now, in your Update() method, add the following line right after the call to player.Update:
!!!!!!!!!!!!!!!!!!!!CD&'E;<==&%F*%,128
Run your game, and you should be able to shoot enemies out of the sky. Of course, they simply disappear without much of a satisfactory feel, but
still the concept works.
What about enemies smashing into the player? This is similarly easy to check for, as we simply loop through all of the active enemies and check
Intersects agains the player rectangle. Unfortunately, we need a lot of other things in place before we can actually do this, so we’re going to hold off
on implementing it until we get the structure of our game in place.
XNA Resources - XNA Tutorials, GSE Tutorials, XNA News... http://www.xnaresources.com/pages.asp?pageid=39
3 de 4 23/5/09 11:12

Star Defense XNA Game Tutorial Series – Part Eight – Explosions
Now that we have enemies flying around on the screen and the ability to shoot them down, it's time to blow some stuff up!
You should already have the Explosions.png file as part of your project. I noticed a few problems with the alignment of some of the explosion
frames, so I reconstructed the explosion sheet and have it available here in case you want to replace your existing Explosions.png (remember to
replace it and rename it Explosions.png!)
We will be handling explosions in much the same way we handle bullets, in that they will be completely self contained. Once triggered, they will play
their animation until it finishes and then shut themselves off.
One thing we will be doing differently from our bullets, however, is that we will not search for “Free” explosions when we need to generate one.
Since it is theoretically possible to have an explosion playing for every active enemy on the screen (ie, the player hits a super bomb when all of the
enemies on the map are on-screen) we will construct our array so we have as many explosion objects as we will have enemies, plus an additional
explosion object for the player’s ship.
Fixing a Bug
Before we go on, there is a bug we need to fix in our AnimatedSprite class. The FrameLength property doesn’t actually let you set the framelength
because of a typo. Open your AnimatedSprite class and update the FrameLength property to look like this (the change is that the old property has
“fFrameRate” in the set line where “value” should be):
public float FrameLength
{
get { return fFrameRate; }
set { fFrameRate = (float)Math.Max(value, 0f); }
}
Go ahead and add a class called Explosion to your project. As always, we will add the two Using statements we need to the top of the class:
using Microsoft.Xna.Framework.Graphics;
using Microsoft.Xna.Framework;
Next, we will add our declarations. We are departing a bit further from the bullet class here in that we are going to be tracking “world position” for
our explosions:
static int iMapWidth = 1920;
AnimatedSprite asSprite;
int iX = 0;
int iY = -100;
bool bActive = true;
int iBackgroundOffset = 0;
Vector2 v2motion = new Vector2(0f, 0f);
float fSpeed = 1f;
XNA Resources - XNA Tutorials, GSE Tutorials, XNA News... http://www.xnaresources.com/pages.asp?pageid=40
1 de 5 23/5/09 11:12

We need to know how big the world map is, because our explosions will take on some of the momentium of the ship that is exploding (for enemy
explosions) so they continue to drift in the direction that the enemy ship was moving when it exploded. This means that it is possible for the
explosion to cross the “zero line”, or the point where our map wraps around from the 1920th pixel to the 0th pixel.
Additionally, if we didn’t track the explosions world position explosions would essentially stop on screen and move with the player’s ship instead of
zooming past as we fly through them.
So we have iMapWidth so our explosion class knows how big the map is. Next is our standard set of location variables and a boolean to determine if
the explosion is active. We also will be tracking the game board’s background offset, which will be suppled to our explosions by the Game1 class.
The motion vector and fSpeed variables will receive information when the explosion is created that allow it to float after it comes into existance. This
will make more sense when we implement the explosions associated with enemies, as we will copy the direction of the enemy’s current motion to
the motion vector and half of the enemies speed to the fSpeed variable.
As normal, we need some public properties to access our variables:
public int X
{
get { return iX; }
set { iX = value; }
}
public int Y
{
get { return iY; }
set { iY = value; }
}
public bool IsActive
{
get { return bActive; }
}
public int Offset
{
get { return iBackgroundOffset; }
set { iBackgroundOffset = value; }
}
public float Speed
{
get { return fSpeed; }
set { fSpeed = value; }
}
public Vector2 Motion
{
get { return v2motion; }
set { v2motion = value; }
}
The only really different thing to note here is that the IsActive property is read-only. Once an explosion has been started (which will be done via a
method call) it will handle itself, so our external code can check to see if the explosion is still going on, but it can’t alter the process.
Our constructor this time around will be fairly simple:
public Explosion(Texture2D texture,
int X, int Y, int W, int H, int Frames)
{
asSprite = new AnimatedSprite(texture, X, Y, W, H, Frames);
asSprite.FrameLength = 0.05f;
}
Here, we pass along the creation parameters to our AnimatedSprite, and we also modify the default FrameLength property of the sprite. This will
slow down the explosion a bit so it doesn’t fly by quite so fast. Which brings us to our Activate method:
public void Activate(int x, int y, Vector2 motion,
float speed, int offset)
{
iX = x;
iY = y;
v2motion = motion;
fSpeed = speed;
iBackgroundOffset = offset;
asSprite.Frame = 0;
bActive = true;
}
Our Activate() method passes along the parameters sent into it to the local variables, and then sets the AnimatedSprite’s frame to 0 and bActive to
true. This positions the explosion and then starts it animating. We will check the bActive value during the class’ Update method later.
XNA Resources - XNA Tutorials, GSE Tutorials, XNA News... http://www.xnaresources.com/pages.asp?pageid=40
2 de 5 23/5/09 11:12
Next we need a helper function for our Draw code:
private int GetDrawX()
{
int X = iX - iBackgroundOffset;
if (X > iMapWidth)
X -= iMapWidth;
if (X < 0)
X += iMapWidth;
return X;
}
The GetDrawX() method is identical to the same method in the Enemy class and serves the same purpose. When the explosion is drawn, this
method is used to translate the World Position into a Screen Position.
Lets move on to our Update() method:
public void Update(GameTime gametime, int iOffset)
{
if (bActive)
{
iBackgroundOffset = iOffset;
iX += (int)((float)v2motion.X * fSpeed);
iY += (int)((float)v2motion.Y * fSpeed);
asSprite.Update(gametime);
if (asSprite.Frame >= 15)
{
bActive = false;
}
}
}
As normal, we pass in a GameTime so we can maintain a consistant framerate. If the explosion is active, we will set the current background offset
(also passed as a parameter to Update) and then modify the postion of the explosion using the v2motion vector and fSpeed float.
Next we call asSprite.update(gametime) to potentially update the animation frame if enough game time has passed.
Finally, we check to see if the animation is over (we have reached the 16th frame (frame # 15)). If we have, we deactivate the explosion. All that is
left now is for us to draw the explosion to the screen:
public void Draw(SpriteBatch sb, bool bAbsolute)
{
if (bActive)
{
if (!bAbsolute)
asSprite.Draw(sb, GetDrawX(), iY, false);
else
asSprite.Draw(sb, iX, iY, false);
}
}
You will notice we have two potential ways to call the Draw method. If we pass a “true” as bAbsolute we will draw the explosion without taking
iBackgroundOffset into account (via the GetDrawX() method). If we pass false we will use GetDrawX() to convert the world coordinates into screen
coordinates.
The reason behind this is actually for the explosion of the player’s ship. Remember that we don’t track the player’s ship is world coordinates, as it is
always in the center of the screen (you can think of it this way : what we are really tracking is how the world moves around a static point where the
player resides.)
So now lets add our explosions into our Game code. Open up Game1.cs and add the following declarations (place them after the Enemy array
declaration):
Random rndGen = new Random();
Texture2D t2dExplosionSheet;
Explosion[] Explosions = new Explosion[iTotalMaxEnemies + 1];
The t2dExplosionSheet texture will hold our explosion image, while the array of Explosion objects will house all of the explosions we will be using in
the game. We have one more explosion than we have enemies to allow for an explosion for the player’s ship.
In LoadContent, lets add the now familiar code to initialize our Explosions:
t2dExplosionSheet = Content.Load<Texture2D>(@"Textures\Explosions");
for (int i = 0; i < iTotalMaxEnemies + 1; i++)
{
Explosions[i] = new Explosion(t2dExplosionSheet,
rndGen.Next(8) * 64, 0, 64, 64, 16);
}
(Note, while you are in the LoadContent routine, remove the code near the top that starts with "Explosion = new AnimatedSprite(..." which loads up
XNA Resources - XNA Tutorials, GSE Tutorials, XNA News... http://www.xnaresources.com/pages.asp?pageid=40
3 de 5 23/5/09 11:12

the little explosion that has been playing in the corner of our screen forever. Additionally, take "Explosion.Update(gameTime);" out of the Update()
method and "Explosion.Draw(spriteBatch, 0, 0, false);" out of the Draw method to eliminate it completely.
We use our random number generator to pick out one of the explosion sprite strips to use for each of the Explosion objects (by picking a random
number from 0 to 7 and multiplying that by the height of the frame to get topmost position of our sprite frame).
We will, of course, need to udpate and draw our explosions. We can use the same loop we use to update the enemies to update our explosions
(except for the player explosion) so change the loop in your Update method to look like this:
for (int i = 0; i < iTotalMaxEnemies; i++)
{
if (Enemies[i].IsActive)
Enemies[i].Update(gameTime,
background.BackgroundOffset);
if (Explosions[i].IsActive)
Explosions[i].Update(gameTime,
background.BackgroundOffset);
}
Here we are just adding the second “if” condition to the loop. As I said above, this won’t update the player’s explosion, but this is one of those cases
where we are missing some game structure that we will need to allow this to happen, so we will come back to that in a future segment.
In our Draw code, we can do the same. Update your enemy drawing loop to add explosions to it, ad add the lines below it to draw the player’s
explosion if it is active:
for (int i = 0; i < iMaxEnemies; i++)
{
if (Enemies[i].IsActive)
{
Enemies[i].Draw(spriteBatch,
background.BackgroundOffset);
}
if (Explosions[i].IsActive)
{
Explosions[i].Draw(spriteBatch, false);
}
}
if (Explosions[iTotalMaxEnemies].IsActive)
Explosions[iTotalMaxEnemies].Draw(spriteBatch, true);
Again, this should all be old hat by now. We are just adding a few calls to Draw our underlying objects. Notice, however, that when we draw the
player’s explosion we use the “true” value for the second parameter which causes the explosion’s draw method to use screen coordinates instead of
world coordinates.
The only thing left to do to get our enemies to explode is to activate explosions when they are destroyed. Update your DestroyEnemy helper
function to look like this:
protected void DestroyEnemy(int iEnemy)
{
Enemies[iEnemy].Deactivate();
Explosions[iEnemy].Activate(
Enemies[iEnemy].X-16,
Enemies[iEnemy].Y-16,
Enemies[iEnemy].Motion,
Enemies[iEnemy].Speed/2,
Enemies[iEnemy].Offset);
}
Here we just added a call to the Activate() method of our Explosion class, passing it the values we derrive from the enemy that we are destroying.
Notice that we offset the X and Y position of the explosion by -16 compared to the location of the enemy sprite. This is because our enemy sprite is
32x32 pixels, while our explosions are 64x64 pixels. This keeps the center of the explosion on the center of the enemy ship while allowing it to be
more “impressing” than a 32x32 explosion would be.
We transfer the Motion vector directly from the enemy to the explosion and half of the enemy speed, which keeps the explosion “drifting” slowing in
the same directon the enemy was moving.
If you run your game, you should be able to shoot down enemies and watch them explode! And you are still invincible!
Coming up, we will add some structure to our project to make it more of a game and less of a freeform shooting gallery.
XNA Resources - XNA Tutorials, GSE Tutorials, XNA News... http://www.xnaresources.com/pages.asp?pageid=40
4 de 5 23/5/09 11:12

Star Defense XNA Game Tutorial Series – Part Nine – Game Structure
So far, we have build a lot of components for our game, but we still are missing a lot of the trimmings that actually make it playable. In this segment
we are going to look at wrapping our project with things that will make it into an actual game.
First, lets add two possible modes the game can be in:
Title Screen Mode
Game Play Mode
In Title Screen mode, we display a title screen (I know, shocking!) and wait for the player to press a button to start the game. In game play mode,
we play as we have been all along.
This, of course, implies that there is a way to get back to Title Screen Mode (by losing the game) so we will need to account for that as well.
Lets do the easy parts first and add a title screen to our resources. Here is the screen Jason put together for me:
Save it to your Content/Textures folder and add it to your project.
We will need to add a declaration for the image (We will also add an integer that determines if we are in Game Mode or Title Screen mode):
int iGameStarted = 0;
Texture2D t2dTitleScreen;
And we will need to initialize it in LoadContent:
t2dTitleScreen = Content.Load<Texture2D>(@"Textures\TitleScreen");
While we are here, take out the line that says “StartNewWave()”, since we will be implementing that as part of our code below.
So lets look at what we need to do in our Update() and Draw() routines to account for the title screen. We need to wrap an If statement around
most of our Update code, but I also want to clean the code up a bit, so I’m going to include a full replacement Update method for our Game1 class.
I’ve cleaned it up, changed a few things (I’ll talk about them below) and commented the code. Additionally, I’ve created the “if” statement for
iGameStarted and set up a couple of #regons to make things easier to deal with.
Big Code Block Warning!
protected override void Update(GameTime gameTime)
{
XNA Resources - XNA Tutorials, GSE Tutorials, XNA News... http://www.xnaresources.com/pages.asp?pageid=41
1 de 8 23/5/09 11:12
// Store values for the Keyboard and GamePad so we aren't
// Querying them multiple times per Update
KeyboardState keystate = Keyboard.GetState();
GamePadState gamepadstate = GamePad.GetState(PlayerIndex.One);
// If the Escape Key is pressed, or the user presses
// the "Back" button on the game pad, exit the game.
if ((keystate.IsKeyDown(Keys.Escape) ||
gamepadstate.Buttons.Back == ButtonState.Pressed))
this.Exit();
// Get elapsed game time since last call to Update
float elapsed = (float)gameTime.ElapsedGameTime.TotalSeconds;
if (iGameStarted == 1)
{
#region GamePlay Mode (iGameStarted==1)
//Accumulate time since the last bullet was fired
fBulletDelayTimer += elapsed;
// Accumulate time since the player's speed changed
player.SpeedChangeCount += elapsed;
// If enough time has passed that the player can change
// speed again, call CheckHorizontalMovementKeys
if (player.SpeedChangeCount > player.SpeedChangeDelay)
{
CheckHorizontalMovementKeys(keystate, gamepadstate);
}
// Accumulate time since the player moved vertically
player.VerticalChangeCount += elapsed;
// If enough time has passed, call CheckVerticalMovementKeys
if (player.VerticalChangeCount > player.VerticalChangeDelay)
{
CheckVerticalMovementKeys(keystate, gamepadstate);
}
// Check any other key presses
CheckOtherKeys(keystate, gamepadstate);
// Update all enemies and explosions
for (int i = 0; i < iTotalMaxEnemies; i++)
{
if (Enemies[i].IsActive)
Enemies[i].Update(gameTime,
background.BackgroundOffset);
if (Explosions[i].IsActive)
Explosions[i].Update(gameTime,
background.BackgroundOffset);
}
// Update the player's star fighter
player.Update(gameTime);
// Move any active bullets
UpdateBullets(gameTime);
// See if any active bullets hit any active enemies
CheckBulletHits();
// Accumulate time since the game board was last updated
// This reflects the actual movement rate of the screen
// as opposed to speed changes by the player
fBoardUpdateDelay += elapsed;
// If enough time has elapsed, update the game board.
if (fBoardUpdateDelay > fBoardUpdateInterval)
{
fBoardUpdateDelay = 0f;
UpdateBoard();
}
#endregion
}
else
{
#region Title Screen Mode (iGameStarted==0)
if ((keystate.IsKeyDown(Keys.Space)) ||
XNA Resources - XNA Tutorials, GSE Tutorials, XNA News... http://www.xnaresources.com/pages.asp?pageid=41
2 de 8 23/5/09 11:12

(gamepadstate.Buttons.Start == ButtonState.Pressed))
{
StartNewGame();
}
#endregion
}
base.Update(gameTime);
}
As you can see, I’ve tried to comment everything here. The first big change is that we store a KeyboardState and GameState so that we can just
reference those later instead of having a bunch of calls to Keyboard.GetState() and GamePad.GetState(PlayerIndex.One).
We do the same with our Elapsed Game Time. Instead of converting it to a float every time we need it, we just make a float called “elapsed” at the
beginning. Note that this and the KeyboardState code happen outside of the “if” statement checking iGameStarted, since we can make use of it in
both cases.
Right inside the curly bracket of the “if” statement you will notice a “#region” line. This is not actual code, but a handy feature of the C#
environment that allows you to have collapsable code regions. A #region and #endregion pair will at a little plus/minus sign on the left side of the
screen that will expand/collapse the code inside the region, leaving just the name of the region behind.
Inside the “if” statement, I’ve modified a few lines of code to use “elapsed” instead of “(float)gameTime.ElapsedGameTime.TotalSeconds” and to use
the KeyboardState and GamePadState objects we created earlier.
I’ve also got the UpdateBullets being called before CheckBulletHits to keep things consistant.
Inside the “Title Screen Mode” region, which is the code we will be running during Update() if iGameStarted==0, we check for the player to press
the Start button on the GamePad or the Space bar on the keyboard. If that happens, we call “StartNewGame()”, which we haven’t yet written. Here
is a basic StarNewGame function:
protected void StartNewGame()
{
iGameStarted = 1;
StartNewWave();
}
Here we simply set iGameStarted to 1 and execute the StartNewWave() method we created when we added enemies to the game.
Next we need to consider our Draw method. Once again, I’ve cleaned it up a little, added some comments and the like:
protected override void Draw(GameTime gameTime)
{
// Clear the Graphics Device
graphics.GraphicsDevice.Clear(Color.Black);
// Start a SpriteBatch.Begin which will be used
// by all of our drawing code.
spriteBatch.Begin();
if (iGameStarted == 1)
{
#region Game Play Mode (iGameStarted==1)
// Draw the Background object
background.Draw(spriteBatch);
// Draw the Player's Star Fighter
player.Draw(spriteBatch);
// Draw any active bullets on the screen
for (int i = 0; i < iMaxBullets; i++)
{
if (bullets[i].IsActive)
{
bullets[i].Draw(spriteBatch);
}
}
// Draw any active enemies and explosions
for (int i = 0; i < iMaxEnemies; i++)
{
if (Enemies[i].IsActive)
{
Enemies[i].Draw(spriteBatch,
background.BackgroundOffset);
}
if (Explosions[i].IsActive)
{
Explosions[i].Draw(spriteBatch, false);
}
}
XNA Resources - XNA Tutorials, GSE Tutorials, XNA News... http://www.xnaresources.com/pages.asp?pageid=41
3 de 8 23/5/09 11:12
// Draw the player's explosion if it is happening
if (Explosions[iTotalMaxEnemies].IsActive)
Explosions[iTotalMaxEnemies].Draw(spriteBatch, true);
#endregion
}
else
{
#region Title Screen Mode (iGameStarted==0)
spriteBatch.Draw(t2dTitleScreen, new Rectangle(0, 0, 1280, 720), Color.White);
#endregion
}
// Close the SpriteBatch
spriteBatch.End();
base.Draw(gameTime);
}
There are only a few changes here other than spacing and comments. I’ve got our “if” statement in there, and if we are in title screen mode, we
just use SpriteBatch.Draw() to throw our title screen up on the display.
If you launch your game, you should get the title screen. Pressing Back or Escape will exit, while pressing Space or Start will start the game.
That gets us started, but we need to go a bit further.
Lets add a few more declarations we are going to need:
int iProcessEvents = 1;
int iLivesLeft = 3;
int iGameWave = 0;
int iPlayerScore = 0;
float fPlayerRespawnTimer = 4f;
float fPlayerRespawnCount = 0f;
iProcessEvents will be used as another “state” variable. When iGameStarted==1 we will use iProcessEvents to determine if we are going to continue
moving enemies, bullets, and the screen. We will use this when the player crashes into an enemy to stop the action but allow the explosion
animations to continue playing.
iLivesLeft is the number of ships the player has until the game is over.
iGameWave is the level the player is currently on. Whenever all of the enemies on a wave are cleared, the number of enemies is increased by one
and a new wave is spawned.
iPlayerScore is the score the player has accumulated in this game.
fPlayerRespawnTimer and fPlayerRespawnCount determine the delay between the player exploding and respawning (if they have ships left)
Lets edit our StartNewGame() method to set these variables as well as some of our existing variables when a game is started:
protected void StartNewGame()
{
iGameStarted = 1;
iProcessEvents = 1;
iLivesLeft = 3;
player.ScrollRate = 0;
iPlayerScore = 0;
iGameWave = 0;
iMaxEnemies = 9;
StartNewWave();
}
Lets update our StartNewWave() method to make sure iGameStarted and iProcessEvents are running:
protected void StartNewWave()
{
iProcessEvents = 1;
iGameStarted = 1;
iGameWave++;
GenerateEnemies();
}
Lets add another helper function. This one will get expanded upon when we add Power Ups later:
protected void PlayerKilled()
{
// Reset the iGameWave and iMaxEnemies, since they will
// both be bumped automatically when the new wave is
// generated.
iGameWave--;
iMaxEnemies--;
XNA Resources - XNA Tutorials, GSE Tutorials, XNA News... http://www.xnaresources.com/pages.asp?pageid=41
4 de 8 23/5/09 11:12

// Stop the player's ship
player.ScrollRate = 0;
}
Since our GenerateEnemies method automatically bumps up the iMaxEnemies and StartNewWave bumps up the current wave number, we simply
subtract one from each in preparation for calling StartNewWave(). (When a player is killed, the wave starts over with a full load of enemies)
Now, while I hate to do this to you for the second time in the same installment, here is the whole update method (again) adding our iProcessEvents
checks:
protected override void Update(GameTime gameTime)
{
// Store values for the Keyboard and GamePad so we aren't
// Querying them multiple times per Update
KeyboardState keystate = Keyboard.GetState();
GamePadState gamepadstate = GamePad.GetState(PlayerIndex.One);
// If the Escape Key is pressed, or the user presses
// the "Back" button on the game pad, exit the game.
if ((keystate.IsKeyDown(Keys.Escape) ||
gamepadstate.Buttons.Back == ButtonState.Pressed))
this.Exit();
// Get elapsed game time since last call to Update
float elapsed = (float)gameTime.ElapsedGameTime.TotalSeconds;
if (iGameStarted == 1)
{
#region GamePlay Mode (iGameStarted==1)
if (iProcessEvents == 1)
{
#region Processing Events (iProcessEvents==1)
//Accumulate time since the last bullet was fired
fBulletDelayTimer += elapsed;
// Accumulate time since the player's speed changed
player.SpeedChangeCount += elapsed;
// If enough time has passed that the player can change
// speed again, call CheckHorizontalMovementKeys
if (player.SpeedChangeCount > player.SpeedChangeDelay)
{
CheckHorizontalMovementKeys(keystate, gamepadstate);
}
// Accumulate time since the player moved vertically
player.VerticalChangeCount += elapsed;
// If enough time has passed, call CheckVerticalMovementKeys
if (player.VerticalChangeCount > player.VerticalChangeDelay)
{
CheckVerticalMovementKeys(keystate, gamepadstate);
}
// Check any other key presses
CheckOtherKeys(keystate, gamepadstate);
// Update all enemies and explosions
for (int i = 0; i < iTotalMaxEnemies; i++)
{
if (Enemies[i].IsActive)
Enemies[i].Update(gameTime,
background.BackgroundOffset);
if (Explosions[i].IsActive)
Explosions[i].Update(gameTime,
background.BackgroundOffset);
}
// Update the player's star fighter
player.Update(gameTime);
// Move any active bullets
UpdateBullets(gameTime);
// See if any active bullets hit any active enemies
CheckBulletHits();
XNA Resources - XNA Tutorials, GSE Tutorials, XNA News... http://www.xnaresources.com/pages.asp?pageid=41
5 de 8 23/5/09 11:12

// Accumulate time since the game board was last updated
// This reflects the actual movement rate of the screen
// as opposed to speed changes by the player
fBoardUpdateDelay += elapsed;
// If enough time has elapsed, update the game board.
if (fBoardUpdateDelay > fBoardUpdateInterval)
{
fBoardUpdateDelay = 0f;
UpdateBoard();
}
#endregion
}
else
{
#region Not Processing Events (iProcessEvents==0)
if (Explosions[iTotalMaxEnemies].IsActive)
Explosions[iTotalMaxEnemies].Update(gameTime,
background.BackgroundOffset);
fPlayerRespawnCount+=elapsed;
if (fPlayerRespawnCount > fPlayerRespawnTimer)
{
iLivesLeft -= 1;
if (iLivesLeft > 0)
{
PlayerKilled();
StartNewWave();
}
else
{
iGameStarted = 0;
iProcessEvents = 1;
}
}
#endregion
}
#endregion
}
else
{
#region Title Screen Mode (iGameStarted==0)
if ((keystate.IsKeyDown(Keys.Space)) ||
(gamepadstate.Buttons.Start == ButtonState.Pressed))
{
StartNewGame();
}
#endregion
}
base.Update(gameTime);
}
Other that the addition of the if block for iProcessEvents, this is unchanged, but explaining where to put the if statement to surround everything
would probably end up with a mess in the editor. Inside the “Not Processing Events” region we see what we will do when iProcessEvents is false. We
continue to animate the player’s explosion, and we accumulate time in fPlayerRespawnCount until it is greater than fPlayerRespawnTimer (4
seconds).
Then we subtract one from iLivesLeft and check to see if the player has any lives remaining. If so, we call our PlayerKilled() method and then
StartNewWave(). If the player is out of lives, we set iGameStarted to 0 and turn iProcessEvents back on (just to be safe later).
Fortunately, or draw code when the player’s ship is exploding is much easier to update. Find the line that says “player.Draw(spriteBatch);” and
replace it with:
if (iProcessEvents == 1)
{
player.Draw(spriteBatch);
}
Since the only thing we don’t want to draw is the player’s ship (because it is exploding) that is the only thing we need to eliminate if
iProcessEvents==0. (Bullets and enemies will freeze in place, but will still be drawn).
At the end of your CheckBulletHits() method, add the following:
// If we have run out of active enemies, generate new ones
if (iActiveEnemies < 1)
StartNewWave();
Which will start a new wave if we run out of enemies. In order for our game to run out of enemies, though, we need up update our DestroyEnemy()
method by adding a line:
XNA Resources - XNA Tutorials, GSE Tutorials, XNA News... http://www.xnaresources.com/pages.asp?pageid=41
6 de 8 23/5/09 11:12

iActiveEnemies--;
This can be placed anywhere in the call, but I have it after the call to the Activate() method of the explosion.
One more helper function for this installment:
protected void CheckPlayerHits()
{
for (int x = 0; x < iTotalMaxEnemies; x++)
{
if (Enemies[x].IsActive)
{
// If the enemy and ship sprites collide...
if (Intersects(player.BoundingBox, Enemies[x].CollisionBox))
{
// Stop event processing
iProcessEvents = 0;
// Set up the ship's explosion
Explosions[iTotalMaxEnemies].Activate(
player.X - 16,
player.Y - 16,
Vector2.Zero,
0f,
background.BackgroundOffset);
fPlayerRespawnCount = 0.0f;
return;
}
}
}
}
Here we are checking each active enemy’s CollisionBox against the player’s BoundingBox to see if they have collided. If they have, we set
iProcessEvents to 0, which will freeze the action. We then set up the player’s ship explosion and activate it. Finally, we set fPlayerRespawnCount to 0
so we can start a four second countdown to respawing. We throw in a return here because if we have exploded once there is no need to keep
checking other enemies.
We are ALMOST DONE! Promise. The last thing we need to do is add a call to CheckPlayerHits() to our Update() method. Right after
CheckBulletHits(); add:
// Check to see if the player has collided with any enemies
CheckPlayerHits();
Run your game, and you should have a pretty much playable game! You have enemies that “attack” in waves as you kill them off, you have a limited
number of lives, after which you return to the title screen, you have explosions flying all over the place, and life is good!
We have a few more things to do, though, so check back for our next installment, where we will handle setting up our “game screen” overlay,
displaying information like your score and the number of lives you have left, and such. We’ll also throw in Super Bombs.
I’ve packed up the project as it stands right now and am uploading the code in case you are having any trouble getting things to work.
XNA Resources - XNA Tutorials, GSE Tutorials, XNA News... http://www.xnaresources.com/pages.asp?pageid=41
7 de 8 23/5/09 11:12
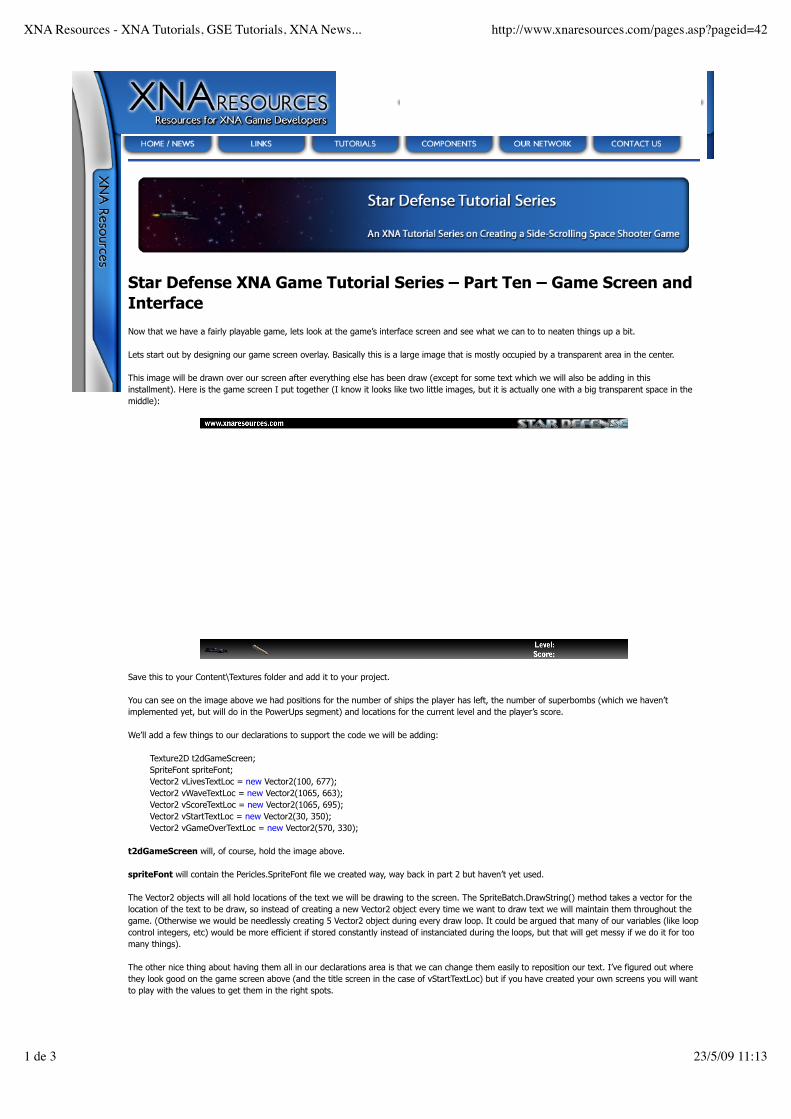
Star Defense XNA Game Tutorial Series – Part Ten – Game Screen and
Interface
Now that we have a fairly playable game, lets look at the game’s interface screen and see what we can to to neaten things up a bit.
Lets start out by designing our game screen overlay. Basically this is a large image that is mostly occupied by a transparent area in the center.
This image will be drawn over our screen after everything else has been draw (except for some text which we will also be adding in this
installment). Here is the game screen I put together (I know it looks like two little images, but it is actually one with a big transparent space in the
middle):
Save this to your Content\Textures folder and add it to your project.
You can see on the image above we had positions for the number of ships the player has left, the number of superbombs (which we haven’t
implemented yet, but will do in the PowerUps segment) and locations for the current level and the player’s score.
We’ll add a few things to our declarations to support the code we will be adding:
Texture2D t2dGameScreen;
SpriteFont spriteFont;
Vector2 vLivesTextLoc = new Vector2(100, 677);
Vector2 vWaveTextLoc = new Vector2(1065, 663);
Vector2 vScoreTextLoc = new Vector2(1065, 695);
Vector2 vStartTextLoc = new Vector2(30, 350);
Vector2 vGameOverTextLoc = new Vector2(570, 330);
t2dGameScreen will, of course, hold the image above.
spriteFont will contain the Pericles.SpriteFont file we created way, way back in part 2 but haven’t yet used.
The Vector2 objects will all hold locations of the text we will be drawing to the screen. The SpriteBatch.DrawString() method takes a vector for the
location of the text to be draw, so instead of creating a new Vector2 object every time we want to draw text we will maintain them throughout the
game. (Otherwise we would be needlessly creating 5 Vector2 object during every draw loop. It could be argued that many of our variables (like loop
control integers, etc) would be more efficient if stored constantly instead of instanciated during the loops, but that will get messy if we do it for too
many things).
The other nice thing about having them all in our declarations area is that we can change them easily to reposition our text. I’ve figured out where
they look good on the game screen above (and the title screen in the case of vStartTextLoc) but if you have created your own screens you will want
to play with the values to get them in the right spots.
XNA Resources - XNA Tutorials, GSE Tutorials, XNA News... http://www.xnaresources.com/pages.asp?pageid=42
1 de 3 23/5/09 11:13

Next we need to update a few of our routines to actually keep score and track the wave we are on, etc. Lets start off with our DestroyEnemy
method. Add the following line to the bottom of the method:
iPlayerScore += 10;
So each enemy the player kills will be worth 10 points.
Next, we need to update our StartNewGame() method to look like this:
protected void StartNewGame()
{
iLivesLeft = 3;
player.ScrollRate = 0;
iGameStarted = 1;
iGameWave = 0;
iPlayerScore = 0;
StartNewWave();
}
We’ve added a reset for the iGameWave and iPlayerScore variables as well as iLivesLeft and player.ScrollRate.
Finally, we need to update our GenerateEnemies method by adding:
iGameWave++;
This can go pretty much anywhere in the method, but I have it right before iActiveEnemies is set to 0.
We have two new pieces of content we need to add in LoadContent():
t2dGameScreen = Content.Load<Texture2D>(@"Textures\GameScreen");
spriteFont = Content.Load<SpriteFont>(@"Fonts\Pericles");
Finally, it is time to work on our Draw() method. Fortunately we don’t need anything too extensive here, so I won’t be pasting the entire method
into the web page again. Lets handle drawing on the Title Screen first, where we are going to flash the text “Press START or SPACE to Begin”. In
your Draw() code, scroll all the way to the bottom and add these lines in the Title Screen Mode region, right after the
spriteBatch.Draw(t2dTitleScreen…) call:
if (gameTime.TotalGameTime.Milliseconds % 1000 < 500)
{
spriteBatch.DrawString(spriteFont, "Press START or SPACE to Begin",
vStartTextLoc, Color.Gold);
}
Here we are checking the absolute game time, or how many milliseconds have passed since we started the program. We don’t care about elapsed
time here because then we would have to set up a timer and a comparison variable like we do with our timing code, and we don’t really need that
complexity here. We use the Modulo operator again to get the remainder of dividing the milliseconds value by 1000. If the remainder is less than
500, we draw the text. Otherwise we don’t. Since there are 1000 milliseconds in 1 second, what we are really doing is switching the drawing code
on and off every half second.
You can see here how easy drawing text is with XNA 2.0 and beyond. In the past, we had to write a function draw out each character with
SpriteBatch.Draw() calls one at a time, stepping through the string until everything had been drawn. All that is gone now thanks to the DrawString()
method.
Just above this section of code is the end of the Game Mode draw region. The last thing we do in that code is draw the player explosion. Right after
that, just before the end of the region, lets add the following:
// Draw the Game Screen overlay
spriteBatch.Draw(t2dGameScreen, new Rectangle(0, 0, 1280, 720), Color.White);
spriteBatch.DrawString(spriteFont, iLivesLeft.ToString(),
vLivesTextLoc, Color.White);
spriteBatch.DrawString(spriteFont, iGameWave.ToString(),
vWaveTextLoc, Color.White);
spriteBatch.DrawString(spriteFont, iPlayerScore.ToString(),
vScoreTextLoc, Color.White);
// If the player is dead and this is their last life, display
// "GAME OVER" while waiting for the fPlayerRespawnCount to end.
if (iProcessEvents == 0 && iLivesLeft == 1)
spriteBatch.DrawString(spriteFont, "G A M E O V E R",
vGameOverTextLoc, Color.Gold);
Here, as you can see, we draw the game screen after all of our actual game drawing is done. This makes sure our game screen “covers up”
everything it is supposed to. That is also why we do all of our text drawing after that, so it appears on top of the game screen.
The rest of the code is just a few calls to spriteBatch.DrawString(), using our sprite font and the various variables we want to output, and the
vectors we established earlier for the position of the text.
Finally, you can see that we check the value of iProcessEvents and iLivesLeft to see if we should display “GAME OVER” to the screen. The way our
control variables work, iProcessEvents is set to false whenever the player runs into an enemy ship. It stays that way for 4 seconds while the player
XNA Resources - XNA Tutorials, GSE Tutorials, XNA News... http://www.xnaresources.com/pages.asp?pageid=42
2 de 3 23/5/09 11:13

explodes. After that 4 seconds is over, iLivesLeft is decremented and, if it reaches zero, the game returns to Title Screen mode.
So, if you have just died (iProcessEvents==0) and you are on your last life (iLivesLeft==1) then we know that the game is going to exit to the Title
Screen in 4 seconds, so draw “GAME OVER”.
Fire up your game, and you should have an interface with a score, level number, and lives left!
In the next installment we will add Power Ups to our game. These are things that will spawn occasionally that will make improvements to the
player’s star fighter.
Site Contents Copyright © 2006 Full Revolution, Inc. All rights reserved.
This site is in no way affiliated with Microsoft or any other company.
All logos and trademarks are copyright their respective companies.
RSS FEED
XNA Resources - XNA Tutorials, GSE Tutorials, XNA News... http://www.xnaresources.com/pages.asp?pageid=42
3 de 3 23/5/09 11:13

Star Defense XNA Game Tutorial Series – Part Eleven - Power Ups
We have come a LONG way in developing our game, and the last planned part of the series is to add some Power Ups to our game to alter the
game play a bit. One of the reasons we have split a lot of simple things into their own functions is so we can come back and expand on them with
this installment of the tutorial.
Lets start out with our Power Up graphic. This will be an animated spinning barrel:
Here we have a 23 frame animation that, when played, will display a slowly tumbling barrel on our screen. Save the image above to your
Content/Textures folder and add it to your project.
We are going to add a new feature to our AnimatedSprite class. Since we are going to have multiple types of Power Ups in our game, we want to be
able to differentiate them by color. We can use the last parameter of the SpriteBatch.Draw() method (which we have always left as Color.White) to
colorize our sprite any way we want. In order to do that, we need to add a declaration to our AnimatedSprite class:
Color cTinting = Color.White;
We will default the tinting to Color.White so we don’t break anything we already have. Next, lets add a property so we can access the tint value:
public Color Tint
{
get { return cTinting; }
set { cTinting = value; }
}
Finally, in the Draw() method, change the last parameter of the call to spriteBatch.Draw() from Color.White to cTinting. The whole call should look
like this:
spriteBatch.Draw(
t2dTexture,
new Rectangle(
iScreenX + XOffset,
iScreenY + YOffset,
iFrameWidth,
iFrameHeight),
GetSourceRect(),
cTinting);
This won’t impact your existing game, since our tint defaults to white.
Lets add a new class called PowerUp to our project. As always, we need to add our Using statements:
using Microsoft.Xna.Framework;
using Microsoft.Xna.Framework.Graphics;
We will also need a couple of declarations for the PowerUp class:
static int iMapWidth = 1920;
static Color[] colorPowerUpColors = new Color[5]
{ Color.White, Color.Aquamarine, Color.Maroon,
Color.Yellow, Color.Orange };
AnimatedSprite asSprite;
int iX = 0;
int iY = -100;
bool bActive = false;
int iBackgroundOffset = 0;
int iPowerUpType = 0;
Since Power Ups will exist in world coordinates, we need the same information to track them as we did for our Enemy and Explosion classes. In
XNA Resources - XNA Tutorials, GSE Tutorials, XNA News... http://www.xnaresources.com/pages.asp?pageid=43
1 de 8 23/5/09 11:14

addition to our normal variables, we also include iPowerUpType, which will have one of 5 values:
0 : Grants the player an extra ship
1 : Grants the player an extra Super Bomb
2 : Improves the handling of the player’s star fighter
3 : Give ths player “dual cannons” on their star fighter
4 : increases the fire rate of the player’s weapons
All three of the enhancement powerups can be active at the same time, and powerups 2 and 4 can “stack” multiple times. For example, there are 3
different fire rates, so picking up a #4 powerup increases your fire rate to the second level, and picking up another #4 increases it to the fastest
rate.
The iPowerUpType is used as an index into colorPowerUpColors to determine what tint to draw the powerup sprite with. This allows the powerups to
be distinguished on the screen.
The next thing our PowerUp class will need is some public properties:
public int X
{
get { return iX; }
set { iX = value; }
}
public int Y
{
get { return iY; }
set { iY = value; }
}
public bool IsActive
{
get { return bActive; }
set { bActive = value; }
}
public int Offset
{
get { return iBackgroundOffset; }
set { iBackgroundOffset = value; }
}
public int PowerUpType
{
get { return iPowerUpType; }
set { iPowerUpType = value;
asSprite.Tint = colorPowerUpColors[iPowerUpType];
}
}
public Rectangle BoundingBox
{
get
{
int X = iX - iBackgroundOffset;
if (X > iMapWidth)
X -= iMapWidth;
if (X < 0)
X += iMapWidth;
return new Rectangle(X, iY, 32, 32);
}
}
Most of these are our standard stuff, with the exception of PowerUpType. Whenever this property is set, we also set the Tint of our AnimatedSprite
to the appropriate color for this power up.
Our constructor is very simple, just passing the texture and size information to our AnimatedSprite class:
public PowerUp(Texture2D texture)
{
asSprite = new AnimatedSprite(texture, 0, 0, 32, 32, 23);
}
We don’t actually need to make this a method, as we could always use IsActive to set a power up active, but if we ever want to do other things
when activating a power up it is nice to have it as a separate method, so lets add a simple Activate() method:
public void Activate()
{
bActive = true;
}
Just like our Enemies and Explosions, we need a helper function to translate world coordinates to screen coordinates:
XNA Resources - XNA Tutorials, GSE Tutorials, XNA News... http://www.xnaresources.com/pages.asp?pageid=43
2 de 8 23/5/09 11:14
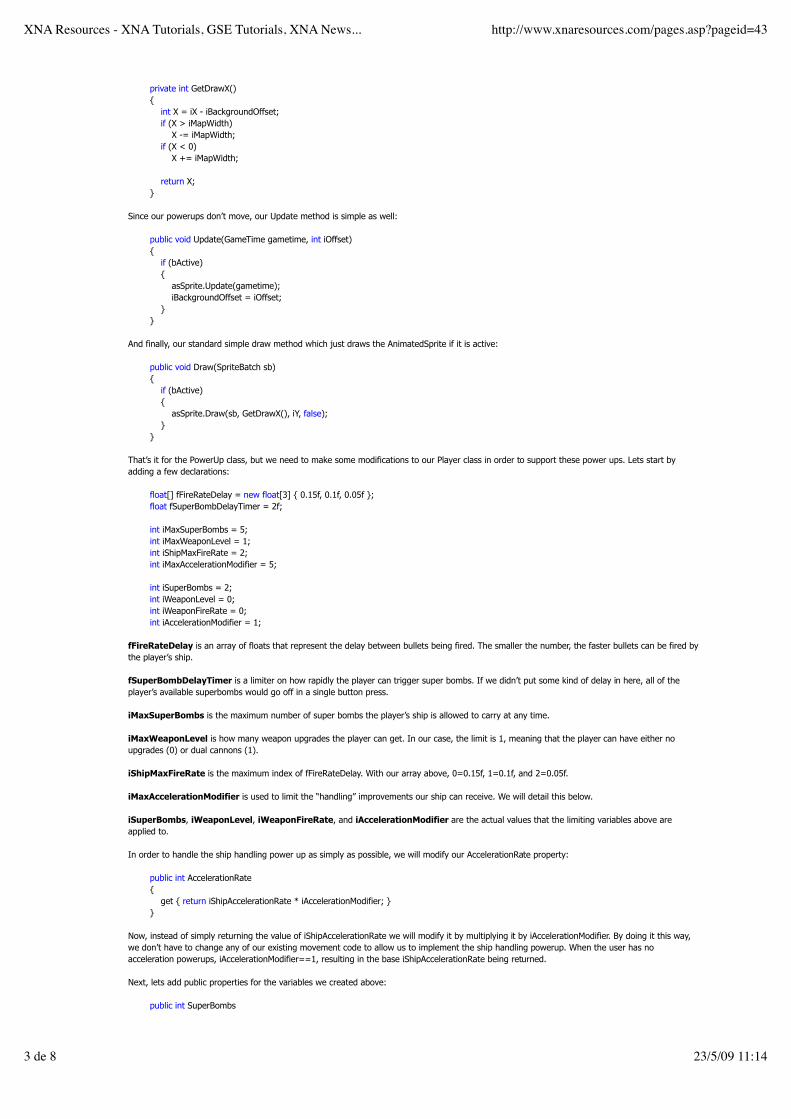
private int GetDrawX()
{
int X = iX - iBackgroundOffset;
if (X > iMapWidth)
X -= iMapWidth;
if (X < 0)
X += iMapWidth;
return X;
}
Since our powerups don’t move, our Update method is simple as well:
public void Update(GameTime gametime, int iOffset)
{
if (bActive)
{
asSprite.Update(gametime);
iBackgroundOffset = iOffset;
}
}
And finally, our standard simple draw method which just draws the AnimatedSprite if it is active:
public void Draw(SpriteBatch sb)
{
if (bActive)
{
asSprite.Draw(sb, GetDrawX(), iY, false);
}
}
That’s it for the PowerUp class, but we need to make some modifications to our Player class in order to support these power ups. Lets start by
adding a few declarations:
float[] fFireRateDelay = new float[3] { 0.15f, 0.1f, 0.05f };
float fSuperBombDelayTimer = 2f;
int iMaxSuperBombs = 5;
int iMaxWeaponLevel = 1;
int iShipMaxFireRate = 2;
int iMaxAccelerationModifier = 5;
int iSuperBombs = 2;
int iWeaponLevel = 0;
int iWeaponFireRate = 0;
int iAccelerationModifier = 1;
fFireRateDelay is an array of floats that represent the delay between bullets being fired. The smaller the number, the faster bullets can be fired by
the player’s ship.
fSuperBombDelayTimer is a limiter on how rapidly the player can trigger super bombs. If we didn’t put some kind of delay in here, all of the
player’s available superbombs would go off in a single button press.
iMaxSuperBombs is the maximum number of super bombs the player’s ship is allowed to carry at any time.
iMaxWeaponLevel is how many weapon upgrades the player can get. In our case, the limit is 1, meaning that the player can have either no
upgrades (0) or dual cannons (1).
iShipMaxFireRate is the maximum index of fFireRateDelay. With our array above, 0=0.15f, 1=0.1f, and 2=0.05f.
iMaxAccelerationModifier is used to limit the “handling” improvements our ship can receive. We will detail this below.
iSuperBombs, iWeaponLevel, iWeaponFireRate, and iAccelerationModifier are the actual values that the limiting variables above are
applied to.
In order to handle the ship handling power up as simply as possible, we will modify our AccelerationRate property:
public int AccelerationRate
{
get { return iShipAccelerationRate * iAccelerationModifier; }
}
Now, instead of simply returning the value of iShipAccelerationRate we will modify it by multiplying it by iAccelerationModifier. By doing it this way,
we don’t have to change any of our existing movement code to allow us to implement the ship handling powerup. When the user has no
acceleration powerups, iAccelerationModifier==1, resulting in the base iShipAccelerationRate being returned.
Next, lets add public properties for the variables we created above:
public int SuperBombs
XNA Resources - XNA Tutorials, GSE Tutorials, XNA News... http://www.xnaresources.com/pages.asp?pageid=43
3 de 8 23/5/09 11:14
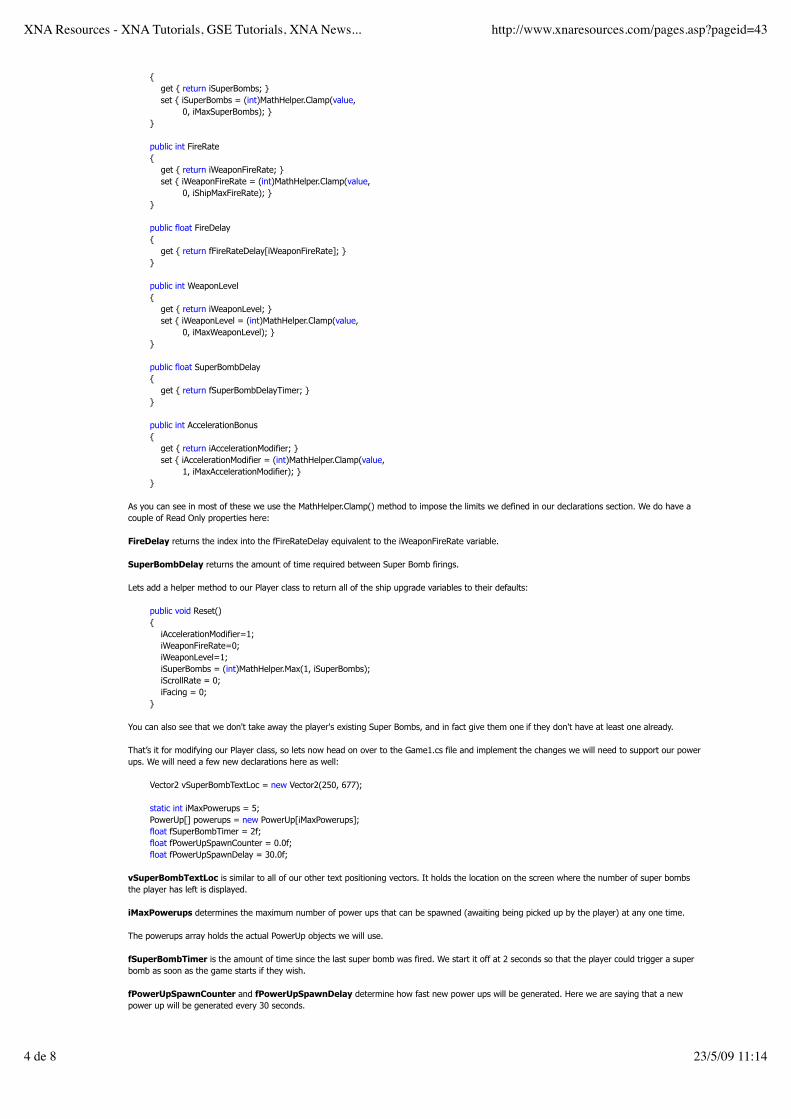
{
get { return iSuperBombs; }
set { iSuperBombs = (int)MathHelper.Clamp(value,
0, iMaxSuperBombs); }
}
public int FireRate
{
get { return iWeaponFireRate; }
set { iWeaponFireRate = (int)MathHelper.Clamp(value,
0, iShipMaxFireRate); }
}
public float FireDelay
{
get { return fFireRateDelay[iWeaponFireRate]; }
}
public int WeaponLevel
{
get { return iWeaponLevel; }
set { iWeaponLevel = (int)MathHelper.Clamp(value,
0, iMaxWeaponLevel); }
}
public float SuperBombDelay
{
get { return fSuperBombDelayTimer; }
}
public int AccelerationBonus
{
get { return iAccelerationModifier; }
set { iAccelerationModifier = (int)MathHelper.Clamp(value,
1, iMaxAccelerationModifier); }
}
As you can see in most of these we use the MathHelper.Clamp() method to impose the limits we defined in our declarations section. We do have a
couple of Read Only properties here:
FireDelay returns the index into the fFireRateDelay equivalent to the iWeaponFireRate variable.
SuperBombDelay returns the amount of time required between Super Bomb firings.
Lets add a helper method to our Player class to return all of the ship upgrade variables to their defaults:
public void Reset()
{
iAccelerationModifier=1;
iWeaponFireRate=0;
iWeaponLevel=1;
iSuperBombs = (int)MathHelper.Max(1, iSuperBombs);
iScrollRate = 0;
iFacing = 0;
}
You can also see that we don't take away the player's existing Super Bombs, and in fact give them one if they don't have at least one already.
That’s it for modifying our Player class, so lets now head on over to the Game1.cs file and implement the changes we will need to support our power
ups. We will need a few new declarations here as well:
Vector2 vSuperBombTextLoc = new Vector2(250, 677);
static int iMaxPowerups = 5;
PowerUp[] powerups = new PowerUp[iMaxPowerups];
float fSuperBombTimer = 2f;
float fPowerUpSpawnCounter = 0.0f;
float fPowerUpSpawnDelay = 30.0f;
vSuperBombTextLoc is similar to all of our other text positioning vectors. It holds the location on the screen where the number of super bombs
the player has left is displayed.
iMaxPowerups determines the maximum number of power ups that can be spawned (awaiting being picked up by the player) at any one time.
The powerups array holds the actual PowerUp objects we will use.
fSuperBombTimer is the amount of time since the last super bomb was fired. We start it off at 2 seconds so that the player could trigger a super
bomb as soon as the game starts if they wish.
fPowerUpSpawnCounter and fPowerUpSpawnDelay determine how fast new power ups will be generated. Here we are saying that a new
power up will be generated every 30 seconds.
XNA Resources - XNA Tutorials, GSE Tutorials, XNA News... http://www.xnaresources.com/pages.asp?pageid=43
4 de 8 23/5/09 11:14
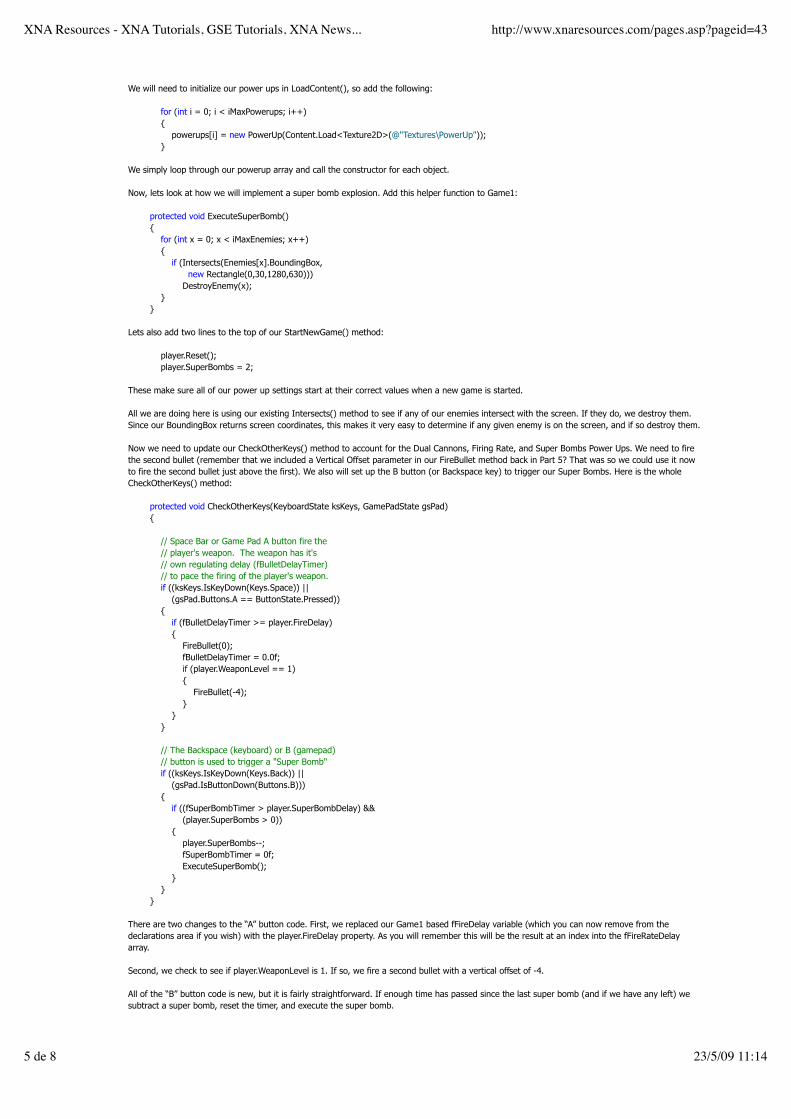
We will need to initialize our power ups in LoadContent(), so add the following:
for (int i = 0; i < iMaxPowerups; i++)
{
powerups[i] = new PowerUp(Content.Load<Texture2D>(@"Textures\PowerUp"));
}
We simply loop through our powerup array and call the constructor for each object.
Now, lets look at how we will implement a super bomb explosion. Add this helper function to Game1:
protected void ExecuteSuperBomb()
{
for (int x = 0; x < iMaxEnemies; x++)
{
if (Intersects(Enemies[x].BoundingBox,
new Rectangle(0,30,1280,630)))
DestroyEnemy(x);
}
}
Lets also add two lines to the top of our StartNewGame() method:
player.Reset();
player.SuperBombs = 2;
These make sure all of our power up settings start at their correct values when a new game is started.
All we are doing here is using our existing Intersects() method to see if any of our enemies intersect with the screen. If they do, we destroy them.
Since our BoundingBox returns screen coordinates, this makes it very easy to determine if any given enemy is on the screen, and if so destroy them.
Now we need to update our CheckOtherKeys() method to account for the Dual Cannons, Firing Rate, and Super Bombs Power Ups. We need to fire
the second bullet (remember that we included a Vertical Offset parameter in our FireBullet method back in Part 5? That was so we could use it now
to fire the second bullet just above the first). We also will set up the B button (or Backspace key) to trigger our Super Bombs. Here is the whole
CheckOtherKeys() method:
protected void CheckOtherKeys(KeyboardState ksKeys, GamePadState gsPad)
{
// Space Bar or Game Pad A button fire the
// player's weapon. The weapon has it's
// own regulating delay (fBulletDelayTimer)
// to pace the firing of the player's weapon.
if ((ksKeys.IsKeyDown(Keys.Space)) ||
(gsPad.Buttons.A == ButtonState.Pressed))
{
if (fBulletDelayTimer >= player.FireDelay)
{
FireBullet(0);
fBulletDelayTimer = 0.0f;
if (player.WeaponLevel == 1)
{
FireBullet(-4);
}
}
}
// The Backspace (keyboard) or B (gamepad)
// button is used to trigger a "Super Bomb"
if ((ksKeys.IsKeyDown(Keys.Back)) ||
(gsPad.IsButtonDown(Buttons.B)))
{
if ((fSuperBombTimer > player.SuperBombDelay) &&
(player.SuperBombs > 0))
{
player.SuperBombs--;
fSuperBombTimer = 0f;
ExecuteSuperBomb();
}
}
}
There are two changes to the “A” button code. First, we replaced our Game1 based fFireDelay variable (which you can now remove from the
declarations area if you wish) with the player.FireDelay property. As you will remember this will be the result at an index into the fFireRateDelay
array.
Second, we check to see if player.WeaponLevel is 1. If so, we fire a second bullet with a vertical offset of -4.
All of the “B” button code is new, but it is fairly straightforward. If enough time has passed since the last super bomb (and if we have any left) we
subtract a super bomb, reset the timer, and execute the super bomb.
XNA Resources - XNA Tutorials, GSE Tutorials, XNA News... http://www.xnaresources.com/pages.asp?pageid=43
5 de 8 23/5/09 11:14
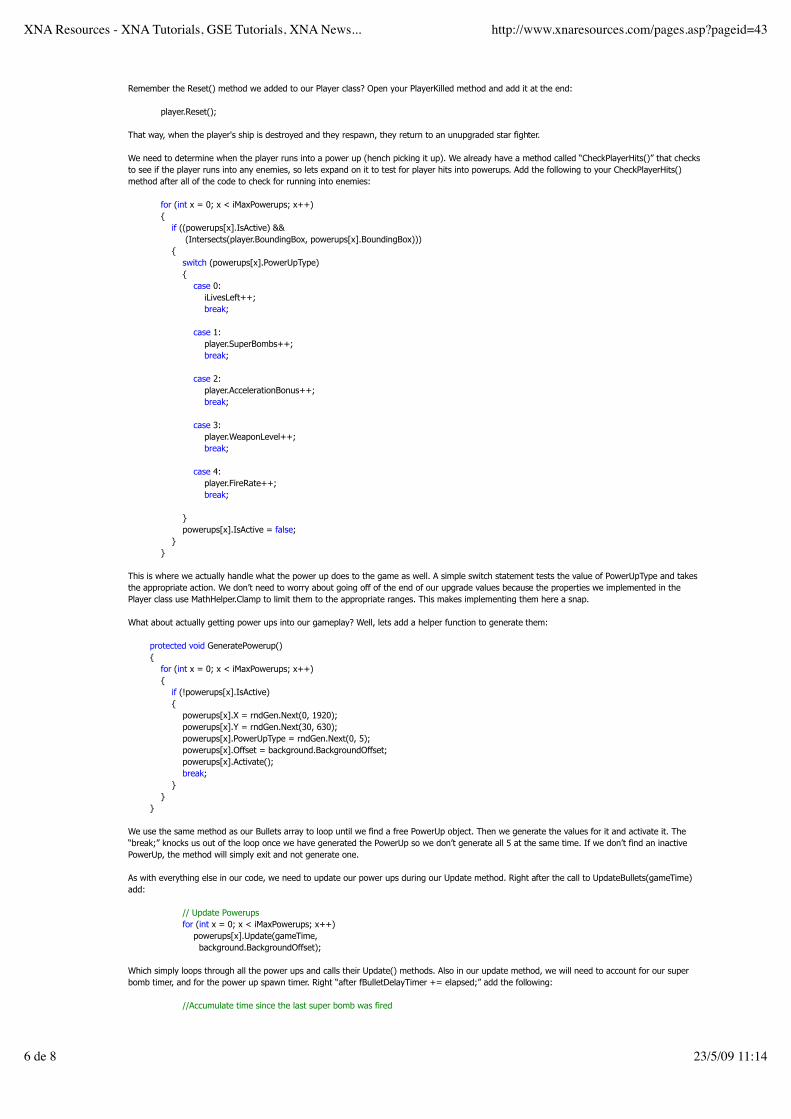
Remember the Reset() method we added to our Player class? Open your PlayerKilled method and add it at the end:
player.Reset();
That way, when the player's ship is destroyed and they respawn, they return to an unupgraded star fighter.
We need to determine when the player runs into a power up (hench picking it up). We already have a method called “CheckPlayerHits()” that checks
to see if the player runs into any enemies, so lets expand on it to test for player hits into powerups. Add the following to your CheckPlayerHits()
method after all of the code to check for running into enemies:
for (int x = 0; x < iMaxPowerups; x++)
{
if ((powerups[x].IsActive) &&
(Intersects(player.BoundingBox, powerups[x].BoundingBox)))
{
switch (powerups[x].PowerUpType)
{
case 0:
iLivesLeft++;
break;
case 1:
player.SuperBombs++;
break;
case 2:
player.AccelerationBonus++;
break;
case 3:
player.WeaponLevel++;
break;
case 4:
player.FireRate++;
break;
}
powerups[x].IsActive = false;
}
}
This is where we actually handle what the power up does to the game as well. A simple switch statement tests the value of PowerUpType and takes
the appropriate action. We don’t need to worry about going off of the end of our upgrade values because the properties we implemented in the
Player class use MathHelper.Clamp to limit them to the appropriate ranges. This makes implementing them here a snap.
What about actually getting power ups into our gameplay? Well, lets add a helper function to generate them:
protected void GeneratePowerup()
{
for (int x = 0; x < iMaxPowerups; x++)
{
if (!powerups[x].IsActive)
{
powerups[x].X = rndGen.Next(0, 1920);
powerups[x].Y = rndGen.Next(30, 630);
powerups[x].PowerUpType = rndGen.Next(0, 5);
powerups[x].Offset = background.BackgroundOffset;
powerups[x].Activate();
break;
}
}
}
We use the same method as our Bullets array to loop until we find a free PowerUp object. Then we generate the values for it and activate it. The
“break;” knocks us out of the loop once we have generated the PowerUp so we don’t generate all 5 at the same time. If we don’t find an inactive
PowerUp, the method will simply exit and not generate one.
As with everything else in our code, we need to update our power ups during our Update method. Right after the call to UpdateBullets(gameTime)
add:
// Update Powerups
for (int x = 0; x < iMaxPowerups; x++)
powerups[x].Update(gameTime,
background.BackgroundOffset);
Which simply loops through all the power ups and calls their Update() methods. Also in our update method, we will need to account for our super
bomb timer, and for the power up spawn timer. Right “after fBulletDelayTimer += elapsed;” add the following:
//Accumulate time since the last super bomb was fired
XNA Resources - XNA Tutorials, GSE Tutorials, XNA News... http://www.xnaresources.com/pages.asp?pageid=43
6 de 8 23/5/09 11:14

fSuperBombTimer += elapsed;
//Accumulate time since the last powerup was generated
fPowerUpSpawnCounter += elapsed;
if (fPowerUpSpawnCounter > fPowerUpSpawnDelay)
{
GeneratePowerup();
fPowerUpSpawnCounter = 0.0f;
}
And finally, we need to add them to our Draw() code. First, in the section where we write all of the rest of our text (lives, score, etc) add:
spriteBatch.DrawString(spriteFont, player.SuperBombs.ToString(),
vSuperBombTextLoc, Color.White);
Which will draw the number of super bombs the player has remaining.
Then, scroll up a little and find the section where we loop through and draw all of the enemies. Right after that, add:
for (int i = 0; i < iMaxPowerups; i++)
{
powerups[i].Draw(spriteBatch);
}
Which simply calles the draw method for all of our power ups.
This should all be old hat by now, simply updating our delay timers and, in the same of the power up spawner, generating one and resetting the
timer if the time has elapsed.
One last quick bug fix. Currently, when the player dies, all of their bullets remain active and may destroy enemies as soon as the player respawns
and everything starts moving again. Edit your StartNewWave() method and add the following at the end:>
for (int x = 0; x < iMaxBullets; x++)
RemoveBullet(x);
Run your game! Besides sound, you should have a fully functional space shooter game.
Here is the whole project as it exists at the end of Part 11:
See the next installment in the series for Sound information (I’m going to hold off on implementing sound until the XNA 3.0 final release because
handing audio is MUCH, MUCH improved in XNA 3.0.)
XNA Resources - XNA Tutorials, GSE Tutorials, XNA News... http://www.xnaresources.com/pages.asp?pageid=43
7 de 8 23/5/09 11:14
Star Defense XNA Game Tutorial Series – Part Twelve – AudioNote: I’m trying out a new way of prepping my tutorial pages, so this page may look a bit different than the previous installments.
Now that XNA 3.0 is live, we will finish up the Star Defense tutorial series by adding sound effects to our game. Prior to version 3.0, adding sound
was a bit more complicated than it is now. You had to much about with XACT and create sound banks and such. All of that is gone now, and the
Content Pipeline takes care of everything for us. Thanks Content Pipeline!
Under XNA 3.0, adding audio support is very simple. In fact, it was harder to locate sound effects to use in the tutorial that it is to add them to the
game code.
The sample sound effects I’m going to use are from this web site: http://www.grsites.com/archive/sounds/. As far as I can tell, they are all free
sound effects for non-commercial use. Of course, you will want to either purchase or produce your own sound effects for your game project if you
intend to sell it.
I have put together a small package of the five sounds we will be using. It can be downloaded from http://www.xnaresources.com/downloads
/StarDefense_Sounds.zip and contains sounds from the Battle and Scifi categories of the site listed above.
In your Visual Studio project, right click on the Content folder and click “New Folder…” and create a folder called “Sounds”. Extract the .WAV files
from the zip file above to the Sounds folder and add them to your project just like you would add a texture. The Content Pipeline will detect the
.WAV format and set the appropriate content importer automatically.
As for the code, we will be working exclusively in the Game1.cs file. We need to add a couple of declarations in our declarations area for the sound
effects we will be playing:
static int iMaxExplosionSounds = 2;
private static SoundEffect[] PlayerShots = new SoundEffect[2];
private static SoundEffect[] ExplosionSounds = new SoundEffect[iMaxExplosionSounds];
private static SoundEffect PowerUpPickupSound;
Here we are simply declaring a few objects of type SoundEffect (there is also a “Song” object type for playing longer background song type files).
We are actually doing a couple of things here, so:
! The PlayerShots sound effect array holds two possible SoundEffect objects. Recall that we can upgrade our weapons to dual cannons by
picking up a powerup object. So we will use two different sounds to represent the different weapon levels.
! The ExplosionSounds array has two (slightly) different explosion sound effects in it. We will randomly play one whenever we need an
explosion sound to happen. If you have a larger variety of explosion sounds available, simply increase iMaxExplosionSounds and load them
in your LoadContent and you can generate a little more sound effect variety.
! The PowerUpPickupSound is played whenever the player … you guessed it… picks up a Power Up.
On to LoadContent, where we just need to load these resources just like we do our textures. Add the following to your LoadContent method:
PlayerShots[0] = Content.Load<SoundEffect>(@"Sounds\Scifi002");
PlayerShots[1] = Content.Load<SoundEffect>(@"Sounds\Scifi050");
ExplosionSounds[0] = Content.Load<SoundEffect>(@"Sounds\battle003");
ExplosionSounds[1] = Content.Load<SoundEffect>(@"Sounds\battle004");
PowerUpPickupSound = Content.Load<SoundEffect>(@"Sounds\Scifi041");
Again, nothing new here. This is identical to the way we load textures except for the Type specifier in Content.Load.
So now what we have our sounds, how do we play them? Very, very simply. Scroll down to your FireBullet method and add the following to the
end:
if (iVerticalOffset==0)
PlayerShots[player.WeaponLevel].Play(1.0f, 0f, 0f, false);
The first line (if (iVerticalOffset==0)) is simply there to prevent us from playing two sound effects when the player has dual cannons (since we use
the FireBullet method twice in that case, with the second one having a -4 pixel vertical offset). What we are really interested in here is the second
line. We simply call the Play() method of the SoundEffect object, specifying the following:
! Volume – A value from 0.0f to 1.0f, indicating how loud (relative to the volume of the actual file) the sound should be played. 0.0f would
be silent (and fairly pointless), while 1.0f is “full volume”.
! Pitch – This float will shift the frequency of the sound up or down. 0f is the “normal” pitch for the sound file.
! Pan – If you are interested in simulating playing the sound in 3d-ish space, this float shifts the sound between the left speaker (-1.0f) and
the right speaker (1.0f). This isn’t really 3d sound, but more like turning the balance knob on your car radio. The 0f value is “centered”.
! Loop – If true, the sound will loop (forever) after it is played. If false, it will play once and stop.
XNA Resources - XNA Tutorials, GSE Tutorials, XNA News... http://www.xnaresources.com/pages.asp?pageid=44
1 de 2 23/5/09 11:14

Executing the Play method creates an instance of the sound playing, so it can be executed multiple times and will play multiple times
simultaneously. Although we are not using it here, the Play() method does return something called a SoundEffectInstance, which gives you a
handle to the instance that is playing so you could do things like stop a “looping” sound after it has been started.
For some good information on more details of this stuff, check out Chase’s Techno Rants and Raves blog entry at http://geekswithblogs.net
/bitburner/archive/2008/06/22/123061.aspx
Lets add the last bits of code we need for the rest of our sound effects. In the DestroyEnemy method, add:
ExplosionSounds[rndGen.Next(0, iMaxExplosionSounds)].Play(1.0f, 0f, 0f, false);
Here you can see we are picking a random explosion sound to play, at full volume, normal pitch and pan, and non-looping. Next, we need to add
two things to the CheckPlayerHits method. Right after fPlayerRespawnCount = 0.0f; add the following line:
ExplosionSounds[0].Play(1.0f, 0f, 0f, false);
And in the PowerUps section of the method, right after powerups[x].IsActive = false; add:
PowerUpPickupSound.Play(1.0f, 0f, 0f, false);
And that’s all there is to it. Run your game and you should have sound for player cannons, enemy/player ship explosions, and picking up powerups.
Of course, you could add more sound effect for just about anything you want. A superbomb will make a super explosion already with all of the
DestroyEnemy() calls firing off explosions, but you may want to add a sound effect specifically for the bomb. Or perhaps a sound to play when the
player is “thrusting” the ship.
I’ve got a final wrap-up .ZIP file of the project for download that contains everything in all 12 parts:
Site Contents Copyright © 2006 Full Revolution, Inc. All rights reserved.
This site is in no way affiliated with Microsoft or any other company.
All logos and trademarks are copyright their respective companies.
RSS FEED
XNA Resources - XNA Tutorials, GSE Tutorials, XNA News... http://www.xnaresources.com/pages.asp?pageid=44
2 de 2 23/5/09 11:14


