Standard Combat Series: The Mighty Endeavor, Rules Layout2_jul11_2015.pdf · would actually be Dx4...
16
The Gamers, Inc. Page 1 Multi-Man Publishing, LLC 403 Headquarters Drive, Suite 7, Millersville MD 21108 © 2014 All Rights Reserved. Standard Combat Series: The Mighty Endeavor, revised ©2014. Multi-Man Publishing, LLC. All Rights Reserved. v1.01 Game Design: Tim Armstrong and Steve Newhouse 1st Stage Game Development : Steve Newhouse Series Design & 2nd Stage Game Development: Dean Essig Playtesting: Tim Armstrong, Jerry Axel, Curtis Baer, John Best, Joseph Vanden Borre, Dave Cheever, Houndog Cross, Shelly Crawford, Francis Czawlytko Gordon Dainty, Jim Daniels, Ric Van Dyke, Dean Essig, Joe Essig, Dirk Heinz, Ken Hutchens, Steve Janesen, Roland LeBlanc, Mike Lynn, Tom Mix, Paul Murphy, Steve Newhouse, Tom Nord, Jeff Offringa, Alberto Rodan, Ernesto Sassot, Brian Scoggins, Jim Stravers, Joe Woolshelger, Reg Young Rules Editing: Dave Demko Introduction The Mighty Endeavor covers the Western Allied invasions of France in 1944, the crossing of the Rhine River in early 1945 and the final push into Germany. Players represent the supreme field commanders on each side responsible for the Second Front in northwestern Europe at the end of World War II. 1.0 General Rules 1.1 Sequence of Play The Allied Player turn is always first. Allied Player Turn • Reinforcement & Replacement Phase • Air Point Phase Remove old Air Zone Domination markers Roll to determine available Air Points Expend Air Points for any Air Zones the player wants to dominate and place markers in those zones • Invasion Placement Phase • Attack HQ Announcement Phase • Air Drop Phase • Movement Phase • Combat Phase • Exploitation Phase • Supply Phase • Shipping Phase • Attack HQ Unflipping Phase German Player Turn • Reinforcement & Replacement Phase • Movement Phase • Combat Phase • Exploitation Phase • Supply Phase 1.2 Abbreviations Abn Airborne ABTF Airborne Task Force Alg Algerian Alp Alpine Arm Armored Bde Brigade Can Canadian Clw Clauswitz Col Colonial CW Commonwealth Div Division EZOC Enemy Zone of Control FF Free French FJ Fallschirmjäger Gds Guards HQ Headquarters Inf Infantry LW Luftwaffe MA Movement Allowance Mor Moroccan Mtn Mountain MP Movement Point OOS Out of Supply Pol Polish PG Panzergrenadier Pz Panzer Res Reserve SS Schutzstaffel Trng Training UK United Kingdom US United States VP Victory Point ZOC Zone of Control 1.3 Glossary Attack HQ: an HQ currently flipped to show its attack side Real Port: a port printed on the map Beach Port: a port created by a Beach Port marker
Transcript of Standard Combat Series: The Mighty Endeavor, Rules Layout2_jul11_2015.pdf · would actually be Dx4...

The Gamers, Inc.
Page 1Multi-Man Publishing, LLC 403 Headquarters Drive, Suite 7, Millersville MD 21108© 2014 All Rights Reserved.
Standard Combat Series:The Mighty Endeavor, revised
©2014. Multi-Man Publishing, LLC. All Rights Reserved. v1.01
Game Design: Tim Armstrong and Steve Newhouse1st Stage Game Development: Steve Newhouse Series Design & 2nd Stage Game Development: Dean Essig Playtesting: Tim Armstrong, Jerry Axel, Curtis Baer, John Best, Joseph Vanden Borre, Dave Cheever, Houndog Cross, Shelly Crawford, Francis Czawlytko Gordon Dainty, Jim Daniels, Ric Van Dyke, Dean Essig, Joe Essig, Dirk Heinz, Ken Hutchens, Steve Janesen, Roland LeBlanc, Mike Lynn, Tom Mix, Paul Murphy, Steve Newhouse, Tom Nord, Jeff Offringa, Alberto Rodan, Ernesto Sassot, Brian Scoggins, Jim Stravers, Joe Woolshelger, Reg YoungRules Editing: Dave Demko
IntroductionThe Mighty Endeavor covers the
Western Allied invasions of France in 1944, the crossing of the Rhine River in early 1945 and the final push into Germany. Players represent the supreme field commanders on each side responsible for the Second Front in northwestern Europe at the end of World War II.
1.0 General Rules
1.1 Sequence of Play The Allied Player turn is always first.
Allied Player Turn• Reinforcement & Replacement Phase• Air Point Phase Remove old Air Zone Domination markers Roll to determine available Air Points Expend Air Points for any Air Zones the player wants to dominate and place markers in those zones• Invasion Placement Phase• Attack HQ Announcement Phase• Air Drop Phase• Movement Phase• Combat Phase• Exploitation Phase• Supply Phase• Shipping Phase• Attack HQ Unflipping Phase
German Player Turn• Reinforcement & Replacement Phase• Movement Phase• Combat Phase• Exploitation Phase• Supply Phase
1.2 Abbreviations Abn AirborneABTF Airborne Task ForceAlg AlgerianAlp AlpineArm ArmoredBde BrigadeCan CanadianClw ClauswitzCol ColonialCW CommonwealthDiv DivisionEZOC Enemy Zone of ControlFF Free French
FJ FallschirmjägerGds GuardsHQ HeadquartersInf InfantryLW LuftwaffeMA Movement AllowanceMor MoroccanMtn MountainMP Movement PointOOS Out of SupplyPol PolishPG PanzergrenadierPz PanzerRes Reserve
SS SchutzstaffelTrng TrainingUK United KingdomUS United StatesVP Victory PointZOC Zone of Control
1.3 GlossaryAttack HQ: an HQ currently flipped to show its attack sideReal Port: a port printed on the mapBeach Port: a port created by a Beach Port marker
The Mighty Endeavor, revised, SCS #10
Page 2 Multi-Man Publishing, LLC 403 Headquarters Drive, Suite 7, Millersville MD 21108© 2014 All Rights Reserved.
1.4 ScaleEach turn represents ten days in the
Summer and half a month during the rest of the year. Each hex is about 15 miles across and units generally represent divisions, though the game contains a handful of smaller units.
1.5 Multiple Terrain Types Some hexes have more than one terrain type within them. In those cases, use only one.
1) For movement, use the type with the highest MP cost (and remember that roads negate other terrain features for units using them).
2) For combat, use the type which most benefits the defender.
Exception: A Fort counts in addition to any other terrain in the hex. For example, hex 18.28 has Rough, Forest and a Fort. By rule 2 above, only one of the two, Forest or Rough, applies so the defender is Dx2. Both terrain types give the same effect; if they differed, the terrain best for the defender would apply. The Fort is in addition to this multiplier, so the defender, if a German unit, would actually be Dx4 in this hex.
1.6 Forts and RetreatsGerman defenders in Fort hexes are x2
and can ignore retreat results. The defender can choose to accept the retreat result (in which case the whole result applies) or ignore it entirely.
Forts have no effect on Allied units that happen to occupy them.
1.7 Sea LinesSea Lines are hexsides that do not allow
movement or combat except where a road or bridge crosses them.
1.8 BridgesImplied bridges exist where roads cross
rivers or Sea Lines, but those are not the “bridge” features affected by this rule. “Bridges” here means only those hexsides with the literal bridge symbol on them.
In all cases, actual bridge symbols allow the hexside to be crossed with a +1 MP cost.
1.9 Attacking across the Rhine and across Sea Lines
Attacks across the Rhine or Sea Lines are allowed only where roads or bridges cross them. Quality Wargames Since 1988
Multi-Man Publishing
M M PM M P
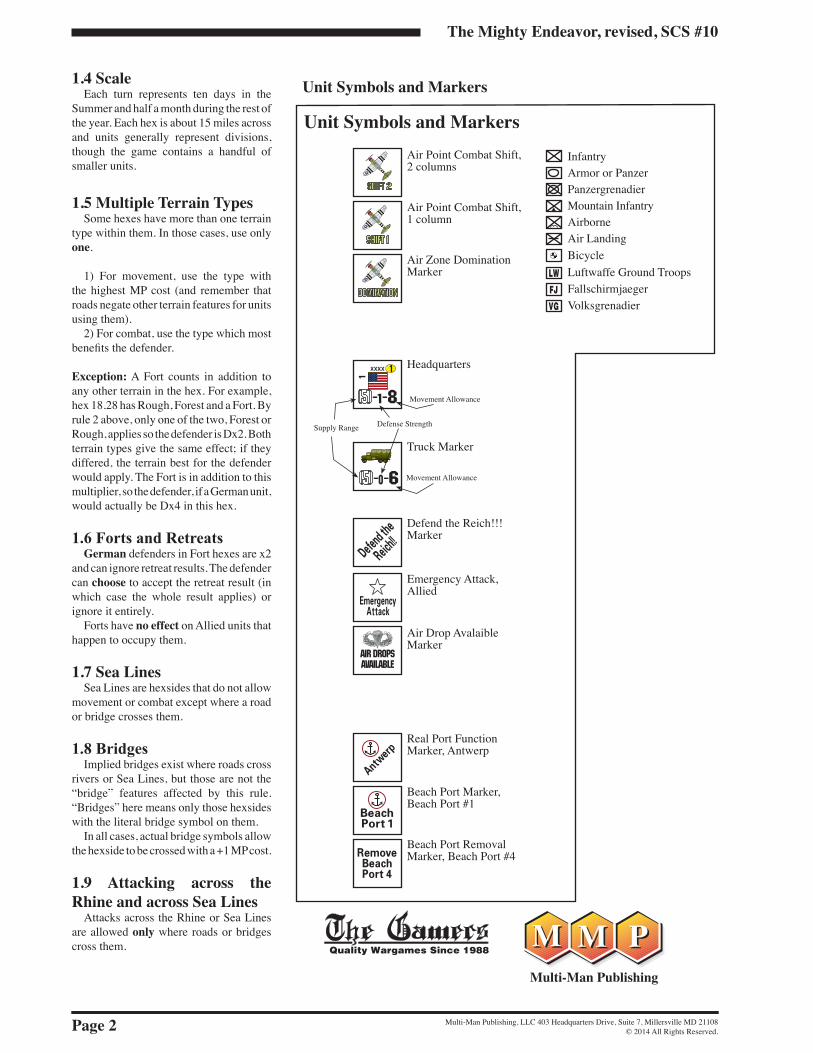
Unit Symbols and Markers
The Gamers, Inc.
Page 3Multi-Man Publishing, LLC 403 Headquarters Drive, Suite 7, Millersville MD 21108© 2014 All Rights Reserved.
1.10 Switzerland & ItalyNo unit can enter Switzerland or Italy.
Destroy any unit forced to do so.
1.11 CountersThe Allied player controls all US (Green),
UK (Brown), Canadian (Tan w/ White), French (Blue), and Polish (Red w/White) units as well as the one Joint US-CW unit (1 ABTF, Green/Tan).
The German player controls all German Army (Grey), Luftwaffe (Grey-Blue) and SS (Black) units.
1.12 Set Up CodesThe counters have either a letter or
number on their right side that indicates where the unit sets up or what turn it enters as a reinforcement.
On German counters, “S” means sets up at start, while a number indicates turn of entry.
On Allied counters, “E” means the unit starts in the England Box, “M” means the unit starts in the Med Box, and a number is the turn of entry.
In both cases, “at start” units have their letter in a yellow box to help avoid confusion with similar looking numbers (“S” and “5” for example).
Set up codes on the counter only apply to scenarios starting on Turn 1.
1.13 StackingUp to four units (of any type or size) can
stack in one hex. HQs, Trucks, and game markers do not count for stacking. HQs and Trucks do count as unit for shipping.
Stacking is enforced only at the end of the regular Movement Phase and at the moment of an Overrun combat. Temporary overstacking is allowed at other times. If a hex is attacked while overstacked, all units defend normally.
1.14 Exploit-Capable UnitsOnly those units with a yellow bar at
the bottom of their counters are Exploit-Capable. Out of Supply units are never Exploit-Capable.
1.15 ReinforcementsReinforcements and rebuilt units can
overstack when they enter play and are “in supply.” Nationality (for the Allies) does not affect the stacking of newly arrived reinforcements or rebuilds.
All reinforcements have an entry hex or location listed for them on their Reinforcement Chart.
If the required entry point is not available, the reinforcement arrives at either the England Box (for the Allies) or Entry Area A (for the Germans).
If more than one hex is listed as available for entry, the owning player can freely choose among the listed ones.
Likewise, in the case of Entry Area A, the German player can choose any of the marked hexes.
1.16 Replacements Replacements allow players to refit
reduced units or rebuild dead ones. Each player receives a number of
Replacement Points each turn, as listed on the Turn Record Track.
1.16a Units in EZOCs can absorb replacements. Dead units can be rebuilt in an EZOC.
1.16b Out of Supply units cannot absorb replacements.
1.16c It costs one Replacement Point to rebuild one step of any unit (including Airborne and Armor/Panzer).
1.16d A unit can absorb more than one Replacement Point in a single turn (i.e., rebuild two steps at once).
1.16e Replacement Points cannot be saved from turn to turn; any unused points are wasted. A player cannot expend more Replacement Points than he has, nor can he “borrow from the future.”
1.16f The Allies get a US number and a CW number of replacements. US replacements can be used only for US or French units. CW replacements can be used only for UK, Canadian or Polish units. The Joint US-CW unit cannot use replacements.
1.16g Refitting and rebuilding occurs in the Reinforcement & Replacement Phase.
1.16h Place rebuilt dead units at the time the points are expended for them. Dead units can be rebuilt, with as many steps as have been paid for, at:
Allied: Any supplied HQ or in the England or Med Boxes.
German: Any Entry Area A hex or any hex of Paris if a path free of enemy units or EZOCs can be traced along roads from Paris to the east map edge.
1.17 RemovalsA number of units are to be withdrawn
from play, as listed on each Reinforcement Chart. Players can remove any unit of the listed type currently in play. The unit chosen can be at reduced strength or Out of Supply. If not enough units of the type indicated are in play, remove one of a similar or higher value (or highest possible) in the order: Pz, PG, Airborne/FJ/Inf, VG/LW, Static.
1.18 General Supply RulesEach side has its own supply trace
requirements; see each side’s special rules for the details. Friendly units usually negate EZOCs for supply purposes per series rule 2.1h; see the exception in the German Supply Rules (the “180-Rule” [3.3d]). 1.19 Out of Supply Effects
A unit is Out of Supply (OOS) if it was marked OOS in a preceding Supply Phase and that marker has not yet been removed.
1) OOS units cannot attack (exception: see Emergency Attacks) but may move at 1/2 MA and defend at 1/2 defense strength, rounded as per the SCS rules.
2) OOS units are no longer Exploit-Capable and do not have ZOCs.
3) OOS units cannot absorb replacements. If otherwise eligible, OOS units can use Strategic Movement in order to move at their normal MA. (1/2 MA x 2 = Normal.)
OOS Allied units can remain out of supply indefinitely without additional ill effects.
1.20 German Surrender German OOS units not located in a
fortress are destroyed if they are OOS two turns in a row (i.e., marked OOS and still OOS in the following Supply Phase. However, see Defend the Reich!!! [3.6], since the German Surrender rule is no longer in force once the German player has declared Defend the Reich!!!.
1.21 Emergency Attacks Each player has a number of Emergency
Attack markers which can be used in the Movement Phase, Combat Phase or Exploitation Phase for regular or Overrun combat. Place the marker on the target hex: any friendly unit adjacent to the target hex can participate the Emergency Attack regardless of supply or Attack Supply state. Units making Emergency Attacks always do so at full strength. Each Emergency Attack marker allows for one attack of any number of adjacent units against one defending hex. Once expended, an Emergency Attack marker is removed from play.
1.21a Each scenario lists the number of Emergency Attack markers each side has when play begins.
1.21b Emergency Attack markers cannot be used to support any kind of defense.
The Mighty Endeavor, revised, SCS #10
Page 4 Multi-Man Publishing, LLC 403 Headquarters Drive, Suite 7, Millersville MD 21108© 2014 All Rights Reserved.
1.22 Strategic MovementDuring the regular Movement Phase,
units may use Strategic Movement in lieu of regular movement provided they:
a) do not begin in an EZOC and never ever enter an EZOC at any point. Friendly units do not negate EZOCs for Strategic Movement.
b) do not end their move in a hex that would place them OOS.
Units that utilize Strategic Movement double their MA.
1.22a Exploit-Capable units can take advantage of Strategic Movement in the Movement Phase and move normally in the Exploitation Phase.
1.22b OOS units can use Strategic Movement. Trucks and HQs cannot use Strategic Movement. Supply trace cannot use Strategic Movement.
1.22c Units using Strategic Movement cannot execute Overruns.
1.23 Goofy Wargamer Stuff Safety Valve
Wargamers being who they are, I can expect to see them abandon France in an effort to secure only the VP hexes. This being the case, something needs to exist to encourage the Germans to control more of the map.
If the Allies occupy (or cut off from trace supply) the three hexes of Paris before Turn 8, the Allies receive an extra 18 VPs. Make this award in the German Supply Phase. This rule is negated should the Allies create a Beach Port in any northern coast hex east of the Seine River.
This rule exists only to keep the Germans from cutting and running when the campaign begins. Should the Germans lose Paris early in spite of a good faith effort to retain it, do not award these points. Running, but leaving a garrison to die in place in Paris does not constitute a good faith effort.
2.0 Allied Special Rules2.1 International Cooperation
2.1a At the end of any Movement Phase or Exploitation Phase, CW (British, Canadian, and Polish) units cannot stack with US or French units (or vice versa). These units may stack momentarily during movement or at the instant of Overrun, but these stacks must be separated before the phase ends. These units can stack together freely as the result of retreat or advance after combat, provided the stack is again split up at the end of the next available friendly Movement or Exploitation Phase.
2.1b HQs can provide Attack Supply only to units given the above nationality restrictions (e.g., a CW HQ cannot provide Attack Supply to a French unit).
2.1c International stacking is not a concern when it comes to arrival at a shipping port, in an off-map box, or for rebuilt units coming back onto the map.
2.1d Except for the restrictions above 2.1a and 2.1b, all Allied units are free to attack together or share HQs for trace supply functions.
2.1e Airborne units and Truck markers are exempt from these restrictions.
2.2 Headquarters2.2a Only the Allied player has HQs.
HQs have supply functions and, if destroyed, return to play in the next Allied Reinforcement & Replacement Phase at any other supplied Allied HQ..
2.2b HQs cannot use Strategic Movement.
2.2c HQs have no combat function other than their (limited) defense strength.
2.2d HQs have a supply range printed on the counter (the lower left value in brackets). This is the distance in regular Movement Points the HQ can use to reach forward to units and/or backwards to a Supply Source.
2.3 Attack HQs2.3a An Attack HQ is an HQ that has
been flipped to its Attack side during the Attack HQ Announcement Phase. Only units within supply range of an Attack HQ at the moment of an attack or Overrun can attack. Exceptions: units which conduct Air Drops or invasions in the current turn, are adjacent to a Beach Port hex, or are participating in an Emergency Attack can attack without an Attack HQ.
2.3b An Attack HQ allows attack by any number of units in range.
2.3c Allied units are restricted by nationality in their use of HQs for Attack Supply [2.1].
2.3d The Allied player identifies and flips HQs to their Attack side during the Attack HQ Announcement Phase. This must be announced for the German player to see, and if the German player doubts the Attack Supply of an HQ, the Allied player must show him how it is possible. Note that HQs flipped to their Attack side have normal combat and supply values, but a reduced Movement Allowance.
2.3e Each functional port or Beach Port can support one Attack HQ. The port can be connected to the HQ via one or more Trucks. Exception: Antwerp and Rotterdam can each support two Attack HQs.
2.3f Attack HQs are flipped back to their normal side during the Attack HQ Unflipping Phase.
2.4 Antwerp & Rotterdam2.4a These cities cannot function as Ports
if any German units are in the estuary hexes (marked on the map with yellow diamonds for each Port) connecting that port with the North Sea. These hexes are independent of each other (i.e., the player need not clear Rotterdam’s estuary hexes to get Antwerp to function).
2.4b Due to their larger size, Antwerp and Rotterdam can support two Attack HQs each.
2.5 Antwerp, Rotterdam & Boulogne-sur-Mer
2.5a To reflect the limited port engineer troops available, only one of these ports can be used for Attack Supply or unit shipping in any single given turn. There is no limit for trace supply.
2.5b The Allied player can select which of the three (provided they are functional and held by the Allied player) he wants to use for that turn at the beginning of the Reinforcement & Replacement Phase.
2.6 Beach Ports2.6a Beach Ports represent the off-
loading facilities and units designed to help in “over the beach” transshipment. No more than one Beach Port marker can ever exist in a single coastal hex at one time.
2.6b Beach Port markers are placed during an invasion [2.16] and remain in place for six turns after the invasion, so a Beach Port placed on Turn 1 functions as a port until the end of Turn 7. Place the appropriate Remove Beach Port marker on the Turn Record Track to remind players when to remove the Beach Port (at the end of the Allied Shipping Phase of the designated turn). The expended Beach Port is removed from the game permanently.
2.6c Beach Ports are unaffected by adjacent enemy units, but if an enemy unit enters the Beach Port hex, the Beach Port marker is immediately and permanently removed from play.
2.6d Beach Ports may be used for trace supply, Attack Supply, and inbound Shipping [2.9]. They may not be used for Direct Shipments [2.10] or outbound shipping.
Design Note: The way Beach Ports work is as follows: They are placed during an invasion and exist for six turns after they land. Some may feel it is harsh that the
The Gamers, Inc.
Page 5Multi-Man Publishing, LLC 403 Headquarters Drive, Suite 7, Millersville MD 21108© 2014 All Rights Reserved.
player might remove his Beach Ports before any regular ports are functional. This is designed to give the player the same sense of urgency regarding the capture of real ports the historical commanders had. No grading on a curve here: you must take a port and take it fast. Should the real port not become functional fast enough, that’s fine... you’ll just miss a couple of turns of Attack HQs and get a fine opportunity to use up your Emergency Attacks.
2.7 Port Capture and Functional Ports
2.7a A port is captured when an Allied unit first enters its hex. Roll one die. The result is the number of turns in the future to place that port’s Functional Port marker on the Turn Record Track. Ports become functional at the very start of that turn. At that time move the marker from the Turn Record Track to the port’s hex to show that it is functional.
2.7b The port can provide trace supply before it is functional, but must become functional before it can be used for unit shipping or to support Attack HQs. Antwerp and Rotterdam can provide trace supply before becoming functional only if their estuary hexes are also cleared [2.4a].
2.7c Should a Beach Port exist in the same hex as a functional port, the Allied player must choose which of the two he will use for the turn. Only one of the two ports can be used at a time.
2.7d Recapture. If the Germans recapture a port, keep the Functional Port marker on the Turn Record Track as a reminder. Should the Allies again take the port, roll one die as above. The result cannot be any sooner than the marker’s original position; if the roll indicates a later turn, move the marker to that turn instead. If the Allies do not retake the port by the marker’s turn, the marker has no effect and is removed from the track. For example, the Allies capture a port on Turn 2 and roll a 6 (so the port would become functional on turn 8). The Germans retake the port on Turn 3, but the Allies retake the port on Turn 4 and this time roll a 1, but because of the original Turn 8 result, the port’s marker remains in the turn 8 box. If the port is functional when recaptured by the Germans and the Allies retake it later, regardless of how many or few turns are involved, roll anew to determine when the port becomes functional.
2.8 Port CapacitiesEach functional port or Beach Port allows
the shipping of one unit each turn. All ports have the same shipping rate. This one unit
is not in addition to the units allowed due to the Beach Class invasion cycle.
A unit for shipping purposes is a combat unit of any size or type, an HQ, or a Truck marker.
2.9 Shipping2.9a Units in the England Box may
ship to any functional port or Beach Port along the Atlantic, Channel or North Sea coasts. Units in the Med box may ship to any functional or Beach Port along the Mediterranean coast.
2.9b No shipment is possible from the England box to the Med box or vice versa.
2.9c The Allies have enough shipping to ship the maximum number of units allowed per port each turn.
2.9d Units stacked in a functional port (not Beach Port) during the Shipping Phase can freely move back to the appropriate box in the Shipping Phase. This outbound shipping has no effect on the port capacity for the turn. Any number of units (subject to stacking limits) can do so in one turn.
2.10 Direct ShipmentsDirect Shipments are reinforcements that
can arrive at a functional port if desired. Direct Shipments are in addition to any shipping sent to that port normally.
Direct Shipments list their arrival in the Reinforcement Chart as “d.” plus North or South. North shipments must go to a functional port on the Atlantic, Channel or North Sea coasts or the England Box. South shipments must go to Marseille (if a functional port) or to the Med Box.
2.11 Allied Supply2.11a Allied supply has two key
elements: Trace supply determination of units in or out of supply (OOS), and Attack Supply determination. In both cases, supply lines must be traced forward to a given unit and back to a supply source using the HQ’s supply range. Count out from the HQ in both directions. Units in the England or Med Boxes are always in supply.
2.11b Units are in trace supply if they are: 1) within the supply range of a friendly HQ which can in turn trace supply back to a supply source, 2) on or adjacent to a friendly supply source, or 3) within 5 MPs of a truck that can itself trace to a supply source.
2.11c Trace supply may be traced to friendly non-functional ports.
2.11d In all cases, supply range must be counted into the desired hex. (Attention OCS players: there is no “adjacent is good enough” rule here).
2.11e EZOCs block supply trace, but friendly units negate EZOCs for the Allies
for supply trace, including the +2 MP cost for entering an EZOC.
2.12 Supply SourcesAllied supply sources are any friendly-
controlled port, be it a non-functional port (for trace supply only), functional port or Beach Port.
2.13 Trucks2.13a Trucks only exist as a supply range
extension back to either a port or another truck. They cannot be used to motorize units or to extend an HQ’s supply range forward to units.
2.13b Count the supply range of an HQ back to a Truck marker and then the truck’s supply range back to another Truck marker or port. Truck markers can count back to other Truck markers in a chain.
2.13c Units at or within 5 MPs of a Truck marker that is capable of supplying HQs (i.e., it can reach back to a port directly or through a chain of trucks) can use the truck for trace (not Attack) supply.
2.13d A single Truck marker can support any number of HQs for trace supply.
2.13e Trucks move like any other unit.2.13f Trucks cannot be destroyed or
captured. If a German unit enters its hex, displace the Truck marker to any Allied HQ, Allied occupied City, or port hex.
2.13g Trucks can retreat with their stack.2.13h Truck markers count as one unit
when being shipped.2.13i Trucks cannot use Strategic
Movement.
2.14 Air Points2.14a Each turn during the Air Point
Phase, the Allied player rolls two dice on the Allied Air Support Table to determine the number of Air Points available for the game turn. Unused Air Points cannot be accumulated from turn to turn. The Allied player receives the number of Air Point markers representing the number of Air Points he has been awarded.
2.14b The German player is allowed to know the number of remaining air points at all times.
2.14c Dominating Air Zones. There are six Air Zones marked on the map; each zone includes all interior hexes plus any hexes making up its boundary. The Allies can choose to dominate any or all of these Air Zones each turn. Mark Dominated Air Zones with a Dominate marker in any convenient location to remind both players.
Each Air Zone costs 1 Air Point to dominate.
Dominating an Air Zone has the following effects:
The Mighty Endeavor, revised, SCS #10
Page 6 Multi-Man Publishing, LLC 403 Headquarters Drive, Suite 7, Millersville MD 21108© 2014 All Rights Reserved.
• Road hexes cost 1 MP (not 1/2) for all German units. • Air Drops can be made in hexes in this Zone. • Each supporting Air Point used in an Allied attack yields two shifts instead of one so long as the defender’s hex is in a dominated zone. • Armor and PG units conducting Strategic Movement pay 2x the normal MP cost for all hexes in a Dominated Zone. In effect, this cancels their 2x movement bonus within a Dominated Zone. 2.14d Ground Support. An Air Point shifts a combat by two columns in the Allies’ favor in an attack or Overrun against a hex in a Dominated Air Zone and one column otherwise. Place the Air Point marker “Shift” side up atop the defending stack and remove the marker when the combat is finished. Use an Air Point marker with the correct number of shifts on it.
Air Points cannot be used in the landing attack of a invasion.
Shifts beyond the 7:1+ column have no additional effect.
Only ONE Air Point can be used in a given combat.2.14e Carpet Bombing. Once per game, the Allied player can announce that an attack will be supported by Carpet Bombing.
In Carpet Bombing, the Allied player can use any number of Air Points to shift the odds and is not limited by the normal “only one Air Point” rule [2.14d].
Carpet Bombing can only be used for an normal (non-Overrun) attack.
2.15 Air Drop 2.15a The Allied player receives a
number of Air Drop points at start. Indicate the number of Air Drop points remaining using the Air Drops Available marker on the Air Drops Track.
2.15b Each Air Drop point allows the Air Drop of one Airborne Division from the England or Med Box to any Open or Bocage terrain hex (only) in a Dominated Air Zone. Each Air Drop point can be used only once.
2.15c Up to two units can land by Air Drop in a single hex in one turn. Regardless of the number of Air Drops available, no more than three units can Air Drop in a single game turn.
2.15d Roll one die for each unit conducting an Air Drop. The unit loses a step on a roll of 1 if in Open Terrain or 1–2 if in Bocage or if the hex is occupied by or in the ZOC of a German unit. On any other roll, the unit lands intact.
2.15e If an Air Drop is made into a hex containing one or more enemy units, the Airborne units(s) must attack the enemy units in their hex during Combat Phase. The Airborne unit(s) attack at 1/2 strength. If any German units remain in the hex after combat, destroy all Airborne units which conducted an Air Drop in that hex. An Air Point may be applied to such an attack only if other non-dropping units are involved.
2.15f Air Drop units cannot move on the turn they land, but they can attack and advance after combat. They can also attack to assist the landing of invading units. Air Drop units that attack units they do not actually land upon use their normal strength.
2.15g Air Drop units are automatically in supply in the Supply Phase the turn they drop. In subsequent turns they must be supplied like any other unit. Air Drop units do not require Attack Supply the turn they land.
2.16 Invasions2.16a The Allied player can make
as many invasions in a game as he has remaining Beach Port markers. No more than three invasion hexes can ever be created in any one game turn. The Allied player is free to use available Beach Port markers singly or in groups at any time during the game. Each Beach Port marker can be used only once to conduct an invasion; it remains in that hex as a Beach Port until removed.
2.16b Invasions can occur in most coastal hexes. Invasions are created in the Allied Invasion Placement Phase. While Beach Ports can be used to invade anywhere along the coast, there are restrictions marked on the map on the number of Beach Port hexes that can exist in the various coastal areas at any one time.
2.16c Invading units do not require Attack Supply the turn they land.
2.16d Units cannot move (other than advance after combat) on the turn they invade.
Procedure: To execute an invasion, place a Beach Port marker with up to the number of allowed Assault Force divisions (given the Beach Classes below) adjacent to the
desired landing hex. Only infantry divisions can be chosen as invading divisions, and the International Cooperation rules [2.1] apply.
Regardless of the defending units in the hex, invading units attack the hex using odds based ONLY on the terrain of the hex. These odds columns are marked on the CRT. Each invading stack can attack only one hex. If the attack succeeds in clearing the landing hex, move the Beach Port marker and invading units into it; those units cannot advance after combat deeper than the landing hex itself. The Beach Port marker cannot leave that hex until it is later removed from play. Air Point shifts cannot be applied to invasion attacks.
Beach Ports can land without any sort of attack into hexes occupied by non-Airborne Allied units; otherwise they must make invasion attacks.
If the attack fails (a defending unit still occupies the hex), return the units and the Beach Port Marker to the Box from which they came. Both can be used again in future landing attempts.
Invasion combat rolls are made in the Combat Phase at any time in the sequence the player desires (i.e., they can be after a regular combat involving other, non-invasion, units). This is an exception to the normal SCS rule allowing only one combat per defending hex per Combat Phase. If all invading units are destroyed in the invasion attempt, the invasion fails and no Beach Port is placed, even if the hex is cleared of German units. 2.17 Beach Classes
2.17a Each coastal hex has a Beach Class number printed on it in a small star. Based on its Beach Class, a certain number of units can land in that hex in the invasion and by follow-on shipping in both the invasion turn and the following turn.
2.17b All Beach Classes allow the landing of one unit each turn beginning two turns after the invasion. This is the normal shipping allowed into a functional port or Beach Port.
2.17c Hexes without a Beach Class number cannot be used to invade.
2.17d Allied armored divisions count as two units for shipping purposes during the Follow-On, and 1st Turn After Shipping Phases.
The following table gives the number of units that can land in one hex of each Beach Class.
Class Assault Force Follow-On 1st Turn After0 1 1 11 1 2 12 2 3 13 2 4 2

The Gamers, Inc.
Page 7Multi-Man Publishing, LLC 403 Headquarters Drive, Suite 7, Millersville MD 21108© 2014 All Rights Reserved.
Assault Force is the number of units that can land with the Beach Port marker to be available to attack in the landing turn’s Combat Phase.
Follow-on is the number of units that can ship into the Beach Port’s hex in the landing turn’s Shipping Phase.
1st Turn After is the number of units that can land in the Beach Port hex in the Shipping Phase of the turn after the landing.
3.0 German Special Rules3.1 Reaction Restrictions
There are none. The German player is free to use his units in any desired way.
3.2 Tactical AdeptnessGerman tactical flexibility, doctrine, and
experience results in a more efficient use of units in offensive operations. Therefore, German Attacker results given in brackets are reduced by one step (A2 becomes A1, A1 becomes no result). Defender results remain the same unless otherwise modified.
For example, a German attack resulting in [A1]/D2 would incur no German losses, while a result of A1/D2 would incur one German step loss.
3.3 Special German Supply 3.3a A unit is in supply if it can trace
a path of hexes, which it could move through, to a supply source; the path may be of any length but must be free of Allied units or ZOCs. There is no requirement for this trace to be done on roads. See also Defend the Reich!!! [3.6].
3.3b There is no Attack HQ requirement for German units, which can attack normally subject to supply rules [1.19].
3.3c Ports have no effect on German supply.
3.3d The 180-Rule. German units do not negate EZOCs for trace supply if two opposite hexes are occupied by Allied units which project a ZOC. Ignore the 180-Rule if Defend the Reich!!! has been played.
3.4 Supply SourcesA German supply source is any east
map edge hex north of the 23.xx hex row provided that hex is not occupied by an Allied unit or a un-negated EZOC.
3.5 Entry Area A Reinforcements
3.5a The German player can distribute his Entry Area A reinforcements to any Entry Area A hex(es) as desired provided they fulfill both of these two conditions:
180-Rule Diagram & German Surrender
Allied Unit German Unit, eligible to Surrender
German Unit, not eligible to Surrender
Possible Supply Path
Ocean
Blockage not provided by terrain, only where enemy units are on both sides.
The usual case, the additional German units do not help the unit in the center.
Hexside Blocks
Allied Rear Areas Lodgement in Allied line creates a surrender possibility.
German Rear Areas
1) The hex is occupied by a German unit or the last unit to move through it was German, and
2) The hex can trace a path free of enemy units and EZOCs to a supply source (friendly units do not negate EZOCs for this). If both of these conditions are not
met, the hex cannot be used as a place to bring on reinforcements.
3.5b If no Entry Area A hex exists that can accept reinforcements, German reinforcements scheduled for Entry Area A can enter any east map edge hex north of 23.35.
The Mighty Endeavor, revised, SCS #10
Page 8 Multi-Man Publishing, LLC 403 Headquarters Drive, Suite 7, Millersville MD 21108© 2014 All Rights Reserved.
3.5c Reinforcements can enter the map in a hex containing an EZOC, but cannot enter any enemy occupied hex.
3.5d If no usable Entry Area A hexes exist and the entire east map edge is occupied by enemy units, no German reinforcements appear.
3.6 Defend the Reich!!!The German player is given one Defend
the Reich!!! counter at the start of the game. He can play it once, and once played, it remains in effect until the end of the game; it cannot be later revoked. It can only be played in the German Reinforcement & Replacement Phase.
The following rules immediately come into effect, many of which directly change the normal rules of play:
1) German lines of supply cannot be longer than 10 hexes and must end in a hex in Germany to be valid. While the trace path still cannot enter prohibited terrain, it otherwise ignores terrain and movement point costs; it is merely a hex distance count.
2) The hex in Germany traced to above must connect in a path free of enemy units and EZOCs to a supply source hex. This secondary trace can be of any length.
3) The German Surrender rule [1.20] no longer applies. No German unit is forced to surrender, regardless of the situation.
4) The “180 Rule” [3.3d] no longer applies. In all situations German units negate the EZOC of hexes they occupy for trace purposes.
Design Note: Players often ask “What’s the downside of choosing Defend the Reich?” The 10 hex supply line limitation is the downside. Think of it as a decision to ditch most of the map in order to get “normal” supply trace (no surrender, friendly units negate EZOCs). Do it too soon and you’ll find out rapidly how much it hurts you.
4.0 Victory Conditions Victory is determined by the capture of the various Victory Point hexes on the map. Only the Allies collect VPs. Count the VPs for controlled hexes when the game ends. A VP hex is controlled if a supplied Allied unit occupies or was the last to move through it. Each VP hex is marked with the number of VPs it is worth.
Final Victory is determined by the proportion of the historical Allied victory
it represents. The historical victory is represented by 41 of the available 48 victory points.
VPs Victory24 or less German Victory25 to 33 Draw34 or more Allied Victory
5.0 Scenarios5.1 Complete Campaign Game This scenario covers the entire campaign in the West from the 6 June landings until the end of April, 1945.
German Set UpHex Unit(s) 7.23 1-2-2 Static Div (347) 10.21 2-3-3 LW Div (16) 9.24 1-2-6 Bicycle Bde (20) 11.22 1-2-2 Static Div (719) 14.20 2-3-4 Inf Div (165 Trng) 17.22 12-9-8 SS Pz Div (1 SS) 15.20 1-2-2 Static Div (712) 16.17 1-2-2 Static Div (48) 17.30 6-8-5 FJ Div (2) 17.20 3-4-5 LW Div (19) 17.16 2-3-3 LW Div (18)1 8.14 2-3-4 Inf Div (182 Trng) 17.14 1-2-2 Static Div (47) 18.13 1-2-2 Static Div (331) 1-2-2 Static Div (49) 19.14 1-2-2 Static Div (326) 23.16 9-7-8 Pz Div (2) 21.15 4-6-5 Inf Div (85) 21.13 1-2-2 Static Div (344) 23.12 1-2-2 Static Div (245) 1-2-2 Static Div (348) 24.10 4-6-5 Inf Div (84)2 4.09 1-2-2 Static Div (346)2 5.09 2-3-3 LW Div (17) 26.11 9-7-8 Pz Div (116) 28.11 10-8-8 SS Pz Div (12 SS) 26.08 1-2-2 Static Div (711) 32.08 10-8-8 Pz Div (Lehr) 38.09 6-8-8 SS PG Div (17 SS) 29.06 9-7-8 Pz Div (21) 28.07 1-2-2 Static Div (716) 26.05 4-6-5 Inf Div (352)2 7.03 4-6-5 Inf Div (91) 24.02 1-2-2 Static Div (243) 1-2-2 Static Div (709) 27.04 1-2-6 Bicycle Bde (30) 30.01 4-6-5 Inf Div (77) 33.02 5-7-5 FJ Div (5)3 7.01 4-6-5 Inf Div (275)4 4.03 1-2-2 Static Div (708) 52.05 9-7-8 Pz Div (11) 41.01 3-5-4 Inf Div (158 Res) 54.03 3-5-4 Inf Div (159 Res) 59.12 10-8-8 SS Pz Div (2 SS)
47.18 3-5-4 Inf Div (189 Res) 60.20 4-6-5 Inf Div (271) 59.22 1-2-2 Static Div (338) 61.27 1-2-2 Static Div (244) 61.29 1-2-2 Static Div (242) 57.25 9-7-8 Pz Div (9)5 8.33 2-3-4 Inf Div (148 Trng)
Available for use: 2x Emergency Attacks 1x Defend the Reich !!!
Allied Set UpLocation Unit(s)England Box (5)-1-8 CW Army HQ (1 Can) (5)-1-8 CW Army HQ (2 UK) (5)-1-8 US Army HQ (1) 9-6-8 CW Arm Div (4 Can) 5-8-6 CW Inf Div (2 Can) 5-8-6 CW Inf Div (3 Can) 9-6-8 CW Arm Div (Gds) 9-6-8 CW Arm Div (7) 8-6-8 CW Arm Div (11) 6-8-6 CW Inf Div (3) 5-8-6 CW Inf Div (15) 5-8-6 CW Inf Div (43) 5-8-6 CW Inf Div (49) 6-8-6 CW Inf Div (50) 6-8-6 CW Inf Div (51) 5-8-6 CW Air Landing Div (52) 5-8-6 CW Inf Div (53) 5-8-6 CW Inf Div (59) 6-9-5 CW Abn Inf Div (1) 6-9-5 CW Abn Inf Div (6) 9-6-8 Polish Arm Div (1 Pol) 10-8-8 US Arm Div (2) 10-8-8 US Arm Div (3) 9-6-8 US Arm Div (4) 9-6-8 US Arm Div (5) 9-6-8 US Arm Div (6) 8-10-6 US Inf Div (1) 6-8-6 US Inf Div (2) 8-10-6 US Inf Div (4) 6-8-6 US Inf Div (5) 6-8-6 US Inf Div (8) 6-8-6 US Inf Div (9) 6-8-6 US Inf Div (28) 6-8-6 US Inf Div (29) 6-8-6 US Inf Div (30) 6-8-6 US Inf Div (35) 6-8-6 US Inf Div (79) 6-8-6 US Inf Div (83) 6-8-6 US Inf Div (90) 6-9-5 US Abn Inf Div (82) 6-9-5 US Abn Inf Div (101) 6-8-8 French Arm Div (2 FF) 3x (5)-0-6 Truck Markers

The Gamers, Inc.
Page 9Multi-Man Publishing, LLC 403 Headquarters Drive, Suite 7, Millersville MD 21108© 2014 All Rights Reserved.
Med Box (5)-1-8 US Army HQ (7) (5)-1-8 French Army HQ (1 FF) 6-8-6 US Inf Div (3) 6-8-6 US Inf Div (36) 6-8-6 US Inf Div (45) 6-8-8 French Arm Div (1 FF) 6-8-8 French Arm Div (5 FF) 6-8-6 French Inf Div (1 FF) 4-6-4 French Inf Div (2 Mor) 4-6-4 French Mtn Inf Div (4 Mor) 4-6-4 French Inf Div (3 Alg) 4-6-4 French Inf Div (9 Col) 2x (5)-0-6 Truck Markers
Available for Use: 6x Beach Port markers 12x Air Drop Points 6x Emergency Attacks
5.2 1 Aug 44 Scenario StartThis scenario, played until the campaign
stop, starts players with the historical situation the night of 31 July 44. The Allied landings in Normandy have occurred and the Americans are poised to breakout. The dash for France is about to begin.
First Turn: Turn 6Last Turn: Turn 25Victory: Use the standard victory conditions.
Reinforcements: Use standard reinforcements
Set up: Units listed in bold italics with an asterisk set up with a step loss already inflicted.
German Set UpDead Pile: 10-8-8 Pz Div (Lehr) 6-8-5 FJ Div (2) 4-6-5 FJ Div (6) 4-6-5 Inf Div (275) 4-6-5 Inf Div (352) 1-2-2 Static Div (243) 1-2-2 Static Div (326) 1-2-2 Static Div (709) 1-2-6 Bicycle Bde (30)
Hex Unit(s) 7.23 1-2-2 Static Div (347) 9.23 1-2-6 Bicycle Bde (20) 10.21 2-3-3 LW Div (16) 11.22 1-2-2 Static Div (719) 14.20 2-3-5 Inf Div (70) 2-3-4 Inf Div (165 Trng) 15.20 1-2-2 Static Div (712) 17.20 3-4-5 LW Div (19) 16.17 1-2-2 Static Div (48) 17.16 2-3-3 LW Div (18)
17.14 1-2-2 Static Div (47) 18.13 1-2-2 Static Div (49) 1-2-2 Static Div (331) 18.14 2-3-4 Inf Div (182 Trng) 21.14 1-2-2 Static Div (344) 21.15 4-6-5 Inf Div (85) 23.12 1-2-2 Static Div (245) 1-2-2 Static Div (348) 25.09 2-3-3 LW Div (17) 26.08 1-2-2 Static Div (711) 27.09 1-2-2 Static Div (346) 1-2-2 Static Div (716) 28.08 4-6-5 Inf Div (272) 29.08 10-8-8 SS Pz Div (12 SS) *4-6-5 Inf Div (89) 29.07 12-9-8 SS Pz Div (1 SS) 10-8-8 SS Pz Div (9 SS) 29.06 10-8-8 SS Pz Div (10 SS) *4-6-5 Inf Div (271) 4-6-5 Inf Div (276) *4-6-5 Inf Div (277) 29.05 9-7-8 Pz Div (2) 6-8-5 FJ Div (3) 29.04 10-8-8 SS Pz Div (2 SS) 6-8-8 SS PG Div (17 SS) *9-7-8 Pz Div (21) 30.07 4-6-5 Inf Div (84) 30.04 9-7-8 Pz Div (116) *5-7-5 Inf Div (353) 31.04 *4-6-5 Inf Div (77) 31.03 *5-7-5 FJ Div (5) *4-6-5 Inf Div (91) 31.02 1-2-2 Static Div (266) 33.08 4-6-5 Inf Div (363) 34.08 1-2-2 Static Div (708) 37.10 4-6-5 Inf Div (16) 38.02 3-5-4 Inf Div (158 Res) 52.05 3-5-4 Inf Div (159 Res) 59.12 9-7-8 Pz Div (11) 47.18 3-5-4 Inf Div (189 Res) 59.22 1-2-2 Static Div (338) 57.25 9-7-8 Pz Div (9) 61.27 1-2-2 Static Div (244) 61.28 1-2-2 Static Div (242) 59.33 2-3-4 Inf Div (148 Trng)Available for use: 2x Emergency Attack 1x Defend the Reich!!!
Allied Set UpDead Pile:None…Steps have been taken from units on the map.
Box Unit(s)England Box: (5)-1-8 US Army HQ (9) *6-9-5 US Abn Div (82) *6-9-5 US Abn Div (101) 9-6-8 US Arm Div (7) 6-8-6 US Inf Div (80) 6-9-5 CW Abn Div (1) 6-8-8 French Arm Div (2 FF) 2x (5)-0-6 Truck Markers
Med Box: (5)-1-8 US Army HQ (7) 6-8-6 Inf Div (3) 6-8-6 Inf Div (36) 6-8-6 Inf Div (45) (5)-1-8 French HQ (1 FF) 6-8-8 French Arm Div (1 FF) 6-8-8 French Arm Div (5 FF) 6-8-6 French Inf Div (1 FF) 4-6-4 French Inf Div (2 Mor) 4-6-4 French Inf Div (3 Alg) 4-6-4 French Inf Div (9 Col) 4-6-4 French Mtn Inf Div (4 Mor) 2x (5)-0-6 Truck Markers
Hex Unit(s) 27.08 *6-9-5 CW Abn Div (6) 5-8-6 CW Inf Div (49) 5-8-6 CW Inf Div (59) 28.07 *9-6-8 CW Arm Div (4 Can) 5-8-6 CW Inf Div (2 Can) 27.07 (5)-1-8 CW Army HQ (1 Can) 6-8-6 CW Inf Div (3) 6-8-6 CW Inf Div (51) 5-8-6 CW Inf Div (3 Can) 28.06 5-8-6 CW AL Div (52) 5-8-6 CW Inf Div (53) 26.06 Beach Port 1 9-6-8 Polish Arm Div (1 Pol) 26.05 Beach Port 2 (5)-0-6 Truck Marker 27.06 (5)-1-8 CW Army HQ (2 UK) 9-6-8 CW Arm Div (7) 6-8-6 CW Inf Div (50) 5-8-6 CW Inf Div (43) 28.05 *9-6-8 CW Arm Div (Gds) 8-6-8 CW Arm Div (11) *5-8-6 CW Inf Div (15) 25.04 Beach Port 3 9-6-8 US Arm Div (5) 27.04 (5)-1-8 US Army HQ (1) 28.04 6-8-6 US Inf Div (2) 6-8-6 US Inf Div (5) 6-8-6 US Inf Div (30) 6-8-6 US Inf Div (35) 27.03 6-8-6 US Inf Div (83) 6-8-6 US Inf Div (90) 28.03 10-8-8 US Arm Div (2) 6-8-6 US Inf Div (9) 6-8-6 US Inf Div (28) *6-8-6 US Inf Div (29) 29.03 10-8-8 US Arm Div (3) *8-10-6 US Inf Div (1) 8-10-6 US Inf Div (4) 30.03 9-6-8 US Arm Div (4) 9-6-8 US Arm Div (6) 6-8-6 US Inf Div (8) 6-8-6 US Inf Div (79)

The Mighty Endeavor, revised, SCS #10
Page 10 Multi-Man Publishing, LLC 403 Headquarters Drive, Suite 7, Millersville MD 21108© 2014 All Rights Reserved.
Available for use: 3x Beach Port markers (Beach Ports 4, 5, 6) 9x Air Drop Points 6x Emergency Attacks
Port Removals:Turn 7…Remove Beach Ports 1, 2, and 3
Ports Captured but Not Yet Activated:Cherbourg…active on turn 9
Carpet Bombing: Used.
5.3 11 Sept 44 Scenario StartThis scenario, played until the campaign
stop, starts players with the historical situation on the night of 10 Sept 44. Players are put in the position of successful landings on the north and south coasts of France, a successful Falaise Pocket, and a successful dash across France in August.
The Allied player is ready to launch his own Operation Market Garden and battles for the Rhine valley and the frontier of Germany to win the war.
The German player is starting to put together a firmer West Wall, build for a winter counter-offensive and a chance to hold on until the Allies sue for peace.
First Turn: Turn 10Last Turn: Turn 25Victory: Use the standard victory conditions.
Reinforcements: Use standard reinforcements.
German Set UpDead Pile:
12-9-8 SS Pz Div (1 SS)10-8-8 SS Pz Div (2 SS)10-8-8 SS Pz Div (9 SS)10-8-8 SS Pz Div (12 SS)9-7-8 Pz Div (2)9-7-8 Pz Div (9)6-8-5 FJ Div (3)4-6-5 FJ Div (6)3-4-5 LW Div (19)2-3-3 LW Div (17)2-3-3 LW Div (18)4-6-5 Inf Div (77)4-6-5 Inf Div (91)4-6-5 Inf Div (271)4-6-5 Inf Div (272)4-6-5 Inf Div (277)4-6-5 Inf Div (276)4-6-5 Inf Div (352)4-6-5 Inf Div (363)2-3-4 Inf Div (148 Trng)2-3-4 Inf Div (182 Trng)
1-2-2 Static Div (47)1-2-2 Static Div (242)1-2-2 Static Div (244)1-2-2 Static Div (266)1-2-2 Static Div (326)1-2-2 Static Div (348)1-2-2 Static Div (708)1-2-2 Static Div (709)1-2-6 Bicycle Bde (30)
Hex Unit(s) (OOS=Out of Supply) 44.03 3-5-4 Inf Div (158 Rs) (OOS) 25.09 1-2-2 Static Div (346) (OOS) 18.13 1-2-2 Static Div (49) (OOS) 1-2-2 Static Div (331) (OOS) 17.14 1-2-2 Static Div (344) (OOS) 15.19 1-2-2 Static Div (243) (OOS) 1-2-2 Static Div (711) (OOS) 16.19 *4-6-5 Inf Div (64) *4-6-5 Inf Div (226) 16.20 *4-6-5 Inf Div (59) 16.21 2-3-5 Inf Div (70) 14.20 2-3-4 Inf Div (165 Trng) 1-2-2 Static Div (245) 15.22 1-2-2 Static Div (719) 10.21 2-3-3 LW Div (16) 11.22 1-2-6 Bicycle Bde (20) 14.23 1-2-2 Static Div (712) 15.23 *6-8-5 FJ Div (2) 15.24 *4-6-5 Inf Div (85) 16.25 *4-6-5 Inf Div (176) 17.26 *9-7-8 Pz Div (116) 4-6-5 Inf Div (275) 11.28 *10-8-8 SS Pz Div (10 SS) 13.28 *4-6-5 Inf Div (84) 15.28 4-6-5 FJ Div (7) 14.29 4-6-5 Inf Div (190) 18.27 5-7-5 Inf Div (353) 2-4-4 VG Div (12) 2-4-4 VG Div (246) 20.28 4-6-5 Inf Div (89) 1-2-2 Static Div (347) 21.28 *10-8-8 Pz Div (Lehr) 23.29 5-7-5 FJ Div (5) 1-2-2 Static Div (48) 24.29 2-4-4 VG Div (19) 2-4-4 VG Div (36) 26.28 6-8-8 PG Div (15) 27.28 6-8-8 SS PG Div (17 SS) 2-4-4 VG Div (462) 26.27 6-8-8 PG Div (3) 26.30 2-4-4 VG Div (553) 2-4-4 VG Div (559) 30.28 *9-7-8 Pz Div (21) 32.27 4-6-5 Inf Div (16) 33.27 1-2-2 Static Div (716) 35.27 3-5-4 Inf Div (189 Res) 35.28 9-7-8 Pz Div (11) 36.27 *4-6-5 Inf Div (198) 1-2-2 Static Div (338) 38.27 3-5-4 Inf Div (159 Res)
Available for use: 1x Emergency AttackDefend the Reich has been played.
Allied Set UpDead Pile: 5-8-6 CW Inf Div (59)
Hex Unit(s)England Box:: 6-9-5 US Abn Div (82) 6-9-5 US Abn Div (101) 4-6-5 US Abn Div (17) 6-4-8 US Arm Div (9) 6-8-6 US Inf Div (95) 6-9-5 CW Abn Div (1) 6-9-5 CW Abn Div (6)
Med Box: 6-8-8 French Arm Div (5 FF) 4-6-4 French Mtn Inf Div (4 Mor)
38.02 6-8-6 US Inf Div (94) 37.01 *6-8-6 US Inf Div (8) 31.01 *6-8-6 US Inf Div (2) *6-8-6 US Inf Div (29) 24.02 6-8-6 US Inf Div (26) 6-8-6 US Inf Div (104) Cherbourg Port Marker 37.10 6-8-6 US Inf Div (83) 35.14 *9-6-8 US Arm Div (6) 34.08 (5)-1-8 US Army HQ (9) 30.08 (5)-0-6 Truck Marker 24.09 *6-8-6 CW Inf Div (51) 25.10 *5-8-6 CW Inf Div (49) 28.17 (5)-0-6 Truck Marker 21.17 [5]-1-8 CW Army HQ (1 Can) 18.14 5-8-6 CW Inf Div (3 Can) 16.18 *9-6-8 CW Arm Div (4 Can) *5-8-6 CW Inf Div (2 Can) 17.20 *9-6-8 CW Arm Div (1 Pol) 17.21 5-8-6 CW AL Div (52) 18.21 (5)-1-8 CW Army HQ (2 UK) (5)-0-6 Truck Marker 17.22 *6-8-6 CW Inf Div (3) 16.22 5-8-6 CW Inf Div (15) 5-8-6 CW Inf Div (53) 16.23 *9-6-8 CW Arm Div (7) 17.23 9-6-8 CW Arm Div (Gds) *8-6-8 CW Arm Div (11) 5-8-6 CW Inf Div (43) 6-8-6 CW Inf Div (50) 18.24 *10-8-8 US Arm Div (2) 18.25 6-8-6 US Inf Div (30) 20.23 (5)-1-8 US Army HQ (1) 19.26 *8-10-6 US Inf Div (1) 20.24 10-8-8 US Arm Div (3) 20.25 6-8-6 US Inf Div (9) 21.26 *8-10-6 US Inf Div (4) 22.26 6-8-6 US Inf Div (28) 23.26 *9-6-8 US Arm Div (5) 23.23 (5)-0-6 Truck Marker 26.26 6-8-6 US Inf Div (90)

The Gamers, Inc.
Page 11Multi-Man Publishing, LLC 403 Headquarters Drive, Suite 7, Millersville MD 21108© 2014 All Rights Reserved.
27.26 *9-6-8 US Arm Div (7) 28.25 6-8-6 US Inf Div (80) 29.24 (5)-1-8 US Army HQ (3) 29.25 6-8-6 US Inf Div (5) *6-8-6 US Inf Div (35) 30.25 9-6-8 US Arm Div (4) 31.26 6-8-6 US Inf Div (79) 33.25 6-8-8 FR Arm Div (2 FF) 39.24 6-8-8 FR Arm Div (1 FF) 41.23 6-8-6 FR Inf Div (1 FF) 39.25 6-8-6 US Inf Div (45) 40.26 6-8-6 US Inf Div (3) 6-8-6 US Inf Div (36) 41.27 4-6-4 FR Inf Div (3 Alg) 44.25 (5)-1-8 US Army HQ (7) (5)-0-6 Truck Marker 47.25 (5)-1-8 FR Army HQ (1 FF) 53.24 (5)-0-6 Truck Marker 53.28 4-6-4 FR Inf Div (2 Mor) Marseilles Port Marker 61.28 4-6-4 French Inf Div (9 Col) 60.31 Beach Port 5 60.32 Beach Port 4 58.33 *3-4-5 All. Abn Div (1 ABTF)
Available for use: 1x Beach Port marker (Beach Port 6) 8x Air Drop Points 4x Emergency Attacks
Port Removals:Turn 11…Remove Beach Port 4 and Beach Port 5
Ports Captured but Not Yet Activated:None
Carpet Bombing: Used.
Developer's NotesIntroductionI got this game from Steve Newhouse in the summer of 2003. He had made great strides in making a wonderful game on this subject, making my job that much easier. My role centered on refinement, some fact checking, and playtesting until the tester’s fingers bled. I can honestly say I’ve played this game more times than any other Gamers release except (perhaps) Afrika and Ardennes (both of which were played very extensively). In terms of raw time devoted to playing the game in its various forms, the several monsters I’ve designed got more hours, but only they did. I hope you enjoy the result. Below I’ll address some of the concepts in the game that might raise an eyebrow.
RulesUnits on the Beach?Playtesters became puzzled by the invasion CRT rolls with respect to units occupying beaches with actual units. A superficial look at the rule seems to indicate that having a unit there does the German player no good in deflecting invasions…so, the playtesters reasoned, why not pull all the units off the coast and defend inland?
The problem is they are not looking at what the Allied player has to do to be successful. A normal (“All other terrain”) landing will successfully land where there are no German units 100% of the time (even if ugly) in Class 2 or Class 3 beaches. On Class 0 and Class 1 beaches, Attacker losses of 2 steps will kill the invasion (rolls of 5 or less), but that is a product of a poor beach and a bad roll and does not matter to my purpose here. Let’s look at only those locations where no matter what the attacker result, the landing makes it (Class 2 and Class 3). So, if you are successful 100% of the time if there is no unit, what happens if you have 1 or 2 steps of Germans in the hex. With one step, you need to roll a 4 or more to get on the beach or a success rate of 92%. Some effect, but not much (given that we are talking about some static division, this is probably correct). With two steps, you now need to roll a 7 or more to succeed, with a success probability of only 58%.
That is the effect of units on the beach. The point of this method is to avoid two problems: 1) you can’t gang up on some geek unit at high odds in order to have an easier time landing than in clear areas and 2) it avoids putting a major premium on landing adjacent to good units but not right into them (which generates its own problems).
German Supply Freedom Vs Tight Allied Supply RangesHere the issue is the use (however hampered by airpower) of the French rail net. The Germans have a logistical freedom the Allies do not have (and won’t until late in the campaign when rail units begin operating). That and the overall frugality of the German logistical effort (especially compared to the Western Allies) gives them a measure of potential activity far different than the Allies.
German Tactical AptitudeThis rule came about after the first few tests showed that German players would literally never choose to counterattack. Between the masses of Allied units and the Allied air cover, the German player was faced with a series of impossibly low odds attacks and a quick determination that such attacks were not going to benefit him in the long run. Downgrading the attacker losses gave the Germans plenty of incentive to try some counterattacks, even though nothing was certain at the lower odds.
The Removal of Beach PortsAt least one tester wondered why it was the Beach Ports go away after six turns regardless of the situation on the ground. His reasoning was good (that if the Allies were indeed bogged down every effort would be made to keep the beach operating). In the end I left out any chance to revise the removal based on circumstance as I wanted the Allied player to be as desperate for a real port as the real commanders. There is enough flexibility (6 turns is a long time) to get a port provided the player gives the idea enough emphasis…and if the worst happens he can use another Beach Port landing to help extend his operations. There might be a lag period between the removal of Beach Ports and the beginning of full-function for a real port, but that happens and can be a good time to use some Emergency Attacks.
UnitsVolksgrenadier UnitsA number of the VG Divisions in play are actually rebuilds of other units destroyed earlier in the campaign. Rather than track the dead units and replace them with specific VG units, the VG units come on as reinforcements. It is assumed that if Division “X” wasn’t killed to bring about the creation of VG Division “X”, some other division (call it “Y”) was destroyed and the VG Division should technically be called VG Division “Y.” This way is simpler yet holds a little confusion regarding who really got rebuilt; still, the strength totals are the same in the end.
79 Arm DivOriginally the game had the 79th Arm Div as a unit that could be deployed like the other CW armored divisions. Roland LeBlanc brought to my attention that the unit never fought as a whole before being dissolved, but was used as individual packets until then. This being the case, I pulled it from the formed units in the game.
52 Air Landing DivThe submission originally had rules allowing this division to be flown into a hex already occupied by another Allied unit (possibly even a recently dropped airborne division). In the course of testing, I found these rules to be almost never used and since they applied to exactly one unit, not to be worth their weight. If you want, as an option, allow the Allied player to fly this unit from the England Box to any friendly occupied hex (during the Movement Phase) at the cost of one of his Air Drop Points. This counts as one of the three air drops allowed in a turn and can be

The Mighty Endeavor, revised, SCS #10
Page 12 Multi-Man Publishing, LLC 403 Headquarters Drive, Suite 7, Millersville MD 21108© 2014 All Rights Reserved.
done any number of times in a game (following the “going back to the box” requirements of airborne divisions).
Odds and Ends There are a couple of units that showed up too late for the campaign. Others were sent off to watch various German-held ports. Lastly a few divisions showed up and were then stranded near Normandy stripped of trucks and their men sent off as individual replacements. All of these have been omitted from the counter-mix.
Panzer RebuildsSome playtesters requested that rebuild limits be placed on the Germans who will, not surprisingly, rebuild their best armored units repeatedly. Given the balance seen in the games run in testing, I did not feel such a rule was needed (certainly the Allied player will rebuild his best units as well). If anything, the top-of-the-line units would get the first pick of the available replacement men and equipment. Also, the VG infantry rebuilds have happened outside the player’s control. I do not think this sort of rule is needed.
MapBrittanyThere are two reasons it is not included—historical and physical. Historically, its ports are just too far away and any invasion of that area will provide the Germans with a extended area with reasonably secure flanks. The diversion of effort in the historical battle merely gave the Allies a port that was too far from the front to be worth having. Landing there initially lengthens the approach to Germany for no good benefit.
Physically, the dang thing just doesn’t fit without dropping the map scale back on the important play areas. Adding a whole map would destroy the game’s one map design parameters and adding some little map extension is just a waste. In the end I dropped it (and the units contained there forever) and never missed it. Ever.
Expanded Edition Note. By the demand of a small number of players, the expanded edition adds the area of Brittany. Now you can judge for yourself if I was right in the first place.
ItalyHere was an interesting design decision. Obviously, the Allies could have sent the forces landing in the South of France into Italy to link with the armies there and advance on Germany from the south. Likewise the Germans could have staged forces there to launch counter-attacks against the Anvil-Dragoon beaches. My decision to omit these possibilities is based on two concerns. First, not only is a national boundary crossed here, but you move from one major Allied command to another. As a result, to show this area properly, one must include the concerns of the other command, the one already in Italy. Drawing the game boundary such that neither player can cross the theater boundary avoids this problem. Secondly, if units are allowed to flow across this boundary, the temptation to provide units that didn’t go to France but were floating
in the neighborhood. Frankly, the counters did not exist to provide such options. Keeping the boundary hard has two bad side-effects. First, German units can be trapped against that edge unable to trace supply or retreat as they would historically (and a few did). Second, the Allied player will never dispatch a handful of units to “watch” this area (to preclude Germans from sneaking across the mountains to hit the supply lines in southern France). I can live with these to avoid the earlier mentioned problems.
Dutch RoadsA number of tests (with an earlier map) ended when the Allies came storming across the Rhine deep into Germany via the roads in Holland. Even with the swamps, it was just too easy to traverse Holland. In the end, I decided that the narrow roadways in the Dutch countryside, raised as they are from soft or flooded ground, simply did not warrant the treatment as a “road” in the game sense. Every test since that change worked much more historically. The addition of the “bridges” allows units to cross some of the river features originally passable by the roads. All in all, it worked very well, even though it really is a bit of “outside the box” thinking.
East Bank of the Rhine in the SouthOK, there are map edges…and no way to operate in Bavaria. The zone east of the Rhine south of Mainz is just off limits. Case closed.
Player's NotesA few hints below, deliberately generalized so as to not stereotype play. Bon Chance!
Allied Player NotesFirst things first, decide where you want to land and how you want to land. You have six Beach Ports. It’s generally a good idea to land with three on Turn 1 just to get lots of men on the ground fast. The others can be used in a number of ways. You can save some for most of the game as a threat which should cause the Germans to defend some coastal areas they would otherwise ignore (or if the Germans abandon them, you can go ahead and start a “second front”). Having some to launch an invasion of southern France might give the Germans too many things to do at once (one playtester advocates always invading in the south on Turn 2). Furthermore, it allows you access to those Med Box troops you might otherwise never see.
Two other good uses for spare Beach Ports are to 1) invade in waves or 2) to invade to provide logistical support. You can establish a 1-2 punch by landing in one place, then waiting a few turns and landing in another spot now stripped of troops the Germans sent to face your first landing. In the second case, if you are having trouble getting a real port operational to keep you armies in Attack Supply and the original Beach Ports are going to go away, you can land a couple more in areas you already have in order to rebuild your logistical effort for a while longer.
Where to land? A Class 3 beach (of which there are very few) will get you 8 units on the ground
by the end of the turn after the invasion. Class 2 gives 6, Class 1 gives 4 and Class 0 gives 3. By the second turn after the invasion, all Beach Classes are the same. Some players insist that they are stuck landing only in the Normandy and southern France Class 3 beaches. Admittedly, these are the best available (almost like somebody at SHAEF thought this out), but the use of Class 2’s should not be overruled as dogma simply because of the extra two units. Some Class 2’s are in very unprotected areas, so the two units will not be missed that much. That, and nobody said your secondary landings couldn’t happen in the Class 3’s so as to get the “meat on the street”. Use your imagination here and you’ll see that there is more to it than “just land in the 3’s”.
OK…so you’ve landed in France. Now the fun begins. As the Allied player you must, I say again, MUST be violent in your execution, aggressive and willing to take chances. Try to bag a pile of Panzers via the Surrender rule (it can be done, but you must move fast). Whatever you do, do not wait to get yourself some real ports…you cannot afford to wait. Regardless, you must move rapidly toward Germany before the Germans can catch their breath and form a line to slow you. Play it safe and you’ll be wintering-over in your beachhead and will lose the game.
Once you’ve moved fast and hard, the Germans are generally able to form a line in the fall to defend the border of the Reich (your goal was to make sure that line was as far toward the north-east as possible). Plan ahead so you have the trucks you need when you need them! During the winter, you must grind down the Germans (kill at least three steps every turn, so they never get out ahead in Repls). Fighting through the West Wall (especially in terrain) takes time and much effort. Work at it methodically so you can be in a good position in the spring.
If you did your job, you should be able in the spring of 1945 to force the Rhine and start gobbling up VP hexes. Don’t get so excited by driving around the Autobahn that you forget to step on VP hexes (it has happened). Keep an idea of what you have and what you need and spare no expense in getting the hexes you need. It’s fairly easy to get sidetracked and then, come Turn 25, to end up with a map that looks like a dramatic Allied victory, but counts out to a Draw, or worse, some sort of silly-looking German ‘victory’.
German Player NotesLet's face it, you got the shorter end of the stick here. Barring some sort of major Allied ineptitude, you will not push them back into the sea, or any other such Führer Bunker-induced daydream. They will land successfully and give you some real fits.
That said, what you’ll need to become is a specialist in economy of force, cost-benefit analysis, and force preservation.
You will have numerous chances to slap around Allied units. The best being when you can damage an Allied formation and then withdraw to a safe area. Sometimes, however, that plan
The Gamers, Inc.
Page 13Multi-Man Publishing, LLC 403 Headquarters Drive, Suite 7, Millersville MD 21108© 2014 All Rights Reserved.
goes dangerously awry and you end up stuck in the Allied line unable to run to freedom. In those cases, your best units might get pounded into oblivion, but that is the price you’ll pay. I’ve seen games where the Germans hunted CW units until the Brits were literally driven out of the war.Later in the game, you should be constantly re-evaluating if a position must be held or given up, or when an attack should be done or not done based on the losses that might happen to you. Some hexes are vitally important (these will become clear to all after a few plays). The German Tactical Aptitude rule gives you plenty of incentive to launch attacks…just watch out for attacks that appear successful but actually cause you problems (such as when you insert yourself into the Allied line in an overrun only to find yourself out of supply due to the 180-rule).
It is easy to run out of live troops toward the end of the game, you must do what you can to keep your army intact.
Don’t get tunnel vision with part of the front. It’s easy to fall into the trap of an “at all costs” defense of some key point and allow it to absorb too many units, such that some other part of the front is a paper-tiger and unable to withstand a tap by the Allies. I’ve seen this happen where a path opened to and across the Rhine in a matter of moments through what was a reasonable looking line the turn before. The resulting US armored flood could not be stopped.In the end, your job is to dent the Allies as much as possible (so they are always operating at a deficit) while preserving your army as much as you can for the last few turns.
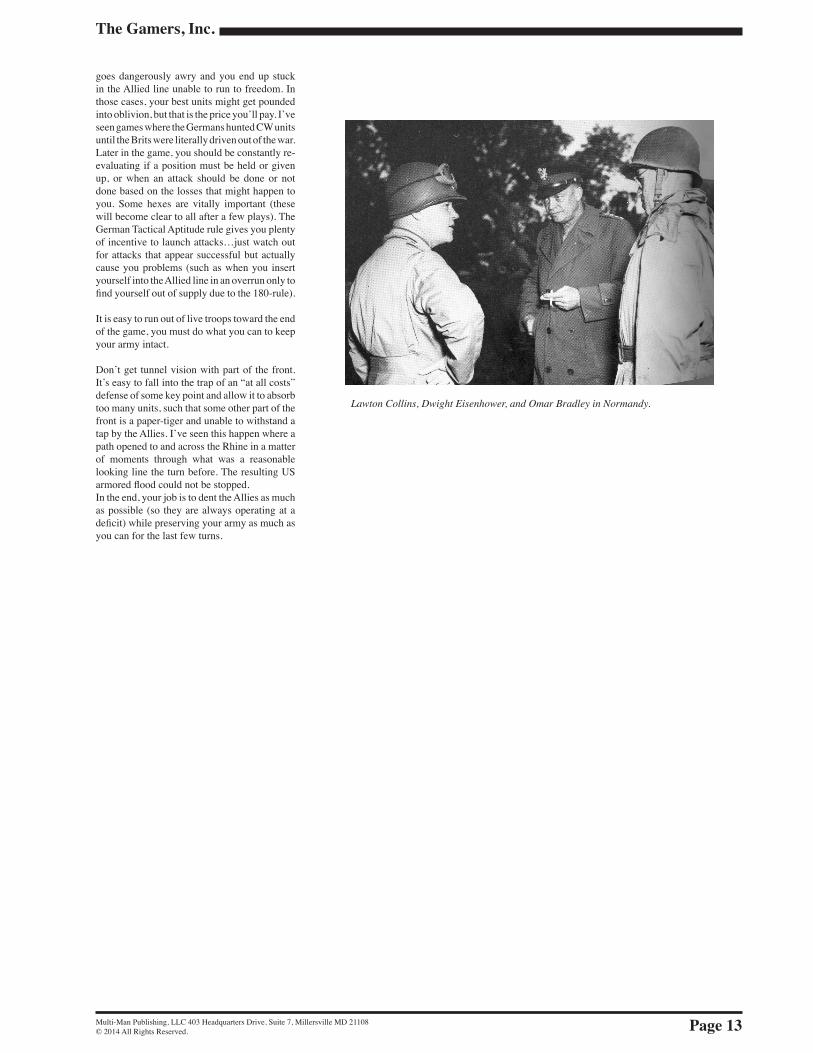
Lawton Collins, Dwight Eisenhower, and Omar Bradley in Normandy.
The Mighty Endeavor, revised, SCS #10
Page 14 Multi-Man Publishing, LLC 403 Headquarters Drive, Suite 7, Millersville MD 21108© 2014 All Rights Reserved.
German Reinforcement ChartTurn Area Units2 B 2-3-5 Inf Div (70) E 4-6-5 Inf Div (277)
3 A 10-8-8 SS Pz Div (9 SS) A 10-8-8 SS Pz Div (10 SS) E 4-6-5 Inf Div (272) D 4-6-5 Inf Div (276) C 1-2-2 Static Div (266) C 6-8-5 FJ Div (3) C 5-7-5 Inf Div (353)
4 A 4-6-5 Inf Div (16) A 4-6-5 Inf Div (363) A 4-6-5 FJ Div (6)
5 A 4-6-5 Inf Div (89)
7 A 4-6-5 Inf Div (59) A 4-6-5 Inf Div (64) A 4-6-5 Inf Div (226) A 2-4-4 VG Div (462)
8 A 6-8-8 PG Div (3) A 6-8-8 PG Div (15) E 4-6-5 Inf Div (198)
9 A 4-6-5 Inf Div (176) A 4-6-5 Inf Div (190) A 2-4-4 VG Div (12) A 2-4-4 VG Div (19) A 2-4-4 VG Div (36) A 2-4-4 VG Div (246) A 2-4-4 VG Div (553) A 2-4-4 VG Div (559) A 4-6-5 FJ Div (7)
11 A 4-6-5 Inf Div (180) A 2-4-4 VG Div (183) A 2-3-4 Inf Div (Tettau)
12 A 2-4-4 VG Div (363) A 2-3-4 Inf Div (406)
13 A 4-6-5 Inf Div (269) A 4-6-5 Inf Div (416) A 2-4-4 VG Div (16) A 2-4-4 VG Div (256) A 2-4-4 VG Div (361)
14 A 4-6-5 Inf Div (159) A 2-4-4 VG Div (352)
15 A 1-3-4 SS Inf Div (30 SS) A 6-8-8 PG Div (25) A 2-4-4 VG Div (18) A 4-6-5 VG Div (26) A 2-4-4 VG Div (272)
16 A 2-4-4 VG Div (276) A 2-4-4 VG Div (326) Remove— 1x Static Div 1x Inf Div
17 A 4-6-5 SS Mtn Inf Div (6 SS) A 2-4-4 VG Div (9) A 2-4-4 VG Div (47) A 2-4-4 VG Div (62) A 2-4-4 VG Div (79) A 2-4-4 VG Div (167) A 2-4-4 VG Div (212) A 2-4-4 VG Div (257) A 2-4-4 VG Div (277) A 2-4-4 VG Div (340) A 2-4-4 VG Div (344) A 2-4-4 VG Div (560) A 2-4-4 VG Div (708) A 4-6-5 FJ Div (8)` Remove— 1x Inf Div
18 A 3-5-4 Inf Div (Rassler)` Remove— 1x Static Div 1x Inf Div 1x VG Div
20 Remove— 6x Pz Div 1x PG Div 21 A 4-6-5 Mtn Inf Div (2) A 3-5-4 Inf Div (166 Res)
23 A 6-6-5 Inf Div (34 SS) A 2-5-4 Inf Div (38 SS) A 4-6-5 FJ Div (11)
24 A 3-5-4 Inf Div (Jutland) A 1-2-4 Inf Div (Schlgtr) 25 A 3-3-6 Pz KG (Clw) A 4-6-5 Inf Div (106) A 2-3-4 Inf Div (Bayern) A 1-2-4 Inf Div (Hutten)
The Gamers, Inc.
Page 15Multi-Man Publishing, LLC 403 Headquarters Drive, Suite 7, Millersville MD 21108© 2014 All Rights Reserved.
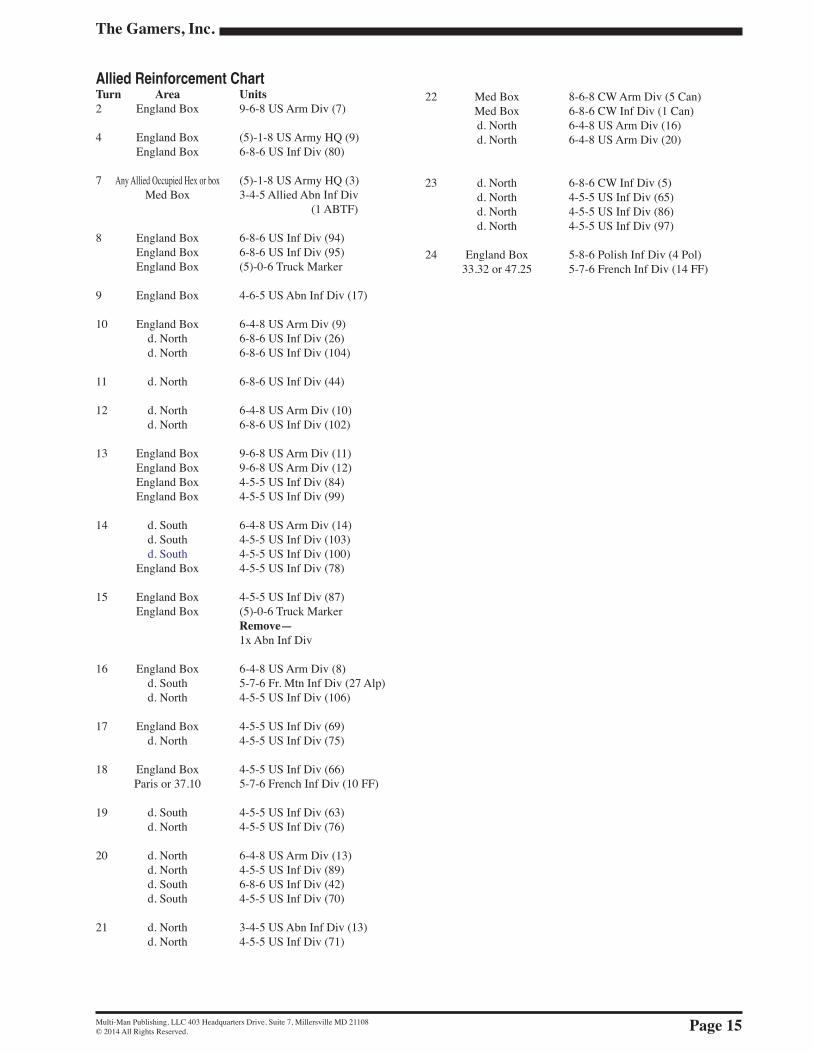
Allied Reinforcement ChartTurn Area Units2 England Box 9-6-8 US Arm Div (7)
4 England Box (5)-1-8 US Army HQ (9) England Box 6-8-6 US Inf Div (80)
7 Any Allied Occupied Hex or box (5)-1-8 US Army HQ (3) Med Box 3-4-5 Allied Abn Inf Div (1 ABTF)
8 England Box 6-8-6 US Inf Div (94) England Box 6-8-6 US Inf Div (95) England Box (5)-0-6 Truck Marker
9 England Box 4-6-5 US Abn Inf Div (17)
10 England Box 6-4-8 US Arm Div (9) d. North 6-8-6 US Inf Div (26) d. North 6-8-6 US Inf Div (104)
11 d. North 6-8-6 US Inf Div (44)
12 d. North 6-4-8 US Arm Div (10) d. North 6-8-6 US Inf Div (102)
13 England Box 9-6-8 US Arm Div (11) England Box 9-6-8 US Arm Div (12) England Box 4-5-5 US Inf Div (84) England Box 4-5-5 US Inf Div (99)
14 d. South 6-4-8 US Arm Div (14) d. South 4-5-5 US Inf Div (103) d. South 4-5-5 US Inf Div (100) England Box 4-5-5 US Inf Div (78)
15 England Box 4-5-5 US Inf Div (87) England Box (5)-0-6 Truck Marker Remove— 1x Abn Inf Div
16 England Box 6-4-8 US Arm Div (8) d. South 5-7-6 Fr. Mtn Inf Div (27 Alp) d. North 4-5-5 US Inf Div (106)
17 England Box 4-5-5 US Inf Div (69) d. North 4-5-5 US Inf Div (75)
18 England Box 4-5-5 US Inf Div (66) Paris or 37.10 5-7-6 French Inf Div (10 FF)
19 d. South 4-5-5 US Inf Div (63) d. North 4-5-5 US Inf Div (76)
20 d. North 6-4-8 US Arm Div (13) d. North 4-5-5 US Inf Div (89) d. South 6-8-6 US Inf Div (42) d. South 4-5-5 US Inf Div (70)
21 d. North 3-4-5 US Abn Inf Div (13) d. North 4-5-5 US Inf Div (71)
22 Med Box 8-6-8 CW Arm Div (5 Can) Med Box 6-8-6 CW Inf Div (1 Can) d. North 6-4-8 US Arm Div (16) d. North 6-4-8 US Arm Div (20)
23 d. North 6-8-6 CW Inf Div (5) d. North 4-5-5 US Inf Div (65) d. North 4-5-5 US Inf Div (86) d. North 4-5-5 US Inf Div (97)
24 England Box 5-8-6 Polish Inf Div (4 Pol) 33.32 or 47.25 5-7-6 French Inf Div (14 FF)

The Mighty Endeavor, revised, SCS #10
Page 16 Multi-Man Publishing, LLC 403 Headquarters Drive, Suite 7, Millersville MD 21108© 2014 All Rights Reserved.
Combat Results Table OddsInvasion Rolls --> Fortress Wetlands All other Terrain
Dice 1:3 or less 1:2 1:1 2:1 3:1 4:1 5:1 6:1 7:1+2 A2 A2 A2 A2 A2 [A2] [A2] [A2] A1 D13 A2 A2 A2 A2 [A2] [A2] D1 [A2] D1 A1 D1 A1 D14 A2 A2 [A2] [A2] D1 [A2] D1 [A2] D1 A1 D1 [A1] D1 D1r15 A2 [A2] [A2] D1 [A2] D1 [A2] D1 A1 D1 [A1] D1 D1r1 D1r26 [A2] [A2] A1 D1 A1 D1 [A1] D1 [A1] D1r1 D1r1 D2r2 D2r27 [A2] [A2] D1 A1 D1 [A1] D1r1 [A1] D1r1 D2r1 D2r2 D2r2 D2r28 [A2] D1 A1 D1 [A1] D1r1 [A1] D1r1 D2r1 D2r2 D2r2 D2r2 D2r29 A1 D1 A1 D1r1 [A1] D2r1 D2r1 D2r2 D2r2 D2r2 D2r2 D2r210 A1 D2r1 [A1] D2r1 D2r1 D2r1 D2r2 D2r2 D2r3 D2r3 D2r311 [A1] D2r2 D2r1 D2r2 D2r2 D2r3 D2r3 D3r3 D3r3 D3r312 D2r2 D2r2 D2r3 D2r3 D3r3 D3r3 D3r3 D3r3 D4r3
A—Attacker Result (Reduce [#] results by 1 step loss if the attacker is German)D—Defender Result#—Step lossr#—Retreat result (German Defenders can ignore if in a Fort hex).
Allied Air Support Table Two Dice Turns 2-3 4-5 6 7 8 9-10 11-12 1-8 3 4 4 5 6 7 8 9-13 2 3 3 4 5 6 7 14-21 1 2 3 4 5 6 7 22-25 2 3 3 4 5 6 7
#—Air Points Available
Sequence of PlayAllied Player Turn
• Reinforcement & Replacement Phase• Air Point Phase Remove old Air Zone Domination Markers Roll to determine available Air Points Expend Air Points for any Air Zones the player wants to dominate and place markers in those zones• Invasion Placement Phase• Attack HQ Announcement Phase• Air Drop Phase• Movement Phase• Combat Phase• Exploitation Phase• Supply Phase• Shipping Phase• Attack HQ Unflipping Phase
German Player Turn• Reinforcement & Replacement Phase• Movement Phase• Combat Phase• Exploitation Phase• Supply Phase
Quality Wargames Since 1988
Multi-Man Publishing
M M PM M P