Stage v166: Handheld Wireless System
62
Stage v166: Handheld Wireless System OWNER'S MANUAL
Transcript of Stage v166: Handheld Wireless System

Stage v166:Handheld Wireless System
OWNER'S MANUAL

Copyright 2013v3Samson Technologies Corp.45 Gilpin AvenueHauppauge, New York 11788-8816Phone: 1-800-3-SAMSON (1-800-372-6766)Fax: 631-784-2201 www.samsontech.com

Owner's Manual 3Stage v166: Handheld Wireless System
ENG
LISH
FRA
NÇ
AIS
DEU
TSC
HE
ESPA
ÑO
LIT
ALI
AN
O
Important Safety Information
CAUTION: TO REDUCE THE RISK OF ELECTRIC SHOCK, DO NOT REMOVE COVER (OR BACK). NO USER-SERVICEABLE PARTS INSIDE. REFER SERVICING TO QUALIFIED SERVICE PERSONNEL.This lightning flash with arrowhead symbol within an equilateral triangle is intended to alert the user to the presence of non-insulated “dangerous volt-age” within the product’s enclosure that may be of sufficient magnitude to constitute a risk of electric shock.
The exclamation point within an equilateral triangle is intended to alert the user to the presence of important operating and maintenance instructions in the literature accompanying the appliance.
If you want to dispose this product, do not mix it with general household waste. There is a separate collection system for used electronic products in accordance with legislation that requires proper treatment, recovery and recycling.
Private household in the 25 member states of the EU, in Switzerland and Norway may return their used electronic products free of charge to designated collection facilities or to a retailer (if you purchase a similar new one).
For Countries not mentioned above, please contact your local authorities for a correct method of disposal.
By doing so you will ensure that your disposed product undergoes the necessary treatment, recovery and recycling and thus prevent potential negative effects on the environment and human health.
ATTENTIONRISQUE D’ÉLECTROCUTION !
NE PAS OUVRIR !
WARNINGTO PREVENT FIRE OR SHOCK HAZARD. DO NOT USE THIS PLUG WITH AN EXTENSION CORD, RE-CEPTACLE OR OTHER OUTLET UNLESS THE BLADES CAN BE FULLY INSERTED TO PREVENT BLADE EXPOSURE. TO PREVENT FIRE OR SHOCK HAZARD. DO NOT EXPOSE THIS APPLIANCE TO RAIN OR MOISTURE. TO PREVENT ELECTRICAL SHOCK, MATCH WIDE BLADE PLUG TO WIDE SLOT AND FULLY INSERT.

4 Stage v166: Handheld Wireless System
Important Safety Information
1. Read these instructions.
2. Keep these instructions.
3. Heed all warnings.
4. Follow all instructions.
5. Do not use this apparatus near water.
6. Clean only with dry cloth.
7. Do not block any ventilation open-ings. Install in accordance with the manufacturer’s instructions.
8. Do not install near any heat sources such as radiators, heat registers, stoves, or other apparatus (including amplifiers) that produce heat.
9. Do not defeat the safety purpose of the polarized or grounding type plug. A polarized plug has two blades with one wider than the other. A grounding type plug has two blades and a third grounding prong. The wide blade or the third prong are provided for your safety. If the provided plug does not fit into your outlet, consult an electrician for replacement of the obsolete outlet.
10. Protect the power cord from being walked on or pinched particularly at the plugs, convenience receptacles, and at the point where they exit from the apparatus.
11. Only use attachments/accessories specified by the manufacturer.
12. Use only with the cart, stand, tripod, bracket, or table specified by the manufacturer, or sold with the ap-paratus. When a cart is used, use caution when moving the cart/apparatus combina-tion to avoid injury from tip-over.
13. Unplug the apparatus during light-ening, sort or when unused for long periods of time. Refer all servicing to qualified personnel. Service is re-quired when the apparatus has been damaged in any way, such as power supply cord or plug is damaged, liq-uid has been spilled or objects have fallen into the apparatus has been exposed to rain or moisture, does not operate normally, or has been dropped.
14. This appliance shall not be exposed to dripping or splashing water and that no object filled with liquid such as vases shall be placed on the ap-paratus.
15. Caution-to prevent electrical shock, match wide blade plug wide slot fully insert.
16. Please keep a good ventilation envi-ronment around the entire unit.
17. The direct plug-in adapter is used as disconnect device, the disconnect device shall remain readily operable.
18. Batteries(battery pack or batteries installed) shall not be exposed to excessive heat such as sunshine, fire or the like.

Owner's Manual 5Stage v166: Handheld Wireless System
ENG
LISH
FRA
NÇ
AIS
DEU
TSC
HE
ESPA
ÑO
LIT
ALI
AN
O
Table of Contents
Introduction. . . . . . . . . . . . . . . . . . . . . . . . . . . . . . . . . . . . . . . . . . . . . . . . 6
Receiver Controls and Features. . . . . . . . . . . . . . . . . . . . . . . . . . . . . . . . . . . . 7
Transmitter Controls and Features. . . . . . . . . . . . . . . . . . . . . . . . . . . . . . . . . . 8
Quick Start Guide . . . . . . . . . . . . . . . . . . . . . . . . . . . . . . . . . . . . . . . . . . . . 9
Specifications . . . . . . . . . . . . . . . . . . . . . . . . . . . . . . . . . . . . . . . . . . . . . . 12
Troubleshooting . . . . . . . . . . . . . . . . . . . . . . . . . . . . . . . . . . . . . . . . . . . . 13

6 Stage v166: Handheld Wireless System
Congratulations on purchasing the Samson Stage v166 Wireless Microphone System! The Stage v166 system is the perfect solution for any application requiring high quality, wireless micro-phones in an easy to use, compact package. The system features the SR166 receiver and HT6 handheld microphone transmitter.
With the Stage v166 system, you’ll have great sound quality with clear reception, and the ability to walk freely around your venue. For any live sound application (karaoke, schools, conferences, houses of worship, etc.) the Stage v166 is the ideal tool for your wireless microphone needs. The Stage v166 always provides outstanding performance and reliability.
Although this product is designed for intuitive operation, we suggest you take some time to go through these pages to learn how we’ve implemented a number of unique features, and to get step-by-step instructions for setting up your system. If your Stage v166 was purchased in the United States, you’ll also find a warranty card enclosed—please don’t forget to fill it out and mail it in so that you can receive online technical support, and so that we can send you updated information about this and other Samson products. Also, be sure to check out our website (www.samsontech.com) for complete information about our full product line.
We recommend that you record your serial number in the space provided below, for future refer-ence.
Serial number:_______________________________
Date of purchase:____________________________
Should your unit ever require servicing, a Return Authorization (RA) number must be obtained before shipping your unit to Samson. Without this number, the unit will not be accepted. Please call Samson at 1-800-3SAMSON (1-800-372-6766) for an RA number prior to shipping your unit. Please retain the original packing materials and, if possible, return the unit in the original carton. If you purchased your Samson product outside the United States, please contact your local dis-tributor for warranty information and service.
Features
• Professional, handheld wireless system.
• Easy setup and operation.
• Crystal-controlled, Superheterodyne circuitry for clear and reliable reception.
• ¼” output
• Up to 250’ of line-of-sight operating range.
• HT6 handheld microphone transmitter with mute switches
• Transmitter provides nine hours of battery life, using standard 9-volt batteries.
Introduction

Owner's Manual 7Stage v166: Handheld Wireless System
ENG
LISH
FRA
NÇ
AIS
DEU
TSC
HE
ESPA
ÑO
LIT
ALI
AN
O
1. Power Switch - Press to turn the receiver on or off.
2. Power Indicator - Lights red when the receiver is powered on.
3. Volume Control - Rotate to adjust the level of the audio signal out-put from receiver.
4. RF Indicator - Lights green when the HT6 transmitter is powered on, and there is an RF signal present and detected by the receiver.
5. Antenna - The antenna mountings allow full rotation for optimum placement. In normal operation, both antennas should be placed in a vertical position. The anten-nas can be folded inward for convenience when transporting the SR166.
6. DC Input - Connect the sup-plied 12-volt, 200 mA power adapter here. WARNING: The substitution of any other kind of power adapter can cause severe dam-age to the SR166 and will void your warranty.
7. Output - Use this unbalanced, ¼” jack to connect the SR166 receiver to the line level input of a mixer, amplifier, or other audio equipment.
8. Adaptor Strain Relief - Loop the included adaptor’s cord through the strain relief to prevent the plug from accidentally detaching from the receiver.
6 87
234 1 5
SR166 Receiver Controls and Features
6 87
234 1 5

8 Stage v166: Handheld Wireless System
1. Audio ON/OFF Switch - When set to the ON position, audio signal is transmitted. When set to the OFF position, the audio signal is muted. Note that moving this switch to the OFF position does not turn off the transmitter power—it is simply a way to temporarily mute the transmission of audio signal. When not in use for extended periods, the transmitter power should be turned off by using the power ON/OFF switch.
2. Power ON/OFF Switch - Use this switch to turn the HT6 on or off (to conserve battery power, be sure to leave it off when not in use). Be sure to mute the audio signal at your external mixer or amplifier before turning transmitter power on or off, or an audible pop may result.
3. Power Indicator - LED lights green when the transmitter is powered on.
4. Battery Compartment - Insert a standard 9-volt alkaline battery here. Be sure to observe the plus and minus polarity markings when installing the battery. We recommend the Duracell MN 1604 type battery for use with this device. Although rechargeable Ni-Cad batteries can be used, they do not supply adequate current for more than four hours. WARNING: Do not insert the battery backwards; doing so can cause severe damage to the HT6 and will void your warranty.
5. Channel Marking - Printed number corresponding to the appro-priate channel on the SR166 receiver.
HT6 Transmitter Controls and Features
13
4
5
2
13
4
5
2

Owner's Manual 9Stage v166: Handheld Wireless System
ENG
LISH
FRA
NÇ
AIS
DEU
TSC
HE
ESPA
ÑO
LIT
ALI
AN
O
Quick Start Guide
Follow these basic procedures for setting up and using your Stage v166 Series Wireless System.
1. Connect the SR166 receiver power adaptor to the rear panel DC input, and then to an electrical outlet.
2. Connect the receiver’s appropriate ¼” output to the input of a mixer, stereo, karaoke machine, or any other line level input (see below). Use the included ¼” to ¼” cable to connect the SR166 receiver to a mixer. Use the included ¼” to ¼” cable to connect the SR166 receiver to karaoke machine.
1. Plugging the receiver into the wall.
2. Plugging the receiver into a mixer using 1/4" - 1/4" cable.
4. Plugging the receiver into a Karaoke machine using 1/4" - 1/4" cable.
1. Plugging the receiver into the wall.
2. Plugging the receiver into a mixer using 1/4" - 1/4" cable.
4. Plugging the receiver into a Karaoke machine using 1/4" - 1/4" cable.
1. Plugging the receiver into the wall.
2. Plugging the receiver into a mixer using 1/4" - 1/4" cable.
4. Plugging the receiver into a Karaoke machine using 1/4" - 1/4" cable.

10 Stage v166: Handheld Wireless System
3. While holding the upper section of the HT6 transmitter, rotate the bottom section and slide down to expose the battery compartment. Insert a standard 9-volt alkaline battery, being sure to follow the plus and minus polarity markings.
4. Turn on the HT6 transmitter by sliding the POWER switch to the right, and replace the bottom section.
5. Place the SR166 receiver where it will be used (the general rule of thumb is to maintain “line of sight” between the receiver and transmitters so that the person(s) using the transmitter can see the receiver). Turn on the power of the SR166 receiver.
6. Turn on the connected amplifier and/or mixer, but keep its volume all the way down. Next, make sure that your transmitter is un-muted by setting its Audio switch to ON. Then, set the Volume Control knob on the SR166 fully clockwise; this is unity gain. Speak or sing into the mic at a normal performance level while slowly raising the volume of your amplifier/mixer until the desired level is reached.
Quick Start Guide
1. Plugging the receiver into the wall.
2. Plugging the receiver into a mixer using 1/4" - 1/4" cable.
4. Plugging the receiver into a Karaoke machine using 1/4" - 1/4" cable.
Owner's Manual 11Stage v166: Handheld Wireless System
ENG
LISH
FRA
NÇ
AIS
DEU
TSC
HE
ESPA
ÑO
LIT
ALI
AN
O
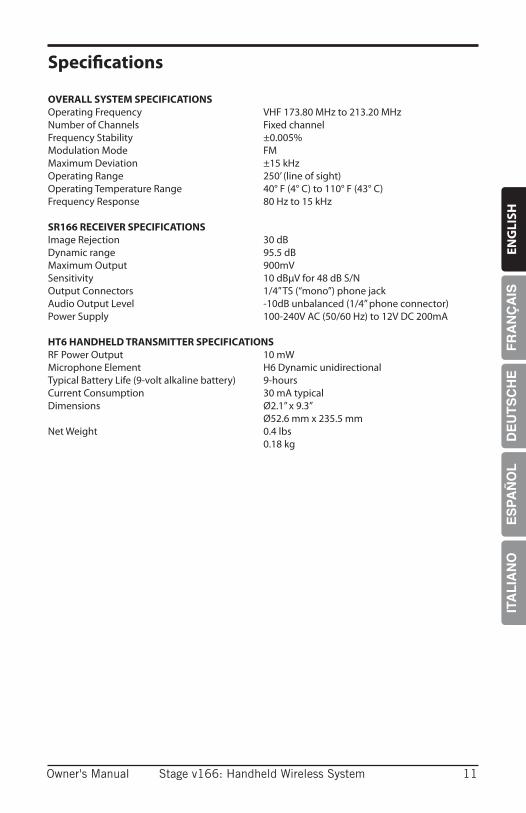
OVERALL SYSTEM SPECIFICATIONSOperating Frequency VHF 173.80 MHz to 213.20 MHzNumber of Channels Fixed channelFrequency Stability ±0.005%Modulation Mode FMMaximum Deviation ±15 kHzOperating Range 250’ (line of sight)Operating Temperature Range 40° F (4° C) to 110° F (43° C)Frequency Response 80 Hz to 15 kHz
SR166 RECEIVER SPECIFICATIONSImage Rejection 30 dB Dynamic range 95.5 dB Maximum Output 900mVSensitivity 10 dBµV for 48 dB S/N Output Connectors 1/4” TS (“mono”) phone jackAudio Output Level -10dB unbalanced (1/4” phone connector)Power Supply 100-240V AC (50/60 Hz) to 12V DC 200mA
HT6 HANDHELD TRANSMITTER SPECIFICATIONSRF Power Output 10 mW Microphone Element H6 Dynamic unidirectionalTypical Battery Life (9-volt alkaline battery) 9-hoursCurrent Consumption 30 mA typicalDimensions Ø2.1” x 9.3” Ø52.6 mm x 235.5 mm Net Weight 0.4 lbs 0.18 kg
Specifications

12 Stage v166: Handheld Wireless System
Issue Solutions
No Audio
Turn on the HT6 transmitter using the Power ON/OFF switch.
Ensure the HT6 transmitter’s batteries are installed correctly.
Check that the HT6 Audio ON/OFF switch is in the ON position.
Confirm that the SR166 adaptor is correctly connected and plugged into an electrical outlet.
Turn on the SR166 receiver.
Make sure the SR166 output and audio input connections are securely connected.
Ensure that the SR166 receiver and HT6 transmitters are in line of sight with one another.
Check the receiver and audio input device level controls.
Distorted Audio
Check the receiver output level and audio input device level.
Check the HT6’s batteries and replace if low.
Another transmitter may be broadcasting on the same channel. Turn off transmitter that may be causing interference.
Audio Dropout
The transmitter may be too far away from the receiver. Move closer to the receiver, or reposition the antennas.
Remove any sources that may cause RF interference, such as cell phones, cordless phones, lighting equipment, computers, etc.
Transmitters and Receiver on Different Channels
Contact your Samson reseller or distributor for assistance.
Troubleshooting

FCC Rules and Regulations
Samson wireless receivers are certified under FCC Rules part 15 and transmitters are certified under FCC Rules part 74.
Licensing of Samson equipment is the user’s responsibility and licensability depends on the user’s classification, appli-
cation and frequency selected.
This device complies with RSS-210 ofIndustry & Science Canada.
Operation is subject to the following two conditions:(1) this device may not cause harmful interference and (2) this device must accept any interference received, includ-
ing interference that may cause undesired operation.
NOTE: This equipment has been tested and found to comply with the limits for a Class B digital device, pursuant to Part 15 of the FCC Rules. These limits are designed to provide reasonable protection against harmful interference in a residential installation. This equipment gener-ates, uses and can radiate radio frequency energy and, if not installed and used in accordance with the instructions, may cause harmful inter-ference to radio communications. However, there is no guarantee that interference will not occur in a particular installation. If this equipment does cause harmful interference to radio or television reception, which can be determined by turning the equipment off and on, the user is encouraged to try to correct the interference by one or more of the fol-lowing measures:
• Reorient or relocate the receiving antenna.• Increase the separation between the equipment and receiver.• Connect the equipment into an outlet on a circuit different from that
to which the receiver is connected.• Consult the dealer or an experienced Radio/TV technician for help.
WARNING: Changes or modifications not expressly approved by the party responsible for compliance could void the user’s authority to operate the equipment.


Owner's Manual 15Stage v166 : Système sans fils portable
ENG
LISH
FRA
NÇ
AIS
DEU
TSC
HE
ESPA
ÑO
LIT
ALI
AN
OCET APPAREIL EST CONFORME À LA PARTIE 15 DU RÈGLEMENT DE LA FCC, CLASSE B. LE FONCTIONNEMENT EST SOUMIS AUX DEUX CONDITIONS SUIVANTES : (1) CET APPAREIL NE PEUT CAUSER D'INTERFÉRENCES NUISIBLES ET (2) IL DOIT ACCEPTER TOUTE INTERFÉRENCE REÇUE, NOTAMMENT CELLES POUVANT ENTRAÎNER UN DYSFONCTIONNEMENT. IDÉAL POUR TOUTE UTILISATION AU BUREAU OU À DOMICILE.
Consignes de sécurité importantes
ATTENTION : POUR ÉVITER TOUT RISQUE D'ÉLECTROCUTION, N'ÔTEZ PAS LE COU-VERCLE (NI LE DOS) DU BOITIER. CET APPAREIL NE CONTIENT AUCUNE PIÈCE REM-PLAÇABLE PAR L'UTILISATEUR. Confiez toutes les réparations à du personnel qualifié.Le signe avec un éclair dans un triangle prévient l’utilisateur de la présence d’une tension dangereuse et non isolée dans l’appareil. Cette tension constitue un risque d’électrocution.
Le signe avec un point d’exclamation dans un triangle prévient l’utilisateur d’instructions importantes relatives à l’utilisation et à la maintenance du produit.
Si vous souhaitez jeter ce produit, ne le mettez pas le container pour déchets ménagers. Le ramassage des équipements électroniques se fait séparément pour assurer le recyclage correct de ces équipements.
Les citoyens des 25 états membres de la CEE, les Suisses et les Norvégiens peuvent apporter leurs produits électroniques sans frais dans des points de collecte désignés, ou auprès d'un revendeur (lorsqu'un nouveau produit est acheté).
Pour les pays non mentionnés ci-dessus, il faut contacter les autorités locales pour connaitre la marche à suivre.
En procédant ainsi, vous êtes assuré que votre produit sera correctement traité, récupéré et recyclé afin de prévenir les effets négatifs possibles sur l'environnement et la santé.
ATTENTION RISQUE D’ÉLECTROCUTION !
NE PAS OUVRIR !
ATTENTION POUR EVITER LES RISQUES D'INCENDIE OU DE DECHARGE ELECTRIQUE, ne pas utilisez cette prise de courant avec un fil d'extention ; prise de contact ou additionnez l'autre sortie sauf que les tranchants peuvent être complètement insérés pour prévenir l'exposition de tranchant. POUR EVITER LES RISQUES D'INCENDIE OU DE DECHARGE ELECTRIQUE, N'EXPOSEZ PAS CET APPAREIL A LA PLUIE OU L'HUMIDITE POUR PREVENIR LES CHOCS ELECTRIQUES, N'INSEREZ LA LAME LARGE DE LA FICHE QUE DANS LA FENTE DE LARGE DE LA PRISE.

16 Stage v166 : Système sans fils portable
Consignes de sécurité importantes
1. Lisez ces instructions.
2. Conservez ces instructions.
3. Respectez les avertissements.
4. Suivez les instructions..
5. N'utilisez pas cet appareil à proximité d'un point d'eau.
6. Nettoyez-le avec un chiffon sec.
7. N'obstruez en aucun cas les orifices d'aéra-tion. Installez en respectant les consignes du fabricant.
8. Ne l'installez pas à proximité d'une source de chaleur telle qu'un radiateur, une bouche de chaleur, un poêle ou d'autres appareils (dont les amplificateurs) produi-sant de la chaleur.
9. Ne détériorez pas la sécurité de la fiche polarisée ou de la fiche de terre. Une prise polarisée est composée de deux fiches dont l'une est plus large que l'autre. Une fiche de terre comporte deux lames et une troisième broche de mise à la terre. La lame la plus large ou la troisième broche assure la sécurité de l'utilisateur. Si la prise de l'appareil ne rentre pas dans la prise d'alimentation secteur de votre installa-tion, veuillez consulter un électricien agréé pour le remplacement de la prise secteur.
10. Placez le cordon d'alimentation de sorte qu'il ne soit ni piétiné ni comprimé, en par-ticulier au niveau de la fiche de connexion, de la prise de courant et du point de sortie de l'appareil.
11. Utilisez uniquement les accessoires et le matériel de fixation recommandés par le fabricant.
12. Utilisez uniquement le chariot, le pied, le trépied, le support ou la table recommandé par le fa-bricant ou fourni avec l'ap-pareil. Lors de l'utilisation
d'un chariot, veuillez faire attention lors du déplacement de l'ensemble chariot/ appareil afin d'éviter toute blessure en cas de renversement.
13. Débranchez cet appareil pendant les orages ou au cours des longues pé-riodes de non utilisation. Faites effectuer toutes les réparations nécessaires par du personnel qualifié. Des réparations sont nécessaires si l'appareil est endommagé d'une façon quelconque, par exemple : cordon ou prise d'alimentation endom-magé, liquide renversé ou objet tombé à l'intérieur de l'appareil, exposition de l'ap-pareil à la pluie ou à l'humidité, appareil qui ne marche pas normalement ou que l'on a fait tomber.
14. Cet appareil ne doit pas être exposé à des éclaboussures ou des gouttes d'eau et aucun objet rempli de liquide comme un vase ne doit se trouver à proximité.
15. Attention - Pour prévenir les chocs élec-triques, n'insérez la lame large de la fiche que dans la fente large de la prise.
16. Veillez à ce que la zone autour de l'unité soit bien aérée.
17. L'adaptateur à tête enfichable est utilisé comme dispositif de débranchement et doit toujours être prêt à fonctionner.
18. Les batteries (kit batterie ou batteries installées) ne peuvent pas être exposées à une chaleur excessive telle que celle du soleil, d'un feu ou d'une source similaire.

Owner's Manual 17Stage v166 : Système sans fils portable
ENG
LISH
FRA
NÇ
AIS
DEU
TSC
HE
ESPA
ÑO
LIT
ALI
AN
O
Table des matières
Introduction. . . . . . . . . . . . . . . . . . . . . . . . . . . . . . . . . . . . . . . . . . . . . . . 18
Commandes et caractéristiques du récepteur SR166 . . . . . . . . . . . . . . . . . . . . . 19
Commandes et caractéristiques de l'émetteur HT6 . . . . . . . . . . . . . . . . . . . . . . 20
Guide de prise en main. . . . . . . . . . . . . . . . . . . . . . . . . . . . . . . . . . . . . . . . 21
Spécifications . . . . . . . . . . . . . . . . . . . . . . . . . . . . . . . . . . . . . . . . . . . . . . 23
Assistance technique . . . . . . . . . . . . . . . . . . . . . . . . . . . . . . . . . . . . . . . . . 24

18 Stage v166 : Système sans fils portable
Merci d’avoir choisi ce système sans fils Samson Stage v166 Microphone ! Le système Stage v166 convient parfaitement à toute application nécessitant des micros sans fils de très bonne qualité, compacts et faciles à utiliser. Le système est équipé d'un récepteur SR166 et d'un émetteur micro portable HT6.
Grâce à votre système Stage v166, vous obtiendrez un son clair et de grande qualité tout en ayant la possibilité d'aller et venir librement. Peu importe l'événement (karaoké, écoles, conférences, lieux de culte, etc.), le système Stage v166 est un outil qui satisfera pleinement vos besoins en mi-cro sans fils. Le Stage v166 vous offrira toujours des performances et une fiabilité exceptionnelles.
Même si ce produit a été conçu pour un fonctionnement intuitif, nous vous recommandons de lire les pages suivantes pour prendre connaissance des caractéristiques uniques que nous avons mises en place et des informations détaillées pour le réglage devotre système. Si vous avez acheté ce système Stage v166 aux USA, vous trouverez une carte de garantie — remplissez-la et renvoyez-la pour bénéficier de l’assistance en ligne et pour recevoir les informations sur les produits SamsonVous trouverez également une carte de garantie : n’oubliez pas de la remplir et de nous l’envoyer. Vous pourrez ainsi bénéficier de l’assistance technique en ligne et recevoir les informations sur les produits Samson. Pensez également à consulter notre site Internet (www.samsontech.com) pour obtenir des informations détaillées sur toute notre gamme de produits.
Prenez le temps de noter le numéro de série et la date d'achat pour toute référence ultérieure.
Numéro de série : _______________________________
Date d'achat : __________________________________
Pour faire réparer vos enceintes, vous devez tout d’abord obtenir un numéro de retour auprès de Samson. Sans ce numéro, l’appareil ne sera pas accepté. Appelez Samson au : 1-800-3SAMSON (1-800-372-6766) pour obtenir ce numéro avant de renvoyer votre unité. Conservez, si possible, l’emballage d’origine afin de l’utiliser en cas de retour. Pour les produits Samson achetés hors des USA, contactez votre revendeur pour obtenir les informations sur la garantie et les réparations.
Caractéristiques
• Système sans fils portable professionnel
• Utilisation et prise en main faciles.
• Circuit superhétérodyne géré par quartz offrant une réception claire et fiable
• Sortie ¼”
• Portée de 205' (en ligne directe dégagée.
• Micro portable émetteur professionnels HT6 avec touches de coupure
• Chaque émetteur HT6 offre une autonomie de neuf heures, avec une pile de 9 Volts stan-dard.
Introduction

Owner's Manual 19Stage v166 : Système sans fils portable
ENG
LISH
FRA
NÇ
AIS
DEU
TSC
HE
ESPA
ÑO
LIT
ALI
AN
O
1. Interrupteur - Appuyez pour placer le récepteur sous/hors tension.
2. Témoin - S’allume en rouge avec la mise sous tension.
3. Volume - Tournez le bouton pour régler le niveau de sortie du signal du récepteur.
4. Témoin HF - S’allume en vert lorsque le micro portable émet-teur HT6 est sous tension, et lorsque le signal HF est présent et détecté par le récepteur.
5. Antenne - Les embases d’an-tennes permettent leur rotation pour une position optimum. En utilisation normale, les deux an-tennes doivent être verticales. Les antennes peuvent être pliées vers l’avant, ce qui facilite le transport du récepteur SR166.
6. Embase DC - - Reliez l’adapta-teur secteur 12 Volts (200 mA) fourni à cette embase. ATTENTION : L’utilisation d’un autre adaptateur secteur peut causer des dommages sévères au SR166, et annule la garantie
7. Sortie - Utilisez ce Jack asymétrique, ¼”pour connecter le récepteur SR166 à l’entrée ligne d’une console de mixage, d’un amplificateur, ou tout autre équipement audio.
8. Passe-câble - Enroulez le cordon de l’adaptateur secteur dans le passe-câble pour éviter que la fiche d’alimentation soit accidentellement déconnectée.
6 87
234 1 5
Commandes et caractéristiques du récepteur SR166
6 87
234 1 5

20 Stage v166 : Système sans fils portable
1. Interrupteur Audio ON/OFF - En position ON, le signal audio est transmis En position OFF, le signal audio est coupé. Notez que lorsque vous placez l’interrupteur en position OFF, vous ne placez pas le micro hors tension — vous ne faites que couper la trans-mission HF du signal audio. Lorsque vous ne l’utilisez plus, placez l’émetteur hors tension avec l’interrupteur ON/OFF.
2. Interrupteur ON/OFF - Utilisez cet interrupteur pour placer l’inter-rupteur HT6 sous/hors tension (pour économiser la pile, laisser le micro hors tension lorsque vous ne l’utilisez pas). Veillez à couper le signal audio sur la console de mixage ou l’ampli-ficateur externe avant de placer l’émetteur sous/hors tension pour éviter tout bruit de pop violent.
3. Témoin Led - Ce témoin s’allume en vert lorsque vous placez l’émet-teur sous tension.
4. Compartiment de la pile - Insérez une pile de 9 Volts alcaline standard dans ce compartiment. Respectez les polarités (+ et -) de la pile. Nous conseillons la pile Duracell MN 1604 avec cet émetteur. Bien que vous puissiez utiliser des accumulateurs rechargeables au Ni-Cad, ceux-ci ne fonctionnent que pendant 4 heures. ATTENTION : Veillez à ne pas insérer la pile à l’envers ; ceci endom-magerait sérieusement le HT6 et annulerait la garantie.
5. Numéro de canal - Le numéro sérigraphié correspond au numéro de canal sur le récepteur SR166.
Commandes et caractéristiques de l'émetteur HT6
13
4
5
2
13
4
5
2

Owner's Manual 21Stage v166 : Système sans fils portable
ENG
LISH
FRA
NÇ
AIS
DEU
TSC
HE
ESPA
ÑO
LIT
ALI
AN
O
Guide de prise en main
Procédez comme suit pour installer et utiliser votre système sans fil Stage v166 :
1. Connectez l’adaptateur secteur entre l’embase DC à l’arrière du récepteur SR166 et la prise électrique.
2. Connectez la sortie en Jack¼” correspondant à l’émetteur à l’entrée d’une console de mixage, d’un amplificateur, d’une machine de karaoké, ou à l’entrée de tout équipement à entrée ligne (voir ci-dessous). Utilisez le cordon Jack¼” ¼” fourni pour relier le récepteur SR166 à la console de mixage.
Utilisez le cordon adaptateur¼” ¼” fourni pour relier le récepteur SR166 à un équipement de karaoké.
1. Plugging the receiver into the wall.
2. Plugging the receiver into a mixer using 1/4" - 1/4" cable.
4. Plugging the receiver into a Karaoke machine using 1/4" - 1/4" cable.
1. Plugging the receiver into the wall.
2. Plugging the receiver into a mixer using 1/4" - 1/4" cable.
4. Plugging the receiver into a Karaoke machine using 1/4" - 1/4" cable.
1. Plugging the receiver into the wall.
2. Plugging the receiver into a mixer using 1/4" - 1/4" cable.
4. Plugging the receiver into a Karaoke machine using 1/4" - 1/4" cable.

22 Stage v166 : Système sans fils portable
3. Tout en tenant fermement la partie supérieure de l’émetteur HT6, faites tourner la partie inférieure et faites-la glisser vers le bas pour ouvrir le compartiment de la pile Insérez une pile alcaline de 9 Volts standard, en respectant les polarités.
4. Placez l’émetteur HT6 sous tension en plaçant l’interrupteur POWER sur la droite et replacez la section inférieure du micro.
5. Placez le récepteur SR166 où il sera utilisé pendant la prestation (pensez à conserver une ligne de mire directe entre l’émetteur et le récepteur, exempte de tout obstacle — l’utilisateur du micro doit voir le récepteur). Placez le récepteur SR166 sous tension.
6. Placez la console de mixage ou l’amplificateur connecté, en veillant à régler son volume au minimum. Veillez à ce que la transmission de l’émetteur soit assurée, en veillant à ce que le sélecteur Audio soit en position ON. Ensuite, montez le bouton de Volume du SR166 au maximum, ce qui correspond au gain unitaire. Parlez ou chantez normalement dans le micro tout en montant progressivement le volume de votre amplificateur/mélangeur jusqu’à obtenir le niveau sonore souhaité.
Guide de prise en main
1. Plugging the receiver into the wall.
2. Plugging the receiver into a mixer using 1/4" - 1/4" cable.
4. Plugging the receiver into a Karaoke machine using 1/4" - 1/4" cable.

Owner's Manual 23Stage v166 : Système sans fils portable
ENG
LISH
FRA
NÇ
AIS
DEU
TSC
HE
ESPA
ÑO
LIT
ALI
AN
O
CARACTÉRISTIQUES SYSTÈME GÉNÉRALESFréquence VHF 173.80 MHz à 213.20 MHzNombre de canaux Canal fixeStabilité en fréquence ±0,005 %Mode de modulation FMDéviation maximum ±15 kHzPortée 250' (en ligne directe)Plage de température de fonctionnement 4° C à 43° CRéponse en fréquence 80 Hz à 15 kHz
CARACTÉRISTIQUES DU RÉCEPTEUR SR166Réjection d’image 3 0 dB Plage dynamique 95,5 dB Niveau de sortie maximum ±900mVSensibilité 10 dBµV pour un signal/bruit de 48 dB Connecteurs de sortie Jacks 1/4” monoNiveaux de sorties audio -10 dB asymétrique (Jack 1/4")Alimentation 100-240 Vca (50/60 Hz) vers 12 Vcc, 200mA
CARACTÉRISTIQUES DU MICRO PORTABLE ÉMETTEUR HT6Puissance HF 10 mW Élément du micro Capsule H6, dynamique, unidirectionnelleAutonomie type (pile alcaline de 9 Volts) 9 heuresConsommation en courant 30 mA, typeDimensions Ø2.1” x 9.3” Ø52.6 mm x 235.5 mm Poids net 0,4 lbs 0,18 kg
Spécifications

24 Stage v166 : Système sans fils portable
Problème Solutions
Pas de signal audio
Placez l’émetteur HT6 sous tension avec l’interrupteur ON/OFF
Vérifiez que la pile de l’émetteur HT6 soit installée correctement
Vérifiez que l’interrupteur Audio ON/OFF du HT6 soit sur ON.
Vérifiez que l’adaptateur secteur SR266 soit correctement connecté et relié à une prise secteur.
Placez le récepteur SR166 sous tension.
Vérifiez que la sortie audio du SR166 et les entrées audio de tous les équipements soient correctement connectées.
Vérifiez que le récepteur SR166 et les émetteurs HT6 soient en ligne directe.
Vérifiez le réglage de niveau sur le récepteur et sur la console de mixage.
Distorsion audio
Vérifiez le réglage de niveau sur le récepteur et sur la console de mixage.
Contrôlez la pile de l’émetteur HT6. Remplacez-la si besoin est.
Il se peut qu’un autre émetteur utilise la même fréquence que vous. Placez l’émetteur qui semble causer le problème hors tension.
Décrochages audio
L’émetteur est trop loin du récepteur. Rapprochez-vous du récep-teur, ou essayez de modifier la position des antennes.
Placez hors tension toutes les sources qui peuvent causer des interférences HF, comme les téléphones portables, sans fil, équi-pements d’éclairage, ordinateurs, etc.
L’émetteur et le récep-teur sont sur des canaux différents
Contactez votre revendeur ou votre distributeur Samson et demandez son aide.
Assistance technique

Régulations FCC
Les systèmes Samson répondent aux normes FCC, alinéa 15 et les émetteurs répondent aux normes FCC, alinéa 74.L’obtention des licences pour l’utilisation des produits
Samson est de la responsabilité du client et dépend du pays d’utilisation.
Cet appareil est conforme à RSS-310 de l'industrie canadienne.Le fonctionnement du dispositif est soumis aux deux conditions
suivantes :(1) cet appareil ne doit pas causer d’interférences et
(2) cet appareil doit fonctionner en présence d’interférences externes, ce qui comprend les interferences qui peuventgénérer
un dysfonctionnement.
REMARQUE : Cet équipement a été testé et déclaré conforme aux limites pour appareils numériques de classe B, selon la section 15 des règlements de la FCC. Ces restrictions visent à garantir une protection suffisante contre les interférences nuisibles dans une installation à domicile. Cet appareil génère et utilise un rayonnement de fréquence radio et peut causer des interférences nuisibles aux communications radio s'il n'est pas installé ou utilisé conformément aux instructions. Cependant, il n'existe aucune garantie contre ces interférences dans le cas où l'installation n'est pas conforme. Si cet appareil cause des interfé-rences nuisibles à la réception des signaux de radio ou de télévision, ce qui peut être déterminé en allumant et en éteignant l'appareil, l'utilisa-teur peut tenter de résoudre le problème de l'une des façons suivantes :
- Réorientez ou repositionnez l'antenne de réception.- Augmentez la distance séparant l'équipement du récepteur.• Branchez l'appareil sur un circuit différent de celui du récepteur.• Demandez conseil à un fournisseur ou technicien radio/TV spécialisé.
ATTENTION : Les changements ou les modifications non expressément approuvées par le fabricant peuvent annuler l'autorisation de l'utilisa-teur à faire fonctionner l'équipement.


Owner's Manual 27Stage v166: Handheld Wireless System
ENG
LISH
FRA
NÇ
AIS
DEU
TSC
HE
ESPA
ÑO
LIT
ALI
AN
ODIESES GERÄT ENTSPRICHT DEM TEIL 15 DER VERORDNUNGEN DER KLASSE B. DER BETRIEB UNTERLIEGT FOLGENDEN ZWEI BEDINGUNGEN: (1) DIESES GERÄT DARF KEINE GEFÄHRLICHEN STÖRUNGEN VERURSACHEN UND (2) DIESES GERÄT MUSS STÖRUNGEN AKZEPTIEREN, DIE EINEN UNERWÜNSCHTEN BETRIEB DIESES GERÄTS VERURSACHEN KÖNNEN. GEEIGNET FÜR DEN EINSATZ ZU HAUSE UND IM BÜRO.
Wichtige Sicherheitshinweise
ACHTUNG: UM DAS RISIKO EINES ELEKTRISCHEN SCHLAGS ZU REDUZIEREN NICHT DIE HINTERE ABDECKUNG ENTFERNEN. ES ENTHÄLT KEINE VOM BENUTZER ZU WARTENDEN TEILE. ÜBERGEBEN SIE DAS GERÄT NUR QUALIFIZIERTEM PERSONAL ZUR REPARATUR.Dieser Blitz mit einem Pfeil als Symbol in einem gleichseitigen Dreieck soll den Benutzer auf das Vorhandensein von “gefährlicher Spannung” im Ge-häuse des Produkts hinweisen. Diese Spannung ist unter Umständen groß genug, um ein Risiko für einen elektrischen Schlag darzustellen.
Der Ausrufungszeichen in einem gleichseitigen Dreieck soll den Benutzer in der mit dem Gerät mitgelieferten Dokumentation auf eine wichtige Be-triebs- oder Wartungsanweisung hinweisen.
Wenn Sie das Produkt entsorgen möchten, geben Sie es nicht in den Hausmüll. In Übereinstimmung mit der Gesetzgebung existiert ein separates Sammelsystem für elektrische und elektronische Produkte. Diese Gesetze fordern eine angemessene Behandlung, Verwertung und Wiederaufbereitung solcher Geräte.
Private Haushalte in den 25 Mitgliedsstaaten der EU, in der Schweiz und Norwegen können ihre elektronischen Produkte kostenlos an eine Sammelstelle oder den Händler abgeben (wenn Sie ein ähnliches Produkt wieder erwerben).
Verbraucher in Ländern, die nicht oben genannt werden, kontaktieren bitte ihre lokalen Behörden, um Informationen über eine korrekte Entsorgung zu erhalten.
Sie werden so sicherstellen, dass Ihr Produkt der notwendigen Behandlung, Verwertung und Wiederaufbereitung unter-zogen wird und eventuelle negative Auswirkungen auf die Umwelt und die Gesundheit vermieden werden.
ACHTUNG: GEFAHR EINES ELEKTRISCHEN SCHLAGS,
NICHT ÖFFNEN
WARNUNGUM EINEN ELEKTRISCHEN SCHOCK ZU VERMEIDEN, BENUTZEN SIE DEN GEPOLTEN STECKER NICHT MIT EINER VERLÄNGERUNGSSCHNUR, EINER STECKDOSE ODER ANDEREN STECKERN, ES SEI DENN, DIE KONTAKTE KÖNNEN VOLLKOMMEN HINEINGESTECKT WERDEN. UM BRANDGEFAHR UND GEFAHREN EINES SCHOCKS ZU VERMEIDEN, SETZEN SIE DAS GERÄT WEDER WASSER NOCH FEUCHTIGKEIT AUS. UM EINEN ELEKTRISCHEN SCHOCK ZU VERMEIDEN, MUSS DER BREITE FLACH-KONTAKT VOLLKOMMEN IN DIE BREITE BUCHSE EINGEFÜHRT WERDEN.

28 Stage v166: Handheld Wireless System
Wichtige Sicherheitshinweise
1. Lesen Sie diese Anweisungen.
2. Bewahren Sie diese Anweisungen auf.
3. Beachten Sie alle Warnungen.
4. Folgen Sie allen Anweisungen.
5. Benutzen Sie das Gerät nicht in der Nähe von Wasser.
6. Reinigen Sie es nur mit einem trockenen Tuch.
7. Verschließen Sie keine Ventilationsöff-nungen. Installieren Sie das Gerät gemäß den Anweisungen des Herstellers.
8. Installieren Sie es nicht in der Nähe von Wärmequellen wie Radiatoren, Heiz-körpern, Öfen oder anderen Geräten (einschließlich Verstärker), die Hitze erzeugen.
9. Umgehen Sie nicht die Sicherheitsfunk-tion des polarisierten oder geerdeten Steckers. Ein polarisierter Stecker besteht aus zwei Flachkontakten, wobei einer breiter ist als der andere. Ein Stecker mit Erdung besteht aus zwei Flachkontakten und einem dritten runden Erdungss-tift. Der breite Flachkontakt und der Erdungsstift werden aus Sicherheitsgrün-den integriert. Wenn der mitgelieferte Stecker nicht in Ihre Steckdose passt, bitten Sie einen Elektriker, die obsolete Steckdose auszutauschen.
10. Schützen Sie das Stromversorgungskabel davor, dass man darauf tritt und dass es geknickt wird, vor allem an den Steckern, Buchsenteilen und an den Punkten, an denen das Kabel aus dem Gerät kommt.
11. Benutzen Sie nur die vom Hersteller spezifizierten Zubehörteile.
12. Benutzen Sie nur Wagen, Ständer, Stative, Halter oder Tische, die vom Hersteller angegeben werden oder passend zum Gerät erhältlich sind.
Wenn ein Wagen eingesetzt wird, sollten Sie vorsichtig sein, wenn Sie den Wagen und das Gerät bewegen, um Verletzun-gen durch Umkippen zu vermeiden.
13. Ziehen Sie den Stecker des Geräts bei Gewittern oder wenn es längere Zeit nicht benutzt wird aus der Steckdose. Übergeben sie das Gerät zur Reparatur nur qualifiziertem Personal. Wenn das Gerät in irgendeiner Weise beschädigt wurde, zum Beispiel wenn das Strom-versorgungskabel oder der Stecker beschädigt sind, Flüssigkeit ausgelaufen ist oder ein Objekt in das Gerät gefallen ist oder das Gerät Regen oder Feuchtig-keit ausgesetzt wurde, es nicht normal funktioniert oder gefallen ist, muss es von einer Fachkraft werden.
14. Dieses Gerät darf nicht Wasserspritzern oder einem Wasserstrahl ausgesetzt werden und es darf keine Vase oder ein mit Wasser gefülltes Objekt auf das Gerät gestellt werden.
15. Achtung - um einen elektrischen Schock zu vermeiden, muss der breite Flachkon-takt vollkommen in die breite Buchse eingeführt werden.
16. Bitte achten Sie darauf, dass die gesamte Umgebung um das Gerät gut gelüftet ist.
17. Der Hauptstecker ist als Abschalteinrich-tung ausgelegt. Die Abschalteinrichtung muss immer betriebsbereit sein.
18. Die Batterie (Batterie oder Batterien oder Batteriepaket) darf keiner Hitze etwa Sonneneinstrahlung, Feuer oder ähnli-chen Einwirkungen ausgesetzt werden.

Owner's Manual 29Stage v166: Handheld Wireless System
ENG
LISH
FRA
NÇ
AIS
DEU
TSC
HE
ESPA
ÑO
LIT
ALI
AN
O
Inhaltsverzeichnis
Einführung . . . . . . . . . . . . . . . . . . . . . . . . . . . . . . . . . . . . . . . . . . . . . . . 30
SR166 Steuerelemente des Empfängers und Funktionen . . . . . . . . . . . . . . . . . . 31
HT6 Steuerelemente des Senders und Funktionen . . . . . . . . . . . . . . . . . . . . . . 32
Quick Start Anleitung . . . . . . . . . . . . . . . . . . . . . . . . . . . . . . . . . . . . . . . . . 33
Spezifikationen. . . . . . . . . . . . . . . . . . . . . . . . . . . . . . . . . . . . . . . . . . . . . 35
Fehlerbehebung . . . . . . . . . . . . . . . . . . . . . . . . . . . . . . . . . . . . . . . . . . . . 36

30 Stage v166: Handheld Wireless System
Herzlichen Glückwunsch für den Kauf des Samson Stage v166 Kabellosen Mikrofonsystems! Das Stage v166 System ist die perfekte Lösung für eine jede Anwendung, die qualitativ hochwertige kabellose Mikrofone in einer leicht zu bedienenden kompakten Form erfordert. Dieses System besteht aus dem SR166 Empfänger und dem tragbaren kabellosen HT6 Mikrofonsender.
Mit dem Stage v166 System werden Sie hervorragende Sound Qualität mit klarem Empfang erhalten und die Möglichkeit, sich frei am Veranstaltungsort zu bewegen. Das Stage v166 System ist das ideale Tool für jeden Live Einsatz (Karaoke, Schulveranstaltungen, Konferenzen und Gotteshäuser / Kirchen), bei dem kabellose Mikrofone erforderlich sind. Das Stage v166 bietet außergewöhnliche Leistung und Zuverlässigkeit.
Obwohl dieses Produkt für eine intuitive Bedienung ausgelegt ist, empfehlen wir Ihnen, sich die Zeit zu nehmen, diese Seiten zu lesen um zu lernen, wie wir eine Reihe von einzigartigen Funktionen implementiert haben. Sie erhalten hier ebenfalls eine Schritt-für-Schritt Anleitungen für die Einrichtung des Systems. Wenn Sie Ihr Stage v166 System in den Vereinigten Staaten erworben haben, werden Sie ebenfalls im Lieferumfang eine Garantiekarte finden — vergessen Sie bitte nicht, sie auszufüllen und einzusenden, so dass Sie Online-Support in Anspruch nehmen können und wir Ihnen aktualisierte Informationen über dieses und andere Samson Produkte zusenden können. Besuchen Sie ebenfalls unsere Website (www.samsontech.com), um Informa-tionen über unser komplettes Produktangebot zu erhalten.
Wir empfehlen Ihnen, die Seriennummer im unten dafür vorgesehenen Bereich festzuhalten, um sie später zur Hand zu haben.
Seriennummer:___________________________________
Kaufdatum:______________________________________
Falls Ihre Einheit je eine Reparatur benötigen sollte, ist eine Return Authorization (RA) Num-mer [Rücksende-Genehmigungsnummer] erforderlich, bevor Sie Ihr Gerät an die Samson schicken. Ohne diese Nummer wird das Gerät nicht angenommen. Bitte rufen Sie Samson unter 1-800-3SAMSON (1-800-372-6766) an und erbitten Sie eine RA Nummer, bevor Sie die Einheit einschicken. Bitte bewahren Sie das originale Verpackungsmaterial auf und schicken Sie das Gerät wenn möglich in der originalen Verpackung ein. Wenn Sie Ihr Samson außerhalb der Vereinig-ten Staaten erworben haben, kontaktieren Sie bitte Ihren lokalen Händler für Informationen zu Garantie und Reparaturen.
Funktionen
• Professionelles, kabelloses System.
• Leicht zu konfigurieren und zu bedienen.
• Kristallgesteuerter Zwischenfrequenzkreis für klaren und zuverlässigen Empfang.
• 1/4” Ausgang
• Reichweite bis zu 100 m Sichtlinie.
• Tragbarer HT6 Mikrofonsender mit Mute Schaltern
• Der Sender ermöglicht einen ununterbrochenen Betrieb von bis zu neun Stunden mit Standard 9-Volt Batterien.
Einführung

Owner's Manual 31Stage v166: Handheld Wireless System
ENG
LISH
FRA
NÇ
AIS
DEU
TSC
HE
ESPA
ÑO
LIT
ALI
AN
O
1. Hauptschalter - Betätigen Sie ihn, um den Empfänger ein- oder auszuschalten.
2. Stromindikator - Leuchtet rot, wenn der Empfänger einge-schaltet ist.
3. Lautstärkeregler - Drehen Sie den Regler, um den Pegel des Audio Ausgangssignals vom Empfänger einzustellen.
4. RF Indikator - Leuchtet grün, wenn der entsprechende HT6 Mikrofonsender eingeschaltet ist und ein kabelloses Signal vom Empfänger erkannt wird.
5. Antenne - Der Antennenhalter ermöglicht eine volle Umdrehung, um die optimale Stellung für den Empfang einstellen zu können. Bei normalem Betrieb sollen sich beide Antennen in vertikaler Position befinden. Die Anten-nen können für den Trans-port des SR166 nach innen geklappt werden.
6. DC Eingang - Schließen Sie hier das mitgelieferte 12-Volt, 200 mA Netzteil an. WARNUNG: Der Austausch des Netzteils durch irgendein anderes kann schwere Schäden am SR166 verursachen und die Garantie wird dadurch ungültig.
7. Ausgang - Verwenden Sie einen unabgeglichenen 1/4” Stecker, um den SR166 Empfänger an ein Line Leve Eingang eines Mixers, Verstärkers oder eines anderen Audio Geräts anzuschließen.
8. Adapter Zugentlastung - Ziehen Sie das Kabel des Netzanschlusses durch die Zugentlas-tung, um zu verhindern, dass der Stecker unbeabsichtigt vom Sender herausgezogen wird.
6 87
234 1 5
SR166 Steuerelemente des Empfängers und Funktionen
6 87
234 1 5

32 Stage v166: Handheld Wireless System
1. Audio ON/OFF Schalter - Wenn er in der ON Position befindet, wird das Audio Signal übertragen. Wenn er in der OFF Position befindet, wird das Audio Signal abgeschaltet [Mute]. Bitte beachten Sie, dass, wenn Sie den Schalter auf die OFF Position schalten, der Sender nicht ausgeschaltet wird - dies ist lediglich ein Weg, temporär die Übertragung des Audio-Signals auszuschalten. Wenn das Gerät für längere Zeit nicht genutzt wird, sollte es ausgeschaltet werden, indem der Hauptschalter, der ON/OFF Schalter ausgeschaltet wird.
2. Haupt ON/OFF Schalter - Benutzen Sie diesen Schalter, um das HT6 ein- oder auszuschalten (lassen Sie den Schalter ausgeschaltet, wenn das Gerät nicht benutzt wird, um die Batterie zu schonen). Stellen Sie sicher, das Audio Signal an Ihrem externen Mixer oder Verstärker auszuschalten, bevor Sie den Sender ein- oder ausschalten. Andern-falls kann ein hörbares Knacken erfolgen.
3. Stromindikator - Das LED leuchtet grün, wenn der Sender einge-schaltet ist.
4. Batteriefach - Setzen Sie hier eine Standard 9-Volt Alkaline Bat-terie ein. Achten Sie auf die korrekte Polung, wenn Sie die Batterie einsetzen. Wir empfehlen für dieses Gerät eine Duracell Typ MN 1604 Batterie. Obwohl aufladbare Ni-Cad Batterien eingesetzt werden können, liefern diese nicht ausreichend Energie für mehr als vier Stunden. WARNUNG: Setzen Sie die Batterie nicht rückwärts ein; dies kann schwere Schäden am HT6 System verursachen und die Garantie wird dadurch ungültig.
5. Kanalmarkierung - Gedruckte Nummer, die dem jeweiligen Kanal am SR166 Empfänger entspricht.
HT6 Steuerelemente des Senders und Funktionen
13
4
5
2
13
4
5
2

Owner's Manual 33Stage v166: Handheld Wireless System
ENG
LISH
FRA
NÇ
AIS
DEU
TSC
HE
ESPA
ÑO
LIT
ALI
AN
O
Quick Start Anleitung
Folgen Sie diesen grundlegenden Vorgehensweisen zur Einstellung und für den Einsatz Ihres Kabellosen Stage v166 Systems.
1. Schließen Sie das Netzteil des SR166 Empfängers an den DC Eingang an der Rückseite und an eine Steckdose.
2. Verbinden Sie den entsprechenden 1/4” Ausgang an den Eingang eines Mixers, Verstärkers, einer Karaoke Maschine oder irgendein Line Level Gerät (siehe unten). Benutzen Sie die zwei im Lieferumfang enthaltenen ¼” - ¼” Kabel, um den SR166 Empfänger mit einem Mixer zu verbinden. Benutzen Sie die im Lieferumfang enthaltenen ¼” - ¼” Kabel, um den SR166 Empfänger mit einer Karaoke Maschine zu verbinden.
1. Plugging the receiver into the wall.
2. Plugging the receiver into a mixer using 1/4" - 1/4" cable.
4. Plugging the receiver into a Karaoke machine using 1/4" - 1/4" cable.
1. Plugging the receiver into the wall.
2. Plugging the receiver into a mixer using 1/4" - 1/4" cable.
4. Plugging the receiver into a Karaoke machine using 1/4" - 1/4" cable.
1. Plugging the receiver into the wall.
2. Plugging the receiver into a mixer using 1/4" - 1/4" cable.
4. Plugging the receiver into a Karaoke machine using 1/4" - 1/4" cable.

34 Stage v166: Handheld Wireless System
3. Drehen Sie, während Sie den oberen Teil des HT6 Senders halten, den unteren Teil und schieben Sie ihn nach unten, um das Batteriefach zu öffnen. Setzen Sie eine Standard 9-Volt Alkaline Batterie ein. Achten Sie dabei auf die korrekte Polung.
4. Schalten Sie den HT6 Sender ein, indem Sie den POWER Schalter nach rechts schieben, und ersetzen Sie den unteren Teil.
5. Platzieren Sie den SR166 Empfänger an der Stelle, an der er eingesetzt werden soll (allgemeine Daumenregel ist, die “Sichtverbindung” zwischen dem Empfänger und dem / den Sender(n) zu halten, so dass die Person / Personen, die den Sender nutzen, den Empfänger sehen können). Schalten Sie den SR166 Empfänger ein.
6. Schalten Sie den angeschlossenen Verstärker und / oder Mixer ein, halten Sie dabei jedoch die Lautstärke niedrig. Vergewissern Sie sich als nächstes, dass Ihr Sender nicht leise geschaltet ist [Mute], indem Sie den Audio Schalter auf die ON (oben) Position stellen. Drehen Sie dann den Lautstärkeknopf am SR166 voll im Uhrzeigersinn; dies ist Einsverstärkung. Sprechen oder singen Sie in das Mikrofon mit normaler Lautstärke, während Sie langsam das Volumen an Ihrem Verstärker / Mixer erhöhen, bis Sie die gewünschte Lautstärke erreicht haben.
Quick Start Anleitung
1. Plugging the receiver into the wall.
2. Plugging the receiver into a mixer using 1/4" - 1/4" cable.
4. Plugging the receiver into a Karaoke machine using 1/4" - 1/4" cable.

Owner's Manual 35Stage v166: Handheld Wireless System
ENG
LISH
FRA
NÇ
AIS
DEU
TSC
HE
ESPA
ÑO
LIT
ALI
AN
O
ALLGEMEINE SYSTEMSPEZIFIKATIONENBetriebsfrequenz VHF 173.80 MHz to 213.20 MHzAnzahl der Kanäle Fester KanalFrequenzstabilität ±0.005%Modulationsmodus FMMaximale Abweichung ±15 kHzReichweite 100m (Sichtlinie)Betriebstemperaturbereich 40° F (4° C) bis 110° F (43° C)Frequenzgang 80 Hz bis 15 kHz
SR166 EMPFÄNGER SPEZIFIKATIONENSpiegelfrequenz 30 dB Dynamikbereich 95.5 dB Maximaler Ausgang 900mVEmpfindlichkeit 10 dBuV für 48 dB S/N Ausgangsanschlüsse 1/4” TS (“Mono”) Phone BuchseAudio Ausgangslevel -10dB unabgeglichen (1/4” Phone Anschluss)Stromversorgung 100-240V AC (50/60 Hz) nach 12V DC 200A
SPEZIFIKATIONEN DES TRAGBARER HT6 SENDERSRF Stromausgang 10 mW Mikrofon Element H6 Dynamisch unidirektionalTypische Batteriebetriebsdauer (9-Volt Alkaline Batterie) 9-hoursStromaufnahme 30 mA typischAbmessungen Ø2.1” x 9.3” Ø52.6 mm x 235.5 mm Netto Gewicht 0.4 lbs 0.18 kg
Spezifikationen

36 Stage v166: Handheld Wireless System
Ausgabe Lösungen
Kein Audio
Schalten Sie den HT6 Sender über den Haupt- ON/OFF Schalter ein.
Vergewissern Sie sich, dass die Batterien des HT6 Senders korrekt eingelegt sind.
Prüfen Sie, ob der HT6 Audio ON/OFF Schalter auf der ON Posi-tion steht.
Prüfen Sie, ob das SR166 Netzteil korrekt eingesteckt ist und richtig mit einer Steckdose verbunden ist.
Schalten Sie den SR166 Empfänger ein.
Vergewissern Sie sich, dass der SR166 Ausgang und Audio Ein-gangsanschlüsse sicher verbunden sind.
Vergewissern Sie sich, dass sich der SR166 Empfänger und der HT6 Sender untereinander in Sichtlinie befinden.
Prüfen Sie den Empfänger und Audio Input Pegel.
Verzerrter Ton
Prüfen Sie den Ausgangspegel des Empfänger und den Audio Input des Pegel des Geräts.
Prüfen Sie die Batterien des HT6 und ersetzen Sie sie, falls sie schwach sein sollten.
Ein anderer Sender kann auf demselben Kanal senden. Schalten Sie den Sender aus, der eventuell Störungen verursachen könnte.
Audio Aussetzer
Der Sender kann ist eventuell zu weit vom Empfänger entfernt. Bewegen Sie ihn näher an den Empfänger oder positionieren Sie die Antennen neu.
Entfernen oder vermeiden Sie Quellen, die RF Störungen ver-ursachen könnten, wie etwa Mobiltelefone, kabellose Telefone, Beleuchtungsequipment, Computer, Metallstrukturen, etc.
Sender und Empfänger sind auf unterschiedliche Kanälen eingestellt
Kontaktieren Sie Ihren Samson Händler oder Vertrieb.
Fehlerbehebung

FCC Verordnungen und Regelungen
Samsons kabellose Empfänger wurden nach den FCC Verordnungen Teil 15 und die Sender nach den FCC Verordnungen Teil 74 zertifiziert. Die Lizenzierung von Samson Geräten liegt in der Verantwortung des Benutzers und die Lizenzierbarkeit hängt von der Klassifikation des
Benutzers, der Anwendung und der gewählten Frequenz ab.
Dieses Gerät entspricht RSS-210 der Industrie & Wissenschaft Kanadas.
Der Betrieb unterliegt folgenden beiden Bedingungen: (1) dieses Gerät darf keine gefährlichen Störungen verur-sachen und (2) dieses Gerät muss Störungen akzeptieren, die einen unerwünschten Betrieb dieses Geräts verursa-
chen können.
ANMERKUNG: Dieses Equipment wurde getestet und entsprechend der FCC Regelungen, Teil 15, als mit der Class B Digital Device Grenzen konform eingestuft. Diese Grenzen wurden festgelegt, um einen angemessenen Schutz gegen gefährliche Störungen in einer Haushalts-Umgebung zu bieten. Dieses Gerät erzeugt und verwendet Hochfrequenzenergie. Wenn es nicht in Übereinstimmung mit den Anleitungen installiert und verwendet wird, kann es Störungen des Rundfunkempfangs verursachen. Bei keiner Installation können Störungen jedoch völlig ausgeschlossen werden. Wenn das Gerät den Rundfunk- und Fernsehempfang stört, was durch Ein- und Ausschalten des Geräts festgestellt wird, kann der Benutzer versuchen, die Störung durch eine oder mehrere der folgenden Maßnahmen zu beseitigen:
• Die Position oder die Richtung der Empfängerantenne ändern.• Den Abstand zwischen Equipment und Receiver erhöhen.• Das Equipment mit einer Steckdose eines anderen internen Kreises
verbinden als den, mit dem der Empfänger verbunden ist.• Fragen Sie Ihren Händler oder bitten Sie einen erfahrenen Radio- und
Fernsehtechniker um Hilfe.
WARNUNG: Änderungen oder Modifikationen, die nicht ausdrücklich von der Institution genehmigt wurden, die für die Konformität mit den geltenden Verordnungen verantwortlichen ist, können zum Verlust der Betriebserlaubnis des Geräts führen.


Owner's Manual 39Stage v166: Handheld Wireless System
ENG
LISH
FRA
NÇ
AIS
DEU
TSC
HE
ESPA
ÑO
LIT
ALI
AN
OESTE DISPOSITIVO CUMPLE EL APARTADO 15 DE LAS NORMAS DE LA FCC – CLASE B. SU USO ESTÁ SUJETO AL CUMPLIMIENTO DE LAS DOS CONDICIONES SIGUIENTES: (1) ESTE DISPOSITIVO NO DEBE PROVOCAR INTERFERENCIAS, Y (2) ESTE DISPOSITIVO DEBE ACEP-TAR CUALQUIER INTERFERENCIA QUE RECIBA, INCLUIDAS LAS INTERFERENCIAS QUE PUEDAN PROVOCAR UN FUNCIONAMIENTO NO DESEADO. ADECUADO PARA EL USO EN VIVIENDAS Y OFICINAS.
Información de Seguridad Importante
PRECAUCIÓN: PARA REDUCIR EL RIESGO DE DESCARGA ELÉCTRICA, NO RETIRE NUNCA LA TAPA NI LA PARTE POSTERIOR. EL APARATO NO CONTIENE PIEZAS EN SU INTERIOR CUYA REPARACIÓN PUEDA SER EFECTUADA POR EL USUARIO. ENCARGUE LAS REPARACIONES A PERSONAL TÉCNICO DEBIDAMENTE CUALIFICADO.Este símbolo de un relámpago con cabeza de flecha situado en el interior de un triángulo equilátero tiene como objeto alertar al usuario de la presencia de “ten-sión peligrosa” no aislada en el interior del alojamiento del producto que podría tener la magnitud suficiente para presentar un riesgo de sacudida eléctrica.
El símbolo de un signo de exclamación situado en el interior de un triángulo equilá-tero tiene como objeto alertar al usuario de la presencia de instrucciones de opera-ción y mantenimiento importantes en la documentación que acompaña al aparato.
Si desea desechar este producto, recuerde que no deberá mezclarlo con los residuos domésticos habituales. Existe un sistema de recogida por separado para los productos electrónicos usados de conformidad con lo dispuesto en la legislación que exige un tratamiento, una recuperación y un reciclado adecuados.
Los hogares de los 25 estados miembros de la UE, Suiza y Noruega podrán devolver de forma gratuita sus aparatos electrónicos usados en las instalaciones de recogida habilitadas a tal fin o entregándolos al vendedor (en caso de adquirir un aparato nuevo similar).
Si se encuentra en algún país no incluido en los anteriormente mencionados, póngase en contacto con las autoridades locales para que le informen del método correcto para desechar el aparato eléctrico usado.
Al hacerlo de esta manera garantizará que el producto desechado se somete a los procesos de tratamiento, recuperación y reciclado necesarios, evitando así los posibles efectos negativos que estos aparatos tienen para el medio ambiente y la salud humana.
ATENCIÓN¡PELIGRO DE DESCARGA ELÉCTRICA!
¡NO ABRIR!
ADVERTENCIAPARA EVITAR EL PELIGRO DE INCENDIO O DE DESCARGA ELÉCTRICA. NO UTILICE ESTE ENCHUFE CON UN CABLE ALARGADOR NI CON UNA TOMA ELÉCTRICA EN LA QUE LAS PATILLAS DEL ENCHU-FE NO PUEDAN INSERTARSE TOTALMENTE CON EL FIN DE EVITAR QUE ÉSTAS QUEDEN EXPUESTAS. PARA EVITAR EL PELIGRO DE INCENDIO O DE DESCARGA ELÉCTRICA. NO EXPONGA ESTE APARATO A LA LLUVIA O A LA HUMEDAD. PARA EVITAR DESCARGAS ELÉCTRICAS, ASEGÚRESE DE INSERTAR TOTALMENTE LA PATILLA ANCHA DEL ENCHUFE EN LA RANURA ANCHA DE LA TOMA ELÉCTRICA

40 Stage v166: Handheld Wireless System
Información de Seguridad Importante
1. Lea cuidadosamente estas instrucciones.
2. Conserve estas instrucciones para cual-quier consulta en el futuro.
3. Siga cuidadosamente todas las adver-tencias.
4. Observe y siga todas las instrucciones del fabricante.
5. No utilice este aparato cerca del agua.
6. Limpie el aparato solo con un trapo seco.
7. No bloquee las aperturas de ventilación. Instale el aparato de acuerdo con las instrucciones del fabricante.
8. No instale el aparato cerca de fuentes de calor como, por ejemplo, rejillas de calefacción, estufas u otros aparatos (in-cluyendo amplificadores) que produzcan calor.
9. No anule el sistema de seguridad del enchufe de tipo polarizado o con toma de tierra. Un enchufe polarizado tiene dos patillas, una más ancho que la otra. Un enchufe con toma de tierra tiene dos patillas normales y una tercera para la conexión a tierra. La patilla ancha o la tercera patilla se incluyen como medida de seguridad. Si el enchufe no encajara en su toma de corriente, llame a un electricista para que le cambie su toma anticuada.
10. Evite que el cable de corriente quede en una posición en la que pueda ser pisado o aplastado, especialmente en los enchu-fes, receptáculos y en el punto en el que sale de la unidad.
11. Utilice solo las conexiones/accesorios especificados por el fabricante.
12. Utilice solo el soporte de carro, el soporte de trípode o la mesa especi-ficados por el fabricante
o vendidos junto con el aparato. Si utiliza un carro, es necesario que proceda con precaución a la hora de mover el conjun-to del carro/aparato con el fin de evitar que vuelque y las lesiones personales que ello podría acarrearle.
13. Desenchufe este aparato durante las tormentas eléctricas o cuando no vaya a utilizarlo durante un período de tiempo prolongado. Dirija cualquier posible reparación solo a personal técnico debidamente cualificado. Deberá hacer que su aparato sea reparado cuando esté dañado de cualquier manera, como por ejemplo si el cable de corriente o el enchufe están dañados, o si se han derramado líquidos, o se ha introducido algún objeto dentro de la unidad, si ésta ha quedado expuesta a la lluvia o la humedad, si no funciona normalmente o si ha caído al suelo.
14. Este aparato no debe exponerse al goteo o a las salpicaduras de líquidos. Tampoco deben colocarse sobre él objetos llenos de líquidos, como por ejemplo jarrones.
15. Atención - para evitar descargas eléctri-cas, introduzca totalmente las patillas del enchufe en las ranuras de la toma.
16. Mantenga este aparato en un entorno con buena ventilación.
17. El adaptador enchufable directo se utiliza como sistema de desconexión, por lo que debe colocarlo de forma que pueda acceder fácilmente a él.
18. Las baterías (pilas o batería instaladas) no deben exponerse a un calor excesivo, como por ejemplo la luz solar directa, el fuego, etc.

Owner's Manual 41Stage v166: Handheld Wireless System
ENG
LISH
FRA
NÇ
AIS
DEU
TSC
HE
ESPA
ÑO
LIT
ALI
AN
O
Índice
Introducción . . . . . . . . . . . . . . . . . . . . . . . . . . . . . . . . . . . . . . . . . . . . . . 42
Controles y Funciones del Receptor SR166 . . . . . . . . . . . . . . . . . . . . . . . . . . . 43
Controles y Funciones del Transmisor HT6. . . . . . . . . . . . . . . . . . . . . . . . . . . . 44
Guía de Inicio Rápido . . . . . . . . . . . . . . . . . . . . . . . . . . . . . . . . . . . . . . . . . 45
Especificaciones . . . . . . . . . . . . . . . . . . . . . . . . . . . . . . . . . . . . . . . . . . . . 47
Localización de Fallos . . . . . . . . . . . . . . . . . . . . . . . . . . . . . . . . . . . . . . . . . 48

42 Stage v166: Handheld Wireless System
Le felicitamos por haber adquirido el Sistema de Micrófono Inalámbrico Stage v166 de Samson. El sis-tema Stage v166 es la solución perfecta para cualquier aplicación que requiera micrófonos inalámbri-cos de alta calidad en un paquete compacto y fácil de utilizar. El sistema está formado por el receptor SR166 y el transmisor de micrófono manual HT6.
Con el sistema Stage v166 disfrutará de una excelente calidad de sonido con una recepción clara y podrá moverse libremente mientras lo utiliza. En cualquier aplicación de sonido en vivo (karaoke, escuelas, conferencias, iglesias, etc.), el sistema Stage v166 es la herramienta ideal para sus necesi-dades de micrófono inalámbrico. El sistema Stage v166 siempre proporciona un rendimiento y una fiabilidad extraordinarios.
Aunque este producto está diseñado para un manejo simple e intuitivo por parte del usuario, le recomendamos que se tome algún tiempo para leer estas páginas en las que podrá ver las diversas características únicas que hemos implementado y encontrará instrucciones paso a paso para configurar su sistema. Si ha adquirido su Sistema Stage v166 en los Estados Unidos, también encontrará una tarjeta de garantía — no olvide rellenarla y enviárnosla por correo para que pueda recibir soporte técnico online y para que le podamos ofrecer información actualizada sobre éste y otros productos de Samson en el futuro. Además, no deje de visitar nuestra web (www.samsontech.com) para ver toda la información sobre nuestra línea de productos.
Le recomendamos que anote el número de serie de su unidad en las líneas siguientes para utilizarlo como referencia en el futuro si fuera necesario.
Número de serie:__________________________________
Fecha de compra:_________________________________
En el caso improbable de que en algún momento tuviera que reparar este aparato, deberá solicitar-nos un número de Autorización de Devolución (RA) para poder enviar su unidad a Samson. Sin este número no se aceptará la unidad. Póngase en contacto con Samson en el número 1-800- 3SAMSON (1-800-372-6766) para que le facilitemos este número de autorización de devolución antes de enviar-nos la unidad. Si fuera posible, conserve el embalaje original y los materiales de protección para de-volvernos la unidad dentro de ellos. Si ha adquirido su producto Samson fuera de los Estados Unidos, póngase en contacto con su distribuidor local para recibir información sobre la garantía y el servicio.
Funciones y Características
• Sistema inalámbrico manual profesional
• Configuración y manejo sencillos
• Circuitos superheterodino con control de cristal para una recepción clara y fiable
• Salida de ¼”
• Alcance de operación de hasta 75 metros de línea de visión
• Transmisor de micrófono manual HT6 con interruptores de modo silencio
• El transmisor proporciona nueve horas de vida de batería utilizando pilas de 9 voltios estándar
Introducción

Owner's Manual 43Stage v166: Handheld Wireless System
ENG
LISH
FRA
NÇ
AIS
DEU
TSC
HE
ESPA
ÑO
LIT
ALI
AN
O
1. Interruptor de Alimentación - Pulse este interruptor para encender y apagar el receptor.
2. Indicador de ALIMENTACIÓN - Se ilumina en color rojo cuando el receptor está encendido.
3. Control de Volumen - Gírelo para ajustar el nivel de la salida de la señal de audio del receptor
4. Indicador RF - Se ilumina en verde cuando el transmisor de micró-fono HT6 está encendido y hay una señal inalámbrica presente y detectada por el receptor.
5. Antena - Las monturas de las antenas permiten el giro completo para una colocación óptima. Du-rante la operación normal, las dos antenas deben estar colocadas en posición vertical. Las antenas pueden plegarse hacia dentro para mayor comodidad al transportar el SR166.
6. Entrada de CC - Conecte aquí el adaptador de potencia de 12 voltios, 200 mA suministrado con la unidad. ADVERTENCIA: El uso de cual-quier otro tipo de adaptador de potencia podría provocar graves daños en el SR166 y la anulación de la garantía.
7. Salida - Utilice este conector de ¼” no balanceado para conectar el receptor del SR166 a la entrada de nivel de línea de una mezcladora, amplificador u otro equipo de audio.
8. Protección contra Tirones del Cable del Adaptador - Pase el cable del adaptador suministrado con la unidad a través del dispositivo de protección contra tirones con el fin de evitar que el enchufe se desconecte accidentalmente del receptor.
6 87
234 1 5
Controles y Funciones del Receptor SR166
6 87
234 1 5

44 Stage v166: Handheld Wireless System
1. Interruptor ON/OFF (Encendido/Apagado) de la Señal de Audio – Cuando se sitúa este interruptor en la posición de ON (Encendido), se transmite señal de audio. Cuando se sitúa en la posición de OFF (Apagado), la señal de audio se silencia. Tenga en cuenta que el hecho de situar este interruptor en la posición de OFF no desconec-ta la alimentación eléctrica del transmisor, sino que simplemente se silencia temporalmente la transmisión de la señal de audio. Cuando no vaya a utilizarse el transmisor durante un período de tiempo prolongado, debe desconectarse la alimentación eléctrica utilizando el interruptor ON/OFF (Encendido/Apagado).
2. Interruptor ON/OFF (Encendido/Apagado) de la Alimentación Eléctrica – Utilice este interruptor para encender o apagar el HT6 (para conservar la potencia de la batería, asegúrese de situarlo en la posición de OFF cuando no lo utilice). Asegúrese de silenciar la señal de audio en su mezcladora o ampli-ficador externo antes de encender a apagar el transmisor, ya que en caso contrario se escuchará un sonido similar a una pequeña explosión.
3. Indicador de Alimentación - El LED se ilumina en color verde cuan-do el transmisor está encendido.
4. Compartimento de la Pila – Inserte en este compartimento una pila alcalina de 9 voltios estándar. Asegúrese de respetar las marcas de polaridad más y menos al instalar la pila. Recomenda-mos utilizar una pila tipo Duracell MN 1604 con este dispositivo. Aunque pueden utilizarse pilas Ni-Cad recargables, este tipo de pilas no suministran la corriente adecuada durante más de cuatro horas. ADVERTENCIA: No inserte la pila hacia atrás, ya que en ese caso el HT6 podría sufrir daños importantes y se anularía la garantía.
5. Marcas de Canal – Número impreso correspondiente al canal apropiado en el receptor SR166.
Controles y Funciones del Transmisor HT6
13
4
5
2
13
4
5
2

Owner's Manual 45Stage v166: Handheld Wireless System
ENG
LISH
FRA
NÇ
AIS
DEU
TSC
HE
ESPA
ÑO
LIT
ALI
AN
O
Guía de Inicio Rápido
Siga los procedimientos básicos que se indican a continuación para la configuración y el uso de su Sistema Inalámbrico Stage Serie v166.
1. Conecte el adaptador de potencia del receptor SR166 a la entrada de CC del panel posterior del aparato y, a continuación, a una toma eléctrica.
2. Conecte la salida de ¼” del receptor apropiada a la entrada de una mezcladora, estéreo, aparato de karaoke o cualquier otra entrada de nivel de línea (ver la información que se ofrece más adelante). Utilice el cable ¼” a ¼” incluido para conectar el receptor SR166 a una mezcladora.
Utilice el cable ¼” a ¼” incluido para conectar el receptor SR166 a una máquina de karaoke.
1. Plugging the receiver into the wall.
2. Plugging the receiver into a mixer using 1/4" - 1/4" cable.
4. Plugging the receiver into a Karaoke machine using 1/4" - 1/4" cable.
1. Plugging the receiver into the wall.
2. Plugging the receiver into a mixer using 1/4" - 1/4" cable.
4. Plugging the receiver into a Karaoke machine using 1/4" - 1/4" cable.
1. Plugging the receiver into the wall.
2. Plugging the receiver into a mixer using 1/4" - 1/4" cable.
4. Plugging the receiver into a Karaoke machine using 1/4" - 1/4" cable.

46 Stage v166: Handheld Wireless System
3. Sujete la sección superior del transmisor HT6 y gire la sección inferior deslizándola hacia abajo para dejar al descubierto el compartimento de la pila. Inserte una pila alcalina de 9 voltios estándar asegurándose de respetar las marcas de polaridad más y menos.
4. Encienda el transmisor HT6 deslizando el interruptor de ALIMENTACIÓN hacia la derecha y coloque de nuevo la sección inferior en su posición correcta.
5. Coloque el receptor SR166 en el lugar en el que vaya a utilizarse (la regla general consiste en mantener la “línea de visión” entre el receptor y los transmisores de manera que la(s) persona(s) que utilice(n) el transmisor puedan ver el receptor). Conecte la alimentación del receptor SR166.
6. Encienda el amplificador y/o la mezcladora conectado(s), pero mantenga el volumen en el nivel mínimo. A continuación, asegúrese de que su transmisor no esté silenciado colocando el interruptor de Audio en la posición de ON. A continuación, gire el mando de Control de Volumen del SR166 totalmente en el sentido de las agujas del reloj; este ajuste corresponde a la ganancia unitaria. Hable o cante al micrófono con un nivel de representación o actuación normal subiendo del mismo tiempo el volumen de su amplificador/mezcladora gradualmente hasta alcanzar el nivel deseado.
Guía de Inicio Rápido
1. Plugging the receiver into the wall.
2. Plugging the receiver into a mixer using 1/4" - 1/4" cable.
4. Plugging the receiver into a Karaoke machine using 1/4" - 1/4" cable.

Owner's Manual 47Stage v166: Handheld Wireless System
ENG
LISH
FRA
NÇ
AIS
DEU
TSC
HE
ESPA
ÑO
LIT
ALI
AN
O
ESPECIFICACIONES GENERALES DEL SISTEMAFrecuencia de Funcionamiento VHF 173,80 MHz a 213,20 MHzNúmero de Canales Canal fijoEstabilidad de Frecuencia ±0,005%Modo de Modulación FMDesviación Máxima ±15 kHzRango Operativo 75 metros (línea de visión)Rango de Temperatura de Funcionamiento 40° F (4° C) a 110° F (43° C)Respuesta de Frecuencia 80 Hz a 15 kHz
ESPECIFICACIONES DEL RECEPTOR SR166Rechazo de Imagen 30 dB Rango Dinámico 95,5 dB Salida Máxima 900mVSensibilidad 10 dBµV para 48 dB S/N Conectores de Salida Conector telefónico (“mono”) 1/4” TSNivel de Salida de Audio -10dB no balanceado (conector telefónico 1/4”)Alimentación 100-240V CA (50/60 Hz) a 12V CC 200mA
ESPECIFICACIONES DEL TRANSMISOR MANUAL HT6Salida de Potencia de RF 10 mW Elemento de Micrófono H6 Dinámico unidireccionalVida Típica de la Batería ( pila alcalina de 9 voltios) 9 horasConsumo de Corriente 30 mA típicoDimensiones Ø2,1” x 9,3” Ø52,6 mm x 235,5 mm Peso Neto 0,4 libras 0,18 kg
Especificaciones

48 Stage v166: Handheld Wireless System
Problema Soluciones
No Hay Audio
Encienda el transmisor HT6 utilizando el interruptor ON/OFF (Encendido/Apagado) de la Alimentación.
Compruebe que la pila del transmisor HT6 esté bien instalada.
Compruebe que el interruptor ON/OFF (Encendido/Apagado) del Audio del HT6 esté en la posición de ON.
Compruebe que el adaptador del SR166 esté conectado correcta-mente y enchufado a una toma eléctrica.
Encienda el receptor SR166.
Asegúrese de que las conexiones de entrada y salida de audio del SR166 estén conectadas correctamente.
Compruebe que el receptor SR166 y los transmisores HT6 estén situados de manera que se mantenga la línea de visión entre ellos.
Compruebe los controles de nivel del dispositivo de la entrada de audio y el receptor.
Audio Distorsionado
Compruebe el nivel de la salida del receptor y el nivel del disposi-tivo de la entrada de audio.
Compruebe el nivel de la pila del HT6 y reemplácela si fuera bajo.
Podría haber otro transmisor transmitiendo en el mismo canal. Apague el transmisor que podría estar causando la interferencia.
Pérdidas de Audio
El transmisor podría estar demasiado alejado del receptor. Acér-quelo al receptor o reposicione las antenas.
Retire o evite las fuentes que puedan causar interferencias de RF, como por ejemplo teléfonos celulares, teléfonos inalámbricos, equipos de iluminación, ordenadores, etc.
Los Transmisores y el Re-ceptor Están en Diferentes Canales
Póngase en contacto con su revendedor o distribuidor de Sam-son en busca de asistencia
Localización de Fallos

Normas y Regulaciones de la FCC
Los receptores inalámbricos Samson están certificados conforme al Apartado 15 de las Normas de la FCC y los transmisores están certificados conforme al Apartado 74 de las Normas de la FCC.
La obtención de las licencias de operación para los equipos de Samson es responsabilidad del usuario y la otorgabilidad de las licencias
dependerá de la clasificación y la aplicación del usuario y de la frecuen-cia seleccionada.
Este dispositivo cumple la Norma RSS-210 deIndustry & Science Canada.
Su funcionamiento está sujeto a las dos condiciones siguientes:(1) este dispositivo no debe provocar interferencias y (2) este dispositivo debe aceptar cualquier interferencia que reciba,
incluidas las interferencias que puedan provocar un funcionamiento no deseado.
NOTA: Se ha verificado que este aparato cumple con los límites estableci-dos para un dispositivo digital de Clase B, de acuerdo a lo establecido en la Sección 15 de las Normas FCC. Estos límites han sido diseñados para ofrecer una protección razonable contra las interferencias molestas en instalaciones residenciales. Este aparato genera, utiliza y puede emitir energía de radio-frecuencia y, si no se instala y utiliza de acuerdo con las instrucciones, puede producir interferencias molestas en las comunicaciones de radio. No obstan-te, no está garantizado que estas interferencias no se produzcan en una insta-lación concreta. Si este aparato produce interferencias molestas en la recep-ción de la radio o la televisión, lo cual podrá comprobar fácilmente apagando y encendiendo este aparato, el usuario será el responsable de tratar de corre-gir dichas interferencias por medio de una o más de las siguientes medidas:
• Reoriente o reubique la antena receptora.• Aumente la distancia de separación entre este aparato y el receptor.• Conecte este aparato a una salida de corriente o regleta distinta a la que
esté conectado el receptor.• Pida consejo a un técnico especialista en radio/TV o en el establecimiento
en el que adquirió el producto.
ADVERTENCIA: Los cambios o modificaciones no aprobados expresamente por el responsable del cumplimiento normativo podrían anular la autoriza-ción del usuario para utilizar el equipo.


Owner's Manual 51Stage v166: Handheld Wireless System
ENG
LISH
FRA
NÇ
AIS
DEU
TSC
HE
ESPA
ÑO
LIT
ALI
AN
OIL PRESENTE DISPOSITIVO È CONFORME CON LA PARTE 15 DELLE NORME FCC CLASSE B. IL FUNZIONAMENTO È SOGGETTO ALLE SEGUENTI DUE CONDIZIONI: (1) IL DISPOSITIVO NON DEVE CAUSARE INTERFERENZE DANNOSE E (2) IL DISPOSITIVO DEVE ACCETTARE QUALSIASI INTERFERENZA RICEVUTA, COMPRESE QUELLE CHE POTREBBERO PROVOCARNE IL FUNZIONAMENTO INDESIDERATO. ADATTO PER USO DOMESTICO O IN UFFICIO.
Informazioni importanti sulla sicurezza
ATTENZIONE: PER RIDURRE IL RISCHIO DI FOLGORAZIONE NON ASPORTARE IL CO-PERCHIO (O LA PARTE POSTERIORE). NON CONTIENE ELEMENTI RIPARABILI DALL'U-TENTE. PER LE RIPARAZIONI RIVOLGERSI A PERSONALE DI ASSISTENZA QUALIFICATO.Il simbolo del fulmine con la punta a forma di freccia all'interno di un trian-golo equilatero ha lo scopo di avvisare l'utente della presenza di "tensioni pericolose" non isolate nella cassa del prodotto, di ampiezza sufficiente a costituire un rischio di folgorazione.
Il punto esclamativo all'interno di un triangolo equilatero ha lo scopo di av-visare l'utente della presenza di importanti istruzioni di funzionamento e manutenzione nella documentazione a corollario dell'apparecchio.
ATTENZIONERISCHIO DI FOLGORAZIONE!
NON APRIRE!
AVVERTIMENTOPER SCONGIURARE IL PERICOLO DI INCENDI O FOLGORAZIONI NON UTILIZZARE QUESTA SPINA CON UNA PROLUNGA, UNA PRESA DI CORRENTE O ALTRE USCITE A MENO CHE LE LAME NON POSSANO ESSERE INSERITE COMPLETAMENTE PER EVITARE UN'ESPOSIZIONE DELLE LAME. PER SCONGIURARE IL PERICOLO DI INCENDI O FOLGORAZIONI NON ESPORRE L'APPARECCHIO ALLA PIOGGIA O ALL'UMIDITÀ. PER EVITARE FOLGORAZIONI INSERIRE COMPLETAMENTE LA LAMA LARGA DELLA SPINA NELLA FESSURA LARGA DELLA PRESA.
Se si desidera smaltire il prodotto non metterlo tra i rifiuti domestici generici. Esiste un sistema di raccolta separato per i prodotti elettronici usati conformemente con la normativa che prescrive trattamento, recupero e riciclaggio corretti.
I soggetti privati nei 25 stati membri dell’UE, in Svizzera e in Norvegia potranno rendere gratuitamente i propri prodotti elettronici usati presso le strutture di raccolta a ciò preposte o a un rivenditore (acquistando un prodotto nuovo similare).
Per quanto concerne i Paesi non menzionati sopra, contattare le autorità locali per venire a conoscenza dei corretti metodi di smaltimento.
Così facendo ci si assicurerà che il prodotto smaltito sia sottoposto al trattamento e alle operazioni di recupero e riciclaggio necessari e si eviteranno effetti potenzialmente negativi per l’ambiente e la salute umana

52 Stage v166: Handheld Wireless System
Informazioni importanti sulla sicurezza
1. Leggere le presenti istruzioni.
2. Conservare le presenti istruzioni.
3. Prestare attenzione a tutte le avver-tenze.
4. Seguire tutte le istruzioni.
5. Non utilizzare l'apparecchio vicino all'acqua.
6. Pulire unicamente con un panno asciutto.
7. Non bloccare alcuna delle aperture di ventilazione. Eseguire l'installazione conformemente con le istruzioni della società produttrice.
8. Non installare nei pressi di sorgenti di calore come termosifoni, registri di ca-lore, stufe o altri apparecchi (compresi gli amplificatori) che producono calore.
9. Non ignorare lo scopo di sicurezza della spina polarizzata o con messa a terra. Una spina polarizzata ha due lame, una più ampia dell'altra. Una spina con messa a terra ha due lame e un terzo connettore di messa a terra. La lama larga, o il terzo polo, è inseri-ta/o per la sicurezza dell'utente. Se la spina in dotazione non è adatta per la propria presa, consultare un elettricista per sostituire la presa obsoleta.
10. Proteggere il cavo di alimentazione in modo che non venga calpestato o schiacciato, soprattutto in corrispon-denza delle spine, dei connettori e del punto in cui esce dall'apparecchio.
11. Usare soltanto dispositivi/accessori specificati dalla società produttrice.
12. Usare unicamente con il carrello, basamento, treppiede, sostegno o tavolo specificati dalla società produttrice o venduti con l'apparec-
chio. Quando si utilizza un carrello, fare attenzione nello spostamento dell'in-sieme carrello/apparecchio per evitare lesioni da ribaltamento.
13. Staccare la spina dell'apparecchio dalla presa di corrente in presenza di lampi o quando non è utilizzato per lunghi pe-riodi di tempo. Per qualsiasi riparazione rivolgersi a personale di assistenza qualificato. Eventuali riparazioni sono necessarie se l'apparecchio è stato danneggiato in qualche modo, come nel caso di guasti al cavo di alimen-tazione o alla spina, danni provocati dal rovesciamento di liquido o dalla caduta di oggetti sull'apparecchio, esposizione alla pioggia o all'umidità, o se l'apparecchio non funziona in modo normale o è stato fatto cadere.
14. L'apparecchio non dovrà essere espo-sto a sgocciolamento o schizzi di acqua e su di esso non deve essere posato alcun oggetto contenente liquido, come per esempio un vaso.
15. Fare attenzione ad evitare folgorazioni, inserire completamente la lama larga della spina nella fessura larga della presa.
16. Mantenere una corretta ventilazione attorno all'intera unità.
17. L'adattatore a inserimento diretto viene utilizzato come dispositivo di disconnessione, si dovrà sempre essere in condizione di poterlo mettere pron-tamente in funzione.
18. Le batterie (pacco batterie o batterie installate) non dovranno essere espo-ste a un calore eccessivo come quello della luce del sole, del fuoco o similare.

Owner's Manual 53Stage v166: Handheld Wireless System
ENG
LISH
FRA
NÇ
AIS
DEU
TSC
HE
ESPA
ÑO
LIT
ALI
AN
O
Indice
Introduzione . . . . . . . . . . . . . . . . . . . . . . . . . . . . . . . . . . . . . . . . . . . . . . 54
Comandi e caratteristiche del ricevitore SR166. . . . . . . . . . . . . . . . . . . . . . . . . 55
Comandi e caratteristiche dell'apparecchio trasmittente HT6 . . . . . . . . . . . . . . . 56
Guida introduttiva . . . . . . . . . . . . . . . . . . . . . . . . . . . . . . . . . . . . . . . . . . . 57
Specifiche . . . . . . . . . . . . . . . . . . . . . . . . . . . . . . . . . . . . . . . . . . . . . . . . 59
Localizzazione guasti . . . . . . . . . . . . . . . . . . . . . . . . . . . . . . . . . . . . . . . . . 60

54 Stage v166: Handheld Wireless System
Congratulazioni per aver acquistato il sistema microfonico senza fili Samson modello Stage v166! Il sistema Stage v166 è la soluzione perfetta per tutte le applicazioni che richiedano microfoni wireless di elevata qualità in una configurazione compatta e semplice da usare. Il sistema è composto dal ricevito-re SR166 e dalla capsula microfonica trasmittente portatile HT6.
Con il sistema Stage v166 si avrà un'elevata qualità del suono con una ricezione chiara, oltre alla possi-bilità di camminare liberamente nel luogo di utilizzo. Per qualsiasi applicazione in cui si faccia ricorso a suono dal vivo (karaoke, scuole, conferenze, luoghi di culto, ecc.) il modello Stage v166 è lo strumento ideale per far fronte alle necessità di utilizzo di microfoni senza fili. Lo Stage v166 fornisce sempre prestazioni e affidabilità eccezionali.
Nonostante il prodotto sia stato progettato in modo da avere un funzionamento intuitivo, consigliamo agli utenti di dedicare un po' di tempo alla lettura di queste pagine per comprendere come abbiamo implementato una serie considerevole di caratteristiche uniche e per ricavare istruzioni per una configurazione passo per passo del sistema. Se l'apparecchio Stage v166 è stato acquistato negli Stati Uniti, troverete anche un certificato di garanzia — vi preghiamo di compilarlo e spedirlo in modo da poter ricevere assistenza tecnica on-line e da permetterci di inviarvi informazioni aggiornate su questo e altri prodotti Samson in futuro. Vi invitiamo inoltre a consultare il nostro sito web (www.samsontech.com) per ottenere informazioni complete su tutta la nostra linea di prodotti.
Vi raccomandiamo di registrare il numero di serie del vostro prodotto nello spazio apposito sottostan-te, in modo da farvi riferimento in futuro.
Numero di serie:_______________________________
Data di acquisto:_______________________________
Se l'unità dovesse necessitare riparazioni, bisognerà ottenere un numero di autorizzazione al reso (RA) prima di spedirla a Samson. Senza questo numero, l'unità non sarà accettata. Vi preghiamo di contattare Samson allo 1-800-3SAMSON (1-800-372-6766) per ottenere un numero RA prima di spedire la vostra unità. Conservare la confezione originale e, se possibile, effettuare il reso dell'unità nell'imbal-laggio originario. Se il prodotto Samson è stato acquistato fuori dal territorio statunitense, contattare il distributore locale per dettagli sulla garanzia e informazioni sull'assistenza.
Caratteristiche
• Sistema portatile senza fili per uso professionale.
• Semplicità di configurazione e funzionamento.
• Circuiteria supereterodina controllata mediante cristalli per una ricezione chiara e affidabile.
• Uscita da ¼" (6 mm)
• Campo di funzionamento: fino a 250' (76 m) di linea di vista.
• Microfono trasmittente portatile HT6 con silenziatore
• Con batterie standard da 9 Volt l'apparecchio trasmittente offre nove ore di carica della batteria.
Introduzione

Owner's Manual 55Stage v166: Handheld Wireless System
ENG
LISH
FRA
NÇ
AIS
DEU
TSC
HE
ESPA
ÑO
LIT
ALI
AN
O
1. Interruttore di alimentazione - Premere per spegnere o accendere il ricevitore.
2. Spia "Sistema in attività" - Si accende e assume colore rosso quando viene acceso il ricevitore.
3. Controllo del volume - Si ruota per regolare il livello dell'uscita del segnale audio dal ricevitore.
4. Spia "RF" - Si accende e assume colore verde quando il microfono trasmittente HT6 è acceso e un segnale di radio frequenza è pre-sente e rilevato dal ricevitore.
5. Antenna - I supporti dell'antenna ne consentono una rotazione completa per un posizionamento ottimale. In condizioni di funzio-namento normale entrambe le antenne dovrebbero essere posi-zionate in verticale. Durante il trasporto del sistema SR166 le antenne possono essere piega-te all'interno per comodità.
6. Ingresso in c.c. - Collegare in questo punto l'adattatore di corrente da 12 Volt fornito. AVVERTIMENTO: la sostituzio-ne dell'adattatore con uno di qualsivoglia altro tipo può provocare gravi danni al sistema SR166 e renderà nulla la garanzia.
7. Uscita - Fare uso del jack da ¼" (6 mm) sbilanciato per collegare il ricevitore SR166 all'ingresso di linea di un mixer, di un amplificatore o di un'altra apparecchiatura audio.
8. Pressacavo adattatore - Facendo uso del pressacavo avvolgere ad anello il cavo dell'adattatore incluso per evitare che la spina si stacchi accidentalmente dal ricevitore.
6 87
234 1 5
Comandi e caratteristiche del ricevitore SR166
6 87
234 1 5

56 Stage v166: Handheld Wireless System
1. Interruttore accensione/spegnimento audio - Quando è imposta-to sulla posizione ON viene trasmesso un segnale audio. Quando è impostato sulla posizione OFF il segnale audio è silenziato. Si noti che lo spostamento di questo interruttore in posizione OFF non disattiva l'alimentazione dell'apparecchio trasmittente — è sempli-cemente un modo per silenziare temporaneamente la trasmissione del segnale audio. Quando non viene usato per periodi di tempo prolungati, l'alimentazione del microfono trasmittente dovrebbe essere spenta facendo ricorso all'interruttore di accensione/spegni-mento dell'apparecchio.
2. Interruttore di accensione/spegnimento dell'apparecchio - Usare questo interruttore per accendere o spegnere l'apparecchio HT6 (per mantenere la carica della batteria accertarsi che sia su OFF quando il microfono non viene utilizzato). Assicurarsi di silenziare il segnale audio sul mixer o l'amplificatore esterno prima di spegnere o accendere l'alimentazione dell'appa-recchio trasmittente, in caso contrario ne potrebbe risultare un pop udibile.
3. Spia "Sistema in attività" - Il LED si accende e assume colore verde quando l'apparecchio trasmittente è acceso.
4. Vano batteria - Inserire in questo vano una batteria alcalina standard da 9 Volt. All'installazione della batteria accertarsi di rispettare i contrassegni della polarità positiva e negativa. Con questo apparecchio si consiglia di usare batterie Duracell di tipo MN 1604. Anche se è possibile fare uso di batterie Ni-Cad esse non forni-scono un quantitativo adeguato di corrente per più di quattro ore. AVVERTIMENTO: non inserire le batterie a rovescio; farlo può provocare gravi danni all'apparecchio HT6 e ne renderà invalida la garanzia.
5. Contrassegno del canale - Sul ricevitore SR166 è stampato un numero corrispondente all'idoneo canale.
Comandi e caratteristiche dell'apparecchio trasmittente HT6
13
4
5
2
13
4
5
2

Owner's Manual 57Stage v166: Handheld Wireless System
ENG
LISH
FRA
NÇ
AIS
DEU
TSC
HE
ESPA
ÑO
LIT
ALI
AN
O
Guida introduttiva
Rispettare queste procedure basilari per impostare e utilizzare il sistema senza fili della serie Stage v166.
1. Collegare l'adattatore di corrente del ricevitore SR166 all'ingresso in c.c. del pannello posteriore e quindi a una presa elettrica.
2. Collegare l'idonea uscita da ¼" (6 mm) all'ingresso di un mixer, stereo, apparecchio per karaoke o a qualsiasi altro ingresso di linea (si veda di seguito). Usare il cavo per il collegamento di un'uscita da ¼" a un ingresso da ¼" in dotazione per collegare il ricevitore SR166 a un mixer.
Usare il cavo per il collegamento di un'uscita da ¼" a un ingresso da ¼" in dotazione per collegare il ricevitore SR166 a un apparecchio per karaoke.
1. Plugging the receiver into the wall.
2. Plugging the receiver into a mixer using 1/4" - 1/4" cable.
4. Plugging the receiver into a Karaoke machine using 1/4" - 1/4" cable.
1. Plugging the receiver into the wall.
2. Plugging the receiver into a mixer using 1/4" - 1/4" cable.
4. Plugging the receiver into a Karaoke machine using 1/4" - 1/4" cable.
1. Plugging the receiver into the wall.
2. Plugging the receiver into a mixer using 1/4" - 1/4" cable.
4. Plugging the receiver into a Karaoke machine using 1/4" - 1/4" cable.

58 Stage v166: Handheld Wireless System
3. Tenendo ferma la parte superiore dell'apparecchio trasmittente HT6, ruotare la parte inferiore e farla scorrere verso il basso in modo da aprire il vano batteria. Inserire una batteria alcalina standard da 9 Volt, assicurandosi di rispettare i contrassegni della polarità positiva e negativa.
4. Accendere l'apparecchio trasmittente HT6 facendo scorrere l'interruttore di ACCENSIONE verso destra e
rimettere a posto la parte inferiore.
5. Posizionare il ricevitore SR166 nel luogo di utilizzo (il generico principio basilare da applicare è mantenere la "linea di vista" tra ricevitore e apparecchi trasmittenti in modo che la/e persona/e che usi/no questi ultimi possa/no vedere il ricevitore). Accendere l'alimentazione del ricevitore SR166.
6. Accendere il connesso amplificatore e/o mixer, ma tenerne il volume completamente abbassato. Successivamente, accertarsi che l'apparecchio trasmittente non sia silenziato impostando l'interruttore dell'audio su ON. Quindi, ruotare completamente e in senso orario la manopola di controllo del volume sul dispositivo SR166; questo è il guadagno unitario. Parlare o cantare nel microfono al normale livello che si avrebbe durante una performance alzando nel contempo lentamente il volume dell'amplificatore/mixer fino al raggiungimento del livello desiderato.
Guida introduttiva
1. Plugging the receiver into the wall.
2. Plugging the receiver into a mixer using 1/4" - 1/4" cable.
4. Plugging the receiver into a Karaoke machine using 1/4" - 1/4" cable.

Owner's Manual 59Stage v166: Handheld Wireless System
ENG
LISH
FRA
NÇ
AIS
DEU
TSC
HE
ESPA
ÑO
LIT
ALI
AN
O
SPECIFICHE COMPLESSIVE DEL SISTEMAFrequenza di esercizio VHF da 173,80 MHz a 213,20 MHzNumero di canali Canale fissoStabilità di frequenza ±0,005%Modulazione FMDeviazione massima ±15 kHzRange di esercizio 250' (76 m) (linea di vista)Gamma di temperature di esercizio da 40° F (4° C) a 110° F (43° C)Risposta in frequenza da 80 Hz a 15 kHz
SPECIFICHE DEL RICEVITORE SR166Reiezione di immagine 30 dB Gamma dinamica 95,5 dB Uscita massima 900 mVSensibilità 10 dBµV per 48 dB S/N Connettori di uscita Jack telefonico da 1/4" TS ("mono")Livello di uscita audio -10 dB sbilanciato (connettore telefonico da 1/4")Alimentazione 100-240 V c.a. (50 / 60 Hz) a 12 V c.c. 200 mA
SPECIFICHE DEL TRASMETTITORE PORTATILE HT6Uscita di alimentazione in radiofrequenza 10 mW Elemento microfono Unidirezionale dinamico H6Normale durata della batteria (batteria alcalina da 9 Volt) 9 oreConsumo di corrente Valore tipico 30 mADimensioni Ø 2,1" x 9,3" Ø 52,6 mm x 235,5 mm Peso netto 0,4 lb 0,18 kg
Specifiche

60 Stage v166: Handheld Wireless System
Problema Soluzioni
Assenza di audio
Accendere il microfono trasmittente HT6 con l'interruttore di accensione/spegnimento dell'apparecchio.
Accertarsi che le batterie del microfono trasmittente HT6 siano installate correttamente.
Controllare che l'interruttore di accensione/spegnimento audio dell'HT6 sia sulla posizione ON.
Confermare che l'adattatore SR166 sia correttamente collegato e inserito in una presa elettrica.
Accendere il ricevitore SR166.
Accertarsi che i collegamenti dell'uscita e dell'ingresso audio del ricevitore SR166 siano attivi in modo stabile.
Assicurarsi che il ricevitore SR166 e gli apparecchi di trasmissione HT6 siano nella linea di vista l'uno con gli altri.
Controllare i comandi di livello del ricevitore e del dispositivo di ingresso audio.
Audio distorto
Controllare il livello di uscita del ricevitore e il livello del dispositi-vo di ingresso audio.
Controllare le batterie dell'HT6 e sostituirle se il livello di carica è basso.
Un altro dispositivo trasmittente potrebbe essere in fase di trasmissione sul medesimo canale. Spegnere l'apparecchio tra-smittente colpevole di causare interferenze.
Breve interruzione nella trasmissione audio
L'apparecchio trasmittente potrebbe essere troppo lontano dal ricevitore. Avvicinare il ricevitore o riposizionare le antenne.
Eliminare tutte le sorgenti che potrebbero causare interferenze in radiofrequenza, come telefoni cellulari, cordless, dispositivi di illuminazione, computer, ecc.
Gli apparecchi trasmittenti e il ricevitore sono su canali diversi
Contattare il rivenditore o il distributore Samson di fiducia chie-dendo la sua assistenza.
Localizzazione guasti

Regole e normativa FCC
I ricevitori senza fili Samson sono certificati in virtù della parte 15 delle regole FCC, mentre gli apparecchi trasmittenti
sono certificati in virtù della parte 74 delle regole FCC.La concessione di licenze relative ad apparecchiature
Samson è di responsabilità dell'utente e la licenziabilità dipende dalla classificazione, dall'applicazione e dalla fre-
quenza selezionate dall'utente.
Il dispositivo è conforme alla RSS-210 diIndustry & Science Canada.
Il funzionamento è soggetto alle seguenti due condizioni:(1) l'apparecchio non può causare interferenze dannose e (2) l'apparecchio deve accettare tutte le interferenze rice-
vute, ivi comprese quelle che potrebbero provocarne il funzionamento indesiderato.
NOTA: l'apparecchio è stato testato e ritenuto confacente ai limiti applicabili ai dispositivi digitali di Classe B, conformemente alla Parte 15 delle norme FCC. Questi limiti hanno lo scopo di assicurare una prote-zione ragionevole dalle interferenze dannose negli impianti domestici. L'apparecchio genera, usa e può irradiare energia in radiofrequenza e, se non installato e utilizzato conformemente con le istruzioni, potrebbe causare delle interferenze dannose alle comunicazioni radio. Tuttavia non ci sono garanzie che in impianti particolari non si producano inter-ferenze. Se questo apparecchio effettivamente dovesse causare inter-ferenze dannose al ricevimento di segnali radio o televisivi, che potreb-bero essere determinate dal suo spegnimento e dalla sua accensione, l'utente è invitato a cercare di correggere le interferenze mettendo in atto una o più delle seguenti misure:
• Orientare o posizionare nuovamente l'antenna ricevente.• Aumentare la separazione tra l'apparecchio e il ricevitore.• Collegare l'apparecchio a una presa collocata su un circuito diverso
da quello a cui il ricevitore è collegato.• Chiedere assistenza al rivenditore o a un tecnico radio/TV esperto.
AVVERTIMENTO: variazioni o modifiche non espressamente approvate dal soggetto responsabile per la conformità potrebbero rendere nulla l'autorizzazione all'utilizzo dell'apparecchio da parte dell'utente.

Samson Technologies45 Gilpin Avenue
Hauppauge, New York 11788-8816Phone: 1-800-3-SAMSON (1-800-372-6766)
Fax: 631-784-2201 www.samsontech.com