SSDNow - Kingston Technologymedia.kingston.com/support/downloads/SNM225S2B_noteinstall.pdf ·...
12
SSDNow For Notebooks Document No. 4808066-001.A02 SSDNow Notebook Installation Guide 07-16-2009 Installation Guide Your purchase of the SSDNow with Accessory Kit will allow you to enjoy the benefits of increased system performance and reliability. All hardware and software necessary to replace your Notebook PC's internal hard drive with the SSDNow Solid State Drive (SSD) is included. The Acronis ® True Image HD software * , an imaging program that copies the contents of one computer hard disk and loads those contents to another system drive, will take you through the cloning process. This software allows you to move your Operating System and your personal data from your current system hard drive to your new SSD. Once the Acronis ® True Image HD cloning process is complete and the data is successfully transferred to your SSD, your hard drive can then be used as a secondary drive for data storage. * The software provided in this kit does not support imaging/cloning of RAID or Spanned disk arrays. There are tools and features included in the Acronis software that are not applicable to this product bundle. This manual provides instructions for the Cloning feature only. Please refer to the Acronis “Help” menu, located within the software application, for instructions on the use of any other software features.
Transcript of SSDNow - Kingston Technologymedia.kingston.com/support/downloads/SNM225S2B_noteinstall.pdf ·...
SSDNow For Notebooks
Document No. 4808066-001.A02 SSDNow Notebook Installation Guide 07-16-2009
Installation Guide Your purchase of the SSDNow with Accessory Kit will allow you to enjoy the benefits of increased system performance and reliability. All hardware and software necessary to replace your Notebook PC's internal hard drive with the SSDNow Solid State Drive (SSD) is included. The Acronis® True Image HD software*, an imaging program that copies the contents of one computer hard disk and loads those contents to another system drive, will take you through the cloning process. This software allows you to move your Operating System and your personal data from your current system hard drive to your new SSD. Once the Acronis® True Image HD cloning process is complete and the data is successfully transferred to your SSD, your hard drive can then be used as a secondary drive for data storage.
* The software provided in this kit does not support imaging/cloning of RAID or Spanned disk arrays. There are tools and features included in the Acronis software that are not applicable to this product bundle. This manual provides instructions for the Cloning feature only. Please refer to the Acronis “Help” menu, located within the software application, for instructions on the use of any other software features.
SSDNow For Notebooks
2
This device complies with Part 15 FCC Rules. Operation is subject to the following two conditions: (1) This device may not cause harmful interference. (2) This device must accept any interference received, including interference that may cause undesired operations. This Equipment has been tested and found to comply with the limits for a Class B digital device, pursuant to Part 15 of the FCC rules. These limits are designed to provide reasonable protection against harmful interference in a residential installation. This equipment generates, uses and can radiate radio frequency energy and, if not installed and used in accordance with the instructions, may cause harmful interference to radio communications. However, there is no guarantee that interference will not occur in a particular installation. If this equipment does cause harmful interference to radio or television reception, which can be determined by turning the equipment off and on, the user is encouraged to try and correct the interference by one or more of the following:
• Reorient or relocate the receiving antenna. • Increase the separation between the equipment and receiver. • Connect the equipment into an outlet on a circuit, different from that to which the
receiver is connected. • Consult the dealer or an experienced radio/TV technician for help.
SSDNow For Notebooks
3
TABLE OF CONTENTS Kit Includes:................................................................................................................4 Tools Needed: .............................................................................................................4 System Requirements ..................................................................................................5 Handling Precautions ..................................................................................................6 Hardware Installation ..................................................................................................6 Setup and Use Acronis® True Image HD.....................................................................8

SSDNow For Notebooks
4
Kit Includes:
● external drive enclosure (2-piece unit consisting of a top and bottom panel) ● USB cable (1) ● cloning software CD (1) ● SSDNow (1)
Tools Needed:
● Phillips head screw driver ● Computer system manual (optional)
SSDNow For Notebooks
5
System Requirements
Operating System: Windows Vista® (SP1), Windows XP® (SP3) and Windows 2000® (SP4)
Pentium processor or higher 128MB RAM CD-ROM or DVD drive for bootable media creation
ATTENTION: PLEASE READ BEFORE BEGINNING INSTALLATION. ● If the SSD provided in this kit is larger in capacity than the hard drive currently in
your system, please proceed to Handling Precautions. ● If the SSD provided in this kit is smaller in capacity than the hard drive currently in
your system, please confirm that the used capacity on the system hard drive is not larger than the capacity of your new SSD. To determine the Used space on your hard drive, do the following:
1) Boot your computer to your desktop. 2) Double click on My Computer (Computer in Vista) located on your desktop or
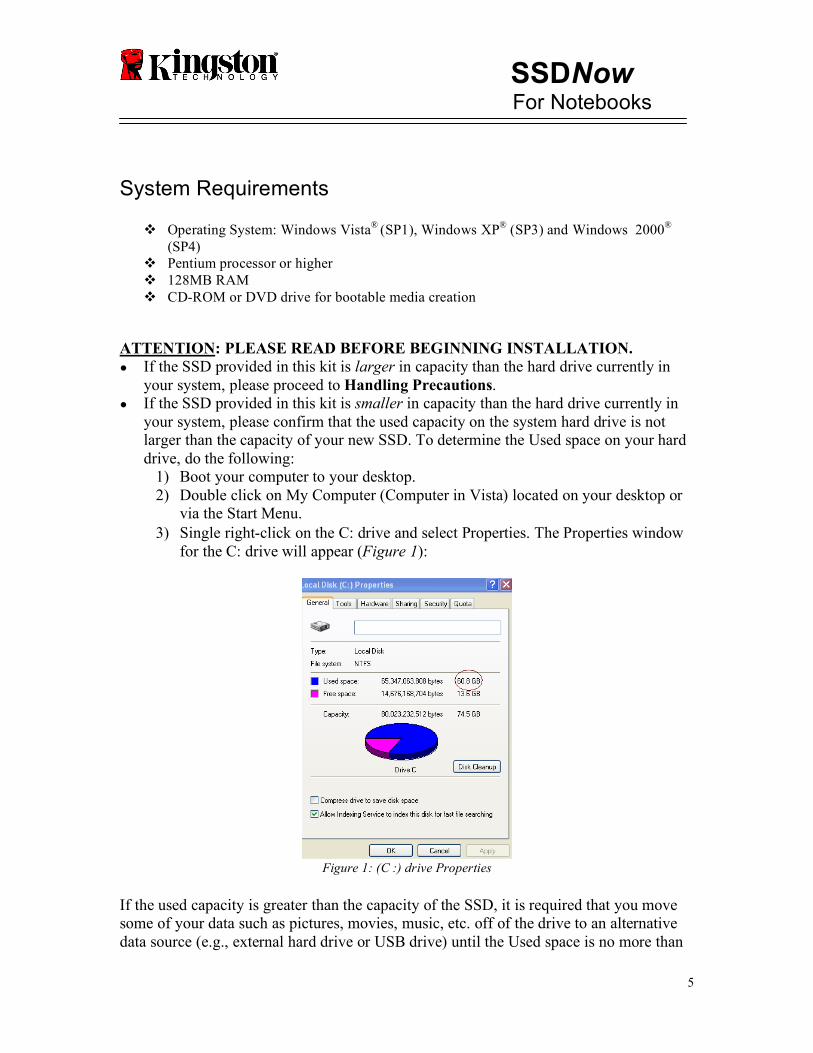
via the Start Menu. 3) Single right-click on the C: drive and select Properties. The Properties window
for the C: drive will appear (Figure 1):
Figure 1: (C :) drive Properties
If the used capacity is greater than the capacity of the SSD, it is required that you move some of your data such as pictures, movies, music, etc. off of the drive to an alternative data source (e.g., external hard drive or USB drive) until the Used space is no more than
SSDNow For Notebooks
6
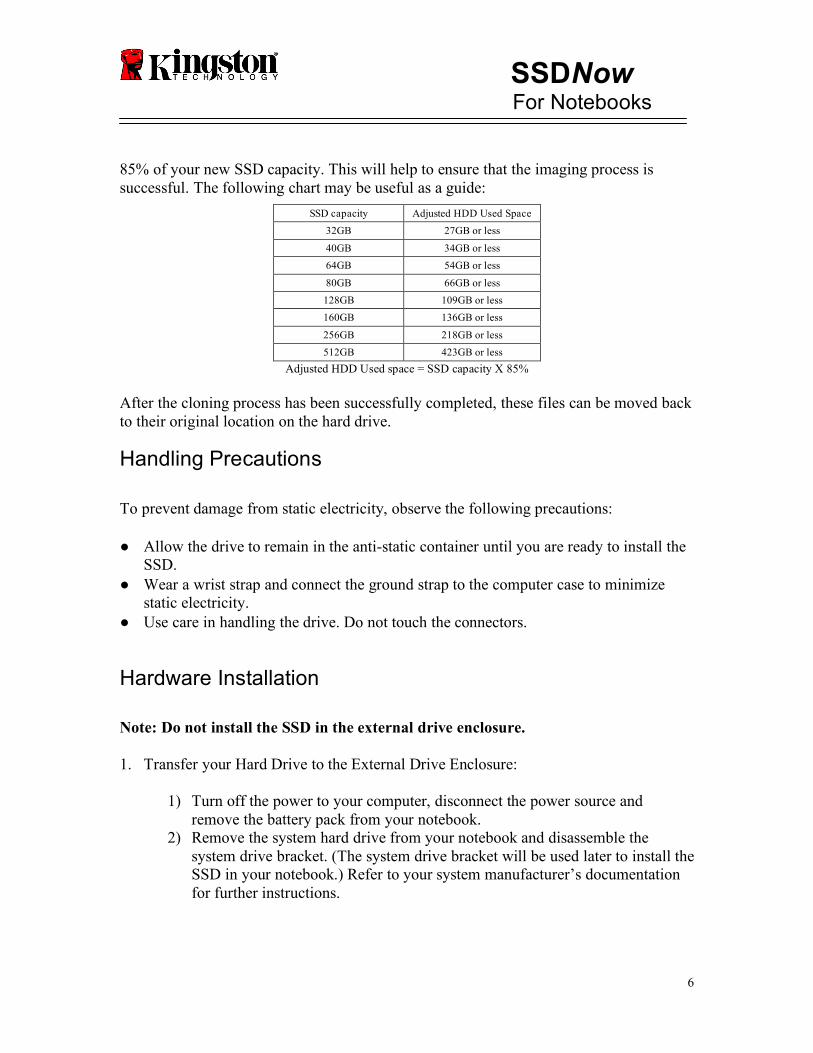
85% of your new SSD capacity. This will help to ensure that the imaging process is successful. The following chart may be useful as a guide:
SSD capacity Adjusted HDD Used Space 32GB 27GB or less
40GB 34GB or less 64GB 54GB or less
80GB 66GB or less 128GB 109GB or less 160GB 136GB or less
256GB 218GB or less 512GB 423GB or less
Adjusted HDD Used space = SSD capacity X 85% After the cloning process has been successfully completed, these files can be moved back to their original location on the hard drive.
Handling Precautions To prevent damage from static electricity, observe the following precautions: ● Allow the drive to remain in the anti-static container until you are ready to install the
SSD. ● Wear a wrist strap and connect the ground strap to the computer case to minimize
static electricity. ● Use care in handling the drive. Do not touch the connectors.
Hardware Installation Note: Do not install the SSD in the external drive enclosure. 1. Transfer your Hard Drive to the External Drive Enclosure:
1) Turn off the power to your computer, disconnect the power source and remove the battery pack from your notebook.
2) Remove the system hard drive from your notebook and disassemble the system drive bracket. (The system drive bracket will be used later to install the SSD in your notebook.) Refer to your system manufacturer’s documentation for further instructions.

SSDNow For Notebooks
7
3) To open the external drive enclosure, press down on the release button (Figure 2a) and slide the two panels apart (Figure 2b).
Figure 2a: Press the release button.
Figure 2b: Slide panels apart.
The external drive enclosure consists of a top panel which is affixed to the 22PIN SATA connector (Figure 3a) and a bottom panel (Figure 3b).
Figure 3a: top panel Figure 3b: bottom panel
4) To assemble the system hard drive together with the external drive enclosure,
align the pins of the system hard drive to the 22PIN SATA connector and push them together until the drive is securely in place (Figure 4).
Figure 4: Secure hard drive to 22PIN SATA connector.
SATA connector
Release button

SSDNow For Notebooks
8
5) Align the top and bottom panels of the enclosure and slide them together until they snap into place (Figure 5).
Figure 5: Snap panels in place. 2. Install the SSD in your Notebook and attach the External Drive Enclosure:
1) Assemble the SSD with the system drive bracket and insert the drive into the drive bay of your notebook. Refer to your system manufacturer’s documentation for instructions.
2) Using the USB cable provided, attach the system hard drive (installed in the provided external drive enclosure) to your notebook via any USB port.
3) You are now ready to copy your data from the system hard drive to the SSD using the cloning software CD provided.
Setup and Use Acronis® True Image HD IMPORTANT: ** It is strongly recommended that you uninstall any Trial versions of Acronis software prior to installing full versions.
1. Insert the Acronis True Image HD software CD into the system CD-ROM drive. 2. Restart the system. 3. The Acronis True Image HD CD is a bootable disk and will boot to the Acronis
True Image HD screen. Note: If the system does not boot to the Acronis True Image HD screen and instead boots to Windows or fails to boot at all, perform the following:
1) Restart the computer. While the system is restarting, run the system setup program (BIOS). The system BIOS can be activated by pressing a special key such as ESC, F1, F12 or DELETE. (Consult your computer system’s documentation for the correct key.)
SSDNow For Notebooks
9
2) While in the system BIOS, change the boot order so that CD-ROM is the first boot device.
3) Save the settings and exit BIOS. (For more detailed instructions on configuring the BIOS, consult your computer system’s documentation.)
4) Restart the computer. When the computer restarts, it should now boot to the Acronis True Image HD page.
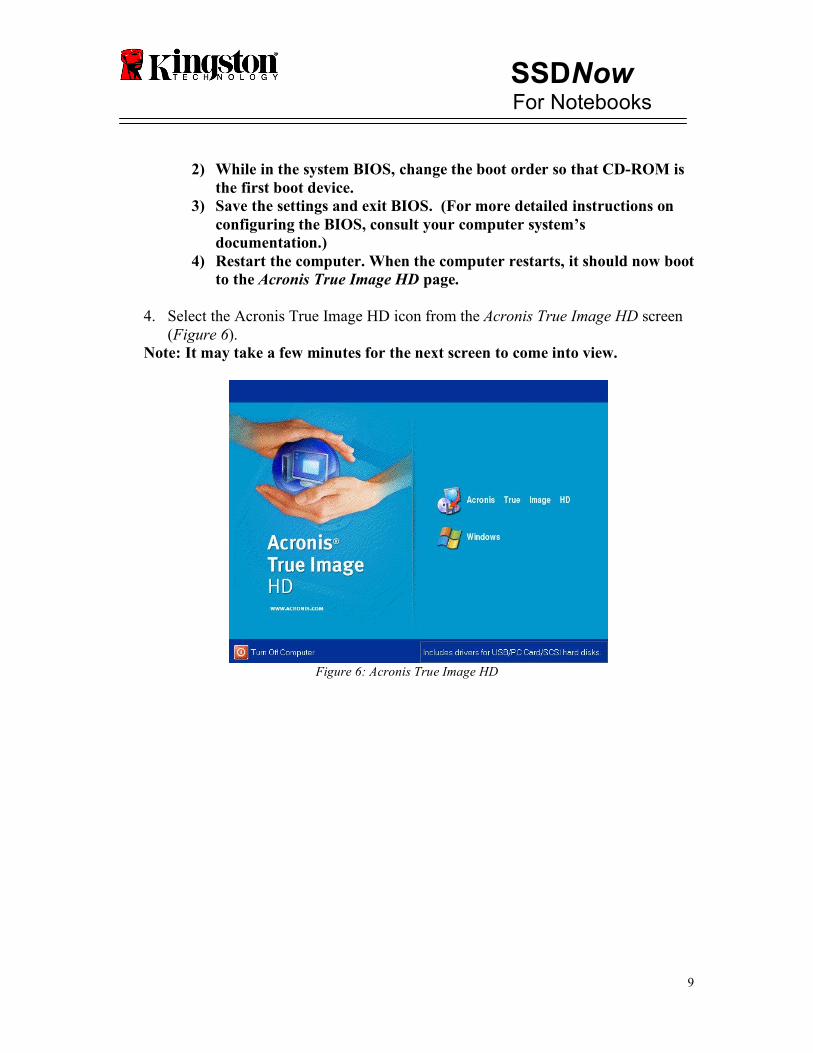
4. Select the Acronis True Image HD icon from the Acronis True Image HD screen
(Figure 6). Note: It may take a few minutes for the next screen to come into view.
Figure 6: Acronis True Image HD

SSDNow For Notebooks
10
5. Select Clone Disk from the Pick a Task screen (Figure 7).
Figure 7: Pick a Task
6. The Welcome to the Disk Clone Wizard! screen will appear and the wizard will
guide you through the cloning process (Figure 8). Click Next to continue.
Figure 8: Disk Clone Wizard

SSDNow For Notebooks
11
7. Select Automatic from the cloning mode options (Figure 9). DO NOT select Manual mode. (Manual mode should be used by advanced users only.) Click Next.
Figure 9: Cloning mode options
8. The Hard Disk Drives Structure screen will appear (Figure 10). Click Next. Note: The original partition sizes will be scaled according to the new drive size. If the new drive is smaller in size than the original drive, the partitions will shrink accordingly. If the new drive is larger than the original drive, the partitions will be enlarged proportionately.
Figure 10: Hard Disk Drives Structure
SSDNow For Notebooks
12
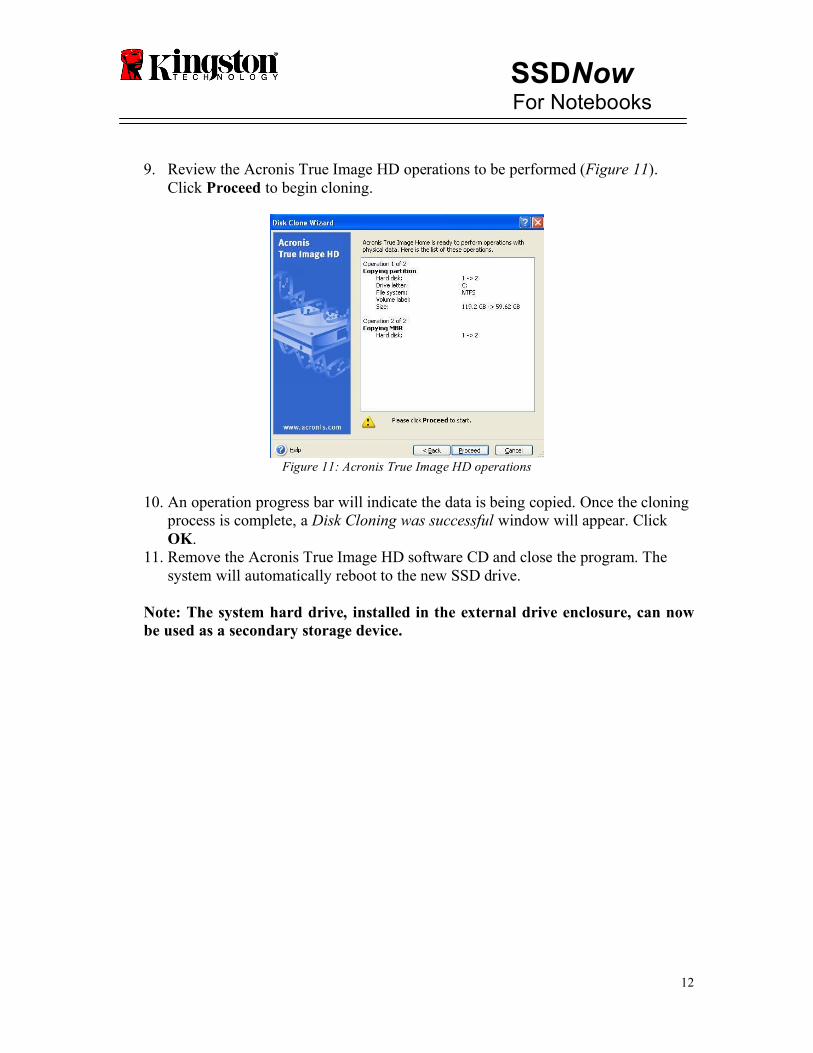
9. Review the Acronis True Image HD operations to be performed (Figure 11). Click Proceed to begin cloning.
Figure 11: Acronis True Image HD operations
10. An operation progress bar will indicate the data is being copied. Once the cloning
process is complete, a Disk Cloning was successful window will appear. Click OK.
11. Remove the Acronis True Image HD software CD and close the program. The system will automatically reboot to the new SSD drive.
Note: The system hard drive, installed in the external drive enclosure, can now be used as a secondary storage device.