SS 100DOwnersManual
60
SUZUKI Pianos SS-100 DIGITAL PIANO OWNER’S MANUAL SUZUKI
-
Upload
mrpeeble-mrpeeble -
Category
Documents
-
view
224 -
download
0
description
suzuki ss-100 manual
Transcript of SS 100DOwnersManual
1
SUZUKI Pianos
SS-100 DIGITAL PIANO
OWNER’S MANUAL
SUZUKI

2
3
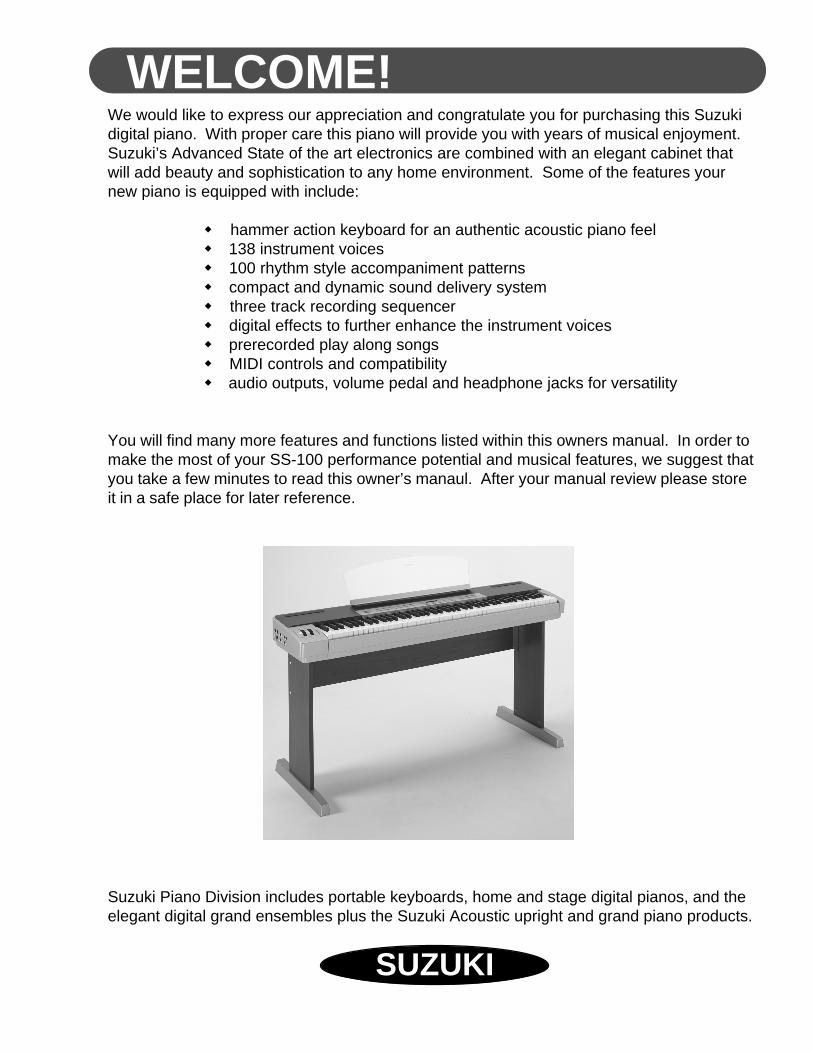
WELCOME!We would like to express our appreciation and congratulate you for purchasing this Suzukidigital piano. With proper care this piano will provide you with years of musical enjoyment.Suzuki’s Advanced State of the art electronics are combined with an elegant cabinet thatwill add beauty and sophistication to any home environment. Some of the features yournew piano is equipped with include:
hammer action keyboard for an authentic acoustic piano feel 138 instrument voices 100 rhythm style accompaniment patterns compact and dynamic sound delivery system three track recording sequencer digital effects to further enhance the instrument voices prerecorded play along songs MIDI controls and compatibility audio outputs, volume pedal and headphone jacks for versatility
You will find many more features and functions listed within this owners manual. In order tomake the most of your SS-100 performance potential and musical features, we suggest thatyou take a few minutes to read this owner’s manaul. After your manual review please storeit in a safe place for later reference.
Suzuki Piano Division includes portable keyboards, home and stage digital pianos, and theelegant digital grand ensembles plus the Suzuki Acoustic upright and grand piano products.
SUZUKI
4
GENERAL PRECAUTIONS
CAUTIONRISK OF ELECTRIC SHOCK
DO NOT OPEN
CAUTION: TO REDUCE THE RISK OF ELECTRIC SHOCK,DO NOT REMOVE COVER OR BACKNO USER-SERVICEABLE PARTS INSIDE
REFER SERVICING TO QUALIFIED SERVICE PERSONNEL
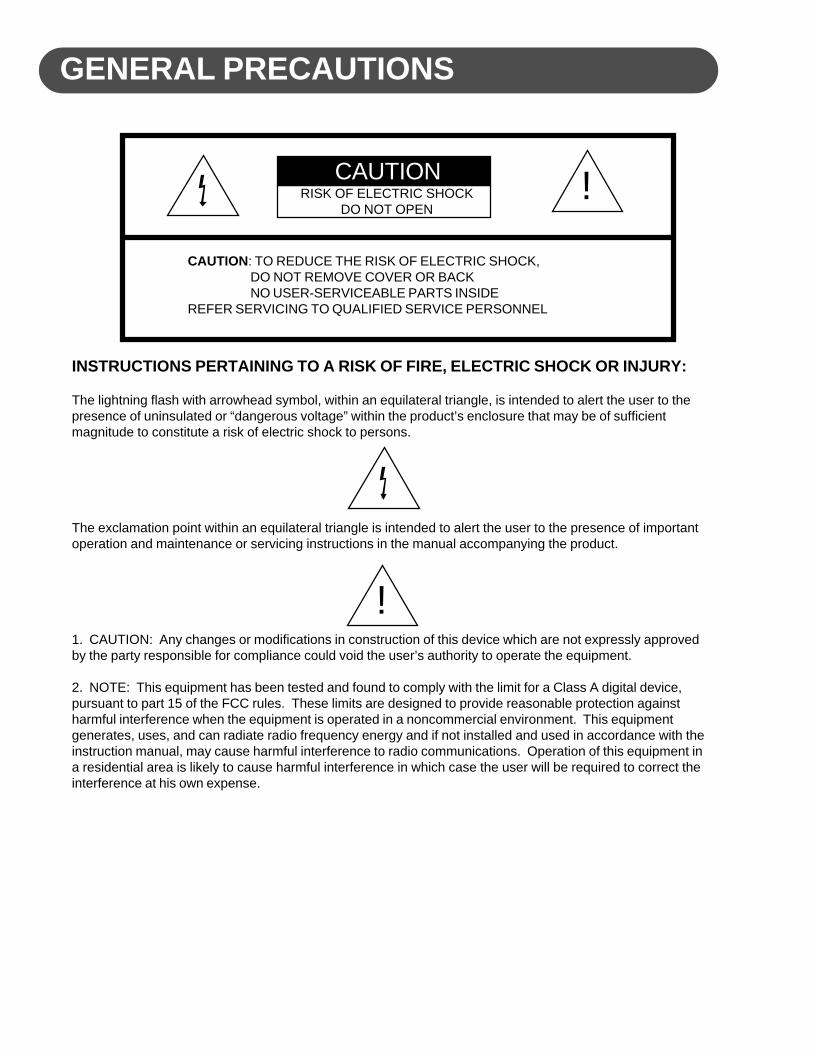
INSTRUCTIONS PERTAINING TO A RISK OF FIRE, ELECTRIC SHOCK OR INJURY:
The lightning flash with arrowhead symbol, within an equilateral triangle, is intended to alert the user to thepresence of uninsulated or “dangerous voltage” within the product’s enclosure that may be of sufficientmagnitude to constitute a risk of electric shock to persons.
The exclamation point within an equilateral triangle is intended to alert the user to the presence of importantoperation and maintenance or servicing instructions in the manual accompanying the product.
1. CAUTION: Any changes or modifications in construction of this device which are not expressly approvedby the party responsible for compliance could void the user’s authority to operate the equipment.
2. NOTE: This equipment has been tested and found to comply with the limit for a Class A digital device,pursuant to part 15 of the FCC rules. These limits are designed to provide reasonable protection againstharmful interference when the equipment is operated in a noncommercial environment. This equipmentgenerates, uses, and can radiate radio frequency energy and if not installed and used in accordance with theinstruction manual, may cause harmful interference to radio communications. Operation of this equipment ina residential area is likely to cause harmful interference in which case the user will be required to correct theinterference at his own expense.
!
!

5
TAKING CARE OF YOUR DIGITAL PIANOThis Suzuki digital piano will supply you with years of musical enjoyment if you follow thesimple rules listed below.
SERVICE AND MODIFICATIONThis product should be serviced by qualified
service personnel when, the power supply cord or the plug hasbeen damaged,
liquid has been spattered into the unit or ithas been exposed to rain,
the instrument does not appear to operatenormally or exhibits a marked change inperformance,
the instrument has been dropped or thecabinet has been damaged.
Do not attempt to open the piano or makeany change in the circuits or parts of theunit.
HANDLING AND TRANSPORT Never apply excessive force to the con-trols, connectors or other parts of theinstrument.
Always unplug cables by gripping the plugfirmly, not by pulling on the cable.
Disconnect all cables before moving theinstrument.
Physical shocks caused by dropping,bumping, or placing heavy objects on theinstrument can result in scratches and/ormore serious damage.
Carefully check the amplifier volumecontrol before stating to play. Excessivevolume can cause permanent hearingloss.
CLEANING Clean the cabinet and panel with a drysoft cloth. A wax based polish may beused on the cabinet, although rubbingwith a soft cloth will usually suffice. Donot use paint thinner or petrochemicalbased polishes.
To maintain the luster of the keys andbuttons wipe with a clean, lightly damp-ened cloth, and then polish with a soft drycloth.
LOCATIONDo not expose the instrument to the follow-ing conditions to avoid deformation, discol-oration, or more serious damage,
direct sunlight (near a window), high temperatures (near a heat source,outside, or in a car during the daytime),
excessive humidity, excessive dust, strong vibration. Leave enough space around the piano forit to be properly ventilated.
This instrument contains digital circuitryand may cause interference if placed tooclose to radio or television receivers. Ifinterference occurs, move the instrumentfurther away from the affected equipment.
Avoid placing vinyl objects on top of theinstrument, vinyl can stick to and discolorthe surface.
POWER Turn the power switch off when the instru-ment is not in use.
To avoid damage to the instrument andother devices to which it is connected,turn the power switches of all relateddevices off prior to connection or discon-nection of MIDI cables.
Turn the power off if the main cable isdamaged or the instrument is spatteredwith liquid.
Do not switch the unit on and off in quicksuccession, this places an undue load onthe electronic components.
Unplug the AC power cord during anelectrical storm.
Avoid plugging the AC adaptor into thesame AC outlet as appliances with highpower consumption, such as electricheaters or ovens.

6
TABLE OF CONTENTS
EASY SET UP AND QUICK PLAY ............................................... 7ASSEMBLY ................................................................................... 8PANEL CONTROLS .................................................................. 11WHEELS ..................................................................................... 20DEMO ......................................................................................... 21KEYBOARD VOICES .................................................................. 22
Voice Selection ......................................................................... 22Layer (dual) .............................................................................. 23Lower (split) .............................................................................. 23
RHYTHM SECTION .................................................................... 25Rhythm Style Select ................................................................. 25Adjusting the Tempo ................................................................. 26Starting and Stopping the Rhythm Style .................................. 27Variation ................................................................................... 28Fill-In ........................................................................................ 28
AUTO ACCOMPANIMENT (AUTO BASE CHORD).................... 29Single ....................................................................................... 29Fingered ................................................................................... 30Piano ........................................................................................ 31Manual Bass Chord .................................................................. 31Auto Harmony .......................................................................... 31Starting and Stopping the Auto Accompaniment ..................... 32Variation ................................................................................... 33Fill-In ........................................................................................ 33
FUNCTION .................................................................................. 34Metronome ............................................................................... 35Reverb Level ............................................................................ 35Chorus Level ............................................................................ 36Touch Response ...................................................................... 36Split Point for Lower Voice ........................................................ 37Split Point for Auto Accompaniment ......................................... 37Master Tune .............................................................................. 38Drum Kit Selecting (Keyboard Percussion) .............................. 38Auto Harmony Type Selecting .................................................. 39
RECORD ..................................................................................... 40Recording ................................................................................. 41Playback ................................................................................... 42
REGISTRATION MEMORY ......................................................... 43PLAY ALONG SONGS ................................................................ 44MIDI ............................................................................................. 45MIDI IMPLEMENTATION CHART ............................................... 47VOICE LIST ................................................................................. 48STYLE LIST ............................................................................... 51DRUM KIT LIST .......................................................................... 52CONNECTOR PANEL ................................................................. 55PEDALS ...................................................................................... 56SPECIFICATIONS ....................................................................... 57WARRANTY ................................................................................ 58

7
EASY SET UP AND QUICK PLAYEASY SET UP AND QUICK PLAY IN FOUR SIMPLE STEPS
1 2
3 4
CHECK THEPACKAGE
CONTENTS
ASSEMBLE THEPIANO STAND
PLACE THE PIANOON THE STANDAND PLUG THEAC CORD INTO
THE AC OUTLET
TURN THE POWERSWITCH ON, ADJUST THEVOLUME AND
BEGIN TO PLAY
8
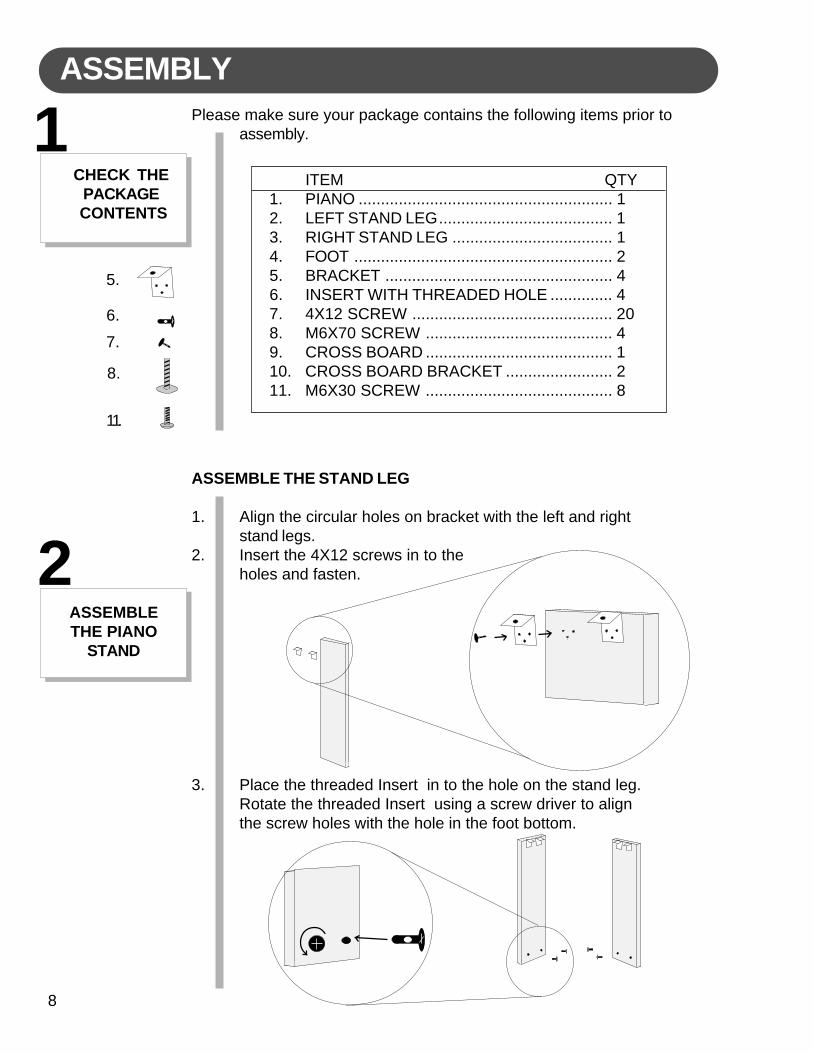
ASSEMBLYPlease make sure your package contains the following items prior to
assembly.
ASSEMBLE THE STAND LEG
1. Align the circular holes on bracket with the left and rightstand legs.
2. Insert the 4X12 screws in to theholes and fasten.
3. Place the threaded Insert in to the hole on the stand leg.Rotate the threaded Insert using a screw driver to alignthe screw holes with the hole in the foot bottom.
CHECK THEPACKAGE
CONTENTS
ITEM QTY1. PIANO ......................................................... 12. LEFT STAND LEG....................................... 13. RIGHT STAND LEG .................................... 14. FOOT .......................................................... 25. BRACKET ................................................... 46. INSERT WITH THREADED HOLE .............. 47. 4X12 SCREW ............................................. 208. M6X70 SCREW .......................................... 49. CROSS BOARD .......................................... 110. CROSS BOARD BRACKET ........................ 211. M6X30 SCREW .......................................... 8
ASSEMBLETHE PIANO
STAND
5.
6.
7.
11.
8.
1
2

9
ASSEMBLE THE SIDE BOARD (continued)
4. Insert the M6X70 screws to the holes in the foot and align with thethreaded holes of the Insert in the side board and fasten.
ASSEMBLE THE CROSS BOARD - Place the cross board bracket onthe cross board and fasten with 4X12 screws.
ASSEMBLE THE PIANO STAND
1. Align the circular holes on the end of the cross board assemblywith the right and left stand leg assembly.
2. Insert the M6X30 screws into the holes and fasten.
ASSEMBLY
10
ATTACH THE PIANO TO THE STAND
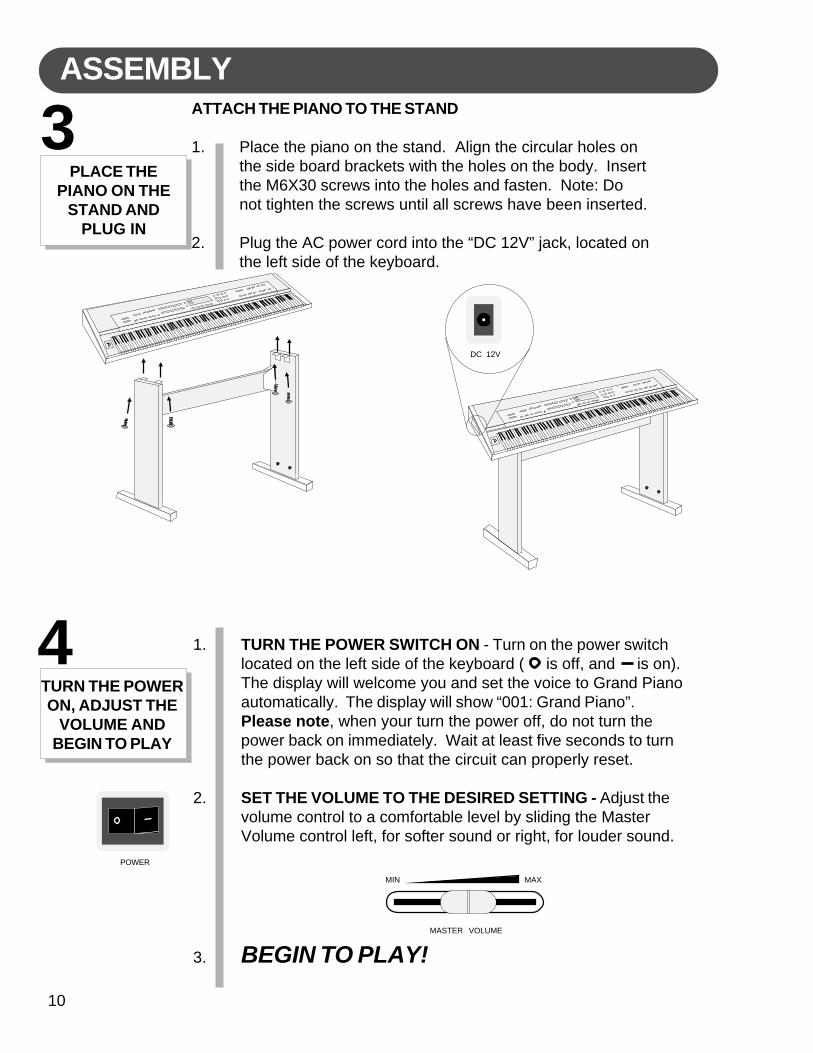
1. Place the piano on the stand. Align the circular holes onthe side board brackets with the holes on the body. Insertthe M6X30 screws into the holes and fasten. Note: Donot tighten the screws until all screws have been inserted.
2. Plug the AC power cord into the “DC 12V” jack, located onthe left side of the keyboard.
PLACE THEPIANO ON THE
STAND ANDPLUG IN
TURN THE POWERON, ADJUST THE
VOLUME ANDBEGIN TO PLAY
1. TURN THE POWER SWITCH ON - Turn on the power switchlocated on the left side of the keyboard ( is off, and is on).The display will welcome you and set the voice to Grand Pianoautomatically. The display will show “001: Grand Piano”.Please note, when your turn the power off, do not turn thepower back on immediately. Wait at least five seconds to turnthe power back on so that the circuit can properly reset.
2. SET THE VOLUME TO THE DESIRED SETTING - Adjust thevolume control to a comfortable level by sliding the MasterVolume control left, for softer sound or right, for louder sound.
3. BEGIN TO PLAY!
POWER
MASTER VOLUME
MIN MAX
DC 12V
3
4
ASSEMBLY

11
SUZUKISINGLE
FINGERED
PIANOMASTER VOLUME
MIN MAX
ACCOMP VOLUME
MIN MAX
– TEMPO + HARMONY LAYER LOWER
SYNCHSTART
START/STOP
INTRO/ENDING
ACCOMPFILL IN VARIATION
PANEL CONTROLSThe elegant control panel is divided into several distinct sections. The following is a briefdescription of all the features located on the control panel.
1. MASTER VOLUME - Use this sliding control button to adjustthe overall volume of the keyboard.
2. ACCOMP VOLUME - Slide this controller to adjust the volumeof the auto accompaniment only, the keyboard instrument voicewill not be affected.
3. TEMPO - Press one of the TEMPO buttons, the current tempovalue will appear on the display. You can use the TEMPO +,TEMPO – buttons, or the +/YES and –/NO buttons to changethe tempo value range from 40 to 240 bpm (beats per minute).Press the TEMPO + or TEMPO – buttons or the +/YES and–/NO buttons simultaneously to recall the default tempo settingfor the selected rhythm style. After three seconds the displaywill revert to the selected voice.There is a four-dot beat indicator above the tempo buttons. Itindicates the tempo and beat for the accompaniment that isplaying.
4. HARMONY - When selected, the single note played on theright-hand section of the keyboard will sound with additionalauto harmony notes. The note played in the upper section ofthe piano determines the root key of the harmony. It is recom-mended that one note be played at a time. If more than onenote is played only the highest note will add harmony.Auto harmony is only available when the auto accom-paniment is engaged. The harmony type selection is as-signed in the Function menu. Use it to select the type of har-mony, Duet, Close Harmony, Open Harmony, or Octave. Seethe Function section for more information.
1
2
3
4
12
PANEL CONTROLS
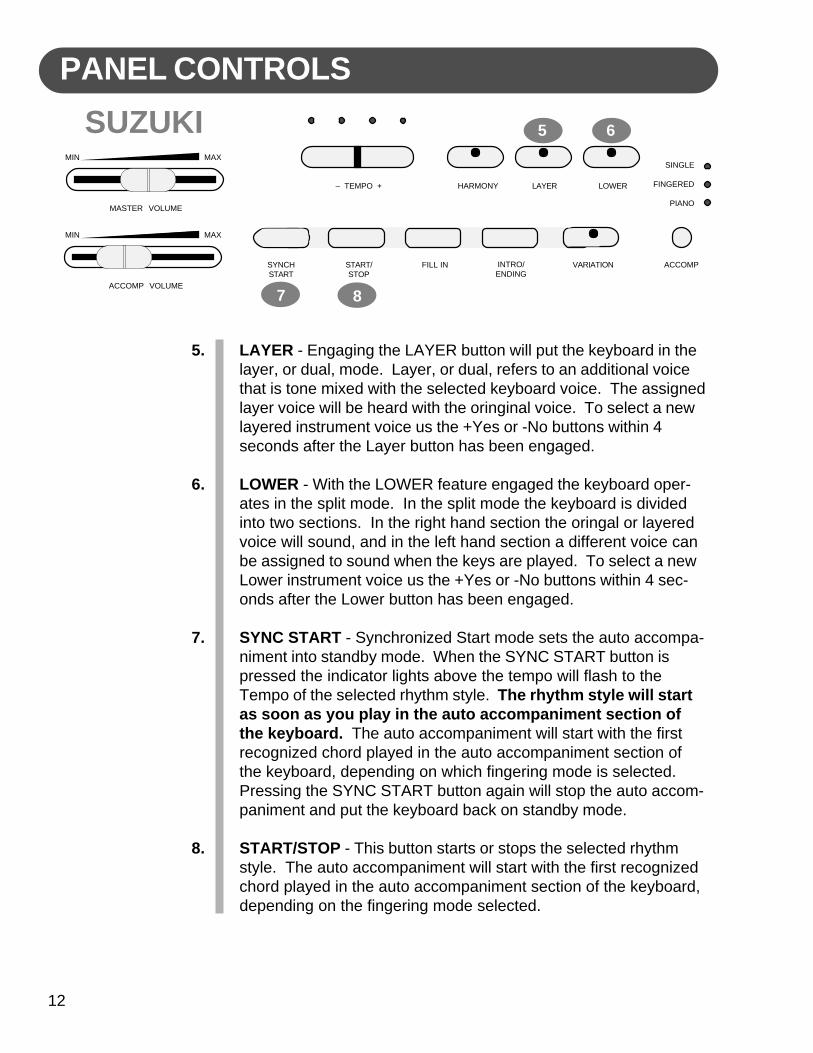
5. LAYER - Engaging the LAYER button will put the keyboard in thelayer, or dual, mode. Layer, or dual, refers to an additional voicethat is tone mixed with the selected keyboard voice. The assignedlayer voice will be heard with the oringinal voice. To select a newlayered instrument voice us the +Yes or -No buttons within 4seconds after the Layer button has been engaged.
6. LOWER - With the LOWER feature engaged the keyboard oper-ates in the split mode. In the split mode the keyboard is dividedinto two sections. In the right hand section the oringal or layeredvoice will sound, and in the left hand section a different voice canbe assigned to sound when the keys are played. To select a newLower instrument voice us the +Yes or -No buttons within 4 sec-onds after the Lower button has been engaged.
7. SYNC START - Synchronized Start mode sets the auto accompa-niment into standby mode. When the SYNC START button ispressed the indicator lights above the tempo will flash to theTempo of the selected rhythm style. The rhythm style will startas soon as you play in the auto accompaniment section ofthe keyboard. The auto accompaniment will start with the firstrecognized chord played in the auto accompaniment section ofthe keyboard, depending on which fingering mode is selected.Pressing the SYNC START button again will stop the auto accom-paniment and put the keyboard back on standby mode.
8. START/STOP - This button starts or stops the selected rhythmstyle. The auto accompaniment will start with the first recognizedchord played in the auto accompaniment section of the keyboard,depending on the fingering mode selected.
7
65
8
SUZUKISINGLE
FINGERED
PIANOMASTER VOLUME
MIN MAX
ACCOMP VOLUME
MIN MAX
– TEMPO + HARMONY LAYER LOWER
SYNCHSTART
START/STOP
FILL IN ACCOMPINTRO/ENDING
VARIATION
13
PANEL CONTROLS
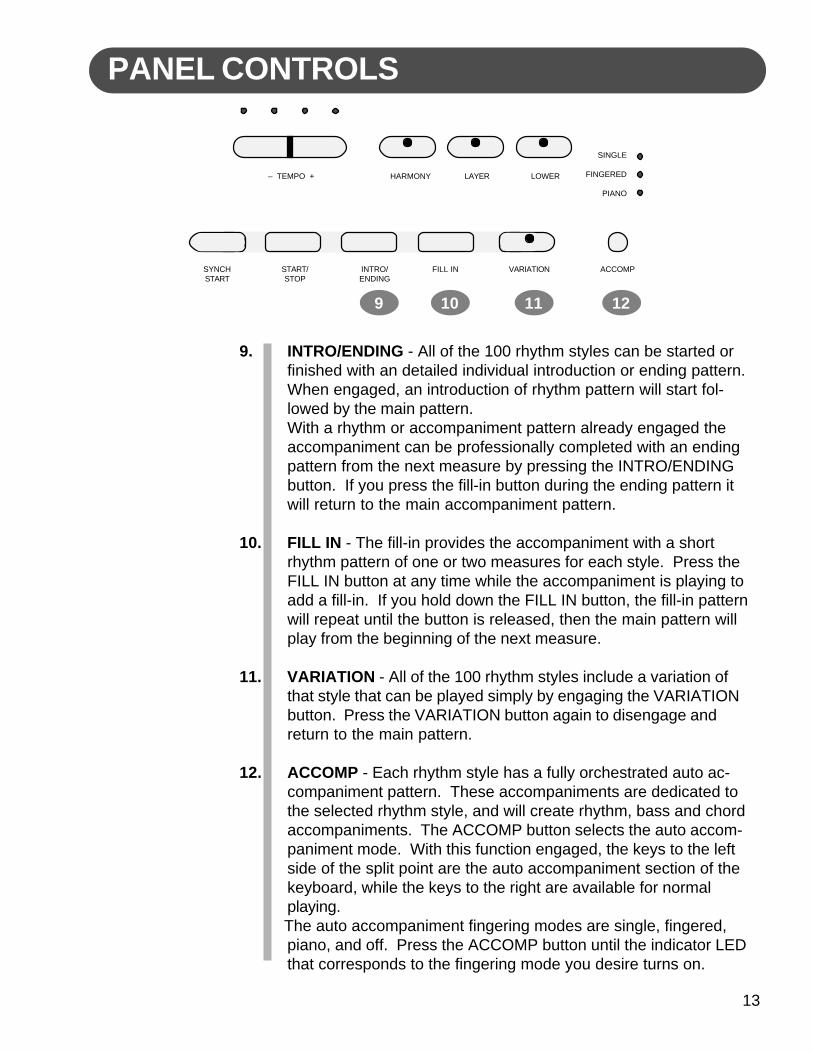
9. INTRO/ENDING - All of the 100 rhythm styles can be started orfinished with an detailed individual introduction or ending pattern.When engaged, an introduction of rhythm pattern will start fol-lowed by the main pattern.With a rhythm or accompaniment pattern already engaged theaccompaniment can be professionally completed with an endingpattern from the next measure by pressing the INTRO/ENDINGbutton. If you press the fill-in button during the ending pattern itwill return to the main accompaniment pattern.
10. FILL IN - The fill-in provides the accompaniment with a shortrhythm pattern of one or two measures for each style. Press theFILL IN button at any time while the accompaniment is playing toadd a fill-in. If you hold down the FILL IN button, the fill-in patternwill repeat until the button is released, then the main pattern willplay from the beginning of the next measure.
11. VARIATION - All of the 100 rhythm styles include a variation ofthat style that can be played simply by engaging the VARIATIONbutton. Press the VARIATION button again to disengage andreturn to the main pattern.
12. ACCOMP - Each rhythm style has a fully orchestrated auto ac-companiment pattern. These accompaniments are dedicated tothe selected rhythm style, and will create rhythm, bass and chordaccompaniments. The ACCOMP button selects the auto accom-paniment mode. With this function engaged, the keys to the leftside of the split point are the auto accompaniment section of thekeyboard, while the keys to the right are available for normalplaying.
The auto accompaniment fingering modes are single, fingered,piano, and off. Press the ACCOMP button until the indicator LEDthat corresponds to the fingering mode you desire turns on.
11 1210
SINGLE
FINGERED
PIANO
– TEMPO + HARMONY LAYER LOWER
SYNCHSTART
START/STOP
INTRO/ENDING
ACCOMPFILL IN VARIATION
9
14
PANEL CONTROLS
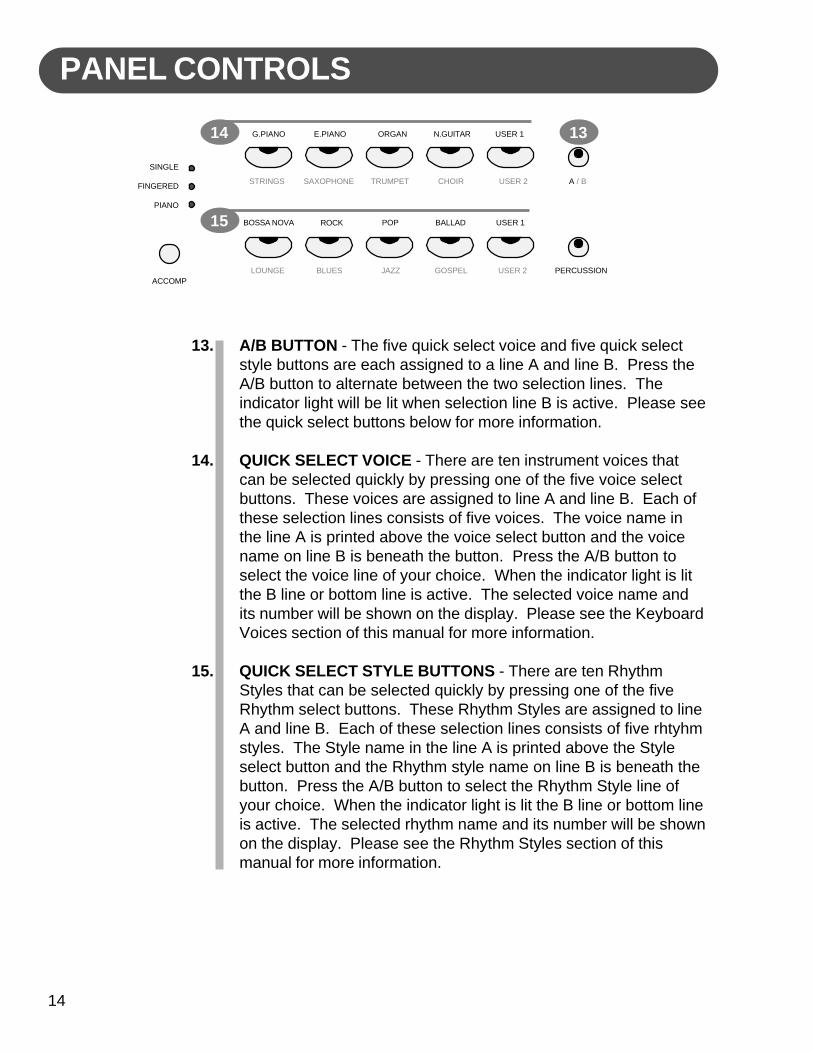
13. A/B BUTTON - The five quick select voice and five quick selectstyle buttons are each assigned to a line A and line B. Press theA/B button to alternate between the two selection lines. Theindicator light will be lit when selection line B is active. Please seethe quick select buttons below for more information.
14. QUICK SELECT VOICE - There are ten instrument voices thatcan be selected quickly by pressing one of the five voice selectbuttons. These voices are assigned to line A and line B. Each ofthese selection lines consists of five voices. The voice name inthe line A is printed above the voice select button and the voicename on line B is beneath the button. Press the A/B button toselect the voice line of your choice. When the indicator light is litthe B line or bottom line is active. The selected voice name andits number will be shown on the display. Please see the KeyboardVoices section of this manual for more information.
15. QUICK SELECT STYLE BUTTONS - There are ten RhythmStyles that can be selected quickly by pressing one of the fiveRhythm select buttons. These Rhythm Styles are assigned to lineA and line B. Each of these selection lines consists of five rhtyhmstyles. The Style name in the line A is printed above the Styleselect button and the Rhythm style name on line B is beneath thebutton. Press the A/B button to select the Rhythm Style line ofyour choice. When the indicator light is lit the B line or bottom lineis active. The selected rhythm name and its number will be shownon the display. Please see the Rhythm Styles section of thismanual for more information.
1314
15
SINGLE
FINGERED
PIANO
ACCOMP
G.PIANO E.PIANO ORGAN N.GUITAR USER 1
STRINGS SAXOPHONE TRUMPET CHOIR USER 2
PERCUSSION
A / B
BOSSA NOVA ROCK POP BALLAD USER 1
LOUNGE BLUES JAZZ GOSPEL USER 2
15
PANEL CONTROLS
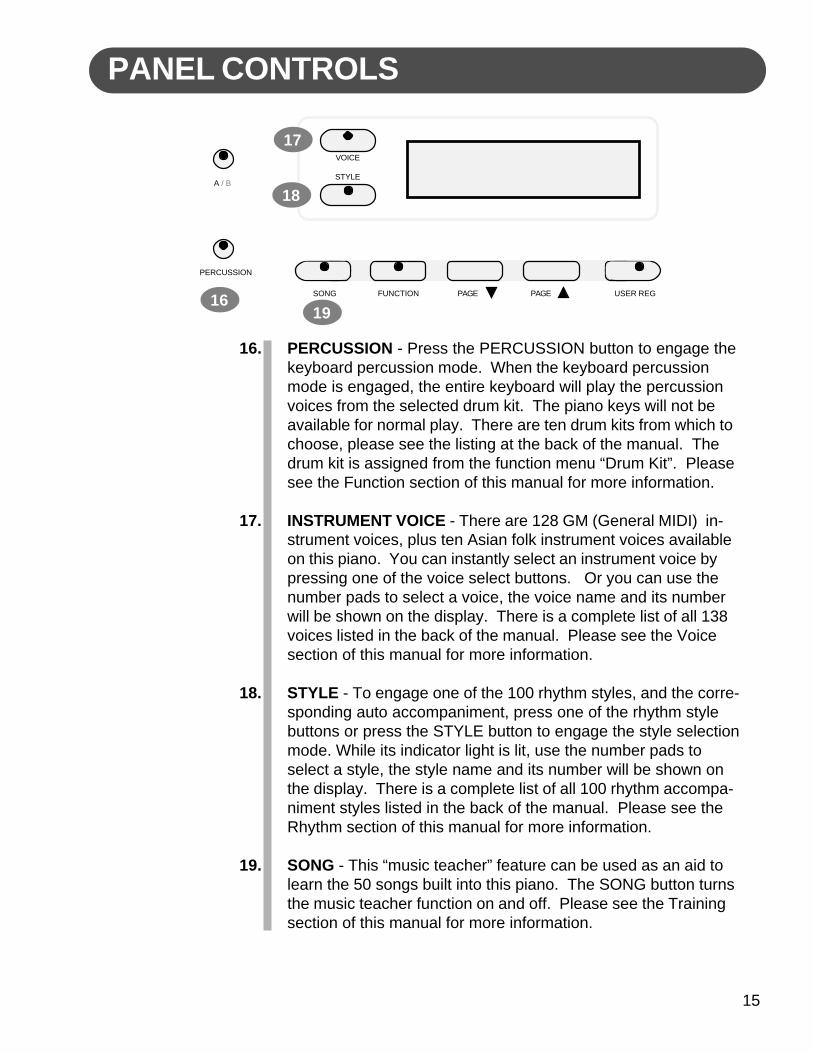
16. PERCUSSION - Press the PERCUSSION button to engage thekeyboard percussion mode. When the keyboard percussionmode is engaged, the entire keyboard will play the percussionvoices from the selected drum kit. The piano keys will not beavailable for normal play. There are ten drum kits from which tochoose, please see the listing at the back of the manual. Thedrum kit is assigned from the function menu “Drum Kit”. Pleasesee the Function section of this manual for more information.
17. INSTRUMENT VOICE - There are 128 GM (General MIDI) in-strument voices, plus ten Asian folk instrument voices availableon this piano. You can instantly select an instrument voice bypressing one of the voice select buttons. Or you can use thenumber pads to select a voice, the voice name and its numberwill be shown on the display. There is a complete list of all 138voices listed in the back of the manual. Please see the Voicesection of this manual for more information.
18. STYLE - To engage one of the 100 rhythm styles, and the corre-sponding auto accompaniment, press one of the rhythm stylebuttons or press the STYLE button to engage the style selectionmode. While its indicator light is lit, use the number pads toselect a style, the style name and its number will be shown onthe display. There is a complete list of all 100 rhythm accompa-niment styles listed in the back of the manual. Please see theRhythm section of this manual for more information.
19. SONG - This “music teacher” feature can be used as an aid tolearn the 50 songs built into this piano. The SONG button turnsthe music teacher function on and off. Please see the Trainingsection of this manual for more information.
1916
VOICE
STYLE
PERCUSSION
A / B
SONG FUNCTION USER REGPAGEPAGE
17
18
16
PANEL CONTROLS
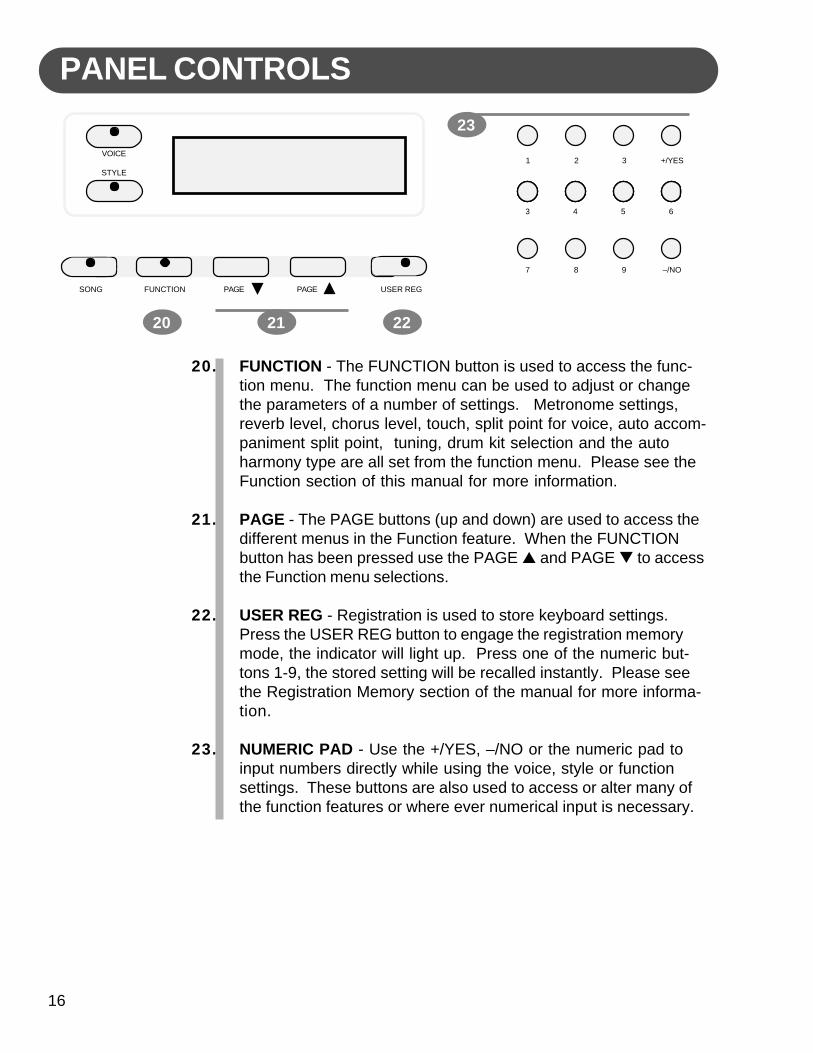
20. FUNCTION - The FUNCTION button is used to access the func-tion menu. The function menu can be used to adjust or changethe parameters of a number of settings. Metronome settings,reverb level, chorus level, touch, split point for voice, auto accom-paniment split point, tuning, drum kit selection and the autoharmony type are all set from the function menu. Please see theFunction section of this manual for more information.
21. PAGE - The PAGE buttons (up and down) are used to access thedifferent menus in the Function feature. When the FUNCTIONbutton has been pressed use the PAGE ▲ and PAGE ▼ to accessthe Function menu selections.
22. USER REG - Registration is used to store keyboard settings.Press the USER REG button to engage the registration memorymode, the indicator will light up. Press one of the numeric but-tons 1-9, the stored setting will be recalled instantly. Please seethe Registration Memory section of the manual for more informa-tion.
23. NUMERIC PAD - Use the +/YES, –/NO or the numeric pad toinput numbers directly while using the voice, style or functionsettings. These buttons are also used to access or alter many ofthe function features or where ever numerical input is necessary.
21 22
23VOICE
STYLE
SONG FUNCTION USER REGPAGEPAGE
1 2 3 +/YES
3 4 5 6
7 8 9 –/NO
20

17
24. TRANSPOSE - The transpose feature can shift the pitch of thekeyboard up or down in semitone intervals up to a maximumof 24 semitones. Press one of the TRANSPOSE buttons, thecurrent transpose value will appear on the display. Use theTRANSPOSE + or TRANSPOSE – buttons to set the transposevalue range from –12, one octave lower, to 12, one octavehigher. Press the + and – value buttons simultaneously torecall the default value of 0. After three seconds the display willreturn to the currently selected instrument voice. Transposedoes not affect notes that are currently playing. Transposedoes not affect the keyboard percussion.
25. REVERB - The reverb effect is engaged automatically when thepower is turned on. Reverb simulates the effect of playing in abig room or hall where the sound reverberates off the walls andceiling. Press the REVERB button to turn off the reverb effect.You can switch the reverb feature on and off by pressing theREVERB button. The reverb setting does not affect the autoaccompaniment. Reverb depth can be changed in the functionmenu “Reverb Level”. Please see the Function Section formore information.
26. CHORUS - The Chorus effect adds depth and spaciousness tothe selected keyboard voice. Press the CHORUS button toengage the chorus effect and the indicator will light up. Pressthe button again to turn off the chorus effect. The chorus set-ting does not affect the auto accompaniment. Chorus depthcan be changed in the function menu “Chorus Level”. Pleasesee the Function Section for more information.
PANEL CONTROLS
25 2624
1
2
3
4
USER SONG ACCOMP MELODY 1 MELODY 2 REC PLAY/STOP DEMO
– TRANSPOSE + REVERB CHORUS LEFT RIGHT
EFFECT SONG
18
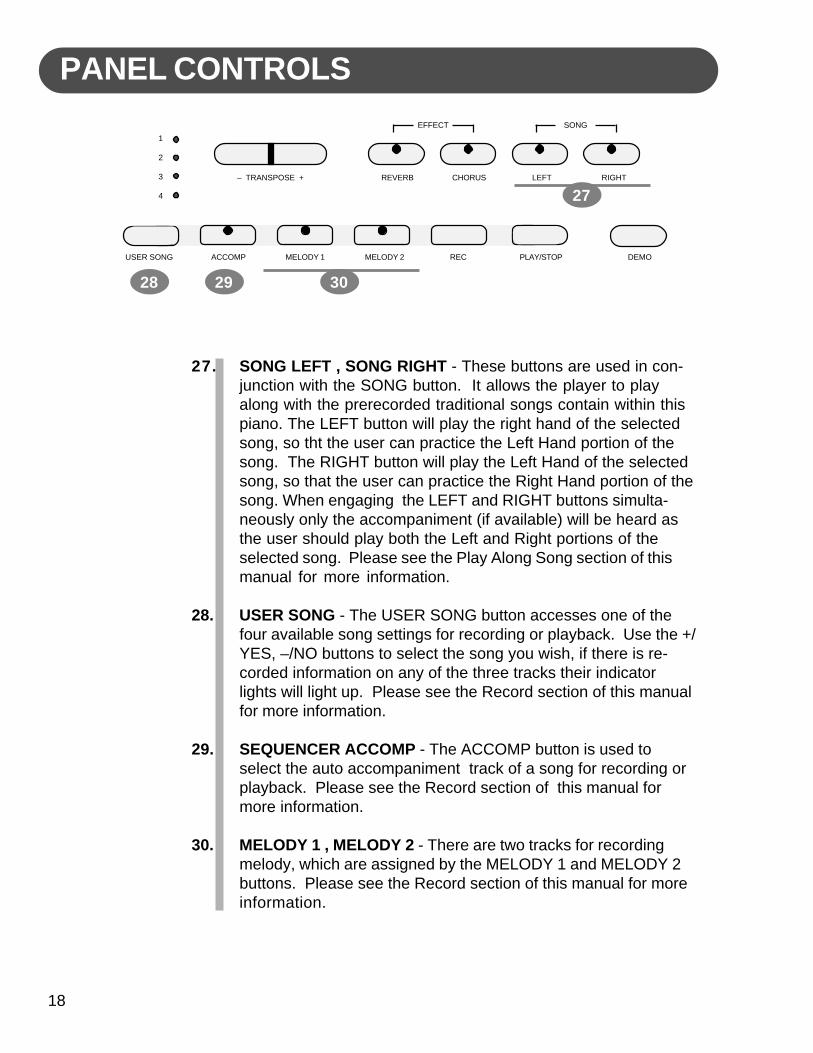
27. SONG LEFT , SONG RIGHT - These buttons are used in con-junction with the SONG button. It allows the player to playalong with the prerecorded traditional songs contain within thispiano. The LEFT button will play the right hand of the selectedsong, so tht the user can practice the Left Hand portion of thesong. The RIGHT button will play the Left Hand of the selectedsong, so that the user can practice the Right Hand portion of thesong. When engaging the LEFT and RIGHT buttons simulta-neously only the accompaniment (if available) will be heard asthe user should play both the Left and Right portions of theselected song. Please see the Play Along Song section of thismanual for more information.
28. USER SONG - The USER SONG button accesses one of thefour available song settings for recording or playback. Use the +/YES, –/NO buttons to select the song you wish, if there is re-corded information on any of the three tracks their indicatorlights will light up. Please see the Record section of this manualfor more information.
29. SEQUENCER ACCOMP - The ACCOMP button is used toselect the auto accompaniment track of a song for recording orplayback. Please see the Record section of this manual formore information.
30. MELODY 1 , MELODY 2 - There are two tracks for recordingmelody, which are assigned by the MELODY 1 and MELODY 2buttons. Please see the Record section of this manual for moreinformation.
PANEL CONTROLS
27
28
1
2
3
4
USER SONG ACCOMP MELODY 1 MELODY 2 REC PLAY/STOP DEMO
– TRANSPOSE + REVERB CHORUS LEFT RIGHT
EFFECT SONG
29 30

19
31. REC - This unit is able to record four songs, each with a 3-tracksequencer. It will record all note events and the accompanimentpatterns exactly as they are performed. This recorded informationis nonvolatile and therefore will not be lost when the power isturned off. To Record press and hold down the RECORD buttonthen press the track button(s) you want to record in. Recordingbegins as soon as you start to play on any section of the key-board. Press the RECORD button again to stop recording.Please see the record section of the manual for more information.
32. PLAY/STOP - Press the PLAY/STOP button to hear selectedtracks that you have recorded on. Press the PLAY/STOP buttonagain to stop the playback. Please see the Record section ofthis manual for more information.
33. DEMO - Press the DEMO button. The first demo song will playback instantly. This piano has twelve different demonstrationsongs. All songs will play repeatedly until you press the DEMObutton again to stop the song demonstration. To access anindividual demo song press the + Yes or - No buttons when theDemo Feature is engaged. Your individually selected demo songwill repeat after completition.
PANEL CONTROLS
1
2
3
4
USER SONG ACCOMP MELODY 1 MELODY 2 REC PLAY/STOP DEMO
– TRANSPOSE + REVERB CHORUS LEFT RIGHT
EFFECT SONG
3331 32
20
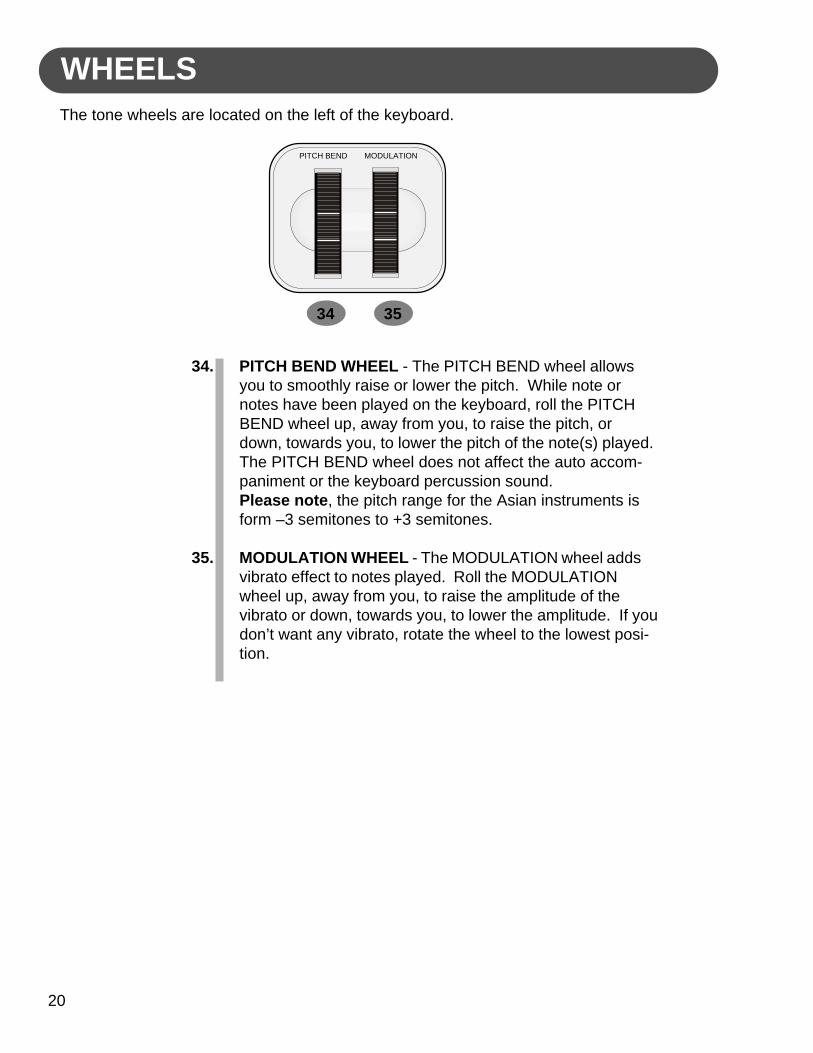
WHEELSThe tone wheels are located on the left of the keyboard.
34. PITCH BEND WHEEL - The PITCH BEND wheel allowsyou to smoothly raise or lower the pitch. While note ornotes have been played on the keyboard, roll the PITCHBEND wheel up, away from you, to raise the pitch, ordown, towards you, to lower the pitch of the note(s) played.The PITCH BEND wheel does not affect the auto accom-paniment or the keyboard percussion sound.Please note, the pitch range for the Asian instruments isform –3 semitones to +3 semitones.
35. MODULATION WHEEL - The MODULATION wheel addsvibrato effect to notes played. Roll the MODULATIONwheel up, away from you, to raise the amplitude of thevibrato or down, towards you, to lower the amplitude. If youdon’t want any vibrato, rotate the wheel to the lowest posi-tion.
PITCH BEND MODULATION
34 35

21
DEMO
1. PLAY ALL DEMO SONGS - Press the DEMO button. The firstdemo song will playback instantly. This unit has twelve demosongs. All songs will play repeatedly until you press the DEMObutton again to stop the demonstration.
2. PLAY A SINGLE DEMO SONG - Use the +/YES or the -/NObuttons to change songs while the demo is playing, or enter asong number directly by using the numeric pad. Please note thattwo digits are required for selecting a song number, for example,to select song No. 9 enter “09”. The song will play repeatedly untilyou press the demo button again to stop.
There are 50 songs for the musical training course that can alsobe played back for demonstration. Please see the Training sectionof this manual for more information.
PLAYING THE DEMO SONGS - This piano has twelve different demonstration songs that aredesigned to showcase the different sampled voices that are available. The display will showthe song number with a “d” prefix. When playing all the songs, “ALL” will appear on the dis-play initially, and will change to the demo song number as it plays. After exiting the demon-stration mode the display will revert to its initial data.
DEMO
VOICE
STYLE ALL:Demo Song
VOICE
STYLE d-9:Demo Song
DEMO
1 2 3 +/YES
3 4 5 6
7 8 9 –/NO
22
KEYBOARD VOICES
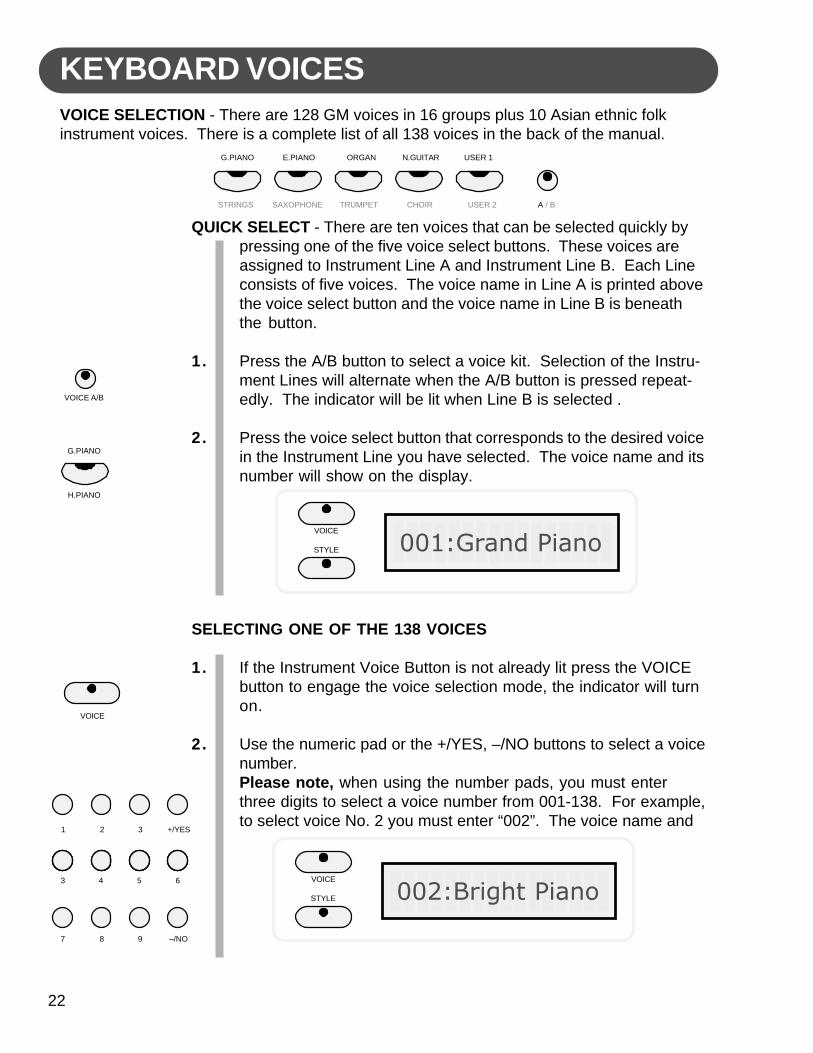
QUICK SELECT - There are ten voices that can be selected quickly bypressing one of the five voice select buttons. These voices areassigned to Instrument Line A and Instrument Line B. Each Lineconsists of five voices. The voice name in Line A is printed abovethe voice select button and the voice name in Line B is beneaththe button.
1. Press the A/B button to select a voice kit. Selection of the Instru-ment Lines will alternate when the A/B button is pressed repeat-edly. The indicator will be lit when Line B is selected .
2. Press the voice select button that corresponds to the desired voicein the Instrument Line you have selected. The voice name and itsnumber will show on the display.
SELECTING ONE OF THE 138 VOICES
1. If the Instrument Voice Button is not already lit press the VOICEbutton to engage the voice selection mode, the indicator will turnon.
2. Use the numeric pad or the +/YES, –/NO buttons to select a voicenumber.Please note, when using the number pads, you must enterthree digits to select a voice number from 001-138. For example,to select voice No. 2 you must enter “002”. The voice name and
VOICE SELECTION - There are 128 GM voices in 16 groups plus 10 Asian ethnic folkinstrument voices. There is a complete list of all 138 voices in the back of the manual.
VOICE A/B
G.PIANO
H.PIANO
VOICE
STYLE 001:Grand Piano
VOICE
VOICE
STYLE 002:Bright Piano
G.PIANO E.PIANO ORGAN N.GUITAR USER 1
STRINGS SAXOPHONE TRUMPET CHOIR USER 2 A / B
1 2 3 +/YES
3 4 5 6
7 8 9 –/NO
23
KEYBOARD VOICES
its number will show on the display. Please refer to the back ofthe manual for a list of all available voices.
USER DEFINED QUICK SELECTION BUTTON - You can assign afavorite voice to the voice quick select button in the follow manner.
1. Select the desired voice by using the numeric pad or the +/YES,–/NO buttons. Please refer to Selecting one of the 138 Voices.
2. Press and hold the VOICE button.3. Press, don’t hold, the voice USER button, USER 1 from Line A, or
USER 2 from Line B. The currently selected voice will be as-signed to this button to be available for quick selection. Pleasenote the USER button will revert to the default setting when thepower is turned off (USER 1=007:Harpsichord, USER2=039:Synth Brass1).
LAYER (DUAL) VOICE - Layer, or dual, refers to an additional voice thatis tone mixed with the selected keyboard voice. The assignedlayer voice will be heard with the original voice when the layerfeature is engaged.
1. Press the LAYER button, the currently assigned layer voice willshow on the display, and the indicator will light up.
2. Use the +/YES, –/NO buttons or the numeric pad to select thedesired voice. The display will show the layer voice number andname, after three seconds the display will revert to the selectedmain voice.
3. Press the LAYER button again to turn the feature off.
LOWER VOICE - In the lower, or split, mode the keyboard is divided intotwo sections. To the right of the Split Point the currently selectedmain voice, or the layer voice will sound. The keys to the left ofthe Split Point can play a different instrument voice.
1. Press the LOWER button, the currently assigned lower voice willshow on the display, and the indicator will light up.
2. Use the +/YES, –/NO buttons or the numeric pad to select thedesired voice. The display will show the lower voice number and
LOWER
USER 1
USER 2 A / B
LAYER
24
KEYBOARD VOICES
name, after three seconds the display will revert to themain voice.
3. Press the LOWER button again to turn the feature off.
ASSIGNING THE SPLIT POINT FOR VOICE - The keyboard issplit into two sections at the split point. The default splitpoint is the C3 key for voice. A different voice split pointcan be assigned in the Function menu “Split Point”. Pleasesee the Function section of this manual for more informa-tion.
FUNCTION

25
QUICK SELECT - There are ten styles that can be selected quicklyby pressing one of the five style select buttons. These stylesare assigned to Line A and Line B. Each Rhythm Style Lineconsists of five styles. The style name in Line A is printedabove the style select button and the voice name in Line B isbeneath the button.
1. Press the A/B button to select a Line. Selection of the Lineswill alternate when the A/B button is pressed repeatedly. Theindicator will be lit when Line B is selected.
2. Press the style quick select button that corresponds to thedesired style in the Line you have selected. The style nameand its number will show on the display.
SELECTING ONE OF THE 100 STYLES
1. Press the STYLE button to engage the style selection mode,the indicator will light up.
2. Use the numeric pad or the +/YES, –/NO buttons to select astyle number while the indicator is lit.Please note, when using the number pads, you must entertwo digits to select a style number from 00-99. For example,to select style No. 4 you must enter “04”. The style name andits number will be shown on the display. Please refer to theback of the manual for a list of all available styles.
RHYTHM SECTIONRHYTHM STYLE SELECTION - This piano offers 100 rhythm styles and a variation of eachstyle pattern to choose from. There is a complete list of all 100 styles in the back of themanual.
STYLE A / B
VOICE
STYLE 75:Bossa Nova1
STYLE
VOICE
STYLE 04:8BeatPop2
1 2 3 +/YES
3 4 5 6
7 8 9 –/NO
PERCUSSION
A / B
BOSSA NOVA1 ROCKNROLL POP 1 BALLADPOP1 USER 1
LOUNGE BLUES1 JAZZCOMBO GSPL.BALLAD USER 2
BOSSA NOVA1
LOUNGE

26
RHYTHM SECTION
USER DEFINED QUICK SELECTION BUTTON - You can assign afavorite rhythm style to the style quick select button in the follow-ing manner.
1. Select the desired rhythm style by using the STYLE button andthe numeric pad or the +/YES, –/NO buttons. Please refer toSelecting one of the 100 Styles.
2. Press and hold the STYLE button.
3. Press, don’t hold, the style USER button, USER 1 from LIne A, orUSER 2 from Line B. The currently selected style will be assignedto this button and available for quick selection. Please note theUSER button will revert to the default setting when the power isturned off (USER 1=40:JiveRock, USER 2=82:Cha-Cha1)
ADJUSTING THE TEMPO - There is a four-beat indicator above theTEMPO buttons that indicates the tempo and the beat for theaccompaniment playing. Each style has its own preset tempo.The tempo can be adjusted before or during rhythm style play bypressing the either of the –TEMPO+ buttons. When you changethe style before you play, the tempo will be set to that defaultvalue. If you change style during play, the tempo will keep itscurrent value, press the –/+ TEMPO buttons simultaneously to setthe tempo to the new styles default value.
STYLE
PERCUSSION
USER 1
USER 2
- TEMPO +

27
STRAIGHT START - The START/STOP button starts the selectedrhythm style immediately with the percussive rhythm. Press theSTART/STOP button again to stop the accompaniment.
STARTING WITH AN INTRODUCTION - All of the 100 styles can bestarted with a appropriate introduction. As soon as you press theINTRO/ENDING button, the rhythm of the introduction will startfollowed by the main pattern. Press the START/STOP button tostop the accompaniment or the INTRO/ENDING button again tostop with an ending pattern.Please note, if you want the selected rhythm style to be engagedagain after the ending pattern has been completed, press theFILL IN button while the ending pattern is engaged.
SYNCHRONIZED START - Synchronized Start engages the accompani-ment in the standby mode.Press the SYNC START button, the beat indicator dots above theTEMPO buttons will blink at the current tempo, showing that thesynchronized start mode is ready. The rhythm style will start assoon as you play in the auto accompaniment section of the key-board. You may add an introduction by pressing the INTRO/ENDING button after pressing the SYNCH START button.Press the START/STOP or the SYNCH START buttons to stop theaccompaniment. If the SYNCH START button is used, the syn-chronized start mode will be on standby. Use the INTRO/ENDINGbutton to stop with an ending pattern.
SYNCHSTART
START/STOP
INTRO/ENDING
RHYTHM SECTIONSTARTING AND STOPPING THE RHYTHM STYLE - There are several ways to start andstop the rhythm style.
28
RHYTHM SECTION
VARIATION - To select the variation of the main patterns, press theVARIATION button. The indicator will light up. If you press theVARIATION button, then press the INTRO/ENDING button, thevariation pattern will play after the introduction.
FILL - IN - The fill feature will insert a short rhythmic pattern of one totwo measures in length, depending on the rhythm style selectedand the variation. Holding down the FILL IN button will extend thefill indefinitely.
ASSIGNING THE SPLIT POINT FOR THE AUTO ACCOMPANIMENT -The keyboard is split into two sections at the split point. Thedefault split point is the G1 key for auto accompaniment. A differ-ent split point for the auto accompaniment can be assigned in theFunction menu “Auto A.Split”. Please see the Function section ofthis manual for more information.
VARIATION
FILL IN
FUNCTION
29
AUTO ACCOMPANIMENTAUTO ACCOMPANIMENT (AUTO BASS CHORD) - The rhythm styles have their own autoaccompaniment, dedicated to that rhythm style. These auto accompaniments patternscreate fully orchestrated rhythm, bass and chord progressions based on the chords thatyou play with your left hand. The selected rhythm style determines the characteristics ofthe auto accompaniment. The auto accompaniment section of the keyboard is assigned bythe split point. The keys on the left of the split point are reserved for the auto accompani-ment. The keys to the right are available for normal playing.
AUTO BASS CHORD FINGERING - This piano has three auto accom-paniment fingering modes, single, fingered, and piano.
1. Press the ACCOMP button until the indicator light until the Fin-gering mode that you desire is selected.
2. Press the START/STOP or the SYNCH START buttons to start therhythm style. Press the INTRO/ENDING button to start with anintroduction.
3. Press the START/STOP or the SYNCH START buttons to stop theaccompaniment, or press the INTRO/ENDING button to stop withan ending.
SINGLE (INTELLIGENT) MODE - Single fingering mode makes itsimple to produce four types of orchestrated accompanimentchords using a minimum of fingers, ( one, two, or three fingersat the most), while playing in the auto accompaniment section ofthe keyboard. In this mode, keys in the auto accompanimentsection of the keyboard are used to produce major, seventh,minor, and minor-seventh chords. The auto accompaniment willstart with the percussive rhythm as soon as a recognized chord isplayed. The accompaniment produced is perfectly matched tothe selected rhythm style.
Major Chord: Press any key in the auto accompaniment section ofthe keyboard. The key you press determines the root note of themajor chord.Minor Chord: Press the root key and two keys to its left in theauto accompaniment section of the keyboard simultaneously.Seventh Chord: Press the root key and one key to its left (7thkey) in the auto accompaniment section of the keyboard simulta-neously.Minor-Seventh Chord: Press the root key and both the first andsecond keys to its left in the auto accompaniment section of thekeyboard simultaneously.
ACCOMP
SINGLE
FINGERED
PIANO
30
AUTO ACCOMPANIMENTAUTO BASS CHORD FINGERING continued
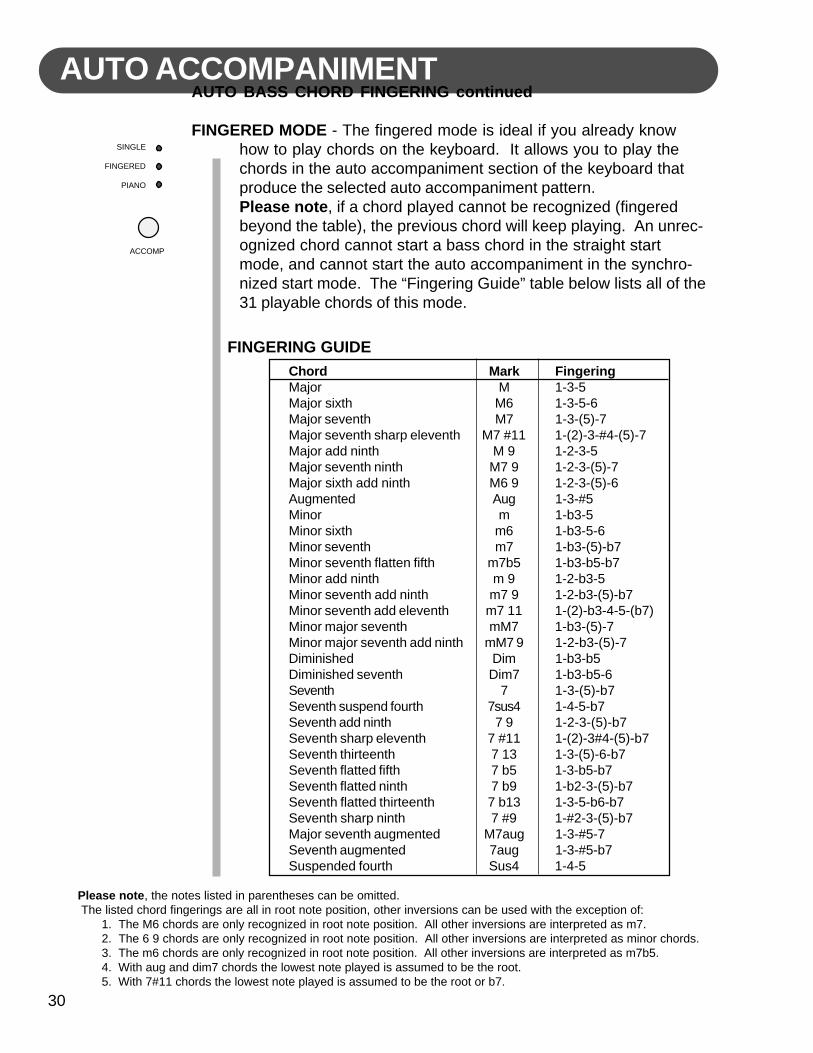
FINGERED MODE - The fingered mode is ideal if you already knowhow to play chords on the keyboard. It allows you to play thechords in the auto accompaniment section of the keyboard thatproduce the selected auto accompaniment pattern.Please note, if a chord played cannot be recognized (fingeredbeyond the table), the previous chord will keep playing. An unrec-ognized chord cannot start a bass chord in the straight startmode, and cannot start the auto accompaniment in the synchro-nized start mode. The “Fingering Guide” table below lists all of the31 playable chords of this mode.
FINGERING GUIDEChord Mark FingeringMajor M 1-3-5Major sixth M6 1-3-5-6Major seventh M7 1-3-(5)-7Major seventh sharp eleventh M7 #11 1-(2)-3-#4-(5)-7Major add ninth M 9 1-2-3-5Major seventh ninth M7 9 1-2-3-(5)-7Major sixth add ninth M6 9 1-2-3-(5)-6Augmented Aug 1-3-#5Minor m 1-b3-5Minor sixth m6 1-b3-5-6Minor seventh m7 1-b3-(5)-b7Minor seventh flatten fifth m7b5 1-b3-b5-b7Minor add ninth m 9 1-2-b3-5Minor seventh add ninth m7 9 1-2-b3-(5)-b7Minor seventh add eleventh m7 11 1-(2)-b3-4-5-(b7)Minor major seventh mM7 1-b3-(5)-7Minor major seventh add ninth mM7 9 1-2-b3-(5)-7Diminished Dim 1-b3-b5Diminished seventh Dim7 1-b3-b5-6Seventh 7 1-3-(5)-b7Seventh suspend fourth 7sus4 1-4-5-b7Seventh add ninth 7 9 1-2-3-(5)-b7Seventh sharp eleventh 7 #11 1-(2)-3#4-(5)-b7Seventh thirteenth 7 13 1-3-(5)-6-b7Seventh flatted fifth 7 b5 1-3-b5-b7Seventh flatted ninth 7 b9 1-b2-3-(5)-b7Seventh flatted thirteenth 7 b13 1-3-5-b6-b7Seventh sharp ninth 7 #9 1-#2-3-(5)-b7Major seventh augmented M7aug 1-3-#5-7Seventh augmented 7aug 1-3-#5-b7Suspended fourth Sus4 1-4-5
Please note, the notes listed in parentheses can be omitted. The listed chord fingerings are all in root note position, other inversions can be used with the exception of:
1. The M6 chords are only recognized in root note position. All other inversions are interpreted as m7.2. The 6 9 chords are only recognized in root note position. All other inversions are interpreted as minor chords.3. The m6 chords are only recognized in root note position. All other inversions are interpreted as m7b5.4. With aug and dim7 chords the lowest note played is assumed to be the root.5. With 7#11 chords the lowest note played is assumed to be the root or b7.
ACCOMP
SINGLE
FINGERED
PIANO
31
AUTO BASS CHORD FINGERING continued
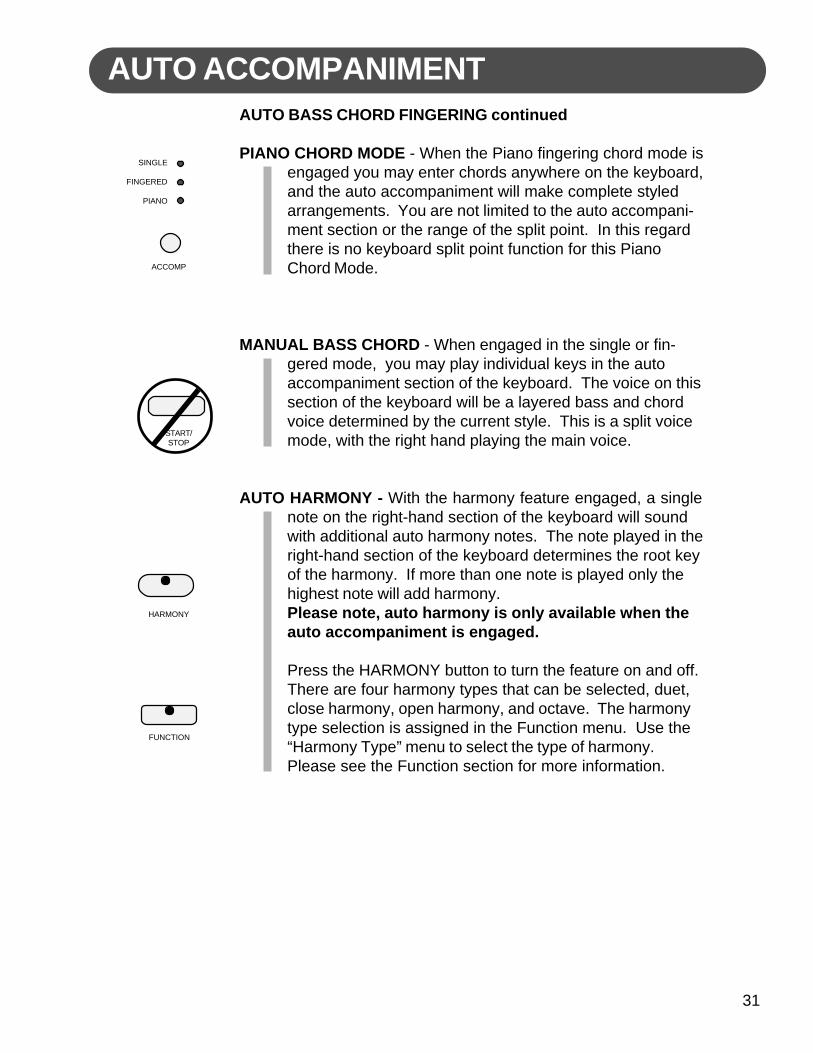
PIANO CHORD MODE - When the Piano fingering chord mode isengaged you may enter chords anywhere on the keyboard,and the auto accompaniment will make complete styledarrangements. You are not limited to the auto accompani-ment section or the range of the split point. In this regardthere is no keyboard split point function for this PianoChord Mode.
MANUAL BASS CHORD - When engaged in the single or fin-gered mode, you may play individual keys in the autoaccompaniment section of the keyboard. The voice on thissection of the keyboard will be a layered bass and chordvoice determined by the current style. This is a split voicemode, with the right hand playing the main voice.
AUTO HARMONY - With the harmony feature engaged, a singlenote on the right-hand section of the keyboard will soundwith additional auto harmony notes. The note played in theright-hand section of the keyboard determines the root keyof the harmony. If more than one note is played only thehighest note will add harmony.Please note, auto harmony is only available when theauto accompaniment is engaged.
Press the HARMONY button to turn the feature on and off.There are four harmony types that can be selected, duet,close harmony, open harmony, and octave. The harmonytype selection is assigned in the Function menu. Use the“Harmony Type” menu to select the type of harmony.Please see the Function section for more information.
AUTO ACCOMPANIMENT
HARMONY
ACCOMP
SINGLE
FINGERED
PIANO
START/STOP
FUNCTION
32
AUTO ACCOMPANIMENT
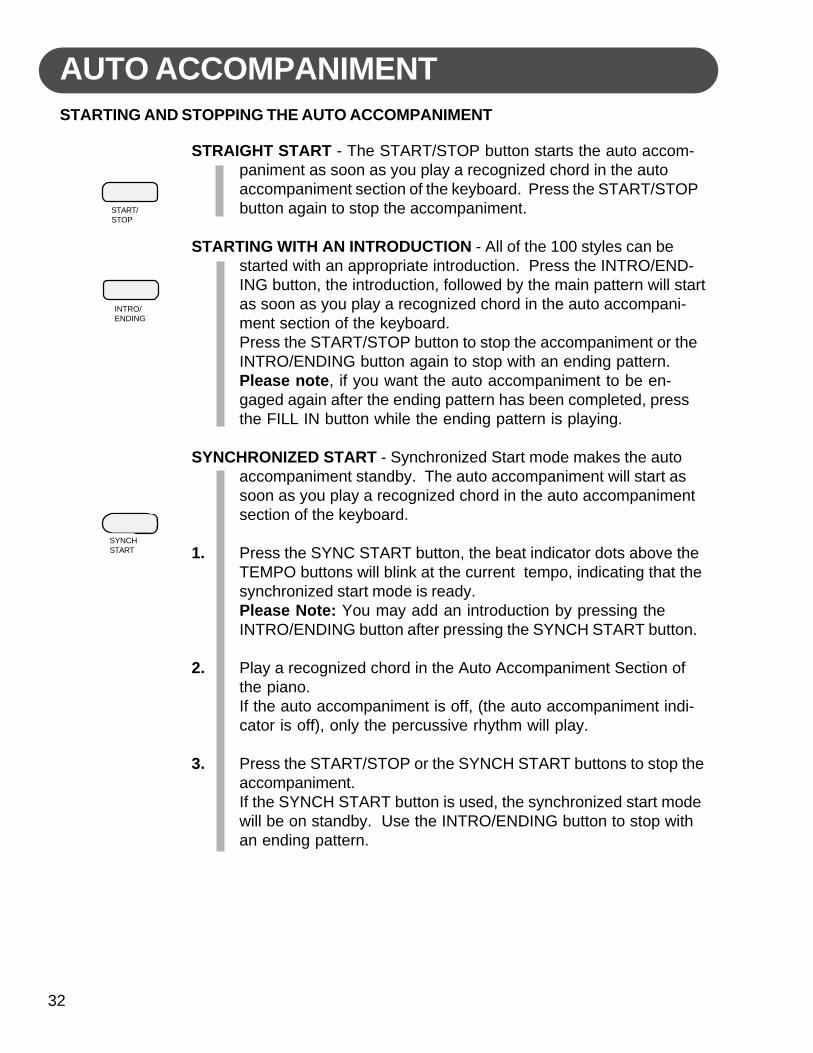
STRAIGHT START - The START/STOP button starts the auto accom-paniment as soon as you play a recognized chord in the autoaccompaniment section of the keyboard. Press the START/STOPbutton again to stop the accompaniment.
STARTING WITH AN INTRODUCTION - All of the 100 styles can bestarted with an appropriate introduction. Press the INTRO/END-ING button, the introduction, followed by the main pattern will startas soon as you play a recognized chord in the auto accompani-ment section of the keyboard.Press the START/STOP button to stop the accompaniment or theINTRO/ENDING button again to stop with an ending pattern.Please note, if you want the auto accompaniment to be en-gaged again after the ending pattern has been completed, pressthe FILL IN button while the ending pattern is playing.
SYNCHRONIZED START - Synchronized Start mode makes the autoaccompaniment standby. The auto accompaniment will start assoon as you play a recognized chord in the auto accompanimentsection of the keyboard.
1. Press the SYNC START button, the beat indicator dots above theTEMPO buttons will blink at the current tempo, indicating that thesynchronized start mode is ready.Please Note: You may add an introduction by pressing theINTRO/ENDING button after pressing the SYNCH START button.
2. Play a recognized chord in the Auto Accompaniment Section ofthe piano.If the auto accompaniment is off, (the auto accompaniment indi-cator is off), only the percussive rhythm will play.
3. Press the START/STOP or the SYNCH START buttons to stop theaccompaniment.If the SYNCH START button is used, the synchronized start modewill be on standby. Use the INTRO/ENDING button to stop withan ending pattern.
STARTING AND STOPPING THE AUTO ACCOMPANIMENT
SYNCHSTART
START/STOP
INTRO/ENDING
33
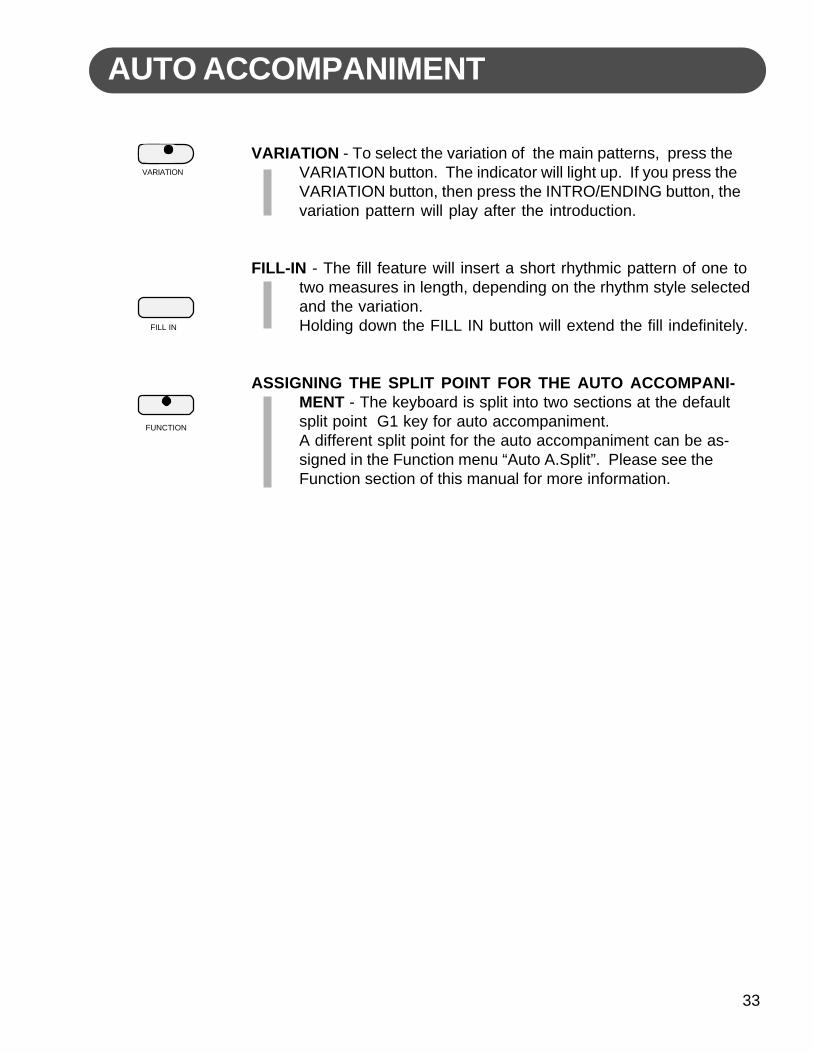
VARIATION - To select the variation of the main patterns, press theVARIATION button. The indicator will light up. If you press theVARIATION button, then press the INTRO/ENDING button, thevariation pattern will play after the introduction.
FILL-IN - The fill feature will insert a short rhythmic pattern of one totwo measures in length, depending on the rhythm style selectedand the variation.Holding down the FILL IN button will extend the fill indefinitely.
ASSIGNING THE SPLIT POINT FOR THE AUTO ACCOMPANI-MENT - The keyboard is split into two sections at the defaultsplit point G1 key for auto accompaniment.A different split point for the auto accompaniment can be as-signed in the Function menu “Auto A.Split”. Please see theFunction section of this manual for more information.
AUTO ACCOMPANIMENT
FILL IN
FUNCTION
VARIATION

34
FUNCTION
USING THE FUNCTION MENU
1. Press the FUNCTION button. The first menu item that can bemanipulated will appear on the display.
2. Press the PAGE ▲ or the PAGE ▼ buttons until the menu youwish to access appears on the display screen.
3. Press the +/YES button to show the current parameter for yourselected function.
4. Use the number pad or the +/YES, –/NO buttons to set a newparameter.Note: Pressing the +/YES and the –/NO buttons simultaneouslywill recall the default setting.
5. Press the FUNCTION button again to exit this mode and con-firm your selection.
The Function mode is used to set up or to adjust various parameters related to the opera-tion of this keyboard. With the FUNCTION button engaged you may access the menu forthe Metronome, Reverb level, Chorus level, Touch sensitivity, Lower Split point for voice,Split point for auto accompaniment, tuning, the Drum kit selection, and Harmony typeselection.
FUNCTION
+ / YES
0
- / NO
FUNCTION
1 2 3 +/YES
3 4 5 6
7 8 9 –/NOSONG FUNCTION USER REGPAGEPAGE
VOICE
STYLE Metronome
PAGEPAGE

35
METRONOME SETTING - Use the metronome menu to choose themeter of your choice, 2/4, 3/4, or 4/4 time. When any of the timesignatures have been selected, the metronome will be engaged.If the auto accompaniment is playing the metronome sound willreplace the percussive rhythm sound immediately. If the autoaccompaniment is not engaged, press the START/STOP button tostart the metronome, and again to stop it. If the metronome settingis in the “off” position, the metronome will not sound.
1. Press the FUNCTION button.2. Press the PAGE ▲ or the PAGE ▼ buttons until the “Metronome”
menu appears.3. Press the +/YES button to confirm and the current metronome
setting will be shown.4. Use the +/YES or the –/NO to choose the meter of your choice or to
turn the metronome off. Press the +/YES, –/NO buttons simulta-neously to recover the default setting.
5. Press the FUNCTION button again to exit the function mode.
REVERB LEVEL SETTING - Reverb simulates the effect of playing in abig room or hall where the sound reverberates off the walls andceiling. The reverb effect is engaged automatically when the poweris turned on. You can switch the reverb feature on and off by press-ing the REVERB button. Select the level of reverb from the Func-tion menu.
1. Press the FUNCTION button.2. Press the PAGE ▲ or the PAGE ▼ buttons until the “Reverb Level”
menu appears.3. Press the +/YES button and the current reverb level will be shown.4. Use the +/YES button to increase the reverb level or the –/NO
buttons to decrease the level. The number pad can also be used todirectly enter a value ranged from 01-16. Press the +/YES, –/NObuttons simultaneously to recover the default setting of 12.
5. Press the FUNCTION button again to exit the function settingmode.
FUNCTION
Metronome
REVERB
Reverb Level

36
FUNCTION
Touch
Chorus Level
CHORUS LEVEL SETTING - The Chorus effect enriches your selectedinstrument voice by adding depth and texture.Press the CHORUS button to engage the chorus effect, the indica-tor will light up. Adjust the level of chorus in the Function menu.
1. Press the FUNCTION button.2. Press the PAGE ▲ or the PAGE ▼ buttons until the “Chorus
Level” menu appears.3. Press the +/YES button to confirm your selection and the current
Chorus level will be shown.4. Use the +/YES to increase the chorus level or the –/NO buttons to
decrease the level. The number pad can also be used to directlyenter a value ranged from 01-16. Press the +/YES, –/NO buttonssimultaneously to recover the default setting of 08.
5. Press the FUNCTION button again to exit the function settingmode.
TOUCH - The piano offers four types of keyboard touch sensitivity set-tings, soft, normal, hard, and fixed. These are also known asvelocity settings and are designed to suit your style of playing.The normal setting is selected automatically when the piano isturned on. The touch response can be changed with the functionfeature.
Soft is the most sensitive keyboard response which permits maximumsound levels with a light touch.Normal is an intermediate response suitable for most styles of music.Normal is the default setting.Hard is a less sensitive keyboard response which requires a heaviertouch to obtain maximum sound levels.Fixed does not offer any touch sensitivity. Each key plays at fullvolume no matter how hard the piano key is hit.It is commonly used on Harpsichord and Organ voices.
1. Press the FUNCTION button.2. Press the PAGE ▲ or the PAGE ▼ buttons until the “Touch” menu
appears.3. Press the +/YES button to confirm your selection. The current
touch response setting will be shown.4. Use the +/YES, –/NO buttons to select a touch response.5. Press the FUNCTION button again to confirm your selection and
exit the function setting mode.
CHORUS
37
FUNCTIONCHANGING THE SPLIT POINT FOR LOWER VOICE - When the
lower mode isn engaged the keyboard is divided into two parts atthe split point. In the right hand section the original or Uppervoice will sound. In the left hand section a new instrument voicecan be assigned, the lower voice. The split point for the Lowersection can be changed in the Function feature.
1. Press the FUNCTION button.2. Press the PAGE ▲ or the PAGE ▼ buttons until the “Split Point”
menu appears.3. Press the +/YES button to confirm your selection and the current
voice split point will be shown.4. Use the +/YES button to shift the split point up the keyboard, to
the right, and the –/NO button to shift the split point down thekeyboard, to the left. The number pad can also be used to enterthe split point directly (by key number) from C3–C7. Press the+/YES, –/NO buttons simultaneously to recover the default settingof C3.
5. Press the FUNCTION button again to confirm your selection andexit the function setting mode.
CHANGING THE SPLIT POINT FOR AUTO ACCOMPANIMENT - Thesplit point that divides the keyboard can also be changed in thefunction menu.
1. Press the FUNCTION button.2. Press the PAGE ▲ or the PAGE ▼ buttons until the “Auto A.Split”
menu appears.3. Press the +/YES button to confirm your selection and the current
auto accompaniment split point will be shown.4. Use the +/YES button to shift the split point up the keyboard, to
the right, and the –/NO button to shift the split point down thekeyboard, to the left, from AO–C3. Press the +/YES, –/NO but-tons simultaneously to recover the default setting of G1.
5. Press the FUNCTION button again to confirm your selection andexit the function setting mode.
LOWER
Split Point
Auto A.Split
SINGLE
FINGERED
PIANO
ACCOMP
38
FUNCTION
Master Tune
MASTER TUNE - The pitch of this piano is very accurate and stable, itis automatically set to standard A440 pitch when the piano isturned on. The tuning feature makes it possible to tune the pitchof the instrument in fine intervals. If necessary, you can alter thepiano pitch. Tuning can be accomplished over –50 to +50semitone steps, or cents.
1. Press the FUNCTION button.2. Press the PAGE ▲ or the PAGE ▼ buttons until the “Master Tune”
menu appears.3. Press the +/YES button the tuning value will be shown.4. Use the +/YES button to increase the value or the –/NO buttons
to decrease the value. Press the +/YES, –/NO buttons simulta-neously to recover the default setting of 00.
5. Press the FUNCTION button again to confirm your selection andexit the function setting mode.
DRUM KIT SELECTION (KEYBOARD PERCUSSION) - When keyboardpercussion has been engaged using the PERCUSSION button,the entire keyboard will play the percussion voices from the se-lected Drum kit. There are ten drum kits, based on the StandardKit, that can be assigned. Kit 10 is a sound effects kit. Pleasesee the “Drum List” at the back of the manual for a completelisting.
1. Press the FUNCTION button, then the +/YES button to confirm.2. Press the PAGE ▲ or the PAGE ▼ buttons until the “Drum Kit”
menu appears.3. Press the +/YES button to confirm your selection. The current
drum kit number will be shown.4. Use the +/YES, –/NO buttons to select a drum kit 01 to 10.
5. Press the FUNCTION button again to exit the function settingmode.Please note Drum Kit selection only alters the KeyboardPercussion mode.
Drum Kit
PERCUSSION
KYBD PERC. 01
39
FUNCTION
Harmony Type
AUTO HARMONY TYPE SELECTING - When the HARMONY button isengaged, a single note on the right-hand section of the keyboardwill sound with additional auto harmony notes, when the autoaccompaniment is engaged. There are four types of harmony thatcan be selected.
Duet adds a harmonizing note sounding below the single right handnote that you supply when the chord accompaniment is playing.Close harmony adds two harmonizing notes sounding below thesingle right hand melody note that you supply, when the chord accom-paniment is playing.Open harmonyOctave add a note one octave below the note you play in the right handsection of the keyboard when the chord accompaniment is playing.
1. Press the FUNCTION button, then the +/YES button to confirm.2. Press the PAGE ▲ or the PAGE ▼ buttons until the “Harmony
Type” menu appears.3. Press the +/YES button to confirm your selection. The current
harmony type will be shown.4. Use the +/YES or –/NO buttons to select a harmony type.5. Press the FUNCTION button again to exit the function setting
mode.
HARMONY

40
VOICE
STYLE 1:User Song
RECORDThis piano is equipped with a real time recorder, able to store four songs, each with a3-track sequencer. It will record all note events and the accompaniment as they areperformed. This recorded information is nonvolatile and therefore will not be lost whenthe power is turned off. All the tracks can playback separately or together as a com-plete song.
RECORDING -1. Prepare - Prepare to record by setting the voice, style, tempo and
reverb level and other parameters as desired. These settings can be stored into a registration memory for easy
recall, please see the registration memory section for more infor-mation.
2. Select a Song - Press the USER SONG button, and use the+/YES, –/NO buttons to select a song, the display will show thesong number selected. This is where the recorded information willbe stored.
3. Select a track -Melody will record, all notes.
There are two tracks available for recording the melody, these areassigned by pressing the MELODY 1 or the MELODY 2 button.Auto Accompaniment will record all the auto accompanimentevents just as they are played.
The ACCOMP track button will select the accompaniment track.
Press and hold down the REC button, then press the track buttonthat you want to record in. The corresponding track indicator willblink, and the four dots of the beat indicator will blink with thecurrent tempo, to show that the recorder is on standby.If you already have a recorded track(s) in the selected song, thatindicator will also be lit and the recorded music will play, as a refer-ence for you while you record the new track. If you do not wish forpreviously recorded tracks to play while you are recording, pressthe corresponding track button to turn the indicator light off.
Please note, be careful not to hold the REC button down whiledeselecting a track as that will put that track on standby, and imme-diately erase the existing recording.
ACCOMP
MELODY 1 MELODY2
USER SONG ACCOMP MELODY 1 MELODY 2 REC PLAY/STOP DEMO
+/YES
6
–/NO
1
2
3
4
USER SONG
REC
41
RECORDRECORDING (continued)
4. Record - Your performance can be recorded in the followingways:
Record Melody Track OnlyIf the MELODY 1 or MELODY 2 buttons are selected the record-ing will begin as soon as you play the keyboard.Please Note: It is suggested to turn off the fingering mode whenrecording on a melody track alone. When the fingering mode isset to Fingered or Single, the auto accompaniment section of thekeyboard will not be recorded, although the notes are sounding.
Record Auto Accompaniment Track OnlyWith the Auto Accompaniment ACCOMP engaged recording willstart as soon as a chord is played on the auto accompanimentsection of the keyboard.
Please note, notes played on the Melody section of the keyboardwill not be recorded in the auto accompaniment track. If the autoaccompaniment is off, only the percussive rhythm will be recordedin the ACCOMP track.
An unrecognized chord in the fingered mode cannot start therecording.
Record the Auto Accompaniment and a Melody TrackIf you want to record a melody and the accompaniment at thesame time, Press a MELODY track button, then the ACCOMPtrack button and both indicators will blink in the standby mode.Recording begins as soon as you start to play on any section ofthe keyboard.
Please Note: the contents in a track will be erased as soon youstart to record on the selected track.
It will be replaced by the new data that the user is recording.
5. Stop Recording - Press the START/STOP button, the PLAY/STOP button or the REC button to stop recording.
Or when the accompaniment track is being recorded, press theINTRO/ENDING button to stop the recording with an endingpattern in the accompaniment track.
Please Note: When the record memory is full, recording will stopautomatically and “End” will appear on the display screen.
ACCOMP
MELODY 1 MELODY2
REC PLAY/STOP
ACCOMP MELODY 1
42
RECORD
+ / YES
0
- / NO
ACCOMP
MELODY 1 MELODY2
VOICE
STYLE 1:User Song
PLAY/STOP
PLAY/STOP
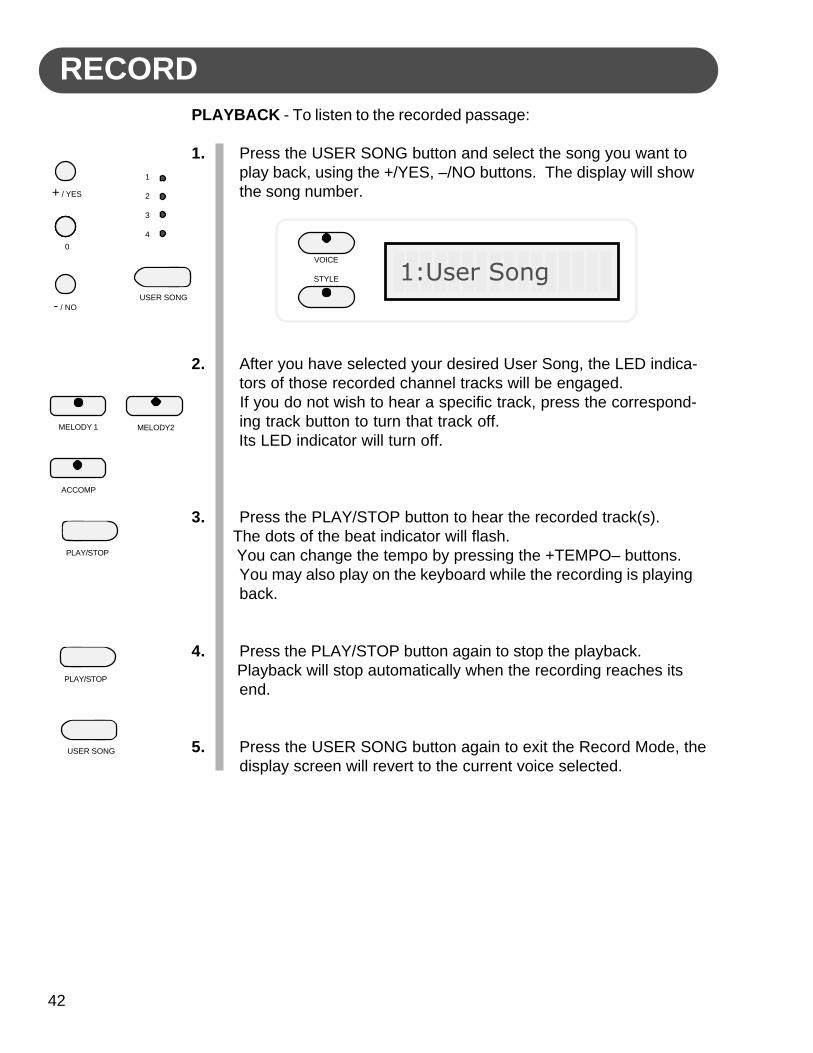
PLAYBACK - To listen to the recorded passage:
1. Press the USER SONG button and select the song you want toplay back, using the +/YES, –/NO buttons. The display will showthe song number.
2. After you have selected your desired User Song, the LED indica-tors of those recorded channel tracks will be engaged.
If you do not wish to hear a specific track, press the correspond-ing track button to turn that track off.
Its LED indicator will turn off.
3. Press the PLAY/STOP button to hear the recorded track(s). The dots of the beat indicator will flash. You can change the tempo by pressing the +TEMPO– buttons.
You may also play on the keyboard while the recording is playingback.
4. Press the PLAY/STOP button again to stop the playback. Playback will stop automatically when the recording reaches its
end.
5. Press the USER SONG button again to exit the Record Mode, thedisplay screen will revert to the current voice selected.
1
2
3
4
USER SONG
USER SONG
43
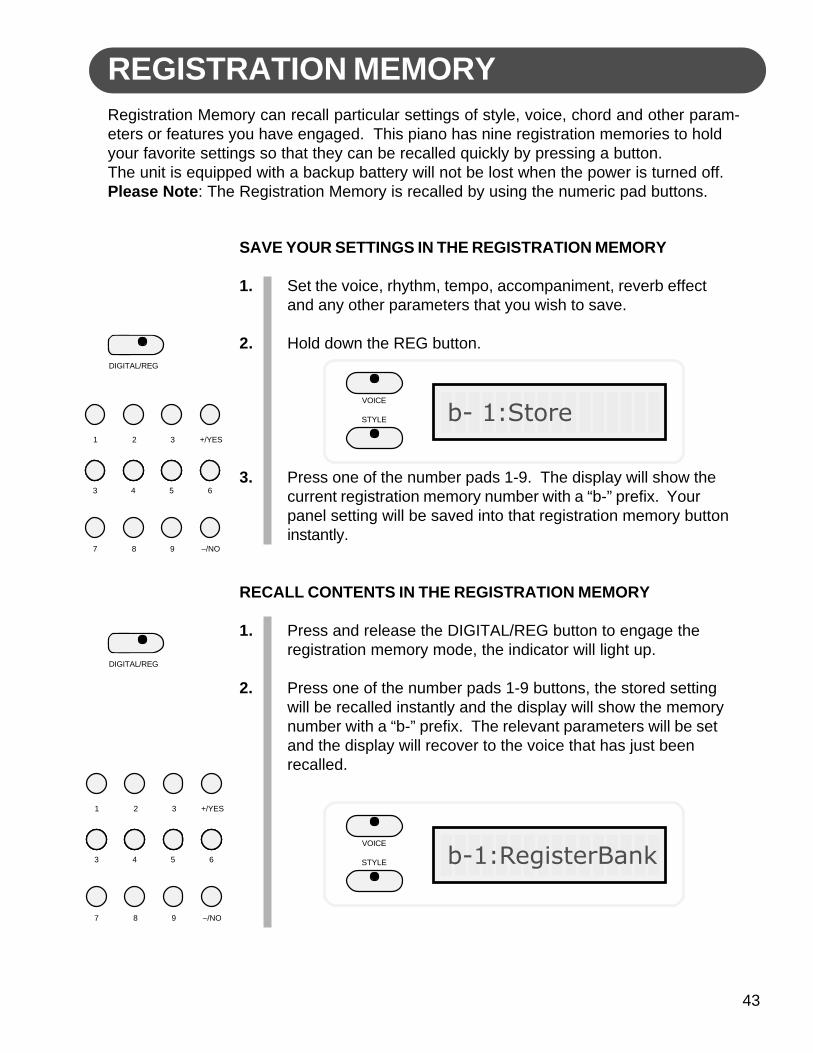
REGISTRATION MEMORYRegistration Memory can recall particular settings of style, voice, chord and other param-eters or features you have engaged. This piano has nine registration memories to holdyour favorite settings so that they can be recalled quickly by pressing a button.The unit is equipped with a backup battery will not be lost when the power is turned off.Please Note: The Registration Memory is recalled by using the numeric pad buttons.
SAVE YOUR SETTINGS IN THE REGISTRATION MEMORY
1. Set the voice, rhythm, tempo, accompaniment, reverb effectand any other parameters that you wish to save.
2. Hold down the REG button.
3. Press one of the number pads 1-9. The display will show thecurrent registration memory number with a “b-” prefix. Yourpanel setting will be saved into that registration memory buttoninstantly.
RECALL CONTENTS IN THE REGISTRATION MEMORY
1. Press and release the DIGITAL/REG button to engage theregistration memory mode, the indicator will light up.
2. Press one of the number pads 1-9 buttons, the stored settingwill be recalled instantly and the display will show the memorynumber with a “b-” prefix. The relevant parameters will be setand the display will recover to the voice that has just beenrecalled.
VOICE
STYLE b-1:RegisterBank
VOICE
STYLE b- 1:Store
DIGITAL/REG
DIGITAL/REG
1 2 3 +/YES
3 4 5 6
7 8 9 –/NO
1 2 3 +/YES
3 4 5 6
7 8 9 –/NO

44
PLAY ALONG SONGSPress the SONG button to access the play along song function.There are 50 songs built into the piano for your musical enjoyment.Please Note: If you press the SONG button, hold it down, and then press the DEMObutton, all the training songs will play back.You can change the song by pressing the +/YES , –/NO buttons or use the number pads toinput a song number directly.Press the DEMO button again to stop the song demonstration.
USING THE SONG FEATURE
1. Engage the Song mode - Press the SONG button.The first song number will appear on the display.Use the +/YES, –/NO buttons or the number pads to select asong. The song number will appear on the display.
2. Listen to the demonstration - Press the START/STOP button tolisten to the selected song. The chord playing from the autoaccompaniment and the tempo will be shown on the display.
Right hand play along - Press the RIGHT button. Then pressthe START/STOP button, after the metronome sound the autoaccompaniment will playback, and you can play the right handmelody notes with the rhythm accompaniment track.
Left hand play along - Press the LEFT button. Then press theSTART/STOP button, after the metronome sound the melody willplayback with the rhythm and/or accompaniment track, you canplay the left hand accompaniment pattern to match this melody.
Right and Left hand play along- Press the RIGHT and LEFTbuttons simultaneously, then press the START/STOP button, afterthe metronome sound, you can play the entire section with bothhands with the percussive rhythm or metronome track.
3. Check you progress - You will hear a vocal grading as soon asyou finish the performance. The grades are “Try Again”, “Good”,“Very good” and “Excellent”.The same song passage will continue until you press the START/STOP button.
4. Stop the Song Function - Press the SONG button again to exitthe Play Along Song Mode.
+ / YES
0
- / NO
SONG
START/STOP
START/STOP
SONG
SONG FUNCTION USER REGPAGEPAGE
001:Teach Song
RIGHT
LEFT
RIGHT LEFT

45
MIDIMIDI stands for Musical Instrument Digital Interface. This is a world wide standard commu-nication interface that enables electronic musical instruments and computers (of all brands)to communicate with each other so that instructions and other data can pass betweenthem. This exchange of information makes it possible to create a system of MIDI instru-ments and devices that offers far greater versatility and control than is available with iso-lated instruments. Whether you interface with computers, sequencers, expanders or otherkeyboards your musical horizons will be greatly enhanced. For further information on MIDIand MIDI equipment that is available, please contact your local Suzuki music store.
MIDI CONNECTION - The MIDI terminals are located on the left sidepanel of the piano.
1. MIDI In: This terminal receives MIDI data from an external MIDIdevice.
2. MIDI Out: This terminal transmits data from this instrument toother MIDI devices. The transmitted data includes the note andtouch velocity produced while playing on the keyboard, as well asvoice changes, wheel operation, and recorded playback for themelody tracks. Demo songs and auto accompaniment are nottransmitted.
For more information regarding transmitted MIDI dataplease see the next page and or the MIDI implementa-tion chart.
MIDI
OUT IN
1
MIDI
OUT IN
DC 12VPOWER
LINE OUT PHONE 1 PHONE 2
VOLUME PEDAL SUSTAIN PEDAL
2

46
MIDI CHANNELS - The MIDI system in this unit has 16 channelsnumbered from 1-16. Each of the channels is responsible for avoice. When the instrument receives from an external device, theactive channel is determined by the control message. The trans-mission channels on this keyboard are fixed as follows:
Channel 1: Master voiceChannel 2: Layer voiceChannel 3: Split voiceChannel 4: Bass in manual bass chord modeChannel 7: Chord in manual bass chord modeChannel 10: Percussion soundPlease see the MIDI Implementation Chart for more detail.
For further MIDI setup options please see your local Suzuki MusicStore.
MIDI
MIDI
OUT IN

47
MIDI IMPLEMENTATION CHART
Function Transmitted Recognized RemarkBasic Channel 1 CH 1-16 CHChannel changed 1-16 CH 1-16 CHDefault Mode 3 3Note Number 9-120 0-127Velocity: Note OnVelocity: Note Off XPitch BenderControl Change: 0 X Variation page1 X X Modulation5 X X Portamento value7, 10 Volume, Pan11 X Expression64, 66, 67 Sustain. Sostenuto, Soft Pedal65 X X Portamento yes/no80, 81 Reverb, Chorus program91 Reverb, Chorus send level98, 99 X X NRPNL, NRPHH100 ,101 X X RPNL, RPNH121 Reset all controllers123 All notes offProgram Change 0-127 0-127System Exclusive X XSys. Common: Song Select X XSys. Common: Song Position X XSystem: Clock X XReal Time: Commands X X
Mode 1: OMNI ON, POLYMode 2: OMNI ON, MONOMode 3: OMNI OFF, POLYMode 4: OMNI OFF, MONO
48
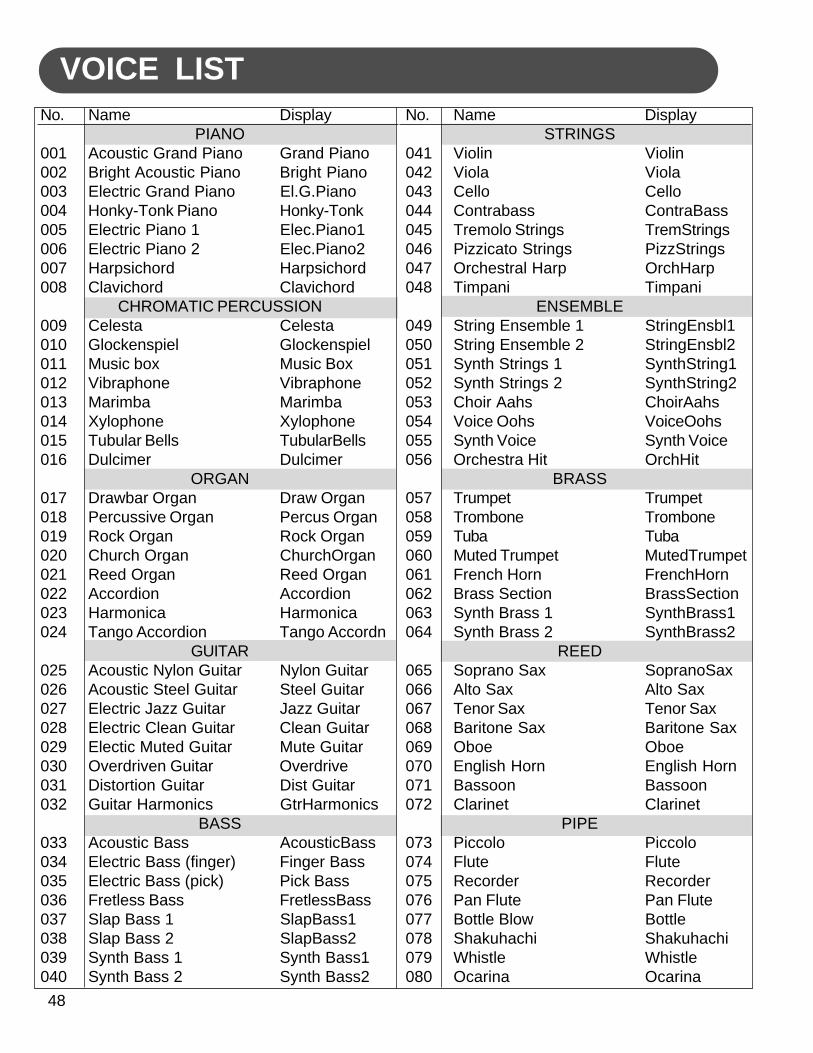
VOICE LISTNo. Name Display
PIANO001 Acoustic Grand Piano Grand Piano002 Bright Acoustic Piano Bright Piano003 Electric Grand Piano El.G.Piano004 Honky-Tonk Piano Honky-Tonk005 Electric Piano 1 Elec.Piano1006 Electric Piano 2 Elec.Piano2007 Harpsichord Harpsichord008 Clavichord Clavichord
CHROMATIC PERCUSSION009 Celesta Celesta010 Glockenspiel Glockenspiel011 Music box Music Box012 Vibraphone Vibraphone013 Marimba Marimba014 Xylophone Xylophone015 Tubular Bells TubularBells016 Dulcimer Dulcimer
ORGAN017 Drawbar Organ Draw Organ018 Percussive Organ Percus Organ019 Rock Organ Rock Organ020 Church Organ ChurchOrgan021 Reed Organ Reed Organ022 Accordion Accordion023 Harmonica Harmonica024 Tango Accordion Tango Accordn
GUITAR025 Acoustic Nylon Guitar Nylon Guitar026 Acoustic Steel Guitar Steel Guitar027 Electric Jazz Guitar Jazz Guitar028 Electric Clean Guitar Clean Guitar029 Electic Muted Guitar Mute Guitar030 Overdriven Guitar Overdrive031 Distortion Guitar Dist Guitar032 Guitar Harmonics GtrHarmonics
BASS033 Acoustic Bass AcousticBass034 Electric Bass (finger) Finger Bass035 Electric Bass (pick) Pick Bass036 Fretless Bass FretlessBass037 Slap Bass 1 SlapBass1038 Slap Bass 2 SlapBass2039 Synth Bass 1 Synth Bass1040 Synth Bass 2 Synth Bass2
No. Name DisplaySTRINGS
041 Violin Violin042 Viola Viola043 Cello Cello044 Contrabass ContraBass045 Tremolo Strings TremStrings046 Pizzicato Strings PizzStrings047 Orchestral Harp OrchHarp048 Timpani Timpani
ENSEMBLE049 String Ensemble 1 StringEnsbl1050 String Ensemble 2 StringEnsbl2051 Synth Strings 1 SynthString1052 Synth Strings 2 SynthString2053 Choir Aahs ChoirAahs054 Voice Oohs VoiceOohs055 Synth Voice Synth Voice056 Orchestra Hit OrchHit
BRASS057 Trumpet Trumpet058 Trombone Trombone059 Tuba Tuba060 Muted Trumpet MutedTrumpet061 French Horn FrenchHorn062 Brass Section BrassSection063 Synth Brass 1 SynthBrass1064 Synth Brass 2 SynthBrass2
REED065 Soprano Sax SopranoSax066 Alto Sax Alto Sax067 Tenor Sax Tenor Sax068 Baritone Sax Baritone Sax069 Oboe Oboe070 English Horn English Horn071 Bassoon Bassoon072 Clarinet Clarinet
PIPE073 Piccolo Piccolo074 Flute Flute075 Recorder Recorder076 Pan Flute Pan Flute077 Bottle Blow Bottle078 Shakuhachi Shakuhachi079 Whistle Whistle080 Ocarina Ocarina
49
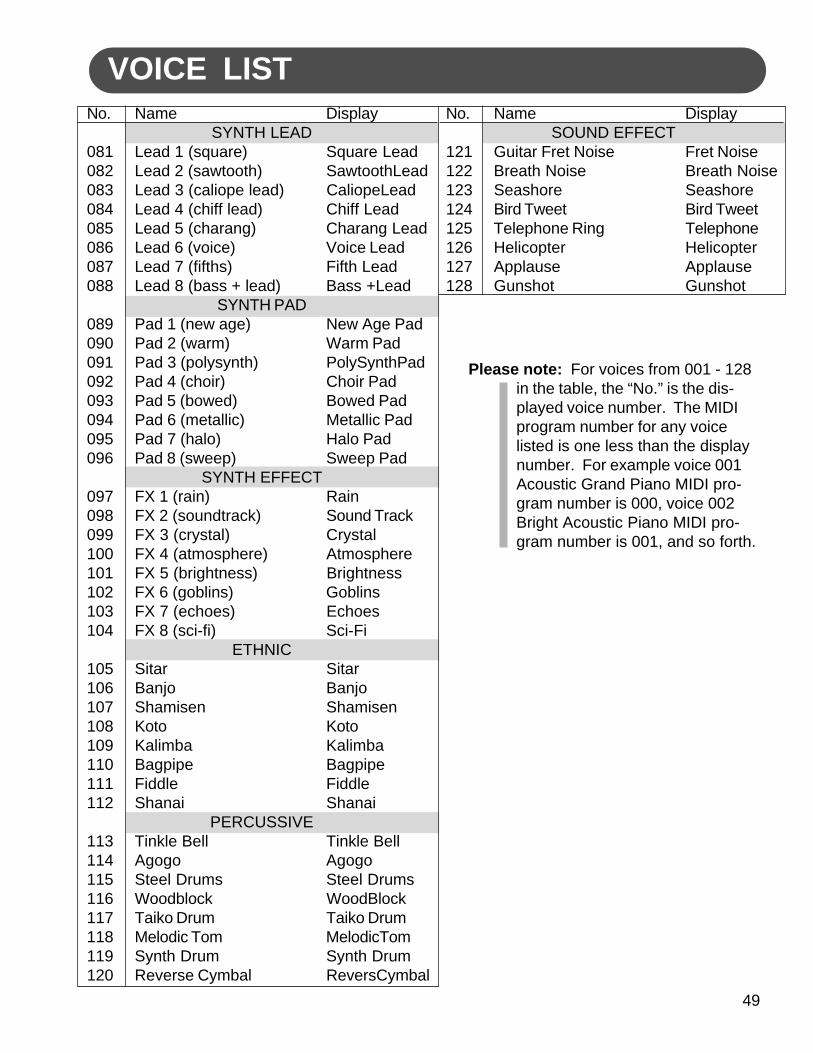
VOICE LISTNo. Name Display
SYNTH LEAD081 Lead 1 (square) Square Lead082 Lead 2 (sawtooth) SawtoothLead083 Lead 3 (caliope lead) CaliopeLead084 Lead 4 (chiff lead) Chiff Lead085 Lead 5 (charang) Charang Lead086 Lead 6 (voice) Voice Lead087 Lead 7 (fifths) Fifth Lead088 Lead 8 (bass + lead) Bass +Lead
SYNTH PAD089 Pad 1 (new age) New Age Pad090 Pad 2 (warm) Warm Pad091 Pad 3 (polysynth) PolySynthPad092 Pad 4 (choir) Choir Pad093 Pad 5 (bowed) Bowed Pad094 Pad 6 (metallic) Metallic Pad095 Pad 7 (halo) Halo Pad096 Pad 8 (sweep) Sweep Pad
SYNTH EFFECT097 FX 1 (rain) Rain098 FX 2 (soundtrack) Sound Track099 FX 3 (crystal) Crystal100 FX 4 (atmosphere) Atmosphere101 FX 5 (brightness) Brightness102 FX 6 (goblins) Goblins103 FX 7 (echoes) Echoes104 FX 8 (sci-fi) Sci-Fi
ETHNIC105 Sitar Sitar106 Banjo Banjo107 Shamisen Shamisen108 Koto Koto109 Kalimba Kalimba110 Bagpipe Bagpipe111 Fiddle Fiddle112 Shanai Shanai
PERCUSSIVE113 Tinkle Bell Tinkle Bell114 Agogo Agogo115 Steel Drums Steel Drums116 Woodblock WoodBlock117 Taiko Drum Taiko Drum118 Melodic Tom MelodicTom119 Synth Drum Synth Drum120 Reverse Cymbal ReversCymbal
No. Name DisplaySOUND EFFECT
121 Guitar Fret Noise Fret Noise122 Breath Noise Breath Noise123 Seashore Seashore124 Bird Tweet Bird Tweet125 Telephone Ring Telephone126 Helicopter Helicopter127 Applause Applause128 Gunshot Gunshot
Please note: For voices from 001 - 128in the table, the “No.” is the dis-played voice number. The MIDIprogram number for any voicelisted is one less than the displaynumber. For example voice 001Acoustic Grand Piano MIDI pro-gram number is 000, voice 002Bright Acoustic Piano MIDI pro-gram number is 001, and so forth.

50
VOICE LIST
ASIAN FOLK INSTRUMENTS
No. Name Display Prog. Change Bank129 Yangquin Yangqin 15 1130 Sanxian Pipa 106 1131 Zheng Zheng 107 1132 Erhu Erhuvib 110 1133 Banhu Banhu 0 1134 Suona Suona 1 1135 Sheng Sheng 2 1136 Dizi Dizi 3 1137 Erhu + Yangqin ErhuYangqin2 7 1138 Dizi + Zheng DiziZheng2 11 1
Please note: When the touch sensitivity is in the “Soft,” “Normal,” or “Hard,”mode, voice No. 137 will sound as Erhu when a key is struck softly, andas Yangqin when the key is struck hard.
If the touch response is fixed, voice No. 137 will always sound as Yangqin.
When the touch sensitivity is in the “Soft,” “Normal,” or “Hard,” mode,voice No. 138 will sound as Zheng when a key is struck softly, and as Diziwhen the key is struck hard.
If the touch response is fixed, voice No. 138 will always sound as Dizi.
More ethnic Asian Instruments have been added to the voice list as shown below.
51
No.
0001020304050607
0809101112
13141516171819
20212223
24252627282930313233
Name
8 Beat 18 Beat 28 Beat 38 Beat 48 Beat 516 Beat 116 Beat 216 Beat 3
Waltz 1Waltz 2Waltz 3Waltz 4Slow Waltz
TangoRhumbaBossanovaCha ChaSambaSalsaMamba
March 1March 2Polka 1Polka 2
Dance 1Dance 2Dance 3Dance 4Dance 5Dance 6Dance 7Trance 1Hip-HopTechno
No.
34353637383940
41424344454647
484950515253545556
57585960616263646566
No.
6768697071727374757677
7879
8081828384858687888990919293949596979899
Name
Disco 1Disco 2Disco 3Disco 4Disco 5Disco 6Disco Techno
HousePop 1Pop 2Pop 3Pop 4Pop 5Pop 6
Ballad 1Ballad 2Ballad 3Ballad 4Ballad 5Ballad 6Ballad 7Ballad 8Ballad 9
Rock 1Rock 2Rock 3Rock 4Rock 5Rock 6Slow Rock 1Slow Rock 2Slow Rock 3Slow Rock 4
Name
Jazz 1Jazz 2Jazz 3BebopR & BBoogie 1Boogie 2SwingShuffle 1Shuffle 2Slow Fox
Country 1Country 2
BeguineChristmasCha ChaGalopSoulAibetiAriaNoctureMarchPopArpeggio 1Arpeggio 2FolkShuffleRagtime 1Ragtime 2Waltz 1Waltz 2Slow Waltz 1Slow Waltz 2
Display
8 Beat 18 Beat 28 Beat 38 Beat 48 Beat 516Beat 116Beat 216Beat 3
Waltz 1Waltz 2Waltz 3Waltz 4SlowWltz
TangoRhumbaBossaChaChaSambaSalsaMamba
March 1March 2Polka 1Polka 2
Dance 1Dance 2Dance 3Dance 4Dance 5Dance 6Dance 7Trance 1Hip-HopTechno
Display
Disco 1Disco 2Disco 3Disco 4Disco 5Disco 6Distec
HousePop 1Pop 2Pop 3Pop 4Pop 5Pop 6
Ballad 1Ballad 2Ballad 3Ballad 4Ballad 5Ballad 6Ballad 7Ballad 8Ballad 9
Rock 1Rock 2Rock 3Rock 4Rock 5Rock 6SlwRock1SlwRock2SlwRock3SlwRock4
Display
Jazz 1Jazz 2Jazz 3BebopR & BBoogie 1Boogie 2SwingShuffle1Shuffle2Slow Fox
Country1Country2
BeguineXmasChaChaGalopSoulAibetiAriaNoctureMarchPopArpgio 1Arpgio 2FolkShuffleRagtime1Ragtime2Waltz 1Waltz 2SlowWlz1SlowWlz2
8 BEAT / 16 BEAT
WALTZ
LATIN
MARCH / POLKA
DANCE
DISCO
POP
BALLAD
ROCK
JAZZ
COUNTRY
PIANO
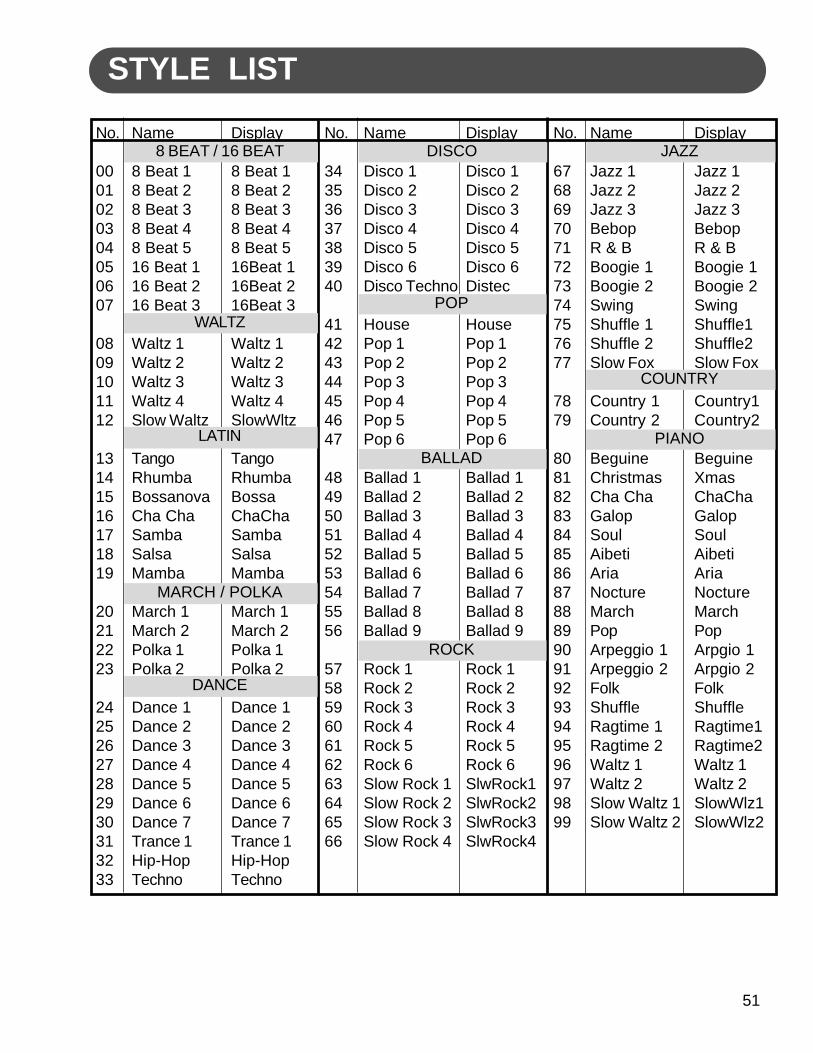
STYLE LIST

52
DRUM KIT LISTDRUM KIT LIST 1
No.-Key
27-Eb128-E129-F130-F#131-G132-G#133-A134-Bb135-B136-C237-C#238-D239-Eb240-E241-F242-F#243-G244-G#245-A246-Bb247-B248-C349-C#350-D351-Eb352-E353-F354-F#355-G356-G#357-A358-Bb359-B360-C461-C#462-D463-Eb464-E465-F466-F#467-G468-G#469-A470-Bb471-B472-C573-C#574-D575-Eb576-E577-F578-F#579-G580-G#581-A582-Bb583-B584-C685-C#686-D687-Eb6
Standard (0)P-1: StandardHigh QSlapScratch PushScratch PullStickSquare ClickMetronome ClickMetronome BellKick Drum 2Kick Drum 1Side StickSnare Drum 2Hand ClapSnare Drum 1Low Floor Tom 2Close Hi-hatLow Floor Tom 1Pedal Hi-hatLow TomOpen Hi-hatLow-mid TomHi-mid TomCrash Cymbal 1High TomRide Cymbal 1Chinese CymbalRide BellTambourineSplash CymbalCowbellCrash Cymbal 2Vibra SlapRide Cymbal 2Hi BongoLow BongoMute CongaHi CongaLow CongaHigh TimbaleLow TimbaleHigh AgogoLow AgogoCabasaMaracasShort WhistleLong WhistleShort GuiroLong GuiroClavesHi Wood BlockLow Wood BlockMute CuicaOpen CuicaMute TriangleOpen TriangleCabasaShakerBelltreeCastanetsMute SurdoOpen Surdo
Room (8)P-2: RoomHigh QSlapScratch PushScratch PullStickSquare ClickMetronome ClickMetronome BellKick Drum 2Kick Drum 1Side StickSnare Drum 2Hand ClapSnare Drum 1Room Low Floor Tom 2Close Hi-hatRoom Low Floor Tom 1Pedal Hi-hatRoom Low TomOpen Hi-hatRoom Low-mid TomRoom Hi-mid TomCrash Cymbal 1Room High TomRide Cymbal 1Chinese CymbalRide BellTambourineSplash CymbalCowbellCrash Cymbal 2Vibra SlapRide Cymbal 2Hi BongoLow BongoMute CongaHi CongaLow CongaHigh TimbaleLow TimbaleHigh AgogoLow AgogoCabasaMaracasShort WhistleLong WhistleShort GuiroLong GuiroClavesHi Wood BlockLow Wood BlockMute CuicaOpen CuicaMute TriangleOpen TriangleCabasaShakerBelltreeCastanetsMute SurdoOpen Surdo
Power (16)P-3: PowerHigh QSlapScratch PushScratch PullStickSquare ClickMetronome ClickMetronome BellKick Drum 2Power Kick DrumSide StickPower Snare Drum 2Hand ClapPower Snare Drum 1Low Floor Tom 2Close Hi-hatLow Floor Tom 1Pedal Hi-hatLow TomOpen Hi-hatLow-mid TomHi-mid TomCrash Cymbal 1High TomRide Cymbal 1Chinese CymbalRide BellTambourineSplash CymbalCowbellCrash Cymbal 2Vibra SlapRide Cymbal 2Hi BongoLow BongoMute CongaHi CongaLow CongaHigh TimbaleLow TimbaleHigh AgogoLow AgogoCabasaMaracasShort WhistleLong WhistleShort GuiroLong GuiroClavesHi Wood BlockLow Wood BlockMute CuicaOpen CuicaMute TriangleOpen TriangleCabasaShakerBelltreeCastanetsMute SurdoOpen Surdo
Electronic (24)P-4: ElectronicHigh QSlapScratch PushScratch PullStickSquare ClickMetronome ClickMetronome BellKick Drum 2Elec Kick DrumSide StickElec Snare Drum 2Hand ClapPower Snare Drum 1Elec Low Floor Tom 2Close Hi-hatElec Low Floor Tom 1Pedal Hi-hatElec Low TomOpen Hi-hatElec Low-mid TomElec Hi-mid TomCrash Cymbal 1Elec High TomRide Cymbal 1Reverse CymbalRide BellTambourineSplash CymbalCowbellCrash Cymbal 2Vibra SlapRide Cymbal 2Hi BongoLow BongoMute CongaHi CongaLow CongaHigh TimbaleLow TimbaleHigh AgogoLow AgogoCabasaMaracasShort WhistleLong WhistleShort GuiroLong GuiroClavesHi Wood BlockLow Wood BlockMute CuicaOpen CuicaMute TriangleOpen TriangleCabasaShakerBelltreeCastanetsMute SurdoOpen Surdo
TR-808 (25)P-5: TR-808High QSlapScratch PushScratch PullStickSquare ClickMetronome ClickMetronome BellKick Drum 2Synth Kick Drum 1Synth Side StickSynth Snare DrumHand ClapSnare Drum 1Synth Low Floor Tom 2Synth Close Hi-hatSynth Low Floor Tom 1Synth Pedal Hi-hatSynth Low TomSynth Open Hi-hatSynth Low-mid TomSynth Hi-mid TomSynth Crash Cymbal 1Synth High TomRide Cymbal 1Chinese CymbalRide BellTambourineSplash CymbalCowbellCrash Cymbal 2Vibra SlapRide Cymbal 2Hi BongoLow BongoMute CongaHi CongaLow CongaHigh TimbaleLow TimbaleHigh AgogoLow AgogoCabasaMaracasShort WhistleLong WhistleShort GuiroLong GuiroClavesHi Wood BlockLow Wood BlockMute CuicaOpen CuicaMute TriangleOpen TriangleCabasaShakerBelltreeCastanetsMute SurdoOpen Surdo
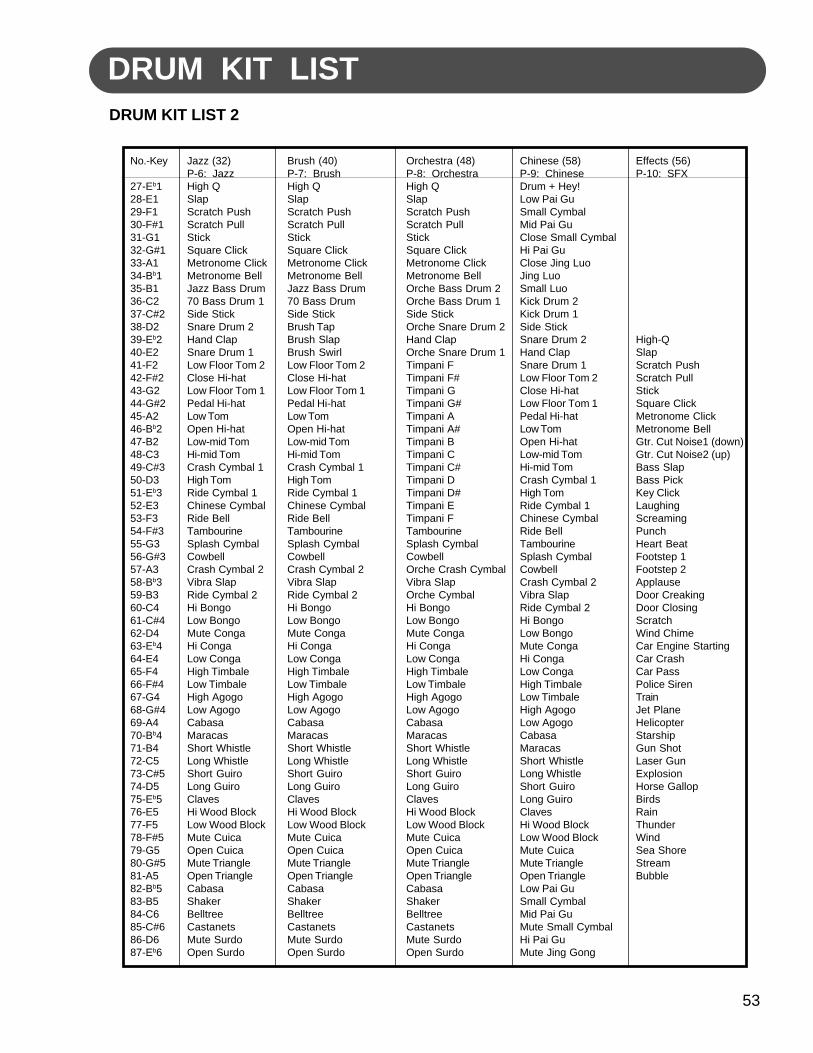
53
DRUM KIT LIST 2
No.-Key
27-Eb128-E129-F130-F#131-G132-G#133-A134-Bb135-B136-C237-C#238-D239-Eb240-E241-F242-F#243-G244-G#245-A246-Bb247-B248-C349-C#350-D351-Eb352-E353-F354-F#355-G356-G#357-A358-Bb359-B360-C461-C#462-D463-Eb464-E465-F466-F#467-G468-G#469-A470-Bb471-B472-C573-C#574-D575-Eb576-E577-F578-F#579-G580-G#581-A582-Bb583-B584-C685-C#686-D687-Eb6
DRUM KIT LIST
Jazz (32)P-6: JazzHigh QSlapScratch PushScratch PullStickSquare ClickMetronome ClickMetronome BellJazz Bass Drum70 Bass Drum 1Side StickSnare Drum 2Hand ClapSnare Drum 1Low Floor Tom 2Close Hi-hatLow Floor Tom 1Pedal Hi-hatLow TomOpen Hi-hatLow-mid TomHi-mid TomCrash Cymbal 1High TomRide Cymbal 1Chinese CymbalRide BellTambourineSplash CymbalCowbellCrash Cymbal 2Vibra SlapRide Cymbal 2Hi BongoLow BongoMute CongaHi CongaLow CongaHigh TimbaleLow TimbaleHigh AgogoLow AgogoCabasaMaracasShort WhistleLong WhistleShort GuiroLong GuiroClavesHi Wood BlockLow Wood BlockMute CuicaOpen CuicaMute TriangleOpen TriangleCabasaShakerBelltreeCastanetsMute SurdoOpen Surdo
Brush (40)P-7: BrushHigh QSlapScratch PushScratch PullStickSquare ClickMetronome ClickMetronome BellJazz Bass Drum70 Bass DrumSide StickBrush TapBrush SlapBrush SwirlLow Floor Tom 2Close Hi-hatLow Floor Tom 1Pedal Hi-hatLow TomOpen Hi-hatLow-mid TomHi-mid TomCrash Cymbal 1High TomRide Cymbal 1Chinese CymbalRide BellTambourineSplash CymbalCowbellCrash Cymbal 2Vibra SlapRide Cymbal 2Hi BongoLow BongoMute CongaHi CongaLow CongaHigh TimbaleLow TimbaleHigh AgogoLow AgogoCabasaMaracasShort WhistleLong WhistleShort GuiroLong GuiroClavesHi Wood BlockLow Wood BlockMute CuicaOpen CuicaMute TriangleOpen TriangleCabasaShakerBelltreeCastanetsMute SurdoOpen Surdo
Orchestra (48)P-8: OrchestraHigh QSlapScratch PushScratch PullStickSquare ClickMetronome ClickMetronome BellOrche Bass Drum 2Orche Bass Drum 1Side StickOrche Snare Drum 2Hand ClapOrche Snare Drum 1Timpani FTimpani F#Timpani GTimpani G#Timpani ATimpani A#Timpani BTimpani CTimpani C#Timpani DTimpani D#Timpani ETimpani FTambourineSplash CymbalCowbellOrche Crash CymbalVibra SlapOrche CymbalHi BongoLow BongoMute CongaHi CongaLow CongaHigh TimbaleLow TimbaleHigh AgogoLow AgogoCabasaMaracasShort WhistleLong WhistleShort GuiroLong GuiroClavesHi Wood BlockLow Wood BlockMute CuicaOpen CuicaMute TriangleOpen TriangleCabasaShakerBelltreeCastanetsMute SurdoOpen Surdo
Chinese (58)P-9: ChineseDrum + Hey!Low Pai GuSmall CymbalMid Pai GuClose Small CymbalHi Pai GuClose Jing LuoJing LuoSmall LuoKick Drum 2Kick Drum 1Side StickSnare Drum 2Hand ClapSnare Drum 1Low Floor Tom 2Close Hi-hatLow Floor Tom 1Pedal Hi-hatLow TomOpen Hi-hatLow-mid TomHi-mid TomCrash Cymbal 1High TomRide Cymbal 1Chinese CymbalRide BellTambourineSplash CymbalCowbellCrash Cymbal 2Vibra SlapRide Cymbal 2Hi BongoLow BongoMute CongaHi CongaLow CongaHigh TimbaleLow TimbaleHigh AgogoLow AgogoCabasaMaracasShort WhistleLong WhistleShort GuiroLong GuiroClavesHi Wood BlockLow Wood BlockMute CuicaMute TriangleOpen TriangleLow Pai GuSmall CymbalMid Pai GuMute Small CymbalHi Pai GuMute Jing Gong
Effects (56)P-10: SFX
High-QSlapScratch PushScratch PullStickSquare ClickMetronome ClickMetronome BellGtr. Cut Noise1 (down)Gtr. Cut Noise2 (up)Bass SlapBass PickKey ClickLaughingScreamingPunchHeart BeatFootstep 1Footstep 2ApplauseDoor CreakingDoor ClosingScratchWind ChimeCar Engine StartingCar CrashCar PassPolice SirenTrainJet PlaneHelicopterStarshipGun ShotLaser GunExplosionHorse GallopBirdsRainThunderWindSea ShoreStreamBubble
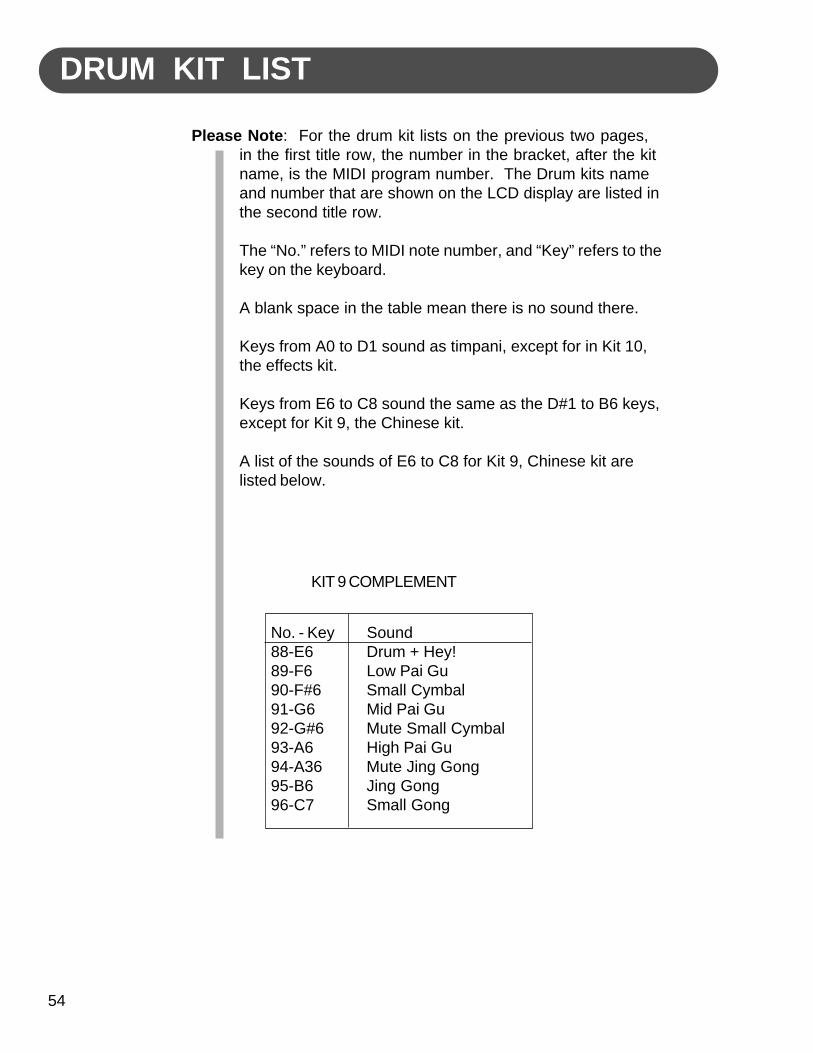
54
DRUM KIT LIST
Please Note: For the drum kit lists on the previous two pages,in the first title row, the number in the bracket, after the kitname, is the MIDI program number. The Drum kits nameand number that are shown on the LCD display are listed inthe second title row.
The “No.” refers to MIDI note number, and “Key” refers to thekey on the keyboard.
A blank space in the table mean there is no sound there.
Keys from A0 to D1 sound as timpani, except for in Kit 10,the effects kit.
Keys from E6 to C8 sound the same as the D#1 to B6 keys,except for Kit 9, the Chinese kit.
A list of the sounds of E6 to C8 for Kit 9, Chinese kit arelisted below.
No. - Key Sound88-E6 Drum + Hey!89-F6 Low Pai Gu90-F#6 Small Cymbal91-G6 Mid Pai Gu92-G#6 Mute Small Cymbal93-A6 High Pai Gu94-A36 Mute Jing Gong95-B6 Jing Gong96-C7 Small Gong
KIT 9 COMPLEMENT
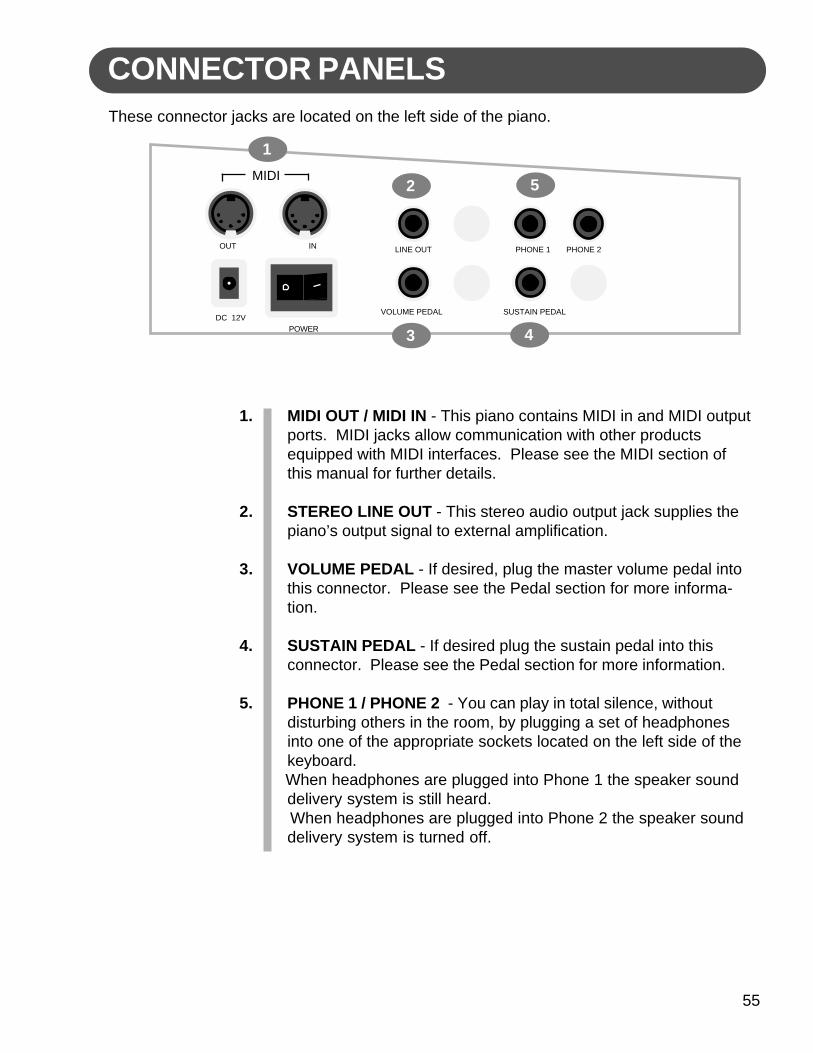
55
CONNECTOR PANELS
1. MIDI OUT / MIDI IN - This piano contains MIDI in and MIDI outputports. MIDI jacks allow communication with other productsequipped with MIDI interfaces. Please see the MIDI section ofthis manual for further details.
2. STEREO LINE OUT - This stereo audio output jack supplies thepiano’s output signal to external amplification.
3. VOLUME PEDAL - If desired, plug the master volume pedal intothis connector. Please see the Pedal section for more informa-tion.
4. SUSTAIN PEDAL - If desired plug the sustain pedal into thisconnector. Please see the Pedal section for more information.
5. PHONE 1 / PHONE 2 - You can play in total silence, withoutdisturbing others in the room, by plugging a set of headphonesinto one of the appropriate sockets located on the left side of thekeyboard.
When headphones are plugged into Phone 1 the speaker sounddelivery system is still heard.
When headphones are plugged into Phone 2 the speaker sounddelivery system is turned off.
These connector jacks are located on the left side of the piano.
1MIDI
OUT IN
DC 12VPOWER
LINE OUT PHONE 1 PHONE 2
VOLUME PEDAL SUSTAIN PEDAL
2 5
43
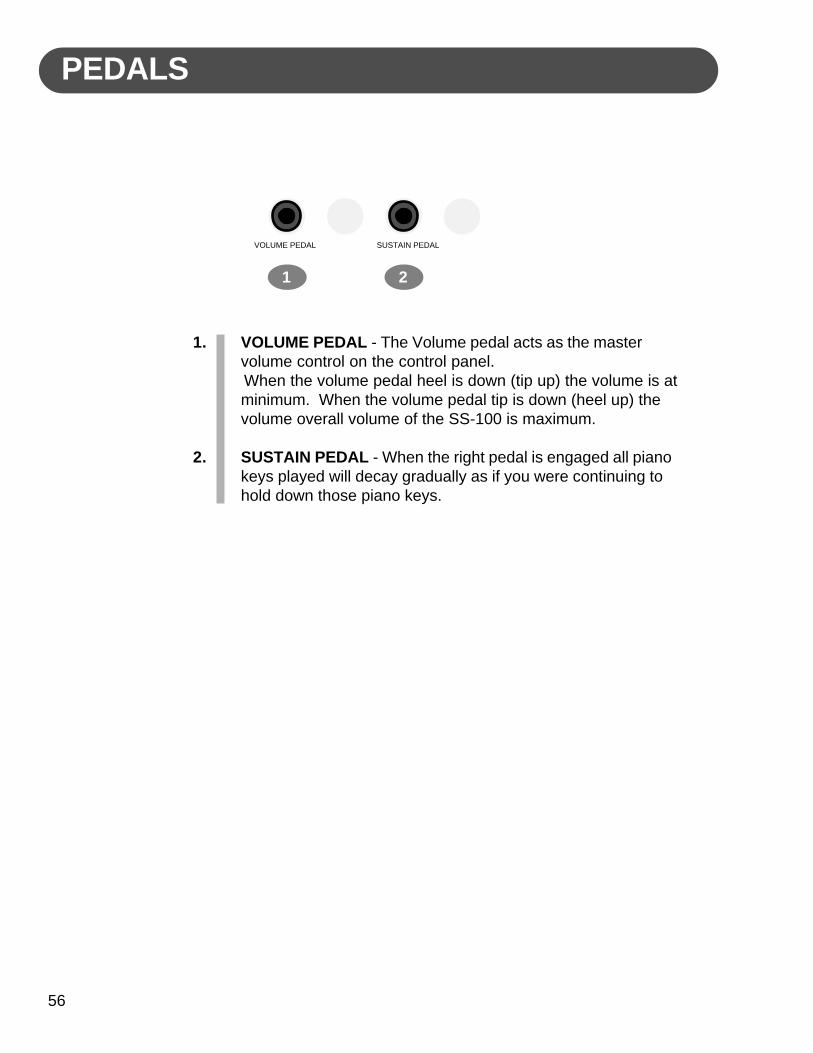
56
PEDALS
1. VOLUME PEDAL - The Volume pedal acts as the mastervolume control on the control panel.
When the volume pedal heel is down (tip up) the volume is atminimum. When the volume pedal tip is down (heel up) thevolume overall volume of the SS-100 is maximum.
2. SUSTAIN PEDAL - When the right pedal is engaged all pianokeys played will decay gradually as if you were continuing tohold down those piano keys.
VOLUME PEDAL SUSTAIN PEDAL
1 2

57
SPECIFICATIONSSPECIFICATIONS
KEYBOARD88-note, hammer-action keyboard
POLYPHONY: 32
VOICES138 Voices( including ten Asian folk instrument voices)ten quick select voice buttons
VOICE MODELayer (dual) voiceLower (split) voice
VOICE EFFECTSReverbChorus
SET UPPower: On/OffMain Volume Control: Min-MaxAccomp Volume Control: Min-Max
NUMERIC PAD: 12
DISPLAY: 16 Character LCD
REGISTRATION MEMORY: 9
DEMONSTRATION: Twelve songs,
RECORDING: Four songs, 3 track recording
OVERALL CONTROLTransposeTempoPitch Bend WheelModulation WheelTouch response: soft, normal, hard, fixedVoice split pointAccompaniment split point
AUTO BASS CHORD MODESingleFingeredPianoOff
AUTO ACCOMPANIMENT STYLE100 Auto accompaniment stylesten quick select style buttons
ACCOMPANIMENT CONTROLSynchro startStart/StopIntroductionEndingFill-InVariationMetronomeAuto harmony (four types)
FUNCTIONMetronomeReverb levelChorus levelTouch SensitivitySplit point for voiceSplit point for auto accompanimentMaster TuneDrum kit selectionHarmony type selection
AUXILIARY JACKSHeadphone x 2Line OutPower InMIDI In/Out
PEDALSSustain PedalVolume Pedal
VOLTAGE: 12V DC 3.4ma
AMPLIFIER: 12.5W x 2
DIMENSIONS1390 x 327 x 138 mm, stand exclusive, L x W x H1390 x 480 x 760 mm, including stand, L x W x H
WEIGHT: 34.7 Kg
STANDARD ACCESSORIESAdapterSustain pedalMusic standOwner’s manual
58
WARRANTY
This product, except the exterior cosmetic parts, is warrantedby the Suzuki Corporation to the original purchaser to be freefrom defects in material and workmanship under normal useas follows:
1. For a period of one year from the date of purchase, theSuzuki Corporation will pay the labor charges to repair thedefective product. After this one year period, you mustpay all labor charges.
2. In addition, the Suzuki Corporation will supply, at nocharge, new or rebuilt replacements for defective parts fora period of one year from the date of purchase.
In the event repairs are needed, the original purchaser willreturn the product to an Authorized Suzuki Retail Center withthe original proof of purchase. The dealer will then repair theproduct or return it to the Suzuki distribution center in San Diego,California for repairs. Upon completion of the repair, the unit willbe returned to the music store freight prepaid. This warranty willnot apply to this product if it has been misused, abused, or al-tered. This warranty is void if the product has been opened.Without limiting the foregoing, bending, dropping of unit, or visiblecracks and/or scratches are presumed to be defects resultingfrom misuse or abuse.
Neither this warranty nor any other warranty expressed or implied,including implied warranties of merchantable, shall extend beyondthe warranty period. No responsibility is assumed for any inciden-tal or consequential damages.
In the United States Contact:Suzuki CorporationSan Diego Distribution CenterP.O. Box 261030San Diego, CA 92196
In all other Countries Contact: Original retailer where productwas purchased for additional warranty details.

59

60
SUZUKIDIGITAL PIANOS
SUZUKI
OWNER’S MANUAL
SS-100
P.O. BOX 261030SAN DIEGO, CALIFORNIA 92196
(858) 566-9710Visit us on the web at www.suzukimusic.com
Copyright 2003 Suzuki Musical Instrument Corporation