
Spice Mi 270 Manual
82
1 ALL RIGHTS RESERVED Spice Mobility Ltd. ©2011. All rights are reserved. No part of this document can be reproduced without permission. All trademarks and brand names mentioned in this publication are property of their respective owners. While all the efforts have been made to ensure the accuracy of contents in this manual, we presume no responsibility for errors or omissions or statements of any kind, whether such errors are omissions or statements resulting from negligence, accidents, or any other cause. We operate a policy of continuous development and reserve the right to make changes, modifications and improvements to the phone, phone features/specifications or any of its parts without prior notice. Your device may have preinstalled bookmarks and links for third party internet sites and may allow you to access third party sites. These are no affiliated with Spice, and Spice does not endorse or assume liability for them. If you access such sites, take precautions for security or content. The limited warranty does not cover user manuals or any third party software, settings, content, data or links, whether included/downloaded in the product, whether included during installment, assembly, shipping or any other time in the delivery chain or otherwise and in any way acquired by you. To the extent permitted by applicable law(s), Spice does not warrant that any Spice software will meet your requirements, will work in combination with any hardware or software applications provided by a third party, that the operations of the software will be uninterrupted or error free or that any defects in the software are correctable or will be corrected. Note: User’s Manual is provided just to guide the user about the functionality of the phone. This does not seem to be any certificate of technology. Some functions may vary due to modifications and up- gradations of software or due to printing mistake.
-
Upload
khaher-hussain -
Category
Documents
-
view
206 -
download
2
Transcript of Spice Mi 270 Manual

1
ALL RIGHTS RESERVED
Spice Mobility Ltd. ©2011. All rights are reserved. No part of this document can be reproduced without permission. All trademarks and brand names mentioned in this publication are property of their respective owners. While all the efforts have been made to ensure the accuracy of contents in this manual, we presume no responsibility for errors or omissions or statements of any kind, whether such errors are omissions or statements resulting from negligence, accidents, or any other cause. We operate a policy of continuous development and reserve the right to make changes, modifications and improvements to the phone, phone features/specifications or any of its parts without prior notice. Your device may have preinstalled bookmarks and links for third party internet sites and may allow you to access third party sites. These are no affiliated with Spice, and Spice does not endorse or assume liability for them. If you access such sites, take precautions for security or content. The limited warranty does not cover user manuals or any third party software, settings, content, data or links, whether included/downloaded in the product, whether included during installment, assembly, shipping or any other time in the delivery chain or otherwise and in any way acquired by you. To the extent permitted by applicable law(s), Spice does not warrant that any Spice software will meet your requirements, will work in combination with any hardware or software applications provided by a third party, that the operations of the software will be uninterrupted or error free or that any defects in the software are correctable or will be corrected. Note: User’s Manual is provided just to guide the user about the functionality of the phone. This does not seem to be any certificate of technology. Some functions may vary due to modifications and up-gradations of software or due to printing mistake.

SAFETY PRECAUTIONS Please read the following safety guidelines before using the phone. Do not use the phone while you are driving. Pull over and
stop your automobile to dial or listen to a phone call.
Do not place magnetic storage media near your phone. Radiation from the phone may erase the information stored on them.
Keep your phone and its accessories away from children. Do not allow children to use your phone without guidance. Small parts such as the SIM card, dust cap, lens ring and lens cap as well as the microSD card can be dismantled and swallowed by small children.
Mobile phones can interfere with the functioning of medical devices such as hearing aids or pacemakers. Keep at least 20 cm (9 inches) between the phone and pacemaker. When using the mobile phone hold it to the ear which is furthest away from the pacemaker. For more information, consult your doctor.
3
Permanent hearing loss may occur if you use earphones or headphones at high volume. You can adapt over time to a higher volume, which may sound normal but can be damaging to your hearing. Set your volume to a safe level. If you experience discomfort or buzzing in your ears, reduce the volume or discontinue use of your earphones or headphones.
Use only original batteries and charging devices, otherwise you may risk serious damage to health and property. Battery can cause property damage, injury or burns if a conductive material, such as jewelry, keys or beaded chains touch exposed terminals. The material may complete an electrical circuit and become quite hot. Take extra care while handling any charged battery, particularly when placing it inside your pocket, purse or other container with metal objects. Do not dispose of batteries in fire as they may explode.

4
Notice: • Do not dismantle the device or accessories otherwise, manufacturer
is not liable to pay for damages as the device and accessories are not covered by warranty.
• Please back up your important data timely and keep them properly. The company is not liable for any failure to call or loss of data due to mis-operation, poor signal or power cut, etc.
• All the screens in this manual are for reference only, and some contents actually displayed may depend on the presetting of the service provider or the network operator, or the SIM card. If any functions referred to in this manual are different from those of your phone, please follow your phone.
• Improper use will invalidate the guarantee! These safety instructions also apply to original accessories.
• Do not put your phone in a high-temperature place or use it in a place with flammable gas such as a petrol pumps.
• Do not touch the charger, power cable or socket with wet hands. This may cause an electric shock.
• Do not use the phone in an environment of extremely high or low temperature, or an environment of high humidity. It may cause malfunction of the phone, the charger and the battery. The phone
using environment recommendation: temp 5-35 , humidity 35%-
85%, charging temp: 0oC-45 oC. • If you have difficulties installing the battery, do not force the
installation. This may cause battery leakage, overheating, explosion or even fire.
Note: If your phone or any of its accessories do not function normally, please send them to the nearest authorized service facility. The qualified personnel will assist you, and if necessary, will arrange for service.

PHONE OVERVIEW
6

7
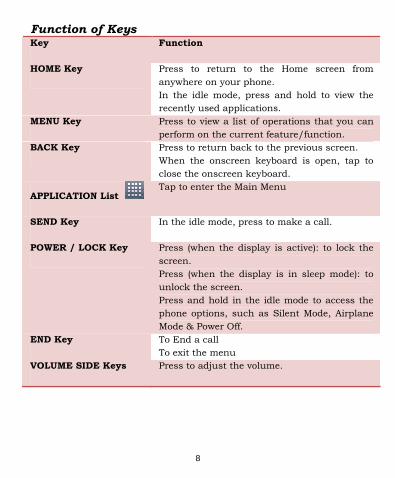
Function of Keys Key Function
HOME Key Press to return to the Home screen from anywhere on your phone. In the idle mode, press and hold to view the recently used applications.
MENU Key Press to view a list of operations that you can perform on the current feature/function.
BACK Key Press to return back to the previous screen. When the onscreen keyboard is open, tap to close the onscreen keyboard.
APPLICATION List Tap to enter the Main Menu
SEND Key In the idle mode, press to make a call.
POWER / LOCK Key Press (when the display is active): to lock the screen. Press (when the display is in sleep mode): to unlock the screen. Press and hold in the idle mode to access the phone options, such as Silent Mode, Airplane Mode & Power Off.
END Key To End a call To exit the menu
VOLUME SIDE Keys Press to adjust the volume.
8

Status Icons The table below lists various icons that might appear on the status bar while using the phone. Apart from the icons for signal strength level and the power, other icons are displayed as per the current mode and priority of the phone. Icon Function Icon Function
No signal GPS activated
Signal strength Synchronized
GPRS network connected New text or
EDGE network connected New email
More status icons are available Alarm
Call in progress Calendar
Call diverting activated Error occurred
Missed call Silent mode
Speakerphone activated Airplane mode
Call muted Music
Connect to PC FM radio
Wi-Fi connected Battery power
Bluetooth activated Current time
9

GETTING STARTED Please switch off your phone before inserting or removing the battery/SIM card or memory card. Installing Battery/SIM Card and Memory Card Lift the back cover up to remove it.
Insert the SIM/Memory card. Make sure the gold contacts are facing down and cut-off corner is facing towards the battery slot. After installing SIM/Memory Card, insert the battery. Make sure the contacts of the battery are aligned with the connectors on battery slot.
Charging the Battery Your phone comes with a rechargeable Li-Ion battery. Battery life varies depending upon the network and applications used and the type of connections attached to your phone. The battery out of the box is only partially charged. To fully charge the battery, charge it for 3 hours. In order to charge the handset:
• Plug the charger in the USB port • Plug the AC adapter to the wall outlet to start charging.
10
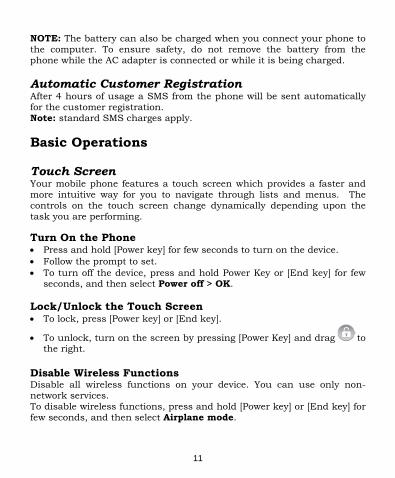
NOTE: The battery can also be charged when you connect your phone to the computer. To ensure safety, do not remove the battery from the phone while the AC adapter is connected or while it is being charged. Automatic Customer Registration After 4 hours of usage a SMS from the phone will be sent automatically for the customer registration. Note: standard SMS charges apply. Basic Operations Touch Screen Your mobile phone features a touch screen which provides a faster and more intuitive way for you to navigate through lists and menus. The controls on the touch screen change dynamically depending upon the task you are performing. Turn On the Phone • Press and hold [Power key] for few seconds to turn on the device. • Follow the prompt to set. • To turn off the device, press and hold Power Key or [End key] for few
seconds, and then select Power off > OK.
Lock/Unlock the Touch Screen • To lock, press [Power key] or [End key].
• To unlock, turn on the screen by pressing [Power Key] and drag to the right.
Disable Wireless Functions Disable all wireless functions on your device. You can use only non-network services. To disable wireless functions, press and hold [Power key] or [End key] for few seconds, and then select Airplane mode.
11

Use the touch screen You can perform the following actions on your device's touch screen:
Tap: Touch the screen once to select commands or launch applications.
Tap-and-hold: Tap and hold an item to see a list of available actions. Tap the action you want to perform on the pop-up menu.
Drag: Tap-and-hold a scroll bar or text and then drag it to move the bar or select text.
If your device does not respond accurately to your screen taps, realign your touch screen. To realign the screen, press [Menu key] in idle mode, then select Settings → Screen calibrate. Follow the prompts to realign. Attention: For optimal use of the touch screen, remove the screen protection film before using your device. Idle Screen When the device is in idle mode, you will see the idle screen. From the idle screen, you can view your device’s status and access applications.
12

View idle screen The idle screen has multiple panels. Scroll left or right to switch panels. Add items to the idle screen You can customize the idle screen by adding shortcuts to applications or items in applications, widgets, or folders. To add items to the idle screen: 1. In Idle mode, press [Menu key] → Add. 2. Select the item category → an item:
Shortcuts: Add shortcuts to items, such as applications, bookmarks, and contacts.
Widgets: Add widgets, such as various clocks, photos, favorite contact list, and online services.
Folders: Create a new folder or add folders for your contacts. Wallpapers: Set a background image.
Move items on the idle screen 1. Tap and hold an item to move. 2. Drag the item to the location you want when the item is magnified. Remove items from the idle screen 1. Tap and hold an item to remove.
2. The item is magnified and the icon appears on the application area, meaning that the application area at the bottom of the idle screen changes to the trash.
3. Drag the item to the trash. 4. When the item and the trash bar turn red, release the item. Access applications Access your device’s applications 1. In Idle mode, tap to access the application list. 2. Select an application. 3. Press [Back Key] to return to the idle screen. Note: Tap and hold an application icon, it will be added to the idle screen. Access recent applications 1. Press and hold [Home key] to open the list of applications you have
accessed recently. 2. Select an application to access. Customize your device Get more from your device by customizing it to match your preferences.
13

14
Set the current time and date 1. In Idle mode, press [Menu key] → Settings → Date & time. 2. Set the time and date and change other options. Turn on or off the touch tone In Idle mode, press [Menu key] → Settings → Audio profiles → select a profile → Audible selection. Adjust the volume of the ringtones Press [Volume key] up or down to adjust the ringtone volume. Switch to the silent mode To mute or unmute your device, do one of the followings: In Idle mode, press and hold [Power key] or [End key] → Silent mode. Change your ringtone 1. In Idle mode, press [Menu key] → Settings → Audio profiles → select
a profile → Phone ringtone. 2. Select a ringtone from the list and select OK. Select wallpaper for the idle screen 1. In Idle mode, press [Menu key] → Wallpaper → an option. 2. Select an image. 3. Select Set wallpaper.
Adjust The Brightness Of The Display 1. In Idle mode, press [Menu key] → Settings → Display → Brightness. 2. Drag the slider to adjust the level of brightness. 3. Select OK. Note: The brightness level of the display will affect how quickly the device consumes battery power. Activate animation for switching windows 1. In Idle mode, press [Menu key] → Settings → Display → Animation. 2. Select an option from the list. Set screen lock You can set an unlock pattern, PIN, or password to prevent unauthorized people from using the device without your permission. Pattern 1. In Idle mode, press [Menu key] → Settings → Location & security →
Set up screen lock→ Pattern.

15
2. See the on-screen instructions and example patterns and select Next. 3. Draw a pattern by dragging your finger to connect at least 4 dots. 4. Select Continue. 5. Draw the pattern again to confirm. 6. Select Confirm. PIN 1. In Idle mode, press [Menu key] → Settings → Location & security →
Set up screen lock→ PIN. 2. Enter a numeric PIN at least 4 digits. 3. Select Continue. 4. Enter the PIN again to confirm. 5. Select Confirm. Password 1. In Idle mode, press [Menu key] → Settings → Location & security →
Set up screen lock→ Password. 2. Enter a password at least 4 characters. 3. Select Continue. 4. Enter the PIN again to confirm. 5. Select Confirm. Note: Once you set an unlock pattern, PIN, or password, your device will require it each time you turn it on. If you do not want the device to require it, in Idle mode, press [Menu key] → Settings → Location & security → Change screen lock→ None. Lock your SIM card You can lock your device by activating the PIN supplied with your SIM card. • In Idle mode, press [Menu key] → Settings → Location & security →
Set up SIM card lock → tap the table of SIM1 or SIM2 → Lock SIM card.
• Enter the PIN of the SIM card and select OK. Once the PIN lock is enabled, you must enter the PIN each time you turn on the device. Note:
If you enter an incorrect PIN too many times, your SIM card will be blocked. You must enter a PIN unlock key (PUK) to unblock the SIM card.
If you block your SIM card by entering an incorrect PUK, bring the

16
card to your service provider to unblock it. Copy And Paste Text While you are entering text, you can use the copy and paste feature to use text in other applications. • Tap and hold the text input field. • Select Select text from the option list. • Drag your finger across the text you want to highlight. • Tap and hold the highlighted text. • Select Copy to copy and paste onto the clipboard. • In another application, tap and hold the text input field. • Select Paste to insert the text from the clipboard into the text field.

MAIN MENU Menu guides you to the various features, applications and services available in your phone. Tap on the Application Tab (as shown in the image below) in the idle mode to access the main menu.
Browser
• Go to Application Tab > Browser • In the address bar type the desired URL
To scroll the page: To scroll up or down, swipe your finger down or up. To scroll left or right, tap and swipe your finger to the right or left To set the Home Page:
• While viewing a web page, tap Menu > More > Settings > Set Home Page.
• Enter the URL of the page that you want to set as home page. • Select OK to save your settings
Open a Webpage: • Press Menu Key > Bookmarks > a bookmark. • Press Menu Key > Bookmarks, select the Most Visited or
17

18
History tab, and select a web page. • Select address filed on the top of the screen to enter a web
address, and select Go. While browsing web page use:
• Back Key to return to the previous page. • Menu > Refresh to reload a web page.
Open multiple pages: You can open multiple pages and switch back and forth between them.
• In Idle mode, open the application list and select Browser. • Access a web page and press Menu key > New window. • Open another web page on the new window. • Repeat steps 2 and 3 to open more web pages. • Press Menu Key > Windows to view the web pages that are
currently open. • Select a web page to retrieve or select to close the page.
Search for text on a web page: • In Idle mode, open the application list and select Browser. • Press Menu Key > More > Find on page. • Enter a keyword in the search field. The web page will highlight the text that matches your input.
Calculator Calculator helps you perform basic arithmetic functions, such as addition, subtraction, multiplication and division.
• In Idle mode, open the Application List > Calculator. • Enter the numbers and operators using the on screen keyboard. • To clear/delete the entered numbers, select CLEAR. • To view the result, select =. • To use the advanced calculation, press Menu Key > Advanced Panel.
Calendar The Calendar lets you schedule your appointments, meetings and other events. The scheduled appointments for the day can be displayed on Home screen.

Change the calendar view: In Idle mode, open the application list and select Calendar. By default monthly view is shown: Press [Menu key] > and select among the following view options:
Agenda: A list of scheduled appointments for the current month. Day: Hourly blocks for one full day. Week: Hourly blocks for the days in one full week.
Camera Your phone is equipped with a 2.0 megapixels camera, which supports photographing and recording functions. Capturing Images
• Go to Application List > Camera. • Aim the phone at the subject.
• Press and hold to capture image. • You can change the image settings, by selecting the following:
Icon Function
Set EV, scene mode, picture size, picture quality, and color effect.
Set capture mode, self timer, and anti-flicker.
Set to capture photos with location information (latitude, longitude).Turn on/off.
Adjust the color balance according to the light conditions.
19

Zoom in or out.
Capturing Videos • In Idle mode, open the application list and select Camera. • Rotate the device anti-clockwise to switch to landscape view. • Drag to (symbolizes video mode) • Aim the lens at the subject. • Select to start recording. • Select to stop recording. • You can change the image settings, by selecting the following:
Icon Function
Set EV, scene mode, video quality, video duration, and color effect.
Set micro phone and anti-flicker.
Adjust the color balance according to the light conditions.
Clock The clock function contains alarm clock, slide show, access to music and main menu. Select the Menu Key, to view alarms, add new alarm and dock settings. Set a new alarm • In Idle mode, open the Application List and select Clock.
20

21
• Press Menu Key > Add alarm. • Set alarm details in each field (time, repeat, ringtone, vibrate, and
label). • Select Done to save. Stop an alarm When an alarm sounds, select Dismiss to stop the alarm or Snooze to repeat the alarm after 10 minutes. Delete an alarm • In Idle mode, open the application list and select Clock. • Press Menu Key > Alarms. • Tap and hold an alarm you want to delete. • Select Delete Alarm >OK.
Set alarm in silent mode To play alarm even when the phone is in silent mode: • In Idle mode, open the application list and select Clock. • Press Menu Key > Alarms. • Press Menu Key] > Settings > Alarm in silent mode. Contacts Contacts is your phonebook that lets you store names, phone numbers, e-mail addresses and other information. Contacts are stored in the phone memory. You can save information such as names, pictures, phone numbers, e-mail addresses, etc. You can also add the frequently used contacts to the favorites list. Adding a Contact • Application List > Contacts. • Press Menu Key > New Contact. The New contact window appears. • Tap each field to enter the contact information with the on-screen
keypad. • Select Done to save. Searching for Contacts On Contacts screen:
• Press Menu Key > Search.

22
• Type the initials of the contact to be searched. Import or export contacts In Idle mode, open the application list and select Contacts.
• Press Menu Key > Import/Export. • Select an option to import or export.
Note: • To import a contact from SIM card, tap and hold the contact
and select Import. • To import all contacts from SIM card, press Menu Key >
Import all. Email Use Email to send and receive email messages via your internet e-mail accounts. Set up an email account • In Idle mode, open the application list and select Email. • Enter your email address and password, and then select Next. • Select an account type (POP3, IMAP or Exchange). • Follow the on-screen instructions. Send an email message • In Idle mode, open the application list and select Email > an email
account. • Press Menu Key > Compose. • Enter a name or address in the recipient field. • Select the subject field to enter a subject. • Select the text input field to enter your email text. • Press Menu Key > Add attachment and attach a file. You can select a
file from the file list or capture a photo, video, or sound clip. • Select Send by SIM. Note: If you are offline or outside your service area, the message will be held in the message thread list until you are online and in your service area. Delete an email account

• In Idle mode, open the application list and select Email. • Press Menu Key > Accounts. • Tap and hold an email account. • Select Remove account. Facebook Facebook is a very popular social networking site around the world giving people the power to share and make the world more open and connected. Millions of people use Facebook everyday to keep up with friends, uploads an unlimited number of photos, share links and videos, and learn more about the people they meet. File Manager By accessing the "File Manager" menu, you can browse, open and manage the data saved in the Memory card. Press Menu Key to choose from the following options: • Select All • New Directory • Preferences • Help FM Radio You can use your phone to listen to FM radio stations once the original Headset is plugged into the accessories connector. Switch on the FM radio: • Plug the supplied headset into the device. • In Idle mode, open the application list and select FM Radio. • Select to turn on the FM radio. • Control the FM radio with the following keys:
Icon/Key Function
Turn on / off the FM radio.
23

Search for the available radio stations.
Change the frequency by 0.1 MHz.
Add the current radio station to the favorites list.
Change the frequency by scrolling left or right on the scale bar.
Free SMS Free SMS service is powered by Ibibo. You can now send free SMS to your friends using this feature. You require GPRS connection to use this feature. Please contact your operator for GPRS activation. Free Videos Vuclip is a Mobile Video search and Delivery service which gives you a premium experience by providing real time device optimization and delivery of Videos. Write the search term for video in the search box and you get options for both downloading and streaming. Videos can be played in different resolutions and in parts. You can also create your own playlist by adding your favorite video to ‘Add to my Cliplist’ tab. Please ensure that you have GPRS settings in your phone to open Vuclip. Contact your operator for GPRS settings.
Gallery You can view the captured images and recorded video clips in the Gallery.
• Go to Application List > Gallery. • The picture folder and video folder are displayed. • Select to view the camera pictures or camera videos.
To view photos in the album
• Go to Application Tab > Gallery. • Select Camera Pictures to view the images. • Select an image to view.
To play slideshow
24

• While viewing an image, go to Menu > Slide Show. • Tap screen again to stop slide show.
Play a video • In Idle mode, open the application list and select Gallery.
• Select a folder > a video (with the icon) to play. • Rotate the device anti-clockwise to landscape view. • Control playback with the following keys:
Icon/Key Function
Pause playback; Select to resume playback.
Scan backward in a file.
Scan forward in a file.
Share images or videos • In Idle mode, open the application list and select Gallery. • Select a folder and press [Menu key] twice. • Select image or video files. • Select Share > a sharing option. Send the file via multimedia, email,
message or Bluetooth or upload the file to the online album or community site.
Gmail Gmail is Google's web-based email service. Google Mail is configured when you first set up your phone. Depending on your synchronization settings, Google Mail on your phone is automatically synchronized with your Google Mail account on the web.
• Go to Application List > Gmail. • Select Create or Sign in your Google account. • Follow the on screen instructions to login or create your Gmail
username and password.
25

26
• Once logged in, you can begin reading and sending emails from your Gmail account.
Ibibo Now connect with the Ibibo community on Spice Mobiles. Go and create your profile, search for people based on their age, sex & location, make new friends and send or receive blurbs. Invite your existing friends to join your new community. Just Dial You can now find updated information on all B2B and B2C Products and Services using Just dial on your handset. Just Dial is India’s No.1 local search engine and a virtual directory service that allows you search about anything. Please ensure that you have GPRS settings in your phone to open Just Dial. Contact your operator for GPRS settings.
Maps Maps are Google's mapping service to search for places of interest. Market Android Market allows you to find and download applications and fun games for your phone. Go to Application Tab > Market. Setup your Google account. Select Create to create a new account or Sign in to sign in your existing account. Once you are signed in you can begin searching and downloading programs from the market. Tap Apps to view the list of applications available and tap Games to view the list of games available. You can also tap Downloads to view the programs you have previously downloaded. NOTE: The services/applications provided by Android Market solely belong to Google and are not affiliated with Spice, and Spice does not assume liability for them.

27
Messaging Messaging menu enables you to read/create/view SMS and MMS. SMS Creating and sending a text message After entering the messaging menu:
• Select new message. • Compose screen is displayed. • In the To field, enter the recipient’s phone number. • Type your message in the Type to Compose field. • Select send by SIM1/SIM2 to send your message.
To forward a text message
• Tap to view a message thread. • Press and hold a message to view the message options. • Select Forward. • In the To field, enter the recipient’s phone number. • Click send by SIM1/SIM2 to send your message
To delete all text messages • You can delete all text threads in the Messaging. • Go to Application Drawer > Messaging. • Tap Menu > Del. threads. • Click OK to confirm.
To delete one message thread • Press and hold the message thread you want to delete. • Select Del. thread.
To delete a message within a thread • Select the message thread to open it. • Highlight the message to delete by flicking your finger
downward across the sender of the message. • Press and hold the highlighted message. • Press Del. message.
MMS Creating and sending an MMS message
• Go to Application Tab > Messaging.

28
• Select New Message. • Select Menu > Add sbj. • The message automatically gets converted into a MMS
message. • In the To field, enter the recipient’s phone number or email
address. • Enter the Subject. • To insert a picture or video file, select Menu > Attach. • To insert text, tap Type to Compose, then enter your message. • To insert an audio file, tap Menu > Attach > Audio. • Click Send.
Mgurujee Mgurujee is India's leading M-Learning portal delivering unique anytime anywhere mobile phone based learning experience with access to a wide variety of quality knowledge content from market leaders.
Mind Mapper Mind Mapper is a game that challenges the memory capability of the user. There is a grid of cards and every card has an image under it. Game aims at finding the same second image in the grid. There are different image categories and difficulty levels. User needs to find the all the pairs in minimum moves. Music Music menu, enables you to enjoy and listen to their favorite songs. All the songs saved in your memory card can be played via Music menu. To play music
• Go to Application Tab > Music. • The Library screen is displayed. • Select Songs and all songs on the phone will be displayed. • Tap to select the song, then select Play. • Control playback with the following keys:

Icon/Key Function
Pause playback; Select to resume playback.
Scan backward in a file.
Scan forward in a file.
Open the playlist.
Active Shuffle mode.
Change the repeat mode (off, repeating a file, or repeating all files).
While in Playback screen, tap Menu to:
• Select Library to go to the Music Library screen. • Select Party shuffle to play all songs in shuffle order. • Select Add to playlist to add the song to a preferred playlist. • Select Use as ringtone to set this song as ringtone. • Select Delete to delete the song.
To add a song in the playlist and create a new playlist Add songs to an already existing playlist or create a new playlist. While viewing the Library screen:
• Click and hold the song you want to add. • Select Add to playlist. • Select from the current playlist or select New to create a new
playlist. If you wish to create a new playlist, enter the playlist name).
Naukri 29

Search Jobs in India - Delhi, Mumbai, Bangalore, Kolkata. Find career openings in top companies. Post your resume and find your dream job now on spice phones with one touch access to naukri.com. Please ensure that you have GPRS settings in your phone to access Naukri. Contact your operator for GPRS settings. Nimbuzz Nimbuzz, another path-breaking innovation is available exclusively to the users of Spice Mobiles. Nimbuzz is a common IM platform that allows one to chat, message and send files on the move. This service is common for most of the commonly used IM portals including Skype, MSN, yahoo, ICQ, AIM, Google talk – one log-in, one contact list for all accounts. Phone Phone menu, allows you to access four other sub-menus namely Phone, Call Log, Contacts and Favorites. Application Tab > Phone To make a call
• Enter the phone number using the onscreen keypad.
• Press to make a call. • During a call, you can select from the options, such as mute,
speaker, hold, dial-pad and end. You can also select more to access start recording and add a call.
Call Log By tapping on Call Log, you can view the dialled, missed and received call details of both the SIMs. Select a call from the call log and press & hold to perform operations, such as view contact, edit number, send text message and remove from the call log. Contacts Contacts refer to the directory wherein all the contacts are stored in an alphabetical order. You can view, edit, delete, send message and perform various other functions on each contact of your phonebook. Favorites
30

You can add the most frequently called contacts to the favorite contact list, which helps you to access the contacts quickly and easily. From the contact list, select the desired contact and hold. The contact submenu appears, select Add to favorites. Reuters Reuters India gives you the latest India, World and Business news and more. Also, get the latest stock market information along with tools like the currency converter and weather in your city on your mobile phone. NOTE: Please ensure that you have GPRS settings in your phone to open Reuters. Contact your operator for GPRS settings. Search Select the Search menu and then type the text to be searched. Settings In the Settings menu, you can view and make adjustments for Wireless Control, Call Settings, Phone General Settings and Security Settings. Go to Application List > Settings to view and adjust the settings of your phone. The Settings menu is categorized into: Multi SIM Settings, Wireless & Networks, Call Settings, Audio Effects, Audio Profiles, Display, Location & Security, Applications, Accounts & Sync, Privacy, SD card & Phone Storage, Language & Keyboard, Voice Input & Output, Accessibility, Date & Time, Schedule Power On/off, Screen Calibrate and About Phone. Multi SIM Settings
Select or to active or deactivate the SIM card. Select SIM when bootup: Select which SIM you will use when bootup. Default SIM card option: Select the default SIM card.
Wireless & Networks Change the settings for wireless and network connections.
Airplane mode: Disable all wireless functions on your device. 31

32
Wi-Fi: Turn the WLAN feature on or off. Wi-Fi settings
- Wi-Fi: Turn the WLAN feature on or off. - Network notification: Set the device to notify you when an open
network is available. - Add Wi-Fi network: Add WLAN networks.
Bluetooth: Turn the Bluetooth wireless feature on or off. Bluetooth settings
- Bluetooth: Turn the Bluetooth wireless feature on or off. - Device name: Set a Bluetooth name for your device. - Discoverable: Set your device to be visible to other Bluetooth
devices. - Advanced settings: FTP server and Remote SIM settings. - Scan for devices: Search for available Bluetooth devices.
Tethering: Share your phone’s data connection via USB. VPN settings: Set up Virtual Private Network (VPN) server
connections. Mobile networks: Select the label of SIM1 or SIM2 and then set the
following options. - Data roaming: Set the device to connect another network when
you are roaming or your home network is not available. - Access Point Names: Set up access point names (APNs). - Network operators: Search for available networks and select a
network for roaming. Data Connection SIM: Set the SIM for data connection.
GPRS transfer pref.: Switch call or data prefer Call Settings Change the settings for call functions. Select SIM1 or SIM2 and then set the following options.
Fixed Dialing Numbers - Enable FDN: Restrict outgoing calls only to contacts specified in
the SIM or USIM card. To activate or deactivate this feature, enter the PIN2 supplied with your SIM or USIM card and reboot the device.
- Change PIN2: Change the PIN2. - FDN list: Set up a list of contacts for fixed dialing.
Voicemail service: Select your service provider’s voicemail service.

You can also select other voicemail services if you downloaded applications that support them.
Voicemail settings: Enter the number to access the voicemail service. You can obtain this number from your service provider.
Call forwarding: Divert incoming calls to another number. When you divert calls, you must specify a receiving number or delay time for diverted calls.
Call barring: Restrict incoming or outgoing calls. You can also change the password that you have set for call barring.
Call cost: Set currency and price per unit and view the call cost. The service needs PIN2.
Additional settings - Caller ID: Display your caller ID to other parties for outgoing calls. - Call waiting: Allow incoming call alerts when a call is already in
progress. Cell broadcast: Turn cell broadcast on or off. Cell broadcast settings
- Language: Select language. - Add Channel: Edit the channel name and number to add.
Audio Effect Select to change the audio effects of the handset by accessing the audio effects. Choose among the various effects, such as normal, 3D, bass, concert, shower, opera, dance, classical, treble, party, pop and rock as per your desire. Audio Profiles
General: Select at the right of profile name to active the profile. - Vibrate: Set the device to vibrate to alert you to incoming calls. - Volume: Set the default volume of the call ringtone and
notifications. - Phone ringtone: Select a ringtone to alert you to incoming calls. - Notification ringtone: Select a ringtone to alert you to events,
such as incoming messages, missed calls, and alarms. - Audible touch tones: Set the device to sound when you touch the
keys on the dialer.
33 - Audible selection: Set the device to sound when you select an

34
- und when you lock or
- et the device to vibrate when you touch the
Si
application or option on the touch screen. Screen lock sounds: Set the device to sounlock the screen. Haptic feedback: Skeys on the screen.
lent mode: Select at the right of profile name to active the profile.
ou to incoming calls. the
e General.
isplay ss: Adjust the brightness of the screen.
on to automatically
isplay animation when you switch
et the length of time the screen stays on when the
ocation & Security
ecuring your device and the SIM or USIM card,
ks: Set the device to use the wireless networking
y for checking
nt data to speed up the fixed time of
t the options of A-GPS. f screen lock.
nd then set
Lock your SIM card by activating the PIN requirement. You need to enter the PIN supplied with your SIM
Activate the silent mode to mute all sounds. - Vibrate: Set the device to vibrate to alert y- Haptic feedback: Set the device to vibrate when you touch
keys on the screen. M eting: please refer to
Outdoor: please refer to General. D
Brightne Auto-rotate screen: Set the screen orientati
switch when rotating the device. Animation: Set the device to dbetween windows. Screen timeout: Sdevice is not in use.
LChange the settings for sand GPS functionality.
Use wireless networfor checking locations, if supported in an application. Use GPS satellites: Enable the GPS functionalitlocations, if supported in an application. You can view locations at street level by using the GPS. A-GPS: Enable using assistalocation with GPS. A-GPS settings: Se
Set up screen lock: Select and set a kind o Set up SIM card lock: Select the label of SIM1 or SIM2 a
the following options. - Lock SIM card:

35
- SI ock: Select the label of SIM1 or SIM2 and then set your
. Set the device to display your password as you enter.
ure
Ahange the setting for managing installed applications.
rces: Select to download applications from any source. pplications only
k the application information. To view the
ng: Select to connect your device to a PC by using a e.
n to be sent to a Location Manager service for testing.
cco nts & sync
card. Change SIM PIN: Change the PIN.
M ME Lpassword.
Visible passwords: By default, the device displays your password as (.) for security
Select device administrators: Add or remove device administrators. Use secure credentials: Use certificates and credentials to enssecure use of various applications.
Install from SD card: Install encrypted certificates that are stored on a memory card.
Set password: Create and confirm a password for accessing credentials.
Clear storage: Erase the credential contents from the device and reset the password.
pplications
C Unknown sou
If you do not select this option, you can download afrom Android Market. Manage applications: Access the list of the applications installed on the device and checapplications that are currently running or third-party applications installed additionally, press Menu Key > Filter. Running services: View the services you are using and access them to manage.
Development - USB debuggi
PC data cabl- Stay awake: Set the device’s screen to stay on while charging the
battery. - Allow mock locations: Allow mock locations and service
informatioThis is for application development.
A u

36
r the auto sync feature or manage accounts for
nchronize contact, calendar, and email
rivacy
e settings for managing your settings and data.
fault values
D Card & Phone Storage
ge of your phone: mount of space on the
• om your phone
•
• The amount of internal phone storage used by the
Lan age & Keyboard input.
play language for all menus and
enu Key > Add
Change the settings fosynchronization.
Background data: Select this setting to use the auto sync feature. The auto sync will run in the background without opening applications synchronize data. Auto-sync: Set the device to sydata automatically.
PChange th
Back Up My Data: Back up the data. utomatically. Automatic Restore: Select to restore a
Factory data reset: Reset your settings to the factory deand delete all your data.
SView and manage the data stora• Total Space and Available Space: Lists the a
microSD card installed in your phone and the amount you have used to store photos, videos, music, and other files. Un-mount SD Card: Un-mounts the microSD card frso that you can format the card or safely remove it when the phone is on. Format SD Card: Permanently erases everything on the microSD card. Available Space: operating system, its components, applications (including those you downloaded), and their permanent and temporary data.
guChange the settings for text
Select language: Select a disapplications, and a writing language for all text editors. Android keypad: Set the options of Android keypad.
User dictionary: Set up your own dictionary. Press Mand enter a word to save in your dictionary. The words in your dictionary will appear as word suggestions for your text inputs.

37
oice Input & Output Settings
ult recognizer language.
nized offensive voice results. ch
e: Listen to the spoken text for an example.
settings you
- e used for
- data: Download and install voice data for the text-to-
- ect a speed for the text-to-speech feature.
ccessibility
ds call: select it to use power key to end call instead
ate & time the following settings to control how time and date are
lly update the time when you move across
e.
o be displayed in 24-hour
chedule Power On/Off
V Voice recognizer settings:
- Language: Select the defa- Safe Search: Select filter rules. - Block offensive words: Hide recogText-to-speech settings: Change the settings for the text-to-speefeature that reads aloud text from messages or applications that support the feature. - Listen to an exampl
Install voice data for using the text-to-speech feature. - Always use my settings: Set the device to use the
specify in applications rather than the default settings. Default Engine: Set the speech synthesis engine to bspoken text. Install voice speech feature. Speech rate: Sel
- Language: Select a language for the text-to-speech feature.
APower button enof turning off screen. DAccess and alterdisplayed on your device:
Automatic: Automaticatime zones. Set date: Set the current date manually.
Select time zone: Set your home time zon Set time: Set the current time manually. Use 24-hour format: Set to the time t
format. Select date format: Select a date format.
S

38
feature.
reen.
e Status. This screen lists a variety of information,
IM Manager you manage contacts of SIM cards and your phone.
In Idle mode, open the application list and select SIM Manager. acts
Io and use services provided by your mobile service
MS Directory es a list of services across various categories like
ables the user to search his inbox with a keyword.
Set time and turn on or off the creen Calibrate S
Calibrate the touch sc
bout Phone AView your phonincluding your phone model number, the network you are currently using, the type of network, signal strength, whether you are in roaming or not, any Wi-Fi addresses you’re connected to, and more. Select Legal information for copyright and licensing information, as well as the Google Terms of Service for the Google applications on your phone. Select the System Tutorial to learn how to use your phone.
SSIM Manager allows • • Select among the options, to copy, delete, backup, or resume cont
to SIM card or phone.
M Toolkit SDirectly connect tprovider. Go to Applications Tab > SIM Toolkit. SSMS directory providtravel, banking, insurance, social networking etc. The user needs to just choose the service and the application will automatically send the correct SMS to the appropriate service number; response to the query will be received by the user either through an SMS or a call. SMS Search This application enThe user needs to enter the keyword and click, all the messages

containing the keyword get displayed in a list with preview text. Selecting any message opens up the complete text of the SMS. Social Gaming Spice presents a social gaming platform in partnership with Ibibo, where users can play online game ‘The Great Indian Parking wars’ with their Ibibo friends. Earn virtual money by parking on your friend’s streets. Click on any of your friends in the list to go to their street. Then click on the PARK HERE button in any open parking spot which matches the color of your vehicle. Please ensure that you have correct GPRS settings in your phone to open Sound Recorder You can use the sound recorder to record sounds and also select to save the recordings in your phone. Record the sound • In Idle mode, open the application list and select Sound Recorder. • Select to start. • Speak to the microphone. • Select to stop and select Save to save the file. • To record more, select again.
Play the recording • In Idle mode, open the application list and select Music. • Select Playlist > My recordings. • Select a recording to play. Spice Gang Spice Gang is a WAP portal from where user can download ringtones, wallpapers, animations, video and other kind of content. Step1: Check the GPRS settings for your operator. Step2: Initiate Spice Gang WAP portal to browse and download the content. Step3: Charges for download apply as per operator pricing. Explore the whole world of Entertainment with Spice Gang.
39

Talk Google Talk is Google's instant messaging program. To sign in to Google Talk
• Go to Application List > Google Talk. • Select Create or Sign in your Google account. • Follow the on screen instructions to login or create your Gmail
username and password. • Once logged in, you can begin using Google Talk and View
friend’s list, Add friends to friend’s list, sign out and view terms and privacy.
Task Manager Task manager sub-menu allows you to view the entire list of applications in the phone and also the currently running/in-use applications. Further, after accessing the Task Manager sub-menu tap on Resource to fetch details, such as CPU and Memory. Videos You can playback the video clips captured and saved in your phone. • In Idle mode, open the application list and select Videos. • Select a video to play. • Rotate the device anti-clockwise to landscape view. • Control playback with the following icons: Icon/Key Function
Pause playback; Select to resume playback.
Scan backward in a file.
Scan forward in a file.
40

41
Voice Google voice provides the voicemail service for your phone, replacing the service from your mobile carrier. With this, you can play and view transcripts of your messages on your phone. Voice Dialer Read and record predefined texts to be recognized and used by your phone for voice dialing, finding a contact and others. Go to Application List > Voice Dialer. Call a contact using Voice Dialer: You can call numbers directly by saying the contact’s name or number.
• In Idle mode, open the application list and select Voice Dialer. • Say “Call” or “Dial” and then a name or a phone number. • Alternatively, say "Redial" to re-dial the last number. The
device dials the selected number.
Open an application: • In Idle mode, open the application list and select Voice Dialer. • Say “Open” and then an application. • The device opens the corresponding application.
Note:
This feature may be unavailable depending upon your region. Your device may recognize only American English commands. Recognized languages may vary depending upon your region.
Wapedia Welcome to Wapedia, the encyclopedia for mobile devices. Wapedia brings the contents of Wikipedia to mobile devices offering the most high speed and up-to-date articles. Standard Wikipedia pages are typically too long for display on these devices, so long pages are divided into smaller chunks to fit into the small displays. Yahoo Launch You can view Yahoo supported services, including Yahoo homepage, Mail, News and so on by accessing this sub-menu.

42
You Tube YouTube is an online video streaming service that allows you to view, search, and upload videos. To start using YouTube
• Tap the Application List > Select YouTube. • Videos are grouped into various categories. Tap a category to
see the available videos for that category. • Select a video to play it.

DRIVER INSTALLATION
Driver Installation for Vista
1. Double click to access Install Shield Wizard.
2. Click “Next” as shown in the figure.
43

3. Click “Install” as shown in the figure
.
44

4. Wait for the setup to complete
45

5. The system will show a pop-up window which prompts “Don’t run
the program unless you know where it’s from or you’ve used it
before”.
To continue the installation, select “Allow”.
If you select “Cancel”, the system will show an error and terminate the
installation wizard.
46

6. Click “Finish” to complete driver installation.
7. Connect the phone and PC with USB. Select the option, as
highlighted in the image shown below:
47

8. Select the option, as shown in the figure.
48

9. Select the option as highlighted in the figure.
49
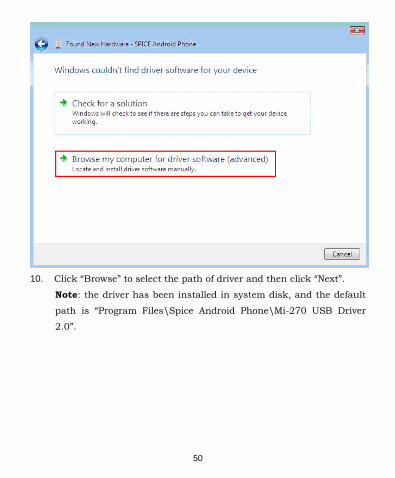
10. Click “Browse” to select the path of driver and then click “Next”.
Note: the driver has been installed in system disk, and the default
path is “Program Files\Spice Android Phone\Mi-270 USB Driver
2.0”.
50

11. Select the option as shown in the figure.
51
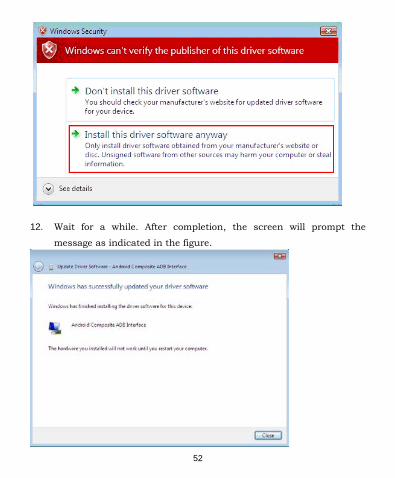
12. Wait for a while. After completion, the screen will prompt the
message as indicated in the figure.
52

13. Open device manage to see if there are options in the red box as
shown in the figure.
14. After completing the above steps, connect the phone to use.
53

Driver installation for Windows 7
1. Double click access Install Shield Wizard.
2. Click “Next” as shown in the figure.
54

3. Click “Install” as shown in the figure.
55
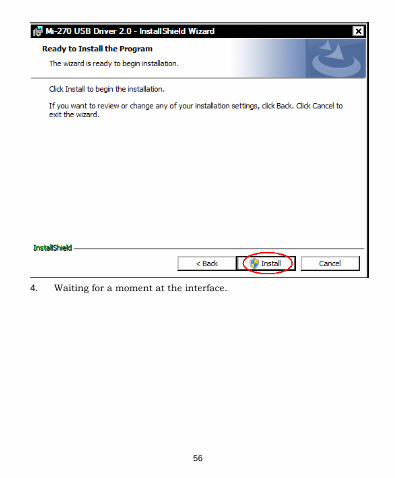
4. Waiting for a moment at the interface.
56

5. The system will show a pop-up window which prompts “Do you
want to allow the following program from an unknown publisher to
make change to this computer”.
To continue the installation, select “Yes” .
If you select “No”, the system will prompt error and exit installation
wizard.
6. Click “Finish” to complete driver installation.
57
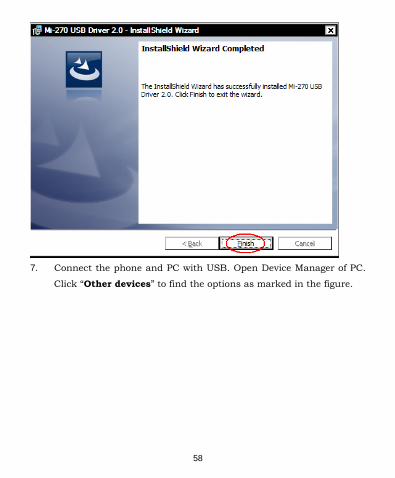
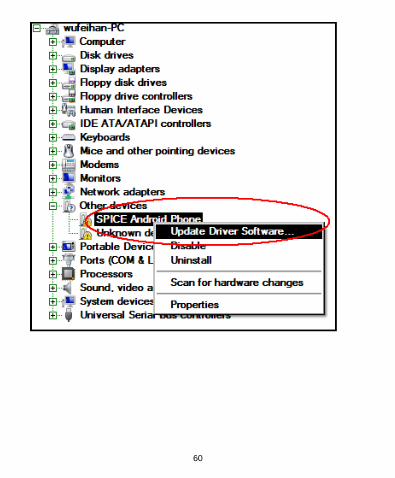
7. Connect the phone and PC with USB. Open Device Manager of PC.
Click “Other devices” to find the options as marked in the figure.
58

8. Right click “SPICE Android Phone” and select “Update Driver
Software…” access the following interface as shown in the figure.
And then select the option as mentioned in the images below
59
60

9. Click “Browse” to select the path of driver and then click “Next”.
Note: the driver has been installed in system disk, and the default
path is “Program Files\Spice Android Phone\Mi-270 USB Driver
2.0”.
61

10. Select the option as highlighted in figure.
62

11. Wait for a while. After completion, the screen will show the prompt
as shown in the figure.
12. Open device manager to view the options as shown in the figure.
63

13. After completing the all the above mentioned steps, connect the
phone.
64

Driver installation for XP
1. Double click access Install Shield Wizard.
2. Click “Next” as shown in the figure.
65

3. Click “Install” as shown in the figure.
66

67

4. Click “Finish” to complete driver installation.
68

5. Connect the phone and PC with USB. The screen will show prompts
at the right-bottom corner, as shown in the figure.
6. In the Found New Hardware Wizard, select the option as highlighted
in the image and click “Next”.
69

7. Connect the phone and PC with USB. Select the option as show
below and click “Next”.
70

8. Click “Browse” to select the path of driver. And then, select the
option as highlighted in red box and click “Next”, as shown in the
figure.
Note: the driver has been installed in system disk, and the default
path is “Program Files\Spice Android Phone\Mi-270 USB Driver
2.0”.
71

9. Select the option as shown in the image and click “Next”. And then
access installation interface.
72

73

74

10. Click “Finish” to exit. The screen will show prompts at the right-
bottom corner, as shown in the figure.
75

11. Open device manager to view the options, as shown in the red box
below:
76

77
Frequently Asked Questions And Troubleshooting If you encounter problems while using the phone, or if it performs erratically, you can refer to the information given in the following table.
Problem Causes Solution
The phone cannot be switched on
• Check if the battery power has been used up completely.
• Did you press the End Key for adequate time?
• Have you inserted the battery properly?
• Charge the battery • Press the power on key for about 1 second.
• Please remove and re-install the battery and turn on the phone.
SIM card error
• SIM card malfunction or damage.
• SIM card is not inserted properly.
• Take the SIM card to your service provider for testing.
• Insert the SIM card properly.
Unable to make calls
• Has the signal bar disappeared?
• Is the phone number entered by you is correct?
• Move to a place with strong signal.
• Please re-check whether the number entered by you is correct or not.
You cannot answer incoming calls.
• You have activated the call barring feature.
• Go to Settings > General call settings > MASTER SIM card /SLAVE SIM card call settings > Call Barring/Line Switching, and then select Cancel All/Line1.

78
Fail to connect to the network.
• Weak signals. • Invalid UIM card.
• Please try and move to a location with strong signal and try connecting to the network again
• Please ensure that you have a valid UIM card. Please contact your network provider for further information.
Poor reception.
• The network signal is too weak at your current location, for example, in a basement or near a tall building, because wireless transmissions cannot effectively reach it.
• The network is busy. • You are too far away from a base station of your service provider.
• Move to a location where the network signal can be properly received.
• Avoid using the phone at such time, and try again after waiting for a while.
• You can request for a service area map from your service provider.
Echo or noise during the calls
• Poor network trunk quality on the part of your service provider.
• Press the ending key and dial again. You may be switched to a better-quality network trunk or phone line.
Unable to enter information in the phone book.
• The memory of the phone book is already full.
• Delete unnecessary data from the phone book.

79
Unable to charge battery
• The battery or battery charger is damaged.
• The temperature of the phone is below 10°C or higher than 55°C.
• Poor contact between the battery and charger.
• Contact the dealer. • Adjust the battery charging environment to avoid extremes of temperature.
• Check all connectors to make sure all connections have been properly made.
PIN Code is blocked
• You have entered an incorrect PIN code three times in a row.
• Contact your service provider. If the service provider provides the PUK code of the SIM card, use the PUK code to unlock the SIM card.
Fail to set certain functions
• Wrong operation • The network provider does not support the function, or you have not applied for it.
• Please refer to the user manual
• Please contact your service operator.
Short stand by time
• The standby time is related to your service provider system configuration. The same phone used with different service providers’ system will not provide exactly the same length of standby time.
• The battery is depleted.
• If you are located in an area where signals are weak, temporarily switch off your phone.
• Use a new battery.
If you still face problems while using your handset or the solution to your query is not mentioned here, then you can visit nearest Spice service center. Note: For issues related to network or UIM card, please contact your network operator

80
SUPPORT AND CONTACT
• You can visit www.spice-mobile.com for additional information, downloads and services related to your Spice handset.
• To check for your nearest SPICE service center, you can visit www.spice-mobiles.com/support-services .
• For further assistance or queries, you can call on SPICE
customer care number 1800-300-77423 (toll free) or mail at [email protected] or [email protected].
• To know the address of your nearest Spice service station
please SMS- SPICE SERVICE to 56300.

81
Specifications
Radio band Standard
GSM/GPRS/EDGE 900/1800
Connectivity
GPS GPS/AGPS
Wi-Fi 802.11 b/g
Bluetooth 2.1+EDR
USB USB 2.0
Power
Battery Rechargeable Li-lon 1000mAh
power Adapter AC input:100-240V, 50/60Hz,0.2A max. DC output:5V,1A
Temperature
Operating -15℃ to 55℃
Non-operating/Storage -20℃ to 70℃
Charging 0℃ to 40℃
Humidity
Operating 10% to 90% non-condensing
Non-operating/Storage 5% to 95% non-condensing

1
Index A Accessibility, 37 Add contacts, 21 Airplane mode, 11, 31 Alarm
Add new alarm, 20 Delete alarm, 21 Stop alarm, 21
Album, 24 Application, 13, 35 Appointment, 18 Attachment, 22 Audio effect, 33
B Battery
Charge, 10 Install, 10
Bluetooth, 32 Brightness, 14, 34 Browser, 17
C Calculator, 18 Calendar, 18 Call, 30 Call barring, 33 Call forwarding, 33 Call history, 30 Call waiting, 33 Camera
Capture image, 19 Capture video, 20
Clock, 20 Contacts
create, 21 import or export, 22 search, 21
Copy, 16
D Data connection, 32 Date, 14, 37 Dictionary, 36 Driver installation
Vista, 43 Windows 7, 54 Windows XP, 65
E Email
Email account, 22 Send, 22
F Facebook, 23 Favorite contacts, 30 File manager, 23 Fixed dialing numbers, 32 FM radio, 23 Free SMS, 24 Free Videos, 24
G Gallery
Play video, 25 view photo, 24

2
Google Mail, 25 Google Maps, 26 Google Talk, 40 GPS, 34
I Ibibo, 26 Idle screen
Add item, 13 Move item, 13 Remove item, 13
J Just Dial, 26
K Keypad, 8, 36
L Language, 36 Location, 34 Lock screen, 11, 14
Password, 15 Pattern, 14 PIN, 15
Lock SIM card, 15
M Market, 26 Message
MMS, 27 SMS, 27
Mgurujee, 28 Micro SD card
Format, 36 Insert & remove, 10
Unmount, 36 Mind Mapper, 28 Multimedia messages, 27 Music player
Play music, 28 playlist, 29
N Naukri, 29 Network, 31 Nimbuzz, 30 Notification ringtone, 33
P Paste, 16 Phonebook, 21 Photo
Capture, 19 View, 24
Power, 11 Privacy, 36 Profiles, 33
R Record, 39 Reuters, 31 Ringtone, 33
S Screen calibrate, 38 SD card, 36 Search, 31 Security, 34 Settings, 31 Share photos and videos, 25

3
Silent mode, 14, 34 SIM card
Insert, 10 Lock, 15 Multi SIM settings, 31
SIM Manager, 38 SIM Toolkit, 38 SMS Directory, 38 SMS Search, 38 Social Gaming, 39 Sound Recorder, 39 Specifications, 81 Spice Gang, 39 Status icons, 9 Support, 80 Synchronization, 35
T Task Manager, 40 Text message, 27 Time, 14, 37 Touch screen
Calibrate, 38 Lock, 11 Use, 12
Troubleshoot, 77
U Unlock
Screen, 11, 14 SIM card, 15
V Vibrate, 33
Video player, 40 Voice, 41 Voice dialer, 41 Voice Input & Output, 37 Voice mail, 32 Volume, 14, 33
W Wallpaper, 14 Wapedia, 41 Wi-Fi, 32 Wireless network, 31
Y Yahoo Launch, 41 You Tube, 42


![SPICE Mie [mi:] Dmitry Chirkin, UW Madison. Updates to ppc and spice PPC: Randomized the simulation based on system time (with us resolution) Added the.](https://static.fdocuments.us/doc/165x107/56649cec5503460f949b834e/spice-mie-mi-dmitry-chirkin-uw-madison-updates-to-ppc-and-spice-ppc-randomized.jpg)