spectro-guide 45/0 gloss spectro-guide sphere gloss · instrument, standards for calibration and...
74
Additives & Instruments A member of Measure what you see. spectro-guide 45/0 gloss spectro-guide sphere gloss Manual
Transcript of spectro-guide 45/0 gloss spectro-guide sphere gloss · instrument, standards for calibration and...

Additives & InstrumentsA member of
Measure what you see.
spectro-guide 45/0 glossspectro-guide sphere gloss
Manual

1
Manual
Patent pending 250 020 858 E 1105
BYK-Gardner GmbHLausitzer Str. 8D-82538 GeretsriedGermanyTel. 0-800-gardner (0-800-4273637) +49-8171-3493-0Fax +49-8171-3493-140
BYK - Gardner USA9104 Guilford RoadColumbia, MD 21046USAPhone 800-343-7721 301-483-6500Fax 800-394-8215 301-483-6555
www.byk.com/instruments
spectro-guide 45/0 gloss
spectro-guide sphere gloss

2
Dear customer,thank you for having decided for a BYK-Gardner product. BYK-Gardner is committed to providing you with quality products and services. We offer complete system solutions to solve your problems in areas of gloss and physical properties. As the basis of our worldwide business, we strongly believe in total customer satisfaction. Therefore, in addition to our products, we offer many VALUE-ADDED services: · Technical Sales Force· Technical & Application Support· Application and Technical Seminars· Repair&CertificationService BYK-Gardner is part of Altana AG and a direct subsidiary of BYK-Chemie GmbH, a leading supplier of additives for coatings and plastics. Together, we offer complete and unique solutions for you, our customer.
Thankyouforyourtrustandconfidence.Ifthereisanything we can do better to serve your needs, do not hesitate to let us know.
Your BYK-Gardner Team

3
Table of content
1. Safety instructions ..................................................................................5
2. System description and Delivery notes ..............................................10
3. Power supply .........................................................................................12
4. Controls ..................................................................................................14
5. Getting started .......................................................................................175.1 Turning on and measuring .....................................................................175.2 Overview of main menu ..........................................................................18
6. Calibrate .................................................................................................20
7. Measuring procedure ............................................................................237.1 Measuring .................................................................................................237.2 Saving .......................................................................................................247.3 Opening ....................................................................................................26
8. Multiple readings ...................................................................................278.1 Storing the mean .....................................................................................298.2 Deleting the last reading .........................................................................308.3 Number of readings .................................................................................31
9. Display ....................................................................................................329.1 Sample mode ...........................................................................................329.2 Difference .................................................................................................339.3 Pass/Fail ...................................................................................................349.4 Metamerism..............................................................................................369.5 Illuminant ..................................................................................................37
10. Options ..................................................................................................3810.1 Color system ............................................................................................3810.2 Index .........................................................................................................3910.3 Gloss .........................................................................................................4210.4 Illuminant/observer .................................................................................43
Table of content

4
10.5 Calibration ................................................................................................4410.6 Setup .........................................................................................................45
10.6.1 Auto store .......................................................................................4510.6.2 Auto standard .................................................................................4610.6.3 Metamerism index limit ..................................................................4710.6.4 CMC ratio .......................................................................................4810.6.5 ∆E94 ratio .......................................................................................4910.6.6 Switch off time ................................................................................5010.6.7 Beeper ............................................................................................5110.6.8 Set time ..........................................................................................5210.6.9 Trigger adjustment .........................................................................5310.6.10 Language......................................................................................54
10.7 Configuration ...........................................................................................55
11. File..........................................................................................................5811.1 Open .........................................................................................................5811.2 Save ..........................................................................................................5911.3 Delete ........................................................................................................6011.4 Mean .........................................................................................................6111.5 Print ..........................................................................................................61
12. Interface.................................................................................................62
13. Standards ..............................................................................................63
14. Technical Data ......................................................................................65
15. Errors and Warning Messages ............................................................67
16. Instrument reset ...................................................................................68
17. Cleaning and Maintenance ..................................................................69
18.ServiceandCertification .....................................................................70
19. Copyright ...............................................................................................72
Table of content
5
1. Safety instructions• Beforeoperatingtheinstrumentthefirsttime,
please read the operating instructions and take particular notice of the safety instructions.
• Ifyouusetheunitandaccessoriesproperly,there are no hazards to fear.
• Thisproductisequippedwithsafetyfeatures.Nevertheless, read the safety warnings carefully and use the product only as described in these instructions to avoid accidental injury or damage.
• Noclaimsofproductliabilityorwarrantycanbe honored if the device is not operated in accordance with the operating instructions.
• Keeptheseinstructionsforfuturereference.
• Ifyoupassthisinstrumenttosomebodyelse,make sure to include these instructions.
Safety instructions

6
The following symbols and terms are used.
This symbol warns of the danger of injury.
This symbol warns of the danger of injury caused by electricity.
This sign points out additional information.
DANGERThe term DANGER warns of possible severe injuries and danger to life.
WARNINGThetermWARNINGwarnsofinjuriesandseverematerial damage.
CAUTIONThetermCAUTIONwarnsofslightinjuriesordamage.
Safety instructions

7
Safety instructions
DANGER injuries possible
• Defectsandextraordinaryloads Ifsafeoperationcannolongerbepresumed,
shut down the device and secure it against unintended operation.
The device must be presumed unsafe to operate:• ifvisibledamageisevident• iftheinstrumentisnolongerworking• ifithasbeenstoredforlongperiodsunder
adverse conditions• afterharshtreatmentduringshipping.
• Safetyadvicesforbatteries:Donotcrushor dismantle, do not heat or incinerate, do not immerse in any liquid. This may cause explosion or release harmful substances.
• Donotperformanyrepairsontheunityourself. The unit must be opened by trained professionals only. Please contact our customer service department in such cases.
• Themeasurementdevicemaybedisconnectedfrom any power source as follows:
a) by removing the batteries and/or b) by disconnecting the interface cable

8
Safety instructions
• Whenworkingwiththebatteries/rechargeablebatteries make certain there is no short circuit on the contacts. Metallic objects must not come in contact with the bare contacts.
WARNING severe material damage
• Themeasurementunitconsistsofsensitiveoptical and electronic precision parts. Prevent it from being dropped, bumped or shaken!
• Avoidexposuretocontinuoushumidityandcon densation. Avoid splashing with water, chemicals or other liquids.
• Pleaseuseonlyaccessoriesthatareavailablefor the unit.
• Onlydevicesthatmeettherequirementsforlow-voltage safety may be connected to the interface.
CAUTION material damage
• Donotallowanyforeignobjectstogetintothemeasurement opening.
• Donotexposetheunittodirectsunlightforextended periods of time. Do not store it in a hot or dusty environment. Use the instrument case for storage.

9
• Avoidprolongedhighrelativehumidityanddonot allow condensation water.
• Donotuseanyacetoneforcleaningtheunit! The unit housing is resistant to many solvents. For cleaning you should use a soft, moist cloth. Excessive dirt and dust can be removed with propanol.
• Incaseyouintendnottousetheinstrumentfora longer period of time, take out the batteries.
Additonal information on use:
• Youwillfindthetechnicaldataforallsystemcomponents on the respective manufacturer’s plates and in the section Technical Data
• Batteries and rechargeable batteries are special waste and must therefore not be disposed of with household trash. Make certain to observe the disposal instructions of the battery or rechargeable battery manufacturer.
Safety instructions
10
System description and Delivery notes
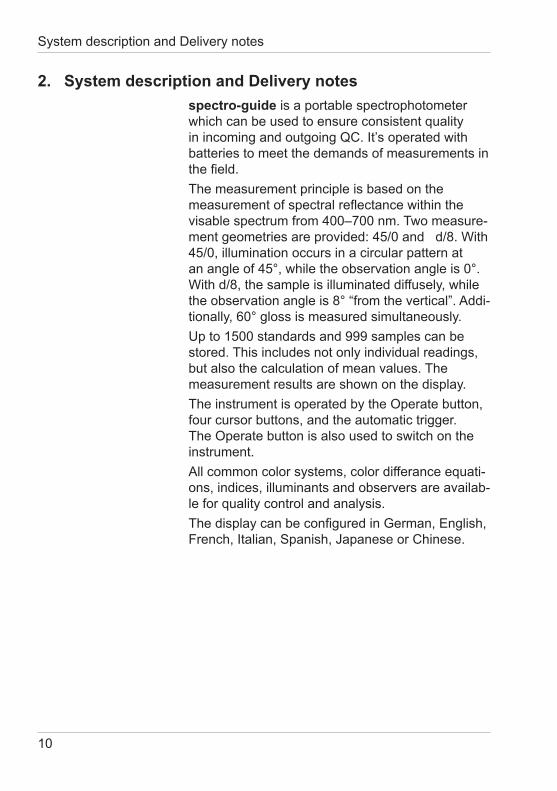
2. System description and Delivery notesspectro-guide is a portable spectro photometer which can be used to ensure consistent quality inincomingandoutgoingQC.It’soperatedwithbatteries to meet the demands of measurements in thefield.The measurement principle is based on the measurementofspectralreflectancewithinthevisable spectrum from 400–700 nm. Two measure-ment geometries are provided: 45/0 and d/8. With 45/0, illumination occurs in a circular pattern at an angle of 45°, while the observation angle is 0°. With d/8, the sample is illuminated diffusely, while the observation angle is 8° “from the vertical”. Addi-tionally, 60° gloss is measured simultaneously. Up to 1500 standards and 999 samples can be stored. This includes not only individual readings, but also the calculation of mean values. The measurement results are shown on the display. TheinstrumentisoperatedbytheOperatebutton,four cursor buttons, and the automatic trigger. TheOperatebuttonisalsousedtoswitchontheinstrument. All common color systems, color differance equati-ons, indices, illum inants and observers are availab-le for quality control and analysis.ThedisplaycanbeconfiguredinGerman,English,French,Italian,Spanish,JapaneseorChinese.

11
The instrument complies with the following standards.Color: DIN5033,5036,6174;ISO7724;ASTMD2244,E308, E1164.Gloss: DIN67530;ISO2813,ISO7668;JISZ8741;ASTM D 523, ASTM D 2457.
Instrument type:spectro-guide 45/0 gloss CC-6801 spectro-guide 45/0 gloss-S CC-6802spectro-guide sphere gloss CD-6834 spectro-guide sphere gloss-S CD-6836 Comes complete with:Measurement device, black calibration standard, whitecalibrationstandardwithcertificate,greenchecking reference, high gloss standard, sample area locator, software easy-link, interface cable, USB-adapter, batteries, hand strap, manual, carrying case, training.
Recommended accessories: BYKWARE auto-QC lite CS-6532 complete QC-Software for advanced color analysisUSB-Adapter AG-4401 for connection to USB-interface, incl. driver softwareChecking Standard 60° Gloss CC-6844Checking Standard 60° Gloss S CC-6846Protective stand CC-6818 to hold the instrument and store accessories
System description and Delivery notes

12
Power supply
3. Power supplyBeforeoperatingtheinstrumentforthefirsttime,please read the operating instructions and pay attention to the safety instructions in Chapter 1. Unpack the device and check to make certain all pieces have been included with delivery (for scope of delivery, see Section Delivery notes).
3.1 Power supply battery-operated
The battery must be placed in the measuring unit for operation service. The device runs on four AA 1.5-V alkaline or 1.2-V NiMH rechargeable battery. Use only alkaline batteries or NiMH rechargeables (AA /LR6)!Depending on the exact brand and the settings of the instrument, the capacity of each battery is sufficientforabout8000measurements.Whenthebattery voltage falls below the required minimum voltage in the course of operation, the following message appears on the display Battery empty! To ensure that the unit is always ready for operation, it is recommended to have spare batteries handy, especially when performing measurementsinthefield.

13
3.2 Changing the battery
To remove the battery compartment, hold the instrument in one hand and depress the battery compartmentreleasewithyourindexfinger.Atthesame time, pull the battery compart ment out of the instrument with your other hand, as indicated by the arrows in the accompanying illustration. Remove the used batteries.OnlyalkalinecellsofthetypeAA/LR6shouldbe used as new primary (i.e. non-rechargeable) batteries.Ifyoupreferrechargeablebatteries,youcan insert type AA NiMH batteries. The simplest method is to begin by inserting the two middle batteries 1 and 2, followed by the outer batteries 3 and4.(SeeFig.2)Ifthepolarityofthebatteriesismistakenly reversed, the reverse polarity protection built into the instrument will prevent damage.
Fig. 1 Remove battery holder
Fig. 2 Battery holder
Power supply

14
Controls
4. Controls
Measuring Instrument
1 Display
2 Battery Compartment
3 Measurement Aperture
4 Battery Compartment Release
5 InstrumentLabelwith Serial Number
6 OperateButton
7 Cursor Buttons
8 SerialInterface
Standard
9 Standard Box
10 Diaphragm
11 Standard
12 Black Standard
13 Sample Area Locator

15
The basic system consists of the measuring instrument, standards for calibration and testing, the sample area locator, and the instrument case.You should calibrate the instrument before starting to measure. The stan dards are provided for this pur pose. Be sure to always set the instrument on the standard in the same direction. Always keep the standards clean, or clean them before using them.When the measuring instrument is not in use, it is best to store it in the instrument case. The case is also the ideal place to store the accessories provided with the instrument.The simplest way to operate the instrument is to grasp it from the side on which the battery compartment is located. The thumb and last three fingersslideintothedepressionsonthesideoftheinstrument.Theindexfingerrestsonthetopoftheinstru ment, where it can operate the cursor buttons andtheOperatebutton(Fig.3).When measurements are performed with the automatic trigger, you can hold the instrument in anydesiredmanner.Inthiscase,youcanstartthe measuring operation merely by applying even pressure to the instrument from above (Fig. 4).
Fig.3 HandlingwithOperatebutton
Fig. 4 Handling with trigger
Controls

16
Controls
The instrument is operated by means of the Operatebuttonandthecursorbuttons.AftertheinstrumentisswitchedonwiththeOperatebutton,it is immediately ready to use with the preset parameters.The cursor buttons are used for making menu selections. You can use these buttons to move around in the main menu and open the desired sub menu. The current position within a menu is indicated by a reverse display. OptionsareselectedfromsubmenusbypressingtheOperatebuttonorthe
button. To select an option from the main menu, use the cursor buttons:
The last option selected from a sub menu is always displayed on a reverse background. This allows repetitive operations to be performed quickly.

17
Getting started
5. Getting started
5.1 Turning on and measuring
ThedeviceisswitchedonwiththeOperatebutton.The company logo, copyright notice and version number appear. The instrument then enters into the ready-to-measure state.The display indicates the difference measurement. This is the default setting for the basic version. The measurement data for the sample are shown on the left side of the display, while the differences to the last measured standard appear on the right side.Atthispoint,youcanusetheOperatebutton(the large button) to start the measurement of the sample. As an alternative, you can perform the measurement with the automatic trigger by pressing on the instrument as illustrated here.You can perform a quick standard measurement with the button.
First, the absolute values of the stan dard are displayed.Ifyouperformasamplemeasurementat this point, the measurement data for the sample will be shown on the left side. The right side of the display will show the differences between this sample data and the standard which has just been measured.
std

18
Getting started
5.2 Overview of main menu
File
Open Standard Sample
Save Standard Sample Sample–>Std.
Delete Last Smpl All Smpl OneStd All Std Memory
Mean On/Off Del last DefineN
Print Standard Sample Online
The framed menu options are not accessible in the basic version.
Display
Sample Mode
Difference Smp/Dif Std/Dif Smp/Std
Pass/Fail ∆E* all ∆‘s
Metamerism
Illuminant ⇑ ⇓

19
Getting started
Options Color sys CIELab CIELCH Spectrum XYZ Yxy Lab(h) FMC2 CIELCH94 DINLab99 DINLCH99 Rx Ry RzIndex ∆E* ∆E(h) ∆E CMC ∆E FMC2 ∆E 94 ∆E 99 ∆E 2000 WIBerger WE313-73 WE313/CIE Yl D1925 YIE313-73 YIE313-98 Opacity StrMax abs StrUndCur StrTrist GreyscaleGloss Gloss on Gloss offIllum/Obs A/2° A/10° C/2° C/10° D50/2° D50/10° D55/2° D55/10° D65/2° D65/10° D75/2° D75/10°
Optionen lllum/Obs F2/2° F2/10° F6/2° F6/10° F7/2° F7/10° F8/2° F8/10° F10/2° F10/10° F11/2° F11/10° U30/2° U30/10°Calibr. Chk Green CalibrateSetup AutoStore Auto Std MILimit CMC Ratio DE94 Ratio DIN99K-F ∆E 00 Ratio DispTime Beeper Set Time Trig adj Language Configure Basis Advanced Custom1 Custom2 Def Cust1 Def Cust2
The framed menu options are not accessible in the basic version.

20
Calibrate
6. CalibrateThree calibration standards are supplied with the measuring instrument. These include a black standard and a white standard for calibration of the instrument, as well as a green test standard. To perform the gloss calibration, the instrument is further equipped with a high-gloss standard. All standards are manufactured from highly stable materials. When performing calibration, it is especially important to ensure that:1. The standard is clean.2. The instrument lies completely within the diaphragm on the standard.3. You set the instrument on the standard as shown in the illustration.Openthelidofthestandard.Positionthemeasuring instrument so that the display points in the direction of the open lid and the front edge of the instrument is parallel to the edge of the lid. This ensures that you will always perform the calibration under the same conditions.The measurement results are very stable over time. With proper handling, it is possible to obtain calibration intervals of up to 3 months.Recalibration is necessary when the optical components become dirty.You can determine the need for recalibration of the instrument at any time by performing a measure-ment with the green test standard. The values for the test standard are stored in the measuring instrument. When you measure the green standard with the “chk green” option from the calib ration menu, you receive a message indicating whether recalibration is necessary. You should also carry out this test immediately after calibration, in order to determine whether it was performed correctly.
Fig. 5 Calibration

21
Calibrate
chk green
To determine whether recalibration of the instrument is necessary, perform a test measurement with the green standard. From the “Option”menu,usethe
button to place the cursor on the “Calibr.” option.
WhenyoupresstheOperatebutton,thesubmenuopens. The option “chk green” is preselected.
Take the green test standard and open the lid. Position the measuring instrument so that the display points in the direction of the open lid and the front edge of the instrument is parallel to the edgeofthelid.PresstheOperatebutton.Youwill then be instructed to measure the green test standard.
A message will then appear, indicating whether the calibrationisstillvalid.Ifthemessage Please calibrateappears, you need to perform the calibration with the black and white standards.
Clean the standards with a moist cloth. Never use window cleaner or any abrasive cleaning agents. For stubborn stains, saturate the cloth with propa-nol.

22
Calibrate
Use the
buttonstomovethecursortothe“Option”menu.From this menu, use the
button to place the cursor on the “Calibr.” option. PresstheOperatebutton.Whenthesubmenuopens, use the
button to move the cursor to the “Calibrate” option. NowpresstheOperatebutton,andcalibrationwillbegin.Theinstrumentwillfirstcallfortheblack standard. Place the instrument on the black standardandpresstheOperatebutton.A beep will indicate that the measure ment has been completed.
Now place the instrument on the white standard andpresstheOperatebutton.
For gloss calibration, place the instrument on the high-glossstandardandpresstheOperatebutton.Ifcalibrationwasperformedcorrectly,themessage Calibration OKwill appear on the display. The instrument returns to the previous measurement mode.Use the test with the green standard again to determine whether the calibration was performed correctly.
File Display Option
Measure Black Trap
Press Operate Button

23
Measuring procedure
7. Measuring procedure
7.1 MeasuringSwitch the instrument on. The display shows the difference measurement.Set the instrument on the sample to be measured. NowpresstheOperatebuttontostartmeasuring.The beep indicates that measurement has been completed. The display will now show the measured values for the new sample as well as the differences to the last measured standard. As analternativetotheOperatebutton,youcanusethe automatic trigger to perform the measurement. To do this, hold the instrument as shown in the accompanying illustration. Press on the instrument to start measuring. The trigger is provided for measuring inaccessible areas. The beep indicates that measurement is complete. You can now decide whether to store your reading as a standard or a sample. Use the
button in the difference mode to perform a quick standard measurement. The following message appears on the display: Measuring Standard

24
Measuring procedure
7.2 SavingTo store the last measurement, use the
button from the “File” menu to move the cursor to the “Save” option. The submenu opens when you presstheOperatebutton.Choose“Standard”andpresstheOperatebuttonagain.Theinputmenufor the standard name will now appear.You can select the appropriate letter at the position indicated by the arrow by using the
buttons. You can use the
button to move the arrow to the next letter.
Enter any desired sequence of up to seven alphanumeric characters. The last three positions are reserved for use as a combination of digits. They are automatically incremented each time the measurement is stored.Afterperformingthisinput,presstheOperatebutton.Ifthenamehasalreadybeenassigned,awarning is issued. You can overwrite the name or enteradifferentone.The“InputTolerances”menuwill now appear. Enter the appropriate values in the mannerdescribedabove,thenpresstheOperatebutton. The instrument will return to the previous measurement mode.
Samples are stored in the same way, except that no tolerances are entered.

25
Measuring procedure
Ifthe“AutoStore”functionintheOption-Setupmenu is activated, readings will be stored automatically.There are three different ways to store a reading:Ifyoustartedthemeasurementwiththe
button, you can store it as a new standard with the“Save/Standard” function.
IfyoustartedthemeasurementwiththeOperatebutton, you can store it as a new sample with the“Save/Sample” function.
You can also save the sample as a new standard by using the“Save/Sample–›Std. ” function.

26
7.3 OpeningFrom the “File” menu, use the
buttontomovethecursortothe“Open”option.
PresstheOperatebutton.Thesubmenuwillopen.Use the
buttons to move the cursor to “Sample.” Press the Operatebuttonagain.
The sample selection menu will appear.Use the
buttons to select the desired sample and press the Operatebutton.
The instrument returns to the previous measurement mode. The selected sample is displayed at lower left.Standards are opened in the same manner.
Measuring procedure

27
8. Multiple readingsMultiple readings should always be performed in cases of uneven or structured surfaces. The advantage of multiple readings is that the visual evaluation is supplemented by the calculation of a mean for the meas ured values.This function is activated from the “File” menu.Use the
button to move the cursor to “Mean” and press the Operatebutton.The submenu will open. Choose “on” and press the Operatebuttontoswitchonthecalculationofthemean.Inthedefaultsetting,themeaniscalculatedbased on three readings. The display shows the calculation of the new mean as it begins.Afterthefirstmeasurement,thedisplayshowsthe standard’s absolute values. The number of readings is displayed on the right side. After each following measurement the mean value is displayed.
Multiple readings
File Display Option
L* 92.45 L*a* 0.46 a*b* - 1.55 b*
ED65/10°
∆
∆
∆
∆
Standard N=01/03
*

28
Multiple readings
Inthedefaultsetting,thedifferencemodeisshown on the display. When multiple readings are performed, the mean value is shown on the left and the differences of the mean are shown on the right.Ifyouliketoseethecurrentvalue,youcanselectthe “Sample Mode” option from the “Display” menu. To do this, use the
buttons to place the cursor on the “Display” menu. Then use the
button to open the submenu. “Sample Mode” is preselected.PresstheOperatebutton.Thedisplaywillchangeto show the current value on the left side, while the right side displays the mean for the measurements taken so far.Inordertoturnoffthecalculationofthemean,usetheOperatebuttontoconfirmthe“Off”optiononthe“File/Mean/Off”menu.

29
Multiple readings
8.1 Storing the meanFrom the “File” menu, use the
button to move the cursor to the “Save” option. The submenuwillopenwhenyoupresstheOperatebutton. Use the
button to move the cursor to “Sample” and press theOperatebutton.Theinputmenuforthesamplename appears. You can select the appropriate letter at the position indicated by the arrow by using the
buttons. Use the
buttons to move the arrow to the next letter. Enter a name. After performing this input, press the Operatebutton.Themeanisstoredthen.
The instrument returns to the measuring mode with calculation of the mean. The name of the stored mean is displayed at lower left. The standard measurement can be stored accordingly using ”Save/Standard”.

30
8.2 Deleting the last readingIfyouhaveperformedaninvalidmeasurementandwould like to delete the last measured value, go to the “File” menu and use the
button to move the cursor to the “Mean” option. ThesubmenuopenswhenyoupresstheOperatebutton. Use the
button to move the cursor to “Del last” and press theOperatebutton.A prompt is asking whether you really want to deletethelastreading.Ifthisisnotthecase,simply use the buttonstoexitthemenu.Ifyouwanttodelete,presstheOperatebutton.The instrument then returns to the preset measuring mode. The counter for the number of readings is decremented by 1.
Multiple readings

31
8.3 Number of readingsFrom the “File” menu, use the
button to move the cursor to the “Mean” option.ThesubmenuopenswhenyoupresstheOperatebutton. Use the
buttontomovethecursorto“DefineN”andpresstheOperatebutton.Theinputmenuforthenumberof readings appears. The preset value is 3. You can use the
buttons to select the appropriate digit at the position indicated by the arrow. Use the
button to move the arrow to the next decimal position.ThenpresstheOperatebutton,andthenewnumber of readings is stored.The number of readings can only be altered in the advanced version.
Multiple readings

32
Display
9 Display
9.1 Sample ModeThe instrument is preset to the “Difference” mode. To change to the “Sample Mode” from the “Display” menu, use the
button to move the cursor to the “Sample Mode” option.PresstheOperatebuttonandthedisplaychangesto Sample Mode. The absolute values of the last reading are displayed in an enlarged format, in accordance with the chosen color system.The type of illuminant is dis played at lower right.
33
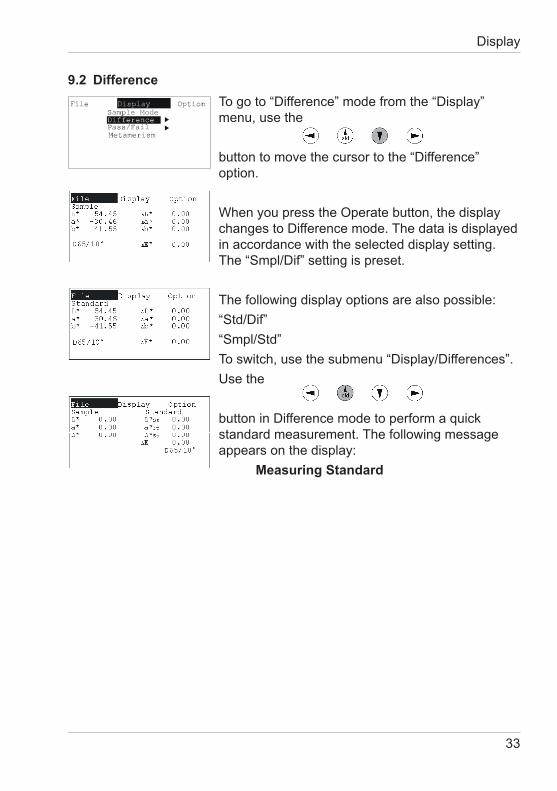
9.2 DifferenceTo go to “Difference” mode from the “Display” menu, use the
button to move the cursor to the “Difference” option.
WhenyoupresstheOperatebutton,thedisplaychanges to Difference mode. The data is displayed in accordance with the selected display setting. The “Smpl/Dif” setting is preset.
The following display options are also possible:“Std/Dif”“Smpl/Std”To switch, use the submenu “Display/Differences”.Use the
button in Difference mode to perform a quick standard measurement. The following message appears on the display: Measuring Standard
Display

34
Display
9.3 Pass/FailTo go to “Pass/Fail” mode from the “Display” menu, use the
button to move the cursor to the “Pass/Fail” option. You can either insert only ∆E* values or individual components as well.To make this selection use the
button to “∆E*” or “all ∆’s”.
Ifyouperformameasurementinthismode,you will receive a message indicating whether the reading is within (Pass) or outside (Fail) the tolerance.Additionally, a beep indicates when the result is “Fail.”
Ifthesettingofindividualcomponentsisselectedintheconfiguration(e.g.∆E*, ∆L*, ∆a*, ∆b* ), the expanded input screen appears. You can also enter a gloss range when gloss measurement is activated.Tostoretheinput,presstheOperatebutton.Tocancel the operation without storing the input, use the
buttontoexittheinputfield.
Tostarttakingreadings,presstheOperatebutton.The display shows the differences between these measurements and the selected standard, as well as a message indicating Pass or Fail.

35
The bottom line shows the names of the opened sample and standard.Ifyouliketochangethetolerancesforastandard,you must open this standard and then store it again under the same name. The input screen for the tolerances will then appear, and you can change the tolerances. Then store the standard withtheOperatebutton.
Display

36
Display
9.4 MetamerismIfthemetamerismindexissetunequaltozeroin“Setup,” the metamerism index will be calculated foreachmeasurement.Ifitislargerthanthevalue selected in “Setup,” it will be indicated by a reversed “M” in the bottom line of the display.
To display the metamerism index for the individual illuminants, use the
button to select the “Metamerism” option on the “Display” menu.
WhenyoupresstheOperatebutton,themetamerism index for the individual illuminants appears on the display.The display is determined by the selected illumination/observercombination.IfD65,A,orF2are selected, the display appears as shown in the accompanying illustration.IfilluminationtypeCisselected,D65isreplacedbyC.Ifanotherfluorescentilluminationtype(e.g.,F7 or F11) is selected, F2 is changed accordingly.Note: Ifthemetamerismindexisnotneeded,thelimitshouldbesetto0.00inthe“Options/Setup/MILimit” menu. This reduces processing time and, consequently, power consumption.

37
9.5 Illuminant ⇑ ⇓
With this option you can scroll through the selected illuminants. From the „Display“ menu, use the buttontomovethecursertothe„Illumin.⇑ ⇓“ option.WhenpressingtheOperatebutton,theinstrumentswitches to the next illuminant which is displayed in the lower left corner.Repeat this as many times as needed to display all selected illuminants. How to select illuminants please refer to Chapter 10.4.
Display

38
Options
10. Options
10.1 Color systemMove the cursor with the button from the “Options”menutothe“ColorSystem”menu.
AfterpressingtheOperatebutton,thesubmenuopens.Press the
keystobrowsethroughthemenuandconfirmthedesiredcolorsystembypressingtheOperatebutton.The instrument returns to the previous measuring mode and the chosen color system is shown on the display.
You can also use the keys
to exit the submenu without changing the color system.
Available color systems:
CIELab
CIELCH
Spectrum
XYZ
Yxy
Lab(h)
FMC2
CIELCH94
DINLab99
DINLCH99
Rx Ry Rz

39
10.2 IndexFromthe“Options”menu,usethe
buttontomovethecursortothe“Index”option.The submenu will open when you press the Operatebutton.Move through the menu with the
buttonsandconfirmtherequiredindexwiththeOperatebutton.The instrument returns to the previous measuring mode. The selected index appears on the display.Use the
buttons to exit the submenu without changing the index.
Available indices :
∆E*
∆E(h)
∆ECMC
∆EFMC2
∆E94
∆E99
∆E2000
WIBerger
WE313-73
WE313/CIE
YID1925
YE313-73
YE313-98
Opacity
StrMaxAbs
StrUndCur
StrTrist
Grey Scale
Options

40
Options
OpacityOpacitycanonlybeperformedinDifferencemode.To activate this function, move the cursor to the “Opacity”optionasdescribedforthe“Options/Index”menu.Theinstrumentthenreturnstothemeasuring mode. All values on the display are set to zero. To determine the opacity of a sample, use the
button to measure the sample over the black background.ThenusetheOperatebuttontomeasure the sample over the white background.After measuring with the “Std” button, the opacity is zero. The L*, a*, and b* values for the sample over the black background are displayed on the right side. After the measurement has been performed with theOperatebutton,theopacityandthedeltavalues between the measurements over the black and white backgrounds are displayed.Ifyouwouldliketostorethereadingwiththe“File/Save/Sample” function, only the reading against the white background is stored.

41
Color strengthColor strength can only be performed in Difference mode. To activate this function, move the cursor to the “Color Strength” option in the manner descri-bedforthe“Options/Index”menu.Theinstrumentwill then return to the measuring mode. All the values on the display are set to zero. To display the color strength, use the
button to measure the standard. Then use the Operatebuttontomeasurethesample.After measurement has been perfor med with the “Std” button, the color strength is zero, and the L*, C*, and h° values for the standard are displayed. After measurement has been perfor med with the Operatebutton,thecolorstrengthisdisplayed.The display also shows the differences between the standard and the sample after theoretical color strength adjustment has been applied. Ifyouchoosetostorethereadingwiththe“File/Save/Sample” function, only the sample will be stored. However, Sample, Difference and Color Strength can be transferred to a computer. Three different tests of color strength are provided:F520 StrMaxAbs (color strength at maximum absorption) The index following the F indicates the wave length with the maximum absorption. This is automatically displayed by the instrument.FXYZ StrTrist(tristimuluscolorstrength)Fcurve StrUndCur (color strength as inte- gral below the curve)
Options

42
Options
10.3 GlossFromthe“Options”menu,usethebutton
to move the cursor to the “Gloss” option. The submenu will open when you press the Operatebutton.Movethecursorto“Glosson”andconfirmyourchoicebypressingtheOperatebutton.The instrument will return to the measuring mode.Ifyouareinthe“Display/SampleMode”andtakeareadingwiththeOperatebutton,thedisplaywillshow the values of the sample.
You can now either save the measured value as Standard or as Sample. See Chapter 7.2. When entering the tolerances you will also be prompted to enter a gloss range.EntertherespectivevaluesandconfirmyourchoicebypressingtheOperatebutton.
Ifyouareinthe“Display/Differences”mode,thecolor and gloss values of the sample are displayed on the left side, and the differences to the standard are shown on the display’s right side.
The color and gloss tolerances are taken into accountinthePass/Failmode.Iftheglossvalueis outside the entered tolerance range, a message will be displayed in the form of ↑ (higher gloss) or ↓ (lower gloss).

43
10.4 Illuminant /observerHere you decide which illuminants are enabled on the display of the instrument. Chapter 9 provides an overview of all available illuminants.Fromthe„Option“menu,usethe buttontomovethecursortothe„Illum/Obs“option.ThesubmenuopenswhenyoupresstheOperatebutton.The illuminants which will appear on the display are indicated by check marks. You can toggle illuminants on or off by moving the cursor to the illuminantandpressingtheOperatebuttontomakethe check mark appear or disappear.The number of selected illuminants is unlimited.Use the buttonstoexitthesubmenu„Illum/Obs“.Theselection is automatically saved.How to change illuminants on the display please refer to Chapter 9.5.
Options

44
Options
10.5 CalibrationChk GreenFromthe“Options”menu,usethe
button to move the cursor to the “Calibr.” option.ThesubmenuopenswhenyoupresstheOperatebutton. The “chk green” option is preselected.
Take the green test standard and open the lid. Position the instrument so that the display points in the direction of the open lid and the front edge of the instrument is parallel to the edge of the lid. PresstheOperatebutton.
At this point, you will be prompted to measure the green test standard.
You will then see a message indicating whether the calibrationisstillvalid.Ifthemessage Please calibrate!appears, the calibration must be per formed with the black and white standards (see Chapter 6 – Calibrate).

45
10.6 Setup
10.6.1 Auto storeWhen the “AutoStore” function is activated, the sample or standard is automatically stored after each measurement. This function can be toggled onandoff.Itispossibletoassignaseven-digitname and a three-digit starting number. The number is automatically incremented by 1 on each storing operation. The starting number and name can be changed, even when AutoStore is activated.Fromthe“Option”menu,usethe
button to move the cursor to the “Setup” option. The submenu will open when you press the Operatebutton.“AutoStore”ispreselected.ConfirmwiththeOperatebutton. AutoStore On(or off) appears on the display. The sample name isassignedatthetimeofthefirstmeasurement.The last name entered always appears as a default.Itcanbechangedeachtimethedataisstored.To end the input operation without storing, use the
buttonstoexittheinputfield.
Options

46
Options
10.6.2 Auto standardWhen the “Auto Std” function is activ ated, the standard which corresponds most closely to the sample is automatically chosen from the set of stored standards, and the differences are displayed. This func tion can be toggled on and off.ItisonlyactiveintheDifferenceandPass/Failmodes.Fromthe“Options”menu,usethe
buttontomovethecursortothe“Setup”option.Inthe submenu, place the cursor on “Auto Std” and presstheOperatebutton.Thetoggledstatusisshown on the display, e.g.: Auto Std on!(or off). After a measurement has been performed in the Difference mode, the message “Auto Std” appears at lower left, in the next-to-last line. The name of the automatically selected standard appears at lower right, in the last line.The “Std” button is not active in this mode.

47
10.6.3 Metamerism index limitFromthe“Options”menu,usethe
button to move the cursor to the “Setup” option.ThesubmenuopenswhenyoupresstheOperatebutton.Movethecursortothe“MILimit”optionandpresstheOperatebutton.TheinputmenufortheMIlimitappears. Use the
buttons to change the underlined digit. Use the
button to move the underline to the next digit.EndtheinputoperationbypressingtheOperatebutton. The instrument returns to the measuring mode.To end the input without storing, use the
buttonstoexittheinputfield.The metamerism index is now calculated for eachdifferencemeasurement.Ifitisgreaterthanthe selected limit, a reverse “M” appears on the display. To switch off the calculation, the limit must be reset to 0.00.
Options

48
Options
10.6.4 CMC ratioFromthe“Options”menu,usethe
button to move the cursor to the “Setup” option.
ThesubmenuopenswhenyoupresstheOperatebutton.Move the cursor to the “CMC Ratio” option and presstheOperatebutton.TheinputmenufortheCMC Ratio appears. Use the
buttons to change the underlined digit. Use the
button to move the underline to the next digit.EndtheinputoperationbypressingtheOperatebutton. Having done this, you are prompted to enter the commercial factor (cf). After pressing the operate button, the instrument returns to the measuring mode.To end the input operation without storing the data, use the
buttonstoexittheinputfield.
Recommended setting:
L : C = 2.00 : 1
Recommended setting:
01.00

49
10.6.5 ∆E94 ratioFromthe“Options”menu,usethe
button to move the cursor to the “Setup” option.ThesubmenuopenswhenyoupresstheOperatebutton.Move the cursor to the “∆E94 Ratio” option and presstheOperatebutton.Theinputmenuforthe∆E94 ratio appears. Use the
buttons to change the underlined digit. Use the
button to move the underline to the next digit.EndtheinputoperationbypressingtheOperatebutton. The instrument returns to the measuring mode.To end the input operation without storing, use the
buttonstoexittheinputfield.ThesameprocedureisusedtochangetheDIN99and DE2000 ratio.
Default setting:
kL = 1.00
kC = 1.00
kH = 1.00
Options

50
Options
10.6.6 Switch off timeFromthe“Options”menu,usethe
button to move the cursor to the “Setup” option.ThesubmenuopenswhenyoupresstheOperatebutton.Move the cursor to the “Disp Time” option and presstheOperatebutton.Thesettingsmaskforthe switch off time appears. Use the
buttons to move the black bar.Note: As the switch off time increases, the instrument consumes more power.
51
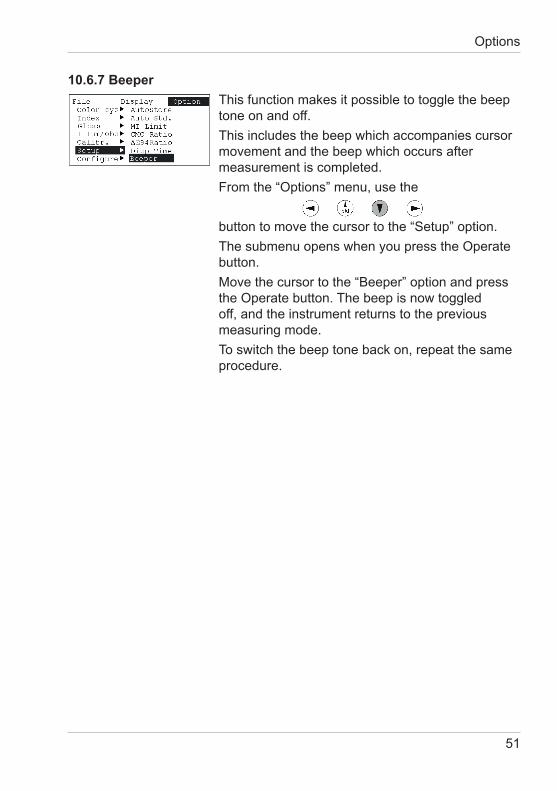
10.6.7 BeeperThis function makes it possible to toggle the beep tone on and off.This includes the beep which accompanies cursor movement and the beep which occurs after measurement is completed.Fromthe“Options”menu,usethe
button to move the cursor to the “Setup” option.ThesubmenuopenswhenyoupresstheOperatebutton.Move the cursor to the “Beeper” option and press theOperatebutton.Thebeepisnowtoggledoff, and the instrument returns to the previous measuring mode.To switch the beep tone back on, repeat the same procedure.
Options

52
Options
10.6.8 Set timeFromthe“Options”menu,usethe
button to move the cursor to the “Setup” option. The submenu appears when you press the Operatebutton.Movethecursorto“SetTime.”WhenyoupresstheOperatebutton,theinputscreen for the date and time appears. Use the
buttons to change the underlined digit. Use the
button to move the underline to the next digit.The selection of a language automat ic ally determinesthecountry-specificformattingofthetime and date display.PresstheOperatebuttontoendtheinput.Theinstrument returns to the measuring mode.

53
10.6.9 Trigger adjustmentThesensitivityoftheflexiblemeasuringconeisadjustable.Fromthe“Options”menu,usethe
button to move the cursor to the “Setup” option.
The submenu appears when you press the Operatebutton.Movethecursorto“Trigadj.”Themenu-driven instructions for adjusting the trigger appears.
When following the prompts, the menu for adjusting the sensitivity of the measuring cone appears. Use the
buttons to move the bar. When the bar is moved toward “Lighter,” the trigger will react to lower pressure. When the bar is moved all the way to the “off” position, the trigger is switched off.PresstheOperatebuttontoendtheinputoperation.Note: When not using the automatic trigger, it is strongly recommended to choose the “off” position to reduce power consumption.
Options

54
Options
10.6.10 LanguageFromthe“Options”menu,usethe
button to move the cursor to the “Setup” option.ThesubmenuopenswhenyoupresstheOperatebutton.Move the cursor to the “Language” option and presstheOperatebutton.Thelanguageselectionmenu appears. Use the
buttons to select a language. ConfirmyourselectionwiththeOperatebutton.The language selection autom atically determines the output format for the time and date.

55
10.7 ConfigurationHere you decide which functions are enabled for your instrument. The instrument is shipped in the advanced version. To change to the basic version movethecursorto“Basic”andpresstheOperatebutton. Chapter 5.2 provides an overview of the functions of the basic and advanced version. Itisalsopossibletodefinetwocustommenusandstorethem.Thedefinitionandselectionofthesemenus are secured against improper access by means of a key combination. Move the Cursor to the “DefMenu1” (or DefMenu2) and press the Operatebutton.The messageProtected Option!appears.Press the buttons
simultaneously for 5 seconds. The options which will appear on the instrument are indicated by check marks.
Options
56
Options
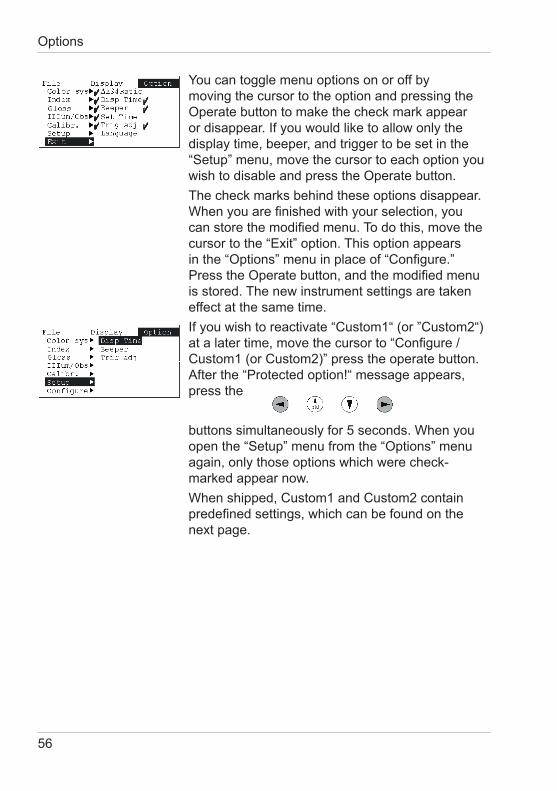
You can toggle menu options on or off by moving the cursor to the option and pressing the Operatebuttontomakethecheckmarkappearordisappear.Ifyouwouldliketoallowonlythedisplay time, beeper, and trigger to be set in the “Setup” menu, move the cursor to each option you wishtodisableandpresstheOperatebutton.The check marks behind these options disappear. Whenyouarefinishedwithyourselection,youcanstorethemodifiedmenu.Todothis,movethecursor to the “Exit” option. This option appears inthe“Options”menuinplaceof“Configure.”PresstheOperatebutton,andthemodifiedmenuis stored. The new instrument settings are taken effect at the same time.Ifyouwishtoreactivate“Custom1“(or”Custom2“)atalatertime,movethecursorto“Configure/Custom1 (or Custom2)” press the operate button. After the “Protected option!“ message appears, press the
buttons simultaneously for 5 seconds. When you openthe“Setup”menufromthe“Options”menuagain, only those options which were check-marked appear now.When shipped, Custom1 and Custom2 contain predefinedsettings,whichcanbefoundonthenext page.

57
Setting Custom1:
Setting Custom2:
Options

58
File
11. File
11.1 OpenFrom the “File” menu, use the
buttontomovethecursortothe“Open”optionandpresstheOperatebutton.Thesubmenuopens.
Select“Standard.”WhenyoupresstheOperatebutton, all stored standards appear. Use the
buttons to select the desired standard, then press theOperatebutton.The cursor is always positioned on the standard which was selected most recently.After the standard has been selected, the instrument returns to the previous measuring mode. The selected standard is displayed below the illuminant.The procedure for opening a sample is identical. Insteadof“Standard,”select“Sample”withthecursor.

59
11.2 SaveFrom the “File” menu, use the
button to move the cursor to the “Save” option. ThesubmenuopenswhenyoupresstheOperatebutton.Select“Standard”.PresstheOperatebutton again. The input menu for the standard name appears.You can use the
buttons to select the appropriate letter at the position of the arrow. Use the
button to move the arrow to the next letter.Whenyouarefinishedwiththeinput,presstheOperatebutton.Themenuforenteringthetolerances appears. Enter the appropriate values, thenpresstheOperatebutton.The procedure for storing samples is similar, except that no tolerances are entered.You can use the “File/Save/Sample–›Std” function to save a sample reading as a standard.
File
60
File
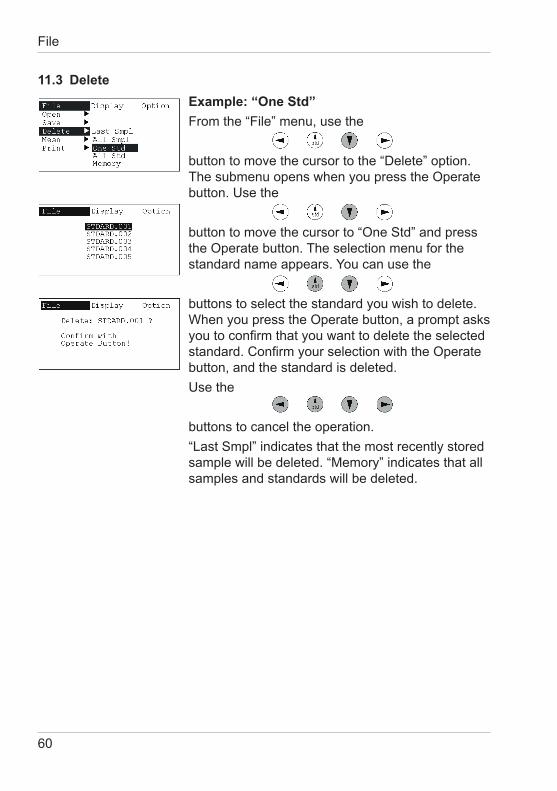
11.3 DeleteExample: “One Std”From the “File” menu, use the
button to move the cursor to the “Delete” option. ThesubmenuopenswhenyoupresstheOperatebutton. Use the
buttontomovethecursorto“OneStd”andpresstheOperatebutton.Theselectionmenuforthestandard name appears. You can use the
buttons to select the standard you wish to delete. WhenyoupresstheOperatebutton,apromptasksyoutoconfirmthatyouwanttodeletetheselectedstandard.ConfirmyourselectionwiththeOperatebutton, and the standard is deleted. Use the
buttons to cancel the operation. “Last Smpl” indicates that the most recently stored sample will be deleted. “Memory” indicates that all samples and standards will be deleted.

61
11.4 MeanThe “Mean” submenu, which can be selected from the File menu, contains the following options:On Del. Last DefineNThese options are described in detail in Chapter 8 “Multiple Readings”.
11.5 PrintYou can output data to a connected printer. The following choices are provided:
Standards:All stored standards are printed in the format: Name,Date,Time,Illuminant/Observer,AbsoluteMeasured Values, Tolerances.
Samples:All stored samples are printed in the format: Name,Date,Time,Illuminant/Observer,AbsoluteMeasured Values, Standard Name, Difference Values.
Online:The results are printed automatically after each reading.
Color system, index, and illumin ant/observer are determined by the instrument settings at the time of saving.Spectral data is printed when the spectral curve is selected (scale – spectrum).
File

62
Interface
12. InterfaceThe measuring instrument has a serial interface which makes it possible to communicate directly with a PC or Printer.Measurement data can be transfered from the instrument’s memory or directly after each reading to Windows™ applications.The easy-link program is included in the standard package for this purpose.Itcontainspredefinedworksheetsforqualitycontrol (lab plot, trend graphics etc.).InterfaceBaud Rate: 9 600-115 200Data Bits: 8Stop Bits: 1Parity: None

63
Standards
13. Standards
Color:
DIN5033 Colorimetry;basicconcepts.
DIN5036 Radiometricandphotometricpropertiesof materials;definitionscharacteristic.
DIN6174 Colorimetricevaluationofcolourdifferencesof surfacecoloursaccordingtotheCIELABformula.
ISO7724 Paintsandvarnishes-Colorimetry.
ASTM D 2244 Standard Test Method for Calculation of Color DifferencesFromInstrumentallyMeasuredColor Coordinates.
ASTM E 308 Standard Practice for Computing the Colors of ObjectsbyUsingtheCIESystem.
ASTME1164 StandardPracticeforObtainingSpectrophotometric DataforObject-ColorEvaluation.

64
Gloss:
DIN67530 ReflektometeralsHilfsmittelzurGlanzbeurteilung anebenenAnstrich-undKunststoffoberflächen (Reflectometerasameansforglossassessmentof plane surfaces of paint coatings and plastics)
ISO2813 Paintsandvarnishes-Determinationofspecular glossofnon-metallicpaintfilmsat20°,60°and85°
ISO7668 Anodizedaluminiumandaluminiumalloys- Measurementofspecularreflectanceandspecular gloss at angles of 20°, 45°, 60° or 85°.
ASTM D 523 Standard Test Method for Specular Gloss
ASTM D 2457 Standard Test Method for Specular Gloss of Plastic Films and Solid Plastics
Standards

65
Technical data
14. Technical data
ColorMeasurementgeometry 45circ./0ord/8perDIN,ASTM,ISOSpectral range 400-700 nmSpectral interval 10 nmPhotometric range 0-100 %, 0.01 resolutionRepeatability 0,01 DE*, 1 σ 10 consecutive measurements on white tileReproducibility 0,2 DE*, 1 σ Averageon12BCRAIItilesColorsystems CIELab,CIELCh,Lab(h),CIELab99,XYZ, Yxy, Rx RyRzColor differences ∆E*, ∆E(h), ∆EFMC2, ∆E94, ∆ECMC, ∆E99, ∆E2000 Component differencesIndices Yellowness: YIE313,YID1925 Whiteness: WIE313,CIE,Berger Grey Scale Color Strength: maximum absorption area under curve tristimulus Opacity Metamerism Illuminants C,D65,D50, D55, D75 Daylight A Incandescentlight F2 CWF F7 broad-bandfluorescent light F11 narrow-bandfluorescent light (TL 84) F6,F8,F10 fluorescentlightObserver 2°,10°Aperture 11 mm (0.43 in.)

66
Technical data
GlossGloss Range 0-100 GU*Repeatability 0,2 GU* (spectro-guide-S: 0,1 GU*)Reproducibility 1 GU* (spectro-guide-S: 0,5 GU*)Aperture 5 x 10 mm (0,2 x 0,4 in.)
GeneralMeasurement time 0.4 secondsMeasurement interval 1 secondMemory 1500 standards/999 samplesLanguage German,English,French,Italian,Spanish, Japanese,ChineseDisplay size 60 x 30 mm (2.4 x 1.2 in.) LCD, 128 x 64 PixelDisplay Absolute values, differences, Pass/Fail, MetamerismPower supply 4 AA batteries (Alkaline, NiCd or NiMH) approx. 8.000 readings per chargeInterface V24RS232Operatingtemperature 10-42°C(50-110°F)Humidity < 85 % relative humidity, non-condensing / 35°C (95°F)Dimensions L x W x H 18 x 9.5 x 8 cm (7 x 3.7 x 3.2 in.)Weight approx. 500 g (with batteries) (1.1 lbs)
*GU: Gloss units
Specificationssubjecttochangewithoutnotice.

67
Errors and warning messages
15. Errors and warning messagesStandard Memory full!The maximum number of standards (1500) is already stored. Delete standards which are no longer needed, or transfer to the PC.
Sample Memory full!The maximum number of samples (999) is already stored. Delete samples which are no longer needed, or transfer to the PC. Unstable measurement!The instrument detected unsteadiness during measurement. Repeat the measurement and keep the instrument stable.

68
Instrumentreset
16. Instrument resetTheInstrumentResetreturnstheinstrumenttothe factory settings, i.e., it activates the advanced version with the default settings.Standard memory and sample memory are not deleted.TodotheInstrumentReset,pressthe
buttons together until the message “Reset Instrument“appears.UsetheOperatebuttontoconfirmInstrumentReset. You can use any other button to cancel the operation.InstrumentResetcanbeactivatedfromanymenuby using the button combination described above.

69
17. Cleaning and maintenance
•Donotinsertanyobjectsintothemeasurementaperture for cleaning. The instrument could get damaged - affecting a proper and safe operation.
•Do not use any acetone! The instrument housing is resistant to a number of solvents, but cannot be guaranteed to withstand all chemicals. You should therefore use a soft, moist cloth for cleaning. For cleaning excessive dirt, use propanol.
Cleaning standards•Donotuseanyacetone!The accuracy of the measurement can be significantlyimpactedbyusingdirtyordamagedstandards. Since the surfaces of the standards are highly sensitive, cleaning must be undertaken with great care.To clean standards, use a new lint-free cloth, dust-free lens paper or an optical cloth.Apply only slight pressure as you clean and make certain there are no large particles stuck in the cloth that could damage the surface. Fordirtthatisdifficulttoremove,useanopticalcloth dipped in liquid. Then wipe the surface with a dry optical cloth.Exact calibration is not possible unless the standardisinperfectcondition.Iftheconditionof the standard seems doubtful because of its appearance or measurement errors, we will be happy to check it for you.
Cleaning and maintenance

70
18.ServiceandCertification
ServiceBesides the repair of your instrument we offer the following additional services:First diagnosis on the telephone or by e-mailCall us or send us an e-mail and we will try to solve yourproblem.Ifthisisnotsuccessful,pleasesendus the instrument for repair.Preventive maintenance, calibration, and recertificationFor precautionary reasons we recommend regular preventive maintenance. We carry out this preventive maintenance automatically when you send us your instrument for maintenance andrecertification.Wecleantheoptics,checkall functions, test and, if required, adjust the measured values by using reference standards. Youwillreceiveacertificate,whichincludestheretraceability to international standards.LoanersDuring the period of repair we furnish you with a loaner on request and availability.Maintenance agreementIncaseyouwanttomakesurethatthenecessarymaintenance is being done on a regular basis and on time, we recommend a maintenance agreement.Extended warranty contractsFurthermore, you can request an extended warranty contract for additional 12 months.Ordering information:SP-6801 Calibration service spectro-guide 45/0 SP-6802 Calibration service spectro-guide 45/0 S SP-6834 Calibration service spectro-guide sphere SP-6836 Calibration service spectro-guide sphere S SE-6800 Extended warranty spectro-guide
ServiceandCertification

71
ServiceandCertification
Service Centers for BYK-Gardner products
GermanyBYK-Gardner GmbH Lausitzer Strasse 8 82538 Geretsried GermanyPhone:+49-8171-3493-0 Fax: +49-8171-3493-166USABYK-Gardner USA 9104 Guilford Road Columbia, MD 21046 USAPhone:+1-301-483-6500 Fax: +1-301-483-6555ChinaBYK-GardnerShanghaiOffice3/F, Building 22 No. 140 Tian Lin Road Xuhui District Shanghai 200233 P.R. ChinaPhone.: +86(021)3367-6331 Fax: +86(021)3367-6332BrazilBYK-Gardner Latin America RuaItaporanga,340 Bairro Paraíso -Santo André-SP CEP 09190-640 BrazilPhone.: +55-11-2147-1199 Fax: +55-11-2147-1168

72
19. Copyright
This instruction manual is an important part of this instrument. It contains es-sential information about setting up, placing in service and use. If you pass the device on to another user, please ensure that the instruction manual is included with the instrument. The manual must be studied carefully before working with the equipment. Please contact your regional service office if you have any questions or require additional information about the device.
The technology and fittings are based on state-of-the art optic and electro-nic technology. New developments and innovations are constantly being integrated into the equipment. Thus, the diagrams, dimensions, and techni-cal data used in this manual may have changed as a result of adapting the device to new information and improvements.
© Copyright 2011 BYK-Gardner GmbHAll rights reserved
No portion of the software, documentation or other accompanying materials may be translated, modified, reproduced, copied or otherwise duplicated (with the exception of a backup copy), or distributed to a third party, without prior written authorization from BYK-Gardner GmbH. In any case, this re-quires the prior written consent of BYK-Gardner.
BYK-Gardner GmbH offers no guarantee that the software will function wit-hout error or that the functions incorporated therein can be executed in all applications and combinations selected by you.
No liability other than as provided by law is assumed for direct or indirect damage sustained in association with the use of the instrument, the softwa-re or documentation.
BYK-Gardner GmbH reserves the right to update the software and written documentation without prior notice.
Copyright

250 020 858 E 1105