Specman Elite Tutorial - Penn State College of...
94
Specman Elite TM Tutorial
Transcript of Specman Elite Tutorial - Penn State College of...

Specman Elite TM
Tutorial

of
anyrior
t aryay
en
to thet.
ay
th inse at
d
(c) 1999 by Verisity. All rights reserved.
Revision 1.1
Trademarks
Verisity is a registered trademark of Verisity. The Verisity logo, Specman, Specview,Specman Elite, Verification Advisor, Pure IP, and Invisible Specman are trademarks Verisity. All other trademarks are the exclusive property of their respective owners.
Confidentiality Notice
No part of this information product may be reproduced, transmitted, or translated in form or by any means, electronic, mechanical, manual, optical, or otherwise without pwritten permission from Verisity.
Information in this product is subject to change without notice and does not represencommitment on the part of Verisity. The information contained herein is the proprietaand confidential information of Verisity or its licensors, and is supplied subject to, and mbe used only by Verisity’s customers in accordance with, a written agreement betweVerisity and its customers. Except as may be explicitly set forth in such agreement,Verisity does not make, and expressly disclaims, any representations or warranties ascompleteness, accuracy, or usefulness of the information contained in this documenVerisity does not warrant that use of such information will not infringe any third partyrights, nor does Verisity assume any liability for damages or costs of any kind that mresult from use of such information.
RESTRICTED RIGHTS LEGEND
Use, duplication, or disclosure by the Government is subject to restrictions as set forsubparagraphs (c)(1)(ii) of the Rights in Technical Data and Computer Software clauDFARS 252.227-7013.
Destination Control Statement
All technical data contained in this product is subject to the export control laws of theUnited States of America. Disclosure to nationals of other countries contrary to UniteStates law is prohibited. It is the reader’s responsibility to determine the applicableregulations and to comply with them.
ii Specman Elite Tutorial
Table of Contents
. .1-1
. .1-3
.1-4
. .1-4
. .2-1
.2-1
. .2-2
. .2-3
. .2-3
2-5
. .3-1
.3-1
. .3-2
.3-8
. .4-1
.4-1
. .4-2
1 IntroductionOverview . . . . . . . . . . . . . . . . . . . . . . . . . . . . . . . . . . . . . . . . . . . . . . . . . . . . .
Tutorial Goals . . . . . . . . . . . . . . . . . . . . . . . . . . . . . . . . . . . . . . . . . . . . . . . . . .
Setting up the Tutorial Environment . . . . . . . . . . . . . . . . . . . . . . . . . . . . . . . . .
Document Conventions . . . . . . . . . . . . . . . . . . . . . . . . . . . . . . . . . . . . . . . . . .
2 Understanding the EnvironmentGoals for this Chapter . . . . . . . . . . . . . . . . . . . . . . . . . . . . . . . . . . . . . . . . . . .
What You Will Learn . . . . . . . . . . . . . . . . . . . . . . . . . . . . . . . . . . . . . . . . . . . . .
The Design Specifications . . . . . . . . . . . . . . . . . . . . . . . . . . . . . . . . . . . . . . . .
The Interface Specifications . . . . . . . . . . . . . . . . . . . . . . . . . . . . . . . . . . . . . . .
The Functional Test Plan . . . . . . . . . . . . . . . . . . . . . . . . . . . . . . . . . . . . . . . . .
Overview of the Verification Environment . . . . . . . . . . . . . . . . . . . . . . . . . . . . .
3 Creating the CPU Instruction StructureGoals for this Chapter . . . . . . . . . . . . . . . . . . . . . . . . . . . . . . . . . . . . . . . . . . .
What You Will Learn . . . . . . . . . . . . . . . . . . . . . . . . . . . . . . . . . . . . . . . . . . . . .
Capturing the Specifications . . . . . . . . . . . . . . . . . . . . . . . . . . . . . . . . . . . . . .
Creating the List of Instructions . . . . . . . . . . . . . . . . . . . . . . . . . . . . . . . . . . . . .
4 Generating the First TestGoals for this Chapter . . . . . . . . . . . . . . . . . . . . . . . . . . . . . . . . . . . . . . . . . . .
What You Will Learn . . . . . . . . . . . . . . . . . . . . . . . . . . . . . . . . . . . . . . . . . . . . .
Defining the Test Constraints . . . . . . . . . . . . . . . . . . . . . . . . . . . . . . . . . . . . . .
Specman Elite Tutorial iii
Table of Contents
.4-4
. .4-6
. .5-1
.5-1
. .5-2
. .5-6
. .6-1
.6-1
.6-2
. .6-3
. .6-5
. .7-1
.7-1
.7-2
. .7-4
. .7-5
. .8-1
.8-1
. .8-2
. .8-4
.8-8
.8-10
. .9-1
.9-1
Loading the Verification Environment . . . . . . . . . . . . . . . . . . . . . . . . . . . . . . .
Generating the Test . . . . . . . . . . . . . . . . . . . . . . . . . . . . . . . . . . . . . . . . . . . . .
5 Driving and Sampling the DUTGoals for this Chapter . . . . . . . . . . . . . . . . . . . . . . . . . . . . . . . . . . . . . . . . . . .
What You Will Learn . . . . . . . . . . . . . . . . . . . . . . . . . . . . . . . . . . . . . . . . . . . . .
Defining the Protocols . . . . . . . . . . . . . . . . . . . . . . . . . . . . . . . . . . . . . . . . . . .
Running the Simulation . . . . . . . . . . . . . . . . . . . . . . . . . . . . . . . . . . . . . . . . . .
6 Generating Constraint-Driven TestsGoals for this Chapter . . . . . . . . . . . . . . . . . . . . . . . . . . . . . . . . . . . . . . . . . . .
What You Will Learn . . . . . . . . . . . . . . . . . . . . . . . . . . . . . . . . . . . . . . . . . . . . .
Defining Weights for Random Tests . . . . . . . . . . . . . . . . . . . . . . . . . . . . . . . . .
Generating Tests With a User-Specified Seed . . . . . . . . . . . . . . . . . . . . . . . . .
Generating Tests With a Random Seed . . . . . . . . . . . . . . . . . . . . . . . . . . . . . .
7 Defining Coverage PointsGoals for this Chapter . . . . . . . . . . . . . . . . . . . . . . . . . . . . . . . . . . . . . . . . . . .
What You Will Learn . . . . . . . . . . . . . . . . . . . . . . . . . . . . . . . . . . . . . . . . . . . . .
Defining Coverage Points for the FSM . . . . . . . . . . . . . . . . . . . . . . . . . . . . . . .
Defining Coverage Points for the Generated Instructions . . . . . . . . . . . . . . . .
Defining Coverage Points for the Corner Case . . . . . . . . . . . . . . . . . . . . . . . .
8 Analyzing CoverageGoals for this Chapter . . . . . . . . . . . . . . . . . . . . . . . . . . . . . . . . . . . . . . . . . . .
What You Will Learn . . . . . . . . . . . . . . . . . . . . . . . . . . . . . . . . . . . . . . . . . . . . .
Running Tests with Coverage Groups Defined . . . . . . . . . . . . . . . . . . . . . . . .
Viewing State Machine Coverage . . . . . . . . . . . . . . . . . . . . . . . . . . . . . . . . . .
Viewing Instruction Stream Coverage . . . . . . . . . . . . . . . . . . . . . . . . . . . . . . . .
Viewing Corner Case Coverage . . . . . . . . . . . . . . . . . . . . . . . . . . . . . . . . . . . .
9 Writing a Corner Case TestGoals for this Chapter . . . . . . . . . . . . . . . . . . . . . . . . . . . . . . . . . . . . . . . . . . .
What You Will Learn . . . . . . . . . . . . . . . . . . . . . . . . . . . . . . . . . . . . . . . . . . . . .
iv Specman Elite Tutorial
Table of Contents
.9-2
.9-3
.10-1
10-1
.10-2
.10-4
.10-7
.11-1
11-1
11-2
.11-5
.11-6
.11-7
.11-8
. A-1
. A-3
A-4
. B-1
. B-3
. B-4
Increasing the Probability of Arithmetic Operations . . . . . . . . . . . . . . . . . . . . .
Linking JMPC Generation to the Carry Signal . . . . . . . . . . . . . . . . . . . . . . . . .
10 Creating Temporal and Data ChecksGoals for this Chapter . . . . . . . . . . . . . . . . . . . . . . . . . . . . . . . . . . . . . . . . . . .
What You Will Learn . . . . . . . . . . . . . . . . . . . . . . . . . . . . . . . . . . . . . . . . . . . . .
Creating the Temporal Checks . . . . . . . . . . . . . . . . . . . . . . . . . . . . . . . . . . . . .
Creating Data Checks . . . . . . . . . . . . . . . . . . . . . . . . . . . . . . . . . . . . . . . . . . . .
Running the Simulation . . . . . . . . . . . . . . . . . . . . . . . . . . . . . . . . . . . . . . . . . .
11 Analyzing and Bypassing BugsGoals for this Chapter . . . . . . . . . . . . . . . . . . . . . . . . . . . . . . . . . . . . . . . . . . .
What You Will Learn . . . . . . . . . . . . . . . . . . . . . . . . . . . . . . . . . . . . . . . . . . . . .
Displaying DUT Values . . . . . . . . . . . . . . . . . . . . . . . . . . . . . . . . . . . . . . . . . . .
Setting Breakpoints . . . . . . . . . . . . . . . . . . . . . . . . . . . . . . . . . . . . . . . . . . . . .
Stepping the Simulation . . . . . . . . . . . . . . . . . . . . . . . . . . . . . . . . . . . . . . . . . .
Bypassing the Bug . . . . . . . . . . . . . . . . . . . . . . . . . . . . . . . . . . . . . . . . . . . . . .
Tutorial Summary . . . . . . . . . . . . . . . . . . . . . . . . . . . . . . . . . . . . . . . . . . . . . .
A Setting up the Tutorial Environment
Downloading the Specman Elite Files . . . . . . . . . . . . . . . . . . . . . . . . . . . . . . .
Installing the Specman Elite Software . . . . . . . . . . . . . . . . . . . . . . . . . . . . . . .
Installing the Tutorial Files . . . . . . . . . . . . . . . . . . . . . . . . . . . . . . . . . . . . . . . .
B Design Specifications for the CPU
CPU Instructions . . . . . . . . . . . . . . . . . . . . . . . . . . . . . . . . . . . . . . . . . . . . . . .
CPU Interface . . . . . . . . . . . . . . . . . . . . . . . . . . . . . . . . . . . . . . . . . . . . . . . . . .
CPU Register List . . . . . . . . . . . . . . . . . . . . . . . . . . . . . . . . . . . . . . . . . . . . . . .
Specman Elite Tutorial v


erageRTL
y
n.
1 Introduction
OverviewThe Specman™ Elite™ verification system provides benefits that result in:
• Drastic reductions in the time and resources required for verification
• Significant improvements in product quality
The Specman Elite system automates verification processes, provides functional covanalysis, and raises the level of abstraction for functional coverage analysis from theto the architectural/specification level. This means that you can:
• Easily capture your design specifications to set up an accurate and appropriateverification environment
• Quickly and effectively create as many tests as you need
• Create self-checking modules that include protocols checking
• Accurately identify when your verification cycle is complete
The Specman Elite system provides three main enabling technologies that drasticallincrease your productivity:
• Constraint-driven test generation— you control automatic test generation bycapturing constraints from the interface specifications and the functional test plaCapturing the constraints is easy and straightforward.
Specman Elite Tutorial 1-1
Introduction Overview
t use a
that
te
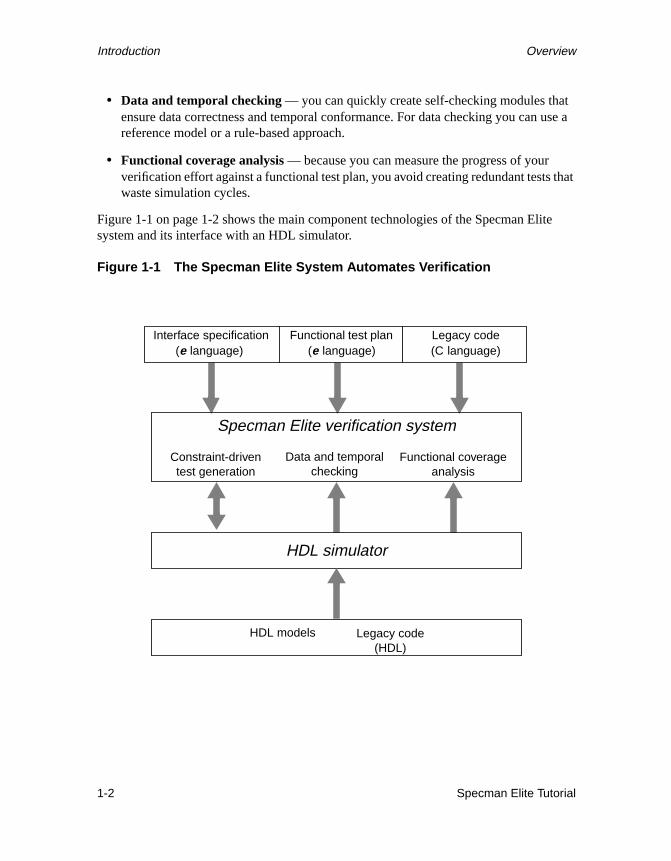
• Data and temporal checking— you can quickly create self-checking modules thaensure data correctness and temporal conformance. For data checking you canreference model or a rule-based approach.
• Functional coverage analysis— because you can measure the progress of yourverification effort against a functional test plan, you avoid creating redundant testswaste simulation cycles.
Figure 1-1 on page 1-2 shows the main component technologies of the Specman Elisystem and its interface with an HDL simulator.
Figure 1-1 The Specman Elite System Automates Verification
Specman Elite verification system
Constraint-driventest generation
Functional coverageanalysis
HDL simulator
HDL models Legacy code(HDL)
Data and temporalchecking
Legacy code(C language)
Interface specification(e language)
Functional test plan(e language)
1-2 Specman Elite Tutorial

Tutorial Goals Introduction
ment
Tutorial GoalsThe goal of this tutorial is to give you first-hand experience in how the Specman Elitesystem effectively addresses functional verification challenges.
As you work through the tutorial, you follow the process described in Figure 1-2 onpage 1-3. The tutorial uses the Specman Elite system to create a verification environfor a simple CPU design.
Figure 1-2 Tutorial Verification Task Flow
Define DUT interfaces
Drive and sample DUT
Generate constraint-driven tests
Define and analyze testcoverage
Create corner-casetests
Create temporal anddata checks
Generate a simple test
Analyze and bypassbugs
Design the verificationenvironment
Specman Elite Tutorial 1-3

Introduction Setting up the Tutorial Environment
eedorial
ps.
or
e
Setting up the Tutorial EnvironmentBefore starting the design verification task flow shown in Figure 1-2 on page 1-3, you nto set up the tutorial environment. You must perform three main steps to set up the tutenvironment:
1. Downloading the Specman Elite software and tutorial files
2. Installing the Specman Elite software
3. Installing the tutorial files
Appendix A, “Setting up the Tutorial Environment” describes how to perform these ste
Note Keep in mind that even if Specman Elite software is currently installed inyour environment, you still have to download and install the tutorial files.
Document ConventionsThe tutorial uses the document conventions described in Table 1-1 on page 1-4.
Table 1-1 Document Conventions
Visual Cue Meaning
courier Specman Elite or HDL code. For example,
keep opcode in [ADD, ADDI];
courier bold Text that you need to type exactly as it appears to complete a proceduremodify a file.
bold In text, bold indicates Specman Elite keywords. For example, in the phras“the verilog trace statement,”verilog and trace are keywords.
% In examples that show commands being entered, the% symbol indicates theUNIX prompt.
1-4 Specman Elite Tutorial

Elite
e
aserm.
iliar
2 Understanding theEnvironment
Goals for this ChapterThis tutorial uses a simple CPU design to illustrate the benefits of using the Specmansystem for functional verification. This chapter introduces the overall verificationenvironment for the tutorial CPU design, based on the design specifications, interfacspecifications, and the functional test plan.
What You Will LearnPart of the productivity gain provided by the Specman Elite system results from the ewith which you can capture the specifications and functional test plan in executable foIn this chapter, you become familiar with the design specifications, the interfacespecifications, and the functional test plan for the CPU design. You also become famwith the overall CPU verification environment.
The following sections provide brief descriptions of the:
• Design specifications
• Interface specifications
• Functional test plan
• Overall verification environment
Specman Elite Tutorial 2-1

Understanding the Environment The Design Specifications
U’s
ond
For more detailed information on the CPU instructions, the CPU interface, and the CPinternal registers, see Appendix B, “Design Specifications for the CPU”.
The Design SpecificationsThe device under test (DUT) is an 8-bit CPU with a reduced instruction set.
Figure 2-1 CPU Block-Level Diagram
The state machine diagram for the CPU is shown in Figure 2-2 on page 2-2. The secfetch cycle is only forimmediate instructions.
Figure 2-2 CPU State Machine Diagram
CPU
Fetch & ExecuteState Machine
ALU
r0
r1
r2
r3
pc
pcs
8
clock
rst
data
Start
Fetch1
Execute
opcode == {ADDI, SUBI, ANDI, XORI, JMP, JMPC, CALL}
Fetch2
2-2 Specman Elite Tutorial
The Interface Specifications Understanding the Environment
tate.
ur
is
spectses.
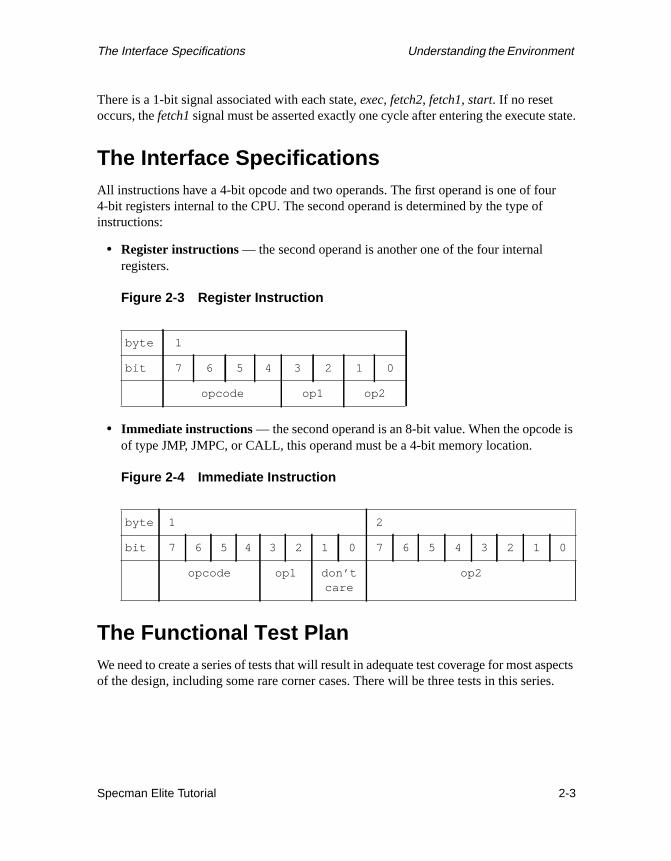
There is a 1-bit signal associated with each state,exec, fetch2, fetch1, start. If no resetoccurs, thefetch1signal must be asserted exactly one cycle after entering the execute s
The Interface SpecificationsAll instructions have a 4-bit opcode and two operands. The first operand is one of fo4-bit registers internal to the CPU. The second operand is determined by the type ofinstructions:
• Register instructions— the second operand is another one of the four internalregisters.
Figure 2-3 Register Instruction
• Immediate instructions — the second operand is an 8-bit value. When the opcodeof type JMP, JMPC, or CALL, this operand must be a 4-bit memory location.
Figure 2-4 Immediate Instruction
The Functional Test PlanWe need to create a series of tests that will result in adequate test coverage for most aof the design, including some rare corner cases. There will be three tests in this seri
byte 1
bit 7 6 5 4 3 2 1 0
opcode op1 op2
byte 1 2
bit 7 6 5 4 3 2 1 0 7 6 5 4 3 2 1 0
opcode op1 don’tcare
op2
Specman Elite Tutorial 2-3
Understanding the Environment The Functional Test Plan
ted
ogic
serted.ed
n.
hen
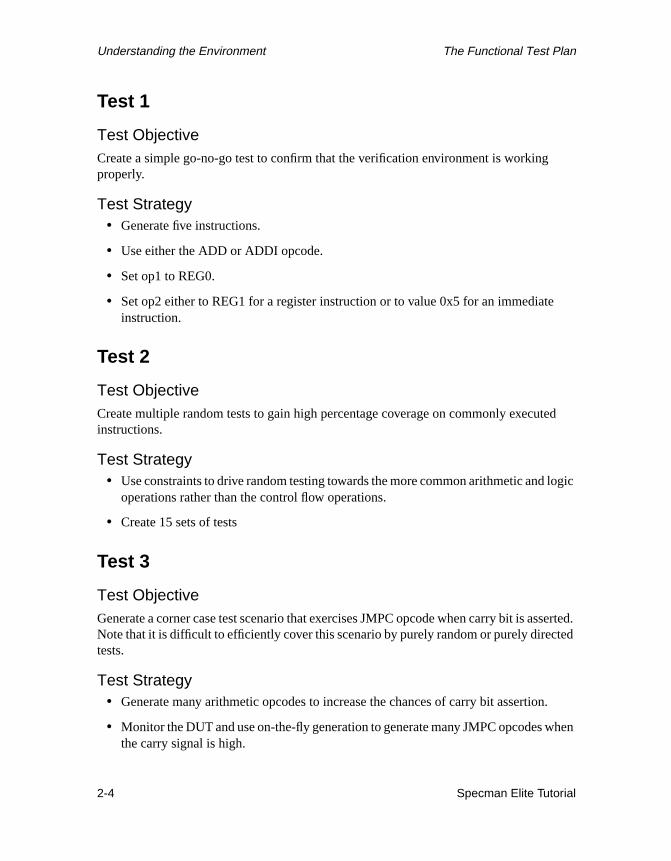
Test 1
Test ObjectiveCreate a simple go-no-go test to confirm that the verification environment is workingproperly.
Test Strategy• Generate five instructions.
• Use either the ADD or ADDI opcode.
• Set op1 to REG0.
• Set op2 either to REG1 for a register instruction or to value 0x5 for an immediateinstruction.
Test 2
Test ObjectiveCreate multiple random tests to gain high percentage coverage on commonly execuinstructions.
Test Strategy• Use constraints to drive random testing towards the more common arithmetic and l
operations rather than the control flow operations.
• Create 15 sets of tests
Test 3
Test ObjectiveGenerate a corner case test scenario that exercises JMPC opcode when carry bit is asNote that it is difficult to efficiently cover this scenario by purely random or purely directtests.
Test Strategy• Generate many arithmetic opcodes to increase the chances of carry bit assertio
• Monitor the DUT and use on-the-fly generation to generate many JMPC opcodes wthe carry signal is high.
2-4 Specman Elite Tutorial
Overview of the Verification Environment Understanding the Environment
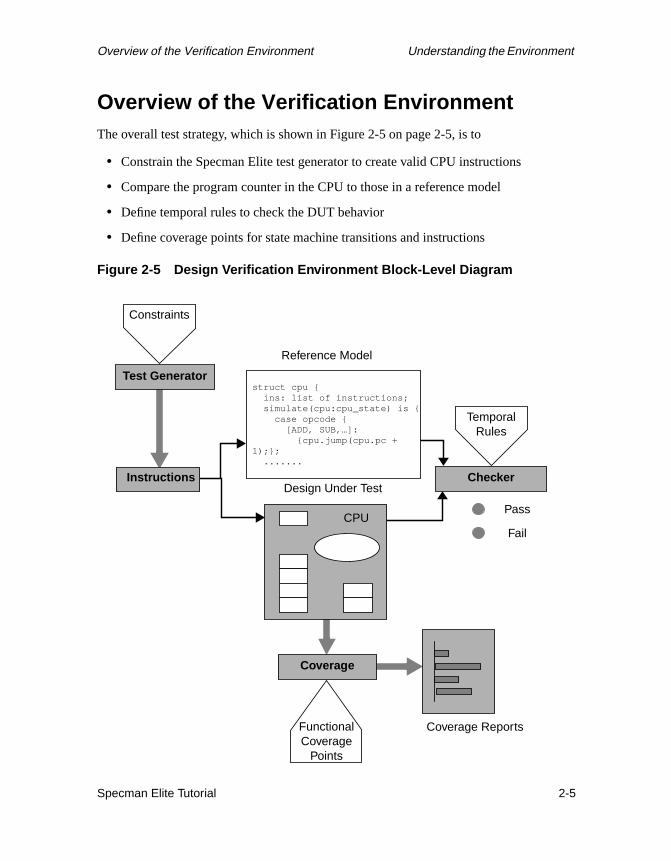
Overview of the Verification EnvironmentThe overall test strategy, which is shown in Figure 2-5 on page 2-5, is to
• Constrain the Specman Elite test generator to create valid CPU instructions
• Compare the program counter in the CPU to those in a reference model
• Define temporal rules to check the DUT behavior
• Define coverage points for state machine transitions and instructions
Figure 2-5 Design Verification Environment Block-Level Diagram
TemporalRules
CPU
struct cpu {ins: list of instructions;simulate(cpu:cpu_state) is {
case opcode {[ADD, SUB,…]:
{cpu.jump(cpu.pc +1);};
.......
Reference Model
Design Under Test
Coverage Reports
Test Generator
Instructions Checker
Coverage
FunctionalCoverage
Points
Pass
Fail
Constraints
Specman Elite Tutorial 2-5

Understanding the Environment Overview of the Verification Environment
HDL
Because the focus of this tutorial is the Specman Elite system, we do not include ansimulator. Rather than instantiating an HDL DUT, we model the DUT ineand simulate itin Specman Elite. The process you use to drive and sample the DUT ine is exactly thesame as a DUT in HDL.Now you are ready to create the first piece of the verification environment, the CPUinstruction stream.
2-6 Specman Elite Tutorial

isPU
raintsnd ofore
e
the
3 Creating the CPUInstruction Structure
Goals for this ChapterThe first task in the verification process is to set up the verification environment. In thchapter you start creating the environment by defining the inputs to the design, the Cinstructions.
What You Will LearnIn this chapter you learn how to create a data structure and define specification constthat enable the Specman Elite system to generate a legal instruction stream. By the ethis chapter, you will have created the core structure for the CPU instructions. This cstructure will be used and extended in subsequent chapters to create the tests.
As you work through this chapter, you gain experience with one of the Specman Elitsystem’s enabling features —easy specification capture. With just a few constructs fromthee language you can define legal CPU instructions exactly as they are described ininterface specifications.
Specman Elite Tutorial 3-1

Creating the CPU Instruction Structure Capturing the Specifications
testr can
n
m
This chapter introduces theeconstructs shown in Table 3-1 on page 3-2.
To create the CPU instruction structure, you need to
• Capture the interface specifications
• Create a list of instructions
The following sections describe how to perform these tasks.
Capturing the SpecificationsIn this step, you create the data structure for the instruction stream and constrain thegenerator to generate only legal CPU instructions. Individual tests that you create lateconstrain the generator even further to test some particular functionality of the CPU.
For a complete description of the legal CPU instructions, refer to Appendix B, “DesigSpecifications for the CPU”.
Table 3-1 Constructs Used in this Chapter
e Construct How the Construct is Used in this Chapter
<'…'> Delineates the beginning and end ofe code.
bits Defines the width of an enumerated type.
extend Adds the data structure for the CPU instructions to the Specman Elite systeof data structures.
keep Specifies rules or constraints for the instruction fields.
list of Creates an array or list without having to keep track of pointers or allocatememory.
struct Creates a data structure to hold the CPU instructions.
type Defines an enumerated data type for the CPU instructions.
when Implements conditional constraints on the possible values of the instructionfields.
3-2 Specman Elite Tutorial
Capturing the Specifications Creating the CPU Instruction Structure
Procedure
Follow this procedure to capture the design specifications ine:
1. Make a new working directory.
2. Copy thetutorial/src/CPU_instr.e file to the working directory.
3. Open theCPU_instr.e file in an editor.
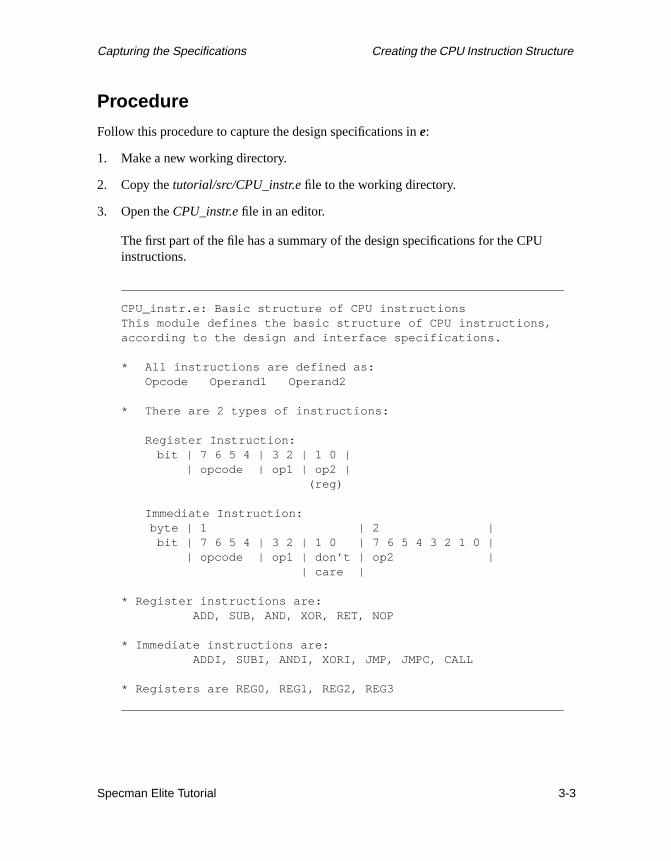
The first part of the file has a summary of the design specifications for the CPUinstructions.
CPU_instr.e: Basic structure of CPU instructionsThis module defines the basic structure of CPU instructions,according to the design and interface specifications.
* All instructions are defined as:Opcode Operand1 Operand2
* There are 2 types of instructions:
Register Instruction:bit | 7 6 5 4 | 3 2 | 1 0 |
| opcode | op1 | op2 |(reg)
Immediate Instruction:byte | 1 | 2 |
bit | 7 6 5 4 | 3 2 | 1 0 | 7 6 5 4 3 2 1 0 || opcode | op1 | don’t | op2 |
| care |
* Register instructions are:ADD, SUB, AND, XOR, RET, NOP
* Immediate instructions are:ADDI, SUBI, ANDI, XORI, JMP, JMPC, CALL
* Registers are REG0, REG1, REG2, REG3
Specman Elite Tutorial 3-3

Creating the CPU Instruction Structure Capturing the Specifications
4. Find the portion of the file that starts with the <' e code delineator and review theconstructs:
<'type cpu_opcode: [ // Opcodes
ADD, ADDI, SUB, SUBI,AND, ANDI, XOR, XORI,JMP, JMPC, CALL, RET,NOP
] (bits: 4);
type reg: [ // Register namesREG0, REG1, REG2, REG3
] (bits:2);
struct instr {
// defines 2nd op of reg instruction
// defines 2nd op of imm instruction
// defines legal opcodes for reg instr
// defines legal opcodes for imm instr
// ensures 4-bit addressing scheme
};
extend sys {// creates a stream of instructions
};'>
defines the legalopcodes as an
enumerated type
defines theinternal registers
when complete,this structure
defines a validCPU instruction
lines beginningwith // arecomments
when complete,this construct
adds the CPUinstruction set to
the Specman Elitesystem
3-4 Specman Elite Tutorial
Capturing the Specifications Creating the CPU Instruction Structure
st
the
e
ding
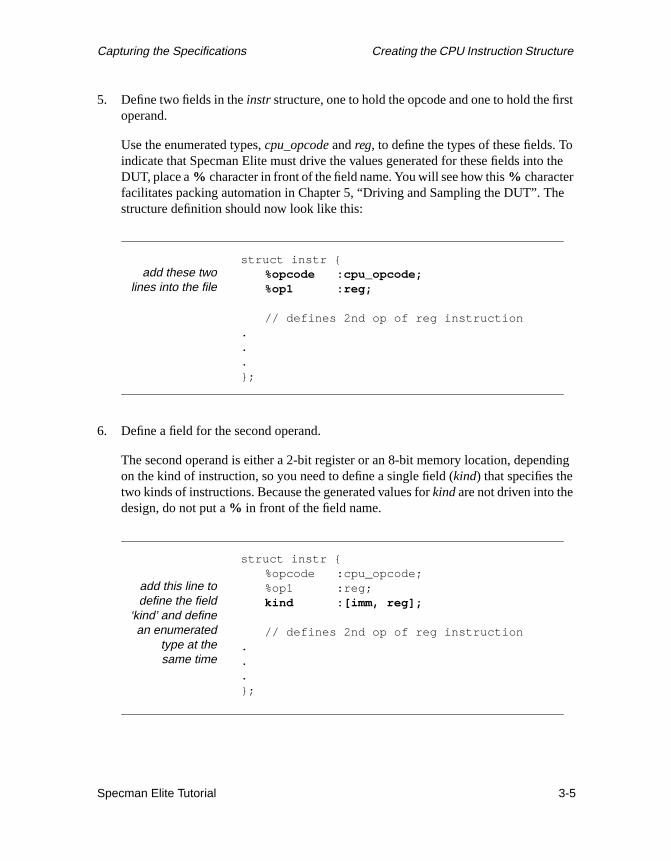
5. Define two fields in theinstr structure, one to hold the opcode and one to hold the firoperand.
Use the enumerated types,cpu_opcodeandreg, to define the types of these fields. Toindicate that Specman Elite must drive the values generated for these fields intoDUT, place a% character in front of the field name. You will see how this% characterfacilitates packing automation in Chapter 5, “Driving and Sampling the DUT”. Thstructure definition should now look like this:
6. Define a field for the second operand.
The second operand is either a 2-bit register or an 8-bit memory location, depenon the kind of instruction, so you need to define a single field (kind) that specifies thetwo kinds of instructions. Because the generated values forkindare not driven into thedesign, do not put a% in front of the field name.
struct instr {%opcode :cpu_opcode;%op1 :reg;
// defines 2nd op of reg instruction...};
add these twolines into the file
struct instr {%opcode :cpu_opcode;%op1 :reg;kind :[imm, reg];
// defines 2nd op of reg instruction...};
add this line todefine the field
‘kind’ and definean enumerated
type at thesame time
Specman Elite Tutorial 3-5

Creating the CPU Instruction Structure Capturing the Specifications
nder
7. Define the conditions under which the second operand is a register and those uwhich it is a byte of data.You can use thewhen construct to do this.
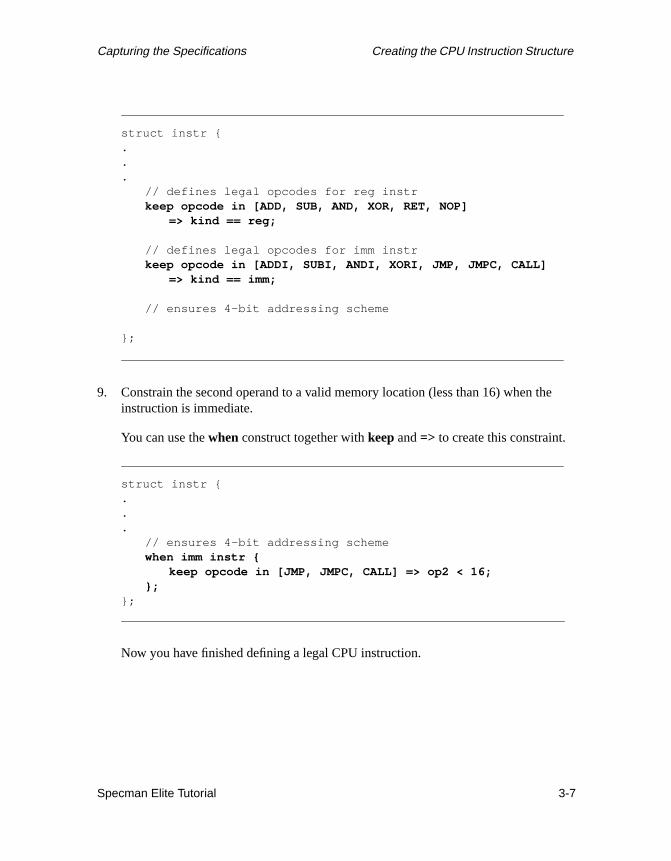
8. Constrain the opcodes for immediate instructions and register instructions to theproper values.
Whenever the opcode is one of the register opcodes, then thekind field must bereg.Whenever the opcode is one of the immediate opcodes, then thekind field must beimm. You can use thekeepconstruct with the implication operator=> to easily createthese complex constraints.
struct instr {%opcode :cpu_opcode;%op1 :reg;kind :[imm, reg];
// defines 2nd op of reg instructionwhen reg instr {
%op2 :reg;};
// defines 2nd op of imm instructionwhen imm instr {
%op2 :byte;};
.
.
.};
3-6 Specman Elite Tutorial
Capturing the Specifications Creating the CPU Instruction Structure
e
9. Constrain the second operand to a valid memory location (less than 16) when thinstruction is immediate.You can use thewhen construct together withkeep and=> to create this constraint.
Now you have finished defining a legal CPU instruction.
struct instr {...
// defines legal opcodes for reg instrkeep opcode in [ADD, SUB, AND, XOR, RET, NOP]
=> kind == reg;
// defines legal opcodes for imm instrkeep opcode in [ADDI, SUBI, ANDI, XORI, JMP, JMPC, CALL]
=> kind == imm;
// ensures 4-bit addressing scheme
};
struct instr {...
// ensures 4-bit addressing schemewhen imm instr {
keep opcode in [JMP, JMPC, CALL] => op2 < 16;};
};
Specman Elite Tutorial 3-7
Creating the CPU Instruction Structure Creating the List of Instructions
the
henringn.
to
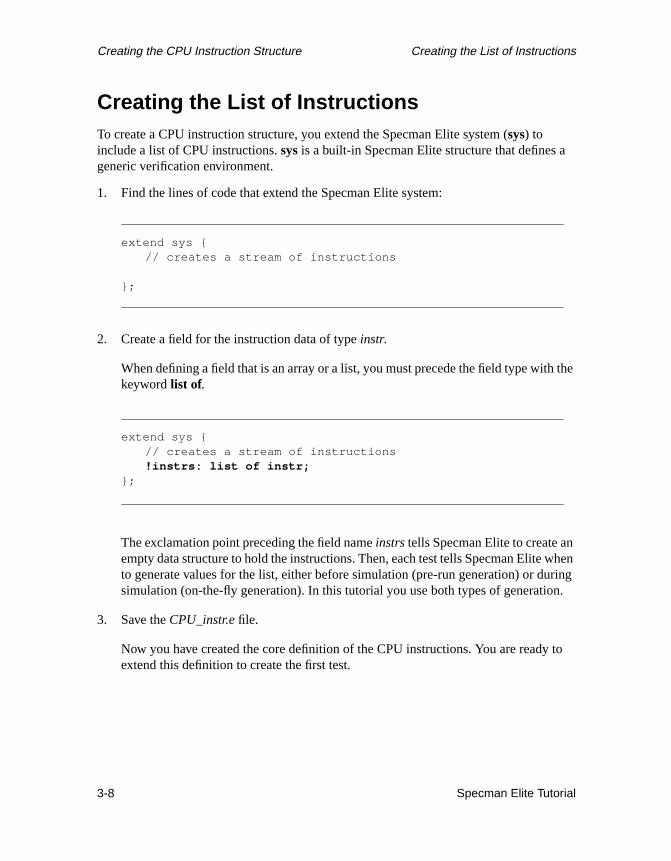
Creating the List of InstructionsTo create a CPU instruction structure, you extend the Specman Elite system (sys) toinclude a list of CPU instructions.sys is a built-in Specman Elite structure that defines ageneric verification environment.
1. Find the lines of code that extend the Specman Elite system:
2. Create a field for the instruction data of typeinstr.
When defining a field that is an array or a list, you must precede the field type withkeywordlist of.
The exclamation point preceding the field nameinstrstells Specman Elite to create anempty data structure to hold the instructions. Then, each test tells Specman Elite wto generate values for the list, either before simulation (pre-run generation) or dusimulation (on-the-fly generation). In this tutorial you use both types of generatio
3. Save theCPU_instr.e file.
Now you have created the core definition of the CPU instructions. You are readyextend this definition to create the first test.
extend sys {// creates a stream of instructions
};
extend sys {// creates a stream of instructions!instrs: list of instr;
};
3-8 Specman Elite Tutorial

hes for
st amanarn
in
n
4 Generating the First Test
Goals for this ChapterAs described in the functional test plan, the first test is a simple test to confirm that tverification environment is set up correctly and that you can generate valid instructionthe CPU model.
What You Will LearnIn this chapter, you learn how to create different types of tests easily by specifying teconstraints in Specman Elite. Test constraints target the Specman Elite generator tospecific test described in the functional test plan. This chapter illustrates how the SpecElite system can quickly generate an instruction stream. In the next chapter, you will lehow to drive this instruction stream to verify the DUT.
As you work through this chapter to create the first test, you gain experience with thefollowing enabling features of the Specman Elite system:
• Extensibility — the ability to add definitions, constraints, and methods to a structorder to change or extend its original behavior, without modifying the originaldefinition.
• Constraint solver — the core technology that intelligently resolves all specificatioconstraints and test constraints and then generates the desired test.
Specman Elite Tutorial 4-1

Generating the First Test Defining the Test Constraints
n
ns for
This chapter shows new uses of theeconstructs introduced in Chapter 3, “Creating theCPU Instruction Structure”. It also introduces the Specman Elite commands shown iTable 4-1 on page 4-2.
The steps required to generate the first test for the CPU model are:
1. Defining the test constraints.
2. Loading the verification environment into Specman Elite.
3. Generating the test.
The following sections describe how to perform these steps.
Defining the Test ConstraintsThe Functional Test Plan for the CPU design describes the objectives and specificatiothis first test.
Test Objectives
The objective is to confirm that the verification environment is working properly.
Table 4-1 Constructs and Commands Used in this Chapter
e Constructs How the Construct is Used in this Chapter
extend Adds constraints to thesys andinstr structs defined in Chapter 3,“Creating the CPU Instruction Structure”.
keep Limits the possible values of the instruction fields and the number ofinstructions generated for this test.
when Defines conditional constraints.
Specman Elite Commands
File->Load Loads uncompiledemodules into Specman Elite.
Objects->Modules Lists theemodules you have loaded into Specman Elite.
Test->Test Generates a test based on the constraints you specify.
4-2 Specman Elite Tutorial
Defining the Test Constraints Generating the First Test
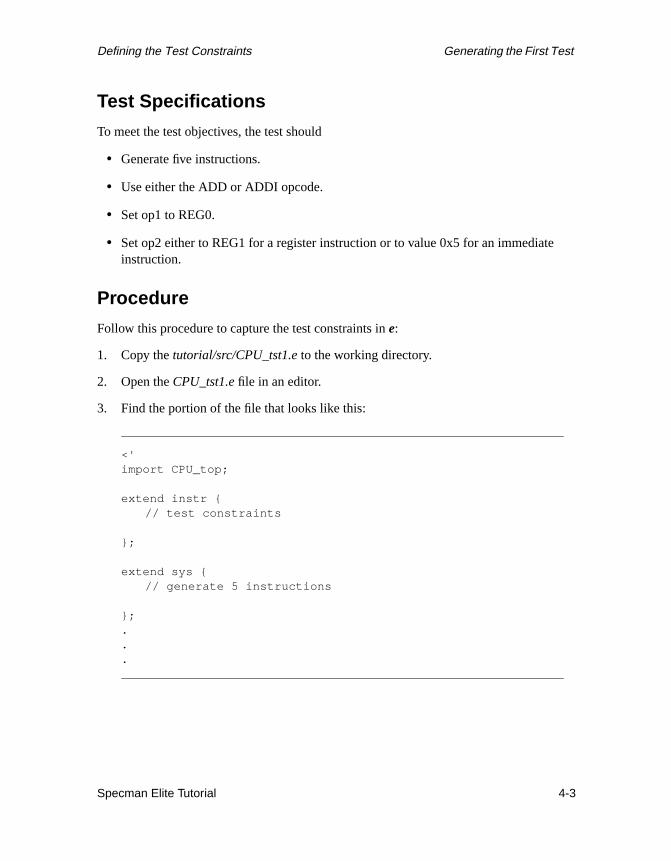
Test Specifications
To meet the test objectives, the test should
• Generate five instructions.
• Use either the ADD or ADDI opcode.
• Set op1 to REG0.
• Set op2 either to REG1 for a register instruction or to value 0x5 for an immediateinstruction.
Procedure
Follow this procedure to capture the test constraints ine:
1. Copy thetutorial/src/CPU_tst1.e to the working directory.
2. Open theCPU_tst1.e file in an editor.
3. Find the portion of the file that looks like this:
<'import CPU_top;
extend instr {// test constraints
};
extend sys {// generate 5 instructions
};...
Specman Elite Tutorial 4-3
Generating the First Test Loading the Verification Environment
of
e the
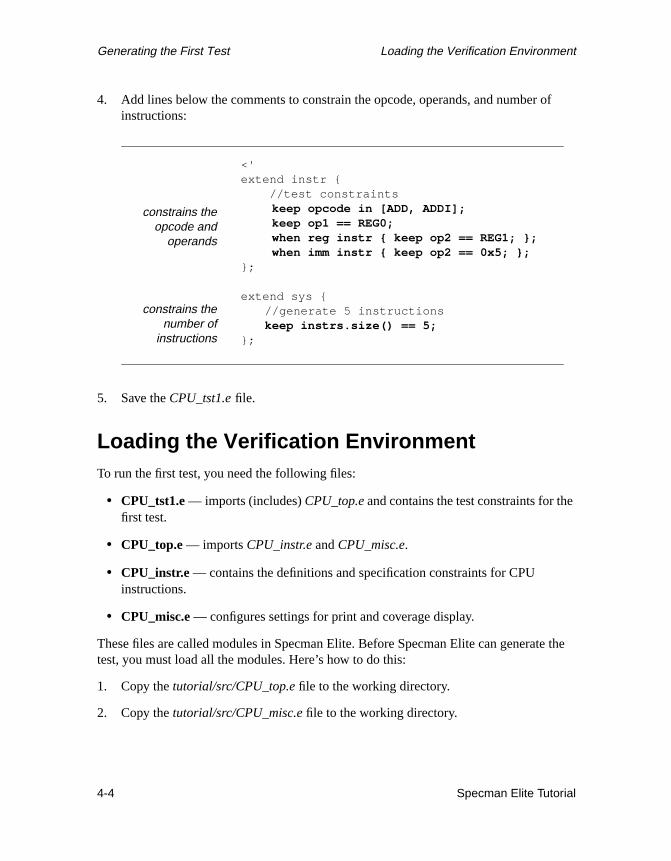
4. Add lines below the comments to constrain the opcode, operands, and number instructions:
5. Save theCPU_tst1.efile.
Loading the Verification EnvironmentTo run the first test, you need the following files:
• CPU_tst1.e— imports (includes)CPU_top.eand contains the test constraints for thefirst test.
• CPU_top.e— importsCPU_instr.e andCPU_misc.e.
• CPU_instr.e— contains the definitions and specification constraints for CPUinstructions.
• CPU_misc.e— configures settings for print and coverage display.
These files are called modules in Specman Elite. Before Specman Elite can generattest, you must load all the modules. Here’s how to do this:
1. Copy thetutorial/src/CPU_top.e file to the working directory.
2. Copy thetutorial/src/CPU_misc.e file to the working directory.
constrains theopcode and
operands
constrains thenumber of
instructions
<'extend instr {
//test constraints keep opcode in [ADD, ADDI]; keep op1 == REG0; when reg instr { keep op2 == REG1; }; when imm instr { keep op2 == 0x5; };
};
extend sys {//generate 5 instructionskeep instrs.size() == 5;
};
4-4 Specman Elite Tutorial
Loading the Verification Environment Generating the First Test
o
the
otog
ed
The working directory should now contain four files,CPU_instr.e, CPU_misc.e,CPU_top.e, andCPU_tst1.e
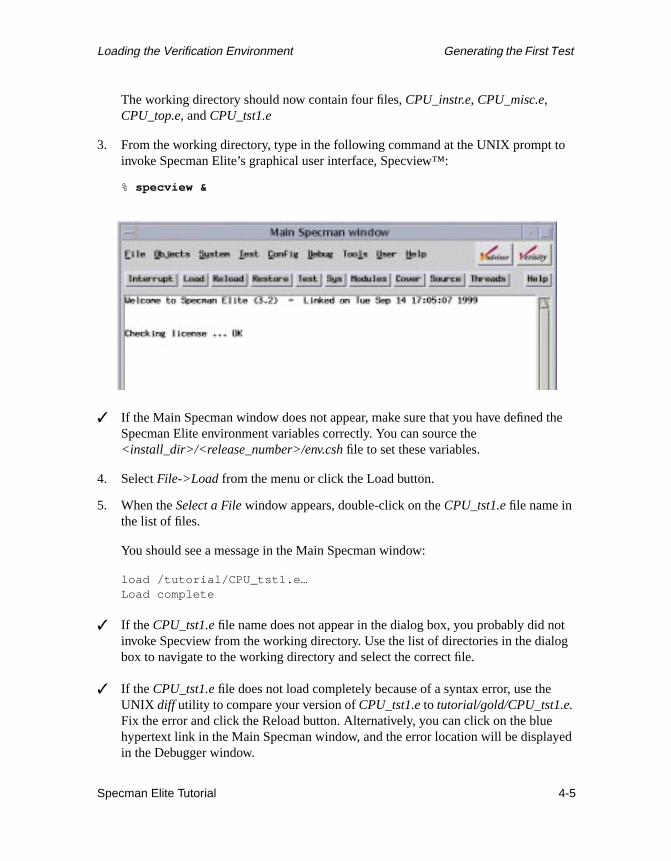
3. From the working directory, type in the following command at the UNIX prompt tinvoke Specman Elite’s graphical user interface, Specview™:
% specview &
✓ If the Main Specman window does not appear, make sure that you have definedSpecman Elite environment variables correctly. You can source the<install_dir>/<release_number>/env.csh file to set these variables.
4. SelectFile->Load from the menu or click the Load button.
5. When theSelect a File window appears, double-click on theCPU_tst1.e file name inthe list of files.
You should see a message in the Main Specman window:
load /tutorial/CPU_tst1.e…Load complete
✓ If the CPU_tst1.e file name does not appear in the dialog box, you probably did ninvoke Specview from the working directory. Use the list of directories in the dialbox to navigate to the working directory and select the correct file.
✓ If the CPU_tst1.e file does not load completely because of a syntax error, use theUNIX diff utility to compare your version ofCPU_tst1.eto tutorial/gold/CPU_tst1.e.Fix the error and click the Reload button. Alternatively, you can click on the bluehypertext link in the Main Specman window, and the error location will be displayin the Debugger window.
Specman Elite Tutorial 4-5
Generating the First Test Generating the Test
.
the
for
am.
6. To see a list of loaded modules, selectObjects->Modulesor click the Modules button.
There should be four modules loaded:
CPU_instrCPU_miscCPU_topCPU_tst1
Generating the TestHere’s how to generate the test:
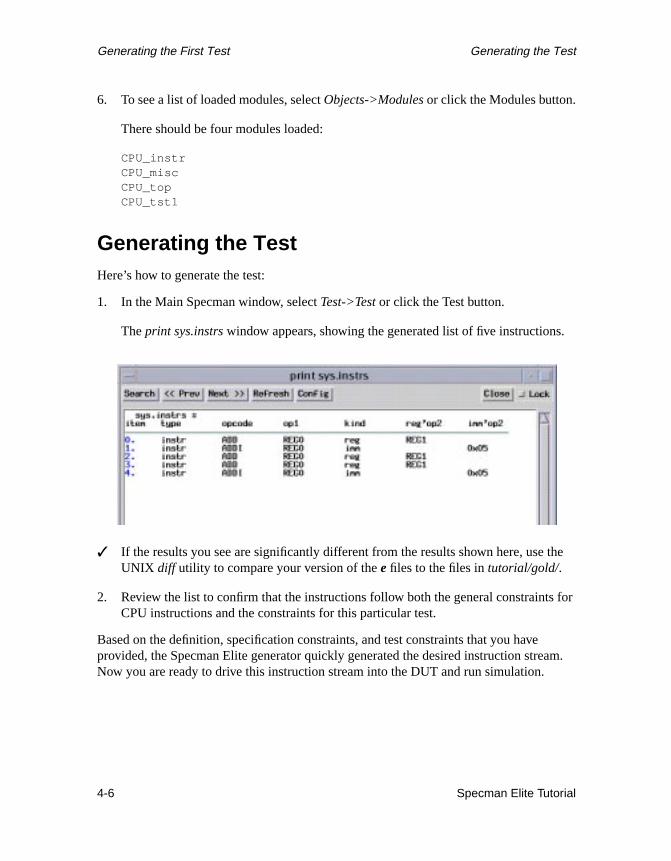
1. In the Main Specman window, selectTest->Test or click the Test button.
Theprint sys.instrs window appears, showing the generated list of five instructions
✓ If the results you see are significantly different from the results shown here, use UNIX diff utility to compare your version of thee files to the files intutorial/gold/.
2. Review the list to confirm that the instructions follow both the general constraintsCPU instructions and the constraints for this particular test.
Based on the definition, specification constraints, and test constraints that you haveprovided, the Specman Elite generator quickly generated the desired instruction streNow you are ready to drive this instruction stream into the DUT and run simulation.
4-6 Specman Elite Tutorial

ted
toer
ed
man
her
n
5 Driving and Samplingthe DUT
Goals for this ChapterThe objective of this chapter is to drive the DUT with the instruction stream you generain the last chapter.
In a typical verification environment, where the DUT is modeled in an HDL, you needlink the Specman Elite system with an HDL simulator before running simulation. In ordto streamline this tutorial, however, we have modeled the DUT ine.
What You Will LearnIn this chapter, you learn how to describe ine the protocols used to drive test data into thDUT. Although this tutorial does not use an HDL simulator, the process of driving ansampling a DUT written in HDL is the same as the process for a DUT written ine.
As you work through this chapter, you gain experience with these features of the SpecElite verification system:
• DUT signal access— you can easily access signals and variables in the DUT, eitfor driving and sampling test data or for synchronizing TCMs.
• Simulator interface automation — you can drive and sample a DUT without havingto write PLI (Verilog simulators) or FLI/CLI (VHDL simulators) code. The SpecmaElite system automatically creates the necessary PLI/FLI calls for you.
Specman Elite Tutorial 5-1
Driving and Sampling the DUT Defining the Protocols
rive
t
ze
tesr
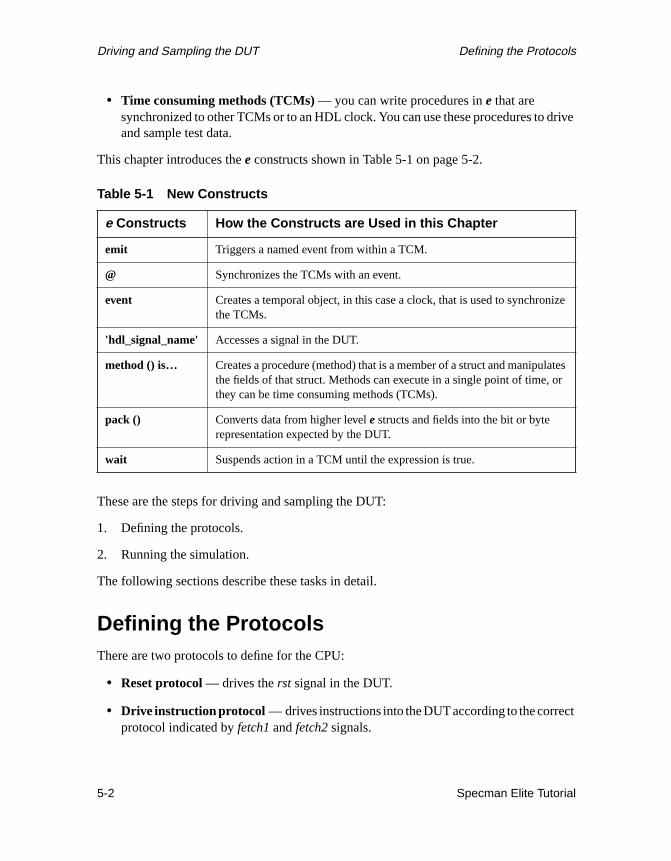
• Time consuming methods (TCMs)— you can write procedures ine that aresynchronized to other TCMs or to an HDL clock. You can use these procedures to dand sample test data.
This chapter introduces theeconstructs shown in Table 5-1 on page 5-2.
These are the steps for driving and sampling the DUT:
1. Defining the protocols.
2. Running the simulation.
The following sections describe these tasks in detail.
Defining the ProtocolsThere are two protocols to define for the CPU:
• Reset protocol— drives therst signal in the DUT.
• Drive instructionprotocol — drives instructions into theDUTaccording to thecorrecprotocol indicated byfetch1 andfetch2 signals.
Table 5-1 New Constructs
e Constructs How the Constructs are Used in this Chapter
emit Triggers a named event from within a TCM.
@ Synchronizes the TCMs with an event.
event Creates a temporal object, in this case a clock, that is used to synchronithe TCMs.
'hdl_signal_name' Accesses a signal in the DUT.
method () is… Creates a procedure (method) that is a member of a struct and manipulathe fields of that struct. Methods can execute in a single point of time, othey can be time consuming methods (TCMs).
pack () Converts data from higher levele structs and fields into the bit or byterepresentation expected by the DUT.
wait Suspends action in a TCM until the expression is true.
5-2 Specman Elite Tutorial

Defining the Protocols Driving and Sampling the DUT
Theuent
. A
Drive instructions protocol has one TCM forpre-run generation, where the complete listof instructions is generated and then simulation starts. There is another TCM foron-the-flygeneration, where signals in the DUT are sampled before the instruction is generated.test in this chapter uses the simple methodology of pre-run generation, while subseqtests in this tutorial use the significantly more powerful on-the-fly generation.
All the TCMs required to drive the CPU are described briefly in Table 5-2 on page 5-3complete description of one of the TCMs follows the table. You can also view theCPU_drive.e file in thetutorial/src directory, if you would like to see the completedescription of the other TCMs ine.
Table 5-2 TCMs Required to Drive the CPU
Name Function
drive_cpu() Callsreset_cpu () and then, depending on whether the list of CPUinstructions is empty or not, callsgen_and_drive_instrs () ordrive_pregen_instrs ().
reset_cpu() Drives therst signal in the DUT to low for one cycle, to high for fivecycles, and then to low.
gen_and_drive_instrs() Generates the next instruction and callsdrive_one_instr ().
drive_pregen_instrs() Callsdrive_one_instr () for each generated instruction.
drive_one_instr() Sends the instruction to the DUT and, if the instruction is animmediate instruction, waits for thefetch2signal to rise and sends thesecond byte of data. Then this TCM waits for theexec signal to rise.
Specman Elite Tutorial 5-3
Driving and Sampling the DUT Defining the Protocols
he
an
s.
ing.
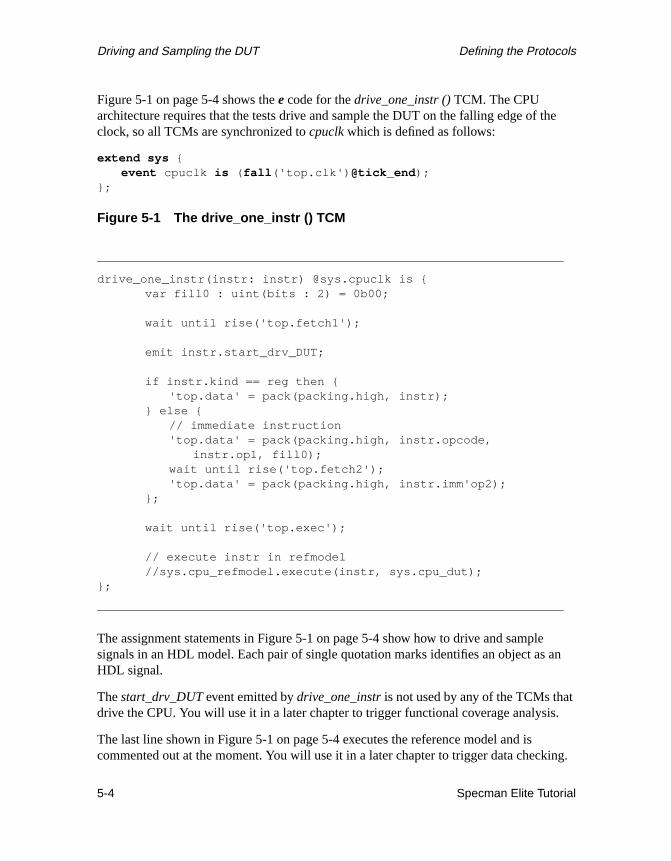
Figure 5-1 on page 5-4 shows thee code for thedrive_one_instr () TCM. The CPUarchitecture requires that the tests drive and sample the DUT on the falling edge of tclock, so all TCMs are synchronized tocpuclk which is defined as follows:
extend sys {event cpuclk is ( fall ('top.clk') @tick_end );
};
Figure 5-1 The drive_one_instr () TCM
The assignment statements in Figure 5-1 on page 5-4 show how to drive and samplesignals in an HDL model. Each pair of single quotation marks identifies an object asHDL signal.
Thestart_drv_DUTevent emitted bydrive_one_instris not used by any of the TCMs thatdrive the CPU. You will use it in a later chapter to trigger functional coverage analysi
The last line shown in Figure 5-1 on page 5-4 executes the reference model and iscommented out at the moment. You will use it in a later chapter to trigger data check
drive_one_instr(instr: instr) @sys.cpuclk is {var fill0 : uint(bits : 2) = 0b00;
wait until rise('top.fetch1');
emit instr.start_drv_DUT;
if instr.kind == reg then {'top.data' = pack(packing.high, instr);
} else {// immediate instruction'top.data' = pack(packing.high, instr.opcode,
instr.op1, fill0);wait until rise('top.fetch2');'top.data' = pack(packing.high, instr.imm'op2);
};
wait until rise('top.exec');
// execute instr in refmodel//sys.cpu_refmodel.execute(instr, sys.cpu_dut);
};
5-4 Specman Elite Tutorial
Defining the Protocols Driving and Sampling the DUT
hat
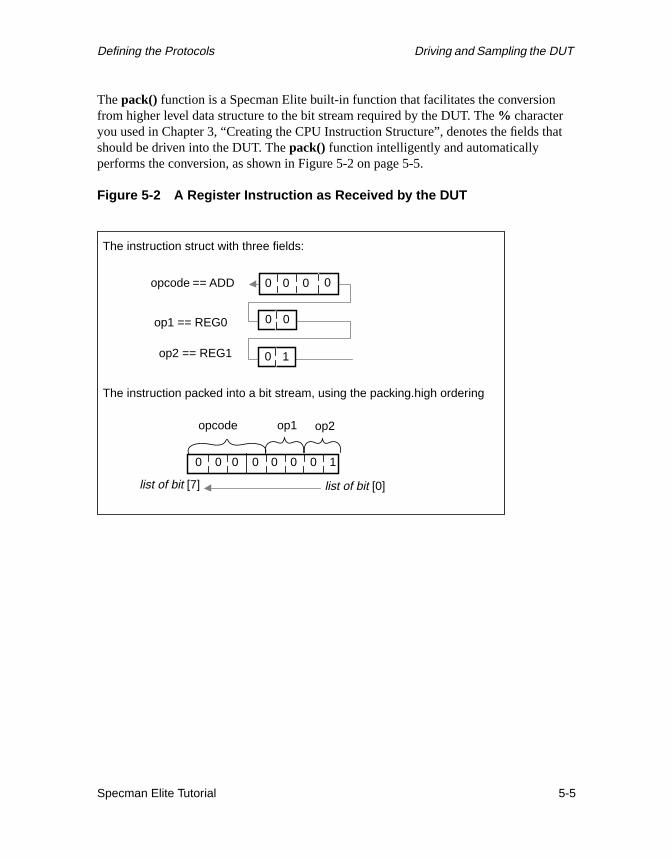
Thepack() function is a Specman Elite built-in function that facilitates the conversionfrom higher level data structure to the bit stream required by the DUT. The% characteryou used in Chapter 3, “Creating the CPU Instruction Structure”, denotes the fields tshould be driven into the DUT. Thepack() function intelligently and automaticallyperforms the conversion, as shown in Figure 5-2 on page 5-5.
Figure 5-2 A Register Instruction as Received by the DUT
The instruction struct with three fields:
opcode == ADD
op1 == REG0
0
0 0 0
00
000 0 0 10
The instruction packed into a bit stream, using the packing.high ordering
opcode op1
list of bit [7] list of bit [0]
0
op2
op2 == REG1 10
Specman Elite Tutorial 5-5

Driving and Sampling the DUT Running the Simulation
ton,t test.
Running the SimulationThis procedure, which involves loading the appropriate files and clicking the Test butis exactly the same as the procedure you used in the last chapter to generate the firs
The difference is that this time you are including the DUT (contained inCPU_dut.e) andTCMs that drive it (contained inCPU_drive.e).
Procedure
1. Copy thetutorial/src/CPU_drive.e to the working directory.
2. Copy thetutorial/src/CPU_dut.e to the working directory.
3. Open the working directory’s copy of theCPU_top.e file in an editor.
4. Find the lines in the file that look like this:
5. Remove the comment characters in front of theimport line so the lines look like this:
6. Save theCPU_top.e file.
7. Click the Reload button to reload the files for test 1.
✓ If you see a message such as
*** Error: No match for 'CPU_dut.e'
you need to check whether the working directory contains the following files:
Add the missing file and then click the Reload button.
CPU_instr.e CPU_drive.e
CPU_misc.e CPU_top.e
CPU_dut.e CPU_tst1.e
// Add dut and drive://import CPU_dut, CPU_drive;
// Add dut and drive:import CPU_dut, CPU_drive;
5-6 Specman Elite Tutorial

Running the Simulation Driving and Sampling the DUT
.en
an
und.ate
8. Click the Modules button to confirm that six modules are loaded:
✓ If some of the modules are missing, first check whether you are loading theCPU_top.e file that you just modified. The modifiedCPU_top.e file must be in theworking directory.
Once the modifiedCPU_top.efile is in the working directory, click the Restore buttonThis action should remove all the currently loaded modules from the session. Thclick the Load button and selectCPU_tst1.e in the Select A File dialog box.
9. Click the Test button to run the simulation.
You should see the following messages (or something similar) in the Main Specmwindow.
Doing setup…Generating the test using seed 0x1…Starting the test…Running the test…DUT executing instr 0 : ADD REG0x0, REG0x1DUT executing instr 1 : ADDI REG0x0, @0x05DUT executing instr 2 : ADD REG0x0, REG0x1DUT executing instr 3 : ADD REG0x0, REG0x1DUT executing instr 4 : ADDI REG0x0, @0x05Last specman tick - stop_run() was calledNormal stop - stop_run() is completedChecking the test…Checking is complete - 0 DUT errors, 0 DUT warnings.Wrote 1 cover_struct to CPU_tst1_1.ecov
You can see from the output that five instructions were executed and no errors were foIt looks like the verification environment is working properly, so you are ready to genera large number of tests.
CPU_instr CPU_drive
CPU_misc CPU_top
CPU_dut CPU_tst1
Specman Elite Tutorial 5-7


ltiple, we
gingts toPU
t
outs.
6 GeneratingConstraint-Driven Tests
Goals for this ChapterAs described in the functional test plan, the second test requires you to generate mutests using constraint-driven test generation. Through this automatic test generationhope to gain high test coverage for the CPU instruction inputs.
What You Will LearnIn this chapter, you learn how to quickly generate different sets of tests by simply chanthe seed used for constraint-driven test generation. You also learn how to use weighcontrol the distribution of the generated values to focus the testing on the common Cinstructions.
As you work through this chapter, you gain experience with two of the Specman Eliteverification system’s enabling features:
• Constraint-driven random test generation— this feature lets you focus random tesgeneration on the areas of the design that need to be exercised the most.
• Random seed generation— by changing the seed used for random generation, ycan quickly cause the Specman Elite system to generate a whole new set of tes
Specman Elite Tutorial 6-1

Generating Constraint-Driven Tests Defining Weights for Random Tests
n
prise
for
sv
This chapter introduces theeconstructs and Specview commands shown in Table 6-1 opage 6-2.
The steps required to generate random tests are:
1. Defining weights for random tests.
2. Generating tests with a user-specified seed.
3. Generating tests with a random seed.
The following sections describe these tasks in detail.
Defining Weights for Random TestsBecause of the way that CPUs are typically used, arithmetic and logic operations coma high percentage of the CPU instructions. You can use theselectconstruct withkeep softto require the Specman Elite system to generate a higher percentage of instructionsarithmetic and logical operations than for control flow.
Procedure
Follow this procedure to see how to create weighted constraints ine:
1. Copy thetutorial/src/CPU_tst2.e file to the working directory.
Table 6-1 New Constructs and Commands
e Constructs How the Construct is Used in this Chapter
keep soft Specifies a soft constraint that is kept only if it does not conflict withother hardkeep constraints.
select Used withkeep softto control the distribution of the generated values.
Specview Commands
Config->Generation Used to create a user-defined seed for random test generation.
File->Save Saves the current test environment, including the random seed, to a .efile. You can load this file with theFile->Restore command.
Test->Test WithRandom Seed
Generates a set of tests with a new random seed.
6-2 Specman Elite Tutorial

Generating Tests With a User-Specified Seed Generating Constraint-Driven Tests
sts.
cky
2. Open theCPU_tst2.e file in an editor.
3. Find the portion of the file that looks like this and review thekeep soft constraint:
Generating Tests With a User-Specified SeedYou can specify the random seed that the Specman Elite system uses to generate te
Procedure
This procedure shows how to create a random seed:
1. Click on the Restore button in the Main Specman window to remove all theemodulesfrom the current session.
2. Click on the Load button and load theCPU_tst2.e file.
3. Click on the Modules button and confirm that the following modules are loaded:
4. SelectConfig->Generation in the Main Specman window.
5. In the Seed field of the Specman Elite Configuration Options window, enter your lunumber.
6. Close the Specman Elite Configuration Options window by clicking OK.
7. Click on the Test button.
CPU_instr CPU_drive
CPU_misc CPU_top
CPU_dut CPU_tst2
<'
extend instr {keep soft opcode == select {
30 : [ADD, ADDI, SUB, SUBI];30 : [AND, ANDI, XOR, XORI];10 : [JMP, JMPC, CALL, RET, NOP];
};};
'>
puts equal weighton arithmetic andlogical operations
and less weighton control flow
operations
Specman Elite Tutorial 6-3
Generating Constraint-Driven Tests Generating Tests With a User-Specified Seed
r
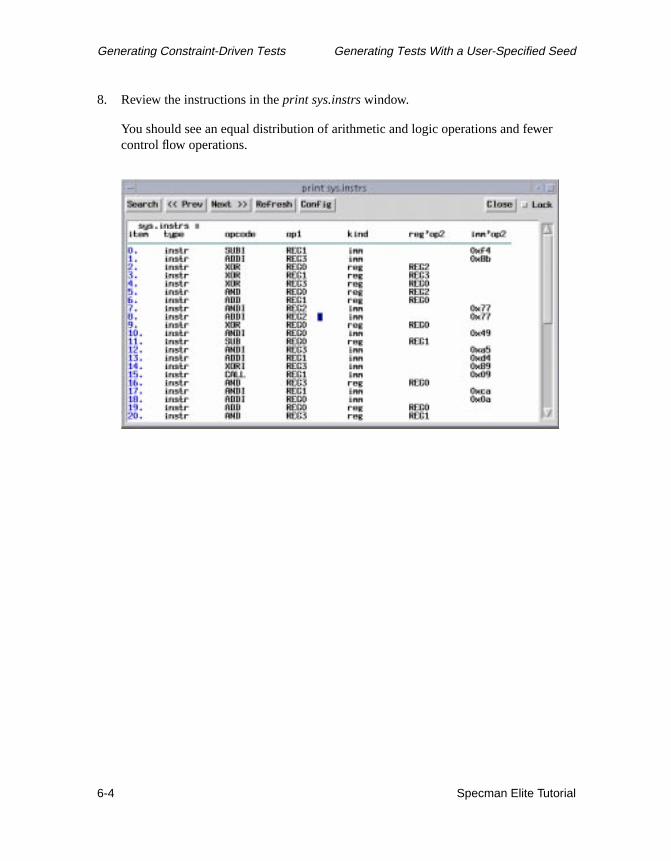
8. Review the instructions in theprint sys.instrs window.
You should see an equal distribution of arithmetic and logic operations and fewecontrol flow operations.
6-4 Specman Elite Tutorial

Generating Tests With a Random Seed Generating Constraint-Driven Tests
r
rent
thethe
uicklyage
Generating Tests With a Random SeedYou can require the Specman Elite system to generate a random seed.
Procedure
This procedure generates tests using a Specman Elite-generated seed:
1. Select Reload button.
2. SelectTest->Test With Random Seedin the Main Specman window.
3. Review the results in theprint sys.instrs window.
You should see an equal distribution of arithmetic and logic operations and fewecontrol flow operations. The results should be different from the previous run.
4. Optionally you could repeat steps 1-3 several times to confirm that you see differesults each time.
✓ If you see similar results in subsequent runs, it is likely that you forgot to reload design before running the test. If you do not reload the design, the test is run withcurrent seed.
You can see that using different random seeds lets you easily generate many tests. Qanalyzing the results of all these tests would be difficult without Specman Elite’s coveranalysis technology. The next two chapters show how to use coverage analysis toaccurately measure the progress of your verification effort.
Specman Elite Tutorial 6-5

f the
r the
man
f thersd bug
7 Defining Coverage Points
Goals for this ChapterThe goal for this chapter is to avoid redundant testing and to measure the progress overification effort by generating effective test coverage statistics.
What You Will LearnIn this chapter, you learn how to define coverage points for the DUT internal states, foinstruction stream, and for an intersection of DUT states and the instruction stream.
As you work through this chapter, you gain experience with another one of the SpecElite verification system’s enabling features — theFunctional Coverage Analyzer. TheSpecman Elite coverage analysis feature lets you define exactly what functionality odevice you want to monitor and report. With coverage analysis, you can see whethegenerated tests meet the goals set in the functional test plan and whether these testcontinue to be sufficient as the design develops, the design specifications change, anfixes are implemented.
Specman Elite Tutorial 7-1

Defining Coverage Points Defining Coverage Points for the FSM
This chapter introduces theeconstructs shown in Table 7-1 on page 7-2.
The steps required to define coverage points are:
1. Defining coverage points for the finite state machine (FSM).
2. Defining coverage points for the generated instructions.
3. Defining coverage points for the corner case.
The following sections describe these tasks in detail.
Defining Coverage Points for the FSMYou can use the constructs shown in Table 7-1 on page 7-2 to define the followingcoverage points for the FSM:
• State machine register
• State machine transition
Procedure
Follow this procedure to define coverage points for the FSM:
1. Copy thetutorial/src/CPU_cover.e file to the working directory.
2. Open theCPU_cover.e file in an editor.
Table 7-1 New Constructs
e Constructs How the Construct is Used in this Chapter
cover Defines a group of data collection items.
event Defines a sampling point when coverage data collection occurs.
item Identifies an object to be sampled.
transition Identifies an object whose current and previous values are to be collectedwhen the sampling point occurs.
7-2 Specman Elite Tutorial

Defining Coverage Points for the FSM Defining Coverage Points
p 3
sd
3. Find the portion of the file that looks like the excerpt below and review the eventdeclaration that defines the sampling point for the FSM:
4. Add the cover group and cover items for state machine coverage.
The cover group name (cpu_fsm) must be the same as the event name defined in steabove. Theitem statement declares the name of the coverage item (fsm), its data type(FSM_type), and the object in the DUT to be sampled. Thetransition statement saysthat the current and previous values offsmmust be collected. In summary this meanthat whenever thesys.cpuclk signal changes, Specman Elite collects the current anprevious values oftop.cpu.curr_FSM.
extend cpu_env {
event cpu_fsm is @sys.cpuclk;...
};
defines FSMsampling point
extend cpu_env {event cpu_fsm is @sys.cpuclk;
// DUT Coverage: State Machinecover cpu_fsm is {
item fsm: FSM_type = 'top.cpu.curr_FSM';transition fsm;
};};
defines the covergroup cpu_fsm
Specman Elite Tutorial 7-3
Defining Coverage Points Defining Coverage Points for the Generated Instructions
en
Defining Coverage Points for the GeneratedInstructionsYou can use the constructs shown in Table 7-1 on page 7-2 to define the followingcoverage points for the CPU instruction stream:
• opcode
• op1
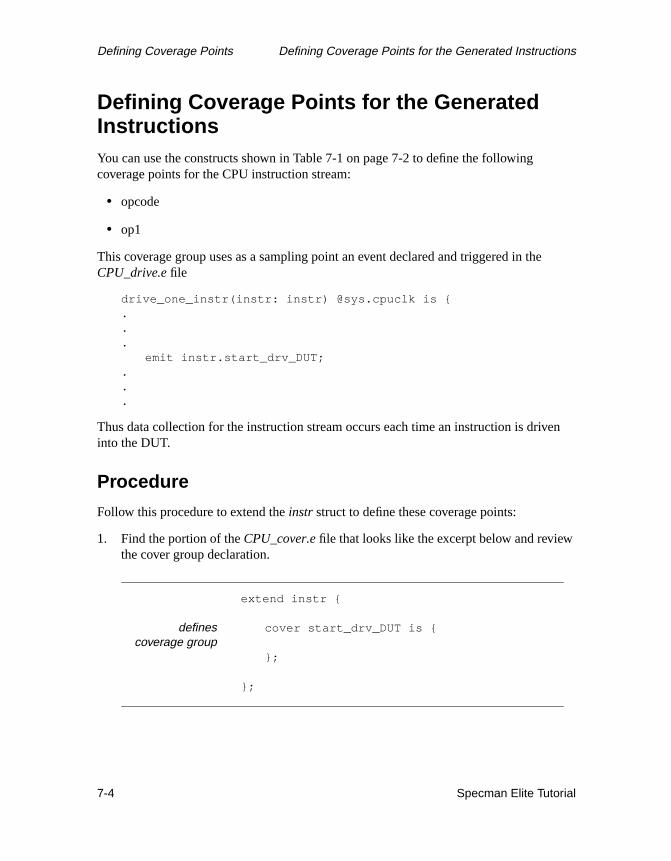
This coverage group uses as a sampling point an event declared and triggered in theCPU_drive.e file
drive_one_instr(instr: instr) @sys.cpuclk is {...
emit instr.start_drv_DUT;...
Thus data collection for the instruction stream occurs each time an instruction is drivinto the DUT.
Procedure
Follow this procedure to extend theinstr struct to define these coverage points:
1. Find the portion of theCPU_cover.efile that looks like the excerpt below and reviewthe cover group declaration.
extend instr {
cover start_drv_DUT is {
};
};
definescoverage group
7-4 Specman Elite Tutorial
Defining Coverage Points for the Corner Case Defining Coverage Points
ode isnce of
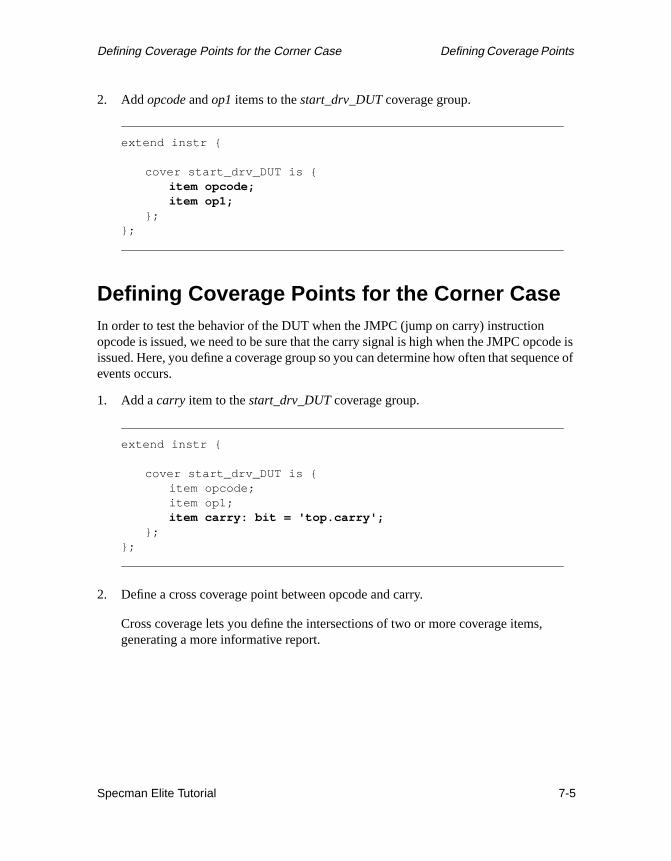
2. Addopcode andop1 items to thestart_drv_DUT coverage group.
Defining Coverage Points for the Corner CaseIn order to test the behavior of the DUT when the JMPC (jump on carry) instructionopcode is issued, we need to be sure that the carry signal is high when the JMPC opcissued. Here, you define a coverage group so you can determine how often that sequeevents occurs.
1. Add acarry item to thestart_drv_DUT coverage group.
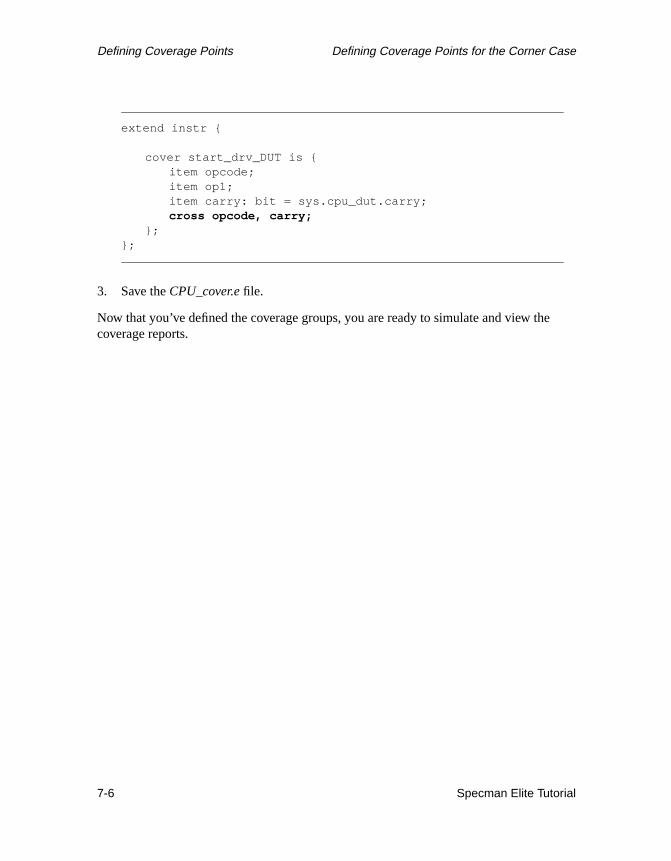
2. Define a cross coverage point between opcode and carry.
Cross coverage lets you define the intersections of two or more coverage items,generating a more informative report.
extend instr {
cover start_drv_DUT is {item opcode;item op1;
};};
extend instr {
cover start_drv_DUT is {item opcode;item op1;item carry: bit = 'top.carry';
};};
Specman Elite Tutorial 7-5
Defining Coverage Points Defining Coverage Points for the Corner Case
e
3. Save theCPU_cover.e file.
Now that you’ve defined the coverage groups, you are ready to simulate and view thcoverage reports.
extend instr {
cover start_drv_DUT is {item opcode;item op1;item carry: bit = sys.cpu_dut.carry;cross opcode, carry;
};};
7-6 Specman Elite Tutorial
the
can
res:
8 Analyzing Coverage
Goals for this ChapterThe goal for this chapter is to determine whether the tests you have generated meetgoals set in the functional test plan and whether additional tests must be created tocomplete design verification.
What You Will LearnIn this chapter, you learn how to display coverage reports for individual cover items,exactly as you have defined them, and to merge reports for individual items so that youeasily analyze the progress of your design verification.
As you work through this chapter, you gain experience with these Specman Elite featu
• Cross Coverage— lets you view the intersections of two or more cover items.
• Apropos — helps you find the information you need in the Specman Elite OnlineDocumentation.
Specman Elite Tutorial 8-1
Analyzing Coverage Running Tests with Coverage Groups Defined
t
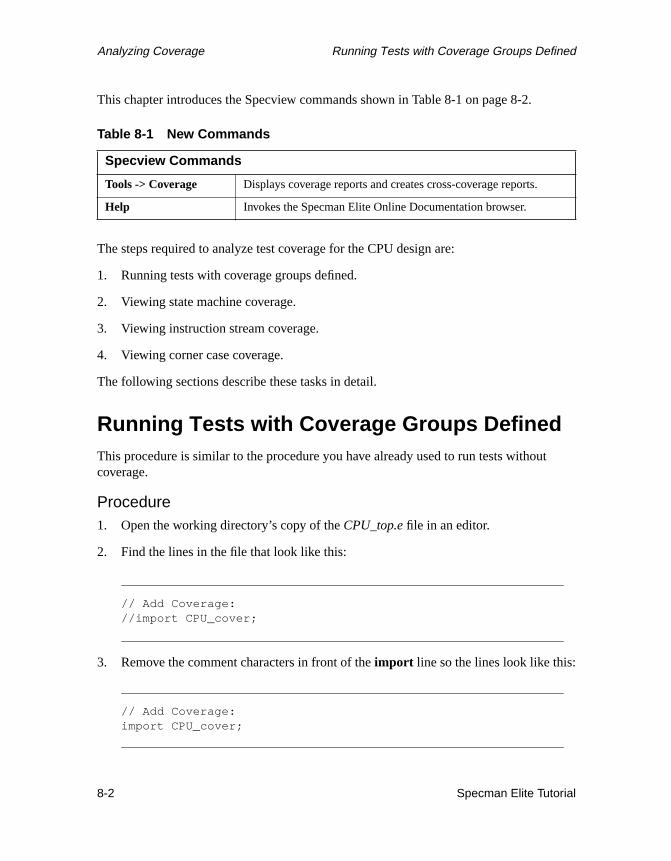
This chapter introduces the Specview commands shown in Table 8-1 on page 8-2.
The steps required to analyze test coverage for the CPU design are:
1. Running tests with coverage groups defined.
2. Viewing state machine coverage.
3. Viewing instruction stream coverage.
4. Viewing corner case coverage.
The following sections describe these tasks in detail.
Running Tests with Coverage Groups DefinedThis procedure is similar to the procedure you have already used to run tests withoucoverage.
Procedure1. Open the working directory’s copy of theCPU_top.e file in an editor.
2. Find the lines in the file that look like this:
3. Remove the comment characters in front of theimport line so the lines look like this:
Table 8-1 New Commands
Specview Commands
Tools -> Coverage Displays coverage reports and creates cross-coverage reports.
Help Invokes the Specman Elite Online Documentation browser.
// Add Coverage://import CPU_cover;
// Add Coverage:import CPU_cover;
8-2 Specman Elite Tutorial

Running Tests with Coverage Groups Defined AnalyzingCoverage
an.
4. Invoke Specman Elite, if it is not already running.
% specview &
5. Click the Reload button to reload the files for test 2.
6. Click the Modules button to confirm that seven modules are loaded:
CPU_instrCPU_miscCPU_dutCPU_driveCPU_coverCPU_topCPU_tst2
7. Click the Test button.
You should see something similar to the following messages in the Main Specmwindow. The last line indicates that the coverage data was written to an .ecov file
testDoing setup…Generating the test using seed 0x1Starting the test…Running the test…DUT executing instr 0 : RET REG0x3, REG0x0DUT executing instr 1 : JMPC REG0x3, @0x02DUT executing instr 2 : ADD REG0x3, REG0x2DUT executing instr 3 : AND REG0x3, REG0x1DUT executing instr 4 : JMPC REG0x3, @0x09...Last specman tick - stop_run() was calledNormal stop - stop_run() is completedChecking the test…Checking is complete - 0 DUT errors, 0 DUT warnings.Wrote 1 cover_struct to CPU_tst2_1.ecov
Specman Elite Tutorial 8-3

Analyzing Coverage Viewing State Machine Coverage
ine
ther
the
Viewing State Machine CoverageYou have two reports to look at, the state machine register report and the state machtransition report.
If you are using a different seed or a version of the Specman Elite verification system othan 3.2, you may see different results in your coverage reports.
Procedure
1. Click the Cover button in the Main Specman window.
The Show Coverage dialog box appears.
2. In the Group field, selectcpu_env.cpu_fsm.
3. In the Items field, selectfsm and click the Display Item button.
The state machine register report appears in the Coverage Analysis window. Fromreport it is easy to see that, for example, thefetch1 state was entered 88 times in the227 times sampled.
8-4 Specman Elite Tutorial

Viewing State Machine Coverage AnalyzingCoverage
rred.
4. In the Items field, selecttransition_fsm and click the Display Item button.
As you scroll down the display, perhaps the first thing you notice about the statemachine transition report is that there are a number of transitions that never occuThis is because these transitions are illegal.
Specman Elite Tutorial 8-5
Analyzing Coverage Viewing State Machine Coverage
rage
he
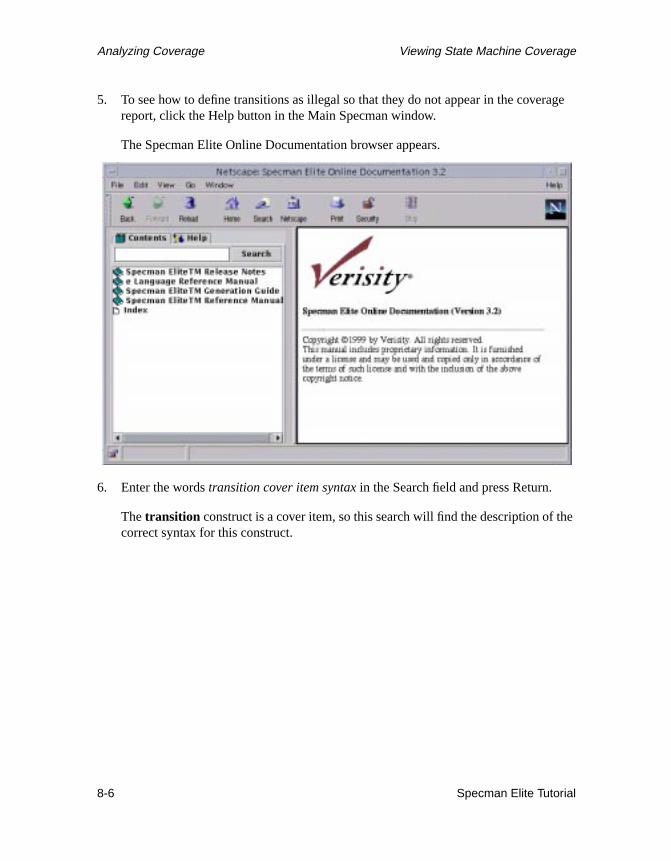
5. To see how to define transitions as illegal so that they do not appear in the covereport, click the Help button in the Main Specman window.
The Specman Elite Online Documentation browser appears.
6. Enter the wordstransition cover item syntax in the Search field and press Return.
Thetransition construct is a cover item, so this search will find the description of tcorrect syntax for this construct.
8-6 Specman Elite Tutorial

Viewing State Machine Coverage AnalyzingCoverage
m in
7. When the list of files that describe cover item options appears, select the first itethe list,eref: transition cover item syntax.The tageref indicates that this document is part of theeLanguage Reference Manual.
8. When thetransition construct description appears, scroll down the page to theillegalcover item option description.
9. Continue scrolling down to the Examples section, and you will find an exampleshowing the use of theillegal option:
cover state_change is {item st;transition st using illegal =
not ((prev_st == START and st == FETCH1)or (prev_st == FETCH1 and st == FETCH2)or (prev_st == FETCH1 and st == EXEC)or (prev_st == FETCH2 and st == EXEC)or (prev_st == EXEC and st == START));
};
If you like, you can follow this example to enhance thetransition statement inCPU_cover.e to ignore the illegal transitions.
Specman Elite Tutorial 8-7
Analyzing Coverage Viewing Instruction Stream Coverage
Viewing Instruction Stream CoverageNow we’ll look at the coverage for the CPU instruction stream. To provide moreinteresting results to look at, we’ll load the results of a set of regression tests. Theseregression tests were run with the second test and many different random seeds.
Procedure
1. Copytutorial/src/regression_3.2.ecov file to the working directory.
2. Click the Cover button in the Main Specman window.
The Show Coverage dialog box appears.
3. Click the Read… button in the Show Coverage dialog box and select theregression_3.2.ecov file.
4. Selectinstr.start_drv_DUT from the scroll list of the Group field.
5. In the Items field, selectopcode and click the Display Item button.
8-8 Specman Elite Tutorial

Viewing Instruction Stream Coverage AnalyzingCoverage
esults to
The opcode coverage report appears in the Coverage Analysis window. These rshow that the current set of tests fulfill the requirement in the functional test planfocus on arithmetic and logic operations rather than control flow operations.
Specman Elite Tutorial 8-9
Analyzing Coverage Viewing Corner Case Coverage
ation
carry
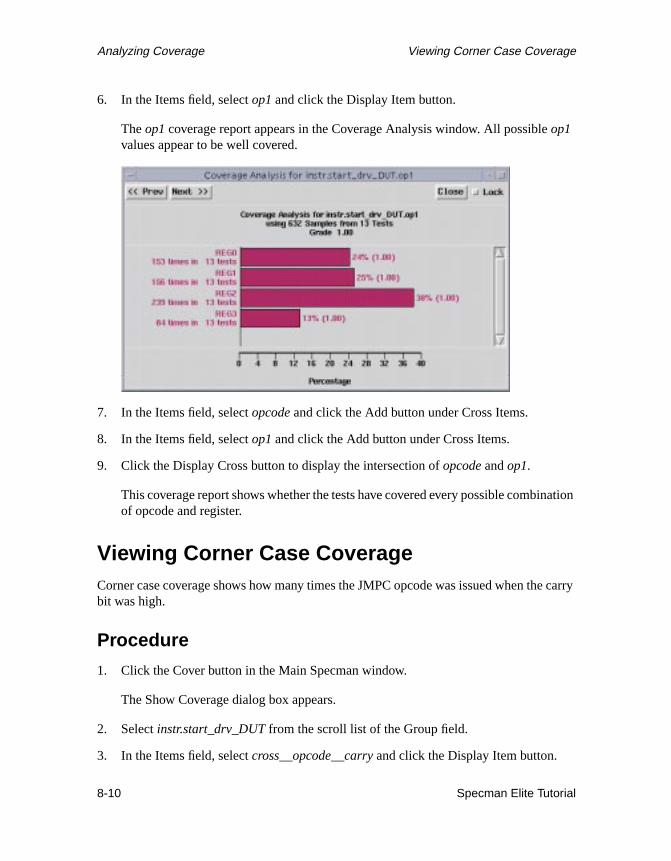
6. In the Items field, selectop1 and click the Display Item button.
Theop1 coverage report appears in the Coverage Analysis window. All possibleop1values appear to be well covered.
7. In the Items field, selectopcode and click the Add button under Cross Items.
8. In the Items field, selectop1 and click the Add button under Cross Items.
9. Click the Display Cross button to display the intersection ofopcode andop1.
This coverage report shows whether the tests have covered every possible combinof opcode and register.
Viewing Corner Case CoverageCorner case coverage shows how many times the JMPC opcode was issued when thebit was high.
Procedure
1. Click the Cover button in the Main Specman window.
The Show Coverage dialog box appears.
2. Selectinstr.start_drv_DUT from the scroll list of the Group field.
3. In the Items field, selectcross__opcode__carryand click the Display Item button.
8-10 Specman Elite Tutorial
Viewing Corner Case Coverage AnalyzingCoverage
is
raise
k thiso do
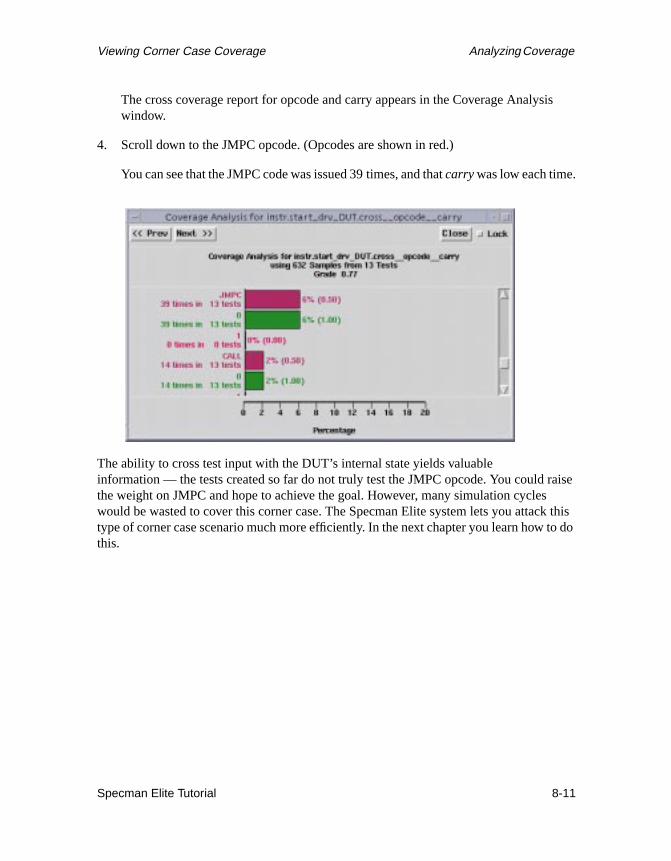
The cross coverage report for opcode and carry appears in the Coverage Analyswindow.
4. Scroll down to the JMPC opcode. (Opcodes are shown in red.)
You can see that the JMPC code was issued 39 times, and thatcarrywas low each time.
The ability to cross test input with the DUT’s internal state yields valuableinformation — the tests created so far do not truly test the JMPC opcode. You could the weight on JMPC and hope to achieve the goal. However, many simulation cycleswould be wasted to cover this corner case. The Specman Elite system lets you attactype of corner case scenario much more efficiently. In the next chapter you learn how tthis.
Specman Elite Tutorial 8-11


at
our
right
uired
.
9 Writing a Corner Case Test
Goals for this ChapterAs described in the Functional Test Plan, you want to create one corner case test thgenerates the JMPC opcode when the carry signal is high.
What You Will LearnAs you work through this chapter, you learn an effective methodology for addressing ycorner case scenario testing. With the Specman Eliteon-the-fly test generation, you candirect the test to constantly monitor the state of signals in the DUT and to generate thetest data — at the right time — to reach a corner case scenario. This feature lets youeffectively generate a corner case test scenario, saving the time-consuming effort reqto write deterministic tests to reach the same result.
This chapter introduces theeconstructs shown in Table 9-1 on page 9-1.
The steps required to create the corner case test are:
Table 9-1 New Constructs
e Constructs How the Construct is Used in this Chapter
'signal' * weight : value An expression containing a DUT signal within theselect block of akeep softconstraint that controls the distribution of generated values
Specman Elite Tutorial 9-1

Writing a Corner Case Test Increasing the Probability of Arithmetic Operations
igh., so
1. Increasing the probability of arithmetic operations.
2. Linking JMPC generation to the DUT’s carry signal.
The following section describes these tasks in detail.
Increasing the Probability of ArithmeticOperationsThe goal of this test is to generate the JMPC opcode only when the carry signal is hThe carry signal can only possibly be high when arithmetic operations are performedthe test first has to increase generation of arithmetic operations over other types ofoperations.
Procedure1. Copy thetutorial/src/CPU_tst3.e file to the working directory.
2. Open theCPU_tst3.e file in an editor.
3. Find the portion of the file that contains thekeep soft constraint:
extend instr {keep soft opcode == select {
// high weights on arithmetic
// generation of JMPC controlled by the carry// signal value
};};
9-2 Specman Elite Tutorial

Linking JMPC Generation to the Carry Signal Writing a Corner Case Test
of
carry
r the
4. Put a high weight on arithmetic operations and low weights on the others.
Linking JMPC Generation to the Carry SignalIf you generate the list of instructions before simulation, there is only a low probabilitydriving a JMPC instruction into the DUT when the carry signal is asserted. A betterapproach is to monitor the carry signal and generate the JMPC instruction when thesignal is known to be high.
This methodology enables you to reach the corner case from multiple paths, in othewords, from different opcodes issued prior to the JMPC opcode. This test shows howDUT behaves under various sequences of opcodes.
extend instr {keep soft opcode == select {
// high weights on arithmetic40 : [ADD, ADDI, SUB, SUBI];20 : [AND, ANDI, XOR, XORI];10 : [JMP, CALL, RET, NOP];
// generation of JMPC controlled by the// carry signal value
};};
keeps high weighton arithmetic
operations
Specman Elite Tutorial 9-3

Writing a Corner Case Test Linking JMPC Generation to the Carry Signal
ning
ule
Procedure
1. Find the portion of theCPU_tst3.e file that looks like this:
2. On a separate line within theselect block, enter a weight for the JMPC opcode,together with the name of the carry signal.
3. Save theCPU_tst3.e file.
You are now ready to run this test to create the corner case test scenario. Before runthis test, you want to address another important part of functional verification:self-checking module creation. In the next chapter, you learn easy self-checking modcreation, another powerful feature provided by the Specman Elite system.
extend instr {keep soft opcode == select {
// high weights on arithmetic40 : [ADD, ADDI, SUB, SUBI];20 : [AND, ANDI, XOR, XORI];10 : [JMP, CALL, RET, NOP];
// generation of JMPC controlled by the// carry signal value
};};
extend instr {keep soft opcode == select {
// high weights on arithmetic40 : [ADD, ADDI, SUB, SUBI];20 : [AND, ANDI, XOR, XORI];10 : [JMP, CALL, RET, NOP];
// generation of JMPC controlled by the//carry signal value'top.carry' * 90 :JMPC;
};};
9-4 Specman Elite Tutorial
e
l
nd
10 Creating Temporal andData Checks
Goals for this ChapterThe goal for this chapter is to check timing-related dependencies and to automate thdetection of unexpected DUT behavior by adding a self-checking module to theverification environment.
What You Will LearnIn this chapter, you learn how to create temporal checks for the state machine controsignals. You also learn how to implement data checks using a reference model.
As you work through this chapter, you gain experience with two of the Specman Eliteverification system’s enabling features:
• Specman Elite temporal constructs —these powerful constructs let you easilycapture the DUT interface specifications, verify the protocols of the interfaces, aefficiently debug them. The temporal constructs minimize the size of complexself-checking modules and significantly reduce the time it takes to implementself-checking.
Specman Elite Tutorial 10-1
Creating Temporal and Data Checks Creating the Temporal Checks
hes
odel
se it
• Specman Elite data checking —data checking methodology can be flexiblyimplemented in the Specman Elite system. For data-mover applications like switcor routers, you can use powerful built-in constructs for rule-based checking. Forprocessor-type applications like the application used in this tutorial, reference mmethodology is commonly implemented.
This chapter introduces theeconstructs shown in Table 10-1 on page 10-2.
The steps required to create these checks are:
1. Creating the temporal checks.
2. Creating the data checks.
3. Running the test with checks.
The following sections describe these tasks in detail.
Creating the Temporal ChecksThe design specifications for the CPU require that after entering theexecute state, thefetch1 signal must be asserted in the following cycle. This is a temporal check becauspecifies the correct behavior of DUT signals across multiple cycles.
Procedure
Follow this procedure to create the check:
1. Copy thetutorial/src/CPU_checker.e file to the working directory.
2. Open theCPU_checker.e file in an editor.
Table 10-1 New Constructs and Commands
e Constructs How the Construct is Used in this Chapter
expect Checks that a temporal expression is true and if not, reports an error.
check Checks that a Boolean expression is true and if not, reports an error.
10-2 Specman Elite Tutorial

Creating the Temporal Checks Creating Temporal and Data Checks
3. Find the portion of the file that looks like this:
4. Define a temporal check for theenter_exec_st event by creating anexpect statement.
5. Save theCPU_checker.e file.
// Temporal (Protocol) Checkerevent enter_exec_st is
(change('top.cpu.curr_FSM')andtrue('top.cpu.curr_FSM' == exec_st))@sys.cpuclk;
event fetch1_assert is(change('top.fetch1')andtrue('top.fetch1' == 1)) @sys.cpuclk;
//Interface Spec: After entering instruction//execution state, fetch1 signal must be//asserted in the following cycle.
defines start ofexec state
defines rise offetch1
// Temporal (Protocol) Checkerevent enter_exec_st is
(change('top.cpu.curr_FSM')andtrue('top.cpu.curr_FSM' == exec_st))@sys.cpuclk;
event fetch1_assert is(change('top.fetch1')andtrue('top.fetch1' == 1)) @sys.cpuclk;
//Interface Spec: After entering instruction//execution state, fetch1 signal must be//asserted in the following cycle.expect @enter_exec_st => {@fetch1_assert}
@sys.cpuclk elsedut_error("PROTOCOL ERROR");
issues an errormessage if fetch1
doesn’t riseexactly one cycle
after enteringexecute state
Specman Elite Tutorial 10-3

Creating Temporal and Data Checks Creating Data Checks
itor
n in
l.
t youe the
Creating Data ChecksTo determine whether the CPU instructions are executing properly, you need to monthe program counter, which is updated by many of the control flow operations.
Reference models are not required for data checking; you can use a rule-basedmethodology instead. However, reference models are part of a typical strategy forverifying CPU designs. The Specman Elite system supports reference models writteVerilog, VHDL, C, or, as in this tutorial,e. All you need to do is create checks thatcompare the program counter in the DUT to their counterparts in the reference mode
Procedure
This procedure has two parts:
• Adding the data checks
• Synchronizing the reference model execution with the DUT
Adding the Data Checks
1. Find the portion of theCPU_checker.e file where theexec_done event is defined.
Notice that there is an event,exec_done, and associated method,on_exec_done. TheSpecman Elite system automatically creates an associated method for every evendefine. The method is empty until you extend it. The method executes every timevent occurs.
// Data Checkerevent exec_done is (fall('top.exec') and
true('top.rst' == 0))@sys.cpuclk;
on_exec_done() is {// Compare PC - program counter
};...
event definition
methodassociated with
event
10-4 Specman Elite Tutorial

Creating Data Checks Creating Temporal and Data Checks
CPU
2. Add a check for the program counter by creating acheckstatement and removing thecomment characters in front ofdut_error.
3. Save theCPU_checker.e file.
Synchronizing the Reference Model with the DUT
1. Open theCPU_drive.e file in the working directory.
2. At the top of the file find the line that imports the CPU reference model.
3. Remove the comment characters from theimport line.
4. Find the line that extends the Specman Elite system by creating an instance of thereference model.
// Data Checkerevent exec_done is (fall('top.exec') and
true('top.rst' == 0))@sys.cpuclk;
on_exec_done() is {// Compare PC - program countercheck that sys.cpu_dut.pc ==
sys.cpu_refmodel.pc elsedut_error("DATA MISMATCH(pc)");
};
issues an error ifthere is a
mismatch in theprogram counters
of the DUT andthe reference
model
<'import CPU_refmodel;
extend sys {event cpuclk is
(fall('top.clk')@tick_end);
cpu_env : cpu_env;cpu_dut : cpu_dut;
// cpu_refmodel : cpu_refmodel;};'>
imports thereference model
Specman Elite Tutorial 10-5

Creating Temporal and Data Checks Creating Data Checks
state.
5. Remove the comment characters.
6. Find the line in thereset_cpu TCM that resets the reference model.
7. Remove the comment characters.
8. Find the line that executes the reference model when the DUT is in the execute
9. Remove the comment characters.
10. Save theCPU_drive.e file.
<'import CPU_refmodel;
extend sys {event cpuclk is
(fall('top.clk')@tick_end);
cpu_env : cpu_env;cpu_dut : cpu_dut;cpu_refmodel : cpu_refmodel;
};'>
creates aninstance of the
reference model
reset_cpu() @sys.cpuclk is {'top.rst' = 0;wait [1] * cycle;'top.rst' = 1;wait [5] * cycle;sys.cpu_refmodel.reset();'top.rst' = 0;
};
resets thereference model
// execute instr in refmodelsys.cpu_refmodel.execute(instr,sys.cpu_dut);
};
10-6 Specman Elite Tutorial
Running the Simulation Creating Temporal and Data Checks
ton,r tests.
.
se
Running the SimulationThis procedure, which involves loading the appropriate files and clicking the Test butis exactly the same as the procedure you used in previous chapters to generate othe
The difference is that this time you are including the reference model and checks.
Procedure
1. Open the working directory’s copy of theCPU_top.e file in an editor.
2. Find the lines in the file that look like this:
3. Remove the comment characters in front of theimport line so the lines look like this:
4. Save theCPU_top.e file.
5. Copy thetutorial/src/CPU_refmodel.e file to the working directory.
6. Invoke the Specman Elite system, if it is not already running.
% specview &
7. Click the Restore button to remove any loaded modules from the current session
8. Click the Load button and loadCPU_tst3.e.
Remember that this is the test that you wrote in Chapter 9, “Writing a Corner CaTest”.
// Add Checking://import CPU_checker;
// Add Checking:import CPU_checker;
Specman Elite Tutorial 10-7

Creating Temporal and Data Checks Running the Simulation
age.
9. Click the Test button to run the simulation.
It looks like we hit a bug here. Specman Elite is reporting a protocol violation.
testDoing setup ...Generating the test using seed 0x7...Starting the test ...Running the test ...DUT executing instr 0 : SUB REG0x0, REG0x2DUT executing instr 1 : NOP REG0x2, REG0x3DUT executing instr 2 : ADDI REG0x1, @0x9eDUT executing instr 3 : SUBI REG0x1, @0x65DUT executing instr 4 : SUB REG0x1, REG0x0DUT executing instr 5 : ADD REG0x0, REG0x2DUT executing instr 6 : SUB REG0x0, REG0x1DUT executing instr 7 : SUBI REG0x3, @0xca
*** Dut error at time 525 Checked at line 41 in @CPU_checker In cpu_env-@0:
PROTOCOL ERROR
Will stop execution immediately (check effect is ERROR)
*** Error: A Dut error has occurred
*** Error: Error during tick command
10. Click on the error hyperlink to view the line in the source that generated this mess
10-8 Specman Elite Tutorial

Running the Simulation Creating Temporal and Data Checks
urs
This message comes from the checker module that you just created.
In the next chapter, you learn how to identify the conditions under which this bug occand how to bypass the bug until it can be fixed.
Specman Elite Tutorial 10-9

usisses an
es you
11 Analyzing and BypassingBugs
Goals for this ChapterThe goal for this chapter is to debug the temporal error generated during your previotutorial session (Chapter 10, “Creating Temporal and Data Checks”). At the end of thchapter, you also learn how to direct the generator to bypass a test scenario that cauerror.
What You Will LearnAs you work through this chapter, you gain experience with two of the Specman Elitesystem’s enabling features:
• The Specman Elite debugger— Powerful debugging features with visibility into theHDL design.
• The Specman Elite bypass feature— You can temporarily prevent the Specman Elitsystem from generating test data that reveals a bug in the design. This feature letcontinue testing while the bug is being fixed.
Specman Elite Tutorial 11-1
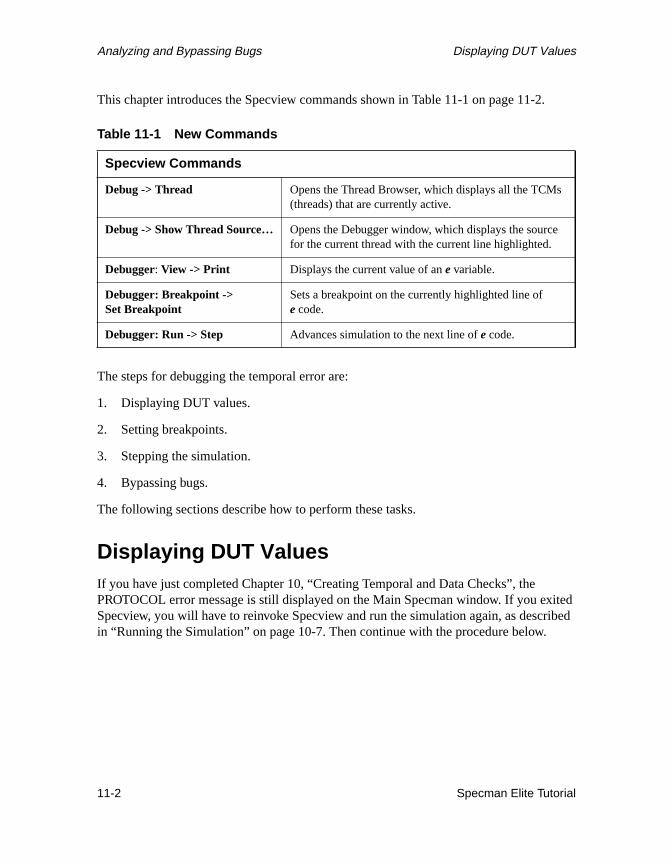
Analyzing and Bypassing Bugs Displaying DUT Values
.
itedribed
This chapter introduces the Specview commands shown in Table 11-1 on page 11-2
The steps for debugging the temporal error are:
1. Displaying DUT values.
2. Setting breakpoints.
3. Stepping the simulation.
4. Bypassing bugs.
The following sections describe how to perform these tasks.
Displaying DUT ValuesIf you have just completed Chapter 10, “Creating Temporal and Data Checks”, thePROTOCOL error message is still displayed on the Main Specman window. If you exSpecview, you will have to reinvoke Specview and run the simulation again, as descin “Running the Simulation” on page 10-7. Then continue with the procedure below.
Table 11-1 New Commands
Specview Commands
Debug -> Thread Opens the Thread Browser, which displays all the TCMs(threads) that are currently active.
Debug -> Show Thread Source… Opens the Debugger window, which displays the sourcefor the current thread with the current line highlighted.
Debugger: View -> Print Displays the current value of an e variable.
Debugger: Breakpoint ->Set Breakpoint
Sets a breakpoint on the currently highlighted line ofecode.
Debugger: Run -> Step Advances simulation to the next line ofe code.
11-2 Specman Elite Tutorial

Displaying DUT Values Analyzing and Bypassing Bugs
Procedure
1. In the Main Specman window, selectDebug->Threads.
The Thread Browser appears.
The Thread Browser indicates the status of each TCM that is currently active inSpecman Elite:
• Clock generation
• Drive and Sample CPU
• DUT
To debug the error, look first at the TCM that drives the DUT.
Specman Elite Tutorial 11-3

Analyzing and Bypassing Bugs Displaying DUT Values
lay
2. On the line [email protected]_cpu, selectSrcto bring up the corresponding sourcefile for this thread.
The Debugger window appears, showingCPU_drive.e. The highlighted line showsthat thedrive_one_instr TCM is waiting for thetop.exec signal to rise.
3. To find out the current instruction type, highlight the phraseinstr.kind, located 9 linesabove the highlightedwait statement.
4. Click the print button.
The value ofinstr.kind shows an immediate instruction.
5. In a similar fashion, find out the current opcode:instr.opcode.
The value of opcode is JMPC.
6. Optionally you could find out the value of any HDL signals. For example, to dispthe value oftop.data, highlight the phrase ‘top.data’ and click the print button.
Forstep 3
Forstep 5
11-4 Specman Elite Tutorial

Setting Breakpoints Analyzing and Bypassing Bugs
de isbugion
e
:
Setting BreakpointsYou have determined that the bug appears on an immediate instruction when the opcoJMPC. It may be possible to narrow down even further the conditions under which theoccurs. You can set a breakpoint on the statement that drives the immediate instructdata into the DUT to see what the operands of the instruction are.
Procedure
1. Highlight any portion of the line:'top.data' = pack(packing.high, instr.imm'op2);
2. SelectBreakpoints -> Set Breakpoint.
This line should now be underlined to indicate a breakpoint has been set.
3. To activate the breakpoint just before the error occurs (at system time 525), in thDebugger window, selectBreakpoint -> Show Breakpoints.
The Breakpoints window appears.
4. In the edit box at the top of the window, modify the current breakpoint as follows
break on line 53 @CPU_drive if (sys.time > 475)
Click Change andClose the window.
EditBoxforstep 4
Specman Elite Tutorial 11-5

Analyzing and Bypassing Bugs Stepping the Simulation
an
Stepping the SimulationYou can trace the exact execution order of thee code by stepping the simulation.
Procedure
1. To run the simulation in debug mode, click the Reload button in the Main Specmwindow.
2. Click the Test button.
3. The simulation stops at the breakpoint.
4. In the Debugger window, selectRun -> Step Anywhereto advance to the next sourceline in any subsequent thread.
5. Repeat theRun -> Step Anywhereuntil the current thread is Thread #3 in theCPU_DUT.e file, as indicated in the title bar at the top of the window.
11-6 Specman Elite Tutorial
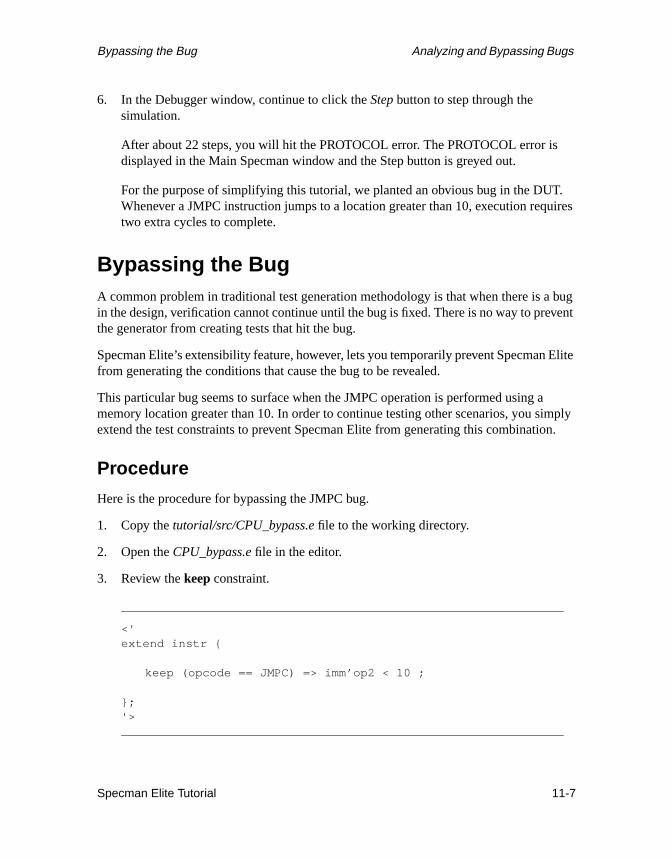
Bypassing the Bug Analyzing and Bypassing Bugs
.ires
bugent
Elite
mplyn.
6. In the Debugger window, continue to click theStep button to step through thesimulation.
After about 22 steps, you will hit the PROTOCOL error. The PROTOCOL error isdisplayed in the Main Specman window and the Step button is greyed out.
For the purpose of simplifying this tutorial, we planted an obvious bug in the DUTWhenever a JMPC instruction jumps to a location greater than 10, execution requtwo extra cycles to complete.
Bypassing the BugA common problem in traditional test generation methodology is that when there is ain the design, verification cannot continue until the bug is fixed. There is no way to prevthe generator from creating tests that hit the bug.
Specman Elite’s extensibility feature, however, lets you temporarily prevent Specmanfrom generating the conditions that cause the bug to be revealed.
This particular bug seems to surface when the JMPC operation is performed using amemory location greater than 10. In order to continue testing other scenarios, you siextend the test constraints to prevent Specman Elite from generating this combinatio
Procedure
Here is the procedure for bypassing the JMPC bug.
1. Copy thetutorial/src/CPU_bypass.e file to the working directory.
2. Open theCPU_bypass.e file in the editor.
3. Review thekeep constraint.
<'extend instr {
keep (opcode == JMPC) => imm’op2 < 10 ;
};'>
Specman Elite Tutorial 11-7
Analyzing and Bypassing Bugs Tutorial Summary
a
ated.
sultsign.
ts ofelyUT.
ured case
-flyuringtests
ate a
4. In the Main Specman window, selectDebug->Delete All Breakpointsto exit debugmode.
5. Click the Reload button.
6. Click the Load button and load theCPU_bypass.e file.
7. Click on the Test button to launch the test.
This time the test runs to completion.
Tutorial SummaryCongratulations! You have successfully completed the major steps required to verifydesign with the Specman Elite verification system. Here’s a review of what you haveaccomplished in this tutorial:
• You captured the interface specifications for the CPU instructions ineand created theinstruction stream.
• You used specification constraints to ensure that only legal instructions were generYou used test constraints to create a simple go-no-go test.
• You created a Specman Elite TCM (time consuming method) to define the driverprotocol and then drove the generated CPU instruction stream into the DUT. The reconfirmed that you had generated the first test and driven it correctly into the des
• Using Specman Elite’s powerful constraint-driven generator, you generated 15 seinstructions. Using weight to control the generation value distribution, you effectivfocused these sets of instructions on the commonly executed portion of the CPU D
• Using Specman Elite’s unique Functional Coverage Analyzer, you accurately measthe effectiveness of the coverage of the regression tests. You identified a corner“hole” by viewing the graphical coverage reports.
• To address the corner case scenario, you used Specman Elite’s powerful on-thegeneration capability to generate a test based on the internal state of the design dsimulation. Compared to the traditional deterministic test approach, this approachthe corner case much more effectively from multiple paths.
• Then you used the unique temporal constructs provided by Specman Elite to creself-checking monitor that verifies protocol conformance.
11-8 Specman Elite Tutorial

Tutorial Summary Analyzing and Bypassing Bugs
sive
ules
• When the self-checking monitor revealed a bug, the GUI debugger provided extenfeatures to debug the design efficiently.
Note that you have created this verification environment, including self-checking modand functional coverage analysis, in a short period of time. Once the environment isestablished, creating a large number of effective tests is merely one click away! Theultimate result of using Specman Elite is a drastic reduction in verification time andresources.
Specman Elite Tutorial 11-9

n get
twarell the
es
A Setting up the TutorialEnvironment
In order to set up the tutorial environment, you need a Specman Elite license. You caone by sending email [email protected] or by calling Verisity customer support at(650) 934-6890.
There are three procedures involved in setting up the tutorial environment:
• Downloading the Specman Elite software and tutorial files
• Installing the Specman Elite software
• Installing the tutorial files
These procedures are described in this appendix. Note that even if Specman Elite sofhas already been installed in your environment, you still have to download and instatutorial files.
Downloading the Specman Elite FilesHere’s the procedure for downloading the Specman Elite software and the tutorial filfrom the Verisityftp site.
1. Change directory to the directory where you want to store the downloaded files.
Specman Elite Tutorial A-1
Setting up the Tutorial Environment Downloading the Specman Elite Files
2. Log in to the Verisityftp site.
% ftp ftp.verisity.comConnected to ftp.verisity.com…Name (ftp.verisity.com:<your_name>): anonymous331 Guest login ok, send ident as passwordPassword: <your-email-address >230 Guest login ok. access restrictions apply.
3. Change directory to theprivate/tutors directory.
ftp> cd private/tutors250 CWD command successful
4. Change the format type tobinary.
ftp> bin200 Type set to I.
5. Get the Specman Elite software.
ftp> get install_specman<release_number>.sh200 PORT command successful.150 Opening BINARY mode data connection forinstall_specman<release_number>.sh226 Transfer complete…ftp> get sn_rel<release_number>.main.tar.gz200 PORT command successful.150 Opening BINARY mode data connection forsn_rel<release_number>.main.tar.gz…226 Transfer complete…ftp> get sn_rel<release_number>.<OS>.tar.gz150 Opening BINARY mode data connection forsn_rel<release_number>.solaris.tar.gz…226 Transfer complete…
where <OS> is one of the platforms that Specman Elite supports, eithersolarisorhpux.
6. Get the tutorial files.
ftp> get se_tutor.tar.gz200 PORT command successful.150 Opening BINARY mode data connection for se_tutor.tar.gz…226 Transfer complete…ftp>
7. Log out offtp.
ftp> quit221 Goodbye.%
A-2 Specman Elite Tutorial
Installing the Specman Elite Software Setting up the Tutorial Environment
rting
e
andstep.
mail,nt
lled.
er
Installing the Specman Elite SoftwareHere’s the procedure for setting the environment variables, installing the files, and staup the license manager. Please refer to README file for installation updates.
1. Log in to the machine where you want to install the Specman Elite software.
% rlogin solaris/hpux-machine
2. Run the installation script.
% sh ./install_specman<release_number>.sh
3. When the Specman Elite Install Script Menu appears, select option 1, “Completinstallation”.
After you have installed the machine-independent files (including the online docs)the machine-dependent files, the script will ask you to select a license installation
4. Choose option 1, “Install license server” from the “License handling” menu.
The script creates a new license file based on the license file you obtained via e-activates the license server, updates the SPECMAN_LICENSE_FILE environmevariable, and optionally creates the “rc.specman” file.
5. Exit the installation script after the license handling procedure is completed.
6. Source the Specman Elite environment file (env.csh or env.sh), for example:
% source <install_dir>/<release_number>/env.csh
7. Make sure the Specman Elite object in your PATH is the one you have just insta
% which specman<install_dir>/<OS>/specman%
8. To check the installation, start the Specman Elite graphical interface.
% specview &
✓ If you have difficulty starting Specview or obtaining a license, call Verisity customsupport at (650) 934-6890.
Specman Elite Tutorial A-3

Setting up the Tutorial Environment Installing the Tutorial Files
will
taskr 2,sent.
Installing the Tutorial FilesHere’s the procedure for installing the tutorial files.
1. Change directory to the directory where you want to install the tutorial files.
% cd <tutor_dir>%
2. Unzip and untar these_tutor.tar.gz file.
% gunzip se_tutor.tar.gz% tar -xvf se_tutor.tar
3. List the directory contents to see the file structure.
% ls *
gold:CPU_bypass.e CPU_instr.e CPU_tst2.eCPU_checker.e CPU_misc.e CPU_tst3.eCPU_cover.e CPU_refmodel.e regression_3.2.ecovCPU_drive.e CPU_top.eCPU_dut.e CPU_tst1.e
src:CPU_bypass.e CPU_instr.e CPU_tst2.eCPU_checker.e CPU_misc.e CPU_tst3.eCPU_cover.e CPU_refmodel.e regression_3.2.ecovCPU_drive.e CPU_top.eCPU_dut.e CPU_tst1.e%
You can see that there are two sets of files. As you work through this tutorial, yoube modifying the files in thesrcdirectory. If you have trouble making the modificationscorrectly, you can view or use the files in thegold directory. The files in thegolddirectory are complete and correct.
Now that the files are installed, you are ready to proceed with the design verificationflow shown in Figure 1-2 on page 1-3. To start the first step in that flow, turn to Chapte“Understanding the Environment”. In this chapter, you review the design specificationand functional test plan for the CPU design and define the overall verification environm
A-4 Specman Elite Tutorial
uron, in
B Design Specifications forthe CPU
This document contains the following specifications:
• CPU instructions
• CPU interface
• CPU register list
CPU InstructionsThe instructions are from three main categories:
• Arithmetic instructions — ADD, ADDI, SUB, SUBI
• Logic instructions — AND, ANDI, XOR, XORI
• Control flow instructions — JMP, JMPC, CALL, RET
• No-operation instructions— NOP
All instructions have a 4-bit opcode and two operands. The first operand is one of fo4-bit registers internal to the CPU. This same register stores the result of the operatithe case of arithmetic and logic instructions.
Specman Elite Tutorial B-1

Design Specifications for the CPU CPU Instructions
ters
xte a
Based on the second operand, there are two categories of instructions:
• Register instructions— the second operand is another one of the four internal regis
• Immediate instructions — the second operand is an 8-bit value contained in the neinstruction. When the opcode is of type JMP, JMPC, or CALL, this operand must b4-bit memory location.
Figure B-1 Register Instruction
Figure B-2 Immediate Instruction
Table B-1 on page B-2 shows a summary description of the CPU instructions.
byte 1
bit 7 6 5 4 3 2 1 0
opcode op1 op2
byte 1 2
bit 7 6 5 4 3 2 1 0 7 6 5 4 3 2 1 0
opcode op1 don’tcare
op2
Table B-1 Summary of Instructions
Name Opcode Operands Comments
ADD 0000 register, register ADD; PC <- PC + 1
ADDI 0001 register, immediate ADD immediate; PC <- PC + 2
SUB 0010 register, register SUB; PC <- PC + 1
SUBI 0011 register, immediate SUB immediate; PC <- PC + 2
AND 0100 register, register AND; PC <- PC + 1
ANDI 0101 register, immediate AND immediate; PC <- PC + 2
XOR 0110 register, register XOR; PC <- PC + 1
B-2 Specman Elite Tutorial
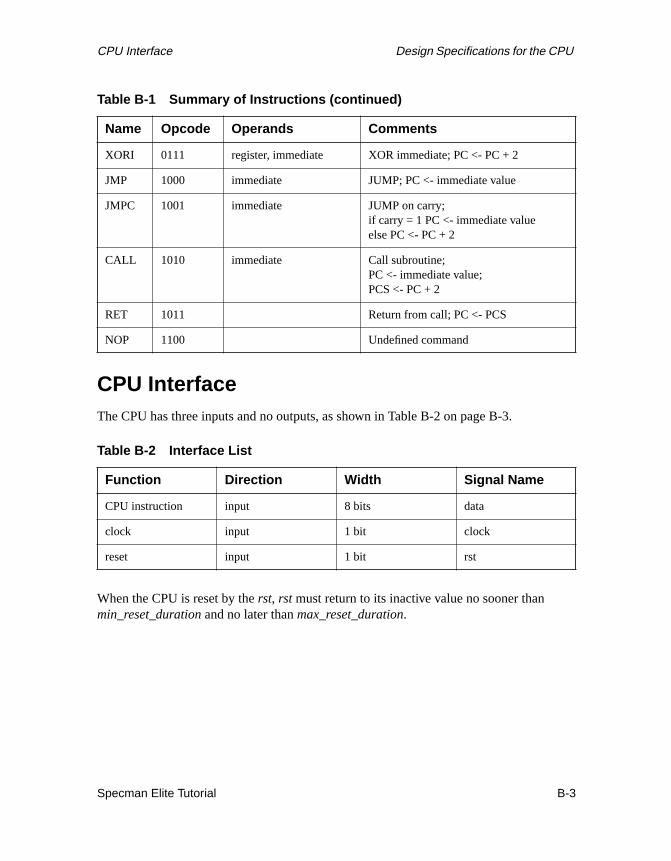
CPU Interface Design Specifications for the CPU
CPU InterfaceThe CPU has three inputs and no outputs, as shown in Table B-2 on page B-3.
When the CPU is reset by therst, rst must return to its inactive value no sooner thanmin_reset_duration and no later thanmax_reset_duration.
XORI 0111 register, immediate XOR immediate; PC <- PC + 2
JMP 1000 immediate JUMP; PC <- immediate value
JMPC 1001 immediate JUMP on carry;if carry = 1 PC <- immediate valueelse PC <- PC + 2
CALL 1010 immediate Call subroutine;PC <- immediate value;PCS <- PC + 2
RET 1011 Return from call; PC <- PCS
NOP 1100 Undefined command
Table B-2 Interface List
Function Direction Width Signal Name
CPU instruction input 8 bits data
clock input 1 bit clock
reset input 1 bit rst
Table B-1 Summary of Instructions (continued)
Name Opcode Operands Comments
Specman Elite Tutorial B-3

Design Specifications for the CPU CPU Register List
B-4.
CPU Register ListThe CPU has six 8-bit registers and one 4-bit register, as shown in Table B-3 on page
Table B-3 Register List
Function Width Register Name
state machine register 4 bits curr_FSM
program counter 8 bits pc
program counter stack 8 bits pcs
register 0 8 bits r0
register 1 8 bits r1
register 2 8 bits r2
register 3 8 bits r3
B-4 Specman Elite Tutorial