Specimen Collection Procedures & Policies - Virginia
33
Jump to: Outpatient Phlebotomy Services ● Collection Containers ● Blood Collection Procedures Urine Collection Procedures ● Cerebrospinal Fluid (CSF) Collection Containers Coagulation Specimen Collection and Processing (General Instructions) Microbiology Cultures and Examination Procedures ● Urine Cultures Virology Specimen Collection Anatomic Pathology Histopathology Specimen Collection ● Cytopathology Specimen Collection Ancillary Testing: Immunohistochemistry, Hormone Receptor Assays, In Situ Hybridization, Immunofluorescence, and Electron Microscopy Specimen Collection Procedures and Policies OUTPATIENT PHLEBOTOMY SERVICES The use of outpatient phlebotomy services for the procurement of outpatient specimens is strongly encouraged in order to provide efficient laboratory services to patients. The following charts give the locations, hours of service, and phone/pager numbers for outpatient phlebotomy services. Center / Location Hours (Monday-Friday) Phone Ambulatory Care Center 2nd Floor, Room 228 8 AM – 5:30 PM 828-7773 Ambulatory Care Center 4th Floor, Room 427 8:30 AM – 5:30 PM 828-7772 Dalton Oncology Lab North Hospital - Ground Floor, Rm G-099A 8 AM – 4:30 PM 828-9899 Forest Office Park - Patient Service Center 8001 Franklin Farms Dr, Suite 100 8:30 AM – 5 PM 662-9400 Gateway Building 1st Floor, Room 1210 8 AM – 5:30 PM 828-0446 Children's Pavilion - Pediatric Clinic 1001 E. Marshall St, Room 1035 9 AM – 5:15 PM 828-6639 Hayes E. Willis Center of South Richmond 4730 N Southside Plaza, #16 8:30 AM – 5 PM 230-7741 Midlothian - Patient Service Center 105 Wadsworth Drive 8:30 AM – 5 PM 323-2964 VCUHS at Stony Point 9000 Stony Point Parkway, 2nd Floor 8 AM – 5 PM 560-8905 Hours subject to change. Please call phone number listed to confirm.
Transcript of Specimen Collection Procedures & Policies - Virginia

Jump to: Outpatient Phlebotomy Services ● Collection Containers ● Blood Collection Procedures
Urine Collection Procedures ● Cerebrospinal Fluid (CSF) Collection Containers Coagulation Specimen Collection and Processing (General Instructions)
Microbiology Cultures and Examination Procedures ● Urine Cultures Virology Specimen Collection
Anatomic Pathology
Histopathology Specimen Collection ● Cytopathology Specimen Collection Ancillary Testing: Immunohistochemistry, Hormone Receptor Assays, In Situ
Hybridization, Immunofluorescence, and Electron Microscopy
Specimen Collection Procedures and Policies
OUTPATIENT PHLEBOTOMY SERVICES The use of outpatient phlebotomy services for the procurement of outpatient specimens is strongly encouraged in order to provide efficient laboratory services to patients. The following charts give the locations, hours of service, and phone/pager numbers for outpatient phlebotomy services.
Center / Location Hours (Monday-Friday)
Phone
Ambulatory Care Center 2nd Floor, Room 228
8 AM – 5:30 PM 828-7773
Ambulatory Care Center 4th Floor, Room 427
8:30 AM – 5:30 PM 828-7772
Dalton Oncology Lab North Hospital - Ground Floor, Rm G-099A
8 AM – 4:30 PM 828-9899
Forest Office Park - Patient Service Center 8001 Franklin Farms Dr, Suite 100
8:30 AM – 5 PM 662-9400
Gateway Building 1st Floor, Room 1210
8 AM – 5:30 PM 828-0446
Children's Pavilion - Pediatric Clinic 1001 E. Marshall St, Room 1035
9 AM – 5:15 PM 828-6639
Hayes E. Willis Center of South Richmond 4730 N Southside Plaza, #16
8:30 AM – 5 PM 230-7741
Midlothian - Patient Service Center 105 Wadsworth Drive
8:30 AM – 5 PM 323-2964
VCUHS at Stony Point 9000 Stony Point Parkway, 2nd Floor
8 AM – 5 PM 560-8905
Hours subject to change. Please call phone number listed to confirm.

Specimen Collection Procedures and Policies
Page 2 of 33
Patient Identification Policy [Go to Top]
Patient is asked to state their full name.
Outpatients will be asked for their date of birth as a second identifier, in addition to stating their full name. This must match information on their identification, requisition and labels.
Specimen Identification Policy
We must emphasize the importance of proper specimen identification. Most errors occur because of specimen mix-up. Therefore, we require that all specimens sent to the laboratory be labeled with the patient's full name and hospital number (if hospital number is not available, date of birth precedes use of social security number).
Specimens for Transfusion Medicine also require date drawn and the phlebotomist's signature on the tube. Specimens lacking proper identification may not be accepted by the laboratory.
Safety Procedure and Policy for Specimen Collection
The Centers for Disease Control (CDC) and Prevention recommend that universal precautions be used when handling a potential biologic hazard such as laboratory specimens. The following guidelines are an abbreviated list of the complete procedures and policies that relate to safety. Refer to the VCUHS Infection Control Manual for a comprehensive list.
Personal Safety
Use personal protective equipment that is appropriate for the biologic risk class of the task. Gloves should be worn when phlebotomy is being performed, or whenever there is a risk of exposure to blood by the hands. Face shields should be used when there is a potential risk of aerosols or splashing of biological material. Gowns should be worn whenever there is a potential for contamination of clothing with biological materials. Hand washing should be performed after removal of gloves and prior to leaving a “dirty or contaminated” area.
Needle Disposal [Go to Top]
All needles that have been used to collect or transfer specimens to containers must be disposed of immediately. Needles must never be recapped or cut prior to disposal. Instead, the needle must be disposed of by placing it in a leak proof plastic container approved for disposal of “biological hazard sharp” material.

Specimen Collection Procedures and Policies
Page 3 of 33
Blood / Body Fluid Precautions All specimens which contain blood or body fluids must be considered infectious. All containers must be tightly capped or sealed to prevent leakage/spillage and placed in a plastic bag that has been approved for specimen transport. Attach a requisition or paperwork that is associated with the specimen to the outside of the plastic bag by using rubber bands. If transport of the specimen is required to be on ice, then the specimen is to be placed first into a plastic bag and then placed on ice.
COLLECTION CONTAINERS [Go to Top]
Vacutainer® Tube Use The following table gives the most common types of collection tubes required for analysis. Additional collection tube types may be required for selected tests. Refer to test listings in this handbook for specific instructions. Invalid results may occur if improper collection techniques and collection tubes are used.
Color Additive Draw Volume
Minimum Volume
Blue Sodium citrate - 3.2% 4.5 mL 2.7 mL 1.8 mL
4.5 mL 2.7 mL 1.8 mL
Gray Potassium oxalate, sodium fluoride
5 mL 3 mL
3 mL 1.5 mL
Green Sodium heparin 7 mL 3 mL
Lavender K2EDTA 3 mL 2.3 mL
Pink EDTA 6 mL (Blood Bank only)
Red None 4 mL 7 mL
Red/gray (SST™)
Inert barrier material; fast-clot activator
8.5 mL 3.5 mL
Capillary Blood Collection Tubes (Microtainers™)
Lavender K2EDTA 500 μL 250 μL
Red Serum Separator 500 μL 250 μL
Gold SST Serum Separator (amber reservoir)
600 µL 600 µL
Lt. Green Lithium Heparin and Plasma Separator (amber reservoir)
600 µL 600 µL
See following “Changes in Laboratory Vacutainer® Tubes” graphic.

Specimen Collection Procedures and Policies
Page 4 of 33

Specimen Collection Procedures and Policies
Page 5 of 33
Urine or Fluid (other than CSF) Collection Containers [Go to Top]
Sterile red top blood collection tubes (chemistries)
Sterile lavender top blood collection tubes (cell counts except CSF; see next section for CSF)
Sterile urine collection tubes for urinalysis (UA) and urine cultures (UC). Two tubes are available from Central Supply:
1. Yellow capped conical bottom tube for UA, Lawson #66794 2. Gray capped tube for UC, Lawson #66793 Collection Instructions: Both tubes are individually marked and packaged with a collection straw. Collect urine in a sterile cup. Place the straw in the urine and then gently press each tube into the top of the straw. The tubes will automatically draw the appropriate volume of urine into the tubes. The urine cup can then be discarded.
3000 mL brown plastic container with lid (for timed collections); preservatives may be added to this container for specific tests — contact lab
Cerebrospinal Fluid (CSF) Collection Containers [Go to Top]
Use the sterile tubes provided in the Spinal Tap kit, or alternatively use sterile plastic or glass tubes that do not contain preservatives or anticoagulants. Properly label each tube submitted with the patient's name, medical record number, date/time of collection, initials of collector, and sequence number of collection. Typically, tubes are labeled #1-4, with tubes #2 or #3 being used for culture and tubes #1 and #4 used for cell counts; any tube can be used for chemistry tests.
Microbiology Culture Containers (Sterile) [Go to Top]
Blood culture bottles Isolator™ tubes (1.5 or 10 mL) Culture Swab Plus™ 100-200 mL plastic container with lid Ova & parasite kit Sterile cap ped syringes without needles Universal transport medium for viral and chlamydial cultures
Chlamydia trachomatis and Neisseria gonorrhoeae DNA
Amplification Assay kits: o Female, Endocervical Swab o Male, Urethral Swab
Urine Collection Kit VZV and Bordetella Antigen, FA Collection kits – call the Microbiology
Laboratory for kit and collection and transport instructions

Specimen Collection Procedures and Policies
Page 6 of 33
BLOOD COLLECTION PROCEDURES [Go to Top]
Patient Preparation
Please provide the patient, in advance, with appropriate collection instructions and information on fasting, diet, and medication restrictions when necessary.
Specimen Preparation
Prior to each collection, review the laboratory's specimen requirement. Note the proper specimen to be collected, the volume needed for the procedure, the collection materials, and the storage and handling requirements.
To avoid incorrect identification, apply the adhesive label with identifying information to the specimen container in the presence of the patient. Each specimen must be labeled with:
Patient's full name Medical record number or Social security number Date and time of collection Phlebotomist's initials on the tube
Confirm the identification in the presence of the patient. Transport or process the specimen as required and store properly.
During specimen collection, preparation, and submission, there is a much greater possibility of critical error than during actual testing or examination of the specimen. Errors in storage and handling compromise the integrity of the specimen and, thus, the test results.
Venipuncture Technique
Considerations:
Draw specimens from veins without an I.V. present when possible; if not possible, draw the specimen distal to the I.V. site. Note this fact on the tube.
Use a large enough needle to permit adequate flow of blood. Avoid drawing blood from a vein associated with a hematoma. If patient has had a mastectomy, do not draw blood from that side. Always use standard precautions when drawing or handling blood
specimens and discarding needles.
Specimen Collection Procedures and Policies
Page 7 of 33
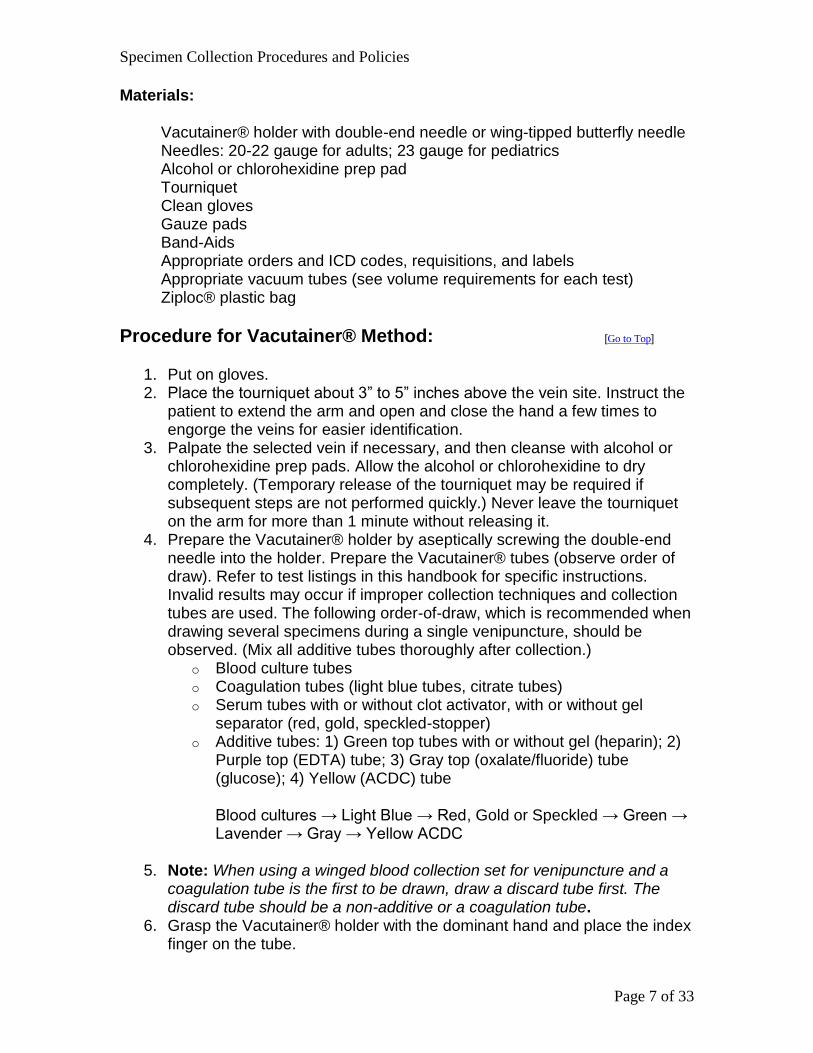
Materials:
Vacutainer® holder with double-end needle or wing-tipped butterfly needle Needles: 20-22 gauge for adults; 23 gauge for pediatrics Alcohol or chlorohexidine prep pad Tourniquet Clean gloves Gauze pads Band-Aids Appropriate orders and ICD codes, requisitions, and labels Appropriate vacuum tubes (see volume requirements for each test) Ziploc® plastic bag
Procedure for Vacutainer® Method: [Go to Top]
1. Put on gloves. 2. Place the tourniquet about 3” to 5” inches above the vein site. Instruct the
patient to extend the arm and open and close the hand a few times to engorge the veins for easier identification.
3. Palpate the selected vein if necessary, and then cleanse with alcohol or chlorohexidine prep pads. Allow the alcohol or chlorohexidine to dry completely. (Temporary release of the tourniquet may be required if subsequent steps are not performed quickly.) Never leave the tourniquet on the arm for more than 1 minute without releasing it.
4. Prepare the Vacutainer® holder by aseptically screwing the double-end needle into the holder. Prepare the Vacutainer® tubes (observe order of draw). Refer to test listings in this handbook for specific instructions. Invalid results may occur if improper collection techniques and collection tubes are used. The following order-of-draw, which is recommended when drawing several specimens during a single venipuncture, should be observed. (Mix all additive tubes thoroughly after collection.)
o Blood culture tubes o Coagulation tubes (light blue tubes, citrate tubes) o Serum tubes with or without clot activator, with or without gel
separator (red, gold, speckled-stopper) o Additive tubes: 1) Green top tubes with or without gel (heparin); 2)
Purple top (EDTA) tube; 3) Gray top (oxalate/fluoride) tube (glucose); 4) Yellow (ACDC) tube
Blood cultures → Light Blue → Red, Gold or Speckled → Green → Lavender → Gray → Yellow ACDC
5. Note: When using a winged blood collection set for venipuncture and a coagulation tube is the first to be drawn, draw a discard tube first. The discard tube should be a non-additive or a coagulation tube.
6. Grasp the Vacutainer® holder with the dominant hand and place the index finger on the tube.

Specimen Collection Procedures and Policies
Page 8 of 33
7. Puncture the vein at a 35° to 45° angle. As the needle enters the skin, lower the angle so you pierce only the anterior wall of the vein.
8. Push the Vacutainer® tube onto the needle in a Vacutainer® holder. Maintain stability of the needle in the vein. Blood should immediately begin to fill the tube due to vacuum action. If no blood flows, slowly retract or advance the needle until blood appears.
9. Remove the tube and replace it with a new tube as needed, keeping the needle steady and in the vein. Invert the collected tube of blood several times (5 or 6).
10. After all tubes have been collected, release the tourniquet. Remove the Vacutainer® tube from the holder before removing the needle from the vein.
11. Press a gauze pad over the venipuncture site and remove the needle. Have the patient lift his arm and hold the pad in place for 1-3 minutes until bleeding has stopped.
12. Place a Band-Aid over the site to prevent blood leakage. 13. Immediately attach barcode label to each specimen and place in a ziplock
bag. Transport specimens to the laboratory as soon as possible. 14. Dispose of needle and attached holder in biohazard sharps container.
Skin Puncture / Fingerstick Techniques [Go to Top]
Considerations:
Primary use is for collection of blood in infants and children using Microtainers™ or capillary collection tubes.
Fingerstick blood collections may also be used for certain tests in adults (ie, glucose, CBC).
Avoid the mixing of tissue fluid with the blood sample (ie, do not squeeze or “milk” the puncture site excessively during collection).
Collection sequence: EDTA → other additive → serum
Materials:
Alcohol prep pad Sterile gauze or cotton ball Microlancet (fixed depth guide) Appropriate Microtainer™ tubes or capillary tubes (heparinized) Appropriate label(s) and requisitions

Specimen Collection Procedures and Policies
Page 9 of 33
Procedure: [Go to Top]
1. The proper site for heel punctures is illustrated in the following drawing.
2. Thoroughly cleanse the puncture site area using an alcohol swab. Wipe
off all excess alcohol and allow the site to dry. 3. Perform the puncture using a sterile microlancet which has a fixed depth
guide. 4. Wipe away the first drop of blood before beginning the collection. Using
only moderate pressure, collect blood by siphon action into the Microtainers™ or capillary tubes. Mix Microtainer™ tubes after they have been filled. If capillary tubes are used for hematocrit determination, touch tip of tube to drop of blood; blood will flow by capillary action. Seal tube with sealing clay, hold tube perpendicular to sealing clay. Place small tubes in red top Vacutainer® tube and label.
5. After the blood is collected, hold a sterile cotton ball or gauze pad over the puncture site until the bleeding has stopped.
Immediately label all specimens and place them into a ziplock bag for transport to the laboratory. Attach any requisitions/transmittal slips to the outside using rubber bands.

Specimen Collection Procedures and Policies
Page 10 of 33
URINE COLLECTION PROCEDURES [Go to Top]
Clean Catch Midstream Urine Collection (CCMS) (Use for urine culture and urinalysis)
Materials:
Sterile urine collection tubes for urinalysis (UA) and urine collection (UC). Two tubes available from Central Supply:
Yellow capped conical bottom tube for UA, Lawson #66794
Gray capped tube for UC, Lawson #66793
Collection Instructions:
Both tubes are individually marked and packaged with a collection straw. Collect urine in a sterile cup. Place the straw in the urine and gently press each tube into the top of the straw. The tubes will automatically draw the appropriate volume of urine into the tubes. The urine cup can be discarded.
Soap pads or towelettes
Barcode labels
Procedure for Female Patients:
1. Wash hands thoroughly with soap and water; rinse and dry well with paper towels.
2. Separate the skin folds around the urinary opening. Wash the area with a soap pad or towelette using a front to back motion. Repeat twice.
3. Begin urinating into the toilet with the skin folds held apart with the fingers. 4. Insert collection container into urine stream without allowing container to
touch the skin area. 5. Fill half of the container and remove from the urine stream. 6. Replace the container lid and seal completely. Label the container and
note the collection time. 7. Transport specimen to the laboratory immediately or refrigerate until
transport is possible.
Procedure for Male Patients:
1. Wash hands thoroughly with soap and water; rinse and dry well with paper towels.
2. Wash the head of the penis with the towelette or soap pad. 3. Begin urinating into the toilet.

Specimen Collection Procedures and Policies
Page 11 of 33
4. Insert the collection container into the urine stream without touching the skin.
5. Fill half the container and remove it from the urine stream. 6. Replace the container lid and seal completely. Label the container and
note the collection time. 7. Transport the specimen to the laboratory immediately or refrigerate until
transport is possible.
Random Urine Collections for Routine Analysis [Go to Top]
Refrigerate the collected urine immediately or keep in a cool place to retard growth of bacteria until the test is performed.
The time of collection is critical because urine values vary considerably during a 24-hour period, and most testing methods are based on normal values for first morning samples. The first urine voided in the morning is preferred because it has a more uniform volume and concentration and a lower pH, which helps preserve the formed elements. If it is not possible to obtain a first morning sample, note the time of the sample on the test requisition form.
Urine collection tubes for urinalysis (UA) and urine cultures (UC). Two tubes available from Central Supply:
1. Yellow capped conical bottom tube for UA, hospital Lawson #66794 2. Gray capped tube for UC, Lawson #66793
Collection Instructions: Both tubes are individually marked and packaged with a collection straw. Collect urine in a sterile cup. The straw is placed in the urine. Gently press each tube into the top of the straw. The tubes will automatically draw the appropriate volume of urine into the tubes. Discard the urine cup.
Routine 24-Hour Urine Collection [Go to Top]
For many urine chemistry tests, it is necessary to analyze a sample taken from an entire 24-hour excretion. Incorrect collection and preservation of a 24-hour urine collection are two of the most frequent errors in laboratory medicine.
The 24-hour urine specimen should be submitted in a wide-mouth, chemically clean, properly labeled urine container. (Patients should not be allowed to submit urine specimens in their own “clean” jars.) The laboratory adds required preservatives or supplies the proper preservative with the container.
Written instructions should clearly explain the following points:
Specimen Collection Procedures and Policies
Page 12 of 33
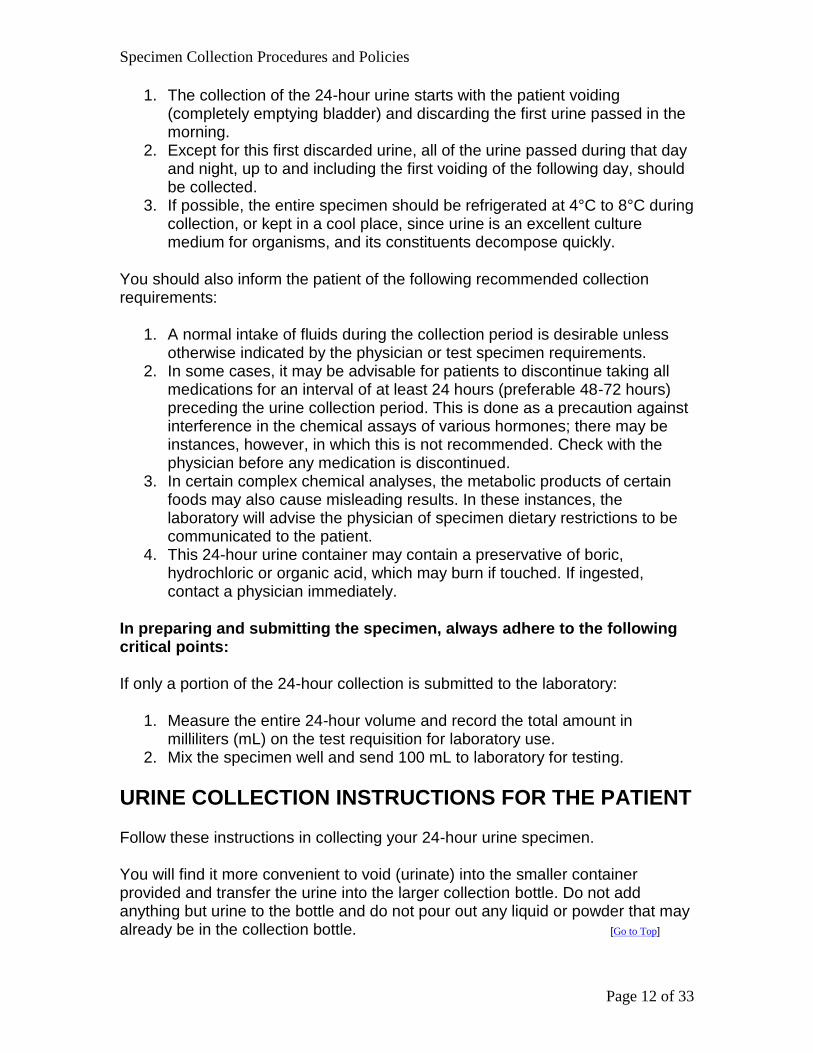
1. The collection of the 24-hour urine starts with the patient voiding (completely emptying bladder) and discarding the first urine passed in the morning.
2. Except for this first discarded urine, all of the urine passed during that day and night, up to and including the first voiding of the following day, should be collected.
3. If possible, the entire specimen should be refrigerated at 4°C to 8°C during collection, or kept in a cool place, since urine is an excellent culture medium for organisms, and its constituents decompose quickly.
You should also inform the patient of the following recommended collection requirements:
1. A normal intake of fluids during the collection period is desirable unless otherwise indicated by the physician or test specimen requirements.
2. In some cases, it may be advisable for patients to discontinue taking all medications for an interval of at least 24 hours (preferable 48-72 hours) preceding the urine collection period. This is done as a precaution against interference in the chemical assays of various hormones; there may be instances, however, in which this is not recommended. Check with the physician before any medication is discontinued.
3. In certain complex chemical analyses, the metabolic products of certain foods may also cause misleading results. In these instances, the laboratory will advise the physician of specimen dietary restrictions to be communicated to the patient.
4. This 24-hour urine container may contain a preservative of boric, hydrochloric or organic acid, which may burn if touched. If ingested, contact a physician immediately.
In preparing and submitting the specimen, always adhere to the following critical points:
If only a portion of the 24-hour collection is submitted to the laboratory:
1. Measure the entire 24-hour volume and record the total amount in milliliters (mL) on the test requisition for laboratory use.
2. Mix the specimen well and send 100 mL to laboratory for testing.
URINE COLLECTION INSTRUCTIONS FOR THE PATIENT
Follow these instructions in collecting your 24-hour urine specimen.
You will find it more convenient to void (urinate) into the smaller container provided and transfer the urine into the larger collection bottle. Do not add anything but urine to the bottle and do not pour out any liquid or powder that may already be in the collection bottle. [Go to Top]

Specimen Collection Procedures and Policies
Page 13 of 33
The collection bottle should be kept refrigerated throughout the collection period.
1. Upon arising in the morning, urinate into the toilet, emptying your bladder completely. Do not collect this sample. Note the exact time and write it down on the container label (request form).
2. After this time collect all urine voided for 24 hours in the container provided by the physician. All urine passed during the 24-hour time period ( day and night) must be collected.
3. Refrigerate the collected urine between all voidings or keep in a cool place.
4. At exactly the same time the following morning, void completely again (first time after awakening), and add this sample to the collection container. This completes your 24-hour collection.
5. Take the 24-hour specimen to the physician's office or laboratory as soon as possible.
Timed Urine Collection Preservatives (see individual test listings for more instructions) [Go to Top]
1. Tests that require no preservative but require refrigeration during collection:
Aldosterone
Amino acids
Amylase
B-2 Microglobulin
Calcium
Calculus analysis
Chloride
Citrate
Copper
Cortisol
Cotinine
Creatinine
Creatinine clearance
Cystine
Deoxypyridinoline crosslink
d-Xylose
Histamine
Histoplasmosis
Homocystine
Hydroxyproline, free
Hydroxyproline, total
Hydroxyproline, total & free
Iron
Long chain fatty acid
Magnesium
Methylmalonic acid
Microalbumin
Nitrogen
N-telopeptide cross links
Osmolality
Organic acids
Oxalate
Phosphorus
Potassium
Protein
Prostaglandin
Sodium
Sulfate
Urea nitrogen
Uric acid
Urobilinogen

Specimen Collection Procedures and Policies
Page 14 of 33
2. Tests requiring 30 mL of 6N HCl as preservative or which can be performed on specimens requiring this preservative (Note: HCl is an acid; handle with care):
Catecholamines
5-HIAA
17-Hydroxycorticosteroids
17-Ketogenic steroids
17-Ketosteroids, total
Cyclic AMP
Homovanillic acid (HVA)
Metanephrines, Fractionated
Vanillylmandelic acid (VMA)
3. Tests for which 30 mL of 6N HCl is acceptable, but is not required:
Amino acids
Calcium
Citrate
Cortisol
Creatinine
Cystine
Hydroxyproline, free
Hydroxyproline, total
Hydroxyproline, total and free
Iron
Magnesium
Oxalate
Phosphorous
Potassium
Sodium
Urea nitrogen
4. Tests requiring 30 mL of glacial acetic acid as preservative:
Delta aminolevulinic acid (delta-ALA)
Porphobilinogen
For tests not listed, refer to the specific test in the Test List. For additional information, call the Help-Line, 828-7284.
[Go to Top]

Specimen Collection Procedures and Policies
Page 15 of 33
CEREBROSPINAL FLUID (CSF) COLLECTION CONTAINERS [Go to Top]
Use the sterile tubes provided in the Spinal Tap kit, or alternatively use sterile plastic or glass tubes that do not contain preservatives or anticoagulants. Properly label each tube submitted with the patient's name, medical record number, date/time of collection, initials of collector, and sequence number of collection. Typically, tubes are labeled #1-4, with tubes #2 or #3 being used for culture and tubes #1 and #4 used for cell counts; use any tube for chemistry tests.
COAGULATION SPECIMEN COLLECTION AND PROCESSING (GENERAL INSTRUCTIONS)
Coagulation tests are extremely sensitive to methods of sample collection and processing. Results are a direct reflection of sample integrity. Samples for most testing are affected by temperature, time parameters, anticoagulant dilution effects, mechanical agitation, hematocrit extremes, and pH fluctuations.
Follow NCCLS Reference Guidelines for Coagulation Sample Collection. Collect specimens in evacuated tube systems or, if a syringe is used, a small volume syringe (<20 mL) is recommended. Note: Check individual test listings for exceptions to these general instructions before collecting and proceeding.
Tube # (BD) Stopper
Color Citrate Volume Required Blood Volume Tube Size
369714 Light blue 0.5 mL 4.5 mL 13 mm x 75 mm
366393 Light blue 0.3 mL 2.7 mL 10 mm x 64 mm
366392 Light blue 0.2 mL 1.8 mL
Pediatric patients only 10 mm x 47 mm
Containers: The Hemostasis Lab uses 3.2% glass citrate tubes (Becton-Dickinson). The reference ranges were determined using these Vacutainer® tubes.
Blood / Anticoagulant Ratio: The ratio of blood to sodium citrate must be 9:1. Therefore, fill all Vacutainer® blue top tubes to complete vacuum volume. When drawing blood using a winged blood collection set, the tube for coagulation testing should be the second or third tube drawn in order to maintain the proper anticoagulant/blood ratio. If no other lab work is being drawn, first draw enough blood into a plain red top tube to fill the collection tubing dead space. This first tube need not be completely filled; one mL of blood is sufficient. Then discard this tube and draw the coagulation specimen.
[Go to Top]

Specimen Collection Procedures and Policies
Page 16 of 33
Patient Hematocrit [Go to Top]
If hematocrit (Hct) is >55%, add calculated amount of whole blood to 0.5 mL anticoagulant per tube using formula:
55
(100 – Hct)
x 4.5 = mL whole blood to be added
Mark tube to indicate correction made for hematocrit.
Drawing Specimen
When drawing blood using a winged blood collection set, if only a coagulation specimen is being drawn, first draw a waste tube to prime the collection set tubing. The first tube need not be completely filled; 1 mL of blood is sufficient. Discard the waste tube and proceed with the coagulation tube. Failure to use a waste tube may lead to under filling of the coagulation tube.
When drawing blood from an indwelling catheter, flush the line with 5 mL of saline and the first 5 mL of blood or six dead space volumes of the VAD (vascular access device) should be discarded. Note: This technique is discouraged and should be used only when a clean venipuncture is impossible.
When drawing blood using a winged blood collection set the tube for coagulation testing should be the second or third tube drawn in order to maintain the proper anticoagulant/blood ratio. If no other lab work is being drawn, first draw enough blood into a plain red top tube to fill the collection tubing dead space. This first tube need not be completely filled; 1 mL of blood is sufficient. Then discard this tube and draw the coagulation specimen.
Specimen Processing [Go to Top]
Samples for PT testing only may be sent without any processing if they will arrive at VCUHS within 24 hours of collection. These samples must be kept at room temperature only. Do not remove the cap to the tube.
Samples for other Coagulation testing may be sent to the lab without centrifuging or removing the cap if they will arrive within four hours of collection.
Storage and Transportation for Nonlocal Specimens
Samples that will not arrive at VCUHS within 4 hours of collection are to be processed as follows:

Specimen Collection Procedures and Policies
Page 17 of 33
1. Centrifuge the sample with the cap on at 3500 rpms for 15 minutes. 2. Transfer the top two-thirds of the plasma being careful not to disturb the
cells using a plastic pipette into a plastic storage vial or tube. 3. Check the platelet count of the plasma to make sure it is platelet poor
(<8,000/mm 3). If it is not platelet poor, repeat steps 1 and 2. If there is not an instrument available to check the platelet count on the plasma, just double spin before freezing the specimen (ie, repeat steps 1 and 2).
4. Label the tube with the patient's name, identifying number, platelet count and “citrated plasma”.
5. Freeze platelet-free specimen immediately at -20°C or less. 6. Ship in styrofoam insulated container with enough space for 3-4 pounds of
dry ice. Packaging: a. Add 3 lb (minimum) dry ice in one large chunk. Do not break up ice as
exposure to air causes quick evaporation. b. Place packing materials (ie, styrofoam “S” or newspaper) in the
container to fill up the rest of air space. c. Close container and seal the styrofoam opening by taping completely.
Tape will minimize exposure of the contents to air. d. Place styrofoam container in cardboard box, seal, and attach shipping
label. 7. Phone VCUHS Coagulation Special Studies Laboratory (804) 628-5736
to alert receiving. 8. Address Package for shipment::
Coagulation - Special Studies Laboratory VCUHS Dept of Pathology Clinical Support Center, Room 665-H 403 North 13th Street Richmond, Virginia 23298
MICROBIOLOGY CULTURES AND EXAMINATION PROCEDURES [Go to Top]
Instructions for Blood Culture Collection
Step 1 – Collection Preparation
Identify Obtain BLOOD CULTURE COLLECTION KITS (one kit for each venipuncture) – Central Supply stocks as follows: Hospital #37141; ESI #26856.
Identify the patient by checking armband or area specific procedure. Explain the procedure to the patient and/or family. Provide patient privacy.

Specimen Collection Procedures and Policies
Page 18 of 33
Mark fluid volume in bottle and then mark volume of blood to be drawn using the hatch marks on bottle (each hatch is a 5-mL increment). Refer to tables below for recommended blood volumes (table for infants and children and a table for adults).
Wash hands with soap and water with friction for 15 seconds or use alcohol based hand rub per policy.
Remove protective flip top overcap and prep the rubber septum of the blood culture bottles with an alcohol pad in a circular motion working outward from the center and allow to dry for 1 minute before inoculation.
Step 2 – Skin Preparation
Apply gloves: Apply tourniquet and select puncture sites keeping the following in mind:
Draw two sets of blood cultures at the same time from two different sites. A set includes one aerobic bottle (green) and one anaerobic bottle (purple). Sampling paired blood cultures from venipunctures at separate sites improves detection of contamination of the blood cultures by skin bacteria (consult with physician regarding sites and timing).
Only use a femoral venipuncture site as a last resort due to skin contamination by fecal bacterial flora in the area. Scrupulous skin antisepsis must be done if a femoral site is used.
Do not draw blood cultures from lines unless there is absolutely no alternative site. (See 3b if no alternative, for Intravascular Catheter draw. An order must be obtained.)
Draw cultures before the initiation of antibiotic therapy if possible. Remove tourniquet for skin preparation:
If palpation of site prior to puncture is anticipated, wear STERILE gloves.
If palpation of site prior to puncture is not anticipated, wear unsterile gloves.
Prep the puncture site with chlorhexidine (Note: <2 months old, do not use chlorhexidine use betadine); DO NOT WIPE SKIN SITE AFTER CHLORHEXIDINE PREP. How to apply to dry skin:
1. Using aseptic technique, remove the applicator from its package. 2. Holding the applicator downward, gently squeeze the wings to release
the solution. 3. For dry sites such as the arm or abdomen, scrub the site with the
friction pad for a full 30 seconds. 4. Scrub with a back-and-forth motion using friction. (If <2 months apply
betadine using a circular motion). 5. Allow to air dry. Do not blot or wipe dry. 6. Discard applicator.
How to apply to moist skin: 1. Follow steps 1 and 2 for dry skin.

Specimen Collection Procedures and Policies
Page 19 of 33
2. Use a back-and-forth motion to scrub the site for 2 full minutes. 3. Completely wet the treatment area. 4. Allow to air dry. Do not blot or wipe dry. 5. Discard applicator.
Step 3a – Venipuncture and Bottle Inoculation
Note the appropriate blood volume from the tables below before beginning venipuncture:
Table 1. Blood volumes suggested for cultures from infants and children
Wt of
patient
Total
volume
for
culture
Recommended vol of
blood for culture (mL)1
Total
patient
blood
volume
used2
kg lb Culture no. 1 Culture no. 2
Aerobic Anaerobic Aerobic Anaerobic
1 2.2 2 mls 2 mls 4%
1.1-2 2.2-
4.4
4 mls 2 mls 2 mls 4%
2.1-
12.7
4.5-
27
6 mls 2 mls 2 mls 2 mls 3%
12.8-
36.3
28-
80
20 mls 5 mls 5 mls 5 mls 5 mls 2.5%
1It is recommended to collect more than one culture (set) to increase sensitivity.
2References indicate up to 4-4.5% of total blood volume can be safely obtained for ALL laboratory
testing on blood in a 24 hour period.
Table 2. Blood volumes suggested for cultures from adults.
Total
volume
Aerobic bottle Anaerobic bottle
Adult patients 20 mls 10 mls 10 mls
Low volume draws –
ADULTS
>4 ml in
adults
All in Aerobic
bottle
NONE
Connect a luer adapter (blue cap Vacutaner® product) to the Blood Culture Adapter Cap. Then connect to the luer connector of the Safety-Lok™ Blood Collection Set.
Apply tourniquet Perform venipuncture. When the needle is in the vein, secure it with tape or
hold in place. Place Blood Culture Adapter Cap first on the Aerobic (green) bottle &
press down to penetrate the bottle septum & obtain blood flow. Fill blood culture bottles, using the previously- marked fill indicator lines (in 5-
ml increments) on the bottle
Specimen Collection Procedures and Policies
Page 20 of 33
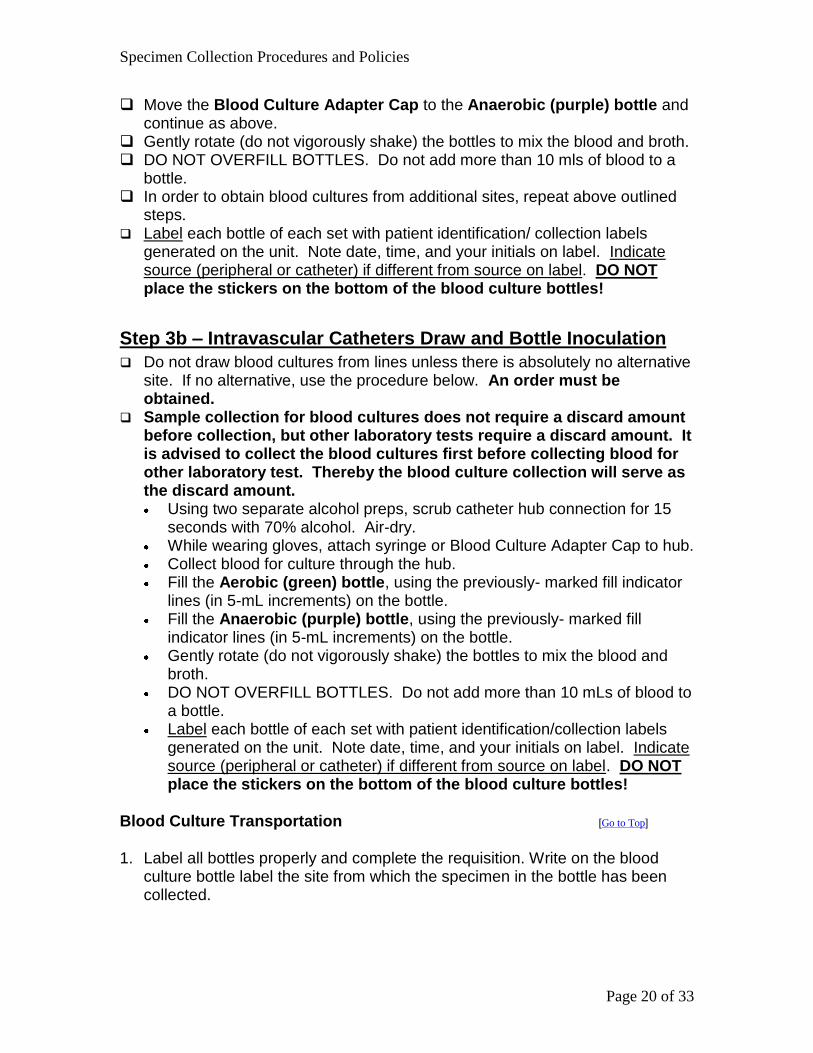
Move the Blood Culture Adapter Cap to the Anaerobic (purple) bottle and continue as above.
Gently rotate (do not vigorously shake) the bottles to mix the blood and broth. DO NOT OVERFILL BOTTLES. Do not add more than 10 mls of blood to a
bottle. In order to obtain blood cultures from additional sites, repeat above outlined
steps.
Label each bottle of each set with patient identification/ collection labels generated on the unit. Note date, time, and your initials on label. Indicate source (peripheral or catheter) if different from source on label. DO NOT place the stickers on the bottom of the blood culture bottles!
Step 3b – Intravascular Catheters Draw and Bottle Inoculation
Do not draw blood cultures from lines unless there is absolutely no alternative site. If no alternative, use the procedure below. An order must be obtained.
Sample collection for blood cultures does not require a discard amount before collection, but other laboratory tests require a discard amount. It is advised to collect the blood cultures first before collecting blood for other laboratory test. Thereby the blood culture collection will serve as the discard amount. Using two separate alcohol preps, scrub catheter hub connection for 15
seconds with 70% alcohol. Air-dry. While wearing gloves, attach syringe or Blood Culture Adapter Cap to hub. Collect blood for culture through the hub. Fill the Aerobic (green) bottle, using the previously- marked fill indicator
lines (in 5-mL increments) on the bottle. Fill the Anaerobic (purple) bottle, using the previously- marked fill
indicator lines (in 5-mL increments) on the bottle. Gently rotate (do not vigorously shake) the bottles to mix the blood and
broth. DO NOT OVERFILL BOTTLES. Do not add more than 10 mLs of blood to
a bottle. Label each bottle of each set with patient identification/collection labels
generated on the unit. Note date, time, and your initials on label. Indicate source (peripheral or catheter) if different from source on label. DO NOT place the stickers on the bottom of the blood culture bottles!
Blood Culture Transportation [Go to Top]
1. Label all bottles properly and complete the requisition. Write on the blood culture bottle label the site from which the specimen in the bottle has been collected.

Specimen Collection Procedures and Policies
Page 21 of 33
2. Place and seal the bottles in a ziplock plastic bag. Attach the requisitions/pickup sheet to the outside with tape, paper clip, or insert sheet into outside pouch of transport bag.
3. Transport to the laboratory as soon as possible. Note: Use foam liner if sent via the pneumatic tube system.
Other Body Fluid and Tissue Cultures [Go to Top]
Fluids and tissues from physiologically sterile body sites (eg, CSF, pleural fluid, peritoneal fluid, and joint fluid) should be obtained using the same precautions applied to blood cultures: careful preparation and disinfection of the skin through which the specimen is obtained. (This includes letting the disinfectant dry, and using sterile gloves and collection container). Importantly, obtain cell counts and Gram stains as well as cultures on all these specimens. CSF see below. For other fluids, submit in a sterile container with screw cap.
CSF Cultures
Use the sterile tubes provided in the Spinal Tap kit or alternatively use sterile plastic or glass tubes that do not contain preservatives or anticoagulants. Properly label each tube submitted with the patient's name, date/time of collection, initials of collector, and sequence number of collection. Typically, tubes are labeled # 1-4, with tube #2 or #3 being used for culture. For CSF specimens, viral cultures are important in children.
Abscess
Avoid swab specimens! Withdraw (aspirate) abscess fluid and submit in a sterile syringe (obeying universal precautions regarding the disposal of needles). Collect revitalized tissue from the base of the abscess cavity with sterile suture-removal-bit forceps and scissors and place on a sterile gauze square moistened with sterile saline in a sterile cup. Transport immediately to laboratory. Orderable test: Wound Culture, Deep.
Sputum
Poor collection of sputum specimen is the most frequent defect in specimen collection. Proper collection requires instructing a cooperative patient to provide a sample from a “deep cough” (that is, from the lower respiratory tract: have the patient sit upright and enlist a respiratory therapist or someone else skilled in “mobilizing” lower tract “secretions”, if necessary. Witness the collection of the sample. Do not collect spit (upper respiratory tract secretions or saliva). A Gram stain is included with respiratory cultures of sputum and endotracheal aspirate. Do not attempt to interpret any sputum specimen reported on Gram

Specimen Collection Procedures and Policies
Page 22 of 33
stains found to be markedly contaminated with squamous (upper tract) epithelial cells (eg, 3+, 4+, epithelial cells or >25 cells/low power field). Such contaminated specimens are a major source of not only useless but also misleading information.
Throat Culture [Go to Top]
1. Sterile dacron or calcium alginate swabs may be used to collect throat specimens for culture. Commercial collection sets containing swabs and transport (holding) medium are available.
2. Using a tongue blade to hold the tongue down, take the specimen directly from the back of the throat, being careful not to touch the teeth, cheeks, gums, or tongue when inserting or removing the swab.
3. Rub swab vigorously over each tonsillar area and the posterior pharynx. White patches in the tonsillar area are especially productive for streptococcal isolation.
4. Label specimens with the patient's name and the date of collection. Maintain a record of all specimens with:
o Identification of patient o Time and date of collection o Source of specimen o Test requested

Specimen Collection Procedures and Policies
Page 23 of 33
Wound
Avoid swab specimens. Aspirated fluid or tissue debrided from deep in the wound obtained sterile and submitted in sterile containers are the appropriate specimens; the orderable test for these specimens is Wound culture, deep. If a swab is used to collect from a superficial body surface, the orderable test for these specimens is Wound culture, superficial.
Direct Antigen FA (VZV, Bordetella, and Chlamydia): Collection Procedure [Go to Top]
Submit specimens (usually swabs of nasopharynx, throat, skin, or genital lesions or infected tissue) collected according to collection guidelines given for viral culture samples to the laboratory where technologists will prepare smears.
If desired, the physician may prepare smears at bedside and submit the smears for DFA testing. Use two frost-end glass slides. On the frosted surface at the end, record the patient's name, hospital identification number, and source of specimen using a lead pencil. Place the sample on the clear part of the slide (take care to place the specimen on the same side of the slide as the frosted surface).
For skin lesions, remove crusts and press the slide against the lesion. Make several spots on each of the two slides. For a throat or genital sample, collect the sample using a swab (be sure to pick up cellular material; mucus and watery secretions are not satisfactory). Use the swab to make two spots, approximately 1 cm in diameter on each of the two slides. Allow the slides to air-dry and send them to the laboratory inside a protective container along with the requisition/transmittal form.
Stool Culture
The diagnostic yield from a culture of formed (solid) stool is negligible. Only unformed (liquid) stool should be submitted for culture. A stool fecal leukocyte test can be useful on such a specimen to help separate “inflammatory” from “noninflammatory” diarrhea. A “routine” stool culture detects Salmonella, Shigella, Campylobacter, Aeromonoas, or Plesiomonas and the enterohemorrhagic E. coli that produce Shiga toxin. If any other agents are suspected, order specifically (eg, Yersinia or Vibrio). Transport stool cultures (not by usual courier service) to arrive in the laboratory within an hour of collection for maximum culture sensitivity. If a patient develops diarrhea while in the hospital or after having been on antibiotic therapy for several days, a test for Clostridium difficile toxin(s) is of much greater diagnostic utility than a stool culture.
Intestinal Parasitology Examination [Go to Top]

Specimen Collection Procedures and Policies
Page 24 of 33
The Clinical Microbiology Laboratory no longer routinely accepts stools for ova and parasite examination based on in-house data and current published literature. Instead, order Cryptosporidium spp. and/ or Giardia FA on all stool specimen requests. Any questions regarding this policy, call the Microbiology Laboratory. Typically, parasitology examinations are performed on stool or duodenal aspirates, but may also include direct preparations such as for pinworm examinations.
Duodenal Aspirate Specimens for Parasitology Exam: Submit aspirates (eg, sigmoidoscopy specimen) to the laboratory during the hours of 8 AM to 3:30 PM, Monday through Friday if possible. Call the laboratory to notify them when a sigmoidoscopy duodenal aspirate specimen is being submitted.
Stool Specimen Collection: Submit specimen in O & P collection kit. Specimens submitted for O & P, but not collected in kit, will be rejected. Instructions are included in the kit. Provide the patient with two specimen vials (one empty and one containing SAF fixative), and specific instructions for collecting the specimen. Obtain the kit from the Parasitology section of the laboratory. The stool should be passed directly into a clean container or wax paper (not toilet paper). Using the applicator sticks, place a sample about the size of a small marble into each vial and mix thoroughly with the contents; use a separate applicator stick for each vial. Place the caps on tightly to prevent leakage.
[Go to Top]

Specimen Collection Procedures and Policies
Page 25 of 33
Pinworm Preparation
Scotch® Tape Collection: See the graphic instruction given below for the steps required to submit a specimen for pinworm examination. Do not use frosted tape. Use clear Scotch® tape.

Specimen Collection Procedures and Policies
Page 26 of 33
SWUBE® Collection: The SWUBE® paddle is a clear plastic paddle coated on one side with a tacky adhesive which collects and holds the specimen. The handle of the paddle is inserted through the cap of a 17x100 mm plastic tube. The paddle, with its sticky surface can be

Specimen Collection Procedures and Policies
Page 27 of 33
removed from the cap and used as a slide for direct microscopic examination. SWUBE® paddles are individually wrapped.
Procedure for Collection of Sample
This method replaces collection by the cellulose tape slide and the petroleum jelly-paraffin swab techniques.
DO NOT USE IF PACKAGE IS NOT INTACT.
1. Hold the paddle by the cap and remove it from the tube. 2. With the patient lying on his side or bending over at the waist, separate
the buttocks. Press the tacky surface against several areas of the perianal region.
3. Replace the paddle in the tube for transport to the laboratory. Wash hands immediately after collection. Label the tube. Specimens should be refrigerated if examination is to be delayed for more than one day.
4. In the laboratory, remove the paddle from the cap and utilize it as a slide for direct low power microscopic examination of the specimen. E. vermicularis eggs measure 50-60 microns in length and 20-30 microns in width and are elliptical to ovoid in shape with a thick, smooth colorless shell. Occasionally adult female worms may be observed. Females are transparent and measure 8-13 mm in length and 0.5 mm in diameter. They possess a ventrally curved posterior end; long, narrow, sharply pointed tail; and cephalic alae or wings at their anterior end.
Chlamydia [Go to Top]
C. trachomatis culture, send specimens from cervix, urethra, eye, bubo aspirate, or other sites to the Microbiology Laboratory in special Chlamydia transport media, obtained by calling the Help-Line at 828-7284.
C. trachomatis and Neisseria gonorrhoeae detection by DNA amplification, o collect cervical, or urethral specimens using the DNA Amplification
Assay collection kits (male and female), obtained by calling the Help-line at 828-7284.
o Testing of urine in sterile cup
C. trachomatis antigen detection by fluorescent antibody (see previous section on Direct Antigen FA Collection Procedures.)
URINE CULTURES [Go to Top]
See CCMS (Clean Catch Mid-Stream) procedure under Urine Collections.

Specimen Collection Procedures and Policies
Page 28 of 33
VIROLOGY SPECIMEN COLLECTION [Go to Top]
Collect specimens as early as possible after symptoms develop, within the first 3 days of illness. If the specimen is collected by swab, use a sterile cotton, dacron, or rayon tipped swab. Calcium alginate and wood-shafted swabs are not acceptable. After collection, place the tissues or swab into the universal transport medium (UTM) provided by the laboratory.
Transport specimens on ice to the laboratory as rapidly as possible. If a delay in transport is necessary, all specimens, except bloods, should be stored refrigerated at 2°C to 8°C; bloods should be stored at room temperature.
Specimen Collection by Site
Respiratory
1. Nasal wash: Instill 5 mL of sterile saline into each nostril with the head hyperextended and the patient told not to swallow. Tilt head forward and allow fluid to run out of nose into a sterile container.
2. Nasal swab: Gently insert flexible fine-shaft swab into nostril until resistance is met, rotate swab to collect cells, and let it rest for several seconds to absorb secretions, and place in universal transport medium.
3. Throat swab: Insert flexible fine-shaft swab into throat, rotate swab to collect cells, and place in universal transport medium.
4. Bronchoalveolar lavage: Sterile nonbacteriostatic saline should be used as the lavage fluid. Submit in sterile screw cap container. For specimens not submitted in UTM (eg, body fluids, washes, lavages), collect into a sterile container or tube and submit ON ICE for viral culture.
CSF and Other Sterile Fluids: Collect as directed in Microbiology Cultures and Examination Procedures. Do not place specimen in UTM.
Urine: Obtain at least 5 mL clean catch, midstream urine in a sterile screw cap container.
Dermal, Vesicle, Genital, and Oral Swabs: Wipe the area clean with sterile saline. Disrupt vesicle, collect fluid with swab. With the same swab, collect cells from the base of lesion. For nonvesicular lesions, collect cells from base of lesion by using a swab premoistened with saline. Place swab in universal transport medium.

Specimen Collection Procedures and Policies
Page 29 of 33
Cervical Swab: Remove exocervical mucus with swab and discard. Insert fresh swab at least 1 cm into cervical canal, and rotate swab for 10 seconds to obtain cells. Place in universal transport medium.
Ocular Swab: Swab the lower conjunctiva with swab premoistened with sterile saline. Place swab in universal transport medium.
Stool: For virus culture, place 2-4 g of stool in universal transport medium. Note: For rotavirus antigen detection, place 2-4 g of stool in sterile container (do not use viral transport medium).
Rectal Swab: Insert swab 4-6 cm into rectum and roll swab against mucosa. Place swab in universal transport medium.
Tissue:
Biopsy specimens: Place biopsy tissue in a small volume of viral transport medium. Place larger specimens in a sterile container and add a small amount of viral transport medium to keep the tissue moist.
Autopsy specimens: Collect postmortem material as soon as possible after death and as aseptically as possible. Place 1 g or more of each tissue in a separate tube of viral transport medium.
Specimens Unacceptable for Virus Culture [Go to Top]
Wooden or calcium alginate swabs Swabs not in universal transport medium (UTM) Urine that is frozen or left at room temperature for 6 hours

Specimen Collection Procedures and Policies
Page 30 of 33
ANATOMIC PATHOLOGY
HISTOPATHOLOGY SPECIMEN COLLECTION [Go to Top]
Specimens from the operating rooms are sent to Surgical Pathology, 6th floor, Gateway Building, fresh (unfixed) and properly labeled and packaged during working hours from 8 AM to 4:30 PM, Monday through Friday. Specimens are otherwise refrigerated (not frozen) and retained in the operating rooms until the laboratory is open for delivery. On Saturday or Sunday, a pathology resident will collect specimens from the operating room. Small biopsy specimens should not be allowed to dry out; they should be placed on muslin sheet squares, not gauze and moistened with balanced salt solution before packaging. Alternatively, small biopsies may be placed in tubes (ones that can be tightly capped) with a small amount of balanced salt solution or 10% neutral buffered formalin. These specimens should be refrigerated if it is not possible to deliver them to Surgical Pathology promptly.
Small biopsies and other tissue specimens of small size from clinics and ambulatory surgery must be placed immediately in adequate, 10% neutral buffered formalin (available from Surgical Pathology), 10-20 times the volume of the specimen. These specimen containers must be labeled with the patient's full name, medical record number, date, and name of the surgeon. Cultures from tissue samples are best taken in the operating room where a sterile field already exists. A piece of tissue (eg, curetting of a fistulous tract) should be placed in an anaerobic tube with a request for a smear, culture, anaerobic culture, acid-fast, and fungus culture as clinically indicated. Call the Surgical Pathology Laboratory if there are questions about fixation of specimens, use of fixatives, or special fixatives. Fixative fluids are available from Surgical Pathology and should be picked up prior to the biopsy. Neutral buffered formalin and special fixatives (eg, B5) may be used where appropriate. Prior arrangements should be made with the Surgical Pathology Laboratory to prevent over-fixation.
Bullets, shotgun pellets, and other metallic objects in medicolegal cases require special handling, with care being taken to maintain an unbroken chain of evidence. Such specimens must be accurately labeled, and transfer and receipt must be documented. Such specimens must also be kept under locked safekeeping in the laboratory until turned over to law enforcement officials. No fixative is needed.
Rush Processing
The laboratory attempts to honor requests for rush reports by 11 AM on the day after biopsy. Rush handling of specimens should only be requested when an emergency therapeutic decision is needed and not merely for convenience of the

Specimen Collection Procedures and Policies
Page 31 of 33
physician or patient. In general, no request for rush processing will be considered for tissues obtained in the clinic or ambulatory surgery center.
Large Specimens
Definitive large resection specimens (eg, colectomy, mastectomy, hysterectomy) do best after excision if they are opened properly in the Surgical Pathology Laboratory, then allowed to fix overnight. In such cases, reports are not available for at least an additional 48 hours beyond the normal 3-day turnaround time for biopsy specimens. No specimens should be sectioned by surgeons in the operative room. This destroys the integrity of margins which are of importance in cancer cases. Section of thyroid nodules may destroy critical evidence of the capsule for evaluation of capsule or vascular invasion.
Work-up of Cases
Pathology faculty reserves the right to work up cases according to their best medical judgment. This sometimes requires not only special stains, but also other special studies. Final reports will be delayed for 1-3 days beyond the normal turnaround time in these cases.
Clinical Correlations
Physicians and surgeons are always welcome in the Surgical Pathology Laboratory, and are always invited to review gross and/or microscopic slides on their cases. Additional blocks, etc, can be processed upon request with the approval of the attending pathologist or fellow handling the case. Bone for metabolic bone disease requires special handling. Please contact the Surgical Pathology Laboratory.
Causes for Specimen Rejection
Lack of medical history, a very common problem Mislabeled specimen container No requisition Unlabeled specimen container Improper and/or delayed fixation Prolonged refrigeration (freezing of the specimen)
[Go to Top]

Specimen Collection Procedures and Policies
Page 32 of 33
CYTOPATHOLOGY SPECIMEN COLLECTION [Go to Top]
Specimen collection information is available on the Clinical Information System (CIS) under the laboratory ordering pathway as part of that pathway for any specific type of cytologic sample. Consult this manual under the specific cytologic examination desired for information on collection of the specimen, delivery of the specimen, and the required requisition and information to accompany the specimen.
ANCILLARY TESTING: IMMUNOHISTOCHEMISTRY, HORMONE RECEPTOR ASSAYS, IN SITU HYBRIDIZATION, IMMUNOFLUORESCENCE, AND ELECTRON MICROSCOPY
Requests for specific ancillary tests on pathology tissues should be made directly with the pathologist responsible for the tissue examination. Typically, these studies are initiated by the pathologist responsible for the tissue examination to help them properly complete the diagnostic report on the submitted tissue.
Send Ancillary Test requests to the Anatomic Pathology Receiving Area located at the VCUHS in the Gateway Building on the 6th floor. Hours of operation are 8 AM - 4:30 PM, Monday through Friday. After hours the specimens are to be delivered to the Clinical Support Central Receiving Area on the 6th floor of Clinical Support Center. Clinical history is required for all patient samples. For neuropathology specimens, bone tumors, or consults, the radiology report and films are also requested. Consult material should be accompanied by any associated pathology report(s), including any preliminary reports, H & E slide, and paraffin block where applicable.
Immunohistochemistry: With Anatomic Pathology or Cytopathology consultation if needed. Performed on paraffin blocks and fresh material as requested. Fresh material should be stored on ice or refrigerated until delivery within 24 hours of collection.
Hormone Receptor Studies: By immunohistochemistry with semiquantitative analysis. Paraffin blocks should be accompanied by a copy of the associated pathology report.
In Situ Hybridization: HPV typing, viral infections are performed on paraffin blocks. Include a copy of the associated pathology report.
Immunofluorescence: Fluorescent stains for immunoglobulin, complement, fibrin, and routine histopathology are performed. Biopsies should be placed in Zeus fixative (immunofluorescence transport media) for transport. Store in refrigerator or on ice until delivered within less than 24 hours of collection.

Specimen Collection Procedures and Policies
Page 33 of 33
Electron Microscopy: Tissues are to be cut into 1 mm cubed pieces and immediately placed in glutaraldehyde. Keep refrigerated until delivered as soon as possible. A formal report must be furnished on all EM studies performed on patients whether or not the EM studies substantiate or alter the histologic diagnosis.
[Go to Top]