SPECIFICATIONS ozito.comcdn1.blocksassets.com/assets/ozito/ozito-product-manuals/Kd5... · SPARE...
10
PETROL CHAINSAW 25.4cc-305mm Bar INSTRUCTION MANUAL SPECIFICATIONS Engine: 25.4cc 2-Stroke Output Power: 0.9kw No Load Idling Motor Speed: 3,500/min Max. No Load Motor Speed: 11,000/min Bar Length: 305mm (12”) Bar Type: Sprocket Nose Chain Brake: Automatic Oil Feed: Automatic Pump Fuel Mixture: 35:1 Chain Oil: Standard Chain Bar Oil PCS-305 WHAT’S IN THE BOX Petrol Chainsaw Socket Wrench and Screwdriver Oil Mix Bottle Guide Bar Cover ozito.com.au Chain File
Transcript of SPECIFICATIONS ozito.comcdn1.blocksassets.com/assets/ozito/ozito-product-manuals/Kd5... · SPARE...

PETROLCHAINSAW25.4cc-305mm BarINSTRUCTION MANUALSPECIFICATIONSEngine: 25.4cc 2-StrokeOutput Power: 0.9kwNo Load Idling Motor Speed: 3,500/minMax. No Load Motor Speed: 11,000/minBar Length: 305mm (12”)Bar Type: Sprocket NoseChain Brake: AutomaticOil Feed: Automatic PumpFuel Mixture: 35:1Chain Oil: Standard Chain Bar Oil
PCS-305
WHAT’S IN THE BOX
Petrol Chainsaw
Socket Wrench and Screwdriver
Oil Mix Bottle
Guide Bar Cover
ozito.com.au
Chain File

1ONLINE MANUALScan this QR Code with your mobile device to take you to the online manual.
5. Fasten the fuel tank cap and clean any spillage.
KNOW YOUR PRODUCT SETUP & PREPARATION
1 Choke control2 Exhaust3 Chain Drive Cover4 Throtle Safety Lock5 Throttle Trigger
6 Chain Tension Screw 7 Chain Drive Cover Nut8 On/Off Switch9 Guide Bar10 Chain
11 Chain Brake12 Bucking Spikes 13 Fuel Tank Cap14 Chain Bar Oil Cap15 Priming Bulb
16 Side Operating Handle17 Recoil Starter18 Carburettor Adjustment Screws 19 Filter Cover20 Filter Cover Knob
1: FUEL
• Only use oil that is expressly labelled for use with air-cooled 2-stroke engines.• Use unleaded petrol with a minimum Octane number of 89.
2. Fill with 2-stroke oil up to oil line.
1. Fill with unleaded petrol up to fuel line.
WARNING!: Petrol is very flammable. Avoid smoking or causing any sparks or flames near fuel. Make sure that you stop the motor and allow it to cool before refuelling the chainsaw. Select an open outdoor area for fuelling and move at least 3m away from the fuelling point before starting the motor.
PETROL CHAINSAW
500ml Regular Unleaded
Fuel tank capacity: 200ml
3. Shake vigorously and ensure thorough mix.
4. Remove YELLOW fuel tank cap and fill the fuel tank to about 80% of its capacity with the fuel mix.

1
WARNING!: Never start work unless the chain and bar are lubicated
2. CHAIN BAR OIL 3. CHAIN BRAKE & CHOKE
2. Fasten the chain bar oil cap and clean any oil spillage..
1. Remove BLACK chain bar oil cap and fill the tank to about 80% of its capacity with chain bar oil
• Only use oil that is expressly labeled “Chain Bar Oil”.
OPERATION
Chain brake / Anti kickback guard
The chain brake operates automatically in the event of kick back. Kick back occurs if the chain catches on the wood being cut. In the event of the chain catching, chainsaw will push back suddenly, when this happens, your hand (which is on the side handle during operation) will naturally move forward automatically causing the guard to be pushed forward, engaging the chain brake.
Chain bar oil tank capacity: 140ml
NOTE: For operator safety, the chain brake disengaging action has been designed to be a firm deliberate action.
IMPORTANT! Pull guard backwards FIRMLY to disengage brake. The chain will not run unless the chain brake is disengaged.
BRAKE DISENGAGED BRAKE ENGAGED
CHOKE - When the chainsaw is cold first pull out the choke control to the CHOKE position, (fully withdrawn).
RUN - Once the choke control has been pulled out, it returns automatically when the throttle trigger is operated
IMPORTANT!: Do not push the choke down manually. The choke will automatically return to run position when the throttle safety lock and trigger are pressed.
Automatic oil feed systemThe chainsaw is equiped with an automatic oil feed system, this delivers oil to the bar and chain.
Run the engine at medium speed and check that the chain splatters a thin line of oil which can be seen on the ground/material when the bar is pointed downwards. This may take 15-30 seconds to occur.

1
4. COLD STARTING 5. CUTTING
1. Set the switch to ON “I”.
3. Pull the choke (fully withdrawn).
4. Depress the priming bulb approximately 6 times until the bulb is full.
5. Hold the chainsaw securely on the ground. Pull the recoil starter until “kicks” (attempts to start),then depress throttle trigger to release choke to RUN position. Pull the recoil starter several times until started.
6. Allow the engine to warm up for 10 seconds.
1. When ready to start cutting, release the brake, by pulling the front guard back firmly towards the rear of the chainsaw
Stopping the chainsaw
“I” ON
2. The chainsaw has bucking spikes to assist with cutting and reduce the chance of kickback, use them as follows. Keep the bucking spikes touching the wood you are cutting. Due to the rotation of the chain, it will pull the saw into the wood. When the bucking spikes are touching the timber, it will help prevent any sudden jerking or kick-back.
“O” OFFBrake Engaged
2. Make sure the brake is ON when starting for safety, by pushing the front guard forward
3. Engage brake and set the On/Off switch to OFF “O”.

1 PCS-305
1. Set the switch to ON “I”.
3. Hold the chainsaw securely on the ground and pull vigorously on the recoil starter. Repeat (at least 15 times) until the engine starts.
4. Allow the engine to run for a few moments.
5. When ready to start cutting, release the brake, by pulling the front guard back firmly towards the rear of the saw
6. HOT STARTING 7. CHAIN & BAR
Adjusting the chain tensionWARNING!: The chain has sharp edges. For your safety, please use work gloves.
Loosen
1. Loosen the chain drive cover nut, but do not remove the nut.
2. Adjust the chain tensioner screw clockwise until the links of the chain just touch the bottom edge of the guide bar.
3. For the correct chain tension, pull up on the chain from the top and middle of the exposed guide bar. The bottom tip of the links should only just stay in the track.
NOTE: Recheck the tension after a few minutes of cutting as the chain may stretch initially after use. A loose chain may cause wear to both the chain and the guide bar and become a major safety hazard.
Rotate Clockwise To Tension Chain
5 - 6.3mm gap is the ideal tension
4. Adjust the chain tensioner screw for the correct tension. Once tensioned correctly tighten the chain drive cover nut.
Tighten
“I” ON
2. Make sure the brake is ON when starting for safety, by pushing the front guard forward

Chain SharpeningChain File: 3.96mm (5/32”)Chain Pitch: 9.53mm (3/8”)Chain Guage: 1.3mm (0.050”)
Sharpen the chain regularly to maintain optimumperformance of the saw. Signs of a dull chain are:• The sawdust becomes powder-like• Extra force is required to execute a cut• The cut does not track in a straight line• Increased vibration• Increased fuel consumption
Warning! Wear heavy gloves when handling the chain. Hold the guide bar securely in a vice.
Sharpen each cutter using a chain file. Always use outward strokes. After sharpening,the cutters must all have the same width and length.After every 3-4 times use an authourised repair centre to professionally sharpen your saw chain. They have the special tools necessary to ensure the correct cutting angles and depths.
Guide bar wearReverse the guide bar every 8 working hours to ensure uniform wear. Check the bar rails frequently and if necessary remove burs and square-up the rails using a flat file.
Adjusting the carburettorThe carburettor is factory set and should not require adjustment.Changes in operating conditions may require fine tuning of the carburettor. A special tool is required for making these adjustments. Contact Ozito Customer Service for advice and instructions. Aus: 1800 069 486 NZ: 0508 069 486
1. Loosen the filter cover knob and remove the filter over.2. Remove the air filter.3. Split the air filter into its two halves and clean the mesh. Dry particles can be removed by tapping on a hard surface. More stubborn dirt may require washing out the filter with petrol or using an air compressor.4. Re-assemble the two halves and replace the airfilter, filter cover and filler cover knob.
NOTE: Before cleaning your chainsaw or carrying out any maintenance procedure,make sure that the engine is off and is cool. Disconnect the spark plug to preventaccidental starting
Maintenance to be preformed after each use
outward stroke
5. Take off the guide bar and maintain it as follows, remove any saw dust from the groove in the guide bar.6. Make sure that the oil port is not clogged. Grease the nose sprocket at the tip of the guide bar.7. Check for fuel and oil leakage and loose fastenings, especially those securing the handles and the guide bar.8. Clean any dust away from the cooling vents as clogged vents can cause overheating.
NOTE: The front guard (chain brake) must be disengaged to remove the chain drive cover, guide bar and chain.
Pruning is the removal of a limb or branch from a standing tree.
Felling a tree
Decide the direction in which you wish the tree to fall taking into account the direction of the wind, the position of branches, lean of the tree, ease of subsequent limbing and bucking and other factors prevalent at the time.
WARNING!: Felling a tree should only be done by trained operators.
1
2
Limbing
WARNING!: Always keep a balanced stance. Do not stand on the log. Be alert to the fact that the log may roll over. When working on a slope, always stand on the up hill side of the log.
Limbing is the process of removing the branches from a fallen tree. Check the direction in which a branch will bend before cutting it. Always cut on the opposite side to the bending direction so that the guide bar is not pinched in the cut. For large limbs that cannot be removed in one cut, make an initial cut from the bent side and finish bysawing from the opposite direction. Do not remove limbs that are supporting the fallen tree on the ground until the tree has been cut into lengths.
1
2 1
2
BuckingBucking is cutting a log into lengths for easier handling.To saw a log lying on the ground, first saw halfway, then roll the log over and cut from the opposite side.To saw the end of a log supported off the ground, first saw up from the bottom one-third through the log then finish by sawing down from the top. To saw a log in the middle of two supports holding it off the ground, first saw down from the top one-third through the log then finish by sawing up from the bottom.
CAUTION!: Avoid cutting into the ground as this will very quickly dull the saw chain.
Pruning
WARNING!: Do not use an unstable foothold or ladder.Do not overreach. Do not saw above shoulder height. Always use both hands to hold the saw. First cut up from the bottom and finish down from the top.
1
2
APPLICATIONS MAINTENANCE

SPARE PARTS Tool: 25.4cc Petrol ChainsawModel No. PCS-305
Item No. Description Part No.
166168429
255355574833738384889276
Guide Plate(Bar) 12”CoverSwitchPiston RingMuffler Seal Washer (pkt 2)Breather AssemblyPriming BulbFuel or Oil Cap AssemblyFuel Pipe AssemblyIgniter AssemblyDental Plate CaseClutch CaseClutch AssemblyClutch WasherChoke Pull Rod & CannulaWorm
SPOZPCS305A-166SPOZPCS305A-168SPOZPCS305A-042SPOZPCS305A-009SPOZPCS305A-025SPOZPCS305A-053SPOZPCS305A-055SPOZPCS305A-057SPOZPCS305A-048SPOZPCS305A-033SPOZPCS305A-073SPOZPCS305A-083SPOZPCS305A-084SPOZPCS305A-088SPOZPCS305A-092SPOZPCS305A-076
Available spare parts can be ordered through the Special Orders Desk at any Bunnings Warehouse. If you have any further questions, please contact Ozito Customer Service on:Australia: 1800 069 486New Zealand: 0508 069 [email protected]
The following is a list of spare parts carried by Ozito. Please contact Customer Service for any parts not listed.Item No. Description Part No.
94958999
100101104108142143144145150162121
CarburetorFoam FilterNeedle BearingAir Filter Cover UpperFoam Filter Air Filter Cover AssyChain CatcherStarter AssemblyScrewTension BlockActive Conical GearClutch Cover NutDamper (c/w Bolt & Cover)Bolt (Front Handle)Brake & Clutch Cover
SPOZPCS305A-094SPOZPCS305A-095SPOZPCS305A-089SPOZPCS305A-099SPOZPCS305A-100SPOZPCS305A-101SPOZPCS305A-104SPOZPCS305A-108SPOZPCS305A-142SPOZPCS305A-143SPOZPCS305A-144SPOZPCS305A-145SPOZPCS305A-150SPOZPCS305A-162SPOZPCS305A-121
HINTS & TIPS• Do not force the saw into the cut. Apply only light pressure whilst running the
engine at full throttle.• If the saw chain gets caught in the cut, do not try to remove it by twisting the guide
or pulling forcibly. Use a lever or wedge to open up the cut so that the saw chain is freed.
While cutting, always:• Run the chainsaw motor at full revs. This makes the job safer, as there is less
chance of pull-in or kick-back.• Position your body to the left of the chainsaw so if it kicks back uncontrollably, it
goes over your right shoulder, never stand in the cutting line of the saw.• Keep a firm grip with your left hand on the front handle, with your thumb securely
below the handle.• The swivel of your wrist in a kick-back situation will activate the chain brake.• Make sure the chain is tensioned correctly.
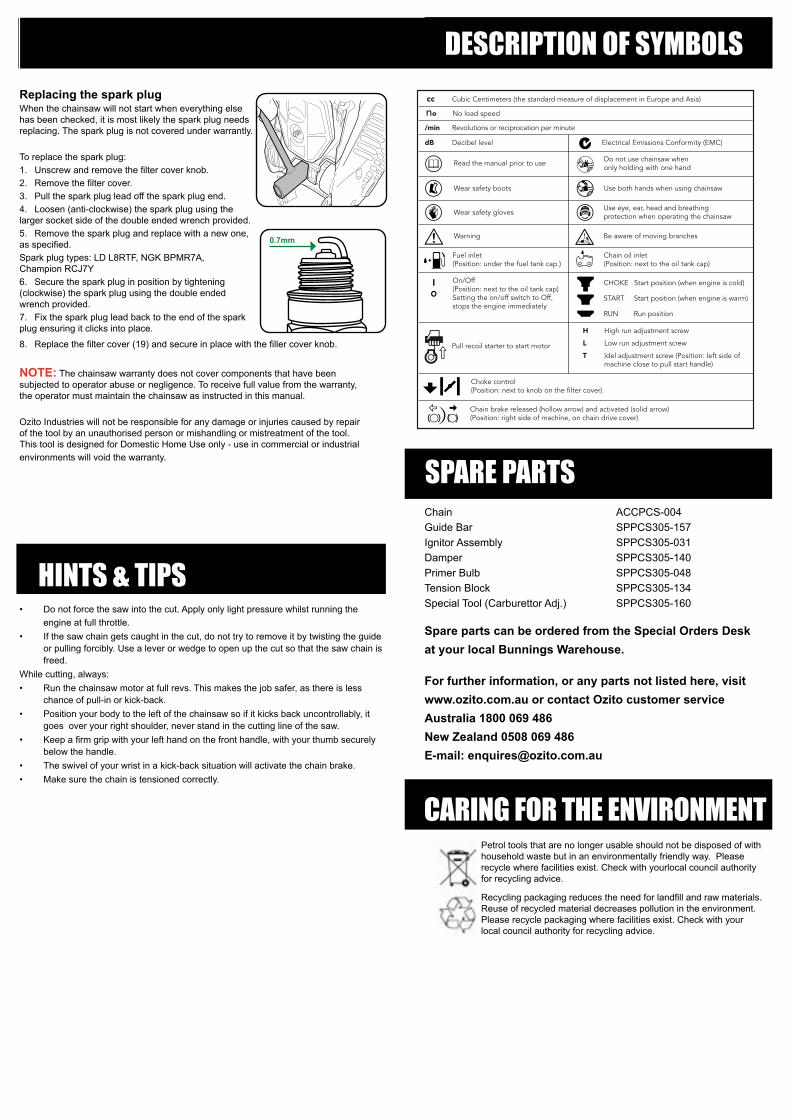
Replacing the spark plugWhen the chainsaw will not start when everything else has been checked, it is most likely the spark plug needs replacing. The spark plug is not covered under warrantly.
To replace the spark plug:1. Unscrew and remove the filter cover knob.2. Remove the filter cover.3. Pull the spark plug lead off the spark plug end.4. Loosen (anti-clockwise) the spark plug using the larger socket side of the double ended wrench provided.5. Remove the spark plug and replace with a new one, as specified.Spark plug types: LD L8RTF, NGK BPMR7A, Champion RCJ7Y6. Secure the spark plug in position by tightening (clockwise) the spark plug using the double ended wrench provided.7. Fix the spark plug lead back to the end of the spark plug ensuring it clicks into place.
0.7mm
8. Replace the filter cover (19) and secure in place with the filler cover knob.
NOTE: The chainsaw warranty does not cover components that have been subjected to operator abuse or negligence. To receive full value from the warranty, the operator must maintain the chainsaw as instructed in this manual.
Ozito Industries will not be responsible for any damage or injuries caused by repair of the tool by an unauthorised person or mishandling or mistreatment of the tool. This tool is designed for Domestic Home Use only - use in commercial or industrialenvironments will void the warranty.
CARING FOR THE ENVIRONMENTPetrol tools that are no longer usable should not be disposed of with household waste but in an environmentally friendly way. Please recycle where facilities exist. Check with yourlocal council authority for recycling advice.
Recycling packaging reduces the need for landfill and raw materials. Reuse of recycled material decreases pollution in the environment. Please recycle packaging where facilities exist. Check with your local council authority for recycling advice.
Chain ACCPCS-004Guide Bar SPPCS305-157Ignitor Assembly SPPCS305-031Damper SPPCS305-140Primer Bulb SPPCS305-048Tension Block SPPCS305-134Special Tool (Carburettor Adj.) SPPCS305-160
Spare parts can be ordered from the Special Orders Desk at your local Bunnings Warehouse.
For further information, or any parts not listed here, visit www.ozito.com.au or contact Ozito customer service Australia 1800 069 486 New Zealand 0508 069 486 E-mail: [email protected]
SPARE PARTS
DESCRIPTION OF SYMBOLS cc Cubic Centimeters (the standard measure of displacement in Europe and Asia)
no No load speed
/min Revolutions or reciprocation per minute
dB Decibel level Electrical Emissions Conformity (EMC)
Read the manual prior to use
Wear safety boots
Wear safety gloves
Warning Be aware of moving branches
Pull recoil starter to start motor
Do not use chainsaw when only holding with one hand
Use both hands when using chainsaw
Use eye, ear, head and breathing protection when operating the chainsaw
Fuel inlet(Position: under the fuel tank cap.)
On/Off(Position: next to the oil tank cap)Setting the on/off switch to Off, stops the engine immediately
Choke control(Position: next to knob on the filter cover)
Chain brake released (hollow arrow) and activated (solid arrow) (Position: right side of machine, on chain drive cover)
CHOKE Start position (when engine is cold)
START Start position (when engine is warm)
RUN Run position
Chain oil inlet(Position: next to the oil tank cap)
H High run adjustment screw
L Low run adjustment screw
T Idel adjustment screw (Position: left side of machine close to pull start handle)

RISK OF EXPLOSION OR FIREWhat can happen:• Spilled petrol and its vapours can become ignited from cigarette sparks, electrical arcing, exhaust gases and hot engine components such as the muffler.• Heat will expand fuel in the tank which could result in a fire.• Operating the tool in an explosive environment could result in a fire.• Muffler exhaust heat can damage painted surfaces, melt any materials sensitive to heat (such as siding plastic, rubber or vinyl) and damage live plants. Keep hot tool away from other objects.• Improperly stored fuel could lead to accidental ignition. Fuel improperly secured could get into the hands of children or other unqualified persons.
How to prevent it:• Shut off engine and allow it to cool before adding fuel to the tank.• Use care when filling the tank to avoid spilling fuel. Move tool away from fuelling area before starting engine.• Keep maximum fuel level 20mm below top of tank to allow for expansion.• Operate and refuel in well ventilated areas free from obstructions.• Store fuel in a approved container (AS/NZS 2906-1999) for petrol. Store in a secure location away from the work area. Make sure the container is clearly marked “fuel”.
RISK TO BREATHING What can happen:• Breathing exhaust fumes can cause serious injury or death.How to prevent it: How to prevent it:• Operate tool in a well ventilated area. Avoid enclosed areas.• Never operate unit in a location occupied by other people or animals.
SAVE THESE INSTRUCTIONS1) Work areaa) Keep work area clean and well lit. Cluttered and dark areas invite accidents. b) Do not operate petrol tools in explosive atmospheres, such as in thepresence of flammable liquids, gases, or dust. Power tools create sparks which may ignite the dust or fumes.c) Keep children and bystanders away while operating a petrol tool.Distractions can cause you to lose control.
2) Personal safetya) Stay alert, watch what you are doing and use common sense when operating a petrol tool. Do not use a power tool while you are tired or under the influence of drugs, alcohol, or medication. Amoment of inattention while operating power tools may result in serious personal injury.b) Use safety equipment. Always wear eye protection. Safety equipment such as a dust mask, non-skid safety shoes, hard hat, or hearing protection used for appropriate conditions will reduce personal injuries.
c) Remove any adjusting key or wrench before turning the tool on. A wrench or a key that is left attached to a rotating part of the petrol tool may result in personal injury.d) Do not overreach. Keep proper footing and balance at all times. This enables better control of the petrol tool in unexpected situations.e) Dress properly. Do not wear loose clothing or jewellery. Keep your hair, clothing and gloves away from moving parts. Loose clothes, jewellery or long hair can be caught in moving parts.f) If devices are provided for the connection of dust extraction and collection facilities ensure that these are connected and properly used. Use of these devices can reduce dust-related hazards.
3) Petrol tool use and carea) Do not force the petrol tool. Use the correct petrol tool for your application. The correct petrol tool will do the job better and safer at the rate for which it was designed.b) Do not use the petrol tool if the switch does not turn it on and off. Any petrol tool that cannot be controlled with the switch is dangerous and must be repaired.c) Turn tool off completely before making any adjustments, changing accessories, or storing petrol tools. Such preventive safety measures reducethe risk of starting the petrol tool accidentally.hair can be caught in moving parts.d) Store idle petrol tools out of the reach of children and do not allow personsunfamiliar with the petrol tool or these instructions to operate the petrol tool.Petrol tools are dangerous in the hands of untrained users.e) Maintain petrol tools. Check for misalignment or binding of moving parts, breakage of parts and any other condition that may affect the petrol tool’s operation. If damaged, have the petrol tool repaired before use. Many accidents are caused by poorly maintained petrol tools.f) Keep utting tools sharp and clean. Properly maintained cutting tools with sharp cutting edges are less likely to bind and are easier to control.g) Use the petrol tool, accessories and tool bits etc., In accordance with these instructions and in the manner intended for the particular type of petrol tool, taking into account the working conditions and the work to be performed. Use of the petrol tool for operations different from intended could result in a hazardous situation.h) This appliance is not intended for use by persons (including children) with reduced physical, sensory or mental capabilities, or lack of experience and knowledge, unless they have been given supervision or instruction concerning use of the appliance by a person responsible for their safety.i) Children should be supervised to ensure that they do not play with the appliance.
4) Servicea) Have your petrol tool serviced by a qualified repair personnel using only identical replacement parts. This will ensure that the safety of the petrol tool is maintained.
SAFETY WARNINGS
ADDITIONAL SAFETY WARNINGS FOR CHAINSAWSNote: For safety reasons the chainsaw is shipped with the chain brake fullyengaged. This brake must be released before the saw becomes operational.Never cut into the ground.Never cut into wire fences. Never cut into samplings. Never cut into prepared wood.Use the chainsaw to cut only wood.It is advisable to provide a support for the chainsaw when cutting branches. Do not cut using the bar point and beware of branches under tension.Children under 18 must not use chainsaws.Keep people away from the chainsaw when in use. Check the following conditions before beginning work:• There should be no people in the felling area.• Make sure there is a second person within calling distance.• The working area should be free from obstacles. Wear suitable clothes which do not hinder movement.Use specific protection during operations involving head, hands, feet, eyes and ears. It is recommended the use of a helmet with a visor during felling, branch cuttingand chopping operations.Wear gloves with an external protection when using the chainsaw. Use ear protection to prevent hearing injuries.Wear safety boots when using the chainsaw.During transport the brake must be applied to avoid accidental start-up. Do not use the chainsaw in rainy or windy conditions or in poor light. Find a suitable position before beginning work.When working on slopes, the saw operator must stand beside or above the wood to cut, i.e. felled trees.Use the chainsaw holding it firmly with both hands.Make a wedge-shaped cut before felling the tree, then the felling cut leaving a hinge for the felling direction.Beware of any falling branches after felling operations. Beware of wood splinters when cutting chopped wood. Ensure your chainsaw is suitable for the job.Never work above shoulder level or reach out to cut a branch: ensure you have stable footing at all times.Do not operate in a hazardous location. Such areas include where there is a risk of explosion of petrol fumes, leaking gas or explosive dust.Do not operate in a confined area. Exhaust gases, smoke or fumes could reach dangerous concentrations.
Protect your tool. This chainsaw is NOT WEATHERPROOF and should not be exposedto direct sunlight, high ambient temperatures, damp, wet or high humidity conditions for prolonged periods of time.Take care not to spill fuel. When refuelling the chainsaw ensure that the motor has been switched off. Prevent the spilling of fuel as this may also ignite with the hot motor. Never refuel whilst the engine running.Be careful where you store the chainsaw. Store the tool in a dry area away from flammable liquids.Keep your distance. The chainsaw emits exhaust fumes. Ensure bystanders keep a safe distance.Operating instructions and instructions for common cutting tasks, including the use of personal protection equipment are covered in this manual. This product has a need for adequate training which is covered in this manual.Do not operate this machine while tired, ill or under the influence of alcohol or other drugs. Ensure that you mix 35 parts unleaded fuel to 1 part 2-stroke oil. If not, the engine will overheat and cause damage to your chainsaw.Never fill fuel tank indoors. Never fill fuel tank when engine is running or hot. Do notsmoke when filling fuel tank.
DANGER! BEWARE OF KICKBACK! Warning! Kickback can lead to dangerous loss of control of the chainsaw and
result in serious or fatal injury to the operator or to anyone standing close by. Always be alert. Rotational kickback and pinch kickback are major chainsaw operational dangers and the leading cause of most accidents.
Kickback may occur when the tip of the guide bar touches an object, or when the wood closes in and pinches the saw chain.If the bar tip or point contacts, it can produce a rapid reverse reaction, kicking the guide bar up and back towards the operator. This is known as rotational kickback.Pinching the saw chain along the top of the guide bar may push the guide bar rapidly back towards the operator. This is known as pinch kickback.Either of these reactions can cause loss of control of the saw, resulting in serious personal injury.Do not rely exclusively on the safety devices built into your saw. Take the following steps to help avoid accident or injury:Reduce the element of surprise by understanding what causes kickback.Keep a firm grip on the chainsaw using both hands, the right hand on the rear handle and the left hand on the front handle when the motor is running. A firm grip will help maintain control. Do not let go whilst the motor is running.Make sure that the area of operation is free of obstructions. Do not let the point of the guide bar contact a log, branch or any other object.Use high speeds when cutting.Do not overreach or cut above shoulder height.Carefully follow the sharpening and maintenance instructions given in this manual.Use only replacement bars and chains specified by the manufacturer.

IN ORDER TO MAKE A CLAIM UNDER THIS WARRANTY YOU MUST RETURN THE PRODUCT TO YOUR NEAREST BUNNINGS WAREHOUSE WITH YOUR BUNNINGS REGISTER RECEIPT. PRIOR TO RETURNING YOUR PRODUCT FOR WARRANTY PLEASE TELEPHONE OUR CUSTOMER SERVICE HELPLINE:
Australia 1800 069 486New Zealand 0508 069 486
1 YEAR REPLACEMENT WARRANTYYour product is guaranteed for a period of 12 months from the original date of purchase. If a product is defective it will be replaced in accordance with the terms of this warranty.
Warranty excludes consumable parts, for example:guide bar, filters, chains, spark plug and included accessories.
WARNINGThe following actions will result in the warranty being void.• Professional, Industrial or high frequency use.• If the tool shows signs of damage or defects caused
by or resulting from abuse, accidents or alterations.• Failure to perform maintenance as set out within the
instruction manual.• If the tool is disassembled or tampered with in any way.
WARRANTY
TO ENSURE A SPEEDY RESPONSE PLEASE HAVE THE MODEL NUMBER AND DATE OF PURCHASE AVAILABLE. A CUSTOMER SERVICE REPRESENTATIVE WILL TAKE YOUR CALL AND ANSWER ANY QUESTIONS YOU MAY HAVE RELATING TO THE WARRANTY POLICY OR PROCEDURE.
OZITO Australia/New Zealand (Head Office) 1-23 Letcon Drive, Bangholme, Victoria, Australia 3175.
The benefits provided under this warranty are in addition to other rights and remedies which are available to you at law.
Our goods come with guarantees that cannot be excluded at law. You are entitled to a replacement or refund for a major failure and for compensation for any other reasonably foreseeable loss or damage. You are also entitled to have the goods repaired or replaced if the goods fail to be of acceptable quality and the failure does not amount to a major failure.
Generally you will be responsible for all costs associated with a claim under this warranty, however, where you have suffered any additional direct loss as a result of a defective product you may be able to claim such expenses by contacting our customer service helpline above.
0812

![Judge: Mario Guido García · 2.a6! bxa6 3.c6 Nc4+ 4.Kd5 Nb6+ 5.Ke5 Na8 [5...Bd8 6.Kd6 Nc4+ 7.Kd5 Nb6+ 8.Kd6=] 6.c7! Nxc7 7.d8=Q /B [7.d8=R? Nxe6 8.Re8 Nd4 9.Kd5 Nf5–+] 7...Bxd8](https://static.fdocuments.us/doc/165x107/5f3d261207815d65393ccefd/judge-mario-guido-garca-2a6-bxa6-3c6-nc4-4kd5-nb6-5ke5-na8-5bd8-6kd6.jpg)