SoundBlaster Live! 5ec1.images-amazon.com/media/i3d/01/A/man-migrate/M… · ·...
45
SoundBlaster Live! 5.1 User Guide On-line Version
Transcript of SoundBlaster Live! 5ec1.images-amazon.com/media/i3d/01/A/man-migrate/M… · ·...

SoundBlaster Live!5.1
User GuideOn-line Version

Information in this document is subject to change without notice and does not represent a commitment on the part of Creative Technology Ltd. No part of this manual may be reproduced or transmitted in any form or by any means, electronic or mechanical, including photocopying and recording, for any purpose without the written permission of Creative Technology Ltd. The software described in this document is furnished under a license agreement and may be used or copied only in accordance with the terms of the license agreement. It is against the law to copy the software on any other medium except as specifically allowed in the license agreement. The licensee may make one copy of the software for backup purposes.
Copyright © 1998-2000 by Creative Technology Ltd. All rights reserved.
Version 1.00 (CLI)September 2000
Sound Blaster and Blaster are registered trademarks, and the Sound Blaster Live! logo, the Sound Blaster PCI logo, EMU10K1, Environmental Audio, Creative Multi Speaker Surround, and LAVA! are trademarks of Creative Technology Ltd. in the United States and/or other countries. E-Mu and SoundFont are registered trademarks of E-mu Systems, Inc.. SoundWorks is a registered trademark, and MicroWorks, PCWorks and FourPointSurround are trademarks of Cambridge SoundWorks, Inc.. Microsoft, MS-DOS, and Windows are registered trademarks of Microsoft Corporation. Manufactured under license from Dolby Laboratories. Dolby, AC-3, Pro Logic and the double-D symbol are trademarks of Dolby Laboratories. © 2000 Dolby Laboratories. All rights reserved. All other products are trademarks or registered trademarks of their respective owners.
This product is covered by one or more of the following U.S. patents:4,506,579; 4,699,038; 4,987,600; 5,013,105; 5,072,645; 5,111,727; 5,144,676; 5,170,369; 5,248,845; 5,298,671; 5,303,309; 5,317,104; 5,342,990; 5,430,244; 5,524,074; 5,698,803; 5,698,807; 5,748,747; 5,763,800; 5,790,837.
������������ Creative Technology Ltd. (“Creative”) warrants to the original end-user purchaser only that the hardware product will be free of defects in materials and workmanship for a period of ONE year from the date of purchase. The physical media (whether CD-ROM or diskettes) enclosed herein are also warranted to be free of defects in materials and workmanship for a period of 60 days from the date of purchase, or such other period as may be expressly required by applicable law (“Warranty Period”).
Should there be a material or workmanship defect in the hardware product or accompanying item(s) during the Warranty Period, the end-user purchaser shall obtain a Return Merchandise Authorization (RMA) number from the nearest support center and be responsible for all efforts and costs incurred in transporting/mailing/shipping/insuring the defective hardware or item(s) to and from the support center. A copy of a dated proof of purchase (e.g., a store receipt) should be enclosed in the returned package, with the RMA number clearly indicated on the outside.
Creative’s entire liability and sole remedy will be, at Creative’s sole discretion, the repair or replacement (with the same or similar model) of any hardware or accompanying item(s) not meeting the “Limited Warranty” explained above that is returned to Creative or an authorized distributor or dealer during the Warranty Period with a copy of your receipt.
� ���� ���������������������
�����
To the maximum extent permitted by applicable law, Creative disclaims all other warranties, expressed or implied, including the warranties of merchantability or fitness for a particular purpose with respect to the use of this product and the program license granted herein. Creative also disclaims any warranty or obligation to support products for all operating environments — for example, by ensuring interoperability with future versions of operating systems or other future software or hardware. In no event shall Creative or its licensors be liable for any indirect, incidental, special or consequential damages or for any lost profits, lost savings, lost data, personal injury, and so on, arising from or relating to the use of this software or hardware product, even if Creative or its licensors have been advised of the possibility of such damages.
Specifically, this warranty does not cover failures of the product which result from accident, abuse, misuse (including but not limited to improper installation, or connection to incorrect voltages or power points), alterations (by persons other than Creative or its authorized repair agents), moisture, corrosive environments, shipping, high voltage surges, or abnormal working conditions (including but not limited to lightning and water damage) after purchase. In no event will Creative’s liability or damages to you, or any other person, ever exceed the purchase price you paid for the product, regardless of the form of the claim.
This warranty does not cover normal wear and tear, or in the case of communications products, the use of the product outside the borders of the country intended for use (as indicated by local telecommunication approval stickers).
Note:This warranty gives you specific legal rights. You may have other rights which vary from country/state to country/state. Certain limitations in this warranty are not permitted by the jurisdiction of some countries/states, so some limitations here may not apply to you.
����������� ������������������������������������������������
����������������� ����� ��������������������������������������������������������������������������������������������������������������������������������
��������������������������������������������������������������������������������������������������������������������� �������������� ����������
������������ ������ ���������������������������
��������������������� ��� ������������� ����� ���!"#$%$&'���(������� ��
����������������� ������������������ �� � ��� ��� ������������� ����������
��������� ���������� ���������� ������ �������������� ��������������� �� ���
�� ��������� ���������� � ��������������������� ������������ ��� ��� ����� ���
� � ����!��� ���������� ������ ��������������� ��������������� ����� �������
������������� ����� � ����"�� ������
#$�%&"%
'� ���#��$)���!�#*�
����"�� ��������������� ��� ����� � ����������������������� ��� ������� ����
������ ��(������� ����������� ������������������ ���"�� ����������������
�������)��� ��������������!��*��� ������ ���������������� �������� � �� ���
�! �� ����������� �� ����������� ���� ����� ��������� � ��� ������������������ ���
"�� ��������������������� ���� ��!��������� ��� ������
+� �$���*��$#�����#&%�� $+,-���
����"�� ������������������������������������� ������������������ ����� �����
(������� ������ ����������,���������� ������� ���"�� ������������
����� �� ����� �������� � ��������� �� ����� ���"�� ������������������
�� ����������� �������������������� ������ ������ ���������� ����������
��������� �� �� � ���"�� ������������������������ ������������� ��� ��� ����
-� ���#(.�%$#����*�*
(����������� ���"�� ��������������� ���,����������� ������ �� � ���"�� ��������
������� ������ ���������������������������� �������������������������������� �
� � ������� ������� �������� ����������� ���"�� ���������������(��������� �
������ ���"�� ������� ������ ����� ����������������� ��� ��� ����� �����������
�� ������� ���"�� ���� ����������� ��������������� ���������
.� $,'��&"�
����"�� ������������������� �������/��� ��������������������� �� ������0�� ���
" � ��������� ������������ ��� ������ �� �������������(��������� �������
��������� ��� �������������������� ���"�� ������������������ ����� ���
�� ����� ������� ������������� ���"�� ����
1� �#����!"� �%� $,'
(�����������������'������������������ ����������,���������� ������� ���
"�� ����������������������������������� ��������������� ���"�� ���������
����������� � ��������� �� ���������������� ������������������ ������ ���
����� ����� ���� ����������������� �������������� ���"�� ����
2� �$����&���$���#��&����$#
(��������� ����������� ������� ���"�� ������ � ����� �� �������� �������
���"�� ������ � ������ ������� ��!��� � �� ����! �� ��!����������� ������
����������� ���3������ �������������������� ���������� ������� ���"�� ����
������� ������ �� ����� ����� ������� ������� ��������� ����� ��������3�� �
�� ��� ������������� �������� ���������� ������������ ������������ ���
��������� �� ����� �������������� ������ �������� ����� ���� �����
������������ �������������� ���"�� ����
4� ���/$�0�1��*�$#
$������������������������� ��������������� ���"�� ��� � ���������� �
�������� �� ������ ���� ������� ���"�� ����������������������������$ ������� ����
��������� ����� �������� �����%����������������� ��� �� ������������������ �
����������� ���������������������������������� ���"�� ��� �����������������
���������������� �� �����������������
5� ��#*)���$)���!�#*�
(������� ��������������������� ���"�� ��� ��������� �� ��������� ����������
�� �������� ���"�� ������������� ����� �������������� �� ���������� ������� ���
"�� ��������������� ����� ��������� ��� ���������������������� �����������
��� ��� ������������� �������� ���������� �
6� ��+�����$#*�$#��*�#&�� $,'�#&���#(��$(�)'�#&��"���$)�/���
%!��� � �� ����! �� ��!����������� ������ ���������� ������ ����������� ���
3������ ���������������)����� ���"�� ��� ����������� ���� ���������������
���"�� �����&�������������,��������������������� ������� ���������� ��
(����������� ���"�� ��������������������������� ������� �����������
��������������� ������ ������������������������������� �����
'7���!$+,�%�#&����*�**�+2%�#&��$���� ��*���#&�#����#&
(�������������� �� � ���"�� ������� ����� �������� ������� �������� ���
������ ���������� ��������� ������������%!��� � �� ����! �� ��!����������� ���
��� ���������� ������ ����������� ���3������ �������������������� �� �����
������ ���������� ���������������� �������������������� ���"�� ��� ���
������������� ����� ��� ���� ���� ������������������� ���� �� ������ ���������
�� ���������������� ������ ��������������� ���"�� ����
''��$���$)�/����/��"� ����)���-��*
��������������� �������� ���������889 �$������9�����������������
�:�889:���������� ���������889�� ���:�889������ :���������� ����
������� ���� ��������������������� ����� ���������� ���������,��� ��������� ��� �
������������� �� �� � �������� � ��������� �����:�889�8� �:�������������
�������:�889�"����:������ ��������� ������� �����
(������� �� ���������������889�8� � � ����889������ ������889�"�����
����������������������,��������������������(��������� � ������� ����� �
�������� ����� � ����889������ ��������889�8� �� ������ ������ ���(;0�
�<=%%�&;���;�0"%�;=�%>?#;$���889�8��� ��@%��889��#$%&� ;=�
�889�"%=A%=" %>�%?���"�%>?=%""#(�?%=B$��%8�@%=%$&�
(������� �� ��������,�!���������������� ������ ����889�8� � � ����889�
����� ������889�"���������� ����� �������������� �� ������� �� ������$������
�������� ����� �� ��������� ��������������������������� ����889�8� � � ���
�889������ ������889�"�������889�������������� ������889�8� � � ���
�889������ ����� ����889�"���� ������������������������� ���(�������
�� ��889 �$���������������� ���� ������� ���������� ������ ��������� ���
���� �����������
�����889������ ����������� �������889�8� �������������� ������:�"�$"�:�
�889���������������� � ����������� ��� ��!�������������� ������� ���
����������������889�8� ��������� ����889�"�������889�������� ����� �
������ ���� ������ ����889�"������� ���������� ���� �������������������
�� ��889���������������� ��&������ ���������� �� � ����889������ ���
�889�"����������,������ �� ����� ����������889������ ����889�
"����������������� ��� �����889������ ������ ��� ��������������� ������
������������������� �������� �� ��������� ������ �� ��889����������� ��
���������� ����� ���
�889�8$"�#�$B"��##�C�==�&�$%"�%>?=%""�;=�$B?#$%8 �
$&�#08$&< �90��&;��#$B$�%8��; �$B?#$%8�C�==�&�$%"�;D�
B%=�@�&��9$#$�( �D$�&%""�D;=���?�=�$�0#�=�?0=?;"% ��$�#%�
�&8�&;&,$&D=$&<%B%&����889�������� ����� � ������� �� �� ���������
�� �������������������� ����889������ ��������889�"�����$&�&;���"%�
C$##��889�9%�#$�9#%�D;=��&(��;&"%E0%&�$�#�;=�$&�$8%&�$�#�
8�B�<%"�;=�D;=��&(�#;"��?=;D$�" �;=�#;"��=%A%&0%"�
$���� ����� ����������� ��������������� �� ����� � ���"�� ��������������
���"�� ���F����3�� ������������������ ���������� �������������������
��������������� ���"�� ���F����3�� �������$�������������������)����
������ ������� ��� �� ����� ��������� ����� ���"�� ������ ��� �������� �
������������ ������������������������� ���"�� ���� ���� ��������������� ��� �
������������ ���)��� ������������ ����������� ����� � ������������� ���
�������0��������������������)��� ���� ����������
'+��� ��������� ��������)��������������� ������������ ��� ������������ ����
�� ���� ��������������������������� ���� �������� ���������������� ��������
������������������ �����
$���������� ������������ ������� ����������������� ���������������������
����������������� ����� ��� ��� ����� ������� �� ��������������� � � �� ���
�������� ���������� ���������� ���� �� ��������������������������� ������ �� ���
"�� ����
���������
�������������� ��� �������������� ������ ��� ����� ����(������� ����� ��� �� �����
�������� ����� ���"�� �������������������� �������������� ������� ��
��� ��������������������������� ����� ���� ��� ��������� ��� ������� ��������
��� ���������������� ����������� ������ ���������� ������� ���������� ��(���
�������������� ����� ���� ��� ��� ���"�� �������������������� ��������������
������� ����� �����0���� ����� ��� ���� �������������������������� ��
��������������������������������� ���������� � �� ��� �� � �������� ����� ��
������ ������������ ��������������� �� ����� ����
��������������
��� �������� � ���� ������������ � � �� � ������������������ ���"�� �������
����������������������������� � ������ ��� ����� ���C��� ����������� ����������
����������� �� ���"�� �����&����� ��� � �������������� ����� � �������������
�� ���G��� ���!��������� �� �������� ��������� ���������������� ����
������ ������������ � ��� �� ��� ���� ������� ������ ��� ����� ����
������ �������� ��������� ����
��� ����������� ����� � �� � ������� �������� ��������� ���"�� ������������ �����
�)������ ���� �� � ������� ������� ���"�� ���������������� ��� �� ���,����
��������������������������D������������� ���������� ������������������
���������������������������� ����� ����� ��� �������� ����������
����� ���� � �������������� ��������� ������� ���� �� ����� ��� ����� �
�� � ������������ ���������������� ������������� ������� �������� � ������ ��
��� �� �������� ���� ��� ���������������� ���3�������� ������� ����� �
���������� ����� ����������3 ��������������1��������
��������������������������1�������.��������
���������������4�����������3������������������
�� �������������������������������������������������
��� ������������������������������ ��������������
����1����������������������1����������������
������������� �� ������������������������
D� �� ���� ������������ �������������� ������������������������ ���������������
��� ������ ������ �� �������������� ��������� �������������������� ��� ���
���� ����������� �� ������ �� �������������������������������������� ���������
�������������� �
(�������������������������� ����� �������� ������� ���"�� ���� ��������������
�� ���������� � �������� ������ ���� ��� ������������� ���� ���������� ���"�� �����
(��������������� ����� ����������� ��������� �� ���)���� ������������������� ���
"�� �����"������ ���"�� �������������� ��� ������������ ���� ��� ���� ��
��� ��� �������������������� ����� ������ ������������������������ ��������
���� ����
��������� ��������������������������� � ������������������������ ����� ��
������������������ �/� � �� ������ �/� � ���"�������� ���/� � �������� �������
����!����������������������� ��� ���� ����������!�������������� ������� �������
��� ���������������������� ������������������� ���"�� ����������� ���G�� �
������������� ���������������������� ������ ��� ��� ������� ����
��������������������������������
���������������������� ����������������������
�������������������� ���������������������
�� ���������������������������1�������� ����1��
�������� ������������������������������� ���� ��������
��� ������� �����������������������������������
��������������1������������1�������������������������
��������������������������������������������
�1������ ����1���������� ��������1���������1��������
������������������ �����������������1��������
����1�5���������������������������������������
��������1����3 ��������������������������������

����������������������������������� ������
"�������� ���/� � �������� ������� ������� � �������!������������������ �����
������� ����������)��� ���������� ���� ������������� � �������!�������������� �
������ ������
����� �������
$��������� ������ ������ ���� ����� ����������� ���G������ ������� ��� ����
����� �������� ��������������������� ��������� ������ ������������������������
���������������� ���� �
�������1������������ �������
����"�� ����������� ���������� � ����������������� ���� �� ����� ���0�� �
������� ������������������� ���0�"��<������� �������3�� � ���� �� ���������� �
�� ���������������������-��������� ���=�� ���������������8� ����������� ��
"�� ������������ �+1+�++4,47'-��$������������,���������������� ���"�� ����
�� �������� ���0�� ���" � �� ������������������� �� ��������������������������������
���� � �0�"���!�� ���� ������ ����� ���%���������������� ���������� �
���� ��6������ ����
������� �� �/B������ ������ ���"�� ������H
����� ���!"#$%$&'���(
-' �$� ��� ������9��������?��
��� ����=������
"�������2766+'
�������
����������� ������������������������������������������ ��������� �
��� �� ���������� � ������������������������������������&�� ��� ���"�� ����
������������� ����������� ���������������!�� ����!��� ���������������� ��
����������� ���0�"����� ������������������������������������ ��������������
����������� ���" � �����������������!��� � �� ����! �� ������������������
������ ������������������ ���� ��������������������� ���� ����� ���
������ ��� ��������������������������� �������� ��������������� � �
�������� ��� ��� ����� ��� � ����� ���� ��� ������� � �� ���"�� �����$������
������������ ���������� ��������������������������������������������� ����
������� �������������3������ ��� � �� ��� ������������������������������
��������� �� ����! �� ���������� ������� �������������������������������� �����
������������������������������������������������������ �
D��)��� �������������� ���������� ����������� �� ���� ����� � ����������
� � ����������D��)��� ������������� ��� ����������� �� ���� �� � ������ ����
�������������� ���� ������� �����
��������������� ���������������� ��������������
7��������8�9
�������:�9������� ���B������ ���� ����������� ����B������ �"�� ������
���������� �� ������������ �������������� �������������� ������������ �����
$����������� ����� �������������� ����� ��� ����������� ����� ���B������ �
"�� ����
����B������ �"�� ������������������ �������������������������� ���
��������������������������� ������������������������������� ���B������ �
��� ��������� ����� ��������������;=$<$&�#�?=;80������0������� ���� ��� �
���B������ �"�� ������������������� ���� ���;=$<$&�#�?=;80����������
���3�� � �� ������������ �������������� ������������� �������� ���;=$<$&�#�
?=;80����$����������� ���������������������� ������ ���;=$<$&�#�?=;80�� �
���������� ����� ���B������ �"�� ���������� ���������� ���B������ �"�� ����
��������� ���
��� �������1������������ �����������������������
$D�(;0���E0$=%8��@%�";D�C�=%�$&��@%�%0=;?%�&�0&$;&��%0� ��@%�
D;##;C$&<�?=;A$"$;&"��#";��??#(��;�(;0��$D��@%=%�$"��&(�
$&�;&"$"�%&�(�9%�C%%&��@%��%=B"�;D��@%�";D�C�=%�#$�%&"%�
�<=%%B%&��"%��;0��%�=#$%=��&8�$&��@%�D;##;C$&<�?=;A$"$;&" �
�@%�D;##;C$&<�?=;A$"$;&"�"@�##���I%�?=%�%8%&�%�
�� ���������
(��������� ��������������� �� ����� � ���"�� �������������� ���"�� ���J��
��3�� ������������������ ���������� ����������������������������������� ���
"�� ���J����3�� �������$�������������������)���������� ������� ��� �� ���
�� ��������� ����� ���"�� ������ ��� �������� ������������� �������������
������������ ���"�� ����
���� ��������������� ��� ������������� ���)��� ������������ ����������� ����
� � ������������� ����������0��������������������)��� ���� ������������ ������
��� ��������)��������������� ������������ ��� ������������ ������ ���� ����
����������������������� ���� �������� ���������������� ���������������������
����� �����
��������������
�3 ������������������������������������������
���1��������������������;�����������<����
��������������1�������.�����������������������4�����
������3�������������������� ������������������������
������������������������� ������������
��� �������������������������������������� �����
��������
������������������������������
�������������������������������������������������
�� �����������������������������������������=����
7�� ����������9�������������� ��������� ����1�5��
�������� �������������=� ��������1������������
���������������;�����������<�
�����������
$���������������� �� ��� ��������� ������������� ������������������������� �� ��
��� �������������������������� �� ����� ����������������������"��������� ���������
���� ��������������!������ � �� ����! �� �������!������� ���� ������ �! ���� ����
����� ��� ����������������$������������������ ����������� ������������� ��� �
���������� ���������� ��������������!������ �������������
������������ ������� ���������� ���������3������������ �� �� ���������
��3�������� ������"�� �����'+ �'- �'.���'1���� ���$����"�������<������� �'56-�����
���������
�������
����������� �������������� ����������� ���=�����������$�����������������
����������������� ���������� ������������� ��"�� ������)�������� ���%0�������
������ ���� ����� ��������� ��� ������� ������������� �� ���� ����������� �
���������������� ����������� ���� � ���� ��������� � ������������� �� ����� ����
���������������� ���������� ����������� ������������������������������
�� ���� ���������� ��������������� ���� � ���� ��������� � �������������
�������� ���
����� �!�"���#���� �$��������
%&����##����������������������������������������������'
�����:������������������ ������ ����������� ������ ������� �����"�/�0A/0#�
�� �����/��� ���$9B����������� ������������������ ������ ���������� ��J��
������������ �������������������� ����)������ ����� ��/��� ���� �����������
���/���� �� ����)������ �������� ��� �������/���������������)������ ����
��� ���������������� ����������� ��� ��� �
������:�����K���K�)����� ���� ��K�L�M �������� K�����J� ����� ���L����
����� ���$9B������ ���K������� K��"�/�0A/0#��������� ���� �L��J�� K����������
G�����F���N���K������������������� �������� �����������J������/�����
�F��� ���� ����� /������������� �����J�������������K����������������)�F����� �
������������������ ���F�� ����K���K�)����L��� ���� N���
(�����������&�� ��
D���?� �'1H�������)������ ���������� �� ������������� ����������� �� ������� ��
�����������9���� ��������� ������� � ��?� �'1���� ���D���=���������������� �����
�������� ��������������������� �� ��������� ���������� �������������
������ ������� ���� �����������)������ ����� �� ����� ������������� �������
��)�������������� ������ ���� ������������������������������ �� ������ �� ���� �
������������������� �������� ���������������� ������@����� � ������ �������
�� ������� ��� �� ��� ��������������� ������������� ��������� ���� �����$�� ����
�)������ ��������������������� �������� ��������� �������������� ��� �������
��������� ���������� ����� ����)������ ����������� � ������������������� �� ��
������������� �������������������H
❑ =����� �������� �� ������������� �����
❑ $������� ������ ������� ����� ����)������ ������������
❑ ������ � ����)������ � ������� �� ����������� �������� ����� �� � �������� ������������������� ���
❑ ������ � ���������������!�������������/�A� ����������
❑ ��� ���
������������ �� ������� ����� ���������9���� ��������� ������� � ��?� �'1���� ���
D���=���� � �������������� ������� �������������� ���)������ ��� ������ ���������
�� �� ���������9����� ��
���������������� �������� � �������� ������������������� �����������������
��������;��� ������ �����,�� ����������� ��������,��������������������
���� ������ �������� ��������� �������������� ����
)�����������
��������������������� ������� ��!������������������ ����� ������ �����������
����������� ������J���� ��� �� ������ �� ����������
(���������������
���������� �������������� �� ����������9������ ������������ ���������������������
��� ������������8��� ��� ������������� �����=�����$� ��������=���� �����
�� ����������� �����������!�����������#�""%��9���J�� ��K���������� ���)���
��K����K�������B���� N������������������������ ��������������N����� ��
�J�� ��K����������
*��#������������������
According to the FCC96 208 and ET95-19
Name: Creative Labs Inc.
Address: 1901 McCarthy BoulevardMilpitas, CA. 95035United StatesTel: (408) 428-6600
declares under its sole responsibility that the product
Trade Name: Creative Labs
Model Number: SB0060
has been tested according to the FCC / CISPR22/85 requirement for Class B devices and found compliant with the following standards:
EMI/EMC: ANSI C63.4 1992, FCC Part 15 Subpart B
This device complies with part 15 of the FCC Rules. Operation is subject to the following two conditions:
1. This device may not cause harmful interference, and2. This device must accept any interference received, including
interference that may cause undesirable operation.Ce matériel est conforme à la section 15 des régles FCC.Son Fonctionnement est soumis aux deux conditions suivantes:
1. Le matériel ne peut étre source D’interférences et2. Doit accepter toutes les interférences reques, Y compris celles pouvant
provoquer un fonctionnement indésirable.
Compliance ManagerCreative Labs, Inc.
March 16, 1999

��������
������������ ����������������������������������������������������������������������������������������� ��System Requirements......................................................................................................................xLive!Ware Benefits..........................................................................................................................xGetting More Information...............................................................................................................x
� ����� ��!�"�����# ����������$������������������������������������������������������������������What You Need............................................................................................................................................1Creative Sound Blaster Live! 5.1 ...............................................................................................................2Installing the Audio Card.............................................................................................................................3Installing the Creative Software..................................................................................................................6
Setting Up Joystick Drivers in Windows NT 4.0 ..............................................................7
% &���!�"�����# ����������$ ����������������������������������������������������������������������'Creative Software.........................................................................................................................................8
Additional Sound Blaster Live! Applications................................................................................8Sound Blaster Live! Experience..................................................................................................................9Creative Diagnostics....................................................................................................................................9Creative Launcher........................................................................................................................................9
Options .............................................................................................................................................9Groups............................................................................................................................................10
Surround Mixer..........................................................................................................................................11Main Section......................................................................................................................11Mixer Section ....................................................................................................................11Analog/Digital Output.......................................................................................................12Bass Redirection................................................................................................................12Dolby Digital (AC-3) Decoding.......................................................................................12
AudioHQ....................................................................................................................................................13SoundFont Control ........................................................................................................................14
Contents v
Configure a MIDI Bank....................................................................................................14Configure an Instrument ...................................................................................................15SoundFont Options............................................................................................................16
Device Controls .............................................................................................................................16Playback Sessions .............................................................................................................16Sound Device.....................................................................................................................16
Creative Keyboard.........................................................................................................................17MIDI Input.........................................................................................................................17Test an Instrument .............................................................................................................17
EAX Control..................................................................................................................................18AutoEAX .......................................................................................................................................19
Associating a Super-Environment....................................................................................19Wave Studio ...............................................................................................................................................19Creative PlayCenter 2 ................................................................................................................................20Creative Recorder ......................................................................................................................................20Creative LAVA!..........................................................................................................................................21PixAround PixMaker Creative Edition.....................................................................................................21
( �����������)�!��������������������������������������������������������������������������%%Positioning Your Speakers.........................................................................................................................22
Connecting Optional Devices .......................................................................................................23Recording and Content Authoring................................................................................................24
*����� �"+���)�������������������������������������������������������������������������������%,Sound Blaster Live! ...................................................................................................................................25
PCI Bus Mastering ........................................................................................................................25EMU10K1......................................................................................................................................25Stereo Digitized Voice Channel ....................................................................................................25AC ’97 Codec Mixer.....................................................................................................................25Volume Control..............................................................................................................................26Dolby Digital (AC-3) Decoding ...................................................................................................26Creative Multi Speaker SurroundTM (CMSSTM)......................................................................26
Connectivity ...............................................................................................................................................26Audio Inputs...................................................................................................................................26Audio Outputs................................................................................................................................26Interfaces........................................................................................................................................26
Contents vi

# ����- �� �����! ����������������������������������������������������������������������������������%.MS-DOS Mode..........................................................................................................................................27
Audio Options................................................................................................................................28Music Options................................................................................................................................28Digital Audio Options ...................................................................................................................28MS-DOS Mode Utilities ...............................................................................................................29
SBECFG.EXE...................................................................................................................29SBEMIXER.EXE..............................................................................................................29SBESET.EXE....................................................................................................................30SBEGO.EXE.....................................................................................................................30
Software......................................................................................................................................................30Sound..........................................................................................................................................................31Surround Mixer..........................................................................................................................................33Insufficient SoundFont Cache...................................................................................................................34Joystick .......................................................................................................................................................34I/O Conflicts...............................................................................................................................................35Windows NT 4.0........................................................................................................................................35Encore DVD Player ...................................................................................................................................36
Contents vii

������������
Sound Blaster Live! is the top audio solution for games, movies, CDs, MP3 music, and Internet entertainment. With its support for today’s leading audio standard—EAX—Sound Blaster Live! creates real-life, multidimensional sound and multi-textured acoustical environments for the most realistic 3D audio experience. Its powerful EMU10K1 audio processor delivers audio at optimum CPU performance with the highest fidelity and absolute clarity. Combine it with a four- or five-speaker setup and you’ll experience realistic 3D audio, EAX in supported games, and enjoy your movies with true surround sound. The Live!Ware upgrade program keeps your Sound Blaster Live! card up to date, supporting future technologies, functionality, and features.
To create your own music or audio content in the future, Sound Blaster Live! offers upgrade options that allow you to connect multiple digital and analog devices simultaneously, including keyboards and other music devices, as well as optical connection to MiniDisc and DAT recorders.
Introduction ix

"����/��0����/���� For Creative software, your card requires at least:❑ Genuine Intel® Pentium® class processor:
166 MHz for Windows 95/98/Me200 MHz for Windows NT 4.0 or Windows 2000
❑ Intel or 100% compatible motherboard chipset❑ Windows 95, 98, or Me; Windows NT 4.0 or Windows 2000❑ 16 MB RAM for Windows 95/98 (32 MB RAM recommended),
32 MB RAM for Windows NT 4.064 MB RAM for Windows 2000
❑ 160 MB of free hard disk space❑ Open half-length PCI 2.1 compliant slot❑ Headphones or amplified speakers (available separately)❑ CD-ROM drive required for software installation
Sound Blaster Live! estimates the hard disk space required when you select it during installation. Included applications may need higher system requirements or microphone for basic functionalities. Refer to the documentation for individual applications for details.
����$�����#���)��� Through Live!Ware, new features and applications are always available so you may experience the latest technology and extend the life of your card. Each upgrade rejuvenates your audio card, allowing you to experience new functionality. The latest Live!Ware upgrades are only a download away. When new standards and capabilities emerge, your hardware is ready for it—just download the functions and the card becomes up-to-date!
Visit the www.sblive.com site for more information, content, and Live!Ware updates.
*�����!��������)��/�����
See the online User’s Guide for MIDI specifications and connector pin assignments, as well as instructions on using the various applications in your audio package.
Introduction x

������ ��!�"�����# ����������$
� ����������� Most of the items you need for installation are included. The following illustration shows the basic components necessary for a complete installation.
Phillips Screwdriver (not included)
Audio Card
Creative Audio Software and Applications
Refer to the colored insert for specific information about your audio card.
Installing Sound Blaster Live! 1

���������
"�����# ����������$��
,��
CD Audio InputConnects to a CD-ROM drive using a CD audio cable.
Joystick/MIDI connectorConnects to a joystick or a MIDI device. An optional MIDI kit allows you to connect the joystick and MIDI device simultaneously
Line In jack Connects to external devices (such as cassette, DAT, or minidisc player) for playback or recording.Microphone In jack Connects to an external microphone for voice input.
Line Out jackConnects to powered speakers or an amplifier for audio output. Also supports headphones.
TAD/Modem Audio I/OProvides a mono connection from a standard voice modem, and transmits microphone signals to the modem
Rear Out jackConnects to powered speakers or an amplilfier for audio output.
CD SPDIF connector Connects to a SPDIF output on a CD-ROM
AUX connectorConnects to internal audio sources such as TV tuner, MPEG, or other similar cards.
SPDIF Extension (digital I/O) connectorConnects to an external SPDIF device.
Analog/Digital Out jackFront and rear SPDIF output channels for connection to external digital devices, such as a Digital Audio Tape (DAT) or MiniDisc recorder via a Digital Output module or to FourPointSurround Digital speakers.
Installing Sound Blaster Live! 2
����� ��!�� ��
���������
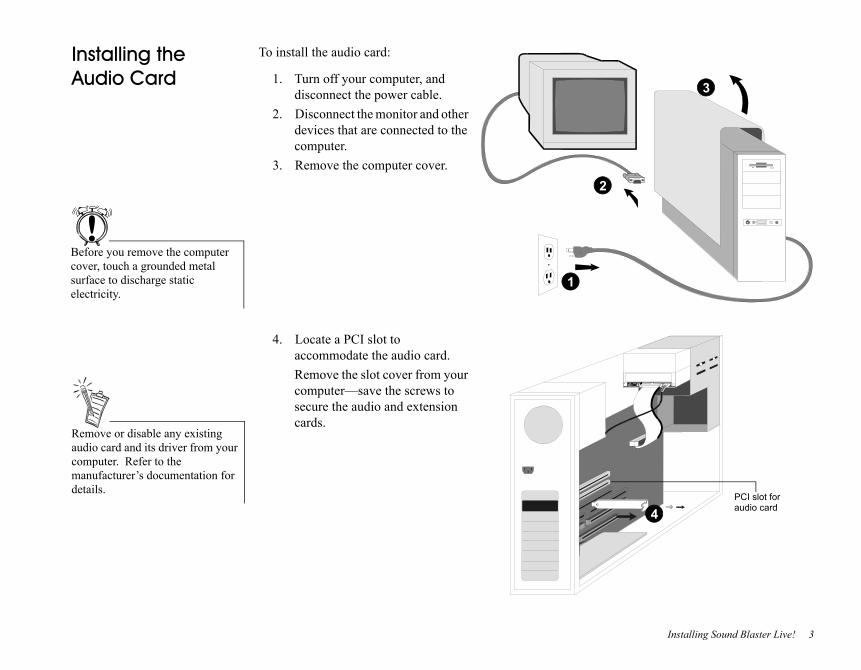
To install the audio card:
1. Turn off your computer, and disconnect the power cable.
2. Disconnect the monitor and other devices that are connected to the computer.
3. Remove the computer cover.
4. Locate a PCI slot to accommodate the audio card.Remove the slot cover from your computer—save the screws to secure the audio and extension cards.
1
2
3
4PCI slot for audio card
Remove or disable any existing audio card and its driver from your computer. Refer to the manufacturer’s documentation for details.
Before you remove the computer cover, touch a grounded metal surface to discharge static electricity.
Installing Sound Blaster Live! 3

Usextinpto tconSou
If ythesamdriandin S
5. Align the gold-striped tabs on the bottom of the audio card with the PCI slot, and firmly press the card into place until it fits snugly.
6. Use the screw from the slot cover to secure the audio card to the frame of the computer—securing the card assures proper grounding.
7. Connect the CD audio cable from your CD-ROM drive to the audio card’s CD audio connector. Optionally, connect the CD SPDIF cable from your CD-ROM or PC-DVD to the audio card’s CD SPDIF connector.
5 6
CD audio connector
7CD or PC-DVD audio connector
CD audioconnector
e the MIDI In jack of the audio ension card to connect a MIDI ut device; connect a gamepad he audio card. You can nect only one MIDI device to nd Blaster Live! at a time.
ou connect the digital audio to analog audio connectors of the e CD-ROM or PC-DVD
ve, do not unmute CD Audio CD Digital at the same time urround Mixer.
Installing Sound Blaster Live! 4

8. Connect your speakers, headphones, microphone, joystick, MIDI devices, or other devices to the back panel of the audio card.
9. Replace the computer cover.10. Reconnect the power cable, monitor, and other devices.
The joystick connector is a standard PC game control adapter. You can connect any analog joystick with a 15-pin D-shell connector or any device compatible with the standard PC joystick. To use two joysticks, you need a Y-cable splitter.
To play games in MS-DOS mode:• Connect the CD In connector ot the analog audio connector of the CD-ROM or PC-DVD drive.• If the audio is distorted, do not connect the CD SPDIF connector to the digital audio connector of
the CD-ROM or PC-DVD drive.
CD-ROM drive
Line Out
Joystick/MIDI
GamePad
Line-out
Microphone
MPC-to-MPC (4-pin) audio cable
Rear Out
Sound Blaster Live!
To analog input of FourPointSurround speakers
MPC-to-MPC (2-pin) audio cable
PC-DVD drive
Line In
Cassette, CD player, Synthesizer, etc.
Mic In
Connects to Optical Digital I/O card or Drive.
Connects to digital speakers*, minidisc, or DAT via minijack-to-DIN cable or Digital Output Module.
* For example, FPS2000 Digital speakers from Cambridge SoundWorks
This manual reflects a software installation in an unmodified version of the operating system. Your installation screens and procedure may vary slightly from what is shown and described. The variations may be caused by other software/hardware installed on your computer, or the version of the Windows operating system.
Installing Sound Blaster Live! 5
����� ��!�� ��
���������"�)�����
The Sound Blaster Live! software CD contains drivers necessary for operation and utilities to make the most of the audio card.
When you turn on your computer, Windows automatically detects the new hardware, and prompts for the installation disk.
To install in Windows:
1. Turn on your computer—Windows automatically detects your new hardware.❑ If the New Hardware Found dialog appears (Windows 95/98), click the Cancel button.❑ If the dialog does not appear, continue below.
2. Insert the installation CD into your CD-ROM drive.3. When the Sound Blaster Live! installation screen appears, follow the instructions on the screen to
complete the installation.
If the installation program does not run, follow the instructions below to set up AutoPlay:
1. Click Start on the Windows Taskbar, choose Settings, and click on Control Panel.2. In the Control Panel window, double-click the System icon.3. In the System Properties dialog, click the Device Manager tab and select your CD-ROM drive.4. Click the Properties button.5. In the Properties dialog, click the Settings tab and select Auto Insert Notification.6. Click the OK button to close the dialog.7. Eject and re-insert the installation CD.8. Follow the instructions on the screen to complete the installation.
Or:
1. With the installation CD in the CD-ROM drive, double-click the My Computer icon on the Windows desktop.
2. Double-click the Sound Blaster Live! CD-ROM icon.Or, right-click the Sound Blaster Live! CD-ROM icon and click on AutoPlay on the menu.
3. Follow the instructions on the screen to complete the installation.
Installing Sound Blaster Live! 6
"�����!�&+�1������2������������
�����������(�3
1. Log on to your computer as Administrator.2. Click Start on the Windows Taskbar, select Settings, and click on Control Panel.3. Double-click the Multimedia icon, click the Devices tab, and then click the Add button.4. On the Add dialog, select Unlisted Or Updated Driver from the List of Drivers, and then click the
OK button.5. Insert the Windows NT 4.0 CD-ROM into the CD-ROM drive.6. In the Install Driver dialog, type E:\DRVLIB\MULTIMED\JOYSTICK\X86 (E:\ is the
CD-ROM drive letter), and then click the OK button.7. On the Add Unlisted Or Updated Driver dialog, select Analog Joystick Driver, and then click the
OK button.8. On the Microsoft Joystick Configuration dialog, click the OK button.9. Restart your computer when prompted.
Installing Sound Blaster Live! 7

�&���!�"�����# ����������$
���������"�)����� Sound Blaster Live! is supported by a full range of applications to help you get the absolute most from the audio card:❑ Sound Blaster Live! Experience❑ Creative Diagnostics❑ Creative Launcher❑ Surround Mixer❑ AudioHQ❑ Wave Studio❑ Creative PlayCenter 2❑ Creative Recorder❑ Creative LAVA!
�������� �"�����# ����������$�++ ��������
❑ PixAround PixMaker Creative Edition
Each of the applications included with Sound Blaster Live! provides online help to guide you during the use of that software.
To run a Creative Software application:1. Click Start on the Windows Taskbar, select Programs, select Creative, select Sound Blaster Live!,
and click on the application you want to open.
Applications included with Sound Blaster Live! are occasionally upgraded; your set of applications may be slightly different from the ones described here.
Using Sound Blaster Live! 8

"�����# ����������$�
��+�������
Sound Blaster Live! Experience presents an interactive introduction to Sound Blaster Live!
To run SB Live! Experience, bring your pointer to the top of the screen to display Creative Launcher, click the Sound Blaster Live! tab, and then click the SB Live! Experience icon. On the opening screen, click to select the topic that interests you.
���������
���!�������
Use Creative Diagnostics to test your audio card’s Wave, MIDI, or CD Audio playback, as well as the recording function and speaker output.
�������������� �� Creative Launcher presents immediate access to Creative applications.
The Creative Launcher is installed at the top of your screen. If it does not appear, move your mouse pointer to the top of the screen. As the pointer reaches the top of the screen, it changes to a pointing hand and the Creative Launcher displays as a bar window. The Launcher consists of the System Menu icon (the Creative logo at the top left corner), the web site icon, the group tab pages, and the group items. The EAX icon also appears in the right corner.
4+����� To set the options for the Launcher:1. Click the System Menu icon on the Launcher.2. On the System menu, click Properties. The Properties dialog appears.3. Select or clear the desired options.4. Click the OK button to apply the changes to the Launcher.
Using Sound Blaster Live! 9
*���+� You can place three kinds of items on the Launcher: • Subgroups• Shortcuts• Plugins
A subgroup is an item within a group that may contain more items.
The installation creates a number of group tab pages in the Launcher that may contain shortcuts to Creative applications such as PlayCenter and Control Panel. It may also contain shortcuts to other applications for your hardware settings, volume control, Help files or demo programs by Creative.
A plugin is a Creative software module that is integrated into the Launcher. Examples are the Volume Control plugin and the Command Line plugin.
Use the System menu on the Launcher to add, delete, and rearrange groups and items within each group on the Launcher.
The Live!Task tab on the Launcher offers a task-oriented form to help you select the correct application for a task. The application can be launched with its associated Super-Environment Presets using the Launcher. The controls are arranged intuitively: “I want to” [perform a task] “With” [Super-Environment preset] You can create and save new Super-Environment presets in Creative Surround Mixer and configure them in Launcher.
The README file on the Live! Task tab offers a comprehensive description on how to configure the Live! Task bar. Click the right scroll-arrow until you see the README icon; then click it.
For the latest updates and drivers, further information, value-added tips, tricks and plug-ins, check the SB Live! website frequently at http://www.sblive.com You can access the website quickly by clicking the right-most icon (the EAX icon) on Creative Launcher.
Using Sound Blaster Live! 10

"������������� Creative Surround Mixer is an application for setting and controlling the various aspects of your audio card. It consists of two sections: Main and Mixer
�����"������ The top area of the Main section allows you to: ❑ Select tasks or save, delete, import, and export Super-Environment presets. You can save the
settings as Super-Environment presets for the selected speaker output. A selected preset is an automatic configuration of speakers, mixer, and effects.
The three buttons on the left side of the Main section allow you to switch between three different views:❑ EAX: Select and create environments; position audio sources within the configuration space.❑ Speaker: Set up speakers and perform a speaker output test.❑ Spectrum: Select and display the spectrum analyzer during playback or recording.
������"������ The Mixer section allows you to:❑ Mix sounds from various audio input sources when playing or recording.❑ Adjust the volume level for the audio input sources.❑ Adjust the treble and bass level, front/rear or left/right balance.
To identify the icons on the Surround Mixer, place the pointer over any icon or area to display a label.
For details on what you can do in Surround Mixer, explore its online help.
Mixer
MainSpeaker view
Spectrum view
Set Super-Environment presets
Using Sound Blaster Live! 11
�� �!5��!��� �4��+�� The default for the Analog/Digital Output jack on Sound Blaster Live! is analog output. To switch to digital output (6-channel or compressed AC-3 SPDIF):1. On the Surround Mixer, click the Speaker button.2. In the Speaker view, click the Digital Output Only check box. Digital Output mode is available for all
speaker configurations except headphones.
Or:1. On the Surround Mixer, click the red plus sign above the volume (VOL) control.2. In the dialog, select the Digital Output Only option.
To return to analog output mode, clear the option check box.
#�������������� Dolby Digital delivers five full range channels and one bass-only effects channel. However, most multimedia speaker systems do not reproduce low-frequency content. Bass redirection allows low-frequency source content from the front, rear, and center channels to be redirected and added to the low-frequency source effects (LFE) channel to produce deeper subwoofer output.
To enable bass redirection:1. On the Surround Mixer, click the Speaker button.2. In the Speaker view, click the Speaker Selection button and select
5.1 speaker mode.3. Click the Advanced button.4. In the dialog, click the Bass Redirection button.
�� -����!��� �6�789�
�������!
Dolby Digital decoding allows Sound Blaster Live! to decode Dolby Digital output to six discrete analog channels, such as the Cambridge SoundWorks DeskTop Theater DTT2200 speaker system. Thus, an external Dolby Digital decoder is not required for you to enjoy multi-speaker surround sound.
To enable Dolby Digital (AC-3) decoding:1. In the Speaker view, clear the Digital Output only check box.2. Follow the steps 1 to 3 described in the previous section and then select AC-3 Decode.3. Remember to set Sound Blaster Live! to Digital Output mode.
To use an external Dolby Digital decoder, do not enable this feature. In addition, you will need a separate 3.5mm-to-RCA jack cable to connect to your decoder.
Using Sound Blaster Live! 12

����:; AudioHQ utilities allow you to view, audition, or set up the audio properties of one or more audio devices on your computer.
AudioHQ can be accessed by using any of the following methods:❑ Click the AudioHQ tab in Creative Launcher;❑ Click Start on the Taskbar, select Programs, select Creative, select Sound Blaster Live!, and click
on AudioHQ.❑ Click the AudioHQ icon located at the bottom right corner of your Windows desktop.
Using Sound Blaster Live! 13

"����<���������� Creative SoundFont Control allows you to configure MIDI banks with SoundFont files and instruments, as well as set the caching algorithm and space.
���)�!�����������#��2 To configure a MIDI bank:1. In SoundFont Control, click the Configure Bank tab.2. In the Select Bank list, select the MIDI bank to
configure.3. Click the Load button and load the SoundFont file you
want to the MIDI bank.The latest file loaded always appears at the top of the Bank Stack box.The top of the stack is indicated by an arrow.
4. To replace a SoundFont file, click the file, and then click the Replace button.
5. To clear a bank from the stack, select the bank and then click the Clear button.A variation bank can only be cleared by clearing its main bank.
6. Repeat Steps 3, 4, or 5 as required.
By stacking a SoundFont file instead of replacing one with the other, you may return to the original sounds or use the new selection.
You can “spot” hide particular instruments by loading one or more SoundFont files on top of the original.
When you clear a SoundFont file, you remove the latest configuration of the main bank and any variation banks, including the latest configuration of instruments on the Configure Instrument tab page.
Using Sound Blaster Live! 14

Setcacdoeresstiloth
���)�!�������������/��� To configure an instrument:1. In the SoundFont dialog, click the Configure
Instrument tab.2. In the Select Bank list, select the bank whose
instruments you want to configure.3. In the Select Instrument list, select the instrument to
configure.In the Instrument Stack, you may see an instrument entry although you did not load an instrument on this page. The instrument can be found in a bank loaded on the Configure Bank tab page.
4. Click the Load button and load a SoundFont or single-instrument (for example, .WAV) file.The last file loaded always appears at the top of the Instrument Stack with an arrow pointing to it.
5. To clear an instrument from the stack, select the instrument and then click the Clear button.6. For faster processing of SoundFont files, the files are loaded into memory. You need to set the
maximum amount of cache memory your SoundFont files can occupy, so that your system performance does not suffer from insufficient memory. You can also set the caching algorithm for a balanced system performance.
ting the maximum amount of he memory for SoundFont files s not mean setting aside or
erving the space. The space can l be used by your computer or er files, if needed.
Using Sound Blaster Live! 15

"����<����4+����� You change the following options on the Options tab page of the SoundFont Control dialog:
To specify the caching algorithm:• Select an algorithm from the SoundFont Cache list.
To set the amount of cache for SoundFont files:• Drag the SoundFont Cache slider to set the amount of
cache.
To change the SoundFont device• Select the new device from the SoundFont Device list.
������������� � Device Controls allow you to configure your audio devices for audio playback. The EMU8008 chip or higher on your audio device allows multiple simultaneous Wave playback sessions; therefore, you can play several games at the same time and enjoy the sounds from them all.
= ��-��2�"������� To set maximum simultaneous Wave playback sessions:• On the Wave tab page, drag the Maximum Simultaneous Wave
Playback slider to the right to set a higher number of wave playback sessions, or to the left to set a lower number of simultaneous playback sessions.
"����������� To select the sound device to configure:• On the Options tab page, click the device you want to configure
from the Sound Device list.The device is immediately selected.
Using Sound Blaster Live! 16

���������>��-���� Creative Keyboard allows you to play musical notes on various instruments much like a composer plays notes on a piano (or other instrument) while creating or arranging music. To edit the sound, use Vienna SoundFont Studio or another sound editor.
�������+�� To select a MIDI input device:1. In the Select MIDI In box in the Options dialog, click the
correct MIDI port.2. Click the OK button.
You can use external MIDI input devices to audition your MIDI banks and instruments. First, connect a MIDI input device to your audio card and then select that device in Creative Keyboard.
��������������/��� To test an instrument:1. In Creative Keyboard, click the bank and the instrument you want.2. Click the keys on the keyboard to test the sound. If you have an external MIDI input device, you
may find it easier to use.
Use mouse to:❑ Select multiple notes to play simultaneously. Use the right mouse button to click the keys, which are
indicated by black dots.❑ Release the keys by right-clicking them one by one,
or click the All Notes Off button for simultaneous release.❑ Play a sequence of notes by dragging the mouse across the keyboard.❑ Shorten sustained playback by clicking the All Notes Off button.
Using Sound Blaster Live! 17
�?������� EAX Control allows you to configure the EMU10K1 effects engine. It allows you to specify the components that make up the audio elements that generate an environment. An environment is the model of a real-world audio experience. Included with Sound Blaster Live! are some entertainment, gaming, and miscellaneous environments to help you get started. EAX Control can be also be accessed from Creative Surround Mixer.
Online help gives detailed instructions on how to:❑ Configure master effects
• Add or remove effects from an environment• Specify the effect type• Specify the degree or amount of the effect• Edit an effect all the way down to its parameters or building blocks
❑ Configure source effects, that is, set the amount of the effects to apply on an audio source❑ Configure MIDI playback effects❑ Export an environment to a file❑ Import an environment
Using Sound Blaster Live! 18
����? AutoEAX allows you to specify a Super-Environment preset for any audio application to automatically associate with the currently active speaker output. For the automatic super-environment to work, AutoEA must be active or at least minimized.
���������!�
��"�+��7�������/���
For each audio application on your computer, you can specify the super-environment to be automatically associated with it, for each speaker output configuration. For example, when playing a MiniDisc using Creative PlayCenter, you may want to associate a different Super-Environment for each of the speaker outputs “Live!Surround” and “4 Speakers.”
To specify a Super-Environment preset for an application:1. In the Application list, select the audio application with which to associate a super-environment for a
speaker output. If the application is not in the list, click the Browse button to locate and open the application.
2. In the Speaker Output box, click the speaker output to configure.3. In the Linked Super-Environment box, click the Super-Environment preset you want to associate with
the application/speaker-output combination. This combination trio is automatically set.4. If you want AutoEA to monitor this application's activity, clear the Do not monitor this application
check box. If you select it, AutoEA does not configure the Super-Environment for that application even when the application is started.
For other functions, refer to its online help.
�����"����� Wave Studio assists you performing the following sound editing functions:❑ Play, edit, and record 8-bit (tape quality) and 16-bit (CD quality) Wave data. Enhance your Wave data
or create unique sounds with various special effects and editing operations such as rap, reverse, echo, mute, pan, cut, copy, and paste.
❑ Open and edit several Wave files at the same time.❑ Import and export raw (.RAW) data files.
See Wave Studio’s online help for details.
Using Sound Blaster Live! 19

���������
= ���������%
��� ����?������ ��+�������������
�8�������� ������������������B?-�
��CB���������
(�����������?������ ��+� ��������
������ ����������������������
����� � ���������� � ����������� ��
�������8� ������� ��B?-/CB��
������������� �����������������$ �
����������� ������ �������������� ��
5!���� �� ���������������������
������� ��-+7������
���������������� Recorder allows you to record sounds or music from various input sources such as a microphone or audio CD, and save them as Wave (.wav) files.
For details on how to use Recorder, see the Creative PlayCenter online help.
Using Sound Blaster Live! 20
����������@$ Creative LAVA! (Live! Audio-Visual Animation) gives your music visual expression that enhances the emotional depth of your music experience.
Through LAVA!, 3D graphical objects interact with the music and intelligently dance to the sound cues from sources such as CD and MIDI.
Explore the various animation scenarios provided by LAVA! or create your own environments and scenarios for your animation.
=��������
=����2������������
�������
PixMaker CE lets you create your own 360° interactive PixAround scenes, web pages, and postcards in three steps—snap, stitch, and publish! You can also insert audio spots in your scenes that play audio files when clicked.
Also included with PixMaker CE is PixScreen, which lets you view PixAround scenes. Navigate around a 360° PixAround scene with the help of buttons built into PixScreen’s friendly user interface, or print out your PixAround scenes in normal or panoramic view.
Using Sound Blaster Live! 21

������������)�!��������
Sound Blaster Live! will give you endless hours of listening pleasure. You can further enhance your SB Live! experience by adding one or more of the several upgrade options (available separately).
=���������!������
"+��2���
If you are using four speakers, place them to form the corners of a square with you in the center. Angle the speakers toward you with the computer monitor positioned to not block the sound path of your front speakers. Adjust the positions of the speakers until you get the best audio experience. If you have a subwoofer, place the unit in a corner of the room.
With FourPointSurround Digital speakers from Cambridge SoundWorks (for example, DTT3500 5.1 digital), you can experience crystal clear gaming sequences or music from the Digital DIN connection. A minijack-to-DIN cable is bundled with the speaker set for this connection.
Or, connect an analog 5.1 channel speaker system (such as the Cambridge Soundworks’ DeskTop Theater 5.1 DTT2200) or your 6-channel home theater speaker system. Sound Blaster Live! includes an Analog/Digital Out jact that allows you to connect center and subwoofer speakers. (For instructions on switching between analog and digital modes, see “Analog/Digital Output” on page 12.
Computer monitor
Front left speaker
Front right speaker
Rear left speaker
Rear right speaker
You
Sub-woofer
Advanced Configurations 22
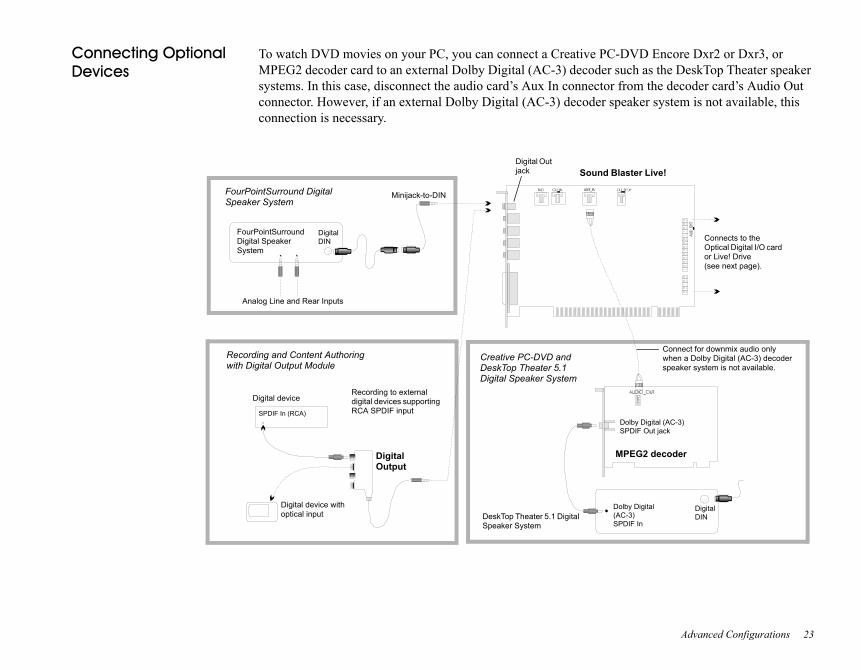
���������!�4+����� ��������
To watch DVD movies on your PC, you can connect a Creative PC-DVD Encore Dxr2 or Dxr3, or MPEG2 decoder card to an external Dolby Digital (AC-3) decoder such as the DeskTop Theater speaker systems. In this case, disconnect the audio card’s Aux In connector from the decoder card’s Audio Out connector. However, if an external Dolby Digital (AC-3) decoder speaker system is not available, this connection is necessary.
FourPointSurround Digital Speaker System
Sound Blaster Live!
Digital Output
Connect for downmix audio only when a Dolby Digital (AC-3) decoder speaker system is not available.
DigitalDIN
MPEG2 decoder
Dolby Digital (AC-3) SPDIF In
Dolby Digital (AC-3) SPDIF Out jack
Analog Line and Rear Inputs
DigitalDIN
FourPointSurroundDigital Speaker System
Creative PC-DVD and DeskTop Theater 5.1Digital Speaker System
Connects to the Optical Digital I/O card or Live! Drive(see next page).
Minijack-to-DIN
DeskTop Theater 5.1 Digital Speaker System
Digital Out jack
Recording and Content Authoringwith Digital Output Module
Digital device
SPDIF In (RCA)
Recording to external digital devices supporting RCA SPDIF input
Digital device with optical input
Advanced Configurations 23

�������!��������������� ����!
❑ Digital Output Module connected to the Digital Out jack of Sound Blaster Live! gives you two sets of SPDIF (RCA) and Optical outputs to which you can connect and record to external digital devices such as MiniDisc or DAT recorders.
❑ If you are a musician with professional requirements, you may want to upgrade Sound Blaster Live! with either the Optical Digital I/O card (plus Digital I/O Module) or the Live! Drive.
❑ Either option includes:• SPDIF (RCA) and Optical input/output jacks for recording to and from external digital devices.• Standard MIDI input/output connectors for connection to MIDI devices.• Digital DIN connection to digital speakers such as the FourPointSurround speaker system.• Second analog Line In for connecting an input device (for example, CD player) for recording.
❑ Live! Drive fits a standard 5¼” drive bay of your computer and for easy access to the connectors on its front panel. The Headphones and Microphone inputs utilize ¼” jacks for high-quality connectivity.
Digital I/O Module
Optical Digital I/O card
Live! Drive
MIDI devices
MIDI devices
Second analog Line In for an additional recording device
Line In 2
Digital In/Out
Digital DIN
MIDI In
MIDI Out
Digital device ( e.g., DAT)
MiniDisc Recorder
SPDIF (RCA) In Out
Recording to or from an external digital device supporting RCA SPDIF input/output
Recording and Content Authoringwith Optical Digital I/O card and Digital I/O Module
Connects to SB Live!
SPDIF In (RCA)
Optical Input
Optical Output
DigitalDINMiniDisc
Recording and Content Authoringwith Live! Drive
Digital DeviceSPDIF (RCA) In Out
Metal bracket
Headphones Microphone / Line In
To Digital Speaker System*
Connects to SB Live!
To Digital Speaker System*
AUX input from an analog source (e.g., CD player, tape deck)
Note: The Optical and AUX input jacks are available only on certain models of the Live! Drive.
Advanced Configurations 24

A*����� �"+���)����������
"�����# ����������$
=���#�����������! ❑ PCI Specification Version 2.1 compliant❑ Bus mastering reduces latency and speeds up system performance
��&�3>� ❑ Advanced hardware accelerated digital effects processing❑ 32-bit digital processing while maintaining a 192 dB dynamic range❑ Patented 8-point interpolation that achieves the highest quality of audio reproduction❑ 64-voice hardware wavetable synthesizer❑ Professional-quality digital mixing and equalization❑ Up to 32 MB of sound RAM mapped to host memory
"��������!���A���@������ ����
❑ True 16-bit Full Duplex operation❑ 16-bit and 8-bit digitizing in stereo and mono modes❑ Playback of 64 audio channels, each at an arbitrary sample rate❑ ADC recording sampling rates: 8, 11.025, 16, 22.05, 24, 32, 44.1 and 48 kHz❑ Dithering for 8-bit and 16-bit recording
��BC.������������ ❑ Mixes EMU10K1 audio sources and analog sources such as CD Audio, Line In, Microphone, Auxiliary, and TAD
❑ Selectable input source or mixing of various audio sources for recording❑ 16-bit Analog-to-Digital conversion of analog inputs at 48 kHz sample rate
General Specifications 25

@� �/�������� ❑ Software record and playback control of Master, Digitized Voice, and inputs from MIDI device, CD Audio, Line, Microphone, Auxiliary, TAD, SPDIF, Wave/DirectSound device, and CD Digital (CD SPDIF)
❑ Separate bass and treble control❑ Front and rear balance control❑ Muting and balance control for individual playback sources
�� -����!��� �6�789��������!
❑ Decodes Doby Digital (AC-3) to 5.1 channels or pass-through compressed Dolby Digital (AC-3) PCM SPDIF stream to external decoder
❑ Bass Redirection: Enhances bass ouput to subwoofer
����������� ���"+��2���
"����������6��""��9
❑ Multi-speaker technology❑ Professional-quality panning and mixing algorithm❑ Independent multiple sounds can be moved and placed around a listener
������������
�������+��� ❑ Line-level analog Line input via stereo jack on rear bracket❑ Mono Microphone analog input via stereo jack on rear bracket❑ CD_IN line-level analog input via 4-pin Molex connector on card❑ AUX_IN line-level analog input via 4-pin Molex connector on card❑ TAD line-level analog input via 4-pin Molex connector on card❑ CD_SPDIF digital input via 2-pin Molex connector on card, accepting sampling rates of 32, 44.1, and 48 kHz
�����4��+��� ❑ ANALOG/DIGITAL OUT (front and rear SPDIF digital outputs) via 4-pole 3.5 mm minijack on rear bracket
❑ Three line-level analog outputs via stereo jacks on rear bracket, Front and Rear Line-Outs❑ Stereo headphone (32-ohm load) support on Front Line-Out
�����)���� ❑ D-Sub MIDI interface for connection to external for connection to external MIDI devices. Doubles as Joystick port.
❑ AUD_EXT 2x20 pin header for connection to Optical Digital I/O card or Live! Drive
General Specifications 26

B����- �� �����!
�"7�4"����� Some legacy games may have been designed for use only in MS-DOS. Sound Blaster Live! supports MS-DOS games. There are two ways to play MS-DOS games:❑ From the MS-DOS window in Windows
To open the MS-DOS window:1. Click the Start button on the Windows Taskbar, select Programs, and then click MS-DOS Prompt.
❑ In Windows MS-DOS modeIf you do not want to or cannot run a game from the MS-DOS window, use MS-DOS mode. For example, when there are insufficient system resources to play the game with Windows loaded.
To restart the system in MS-DOS mode when you are already in Windows:1. Click the Start button on the taskbar, and then click Shutdown.2. Select the Restart The Computer In MS-DOS Mode option, and then click the OK button.
To start the system in MS-DOS mode at system startup:1. At startup as Windows is loading, press and hold the F8 key.2. At the startup menu, choose the Command Prompt Only option, and then press the ENTER key.
Some older games may have difficulty detecting the Sound Blaster Live! card at certain resource settings. Typically, these games would expect the card to be at a fixed set of resources and would fail to load if those resources are not detected. If you have older MS-DOS games that do not work properly, try changing the Sound Blaster Live! SB16 Emulation configuration. Use the following as a guide:
PROBLEM: Sound Blaster emulation is not recognized.Resource: Switch the SB emulation IRQ between 5 and 7, use DMA channel 1, use interface port 220.
PROBLEM: The MPU-401emulation is not recognized.Resource: Try using Port address 330.
❑ To play games in MS-DOS mode:• Connect the CD In connector
to the Analog Audio connector of the CD-ROM or PC-DVD drive.
• If audio is distorted, do not connect the CD SPDIF connector to the digital audio connector of the CD-ROM or PC-DVD drive.
❑ If you connect to the digital audio and analog audio connectors of the same CD-ROM or PC-DVD drive, do not unmute CD Audio and CD Digital at the same time in Surround Mixer.
Troubleshooting 27

�����4+����� Most MS-DOS–based games have a procedure for audio setup. Generally, you are presented with a list of audio cards or audio devices from which to choose.
The methods used by games to present audio options can vary greatly. Some may present a single choice that corresponds to a particular audio device, that is, Sound Blaster, Sound Blaster 16, Roland Sound Canvas, and so on. Others provide an option for music and digital audio separately; for example, General MIDI music with Sound Blaster digital audio. In such a case, there are often two separate menus to configure.
Some games allow you to set the MIDI port address and IRQ for music and sound. These settings should correspond to the values displayed by SBECFG.EXE or the Resources tab page of the Creative Sound Blaster Live! SB16 Emulation Properties dialog.
Other games offer MPU-401/Roland (General MIDI or MT-32/LAPC-1) as an option. Often these games allow you to set the MIDI port address. They must match the MIDI address in the Resources list on the Resources tab page of the Creative Sound Blaster Live! SB16 Emulation Properties dialog. The same values can be found under “MPU-401 (General MIDI, Roland MT-32/LAPC-1) Emulation,” displayed by SBECFG.EXE in MS-DOS mode. Remember to enable the MT-32 MIDI patch with the SBEMIXER program if you select Roland MT-32 or LAPC-1 for music.
������4+����� Most MS-DOS games offer a menu choice for sound when they start up. If you have a choice between General MIDI and MT-32, always choose General MIDI, since it provides the best sound quality. If you need to use MT-32, you must first switch from the General MIDI instrument set (the default) to the MT-32 instrument set using SBEMIXER. Switch back to the General MIDI set when you are finished using the MT-32 instrument set.
��!��� ������4+����� Sound Blaster Live! supports Sound Blaster, Sound Blaster Pro, Sound Blaster 16, and Adlib digital audio emulation. If an application provides all these as options, specify the choices in this order:1. Sound Blaster 162. Sound Blaster Pro3. Sound Blaster4. Adlib
Troubleshooting 28

�"7�4"������&�� ����� The Sound Blaster Live! card includes a few MS-DOS utilities. These utilities require the Sound Blaster Live! DOS driver SBEINIT.COM to be loaded.
"#��<*��?� Use the SBECFG.EXE utility to obtain the hardware settings and the status of the Sound Blaster Live! card. Typing SBECFG.EXE at the command prompt displays the following hardware settings:❑ PCI Hardware Settings: Port, IRQ❑ Sound Blaster Emulation: Port, IRQ, DMA❑ MPU-401 Emulation (GM, Roland MT-32/LAPC-1): Port❑ Adlib Emulation: Port
"#���?���?� Use SBEMIXER.EXE to change the volume levels of the MPU-401 instrument set used on the Sound Blaster Live! card. You can use SBEMIXER.EXE from the command line—useful for advanced users who want to set up batch files with particular volume levels—or within the SBEMIXER screen. The settings for SBEMIXER.EXE are independent of the Creative Mixer settings in Windows 95/98.
To set SBEMIXER values in the command line:At the DOS prompt, type the SBEMIXER command in a single line:
SBEMIXER [/S:x] [/W:x] [/C:x] [/M:x] [/?]
Square brackets [ ] denote optional parameters.
Parameter Specifies/S:x Synth volume. x can be a value from the range 0 to 127./W:x Wave volume. x can be a value from the range 0 to 127./C:x CD audio volume. x can be a value from the range 0 to 127./M:x Synth MT-32/LAPC-1 mode. For x, 0 is Off, 1 is On./? View a short description of the parameters.
For example: SBEMIXER /S:64 /W:120 /C:50 /M:0
To set SBEMIXER values within the Mixer screen:• At the DOS prompt, type SBEMIXER
In interactive editor mode, you can change mixer settings with the mouse, TAB, PGUP, PGDN, or arrow keys.
Use the Save button to save the settings for the next session.
Troubleshooting 29

"#�"����?� Use SBESET.EXE to manually configure SB resources or disable SB Emulation. By default, SB Emulation in DOS follows the Windows settings. For example, if you disable SB Emulation in Windows, in the next boot to DOS, SB Emulation is disabled. Under rare circumstances you may need to manually reconfigure DOS SB Emulation, for example, if there is conflict in DOS before it can boot to Windows. SBESET.EXE is run from the command line.
To set SBESET values in the command line:At the DOS prompt, type the SBESET command in a single line. Its syntax is:
SBESET [-Axxx] [-Ix] [-Dx] [-Hx] [-Pxxx] [-dx] [-wx]
Square brackets [ ] denote optional parameters:
Parameter Specifies-Axxx SB interface’s base I/O address.-Ix IRQ line used by the audio interface.-Dx First DMA channel used by the audio interface.-Hx Second DMA channel used by the audio interface.-Pxxx MPU-401 UART interface’s base I/O address.-dx SB Emulation mode. For x, 1 is Off, 0 is On.-wx Set x to 1 to use the Windows-assigned resource configuration.
Set x to 0 to use (your) user-assigned resource configuration.
For example:SBESET -A240 -I5 -D3 -w0
"#�*4��?� Run this utility to confirm that SB16 Emulation is properly installed and working.
"�)����� ������������ ��������������� ��������������������������� ���� ������������ �� ��
The AutoPlay feature in Windows may not be enabled.
To start the installation program through the My Computer shortcut menu:1. Double-click the My Computer icon on your Windows desktop.2. In the My Computer window, right-click the CD-ROM drive icon.3. On the shortcut menu, click AutoPlay and follow the instructions on the screen.
Troubleshooting 30

To enable AutoPlay through Auto Insert Notification:1. Click the Start button, select Settings, and then click Control Panel.2. In the Control Panel window, double-click the System icon.3. In the System Properties dialog, click the Device Manager tab and select your CD-ROM drive.4. Click the Properties button.5. In the Properties dialog, click the Settings tab and select Auto Insert Notification.6. Click the OK button to exit from the dialog.
"���� �� � ����� �� �� �� �� � � � ����� ������������� �� ����� �������������� ���! ��"����� ��
The last selected preset is an inappropriate environment for the current audio file.
To switch to an appropriate environment:1. Open the Environmental Audio control utility.
ORDisplay Creative Launcher. It is found at the top or bottom of your screen (you may have to bring your pointer to the edge of the screen to display Launcher). And then click the Environments tab.
2. In the Environment list, select “No effects” or an appropriate environment.
#�������������� �� ������ �
Check the following:❑ The headphones are connected to the Line Out jack.❑ In the Environment deck of Surround Mixer, make sure that the Speaker entry is Headphones.
�����$�� �% �������"���������� � ������������������ �� ���� �% ��
Check the following:❑ The rear speakers are connected to the audio card’s Rear Out jack.❑ If you are playing sound from one of these sources:
• CD Audio• Line In• TAD• Auxiliary (AUX)• Microphone
Troubleshooting 31

To solve the problem:1. In Surround Mixer’s Mixer deck, make sure the source being played is unmuted, that is, enabled.2. Select the same source as the record source.
For example, if you are playing DVD games or movies, in Surround Mixer, unmute the Auxiliary device and select the Auxiliary device as your record source.❑ If you change environments, go to Surround Mixer and unmute your active sources.
#�������������� �� �% ��
Check the following:
• Speakers are correctly connecte to your audio card's output.
• You have unmuted the correct source in Surround Mixer.
If both these conditions have been met and you still do not have sound, click the red plus sign above the VOL control. If Digital Output Only is selected, you are in Digital Output Only mode and must connect to digital speakers to hear the sound from your audio card.
#����������������� ��������"���"�������� ���������&'��������� ����&'�������
Possible causes:❑ Speaker volume (if any) is not set properly.❑ External amplifier or speakers are connected to the wrong jack.❑ Hardware conflict.❑ Speakers selection in the Environment deck of Surround Mixer is incorrectly selected.❑ Original Sound in either the Master or Source tab pages of Environmental Audio is set at or near 0%.
Check the following:❑ Speakers’ volume control, if any, is set at mid-range. Use Creative Mixer to adjust the volume, if
necessary.❑ Powered speakers or external amplifier are connected to the card’s Line Out or Rear Out jack.❑ No hardware conflict between the card and a peripheral device. See “I/O Conflicts” on page 35.❑ Speakers selection in the Environment deck of Surround Mixer corresponds to your speaker or
headphone configuration.❑ Original Sound in either/both the Master and Source tab pages of Environmental Audio is set to 100%.
Troubleshooting 32

#����������������� ��������"����&�����
��
#����������������� ��������"���(�"�� ������� )��� ����������
To solve this problem:
• Make sure the Analog Audio connector on the CD-ROM drive and the CD In connector on the audio card are connected.
*�����"������� ��� ��� �����������������
Sometimes when panning an analog audio input source to the left or to the right, the sound from that source turns off.
Cause: Digital Output Only mode and conflicting left-right balances in two mixers
For example, in the Digital Output Only mode, the source’s left-right balance in Windows Volume Control is at the opposite end compared to the position to which you panned the source in the Environment deck of Surround Mixer.
To solve this problem:1. Open the other mixer (Windows Volume Control), and center the balances for all the audio input
sources. This ensures that analog sources do not turn mute when you pan them in Surround Mixer.
"������������� +����� ������" ������� �� ����"������ �������" ������ �� � ����� ����� ��
To solve this problem:
• Dissociate the mixer settings.1. In the Preset deck, click the Surround Mixer title in the upper-left corner.
The system menu appears, with a command Dissociate Mixer Settings.2. To dissociate mixer settings, make sure the command is checked.
Troubleshooting 33

����))�������
"����<������� �
�� � ����������� ���� �������������(����,����
This may occur when a SoundFont-compatible MIDI file is loaded or played.
Cause: There is insufficient memory allocated to SoundFonts.
To allocate more SoundFont cache:
• On the Options tab page of SoundFont Control, move the SoundFont Cache slider to the right.
The amount of SoundFont cache you can allocate depends on the system RAM available.
If there is still insufficient system RAM available:
• On the Configure Banks tab page of SoundFont Control, select a smaller SoundFont bank from the Select Bank box. The smallest SoundFont bank available is 2 MB (2GMGSMT.SF2).
1������2 �� �-�����%���������������%��"�
The audio card’s joystick port conflicts with the system’s joystick port.
To solve this problem:
• Disable the audio card’s joystick port and use the system port instead.
�� �-�����%����������%��"����� ��������� ����"����
The program may use the system processor timing to calculate the joystick position. When the processor is fast, the program may determine the position of the joystick incorrectly, assuming that the position is out of range.
To solve this problem:
• Increase your system’s 8 bit I/O recovery time of the BIOS setting, usually under the Chipset Feature Settings section. Or, if available, you may adjust the AT Bus speed to a slower clock. If the problem persists, try a different joystick.
Do not attempt to make changes to the BIOS unless you have experience with system software.
Troubleshooting 34

�54����) ���� Conflicts between your audio card and another peripheral device may occur if your card and the other device are set to use the same I/O address.
To resolve I/O conflicts, change the resource settings of your audio card or the conflicting peripheral device in your system using Device Manager in Windows.
If you still do not know which card is causing the conflict, remove all cards except the audio card and other essential cards (for example, disk controller and graphics cards). Add each card back until Device Manager indicates that a conflict has occurred.
To resolve hardware conflicts in Windows:1. Click the Start button, point to Settings, and then click Control Panel.2. In the Control Panel window, double-click the System icon.3. In the System Properties dialog, click the Device Manager tab.4. Under the Sound, Video And Game Controllers entry, select the conflicting audio card driver—
indicated by an exclamation mark (!)—and click the Properties button.5. In the Properties dialog, click the Resources tab.6. Make sure that Use Automatic Settings is selected, and click the OK button.7. Restart your system to allow Windows 95/98 to reassign resources to your audio card and/or the
conflicting device.
�����������(�3 &�( � �� �������������" �� ������ �" ���� ���������� ������� ���� �� ������ �" ������ ��
� �����
This occurs after you remove an audio card from your computer after you have successfully installed the Sound Blaster Live! card. Windows is trying to match the drivers to the removed audio card.
To solve this problem:1. Log on to your computer as Administrator.2. Click the Start button, point to Settings, and then click Control Panel.3. Double-click the Multimedia icon, and then click the Devices tab.4. In the list, under these entries:
• Audio Devices• MIDI Devices and Instruments
remove all items other than:
Troubleshooting 35

• Audio for Creative SB Live!• MIDI for Creative SB Live!• MIDI for Creative S/W Synth
5. Click the OK button to close the dialog. The drivers are removed.
��������@��= ���� .���� ��'��*��� �������������� ���� �����'���������� �� ��������� ���� �
To solve this problem:1. In the Windows system tray, right-click the Disc Detector icon, and then click Properties.2. On the General tab page of the Creative Disc Detector dialog, select Enable Disc Detector.3. Click the Players tab.4. Select the DVD Disc entry and then click the Select Player button.5. In the Players Properties dialog, click the Browse button.6. Browse to C:\Program Files\Creative\PC-DVD Encore and double-click the entry ctdvdply
The Name box now displays the entry ctdvdply.7. Click the OK button twice to close.
Now when you double-click the Disc Detector icon, the Encore DVD Player is launched.
Troubleshooting 36