SONO FARM mini - Pig production blog: swine nutrition, … FARM mini USER MANUAL Version: 2015.05. 2...
24
SONO FARM mini USER MANUAL www.draminski.com Version: 2015.05.
Transcript of SONO FARM mini - Pig production blog: swine nutrition, … FARM mini USER MANUAL Version: 2015.05. 2...

SONO FARM mini
USER MANUAL
www.draminski.com
Version: 2015.05.

2
Manufactured by:
DRAMIŃSKI S.A. ul. Owocowa 17 10-860 Olsztyn Poland Phone: +48 89 527 11 30 Fax: +48 89 527 84 44 e-mail: [email protected] www.draminski.com DRAMINSKI S.A. company established and maintains a full quality management system meeting the
requirements of the EN ISO 9001:2008 standard. The system is periodically audited by a notified authority
TUV Rheinland LGA Products GmbH, Tillystrasse 2, 90431 Nuremberg, Germany, which participates in the
conformity assessment.
Declaration of conformity
It can be obtained in our Sales Department: Phone: 89 524 11 30, Fax: 089 527 84 44 e-mail: [email protected]
We wish you and all the users of our product every success with your patients and we are convinced
that with our product you will be able to serve your patients well.
DRAMINSKI S.A. company will be happy to hear any comments from our clients with regard to the device
and this instruction.
Please call us: + 48 89 527 11 30
and send emails to: [email protected]
Developed by DRAMINSKI S.A.
All rights reserved.
Copying without the consent of DRAMINSKI S.A. is prohibited.

3
CONTENTS
INTRODUCTION ............................................................................................................................................... 5
ACCESSORIES ................................................................................................................................................... 5
DESIGN OF THE SCANNER ............................................................................................................................... 6
SPECIFICATIONS ............................................................................................................................................ 12
FRONT PANEL with a membrane keyboard .................................................................................................. 13
PREPARING THE DEVICE FOR OPERATION .................................................................................................... 15
MENU STRUCTURE ........................................................................................................................................ 16
ANIMAL EXAMINATION ................................................................................................................................ 19
CHARGING BATTERIES ................................................................................................................................... 20
MAINTENANCE OF THE DEVICE AND PROBES .............................................................................................. 22
TOUBLE SHOOTING ....................................................................................................................................... 23
GUARANTEE .................................................................................................................................................. 24

4
Information on the user manual for the device
The goal of this User Manual is to identify the technical characteristics of the device. It has been written in
an accessible way to facilitate, as much as possible, the use of information contained in it.
In no way will reading the manual substitute even a basic ultrasound course. It is necessary that the user
of the device completed an appropriate training during authorized ultrasound courses.
Individual chapters of the manual describe the construction, all accessories used during normal use of the device, preparation for work as well as functions and operation of the ultrasound scanner.
Warnings and comments used in this manual
Due to the need of emphasizing important content in this manual, the following ways of highlighting were applied:
Warning! - when necessary to draw attention due to safety of the patient or the user of the device.
Attention! - when necessary to draw attention due to the protection of the device against damage or due to its proper operation.
Bold text - to draw attention to more important fragments in the manual or to make them more distinct or legible..
Descriptions to diagrams and drawings - to make it easier to spot the details.
Since symbols used in the manual do not fully inform about safety tips, you should read the tips first and follow them!

5
INTRODUCTION
Ultrasound scanners, widely applied in farming, prove to be an exceptionally helpful tool in precise
diagnosing of animal pregnancy. B-mode ultrasonography is a highly effective method of scanning in real-
time which enables a two-dimensional imaging of tissues’ cross section. On the monitor, tissue structures
are presented as bright points which brightness is proportional to the amount of reflected ultrasonic
waves. Tissues reflecting a lot of waves are displayed as bright or light grey points. Liquids, in which the
waves do not reverberate, are presented as dark points. The quality of the obtained image depends
largely on the frequency of the waves sent by a probe. The higher frequency, the better resolution of the
image. However, along with the increase in the frequency the depth of penetration is decreasing, and the
rate of absorbing and dispersing waves is increasing almost linearly.
Ultrasonography is a very effective method of diagnosing pregnancy. The majority of researches is
confirming that thanks to ultrasound devices it is possible to easily detect pregnancy at pigs already in
23rd day, at sheep in 40th day, and at cows in 30th day. Conducting diagnostics in earlier phases does not
guarantee a one hundred percent certainty. Also, the effects of ultrasound examination depend largely on
the skills of an individual user.
Thanks to the miniaturization, portable ultrasound scanners have become a standard equipment used for
effective reproduction management in the farming of pigs, sheep, goats, cattle and other animals.
Ultrasound scanner SonoFarm Dramiński mini is designed for a comfortable, fast and reliable diagnosing
pregnancy at animals. It is a portable device powered by a highly efficient battery pack (a fully charged
battery pack enables over 6 hours of continuous work).
Thanks to is small size and weight, SonoFarm mini makes the examination of animals very easy even in
difficult conditions.
The ultrasound scanner is delivered in a purpose-designed transport suitcase which holds all sub-
assemblies necessary for the use of the device. It is a strong and durable suitcase which protects the
device from damage and ensures convenience at transport.
DRAMIŃSKI S.A. congratulates you on the purchase and wishes you a pleasant and effective use of the
device.
ACCESSORIES
No Name and description Amount
1 The device with a LCD screen and keyboard 1
2 5.0 MHz sector probe, abdominal 5.0 MHz sector probe, rectal 5.0 MHz sector probe, Down Fire type
1 optionally optionally
3 A set of belts: neck and waist belts set 1
4 External battery pack Li-Ion 14.4V/3.1Ah 1
5 A dedicated battery pack charger ( with wires ) 1
6 Transport suitcase with a foam filler 1
6
DESIGN OF THE SCANNER
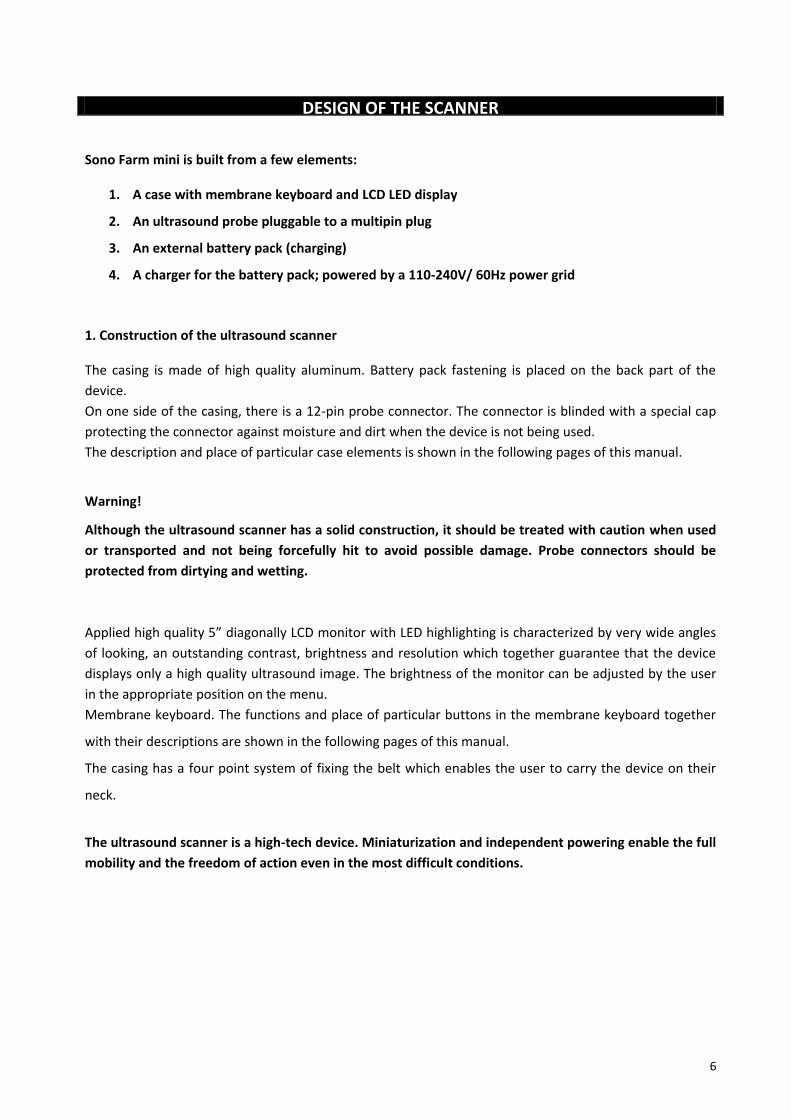
Sono Farm mini is built from a few elements:
1. A case with membrane keyboard and LCD LED display
2. An ultrasound probe pluggable to a multipin plug
3. An external battery pack (charging)
4. A charger for the battery pack; powered by a 110-240V/ 60Hz power grid
1. Construction of the ultrasound scanner
The casing is made of high quality aluminum. Battery pack fastening is placed on the back part of the
device.
On one side of the casing, there is a 12-pin probe connector. The connector is blinded with a special cap
protecting the connector against moisture and dirt when the device is not being used.
The description and place of particular case elements is shown in the following pages of this manual.
Warning!
Although the ultrasound scanner has a solid construction, it should be treated with caution when used
or transported and not being forcefully hit to avoid possible damage. Probe connectors should be
protected from dirtying and wetting.
Applied high quality 5” diagonally LCD monitor with LED highlighting is characterized by very wide angles
of looking, an outstanding contrast, brightness and resolution which together guarantee that the device
displays only a high quality ultrasound image. The brightness of the monitor can be adjusted by the user
in the appropriate position on the menu.
Membrane keyboard. The functions and place of particular buttons in the membrane keyboard together
with their descriptions are shown in the following pages of this manual.
The casing has a four point system of fixing the belt which enables the user to carry the device on their
neck.
The ultrasound scanner is a high-tech device. Miniaturization and independent powering enable the full
mobility and the freedom of action even in the most difficult conditions.

7
The view and the description of casing elements
fastening of the
load-bearing belt
Membrane keyboard with
a window for the monitor
monitor LCD LED
body of aluminum
casing
silicone
gasket
12- pin connector for connecting heads

8
View of the back of the casing without the attached battery pack
system of fixing the battery pack to the casing
Lock for fixing the
battery pack
Connectors for plugging in the battery pack

9
2. Sonda ultradźwiękowa
Probe (head) is a crucial element of the device. Ultrasound scanner DRAMIŃSKI SonoFarm mini is
equipped with one port but can cooperate with three types of mechanical sector probes, these are:
Warning! Because of an intricate mechanism of probes, one should exercise caution during the work and protect the probes from a fall or a strong hit. Small dome, under which a small piezo ceramic element is placed, should be protected from damage and scratches.
Rectal probe, sector 5.0 MHz (3-7 MHz), 180 degrees angle of scanning
Abdominal probe, sector 5,0 MHz ( 3-7 MHz), 90 degrees angle of scanning
Abdominal-rectal probe, sector 5,0 MHz ( 3-7 MHz), 90 degrees angle of scanning, „Down Fire”
type
10
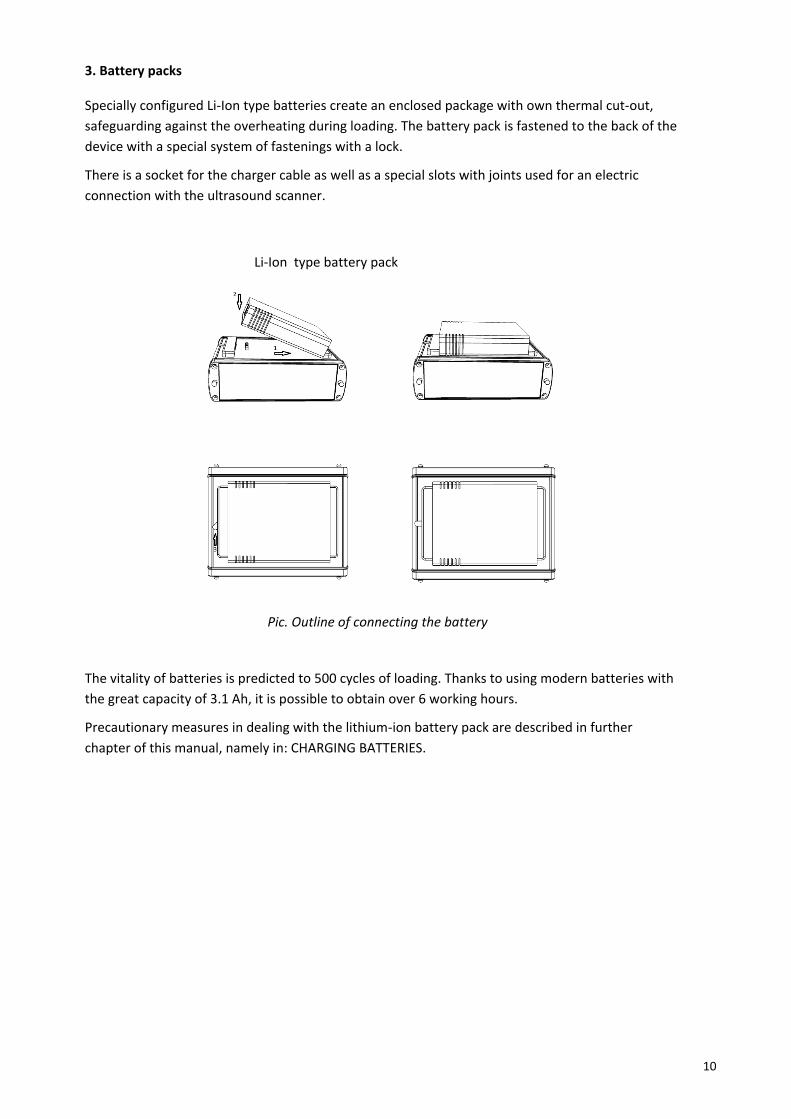
3. Battery packs
Specially configured Li-Ion type batteries create an enclosed package with own thermal cut-out,
safeguarding against the overheating during loading. The battery pack is fastened to the back of the
device with a special system of fastenings with a lock.
There is a socket for the charger cable as well as a special slots with joints used for an electric
connection with the ultrasound scanner.
The vitality of batteries is predicted to 500 cycles of loading. Thanks to using modern batteries with
the great capacity of 3.1 Ah, it is possible to obtain over 6 working hours.
Precautionary measures in dealing with the lithium-ion battery pack are described in further
chapter of this manual, namely in: CHARGING BATTERIES.
Li-Ion type battery pack
Pic. Outline of connecting the battery

11
4. Battery charger for the battery pack
The battery pack can be only charged with a dedicated charger powered by a power grid of 110-
240V/60Hz and equipped both in wires and a color diode signaling the state of the charging process.
Warning: The battery pack should be charged only with the original battery charger delivered with
the ultrasound scanner.
More details relating to charging battery packs and the use of the battery charger are presented in
the chapter "charging batteries".
Lithium-ion battery pack charger

12
SPECIFICATIONS
Depicting method In real time B-mode
Frequency of probes 3 -7 MHz – central frequency - 5.0 MHz
Probe types sector, mechanical: 1. abdominal, 2. rectal,
3. Down Fire
Frequency of probes 3 -7 MHz – central frequency - 5.0 MHz
Penetration depth up to 25 cm (for abdominal and Down Fire probes)
Scanning angle 90° - abdominal and Down Fire probe,
180° - rectal probe
Screen 5.0”LCD - LED,
User interface membrane keyboard
Power source external battery pack Li-Ion 14.4 V, 3.1Ah
Time of continuous work 6 hours (when fully charged)
Time of charging the battery pack 2 hours 30 minutes
Indicator of discharging the battery automatic – sound signal and graphic indicator
Size length 17,5 x width 14,5 x height 6,0 cm
Scanner weight 1010g (without a probe and a battery pack)
Probe weight 250g
Battery pack weight 280g
Working temperature + 5°C do + 40°C
Storage temperature + 0°C do + 45°C
Warning! If storage temperature is lower than 5°C, the probe has to be warmed before starting the device (for example by putting the probe in warm water for one minute). Using the scanner alternately in extremely hot and cold temperatures affects adversely its work and can cause damage.
13
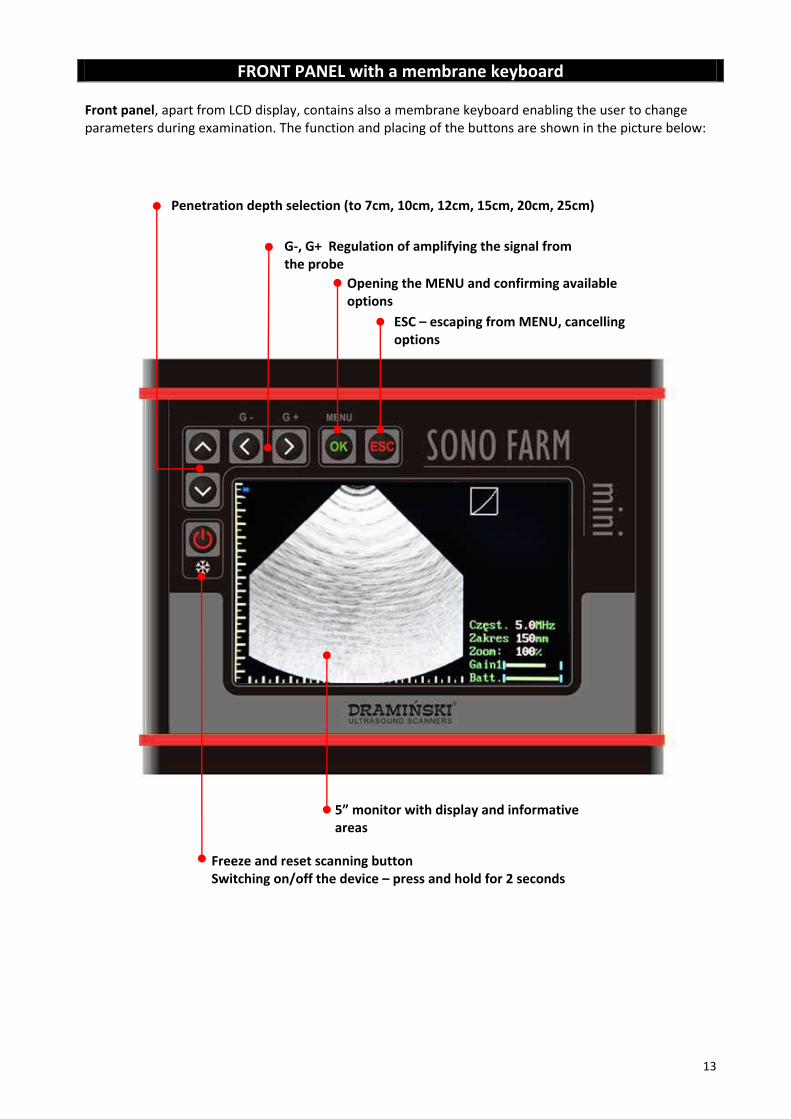
FRONT PANEL with a membrane keyboard Front panel, apart from LCD display, contains also a membrane keyboard enabling the user to change parameters during examination. The function and placing of the buttons are shown in the picture below:
Penetration depth selection (to 7cm, 10cm, 12cm, 15cm, 20cm, 25cm)
G-, G+ Regulation of amplifying the signal from the probe
Freeze and reset scanning button Switching on/off the device – press and hold for 2 seconds
Opening the MENU and confirming available options ESC – escaping from MENU, cancelling
options
5” monitor with display and informative areas

14
PARTS OF THE SCREEN
Messages and pieces of information are displayed on the screen during ongoing work
with the device.
A sample view of ultrasound scanner SonoFarm mini with a description of messages and
displayed information:
Open menu
Imaging sector
Measure 1 cm
Battery level indicator
Gamma
Information bar showing actual settings: the level of probe signal amplification (Gain), set probe
frequency, scope of scanning, zoom, gamma level, freezing the image, the state of the battery.

15
PREPARING THE DEVICE FOR OPERATION
Plugging in the probe
Warning!
Probe connector should be protected from mechanical damage, dirtying and wetting. Probe wire
should be protected from overburden, strong repeated bending and pulling.
After precise sticking in the round connector to the nest in the casing, one should screw probes in holding
them by the metal part in order to ensure the full and correct contact of the probe connector with the
nest in the casing.
Ultrasound scanner DRAMIŃSKI Sono is equipped in one multipin socket for connecting probes.
Warning!
Probes should be exchanged when the device is switched off.
In order to change the probe, one should unscrew the connector holding it by the metal part, take it out
and then stick the new probe in and screw the connector in properly.
The pinned up head will automatically be recognized by the system and the sector of depicting will
change appropriately to the type of the connected probe.
Probe correctly pinned up to the device
Pinning up and checking the state of charging the battery pack
In order to check the state of charging the batteries, one should attach the pack to the device and
switch it on. A color indicator displayed on the information bar will inform the user about the time the
device could work using the energy stored in the battery pack.
I -- I red color indicator – the pack needs charging, only 15 minutes work possible
I I yellow color indicator – around 1.5 hour work possible
I I green color indicator – minimum 2 hour work possible, 6 hours with a fully charged
battery pack

16
MENU STRUCTURE Navigating the menu
The menu of SonoFarm mini ultrasound scanner, which is simple and very intuitive, can be opened with
the „OK” button. Particular options can be chosen and settings can be changed with the buttons.
Chosen option is highlighted green.
In order to confirm an option, use the „OK” button. In order to escape a selected menu option, use the
button „ESC”.
In some options, messages (hints) about the buttons that can be used for setting or changing a selected
parameter.
Menu has a few listings and allows the user to set the following parameter:
Frequency. The option enables the change of the frequency created by the head in order to optimize
the image.
The option enables the user to filter the frequency, created by the broadband head, from 3.0 to 7.0 MHz.
The frequency value is displayed in the information bar.
Gamma . The option enables the change of the scale of greyness in order to optimize the image.
The option enables the change of features of the image in the contrast and the brightness - gamma
correction. On the information bar of the screen, a graphical form of curve gamma is displayed. Level
gamma (scope from 1 to 7) can be set with the buttons . This option is used for the optimization of
the diagnostic quality depending on the type of the conducted examination, the species of the examined
animals and the conditions in which the examination is conducted. The regulation of gamma can be done
in real time during scanning. The level of Gain should be always adjusted after changing Gamma level in
order to obtain the most optimal quality of image.
Zoom. The option of magnifying the image.
This option is used to magnify the displayed image from 100% to: 120%, 140%, 160%. To regulate the
zoom, use the buttons , and confirm with the „OK” button.
Grid. The option of approximate measuring by displaying the grid.
The option enables the user to switch on and off the grid or the so called gun point. To do so, use the
buttons .
Grid - putting the net on the image in the form of horizontal and vertical lines. The net of 1 cm resolution
calibrates itself automatically along with the change of the depth of scanning.
Gunpoint – option of approximate measuring with a 1mm scale put centrally on the image.
.
Frequency .
Gamma
Zoom
Grid
Settings
Frequency
Gamma
Zoom
Grid On. / Off.
Settings .

17
Setting User options enabling the change of parameters and setting the system.
Monitor brightness The option of adjusting the level of brightness of the image displayed on the LCD
monitor.
After selecting this option, one can change the brightness of the image displayed on the LCD monitor in
the range of values from 1 to 15.
Language. The option of selecting the language.
After selecting this option, a window with a list of available languages appears.
After selecting a language and pressing „OK” button, the system automatically switches to the selected
language version.
Factory settings. The option of restoring the factory settings.
After confirming this option, the system displays the message: „To restore Factory settings, Press OK”.
After pressing OK, the system switches off and after switching on again, the factory settings are restored.
This option should be used only in the case of malfunction of the device or when there are problems with
selecting optimal settings. After selecting this option, the system automatically sets the language of the
system to the English version.
Setting the probe.
The option is rarely used. This option is used in the service for the correction of the probe head after it
has been hit forcefully or dropped on the floor.
A lightly blurred, indistinct image is a typical sign of this malfunction. After selecting this option, the
system displays the message: “Set the probe” which enables to choose the best value of the index to
obtain a stable probe image. After stabilizing the image from the probe, confirm the shown value with
„OK” button.
In the case of a rectal 180 probe, one should set „the view” of the probe perfectly downwards by using
the buttons.
Switch L/R (Left-Right)
This option enables the change of the shown probe image to right or left hand so that it matches the
actual side of scanning. This is particularly essential in the case of the examination conducted with a rectal
probe by left or right handed users.
Sound
The option enables to switch off or on the sound associated with pressing the buttons. This option can be
useful while examining timid animals.
Brightness
Language
Factory settings
Set probe
Switch L-R
Sound
Auto shutdown

18
Auto shutdown. The option of automatic switching off the device.
The user has an option to choose the time after which the device switches off. The time is counted from
the last use of any keyboard button and can be set to: 2, 5, 10, 20, 30 minutes or - - - - (the device does
not switch down itself automatically).
This is a battery saving option which proves to be helpful when the device is switched on and left alone
for a period of time.
MOST OFTEN USED FUNCTIONS during the examination
Freezing the
image
After pressing this button, the image is frozen and the information bar displays the message „Frozen”. In order to continue scanning, press the button again. Attention! At longer holding the button (over 2 seconds) the device automatically switches itself off. Freezing is a basic function used during the examination of animals.
The regulation of
the amplification
Button G – and G + allow to regulate the level of amplifying the signal in nearer and more distant range from the head. The levels of amplifying are regulated in order to optimize the level of the legibility and diagnostic quality of the image. This is dependent on the type of the conducted examination, the species of the examined animals and the conditions in which the examination is conducted.
Change of the
penetration depth
The reach of the penetration (depth of scanning) is set with ,
buttons. The depth is adjusted to obtain the optimal image quality in a given examination (taking into account the type of the probe, the type of examination and the conditions in which the examination is conducted). The maximum depth of both abdominal and Down Fire probes is 25 cm; in the case of a rectal probe, it is 12 cm. The value of set scope is displayed on the information bar. At
the bottom of the screen, there is a 1 cm measure 1 cm which
calibrates itself automatically along with the change of the
depth of scanning.

19
ANIMAL EXAMINATION The device and accessories should be prepared before work. 1. Switch on the power supply and check whether the indicator is not signaling that the batteries
require loading up. Fully charged batteries ensure over 6 hours of regular work of conducting animal examination.
2. Examination requires a special gel. (you are asked to use gels recommended for ultrasound scanning, best after assuring that they have special certificates allowing appliance).
The good gelation enhances the penetration of signals and allows obtaining reliable and clear images.
Before starting work, make sure whether there is enough gel required for all the planned examinations.
The best results are attained using a high density gel which is not shoving off easily from the head of the probe. Such gel improves the comfort of work. The obtained results are affected by a few factors, among others the preparation of the animal, placing the head, penetration surface, amount of gel and the skills of the user. The belt fastened to the scanner enables the regulation of his length and the tilt angle of the device. The
regulation should be done accordingly to the needs of the user before conducting an examination.
During an examination, a keyboard is used for choosing the best settings for a given situation.

20
CHARGING BATTERIES The Li-Ion battery is a rechargeable pack. Battery life depends on the manner of use. Ideally, it should
work in full cycles, i.e. fully charged - fully discharged.
DRAMIŃSKI BATTERY PACK batteries are expected to last for about 500 charging cycles. Owing to the use
of high capacity batteries, it's possible to work long hours with one battery. (over 6 hours).
At the bottom of the screen, Dramiński SonoFarm mini has a graphic indication of battery status. When
the indicator is shortened or changes from green to yellow, it means that the battery will be discharged in
about 1.5 hours. When the color changes from yellow to red, it means that the battery will work for about
10 minutes. If the device is still switched on, the pack will be fully discharged, a message will appear in the
middle of the screen, and the device will turn off automatically.
Charging DRAMIŃSKI BATTERY PACKS (3.1Ah)
To charge the battery pack a special charger should be used, which guarantees proper charging of packs.
To charge the battery pack follow the activities described below:
a) turn off the power (ON/OFF) of the ultrasound scanner,
b) disconnect battery from the scanner
c) connect the charger cable to the pack slot,
d) connect the charger to a 230 V / 50 Hz socket,
a) observe the diode on the charger – if the colour changes from red (with a largely discharged
pack) to green, the battery is fully charged.
Charging a fully discharged battery takes about 2 hours and 30 minutes. When fully loaded, the charger
stops charging automatically and the signalling diode turns green.
Ładowarka Typ 2541 LI
Diode –
showing
charging
status
Power supply
cable socket
230 V
Contact for the
battery pack
Battery 14.4V, 3,1Ah
Charger socket
Battery electrical
contacts

21
Warning! - The charger must not be repaired independently by users and
disassembled by unauthorised persons.
The battery pack should be charged only with the use of the charger supplied by
the manufacturer.
With regard to the user's safety and durability of the device, the charger must
not be used in humid or wet places.
Before using the charger always check if its main elements, including cables, are
not damaged.
Should any damage be identified, immediately disconnect the device from the power source and replace
the damaged part with a new one by contacting an authorised service centre.
Attention! A charger is an auxiliary device used solely for the purpose of battery charging. It is not an
integral part of DRAMIŃSKI SonoFarm mini ultrasound scanner, used during operation of the device.
Attention! Connecting the charger to the pack attached to the ultrasound scanner causes automatic
disconnection from the power source and makes examination impossible.
Precautions for dealing with the Li-Ion battery pack
Battery packs which form an integral part must not be disassembled.
Contacts on the pack casing must not be connected with metal objects.
Battery packs must not be thrown into the fire or heated up.
Mechanical packs must not be impacted in any way or thrown.
If an electrolyte leaks from the pack it, the user must immediately refrain from using the pack.
Do not allow any liquid to permeate into the pack, which may result in a sudden increase in the battery temperature and cause danger.
The battery pack must not be used or stored in high temperature, e.g. inside a car, directly in the sun, close to heat sources. Failure to comply with these rules may cause the electrolyte to leak from the battery and damage it or reduce its operating life.
The battery must be charged in the ambient temperature of 0 ° C to 40 °C. Charging the battery in an ambient temperature different from the one provided above may cause danger and permanent damage of the pack.
If, after a long-term use (about 500 cycles), problems with charging occur, the battery pack should be replaced.
An old battery pack should be recycled in accordance with currently enforced regulations.

22
MAINTENANCE OF THE DEVICE AND PROBES
During use, the device may be contaminated, also with infectious agents. Directly after work, the
device should be cleaned with a damp, wet cloth or paper towel, using a mild detergent. When
cleaning, protect slots in the casing from moisture.
The surface of the device should be disinfected with a special agent for disinfecting medical
equipment.
Attention! Ultrasonic probe must be carefully disinfected after each use.
After cleaning with a damp cloth, the ultrasound scanner should be wipe dry with a paper towel, if
necessary.
Warning! - Do not use heavily concentrated, aggressive agents and
abrasives.
When wet cleaning, protect plugs, slots and holes in the casing
against moisture.
It is advised that the ultrasound scanner users have regular technical inspections carried out by
the producer every two years. It will help to ensure the highest level of patients' safety.
Operational and technical comments
Prepare the device and accessories before starting the work.
Turn the power on and check if low battery is signalled.
A special gel is necessary to carry out the examination (please use gels recommended for
ultrasonography, ideally after making sure that they have special certificates authorising their use).
Using other substances may be uncomfortable and ineffective and cause adverse effects. A generous
portion of gel improves signal penetration and makes it possible to achieve a proper and clearer
image. Before starting work it's good to make sure id there is enough gel for the planned
examination.
Images obtained during the penetration are influenced by a number fo factors, such as the place of
applying the head, penetration surface (i.e. the manner of applying the head), amount of gel and, of
course, experience and skills of the operator.
During the examination, a keyboard is used to set the best parameters for operation in specific
conditions. Gain control option should be used. The device 'remembers' previously used gain
settings for individual scanning depths. A focusing function should be used, which contributes to
obtaining more legible results for the examined object.
23
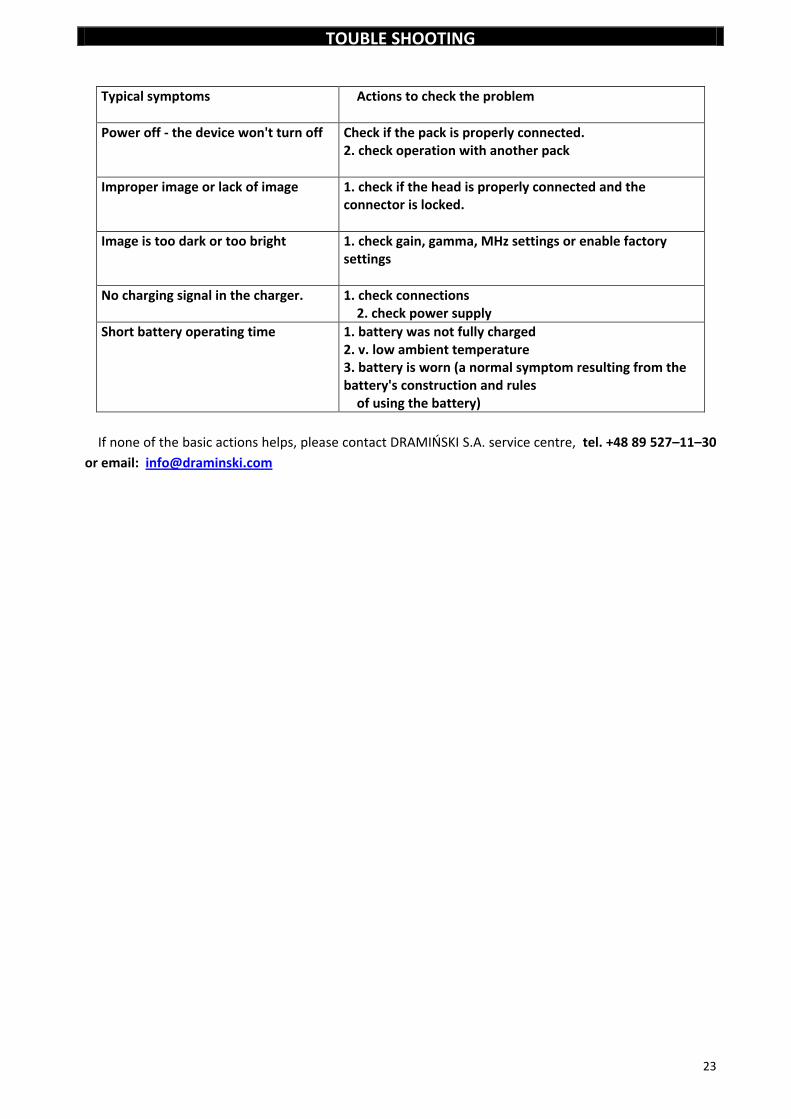
TOUBLE SHOOTING
Typical symptoms
Actions to check the problem
Power off - the device won't turn off Check if the pack is properly connected. 2. check operation with another pack
Improper image or lack of image
1. check if the head is properly connected and the connector is locked.
Image is too dark or too bright
1. check gain, gamma, MHz settings or enable factory settings
No charging signal in the charger.
1. check connections 2. check power supply
Short battery operating time
1. battery was not fully charged 2. v. low ambient temperature 3. battery is worn (a normal symptom resulting from the battery's construction and rules of using the battery)
If none of the basic actions helps, please contact DRAMIŃSKI S.A. service centre, tel. +48 89 527–11–30
or email: [email protected]

24
GUARANTEE
The manufacturer hereby grants the buyer a 24-month guarantee for a trouble-free operation of the
product used in accordance with the attached user manual.
The battery for the device has a 6-month guarantee.
In case of any failure occurring at no fault of the user, the manufacturer undertakes to repair the product
not later than within working 14 days from the date of receiving the device at the service centre (ul.
Owocowa 17, 10-860 Olsztyn) and to return the device in good working order at the manufacturer's cost.
The guarantee excludes mechanical damage, damage resulting from improper operation, storage and
independent repairs.
The guarantee is processed based on a proof of purchase (invoice). To make a complaint, the user should
advise Dramiński S.A. immediately of any suspected fault within a reasonable time from the date of
identifying a suspected Product fault, however not later than before the Guarantee expiry date.
To make a claim under the Guarantee the user should submit:
1. Product
2. A copy of the proof of purchase clearly identifying the name and address of the seller, date and place of
purchase, type of product and product serial number.
The Guarantor is DRAMIŃSKI S.A.:
Owocowa 17, 10-860 Olsztyn, Poland Phone: +48 89 527 11 30, fax +48 89 527 84 44 e-mail: [email protected] www.draminski.com