Sonata System Physician & Staff Training...2020/05/03 · Sonata System Physician & Staff Training...
31
Sonata System Physician & Staff Training Sonata System for Sonography-Guided Transcervical Fibroid Ablation LS 04633-007, Rev A, Physician Training Module, DMR 05860
Transcript of Sonata System Physician & Staff Training...2020/05/03 · Sonata System Physician & Staff Training...

Sonata SystemPhysician & Staff
Training
Sonata System for Sonography-Guided Transcervical Fibroid Ablation
LS 04633-007, Rev A, Physician Training Module, DMR 05860

SYSTEM COMPONENTS
2

The Sonata System Components
3
IUUS Probe (reusable)SMARTTablet
RF Generator
System Cart
RFA Handpiece (single use)
Two (2) Dispersive Electrodes

Treatment Device
4

SMART Tablet
• Ultrasound imaging capabilities
• Compatible with Intrauterine Ultrasound Imaging Probe
5

SMART Guide “Setting Margins for Ablation in Real Time”
SMART Guide is a graphical overlay used for:
• Planning ablation
• Deploying Needles
• Preparing to activate RF energy

INTRAUTERINE ULTRASOUND
7

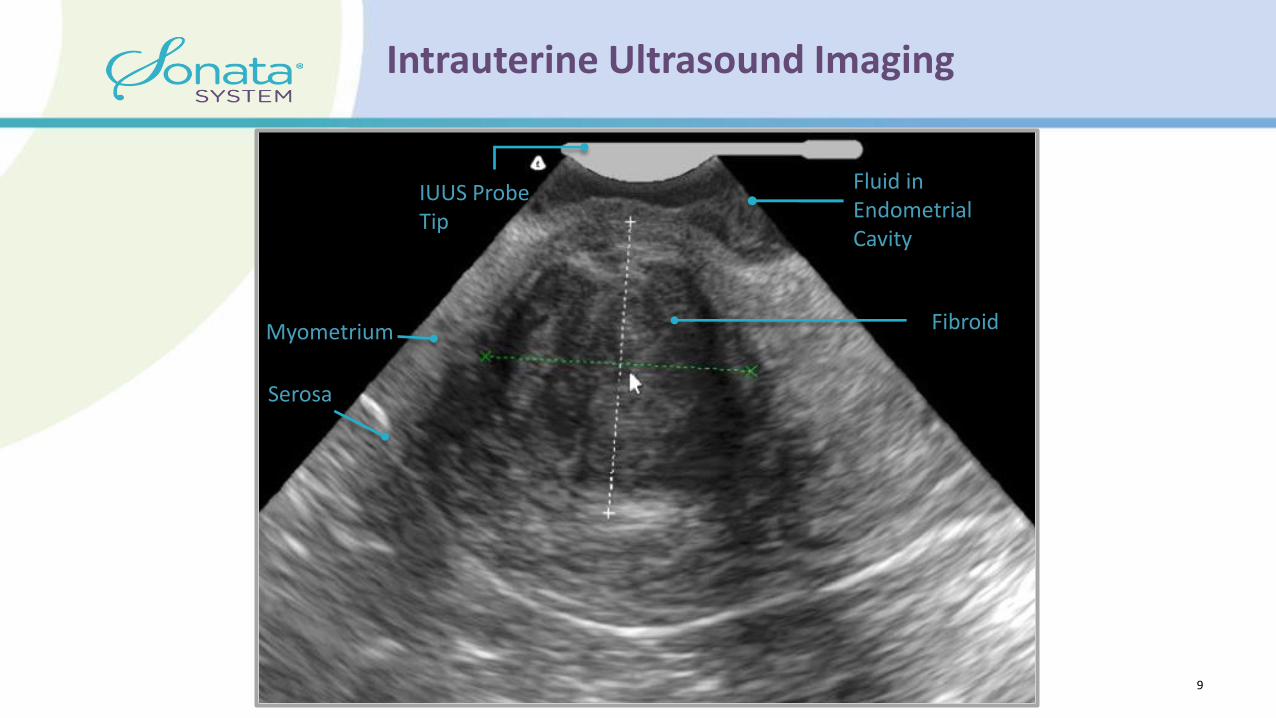
Intrauterine Ultrasound (IUUS) Imaging
• Imaging from within the uterus
• IUUS Tip is within the endometrial cavity
Intrauterine Ultrasound Imaging
9
IUUS Probe Tip
Myometrium Fibroid
Serosa
Fluid in Endometrial Cavity

ABLATION TARGETING
10
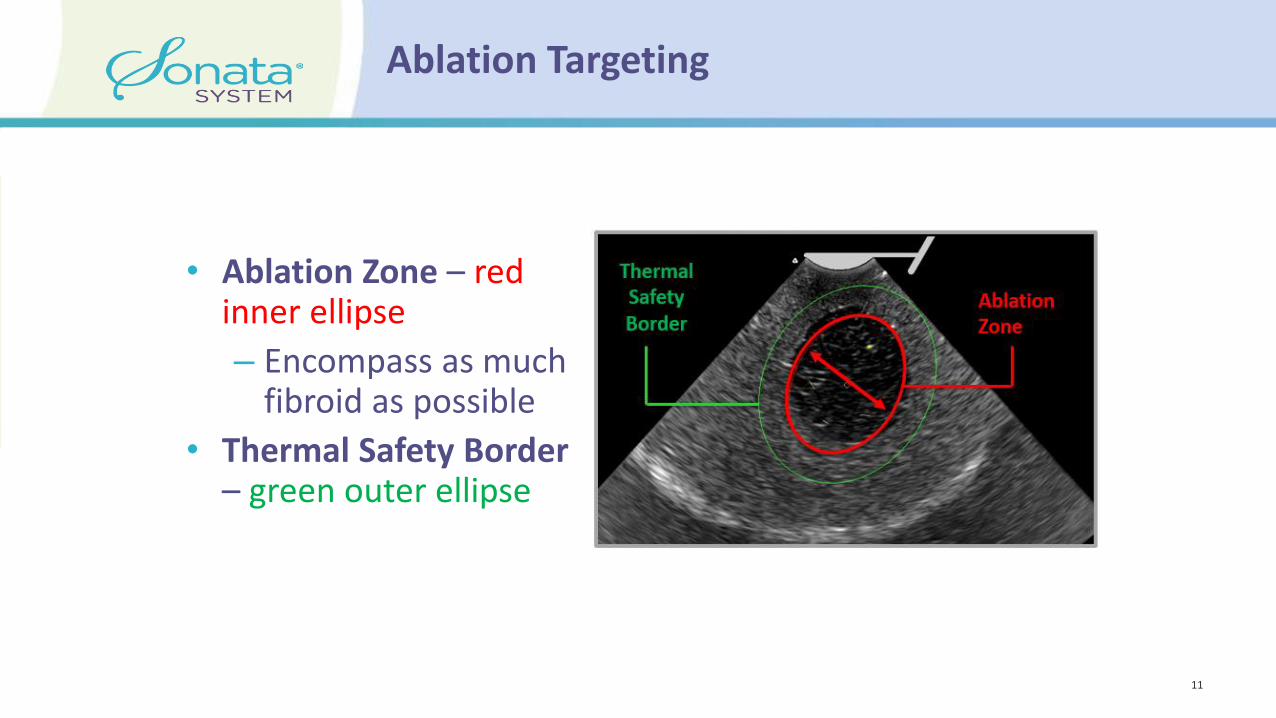
Ablation Targeting
• Ablation Zone – red inner ellipse
– Encompass as much fibroid as possible
• Thermal Safety Border – green outer ellipse

Ablation Targeting
Thermal Safety Border can be positioned up to the serosa.
It should never cross the serosa.
12

TREATMENT DEVICE CONTROLS
13

14
Articulation Lever
NeedleElectrode
Sliders
AblationGuideKnob
Introducer Sliders
Treatment Device Controls

Treatment Device Controls
15
ABLATION PROCEDURE
16

Ablation Procedure –Treatment Device Insertion
• IUUS Tip is at 0°
• Dilate cervix to 27 Fr (9 mm)
• Insert Treatment Device through
cervix
• Fenestrated speculum may help
access
• Place tenaculum to provide
stability and aid insertion
17

Survey the Uterus
• Infuse hypotonic fluid
• Slide tip to fundus
• Survey uterus
• Identify fibroids
• Plan treatment
18

Essential Safety Step SMART Guide Position
21
1
2
3 Perform Safety Rotations
Thermal Safety Border within the serosa
Align Introducer Tip “Click to Tip”

Essential Safety Step Click on Tip for Alignment
• Align Introducer Tip with Introducer Marker
• Place cursor on Introducer Tip and click 23
+ +1
2
3 Perform Safety Rotations
Thermal Safety Border within the serosa
Align Introducer Tip “Click to Tip”

Repositioning
If Thermal Safety Border (green outer ellipse) crosses serosa:
• Reduce Ablation Zone depth or size
• Pull device back
• Change articulation angle
• Move hand/elbow up or down
• Recheck safety Rotation anytime the device is repositioned
25
Essential Safety Key
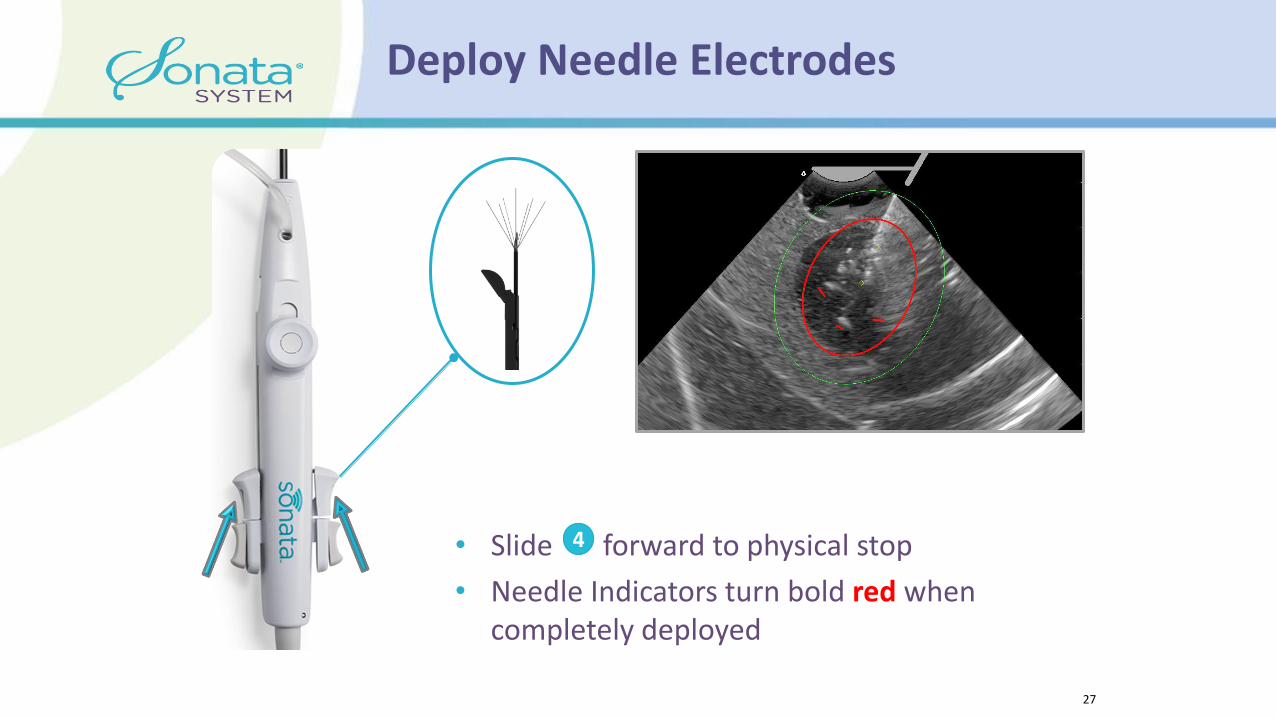
Deploy Needle Electrodes
• Slide forward to physical stop
• Needle Indicators turn bold red when completely deployed
27
4

Essential Safety Step -Final Safety Rotation
• Rotate in both directions
• Verify Thermal Safety Border (green outer ellipse) is within serosa in all planes
• If resized or repositioned, Retract Needle Electrodes and repeat safety rotations
29
1
2
3 Perform Safety Rotations
Thermal Safety Border within the serosa
Align Introducer Tip “Click to Tip”

RF Generator Status – READY
When is clicked:• RF Status changes to • RF Generator is armed and ready for ablation to be initiated
– Ablation does not start until operator initiates RF energy
31

Start Ablation
To start ablation:
• Operator steps once on Footswitch (Do not rest foot on it to prevent unintended stop)
OR
• Support Staff presses ON/OFF button on RF Generator (not sterile)
32

RF Status – ACTIVE
RF is
• RF energy is delivered
• Temperature is displayed
• Energy heats to 221°F (105°C)
• Ablation Time is displayed
• Status bar indicates ablation progress
• Ablation size is displayed
33

POST-PROCEDURE
35

Post Ablation
• Ablation completes automatically
• RF Generator beeps
• Yellow arrows are displayed 36

Treatment Complete: Retract Controls 4-3-2-1
37

Post Treatment Patient Counseling
Patients may experience:
• Continued bleeding symptoms for a few months following procedure before improvement
• Shedding of ablated tissue
• Expulsion of ablated fibroid (low occurrence) 39

40