Solo 2 GPS Lap Timer - aim-sportline.com · Solo 2 can anyway be powered by a 12V, not stabilized,...
22
Solo 2 User Manual 1.01 GPS Lap Timer
Transcript of Solo 2 GPS Lap Timer - aim-sportline.com · Solo 2 can anyway be powered by a 12V, not stabilized,...

Solo 2
User Manual 1.01
GPS Lap Timer

1 – Solo 2 in a few words2 – What is in the kit? 3 – Installation, powering and accessories 4 – At power on 5 – Configuration menu 5.1 – Type of racing 5.2 – Track management 5.2.1 – Track creation with with Solo 2 5.3 – Display setup 5.3.1 – Backlight 5.3.2 – Pages Setup 5.4 – Wi-Fi 5.5 – System settings 5.5.1 – Unit of measure 5.5.2 – Led Bar (Type of race: speed only) 5.5.3 – Date Time 5.5.4 – Language 5.5.5 – Clear Memory 5.5.6 – System info 6 – On the track 6.1 – Track page 6.2 – Other pages 7 – Data Recall7.1 – Data Recall “Speed” mode 7.2 – Data Recall “Performance” mode 8 – Wi-Fi configuration 8.1 – Configuring Solo 2 as an access point (AP) 8.2 – Adding Solo 2 to an existing network 8.3 – Wi-Fi network settings 8.4 – The Internet connectivity8.5 – Connection issues 8.6 – Working on MacTM with virtualized WindowsTM 8.7 – Connected device visualization issues 9 – PC connection 10 – Track Management 11 – Data download 12 – Data Analysis 13 – New firmware upgrade 14 – Technical specifications and drawings
24677891015151617171718191919192020212222232425273031313233343536363738
Solo 2
User Manual 1.01
GPS Lap Timer

What is Solo 2?
Solo 2 is the new AiM GPS Laptimer.
Why Solo 2?
Because it features:n integrated GPS + Glonass receivern a huge tracks database that Solo 2 manages to automatically select the track where you are racingn a powerful and comfortable Wi-Fi connectionn different type of races: speed and performancen 10 RGB LEDs that clearly show you if you are improving or notn a huge amount of internal memory (four gigabytes) capable of recording a lot of tests
1. Solo2 in a few words
CHAPTER 1
02 03

2. What is in the kit?
Solo 2 kit includes:
n Solo 2n Solo 2 power cable with car lighter socketn Solo 2 power cable with AC adaptern Solo 2 mounting bracket with screwsn Race Studio 3 software installation CD
CHAPTER 2

CHAPTER 3-4-5
06 07
3. Installation, powering and accessories
Thanks to its small dimensions and to the installation accessories, Solo 2 can be installed on almost any kind of motorsport vehicle.The internal battery keeps Solo 2 alive for about 4/5 hours: please keep in mind that the power consumption depends on the activity of:
n WiFi (about 100 mA/hour when ON)n Backlightn Shift Light LEDsn GPS tracking: at the power ON, Solo2 starts searching the satellites: this activity is rather power consuming and continues for about 40- 50 seconds; after this short period, the power consumption sensibly decreases.
Solo 2 can anyway be powered by a 12V, not stabilized, external power source.
n support for roll-bar: X46KSTG00
n support for generic tube: X46KSTP00
n support for suction cup: X46KSVS00
4. At power on
When switched on Solo 2 shows satellite page.
To optimize the display management, the keyboards disappears when not necessary.Please simply press one of the pushbuttons for making it show up again.
5. Configuration menu
Before using your Solo 2 you need to set some parameters as explained here below.Press “MENU” and this page shows up.
Type of racing
Track management
Display set up
Wi - Fi
System settings

5.1 Type of racing
Solo 2 features two different type of races, each of them with different options:n speed (left image below)n performance (right image below)
CHAPTER 5
09
Speed racingSolo 2 automatically selects the track in which you are performing: after having found the proper track, it may calculate, show and set:n Circuit type: closed or openn Predictive Reference lap: the time at the end of the current lap is computed looking at the actual speed, compared with a reference lap. The reference lap can be: n the best lap of the test or n the best lap of today
“Auto OFF”: a time time period of inactivity that switches your Solo 2 off. Available options are:n 10 minn 20 minn 30 min
“Lap summary”: at the end of the test Solo 2 shows lap summary page. See chapter 7 “Data Recall” chapter for further information about it. Available options aren enabled (default)n disabledTrack width: can be set in a 5-100 m range
Performance racing:This racing mode shows you different performance options according to the measure unit you set in “System settings” –> “Unit of measure”:n using imperial unit of measure (mph) the available performance options are: n 0-60 mph n 60-0 mph n 1/8 miles n 1/4 milesn using decimal unit of measure (km/h) the available options are: n 0-100 km/h n 0-160 km/h n 100 m n 150 m n 400 m n 1000 m
“Auto OFF” option sets the time period of inactivity that switches your Solo 2 off. Available options are:n 10 minn 20 min
5.2 Track management
Solo 2 built in GPS receiver is used for:n Lap time calculationn Speed calculationn Predictive lap time calculationn Position on the track in Analysis.To calculate these data the system needs to know the Start/Finish line coordinates.
Solo 2 comes with a long list of the world main tracks, list that is constantly updated by our technicians and is downloa-ded on your PC when you run our Analysis software and an Internet connection is available.Solo 2 provides two track selection modes: automatic and manual.
Automatic:Solo 2 automatically recognizes the track you are running on, loads start/finish line and calculates lap times. This is the best mode in most cases.
Manual:allows you to manually select the track from the internal database.This mode is to be preferred when multiple track confi-gurations are available nearby. In this case Solo 2 would anyway recognize the track but would need at least one complete track lap.To be ready from the first lap manual mode would be helpful.
Both track modes provide three track list type:n closed nearest: shows only tracks in a 10 km distance with max 50 tracks shownn all tracks: shows all tracks stored in the system in alphabetical ordern custom: shows only the tracks you have previously created (learning mode)

5.2.1 Track creation with Solo 2
If you are running in a track NOT included in Solo 2 database you can create it. According to the circuit type you set in “Type of racing” (paragraph 5.1) you can create a closed (in automatic or in manual mode) or an open circuit (in manual mode only).
CHAPTER 5
10 11
Creating a closed circuit automatically
To create a closed circuit in automatic mode:n type of racing is to be “Speed” (paragraph 5.1)n circuit type is to be “Closed”
From Solo 2 main page press any key and the bottom keyboard shows up: press “TRACK”
Press “CREATE”.
Select “AUTOMATIC CREATION” and Press “ENABLE”.When GPS signal is good Solo 2 starts recording each track point. When it detects it is crossing the same point for the second time it defines a temporary start/finish line in order to show lap times.Solo 2 automatically creates a track. As soon as the session is over the new track layout is displayed; start/finish line can be changed and a track name can be added using the device keyboard.
Creating a closed circuit manually
To create a closed circuit in manual mode:n type of racing is to be “Speed” (paragraph 5.1)n circuit type is to be “Closed”
From Solo 2 main page press any key and the bottom keyboard shows up: press “TRACK”
Press “CREATE”.
Select “ADD START LINE” andPress “ENABLE”
Go to the start/finish line and press “OK”.

The track has been created.Its name is track date and time
Solo 2 allows the user to create a temporary track::n “Yes”: Solo 2 creates a track that will be available until the following Tuesdayn “No”: Solo 2 creates a track that will be saved in the device memory permanently
CHAPTER 5
12 13
To create an open circuit:n type of racing is to be “Speed” (paragraph 5.1)n circuit type is to be “Open”
Creating an open circuit (only manually)
From Solo 2 main page press any key and the bottom keyboard shows up: press “TRACK”
Press “CREATE”.
Select “ADD START/FINISH LINE” andPress “ENTER”
Ensure that GPS signal is “GOOD”, go to the start line and press “OK”
To acquire the track shape press “YES”.
Go through the track towards the finish line to set it.
Please note: Start and finish line distance has to be at least 10m.Once this distance reached the display of Solo 2 shows an additional bottom line and “OK” button shows up: press it.

5.3 Display setup
Selecting this icon the page shown below shows up.
CHAPTER 5
14 15
The track is created named as date and time of the crea-tion.
The display shows its shape.
For further information about track creation with Solo 2 refer to FAQ section, Solo 2, Lap Functions of www.aim-sportline.com.
Here you can set the system backlight as well as its display pages.
5.3.1 Backlight
You can set Solo 2 backlight as “ON” (default setting) or “OFF” as well as choose among eight different colours:

Solo can show from two up to five pages according to the type of race you set.Some pages are enabled by default and need to be set while other – custom, available only if you set type of race: “speed” – needs to be enabled before being set. The Pages enabled by default are:n track page (see related paragraph)n lap time page (left image below)n predictive page (right image below – speed race only)
5.3.2 Pages Setup
Here you can manage Wi-Fi as well as reset its configuration. Wi-Fi modes are:n ONn Auto: switches Wi-Fi on when the vehicle is stopped and automatically switches it off when Solo 2 starts recording (speed higher than 10 km/h for 3 seconds with a good GPS signal)n OFF
5.4 Wi-Fi
CHAPTER 5
16 17
Lap time page: here you can set lap time format as:n rolling: dynamic is shown for 5 seconds when you cross start/finish line and then starts rolling againn static: shown steady for the entire lap; changes when crossing start/finish line
Predictive page (“Type of race: speed” only): here you can set lap time format as:n predictive: shows the predicted time resultn +/- best: shows time gap between current lap and reference lap you set in “Type of race” menu
The two custom pages (speed race only) need to be enabled as shown here below. This way “CONFIG” button appears (right image below). Press it to configure the page. Each custom page can show up to four fields. All fields can show all available options (left image below).
“Wi-Fi Reset CFG” allows you to reset Wi-Fi configuration and is very useful if you do not remember Wi-Fi password.
5.5 System settingsSelecting this icon you enter this page:
5.5.1 Unit of measure
You can set the measure unit of speed: km/h or mph. Please remember that according to the measure unit you set here you will see different options in “Type of Race” menu if selecting “Performance” type (refer to the related paragraph for further information)

Selecting this icon you enter this page:
5.5.2 Led Bar (Type of race: speed only)
5.5.3 Date Time
CHAPTER 5
18 19
Here you can set the 10 lateral LEDs of Solo 2 function and working mode (value).Function can be:n Laptimen OFF
Led Value can be:n 0.1 secn 0.2 secn 0.05 sec
Working mode:Setting Laptime mode the lateral LED switches on green or red indicating if your lap time is improving (green) or get-ting worse (red). The LED values indicate the time gap to be assigned to each LED. Assuming your lap time is improving of 0.3 sec toward the reference lap:n if you selected 0.1 sec LED Value your Solo 2 will switch on 3 LEDs green;n if you selected 0.2 sec LED value the green led will be 1;n if you selected 0.05 LED value all your Solo 2 LED will switch on green.
Here you can set the time zone of your Solo 2 as well as enable/disable “Daylight Saving time” option. Time zone is always set manually. Date and time can be shown in different format.Time is automatically synchronized as Solo 2 receives the GPS signal.
5.5.4 LanguageYou can set Solo 2 language. Default setting is English.At present available languages are (in this order):n Englishn Italiann Deutschn Spanishn French
5.5.5 Clear Memory
To clear the memory of Solo 2 press “OK”.
5.5.6 System infoThis page shows serial number as well as firmware and boot version and hardware revision of your Solo 2.
n Dutchn Danishn Portuguesen Japanesen Czech

Other available pages are: Laptime Page, predictive Page and two custom Pages. Use “NEXT” button to scroll them.
Laptime page is shown no matter which type of race you set your Solo 2 on. It shows the lap time.
6.2 Other pages
CHAPTER 6
At switch on Solo 2 shows the device main settings:n Type of racingn circuit typen track name: only if the track is in a 10km arean date time: current date and time
6 On the track
20 21
Some Solo 2 pages are available for online visualization. To scroll them press “NEXT” (“Type of Race: Speed” only).Pages can change according to the device configuration.
This page can be recalled pressing “TRACK” button. It shows:n on the left the selected track; you can select a new one manually or automatically (“MENU”/ Track Management); in case of “Automatic” selection the track is selected according to the coordinates of your vehicle; in case the track you are running on is not included in your Solo 2 database the laptimer switches to “learning mode” as shown in the bottom image here on the right
n on the right the satellite bar (visible satellites and signal level of each one) useful for evaluating the status of the GPS signal.
6.1 Track page Predictive page shows the predicted current lap time in the format you set:n +/- in relation to the Reference Lapn Predicted lap time
Custom pages you may freely customize up to two pages for showing all the information you wish. The pages needs to be created and enabled as explained in Pages setup paragraph.
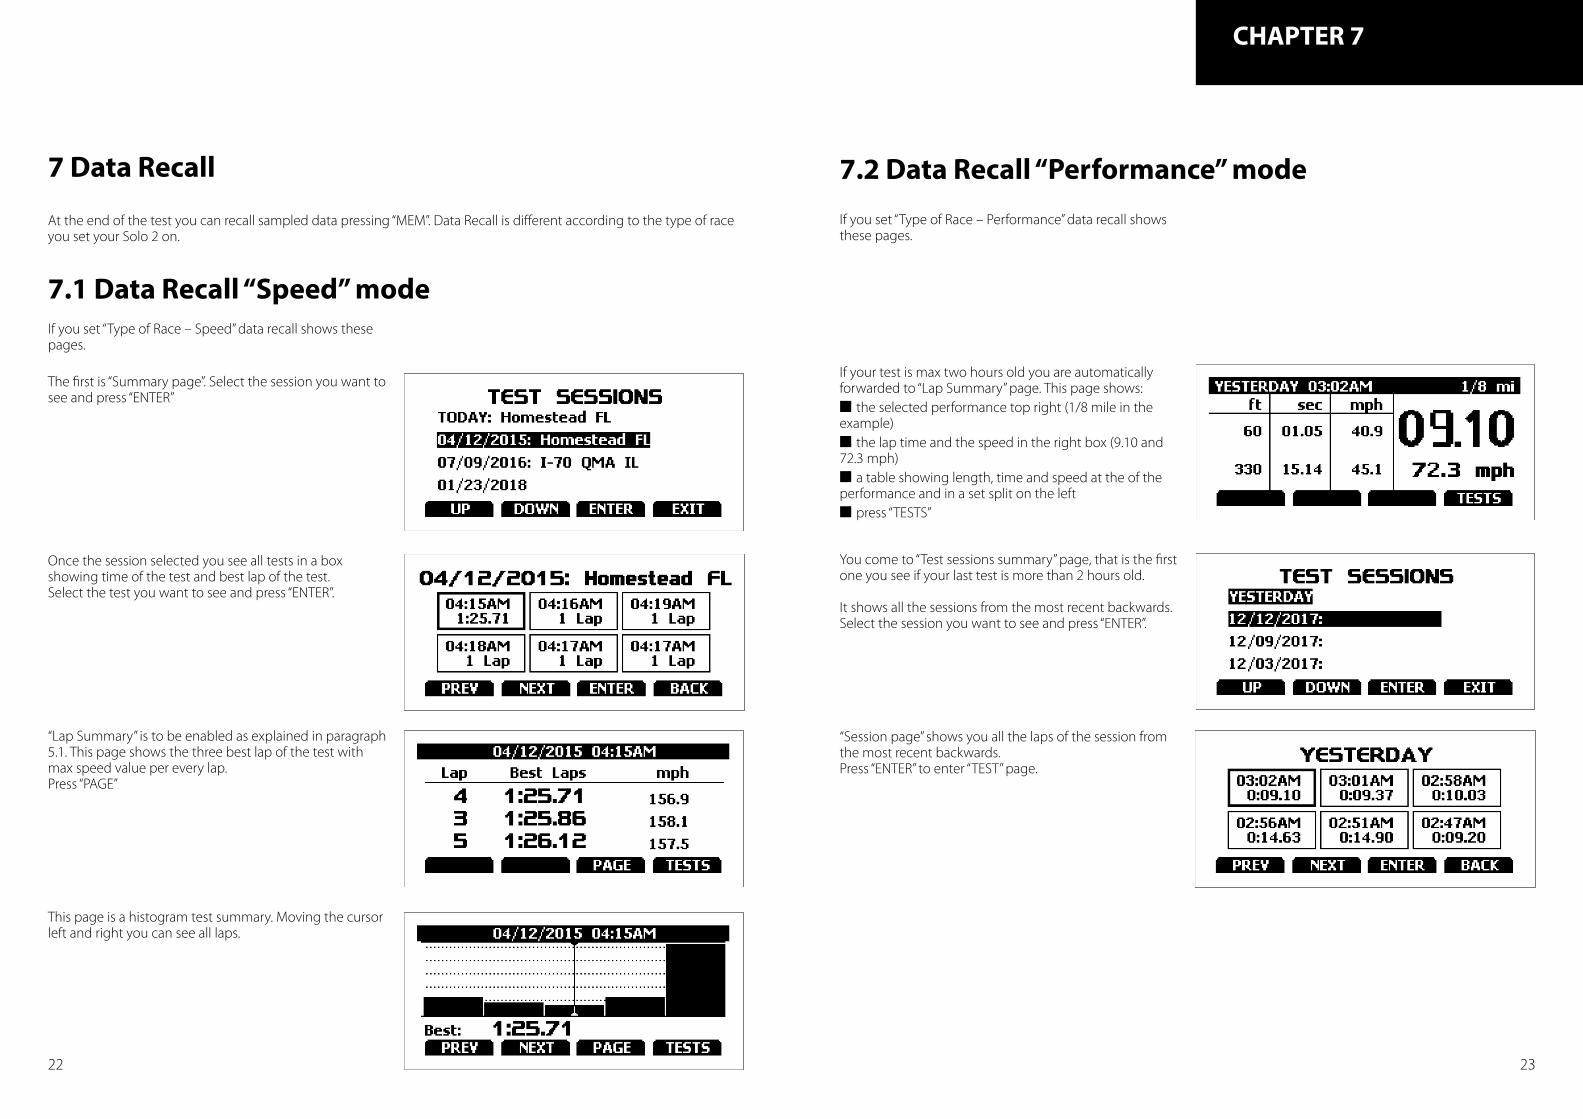
At the end of the test you can recall sampled data pressing “MEM”. Data Recall is different according to the type of race you set your Solo 2 on.
CHAPTER 7
7 Data Recall
22 23
If you set “Type of Race – Speed” data recall shows these pages.
7.1 Data Recall “Speed” mode
The first is “Summary page”. Select the session you want to see and press “ENTER”
Once the session selected you see all tests in a box showing time of the test and best lap of the test.Select the test you want to see and press “ENTER”.
“Lap Summary” is to be enabled as explained in paragraph 5.1. This page shows the three best lap of the test with max speed value per every lap.Press “PAGE”
This page is a histogram test summary. Moving the cursor left and right you can see all laps.
If you set “Type of Race – Performance” data recall shows these pages.
If your test is max two hours old you are automatically forwarded to “Lap Summary” page. This page shows:n the selected performance top right (1/8 mile in the example)n the lap time and the speed in the right box (9.10 and 72.3 mph)n a table showing length, time and speed at the of the performance and in a set split on the leftn press “TESTS”
You come to “Test sessions summary” page, that is the first one you see if your last test is more than 2 hours old.
It shows all the sessions from the most recent backwards.Select the session you want to see and press “ENTER”.
“Session page” shows you all the laps of the session from the most recent backwards.Press “ENTER” to enter “TEST” page.
7.2 Data Recall “Performance” mode

8.1 Configuring Solo 2 as an access point (AP)
CHAPTER 8
8 Wi-Fi configuration
Solo 2 configuration can be made only using Race Studio 3 software. Two possible Wi-Fi modes are available.
1 – As an access point (AP – default)This is the ideal configuration if you have one only device and one only computer. In this situation your Solo 2 creates a Wi-Fi network and works as an Access Point you can connect your PC to.
24 25
2 – Existing network (to connect to an existing Wi-Fi network – WLAN)This mode is complex and implies an external access point (AP) but it is also more flexible and powerful because allows you to communicate with more than one device and with more than one computer in the same network. Solo 2 and the PC must connect to an existing Wi-Fi network made by a device that works as an external access point.
When working in WLAN mode Solo 2 has two available security levels:n network authentication: network passwordn device authentication: Solo 2 password
Both levels allow you to use different strategies. A PC in WLAN, for example, can see several AiM devices but can com-municate only with those he knows the password of.If you forget the password you can reset Wi-Fi configuration from Solo 2 menu as explained before.
This is Solo 2 default configuration and is the easiest and most direct connection mode, ideal if you want to com-municate with one Solo 2 using one PC. It is free and so completely accessible by anyone.
Please set an access password as soon as possible.To establish a Wi-Fi connection:n ensure that the Wi-Fi is enabledn read your Solo 2 Name
n run Race Studio 3n click Wi-Fi icon and select your devicen in a few seconds the connection is established

CHAPTER 8
To set other parameters create a unique password to protect your device/your network. With a password, the commu-nication is safe and encrypted using WPA2-PSK standard. Characters allowed in the password are all letters, capital too, all digits and these characters: ‘+-_()[]{}$£!?^#@*\\\”=~.:;/%”;“Space” type can be used but not as first one not to cause incomprehension in some WindowsTM versions.
8.2 Adding Solo 2 to an existing network
”This situation is ideal for a team with multiple drivers and staff members and is desired to communicate with one or more AiM devices using the same PC network. Each Solo 2 can have its password that adds another security and privacy level to the network.Race Studio 3 will show all Solo 2 connected to the same network under “Connected devices” label, bottom left of the software page: click your device.Enter “Wi-Fi and properties” tab and set it on “Existing Network”; fill in network name, network password and device pas-sword.Transmit the network settings to your device clicking “Transmit”: your device reboots and joins that network.
Please note: the only admitted password are those following WPA2-PSK standard.
26 27
This AP or SSID name is unique for your device.An example of name is:” AiM-Solo2-00101” where:n “AiM” is the prefix of all AiM devicesn “Solo 2” is the device identifiern “00101” is your device serial number assigned by the factory.
To make your device more recognizable you can add a name to the SSID. The limit is of eight characters. Allowed cha-racters are all letters, capital too, all digits and these characters: ‘+ - _ () [] {}!;“Space” type can be used provided that it is not the first one because it can cause incomprehension in some WindowsTM versions.If, for example you add the driver’s name, Tom Wolf, the network name (SSID) becomes: ”AiM-Solo2-00101-TomWolf”Once all parameters set click “Transmit”. Solo 2 reboots and is configured with the new parameters. If Solo 2 is protected by a password, as recommended, Race Studio3 will ask that password to authenticate
Please Note: the same Wi-Fi connection can be created with the operative system tool.Once the device has been authenticated in the Wi-Fi network you can communicate with it using Race Studio 3.

CHAPTER 8
To complete this procedure use Race Studio 3 software as here explained. When the PC is authenticated to the network called “AiM” it can see all devices you configured to access the same network. In the image below two AiM devices are connected to the same “AiM” WLAN.
28 29
Here above you see a device “Solo2-00101” that switched from AP to WLAN mode (Existing Network). Network name is “AiM” and does not work with free access because is protected by a password. To obtain connectivity on the device the PC has to be authenticated to the same network as shown here below.

CHAPTER 8
8.3 Wi-Fi network settings
30 31
In this chapter you find a short description of how to configure a WLAN including AiM devices and a PC. Here on the right is an example of configuration.
For better network performances, we suggest the use of a network device equipped with a DHCP server and using 3x3 MIMO technology like, for example a Linksys AS3200. To maximize the bandwidth, you should not allow the Internet on this WLAN; this means the DHCP server should be configured without any DNS address nor gateway by default.
The parameters for the device network configuration in this example are:n Wireless network name: network_1It means that the WLAN network name is “network_1.” A PC has to be authenticated in this network to interact with any AiM device of this network.
n Gateway address: 192.168.0.1primary DNS server: 0.0.0.0secondary DNS server: 0.0.0.0(These settings prevent Internet connectivity on this WLAN.)
n Subnet mask: 255.255.255.248Enable DHCP server: yesDHCP IP address range: 192.168.0.2 to 192.168.0.6
These settings enable a DHCP server running on this WLAN and provide an IP address in a 2-6 range. This means that this network allows 5 network hosts. The number of devices on a WLAN network depends on the subnet mask. Here below you see typical examples of network masks and IP addresses range.
The configuration in bold is the one we suggest (if a greater number of devices is not needed), being the one that ma-kes it easier and quicker for Race Studio 3 the identification of the devices in the network.
Subnet mask: IP address range: Number of devices:255.255.255.0255.255.255.128255.255.255.192255.255.255.224255.255.255.240255.255.255.248
192.168.0.1 – 254192.168.0.1 – 126192.168.0.1 – 62192.168.0.1 – 30192.168.0.1 – 14192.168.0.1 – 6
2541266230146
8.4 The Internet connectivity
8.5 Connection issues
For an optimal speed of your AiM device(s) we recommend not to allow the Internet on the same network and to set the WLAN in the same way.You can of course allow the Internet access on your network but this would degrade the communication.This slightly slower speed can be suitable for your needs but you can also have a second Wi-Fi connection using an additional hardware (NIC).This configuration would provide an optimal speed of the data network of your AiM device(s) and at the same time would provide an internet connectivity with the second NIC.
It can occur that Solo 2 is correctly connected to Race Studio 3 via Wi-Fi but the user interface does not show it. This may be because Wi-Fi port setting is set with a static IP. To switch it to dynamic (DHCP):n open “Network and sharing centre” in the WindowsTM research engine n right click on the Wi-Fi connection and a panel shows upn select “Properties” optionn double click on “Internet Protocol version 4 (TCP/IPv4)”n verify that option “Obtain an IP address” is active
For further information refer to FAQ section, Wi-Fi of www.aim-sportline.com.

CHAPTER 8
32 33
8.6 Working on MacTM with virtualized WindowsTM
Race Studio 3 only works on WindowsTM operative systems; Mac users can eventually use a virtualized WindowsTM machine.The main problem is that the host OS (Mac) must share its Wi-Fi interface with the virtualized operative system (Windows) as Ethernet interface and not as Wi-Fi interface.
Configuring Parallels(™)Select “Configure… in Parallels “Menu”.
Press “Hardware” – top on the page that shows up – and select “Network” in the drop-down menu on the left.Right on the configuration panel set “Type” field on “Wi-Fi”.Then select the device you want to communicate with.
To ensure that the communication works select “Open Network preferences…” menu.
Verify that the status in the window that shows up is “Connected” and that the IP address associated is, for example, 10.0.0.10 (could be 10.0.0.11, 10.0.0.12, or generically 10.0.0.x).
To enable Race Studio 3 correctly working on a Mac with virtualized WindowsTM.n press Wi-Fi icon n select “Wi-Fi Settings” icon
n enable the checkbox shown here on the right.
8.7 Connected device visualization issues
It may occur that using Race Studio 3 on an iMac with virtualized Windows the device connected via Wi-Fi takes some time to be shown in the network or is not shown at all. This is why we always suggests using an Wi-Fi (WLAN) router.This router work as an Access Point allowing more external devices to connect to its network. Solo 2 Wi-Fi configuration is to be set on Existing Network as explained in the related paragraph.

CHAPTERS 9 -10
9. PC connection
34 35
Solo 2 can be connected to the PC only via Wi-Fi. To do it:
n check that Solo 2 Wi-Fi is set on “AUTO” or on “ON”n read your Solo 2 name – mid of Solo 2 home page bottom line – or look for it in “System Information” page.
n click Race Studio 3 Wi-Fi icon and select your Solo 2.
Once the connection is established you have these options:n Live Measures: to check all Solo 2 channels;n Download: to download data, see the related chapter;n Wi-Fi and Properties: to manage the Wi-Fi configuration – see the related chapter;n Settings to: n set date format n enable/disable daylight time n set time format and time zone n set backlight colour n enable/disable night visionn Tracks: to manage the tracks stored in the device memoryn Logo: transmit/receive the logo that shows up when switching Solo 2 on; supported image format are JPEG or BMP; always use the most recent WindowsTM versions (Windows8 or Windows10) whose graphic libraries are more updatedn Firmware: to check or update your Solo 2 firmware version.
10. Track Management
Solo 2 built in GPS receiver is used for:n Lap Time calculationn Speed calculationn Predictive Lap Time calculationn Position on the track in analysisTo calculate these data the system must know the start/finish line coordinates.Solo 2 comes with a long list of the world main tracks. The tracks are constantly updated by our technicians and are automatically loaded on your PC when you run our software Race Studio 3.Solo 2 provides two track selection modes: automatic and manual.
Automatic:Solo 2 automatically recognizes the track you are running on, loads the start/finish line and calculates lap times.This is the best mode in most cases.
Manual:allows to manually select the track from the internal database.This mode is to prefer when multiple track configurations are available nearby. In this case Solo 2 would recognize the track anyway but would need at least one complete track lap.To be ready from the first lap manual mode would be helpful.
You can scroll the list of available tracks choosing among these options:n nearest: shows only tracks in a 10 km distancen all: shows all tracks stored in the system in alphabetical ordern custom: shows only the tracks you have previously created (learning mode)
If you are running in a track NOT included in Solo 2 database it is possible to create a new track as explained in paragraph 5.2.1 and load it in Race Studio3 database.You can add this new map to Solo 2 database, modify start/finish line coordinates, name the track and transmit it to the PC at first PC-Solo 2 connection.For further information about track management with Race Studio 3 refer to “Track Manager” user manual you find in download area /software/Race Studio 3/documentation of www.aim-sportline.com.

11. Data download
36 37
CHAPTERS 11-12-13
Once Solo 2-PC connection is established activate “Download” tab to download sampled data.
This page shows all information about the files stored in the system: number of laps, best lap, date/time and file dimen-sions.Select one or more files and press “Download” to download and analyse them.
12. Data Analysis
When data have been downloaded press Analysis icon and Race Studio Analysis software will open showing this page.
Select your file double clicking on it and start analysing it. A lot of pages, graphs and images will help you analysing your data in the best way.
13. New firmware upgrade
Our technicians and engineers are constantly working to improve both the firmware (the application that manages your device) and the software (the application you install on your PC).Each time a new firmware and/or software version is available the icon here above appears with an arrow indicating that something is available for download (otherwise the icon only shows the cloud).
Click it and freely download the new applications.
Once the new firmware has been downloaded, connect your device to the PC via Wi-Fi to perform a firmware upgrade. In a few seconds, the device is ready.
11. Data download

CHAPTER 14
14. Technical specifications and drawings
n Display Graphicaln Display resolution 128x64 pixelsn Display pages Up to 5 freely configurablen Backlight 7 configurable RGB colourn Shifl lights/alarm LEDs 10 configurable RGB LEDsn Integrated track database Yesn Inertial platform Internal 3 axis ±5g accelerometer + 3 axis gyro+ 3 axis magnetometern Wi-Fi connection Yesn Integrated GPS 10Hz GPS+Glonassn External power 12Vn Memory 4GBn Battery type Rechargeable Lithiumn Pushbuttons Metallicn Weight 240g battery includedn Waterproof IP65n Analysis software Race Studio Analysis freely downloadable from www.aim-sportline.com
38 39

AiM Tech srl.Via Cavalcanti, 820063 Cernusco S/N (MI)ItaliaTel.(+39) 02.9290571
www.aim-sportline.com