Solaris Files and Directory 2015
34
33 What are Files and Directories? A "classic" file is a collection of data located on a portion of a disk. The reason that I say a classic file is that in UNIX files are often used as a representation of a device or to refer to parts of the operating system. There are 3 types of files • Ordinary - This contains data. One form of file is a text file however this category also includes files created by applications or indeed the applications themselves. • Directory - This is a special kind of file that acts like a table of contents allowing the organisation of files (see later in this section). • Special Files - UNIX operating systems allow you to access logical devices by creating virtual files that refer to them. These are found in the /dev directory. For example /dev/tty1 refers to a TTY screen, /dev/cd0 refers to a CD-ROM etc. One particular file is /dev/null which is a pointer to nothing. You may wonder why you would want a file that didn't point at anything, however this can be useful where you get an output that is not needed. Redirecting the output to /dev/null will cause it to disappear. The number of files on a computer can be in the thousands. To have these in one place would make it very difficult to find what you wanted. Searching a list of thousands of files would be equivalent to searching for a needle in a haystack. The files are therefore collected together by commonality. These are put into groups called directories. To make it even easier these are sorted into a hierarchical tree. Moving down the hierarchical structure allows you to find more specific files. The files and directories are referred to by filenames. The filenames can be quite long (up to several hundred characters with some implementations). They can contain any letters, digits and punctuation (including spaces). It is however better to avoid any special characters and especially spaces. This is particularly important in a command line environment like UNIX where it is necessary to interpret the differences between a single filename with spaces and two separate parameters. See creating a new file for more rules on filenames. The directory structure starts at the root directory which is known by a forward slash '/'. Each directory below the root has it's own name and is separated by the forward slash '/'. Below the root directory are a number of "Top level Directories" Common top level directories include home; usr; var; tmp and etc These are used for the following purposes: home - This directory is used as a starting point for user’s home directories. These are directories that are given to users for them to store any files they create. The users directory is a subdirectory to home normally the same name as the username. e.g. /home/stewart usr - This directory is used to store installed user applications.
-
Upload
nikonpix3100 -
Category
Documents
-
view
9 -
download
4
description
Solaris files and Directory 2015
Transcript of Solaris Files and Directory 2015
33
What are Files and Directories?
A "classic" file is a collection of data located on a portion of a disk. The reason that I say a classic file is that in UNIX files are often used as a representation of a device or to refer to parts of the operating system. There are 3 types of files
• Ordinary - This contains data. One form of file is a text file however this category also includes files created by applications or indeed the applications themselves.
• Directory - This is a special kind of file that acts like a table of contents allowing the organisation of files (see later in this section).
• Special Files - UNIX operating systems allow you to access logical devices by creating virtual files that refer to them. These are found in the /dev directory. For example /dev/tty1 refers to a TTY screen, /dev/cd0 refers to aCD-ROM etc. One particular file is /dev/null which is a pointer to nothing. You may wonder why you would want a file that didn't point at anything, however this can be useful where you get an output that is not needed. Redirecting the output to /dev/null will cause it to disappear.
The number of files on a computer can be in the thousands. To have these in one place would make it very difficult to find what you wanted. Searching a list of thousands of files would be equivalent to searching for a needle in a haystack. The files are therefore collected together by commonality. These are put into groups called directories. To make it even easier these are sorted into a hierarchical tree. Moving down the hierarchical structure allows you to find more specific files.
The files and directories are referred to by filenames. The filenames can be quite long (up to several hundred characters with some implementations). They can contain any letters, digits and punctuation (including spaces). It is however better to avoid any special characters and especially spaces. This is particularly important in a command line environment like UNIX where it is necessary to interpret the differences between a single filename with spaces and two separate parameters. See creating a new file for more rules on filenames.
The directory structure starts at the root directory which is known by a forward slash '/'. Each directory below the root has it's own name and is separated by the forward slash '/'. Below the root directory are a number of "Top level Directories" Common top level directories include home; usr; var; tmp and etc
These are used for the following purposes:
home - This directory is used as a starting point for user’s home directories. These are directories that are given to users for them to store any files they create. The users directory is a subdirectory to home normally the same name as the username. e.g. /home/stewart
usr - This directory is used to store installed user applications.
34
var - This is used for files of variable length. Files that change a lot such as log files would be kept here.
tmp - If used this directory is used for temporary files that are only needed for a short period of file. Some systems use housekeeping jobs to periodically delete files in this directory so important files should not be stored here.
etc - This directory holds many of the configuration files used by applications.
bin or sbin - Whilst you may see bin or sbin directories at the top level these are normally symbolic links to the directories /usr/bin or /usr/sbin respectively. The bin directory carries executable programs that can normally be run by anyone, whereas the sbin directory is for programs intended for the superuser only.
lib – This directory holds additional binary files used by programs. It is actually a link to /usr/lib
export – This directory is used by NFS when configured as an NFS server
opt – Used to install programs. The name refers to optional programs, although effectively applications (or the installer) can choose to install in either /usr/local or in /opt. The opt directory is normally used for complete applications and /usr/local for smaller command line programs.
There are some other top level directories that are used as starting points for other directories.
dev - This is used to hold the devices available on the system. For example the first hard disk (hdisk0) can be referred to as /dev/hdisk0
devices – This directory holds the actual device drivers. This is different to /dev which provides an easier to use logical representation of the devices.
mnt - This is the mount point which is used as a convenient place to attach other devices such as floppy disk drives and CD-ROM Drives. For example the CDROM drive may be mounted as /mnt/cd0/ although the name does not have to be the same as the device name.
proc – This is a special case directory holding information about the running system.
kernel – Another special directory used to represent the running kernel.
These then subdivide into further directories, the are known as subdirectories. The directory structure can be represented as a tree.
35
/
(root)
home
usr
etc
stewart
local
binsbin
man
bin
sbinman1
man2
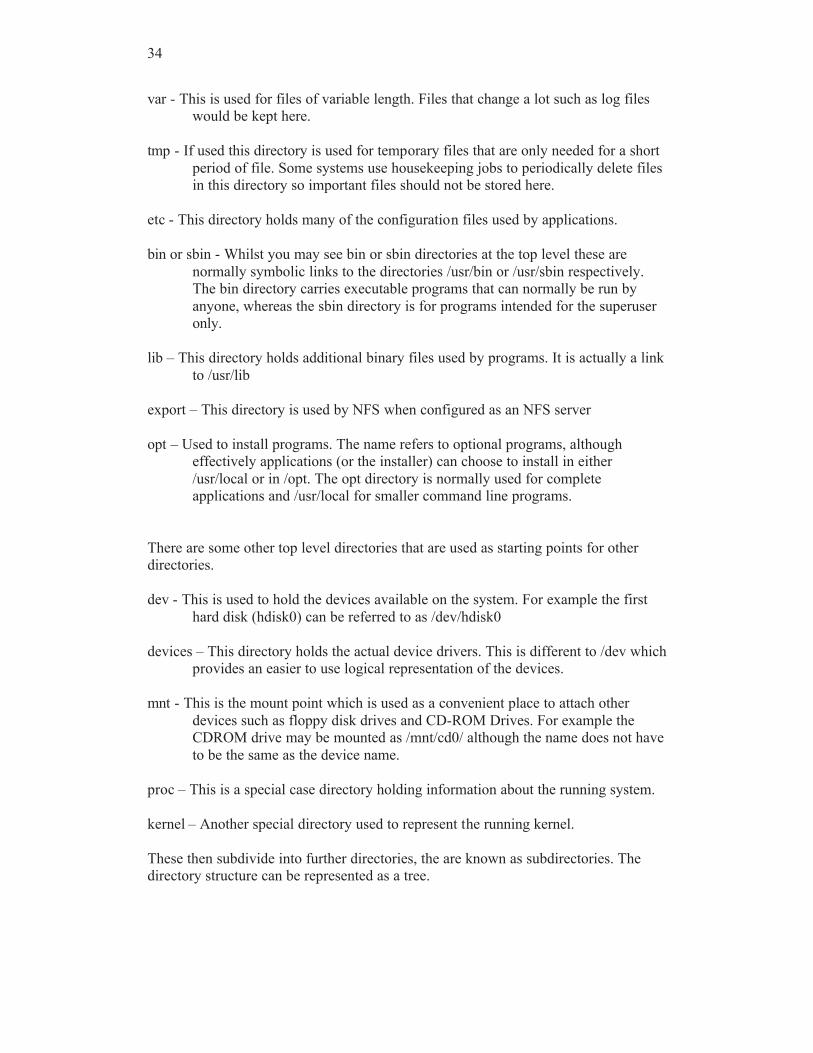
The above tree is far from complete there can actually be over a hundred directorieson a UNIX installation.The full directory path name starts with the root directory (/) and move up the tree with each directory separated by a forward slash. For example the man2 directory would have a full path of /usr/local/man/man2
Relative Directories
So far we've been looking at the directory name in full this is known as the "absolute directory". As well as being able to specify the directory in full (starting with root) it's also possible to specify a "relative directory". To specify the relative directory start from the current position and specify the rest of the directory name. The difference between an absolute and relative directory is that an absolute directory always have a '/' at the start of the path whereas a relative directory will not. If already positioned at the directory /usr/local the man2 directory can be referenced by man/man2
Special Directories
There are 2 special directory names that apply to all the subdirectories. The current directory is marked by a single dot (.) whereas the further up can be referenced by a double dot (..) .
The man2 directory can be referenced from the /usr/local/bin directory with the relative path ../man/man2
Moving about the directories (cd)
When first logging onto a UNIX system you will normally be in your "home"directory. This is normally /home/username (for username stewart that will be /home/stewart).
36
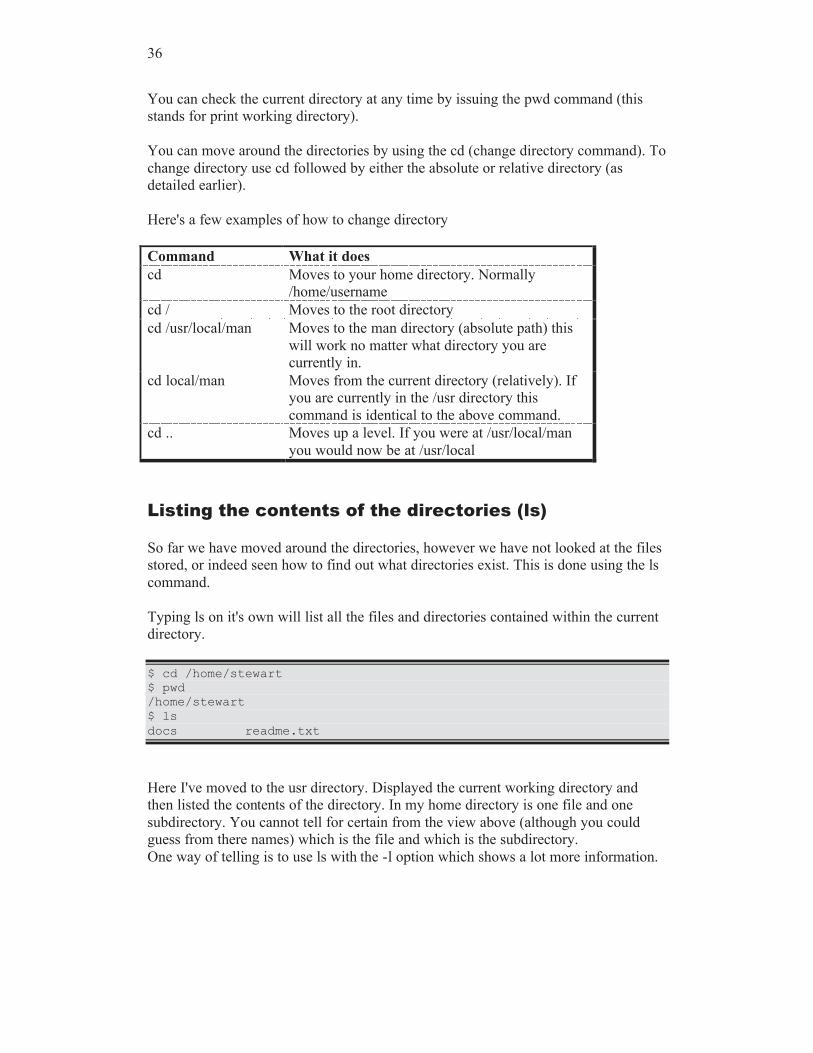
You can check the current directory at any time by issuing the pwd command (this stands for print working directory).
You can move around the directories by using the cd (change directory command). To change directory use cd followed by either the absolute or relative directory (as detailed earlier).
Here's a few examples of how to change directory
Command What it does
cd Moves to your home directory. Normally /home/username
cd / Moves to the root directory
cd /usr/local/man Moves to the man directory (absolute path) this will work no matter what directory you are currently in.
cd local/man Moves from the current directory (relatively). If you are currently in the /usr directory this command is identical to the above command.
cd .. Moves up a level. If you were at /usr/local/man you would now be at /usr/local
Listing the contents of the directories (ls)
So far we have moved around the directories, however we have not looked at the files stored, or indeed seen how to find out what directories exist. This is done using the ls command.
Typing ls on it's own will list all the files and directories contained within the current directory.
$ cd /home/stewart$ pwd/home/stewart$ lsdocs readme.txt
Here I've moved to the usr directory. Displayed the current working directory and then listed the contents of the directory. In my home directory is one file and one subdirectory. You cannot tell for certain from the view above (although you could guess from there names) which is the file and which is the subdirectory.One way of telling is to use ls with the -l option which shows a lot more information.

37
$ ls -ltotal 636drwx------ 2 stewart users 512 Sep 16 17:42 docs
-rw------- 1 stewart users 124 Sep 16 17:26 readme.txt
Using this display you can tell that docs is the directory.
As far as UNIX is concerned a directory is just a special type of file so is displayed along with the other files. From the mode display (this is the 10 characters at the left of each file displayed) the first character shows what type of file it is. The remaining 9 characters show the file permissions however these will be dealt with later.There are seven different file types, which are listed in the table below.
File Type
Letter
Description
- Regular File
d Directory
l Symbolic Link
b Block Special File
c Character Special File
p or s Other Special files (not covered)
A regular file could be an application file or a text file etc. A directory is a file that holds other files (including other directories) A symbolic link allows a file to be redirected to another.
A block and a character file will be explained later.
We can also see that docs, is the directory by going into it and displaying the contents.
$ cd docs$ pwd/home/stewart/docs$ lsfile1 file2
Here's an explanation of the Listing format shown earlier with the ls -l option.

38
(1) (2) (3) (4) (5) (6) (7)drwx------ 2 stewart users 512 Sep 16 17:42 docs-rw------- 1 stewart users 124 Sep 16 17:26 readme.txt
1. File / Directory and permission bits2. Link Count3. Username of person who owns the file4. Group name for which group privileges apply5. Character count of the entry6. Date file was last modified7. Name of the file/directory
The permissions of the file will be explained later.
Referring to files within a directory
A file can be referred to by just it’s filename, it's absolute directory and filename, or by a relative directory and filename. For example file1 can be referred to in the following ways.
From /home/stewart/docs file1 (filename)From anywhere /home/stewart/docs/file1 (Absolute)From /home/stewart docs/file1 (relative)
There is also another way of referring to the current directory using a single dot '.' . This is particularly important when running a program. Some programs that haven't been installed in the standard program directories need to be run by specifying it's directory and filename. The directory can be absolute or relative however when the file is in the current directory the filename alone is not sufficient. To get around this the file is referred to using the dot directory. For example is there is a program called exec in the current directory this would be run by using ./exec
Hidden Files
Whilst you can normally see the files in a directory using the ls command it is also possible to hide some. The normal reason for hiding a file is so that curious users don’t edit or delete the file by mistake. To hide a file all that is needed is for the name to begin with a period ‘.’For example the file .profile is normally hidden from view. To view a hidden file use the –a option when using the ls command.
Lost + Found
There is a special directory name called lost+found. Sometimes when the system crashes it may "lose" a file. If this happens when the system runs it's checks it will store them in the lost+found directory so that any information held in them can be recovered.

39

41
Working with files
We have already covered some
commands used to display the
contents of a directory. This
chapter covers some of the
commands that can be used to
create and modify files and
directories.
Chapter
6


43
Making a new directory (mkdir)
New directories can be created using the mkdir command. Directories can be created either singularly (in which case all directories above it must already exist) or several at a time allowing parent directories to be created at the same time.
Creating a single directory from the current directory is done by mkdir followed by the name of the new directory. For example:
mkdir newdir
The file directory could also have been created using a full path however all the previous directories must already exist. If the previous directories don't already exist then using the -p option will also create the parent directory. For example:
mkdir -p /home/stewart/newdir1/newdir2
Making a new file (touch)
A common way of making a file is to save to a file from an application (see the vi section for details of using a text editor). It is also possible to create a blank file using the touch command. The format is to have the filename after the touch command. For example:touch newfile
The following rules should be followed when creating a file:
• The name should be descriptive of the comments
• Only use alphanumeric characters i.e. Uppercase, lowercase, numbers, #.@-_
• Although spaces can be included in a filename it is strongly advised against this
• Should not include shell metacharacters (characters used by shell pipes etc)*?<>/&;:![]$\'"
• Should not begin with + or -
• Should not be the same as a system command
• Filenames starting with . are hidden (cannot be seen from an ls without the -aoption)
• Less than 255 characters
Whilst this is often the most common use of the touch command it has other uses as well. For example the touch command can be used to change the creation date or other properties of a file.
Removing a directory (rmdir / rm)
44
The safest way to delete a directory is to first remove all files from the directory. Then check the directory is empty by issuing ls -a (the -a will show all files even if they are hidden). Then change to the directory above and type
rmdir dirname
The rmdir command will only work when the directory is already empty which provides a little protection against accidentally deleting files.
For a more cavalier way of removing a directory or multiple directories the rm command can be used. To do this type rm -r followed by the directory name. For example:rm -r dirname
Warning: This is a very dangerous command.The rm -r command will remove all directories below the one specified. Be especially careful if logged in as root as this can delete all the data on the disk.
There is no way of undeleting files that are deleted by mistake.The only way or restoring the file if deleted accidentally is to copy it from the latest backup disk (if available)!
Removing a file (rm)
Files are removed by using the rm command. To delete the file type rm followed by the file name (can include a path).
There is no way of restoring a deleted file (except from a backup copy) so be carefulwhen deleting files. A slightly safer option is to use the -i option, which will prompt before deleting each file. This is particularly useful when using wildcards (see later). It is possible to setup your profile so that you always use the -i option (see alias).
Moving / Renaming a file or directory (mv)
Files or directories can by moved or renamed by using the move command (mv). To move a file enter the mv command followed by the filename and then followed by the new directory. To rename a file or directory enter the mv command followed by the old name and the new name.
You can use the path along with the filename.
Using the -i option will prevent accidentally overwriting an existing file.
Copying a file (cp)
N
45
Files can be copied using the cp command. Enter cp followed by the existing file and then the new file (can include paths). Putting the 2nd parameter (new file) as a directory name will copy the file to another with the same name in the new directory.
Using the -i option will prevent accidentally overwriting an existing file if it exists.Wildcards can also be used to copy multiple files into different directories.
There is also a cpio command that is more versatile and allows the copying of directories and files within them. View the man pages for more information on the cpio command.
Viewing the contents of a text file (cat)
You can view the contents of a text file using the cat command. Whilst cat may seam a strange name for a command the view a file, it's because the command can be used to combine two files into a single one (the name comes from concatenate).
To view a file using cat
cat filename
you should not use this on a binary file as the output can do strange things, including sounding the speaker or accidentally re-mapping the keys.
Other commands that can be used including more, pg and view (see later). Cat is useful for automating a task as it does not need any interaction from a user.
Viewing the beginning / end of a text file (head / tail)
Sometimes you may want to look at the first few or last few lines of a file. For the first few lines you may need to look at the top of a file and take a different action depending upon the type of file, An example of needing to see the last few lines would be a sequential logfile where you want to view the last few entries rather than having to go through all the entries to reach the bottom.
The commands to do these are the head and tail commands for the top and bottom of the file respectively. The commands have a number of options allowing you to specify a certain number of lines or start from a particular place in a file however the easiest way to use it is just to enter
head filename
ortail filename
which will display the first / last 10 lines of a file.
One use of the tail command is to look at the end of a file that is in the process of being updated. The command could be repeatedly run against a file to show any new

46
additions to the file. If however the file has not been changed then the previous output will be redisplayed or if the file has changed too much then some lines may be missed. The better way is to use the -f option, which will display any new lines that are added to a file.
tail -f filename
Checking the type of file (file)
If you try and view the contents of a none text file you will often get garbage on the screen. Sometimes this will actually prevent you from using that terminal by changing the mapping of the keyboard or the screen. It is therefore a good idea to check what an unknown file is before viewing the contents.
One way of doing this is using the file command. Entering
file filename
will tell you if the file is a text file, a command file or a directory etc.
Printing a file
To put a file on the print queue use the following command.
lp filename
You may need to specify the printer (see man lp for more details). If you are using an X-Windows application then there is normally a print function included within the application and this could be used instead.
File Permissions
UNIX systems are designed to have multiple people using them, and as such there are controls on what each user can be done. So a user may create a file on the system that others can view, but not change, or that only certain people can see. You cannot however prevent the root user from accessing the file as they have full permissions to all files on the system.
File permissions are split into 3 different categories. These apply to:
user - the owner of the filegroup - a group of people, e.g. a project team or departmentothers - anyone else that has a login to the computer
these are then split into 3 different permissions, that of being able to:
47
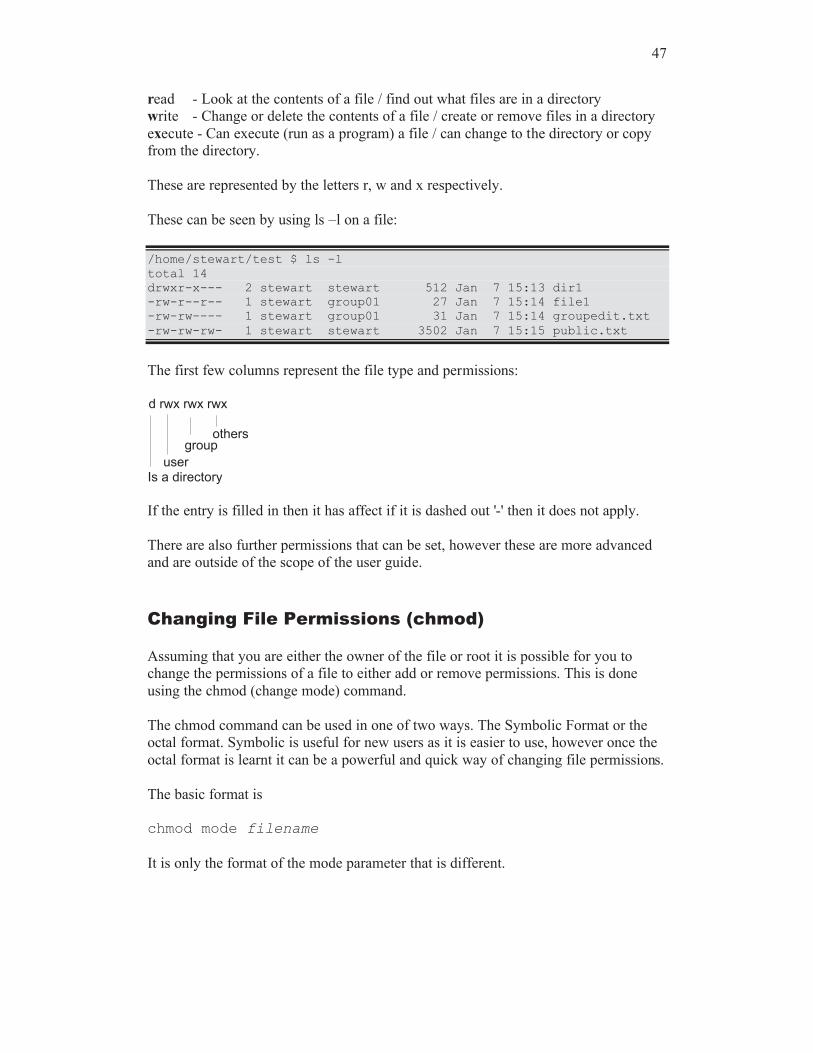
read - Look at the contents of a file / find out what files are in a directorywrite - Change or delete the contents of a file / create or remove files in a directoryexecute - Can execute (run as a program) a file / can change to the directory or copy from the directory.
These are represented by the letters r, w and x respectively.
These can be seen by using ls –l on a file:
/home/stewart/test $ ls -ltotal 14drwxr-x--- 2 stewart stewart 512 Jan 7 15:13 dir1-rw-r--r-- 1 stewart group01 27 Jan 7 15:14 file1-rw-rw---- 1 stewart group01 31 Jan 7 15:14 groupedit.txt-rw-rw-rw- 1 stewart stewart 3502 Jan 7 15:15 public.txt
The first few columns represent the file type and permissions:
d rwx rwx rwx
Is a directoryuser
groupothers
If the entry is filled in then it has affect if it is dashed out '-' then it does not apply.
There are also further permissions that can be set, however these are more advanced and are outside of the scope of the user guide.
Changing File Permissions (chmod)
Assuming that you are either the owner of the file or root it is possible for you to change the permissions of a file to either add or remove permissions. This is done using the chmod (change mode) command.
The chmod command can be used in one of two ways. The Symbolic Format or the octal format. Symbolic is useful for new users as it is easier to use, however once the octal format is learnt it can be a powerful and quick way of changing file permissions.
The basic format is
chmod mode filename
It is only the format of the mode parameter that is different.

48
In symbolic format permissions are added or deleted using the following symbols:
u = owner of the file (user)g = groups owner (group)o = anyone else on the system (other)
+ = add permission- = remove permission
r = read permissionw = write permissionx = execute permission (if the file is a program then this gives permission to run it)
For example from the previous ls entry we have a file called file1 which we would like the group to be able to write to:
-rw-r--r-- 1 stewart group01 27 Jan 7 15:14 file1
Using symbolic format we just need to add write access to the group which can be done using:
chmod g+w file1
In Octal format the mode is based upon a octal number representing the different mode permissions, where each of the permission groups (user, group, others) has an octal value representing the read, write and execute bits. This requires a little bit of knowledge on binary and octal number bases.
To use the octal format we don’t just put the changes, but issue the command on the entire permissions for the file.
User Group Others
Symbolic rwx rw- r--
Binary 111 110 100
4+2+1 4+2+0 4+0+0
Octal 7 6 4
The file permissions would therefore have the octal number 764 and would therefore be changed using the command
chmod 764 file1
A basic way of working this out is to add the following numbers depending upon the permission required.Read = 4Write = 2Execute = 1

49
Therefore if you wanted to set read to yes, write to no and execute to yes, this would be 4+1=5
Changing the file owner (chown)
It is possible to change the owner of a file however normally this requires the user to be logged in as root. The owner or group can be changed using the chown (change owner) command.
The format is as follows:
chown user:group filename

51
Making the Most of UNIX
Commands
This chapter explains how
different commands can interact to
provide extra functionality. It
introduces a number of ways of
dealing with a programs output. It
will introduce some new programs
to make it easier to perform some
tasks.
Chapter
7


53
Whilst the number of options on each UNIX command may seam overwhelming at first this is part of what makes UNIX so powerful. Another of the features that makes UNIX so powerful is the ability to combine several commands to make them more useful. This can be achieved either by stringing commands together on the command line or by bundling the commands together into a script file which can range from something very trivial to a program in it's own right. I will not discuss scripts further in this book (see volume 7) however I will show how multiple commands can be combined.
Using command switches
The most basic way of extending the functionality of a command is to use some of the switches available.
These can be found using the man command as mentioned in an earlier section.
The simple example of this is the ls command. Without any switches all that is displayed is a list of all the files in the current directory.
$ lsdocs readme.txt smit.log smit.script
By adding the '-l' option more information is provided.
$ ls -ltotal 636drwx------ 2 stewart users 512 Sep 16 17:42 docs-rw------- 1 stewart users 124 Sep 16 17:26 readme.txt
The pipe command (|)
There are a number of features missing from some of the commands. For example there is no way of viewing the output a page at a time or of sorting the output into a certain order. Whilst this may sound like a large disadvantage at first it is not really a problem as there are a number of commands that are specially designed to perform those exact functions. By restricting these tasks to other commands it makes the commands simpler and the number of options down.
The way this is achieved is by 'piping' the standard output into another command that is specifically designed to perform the certain function. The pipe command is a vertical bar '|'. This is normally found at the bottom left of the keyboard and is typed by using shift and the '\' key (this assumes a keyboard with the UK layout).

54
The first command is entered first followed by the pipe command and then followed by the second command. Any output from the first command is then used as input to the second command.
For example to sort a basic directory listing by name the ls command is piped through the sort command.
ls | sort
The output can be redirected through any number of pipes each one changing the output in someway. The full command is referred to as a pipeline.
Redirecting stdout, stdin and stderr (> <)
The output from a command goes to the standard output (stdout), which is normally the screen. Whereas the input is normally taken from standard input (stdin), which is normally the keyboard. To automate processes it is sometimes required to change this so that for example the output from a command is routed to a file or the printer. This is done by redirecting the stdout and stdin streams.
The output from the ls command could be redirected to a file in this case called dirlist.txt
ls > dirlist.txt
If the file dirlist.txt already exists it will be deleted. It is also possible to append the output to the end of an existing file by using >> instead of >.
For example
echo "This is the next line of the log" >> log.file
Whilst you may see all the output from a command on a single screen this is not all necessarily coming from stdout. There is also another data stream called standard error which by default is directed to the same screen as stdout. This data stream is used to send messages regarding any error messages. The advantage of having this as a separate stream is that even if you redirect stdout, because you are not interested in the output or just want it for reference you will instantly see any error messages on the screen. If this is a command running automatically without user interaction then there will not be any one to see messages put on the screen. The standard error data stream can therefore be redirected the same as stdout by prefixing the redirect by the number 2 digit. In fact the stdout data stream should be prefixed by the number 1 digit, the 1 is normally dropped to save typing. To therefore redirect any error messages to an error.log file and the normal responses to a log file the following would be used.
command >log.file 2>error.log
The single >'s can be replaced by double >>'s if you would like the output to be appended to the file rather than to overwrite the file.
55
It is also possible to write both stdout and the standard error stream to the same file. This is not simply a case of using the same file name in the above command as you might expect. The reason for this is that a file can only be opened for writing by one process at a time. The two redirects are two different processes and would not allow both streams to write to the same file. This can however be achieved by redirecting the error data stream to the stdout data stream using 2>&1. Which now gives:
command >output.file 2>&1
In a similar light you cannot use a file used as input to the command to redirect theoutput to. For example it is not valid to issue the following command
sort file1 >file1 This is not valid
instead the output would have to be redirected to a temporary file and then renamed to the required name.
sort file1 >/temp/tmp$$mv /tmp/tmp$$ file1
The file ending in $$ will actually be created by the system with a unique number. This is useful for temporary files as it prevents you overwriting a temporary file in use by a different process.
The use of stdin, stdout and stderr is possible using only the single less than / greater than signs because of the way that processes are assigned to a file descriptor table.
The file descriptor table is a list of numbers relating to open files. The first 3 files to be opened are stdin, stdout and stderr, these are numbered 0 for stdin, 1 for stdout and 2 for stderr. Therefore stdin and stdout can be referred to by < and > respectively (no further filename) whereas stderr requires 2> to ensure it is output stream numbered 2 that is to be redirected.
These redirects are fine for use in batch programs that are run without anyone monitoring the system. Sometimes it is necessary for someone to monitor the output of the command but also for it to be duplicated into a file for logging purposes or to perform further processing on.
The tee command is used within a pipeline and whatever input it receives it both puts into a file and forwards on the pipeline.
command | tee file1
The line above will take any output from the command and put a copy in file1 as well as sending it to the screen. This could be combined further by allowing the output to be further processed by another command. The tee command can be used any number of times in a pipeline like this.
command1 | tee file1 | command2
56
If you want tee to append to a file rather than overwrite it the -a option is used.
The same basic redirect can also be done in the reverse direction in that an interactive program that requires input from a user can be automated. For example with an interactive program such as ftp (file transfer protocol). The ftp program allows files to be transferred from one computer to another over a network. This however needs a user to type the commands in to transfer the file. Instead the commands should be entered into a text file the same as how they would be entered from the keyboard. The file is then directed into the program in place of the stdin.
ftp rs6k.mynet.com <commands.txt
Redirecting to a file can have an unfortunate consequence if the file already exists and does not want to be replaced. By using the redirects incorrectly it is possible to accidentally overwrite an important file. In the korn shell there is an option that allows us to prevent overwriting files by mistake. This is the noclobber option and is set by typing
set -o noclobber
If an attempt is now made to overwrite a file the shell will issue an error message and prevent the file being written to. The no clobber option can be turned off using
set + noclobber
If required the noclobber option could be put an a users .profile to have this set automatically.

57
Managing Your Account
This chapter provides information
useful to having your account
work how you want it. It introduces
some of the user settings, but
assumes that you don’t have
superuser privileges. For more
detailed information on managing
userid’s you should consult the
User Administration part of the
System Administrators book.
Chapter
8

59
Whenever you login to a UNIX machine using your username then certain things will be automatically setup. These will be different for different users on the system and to an extent can be customised by you. I will explain where some of the settings originate from, even though you may not be able to change them. At least then you will appreciate why the machine is behaving as it does.
Normal Vs’ Root Username
You may come across references to the following terms: root username, superuser and userid 0. These all refer to the same thing, which is basically a user with full privileges to your system. Anyone logged in as that user can read and update any file on the system, they can read any emails and perform operations as though they are any user. For security reasons the root password should therefore be well guarded. If you are in the position of owning the root userid (i.e. this is a machine that you own and manage) then you might think that it is a good idea to login as root then you don’t have to worry about not being able to do anything. This is not a good idea as it also means that any mistakes that you make could have bad consequences for the whole system. For example the rm command is used on a regular basis to delete unwanted files. Using the –r option whole directories can be deleted at once. If you ran rm –r *from the root directory (a command often run, but never from the root directory) then as root you would delete all the files on the system, however if you were only a normal user you would not be authorised to delete anything from the root directory and so the command would fail. It is therefore better to perform most functions as a normal user, and only use the root userid when it is necessary to use the elevated privileges.
It would be quite tedious to log out and back in again every time you wanted to change userid. There is however a command that allows you to switch userid without having to logout of your existing session. The command is called su. It originally stood for “SuperUser” as all it allowed was to change to the root userid. With modern versions (meaning within the last 10 years so almost all versions in current use) you can change to any user and not just root, it is therefore more appropriate to call it the “SwitchUser” command. For obvious security reasons you need to enter the password for any user you are su’ing to unless you are root. As root has the ability to reset or change the usernames it has the unique ability of being able to su to any other userid without giving a username. The su command is discussed further in the Systems Administrator Book.
Shell Variables
Whilst you are in the shell there are a number of variables that the shell needs to be aware of. These could typically hold information about you, about the shell you are running in, or about your personal preferences. For example the shell needs to know what your home directory is, so that you can easily change directory or save files. It stores this in the $HOME variable.Another variable commonly used is the $TERM variable. This describes the type of terminal you have so that the shell or applications know how to send control the
60
screen. For example a vt100 terminal may have a different command to clear the screen than is used by a Wyse Terminal.There is another one that you may need to change which is the $PATH variable. This indicates which directories the shell will look in to find a program that you’ve asked to be run.
Normally all system defined variables are in uppercase whereas user variables are in lowercase.
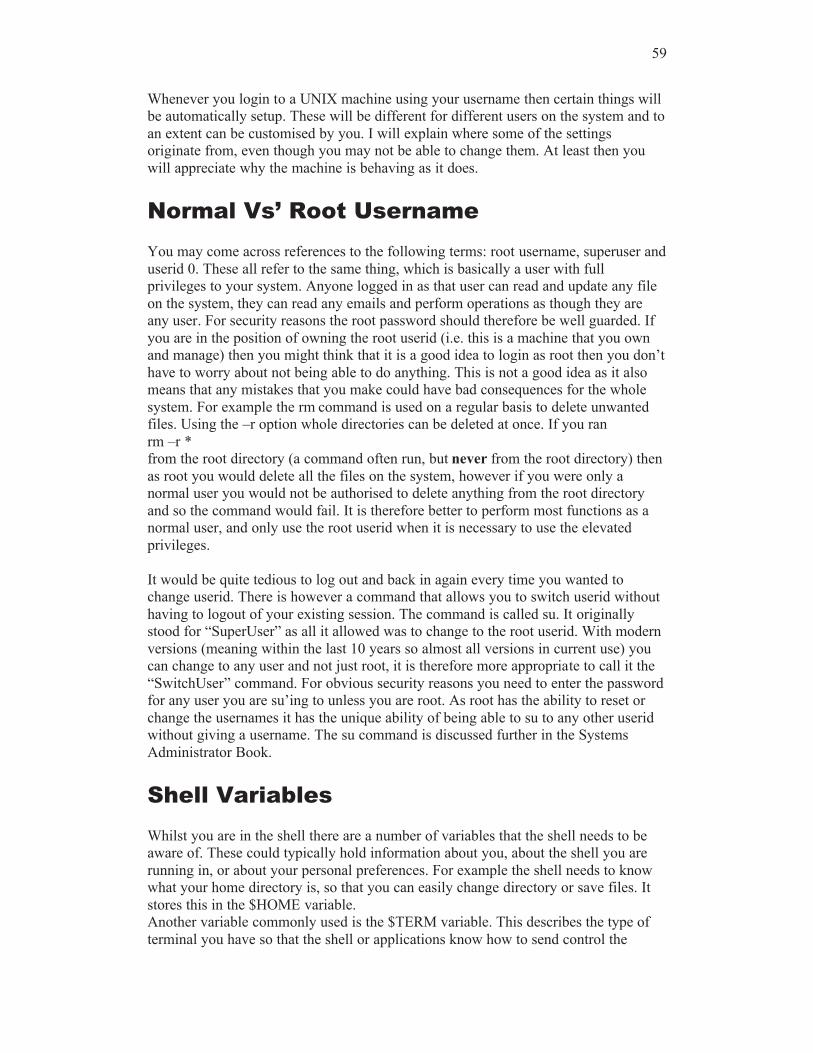
You can list all variables by using the set command.
e.g.
$ setHOME=/export/home/stewartIFS=
LOGNAME=stewartMAIL=/var/mail/stewartMAILCHECK=600OPTIND=1PATH=/usr/bin:/bin:/usr/sbin:/sbinPS1=$PS2=>SHELL=/sbin/shSSH_CLIENT=192.168.2.3 62880 22SSH_TTY=/dev/pts/5TERM=ANSITZ=GBUSER=stewart
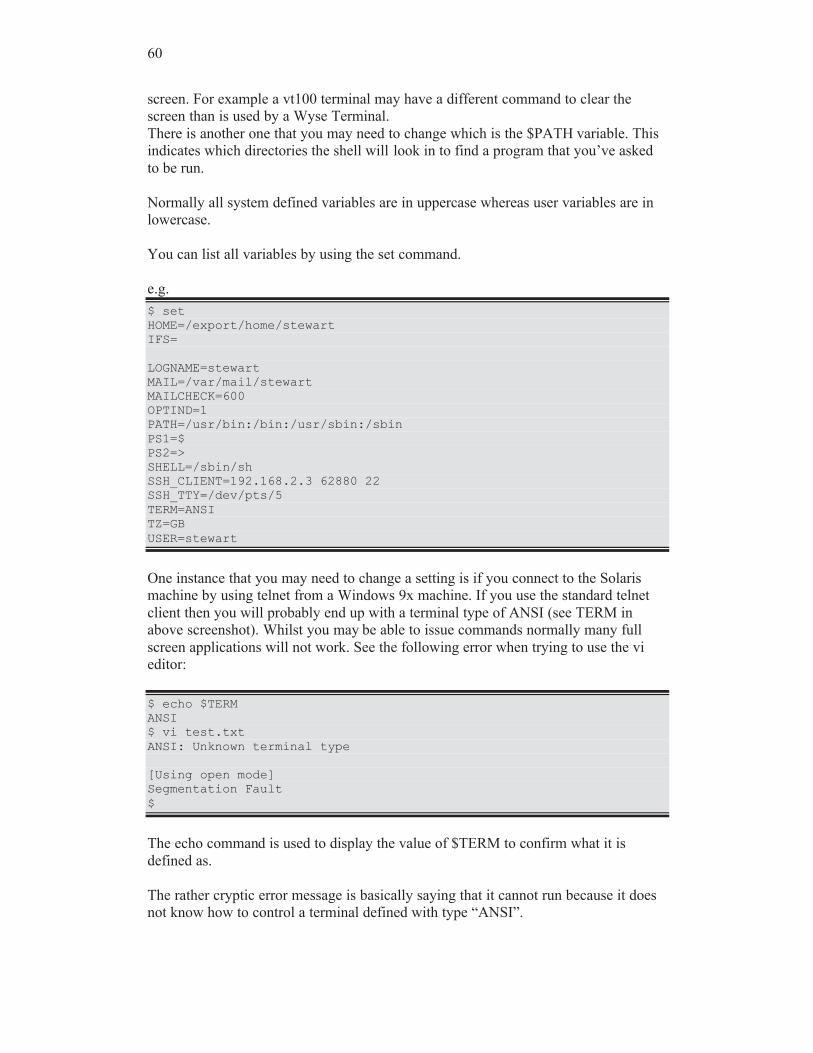
One instance that you may need to change a setting is if you connect to the Solaris machine by using telnet from a Windows 9x machine. If you use the standard telnetclient then you will probably end up with a terminal type of ANSI (see TERM in above screenshot). Whilst you may be able to issue commands normally many full screen applications will not work. See the following error when trying to use the vi editor:
$ echo $TERMANSI$ vi test.txtANSI: Unknown terminal type
[Using open mode]Segmentation Fault$
The echo command is used to display the value of $TERM to confirm what it is defined as.
The rather cryptic error message is basically saying that it cannot run because it does not know how to control a terminal defined with type “ANSI”.
61
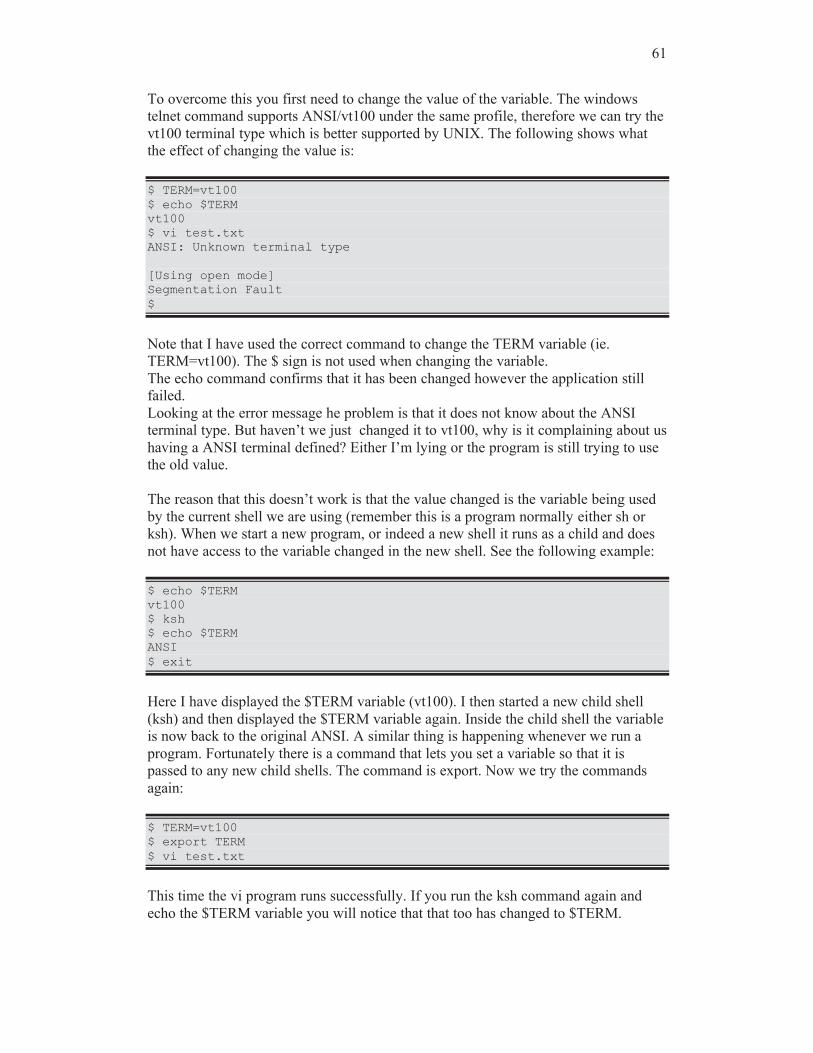
To overcome this you first need to change the value of the variable. The windows telnet command supports ANSI/vt100 under the same profile, therefore we can try the vt100 terminal type which is better supported by UNIX. The following shows what the effect of changing the value is:
$ TERM=vt100$ echo $TERMvt100$ vi test.txtANSI: Unknown terminal type
[Using open mode]Segmentation Fault$
Note that I have used the correct command to change the TERM variable (ie. TERM=vt100). The $ sign is not used when changing the variable.The echo command confirms that it has been changed however the application still failed.Looking at the error message he problem is that it does not know about the ANSI terminal type. But haven’t we just changed it to vt100, why is it complaining about us having a ANSI terminal defined? Either I’m lying or the program is still trying to use the old value.
The reason that this doesn’t work is that the value changed is the variable being used by the current shell we are using (remember this is a program normally either sh or ksh). When we start a new program, or indeed a new shell it runs as a child and does not have access to the variable changed in the new shell. See the following example:
$ echo $TERMvt100$ ksh$ echo $TERMANSI$ exit
Here I have displayed the $TERM variable (vt100). I then started a new child shell (ksh) and then displayed the $TERM variable again. Inside the child shell the variable is now back to the original ANSI. A similar thing is happening whenever we run a program. Fortunately there is a command that lets you set a variable so that it is passed to any new child shells. The command is export. Now we try the commands again:
$ TERM=vt100$ export TERM$ vi test.txt
This time the vi program runs successfully. If you run the ksh command again and echo the $TERM variable you will notice that that too has changed to $TERM.
62
You can get rid of a variable by using the unset command. It is better not to remove any system-defined variables (unless you really do know what your doing), however you may have created your own variable that is no longer needed. The following example creates a new variable before removing it.
$ MYVARIABLE="UNIX is great"$ echo $MYVARIABLEUNIX is great$ unset MYVARIABLE$ echo $MYVARIABLE
$
Below are a list of some other variables you may come across:
• LOGNAME - This holds your login name for use by certain commands. This is one variable that cannot be changed.
• MAIL - This holds the name of the file where your mail is sent
• MAILCHECK - How often the shell will check to see if you have new mail
• TERM - The terminal type you are using / emulating
• umask - This determines what permission bits will be set when a new file is created. This is a mask so an inversion will give you the default file settings. E.g. the default of 022 will create a new directory with 755 (user can read, write, execute everyone else can read, execute). When a regular file is created the execute bit is not set so you would get 644. You may want to make this a little more secure by setting to 027 (don't give any permissions to other users) or even 077 (only give owner permissions). See the book on security for more details.
• PATH - This is a colon separated list of all the directories that will be searched to find a command typed in by the user. Some people add a :. to this string to say if the command is not found in the rest of the path then try the current directory, however there are security issues associated with this (see security section) and certainly this should not be set for the root user.
• PS1 - This is the system prompt and is set to a $ by default. You may want to change this to include your current directory name using the command:PS1='$PWD $'
• ENV - Not included by default it can be useful to add this to your .profile. To set the shell environment file to .kshrc (this is the normal name for the Korn Shell) you would include the following line:export ENV=$HOME/.kshrcThis is especially useful if using a X-Windows where the .profile is not called when you start a new xterm.
.profile
The previous chapter explained how to change your $TERM variable so that you can run full screen programs when logging in from a Windows 9x machine. Whilst the commands were straightforward enough you can probably appreciate it would be awfully annoying to have to type that in every time you logged in. There are several

63
places that these variables can be defined, however there is one that is run every timeyou login that you are allowed to edit yourself. This file is called .profile and is located in your home directory (the directory stored in $HOME).
To add anything just use your preferred editor (the vi later is explained in a laterchapter). If the file does not exist then the editor will normally create a blank file on your behalf. To automatically change the Terminal type to vt100 enter the following lines.
TERM=vt100
export TERM
The problem here is that you may logon to the computer using different methods (physically on the machine; from a windows machine; from a dumb terminal located in a different room etc.). If you do then you may find that your choice of terminal on one screen may conflict with another. The following lines show how you could add an entry that would only select vt100 if you connect with an ANSI terminal (ie. Windows Telnet).
if [ $TERM="ANSI" ]then TERM=vt00export TERMfi
I will not explain this here; just accept that it works. The if statement is explained in volume 7 “Unix Scripts”.
Another common complaint with Solaris users is that the “Backspace” key doesn’t work as expected. This can be a common frustration but you can get around it by running the following command.
stty erase ^H
Here the ^H is generated by pressing the backspace key.
You could add this to the .profile however you may find that when you press the backspace key to generate the ^H it will actually work as a backspace key (just when you don’t want it to). To get around this then enter the following command (note: do not enter the stty command prior to this as it will prevent you being able to create the ^H).
echo “stty erase ^H” >> $HOME/.profile
The echo command displays the entered line, but it is then redirected onto the last line of the .profile file. Then when you login the backspace key will work as expected.
Note that anything added to the .profile file will not take effect until you logout and then login again.
64
.kshrc
This file is similar to the .profile file however is run whenever the Korn shell is started rather than when you login. Again this is located in the $HOME directory.
When using X the .profile is loaded when X-Windows is started. This sets up the system wide variables, however there are commands that can be set that are specific to the shell and not to the overall session. Normally these will not be passed onto the virtual terminal unless they are put in the .kshrc file.The name of the file is not important, however it must be the same as the ENVvariable set in the .profile file. It is not normally in the .profile by default (unless your system administrator has set it up that way), so you need to add the following line in your .profile file first.
export ENV=$HOME/.kshrc
An example of a command that would work differently if it is in .profile and .kshrc is
set -o vi
including the above command is the same as starting the shell with ksh -o vi
which sets the shell environment into the vi style input.
If this was in the .profile then whenever a login was made into a terminal it would take effect, however when starting a terminal from X it is not a new login and therefore would not be invoked. If however this is included in the .kshrc then whenever the Korn Shell was started it would be invoked and as the Korn Shell is invoked by both a login and a new terminal started in X this would happen all the time.
Some of the commands that could be put into the .kshrc file.
• set -o vi This command sets the environment into the vi style input. What this does is to provide a level of command recall for the shell. To really understand this you need to understand how to use the vi editor (see the chapter on the vi editor). To use the recall keys you first need to press the escape key (this may be mapped differently on your system however is normally the key marked Esc). Then you are in command mode and can recall commands and move around using the keys "hjkl" ('h'=left, 'j'=down, 'k'=up, 'l'=right). You can then delete a character by using the 'x' key. Pressing the 'i' key will insert before the cursor and pressing the 'a' key will insert after the cursor. Pressing either 'i' or 'a' will put you into insert mode and to return to command mode you press the escape key again. This may all sound very complex however if you are able to use the vi editor (a useful skill to acquire) then you will find this very familiar.
• alias - The alias command is used to set up alternative names for commands. The format of the command is:
65
alias newcmdname='normalcmdname -args'
What will happen then when you enter newcmdname is that it will be replaced with normalcmdname -args. Note: this will happen only on commands entered at the command line and will have no effect on script files. A few examples of where this would be useful is shown below:
alias rm='rm -i'
This will include the -i option on any delete command. What this does is provideinteractive prompting so that you will be asked if you want to delete each file.
alias up='cd ..'
Whenever you enter the up command it will take you one level up the directory tree. This is useful if you, or a user have trouble remembering a command as you can make easy to remember alias names.
alias computer2='telnet computer2.mynet.com'
If you often telnet to another computer (computer2) this will save you having to type in the whole command instead of entering 26 characters you just need to enter 9 characters.
History
It is possible to recall previous commands using the –o vi option explained earlier, however it is also possible using the history command.
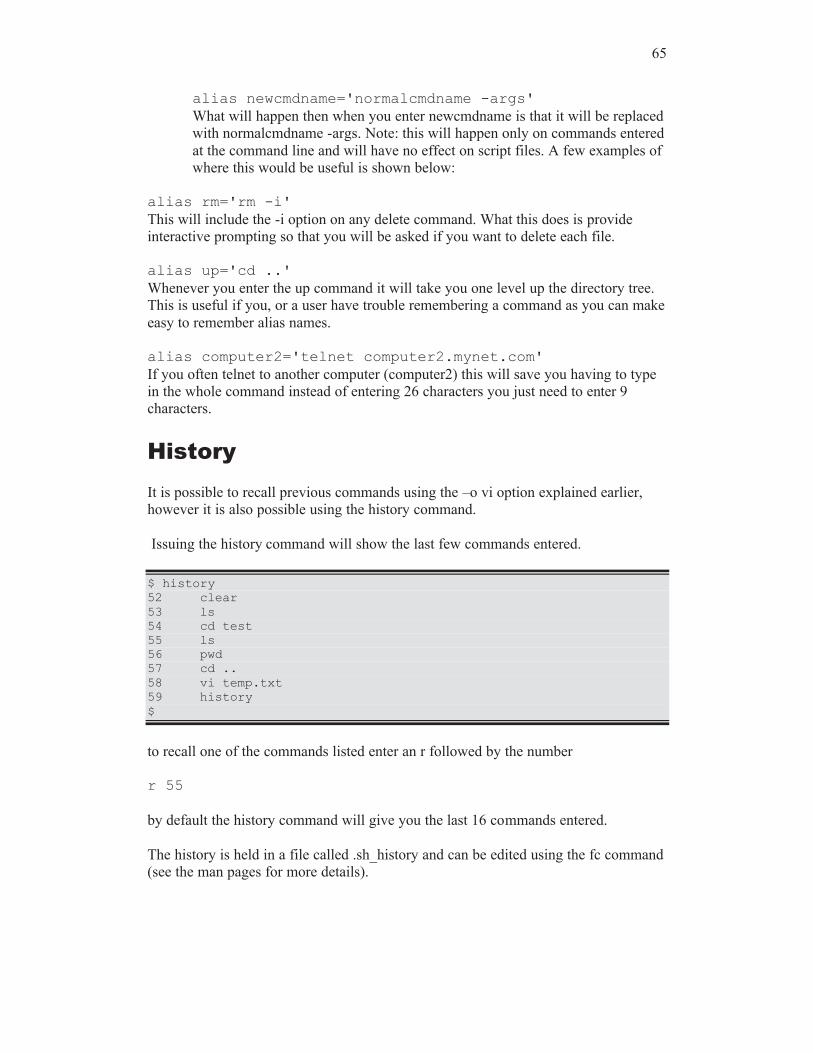
Issuing the history command will show the last few commands entered.
$ history52 clear53 ls54 cd test55 ls56 pwd57 cd ..58 vi temp.txt59 history$
to recall one of the commands listed enter an r followed by the number
r 55
by default the history command will give you the last 16 commands entered.
The history is held in a file called .sh_history and can be edited using the fc command (see the man pages for more details).


![Sun ONE Directory Server 5.2 Administration Guide · Sun, Sun Microsystems, le logo Sun, Java, Solaris, SunTone, Sun[tm] ONE, The Network is the Computer, ... 6 Sun ONE Directory](https://static.fdocuments.us/doc/165x107/5b30b9877f8b9ad76e8e62cc/sun-one-directory-server-52-administration-guide-sun-sun-microsystems-le.jpg)