Activation tutorial for LinkedIn Sales Navigator administrators
Social Selling with LinkedIn Sales Navigator A Step-by-Step Guide to Social Selling Best Practices with LinkedIn Sales Navigator
Sales Solutions
Contents Overview of LinkedIn Sales Navigator ................................................................................................................................ 5
LinkedIn Sales Navigator features ...................................................................................................................................... 5
Getting Started with LinkedIn Sales Navigator .................................................................................................................. 6
Activating Your LinkedIn Sales Navigator Account ............................................................................................................. 6
Activating If You’re Not Already a LinkedIn Member ....................................................................................................... 6
Activating If You're Already a LinkedIn Member but It's Under Your Personal Email Address ....................................... 7
Activating If You're Already a LinkedIn Member and Have Your Own LinkedIn Sales Navigator Account ..................... 8
Activating If You're Already a LinkedIn Member and Set Your Company Email Address as Primary ............................ 8
Creating an Engaging Profile ............................................................................................................................................... 9
Uploading a Professional Photo .......................................................................................................................................... 9
Adding or Changing Your Profile Photo ........................................................................................................................... 9
Writing a Descriptive Headline .......................................................................................................................................... 10
Editing Your Professional Headline ............................................................................................................................... 10
Using Your Summary to Tell Your Story ........................................................................................................................... 11
Edit Your Summary ........................................................................................................................................................ 11
Personalizing Your Public Profile URL .............................................................................................................................. 12
Customizing Your Public Profile URL ............................................................................................................................ 12
Getting Recommendations ................................................................................................................................................ 13
Requesting a Recommendation .................................................................................................................................... 13
Managing & Viewing Received Recommendations ....................................................................................................... 14
Sharing Files, Presentations, and Videos ......................................................................................................................... 15
Adding, Editing, Moving, or Removing Work Samples on Your Profile ......................................................................... 15
Customizing Your Website Links ....................................................................................................................................... 16
Adding a Website to Your Profile ................................................................................................................................... 16
Building a High-Quality Network ....................................................................................................................................... 17
Your Network and Degrees of Connection ........................................................................................................................ 17
Connecting With LinkedIn Members ................................................................................................................................. 17
Finding New Connections .................................................................................................................................................. 18
Connecting with Former Classmates (Alumni) .............................................................................................................. 18
Connecting with Current & Former Co-workers ............................................................................................................. 20
Connecting with Group Members .................................................................................................................................. 21
Participating in Your Professional Social Network ......................................................................................................... 22
Posting a Status Update .................................................................................................................................................... 22
Sharing Ideas, Questions, Articles, and Website Links ................................................................................................. 22
Commenting or Liking Status Updates .............................................................................................................................. 23
Commenting on an Update ............................................................................................................................................ 23
Like an Update ............................................................................................................................................................... 23

Following Companies ........................................................................................................................................................ 24
Start Following a Company ............................................................................................................................................ 24
Stop Following a Company ............................................................................................................................................ 24
LinkedIn Groups ................................................................................................................................................................ 25
Finding and Joining a Group .......................................................................................................................................... 25
Leaving a Group ............................................................................................................................................................ 26
Starting a Discussion in Groups .................................................................................................................................... 26
Searching for Leads ............................................................................................................................................................ 27
Creating a Lead List with Lead Builder .............................................................................................................................. 27
Build a Lead List ............................................................................................................................................................ 27
Expanding or Narrowing Your Search Results with Filters ............................................................................................ 28
Using Keyword (Boolean) Modifiers .............................................................................................................................. 29
Saving a Search and Setting Up an Email Alert ............................................................................................................ 29
Modifying a Saved Search ............................................................................................................................................. 30
Running a Saved Search ............................................................................................................................................... 30
Finding New Leads ............................................................................................................................................................ 31
Uncovering More Leads with Lead Recommendations ................................................................................................. 31
Searching a Group for Specific Job Titles ..................................................................................................................... 32
Searching through a University’s Alumni ....................................................................................................................... 33
Gaining Insights into Your Prospects and Accounts ...................................................................................................... 34
Reviewing Prospect Profiles .............................................................................................................................................. 34
Beginning to Analyze a Profile ....................................................................................................................................... 34
Analyzing Your Inbound Leads.......................................................................................................................................... 35
Selecting What Other Members See When You View Their Profile .............................................................................. 35
Analyzing Who’s Viewed Your Profile ............................................................................................................................ 36
Reaching Your Prospects on LinkedIn ............................................................................................................................. 38
Using TeamLink to Find Your Best Path In ....................................................................................................................... 38
TeamLink Settings ......................................................................................................................................................... 38
Using TeamLink to Get an Introduction ......................................................................................................................... 39
InMail Best Practices ......................................................................................................................................................... 40
Sending an InMail .......................................................................................................................................................... 40
Sending OpenLink Messages............................................................................................................................................ 42
Sending an OpenLink Message ..................................................................................................................................... 42
APPENDIX: Admin Tasks ................................................................................................................................................... 43
Activating LinkedIn Sales Navigator Users ....................................................................................................................... 43
Activating Users ............................................................................................................................................................. 43
Checking Activation Status ............................................................................................................................................ 44
Sending a Reminder ...................................................................................................................................................... 45
Removing Users ............................................................................................................................................................ 46

Viewing Usage Reports ..................................................................................................................................................... 47
Viewing Usage Reports ................................................................................................................................................. 47
Exporting or Printing Usage Reports ............................................................................................................................. 48
Overview of LinkedIn Sales Navigator
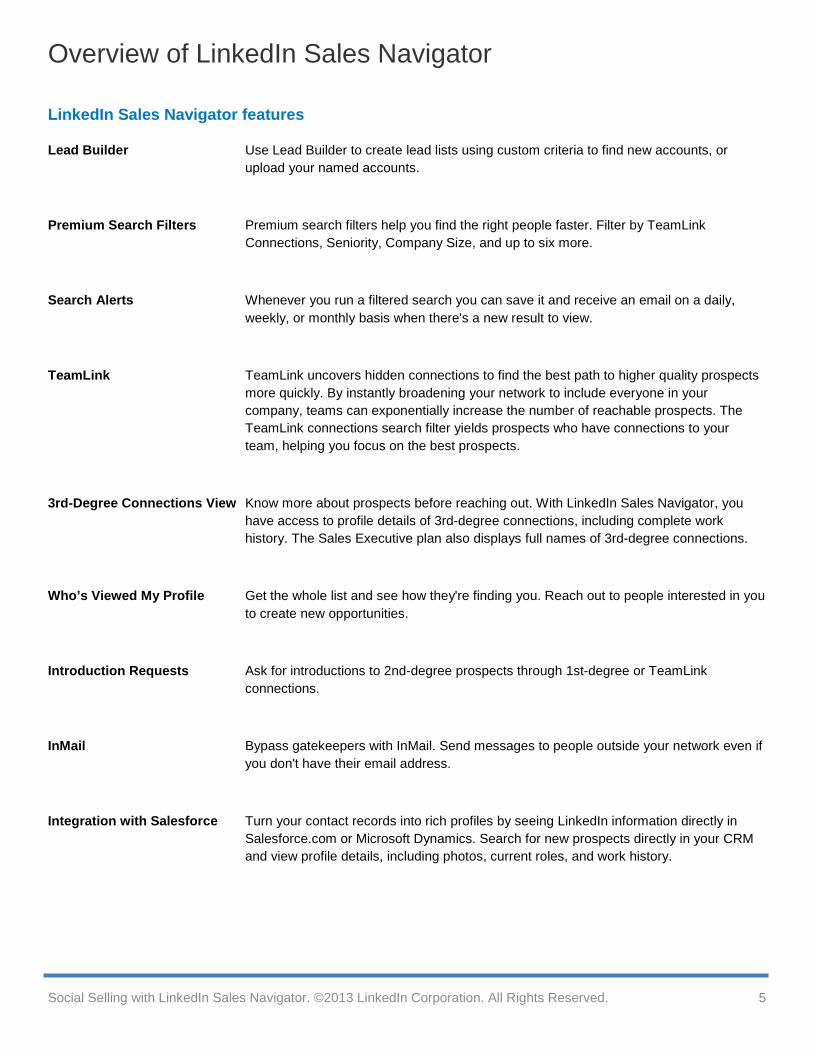
LinkedIn Sales Navigator features
Lead Builder Use Lead Builder to create lead lists using custom criteria to find new accounts, or upload your named accounts.
Premium Search Filters Premium search filters help you find the right people faster. Filter by TeamLink Connections, Seniority, Company Size, and up to six more.
Search Alerts Whenever you run a filtered search you can save it and receive an email on a daily, weekly, or monthly basis when there's a new result to view.
TeamLink TeamLink uncovers hidden connections to find the best path to higher quality prospects more quickly. By instantly broadening your network to include everyone in your company, teams can exponentially increase the number of reachable prospects. The TeamLink connections search filter yields prospects who have connections to your team, helping you focus on the best prospects.
3rd-Degree Connections View Know more about prospects before reaching out. With LinkedIn Sales Navigator, you have access to profile details of 3rd-degree connections, including complete work history. The Sales Executive plan also displays full names of 3rd-degree connections.
Who’s Viewed My Profile Get the whole list and see how they're finding you. Reach out to people interested in you to create new opportunities.
Introduction Requests Ask for introductions to 2nd-degree prospects through 1st-degree or TeamLink connections.
InMail Bypass gatekeepers with InMail. Send messages to people outside your network even if you don't have their email address.
Integration with Salesforce Turn your contact records into rich profiles by seeing LinkedIn information directly in Salesforce.com or Microsoft Dynamics. Search for new prospects directly in your CRM and view profile details, including photos, current roles, and work history.
Social Selling with LinkedIn Sales Navigator. ©2013 LinkedIn Corporation. All Rights Reserved. 5
Getting Started with LinkedIn Sales Navigator Before you can start using LinkedIn Sales Navigator, you’ll need to accept the invitation to activate your account.
Activating Your LinkedIn Sales Navigator Account As an end-user, your experience to activate your LinkedIn Sales Navigator Account will differ slightly, depending on whether or not you’re already a LinkedIn member and a few other factors.
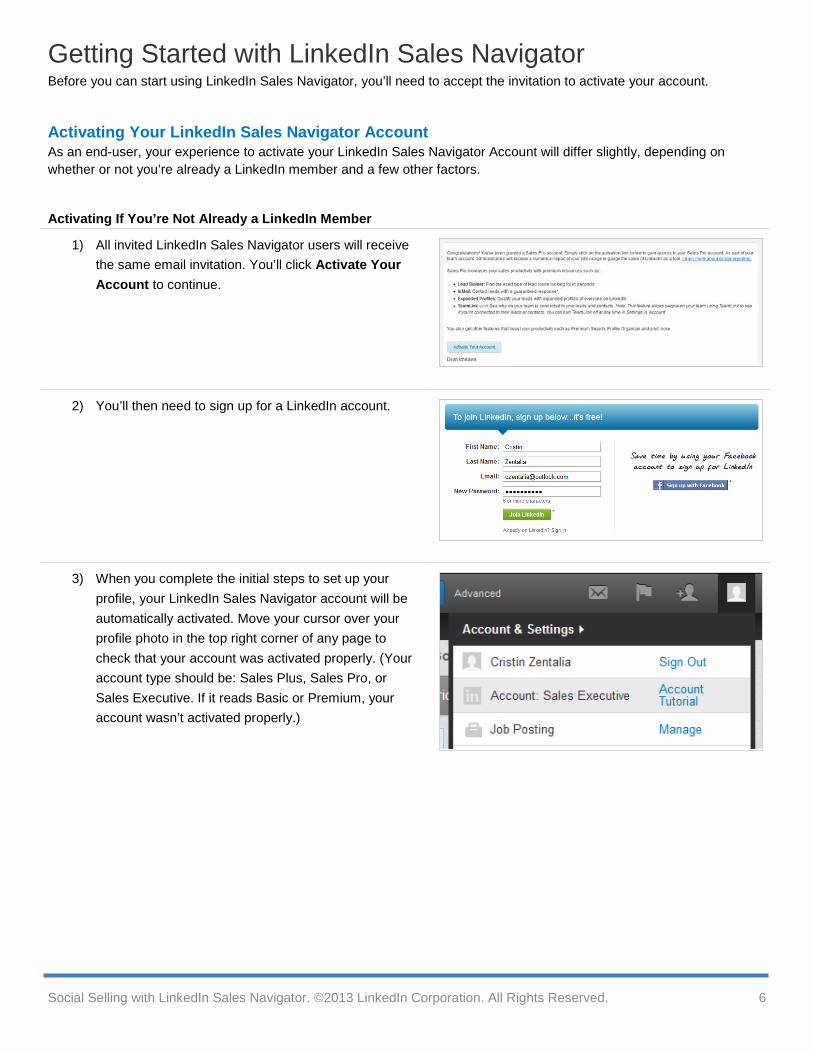
Activating If You’re Not Already a LinkedIn Member
1) All invited LinkedIn Sales Navigator users will receive the same email invitation. You’ll click Activate Your Account to continue.
2) You’ll then need to sign up for a LinkedIn account.
3) When you complete the initial steps to set up your profile, your LinkedIn Sales Navigator account will be automatically activated. Move your cursor over your profile photo in the top right corner of any page to check that your account was activated properly. (Your account type should be: Sales Plus, Sales Pro, or Sales Executive. If it reads Basic or Premium, your account wasn’t activated properly.)
Social Selling with LinkedIn Sales Navigator. ©2013 LinkedIn Corporation. All Rights Reserved. 6
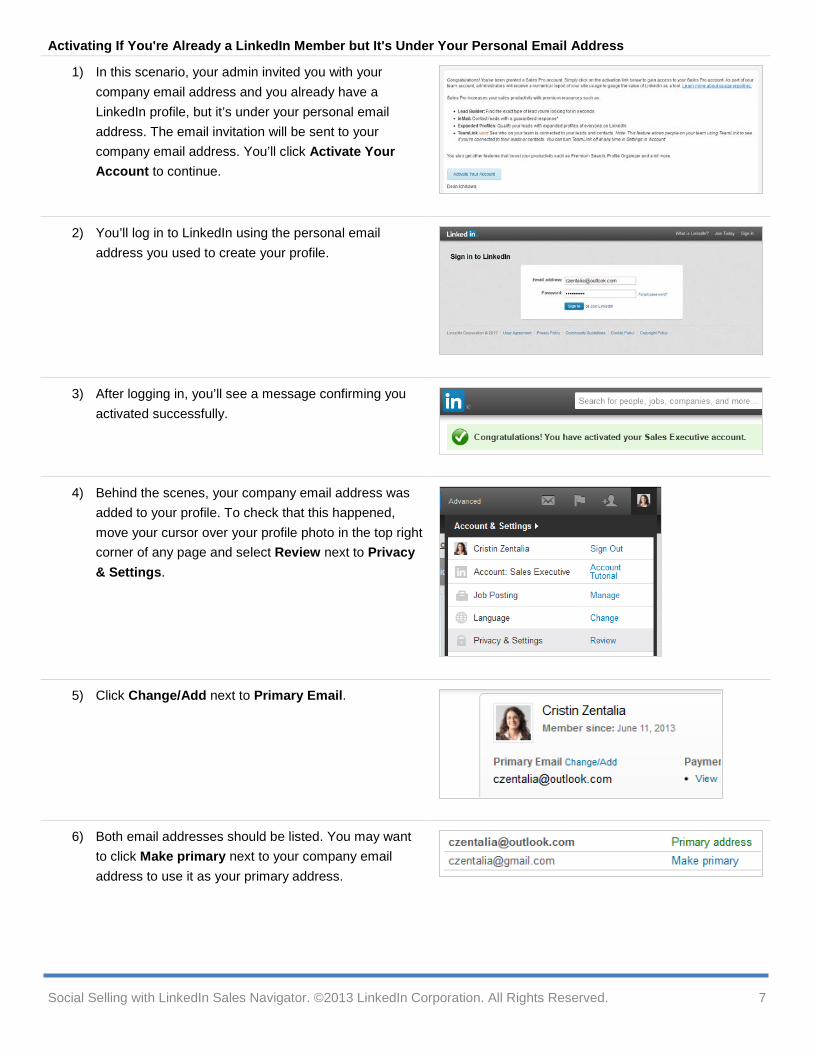
Activating If You're Already a LinkedIn Member but It's Under Your Personal Email Address
1) In this scenario, your admin invited you with your company email address and you already have a LinkedIn profile, but it’s under your personal email address. The email invitation will be sent to your company email address. You’ll click Activate Your Account to continue.
2) You’ll log in to LinkedIn using the personal email address you used to create your profile.
3) After logging in, you’ll see a message confirming you activated successfully.
4) Behind the scenes, your company email address was added to your profile. To check that this happened, move your cursor over your profile photo in the top right corner of any page and select Review next to Privacy & Settings.
5) Click Change/Add next to Primary Email.
6) Both email addresses should be listed. You may want to click Make primary next to your company email address to use it as your primary address.
Social Selling with LinkedIn Sales Navigator. ©2013 LinkedIn Corporation. All Rights Reserved. 7
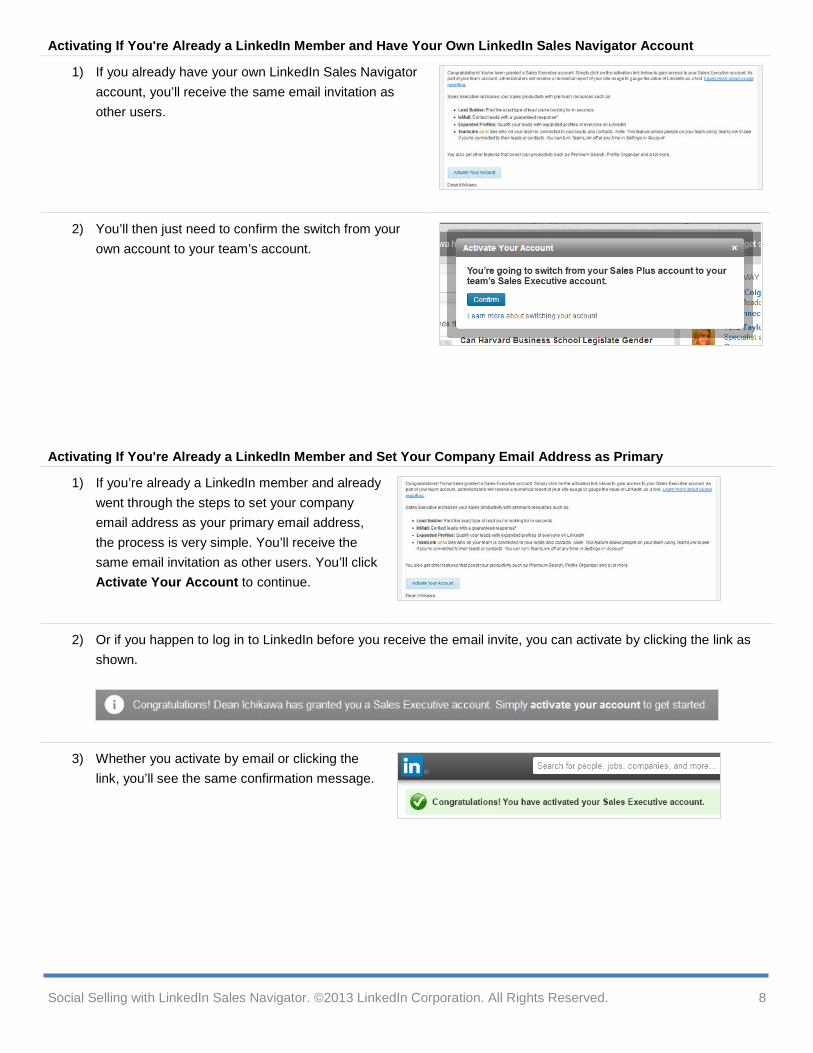
Activating If You're Already a LinkedIn Member and Have Your Own LinkedIn Sales Navigator Account
1) If you already have your own LinkedIn Sales Navigator account, you’ll receive the same email invitation as other users.
2) You’ll then just need to confirm the switch from your own account to your team’s account.
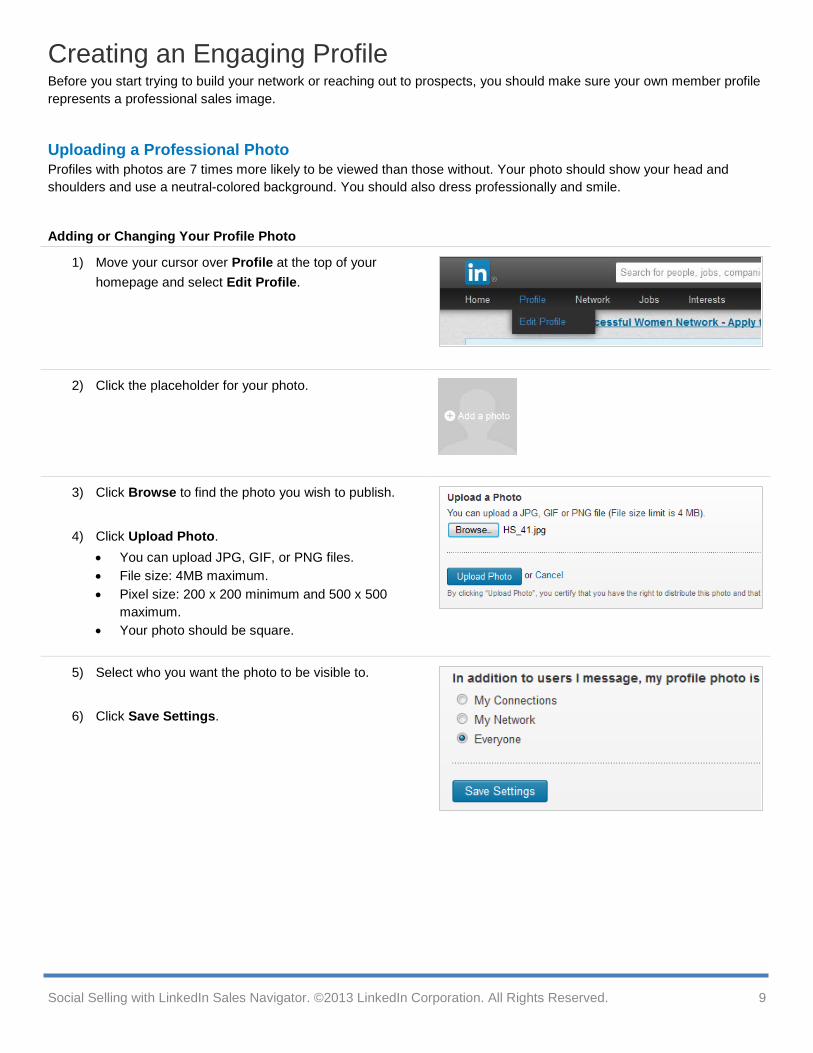
Activating If You're Already a LinkedIn Member and Set Your Company Email Address as Primary
1) If you’re already a LinkedIn member and already went through the steps to set your company email address as your primary email address, the process is very simple. You’ll receive the same email invitation as other users. You’ll click Activate Your Account to continue.
2) Or if you happen to log in to LinkedIn before you receive the email invite, you can activate by clicking the link as shown.
3) Whether you activate by email or clicking the link, you’ll see the same confirmation message.
Social Selling with LinkedIn Sales Navigator. ©2013 LinkedIn Corporation. All Rights Reserved. 8
Creating an Engaging Profile Before you start trying to build your network or reaching out to prospects, you should make sure your own member profile represents a professional sales image.
Uploading a Professional Photo Profiles with photos are 7 times more likely to be viewed than those without. Your photo should show your head and shoulders and use a neutral-colored background. You should also dress professionally and smile.
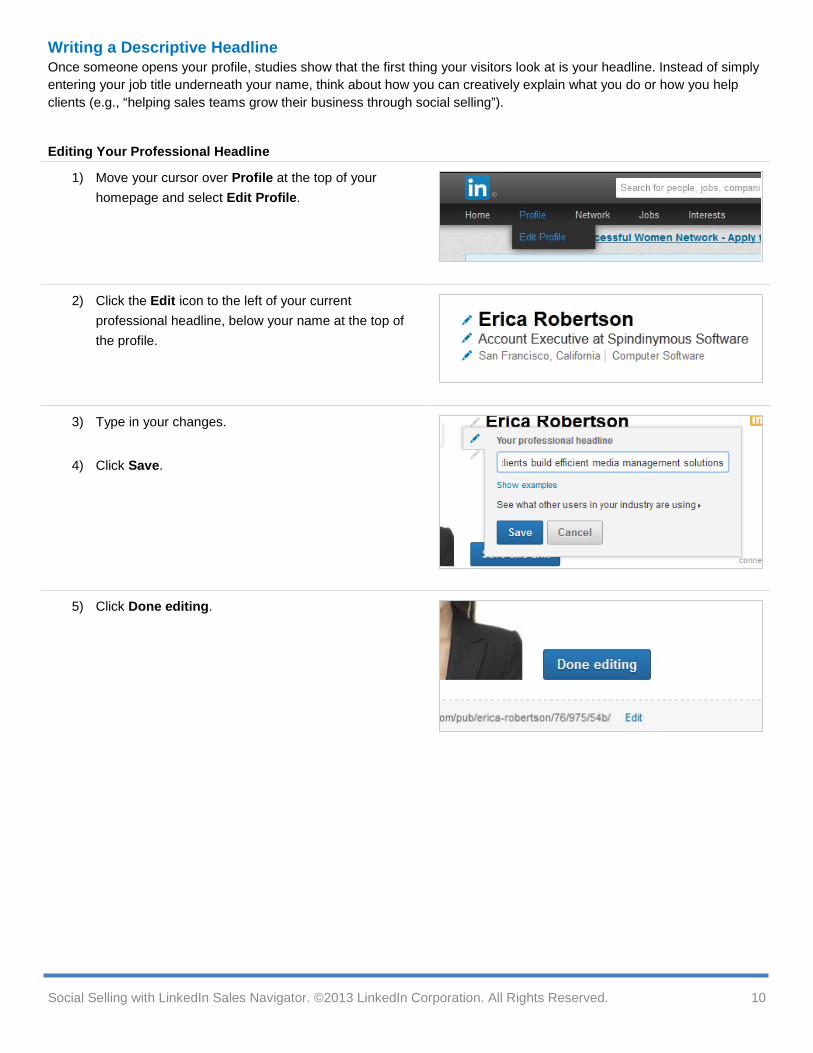
Adding or Changing Your Profile Photo
1) Move your cursor over Profile at the top of your homepage and select Edit Profile.
2) Click the placeholder for your photo.
3) Click Browse to find the photo you wish to publish.
4) Click Upload Photo. • You can upload JPG, GIF, or PNG files. • File size: 4MB maximum. • Pixel size: 200 x 200 minimum and 500 x 500
maximum. • Your photo should be square.
5) Select who you want the photo to be visible to.
6) Click Save Settings.
Social Selling with LinkedIn Sales Navigator. ©2013 LinkedIn Corporation. All Rights Reserved. 9
Writing a Descriptive Headline Once someone opens your profile, studies show that the first thing your visitors look at is your headline. Instead of simply entering your job title underneath your name, think about how you can creatively explain what you do or how you help clients (e.g., “helping sales teams grow their business through social selling”).
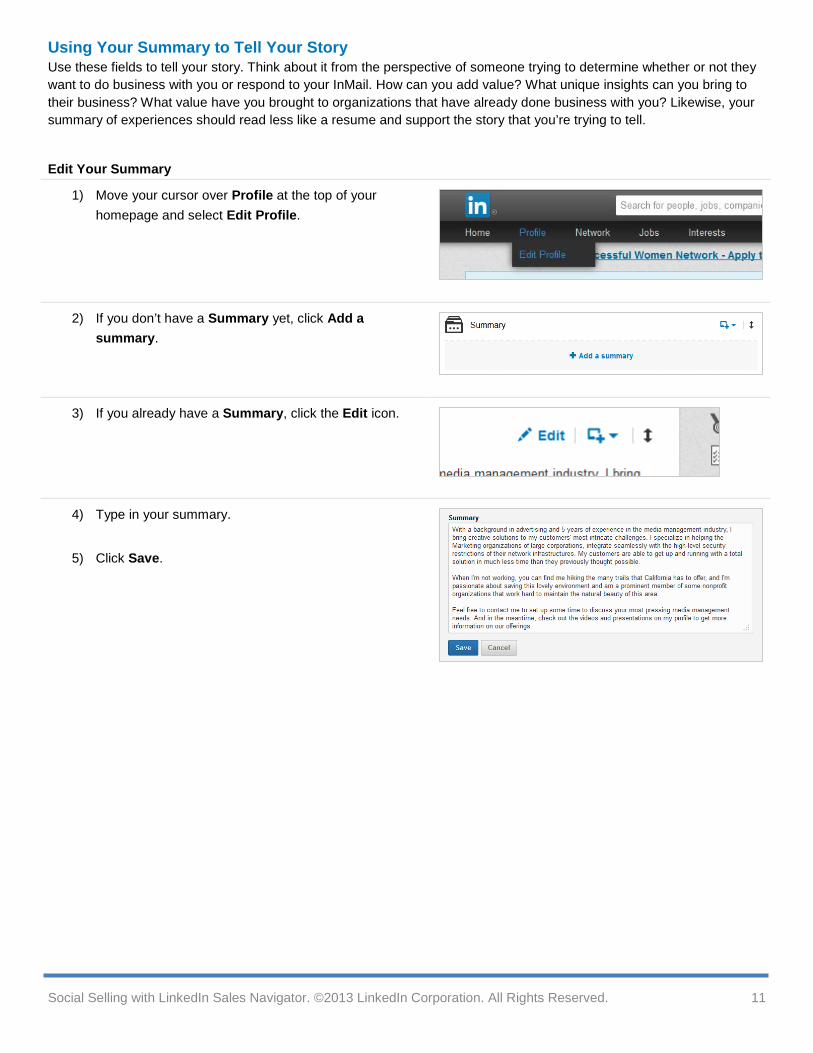
Editing Your Professional Headline
1) Move your cursor over Profile at the top of your homepage and select Edit Profile.
2) Click the Edit icon to the left of your current professional headline, below your name at the top of the profile.
3) Type in your changes.
4) Click Save.
5) Click Done editing.
Social Selling with LinkedIn Sales Navigator. ©2013 LinkedIn Corporation. All Rights Reserved. 10
Using Your Summary to Tell Your Story Use these fields to tell your story. Think about it from the perspective of someone trying to determine whether or not they want to do business with you or respond to your InMail. How can you add value? What unique insights can you bring to their business? What value have you brought to organizations that have already done business with you? Likewise, your summary of experiences should read less like a resume and support the story that you’re trying to tell.
Edit Your Summary
1) Move your cursor over Profile at the top of your homepage and select Edit Profile.
2) If you don’t have a Summary yet, click Add a summary.
3) If you already have a Summary, click the Edit icon.
4) Type in your summary.
5) Click Save.
Social Selling with LinkedIn Sales Navigator. ©2013 LinkedIn Corporation. All Rights Reserved. 11

Personalizing Your Public Profile URL Located at the bottom of the top block on your profile that shows your name and headline, your public profile URL (web address) is a great addition to signatures and business cards and will make you more easily found in search engine results. Create a URL that closely matches your name (ex. www.linkedin.com/in/johnsmith).
Customizing Your Public Profile URL
1) Move your cursor over Profile at the top of your homepage and select Edit Profile.
2) Click Edit next to the URL under your profile photo.
3) In the Your public profile URL box on the right, click Customize your public profile URL.
4) Type the last part of your new custom URL in the text box.
5) Click Set Custom URL.
Social Selling with LinkedIn Sales Navigator. ©2013 LinkedIn Corporation. All Rights Reserved. 12
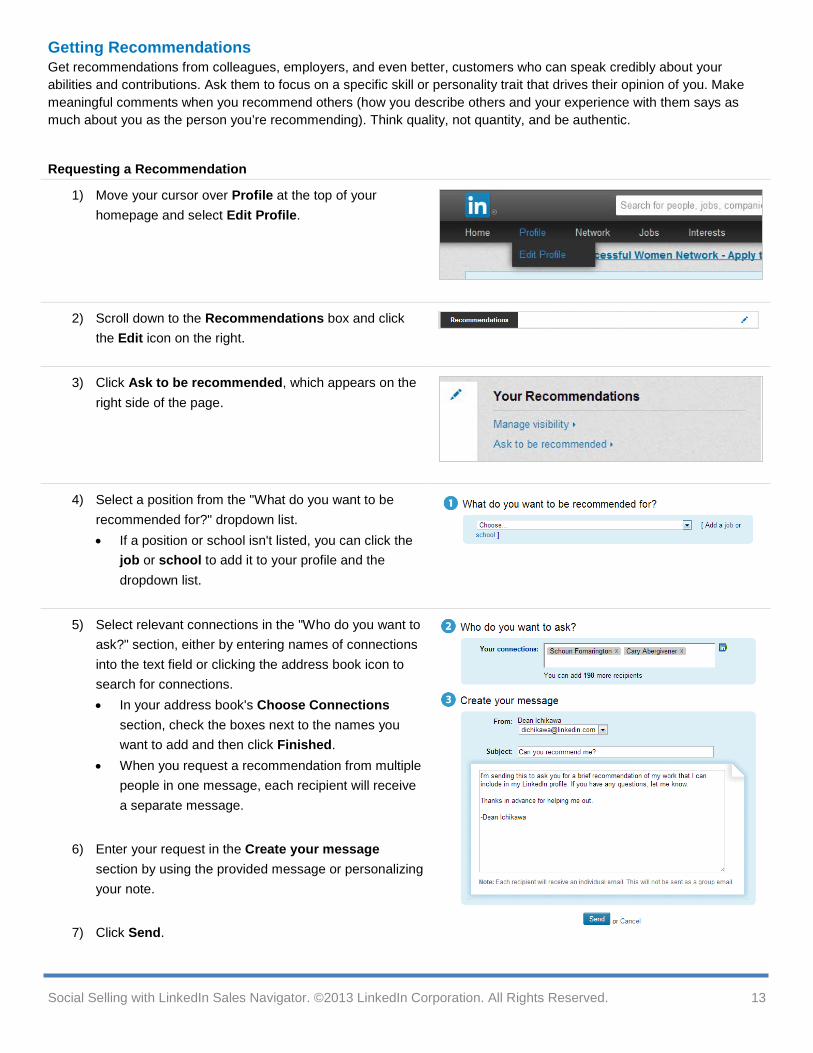
Getting Recommendations Get recommendations from colleagues, employers, and even better, customers who can speak credibly about your abilities and contributions. Ask them to focus on a specific skill or personality trait that drives their opinion of you. Make meaningful comments when you recommend others (how you describe others and your experience with them says as much about you as the person you’re recommending). Think quality, not quantity, and be authentic.
Requesting a Recommendation
1) Move your cursor over Profile at the top of your homepage and select Edit Profile.
2) Scroll down to the Recommendations box and click the Edit icon on the right.
3) Click Ask to be recommended, which appears on the right side of the page.
4) Select a position from the "What do you want to be recommended for?" dropdown list. • If a position or school isn't listed, you can click the
job or school to add it to your profile and the dropdown list.
5) Select relevant connections in the "Who do you want to ask?" section, either by entering names of connections into the text field or clicking the address book icon to search for connections. • In your address book's Choose Connections
section, check the boxes next to the names you want to add and then click Finished.
• When you request a recommendation from multiple people in one message, each recipient will receive a separate message.
6) Enter your request in the Create your message section by using the provided message or personalizing your note.
7) Click Send.
Social Selling with LinkedIn Sales Navigator. ©2013 LinkedIn Corporation. All Rights Reserved. 13
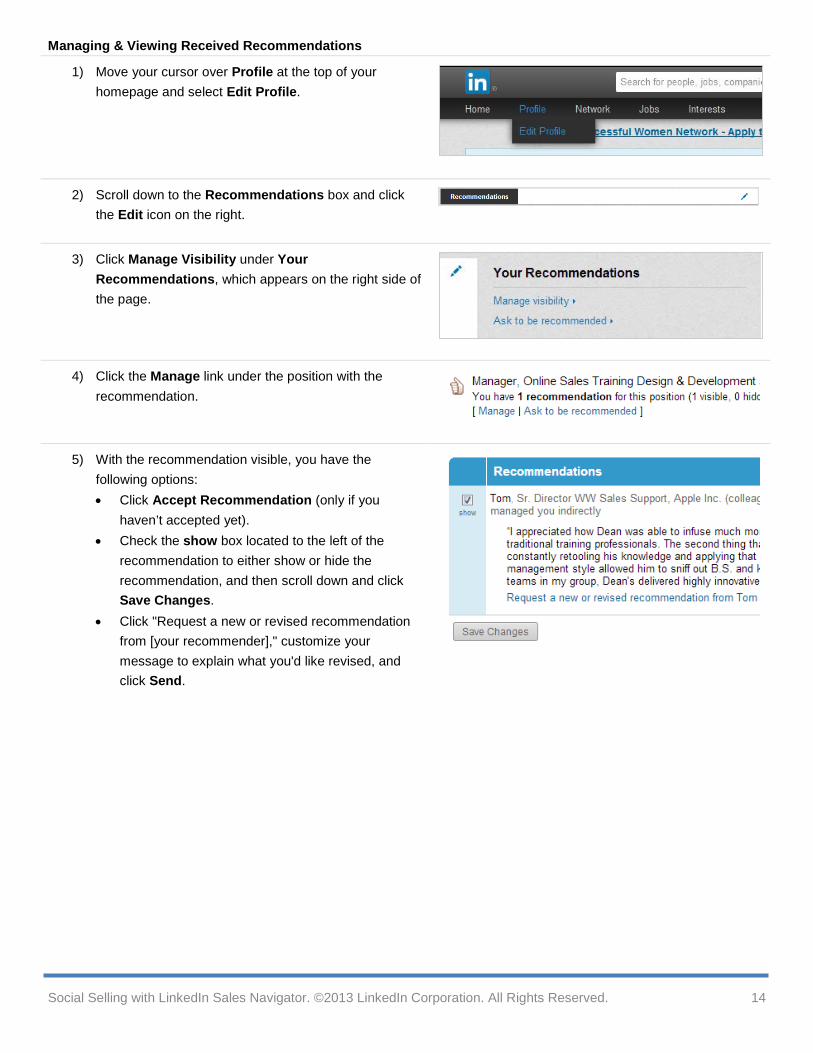
Managing & Viewing Received Recommendations
1) Move your cursor over Profile at the top of your homepage and select Edit Profile.
2) Scroll down to the Recommendations box and click the Edit icon on the right.
3) Click Manage Visibility under Your Recommendations, which appears on the right side of the page.
4) Click the Manage link under the position with the recommendation.
5) With the recommendation visible, you have the following options: • Click Accept Recommendation (only if you
haven’t accepted yet). • Check the show box located to the left of the
recommendation to either show or hide the recommendation, and then scroll down and click Save Changes.
• Click "Request a new or revised recommendation from [your recommender]," customize your message to explain what you'd like revised, and click Send.
Social Selling with LinkedIn Sales Navigator. ©2013 LinkedIn Corporation. All Rights Reserved. 14
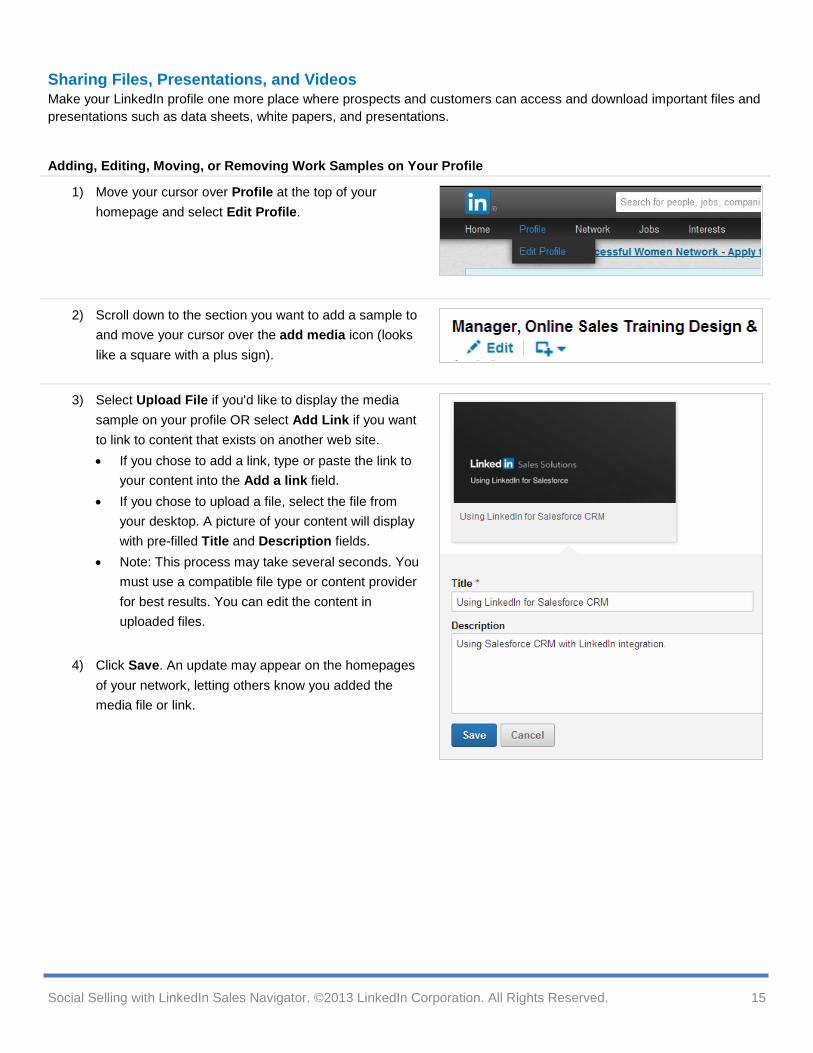
Sharing Files, Presentations, and Videos Make your LinkedIn profile one more place where prospects and customers can access and download important files and presentations such as data sheets, white papers, and presentations.
Adding, Editing, Moving, or Removing Work Samples on Your Profile
1) Move your cursor over Profile at the top of your homepage and select Edit Profile.
2) Scroll down to the section you want to add a sample to and move your cursor over the add media icon (looks like a square with a plus sign).
3) Select Upload File if you'd like to display the media sample on your profile OR select Add Link if you want to link to content that exists on another web site. • If you chose to add a link, type or paste the link to
your content into the Add a link field. • If you chose to upload a file, select the file from
your desktop. A picture of your content will display with pre-filled Title and Description fields.
• Note: This process may take several seconds. You must use a compatible file type or content provider for best results. You can edit the content in uploaded files.
4) Click Save. An update may appear on the homepages of your network, letting others know you added the media file or link.
Social Selling with LinkedIn Sales Navigator. ©2013 LinkedIn Corporation. All Rights Reserved. 15
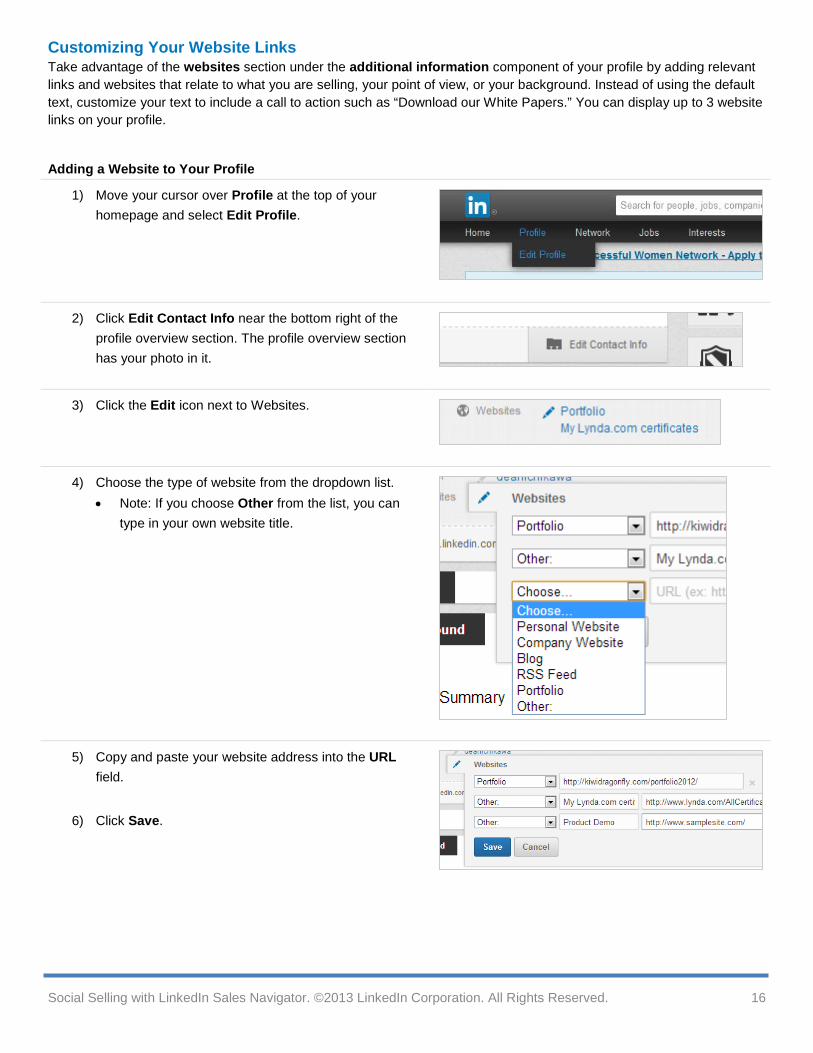
Customizing Your Website Links Take advantage of the websites section under the additional information component of your profile by adding relevant links and websites that relate to what you are selling, your point of view, or your background. Instead of using the default text, customize your text to include a call to action such as “Download our White Papers.” You can display up to 3 website links on your profile.
Adding a Website to Your Profile
1) Move your cursor over Profile at the top of your homepage and select Edit Profile.
2) Click Edit Contact Info near the bottom right of the profile overview section. The profile overview section has your photo in it.
3) Click the Edit icon next to Websites.
4) Choose the type of website from the dropdown list. • Note: If you choose Other from the list, you can
type in your own website title.
5) Copy and paste your website address into the URL field.
6) Click Save.
Social Selling with LinkedIn Sales Navigator. ©2013 LinkedIn Corporation. All Rights Reserved. 16
Building a High-Quality Network Many new LinkedIn members make the mistake of trying to get as many connections as possible, whether they know the person well or not. But to build a high-quality network—one that you can share ideas and potential solutions with, and discuss new opportunities—your connections need to be people you know and trust. You should feel comfortable sharing status updates with your entire network.
Your Network and Degrees of Connection On LinkedIn, people in your network are called connections and your network is made up of your 1st-degree, 2nd-degree, and 3rd-degree connections, and fellow members of your LinkedIn Groups.
1st-degree People you're directly connected to because you have accepted their invitation to connect, or they have accepted your invitation. You'll see a 1st-degree icon next to their name in search results and on their profile. You can contact them by sending a message on LinkedIn.
2nd-degree People who are connected to your 1st-degree connections. You'll see a 2nd-degree icon next to their name in search results and on their profile. You can send them an invitation by clicking Connect or contact them through an InMail or an introduction.
3rd-degree People who are connected to your 2nd-degree connections. You'll see a 3rd-degree icon next to their name in search results and on their profile.
• If their full first and last names are displayed, you will be able to send them an invitation by clicking Connect.
• If only the first letter of their last name is displayed, clicking Connect is not an option but you can still contact them through an InMail or an introduction.
Group Member These people are considered part of your network because you're members of the same group. You'll see a Group icon next to their name in search results and on their profile. You can contact them by sending a message on LinkedIn or using your group's discussion feature.
Connecting With LinkedIn Members You can ask someone to join your professional network by sending them an invitation to connect. If they accept your invitation, they become a 1st-degree connection. We recommend that you only send invitations to people you know well and trust, because 1st-degree connections are given access to the primary email address on your account.
You can invite people to connect from the following areas:
• A member's profile — Click the Connect button on their profile page. • Search results — Click Connect to the right of the person's information. • The Add Connections page — Search your email address book to find contacts or invite them using their
email address. • People You May Know — Click Connect next to the person's name to send an invitation. If you wish to add
a note to the invitation before sending it, please click the pencil icon next to Connect. You can then type your note and click Send Invitation.
As your account matures, you may be required to enter an email address every time you send an invitation.
Note: You cannot paste links or add attachments to invitations.
Social Selling with LinkedIn Sales Navigator. ©2013 LinkedIn Corporation. All Rights Reserved. 17
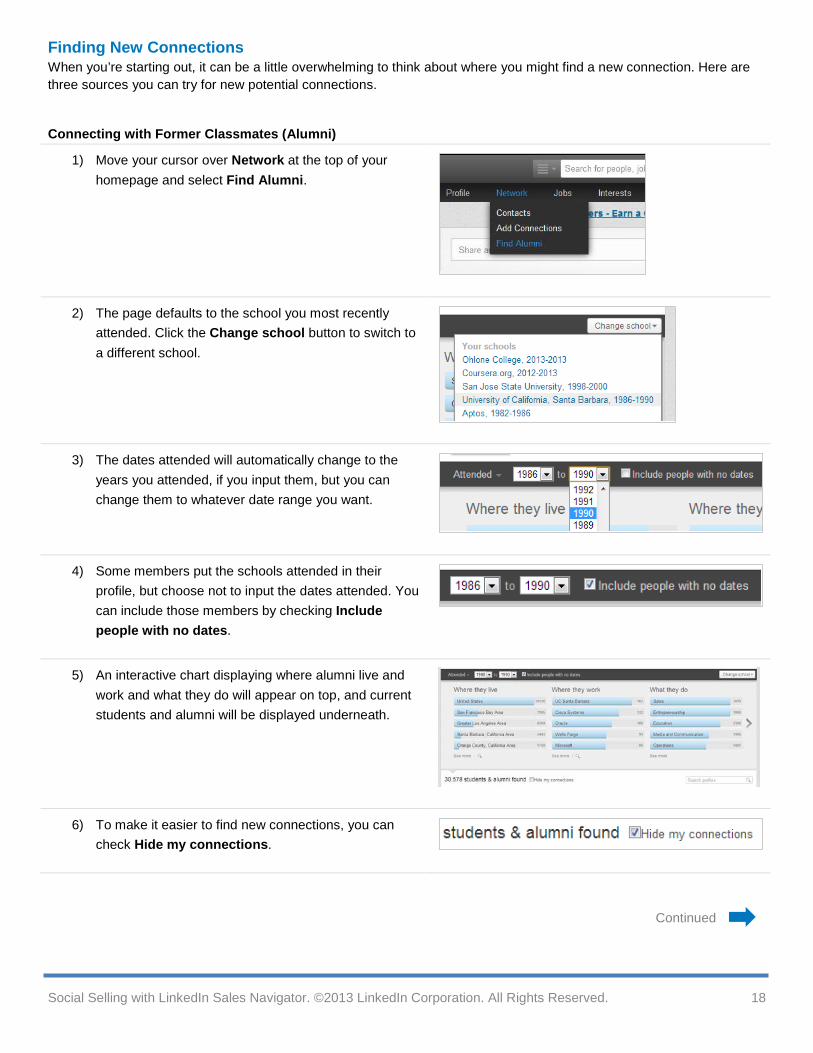
Finding New Connections When you’re starting out, it can be a little overwhelming to think about where you might find a new connection. Here are three sources you can try for new potential connections.
Connecting with Former Classmates (Alumni)
1) Move your cursor over Network at the top of your homepage and select Find Alumni.
2) The page defaults to the school you most recently attended. Click the Change school button to switch to a different school.
3) The dates attended will automatically change to the years you attended, if you input them, but you can change them to whatever date range you want.
4) Some members put the schools attended in their profile, but choose not to input the dates attended. You can include those members by checking Include people with no dates.
5) An interactive chart displaying where alumni live and work and what they do will appear on top, and current students and alumni will be displayed underneath.
6) To make it easier to find new connections, you can check Hide my connections.
Continued
Social Selling with LinkedIn Sales Navigator. ©2013 LinkedIn Corporation. All Rights Reserved. 18
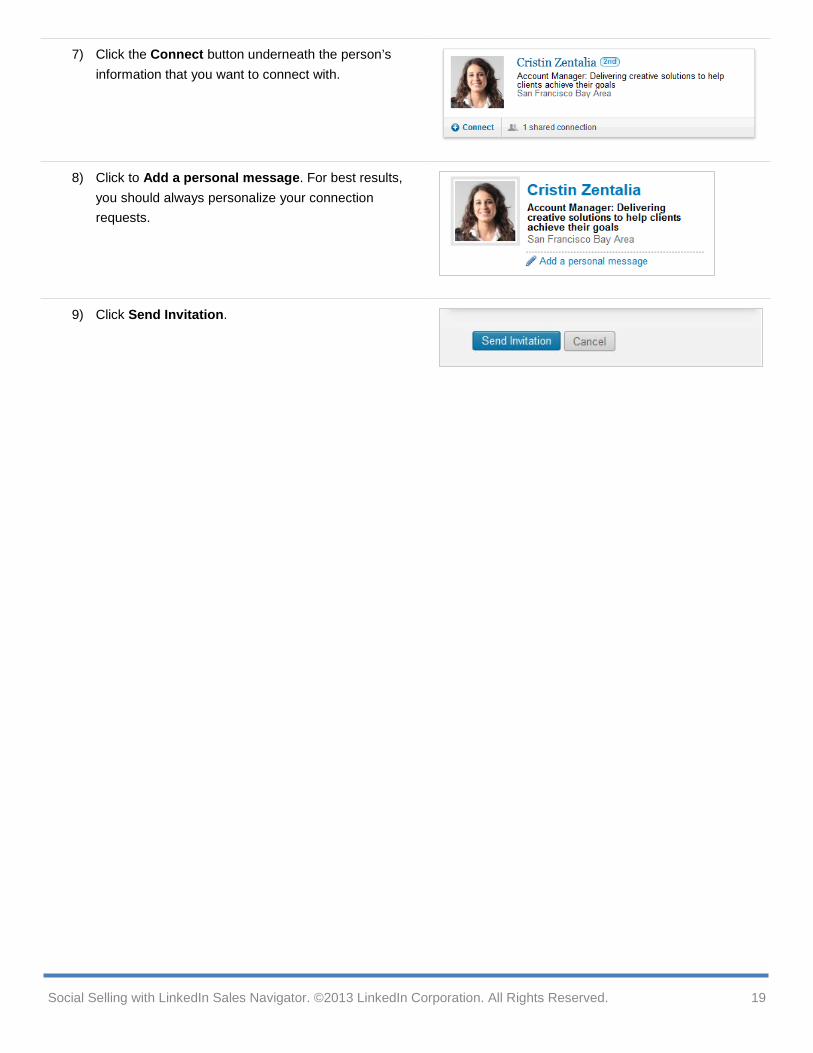
7) Click the Connect button underneath the person’s information that you want to connect with.
8) Click to Add a personal message. For best results, you should always personalize your connection requests.
9) Click Send Invitation.
Social Selling with LinkedIn Sales Navigator. ©2013 LinkedIn Corporation. All Rights Reserved. 19
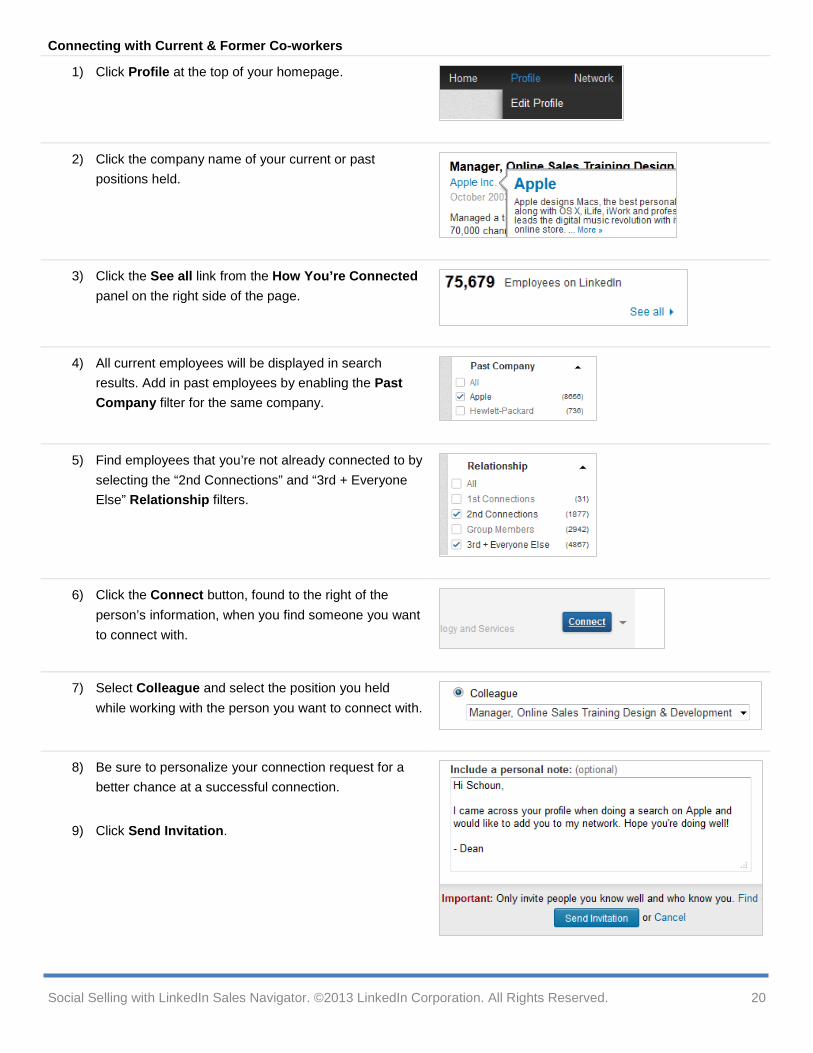
Connecting with Current & Former Co-workers
1) Click Profile at the top of your homepage.
2) Click the company name of your current or past positions held.
3) Click the See all link from the How You’re Connected panel on the right side of the page.
4) All current employees will be displayed in search results. Add in past employees by enabling the Past Company filter for the same company.
5) Find employees that you’re not already connected to by selecting the “2nd Connections” and “3rd + Everyone Else” Relationship filters.
6) Click the Connect button, found to the right of the person’s information, when you find someone you want to connect with.
7) Select Colleague and select the position you held while working with the person you want to connect with.
8) Be sure to personalize your connection request for a better chance at a successful connection.
9) Click Send Invitation.
Social Selling with LinkedIn Sales Navigator. ©2013 LinkedIn Corporation. All Rights Reserved. 20
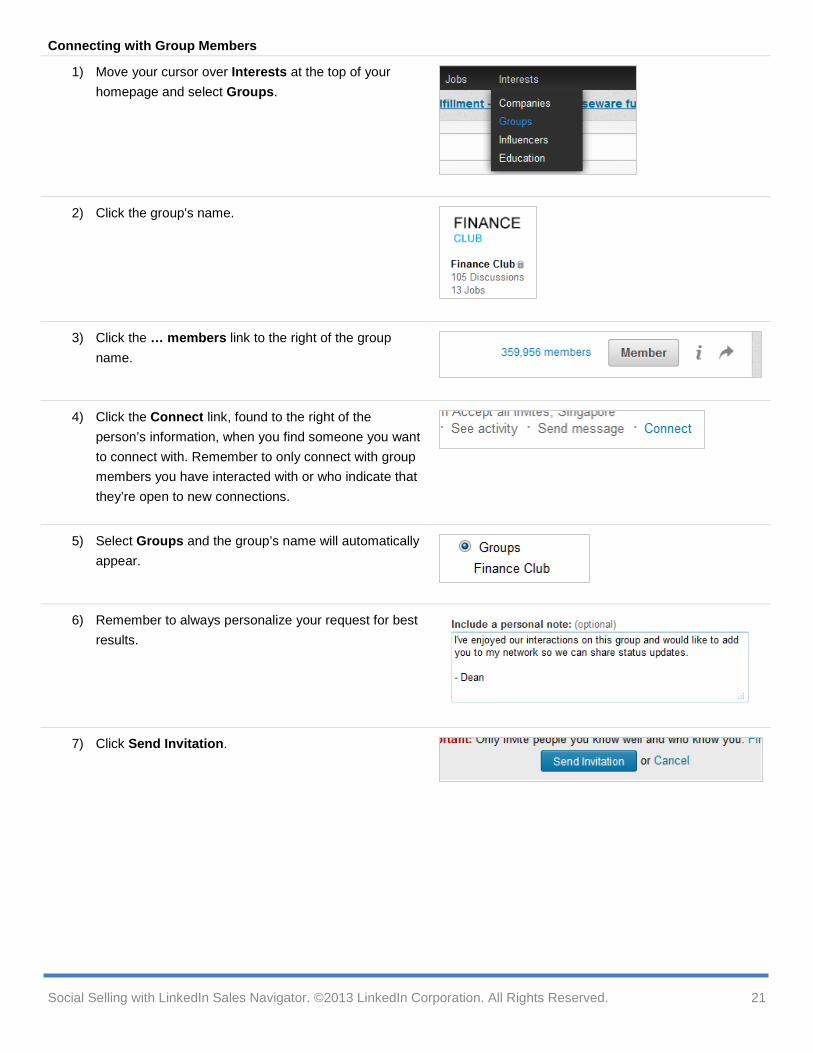
Connecting with Group Members
1) Move your cursor over Interests at the top of your homepage and select Groups.
2) Click the group's name.
3) Click the … members link to the right of the group name.
4) Click the Connect link, found to the right of the person’s information, when you find someone you want to connect with. Remember to only connect with group members you have interacted with or who indicate that they’re open to new connections.
5) Select Groups and the group’s name will automatically appear.
6) Remember to always personalize your request for best results.
7) Click Send Invitation.
Social Selling with LinkedIn Sales Navigator. ©2013 LinkedIn Corporation. All Rights Reserved. 21
Participating in Your Professional Social Network Part of building an online presence as a social selling professional is engaging in social activities such as posting status updates, liking and commenting on updates from your network, and participating in group discussions. And in addition to pushing your thoughts and advice out there, you can follow the companies that are leaders of your industry or your top accounts to stay up to date and to discover links and media to share with your network.
Posting a Status Update Unlike a consumer social networking site, LinkedIn is a site for professionals, so you don’t want to post status updates that talk about how your day is going or what you had for dinner last night. Instead, post your thoughts about new trends in the industry, an upcoming tradeshow, or insights into your products or services. It’s also a good idea to post links to articles, blog posts, or videos that are relevant to your industry.
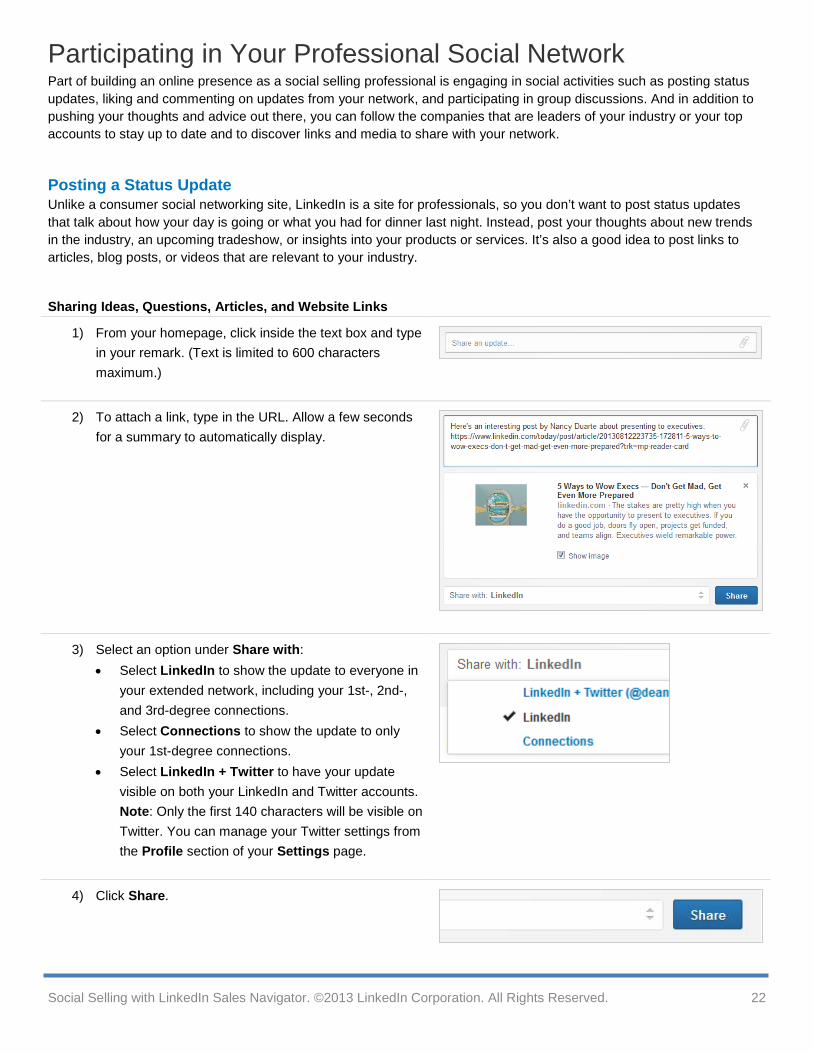
Sharing Ideas, Questions, Articles, and Website Links
1) From your homepage, click inside the text box and type in your remark. (Text is limited to 600 characters maximum.)
2) To attach a link, type in the URL. Allow a few seconds for a summary to automatically display.
3) Select an option under Share with: • Select LinkedIn to show the update to everyone in
your extended network, including your 1st-, 2nd-, and 3rd-degree connections.
• Select Connections to show the update to only your 1st-degree connections.
• Select LinkedIn + Twitter to have your update visible on both your LinkedIn and Twitter accounts. Note: Only the first 140 characters will be visible on Twitter. You can manage your Twitter settings from the Profile section of your Settings page.
4) Click Share.
Social Selling with LinkedIn Sales Navigator. ©2013 LinkedIn Corporation. All Rights Reserved. 22
Commenting or Liking Status Updates If your network sees that you’re always posting information but never commenting or liking their posts, that can give the impression that you only like to state your opinion and never like to listen. Be a good listener by commenting or liking someone else’s status updates on a regular basis.
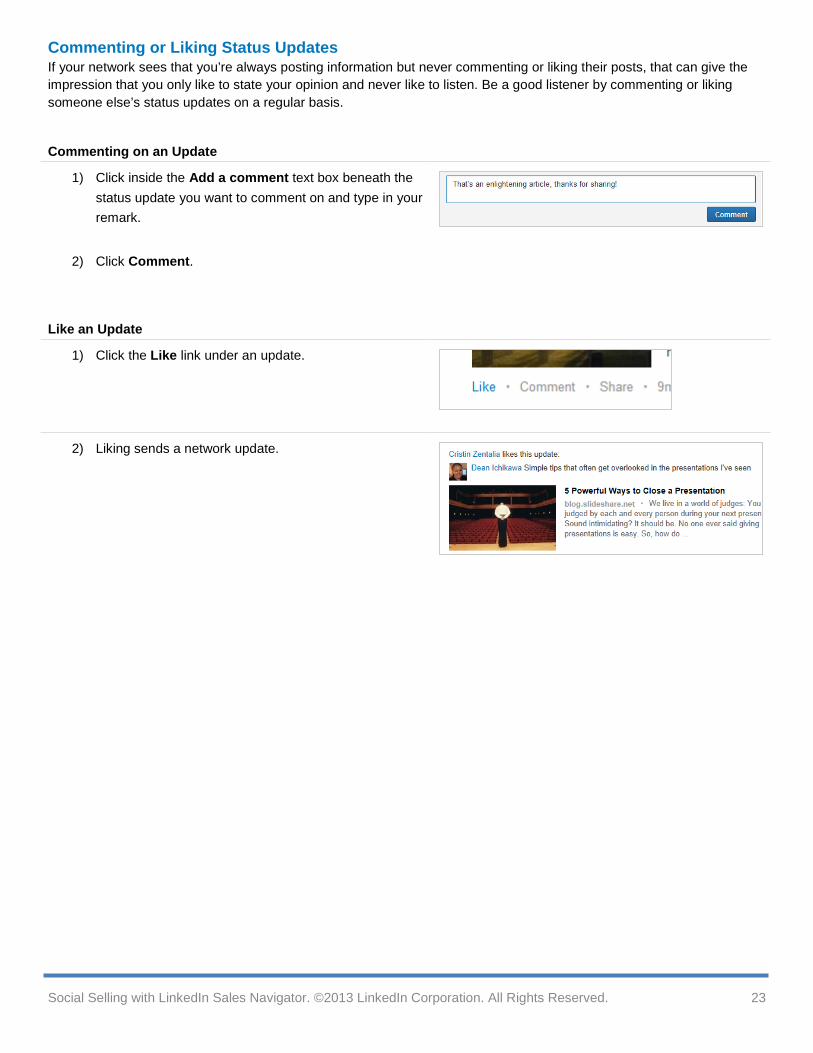
Commenting on an Update
1) Click inside the Add a comment text box beneath the status update you want to comment on and type in your remark.
2) Click Comment.
Like an Update
1) Click the Like link under an update.
2) Liking sends a network update.
Social Selling with LinkedIn Sales Navigator. ©2013 LinkedIn Corporation. All Rights Reserved. 23
Following Companies There are many reasons why you should follow a company, and here are two examples: 1) you can follow your top accounts to find out their latest news, job promotions, and new prospects to connect with, and 2) you can follow leaders in your industry to discover news, trends, and information to share with your network.
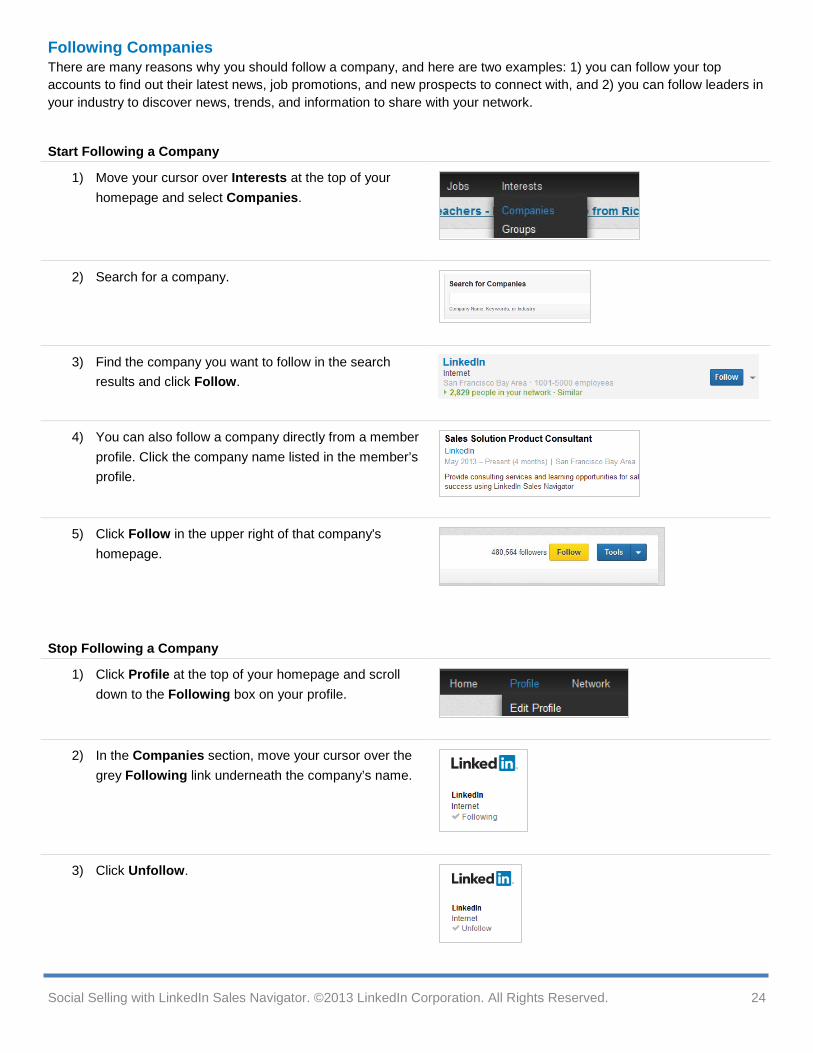
Start Following a Company
1) Move your cursor over Interests at the top of your homepage and select Companies.
2) Search for a company.
3) Find the company you want to follow in the search results and click Follow.
4) You can also follow a company directly from a member profile. Click the company name listed in the member’s profile.
5) Click Follow in the upper right of that company's homepage.
Stop Following a Company
1) Click Profile at the top of your homepage and scroll down to the Following box on your profile.
2) In the Companies section, move your cursor over the grey Following link underneath the company’s name.
3) Click Unfollow.
Social Selling with LinkedIn Sales Navigator. ©2013 LinkedIn Corporation. All Rights Reserved. 24
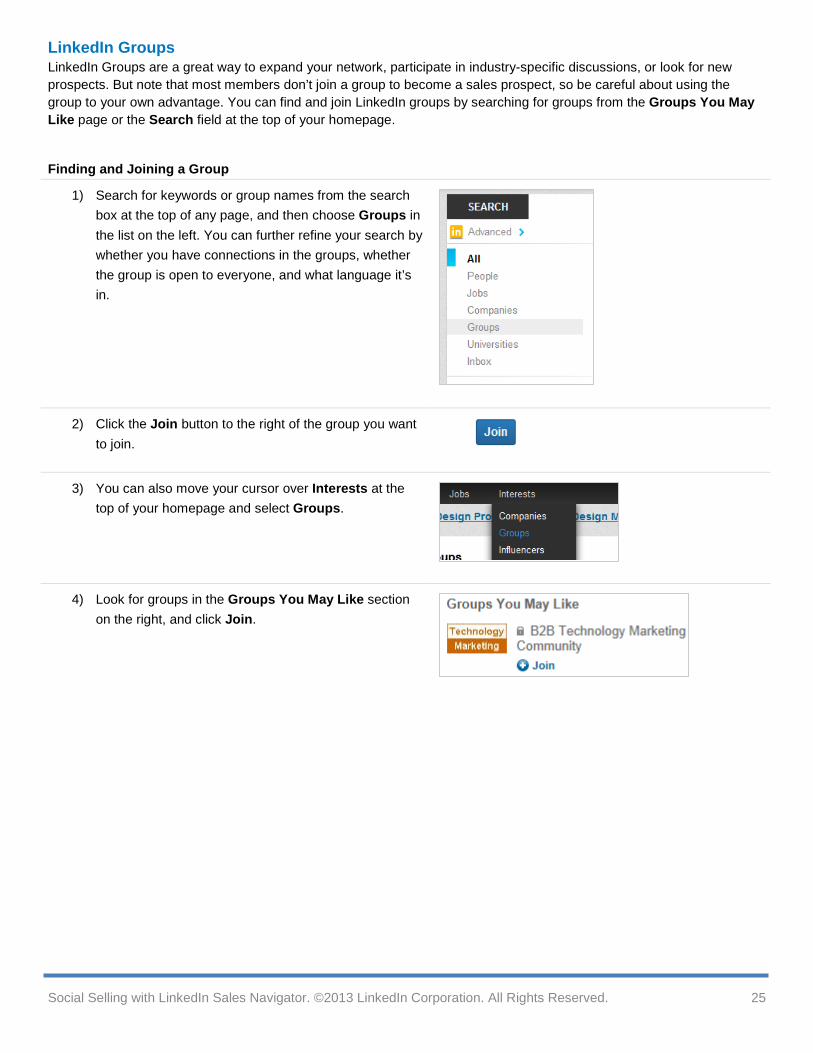
LinkedIn Groups LinkedIn Groups are a great way to expand your network, participate in industry-specific discussions, or look for new prospects. But note that most members don’t join a group to become a sales prospect, so be careful about using the group to your own advantage. You can find and join LinkedIn groups by searching for groups from the Groups You May Like page or the Search field at the top of your homepage.
Finding and Joining a Group
1) Search for keywords or group names from the search box at the top of any page, and then choose Groups in the list on the left. You can further refine your search by whether you have connections in the groups, whether the group is open to everyone, and what language it’s in.
2) Click the Join button to the right of the group you want to join.
3) You can also move your cursor over Interests at the top of your homepage and select Groups.
4) Look for groups in the Groups You May Like section on the right, and click Join.
Social Selling with LinkedIn Sales Navigator. ©2013 LinkedIn Corporation. All Rights Reserved. 25
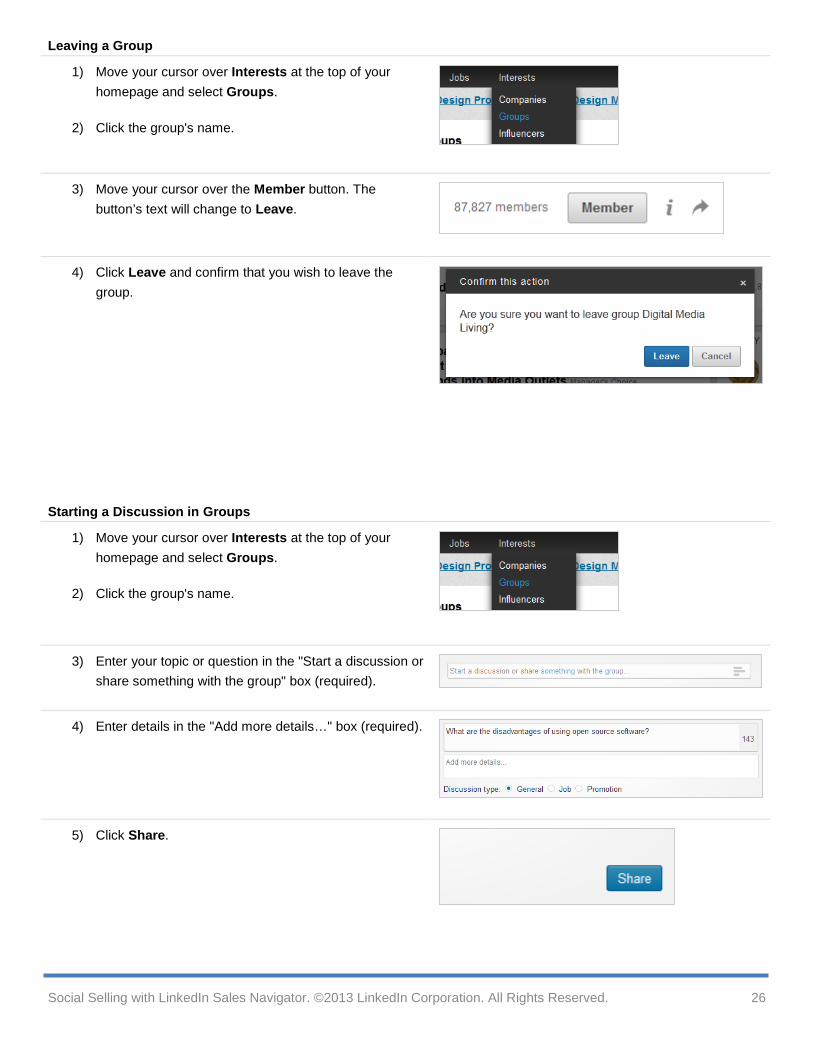
Leaving a Group
1) Move your cursor over Interests at the top of your homepage and select Groups.
2) Click the group's name.
3) Move your cursor over the Member button. The button’s text will change to Leave.
4) Click Leave and confirm that you wish to leave the group.
Starting a Discussion in Groups
1) Move your cursor over Interests at the top of your homepage and select Groups.
2) Click the group's name.
3) Enter your topic or question in the "Start a discussion or share something with the group" box (required).
4) Enter details in the "Add more details…" box (required).
5) Click Share.
Social Selling with LinkedIn Sales Navigator. ©2013 LinkedIn Corporation. All Rights Reserved. 26
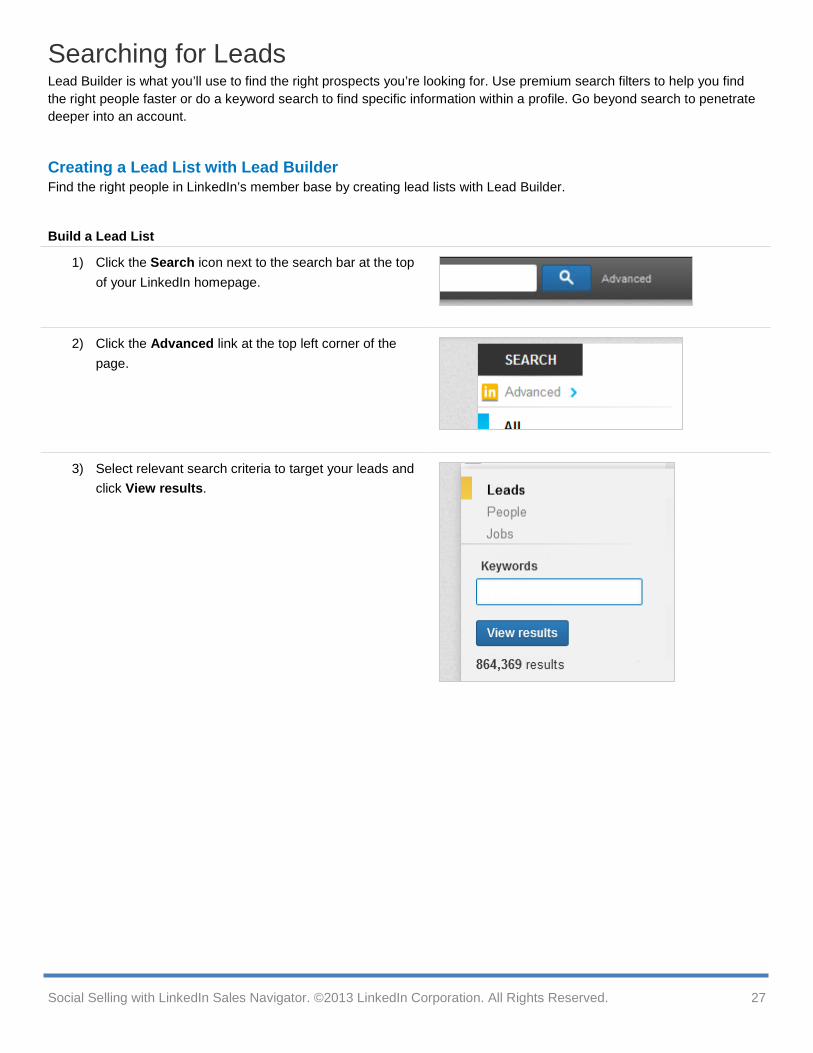
Searching for Leads Lead Builder is what you’ll use to find the right prospects you’re looking for. Use premium search filters to help you find the right people faster or do a keyword search to find specific information within a profile. Go beyond search to penetrate deeper into an account.
Creating a Lead List with Lead Builder Find the right people in LinkedIn’s member base by creating lead lists with Lead Builder.
Build a Lead List
1) Click the Search icon next to the search bar at the top of your LinkedIn homepage.
2) Click the Advanced link at the top left corner of the page.
3) Select relevant search criteria to target your leads and click View results.
Social Selling with LinkedIn Sales Navigator. ©2013 LinkedIn Corporation. All Rights Reserved. 27
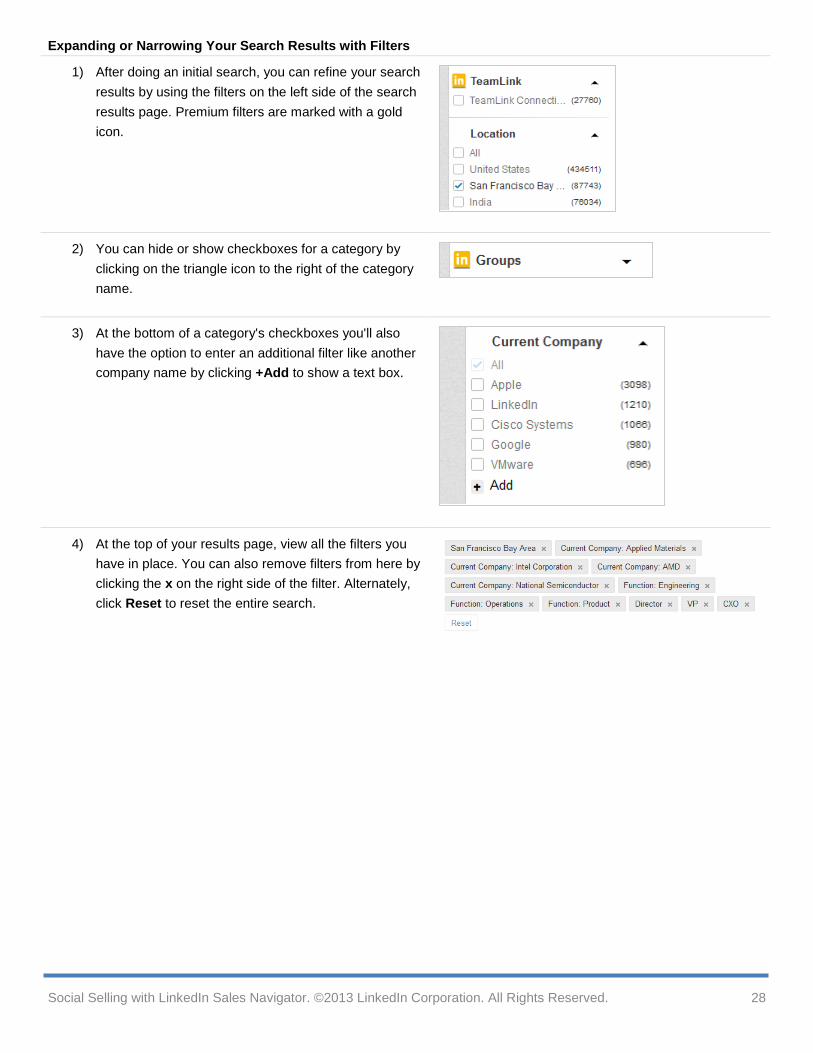
Expanding or Narrowing Your Search Results with Filters
1) After doing an initial search, you can refine your search results by using the filters on the left side of the search results page. Premium filters are marked with a gold icon.
2) You can hide or show checkboxes for a category by clicking on the triangle icon to the right of the category name.
3) At the bottom of a category's checkboxes you'll also have the option to enter an additional filter like another company name by clicking +Add to show a text box.
4) At the top of your results page, view all the filters you have in place. You can also remove filters from here by clicking the x on the right side of the filter. Alternately, click Reset to reset the entire search.
Social Selling with LinkedIn Sales Navigator. ©2013 LinkedIn Corporation. All Rights Reserved. 28
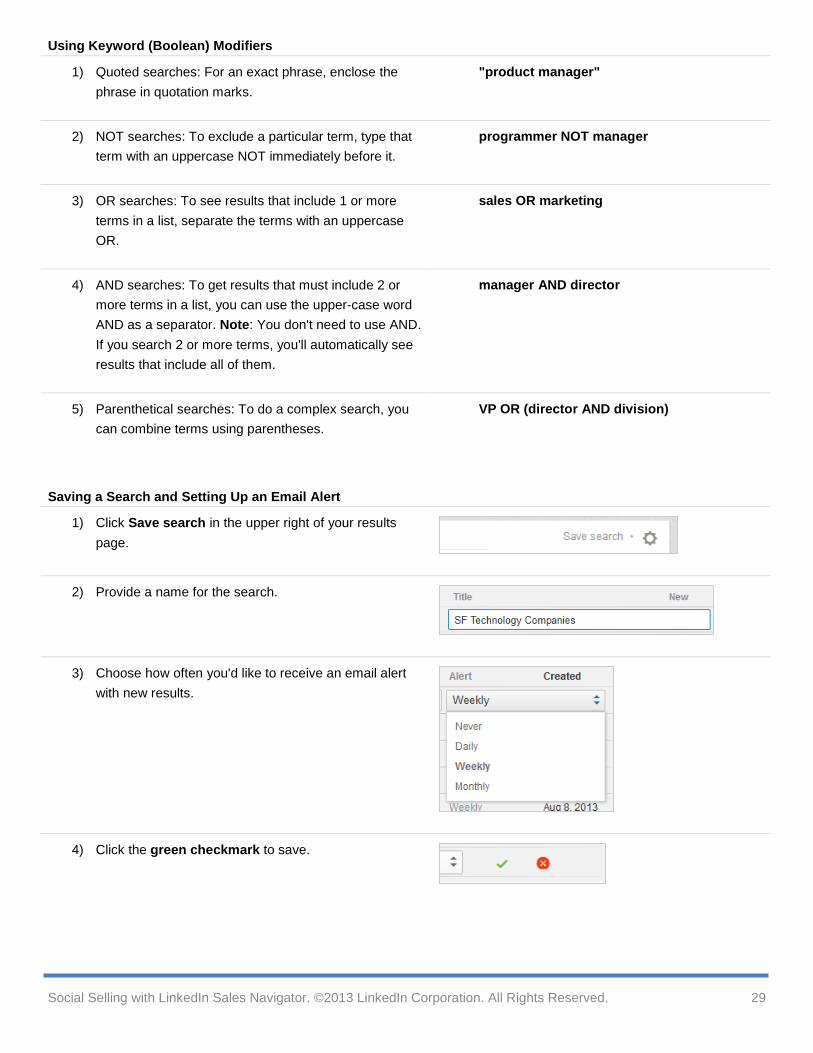
Using Keyword (Boolean) Modifiers
1) Quoted searches: For an exact phrase, enclose the phrase in quotation marks.
"product manager"
2) NOT searches: To exclude a particular term, type that term with an uppercase NOT immediately before it.
programmer NOT manager
3) OR searches: To see results that include 1 or more terms in a list, separate the terms with an uppercase OR.
sales OR marketing
4) AND searches: To get results that must include 2 or more terms in a list, you can use the upper-case word AND as a separator. Note: You don't need to use AND. If you search 2 or more terms, you'll automatically see results that include all of them.
manager AND director
5) Parenthetical searches: To do a complex search, you can combine terms using parentheses.
VP OR (director AND division)
Saving a Search and Setting Up an Email Alert
1) Click Save search in the upper right of your results page.
2) Provide a name for the search.
3) Choose how often you'd like to receive an email alert with new results.
4) Click the green checkmark to save.
Social Selling with LinkedIn Sales Navigator. ©2013 LinkedIn Corporation. All Rights Reserved. 29
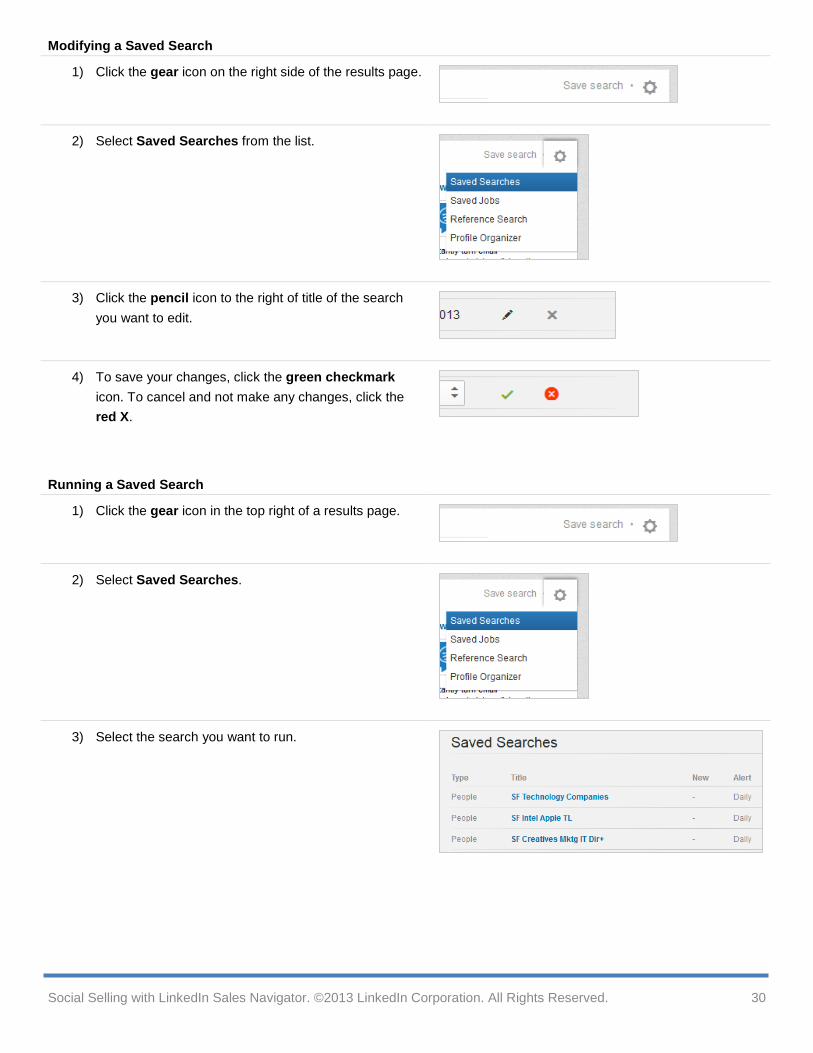
Modifying a Saved Search
1) Click the gear icon on the right side of the results page.
2) Select Saved Searches from the list.
3) Click the pencil icon to the right of title of the search you want to edit.
4) To save your changes, click the green checkmark icon. To cancel and not make any changes, click the red X.
Running a Saved Search
1) Click the gear icon in the top right of a results page.
2) Select Saved Searches.
3) Select the search you want to run.
Social Selling with LinkedIn Sales Navigator. ©2013 LinkedIn Corporation. All Rights Reserved. 30
Finding New Leads Lead Builder searches are not your only source for new leads. Use the Lead Recommendations module at the top of each member’s profile. Join groups whose members are open to new business opportunities or industry-specific universities like MIT.
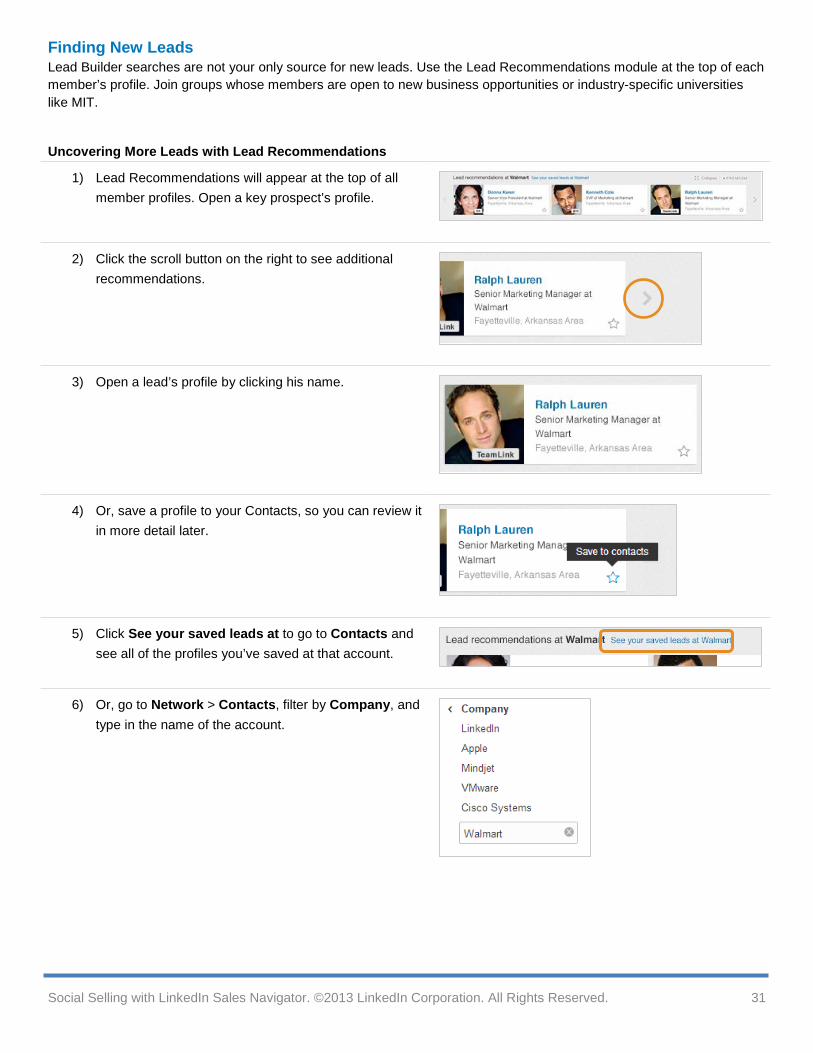
Uncovering More Leads with Lead Recommendations
1) Lead Recommendations will appear at the top of all member profiles. Open a key prospect’s profile.
2) Click the scroll button on the right to see additional recommendations.
3) Open a lead’s profile by clicking his name.
4) Or, save a profile to your Contacts, so you can review it in more detail later.
5) Click See your saved leads at to go to Contacts and see all of the profiles you’ve saved at that account.
6) Or, go to Network > Contacts, filter by Company, and type in the name of the account.
Social Selling with LinkedIn Sales Navigator. ©2013 LinkedIn Corporation. All Rights Reserved. 31
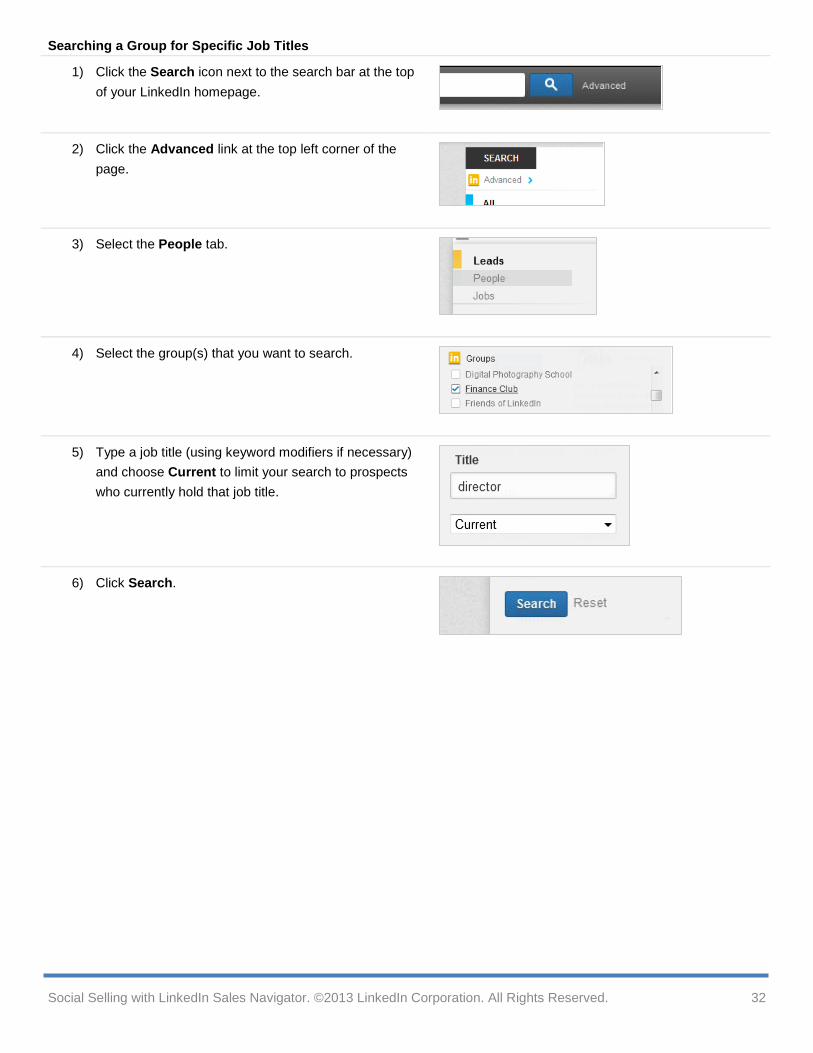
Searching a Group for Specific Job Titles
1) Click the Search icon next to the search bar at the top of your LinkedIn homepage.
2) Click the Advanced link at the top left corner of the page.
3) Select the People tab.
4) Select the group(s) that you want to search.
5) Type a job title (using keyword modifiers if necessary) and choose Current to limit your search to prospects who currently hold that job title.
6) Click Search.
Social Selling with LinkedIn Sales Navigator. ©2013 LinkedIn Corporation. All Rights Reserved. 32
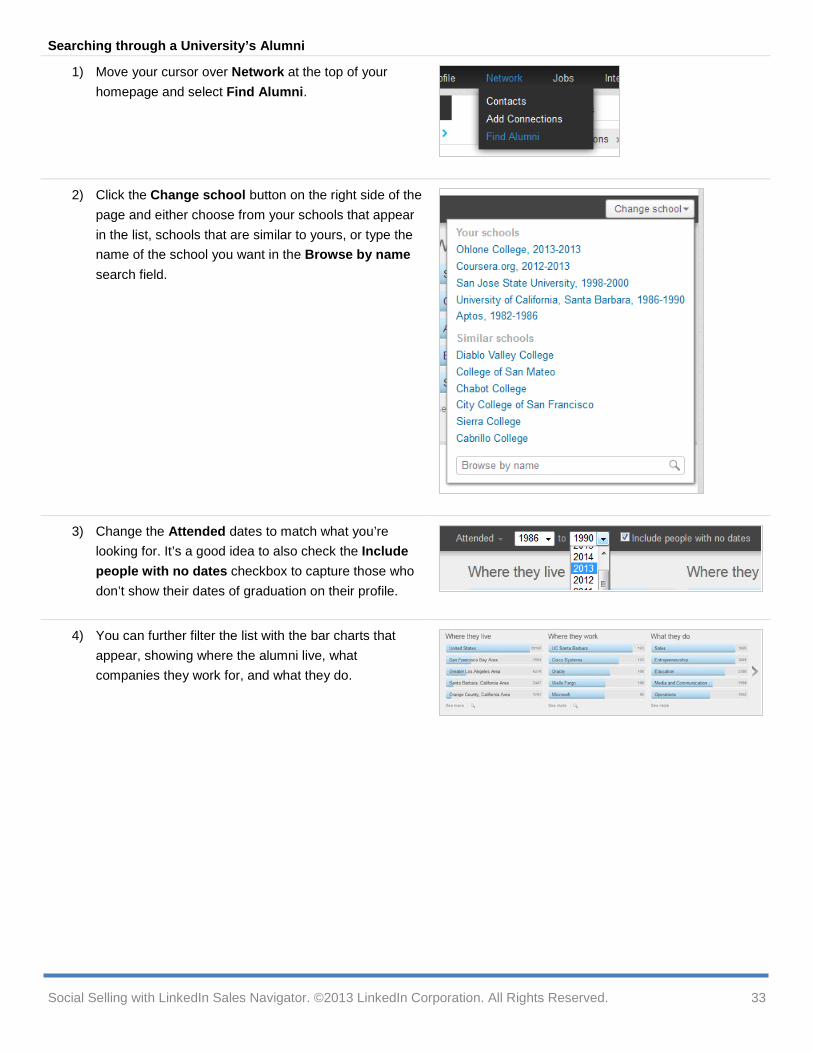
Searching through a University’s Alumni
1) Move your cursor over Network at the top of your homepage and select Find Alumni.
2) Click the Change school button on the right side of the page and either choose from your schools that appear in the list, schools that are similar to yours, or type the name of the school you want in the Browse by name search field.
3) Change the Attended dates to match what you’re looking for. It’s a good idea to also check the Include people with no dates checkbox to capture those who don’t show their dates of graduation on their profile.
4) You can further filter the list with the bar charts that appear, showing where the alumni live, what companies they work for, and what they do.
Social Selling with LinkedIn Sales Navigator. ©2013 LinkedIn Corporation. All Rights Reserved. 33
Gaining Insights into Your Prospects and Accounts In order to make sure a prospect is the right fit for your solution and before you reach out, you should always read through a prospect’s profile to gain insights. You can often find their challenges and pain points, in addition to finding simple icebreakers to start your first conversations.
Reviewing Prospect Profiles It’s best to read through a prospect’s entire profile, but here are some tips for where to start.
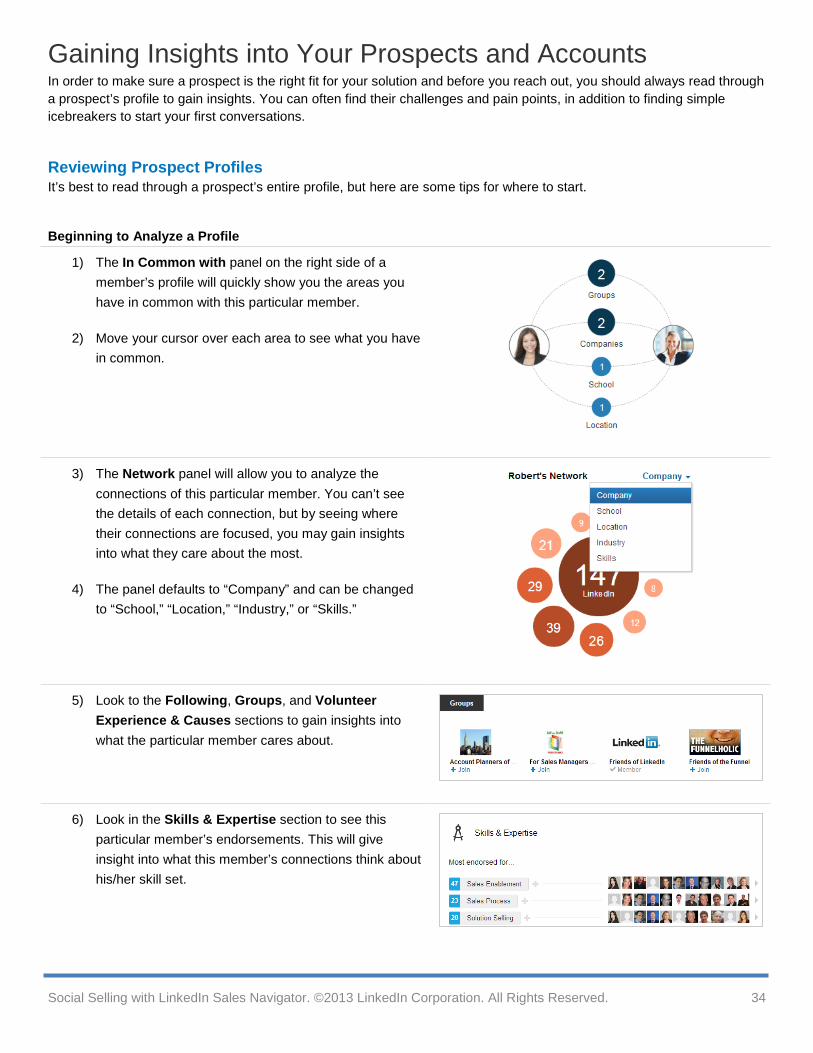
Beginning to Analyze a Profile
1) The In Common with panel on the right side of a member’s profile will quickly show you the areas you have in common with this particular member.
2) Move your cursor over each area to see what you have in common.
3) The Network panel will allow you to analyze the connections of this particular member. You can’t see the details of each connection, but by seeing where their connections are focused, you may gain insights into what they care about the most.
4) The panel defaults to “Company” and can be changed to “School,” “Location,” “Industry,” or “Skills.”
5) Look to the Following, Groups, and Volunteer Experience & Causes sections to gain insights into what the particular member cares about.
6) Look in the Skills & Expertise section to see this particular member’s endorsements. This will give insight into what this member’s connections think about his/her skill set.
Social Selling with LinkedIn Sales Navigator. ©2013 LinkedIn Corporation. All Rights Reserved. 34
Analyzing Your Inbound Leads You can use your Who’s Viewed Your Profile page to simply look up the profiles of those who’ve viewed your profile, but a wealth of analytics are also displayed that you can take advantage of. It’s a good idea to select to display your own name, headline, location, and industry for others to see when you’ve viewed their profiles.
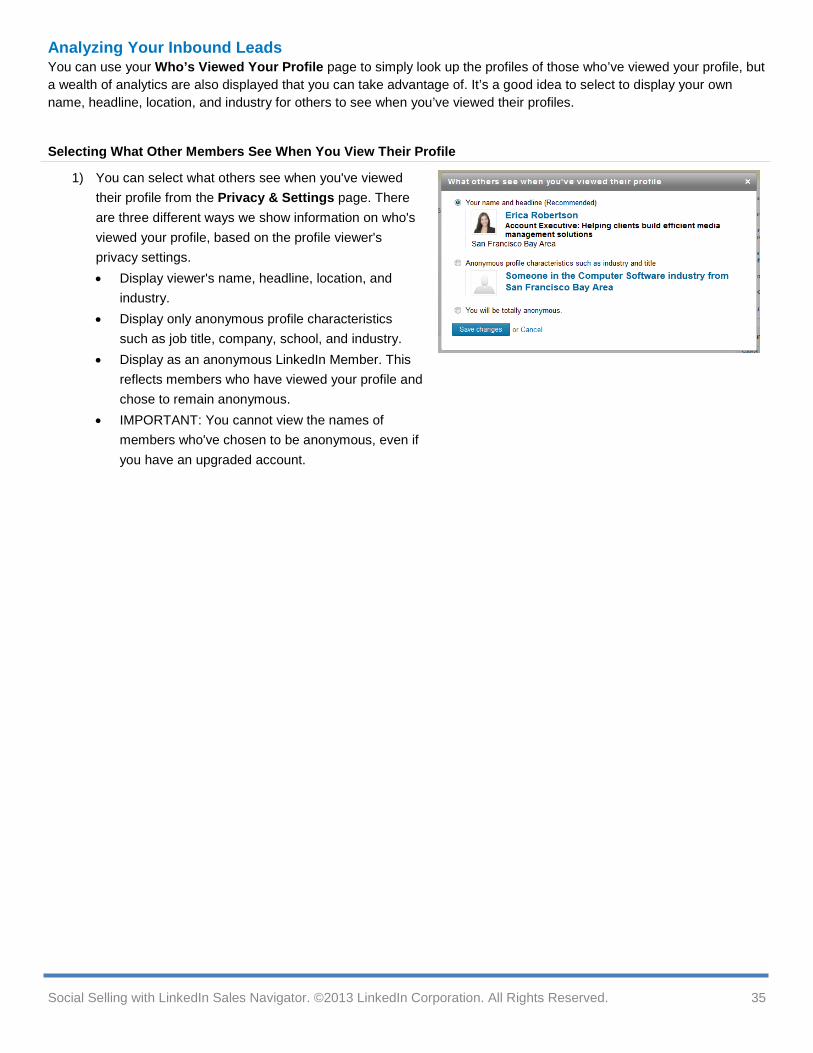
Selecting What Other Members See When You View Their Profile
1) You can select what others see when you've viewed their profile from the Privacy & Settings page. There are three different ways we show information on who's viewed your profile, based on the profile viewer's privacy settings. • Display viewer's name, headline, location, and
industry. • Display only anonymous profile characteristics
such as job title, company, school, and industry. • Display as an anonymous LinkedIn Member. This
reflects members who have viewed your profile and chose to remain anonymous.
• IMPORTANT: You cannot view the names of members who've chosen to be anonymous, even if you have an upgraded account.
Social Selling with LinkedIn Sales Navigator. ©2013 LinkedIn Corporation. All Rights Reserved. 35
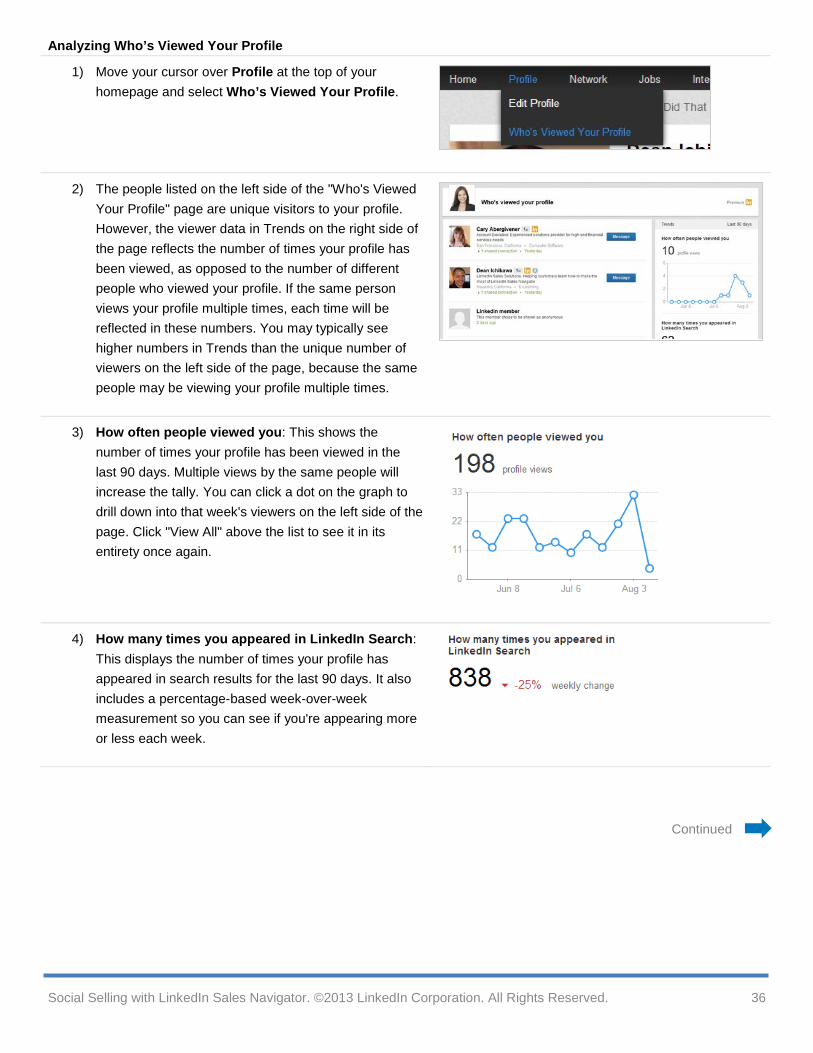
Analyzing Who’s Viewed Your Profile
1) Move your cursor over Profile at the top of your homepage and select Who’s Viewed Your Profile.
2) The people listed on the left side of the "Who's Viewed Your Profile" page are unique visitors to your profile. However, the viewer data in Trends on the right side of the page reflects the number of times your profile has been viewed, as opposed to the number of different people who viewed your profile. If the same person views your profile multiple times, each time will be reflected in these numbers. You may typically see higher numbers in Trends than the unique number of viewers on the left side of the page, because the same people may be viewing your profile multiple times.
3) How often people viewed you: This shows the number of times your profile has been viewed in the last 90 days. Multiple views by the same people will increase the tally. You can click a dot on the graph to drill down into that week's viewers on the left side of the page. Click "View All" above the list to see it in its entirety once again.
4) How many times you appeared in LinkedIn Search: This displays the number of times your profile has appeared in search results for the last 90 days. It also includes a percentage-based week-over-week measurement so you can see if you're appearing more or less each week.
Continued
Social Selling with LinkedIn Sales Navigator. ©2013 LinkedIn Corporation. All Rights Reserved. 36
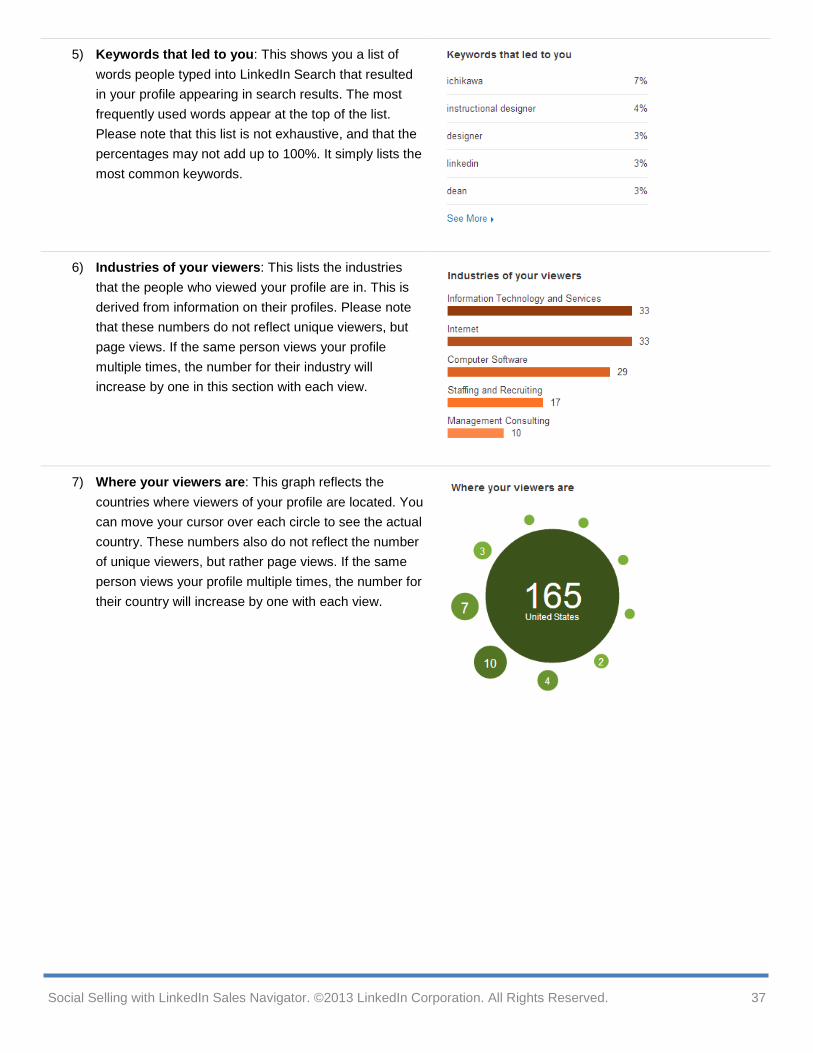
5) Keywords that led to you: This shows you a list of words people typed into LinkedIn Search that resulted in your profile appearing in search results. The most frequently used words appear at the top of the list. Please note that this list is not exhaustive, and that the percentages may not add up to 100%. It simply lists the most common keywords.
6) Industries of your viewers: This lists the industries that the people who viewed your profile are in. This is derived from information on their profiles. Please note that these numbers do not reflect unique viewers, but page views. If the same person views your profile multiple times, the number for their industry will increase by one in this section with each view.
7) Where your viewers are: This graph reflects the countries where viewers of your profile are located. You can move your cursor over each circle to see the actual country. These numbers also do not reflect the number of unique viewers, but rather page views. If the same person views your profile multiple times, the number for their country will increase by one with each view.
Social Selling with LinkedIn Sales Navigator. ©2013 LinkedIn Corporation. All Rights Reserved. 37
Reaching Your Prospects on LinkedIn Effective social selling on LinkedIn is all about making it personal to an individual prospect and not about mass communications and spamming. The most personalized manner of contacting a prospect is through a TeamLink introduction request. InMail and OpenLink messages can be sent as well, but should be used only after seeking an introduction.
Using TeamLink to Find Your Best Path In TeamLink reveals connections that you might not have otherwise found, so that you can reach out to the right prospects quickly and easily.
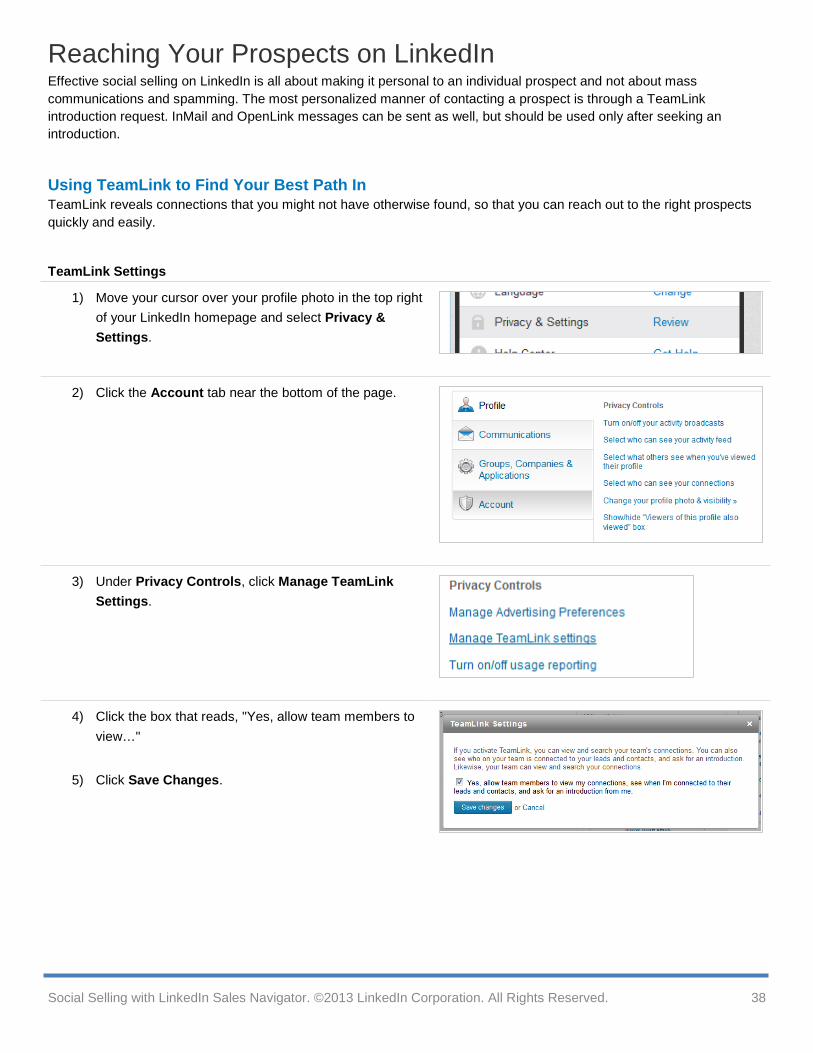
TeamLink Settings
1) Move your cursor over your profile photo in the top right of your LinkedIn homepage and select Privacy & Settings.
2) Click the Account tab near the bottom of the page.
3) Under Privacy Controls, click Manage TeamLink Settings.
4) Click the box that reads, "Yes, allow team members to view…"
5) Click Save Changes.
Social Selling with LinkedIn Sales Navigator. ©2013 LinkedIn Corporation. All Rights Reserved. 38
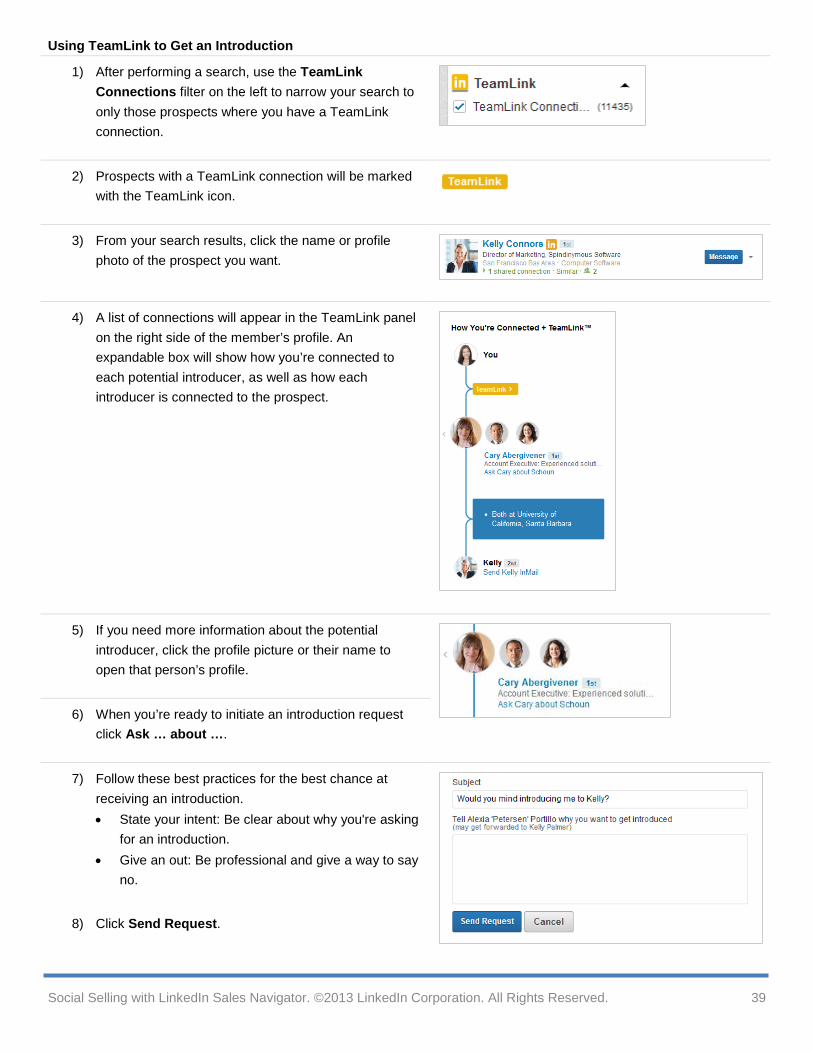
Using TeamLink to Get an Introduction
1) After performing a search, use the TeamLink Connections filter on the left to narrow your search to only those prospects where you have a TeamLink connection.
2) Prospects with a TeamLink connection will be marked with the TeamLink icon.
3) From your search results, click the name or profile photo of the prospect you want.
4) A list of connections will appear in the TeamLink panel on the right side of the member’s profile. An expandable box will show how you’re connected to each potential introducer, as well as how each introducer is connected to the prospect.
5) If you need more information about the potential introducer, click the profile picture or their name to open that person’s profile.
6) When you’re ready to initiate an introduction request click Ask … about ….
7) Follow these best practices for the best chance at receiving an introduction. • State your intent: Be clear about why you're asking
for an introduction. • Give an out: Be professional and give a way to say
no.
8) Click Send Request.
Social Selling with LinkedIn Sales Navigator. ©2013 LinkedIn Corporation. All Rights Reserved. 39
InMail Best Practices When you’re unable to find a TeamLink connection to a prospect or attempts at getting an introduction are unsuccessful, you can send an InMail message. While an InMail isn’t as good as an introduction request, it’s still better than sending a typical email and is much less likely to get stuck in a spam filter.
Sending an InMail
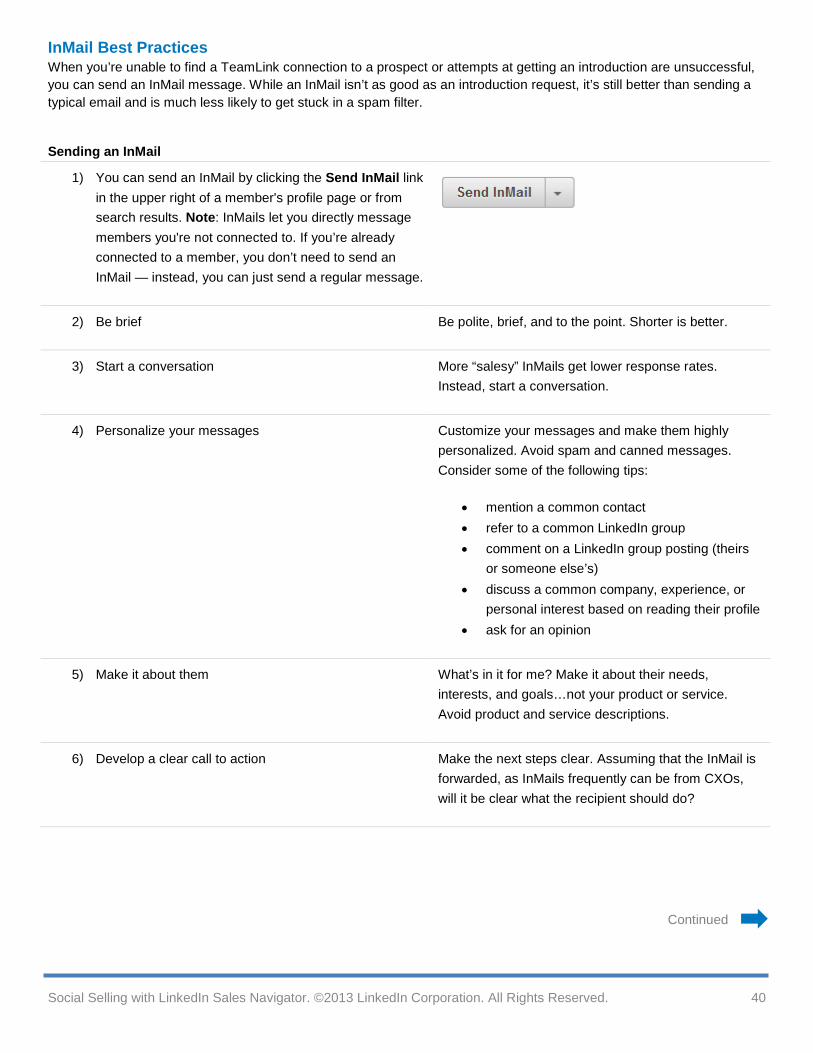
1) You can send an InMail by clicking the Send InMail link in the upper right of a member's profile page or from search results. Note: InMails let you directly message members you're not connected to. If you’re already connected to a member, you don’t need to send an InMail — instead, you can just send a regular message.
2) Be brief Be polite, brief, and to the point. Shorter is better.
3) Start a conversation More “salesy” InMails get lower response rates. Instead, start a conversation.
4) Personalize your messages Customize your messages and make them highly personalized. Avoid spam and canned messages. Consider some of the following tips:
• mention a common contact • refer to a common LinkedIn group • comment on a LinkedIn group posting (theirs
or someone else’s) • discuss a common company, experience, or
personal interest based on reading their profile • ask for an opinion
5) Make it about them What’s in it for me? Make it about their needs, interests, and goals…not your product or service. Avoid product and service descriptions.
6) Develop a clear call to action Make the next steps clear. Assuming that the InMail is forwarded, as InMails frequently can be from CXOs, will it be clear what the recipient should do?
Continued
Social Selling with LinkedIn Sales Navigator. ©2013 LinkedIn Corporation. All Rights Reserved. 40
7) Combine InMail with other contact methods By itself InMail can generate response rates substantially higher than email or cold calls. Some industry consultants have increased contact to meeting ratios with InMail as much as 8% using a multi-contact approach (InMail + email and/or phone calls). Mix it up and find the pattern and approach that generates the best response rates for you.
8) Select recipients carefully Who you choose to InMail matters as much as what you say. Recipient response rates are likely to be higher for active LinkedIn users (high number of connections, member of many LinkedIn groups, frequent updates, and complete profile).
9) Remember the option to get introduced InMail may not always be the most direct path. Where appropriate, take advantage of the LinkedIn option to get introduced (one of the “connect” options along with “Send InMail”). The two most successful ways to gain access to a senior executive are through an internal referral (someone in their company) and an external referral (someone outside their company that they know and trust).
10) Build your sales profile The first thing an InMail recipient will do is review your profile. Poor profiles reduce InMail response rates. Review tips for building a sales profile (LinkedIn Sales Solutions Best Practices: Building Your Sales Profile), and make sure you have a profile that builds your credibility and potential value.
Social Selling with LinkedIn Sales Navigator. ©2013 LinkedIn Corporation. All Rights Reserved. 41
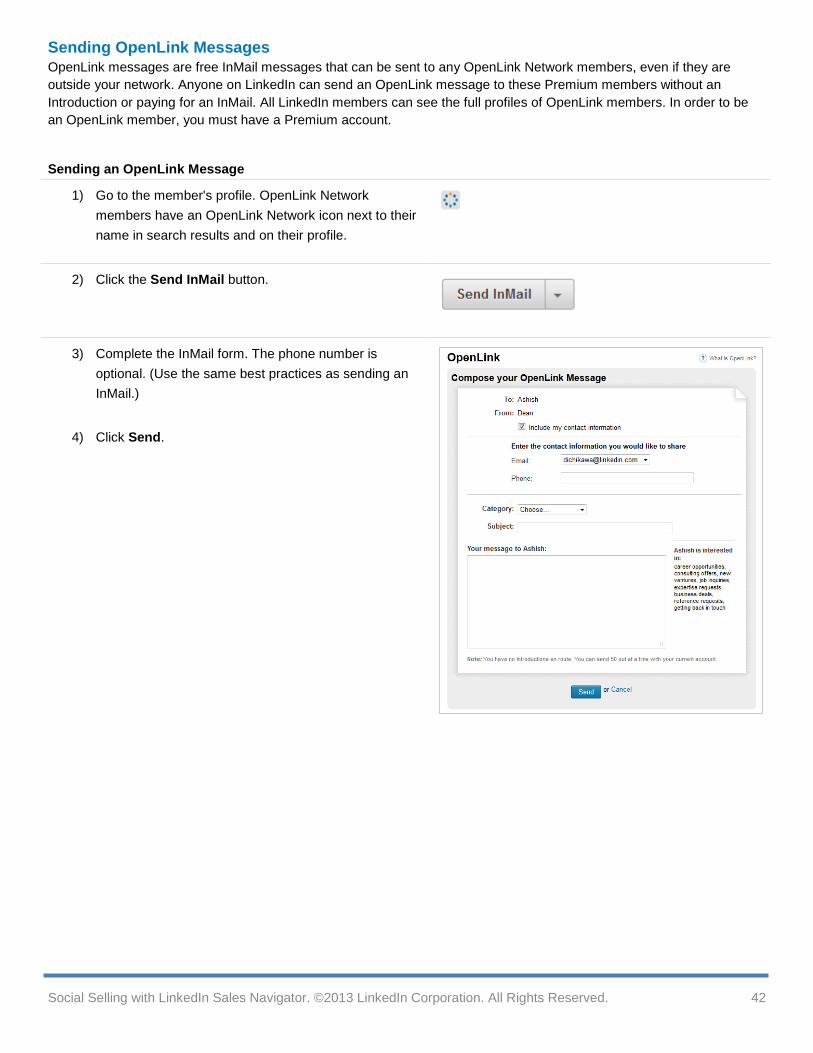
Sending OpenLink Messages OpenLink messages are free InMail messages that can be sent to any OpenLink Network members, even if they are outside your network. Anyone on LinkedIn can send an OpenLink message to these Premium members without an Introduction or paying for an InMail. All LinkedIn members can see the full profiles of OpenLink members. In order to be an OpenLink member, you must have a Premium account.
Sending an OpenLink Message
1) Go to the member's profile. OpenLink Network members have an OpenLink Network icon next to their name in search results and on their profile.
2) Click the Send InMail button.
3) Complete the InMail form. The phone number is optional. (Use the same best practices as sending an InMail.)
4) Click Send.
Social Selling with LinkedIn Sales Navigator. ©2013 LinkedIn Corporation. All Rights Reserved. 42
APPENDIX: Admin Tasks As a LinkedIn Sales Navigator admin, there are just a few tasks that you’ll need to perform to keep your users up and running.
Activating LinkedIn Sales Navigator Users If you’re a Purchaser Admin, you’ll be given a set of accounts to distribute to your users. Follow these step-by-step tasks to activate user accounts, check activation status, send reminders, and remove users.
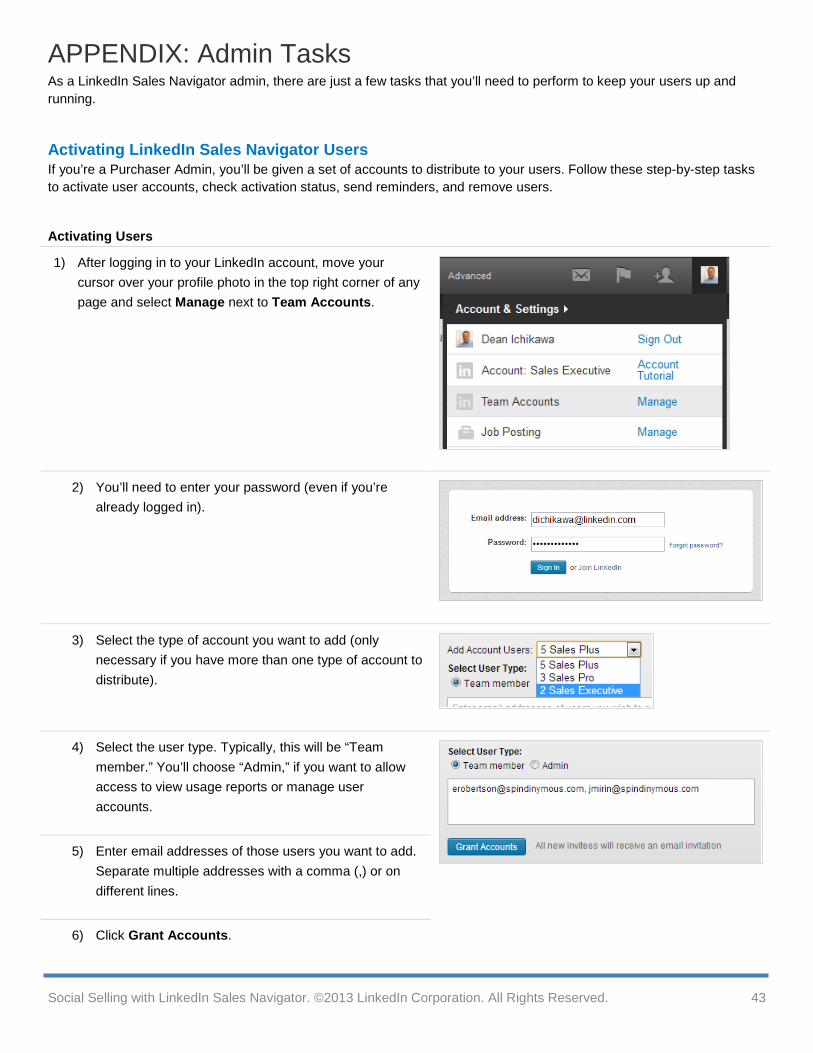
Activating Users
1) After logging in to your LinkedIn account, move your cursor over your profile photo in the top right corner of any page and select Manage next to Team Accounts.
2) You’ll need to enter your password (even if you’re already logged in).
3) Select the type of account you want to add (only necessary if you have more than one type of account to distribute).
4) Select the user type. Typically, this will be “Team member.” You’ll choose “Admin,” if you want to allow access to view usage reports or manage user accounts.
5) Enter email addresses of those users you want to add.
Separate multiple addresses with a comma (,) or on different lines.
6) Click Grant Accounts.
Social Selling with LinkedIn Sales Navigator. ©2013 LinkedIn Corporation. All Rights Reserved. 43
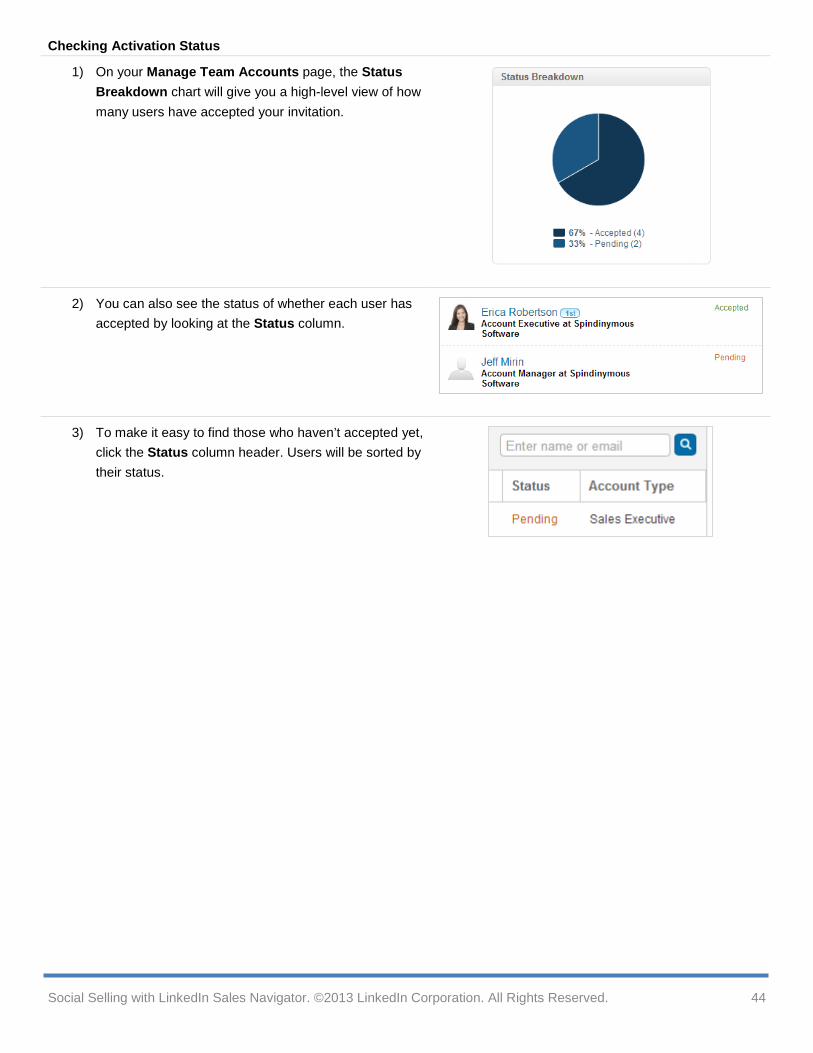
Checking Activation Status
1) On your Manage Team Accounts page, the Status Breakdown chart will give you a high-level view of how many users have accepted your invitation.
2) You can also see the status of whether each user has accepted by looking at the Status column.
3) To make it easy to find those who haven’t accepted yet, click the Status column header. Users will be sorted by their status.
Social Selling with LinkedIn Sales Navigator. ©2013 LinkedIn Corporation. All Rights Reserved. 44
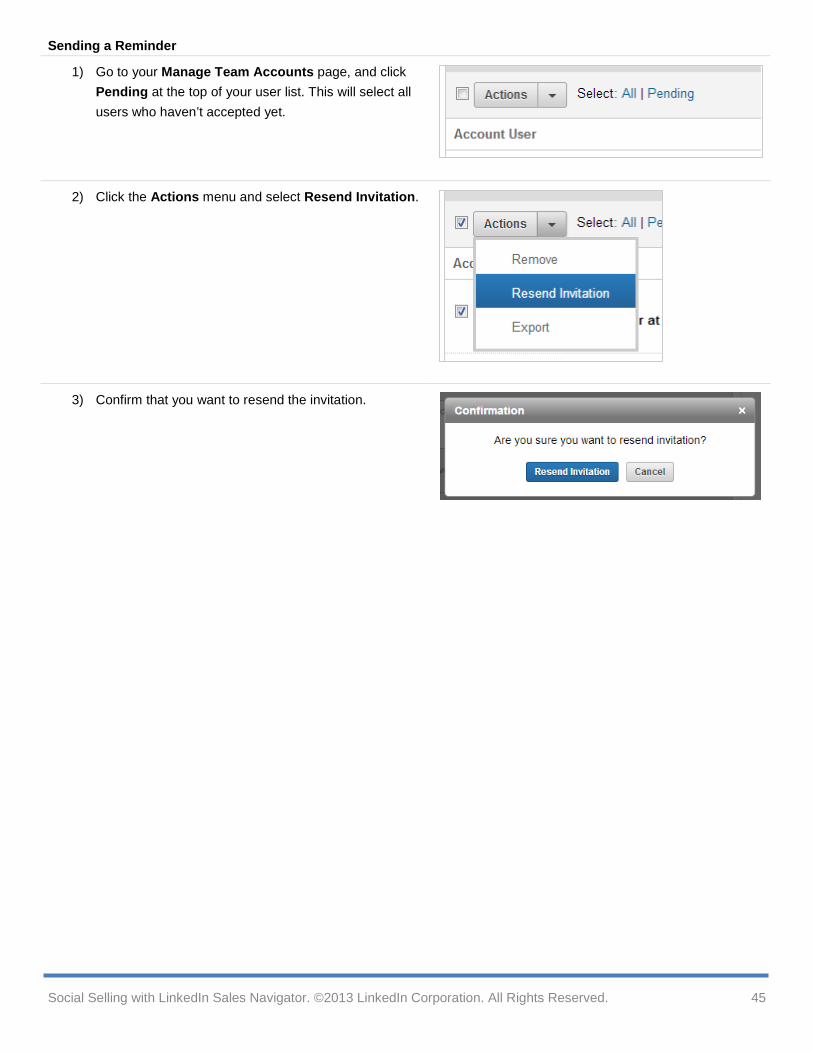
Sending a Reminder
1) Go to your Manage Team Accounts page, and click Pending at the top of your user list. This will select all users who haven’t accepted yet.
2) Click the Actions menu and select Resend Invitation.
3) Confirm that you want to resend the invitation.
Social Selling with LinkedIn Sales Navigator. ©2013 LinkedIn Corporation. All Rights Reserved. 45
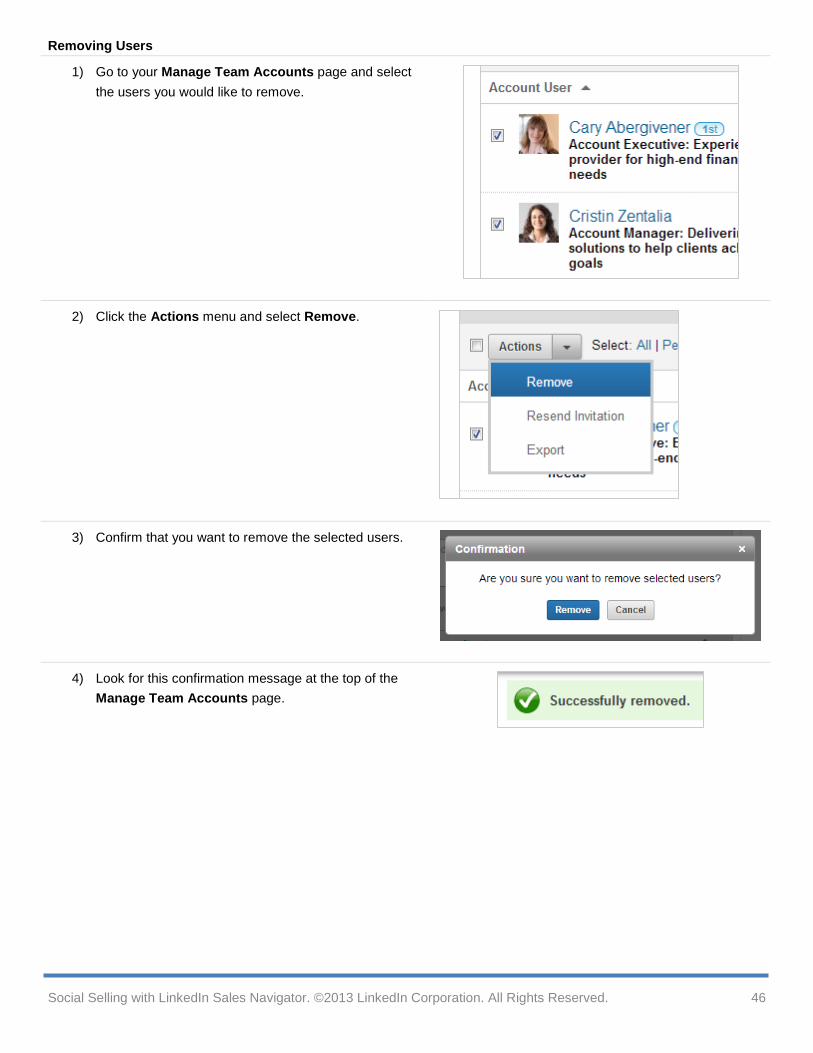
Removing Users
1) Go to your Manage Team Accounts page and select the users you would like to remove.
2) Click the Actions menu and select Remove.
3) Confirm that you want to remove the selected users.
4) Look for this confirmation message at the top of the Manage Team Accounts page.
Social Selling with LinkedIn Sales Navigator. ©2013 LinkedIn Corporation. All Rights Reserved. 46
Viewing Usage Reports If you’re a Purchaser Admin or you’ve been given “Admin” access, you can view usage reports to monitor your team’s engagement in social selling activities on LinkedIn.
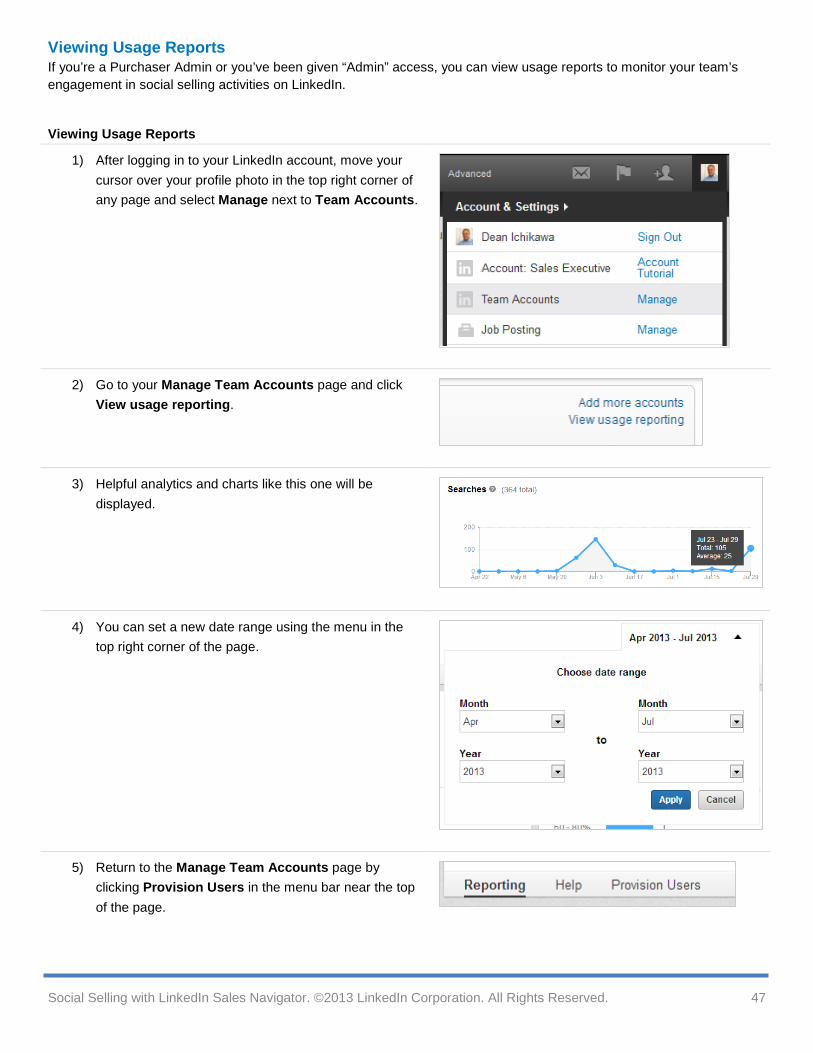
Viewing Usage Reports
1) After logging in to your LinkedIn account, move your cursor over your profile photo in the top right corner of any page and select Manage next to Team Accounts.
2) Go to your Manage Team Accounts page and click View usage reporting.
3) Helpful analytics and charts like this one will be displayed.
4) You can set a new date range using the menu in the top right corner of the page.
5) Return to the Manage Team Accounts page by clicking Provision Users in the menu bar near the top of the page.
Social Selling with LinkedIn Sales Navigator. ©2013 LinkedIn Corporation. All Rights Reserved. 47
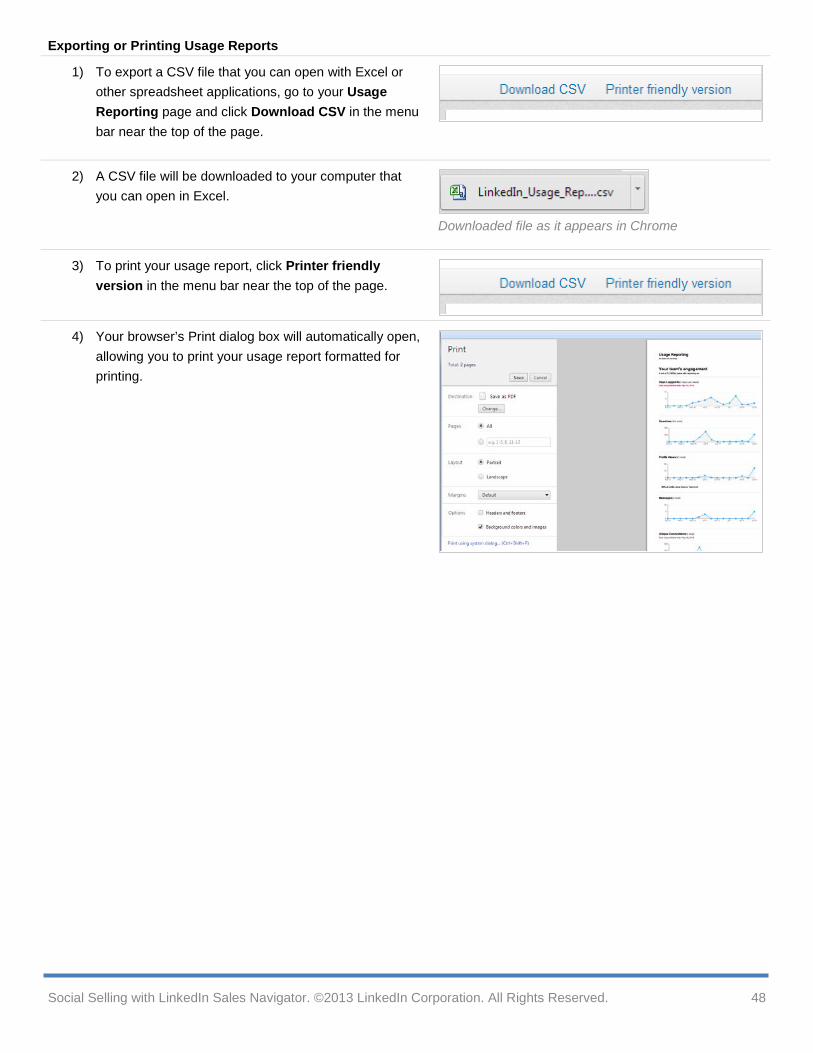
Exporting or Printing Usage Reports
1) To export a CSV file that you can open with Excel or other spreadsheet applications, go to your Usage Reporting page and click Download CSV in the menu bar near the top of the page.
2) A CSV file will be downloaded to your computer that you can open in Excel.
Downloaded file as it appears in Chrome
3) To print your usage report, click Printer friendly version in the menu bar near the top of the page.
4) Your browser’s Print dialog box will automatically open, allowing you to print your usage report formatted for printing.
Social Selling with LinkedIn Sales Navigator. ©2013 LinkedIn Corporation. All Rights Reserved. 48