SOA Software Policy Manager Agent v6.1 for JBoss...
49
SOA Software Policy Manager Agent v6.1 for JBoss Application Server Installation Guide
Transcript of SOA Software Policy Manager Agent v6.1 for JBoss...
SOA Software Policy Manager Agent v6.1 for JBoss Application Server
Installation Guide
Copyright © 2013, SOA Software, Inc. Policy Manager Agent for JBoss AS Installation Guide 2
Trademarks SOA Software and the SOA Software logo are either trademarks or registered trademarks of SOA Software, Inc. Other product names, logos, designs, titles, words or phrases mentioned within this guide may be trademarks, service marks or trade names of SOA Software, Inc. or other third parties and may be registered in the U.S. or other jurisdictions.
Copyright ©2001-2013 SOA Software, Inc. All rights reserved. No material in this manual may be copied, reproduced, republished, uploaded, posted, transmitted, distributed or converted to any electronic or machine-readable form in whole or in part without prior written approval from SOA Software, Inc.
Copyright © 2013, SOA Software, Inc. Policy Manager Agent for JBoss Installation Guide 3
Table of Contents
SOA SOFTWARE POLICY MANAGER AGENT V6.1 FOR JBOSS APPLICATION SERVER INSTALLATION GUIDE ................................................................................................ I
Preface ....................................................................................................................... 6
In This Guide .................................................................................................................................... 6 System Requirements ...................................................................................................................... 6 Prerequisites .................................................................................................................................... 7 Customer Support ............................................................................................................................ 8
Chapter 1: Downloading and Installing Policy Manager Agent for JBoss Application Server ......................................................................................................................... 9
Overview .......................................................................................................................................... 9 Download JBoss Agent (soa-jboss-6.1.0.zip) ................................................................................... 9 Install Jobs Agent (soa-jboss-6.1.0.zip) to Policy Manager Release Directory ................................. 9
Chapter 2: Configuring a JBoss 5.x Agent Container using the Configure Container Instance Wizard ........................................................................................................ 11
Overview ........................................................................................................................................ 11 Configure JBoss 5.x Container Instance ........................................................................................ 11 Configure JBoss 5.x Container Instance (GUI) .............................................................................. 11 Configure JBoss 5.x Container Instance (Silent Configuration ....................................................... 15 JBoss 5.x Container Instance Configuration Results ..................................................................... 17
Chapter 3: Configuring a JBoss 7.x Agent Container using the Configure Container Instance Wizard ........................................................................................................ 18
Overview ........................................................................................................................................ 18 Configure JBoss 7.x Container Instance ........................................................................................ 18 Configure JBoss 7.x Container Instance (GUI) .............................................................................. 18 Configure JBoss 7.x Container Instance (Silent Configuration) ...................................................... 22 JBoss 7.x Container Instance Configuration Results ..................................................................... 23
Chapter 4: Deploying the JBoss 5.x Agent to the JBoss 5.x Console ........................ 25
Overview ........................................................................................................................................ 25 Deploying the JBoss 5.x Agent WAR FILE In JBoss Server .......................................................... 25
Chapter 5: Deploying the JBoss 7.x Agent to the JBoss 7.x Console ........................ 27
Overview ........................................................................................................................................ 27 Deploying the JBoss 7.x Agent War In JBoss Server ..................................................................... 27
Chapter 6: Installing and Configuring the JBoss Agent Feature using the SOA Software Administration Console .............................................................................. 29
Installing JBoss Agent Feature ....................................................................................................... 29 Configuring JBoss Agent Feature .................................................................................................. 32 Configure WS-MetaDataExchange Options (JBoss Agent) ............................................................ 32 Manage PKI Keys (JBoss Agent) ................................................................................................... 34
Copyright © 2013, SOA Software, Inc. Policy Manager Agent for JBoss Installation Guide 4
Perform SOA Software Administration Console Login (JBoss Agent) ............................................ 37
Chapter 7: Registering a JBoss Agent Container in the Policy Manager Management Console .................................................................................................................... 38
Overview ........................................................................................................................................ 38 Register JBoss Agent Container .................................................................................................... 38
Chapter 8: Managing JBoss Web Services with the JBoss Agent ............................. 43
Overview ........................................................................................................................................ 43 Message Flow ................................................................................................................................ 43 Configure Service Filter .................................................................................................................. 44 Add Agent module dependency For JBoss 7.x: ............................................................................. 45 Register Managed Physical Services in Policy Manager ................................................................ 46
Copyright © 2013, SOA Software, Inc. Policy Manager Agent for JBoss Installation Guide 5
Table of Figures
Figure 2-1: Welcome to Configure Container Instance—JBoss 5.x Deployment ...................................... 12 Figure 2-2: Instance Name—JBoss 5.x Deployment ................................................................................ 12 Figure 2-3: Default Admin User—JBoss Deployment ............................................................................... 13 Figure 2-4: Instance Configuration Options—JBoss 5.x Deployment ....................................................... 13 Figure 2-5: JBoss Settings—JBoss 5.x Deployment ................................................................................. 14 Figure 2-6: Instance Configuration Summary—JBoss 5.x Deployment .................................................... 14 Figure 3-1: Welcome to Configure Container Instance—JBoss 7.x and above Deployment .................... 19 Figure 3-2: Instance Name— JBoss 7.x and above Deployment .............................................................. 19 Figure 3-3: Default Admin User—JBoss 7.x and above Deployment ........................................................ 20 Figure 3-4: Instance Configuration Options—JBoss 7.x and above Deployment ...................................... 21 Figure 3-5: JBoss Settings—JBoss 7.x and above Deployment ............................................................... 21 Figure 3-6: Instance Configuration Summary—JBoss 7.x and above Deployment ................................... 22 Figure 6-1: SOA Software Administration Console Login ......................................................................... 29 Figure 6-2: JBoss Agent Feature Installation—Available Features Tab .................................................... 30 Figure 6-3: JBoss Agent Feature Installation—Install Feature – Resolve Phase ...................................... 30 Figure 6-3: JBoss Agent Feature Installation—Install Feature – Feature Resolution Report .................... 31 Figure 6-4: JBoss Agent Feature Installation—Install Feature Installation Complete................................ 31 Figure 6-5: Configure WS-MetadataExchange Options Wizard (WS-MetaDataExchange Options)—JBoss
Agent ................................................................................................................................................. 33 Figure 6-6: Configure WS-MetadataExchange Options Wizard (WS-MetaDataExchange Options
Summary)—JBoss Agent ................................................................................................................... 34 Figure 6-7: Manage PKI Keys Wizard (Select Key Management Option)—JBoss Agent ......................... 35 Figure 6-8: Manage PKI Keys Wizard (Generate PKI Keys & X.509 Certificate)—JBoss Agent .............. 36 Figure 6-9: Manage PKI Keys Wizard (Summary)—JBoss Agent ............................................................. 36 Figure 6-10: SOA Software Administration Console—Login (JBoss Agent) ............................................. 37 Figure 7-1: Register JBoss Agent—Add Container Wizard (Select Container Type) ................................ 38 Figure 7-2: Register JBoss Agent—Add Container Wizard (Specify Metadata Import Options – Metadata
URL selected) .................................................................................................................................... 39 Figure 7-3: Register JBoss Agent—Add Container Wizard (Specify Metadata Import Options – Metadata
Path selected) .................................................................................................................................... 40 Figure 7-4: Register JBoss Agent—Add Container Wizard (X.509 Certificate Not Trusted) ..................... 40 Figure 7-5: Register JBoss Agent—Add Container Wizard (Specify Container Details) ........................... 41 Figure 7-6: Register JBoss Agent—Add Container Wizard (Completion Summary) ................................. 42 Figure 7-7: Register JBoss Agent—Container Details .............................................................................. 42 Figure 8-1: Register Web Service─Create Physical Service Wizard (Select WSDL location)................... 47 Figure 8-2: Register Web Service─Create Physical Service Wizard (Select Service Management Option)
........................................................................................................................................................... 47 Figure 8-3: Register Web Service─Create Physical Service Wizard (Select a Container) ........................ 48 Figure 8-4: Managed Service Details page ............................................................................................... 48 Figure 8-5: Managed Service Monitoring Logs ......................................................................................... 49
Preface
Copyright © 2013, SOA Software, Inc. Policy Manager Agent for JBoss Installation Guide 6
Preface
The SOA Software Policy Manager Agent for JBoss (JBoss Agent) is an adaptor that enables JBoss Server to become a Container for Policy Manager 6.1. The SOA Software Policy Manager Agent for JBoss Application Server Installation Guide provides instructions for installing and configuring the JBoss Agent on Windows, and all supported UNIX platforms.
IN THIS GUIDE
This guide includes the following chapters:
• Chapter 1: Downloading and Installing the Policy Manager Agent for JBoss Application Server
• Chapter 2: Configuring a JBoss 5.x Agent Container using the Configure Container Instance Wizard
• Chapter 3: Configuring a JBoss 7.x Agent Container using the Configure Container Instance Wizard
• Chapter 4: Deploying JBoss 5.x Agent to the JBoss 5.x Console
• Chapter 5: Deploying JBoss 7.x Agent to the JBoss 7.x Console
• Chapter 6: Installing and Configuring the JBoss Agent Feature using the SOA Software Administration Console
• Chapter 7: Registering a JBoss Agent Container in the Policy Manager Management Console
• Chapter 8: Managing JBoss Web Services with the JBoss Agent
SYSTEM REQUIREMENTS
The JBoss Agent supports the following configurations:
• JBoss
The JBoss Agent supports JBoss Application Server 5.1, JBoss Enterprise Application Platform (EAP) 5.1.2, JBoss Application server 7.x and JBoss Enterprise Application Platform (EAP) 6.1.x
• Operating Systems
The JBoss Agent has been tested and certified on the following platforms:

Preface
Copyright © 2013, SOA Software, Inc. Policy Manager Agent for JBoss Installation Guide 7
Windows 2003 (SP1), Windows Server 2003 (SP2, R2), Windows 7, Windows 2008 (SP1, R2), Red Hat Enterprise Linux 5.0 or above.
PREREQUISITES
Prior to beginning the JBoss Agent installation process, the following prerequisite conditions must be met.
• JBoss Application Server
• JBoss Application server 5.x or 7.x
• JBoss EAP 5.1.x or 6.1.x
• Policy Manager 6.1
The JBoss Agent requires the installation and configuration of Policy Manager 6.1, Policy Manager 6.1 Updates (6.1.1), and Policy Manager Features as outlined in the "SOA Software Platform Installation Guide for Windows and UNIX Platforms" (SOA_Software_Platform_Install_Guide.pdf) available via the SOA Software Customer Support site (Refer to support.soa.com in the Downloads > Policy Manager > PM61 section).
Note: The Policy Manager instance hosting the JBoss Agent can be installed into a new JBoss Container, or a separate container. If you already have a Policy Manager container defined, make sure the prerequisite set of updates are applied using the Configure Container Instance Wizard, prior to installing the JBoss Agent feature.
The following SOA Software update scenarios apply:
o Policy Manager installations with updates already applied:
The minimum prerequisite Policy Manager Update version required for JBoss Agent is 6.1.20. Please ensure that the updates are correctly applied.
Preface
Copyright © 2013, SOA Software, Inc. Policy Manager Agent for JBoss Installation Guide 8
CUSTOMER SUPPORT
SOA Software offers a variety of support services to our customers. The following options are available:
Support Options:
Email (direct) [email protected]
Phone 1-866 SOA-9876 (1-866-762-9876)
Email (Web) The "Support" section of the SOA Software website (www.soa.com) provides an option for emailing product related inquiries to our support team.
Documentation Updates Updates to product documentation are issued on a periodic basis and are available by submitting an email request to [email protected].

Chapter 1: Downloading and Installing Policy Manager Agent for JBoss Application Server
Copyright © 2013, SOA Software, Inc. Policy Manager Agent for JBoss Installation Guide 9
Chapter 1: Downloading and Installing Policy Manager Agent for JBoss Application Server
OVERVIEW
After you have completed the prerequisite tasks of installing the Policy Manager application files and installing and configuring the Policy Manager features via the SOA Software Administration Console, you must then install the Policy Manager Agent for JBoss Application Server to the Policy Manager Release Directory.
DOWNLOAD JBOSS AGENT (SOA-JBOSS-6.1.0.ZIP)
The JBoss Agent is available as an extractable .zip file (soa-jboss-6.1.0.zip).
To Download the JBoss Agent Option Pack
Step Procedure
1. Download the JBoss Agent from the SOA Software Support site. Refer to support.soa.com in the Downloads > Agents > JBoss section).
2. The zip file includes the following .jar files:
• com.soa.config.jboss_6.1.xxxx.jar─Extends the Configure Container Instance Wizard to allow creation of an SOA Container that can be deployed as a WAR file into the JBoss Application Server.
• com.soa.feature.agent.jboss_6.1.xxxx.jar─Enables the "Agent" feature which adds the container capability to host physical services.
INSTALL JOBS AGENT (SOA-JBOSS-6.1.0.ZIP) TO POLICY MANAGER RELEASE DIRECTORY
After the JBoss Agent .zip (soa-jboss-6.1.0.zip) is downloaded, it must then be extracted to the Policy Manager Release Directory.
Chapter 1: Downloading and Installing Policy Manager Agent for JBoss Application Server
Copyright © 2013, SOA Software, Inc. Policy Manager Agent for JBoss Installation Guide 10
To Extract JBoss Agent to Policy Manager Release Directory
Step Procedure
1. Copy the JBoss Agent (soa-jboss-6.1.0.zip) to the Policy Manager Release Directory (\sm60).
2. Extract the zip file (soa-jboss-6.1.0.zip) to the Policy Manager Release Directory. Overwrite any existing files.
3. The automated zip file then copies a series of files to the sm60\lib and sm60\instances\configurator\deploy folders in the Policy Manager Release Directory.
4. After extracting the JBoss Agent package, the next step is to configure an SOA Container for your JBoss deployment. This is covered in Chapter 2: Configuring a JBoss 5.x Agent Container Instance.

Chapter 2: Configuring a JBoss 5.x Agent Container using the Configure Container Instance Wizard
Copyright © 2013, SOA Software, Inc. Policy Manager Agent for JBoss Installation Guide 11
Chapter 2: Configuring a JBoss 5.x Agent Container using the Configure Container Instance Wizard
OVERVIEW
This chapter provides instructions for installing and configuring a JBoss 5.x SOA Container instance. This configuration process creates a Web Archive (WAR) file that either one can then be deployed to the JBoss 5.x Application Server.
CONFIGURE JBOSS 5.X CONTAINER INSTANCE
This section provides instructions on how to configure a new JBoss Container Instance using the Configure Container Instance Wizard. Instructions for GUI and Silent configurations are provided.
CONFIGURE JBOSS 5.X CONTAINER INSTANCE (GUI)
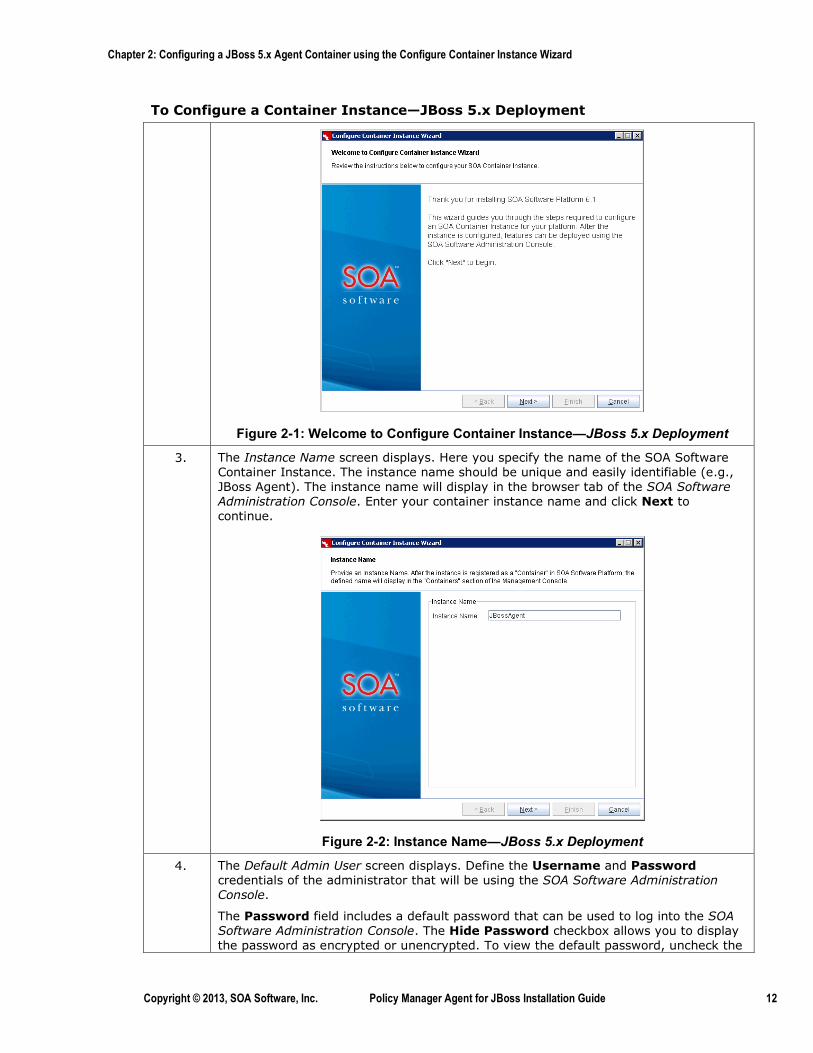
To Configure a Container Instance—JBoss 5.x Deployment
Step Procedure
1. Run Command Prompt as Administrator.
2. Navigate to the Policy Manager release directory c:\sm60\bin and enter: Startup.bat configurator
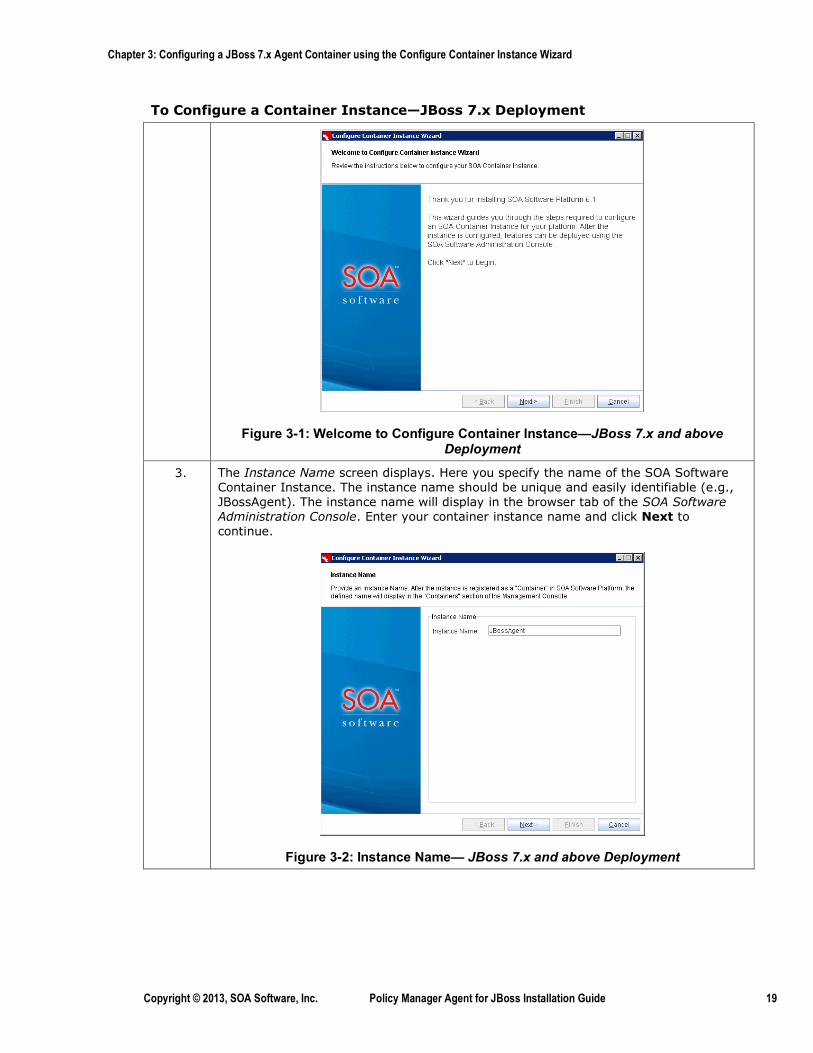
The Welcome to Configure Container Instance Wizard screen displays. Review the information and click Next to continue.
Chapter 2: Configuring a JBoss 5.x Agent Container using the Configure Container Instance Wizard
Copyright © 2013, SOA Software, Inc. Policy Manager Agent for JBoss Installation Guide 12
To Configure a Container Instance—JBoss 5.x Deployment
Figure 2-1: Welcome to Configure Container Instance—JBoss 5.x Deployment
3. The Instance Name screen displays. Here you specify the name of the SOA Software Container Instance. The instance name should be unique and easily identifiable (e.g., JBoss Agent). The instance name will display in the browser tab of the SOA Software Administration Console. Enter your container instance name and click Next to continue.
Figure 2-2: Instance Name—JBoss 5.x Deployment
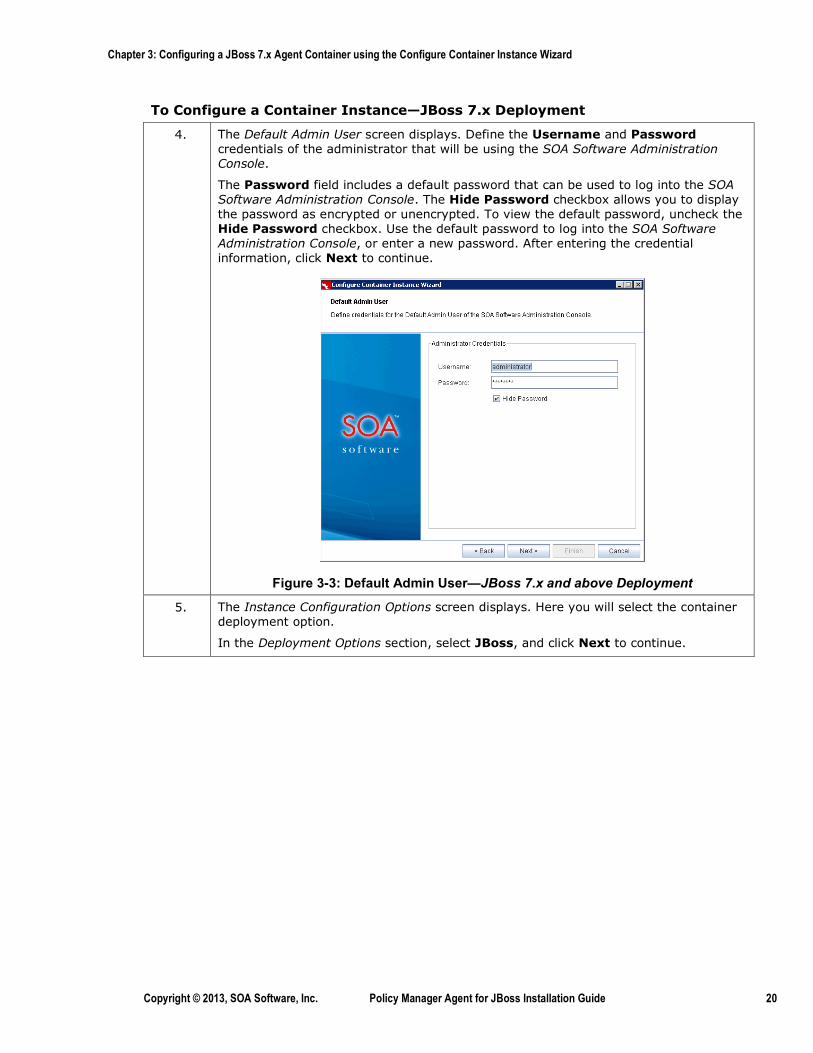
4. The Default Admin User screen displays. Define the Username and Password credentials of the administrator that will be using the SOA Software Administration Console.
The Password field includes a default password that can be used to log into the SOA Software Administration Console. The Hide Password checkbox allows you to display the password as encrypted or unencrypted. To view the default password, uncheck the
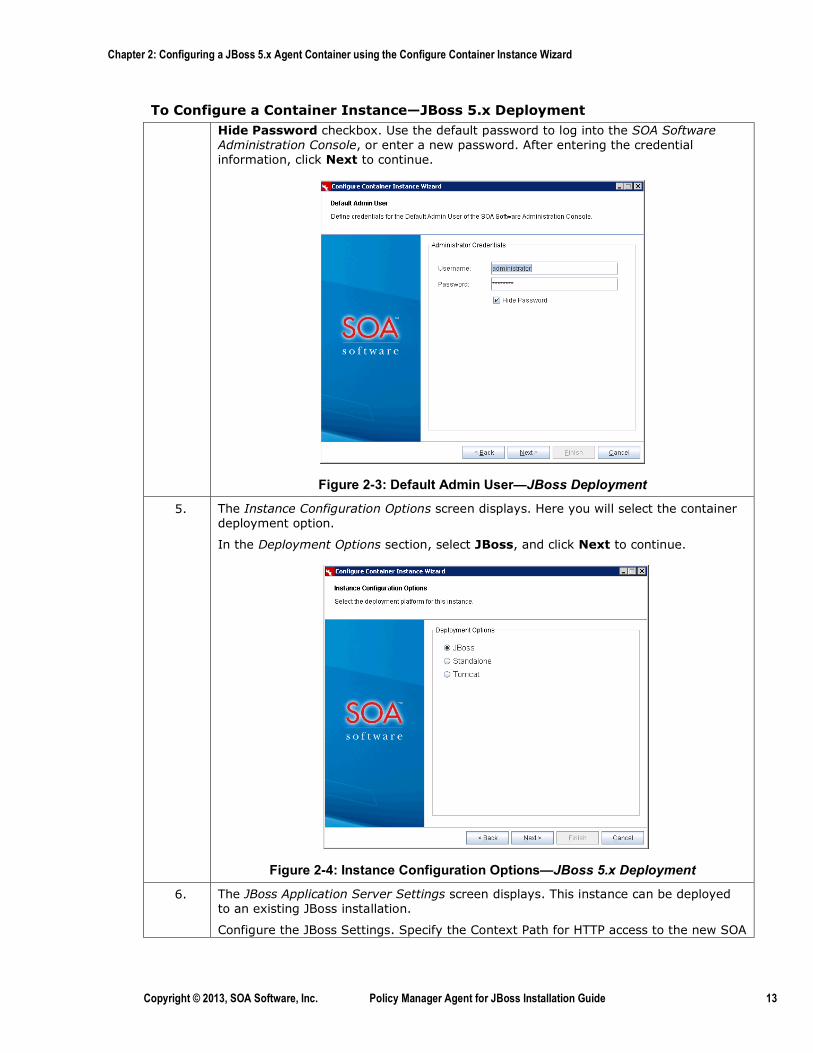
Chapter 2: Configuring a JBoss 5.x Agent Container using the Configure Container Instance Wizard
Copyright © 2013, SOA Software, Inc. Policy Manager Agent for JBoss Installation Guide 13
To Configure a Container Instance—JBoss 5.x Deployment Hide Password checkbox. Use the default password to log into the SOA Software Administration Console, or enter a new password. After entering the credential information, click Next to continue.
Figure 2-3: Default Admin User—JBoss Deployment
5. The Instance Configuration Options screen displays. Here you will select the container deployment option.
In the Deployment Options section, select JBoss, and click Next to continue.
Figure 2-4: Instance Configuration Options—JBoss 5.x Deployment
6. The JBoss Application Server Settings screen displays. This instance can be deployed to an existing JBoss installation.
Configure the JBoss Settings. Specify the Context Path for HTTP access to the new SOA
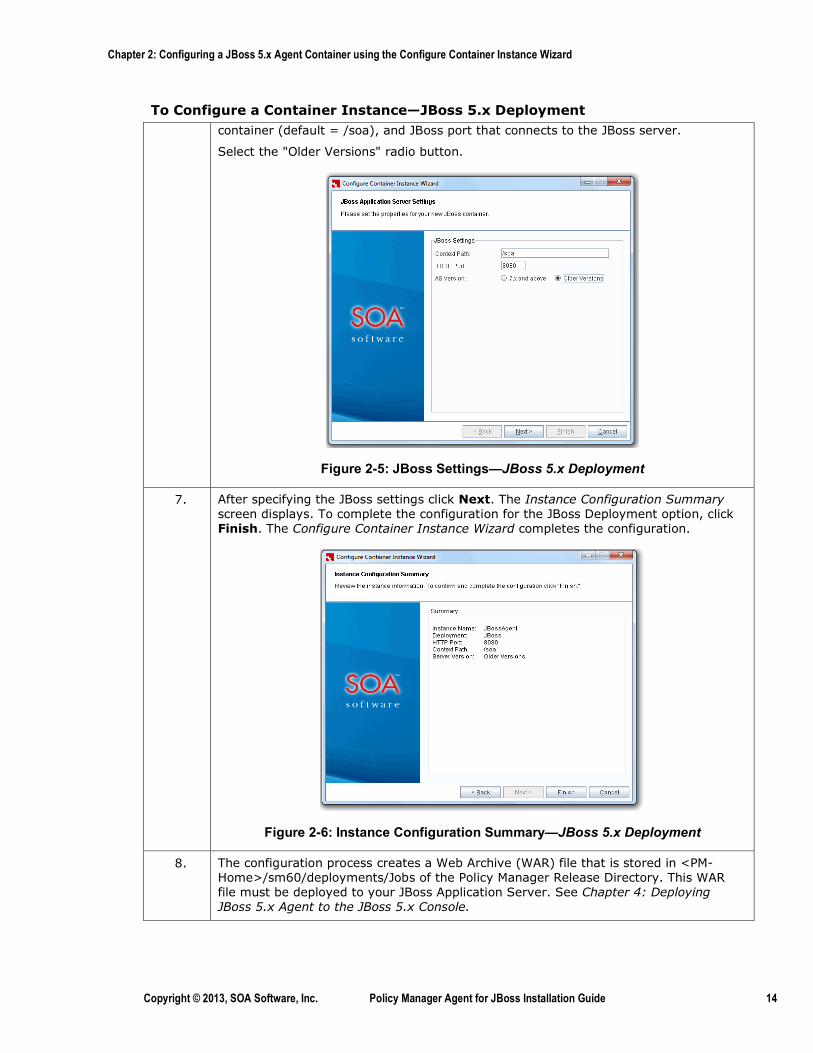
Chapter 2: Configuring a JBoss 5.x Agent Container using the Configure Container Instance Wizard
Copyright © 2013, SOA Software, Inc. Policy Manager Agent for JBoss Installation Guide 14
To Configure a Container Instance—JBoss 5.x Deployment container (default = /soa), and JBoss port that connects to the JBoss server.
Select the "Older Versions" radio button.
Figure 2-5: JBoss Settings—JBoss 5.x Deployment
7. After specifying the JBoss settings click Next. The Instance Configuration Summary screen displays. To complete the configuration for the JBoss Deployment option, click Finish. The Configure Container Instance Wizard completes the configuration.
Figure 2-6: Instance Configuration Summary—JBoss 5.x Deployment
8. The configuration process creates a Web Archive (WAR) file that is stored in <PM-Home>/sm60/deployments/Jobs of the Policy Manager Release Directory. This WAR file must be deployed to your JBoss Application Server. See Chapter 4: Deploying JBoss 5.x Agent to the JBoss 5.x Console.
Chapter 2: Configuring a JBoss 5.x Agent Container using the Configure Container Instance Wizard
Copyright © 2013, SOA Software, Inc. Policy Manager Agent for JBoss Installation Guide 15
CONFIGURE JBOSS 5.X CONTAINER INSTANCE (SILENT CONFIGURATION
This section provides instructions on how to configure an automated configuration properties file that is used to create a new JBoss Container Instance.
To Configure a JBoss 5.x Container Instance (Silent Configuration)
Step Procedure
1. The Configure Container Instance Wizard can be set up to run in an automated mode (i.e., silent). This is done by defining a properties file and pre-defining a set of property values to be used by the Configure Container Instance Wizard to automatically configure a Container instance.
Define a properties file for creating a JBoss Container Instance (e.g., myprops.properties)
1) Add the following content:
container.instance.name=<instancename> container.key=<instancename> credential.username = administrator credential.password = password default.host=<jbosshost> default.port=8080 jboss.context.path=/soa deployment=JBoss jboss.as.version.7x=false
Properties The following properties are used for JBoss Deployments.
container.instance.name—Name of the Container. container.key—SOA recommends that the Container Key be set to the same value as the Container Name. credential.username—Username for logging into the SOA Software Administration Console. credential.password—Password for logging into the SOA Software Administration Console. deployment—Specify the deployment container is "JBoss." default.host—Host name/IP address for the Container Instance. default.port—Port for the Container Instance. 8080 is the default JBoss port. jboss.context.path—Specify /soa for the JBoss "Context Path". Default value is “/soa” jboss.as.version.7x–Value false. This signifies the JBoss AS version is 5.x
Running Silent Configuration
The Configure Container Instance Wizard (Silent Configuration) properties file accepts two system properties which together are used to perform a silent configuration:
1. silent (If True, silent configuration will be performed) 2. properties (location on filesystem of property file to be used for configuration)
Windows: <PM-Home>\sm60\bin>startup.bat configurator "-Dsilent=true" "-
Chapter 2: Configuring a JBoss 5.x Agent Container using the Configure Container Instance Wizard
Copyright © 2013, SOA Software, Inc. Policy Manager Agent for JBoss Installation Guide 16
To Configure a JBoss 5.x Container Instance (Silent Configuration) Dproperties=C:/<property file directory location>/myprops.properties"
UNIX <PM-Home>/sm60/bin>startup.sh configurator -Dsilent=true -Dproperties=/export/home/username/<property file directory location>\myprops.properties
2. The configuration process creates a Web Archive (WAR) file that is stored in sm60/deployments/JBoss of the Policy Manager Release Directory. This WAR file must be deployed to your JBoss Application Server. See Chapter 5: Deploying JBoss 5.5 Agent to the JBoss 5.x Console.
Chapter 2: Configuring a JBoss 5.x Agent Container using the Configure Container Instance Wizard
Copyright © 2013, SOA Software, Inc. Policy Manager Agent for JBoss Installation Guide 17
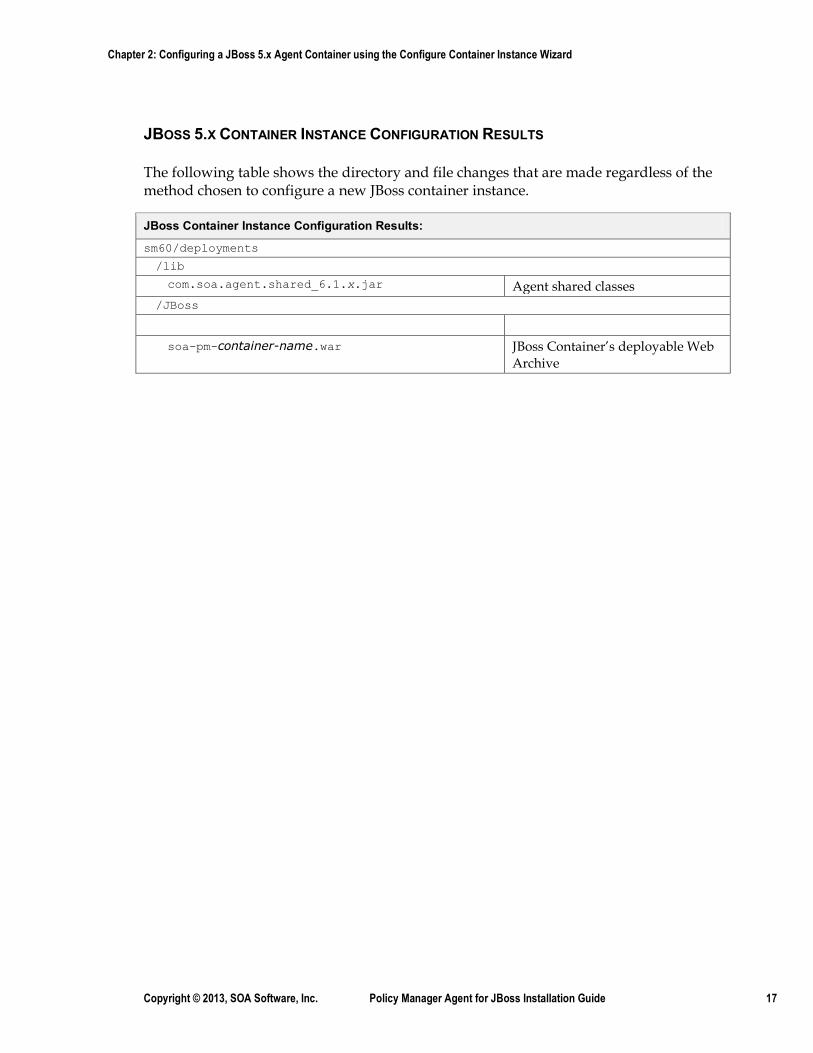
JBOSS 5.X CONTAINER INSTANCE CONFIGURATION RESULTS
The following table shows the directory and file changes that are made regardless of the method chosen to configure a new JBoss container instance.
JBoss Container Instance Configuration Results:
sm60/deployments /lib com.soa.agent.shared_6.1.x.jar Agent shared classes /JBoss soa-pm-container-name.war JBoss Container’s deployable Web
Archive
Chapter 3: Configuring a JBoss 7.x Agent Container using the Configure Container Instance Wizard
Copyright © 2013, SOA Software, Inc. Policy Manager Agent for JBoss Installation Guide 18
Chapter 3: Configuring a JBoss 7.x Agent Container using the Configure Container Instance Wizard
OVERVIEW
This chapter provides instructions for installing and configuring a JBoss 7.x SOA Container instance. This configuration process creates a Web Archive (WAR) file that either one can then be deployed to the JBoss 7.x Application Server.
CONFIGURE JBOSS 7.X CONTAINER INSTANCE
This section provides instructions on how to configure a new JBoss Container Instance using the Configure Container Instance Wizard. Instructions for GUI and Silent configurations are provided.
CONFIGURE JBOSS 7.X CONTAINER INSTANCE (GUI)
To Configure a Container Instance—JBoss 7.x Deployment
Step Procedure
1. Run Command Prompt as Administrator.
2. Navigate to the Policy Manager release directory c:\sm60\bin and enter: Startup.bat configurator
The Welcome to Configure Container Instance Wizard screen displays. Review the information and click Next to continue.
Chapter 3: Configuring a JBoss 7.x Agent Container using the Configure Container Instance Wizard
Copyright © 2013, SOA Software, Inc. Policy Manager Agent for JBoss Installation Guide 19
To Configure a Container Instance—JBoss 7.x Deployment
Figure 3-1: Welcome to Configure Container Instance—JBoss 7.x and above Deployment
3. The Instance Name screen displays. Here you specify the name of the SOA Software Container Instance. The instance name should be unique and easily identifiable (e.g., JBossAgent). The instance name will display in the browser tab of the SOA Software Administration Console. Enter your container instance name and click Next to continue.
Figure 3-2: Instance Name— JBoss 7.x and above Deployment
Chapter 3: Configuring a JBoss 7.x Agent Container using the Configure Container Instance Wizard
Copyright © 2013, SOA Software, Inc. Policy Manager Agent for JBoss Installation Guide 20
To Configure a Container Instance—JBoss 7.x Deployment
4. The Default Admin User screen displays. Define the Username and Password credentials of the administrator that will be using the SOA Software Administration Console.
The Password field includes a default password that can be used to log into the SOA Software Administration Console. The Hide Password checkbox allows you to display the password as encrypted or unencrypted. To view the default password, uncheck the Hide Password checkbox. Use the default password to log into the SOA Software Administration Console, or enter a new password. After entering the credential information, click Next to continue.
Figure 3-3: Default Admin User—JBoss 7.x and above Deployment
5. The Instance Configuration Options screen displays. Here you will select the container deployment option.
In the Deployment Options section, select JBoss, and click Next to continue.
Chapter 3: Configuring a JBoss 7.x Agent Container using the Configure Container Instance Wizard
Copyright © 2013, SOA Software, Inc. Policy Manager Agent for JBoss Installation Guide 21
To Configure a Container Instance—JBoss 7.x Deployment
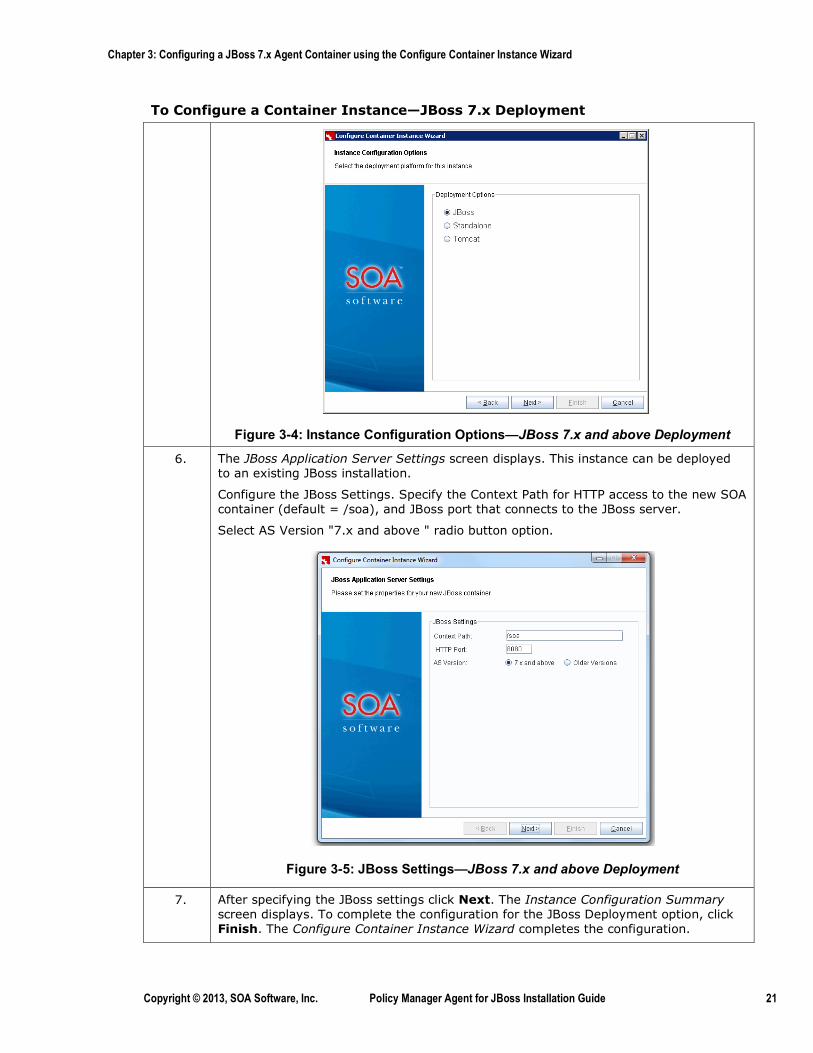
Figure 3-4: Instance Configuration Options—JBoss 7.x and above Deployment
6. The JBoss Application Server Settings screen displays. This instance can be deployed to an existing JBoss installation.
Configure the JBoss Settings. Specify the Context Path for HTTP access to the new SOA container (default = /soa), and JBoss port that connects to the JBoss server.
Select AS Version "7.x and above " radio button option.
Figure 3-5: JBoss Settings—JBoss 7.x and above Deployment
7. After specifying the JBoss settings click Next. The Instance Configuration Summary screen displays. To complete the configuration for the JBoss Deployment option, click Finish. The Configure Container Instance Wizard completes the configuration.
Chapter 3: Configuring a JBoss 7.x Agent Container using the Configure Container Instance Wizard
Copyright © 2013, SOA Software, Inc. Policy Manager Agent for JBoss Installation Guide 22
To Configure a Container Instance—JBoss 7.x Deployment
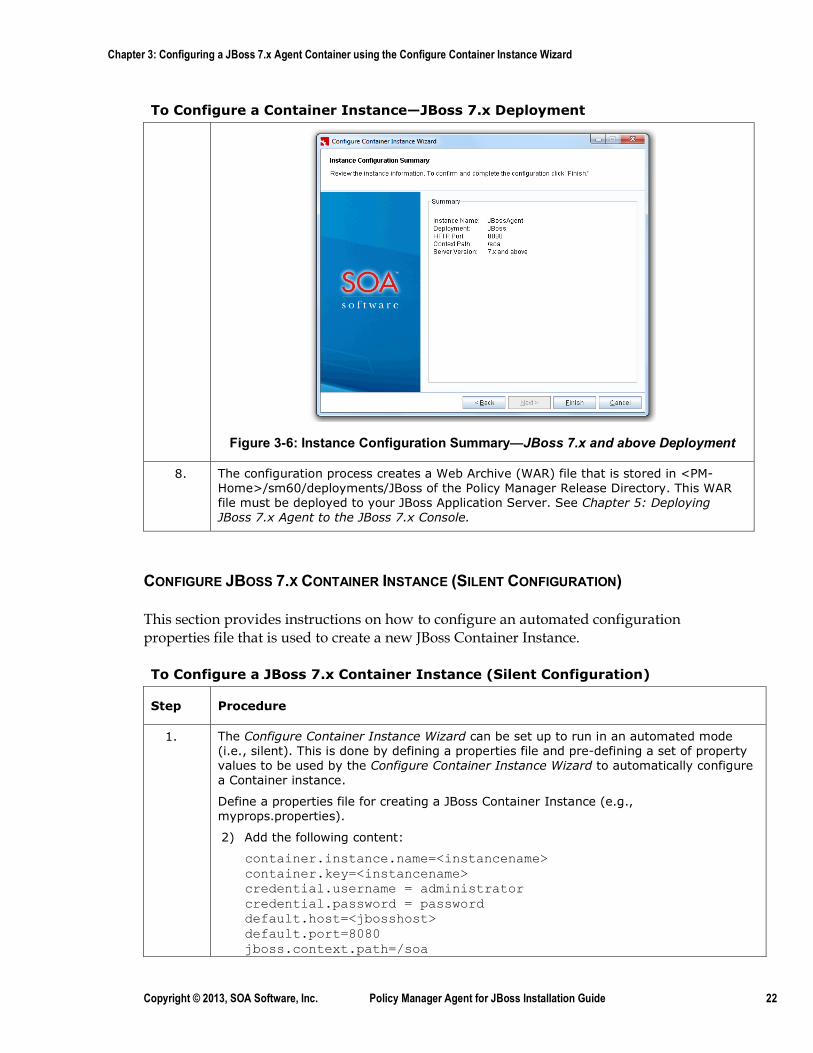
Figure 3-6: Instance Configuration Summary—JBoss 7.x and above Deployment
8. The configuration process creates a Web Archive (WAR) file that is stored in <PM-Home>/sm60/deployments/JBoss of the Policy Manager Release Directory. This WAR file must be deployed to your JBoss Application Server. See Chapter 5: Deploying JBoss 7.x Agent to the JBoss 7.x Console.
CONFIGURE JBOSS 7.X CONTAINER INSTANCE (SILENT CONFIGURATION)
This section provides instructions on how to configure an automated configuration properties file that is used to create a new JBoss Container Instance.
To Configure a JBoss 7.x Container Instance (Silent Configuration)
Step Procedure
1. The Configure Container Instance Wizard can be set up to run in an automated mode (i.e., silent). This is done by defining a properties file and pre-defining a set of property values to be used by the Configure Container Instance Wizard to automatically configure a Container instance.
Define a properties file for creating a JBoss Container Instance (e.g., myprops.properties).
2) Add the following content:
container.instance.name=<instancename> container.key=<instancename> credential.username = administrator credential.password = password default.host=<jbosshost> default.port=8080 jboss.context.path=/soa

Chapter 3: Configuring a JBoss 7.x Agent Container using the Configure Container Instance Wizard
Copyright © 2013, SOA Software, Inc. Policy Manager Agent for JBoss Installation Guide 23
To Configure a JBoss 7.x Container Instance (Silent Configuration) deployment=JBoss jboss.as.version.7x= true
Properties The following properties are used for JBoss Deployments.
container.instance.name—Name of the Container. container.key—SOA recommends that the Container Key be set to the same value as the Container Name. credential.username—Username for logging into the SOA Software Administration Console. credential.password—Password for logging into the SOA Software Administration Console. deployment— Specify the deployment container is "JBoss." default.host—Host name/IP address for the Container Instance. default.port—Port for the Container Instance. 8080 is the default JBoss port. jboss.context.path—Specify /soa for the JBoss "Context Path". Default value is “/soa”. jboss.as.version.7x–Value is “true." This signifies the JBoss AS version is 7.x.
Running Silent Configuration
The Configure Container Instance Wizard (Silent Configuration) properties file accepts two system properties which together are used to perform a silent configuration:
1. silent (If True, silent configuration will be performed) 2. properties (location on filesystem of property file to be used for configuration)
Windows: <PM-Home>\sm60\bin>startup.bat configurator "-Dsilent=true" "-Dproperties=C:/<property file directory location>/myprops.properties"
UNIX <PM-Home>/sm60/bin>startup.sh configurator -Dsilent=true -Dproperties=/export/home/username/<property file directory location>\myprops.properties
2. The configuration process creates a Web Archive (WAR) file that is stored in sm60/deployments/JBoss of the Policy Manager Release Directory. This WAR file must be deployed to your JBoss Application Server. See Chapter 5: Deploying JBoss 7.x Agent to the JBoss 7.x Console.
JBOSS 7.X CONTAINER INSTANCE CONFIGURATION RESULTS
The following table shows the directory and file changes that are made regardless of the method chosen to configure a new JBoss container instance.
JBoss Container Instance Configuration Results:
Chapter 3: Configuring a JBoss 7.x Agent Container using the Configure Container Instance Wizard
Copyright © 2013, SOA Software, Inc. Policy Manager Agent for JBoss Installation Guide 24
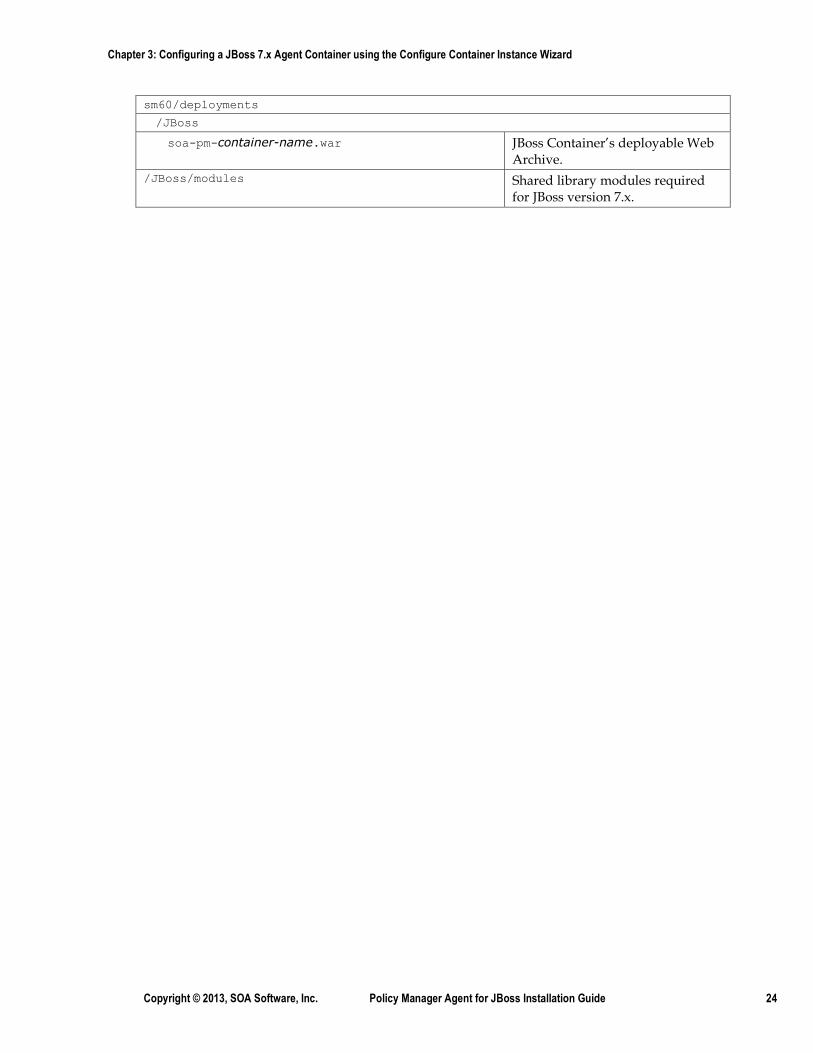
sm60/deployments /JBoss soa-pm-container-name.war JBoss Container’s deployable Web
Archive. /JBoss/modules Shared library modules required
for JBoss version 7.x.
Chapter 4: Deploying the JBoss 5.x Agent to the JBoss 5.x Console
Copyright © 2013, SOA Software, Inc. Policy Manager Agent for JBoss Installation Guide 25
Chapter 4: Deploying the JBoss 5.x Agent to the JBoss 5.x Console
OVERVIEW
This chapter provides a list of steps for configuring the JBoss 5.x Application Server to run the JBoss Agent feature. Tasks include adding JBoss Agent shared .jar file to the system class path of JBoss servers and deploying the JBoss Agent WAR file.
DEPLOYING THE JBOSS 5.X AGENT WAR FILE IN JBOSS SERVER
When you defined the SOA Software Agent Container using the SOA Software Configure Container Instance Wizard a Web Archive (WAR) file are created and saved in the sm60\deployments\JBoss folder of the Policy Manager Release Directory. These files contain the bootstrap code to load the SOA Service Manager OSGi Container and any installed features like the JBoss Agent or SOA Delegate. This WAR file must be installed to each JBoss Application Service running applications that need JBoss Agent processing.
This installation procedure is listed below.
To Deploy JBoss 5.x Agent .war File in JBoss Server
Step Procedure
1. During the JBoss Agent configuration using the Configure Container Instance Wizard, jar files were placed in the sm60/deployments/lib directory. These JBoss Agent shared jar files must be added to system class path of the JBoss server to enable the JBoss Agent.
Copy following jars from the <soa-home>/sm60/deployments/lib directory to the <JBoss_HOME>\server\<PROFILE_NAME>\lib directory.
com.soa.agent.shared_6.1.xxxx.jar
2. JBoss application servers 5.x and above cannot load/register crypto providers from within application class loader due to a known issue. To overcome this, all the bouncy castle jars have been excluded from the Agent WAR file and need to place them in server class path.
To do this, please copy following list of jars to <JBoss_HOME>\server\<PROFILE_NAME>\lib.
bcmail-jdk15-146.jar
bcprov-jdk15-146.jar
3. Deploy the soa-pm-<container>.war from <PM-HOME>/sm60/deployments/JBoss directory in all the JBoss servers that will be using this "Policy Manager Agent for JBoss" container configuration.
Chapter 4: Deploying the JBoss 5.x Agent to the JBoss 5.x Console
Copyright © 2013, SOA Software, Inc. Policy Manager Agent for JBoss Installation Guide 26
To Deploy JBoss 5.x Agent .war File in JBoss Server
4. Restart the JBoss server. This is not mandatory.
Chapter 5: Deploying the JBoss 7.x Agent to the JBoss 7.x Console
Copyright © 2013, SOA Software, Inc. Policy Manager Agent for JBoss Installation Guide 27
Chapter 5: Deploying the JBoss 7.x Agent to the JBoss 7.x Console
OVERVIEW
This chapter provides a list of steps for configuring the JBoss 7.x Application Server to run the JBoss Agent feature. Tasks include adding JBoss Agent shared module and other dependent libraries to the system class path of JBoss servers and deploying the JBoss Agent WAR file.
JBoss Agent WAR application needs following artifacts to start and run successfully:
1) Bouncy castle Jars for cryptographic requirements.
2) SOA Agent shared jar for agent interception of provider services.
When an agent instance is created, the modules listed above will be copied under:
<soa-home>/sm60/deployments/JBoss/modules
DEPLOYING THE JBOSS 7.X AGENT WAR IN JBOSS SERVER
When you defined the SOA Software Agent Container using the SOA Software Configure Container Instance Wizard a Web Archive (WAR) file are created and saved in the sm60\deployments\JBoss folder of the Policy Manager Release Directory. These files contain the bootstrap code to load the SOA Software Policy Manager OSGi Container and any installed features like the JBoss Agent or SOA Delegate. This WAR file must be installed to each JBoss Application Server running applications that need JBoss Agent processing.
This installation procedure is listed below.
To Deploy JBoss 7.x Agent .war File in JBoss Server
Step Procedure
1. SOA Software Policy Manager Agent requires bouncy castle provider and Agent shared modules.
The modules can be configured by either of the steps listed below.
1. Add the modules location to the existing module path as Java runtime arguments (JAVA_OPTS) in the startup file (standalone.bat/standalone.sh for standalone deployments domain.bat/domain.sh for domain based deployments).
For example: -mp "%JBOSS_MODULEPATH%;<modules location>"
Chapter 5: Deploying the JBoss 7.x Agent to the JBoss 7.x Console
Copyright © 2013, SOA Software, Inc. Policy Manager Agent for JBoss Installation Guide 28
To Deploy JBoss 7.x Agent .war File in JBoss Server
.<modules location> has to be replaced the location of the modules.
2. Copy the modules present under:
<soa-home>/sm60/deployments/JBoss/modules/
to the JBoss modules location:
<jboss-home>/ modules/system/layers/base/
2. Deploy soa-pm-<container>.war from <PM-HOME>/sm60/deployments/JBoss directory in all the JBoss servers that will be using this "Policy Manager Agent for JBoss" container configuration.
3. Restart the JBoss server. This is not mandatory.
Chapter 6: Installing and Configuring the JBoss Agent Feature using the SOA Software Administration Console
Copyright © 2013, SOA Software, Inc. Policy Manager Agent for JBoss Installation Guide 29
Chapter 6: Installing and Configuring the JBoss Agent Feature using the SOA Software Administration Console
INSTALLING JBOSS AGENT FEATURE
This section provides a walkthrough for installing the "Policy Manager Agent for JBoss Application Server" (JBoss Agent) feature.
To Install JBoss Agent Feature
Step Procedure
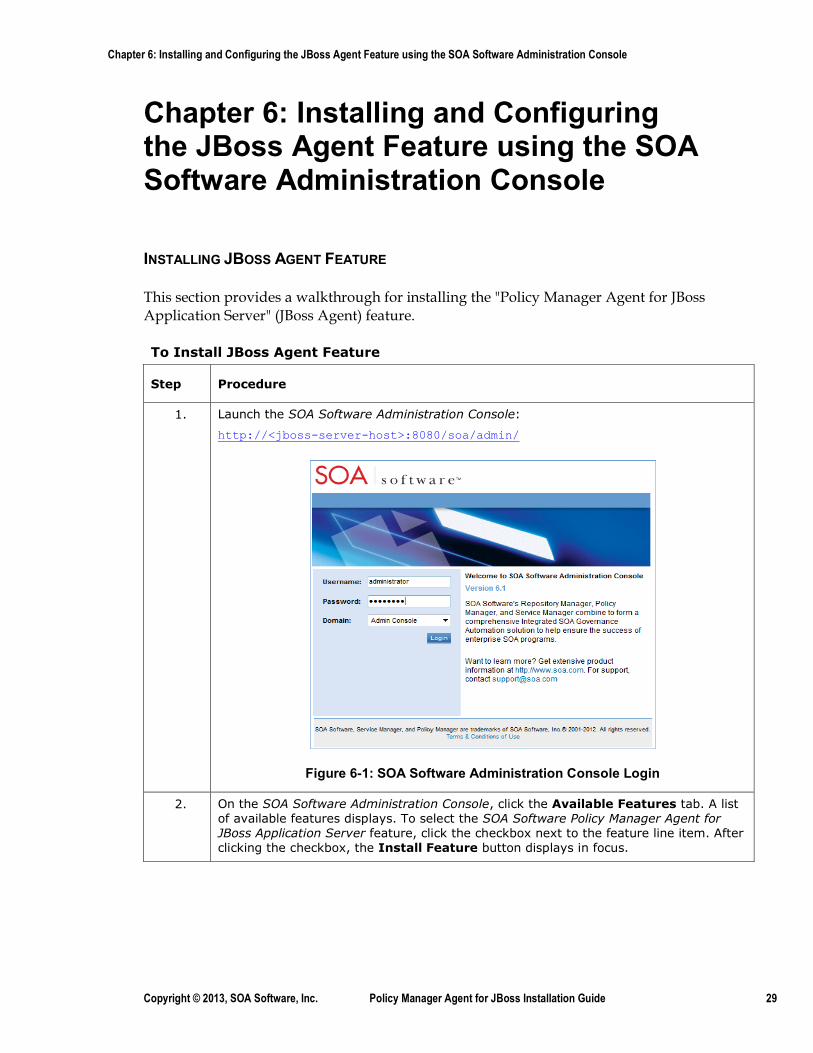
1. Launch the SOA Software Administration Console: http://<jboss-server-host>:8080/soa/admin/
Figure 6-1: SOA Software Administration Console Login
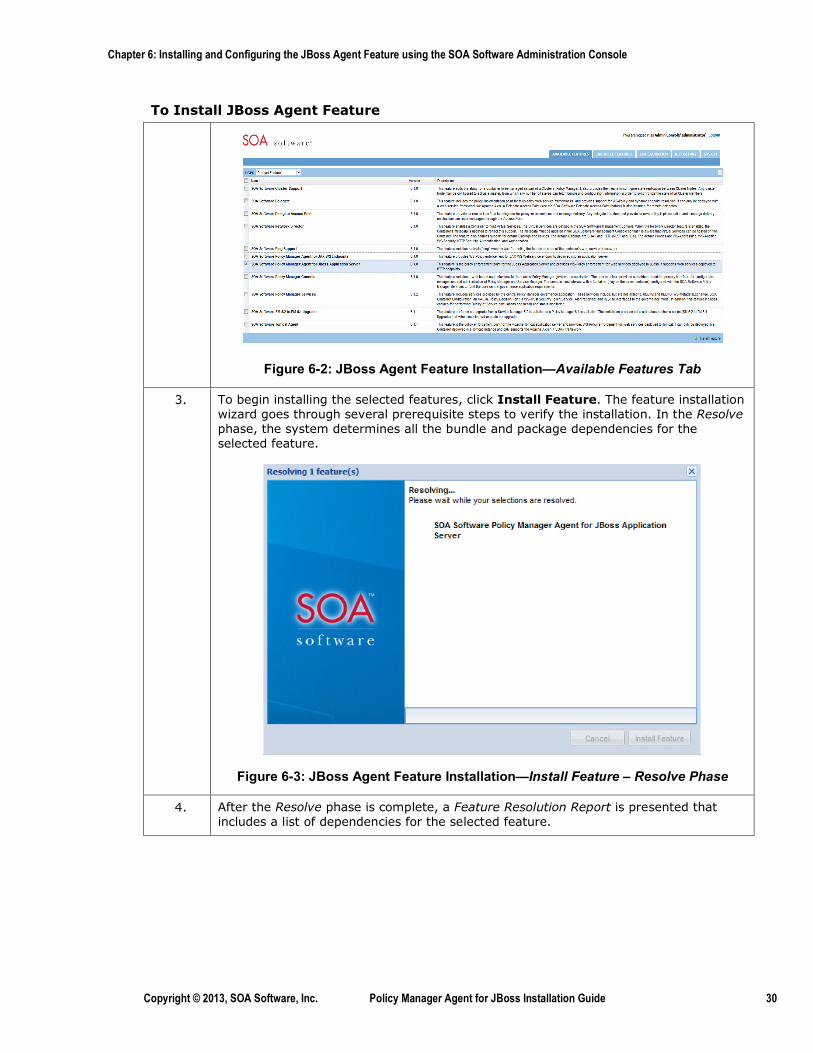
2. On the SOA Software Administration Console, click the Available Features tab. A list of available features displays. To select the SOA Software Policy Manager Agent for JBoss Application Server feature, click the checkbox next to the feature line item. After clicking the checkbox, the Install Feature button displays in focus.
Chapter 6: Installing and Configuring the JBoss Agent Feature using the SOA Software Administration Console
Copyright © 2013, SOA Software, Inc. Policy Manager Agent for JBoss Installation Guide 30
To Install JBoss Agent Feature
Figure 6-2: JBoss Agent Feature Installation—Available Features Tab
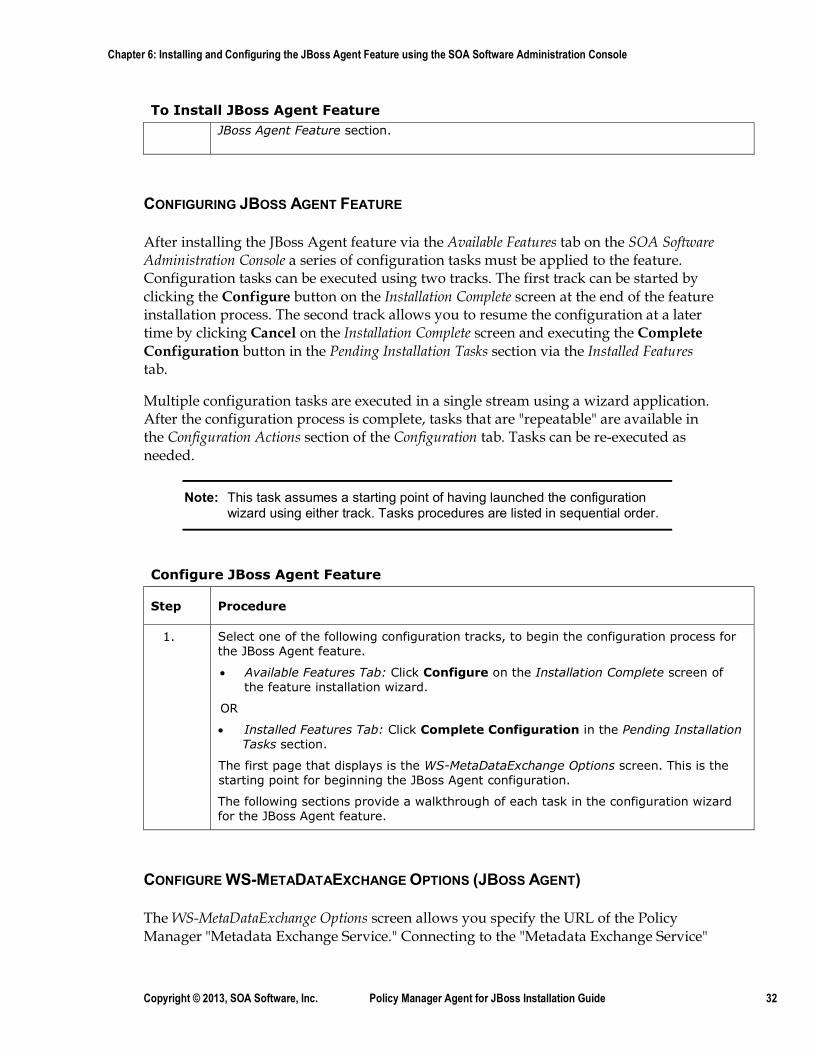
3. To begin installing the selected features, click Install Feature. The feature installation wizard goes through several prerequisite steps to verify the installation. In the Resolve phase, the system determines all the bundle and package dependencies for the selected feature.
Figure 6-3: JBoss Agent Feature Installation—Install Feature – Resolve Phase
4. After the Resolve phase is complete, a Feature Resolution Report is presented that includes a list of dependencies for the selected feature.

Chapter 6: Installing and Configuring the JBoss Agent Feature using the SOA Software Administration Console
Copyright © 2013, SOA Software, Inc. Policy Manager Agent for JBoss Installation Guide 31
To Install JBoss Agent Feature
Figure 6-3: JBoss Agent Feature Installation—Install Feature – Feature Resolution Report
5. To begin installing the feature click Install Feature. The Installing… status displays along with a progress indicator. When the installation process is completed, the Installation Complete screen displays and the feature(s) being installed are removed from the listing under the Available Features tab and transitioned to the Installed Features tab.
Figure 6-4: JBoss Agent Feature Installation—Install Feature Installation Complete
6. After the installation is complete, the next step is to configure the feature. This is done by executing a series of one-time and/or repeatable tasks. Refer to the Configuring
Chapter 6: Installing and Configuring the JBoss Agent Feature using the SOA Software Administration Console
Copyright © 2013, SOA Software, Inc. Policy Manager Agent for JBoss Installation Guide 32
To Install JBoss Agent Feature JBoss Agent Feature section.
CONFIGURING JBOSS AGENT FEATURE
After installing the JBoss Agent feature via the Available Features tab on the SOA Software Administration Console a series of configuration tasks must be applied to the feature. Configuration tasks can be executed using two tracks. The first track can be started by clicking the Configure button on the Installation Complete screen at the end of the feature installation process. The second track allows you to resume the configuration at a later time by clicking Cancel on the Installation Complete screen and executing the Complete Configuration button in the Pending Installation Tasks section via the Installed Features tab.
Multiple configuration tasks are executed in a single stream using a wizard application. After the configuration process is complete, tasks that are "repeatable" are available in the Configuration Actions section of the Configuration tab. Tasks can be re-executed as needed.
Note: This task assumes a starting point of having launched the configuration wizard using either track. Tasks procedures are listed in sequential order.
Configure JBoss Agent Feature
Step Procedure
1. Select one of the following configuration tracks, to begin the configuration process for the JBoss Agent feature.
• Available Features Tab: Click Configure on the Installation Complete screen of the feature installation wizard.
OR
• Installed Features Tab: Click Complete Configuration in the Pending Installation Tasks section.
The first page that displays is the WS-MetaDataExchange Options screen. This is the starting point for beginning the JBoss Agent configuration.
The following sections provide a walkthrough of each task in the configuration wizard for the JBoss Agent feature.
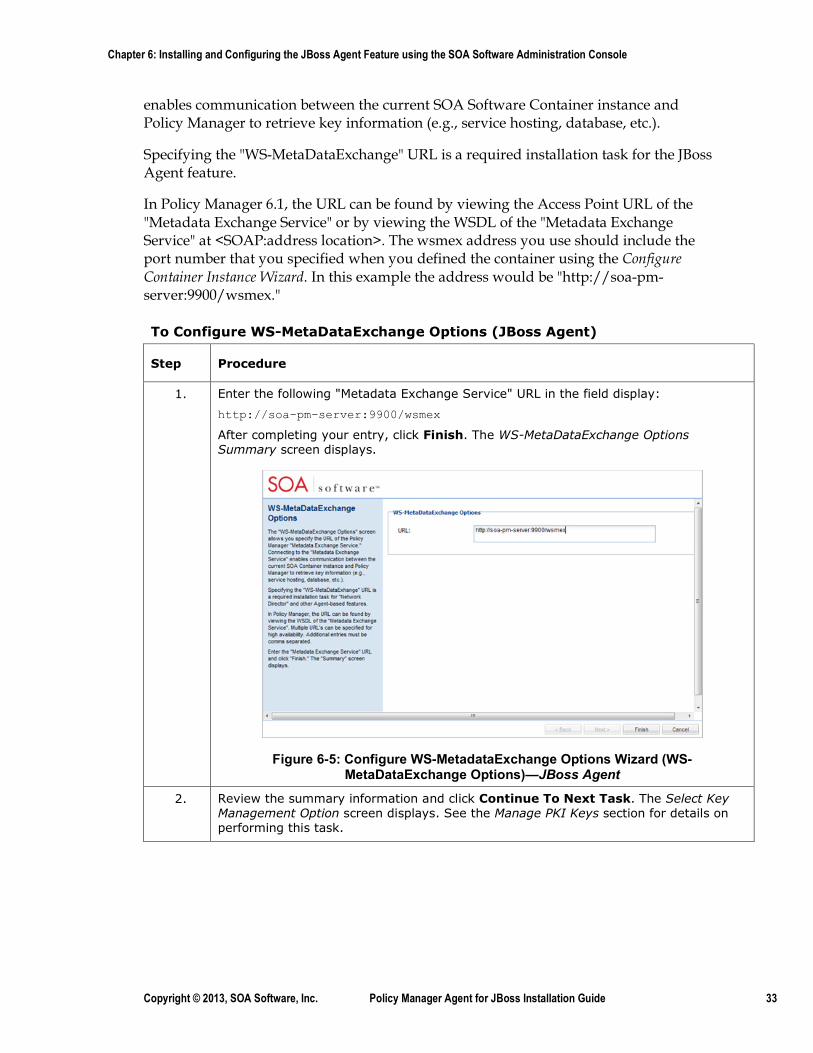
CONFIGURE WS-METADATAEXCHANGE OPTIONS (JBOSS AGENT)
The WS-MetaDataExchange Options screen allows you specify the URL of the Policy Manager "Metadata Exchange Service." Connecting to the "Metadata Exchange Service"
Chapter 6: Installing and Configuring the JBoss Agent Feature using the SOA Software Administration Console
Copyright © 2013, SOA Software, Inc. Policy Manager Agent for JBoss Installation Guide 33
enables communication between the current SOA Software Container instance and Policy Manager to retrieve key information (e.g., service hosting, database, etc.).
Specifying the "WS-MetaDataExchange" URL is a required installation task for the JBoss Agent feature.
In Policy Manager 6.1, the URL can be found by viewing the Access Point URL of the "Metadata Exchange Service" or by viewing the WSDL of the "Metadata Exchange Service" at <SOAP:address location>. The wsmex address you use should include the port number that you specified when you defined the container using the Configure Container Instance Wizard. In this example the address would be "http://soa-pm-server:9900/wsmex."
To Configure WS-MetaDataExchange Options (JBoss Agent)
Step Procedure
1. Enter the following "Metadata Exchange Service" URL in the field display: http://soa-pm-server:9900/wsmex
After completing your entry, click Finish. The WS-MetaDataExchange Options Summary screen displays.
Figure 6-5: Configure WS-MetadataExchange Options Wizard (WS-MetaDataExchange Options)—JBoss Agent
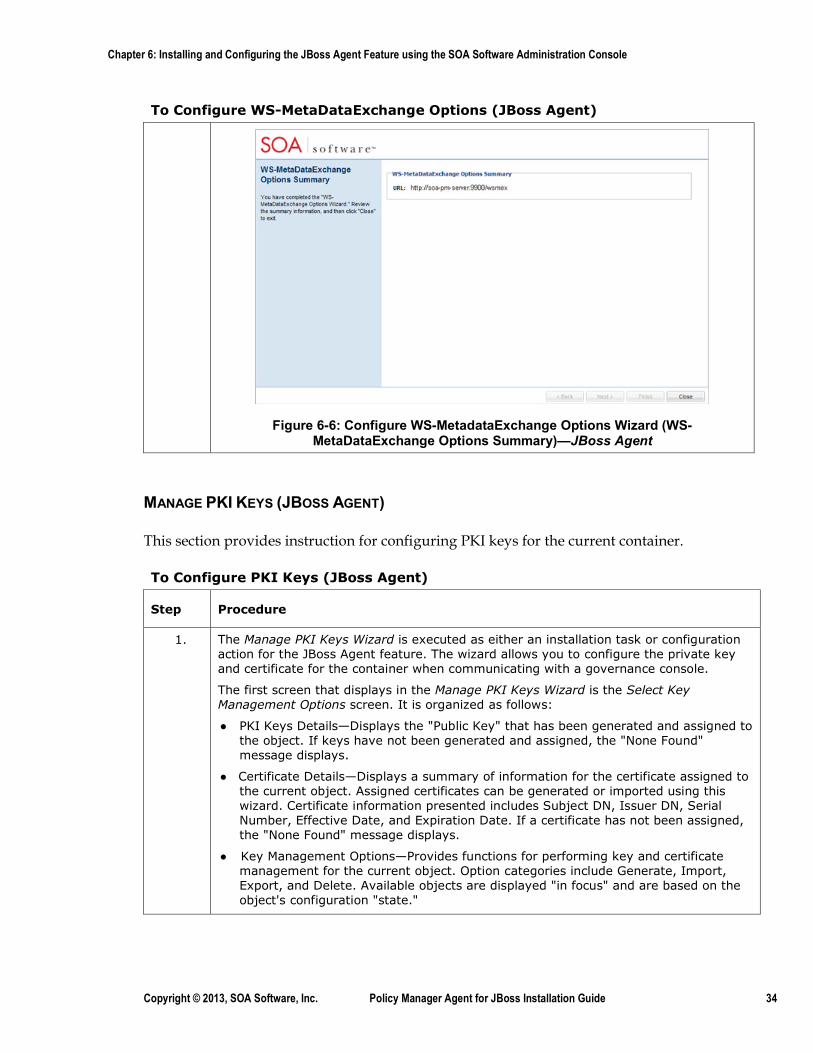
2. Review the summary information and click Continue To Next Task. The Select Key Management Option screen displays. See the Manage PKI Keys section for details on performing this task.
Chapter 6: Installing and Configuring the JBoss Agent Feature using the SOA Software Administration Console
Copyright © 2013, SOA Software, Inc. Policy Manager Agent for JBoss Installation Guide 34
To Configure WS-MetaDataExchange Options (JBoss Agent)
Figure 6-6: Configure WS-MetadataExchange Options Wizard (WS-MetaDataExchange Options Summary)—JBoss Agent
MANAGE PKI KEYS (JBOSS AGENT)
This section provides instruction for configuring PKI keys for the current container.
To Configure PKI Keys (JBoss Agent)
Step Procedure
1. The Manage PKI Keys Wizard is executed as either an installation task or configuration action for the JBoss Agent feature. The wizard allows you to configure the private key and certificate for the container when communicating with a governance console.
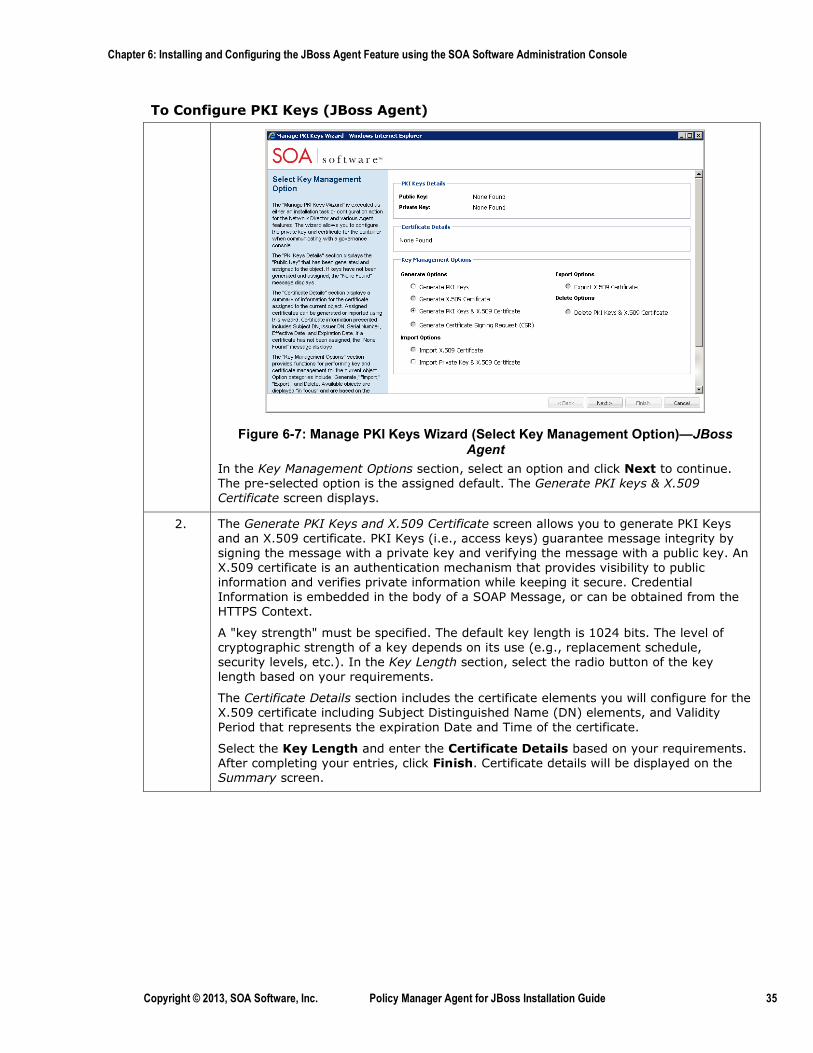
The first screen that displays in the Manage PKI Keys Wizard is the Select Key Management Options screen. It is organized as follows:
● PKI Keys Details—Displays the "Public Key" that has been generated and assigned to the object. If keys have not been generated and assigned, the "None Found" message displays.
● Certificate Details—Displays a summary of information for the certificate assigned to the current object. Assigned certificates can be generated or imported using this wizard. Certificate information presented includes Subject DN, Issuer DN, Serial Number, Effective Date, and Expiration Date. If a certificate has not been assigned, the "None Found" message displays.
● Key Management Options—Provides functions for performing key and certificate management for the current object. Option categories include Generate, Import, Export, and Delete. Available objects are displayed "in focus" and are based on the object's configuration "state."
Chapter 6: Installing and Configuring the JBoss Agent Feature using the SOA Software Administration Console
Copyright © 2013, SOA Software, Inc. Policy Manager Agent for JBoss Installation Guide 35
To Configure PKI Keys (JBoss Agent)
Figure 6-7: Manage PKI Keys Wizard (Select Key Management Option)—JBoss Agent
In the Key Management Options section, select an option and click Next to continue. The pre-selected option is the assigned default. The Generate PKI keys & X.509 Certificate screen displays.
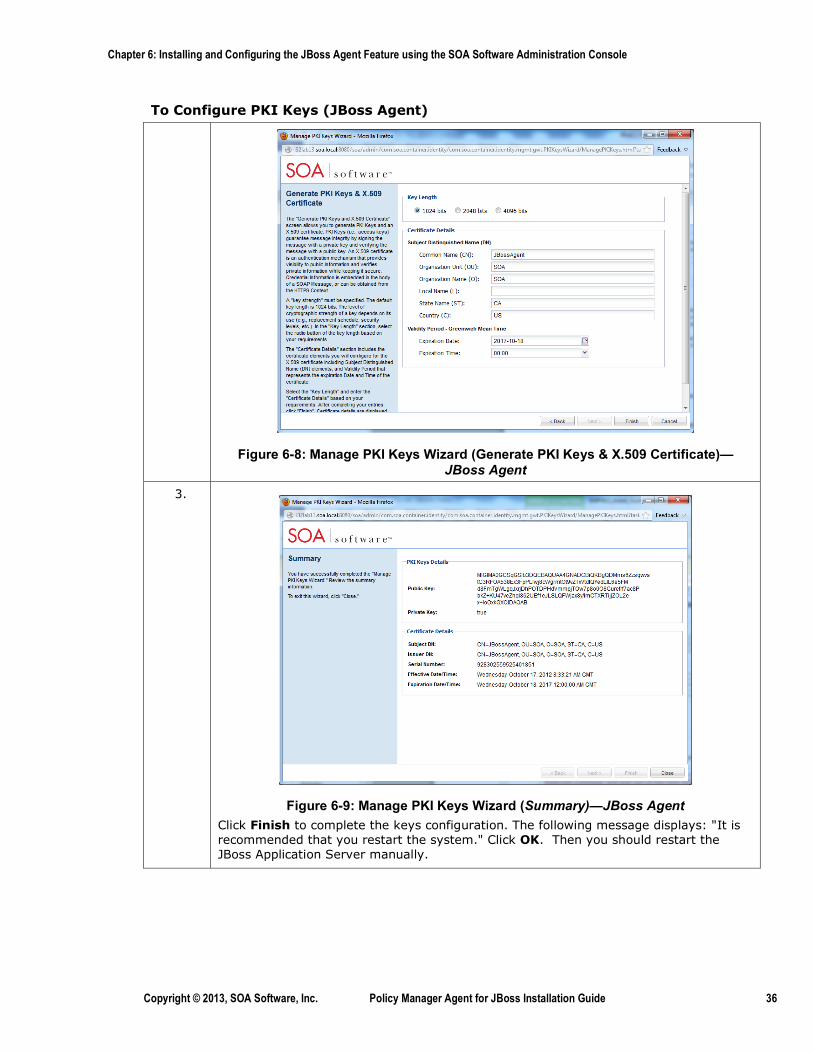
2. The Generate PKI Keys and X.509 Certificate screen allows you to generate PKI Keys and an X.509 certificate. PKI Keys (i.e., access keys) guarantee message integrity by signing the message with a private key and verifying the message with a public key. An X.509 certificate is an authentication mechanism that provides visibility to public information and verifies private information while keeping it secure. Credential Information is embedded in the body of a SOAP Message, or can be obtained from the HTTPS Context.
A "key strength" must be specified. The default key length is 1024 bits. The level of cryptographic strength of a key depends on its use (e.g., replacement schedule, security levels, etc.). In the Key Length section, select the radio button of the key length based on your requirements.
The Certificate Details section includes the certificate elements you will configure for the X.509 certificate including Subject Distinguished Name (DN) elements, and Validity Period that represents the expiration Date and Time of the certificate.
Select the Key Length and enter the Certificate Details based on your requirements. After completing your entries, click Finish. Certificate details will be displayed on the Summary screen.
Chapter 6: Installing and Configuring the JBoss Agent Feature using the SOA Software Administration Console
Copyright © 2013, SOA Software, Inc. Policy Manager Agent for JBoss Installation Guide 36
To Configure PKI Keys (JBoss Agent)
Figure 6-8: Manage PKI Keys Wizard (Generate PKI Keys & X.509 Certificate)—JBoss Agent
3.
Figure 6-9: Manage PKI Keys Wizard (Summary)—JBoss Agent Click Finish to complete the keys configuration. The following message displays: "It is recommended that you restart the system." Click OK. Then you should restart the JBoss Application Server manually.
Chapter 6: Installing and Configuring the JBoss Agent Feature using the SOA Software Administration Console
Copyright © 2013, SOA Software, Inc. Policy Manager Agent for JBoss Installation Guide 37
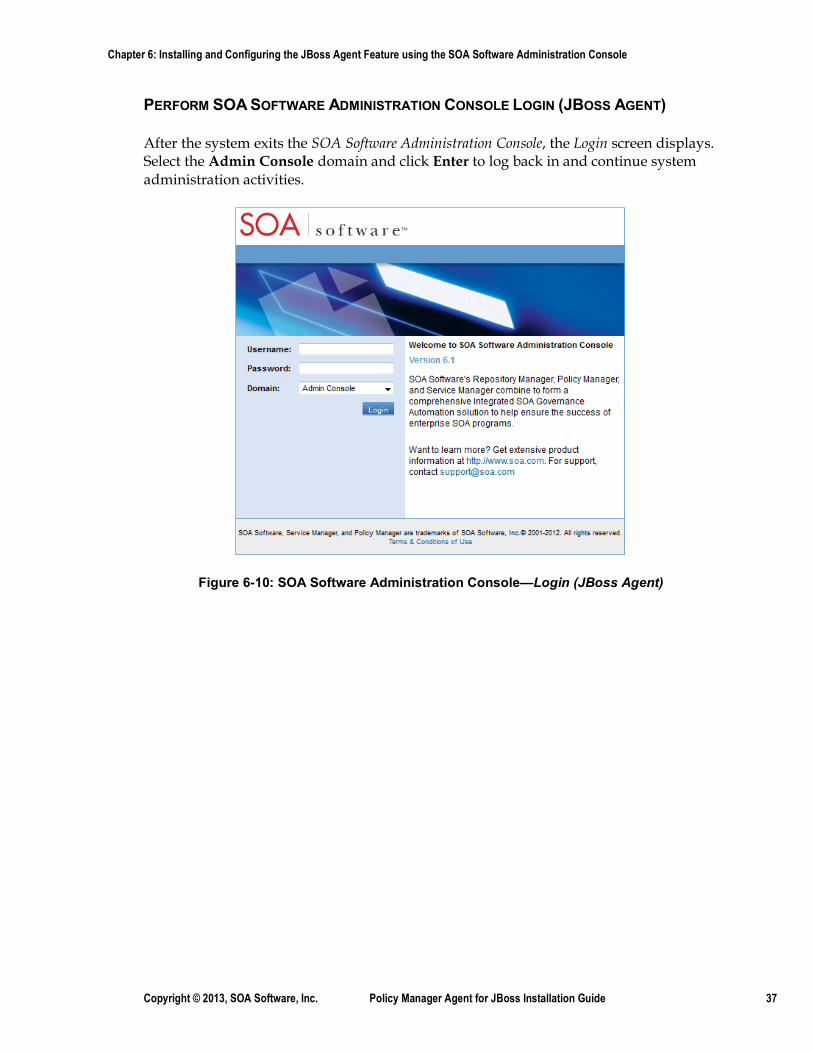
PERFORM SOA SOFTWARE ADMINISTRATION CONSOLE LOGIN (JBOSS AGENT)
After the system exits the SOA Software Administration Console, the Login screen displays. Select the Admin Console domain and click Enter to log back in and continue system administration activities.
Figure 6-10: SOA Software Administration Console—Login (JBoss Agent)
Chapter 7: Registering a JBoss Agent Container in the Policy Manager Management Console
Copyright © 2013, SOA Software, Inc. Policy Manager Agent for JBoss Installation Guide 38
Chapter 7: Registering a JBoss Agent Container in the Policy Manager Management Console
OVERVIEW
This chapter provides instructions on how to register the JBoss Agent Container. The process involves configuring an SOA Container using the Add Container function in the Policy Manager Management Console.
REGISTER JBOSS AGENT CONTAINER
To Register JBoss Container
Step Procedure
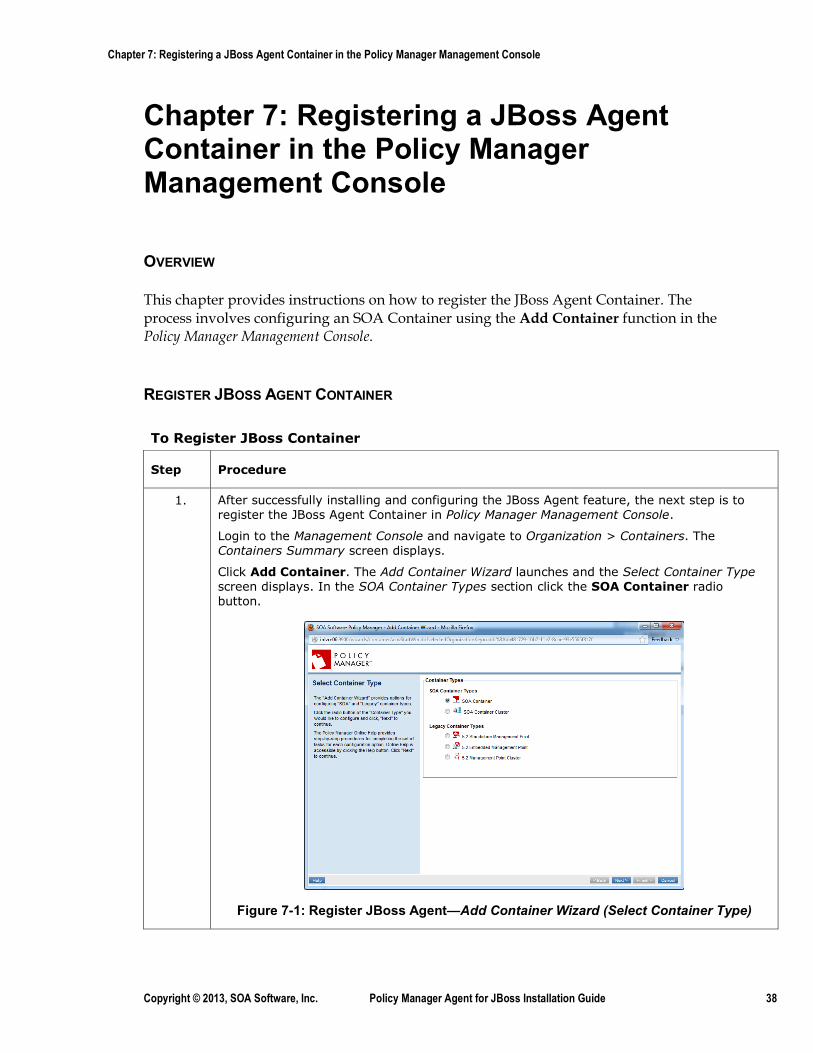
1. After successfully installing and configuring the JBoss Agent feature, the next step is to register the JBoss Agent Container in Policy Manager Management Console.
Login to the Management Console and navigate to Organization > Containers. The Containers Summary screen displays.
Click Add Container. The Add Container Wizard launches and the Select Container Type screen displays. In the SOA Container Types section click the SOA Container radio button.
Figure 7-1: Register JBoss Agent—Add Container Wizard (Select Container Type)
Chapter 7: Registering a JBoss Agent Container in the Policy Manager Management Console
Copyright © 2013, SOA Software, Inc. Policy Manager Agent for JBoss Installation Guide 39
To Register JBoss Container
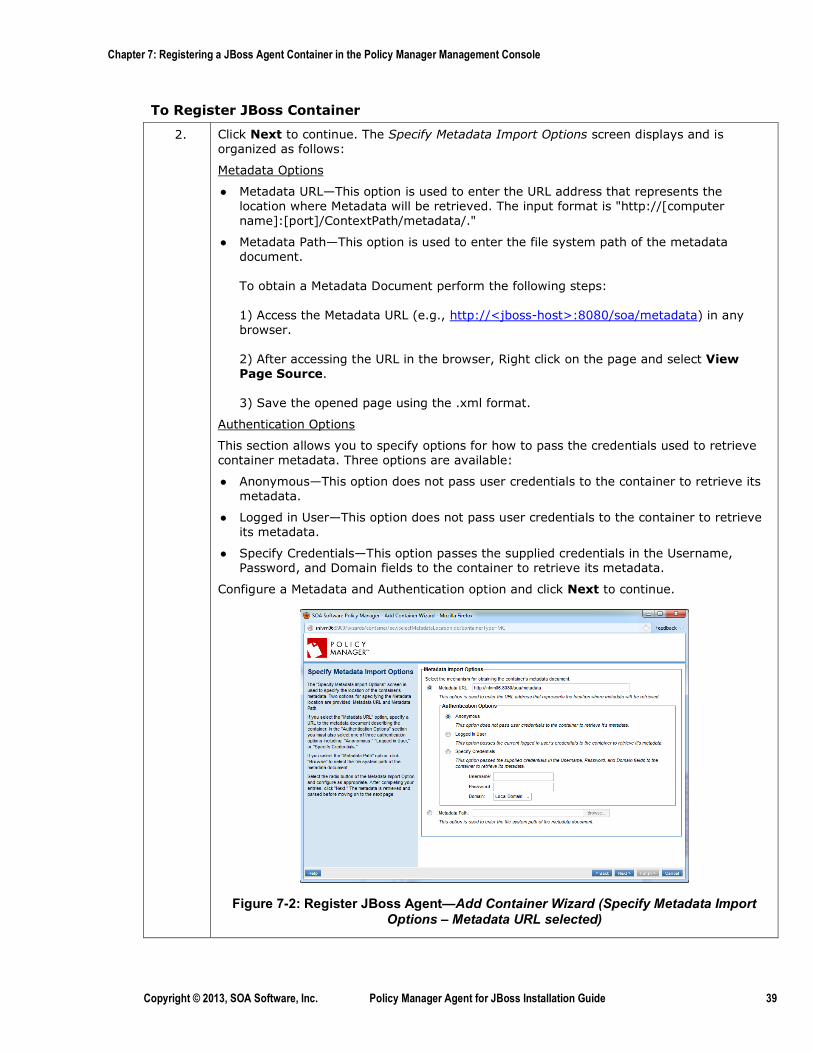
2. Click Next to continue. The Specify Metadata Import Options screen displays and is organized as follows:
Metadata Options
● Metadata URL—This option is used to enter the URL address that represents the location where Metadata will be retrieved. The input format is "http://[computer name]:[port]/ContextPath/metadata/."
● Metadata Path—This option is used to enter the file system path of the metadata document. To obtain a Metadata Document perform the following steps: 1) Access the Metadata URL (e.g., http://<jboss-host>:8080/soa/metadata) in any browser. 2) After accessing the URL in the browser, Right click on the page and select View Page Source. 3) Save the opened page using the .xml format.
Authentication Options
This section allows you to specify options for how to pass the credentials used to retrieve container metadata. Three options are available:
● Anonymous—This option does not pass user credentials to the container to retrieve its metadata.
● Logged in User—This option does not pass user credentials to the container to retrieve its metadata.
● Specify Credentials—This option passes the supplied credentials in the Username, Password, and Domain fields to the container to retrieve its metadata.
Configure a Metadata and Authentication option and click Next to continue.
Figure 7-2: Register JBoss Agent—Add Container Wizard (Specify Metadata Import Options – Metadata URL selected)
Chapter 7: Registering a JBoss Agent Container in the Policy Manager Management Console
Copyright © 2013, SOA Software, Inc. Policy Manager Agent for JBoss Installation Guide 40
To Register JBoss Container
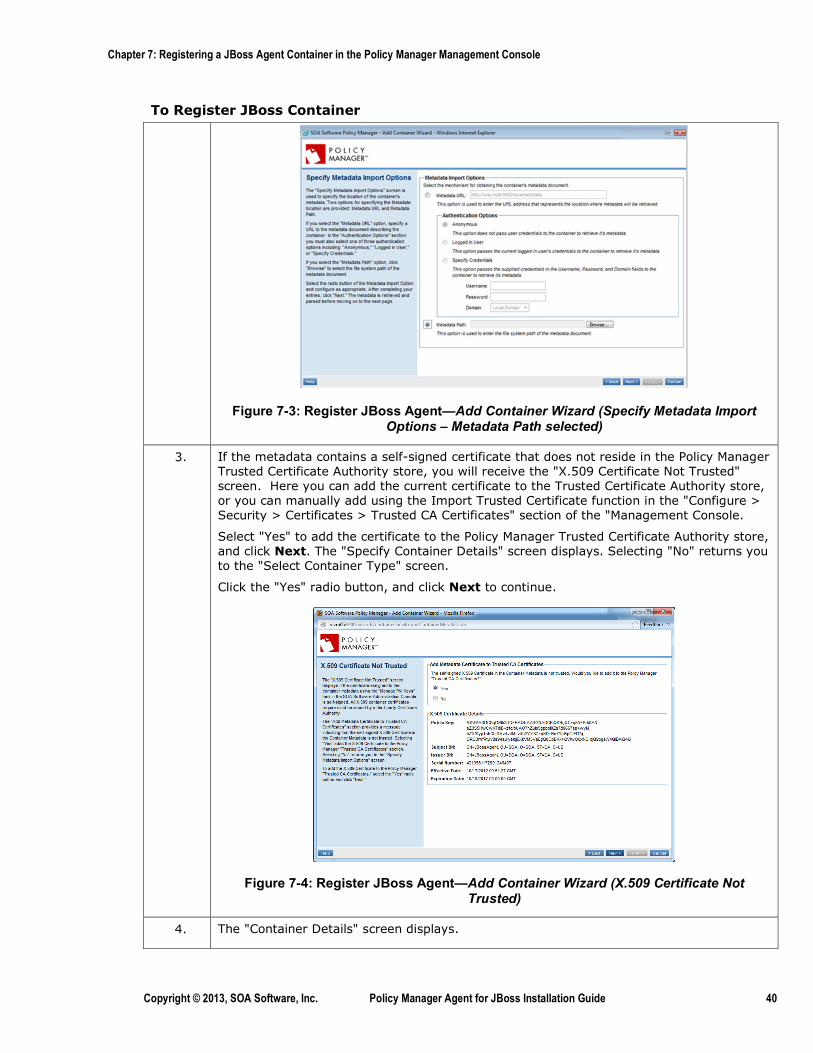
Figure 7-3: Register JBoss Agent—Add Container Wizard (Specify Metadata Import Options – Metadata Path selected)
3. If the metadata contains a self-signed certificate that does not reside in the Policy Manager Trusted Certificate Authority store, you will receive the "X.509 Certificate Not Trusted" screen. Here you can add the current certificate to the Trusted Certificate Authority store, or you can manually add using the Import Trusted Certificate function in the "Configure > Security > Certificates > Trusted CA Certificates" section of the "Management Console.
Select "Yes" to add the certificate to the Policy Manager Trusted Certificate Authority store, and click Next. The "Specify Container Details" screen displays. Selecting "No" returns you to the "Select Container Type" screen.
Click the "Yes" radio button, and click Next to continue.
Figure 7-4: Register JBoss Agent—Add Container Wizard (X.509 Certificate Not Trusted)
4. The "Container Details" screen displays.
Chapter 7: Registering a JBoss Agent Container in the Policy Manager Management Console
Copyright © 2013, SOA Software, Inc. Policy Manager Agent for JBoss Installation Guide 41
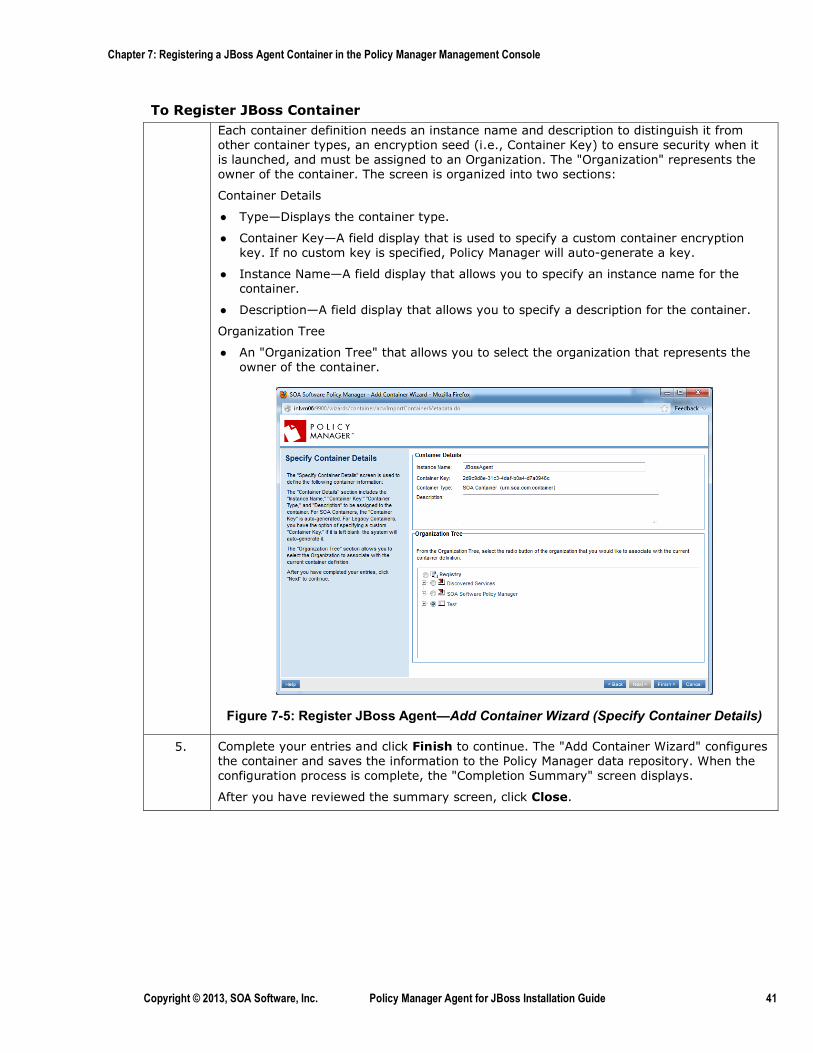
To Register JBoss Container Each container definition needs an instance name and description to distinguish it from other container types, an encryption seed (i.e., Container Key) to ensure security when it is launched, and must be assigned to an Organization. The "Organization" represents the owner of the container. The screen is organized into two sections:
Container Details
● Type—Displays the container type.
● Container Key—A field display that is used to specify a custom container encryption key. If no custom key is specified, Policy Manager will auto-generate a key.
● Instance Name—A field display that allows you to specify an instance name for the container.
● Description—A field display that allows you to specify a description for the container.
Organization Tree
● An "Organization Tree" that allows you to select the organization that represents the owner of the container.
Figure 7-5: Register JBoss Agent—Add Container Wizard (Specify Container Details)
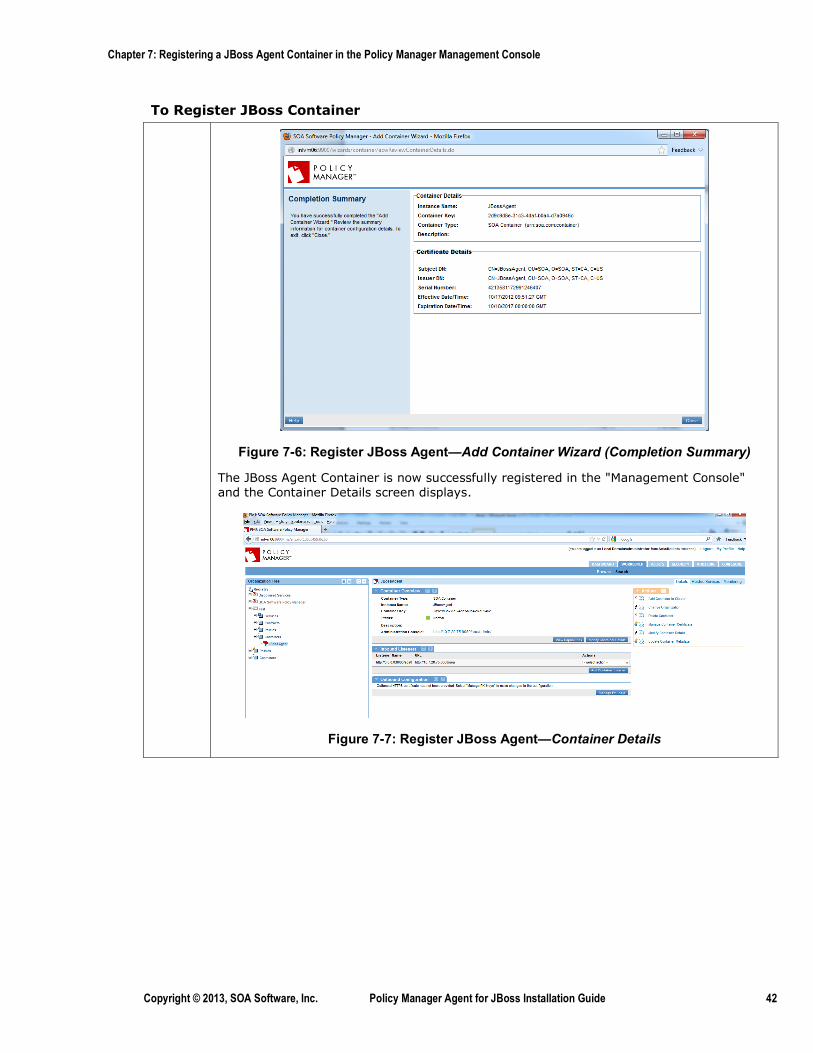
5. Complete your entries and click Finish to continue. The "Add Container Wizard" configures the container and saves the information to the Policy Manager data repository. When the configuration process is complete, the "Completion Summary" screen displays.
After you have reviewed the summary screen, click Close.
Chapter 7: Registering a JBoss Agent Container in the Policy Manager Management Console
Copyright © 2013, SOA Software, Inc. Policy Manager Agent for JBoss Installation Guide 42
To Register JBoss Container
Figure 7-6: Register JBoss Agent—Add Container Wizard (Completion Summary)
The JBoss Agent Container is now successfully registered in the "Management Console" and the Container Details screen displays.
Figure 7-7: Register JBoss Agent—Container Details
Chapter 8: Managing JBoss Web Services with the JBoss Agent
Copyright © 2013, SOA Software, Inc. Policy Manager Agent for JBoss Installation Guide 43
Chapter 8: Managing JBoss Web Services with the JBoss Agent
OVERVIEW
The JBoss Agent intercepts HTTP web service calls by way of a Servlet Filter that must be configured by the developer. After the JBoss Agent installation is complete, you must update the web service WAR file with a servlet filter to activate the JBoss Agent SOA Container so it can apply selected security policies to web services that will be managed by the JBoss Agent.
The managed WAR file will include the SOA Software Servlet Filter that invokes the JBoss Agent to manage the web services. You must deploy the managed WAR file to replace the unmanaged WAR file on JBoss Server, then register the physical services in Policy Manager Management Console and host the services with the JBoss SOA Container. After this configuration is complete, you will be able to attach policies to the managed physical services for monitoring or security.
MESSAGE FLOW
A request message is intercepted before it reaches a web service. At the interception point, a policy is enforced on the request message. If policy enforcement fails, a fault is returned without a message being delivered to the caller. If it succeeds, a request message (potentially, modified during request policy execution) is allowed to be delivered to the web service. When the web service response message is ready to be delivered to the caller, the interception policy applies a response policy on the message before delivering the response message (potentially, modified during response policy execution) to the caller. A message is intercepted using an alternate approach when different web service implementation stacks are used.
When agent servlet filter receives the message, it prepares an object for the request to be handed over to the agent application running in the same JBOSS application server so the entire policy enforcement can take place in a different class loader. This approach is used to avoid the conflict with java classes in the web service class loader or the server class loader. For this reason, agent application should always run with a parent last class loading mechanism so the agent classes will have a higher preference. Also, the object that is used to wrap the request message is part of a jar that is loaded by server class loader. This jar is generally referred to as shared jar and is loaded by the class loader that is shared by all applications running in the JBOSS server.
Chapter 8: Managing JBoss Web Services with the JBoss Agent
Copyright © 2013, SOA Software, Inc. Policy Manager Agent for JBoss Installation Guide 44
CONFIGURE SERVICE FILTER
The JBoss Agent is activated by adding the following elements to the WEB-INF/web.xml file in the WAR that contains the service implementations to be managed.
For SOAP/HTTP:
<filter>
<filter-name>AgentFilter</filter-name> <filter-class>com.soa.agent.servlet.AgentFilter</filter-class> <init-param> <param-name>agenturi</param-name> <param-value>http://soa.com/agents/soap</param-value> </init-param> <init-param> <param-name>methods</param-name> <param-value>POST</param-value> </init-param>
</filter> <filter-mapping> <filter-name>AgentFilter</filter-name> <url-pattern><url-pattern-of-service-endpoint></url-pattern>
</filter-mapping>
The agenturi parameter can take one of the following values.
http://schemas.xmlsoap.org/soap/envelope/ (SOAP 1.1)
http://www.w3.org/2003/05/soap-envelope (SOAP 1.2)
If the SOAP version information is not available, the following value can be used. When this value is set, the Agent will handle both SOAP 1.1 and SOAP 1.2 requests.
http://soa.com/agents/soap
It is recommended that a SOAP version specific agent URI be used as much as possible to avoid possible parsing of the incoming SOAP envelope to determine the SOAP version.
For REST:
<filter>
<filter-name>SOAAgentFilter</filter-name>
<filter-class>com.soa.agent.servlet.AgentFilter</filter-class> <init-param> <param-name>agenturi</param-name> <param-value>http://soa.com/wsdl/http</param-value>
Chapter 8: Managing JBoss Web Services with the JBoss Agent
Copyright © 2013, SOA Software, Inc. Policy Manager Agent for JBoss Installation Guide 45
</init-param> <init-param> <param-name>methods</param-name> <param-value>POST,GET,PUT,DELETE</param-value> </init-param>
</filter> <filter-mapping> <filter-name> SOAAgentFilter</filter-name> <url-pattern><url-pattern-of-service-endpoint></url-pattern>
</filter-mapping>
ADD AGENT MODULE DEPENDENCY FOR JBOSS 7.X:
Note: This step is applicable for the web services which are targeted to deploy on JBoss 7.x and above:
Agent shared library needs to be in the runtime of the agent application, to accomplish this in JBoss 7.x, it can be added as a module. Agent module has to be added as a dependency to the web service application. This can be done by either of the ways mentioned below.
1) Add the agent module as a global module. The advantage with this approach is the agent module is not required to be added as a dependency in each of the provider web service application which needs to be managed.
For standalone deployments, Add the agent module entry in <%JBOSS_HOME%>/standalone/configuration/standalone.xml under
<subsystem xmlns="urn:jboss:domain:ee:1.1">
</subsystem>
section like below:
<subsystem xmlns="urn:jboss:domain:ee:1.1">
<global-modules>
<module name="com.soa.agent"/>
</global-modules>
<spec-descriptor-property-replacement>false</spec-descriptor--replacement>
<jboss-descriptor-property-replacement>true</jboss-descriptor-property-replacement>
</subsystem>
Note: Changes are highlighted in bold.
Chapter 8: Managing JBoss Web Services with the JBoss Agent
Copyright © 2013, SOA Software, Inc. Policy Manager Agent for JBoss Installation Guide 46
For domain based deployments the same agent module entry mentioned above must be added in <%JBOSS_HOME%>/domain/configuration/domain.xml
(OR)
2) Add a module dependency entry to WAR's WEB-INF/jboss-deployment-structure.xml file, under the <deployment><dependencies> section, as shown below.
<dependencies>
<module name="com.soa.agent" slot=”main” export=”true” />
</dependencies>
If you have dependencies in jboss-deployment-structure.xml add this node or create one under WEB-INF folder.
Below is the Sample jboss-deployment-structure.xml
<?xml version=“1.0” encoding=“utf-8”?>
<jboss-deployment-structure xmlns="urn:jboss:deployment-structure:1.1">
<deployment>
<dependencies>
<module export="true" slot="main" name="com.soa.agent"/>
</dependencies>
</deployment>
</jboss-deployment-structure>
REGISTER MANAGED PHYSICAL SERVICES IN POLICY MANAGER
To Register Managed Physical Services in Policy Manager
Step Procedure
1. Log into the Policy Manager Management Console.
2. Register the web service modified in above steps as a physical service and provide the service details.
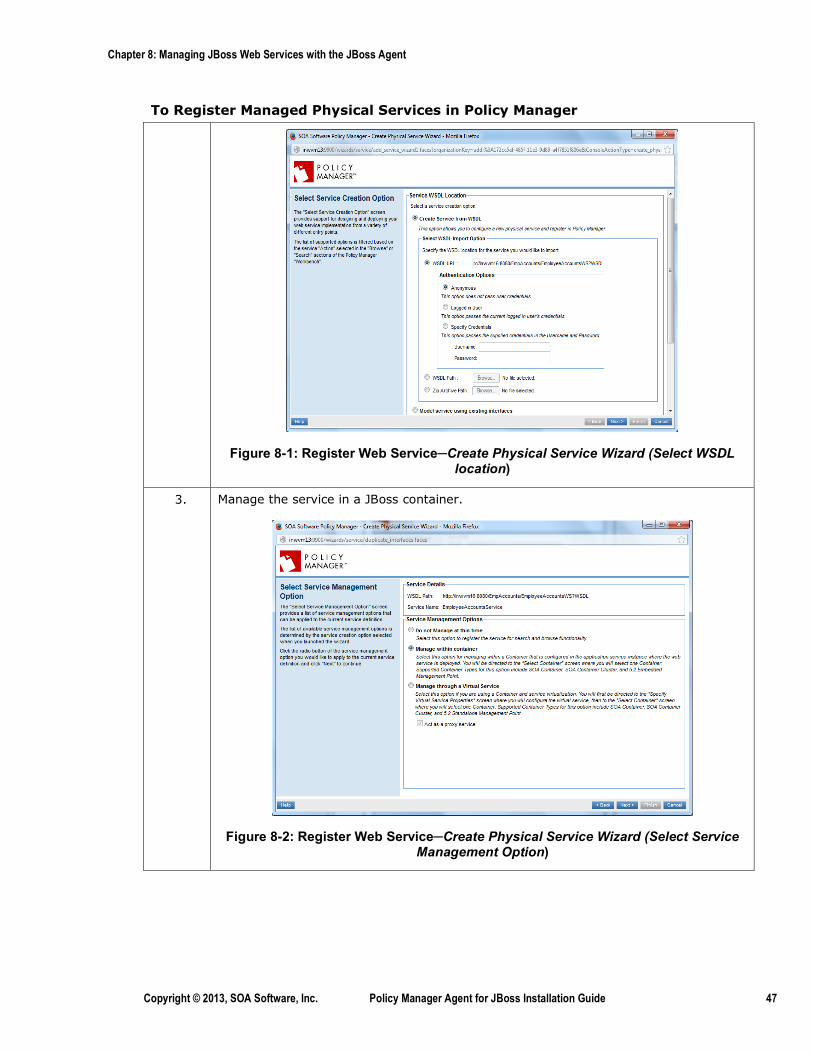
Chapter 8: Managing JBoss Web Services with the JBoss Agent
Copyright © 2013, SOA Software, Inc. Policy Manager Agent for JBoss Installation Guide 47
To Register Managed Physical Services in Policy Manager
Figure 8-1: Register Web Service─Create Physical Service Wizard (Select WSDL location)
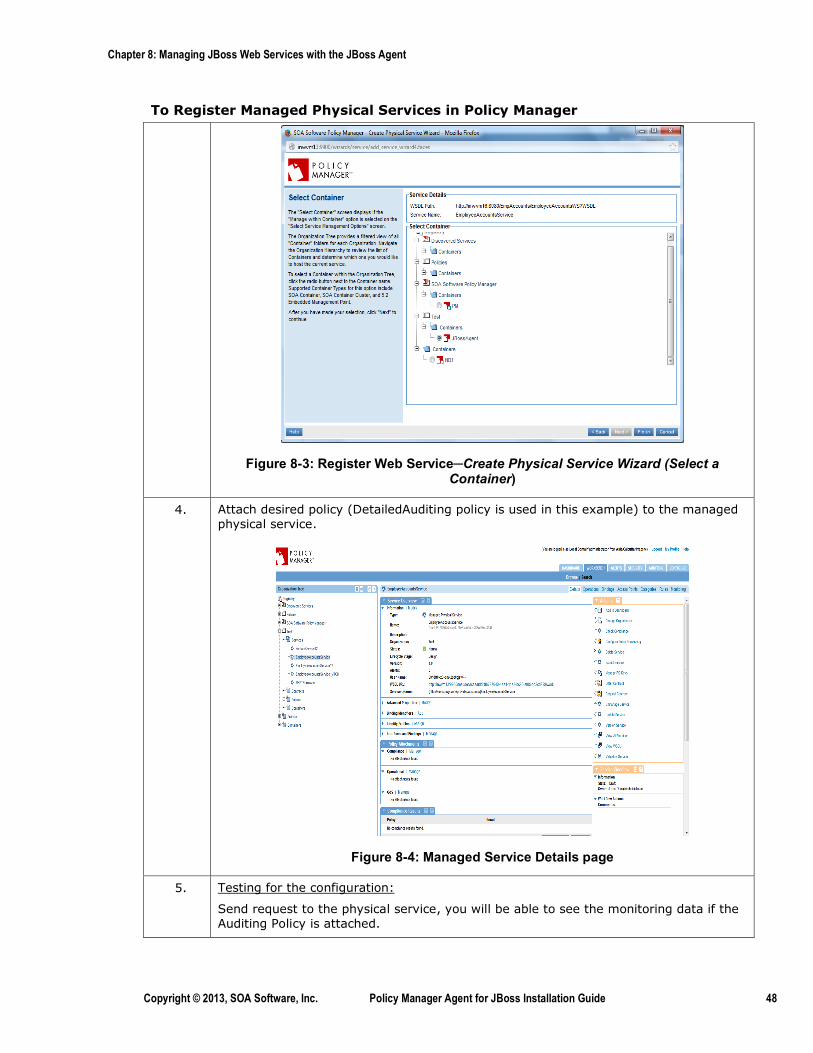
3. Manage the service in a JBoss container.
Figure 8-2: Register Web Service─Create Physical Service Wizard (Select Service Management Option)
Chapter 8: Managing JBoss Web Services with the JBoss Agent
Copyright © 2013, SOA Software, Inc. Policy Manager Agent for JBoss Installation Guide 48
To Register Managed Physical Services in Policy Manager
Figure 8-3: Register Web Service─Create Physical Service Wizard (Select a Container)
4. Attach desired policy (DetailedAuditing policy is used in this example) to the managed physical service.
Figure 8-4: Managed Service Details page
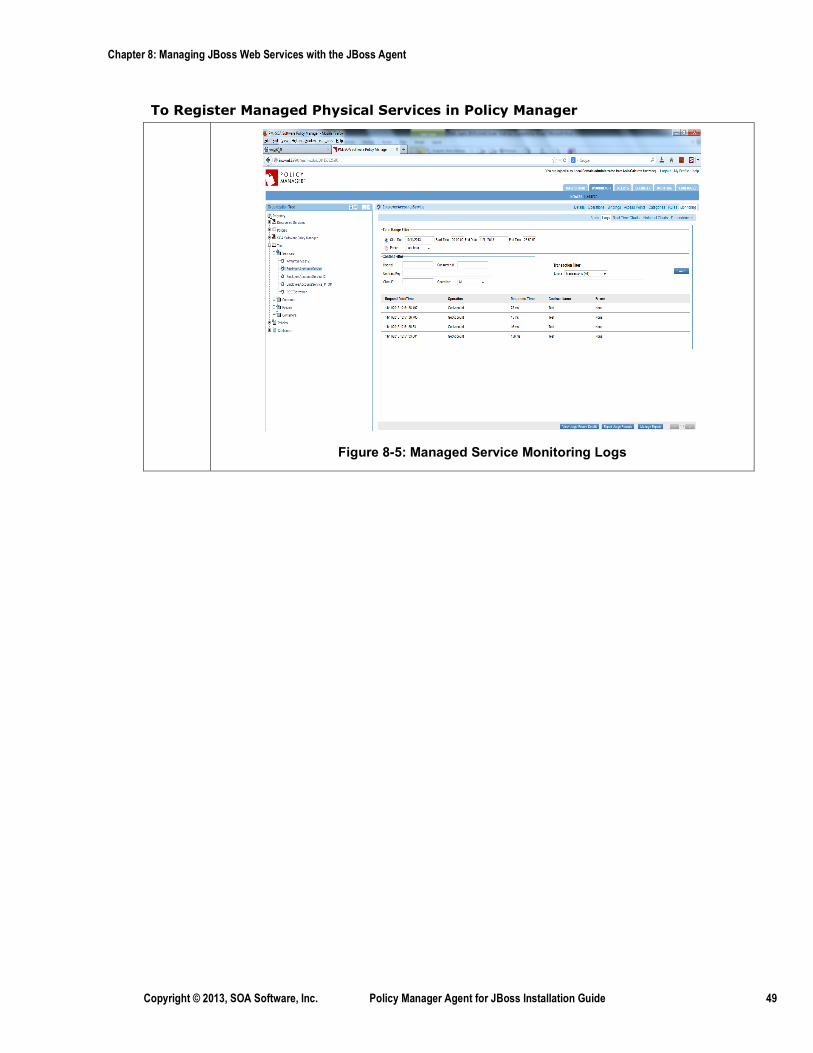
5. Testing for the configuration:
Send request to the physical service, you will be able to see the monitoring data if the Auditing Policy is attached.
Chapter 8: Managing JBoss Web Services with the JBoss Agent
Copyright © 2013, SOA Software, Inc. Policy Manager Agent for JBoss Installation Guide 49
To Register Managed Physical Services in Policy Manager
Figure 8-5: Managed Service Monitoring Logs