Smile Awards aesthetic implant case presentationCase Article).pdf · Smile Awards aesthetic implant...
4
Smile Awards aesthetic implant case presentation Wayne Flack of Vision Dental Laboratory describes his award-winning case that used six implants followed by the construction of a hybrid nano-composite restoration on a cast precious metal framework Background The 60-year-old female patient originally presented with long-standing chronic periodontal problems and rapidly failing upper dentition (Figures 1-4). After considering all treatment options available and in light of the poor prognosis for the longevity of her upper dentition, she opted for full clearance of all upper teeth, followed initially by a temporary acrylic denture and then a permanent screw- retained implant bridge. The dentist included the dental technician in relevant consultations with the patient to ensure a common understanding of all issues and well-informed consent by the patient. Her wish was for a natural-looking and aestheti- cally pleasing restoration. Based on her loss of gingival architecture due to chronic periodontal disease, it was clear that the screw retained implant bridge would need to incorporate a significant amount of gingival replication. Taking all requirements into account, it was decided to proceed with the placement of six Nobel replace implants, followed by the construction of a hybrid nano-composite restoration on a cast precious metal framework. Preparation and diagnostic work In order to preserve important occlusal information, pre-op impressions were taken, along with a face-bow record which enabled the cast models to be articulated on a Denar semi-adjustable articulator. The bite was recorded in centric and vertical dimension records were taken. A temporary immediate acrylic denture (based on existing dimen- sions), was constructed for placement following the extraction of all upper teeth (Figure 5). The denture was used to provide important diagnostic information, including use (following relining), as a radiographic stent for CT scan purposes. The CT scan was used in conjunction with NobelGuide software for treatment planning. The implants were placed in a flapless keyhole procedure using the computer-generated surgical guide produced by Nobel. Following successful osseo-integration of the implants, pick-up impressions were taken using special trays (open tray tech- nique) Figure 6. A soft tissue model was cast and two acrylic implant fixture verification beams were constructed on six non-engaging cylinders (three cylinders per beam) Figure 7. X-rays were taken to ensure that the verification beams seated properly and fitted accurately (Figure 8). A wax occlusal rim was fitted over the verification beams. This has the dual advantage of enabling quick and simple bite registration by the Dentist and also acting as a check for the accuracy of the cast model. The result is a stable, frictional fit occlusal rim, which can easily be removed, adjusted and replaced by the dentist, without the need for screwing/ unscrewing each time (Figure 9).The bite block was then attached to the verification beams, the bite was registered and the upper and lower models were articulated Wayne Flack graduated in 1994 from the Durban University of Technology in South Africa, with a Higher National Diploma in Dental Technology. Instead of focusing on one particular area of Dental Technology after qualifying, he chose to gain proper experience in each discipline, with the aim of becoming a well-rounded, multi-skilled Technician. In 2004, he moved to London and took up a position as a Ceramist for a busy Harley Street Dental Laboratory, where he focused on top-end cosmetic implant, crown and bridge cases. In 2007, he and his brother-in-law, Richard Snook, set up Vision Dental Laboratory in the Scottish Borders town of Hawick. Wayne strongly believes that good outcomes in dentistry are dependent first and foremost on great communication and co-operation between patient, dentist and technician. In just over three years, Wayne and Vision Dental Laboratory have established an enviable reputation for combining technical excellence with exceptional, natural-looking aesthetics. on a Denar semi-adjustable articulator (Figure 10). A wax diagnostic setup was then constructed using denture teeth and the pre-op records relating to vertical dimen- sion. This was sent for try-in to confirm correctness of the bite, identify any denture related speech impediment and to establish whether the patient was happy with the aesthetics (Figures 11 and 12). Following minor alterations to the setup, dentist and patient were satisfied and work commenced on the metal framework design. An index was taken of the denture on the implant model in order to record the position of the teeth, which were then removed from the setup. The index was used to (1) establish the position of the implant screw holes in relation to the buccal surfaces of the teeth, (2) facilitate the design of the metal framework and (3) to accurately transfer the teeth, in their correct positions, to the metal framework. Metal work After placing the bridge screws in the working model, it was evident that the divergent angles, at which the implants had been placed, would have to be corrected in order to facilitate the termination of the screw holes within the occlusal surfaces of the teeth. In order to ensure the even distribution of stress to all bridged implants and to protect their long-term viability, it is important for the metal framework to fit evenly and passively over each implant. This was achieved by use of Astra’s cleverly designed Cresco API (All Parts included) packs and subsequent specialised process- ing of the metal framework (Figures 18-20). This processing enables the internal correction (within the metal framework) of divergent implant placement (Figure 20a). On completion of the Cresco process- ing of the metal framework and confirma- tion that an even, passive fit had been achieved across all implants, the denture teeth were transferred to the framework Case presentation 18 Private Laboratory July 2010
Transcript of Smile Awards aesthetic implant case presentationCase Article).pdf · Smile Awards aesthetic implant...

Smile Awards aesthetic implant case presentation Wayne Flack of Vision Dental Laboratory describes his award-winning case that used six implants followed by the construction of a hybrid nano-composite restoration on a cast precious metal framework
BackgroundThe 60-year-old female patient originally presented with long-standing chronic periodontal problems and rapidly failing upper dentition (Figures 1-4). After considering all treatment options available and in light of the poor prognosis for the longevity of her upper dentition, she opted for full clearance of all upper teeth, followed initially by a temporary acrylic denture and then a permanent screw-retained implant bridge. The dentist included the dental technician in relevant consultations with the patient to ensure a common understanding of all issues and well-informed consent by the patient. Her wish was for a natural-looking and aestheti-cally pleasing restoration. Based on her loss of gingival architecture due to chronic periodontal disease, it was clear that the screw retained implant bridge would need to incorporate a significant amount of gingival replication. Taking all requirements into account, it was decided to proceed with
the placement of six Nobel replace implants, followed by the construction of a hybrid nano-composite restoration on a cast precious metal framework.
Preparation and diagnostic workIn order to preserve important occlusal information, pre-op impressions were taken, along with a face-bow record which enabled the cast models to be articulated on a Denar semi-adjustable articulator. The bite was recorded in centric and vertical dimension records were taken. A temporary immediate acrylic denture (based on existing dimen-sions), was constructed for placement following the extraction of all upper teeth (Figure 5). The denture was used to provide important diagnostic information, including use (following relining), as a radiographic stent for CT scan purposes. The CT scan was used in conjunction with NobelGuide software for treatment planning. The implants were placed in a flapless keyhole procedure using the computer-generated surgical guide produced by Nobel. Following successful osseo-integration of the implants, pick-up impressions were taken using special trays (open tray tech-nique) Figure 6. A soft tissue model was cast and two acrylic implant fixture verification beams were constructed on six non-engaging cylinders (three cylinders per beam) Figure 7. X-rays were taken to ensure that the verification beams seated properly and fitted accurately (Figure 8).
A wax occlusal rim was fitted over the verification beams. This has the dual advantage of enabling quick and simple bite registration by the Dentist and also acting as a check for the accuracy of the cast model. The result is a stable, frictional fit occlusal rim, which can easily be removed, adjusted and replaced by the dentist, without the need for screwing/ unscrewing each time (Figure 9).The bite block was then attached to the verification beams, the bite was registered and the upper and lower models were articulated
Wayne Flack graduated in 1994 from the Durban University of Technology in South Africa, with a Higher National Diploma in Dental Technology. Instead of focusing
on one particular area of Dental Technology after qualifying, he chose to gain proper experience in each discipline, with the aim of becoming a well-rounded, multi-skilled Technician. In 2004, he moved to London and took up a position as a Ceramist for a busy Harley Street Dental Laboratory, where he focused on top-end cosmetic implant, crown and bridge cases. In 2007, he and his brother-in-law, Richard Snook, set up Vision Dental Laboratory in the Scottish Borders town of Hawick. Wayne strongly believes that good outcomes in dentistry are dependent first and foremost on great communication and co-operation between patient, dentist and technician. In just over three years, Wayne and Vision Dental Laboratory have established an enviable reputation for combining technical excellence with exceptional, natural-looking aesthetics.
on a Denar semi-adjustable articulator (Figure 10).
A wax diagnostic setup was then constructed using denture teeth and the pre-op records relating to vertical dimen-sion. This was sent for try-in to confirm correctness of the bite, identify any denture related speech impediment and to establish whether the patient was happy with the aesthetics (Figures 11 and 12). Following minor alterations to the setup, dentist and patient were satisfied and work commenced on the metal framework design.
An index was taken of the denture on the implant model in order to record the position of the teeth, which were then removed from the setup. The index was used to (1) establish the position of the implant screw holes in relation to the buccal surfaces of the teeth, (2) facilitate the design of the metal framework and (3) to accurately transfer the teeth, in their correct positions, to the metal framework. Metal workAfter placing the bridge screws in the working model, it was evident that the divergent angles, at which the implants had been placed, would have to be corrected in order to facilitate the termination of the screw holes within the occlusal surfaces of the teeth. In order to ensure the even distribution of stress to all bridged implants and to protect their long-term viability, it is important for the metal framework to fit evenly and passively over each implant. This was achieved by use of Astra’s cleverly designed Cresco API (All Parts included) packs and subsequent specialised process-ing of the metal framework (Figures 18-20). This processing enables the internal correction (within the metal framework) of divergent implant placement (Figure 20a).
On completion of the Cresco process-ing of the metal framework and confirma-tion that an even, passive fit had been achieved across all implants, the denture teeth were transferred to the framework
Case presentation
18 Private Laboratory July 2010
Case presentation
July 2010 Private Laboratory 19
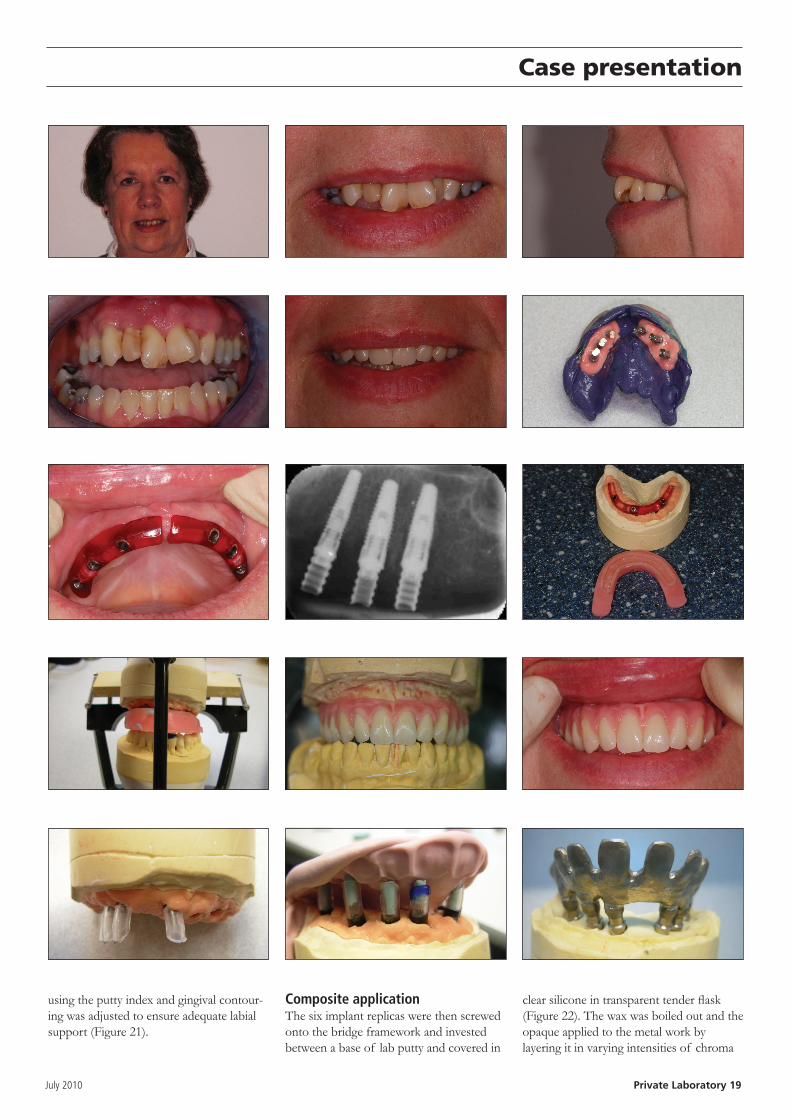
using the putty index and gingival contour-ing was adjusted to ensure adequate labial support (Figure 21).
Composite applicationThe six implant replicas were then screwed onto the bridge framework and invested between a base of lab putty and covered in
clear silicone in transparent tender flask (Figure 22). The wax was boiled out and the opaque applied to the metal work by layering it in varying intensities of chroma

Case presentation
20 Private Laboratory July 2010
and value from cervical to incisal – in much the same way as one would do a metal-ceramic build up. This technique mimics the structure of a natural tooth, where the vitality and colour originate internally, and facilitates a very natural aesthetic outcome.
Following application of the opaque, the bridge was screwed back on to the implant replicas in the base of the Tender flask, in preparation for the pressing of the composite.
Dentine composite preparation and layeringThe next step was to select the shades of composite to be used (Figure 23). In this case the patient’s lower teeth were shade A4/A3.5, with root exposure. Margin (M4) Signum composite was chosen for the neck, A4 for the cervical and A3.5 / A3 for the tips. The A3 was layered into the tips and occlusal areas of the clear silicone mould first, followed by the A3.5 and then the A4 (Figure 24). Margin M4 was then packed around the necks of the teeth, after which
A3.5 was applied as the base composite for the gum areas.
Dentine pressingThe two halves of the Tender flask were then secured together, wing nuts tightened down and the complete unit placed in a dark box to allow the composite to extrude into the escape channels that had previously been cut into the lab putty. After allowing sufficient time for the excess composite to extrude, the Tender flask was placed in a suitable light cure unit for the specified
Case presentation
July 2010 Private Laboratory 21
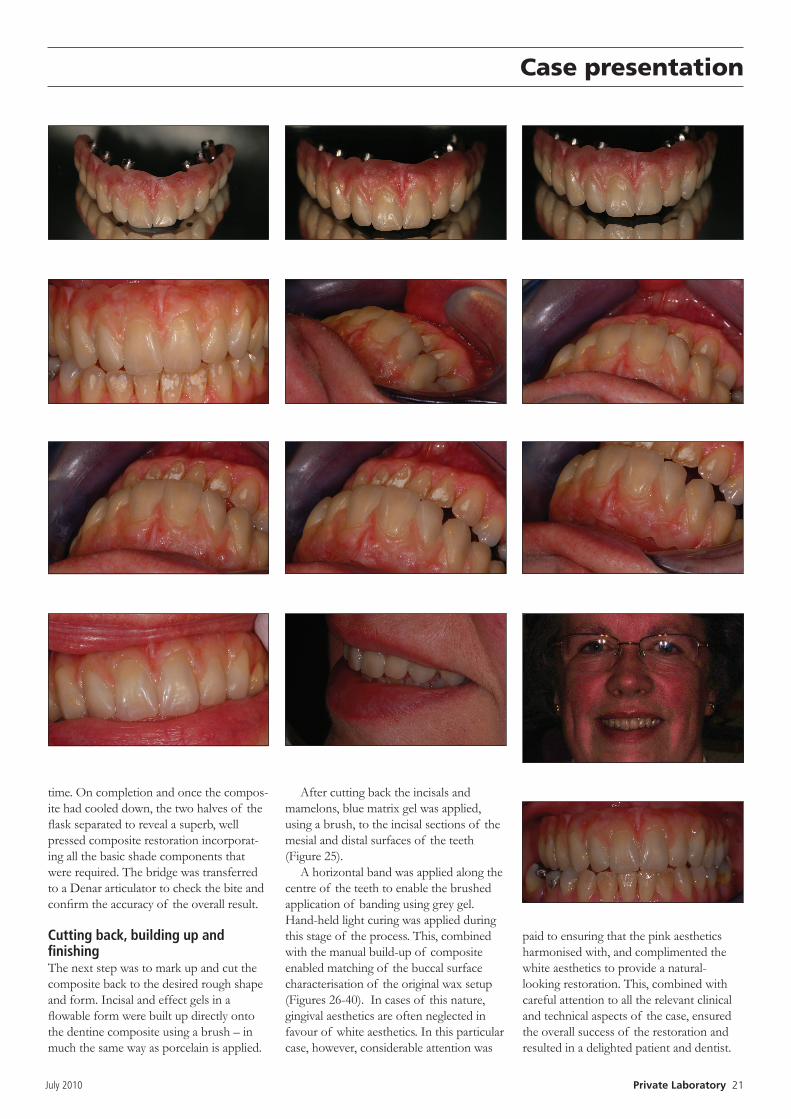
time. On completion and once the compos-ite had cooled down, the two halves of the flask separated to reveal a superb, well pressed composite restoration incorporat-ing all the basic shade components that were required. The bridge was transferred to a Denar articulator to check the bite and confirm the accuracy of the overall result.
Cutting back, building up and finishing The next step was to mark up and cut the composite back to the desired rough shape and form. Incisal and effect gels in a flowable form were built up directly onto the dentine composite using a brush – in much the same way as porcelain is applied.
After cutting back the incisals and mamelons, blue matrix gel was applied, using a brush, to the incisal sections of the mesial and distal surfaces of the teeth (Figure 25).
A horizontal band was applied along the centre of the teeth to enable the brushed application of banding using grey gel. Hand-held light curing was applied during this stage of the process. This, combined with the manual build-up of composite enabled matching of the buccal surface characterisation of the original wax setup (Figures 26-40). In cases of this nature, gingival aesthetics are often neglected in favour of white aesthetics. In this particular case, however, considerable attention was
paid to ensuring that the pink aesthetics harmonised with, and complimented the white aesthetics to provide a natural-looking restoration. This, combined with careful attention to all the relevant clinical and technical aspects of the case, ensured the overall success of the restoration and resulted in a delighted patient and dentist.